HOLIDAY DONATION DRIVE - SUPPORT MSW - DO YOUR PART TO KEEP THIS GREAT FORUM GOING! (Only 24 donations so far out of 49,000 members - C'mon guys!)
×


Chuck
-
Posts
9,660 -
Joined
-
Last visited
Content Type
Profiles
Forums
Gallery
Events
Everything posted by Chuck
-
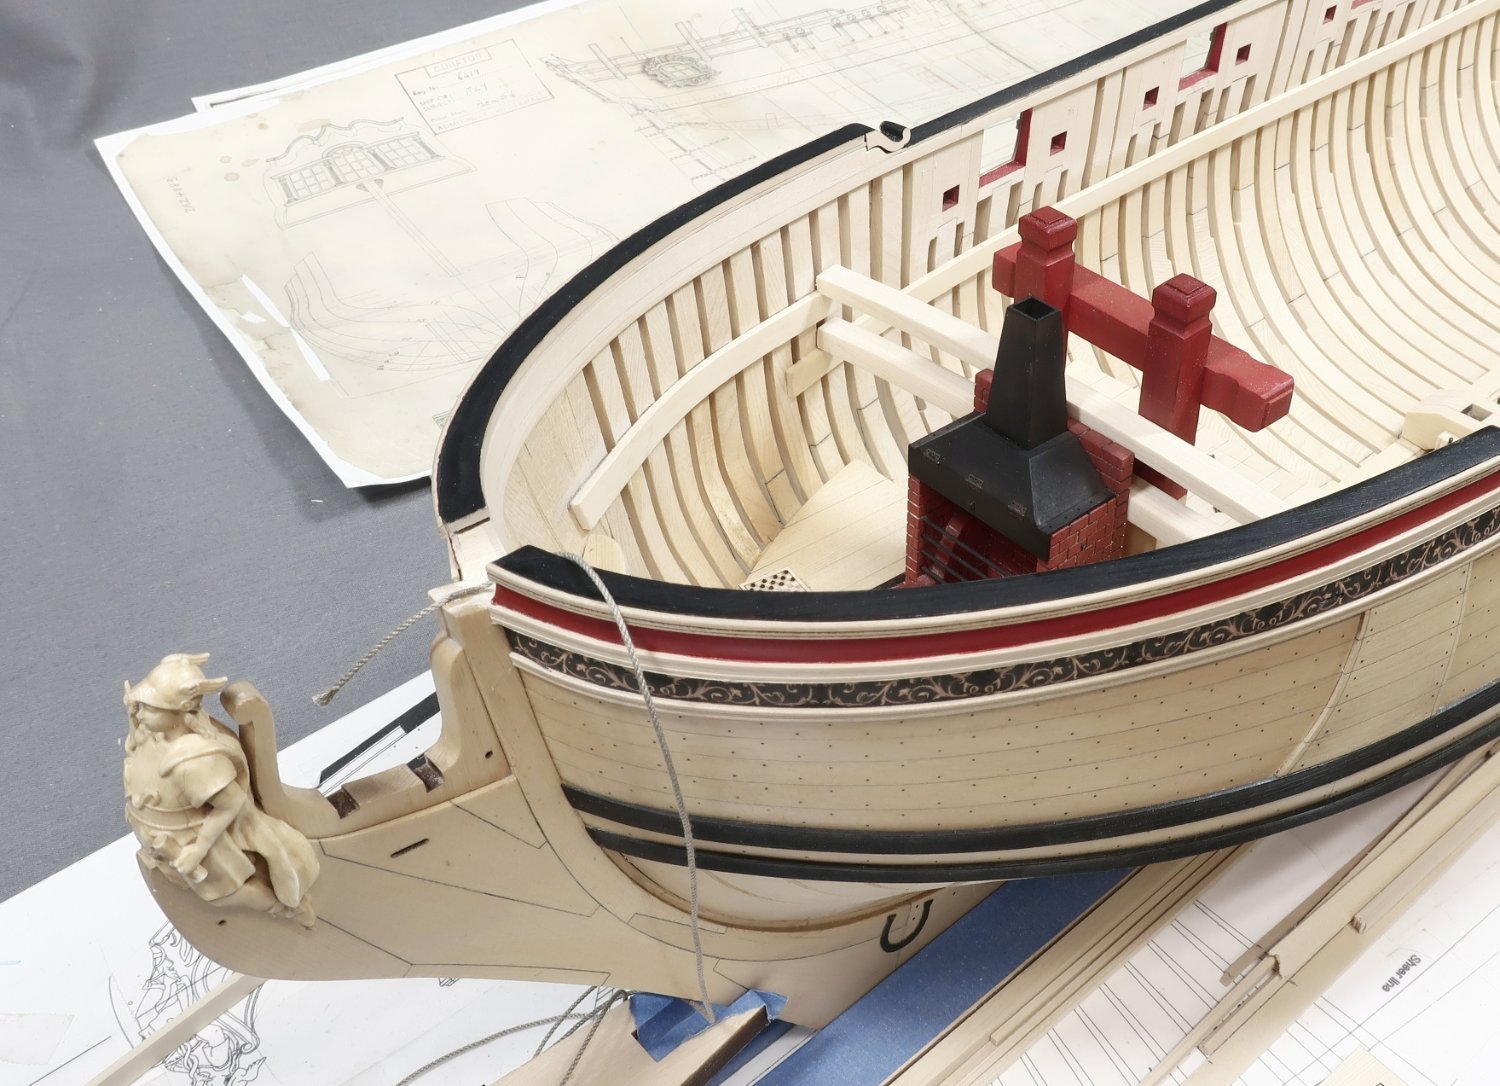
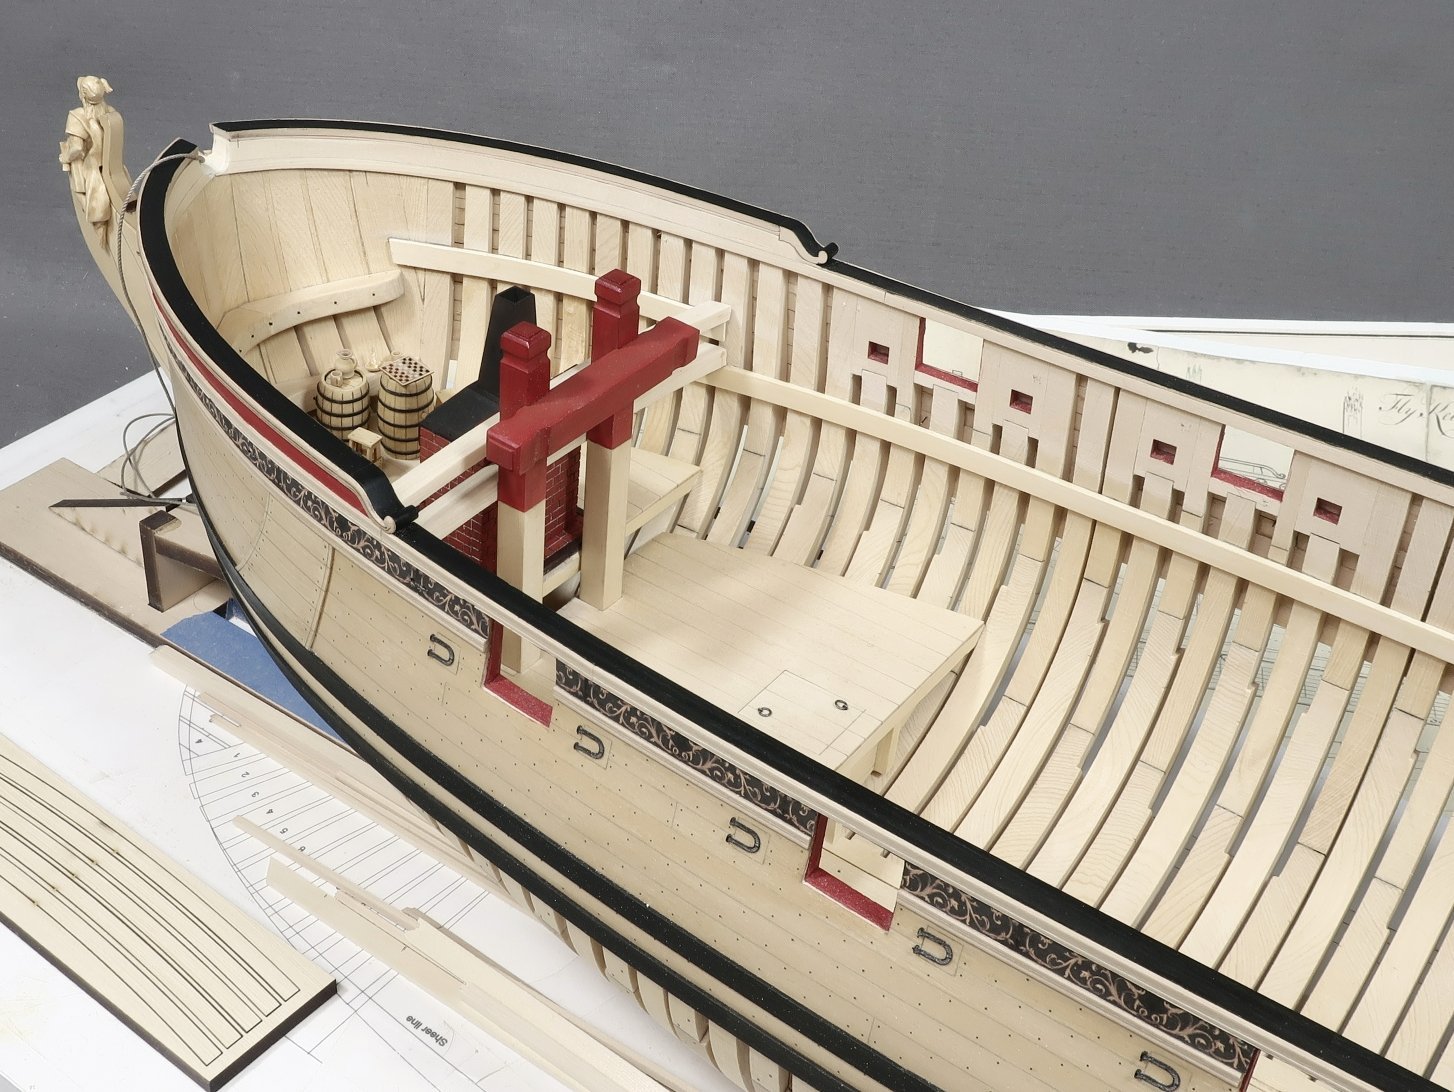
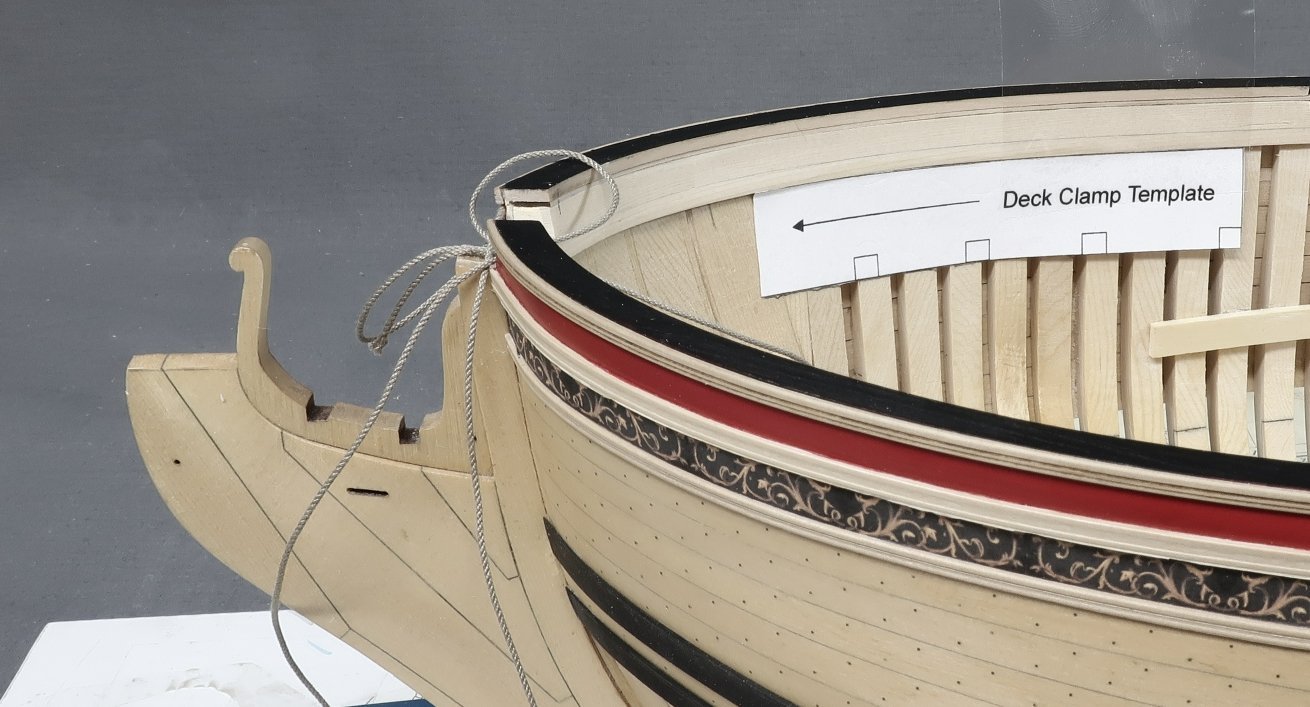
 Decided not to work today and instead start working on the fcastle beams. Its basically the same as establishing the height for the gundeck beams and deck clamps. There is a template provided for you. But yes you can measure it any way you feel comfortable. Trace the bottom of the template in pencil. The line you just drew will become the TOP of the deck clamp for the fcastle beams. I will repeat that...The top edge of the deck clamp. Once the deck clamp is in position which is a small length of 1/4" x 1/16" cedar strip, we can proceed with the first deck beams. There are two we must contend with first. One is a gundeck beam....and the one above that is the first fcsatle beam. They are both 1/4" deep but the fcastle beam on top is much thinner. Those beams were not as heavy. In the photo above you can see how the aft edge of these two beams are all flush with the riding bitts. This is important. The riding bitts are not glued in position yet and we can use them to establish the position of both beams. The beams must of course be cleaned of char and cut to length so they sit nicely on to of the deck clamps for them. These two beams can be glued in position but still refrain from gluing the riding bitts in place. Also do not glue in the fire hearth yet. Although this will sit flush against both beams and can help you position them as well. Next up I will start working on the remaining 3 fcastle deck beams but I wont glue them in position just yet.

-
Excellent…you will enjoy the next chapter.
-
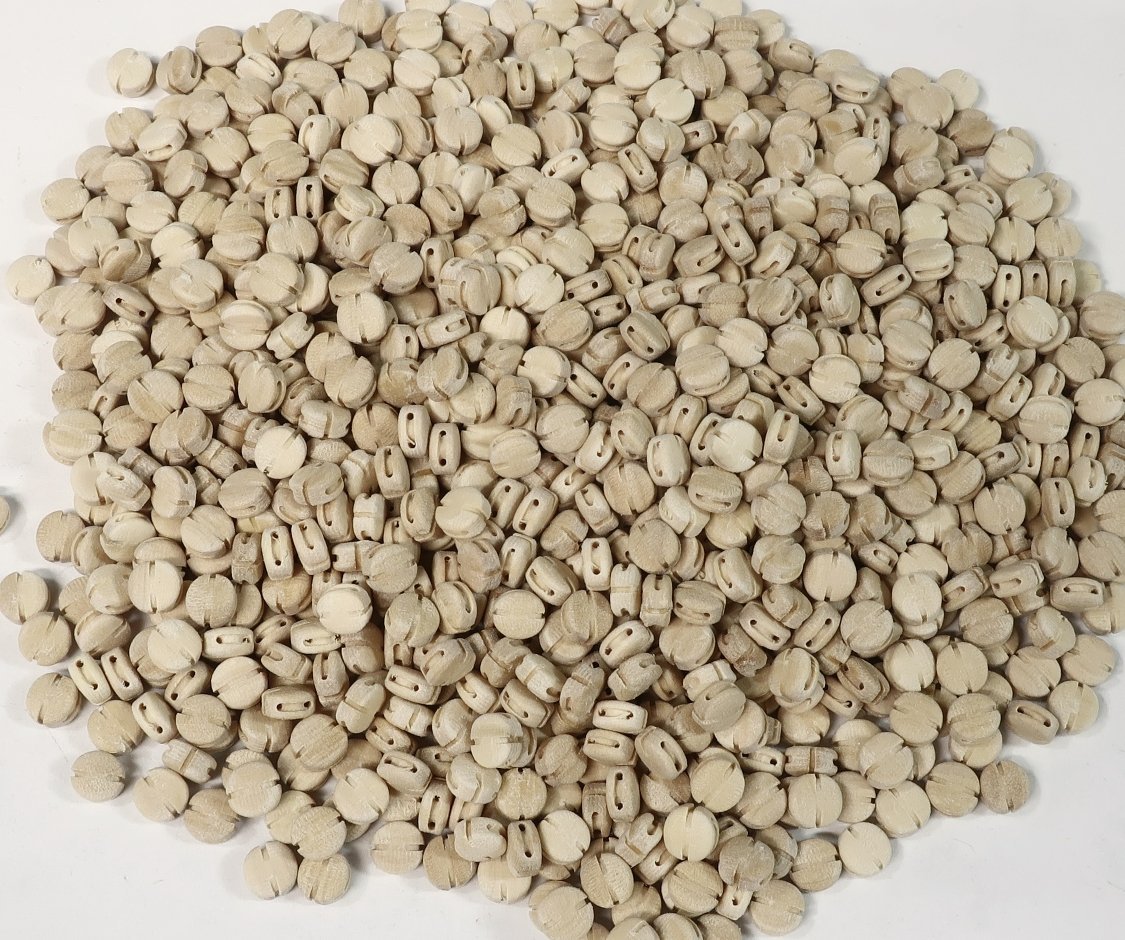
Your blocks are looking great. I imagine they take a while to print. But that is something that cant be avoided. My CNC blocks take forever to make. But the good thing is no laser char as you mentioned earlier. They are pretty crisp. I just now started packaging up a new batch of singles that were completed today. It takes a very long time as the cnc machine is insanely slow. But I would suggest that you try just using some white and yellow ochre weathering powder to make them look like wood. You could also go darker if you prefer. But I find the weathering powders cover the gray easily and you cant see any build up or brush strokes. No loss of detail at all. Here is a picture of the pile that I am just now packaging up. no gluing them up or laser char.
- 16 replies
-
- 10
-

-

-
Not really...there are no drawings of the frames in the kit plans because they are not needed. All the frame parts are laser cut. The other plan sheets will be released however as PDF docs.... But yes there are plans available at 1/4" scale in the seawatch books. They are included in the two volume set. They are of course slightly different than my approach but everything you need is in those two sets for a scratch build. Chuck
-
Looks great Mike.
-
I am going to be listing a few each day as I make more until my wood runs out.
-
Keep checking my site...I will be adding a couple more each day or so if I can manage. Two more sets just now added. But no rush for you Frank...You have a long way to go on Winnie yet. Chuck
-
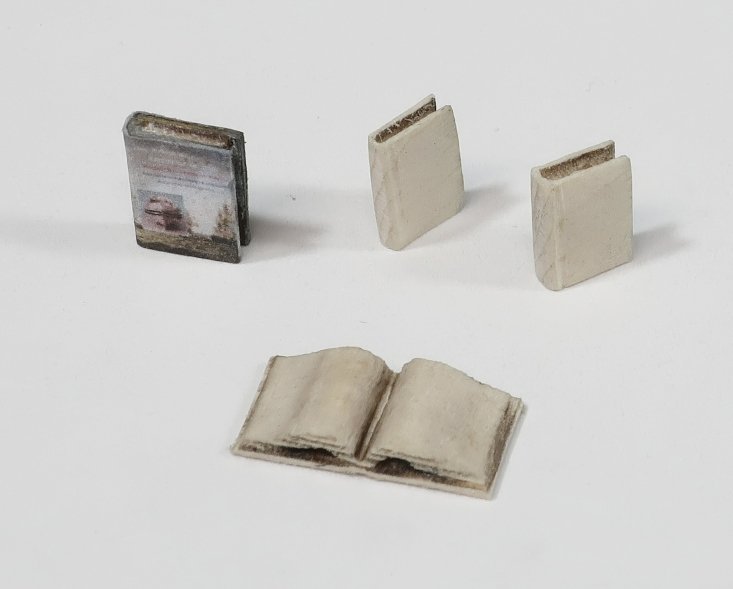
My daughter was very complimentary about my latest model. But she said I had to put something on the table. It looked too bare and boring. So not wanting to disappoint my lovely daughter I added some laser cut books. Yes that is a very very tiny Seawatch book about Speedwell Volume 1 I believe. Great reading while at sail on those quiet evenings!! The cupola really isnt that shiny....its just the very bright overhead light and the photo camera lights. It is actually much darker and subdued. I think. LOL. The books are just 1/4" tall so very very very tiny. Cleaned up after laser cutting and ready for a printed cover scaled down....But here you see them in the raw state. These are right off the laser cutter and just sanded to remove the char. The close ups are brutal but they look really good at regular viewing. About the size of your fingernail.

-
Rick...You gave up on Cheerful? And one more thing....Every person who gets one these has to start a build log!!! Its a requirement, LOL. No hiding in the shop. I want to see these projects progress.
-
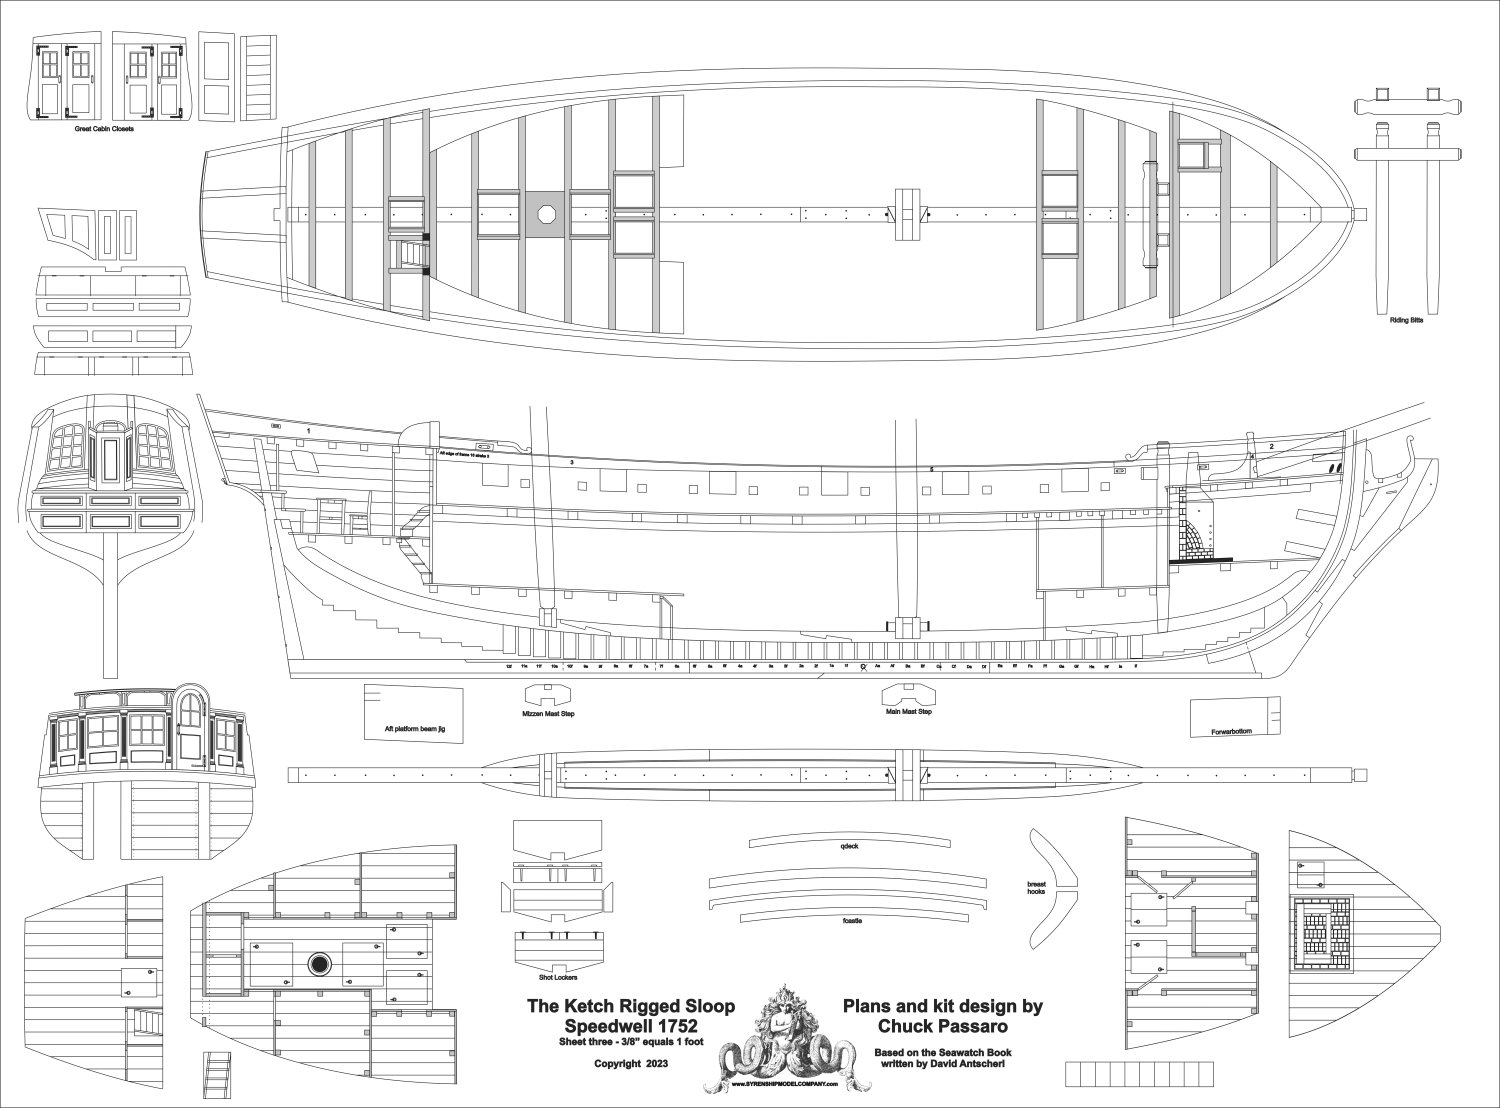
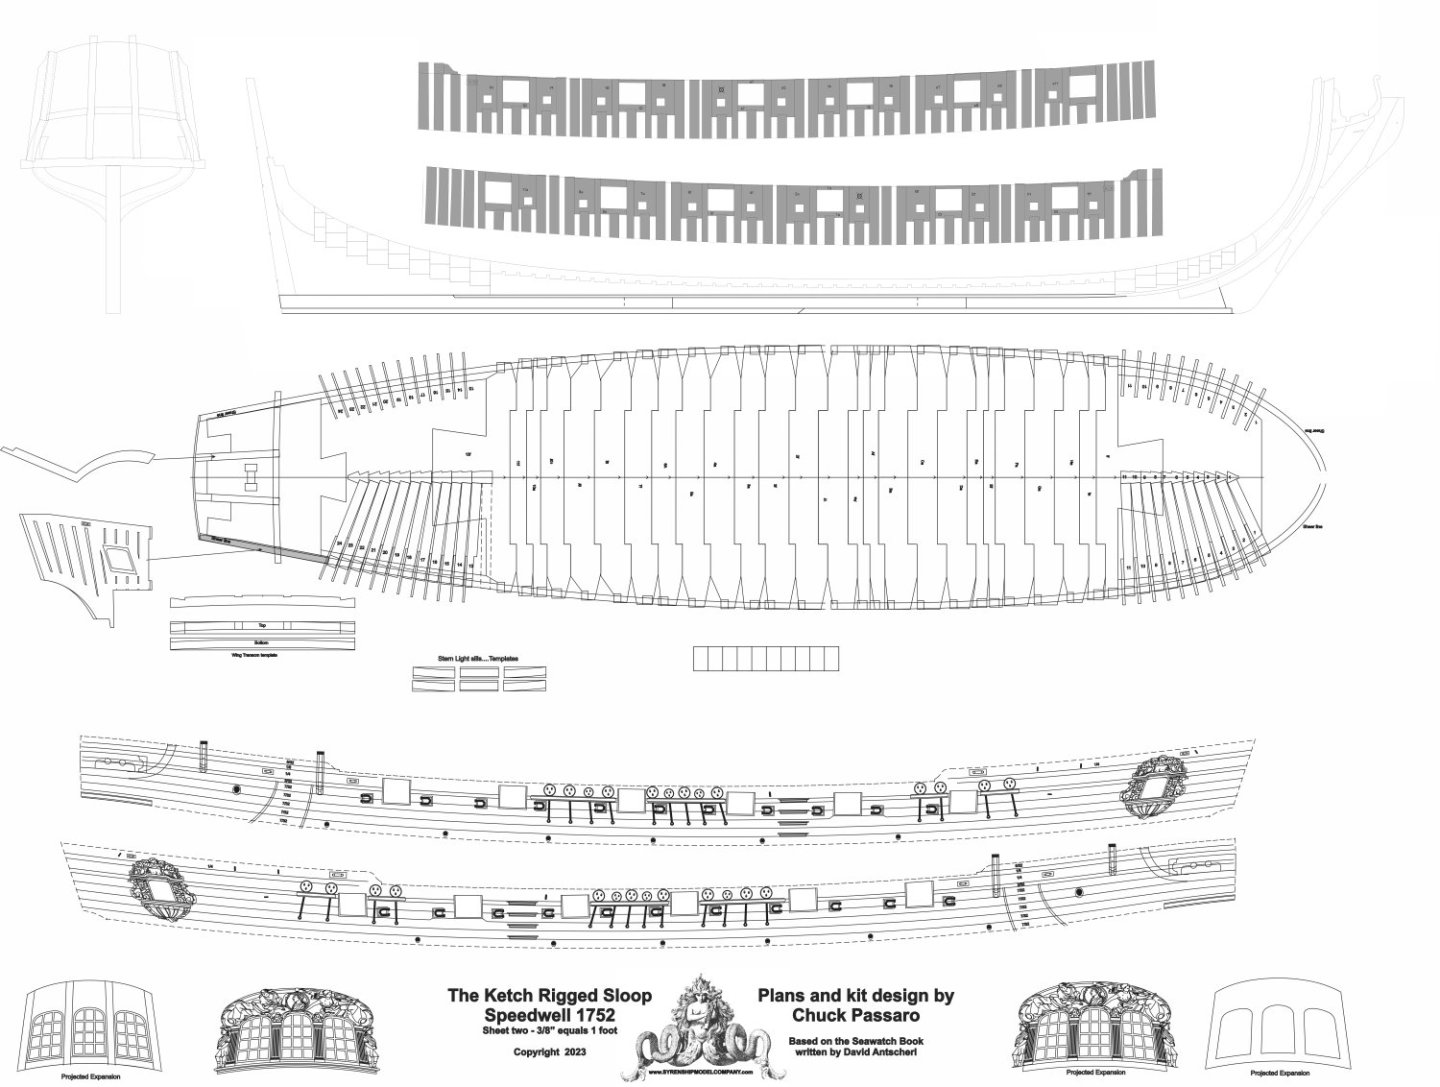
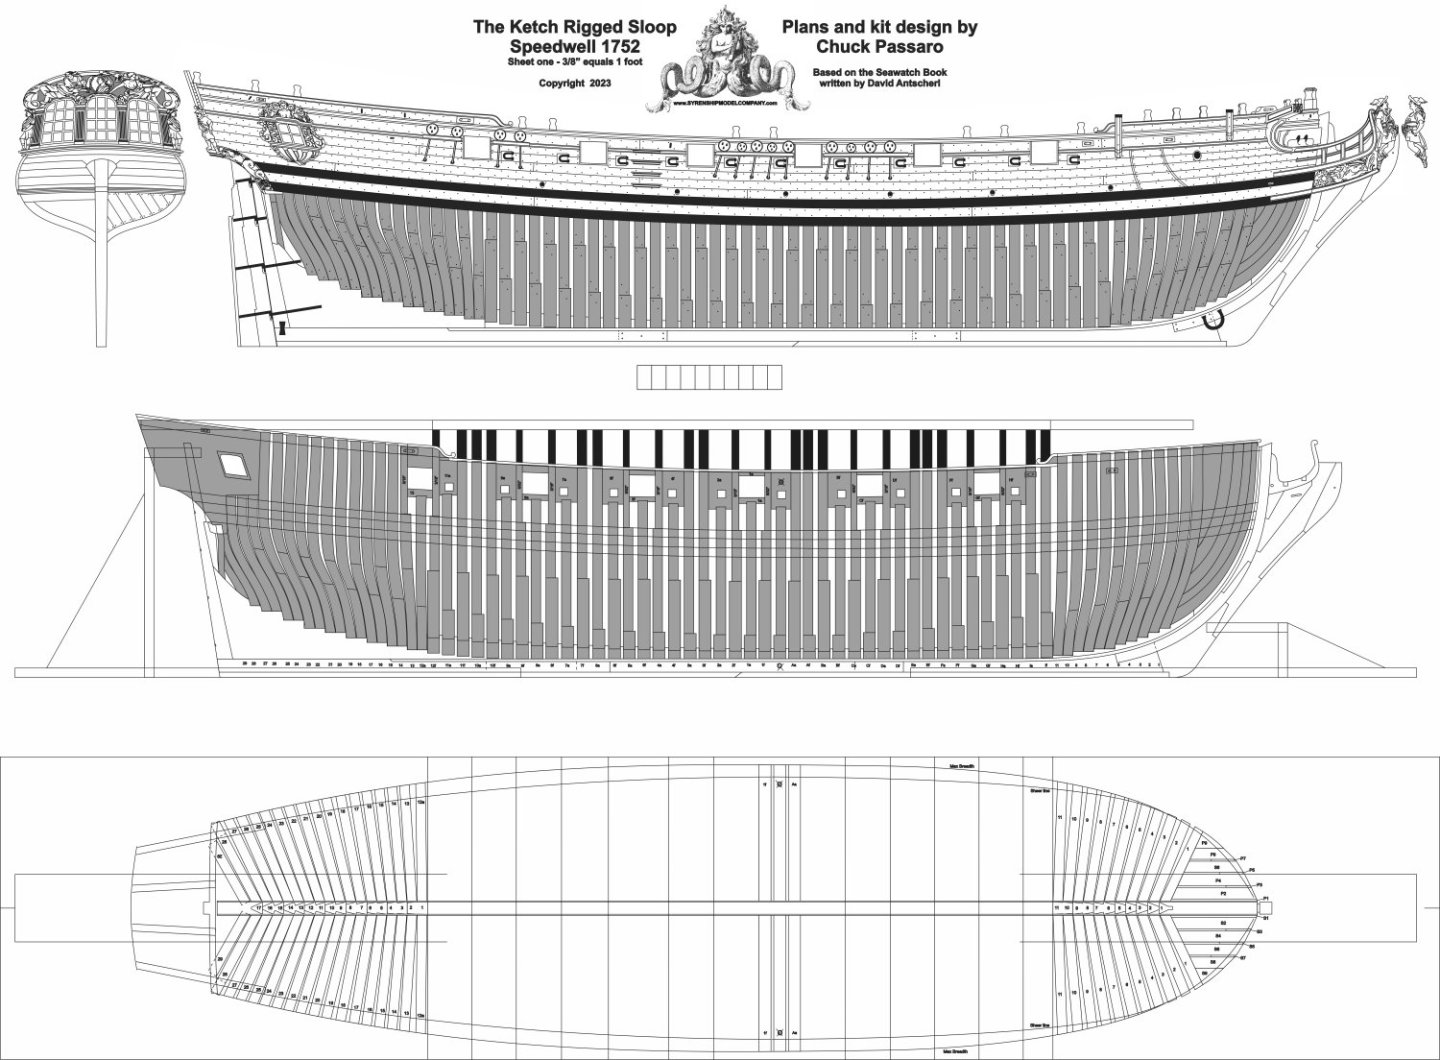
So I am so close to listing the first two chapters folks. Maybe Sunday or Monday. I have one test shipment going out to get an idea of shipping across the country. Once I know that I will list the remaining sets I have made for sale on the site. I have one favor to ask....Please read below. I am NOT limiting production so no need to jump on this. In fact if you are not ready to start a build log and start building immediately I would ask that you wait for the next batch of chapter sets. Seriously asking here. If you are currently working on a model and are several months or even a year away from starting Speedwell, It would suck for these to sit on a shelf. Especially when I know of at least ten guys who are waiting patiently to begin building Speedwell right now. I know some of you are more than a year away from starting so please dont buy from this batch. I will be making more consistently for the next few months before I start even thinking about making chapter 3 parts. There will be plenty of opportunity. Let the guys ready to start building get first crack at these please. Also if I havent mentioned it....this will be a big model. If you plan on rigging her it will be 52" long or thereabouts.....and about 40" tall. The hull unrigged is 32" long. So keep this in mind. Remember its a 3/8" scale model. A big girl..... The chapter sets will come with printed plans. Sheets one and two with the first chapter of parts. The remaining will come with the chapter sets when needed. Here are a few just to give you an idea.

-
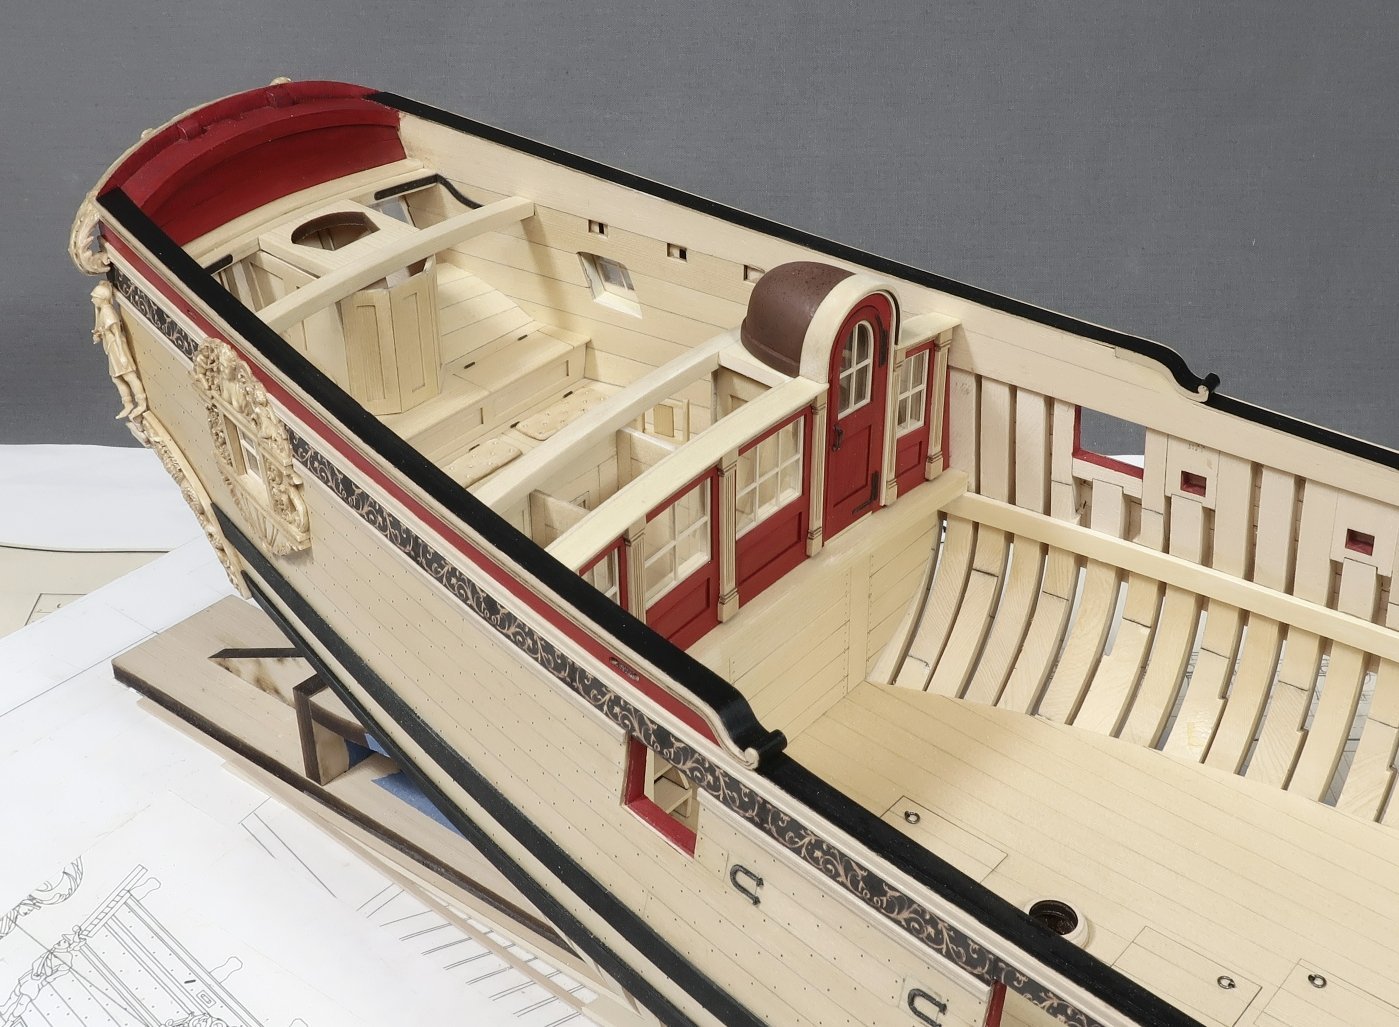
Greg convinced me!!! I also spent a great deal of time looking at the contemporary model. I also decided to coper the top of the doorway. It just made sense to do that. I painted a plain piece of paper with the copper paint and cut a narrow strip. This allowed me to leave a nice neat edge on the front of the bulkhead. I left just a 1/64" of the top showing so it looks like molding around the doorway. I am sure I will get used it over time.
-
Here are two photos of the second version which I made. This one is finished with copper paint and sprayed with dull coat. The copper paint was just from one of those copper leafing pens. It worked really well actually. This was my best result with the copper attempts. I havent glued the cupola on yet so I can keep trying both and pick the one I like best.


-
Indeed it does. That meant the first try went into the scrap bin. But I eventually figured it out. Mike I originally used copper paint but it was too much for my tastes. It just looked out of place and your wye went right to it too much. Even when toned down I just decided to go brown. But who knows…maybe you will like it. Its just a personal preference thing. It would literally be the only thing on the model with that finish…its a bit distracting to my eye.
-
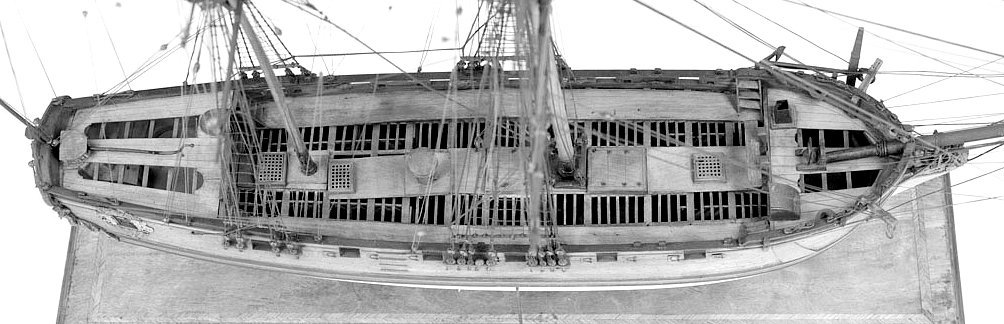
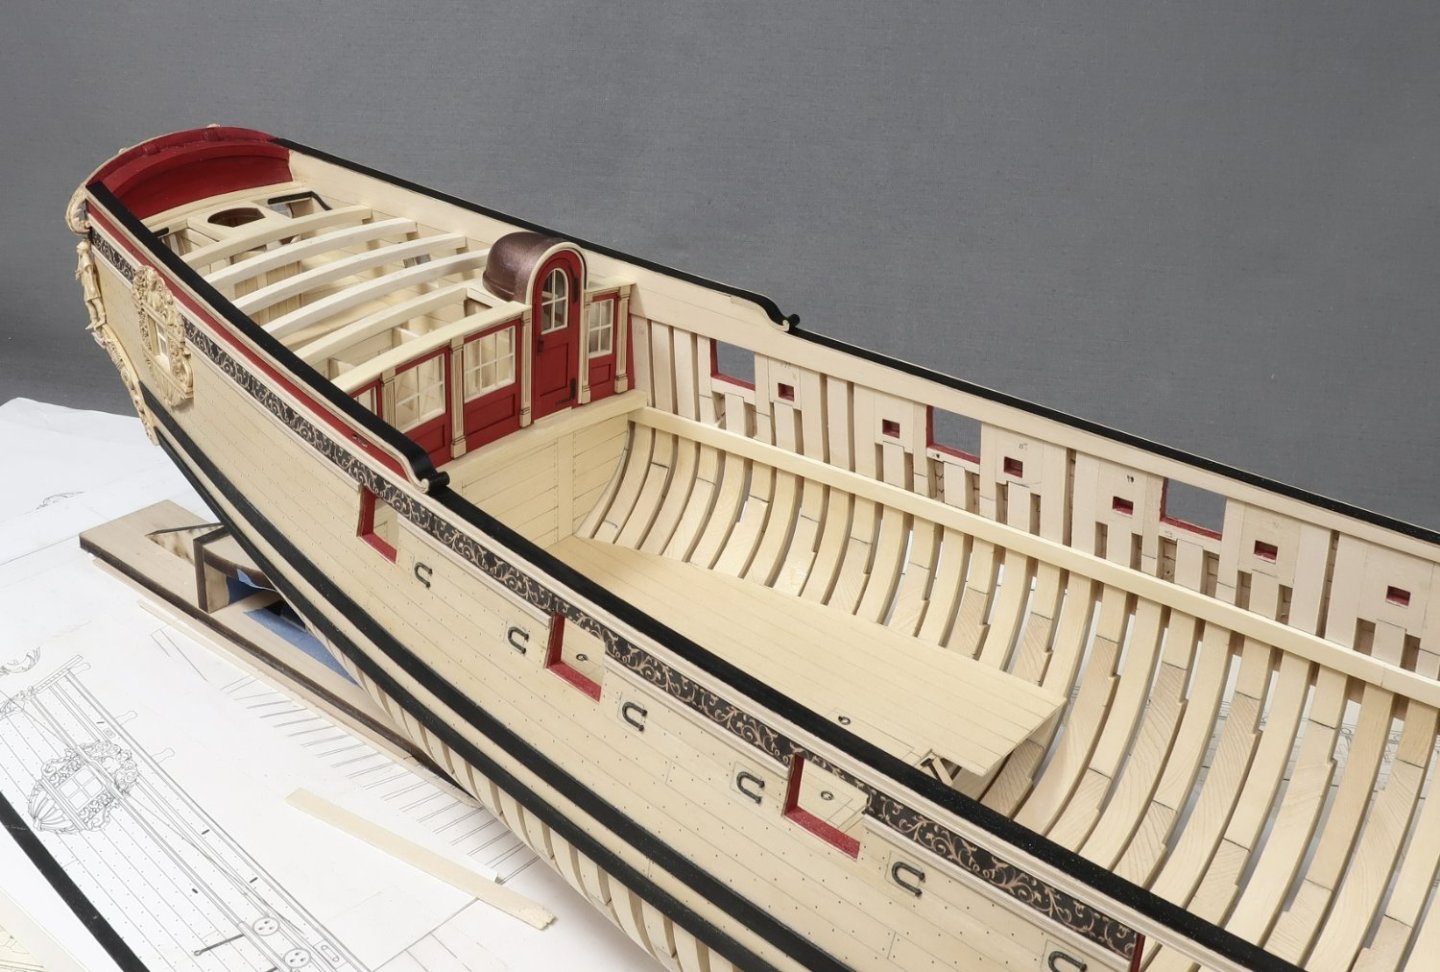
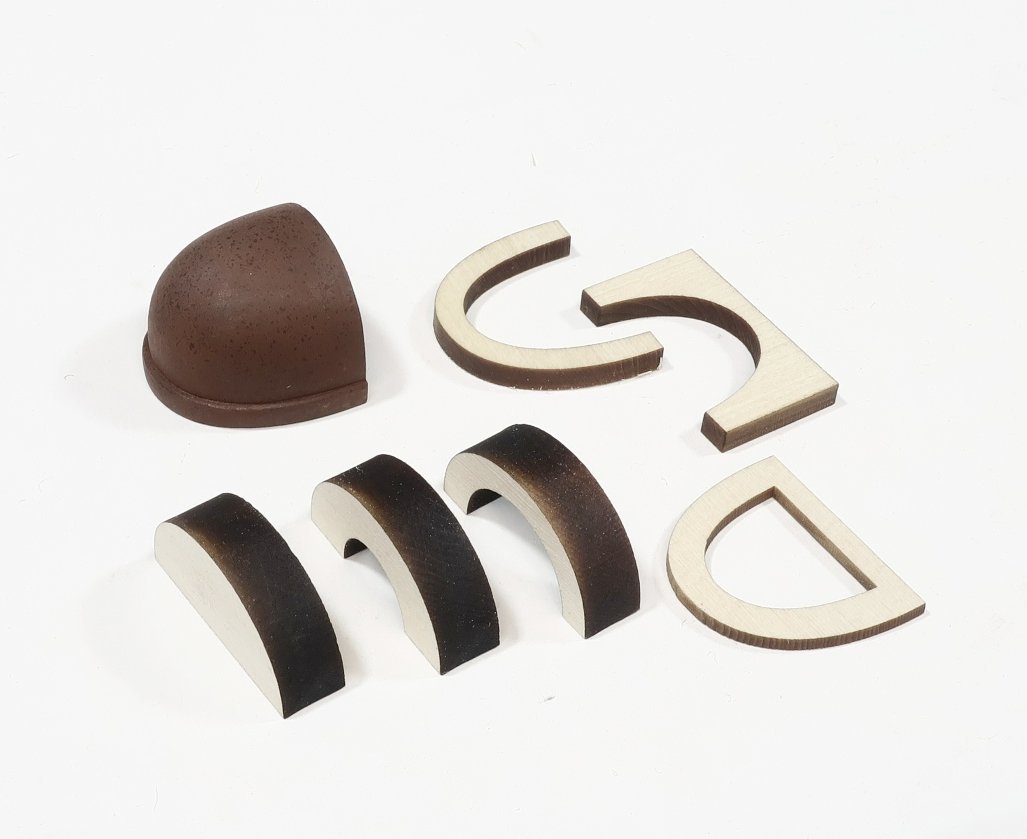
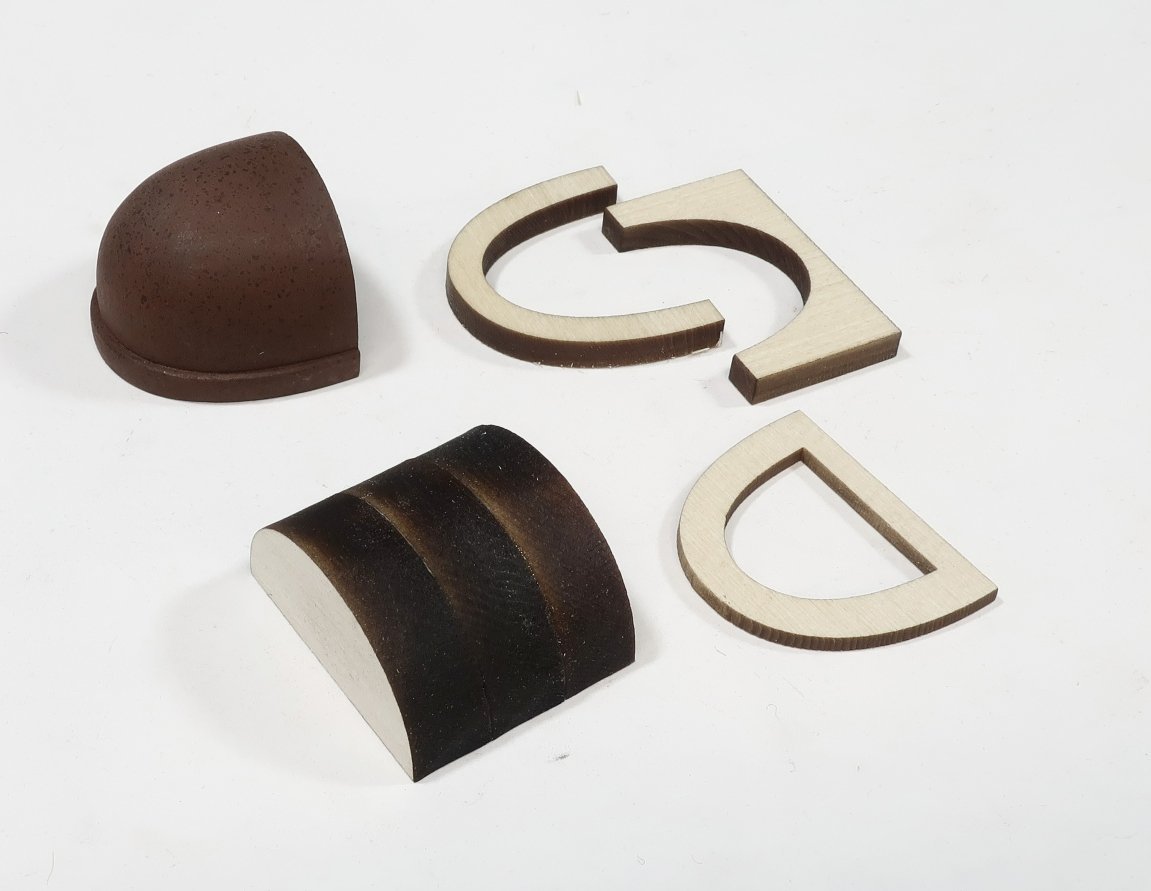
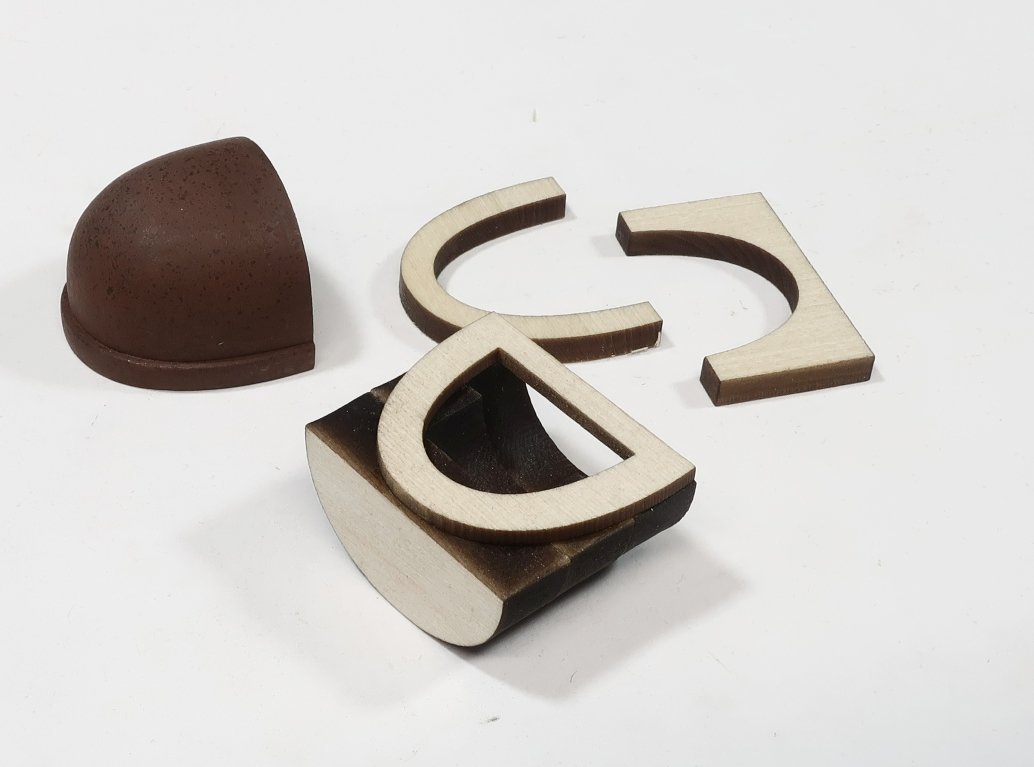
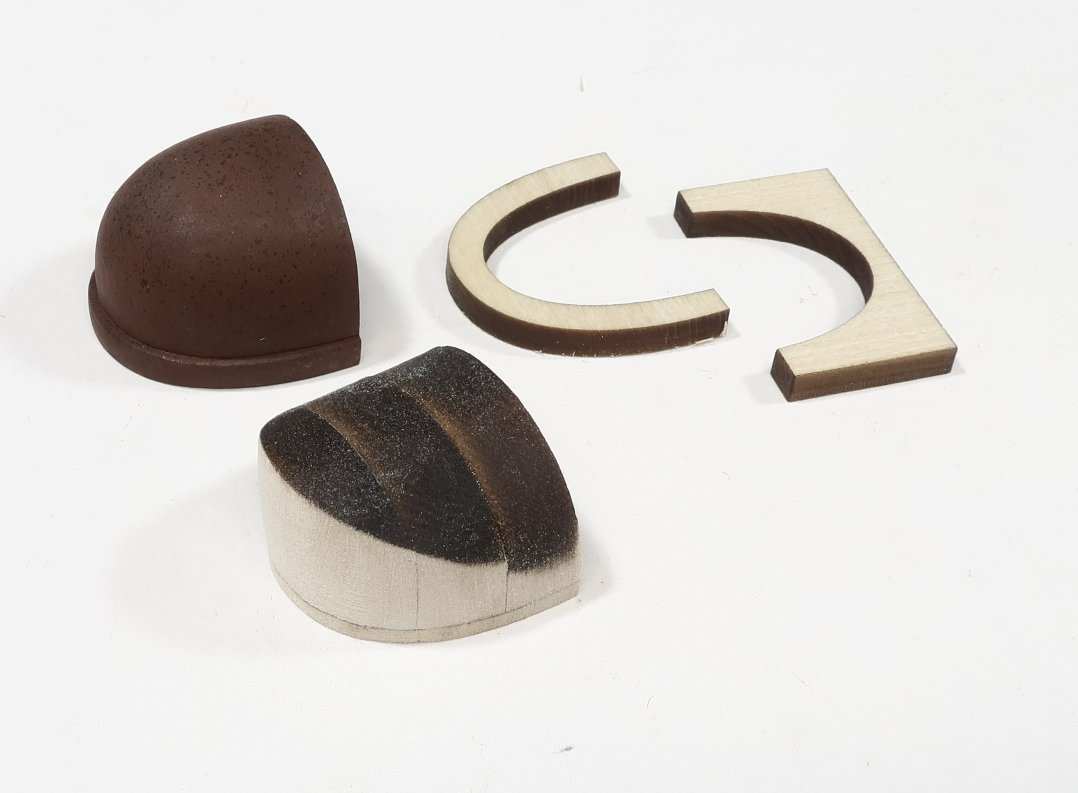
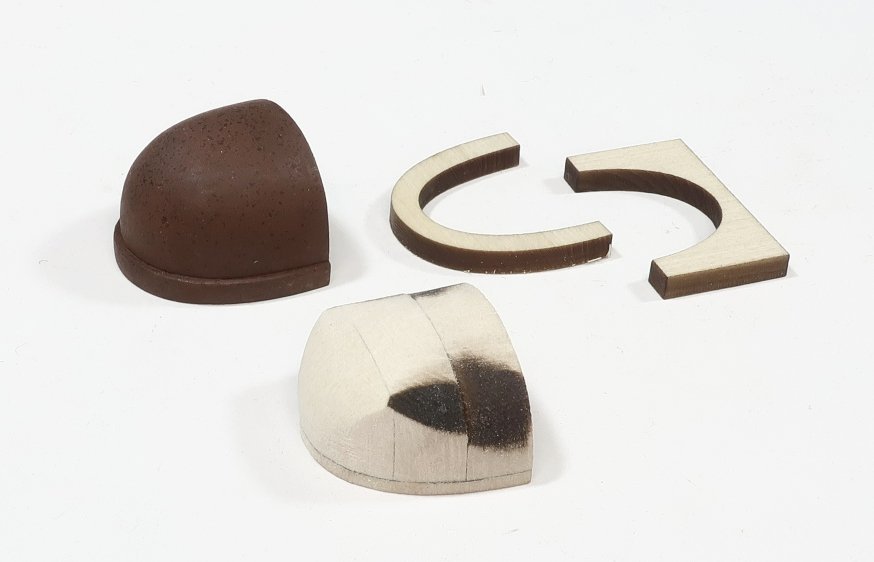
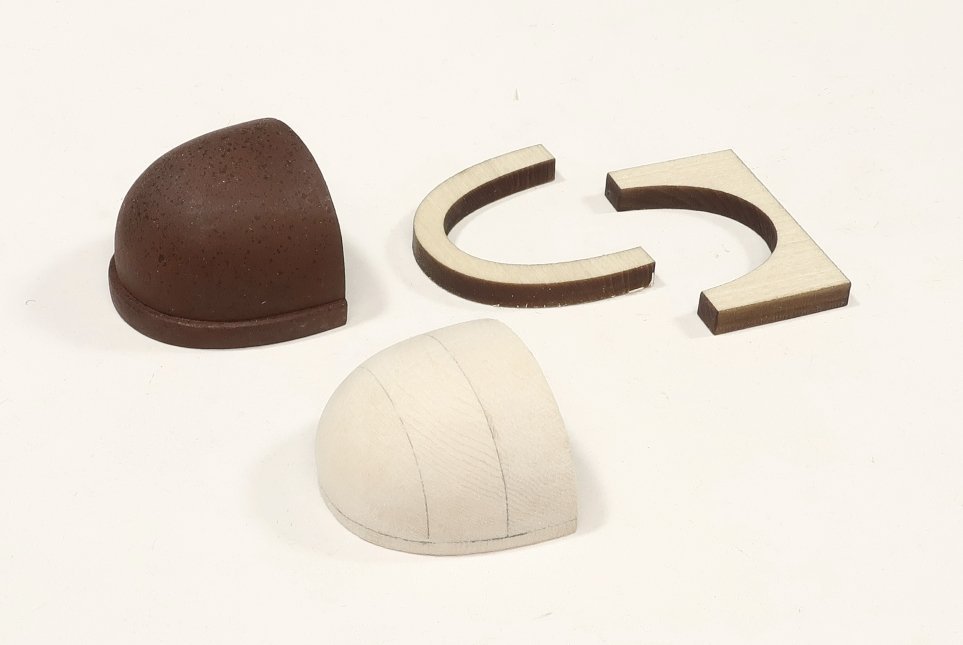
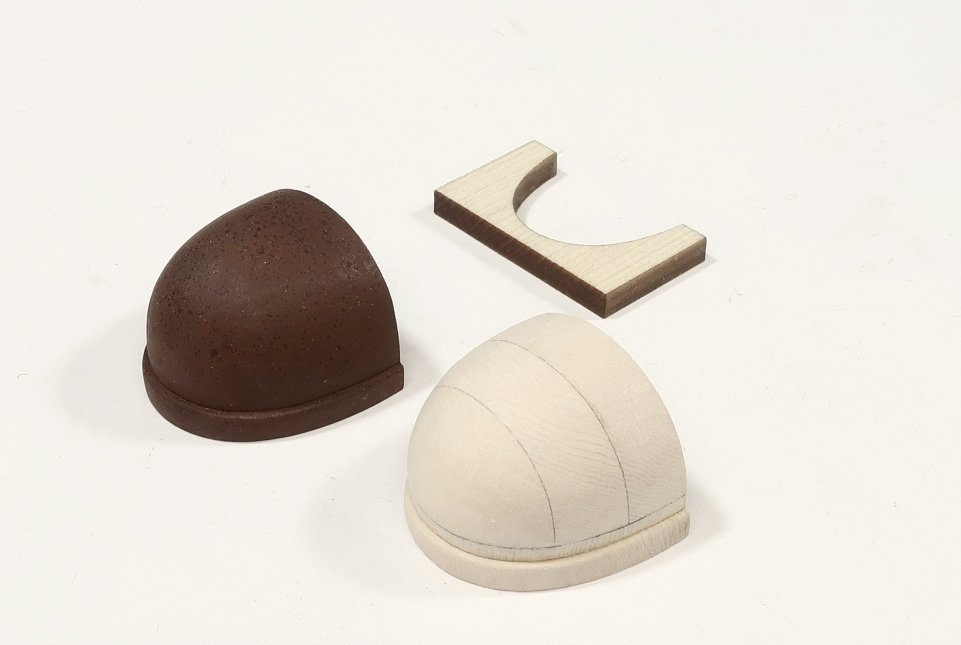
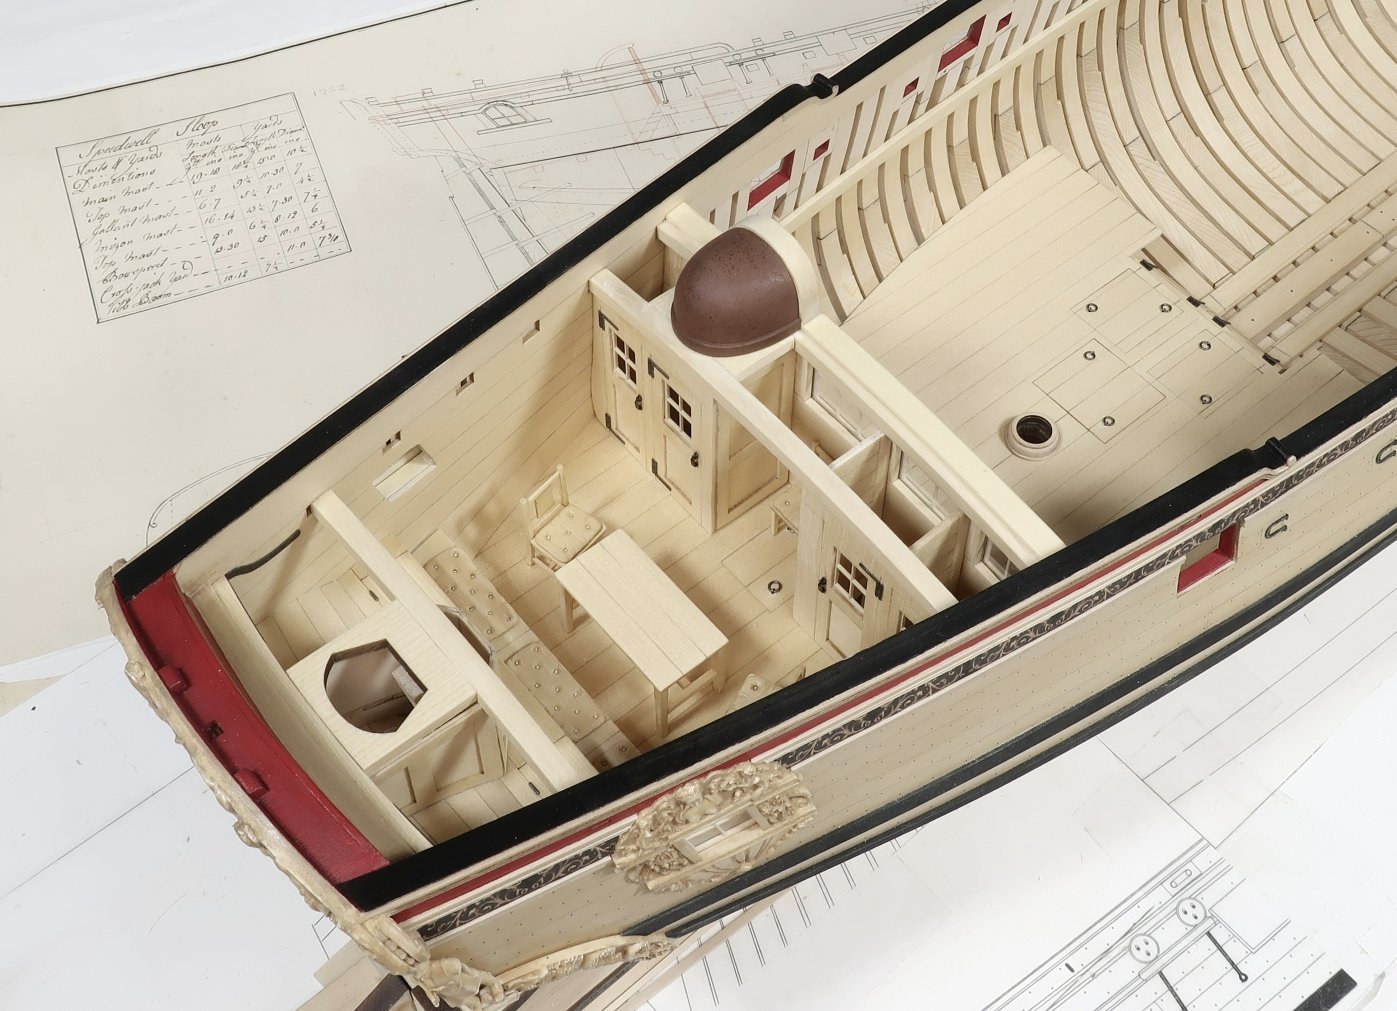
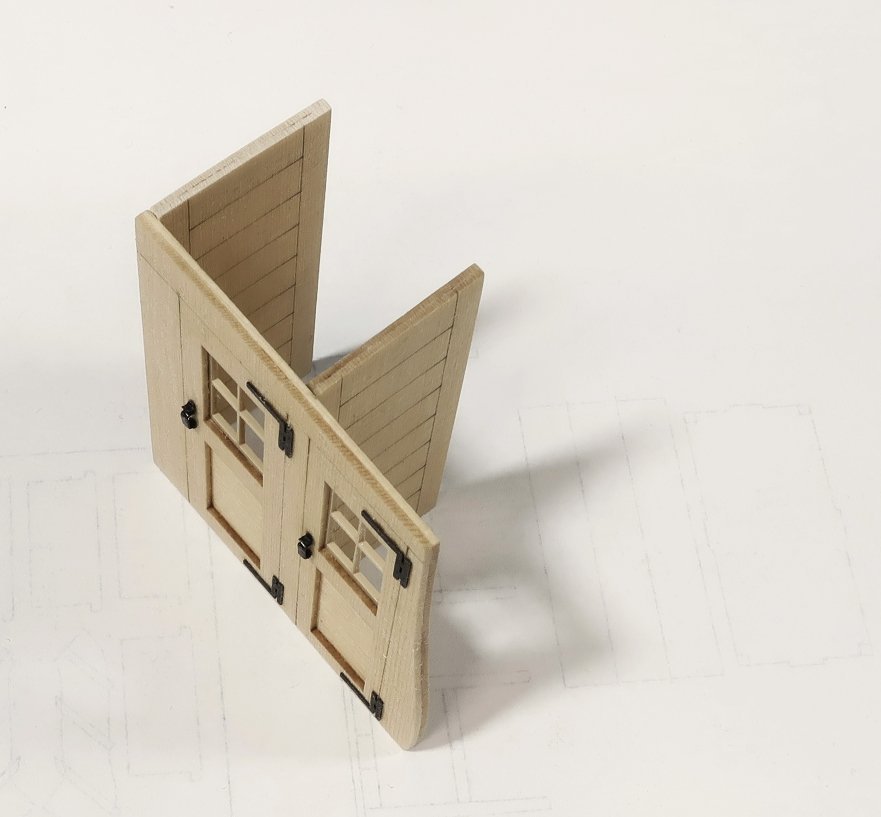
The cupola... I was undecided if it made sense to add the cupola now or wait until after the deck is planked. But I decided it might be easier to plank around it so I went and completed it. It will be shaped in a sort of lift method. Below you see all the parts needed laser cut along with the first prototype completed. Step 1...glue the 3 layers of curved roof together with the thinnest curved horseshoe at the end as shown. Step 2... Glue the 1/16 piece on the bottom which will give you the ultimate rounded shape you are shooting for. Step 3... Sand the roof at first to that rounded shape along the sides. Use the piece glued to the bottom as a guide. Step 4... Then sand the top to shape. Specifically the back end of the dome to establish a nice curve. Dont over sand the forward side. Just remove the char and you will be good. Step 5... Finish off what remains by sanding the remaining parts to a nice dome shape. It should look like the bottom of a test tube cut in half. Now at this stage you could also take a Dremel with a small sanding tip and shape the inside. But why bother. It will never be seen. You can make it as thin as an eggshell if you desire but seriously there is no point. You should remove the cross piece from the opening on the forward side though. There is no reason to keep that now that it is all shaped. That was from the 1/16" layer that you glued to the bottom of the assembly early on. Step 6...Take the last remaining laser cut horse shoe piece (1/8" thick) and sand the char from the outside edge. Also round of the top outside edge. When you place the cupola on top it should leave a consistent lip all around it. This gives you the illusion of a molding piece all around the bottom of the cupola. Step 7...Paint it copper or brown or whatever color you prefer. I didnt want to go with shiny metallic copper paint. I opted for a medium brown color. But before you can add it to the model the framing for the cupola needs to be added between the deck beams. That is the last laser cut piece. Just sand the char from it and position it as shown. No need to clean the char from the center because you will never see it. center it behind the door. Step 8... Glue the cupola in position after making sure it fits snug against the door frame. It should also leave a little lip around the top of the door frame being slightly smaller in size. For now I have left the rim around the top of the door frame bright. But I may decide to paint it the same brown color to match the cupola later on. I havent decided yet. I want to wait until after a build the railing and have the deck planking all done. I will see how it all looks at that time. This finishes work on the qdeck for now....I am going to finally move to the fcastle area.
-
Outstanding!!!
-
I believe he is correct....
-
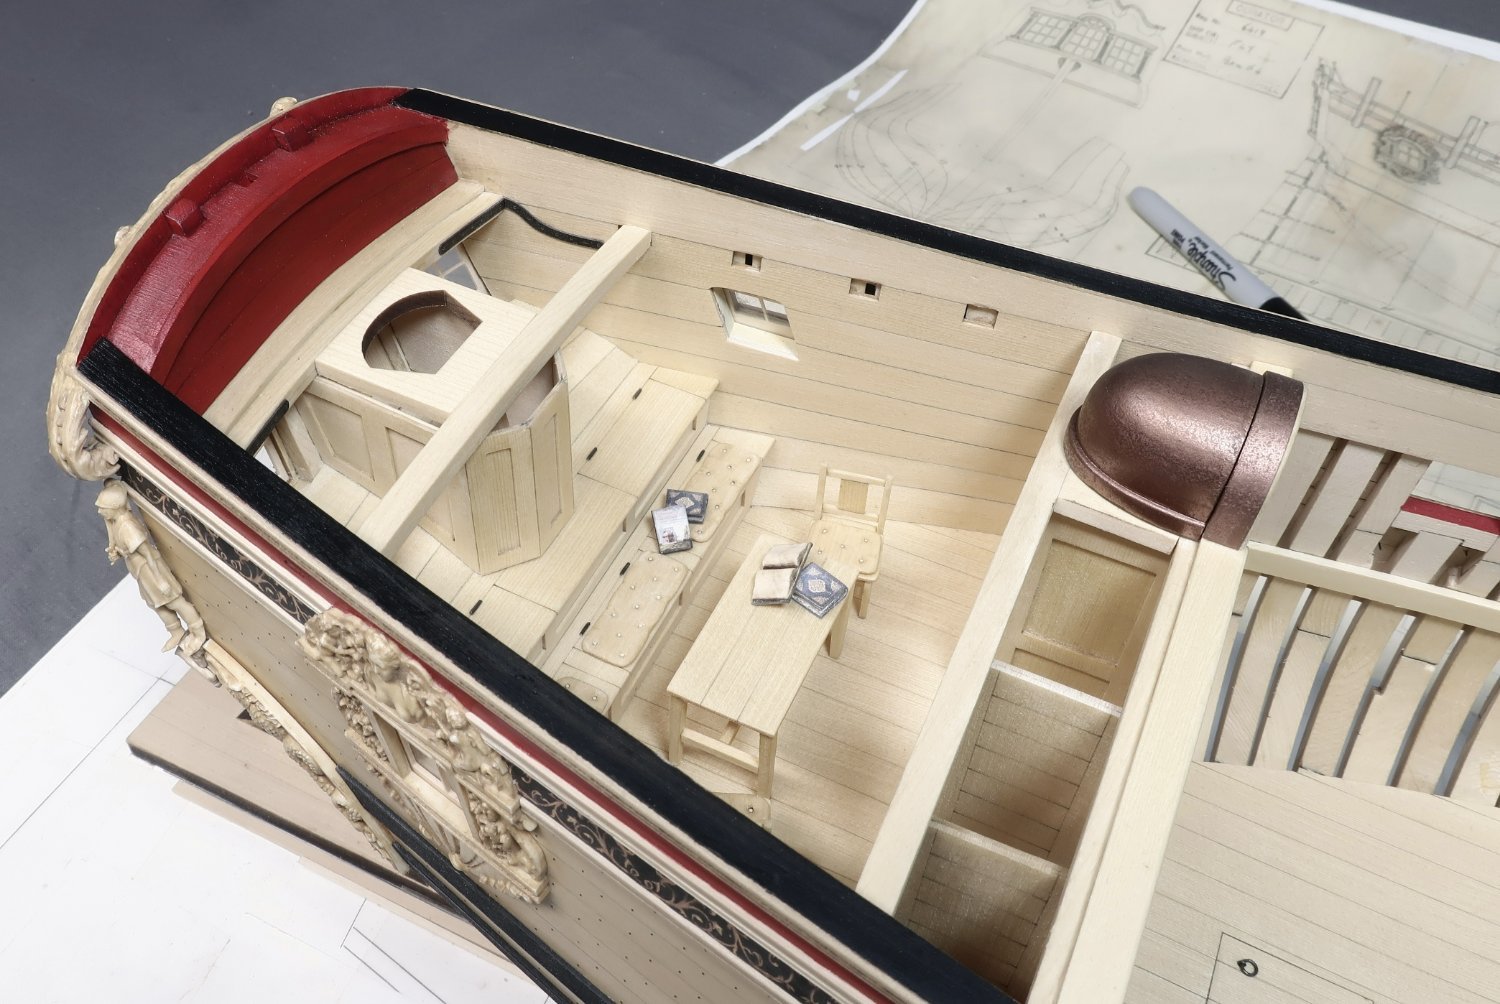
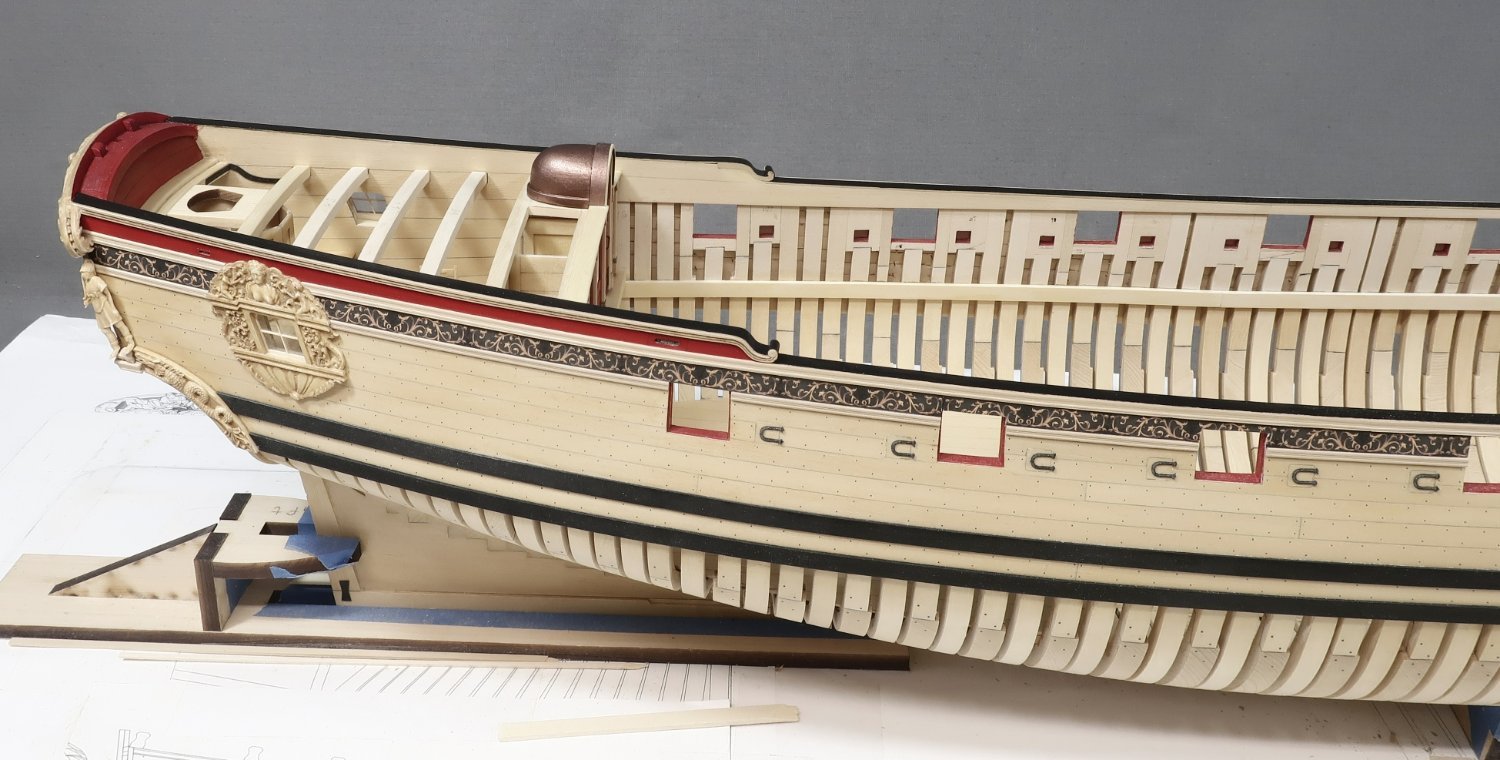
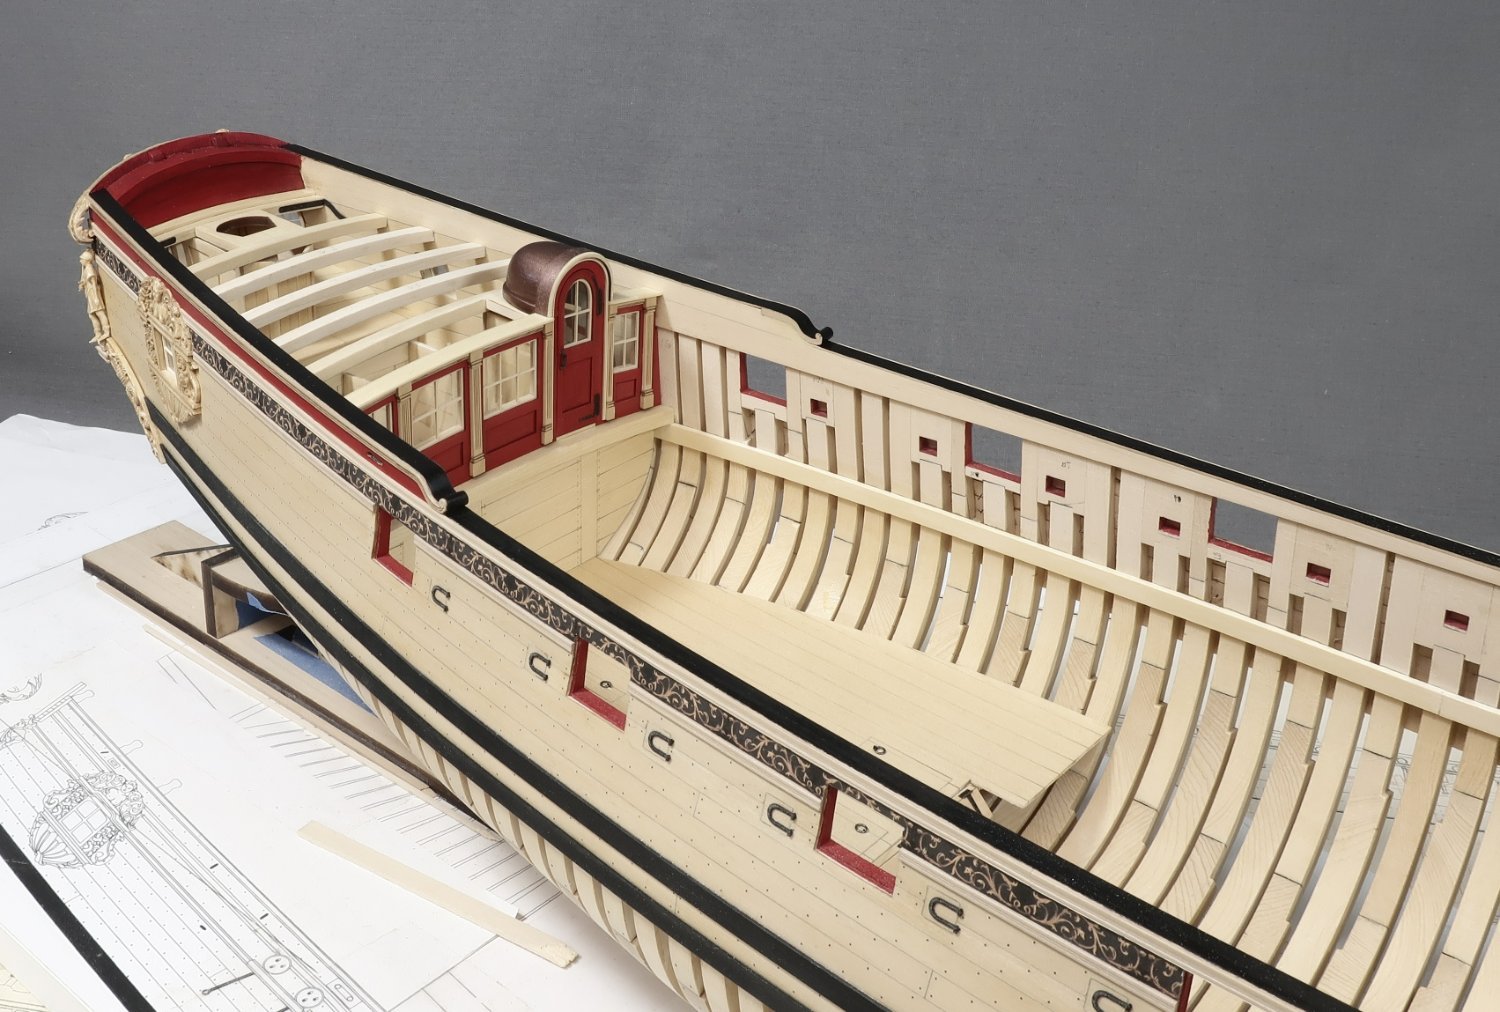
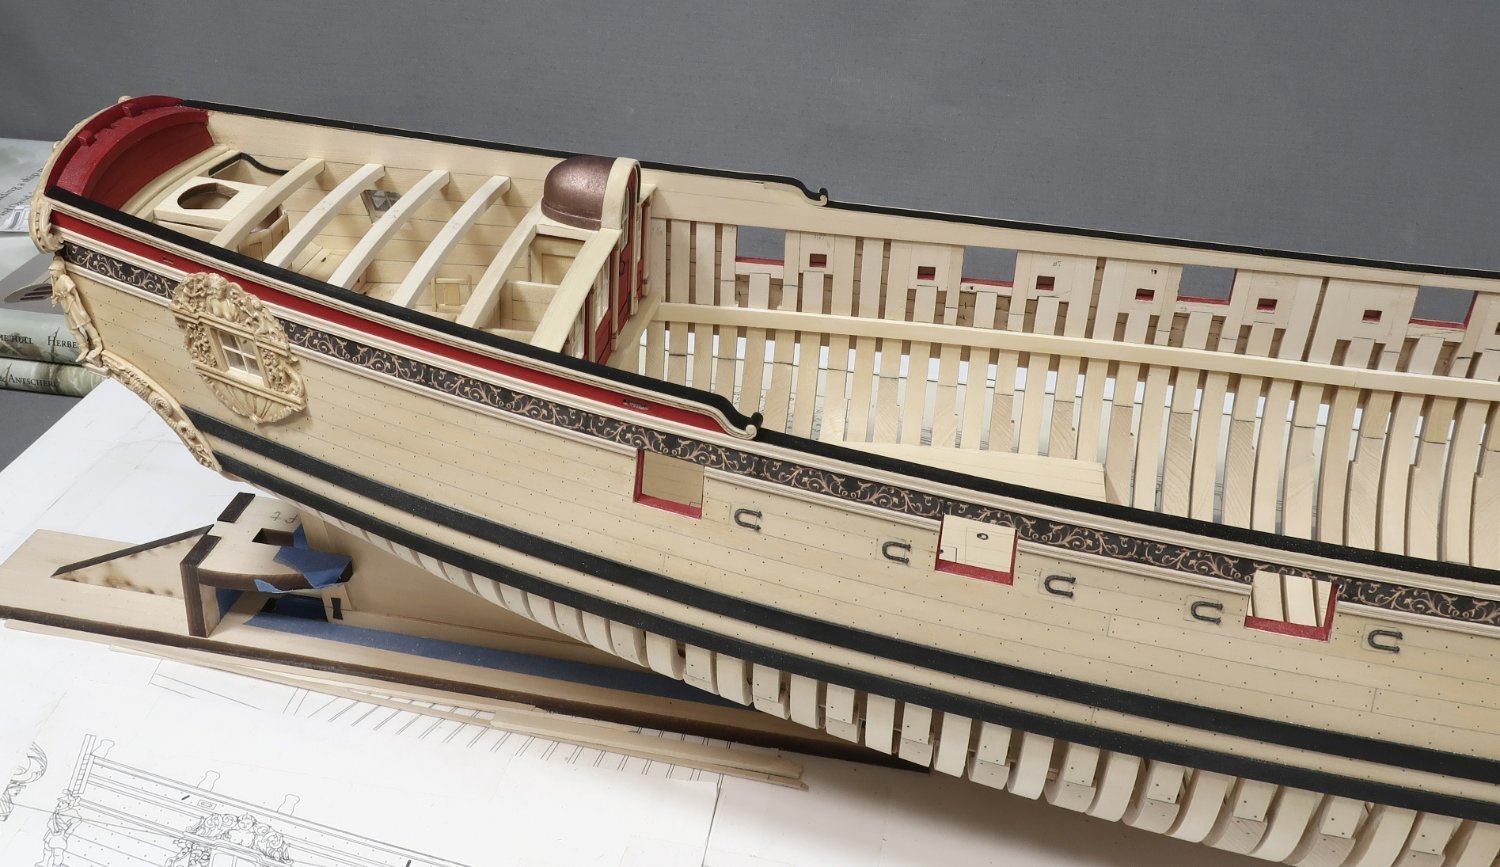
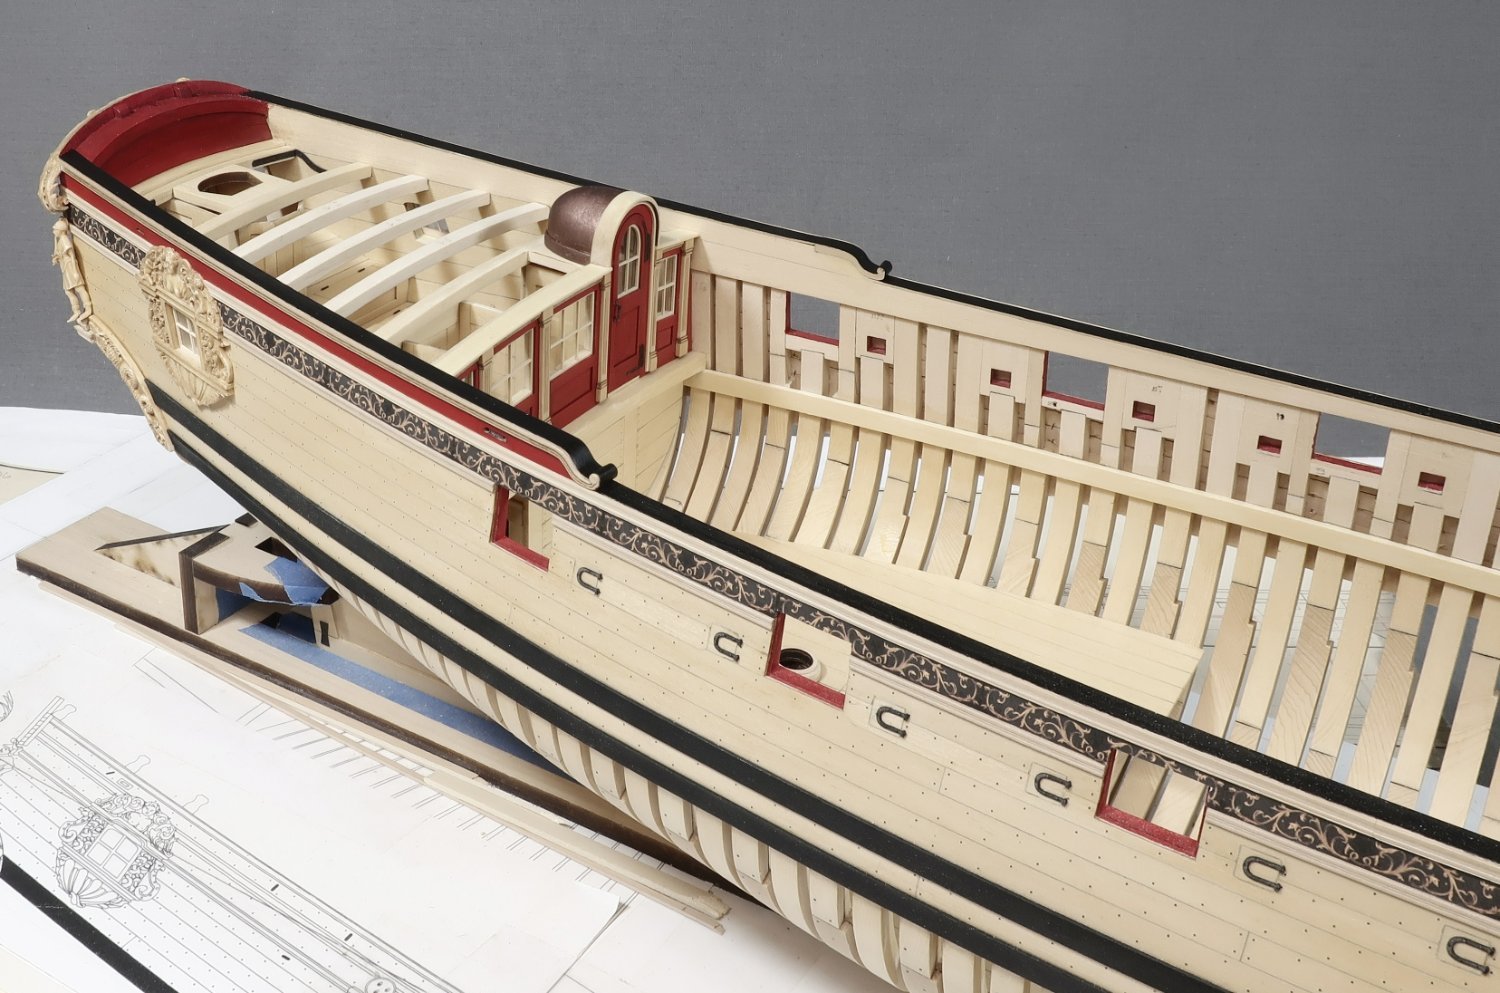
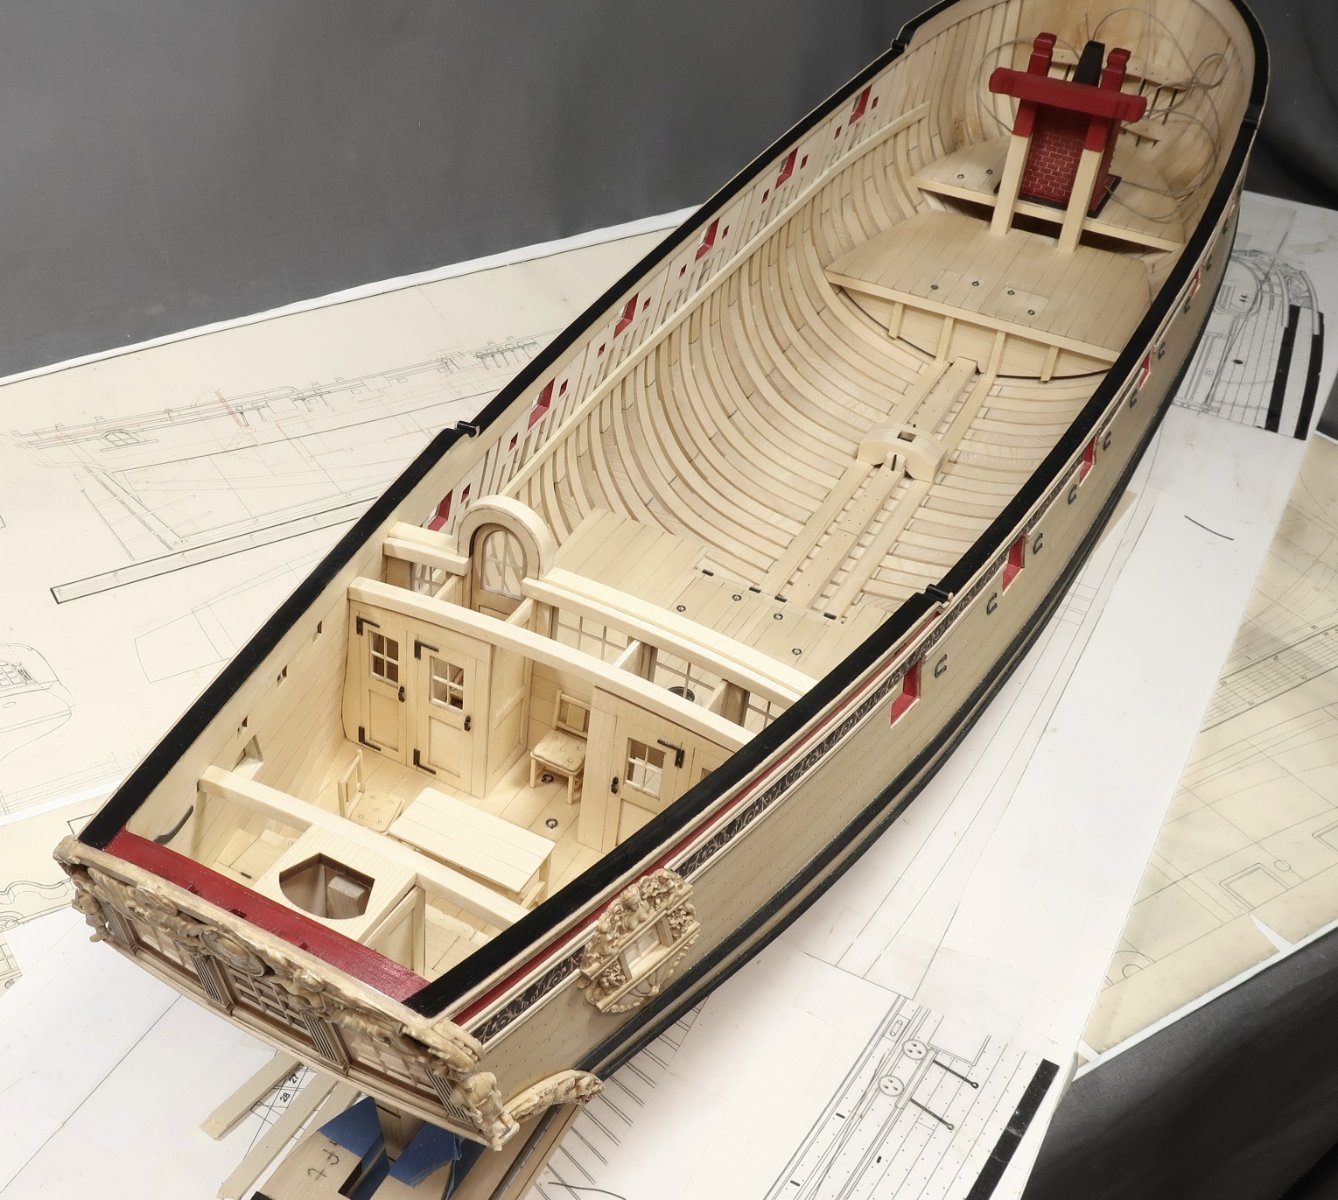
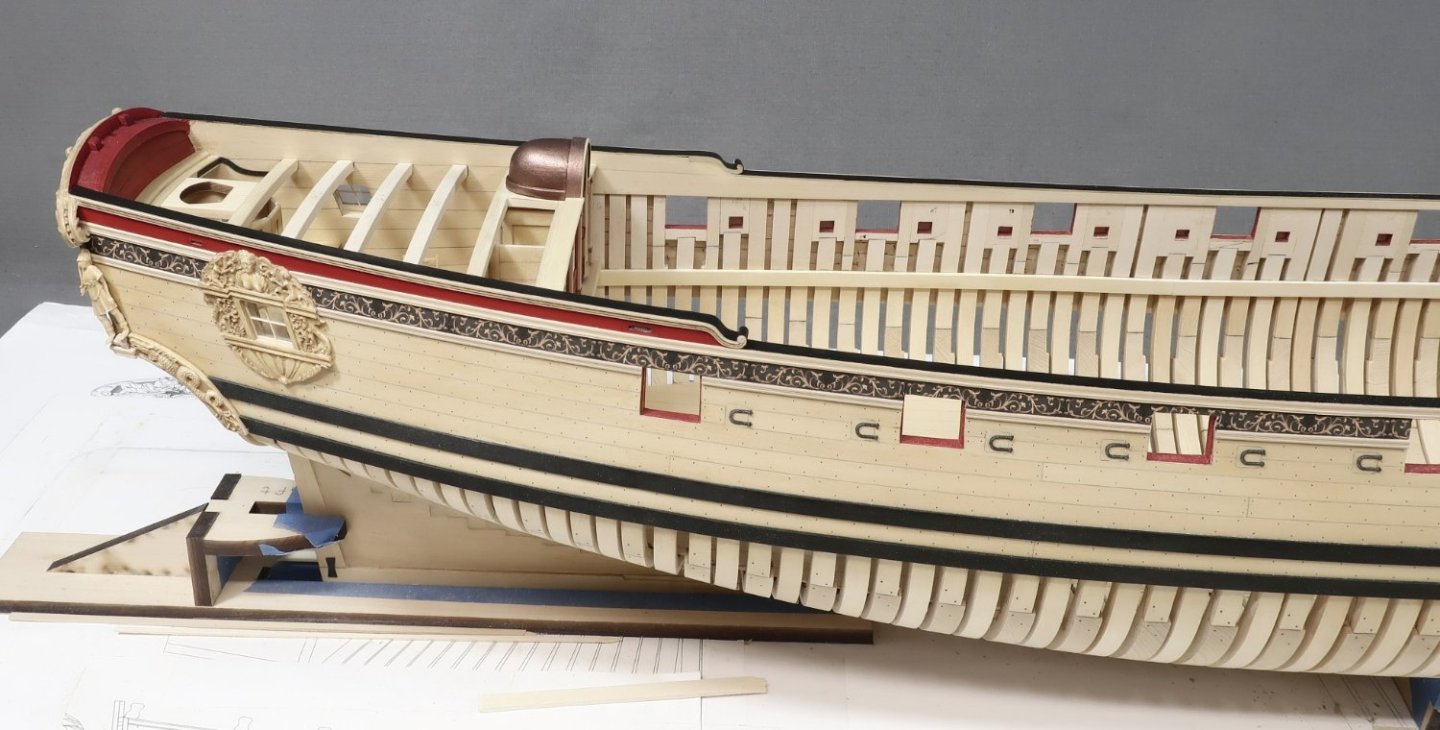
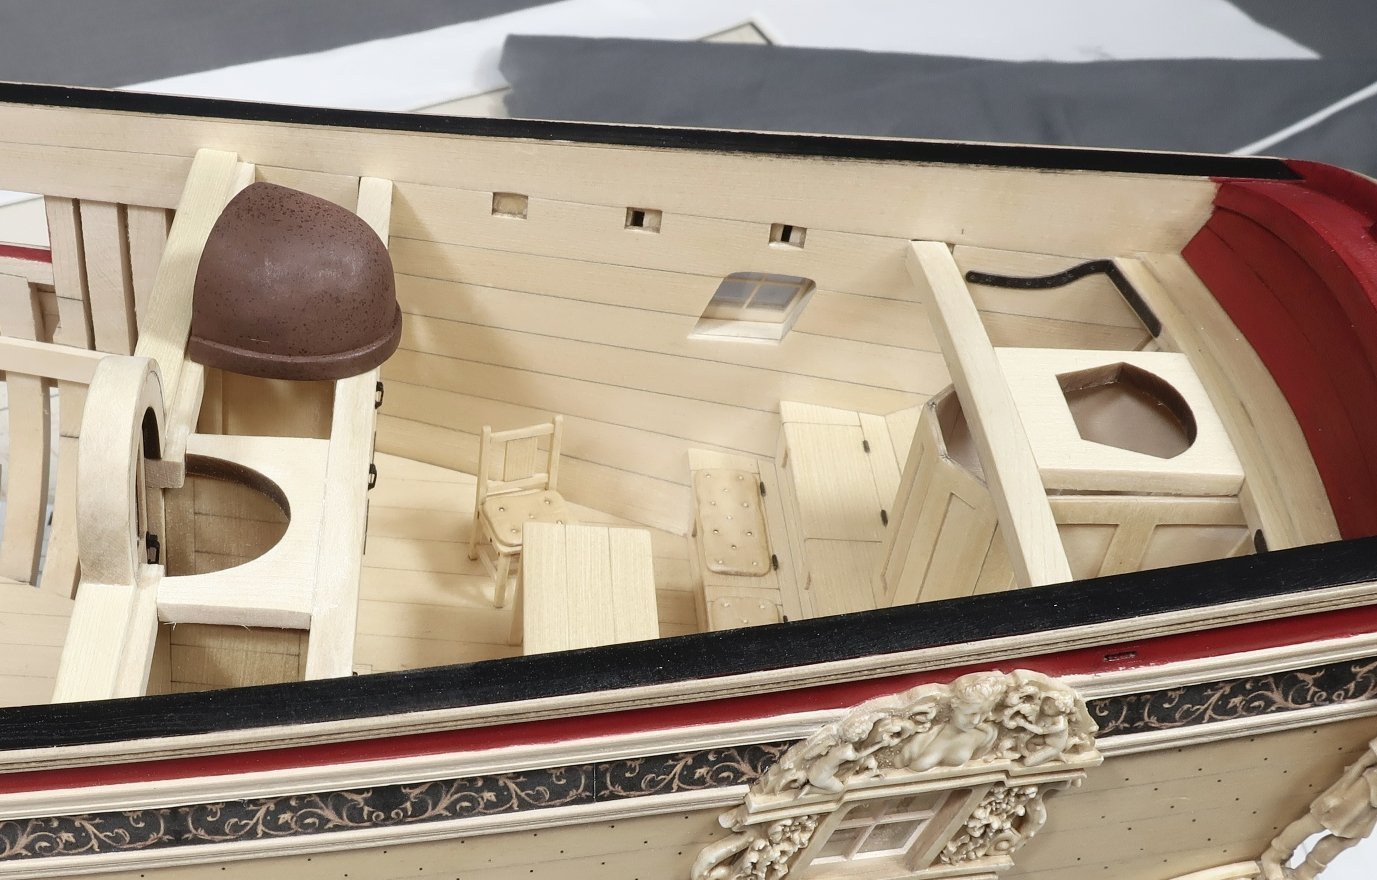
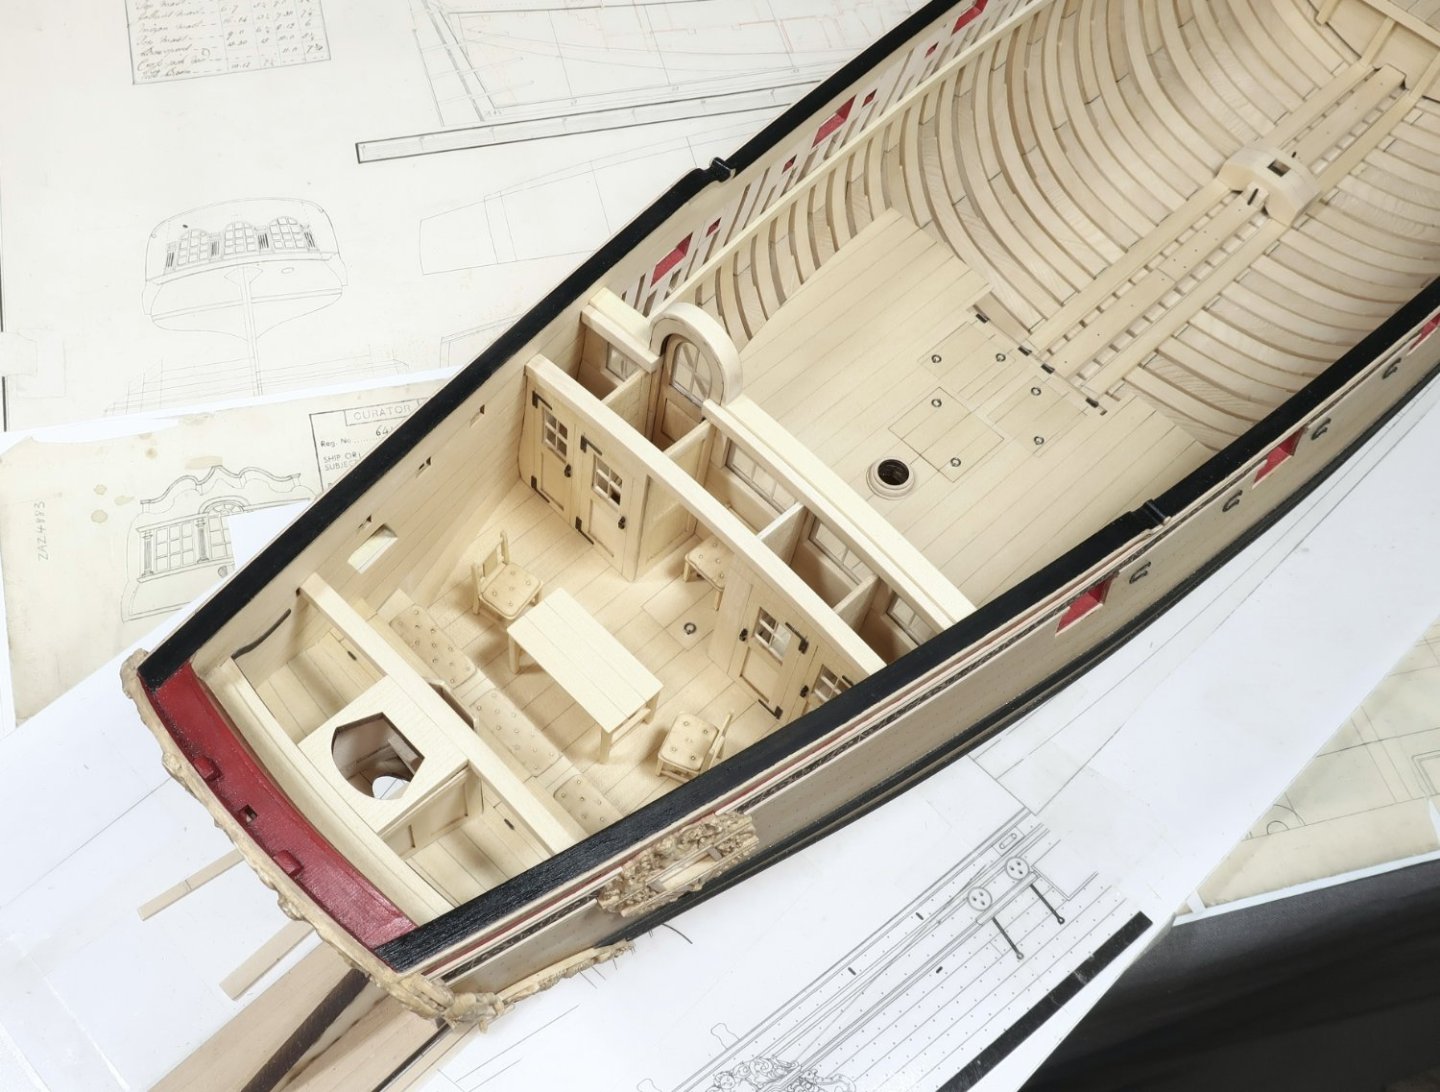
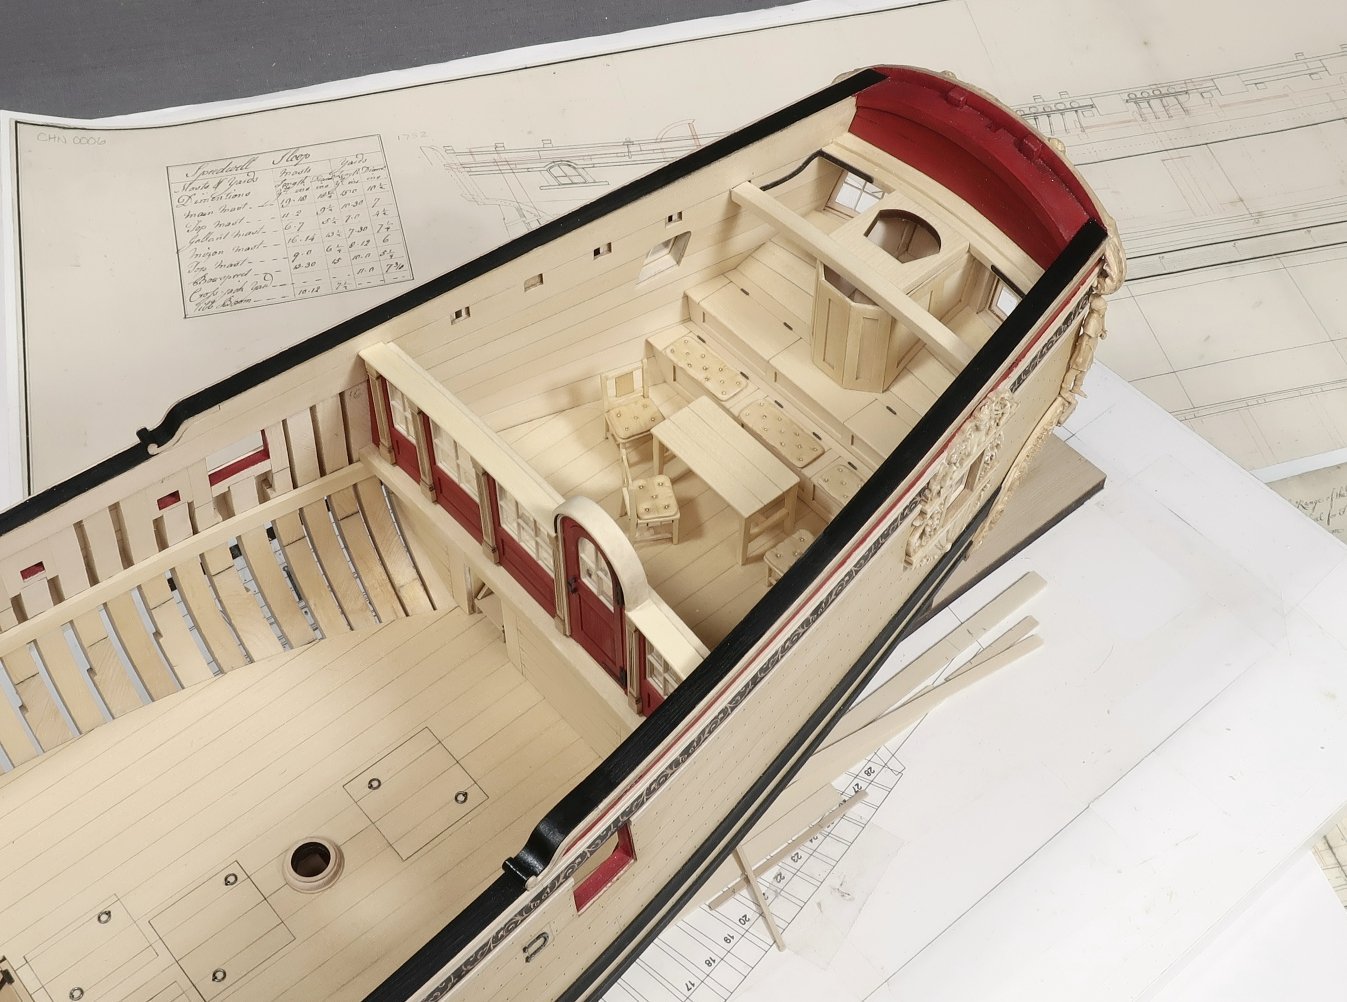
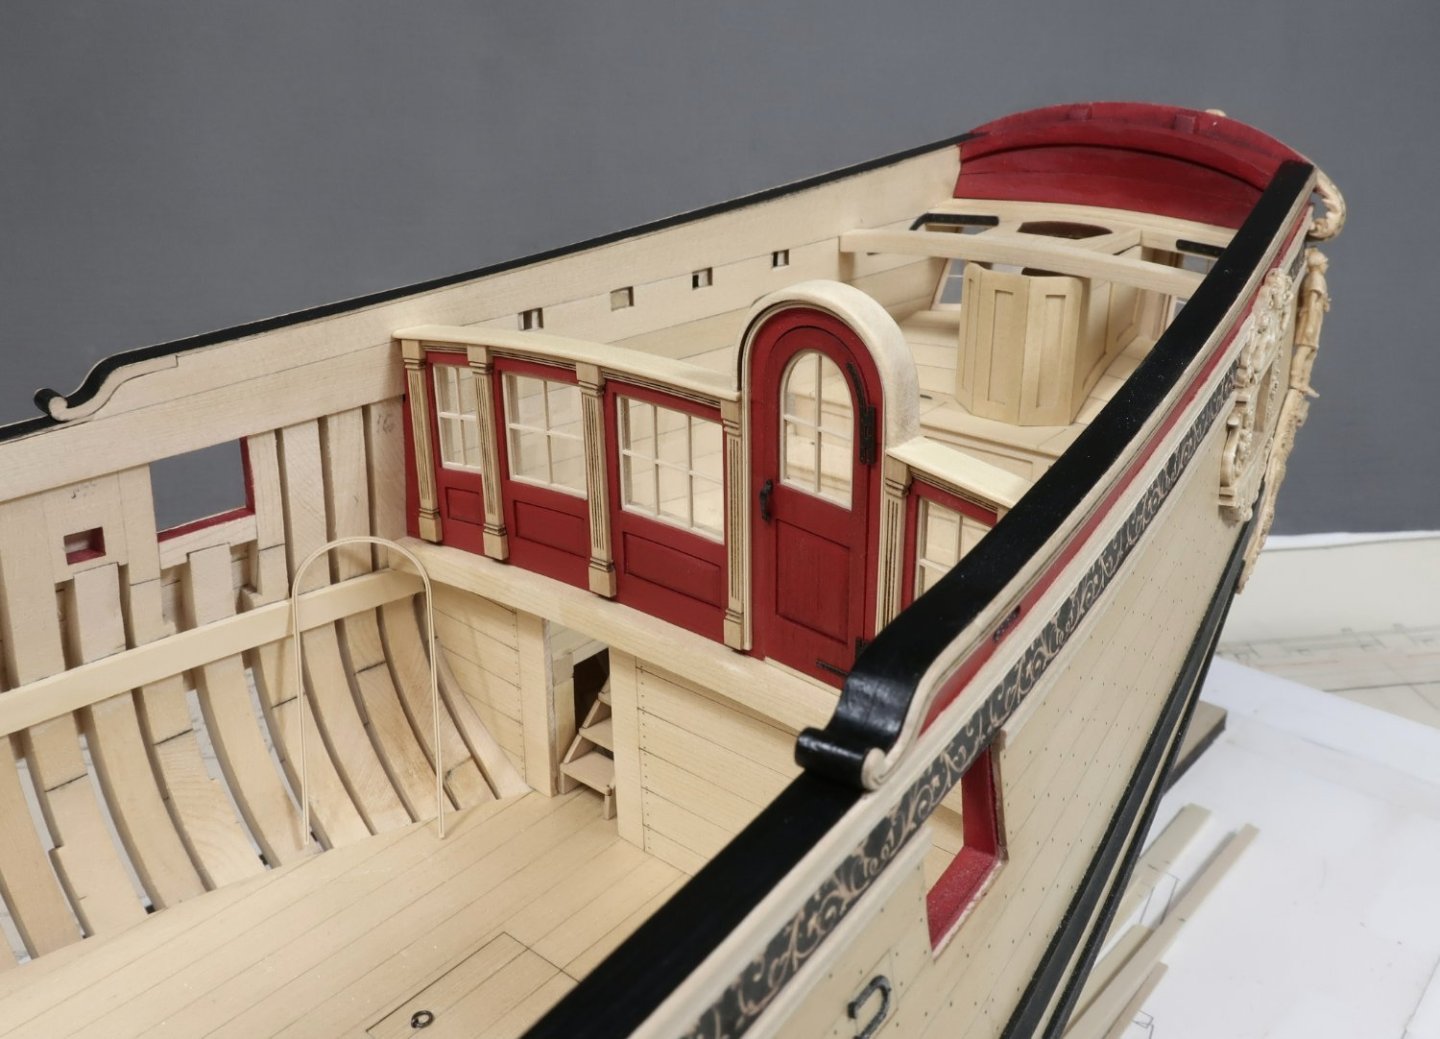
I am not sure what you mean. The great cabin is now finished. That is a small row of closets and entranceways as per the original draft. I am just using windows on the doors to let light in the cabin rather than solid doors. It makes sense that they would have them there. I have a few small things left to add to this area but its basically done for now...then its on to the f'castle details. chuck
-
The wood color and finish has a wonderful quality. But the craftsmanship is top notch as well.
-
HM Cutter Cheerful 1806 by Erik W - 1:48 scale
Chuck replied to Erik W's topic in - Build logs for subjects built 1801 - 1850
Its really looking terrific -
Messing around with cabin cupboards or closets. Making the bulkhead assemblies and inserting them. Nothing is glued in yet.

-
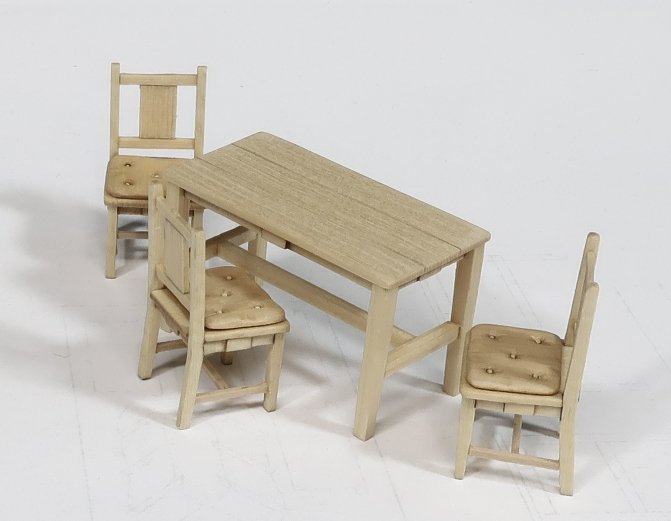
Thank you so much for saying. Today I decided to just have a little fun. I designed and laser cut the parts to make a simple table and chairs for the great cabin. I also made some cushions which are also laser cut. Made some for the bench lockers too. The great cabin is not so large. Even though this looks like a huge model the cabin is actually very small. A tiny space with not too much room. I pondered making a table to show the scale and how little room there would actually be in there. The table is just 2' x 4' in size. Also consider that I havent made the closets and cupboards yet which go on the forward side of the cabin. I will begin work on those now and see how it all looks when completed. I decided not to even paint the cushions...why not!! It was a really fun project at any rate. If I decide to use them I may include the parts in the kit. I also have some 1:32 figures on the way from Chris at Vanguard.
-
Really nice progress Mike. The framing looks fantastic inboard and outboard.
-
I cant believe I forgot to add the last piece. I completely forgot about it and then just saw it sitting inside the hull. I originally tried to make this from boxwood but it was way too fragile. It broke every time. So I cut one out of the tan plastic stuff I used for the windows and just forgot to add it. You can see a spare sitting in the hull. You can see how fragile it looks. A beaded molding trim that goes all around the inside of the doorway. I have now added this last piece and that completes chapter 5. I think it finishes the bulkhead and I am glad I spotted it. Its all about the small details. I also finally cleaned up the hull and added some wipe on poly. So all the wood should be less white and toned down now. This is the final color with the finish added. I dont know If there is much difference but in real life there certainly is. Next I will start building the storage closets inside the great cabin.
-
Door handles are now in stock as well