-
Posts
9,703 -
Joined
-
Last visited
Content Type
Profiles
Forums
Gallery
Events
Everything posted by Chuck
-
That looks very good.....but it all looks very shiny and glossy.
- 144 replies
-
- winchelsea
- Syren Ship Model Company
-
(and 1 more)
Tagged with:
-
That is a nice start. Yes she is a big boy!!! Its literally almost the same size as the Winnie in 1/4" scale. The winnie is 930mm long. You will love working at the larger scale. Its a luxury really. Chuck
- 488 replies
-
- Indefatigable
- Vanguard Models
-
(and 1 more)
Tagged with:
-
That is my thought as well. here is a photo of the jig you will use to find the locations for the headtimbers. it is laser cut in three pieces with the center being 5/32” thick. Its the same thickness as the knee of the head and will slip over the top and sit against stem. Mark the locations of the head timbers and also chisel away the stem if needed so you can slip the head timbers in position down to the top of the hair bracket. You might be able to see how I did this but the paint is also warn away from me slipping the head timbers on off while testing and retesting. Something you will have to do as you shape all of the headrail parts.
- 1,784 replies
-
- winchelsea
- Syren Ship Model Company
-
(and 1 more)
Tagged with:
-
Im referring to the seat/pissdale on the bulwarks. The one with the long tube hanging tube below it. We wont be modeling that and will instead be building similar to those in red shown on the Minerva. Including adding a false rail which was more common.
- 1,784 replies
-
- winchelsea
- Syren Ship Model Company
-
(and 1 more)
Tagged with:
-
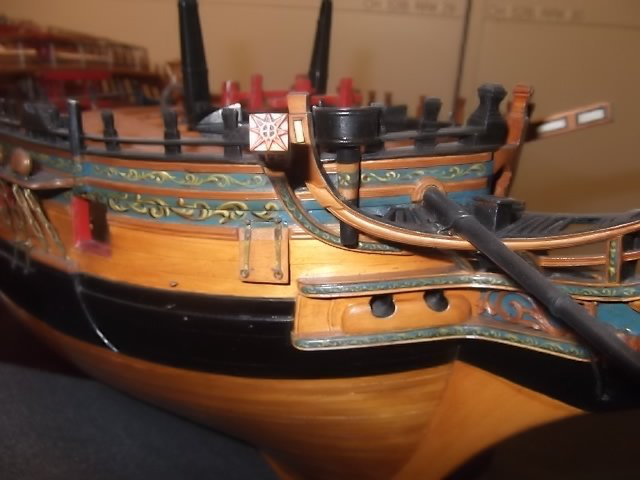
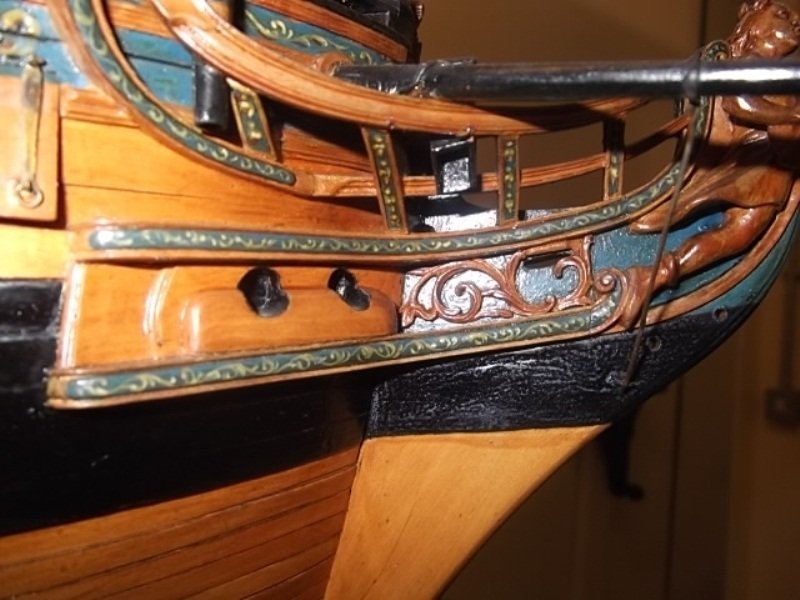
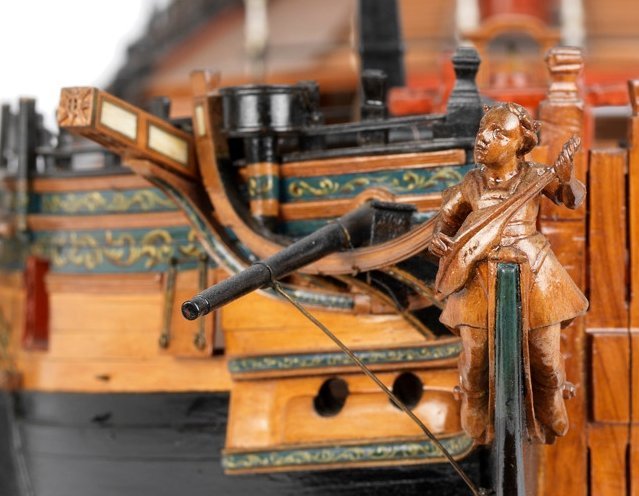
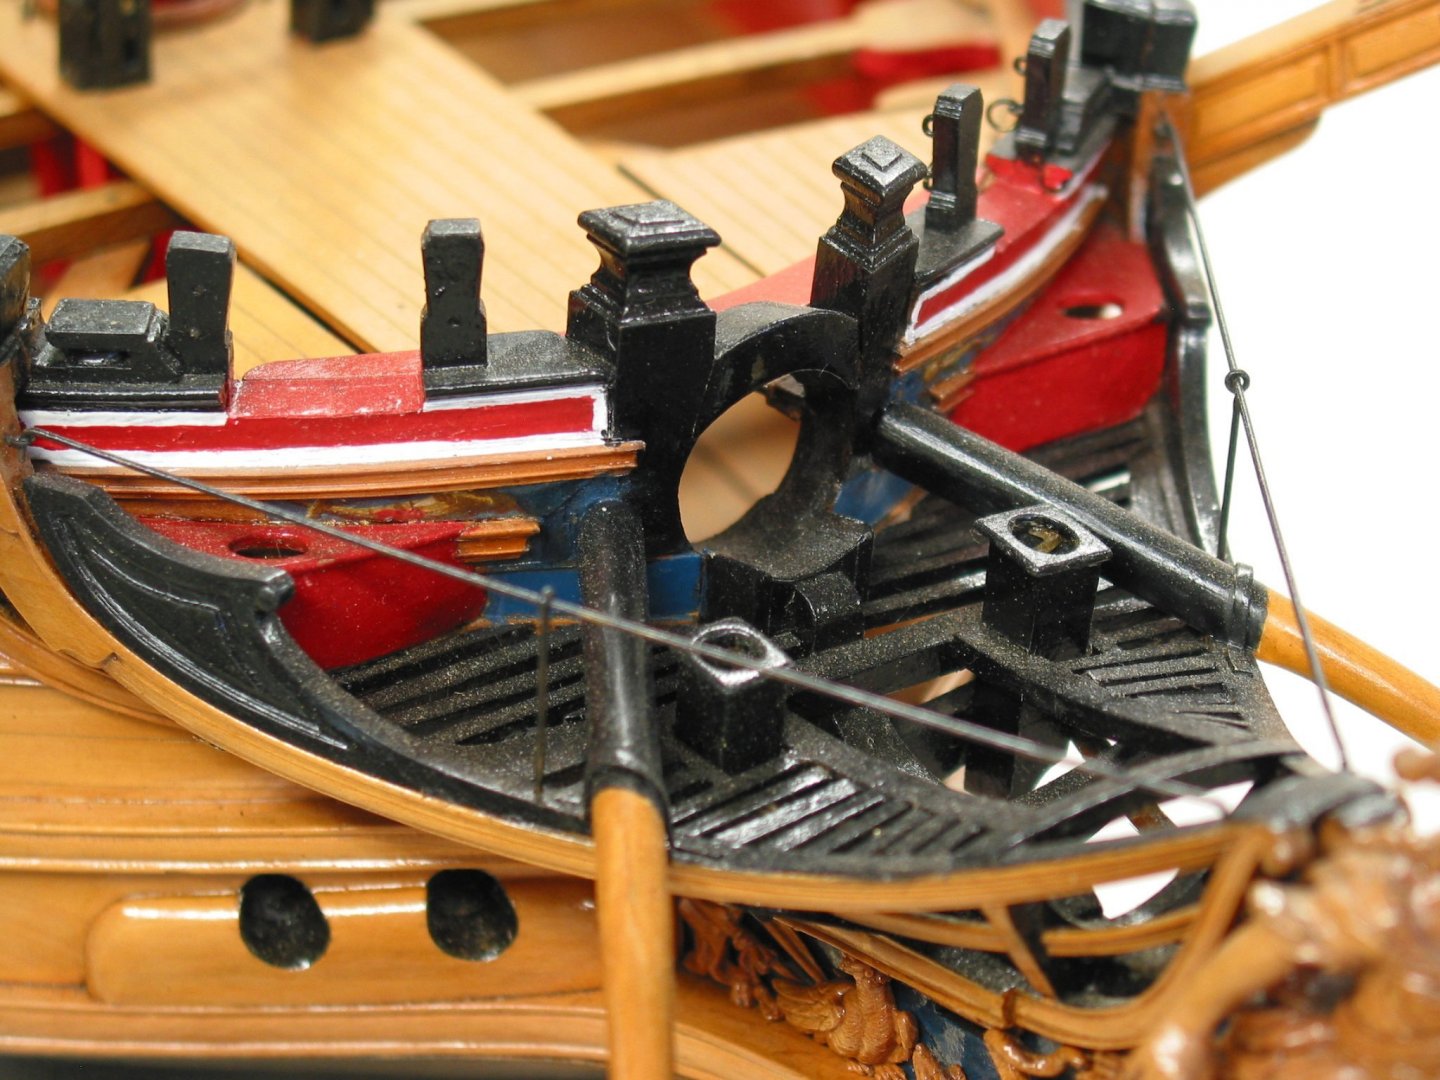
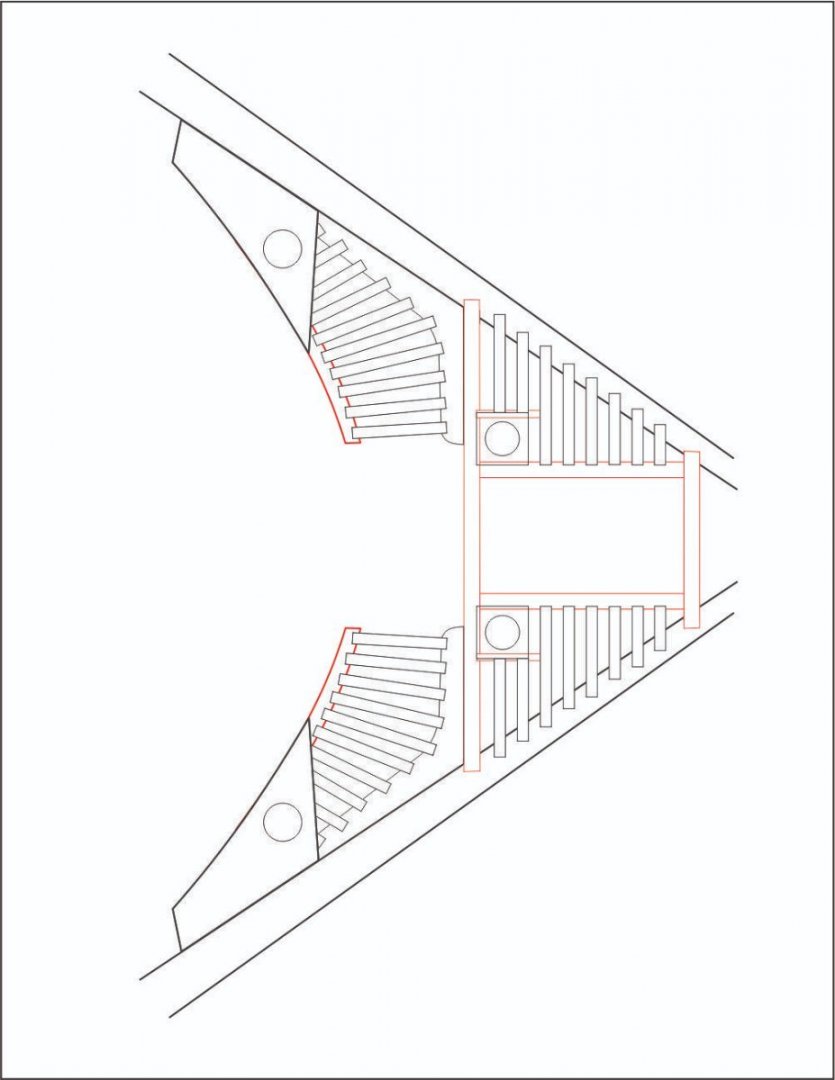
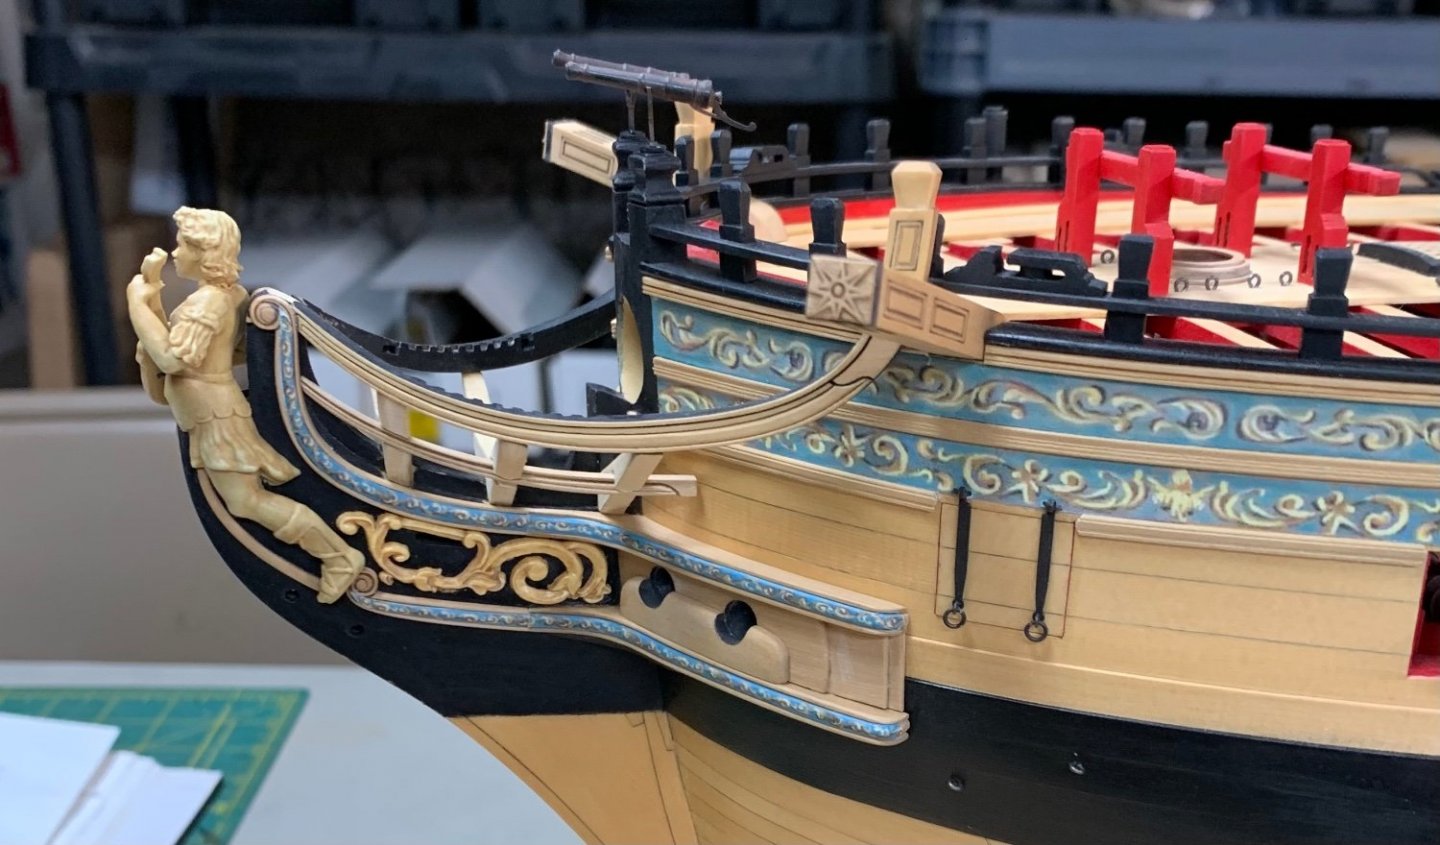
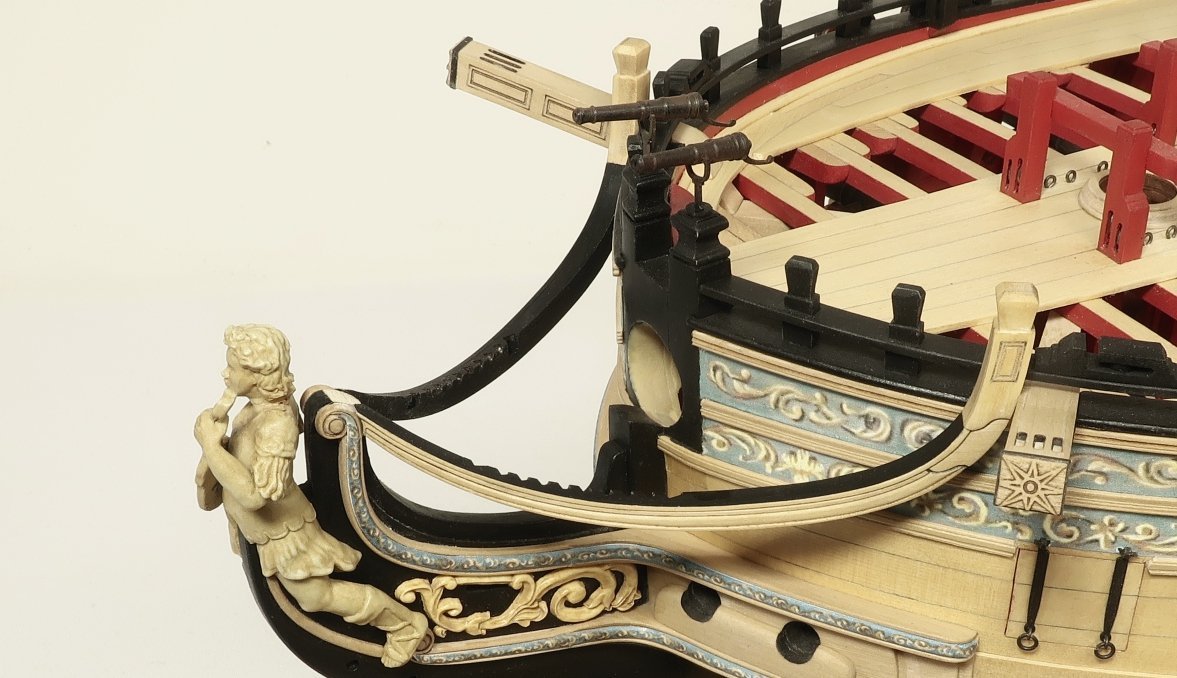
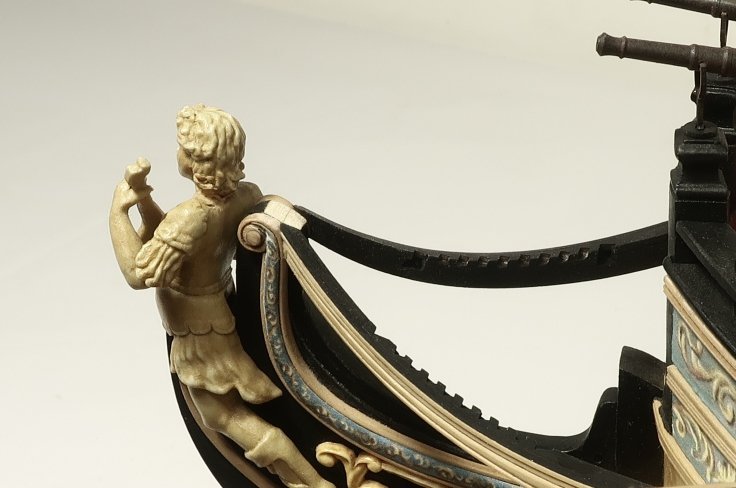
Thank you B.E. In addition, as you approach chapter 12....all of you should spend some time really examining the contemporary model. I made sure to get some really good photos of the headwork. This was crucial to designing and replicating the parts. I admit that it is nearly impossible without making and carving these from scratch to replicate them 100% but I am trying really hard to make mass-producible parts that come close. At least trying to make them look better than anything yet found in a kit. The only way to do that is to study the contemporary examples a lot. Note the fourth head timber aft....the half timber. Note how is sits against the hull. I have yet to prototype this. Note the curved top grating of cross pieces and ledges that form the top of the head. Most kits just laser cut the top grating in one flat piece that looks rather awful. Note the discharge tube for the seat.....and the cover boards for the head timbers with their friezes. Note below how the lower rail is notched into the head timbers. There are vertical slots rather than the typical huge notches used on most kits. An inside look at the head components. And also study other contemporary models such as Minerva. You can really see the curved top cross beams for the grating of the head. Also look at the seats and false rail which we will emulate on our model. Here is the schematic for the Winne headwork and grating to show you a preview of the details we will be adding. We will be adding the knees and all....one piece at a time. No flat laser cut chunky one piece kit part. I think it will be a fun but challenging part of the project. Hopefully I am not pushing things too far. I have mentioned this several times but you will see that funky seat on the Winnie contemporary model. We wont be modeling that. At least not for the official parts in the project. I have never seen that before I doubt it was used. It was probably a test prototype back then incorporated on the model. It is not shown on the draft nor have I seen it on any other model. We will be using the more traditional layout with false rail and seats tucked into the corners. See below.
- 1,784 replies
-
- winchelsea
- Syren Ship Model Company
-
(and 1 more)
Tagged with:
-
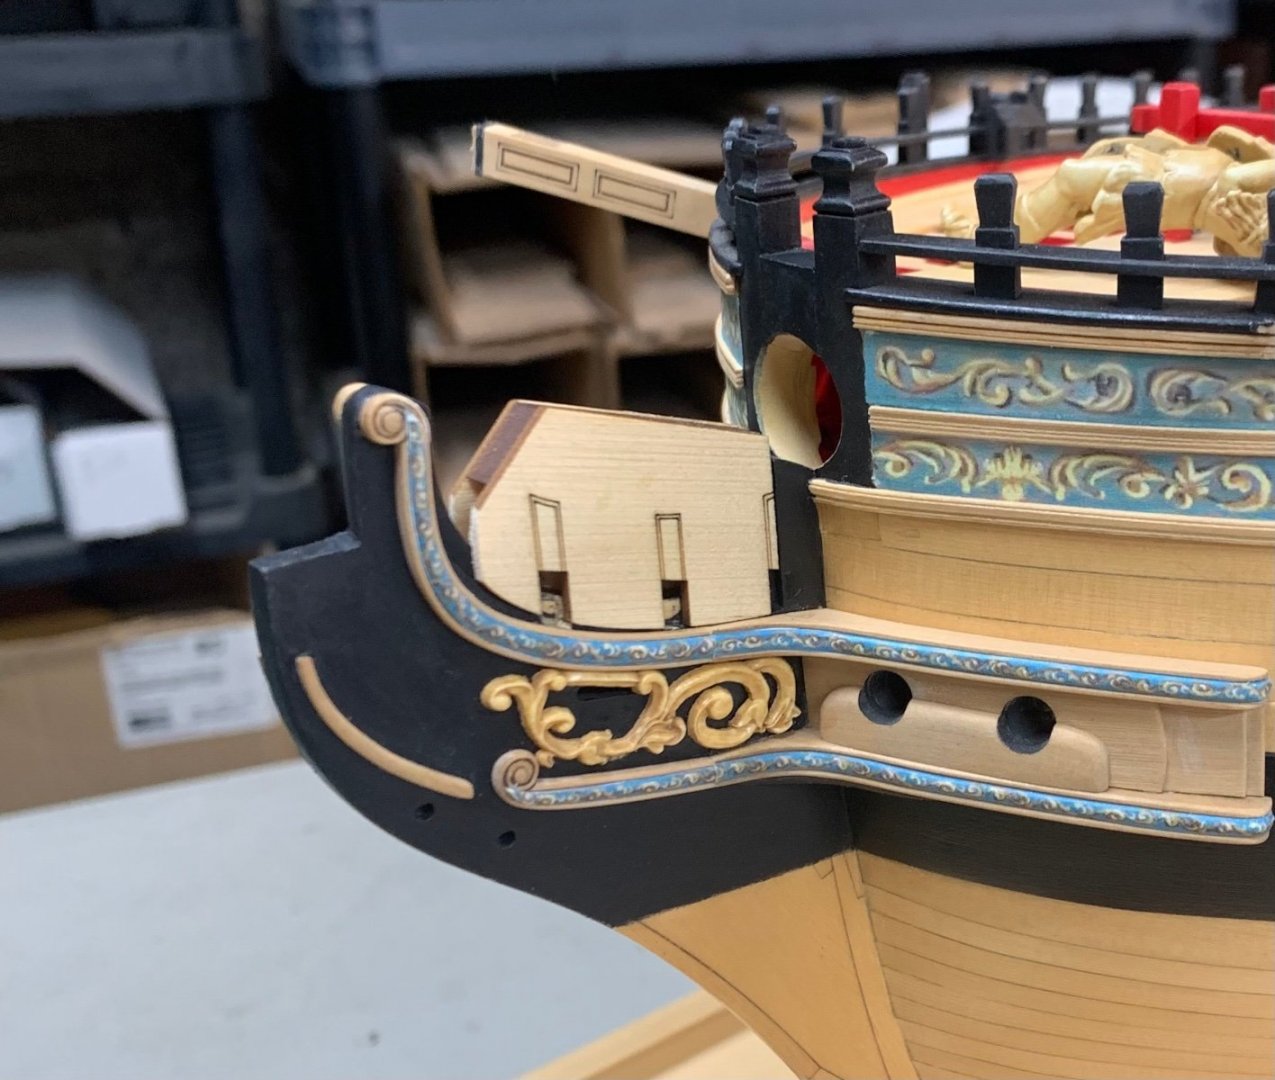
Thanks, Yes this is very complex to prototype and design so its a little easier to assemble. I have been designing a jig to help position the head timbers (uprights). While doing so I have probably made dozens of prototype head timbers and rails which needed to be tweaked. Each element of the head timbers is drafted, tweaked and laser cut….then tested in position. Then deconstructed and tossed so I can repeat the process until satisfied. Here is a quick photo of the testing as of yesterday. Nothing is glued yet…just an assembly test fit. Its almost there but the lower rail need another tweak…sadly it was perfect except for being about 1/32” too short on the aft end. I am working hard and putting lots of hours in to make these look “not like a kit”. Everything is laser cut but does require shaping. But all the decorative beading profiles like those on the lower and main rail are laser etched. But I still ran some sandpaper or a file down each laser etched groove to clean them up and make them look better. This will all be explained in ridiculous detail like I did for the main rail. There will be a lot of paint touch up on my model but hopefully all this testing will mean that your model wont need as much. This will take a while but next week I will start cutting chapter 11 parts while I keep working on the head. Time to take this all apart again…i need to design the cover boards for the face of each head timber and make the friezes for them next.
- 1,784 replies
-
- winchelsea
- Syren Ship Model Company
-
(and 1 more)
Tagged with:
-
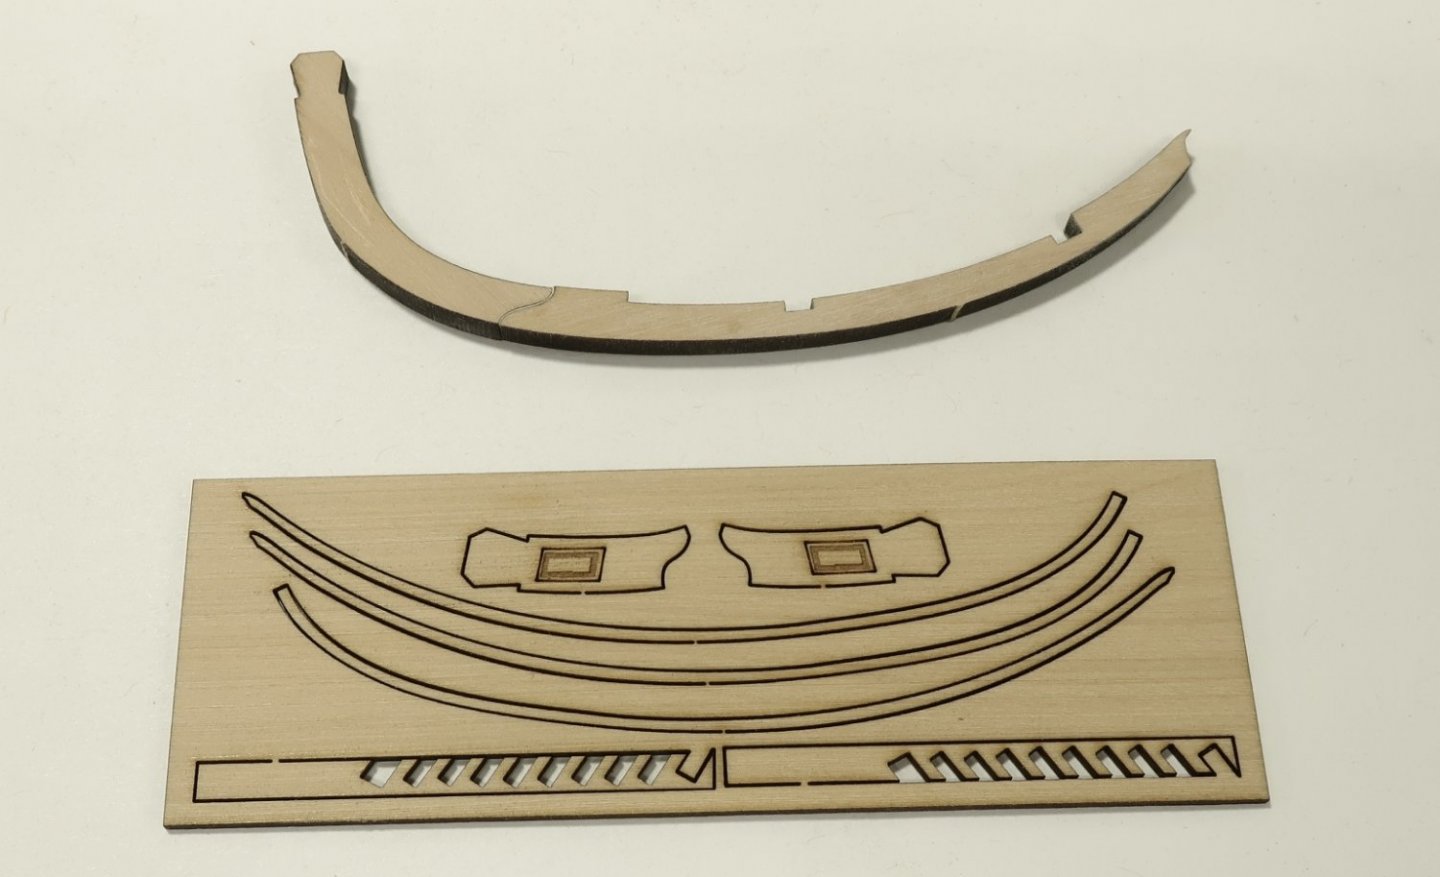
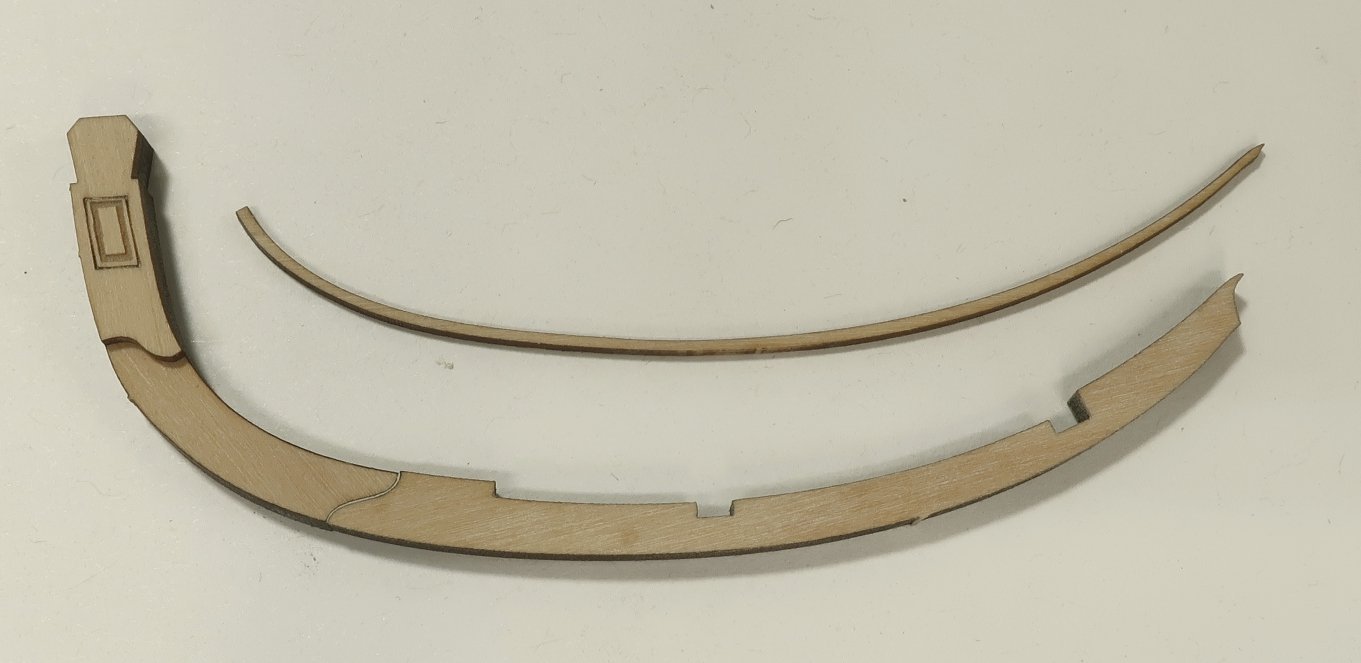
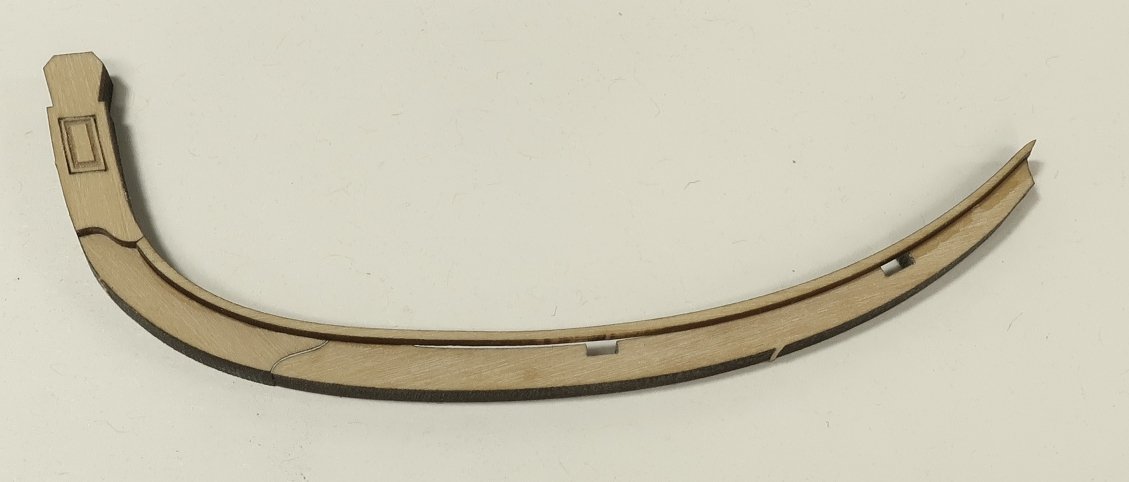
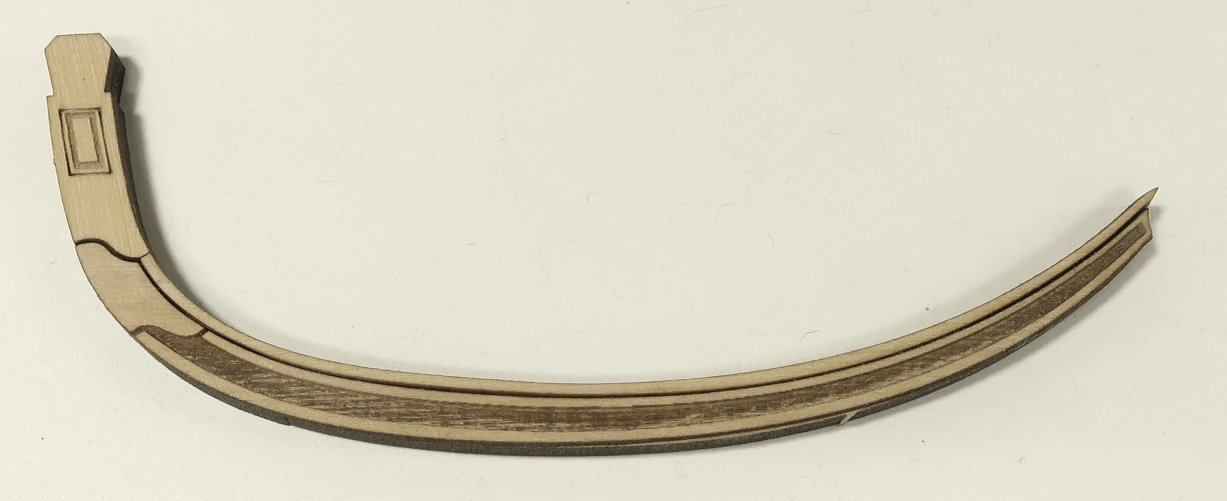
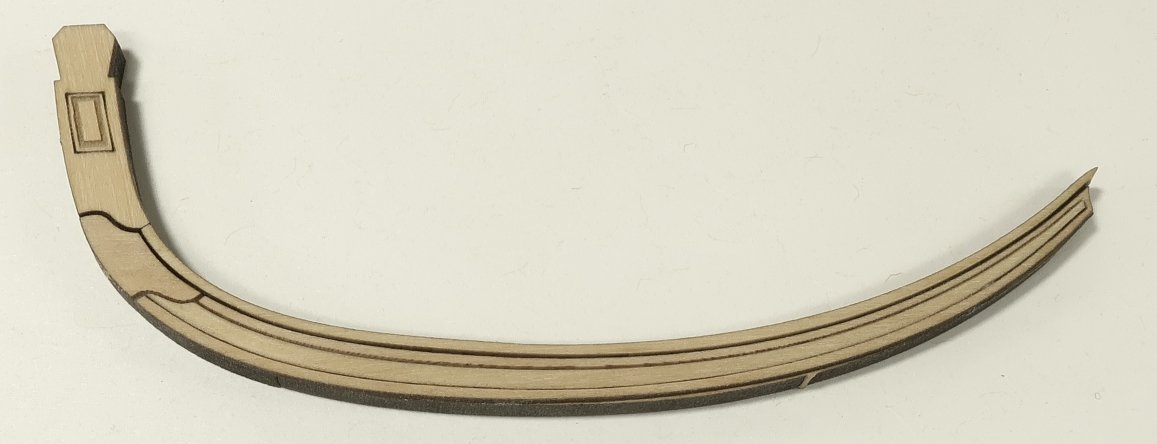
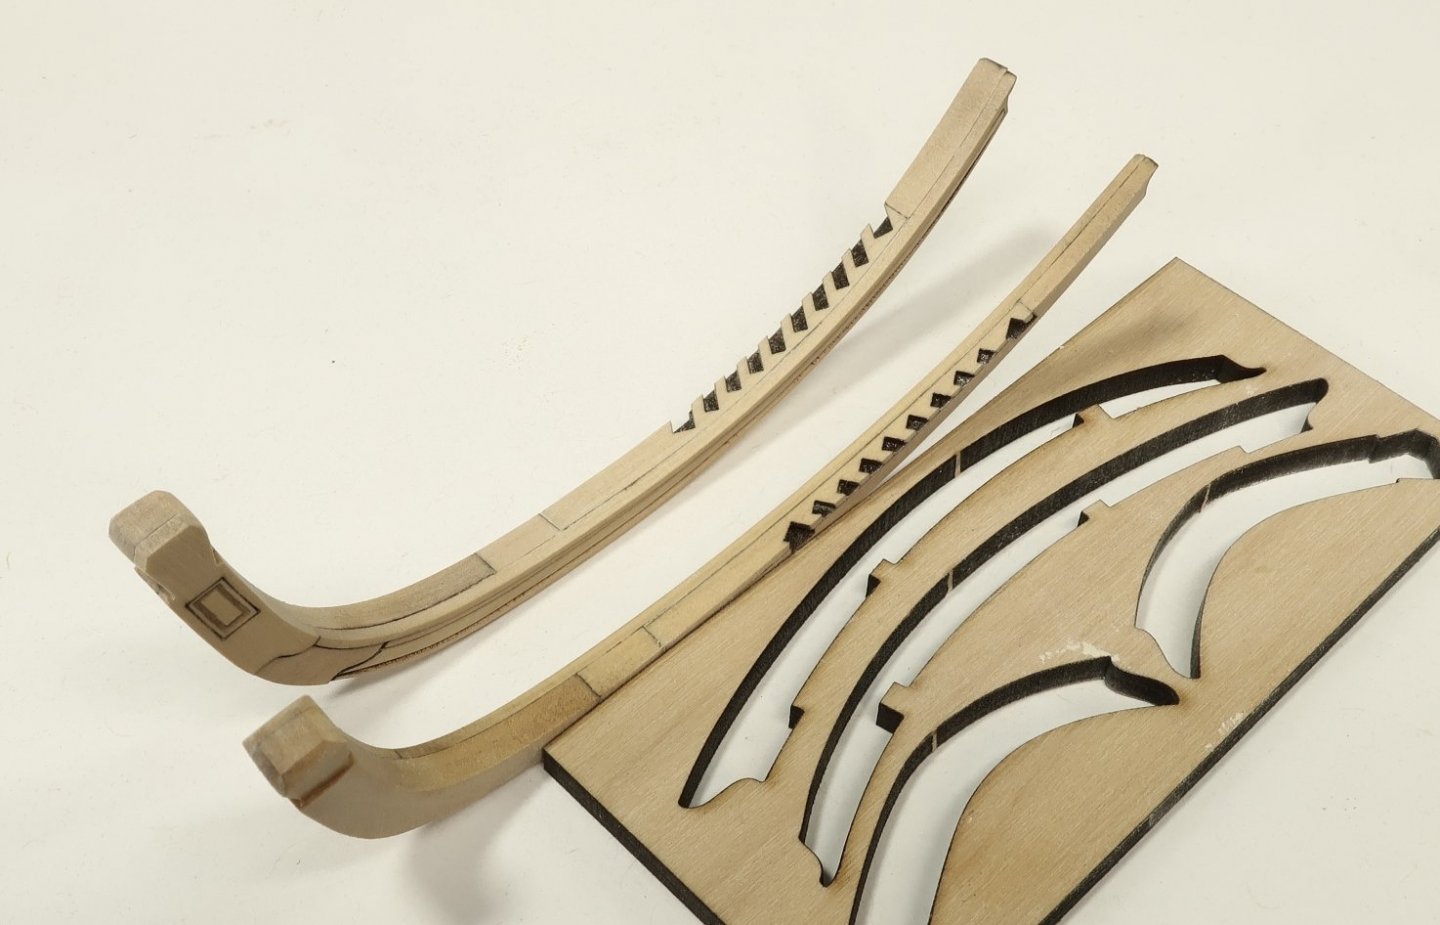
The Main Rail...please excuse what is probably an overly long and detailed explanation. But why not...hopefully I wont forget to mention anything. I have examined a lot of headrails on kits and I havent found one that I liked. So I am trying hard with the headrails on the Winnie to do them justice. It is however impossible to replicate what you see on contemporary models without a lot of carving and hand work. Trying to avoid as much of that as possible I have made some simplifications but I think it will pass mustard as they say. The main rails are boxwood. Like the hair brackets and cheeks they will be made in layers with several components. Do not sand any of the char off these parts unless mentioned in the steps for their assembly. The parts fit rather precisely. Step one: The first two parts of each rail are glued together. These are 1/8" thick. Get a nice clean tight joint but dont sand the surfaces of the joint. Try flipping one of the pieces...try both for a best fit before gluing. The other sheet below is for step 2. STEP 2: These parts are 3/64" thick. Take the timberhead piece first and glue it onto the main rail. Make sure its positioned nicely on top. Then take the long thin strip shown above and glue it into position next This piece will have the top edge flush with the bottom layer. But you will notice this is true only on the ends with a space for another piece we will add later. It is delicate so be careful. That top edge is flush. Step 3: Take the next piece which is 1/32" thick and has a laser etched center which is hollowed out. Glue this into position as shown below. Step 4: Remember the hair brackets??? There is a 1/64" thin delicate strip which will be inserted into that laser etched area. Just like we did for the hair brackets. Now this next step needs to be done carefully and delicately. You can and should gently round off (or bevel) the top and bottom edge of this thin veneer strip. Once inserted it will accentuate the beaded look we are shooting for. Use a lite touch and very fine sandpaper. 400 grit. Step 5: The final piece of the assembly. A 3/64" thick piece that will be positioned on top of the rail. It is laser cut with notches to accept the grating strips for the head...much later. The angles have been predetermined for you. This piece will bend nicely to conform to the curved shape of the main rail. Just apply glue in the slot first and gently push it down so it starts to bend. It should just fit into place. Make sure you orient it correctly with the correct end facing the correct way. Examine the photo below. Now so far it doesnt look pretty because its a laser char mess. But now we can finally sand the heck out of the top and bottom edges of the head rail. You can do that now. And dont be shy. I left a lot of meat on those top and bottom beads of the fancy profile. Go ahead and remove that char....fill any gaps in the seams etc. Just the top and bottom edges for now....and the timberhead. Step 6: In this photo you can see the top edge all cleaned up nice and tidy. No Char. The bottom edge is clean as well. But you will notice that one of the main rails is noticeably thinner than the other. In this step we will gradually taper the main rail. It should be 5/32" thick at the timberhead end.....and gradually taper to 5/64" thick at the forward end. Maybe even a bit thinner. Most of this will be removed from the inboard side of course. But you can and should sand the outside edge (the fancy part towards the forward end) just a bit. The beaded profile is a bit heavy at this point. So you can gently sand mostly the forward end a bit to reduce the thickness just a hair....it makes the beaded profile look more delicate and to scale. Then sand the inboard edge to remove most of the material. You will notice that the nice notches in that strip for the grating strips will starts to get smaller and smaller as you reduce the thickness of the main rail. That is fine. You only need the smallest notch for the job when we get to it. Get a nice even taper as shown on the completed main rail. Once you finish creating the taper....go ahead and sand/file/carve that timberhead on the inboard and outboard edges to match the other two sides. Like you would do for any other timberhead in this project. You can see that it is done on the completed main rail below. Step 7: In the photo the rails are only temporarily in position. But do notice the paint job. The top and bottom edges are painted black along with the inboard edge. But this painted area only goes up to the seam on the parts. In fact, the black paint should cover all the seams for the various parts we used to assemble the main rails. Important other notes: to get the main rail to sit nicely against the hull you will need to notch out the inboard side of the rail near the back corner. You will understand what I mean when you get to this step. You can also notch away the fancy molding on the hull if needed or do a combination of both. In addition...the forward end of the main rail needs to be sanded to fit tightly against the stem and the hair bracket. This is a very complex joint. Basically you need to sand a "V" on the front edge. Before you do this just place it in position and study the angles. Study the photos below as well. You are really only sanding these angles into the top bead of the main rail. The part that sticks out on top. You will know what I mean. Do this with some fine grit sandpaper. Also note that I sanded the stem down flush with the tops of the main rail now that I know where they will go. I had left it taller so it can be tweaked at this time. I left it unpainted so you can see it in the photos. This area .....with all of these crazy angles...will have a small flat piece glued on top. A thin flat protective piece I believe is called a "bolster". So it will cover these joints. But do your best to keep them clean and neat. One last note....everyone's hull will be different. Depending on where you placed your catheads, how you shaped the bow, how you placed your hair brackets on the stem....your model will be slightly different. If to need to shorten the main rail that is easy enough. Do it from the forward end of course. But if you need to make it longer, it will be time to get creative. Or make another set of main rails from scratch slightly longer. On a positive note I think the fancy beaded profile of the main rails came out very good. Not over done or too large. Sanding them down a bit really made them scale beautifully. Dont be afraid to sand the outboard face of the main rail to make those beaded profiles shallower. Basically you will be reducing the top and bottom beads of the profile.
- 1,784 replies
-
- winchelsea
- Syren Ship Model Company
-
(and 1 more)
Tagged with:
-
I havent really checked lately. But its an ongoing effort. It is always a concern and there isnt much anyone can do about it. This project is not yet complete and my guess is they would wait until it is complete. I have however found out about at least three other works by my friends and colleagues which are being pirated as I write this. They are currently in progress in China right now. pirated from Seawatch books authors primarily. What a shame. Chuck
- 1,784 replies
-
- winchelsea
- Syren Ship Model Company
-
(and 1 more)
Tagged with:
-
Not very much… maybe 4 pounds…5 pounds is pushing it. The cherry version may be heavier. But the cedar is very light.
- 1,784 replies
-
- winchelsea
- Syren Ship Model Company
-
(and 1 more)
Tagged with:
-

Photo Reference Library
Chuck replied to JSGerson's topic in Using the MSW forum - **NO MODELING CONTENT IN THIS SUB-FORUM**
All we have to do is add another category for folks in the Gallery so folks can create albums in it. What to call it? “photos of historical vessels or museum ships” something like that but I am worried folks will start adding copyrighted photos they find on the web etc. Some dont know any better…it could be an issue for us to moderate. For example you just cant go to the Sultana official website and start scrubbing photos to put in an album here of their sailing replica. Ten bucks says that starts to happen immediately. Chuck -
If you are looking for cheaper alternatives that look like rope right off the spool…your best bet is to check Ebay regularly for old linen fishing line. Hopefully you will find a bunch by one seller so its all the same color. Remarkable stuff. https://www.ebay.ca/itm/255482484038?hash=item3b7bf15546:g:ze8AAOSwC-RiU42a see this link for example
-
Unless I drop dead I will be continuing to make parts for a long time. And if I ever decide to stop many years in the future I will find someone to cut parts for all my projects. I plan on handing the keys over to the chocolate factory "Willie Wonka" style at some point. Pass out golden tickets in Syren bars, LOL. No joke...
- 1,784 replies
-
- winchelsea
- Syren Ship Model Company
-
(and 1 more)
Tagged with:
-
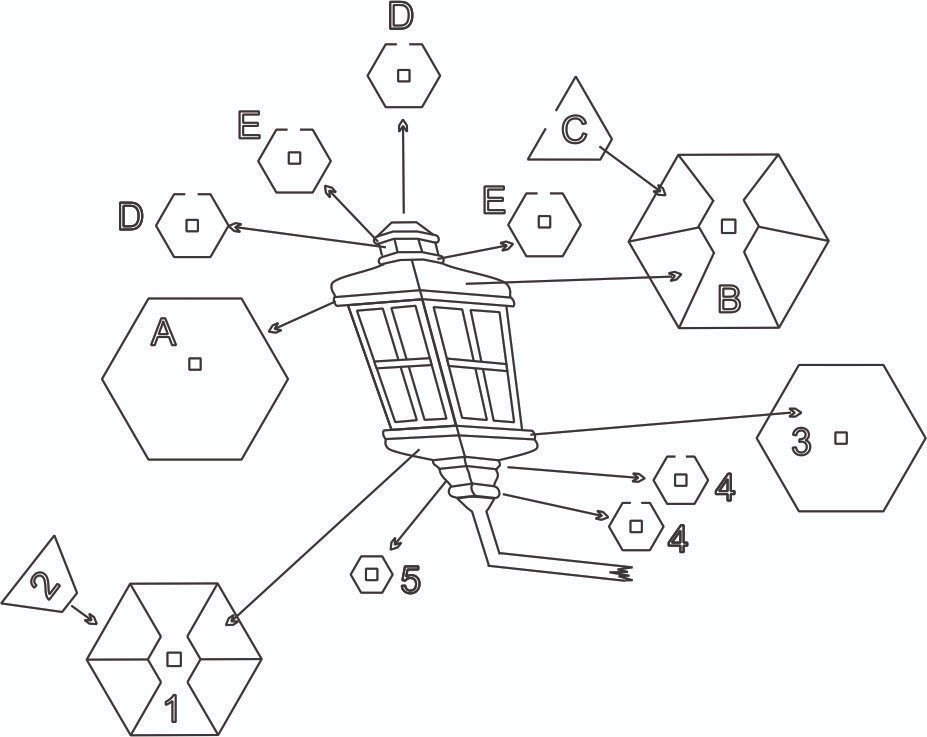
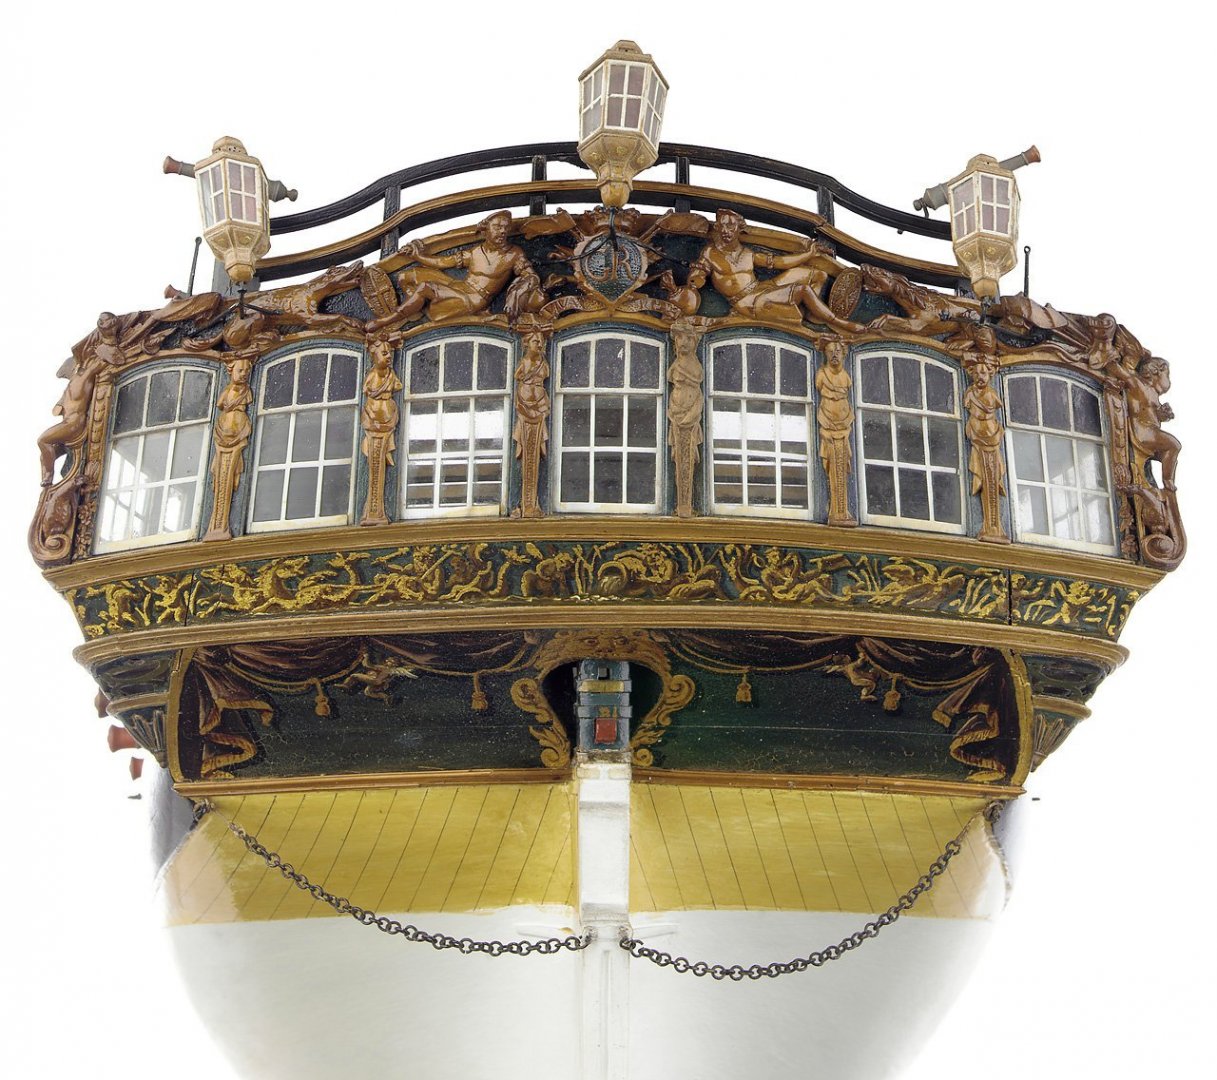
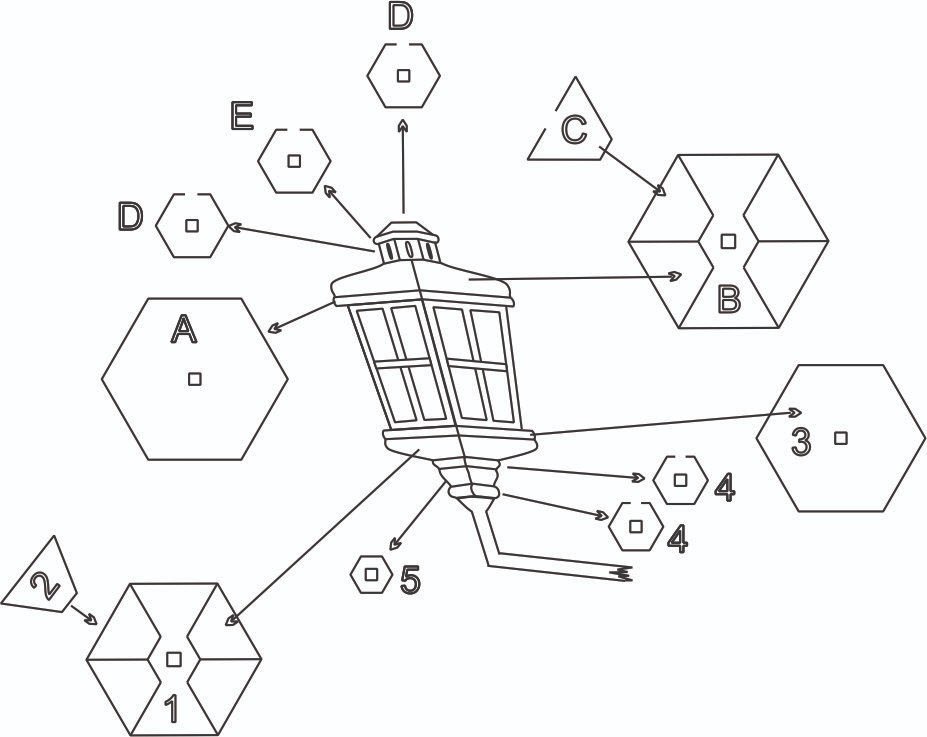
Here is the updated drawing for the lantern.. And a look at the Amazon stern. Which is beautiful. Note it has three lanterns but the Winnie only has one. In comparison to my simplified version. How the heck did they make this stuff way back then?
- 1,784 replies
-
- winchelsea
- Syren Ship Model Company
-
(and 1 more)
Tagged with:
-
That looks great. Dont worry about the color of the cedar varying. It will deepen and even out. My winnie hull is a completely different color now vs when I finished planking. It really mellows.
- 840 replies
-
- winchelsea
- Syren Ship Model Company
-
(and 1 more)
Tagged with:
-
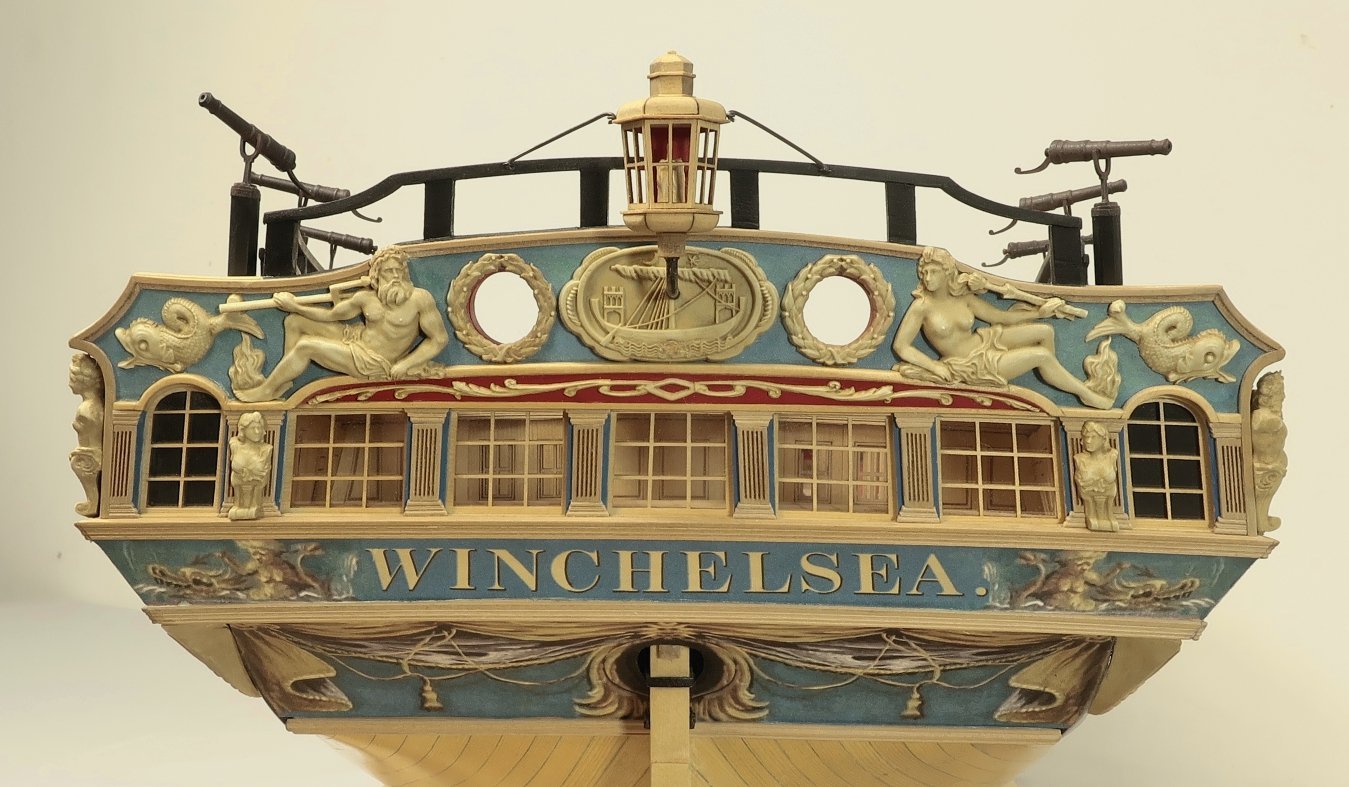
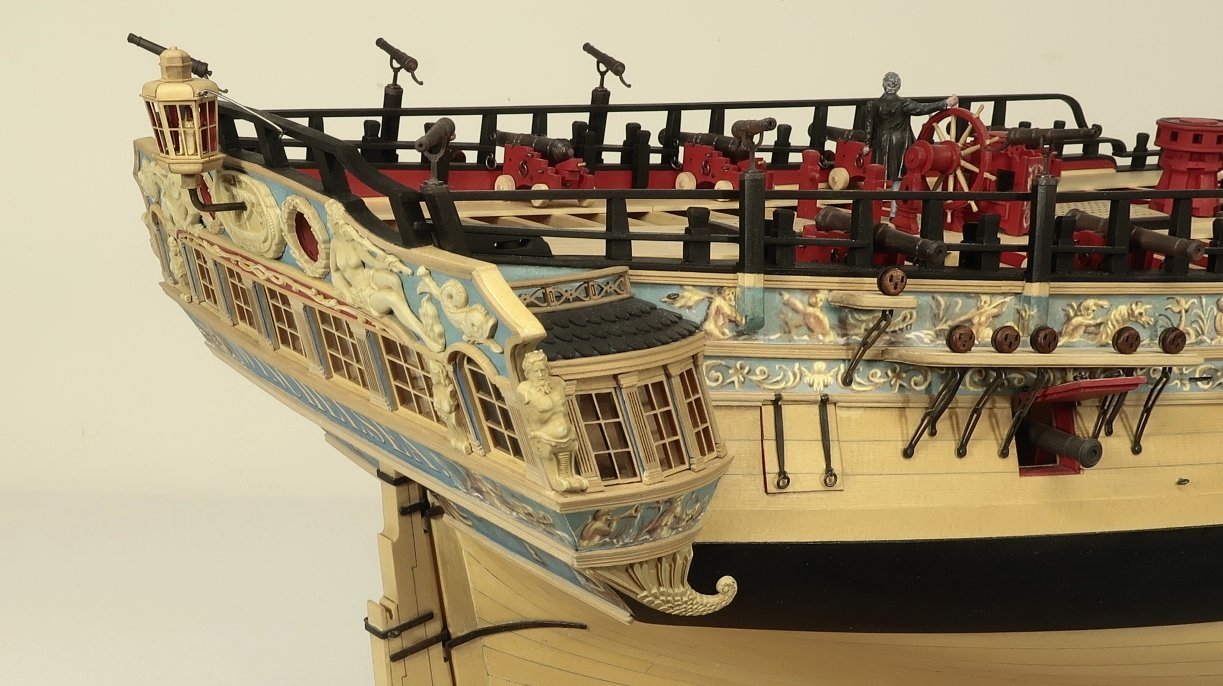
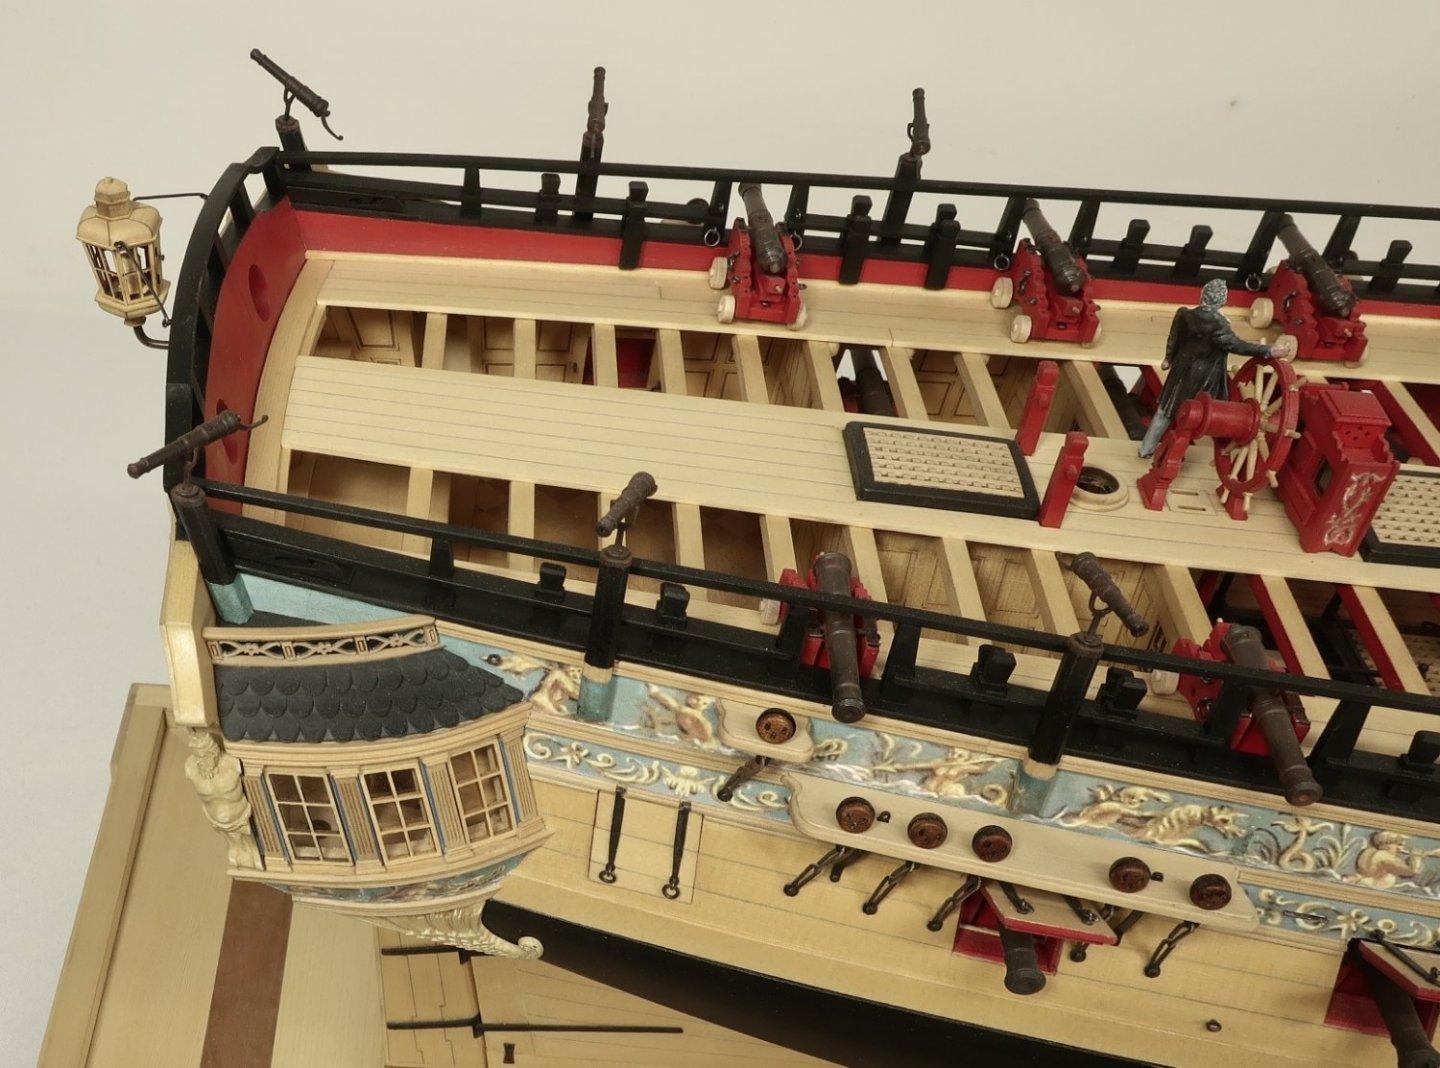
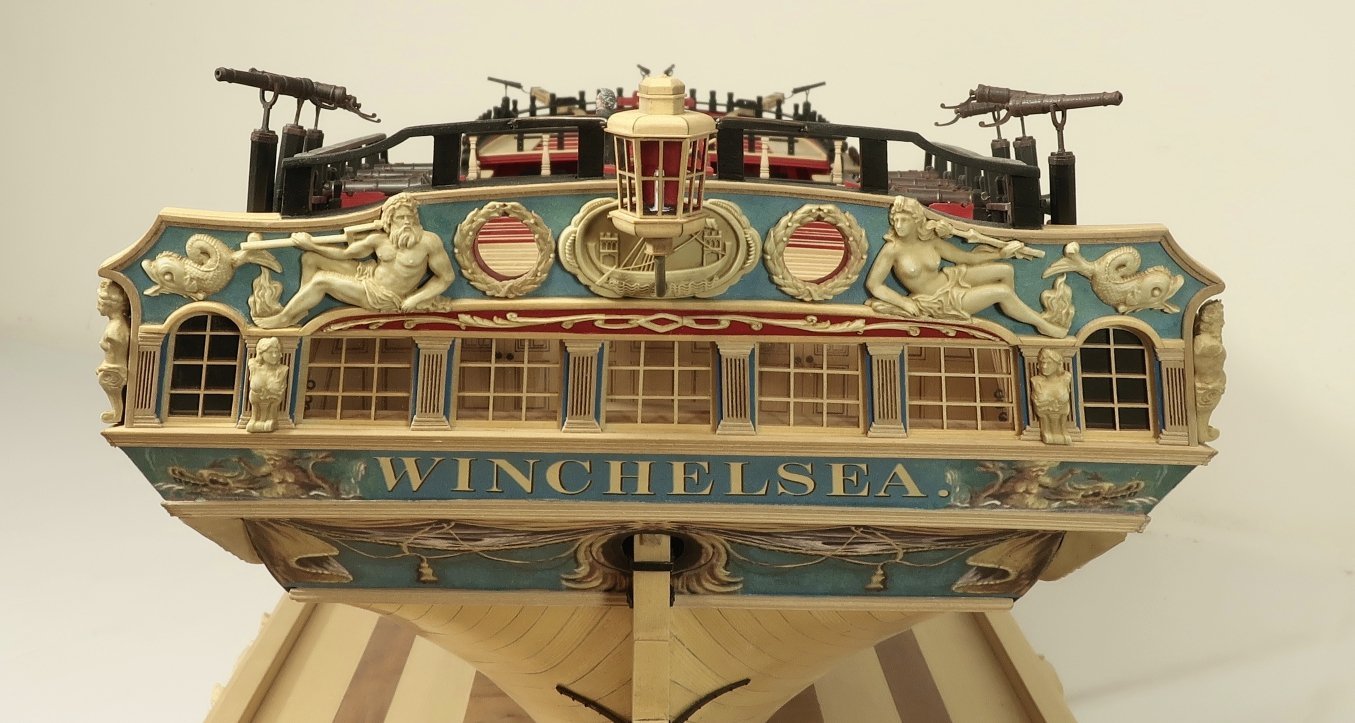
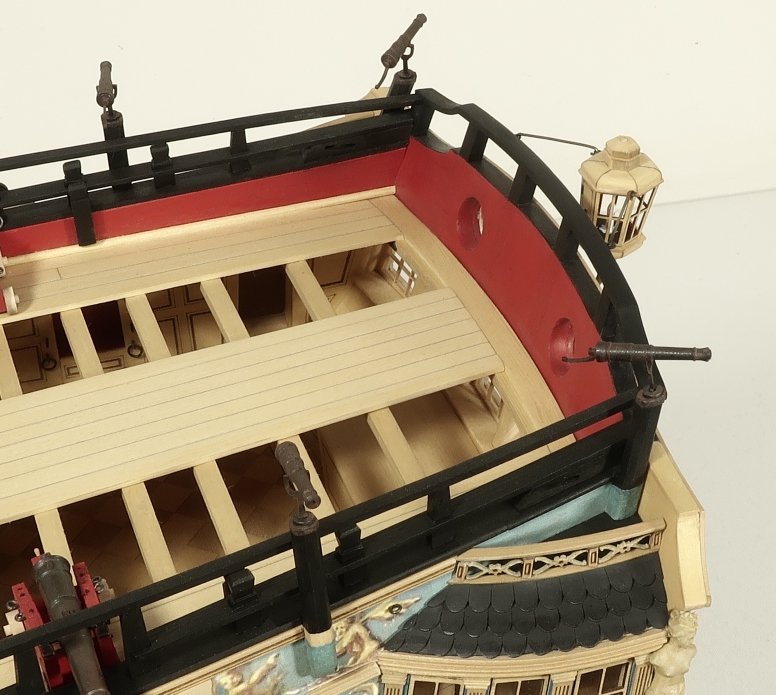
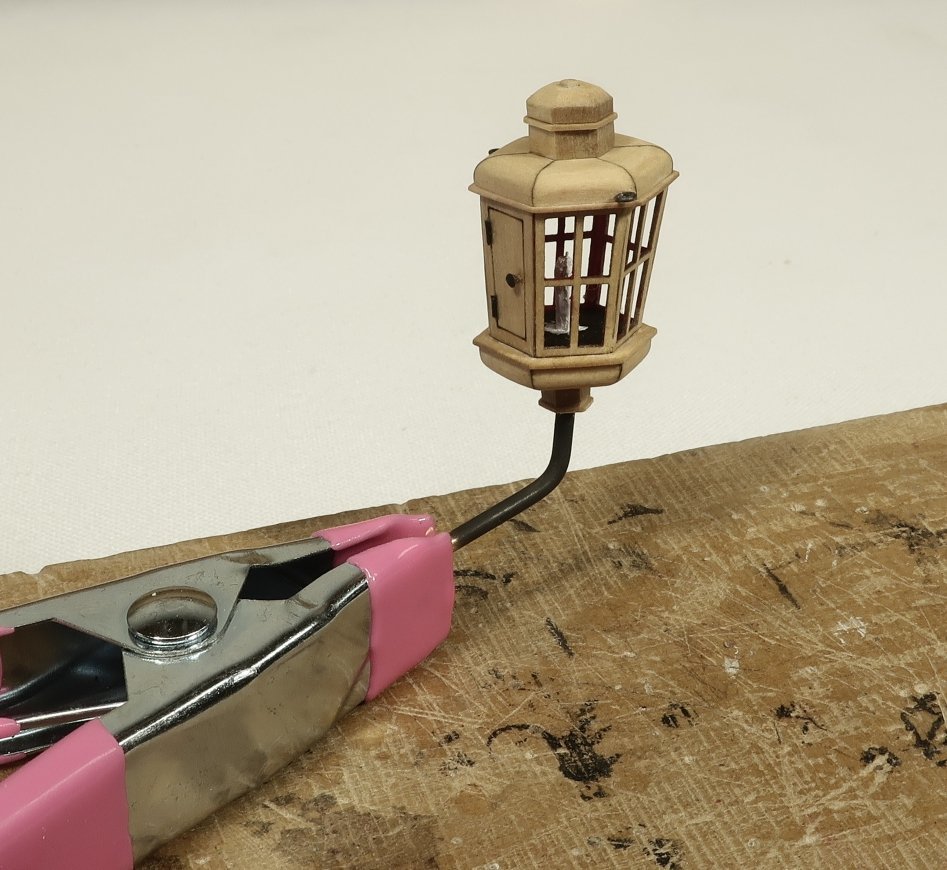
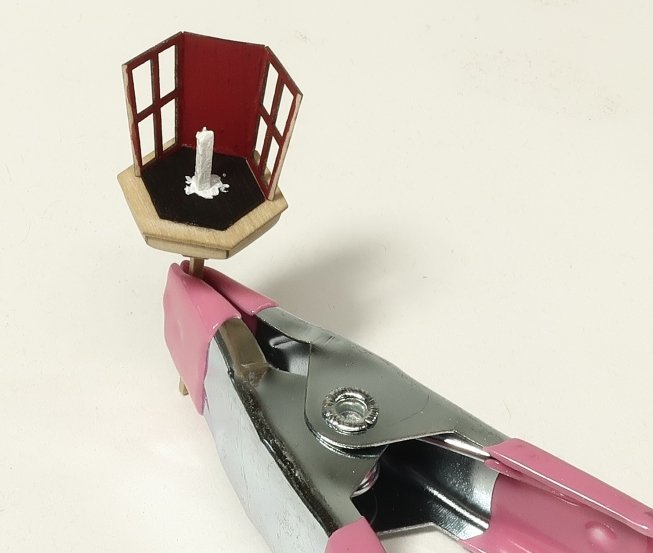
Well uh yupp!!! I decided to make an entirely new lantern. I tweaked it yet again. There were two things bugging me. Not that I wasnt happy with the old one but I know I would see those two issues for eternity. SO first I reduced the overall diameter. The heght was fine. But it was a bit to fat for my tastes. I reduced it to 95% of what it was. Just a wee bit. In addition I reworked the design to move the vent on the roof aft slightly. Previously it was in the center of the hex. That is incorrect and kept bugging me. The vent should be on the same diagonal as the aft edge or main axis of the lantern. That was challenging to design but building it is no different. Here are some photos of the revises lantern which to my eye looks more to scale and better. I hope you agree although it may difficult to see such small changes. I am my own worst enemy with this stuff. Its also higher on the transom as we spoke about. I used the contemporary models of Amazon and the princess Royal to get a good sense of the height. The door can easily swing open to service the lantern and its easily accessible. It takes a good full day to make this lantern and mount it. Although much quicker this last time around. I have made six in all. There are a lot of failures you guys dont see.
- 1,784 replies
-
- winchelsea
- Syren Ship Model Company
-
(and 1 more)
Tagged with:
-
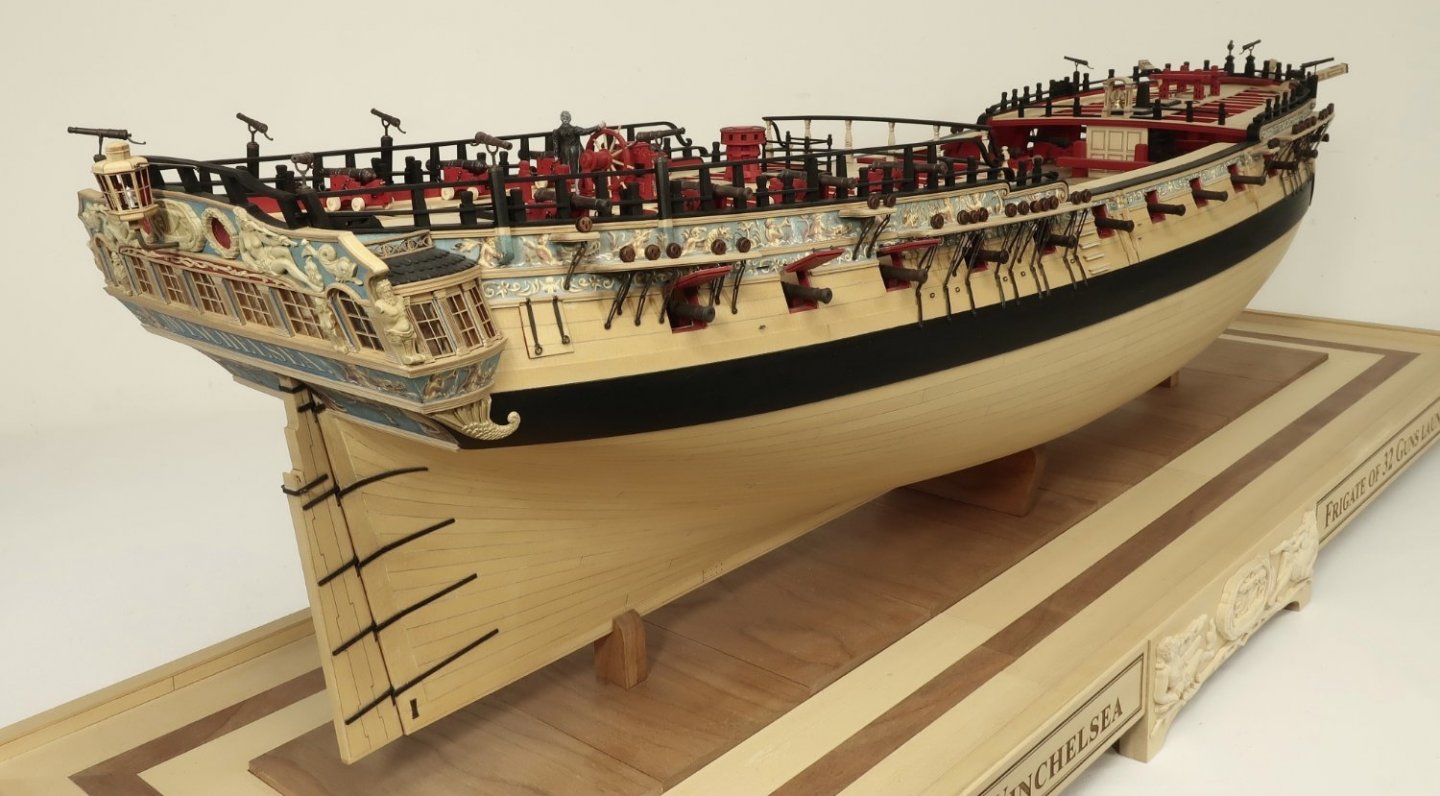
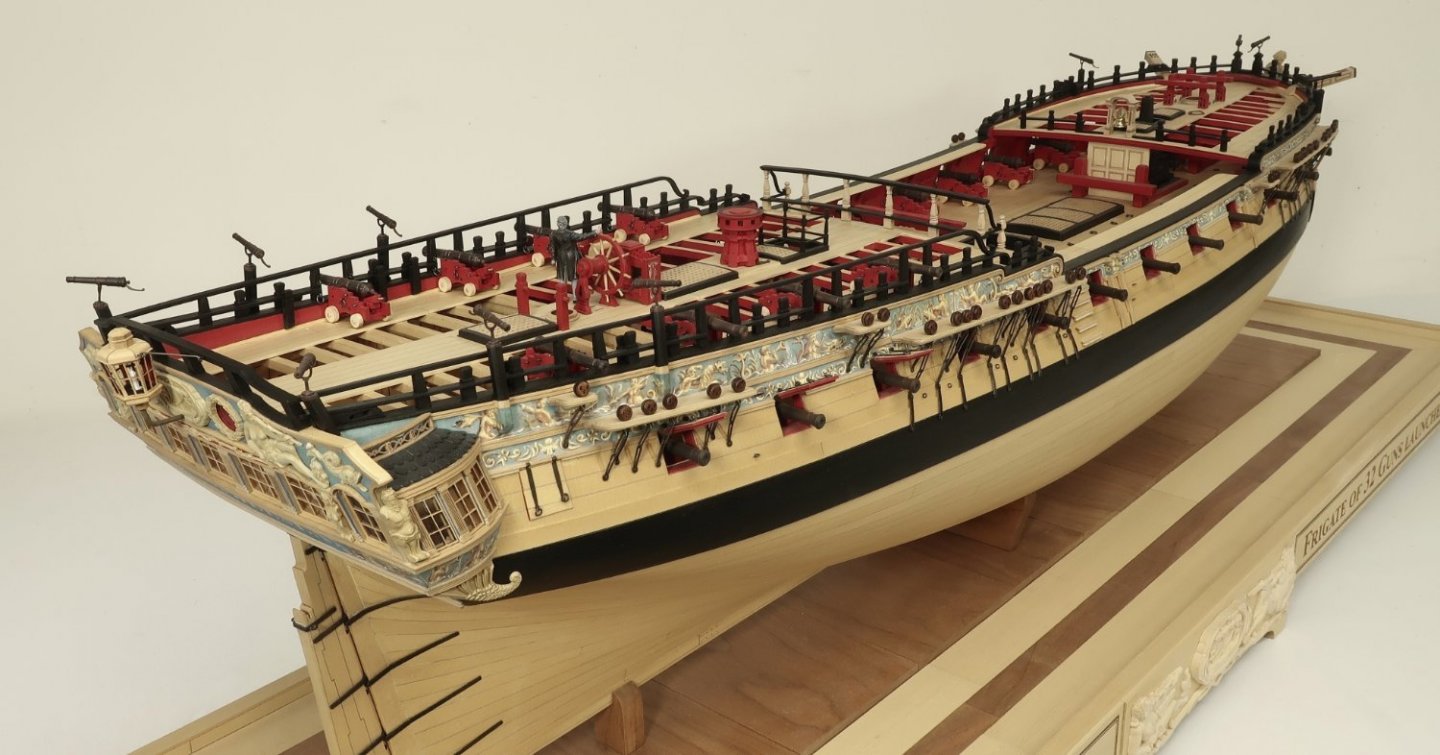
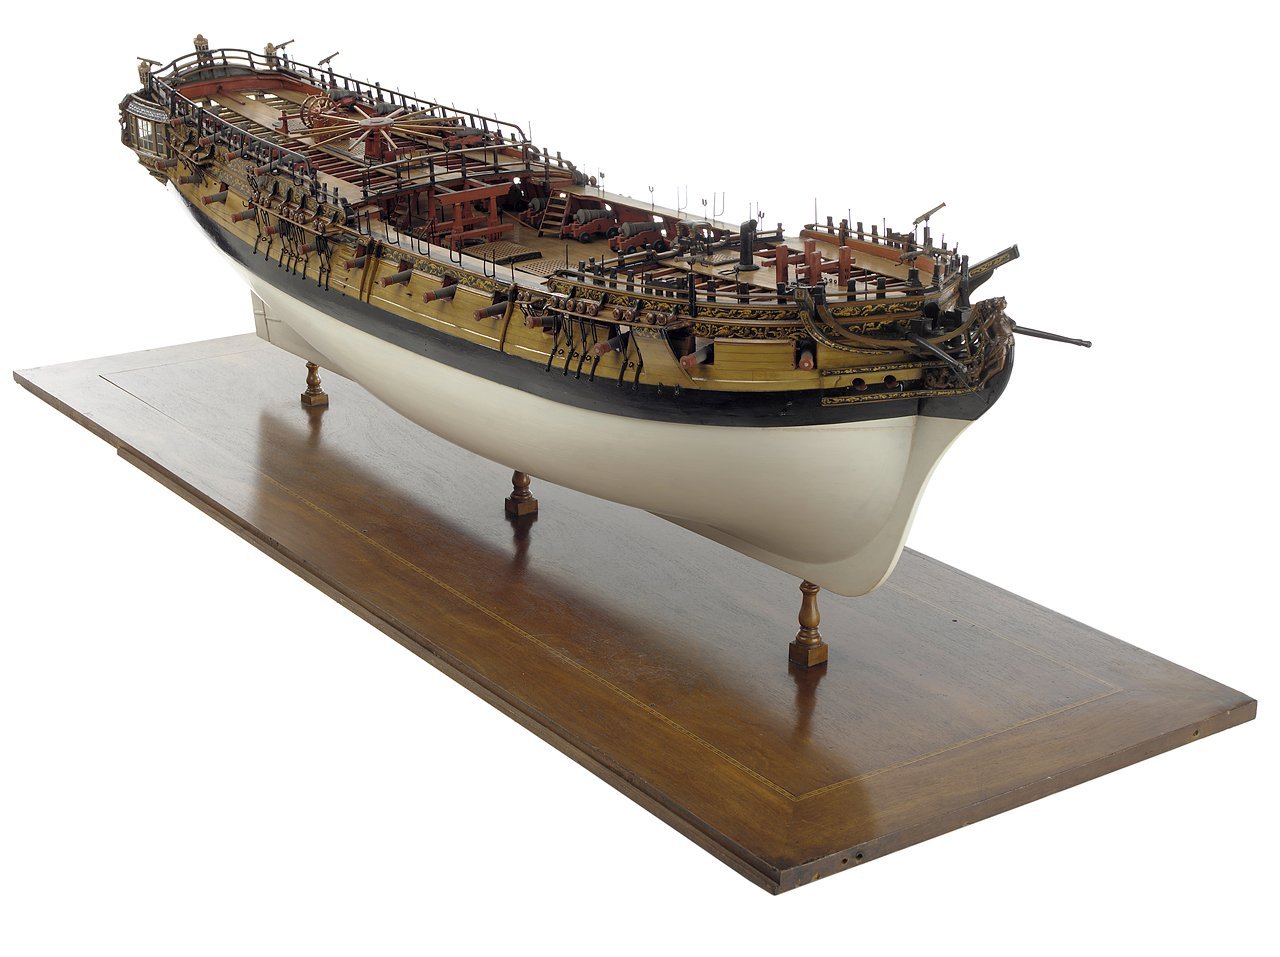
Thats cheating.... Like the Capstan and stove there are plenty of little pieces. But having this made of boxwood really does add a lot to the model if done well. That goes without saying...but for these mini kits there are two other secret weapons. They may seem obvious but it is often overlooked. First....Keep it clean....Wash your hands thoroughly first. Like you were going into surgery. Keeping tiny parts clean is so crucial. Use lots of sand paper. Meaning as soon as it gets dirty with char, throw it away. Otherwise it will just dirty up all your parts. I went through so much 400 grit sandpaper making the lantern. Removing the char carefully without getting it on my fingers and spreading it around. Second....magnification....when making these small fittings I use the strongest magnification possible. You can only see when its 5" in front of you and this helps a lot. Great for tight joints on small parts and keeping your parts clean. The lantern probably should have been a bit higher but I couldnt bring myself to drill through the boat carving on the stern. I drilled for the bracket through the water instead. This proved to be a mistake after looking at it for a while. So since these pictures were taken I moved the lantern higher and filled the hole in the carving. Its much better now. And you cant tell I ever hesitated. I have a ton more construction photos and will be processing them soon. But while working on the model I have now fallen so far behind with rope making and other parts I will be very busy for the next week. So no more building for me. But this just leaves the headwork. From the photos of the hull above that is pretty much what the finished hull will look like since you cant see the headrails arent completed. I have to write chapter 11 as well. Chuck
- 1,784 replies
-
- winchelsea
- Syren Ship Model Company
-
(and 1 more)
Tagged with:
-
The stern lantern is a reworked example of what I currently sell as a mini kit. This one is tweaked a bit but the same concept. I wanted to try my hand at a fully wooden lantern which means this new mini-kit is all boxwood. It is delicate. The old one will look the same but it is made with laserboard elements. Its your choice really. The older version will have to be painted or use the windsor and Newton Markers. I will detail the process to make the new version.....here is the plan... There is a secret to making these neatly and cleanly!!! Want to know what that secret is?
- 1,784 replies
-
- winchelsea
- Syren Ship Model Company
-
(and 1 more)
Tagged with:
-
Im tending to agree with you and it could always be one of those things that anyone could add on their own and make their model more unique. I think the barge on spare topmasts may be enough.
- 1,784 replies
-
- winchelsea
- Syren Ship Model Company
-
(and 1 more)
Tagged with:
-
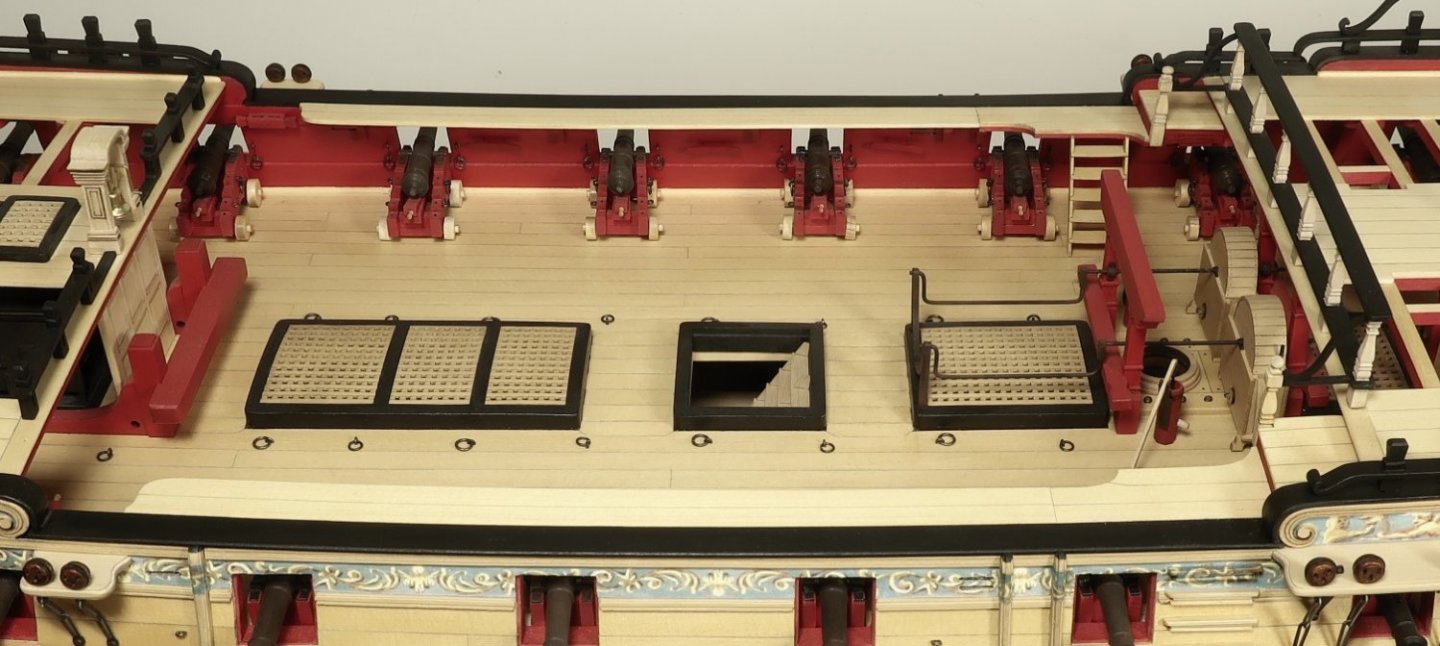
Thanks guys...I am having a struggle with deciding how much else to add in the waist. Should I add boarding stanchions or the skid beam crutches? They might look out of place. I was planning on mounting the barge on two spare topmasts and it may look odd with empty skid beam crutches. It may look even more odd with the skid beams and too busy. I am not sure how to proceed but will skip ahead to the chapter12 and start work on the stern lantern next. I dont like adding stuff just for the sake of adding it. Especially if it makes the model look over crowded and too busy. The contemporary model is so clean without them. In fact it doesnt even show the gangboards. We shall see. If I follow Amazon it will get so busy with hammock cranes and all the stanchions. Might be tricky adding the cranes along the qdeck caprail now that the rail is completed as well. The ships barge may be plenty enough on those spare topmasts.
- 1,784 replies
-
- winchelsea
- Syren Ship Model Company
-
(and 1 more)
Tagged with:
-
- 1,784 replies
-
- winchelsea
- Syren Ship Model Company
-
(and 1 more)
Tagged with:
About us
Modelshipworld - Advancing Ship Modeling through Research
SSL Secured
Your security is important for us so this Website is SSL-Secured
NRG Mailing Address
Nautical Research Guild
237 South Lincoln Street
Westmont IL, 60559-1917
Model Ship World ® and the MSW logo are Registered Trademarks, and belong to the Nautical Research Guild (United States Patent and Trademark Office: No. 6,929,264 & No. 6,929,274, registered Dec. 20, 2022)
Helpful Links
About the NRG
If you enjoy building ship models that are historically accurate as well as beautiful, then The Nautical Research Guild (NRG) is just right for you.
The Guild is a non-profit educational organization whose mission is to “Advance Ship Modeling Through Research”. We provide support to our members in their efforts to raise the quality of their model ships.
The Nautical Research Guild has published our world-renowned quarterly magazine, The Nautical Research Journal, since 1955. The pages of the Journal are full of articles by accomplished ship modelers who show you how they create those exquisite details on their models, and by maritime historians who show you the correct details to build. The Journal is available in both print and digital editions. Go to the NRG web site (www.thenrg.org) to download a complimentary digital copy of the Journal. The NRG also publishes plan sets, books and compilations of back issues of the Journal and the former Ships in Scale and Model Ship Builder magazines.


