HOLIDAY DONATION DRIVE - SUPPORT MSW - DO YOUR PART TO KEEP THIS GREAT FORUM GOING! (Only 36 donations so far out of 49,000 members - C'mon guys!)
×


Chuck
-
Posts
9,660 -
Joined
-
Last visited
Content Type
Profiles
Forums
Gallery
Events
Everything posted by Chuck
-
 Your care and attention at the stern will pay off in dividends later. You will be rewarded for getting it right.
 -
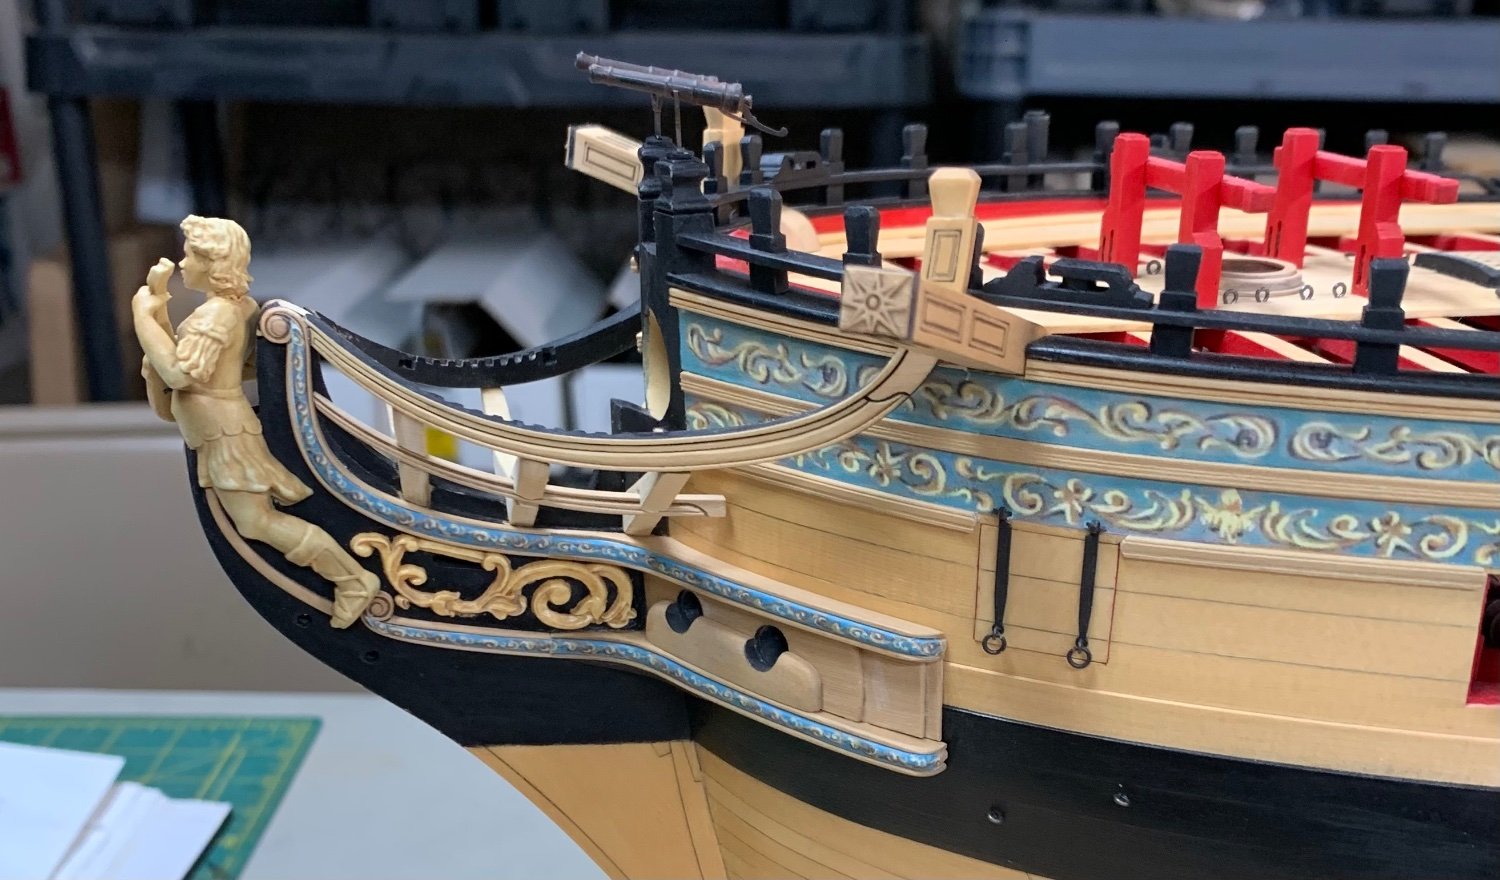
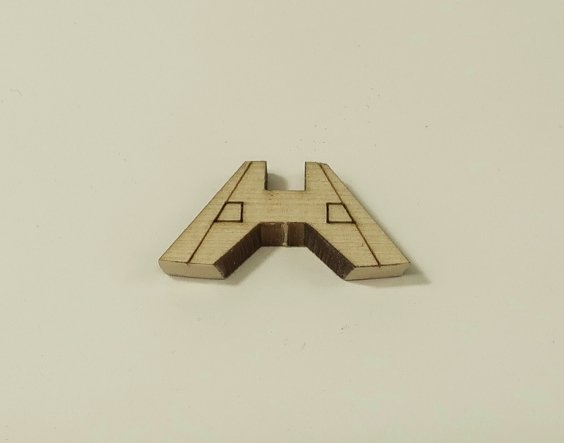
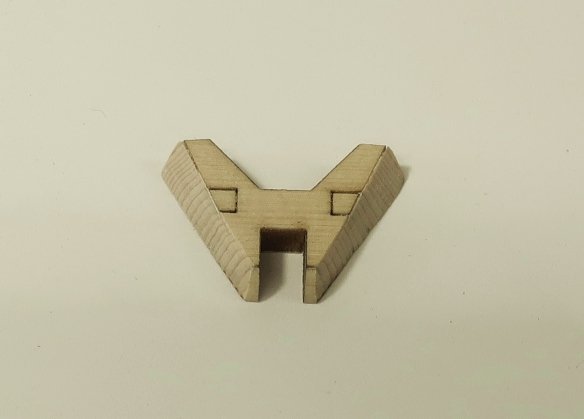
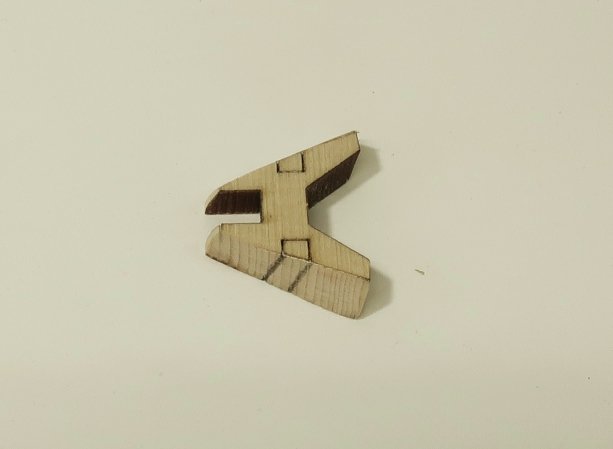
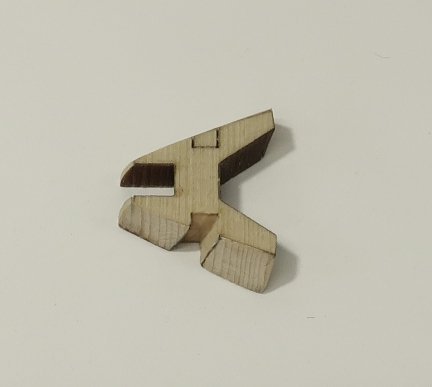
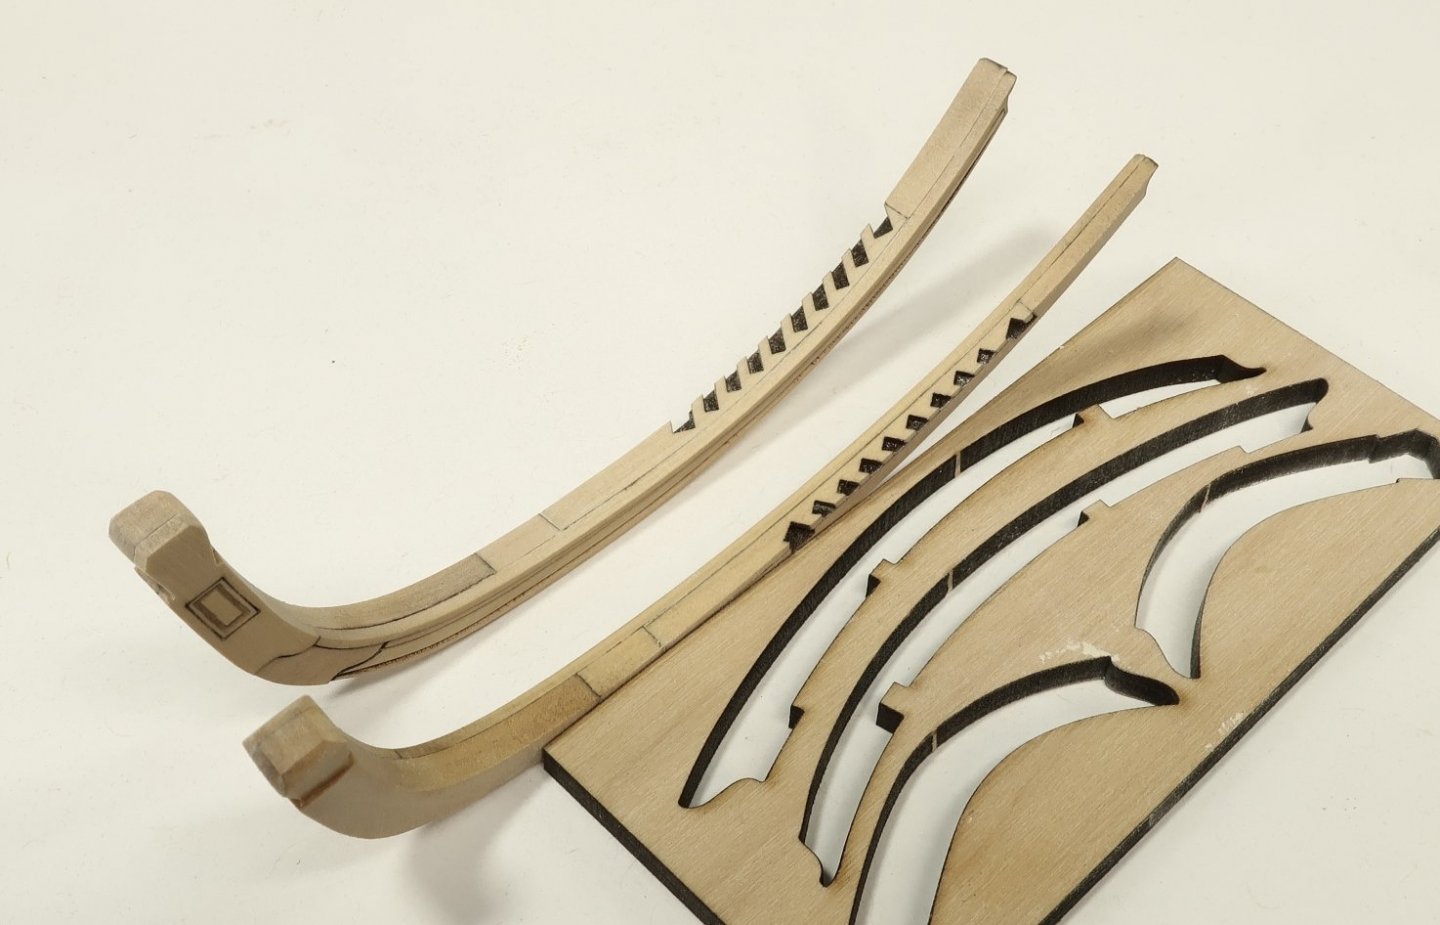
I have completed the prototype for the cathead support knee. This knee is directly under the cathead and is quite complex. It twists and turns while tapering thinner as it gracefully extends down and connects with the lower rail. The frieze follows the same look and feel as the contemporary model. This piece is kind of assembled like you guys did for the cheeks and hair brackets...if you are wondering. This will be built in two lengths. Each length is of course made up of many pieces. I will detail the assembly process soon when I make it for the other side. There will be templates laser cut to help you and assist in the shaping and positioning. Once the other side is finished I will make the fourth "half" head timber that is positioned between this and the main rail. Here are a couple of pics of the cathead support knee on the port side. I am happy with the results considering that the pieces were all laser cut. I have made these from scratch before and these seemed to come out just as good. Its the first time I tried out this concept and laser cut approach. I believe you can now start to see how the finished headwork will look. Hopefully you will agree that it doesnt look like any kit you have ever seen before.
- 1,784 replies
-
- 35
-

-

-
- winchelsea
- Syren Ship Model Company
- (and 1 more)
-
You really should taper the stem more. Not just the front 1/4". This should be a gradual taper from the aft end of the stem. It should be flat and straight so it doesnt look like a curved rounded front end for the stem. There is still plenty of time to correct that. What you have now is more of a rounded bevel than a taper. Its unlikely your figurehead will sit on the stem properly as it stands now. Chuck
- 389 replies
-
- 2
-
-
- winchelsea
- Syren Ship Model Company
- (and 1 more)
-
Really nice progress. That planking looking great.
-
That looks really good Ben. Its nice to see an update on this unique Winnie build.
- 399 replies
-
- 2
-
-
- winchelsea
- Syren Ship Model Company
- (and 1 more)
-
Nicely done. Thank you for that.
-
Much better. Its looking great.
-
Welcome to the project!!! Yes the center is flipped for that exact reason. The same concept is used throughout the model. This includes the stem parts you are about to assemble. Losing some ply wont matter that much although it may make them weaker. You may have to reinforce them at some point or just be very careful. Have fun with the project.
- 389 replies
-
- 2
-
-
- winchelsea
- Syren Ship Model Company
- (and 1 more)
-
Thanks Hoping to have chapter 11 available really soon guys. Sorry for the delay. Lots going on here in NJ. Daughter starting Med School, Selling my Aunts house after moving her to a nursing home...Spring house duties....Vacation starting next week. When I return from vacation all should be back to normal. Heading to the beach in Rhode Island and then up to Maine. All 12 of us including the kids significant others. LOL...need a break. Although with that many young people it may be tough to relax.
- 1,784 replies
-
- 11
-
-
- winchelsea
- Syren Ship Model Company
- (and 1 more)
-
That was the plan…that should be the goal of all kit makers. Sadly most fall horribly short.
- 1,784 replies
-
- 6
-
-
- winchelsea
- Syren Ship Model Company
- (and 1 more)
-
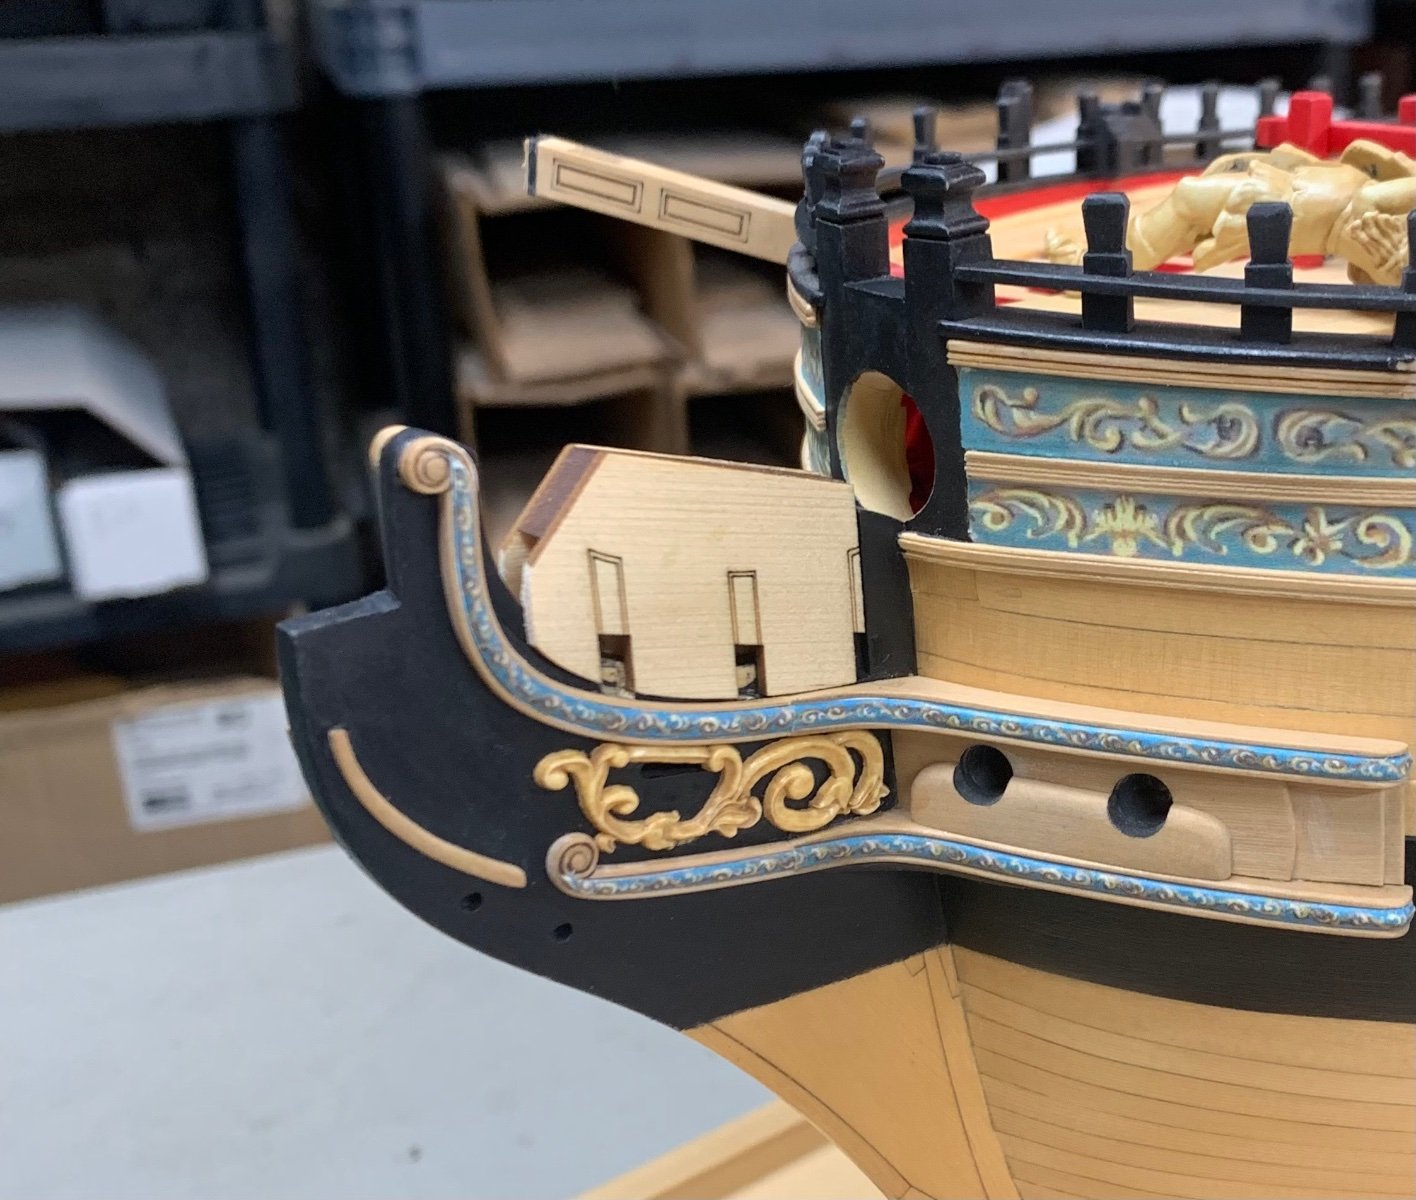
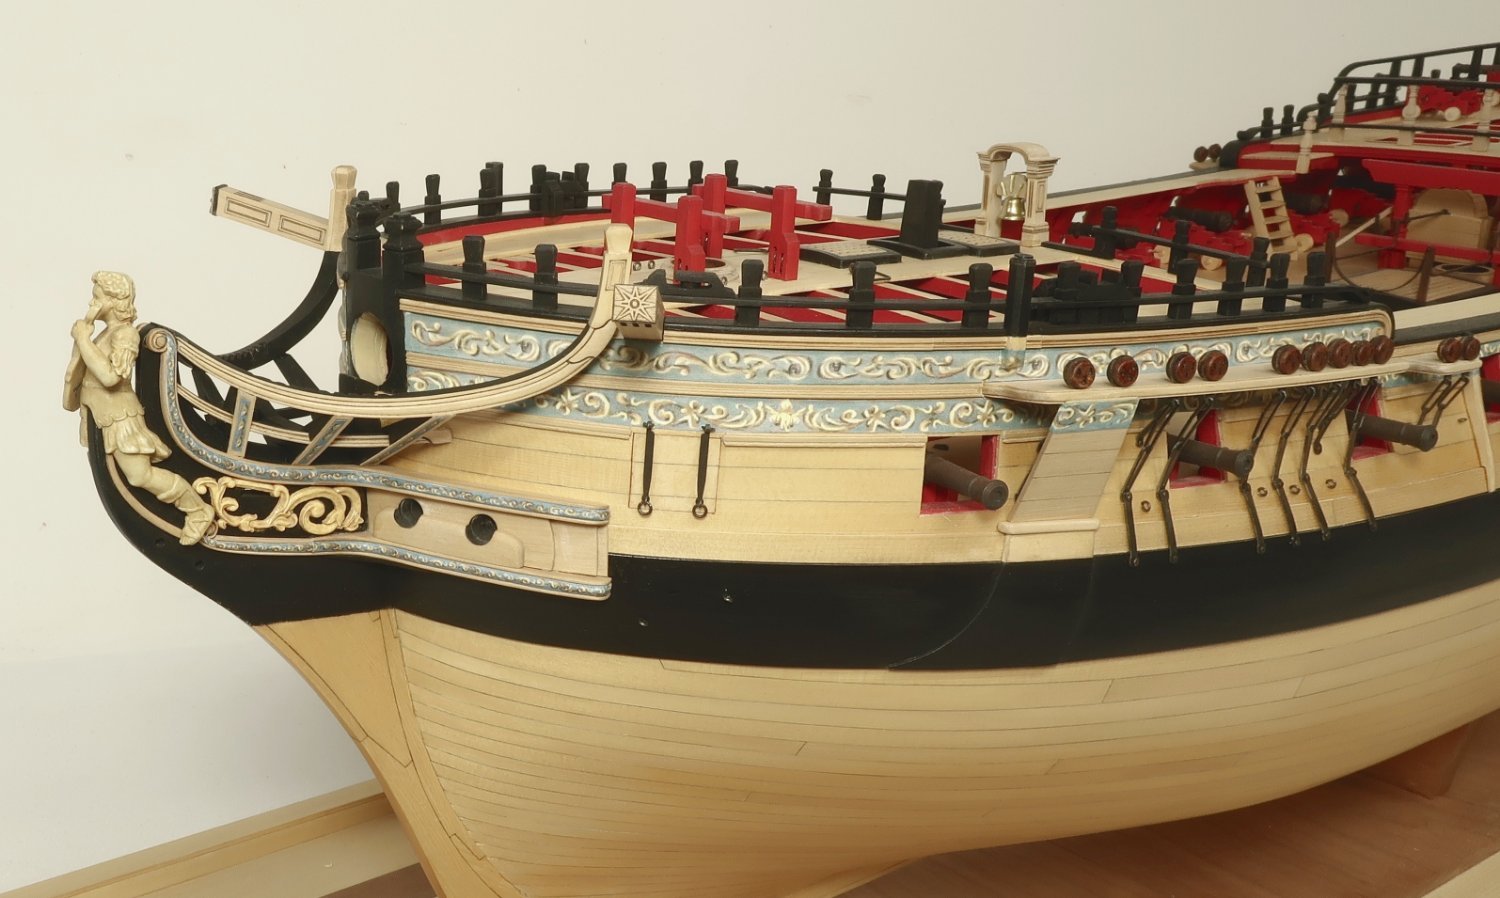
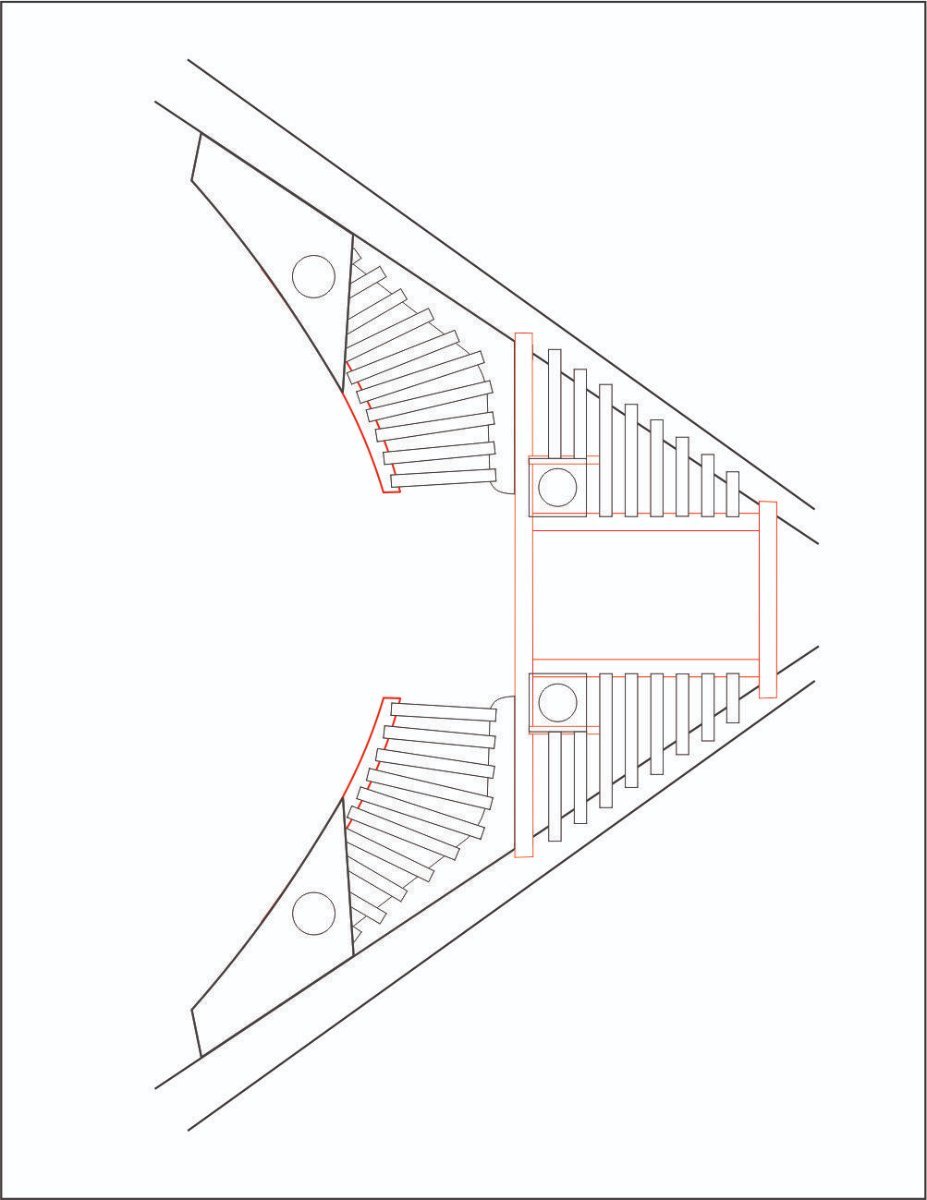
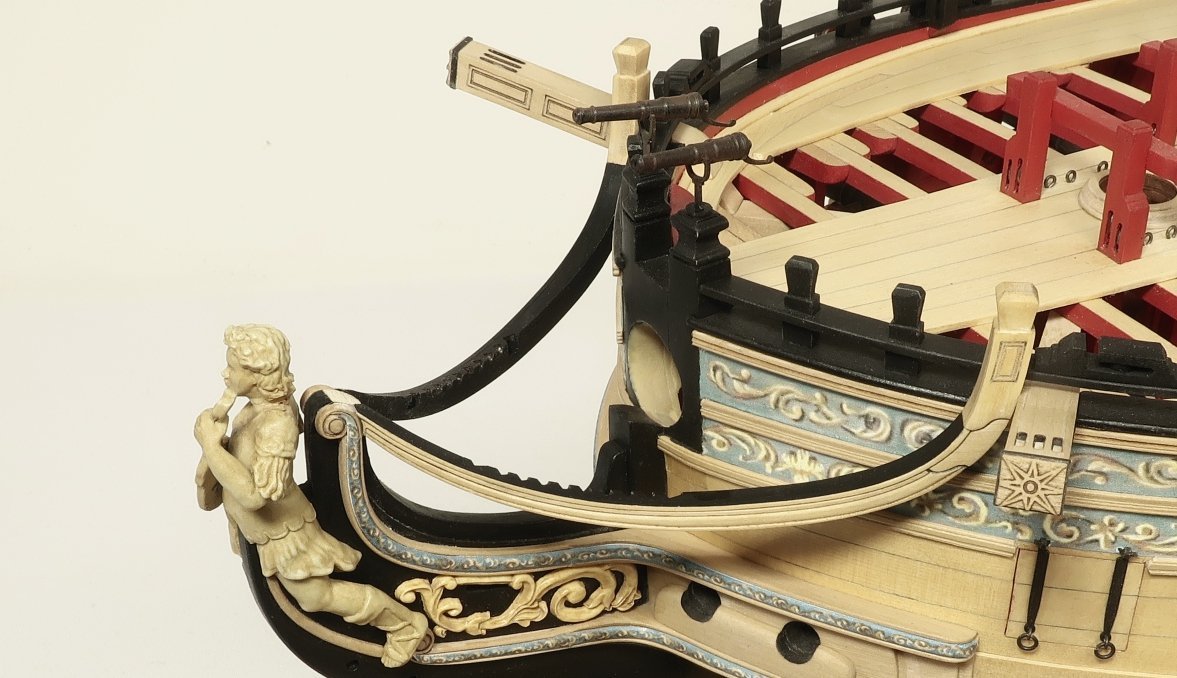
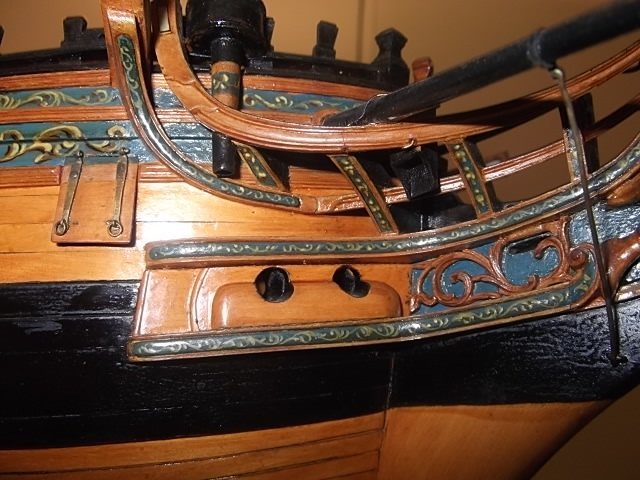
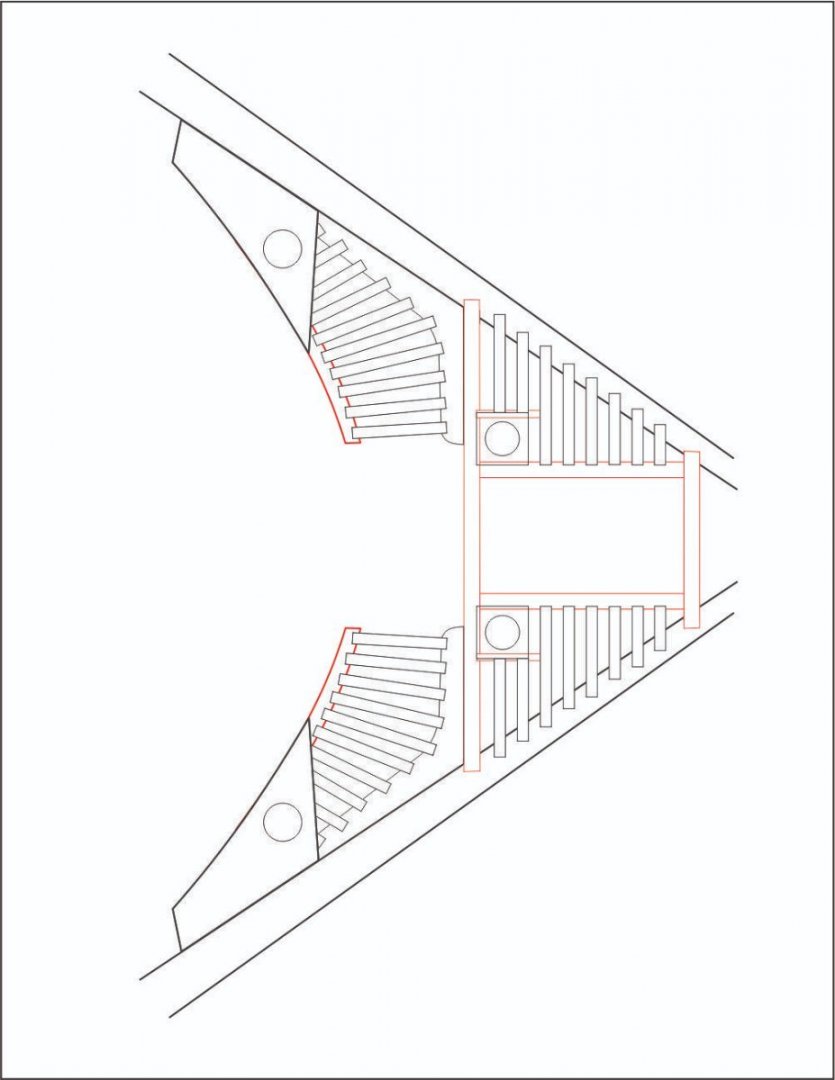
So a quick recap...Proceeding with headwork. First.... Use the handy jig I showed you to mark the locations of the first 3 head timbers. Second... Build the two main head rails as I described in length. Test these on the model but dont glue them in position. You will need to test them and retest them and retest them as you shape the head timbers next. Third....shape and test your head timbers... Rubber cement is your friend. You will need to temporarily position all of these elements while shaping the head timbers. Rubber cement works well for this and is easily removed by rubbing it off with your fingers. Here is a photo of the three head timbers ready for shaping. They are laser cut and etched on both sides. There are laser etched reference marks on both sides to help you shape them...In the photo below you can see both sides of each timber with their etched reference lines. Start by sanding both sides clean and dusting them off to reveal the etched lines more clearly. Then start shaping the first, smaller head timber. All three are shaped in the same way. Begin by sanding the bevels indicated on the top and bottom of the head timber. This is needed to establish the correct slope (for and aft) so you can slide this first head timber over the stem knee and test it. You can go ahead and test it. You may well be adjusting the angles from time to time as we proceed through all three head timbers. If you have to widen or deepen the slot in the head timber so it sits directly down onto the stem and hair brackets you can do that. This photo shows the top and bottom beveled to the reference line. Next, Sand/carve the sides of the head timber up to the reference line. Keep the surface or face of the head timber flat when doing so. This is needed so the cover boards will sit in position neatly later on. Next...the dreaded notches for the lower rail... These are etched onto both sides. But they are not in the same position. To make filing this notch easier, and so you get a sense of the crazy angle you will need...go ahead and draw the width of the notch along the side of the head timber. Basically connect them with a reference line using the laser etched notches on both sides with a pencil. See below. Does this make sense??? This notch is not only angled but it is deeper on one side than the other to accommodate the angle of the lower rail. If not for anything else, this will help you gain an understanding of the complexity of these rails. Many compound angles exist. You may want to make them slightly wider/deeper as the lower rail is 1/16" thick. Making them slightly wider gives you some wiggle room on the lower rail without having to make these notches super huge. That is usually the case on most kits. It looks horrible. See below, one side is completed. Once finished with it, sand off any remaining laser char and paint the entire head timber black. Test it on the model and also test the main rail on top of it. Adjust the angles a bit if needed. Proceed with the same process on the two remaining head timbers. Test and retest and retest.....really. My head timbers started out perfectly vertical when testing them on the model but as I started to test the second and third head timber these were adjusted. There are a lot of optical illusions which you will find yourself compensating for. Just keep testing until all three head timbers fit while the main rails sits properly on top of them. What you see below is just a test fitting. Nothing is glued into position yet. Yes I did go ahead and make the lower rail at this time also. You can do that. Its just a matter of sanding off the char and rounding off the outside edges. I also ran some sandpaper down the fancy grooves to clean them up a bit. It removed some of the char from the laser etching and enhanced the fancy molding appearance. A few notations..... Note: The top, bottom edges and back side of the lower rail will be painted black as well. But do a lot testing first. The lower rail is cut slightly longer than needed so you can adjust to fit you model. Note: The aft side of the lower rail is beveled to sit flush against the hull. Note: The top of the stem has been sanded down flush with the hairbracket scroll and main rail. We will be gluing a bolster here soon. Note: The lower rail sits comfortably in the notches of each head timber but the notches are NOT too big. The lower rail does indeed sit in those notches deep enough that the cover boards will sit flat on the outside face of each head timber. If they stick out and stand proud you should adjust your notches to suit. Note: that the outside faces of each head timber as tested above are NOT flush with the bottom edge of main rail. They need to be inset a bit to accommodate the cover boards we will add shortly. Otherwise the cover boards will stick out and sand proud of the main rail which is not correct. When you are 100% satisfied with the test fitting of all these elements, you can paint it all as described. The inside of the head work is all black. Fill any gaps and glue everything into position permanently. Cover boards and bolster below. Thats it....nothing to it.... Here is a shot of the inside of the head work so far. Everything painted black and neat and tidy. Note the black laser cut bolster now glued to the front/top of the head rails. It is laserboard. Just trim it if you need to so it fits and glue it on top. It will hide all of those joints if they didnt meet your standards so no worries there. You can even sand the interior sides of the head timbers at this point to bevel them if you want and make them cleaner then touch up the black paint. Most of that wont be seen however under the head gratings. The cover boards are laser cut for you and have a laser etched and recessed center. They are very thin and should be glued onto the outside faces of the head timbers. Make any adjustments before gluing them on. The friezes were glued onto them before they were positioned permanently. Note how they are finally flush with the outside lower edge of the main rail which is what you are shooting for. Yes you will have plenty of paint touch up as I now have. I recommend that you remove the figurehead and swivel guns while doing this work. Examine the rails and headwork at multiple angles as you proceed and make any adjustments....no matter how small. Just take you time. I know its a bit involved and not like any other kit on the market but then again you wont see results like this on any other kit on the market. You will have questions trust me so feel free to ask when you get to these. Yes spare parts for these elements will be available. Go slow and be methodical. Test a lot. Ask a lot of questions...and study....really study the images of the contemporary model. I know I may have forgotten some details but we will address them all as time goes by. Next the cathead support knee and connecting with the lower rail.


- 1,784 replies
-
- 35
-
-
-
- winchelsea
- Syren Ship Model Company
- (and 1 more)
-
Dave....How is progress coming along?
-
Fine work!!!
-
Lovely work on the headrails. I am working on mine as I wrote this so I know what a task it is. Your head work looks fantastic.
-
That looks very good.....but it all looks very shiny and glossy.
-
That is a nice start. Yes she is a big boy!!! Its literally almost the same size as the Winnie in 1/4" scale. The winnie is 930mm long. You will love working at the larger scale. Its a luxury really. Chuck
- 488 replies
-
- 16
-
-
- Indefatigable
- Vanguard Models
- (and 1 more)
-
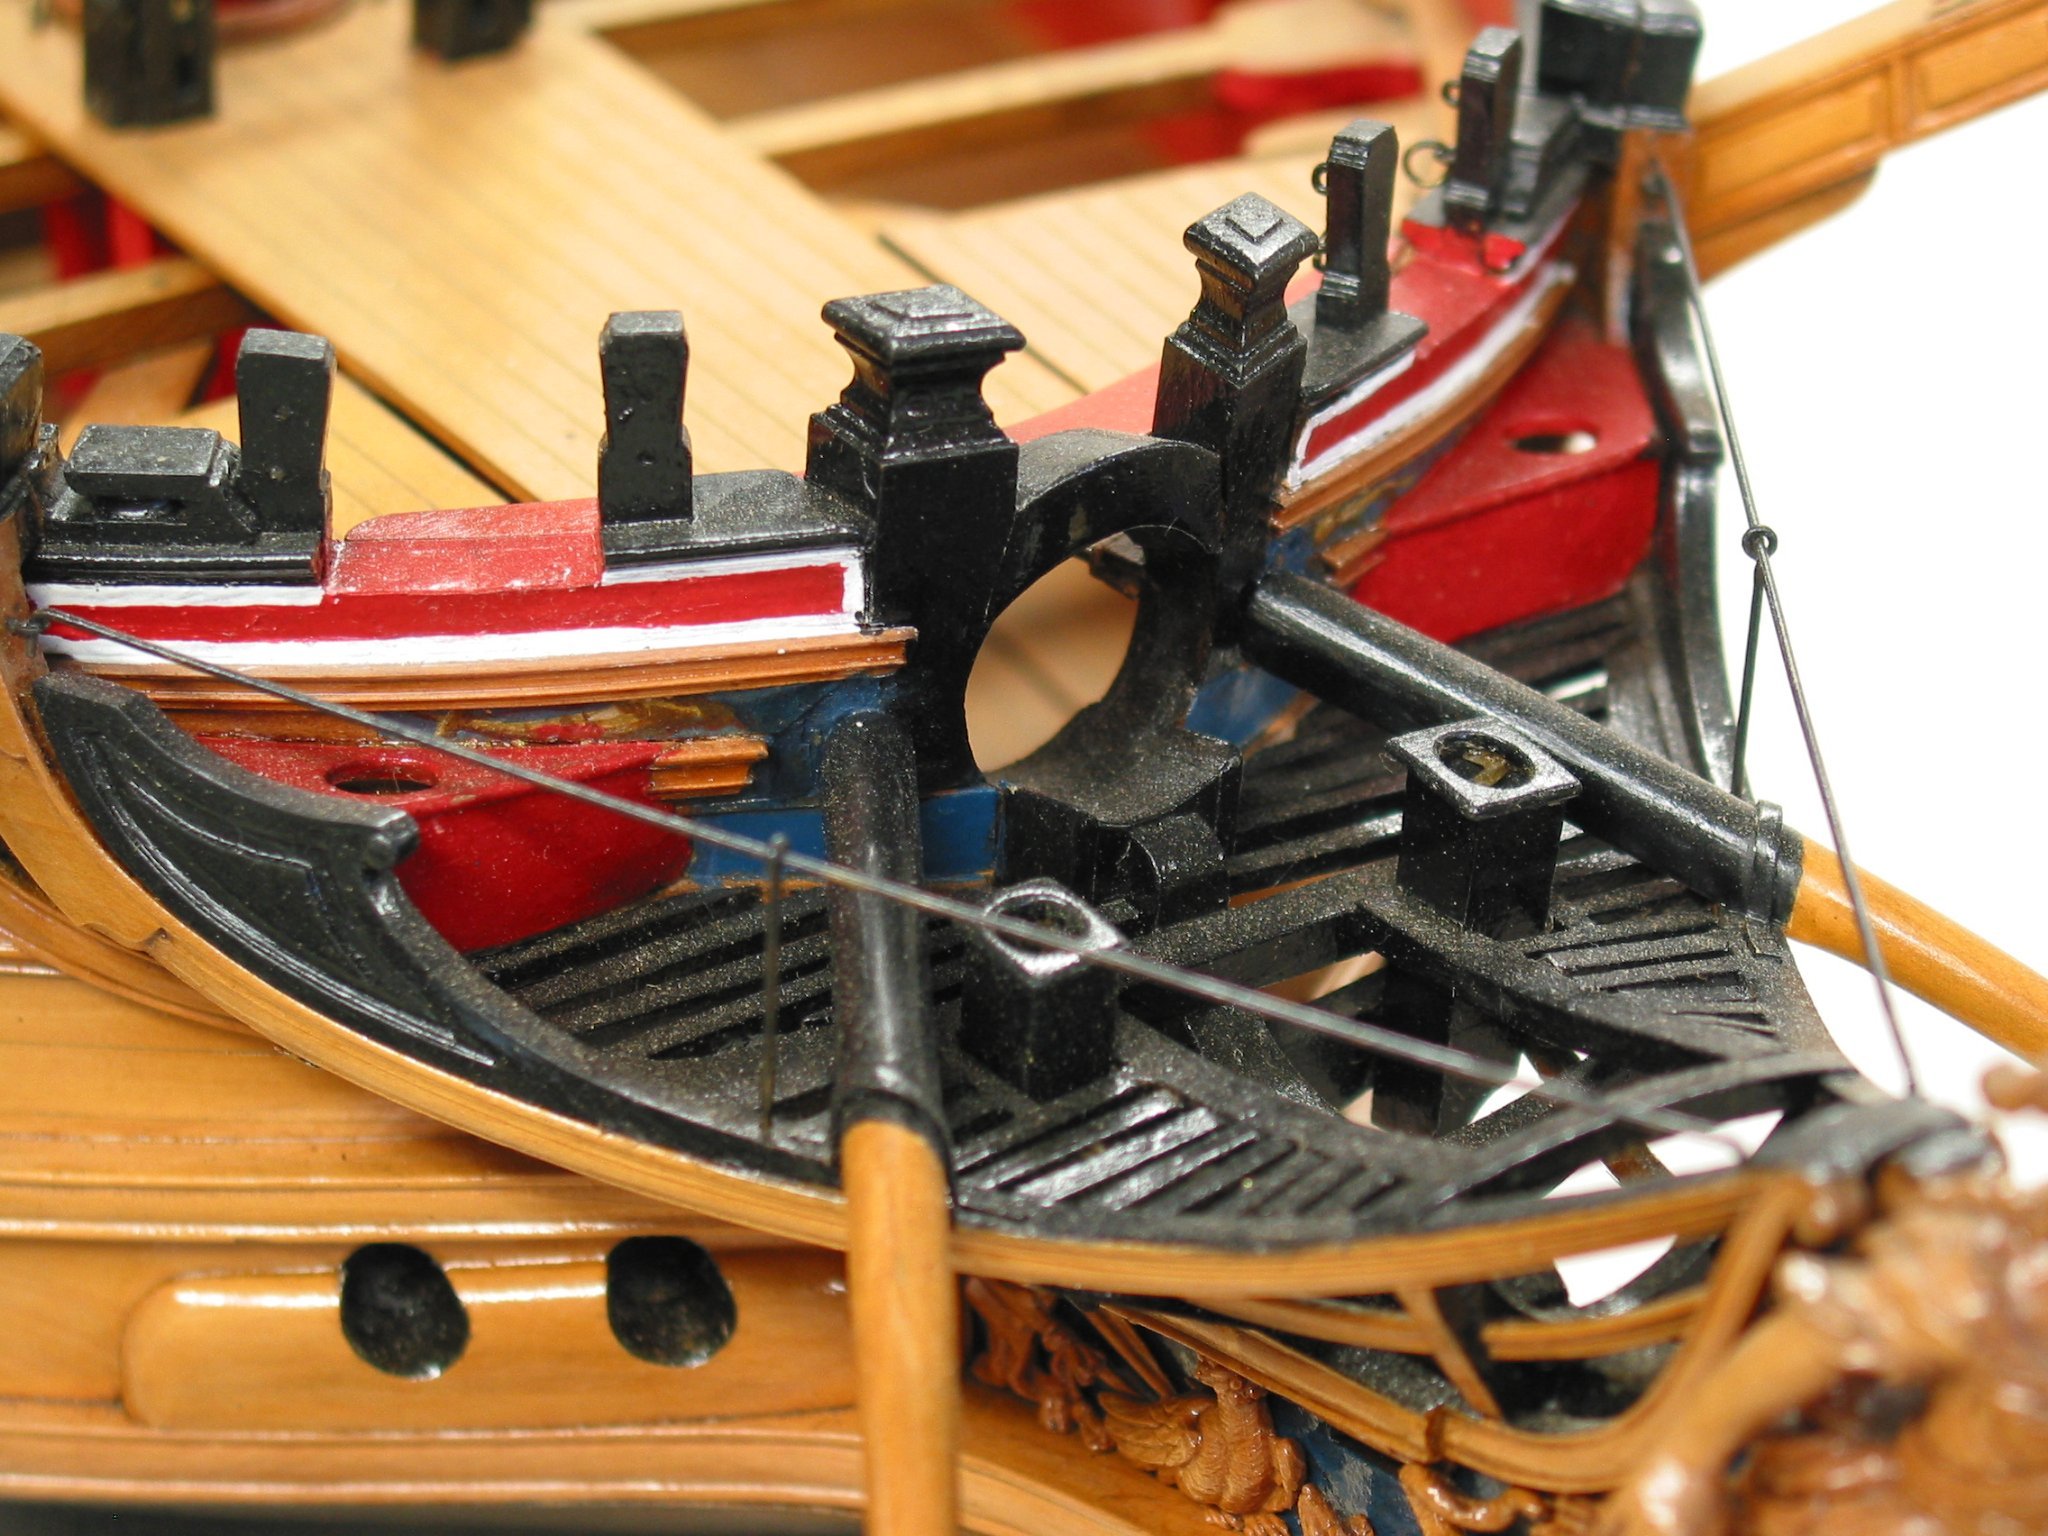
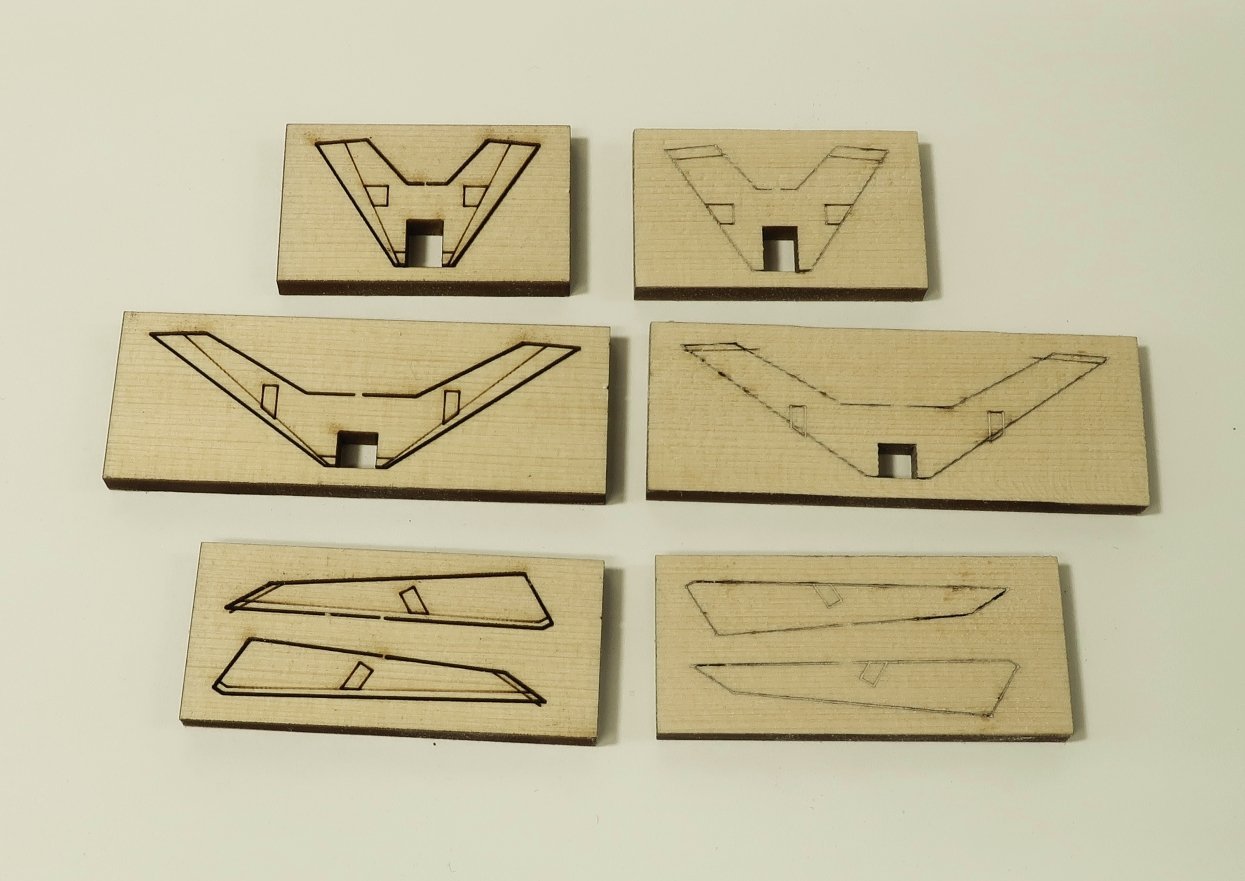
That is my thought as well. here is a photo of the jig you will use to find the locations for the headtimbers. it is laser cut in three pieces with the center being 5/32” thick. Its the same thickness as the knee of the head and will slip over the top and sit against stem. Mark the locations of the head timbers and also chisel away the stem if needed so you can slip the head timbers in position down to the top of the hair bracket. You might be able to see how I did this but the paint is also warn away from me slipping the head timbers on off while testing and retesting. Something you will have to do as you shape all of the headrail parts.
- 1,784 replies
-
- 17
-
-
- winchelsea
- Syren Ship Model Company
- (and 1 more)
-
Im referring to the seat/pissdale on the bulwarks. The one with the long tube hanging tube below it. We wont be modeling that and will instead be building similar to those in red shown on the Minerva. Including adding a false rail which was more common.

- 1,784 replies
-
- 5
-
-
- winchelsea
- Syren Ship Model Company
- (and 1 more)
-
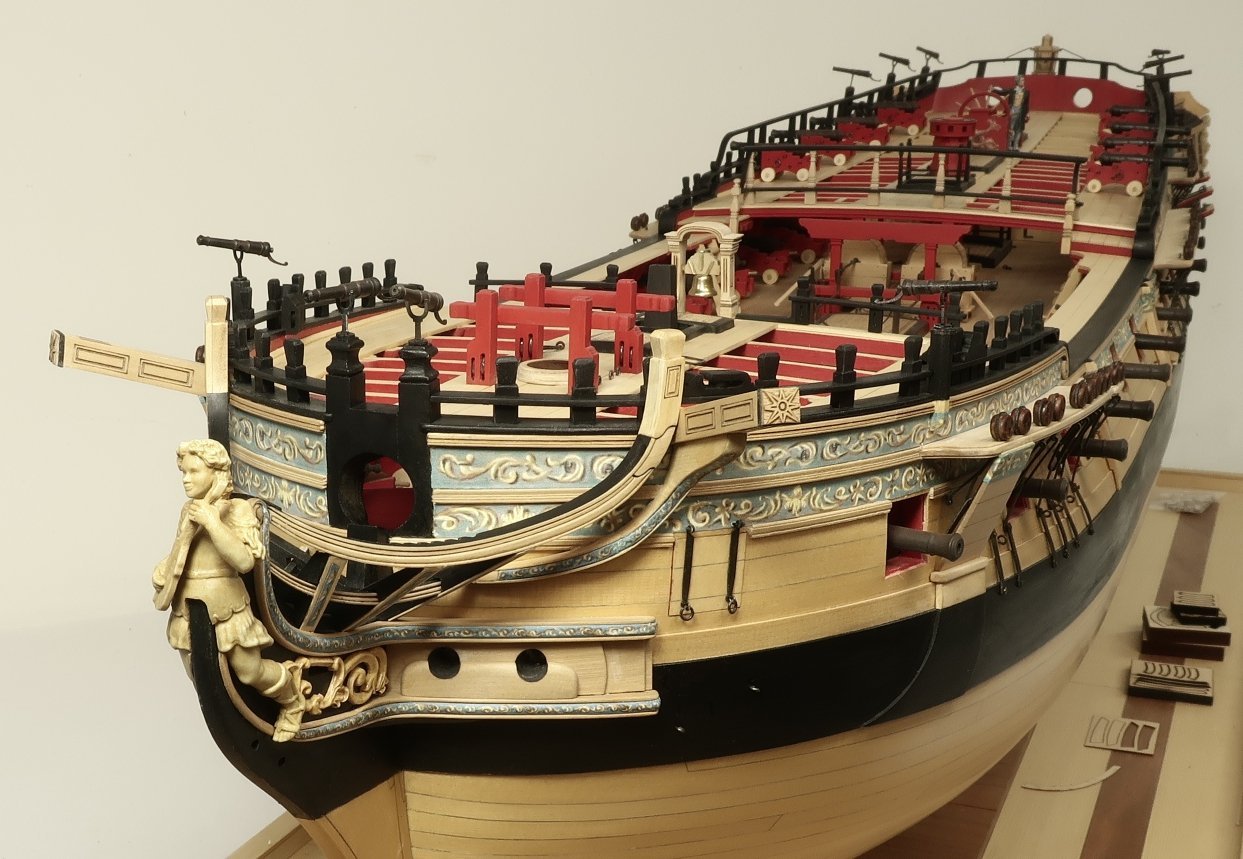
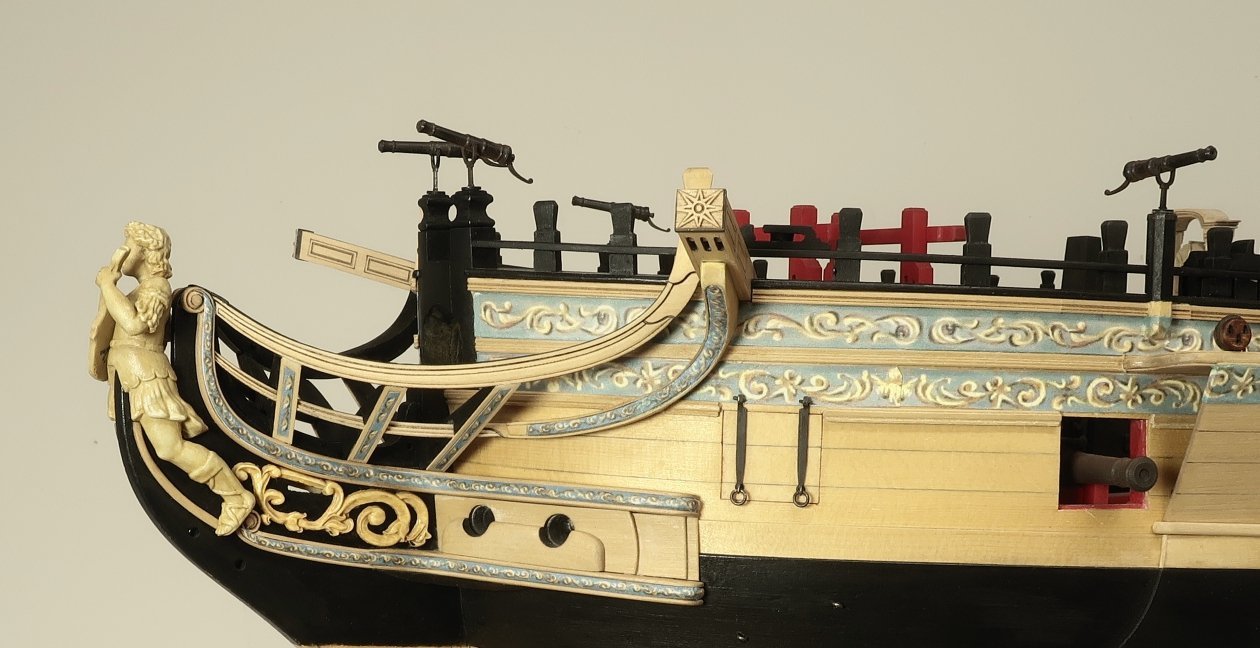
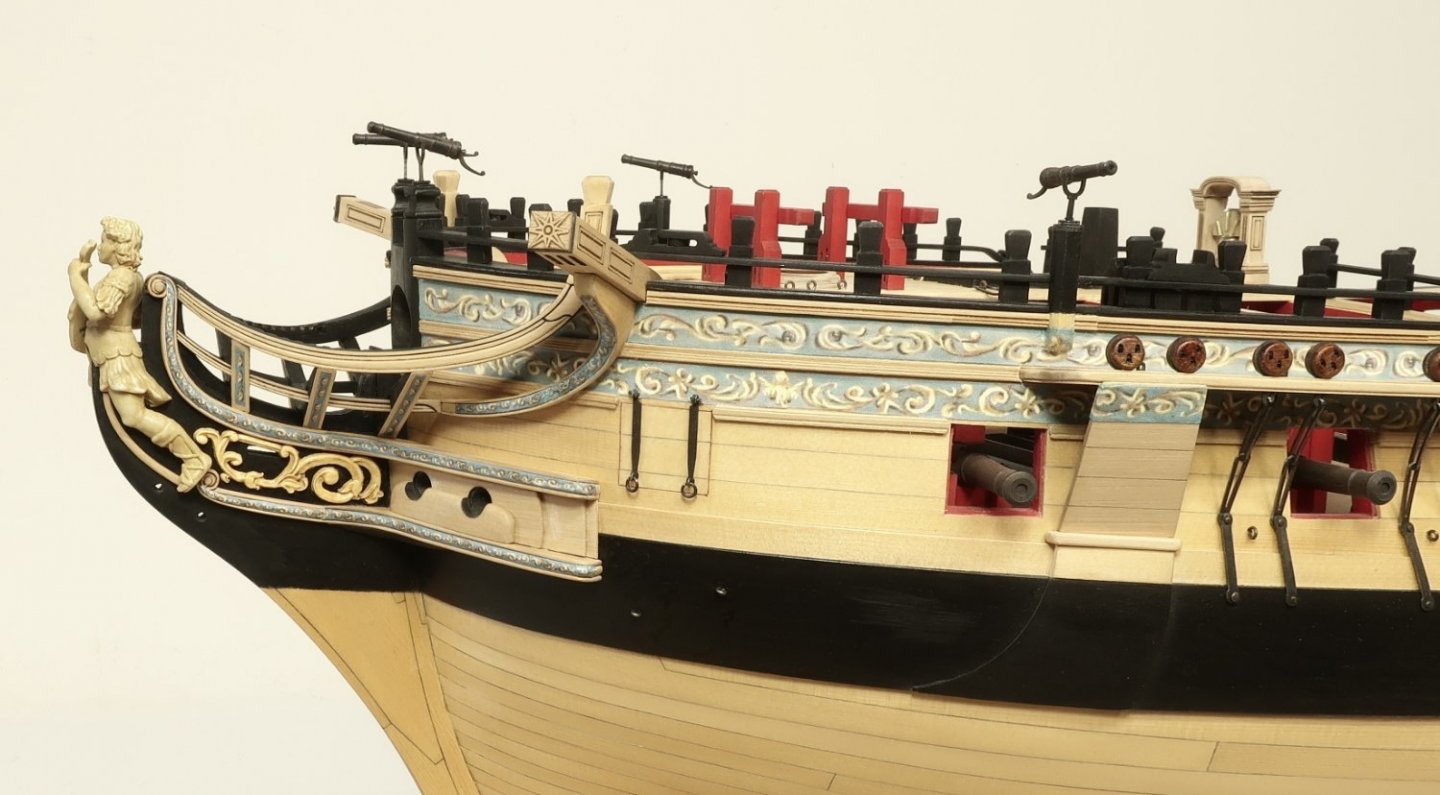
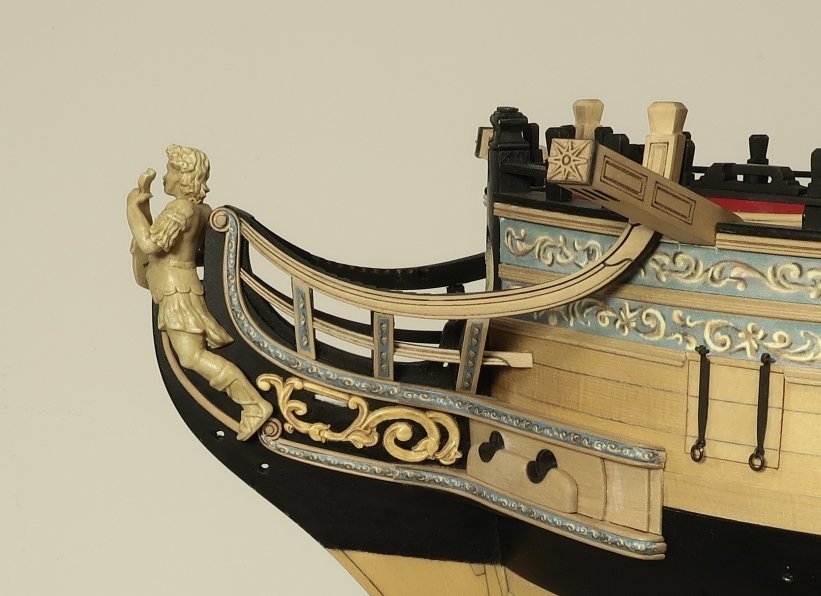
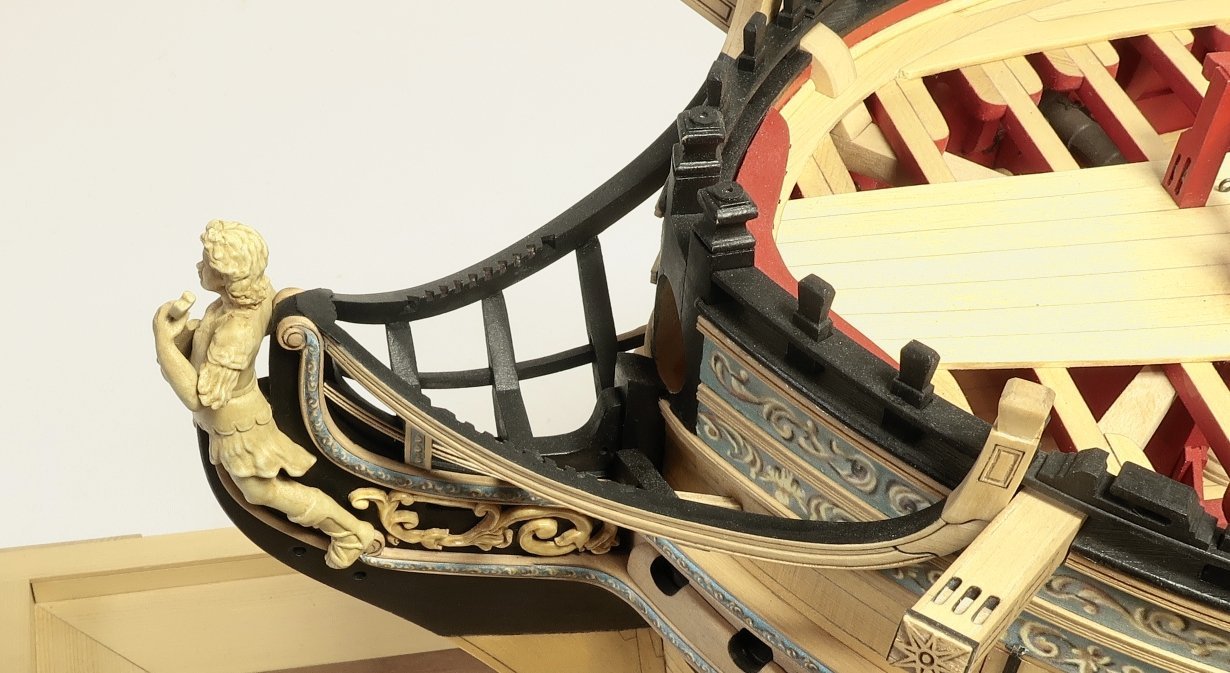
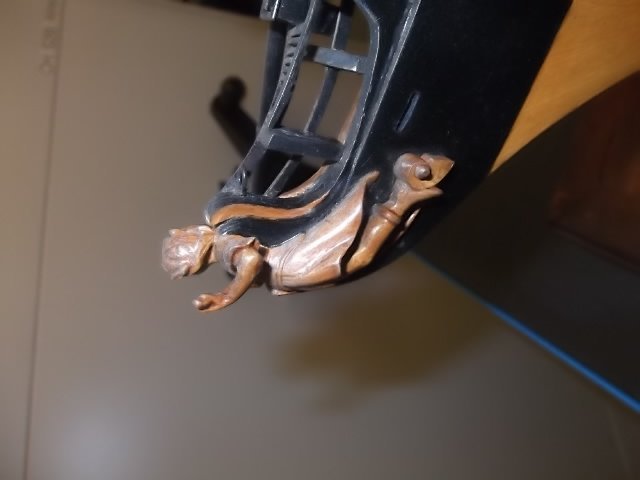
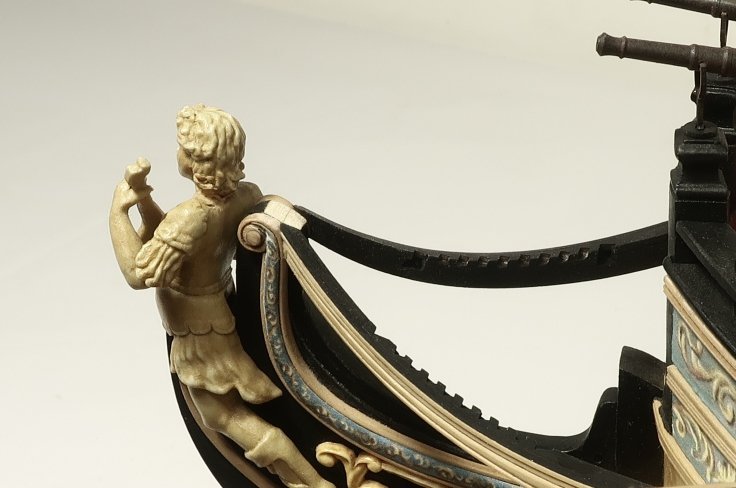
Thank you B.E. In addition, as you approach chapter 12....all of you should spend some time really examining the contemporary model. I made sure to get some really good photos of the headwork. This was crucial to designing and replicating the parts. I admit that it is nearly impossible without making and carving these from scratch to replicate them 100% but I am trying really hard to make mass-producible parts that come close. At least trying to make them look better than anything yet found in a kit. The only way to do that is to study the contemporary examples a lot. Note the fourth head timber aft....the half timber. Note how is sits against the hull. I have yet to prototype this. Note the curved top grating of cross pieces and ledges that form the top of the head. Most kits just laser cut the top grating in one flat piece that looks rather awful. Note the discharge tube for the seat.....and the cover boards for the head timbers with their friezes. Note below how the lower rail is notched into the head timbers. There are vertical slots rather than the typical huge notches used on most kits. An inside look at the head components. And also study other contemporary models such as Minerva. You can really see the curved top cross beams for the grating of the head. Also look at the seats and false rail which we will emulate on our model. Here is the schematic for the Winne headwork and grating to show you a preview of the details we will be adding. We will be adding the knees and all....one piece at a time. No flat laser cut chunky one piece kit part. I think it will be a fun but challenging part of the project. Hopefully I am not pushing things too far. I have mentioned this several times but you will see that funky seat on the Winnie contemporary model. We wont be modeling that. At least not for the official parts in the project. I have never seen that before I doubt it was used. It was probably a test prototype back then incorporated on the model. It is not shown on the draft nor have I seen it on any other model. We will be using the more traditional layout with false rail and seats tucked into the corners. See below.


- 1,784 replies
-
- 21
-
-
-
- winchelsea
- Syren Ship Model Company
- (and 1 more)
-
Thanks, Yes this is very complex to prototype and design so its a little easier to assemble. I have been designing a jig to help position the head timbers (uprights). While doing so I have probably made dozens of prototype head timbers and rails which needed to be tweaked. Each element of the head timbers is drafted, tweaked and laser cut….then tested in position. Then deconstructed and tossed so I can repeat the process until satisfied. Here is a quick photo of the testing as of yesterday. Nothing is glued yet…just an assembly test fit. Its almost there but the lower rail need another tweak…sadly it was perfect except for being about 1/32” too short on the aft end. I am working hard and putting lots of hours in to make these look “not like a kit”. Everything is laser cut but does require shaping. But all the decorative beading profiles like those on the lower and main rail are laser etched. But I still ran some sandpaper or a file down each laser etched groove to clean them up and make them look better. This will all be explained in ridiculous detail like I did for the main rail. There will be a lot of paint touch up on my model but hopefully all this testing will mean that your model wont need as much. This will take a while but next week I will start cutting chapter 11 parts while I keep working on the head. Time to take this all apart again…i need to design the cover boards for the face of each head timber and make the friezes for them next.
- 1,784 replies
-
- 26
-
-
-
- winchelsea
- Syren Ship Model Company
- (and 1 more)
-
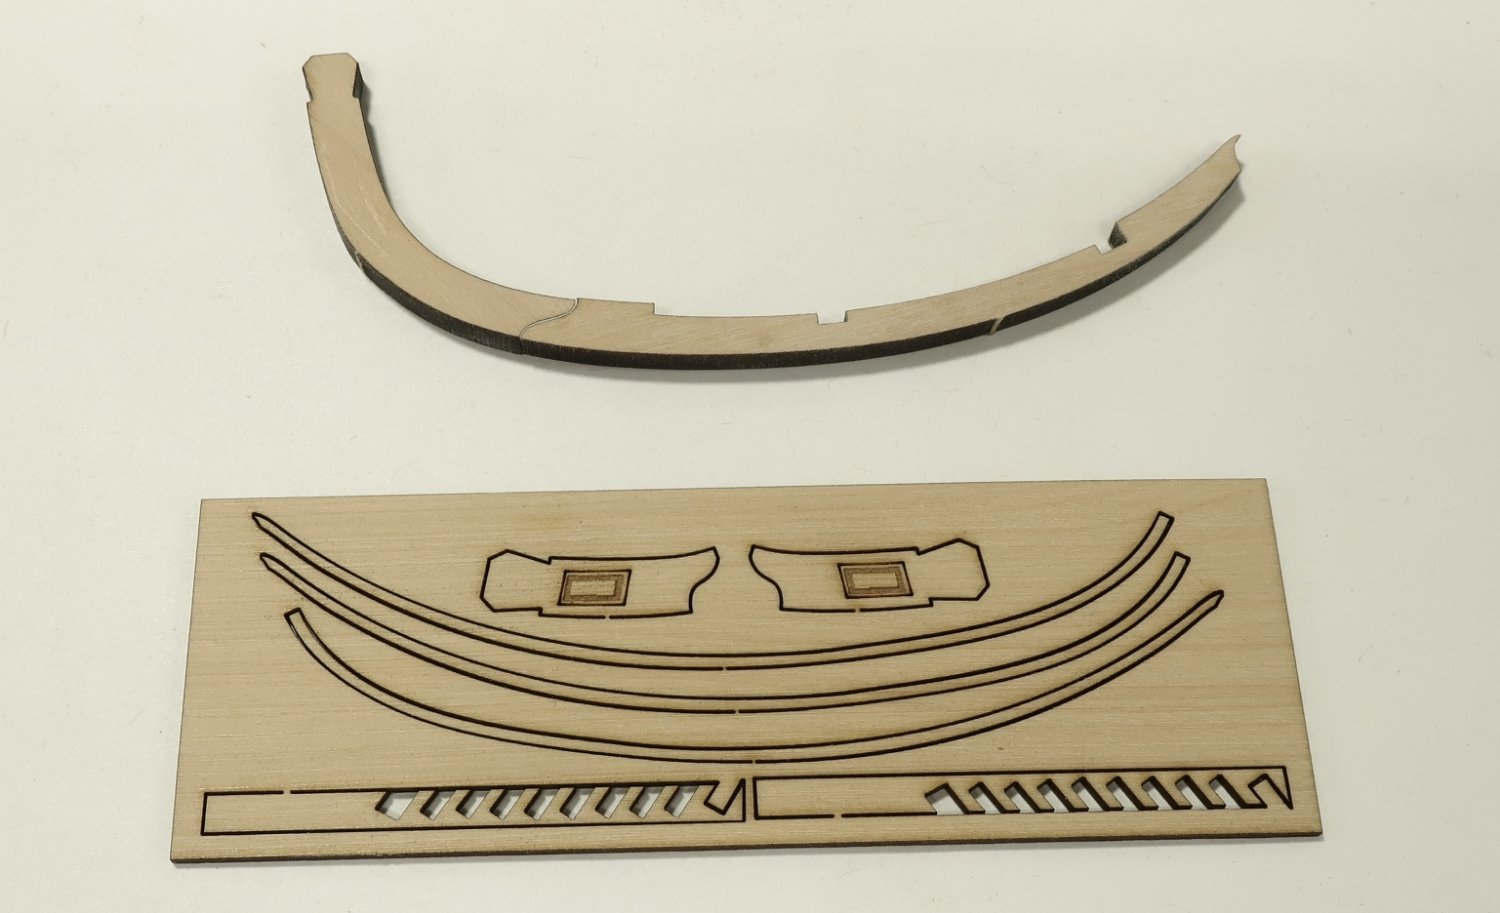
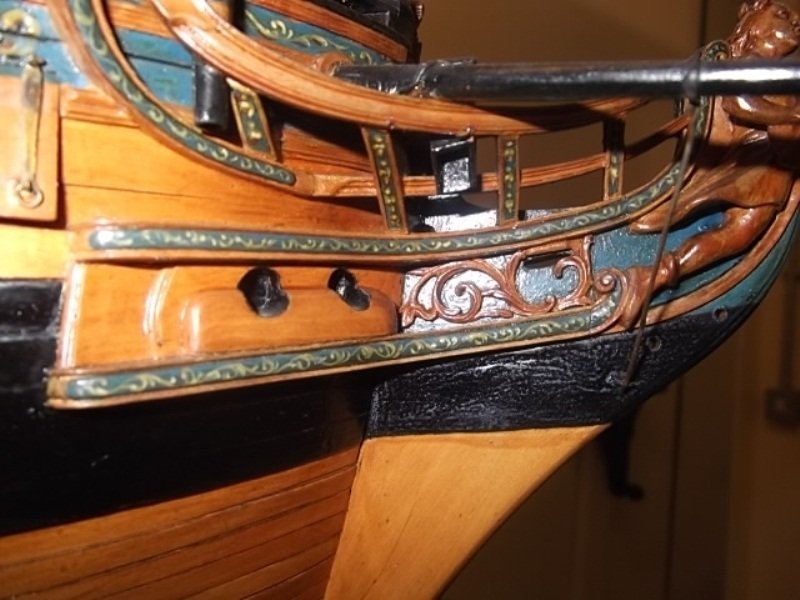
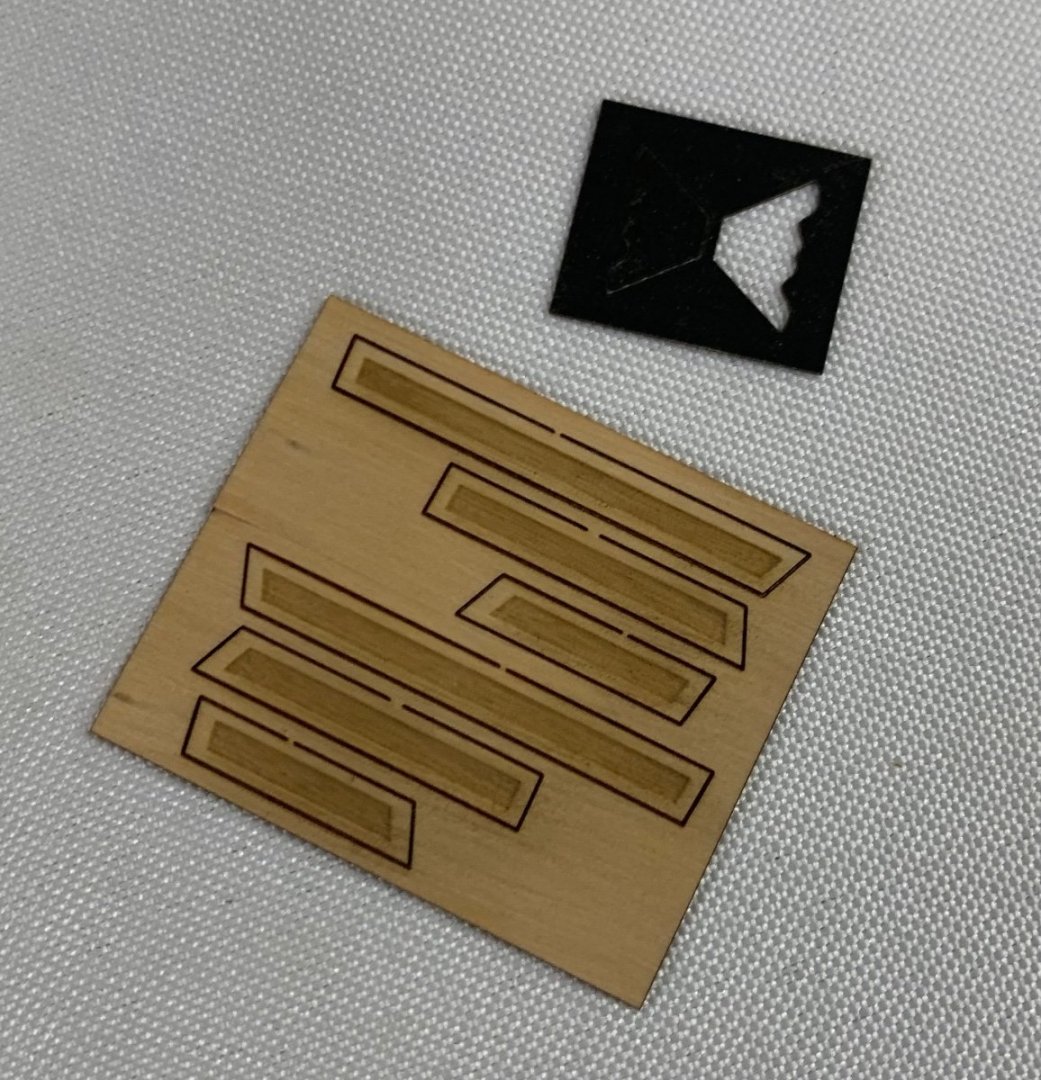
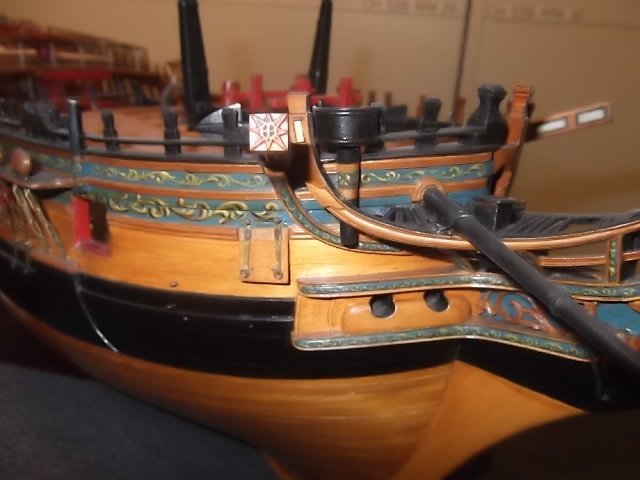
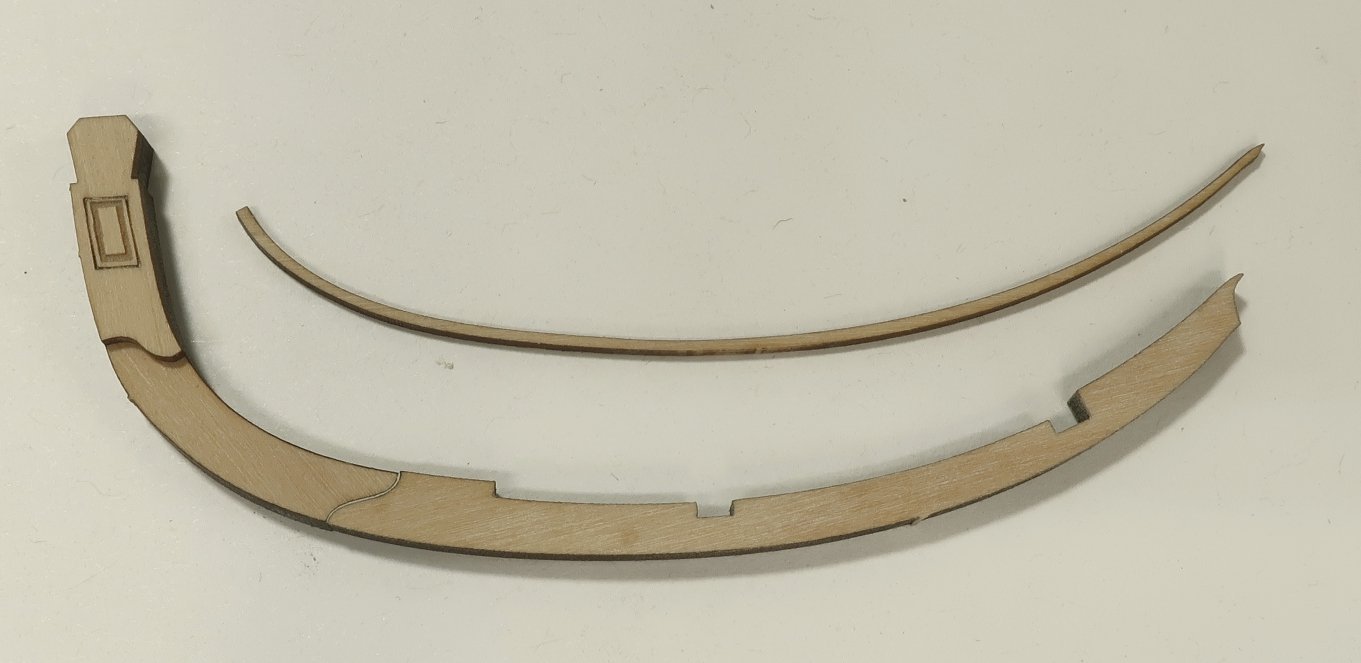
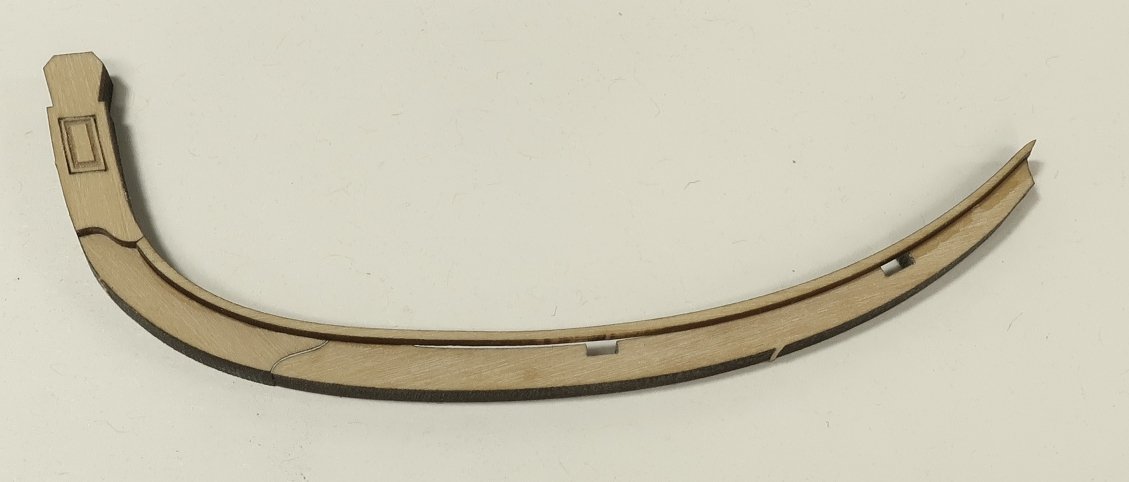
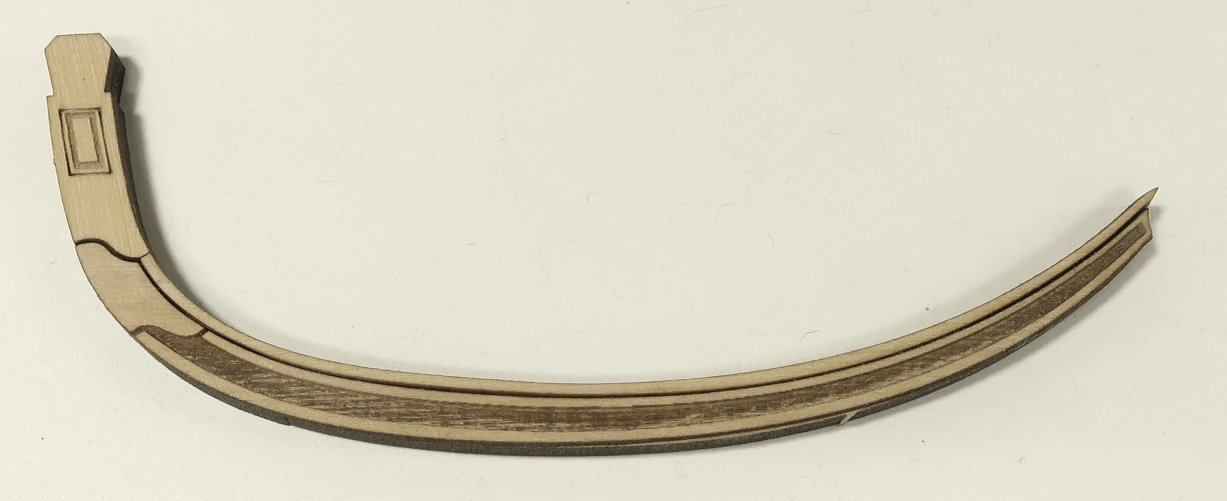
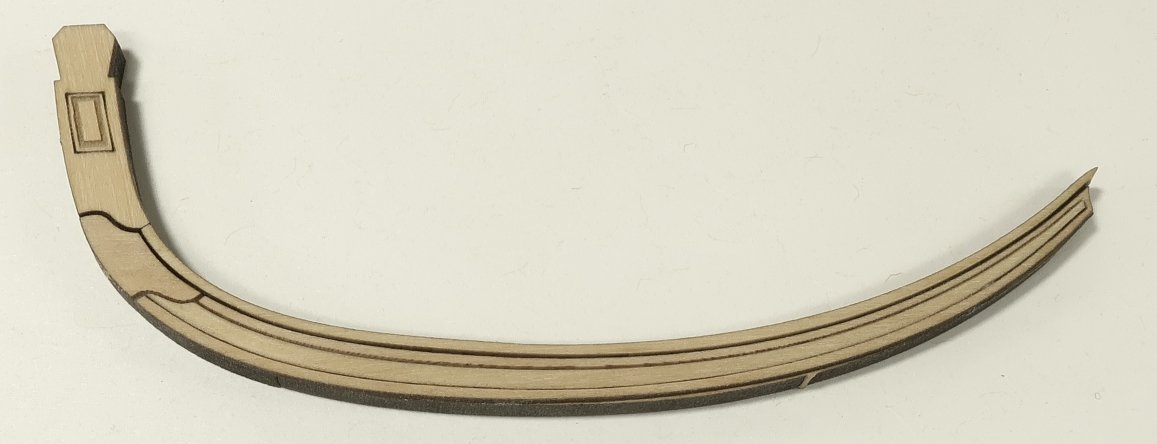
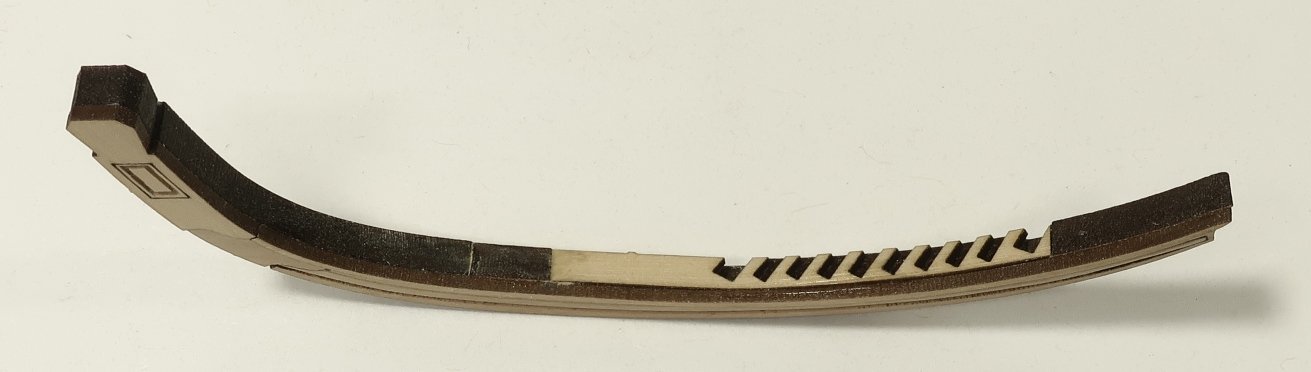
The Main Rail...please excuse what is probably an overly long and detailed explanation. But why not...hopefully I wont forget to mention anything. I have examined a lot of headrails on kits and I havent found one that I liked. So I am trying hard with the headrails on the Winnie to do them justice. It is however impossible to replicate what you see on contemporary models without a lot of carving and hand work. Trying to avoid as much of that as possible I have made some simplifications but I think it will pass mustard as they say. The main rails are boxwood. Like the hair brackets and cheeks they will be made in layers with several components. Do not sand any of the char off these parts unless mentioned in the steps for their assembly. The parts fit rather precisely. Step one: The first two parts of each rail are glued together. These are 1/8" thick. Get a nice clean tight joint but dont sand the surfaces of the joint. Try flipping one of the pieces...try both for a best fit before gluing. The other sheet below is for step 2. STEP 2: These parts are 3/64" thick. Take the timberhead piece first and glue it onto the main rail. Make sure its positioned nicely on top. Then take the long thin strip shown above and glue it into position next This piece will have the top edge flush with the bottom layer. But you will notice this is true only on the ends with a space for another piece we will add later. It is delicate so be careful. That top edge is flush. Step 3: Take the next piece which is 1/32" thick and has a laser etched center which is hollowed out. Glue this into position as shown below. Step 4: Remember the hair brackets??? There is a 1/64" thin delicate strip which will be inserted into that laser etched area. Just like we did for the hair brackets. Now this next step needs to be done carefully and delicately. You can and should gently round off (or bevel) the top and bottom edge of this thin veneer strip. Once inserted it will accentuate the beaded look we are shooting for. Use a lite touch and very fine sandpaper. 400 grit. Step 5: The final piece of the assembly. A 3/64" thick piece that will be positioned on top of the rail. It is laser cut with notches to accept the grating strips for the head...much later. The angles have been predetermined for you. This piece will bend nicely to conform to the curved shape of the main rail. Just apply glue in the slot first and gently push it down so it starts to bend. It should just fit into place. Make sure you orient it correctly with the correct end facing the correct way. Examine the photo below. Now so far it doesnt look pretty because its a laser char mess. But now we can finally sand the heck out of the top and bottom edges of the head rail. You can do that now. And dont be shy. I left a lot of meat on those top and bottom beads of the fancy profile. Go ahead and remove that char....fill any gaps in the seams etc. Just the top and bottom edges for now....and the timberhead. Step 6: In this photo you can see the top edge all cleaned up nice and tidy. No Char. The bottom edge is clean as well. But you will notice that one of the main rails is noticeably thinner than the other. In this step we will gradually taper the main rail. It should be 5/32" thick at the timberhead end.....and gradually taper to 5/64" thick at the forward end. Maybe even a bit thinner. Most of this will be removed from the inboard side of course. But you can and should sand the outside edge (the fancy part towards the forward end) just a bit. The beaded profile is a bit heavy at this point. So you can gently sand mostly the forward end a bit to reduce the thickness just a hair....it makes the beaded profile look more delicate and to scale. Then sand the inboard edge to remove most of the material. You will notice that the nice notches in that strip for the grating strips will starts to get smaller and smaller as you reduce the thickness of the main rail. That is fine. You only need the smallest notch for the job when we get to it. Get a nice even taper as shown on the completed main rail. Once you finish creating the taper....go ahead and sand/file/carve that timberhead on the inboard and outboard edges to match the other two sides. Like you would do for any other timberhead in this project. You can see that it is done on the completed main rail below. Step 7: In the photo the rails are only temporarily in position. But do notice the paint job. The top and bottom edges are painted black along with the inboard edge. But this painted area only goes up to the seam on the parts. In fact, the black paint should cover all the seams for the various parts we used to assemble the main rails. Important other notes: to get the main rail to sit nicely against the hull you will need to notch out the inboard side of the rail near the back corner. You will understand what I mean when you get to this step. You can also notch away the fancy molding on the hull if needed or do a combination of both. In addition...the forward end of the main rail needs to be sanded to fit tightly against the stem and the hair bracket. This is a very complex joint. Basically you need to sand a "V" on the front edge. Before you do this just place it in position and study the angles. Study the photos below as well. You are really only sanding these angles into the top bead of the main rail. The part that sticks out on top. You will know what I mean. Do this with some fine grit sandpaper. Also note that I sanded the stem down flush with the tops of the main rail now that I know where they will go. I had left it taller so it can be tweaked at this time. I left it unpainted so you can see it in the photos. This area .....with all of these crazy angles...will have a small flat piece glued on top. A thin flat protective piece I believe is called a "bolster". So it will cover these joints. But do your best to keep them clean and neat. One last note....everyone's hull will be different. Depending on where you placed your catheads, how you shaped the bow, how you placed your hair brackets on the stem....your model will be slightly different. If to need to shorten the main rail that is easy enough. Do it from the forward end of course. But if you need to make it longer, it will be time to get creative. Or make another set of main rails from scratch slightly longer. On a positive note I think the fancy beaded profile of the main rails came out very good. Not over done or too large. Sanding them down a bit really made them scale beautifully. Dont be afraid to sand the outboard face of the main rail to make those beaded profiles shallower. Basically you will be reducing the top and bottom beads of the profile.

- 1,784 replies
-
- 35
-
-
-
- winchelsea
- Syren Ship Model Company
- (and 1 more)
-
I havent really checked lately. But its an ongoing effort. It is always a concern and there isnt much anyone can do about it. This project is not yet complete and my guess is they would wait until it is complete. I have however found out about at least three other works by my friends and colleagues which are being pirated as I write this. They are currently in progress in China right now. pirated from Seawatch books authors primarily. What a shame. Chuck
- 1,784 replies
-
- 5
-

-
- winchelsea
- Syren Ship Model Company
- (and 1 more)