


Chuck
-
Posts
9,390 -
Joined
-
Last visited
Reputation Activity
-

 Chuck got a reaction from Archi in HM Cutter Cheerful 1806 by Chuck - FINISHED - 1:48 scale - kit prototype
Thank You very much,
Today I decided to build the skylight. There are many shapes and sizes shown on cutters. This matches the original draft but I imaging any similar would do. I decided to make this a mini-kit. All of the parts are laser cut from boxwood, laserboard and acetate.
First I doubled up two parts to form the "lip" I will need to build this thing. There are some funky angles on the skylight because after its built the fore and aft sides must be vertical. So it was a challenge to say the least. This was done for the sides and the window frames.
Then the window frames of the roof were beveled on the top and bottom edges. This was very important so they would fit together tightly in the next step. I used an emery board.
Rather than complete the frame and then add these on top, I decided to build the roof first. I tried a first prototype the other way and it was hard to get all of the angles correct and doing it in this order solved the issues. The two halves of the roof were glued to one of the sides as shown. It helped to keep the whole thing squared up and interestingly this made it easier to build..
Then the other side was added and finally the two port and starboard side pieces beneath the window frames. This finished the initial framing. I know I am going to paint this red so I filled even the smallest cracks and sanded it afterwards.
Finally a coaming was added around the skylight frame. This coaming was not as thick or as high as the coaming for the main hatch. Because it was going to be painted I didnt bother with lap joints. Note how the skylight doesnt sit flush on the ground. It is lifted off the coaming by half of the width of the timbers. This helps keep the decorative etched molding nice and neat with equal distance all around it. The fore and aft sides were done first. Then port and starboard. The corners were rounded with the right angle jig like the coamings for the main hatch to finish it up. Then it was painted red.
Finally the laser cut acetate windows were dropped in position along with the skylight window frames. The later was cut from very thin laserboard and painted to look like boxwood. None if these items are glued to the deck yet. I am waiting to finish up the companionway next and then I should be ready to start planking the deck around these elements.
-
 Chuck got a reaction from muratx in HM Cutter Cheerful 1806 by Chuck - FINISHED - 1:48 scale - kit prototype
Thank You very much,
Today I decided to build the skylight. There are many shapes and sizes shown on cutters. This matches the original draft but I imaging any similar would do. I decided to make this a mini-kit. All of the parts are laser cut from boxwood, laserboard and acetate.
First I doubled up two parts to form the "lip" I will need to build this thing. There are some funky angles on the skylight because after its built the fore and aft sides must be vertical. So it was a challenge to say the least. This was done for the sides and the window frames.
Then the window frames of the roof were beveled on the top and bottom edges. This was very important so they would fit together tightly in the next step. I used an emery board.
Rather than complete the frame and then add these on top, I decided to build the roof first. I tried a first prototype the other way and it was hard to get all of the angles correct and doing it in this order solved the issues. The two halves of the roof were glued to one of the sides as shown. It helped to keep the whole thing squared up and interestingly this made it easier to build..
Then the other side was added and finally the two port and starboard side pieces beneath the window frames. This finished the initial framing. I know I am going to paint this red so I filled even the smallest cracks and sanded it afterwards.
Finally a coaming was added around the skylight frame. This coaming was not as thick or as high as the coaming for the main hatch. Because it was going to be painted I didnt bother with lap joints. Note how the skylight doesnt sit flush on the ground. It is lifted off the coaming by half of the width of the timbers. This helps keep the decorative etched molding nice and neat with equal distance all around it. The fore and aft sides were done first. Then port and starboard. The corners were rounded with the right angle jig like the coamings for the main hatch to finish it up. Then it was painted red.
Finally the laser cut acetate windows were dropped in position along with the skylight window frames. The later was cut from very thin laserboard and painted to look like boxwood. None if these items are glued to the deck yet. I am waiting to finish up the companionway next and then I should be ready to start planking the deck around these elements.
-
 Chuck got a reaction from fatih79 in HM Cutter Cheerful 1806 by Chuck - FINISHED - 1:48 scale - kit prototype
Thank You very much,
Today I decided to build the skylight. There are many shapes and sizes shown on cutters. This matches the original draft but I imaging any similar would do. I decided to make this a mini-kit. All of the parts are laser cut from boxwood, laserboard and acetate.
First I doubled up two parts to form the "lip" I will need to build this thing. There are some funky angles on the skylight because after its built the fore and aft sides must be vertical. So it was a challenge to say the least. This was done for the sides and the window frames.
Then the window frames of the roof were beveled on the top and bottom edges. This was very important so they would fit together tightly in the next step. I used an emery board.
Rather than complete the frame and then add these on top, I decided to build the roof first. I tried a first prototype the other way and it was hard to get all of the angles correct and doing it in this order solved the issues. The two halves of the roof were glued to one of the sides as shown. It helped to keep the whole thing squared up and interestingly this made it easier to build..
Then the other side was added and finally the two port and starboard side pieces beneath the window frames. This finished the initial framing. I know I am going to paint this red so I filled even the smallest cracks and sanded it afterwards.
Finally a coaming was added around the skylight frame. This coaming was not as thick or as high as the coaming for the main hatch. Because it was going to be painted I didnt bother with lap joints. Note how the skylight doesnt sit flush on the ground. It is lifted off the coaming by half of the width of the timbers. This helps keep the decorative etched molding nice and neat with equal distance all around it. The fore and aft sides were done first. Then port and starboard. The corners were rounded with the right angle jig like the coamings for the main hatch to finish it up. Then it was painted red.
Finally the laser cut acetate windows were dropped in position along with the skylight window frames. The later was cut from very thin laserboard and painted to look like boxwood. None if these items are glued to the deck yet. I am waiting to finish up the companionway next and then I should be ready to start planking the deck around these elements.
-
 Chuck reacted to Maury S in Cutter Cheerful 1806 by Maury S - 1:48 - POB
For the lower band, I started with the garboard plank. It fits inside the rabbet and it will be easier to match planks once it is in. Some very minor spiling since the keel is not flat. Some high temp. twisting and it laid in there nicely. This was the easiest garboard I've installed so far (Chuck's rabbet technique)...We'll see how the next plank above lines up. The plans show the plank in three sections but I used only two, matching the pattern of the butt joints.
Maury
-
 Chuck got a reaction from CharlieZardoz in HM Cutter Cheerful 1806 by Chuck - FINISHED - 1:48 scale - kit prototype
Thank You very much,
Today I decided to build the skylight. There are many shapes and sizes shown on cutters. This matches the original draft but I imaging any similar would do. I decided to make this a mini-kit. All of the parts are laser cut from boxwood, laserboard and acetate.
First I doubled up two parts to form the "lip" I will need to build this thing. There are some funky angles on the skylight because after its built the fore and aft sides must be vertical. So it was a challenge to say the least. This was done for the sides and the window frames.
Then the window frames of the roof were beveled on the top and bottom edges. This was very important so they would fit together tightly in the next step. I used an emery board.
Rather than complete the frame and then add these on top, I decided to build the roof first. I tried a first prototype the other way and it was hard to get all of the angles correct and doing it in this order solved the issues. The two halves of the roof were glued to one of the sides as shown. It helped to keep the whole thing squared up and interestingly this made it easier to build..
Then the other side was added and finally the two port and starboard side pieces beneath the window frames. This finished the initial framing. I know I am going to paint this red so I filled even the smallest cracks and sanded it afterwards.
Finally a coaming was added around the skylight frame. This coaming was not as thick or as high as the coaming for the main hatch. Because it was going to be painted I didnt bother with lap joints. Note how the skylight doesnt sit flush on the ground. It is lifted off the coaming by half of the width of the timbers. This helps keep the decorative etched molding nice and neat with equal distance all around it. The fore and aft sides were done first. Then port and starboard. The corners were rounded with the right angle jig like the coamings for the main hatch to finish it up. Then it was painted red.
Finally the laser cut acetate windows were dropped in position along with the skylight window frames. The later was cut from very thin laserboard and painted to look like boxwood. None if these items are glued to the deck yet. I am waiting to finish up the companionway next and then I should be ready to start planking the deck around these elements.
-
Chuck reacted to CPT_D in US Brig Syren by CPT_D - Model Shipways - 1/64 scale - first build
So I bought this kit a year and a half ago and due to several reasons, I never got around to starting it. Now my work situation and living situation are much more conducive to building a wooden ship model. In my research to pick my first ship I bought 3 kits the Syren, the Marseille (C. Mamoli 1/64 kit), and the HMS Victory cross section. I got the other kits because 1, I like them and 2 I got a killer deal on both from eBay. I decided to start with the Syren for a couple of reasons. First, is the fact that the Syren came with the step by step manual. Second, is because there are so many Syrens being built and completed which will be invaluable for me.
So lets get started.
First off I start with a question... lol
I noticed that several others have mentioned that the bulkhead former was warped, so that was the first thing I checked. I found that my BF was warped a little (about 1/16" corner to corner) and bowed in the middle about 1/64". With finding this I Clamped it to the bedway on my lathe. Is this what I need to do or do I need to something else?
Even with this small setback I still tried to do something, so I sanded the the bulkheads to fit the BF, I made them tight, but not so tight that I would be concerned about breaking anything. I also skipped ahead and glued the 25' longboat and will probably start sanding on it tomorrow. I know that the longboat is going to be difficult and very detailed but I think I can do it. The one question I had was related to the stain. The guide book says to stain the wooden parts prior to gluing them; what color stain do I need to use and what can I get it?
-
Chuck got a reaction from Archi in HM Cutter Cheerful 1806 by Chuck - FINISHED - 1:48 scale - kit prototype
Thanks,
Today I started making the coamings for the hatch gratings. There are three, but only two need coamings. The main hatch is shown here. The second smaller grating will be just aft of the windlass.
The gratings were made using the Syren grating kits with camber already built in them.
Then the coamings were built up around the finished gratings. Too often I see folks build the coaming following the plans and then when it comes time to add the grating it wont fit. Sometimes you end up with holes along the coaming or have to shave down the grating too much to fit it into the coaming. By building the coaming around a finished grating I wont have this issue. Now my grating may end up being a hair larger or smaller than the plans but that is less important than having it look correct. We are talking about maybe .025" larger or smaller...thats acceptable.
The coamings were made with the usual lap joints. Note the fore and aft sides have a roundup. These coamings are 1/4" high. Others will be less and not as thick...they are all different but for the two gratings the coamings are 1/4" high x 3/32" thick. But dont forget that the planking will go around them so only 3/16' will be above the planked deck.
Then a right angle jig was used to round off the corners except for what will be the bottom 1/16". The jig is 1/16" thick which will be the same thickness as the planking. I added a strip inside the coaming on the port and starboard sides to create a lip to support the grating as well.
To finish it off I softened the hard corners all around the top edge of the coaming. I may or may not paint the coaming red and leave the grating bright. But I dont know yet. I have seen Cutter models done both ways. There will be a lot of other deck fittings painted red so I dont want to go overboard... . Tomorrow I will make the coaming for the smaller grating behind the windlass.
Chuck
-
 Chuck got a reaction from foxy in Syren by JesseLee - FINISHED - Model Shipways - scale: 1:64
It doent look that bad at all. I would take a bit more off so the bend isnt as sharp where the plank tuck up into the lower counter..
See these pics if it helps. Couldnt find any of the stern unpainted.
Chuck
-
Chuck got a reaction from fatih79 in HM Cutter Cheerful 1806 by Chuck - FINISHED - 1:48 scale - kit prototype
Thanks,
Today I started making the coamings for the hatch gratings. There are three, but only two need coamings. The main hatch is shown here. The second smaller grating will be just aft of the windlass.
The gratings were made using the Syren grating kits with camber already built in them.
Then the coamings were built up around the finished gratings. Too often I see folks build the coaming following the plans and then when it comes time to add the grating it wont fit. Sometimes you end up with holes along the coaming or have to shave down the grating too much to fit it into the coaming. By building the coaming around a finished grating I wont have this issue. Now my grating may end up being a hair larger or smaller than the plans but that is less important than having it look correct. We are talking about maybe .025" larger or smaller...thats acceptable.
The coamings were made with the usual lap joints. Note the fore and aft sides have a roundup. These coamings are 1/4" high. Others will be less and not as thick...they are all different but for the two gratings the coamings are 1/4" high x 3/32" thick. But dont forget that the planking will go around them so only 3/16' will be above the planked deck.
Then a right angle jig was used to round off the corners except for what will be the bottom 1/16". The jig is 1/16" thick which will be the same thickness as the planking. I added a strip inside the coaming on the port and starboard sides to create a lip to support the grating as well.
To finish it off I softened the hard corners all around the top edge of the coaming. I may or may not paint the coaming red and leave the grating bright. But I dont know yet. I have seen Cutter models done both ways. There will be a lot of other deck fittings painted red so I dont want to go overboard... . Tomorrow I will make the coaming for the smaller grating behind the windlass.
Chuck
-
 Chuck got a reaction from _SalD_ in HM Cutter Cheerful 1806 by Chuck - FINISHED - 1:48 scale - kit prototype
Thanks,
Today I started making the coamings for the hatch gratings. There are three, but only two need coamings. The main hatch is shown here. The second smaller grating will be just aft of the windlass.
The gratings were made using the Syren grating kits with camber already built in them.
Then the coamings were built up around the finished gratings. Too often I see folks build the coaming following the plans and then when it comes time to add the grating it wont fit. Sometimes you end up with holes along the coaming or have to shave down the grating too much to fit it into the coaming. By building the coaming around a finished grating I wont have this issue. Now my grating may end up being a hair larger or smaller than the plans but that is less important than having it look correct. We are talking about maybe .025" larger or smaller...thats acceptable.
The coamings were made with the usual lap joints. Note the fore and aft sides have a roundup. These coamings are 1/4" high. Others will be less and not as thick...they are all different but for the two gratings the coamings are 1/4" high x 3/32" thick. But dont forget that the planking will go around them so only 3/16' will be above the planked deck.
Then a right angle jig was used to round off the corners except for what will be the bottom 1/16". The jig is 1/16" thick which will be the same thickness as the planking. I added a strip inside the coaming on the port and starboard sides to create a lip to support the grating as well.
To finish it off I softened the hard corners all around the top edge of the coaming. I may or may not paint the coaming red and leave the grating bright. But I dont know yet. I have seen Cutter models done both ways. There will be a lot of other deck fittings painted red so I dont want to go overboard... . Tomorrow I will make the coaming for the smaller grating behind the windlass.
Chuck
-
Chuck got a reaction from Archi in HM Cutter Cheerful 1806 by Chuck - FINISHED - 1:48 scale - kit prototype
Thank You...
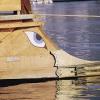
In preparation for planking the deck, I added the waterway/margin planks. For my purposes here I talk about them as two separate pieces. First the wider margin plank was created with scarf joints next to the bulwarks. I used card stock to make templates first. There are three lengths as shown below. This required a lot of tweaking until I got it right. Then the templates were traced onto a 1/16" thick sheet of boxwood and cut out. The deck planking will be 1/16" thick.
I spent a lot of time carefully shaping the scarf joints with a #11 blade and some needle files until they were a nice clean and tight fit. Then they were glued onto the deck area. The back edge needed to be beveled so I could get a tight fit against the bulwarks in many areas. Particularly at the bow. A pencil darkened the seam of scarf joint just like the hull planking. Eventually the deck planking will be nibbed into these margin planks.
When finished, I added the waterway on top of the margin plank. It was a 1/32" strip that was slowly sanded to become a 1/4 round. I basically sanded off one corner edge and rounded it off. It was glued on top and the seams between the pieces were carefully lined up with the scarf joints. So again three lengths were used. This way they look like they were done as one piece. These thin strips also needed to be beveled to fit tight against the bulwarks. The bulwarks are unfortunately not at a nice 90 degree angle to the deck so the bevel was an absolute necessity.
Now its time to start building the hatches, coamings and gratings and skylight. Then I can plank the deck around them. I cant wait until thats done,. After this step its just about the small details...and that is a lot of fun.
Chuck
-
 Chuck got a reaction from Elmer Cornish in HM Cutter Cheerful 1806 by Chuck - FINISHED - 1:48 scale - kit prototype
Thanks,
Today I started making the coamings for the hatch gratings. There are three, but only two need coamings. The main hatch is shown here. The second smaller grating will be just aft of the windlass.
The gratings were made using the Syren grating kits with camber already built in them.
Then the coamings were built up around the finished gratings. Too often I see folks build the coaming following the plans and then when it comes time to add the grating it wont fit. Sometimes you end up with holes along the coaming or have to shave down the grating too much to fit it into the coaming. By building the coaming around a finished grating I wont have this issue. Now my grating may end up being a hair larger or smaller than the plans but that is less important than having it look correct. We are talking about maybe .025" larger or smaller...thats acceptable.
The coamings were made with the usual lap joints. Note the fore and aft sides have a roundup. These coamings are 1/4" high. Others will be less and not as thick...they are all different but for the two gratings the coamings are 1/4" high x 3/32" thick. But dont forget that the planking will go around them so only 3/16' will be above the planked deck.
Then a right angle jig was used to round off the corners except for what will be the bottom 1/16". The jig is 1/16" thick which will be the same thickness as the planking. I added a strip inside the coaming on the port and starboard sides to create a lip to support the grating as well.
To finish it off I softened the hard corners all around the top edge of the coaming. I may or may not paint the coaming red and leave the grating bright. But I dont know yet. I have seen Cutter models done both ways. There will be a lot of other deck fittings painted red so I dont want to go overboard... . Tomorrow I will make the coaming for the smaller grating behind the windlass.
Chuck
-
 Chuck got a reaction from SawdustDave in HM Cutter Cheerful 1806 by Chuck - FINISHED - 1:48 scale - kit prototype
Thanks,
Today I started making the coamings for the hatch gratings. There are three, but only two need coamings. The main hatch is shown here. The second smaller grating will be just aft of the windlass.
The gratings were made using the Syren grating kits with camber already built in them.
Then the coamings were built up around the finished gratings. Too often I see folks build the coaming following the plans and then when it comes time to add the grating it wont fit. Sometimes you end up with holes along the coaming or have to shave down the grating too much to fit it into the coaming. By building the coaming around a finished grating I wont have this issue. Now my grating may end up being a hair larger or smaller than the plans but that is less important than having it look correct. We are talking about maybe .025" larger or smaller...thats acceptable.
The coamings were made with the usual lap joints. Note the fore and aft sides have a roundup. These coamings are 1/4" high. Others will be less and not as thick...they are all different but for the two gratings the coamings are 1/4" high x 3/32" thick. But dont forget that the planking will go around them so only 3/16' will be above the planked deck.
Then a right angle jig was used to round off the corners except for what will be the bottom 1/16". The jig is 1/16" thick which will be the same thickness as the planking. I added a strip inside the coaming on the port and starboard sides to create a lip to support the grating as well.
To finish it off I softened the hard corners all around the top edge of the coaming. I may or may not paint the coaming red and leave the grating bright. But I dont know yet. I have seen Cutter models done both ways. There will be a lot of other deck fittings painted red so I dont want to go overboard... . Tomorrow I will make the coaming for the smaller grating behind the windlass.
Chuck
-
 Chuck got a reaction from ioannis in HM Cutter Cheerful 1806 by Chuck - FINISHED - 1:48 scale - kit prototype
Thanks,
Today I started making the coamings for the hatch gratings. There are three, but only two need coamings. The main hatch is shown here. The second smaller grating will be just aft of the windlass.
The gratings were made using the Syren grating kits with camber already built in them.
Then the coamings were built up around the finished gratings. Too often I see folks build the coaming following the plans and then when it comes time to add the grating it wont fit. Sometimes you end up with holes along the coaming or have to shave down the grating too much to fit it into the coaming. By building the coaming around a finished grating I wont have this issue. Now my grating may end up being a hair larger or smaller than the plans but that is less important than having it look correct. We are talking about maybe .025" larger or smaller...thats acceptable.
The coamings were made with the usual lap joints. Note the fore and aft sides have a roundup. These coamings are 1/4" high. Others will be less and not as thick...they are all different but for the two gratings the coamings are 1/4" high x 3/32" thick. But dont forget that the planking will go around them so only 3/16' will be above the planked deck.
Then a right angle jig was used to round off the corners except for what will be the bottom 1/16". The jig is 1/16" thick which will be the same thickness as the planking. I added a strip inside the coaming on the port and starboard sides to create a lip to support the grating as well.
To finish it off I softened the hard corners all around the top edge of the coaming. I may or may not paint the coaming red and leave the grating bright. But I dont know yet. I have seen Cutter models done both ways. There will be a lot of other deck fittings painted red so I dont want to go overboard... . Tomorrow I will make the coaming for the smaller grating behind the windlass.
Chuck
-
Chuck got a reaction from muratx in HM Cutter Cheerful 1806 by Chuck - FINISHED - 1:48 scale - kit prototype
Thank You...
In preparation for planking the deck, I added the waterway/margin planks. For my purposes here I talk about them as two separate pieces. First the wider margin plank was created with scarf joints next to the bulwarks. I used card stock to make templates first. There are three lengths as shown below. This required a lot of tweaking until I got it right. Then the templates were traced onto a 1/16" thick sheet of boxwood and cut out. The deck planking will be 1/16" thick.
I spent a lot of time carefully shaping the scarf joints with a #11 blade and some needle files until they were a nice clean and tight fit. Then they were glued onto the deck area. The back edge needed to be beveled so I could get a tight fit against the bulwarks in many areas. Particularly at the bow. A pencil darkened the seam of scarf joint just like the hull planking. Eventually the deck planking will be nibbed into these margin planks.
When finished, I added the waterway on top of the margin plank. It was a 1/32" strip that was slowly sanded to become a 1/4 round. I basically sanded off one corner edge and rounded it off. It was glued on top and the seams between the pieces were carefully lined up with the scarf joints. So again three lengths were used. This way they look like they were done as one piece. These thin strips also needed to be beveled to fit tight against the bulwarks. The bulwarks are unfortunately not at a nice 90 degree angle to the deck so the bevel was an absolute necessity.
Now its time to start building the hatches, coamings and gratings and skylight. Then I can plank the deck around them. I cant wait until thats done,. After this step its just about the small details...and that is a lot of fun.
Chuck
-
Chuck got a reaction from fatih79 in HM Cutter Cheerful 1806 by Chuck - FINISHED - 1:48 scale - kit prototype
Thank You...
In preparation for planking the deck, I added the waterway/margin planks. For my purposes here I talk about them as two separate pieces. First the wider margin plank was created with scarf joints next to the bulwarks. I used card stock to make templates first. There are three lengths as shown below. This required a lot of tweaking until I got it right. Then the templates were traced onto a 1/16" thick sheet of boxwood and cut out. The deck planking will be 1/16" thick.
I spent a lot of time carefully shaping the scarf joints with a #11 blade and some needle files until they were a nice clean and tight fit. Then they were glued onto the deck area. The back edge needed to be beveled so I could get a tight fit against the bulwarks in many areas. Particularly at the bow. A pencil darkened the seam of scarf joint just like the hull planking. Eventually the deck planking will be nibbed into these margin planks.
When finished, I added the waterway on top of the margin plank. It was a 1/32" strip that was slowly sanded to become a 1/4 round. I basically sanded off one corner edge and rounded it off. It was glued on top and the seams between the pieces were carefully lined up with the scarf joints. So again three lengths were used. This way they look like they were done as one piece. These thin strips also needed to be beveled to fit tight against the bulwarks. The bulwarks are unfortunately not at a nice 90 degree angle to the deck so the bevel was an absolute necessity.
Now its time to start building the hatches, coamings and gratings and skylight. Then I can plank the deck around them. I cant wait until thats done,. After this step its just about the small details...and that is a lot of fun.
Chuck
-
 Chuck got a reaction from Remcohe in HM Cutter Cheerful 1806 by Chuck - FINISHED - 1:48 scale - kit prototype
Thanks,
Today I started making the coamings for the hatch gratings. There are three, but only two need coamings. The main hatch is shown here. The second smaller grating will be just aft of the windlass.
The gratings were made using the Syren grating kits with camber already built in them.
Then the coamings were built up around the finished gratings. Too often I see folks build the coaming following the plans and then when it comes time to add the grating it wont fit. Sometimes you end up with holes along the coaming or have to shave down the grating too much to fit it into the coaming. By building the coaming around a finished grating I wont have this issue. Now my grating may end up being a hair larger or smaller than the plans but that is less important than having it look correct. We are talking about maybe .025" larger or smaller...thats acceptable.
The coamings were made with the usual lap joints. Note the fore and aft sides have a roundup. These coamings are 1/4" high. Others will be less and not as thick...they are all different but for the two gratings the coamings are 1/4" high x 3/32" thick. But dont forget that the planking will go around them so only 3/16' will be above the planked deck.
Then a right angle jig was used to round off the corners except for what will be the bottom 1/16". The jig is 1/16" thick which will be the same thickness as the planking. I added a strip inside the coaming on the port and starboard sides to create a lip to support the grating as well.
To finish it off I softened the hard corners all around the top edge of the coaming. I may or may not paint the coaming red and leave the grating bright. But I dont know yet. I have seen Cutter models done both ways. There will be a lot of other deck fittings painted red so I dont want to go overboard... . Tomorrow I will make the coaming for the smaller grating behind the windlass.
Chuck
-
 Chuck got a reaction from robin b in HM Cutter Cheerful 1806 by Chuck - FINISHED - 1:48 scale - kit prototype
Thanks,
Today I started making the coamings for the hatch gratings. There are three, but only two need coamings. The main hatch is shown here. The second smaller grating will be just aft of the windlass.
The gratings were made using the Syren grating kits with camber already built in them.
Then the coamings were built up around the finished gratings. Too often I see folks build the coaming following the plans and then when it comes time to add the grating it wont fit. Sometimes you end up with holes along the coaming or have to shave down the grating too much to fit it into the coaming. By building the coaming around a finished grating I wont have this issue. Now my grating may end up being a hair larger or smaller than the plans but that is less important than having it look correct. We are talking about maybe .025" larger or smaller...thats acceptable.
The coamings were made with the usual lap joints. Note the fore and aft sides have a roundup. These coamings are 1/4" high. Others will be less and not as thick...they are all different but for the two gratings the coamings are 1/4" high x 3/32" thick. But dont forget that the planking will go around them so only 3/16' will be above the planked deck.
Then a right angle jig was used to round off the corners except for what will be the bottom 1/16". The jig is 1/16" thick which will be the same thickness as the planking. I added a strip inside the coaming on the port and starboard sides to create a lip to support the grating as well.
To finish it off I softened the hard corners all around the top edge of the coaming. I may or may not paint the coaming red and leave the grating bright. But I dont know yet. I have seen Cutter models done both ways. There will be a lot of other deck fittings painted red so I dont want to go overboard... . Tomorrow I will make the coaming for the smaller grating behind the windlass.
Chuck
-
 Chuck got a reaction from Chuck Seiler in HM Cutter Cheerful 1806 by Chuck - FINISHED - 1:48 scale - kit prototype
Thanks,
Today I started making the coamings for the hatch gratings. There are three, but only two need coamings. The main hatch is shown here. The second smaller grating will be just aft of the windlass.
The gratings were made using the Syren grating kits with camber already built in them.
Then the coamings were built up around the finished gratings. Too often I see folks build the coaming following the plans and then when it comes time to add the grating it wont fit. Sometimes you end up with holes along the coaming or have to shave down the grating too much to fit it into the coaming. By building the coaming around a finished grating I wont have this issue. Now my grating may end up being a hair larger or smaller than the plans but that is less important than having it look correct. We are talking about maybe .025" larger or smaller...thats acceptable.
The coamings were made with the usual lap joints. Note the fore and aft sides have a roundup. These coamings are 1/4" high. Others will be less and not as thick...they are all different but for the two gratings the coamings are 1/4" high x 3/32" thick. But dont forget that the planking will go around them so only 3/16' will be above the planked deck.
Then a right angle jig was used to round off the corners except for what will be the bottom 1/16". The jig is 1/16" thick which will be the same thickness as the planking. I added a strip inside the coaming on the port and starboard sides to create a lip to support the grating as well.
To finish it off I softened the hard corners all around the top edge of the coaming. I may or may not paint the coaming red and leave the grating bright. But I dont know yet. I have seen Cutter models done both ways. There will be a lot of other deck fittings painted red so I dont want to go overboard... . Tomorrow I will make the coaming for the smaller grating behind the windlass.
Chuck
-
 Chuck got a reaction from yvesvidal in HM Cutter Cheerful 1806 by Chuck - FINISHED - 1:48 scale - kit prototype
Thanks,
Today I started making the coamings for the hatch gratings. There are three, but only two need coamings. The main hatch is shown here. The second smaller grating will be just aft of the windlass.
The gratings were made using the Syren grating kits with camber already built in them.
Then the coamings were built up around the finished gratings. Too often I see folks build the coaming following the plans and then when it comes time to add the grating it wont fit. Sometimes you end up with holes along the coaming or have to shave down the grating too much to fit it into the coaming. By building the coaming around a finished grating I wont have this issue. Now my grating may end up being a hair larger or smaller than the plans but that is less important than having it look correct. We are talking about maybe .025" larger or smaller...thats acceptable.
The coamings were made with the usual lap joints. Note the fore and aft sides have a roundup. These coamings are 1/4" high. Others will be less and not as thick...they are all different but for the two gratings the coamings are 1/4" high x 3/32" thick. But dont forget that the planking will go around them so only 3/16' will be above the planked deck.
Then a right angle jig was used to round off the corners except for what will be the bottom 1/16". The jig is 1/16" thick which will be the same thickness as the planking. I added a strip inside the coaming on the port and starboard sides to create a lip to support the grating as well.
To finish it off I softened the hard corners all around the top edge of the coaming. I may or may not paint the coaming red and leave the grating bright. But I dont know yet. I have seen Cutter models done both ways. There will be a lot of other deck fittings painted red so I dont want to go overboard... . Tomorrow I will make the coaming for the smaller grating behind the windlass.
Chuck
-
 Chuck got a reaction from WackoWolf in HM Cutter Cheerful 1806 by Chuck - FINISHED - 1:48 scale - kit prototype
Thanks,
Today I started making the coamings for the hatch gratings. There are three, but only two need coamings. The main hatch is shown here. The second smaller grating will be just aft of the windlass.
The gratings were made using the Syren grating kits with camber already built in them.
Then the coamings were built up around the finished gratings. Too often I see folks build the coaming following the plans and then when it comes time to add the grating it wont fit. Sometimes you end up with holes along the coaming or have to shave down the grating too much to fit it into the coaming. By building the coaming around a finished grating I wont have this issue. Now my grating may end up being a hair larger or smaller than the plans but that is less important than having it look correct. We are talking about maybe .025" larger or smaller...thats acceptable.
The coamings were made with the usual lap joints. Note the fore and aft sides have a roundup. These coamings are 1/4" high. Others will be less and not as thick...they are all different but for the two gratings the coamings are 1/4" high x 3/32" thick. But dont forget that the planking will go around them so only 3/16' will be above the planked deck.
Then a right angle jig was used to round off the corners except for what will be the bottom 1/16". The jig is 1/16" thick which will be the same thickness as the planking. I added a strip inside the coaming on the port and starboard sides to create a lip to support the grating as well.
To finish it off I softened the hard corners all around the top edge of the coaming. I may or may not paint the coaming red and leave the grating bright. But I dont know yet. I have seen Cutter models done both ways. There will be a lot of other deck fittings painted red so I dont want to go overboard... . Tomorrow I will make the coaming for the smaller grating behind the windlass.
Chuck
-
 Chuck got a reaction from Ryland Craze in HM Cutter Cheerful 1806 by Chuck - FINISHED - 1:48 scale - kit prototype
Thanks,
Today I started making the coamings for the hatch gratings. There are three, but only two need coamings. The main hatch is shown here. The second smaller grating will be just aft of the windlass.
The gratings were made using the Syren grating kits with camber already built in them.
Then the coamings were built up around the finished gratings. Too often I see folks build the coaming following the plans and then when it comes time to add the grating it wont fit. Sometimes you end up with holes along the coaming or have to shave down the grating too much to fit it into the coaming. By building the coaming around a finished grating I wont have this issue. Now my grating may end up being a hair larger or smaller than the plans but that is less important than having it look correct. We are talking about maybe .025" larger or smaller...thats acceptable.
The coamings were made with the usual lap joints. Note the fore and aft sides have a roundup. These coamings are 1/4" high. Others will be less and not as thick...they are all different but for the two gratings the coamings are 1/4" high x 3/32" thick. But dont forget that the planking will go around them so only 3/16' will be above the planked deck.
Then a right angle jig was used to round off the corners except for what will be the bottom 1/16". The jig is 1/16" thick which will be the same thickness as the planking. I added a strip inside the coaming on the port and starboard sides to create a lip to support the grating as well.
To finish it off I softened the hard corners all around the top edge of the coaming. I may or may not paint the coaming red and leave the grating bright. But I dont know yet. I have seen Cutter models done both ways. There will be a lot of other deck fittings painted red so I dont want to go overboard... . Tomorrow I will make the coaming for the smaller grating behind the windlass.
Chuck
-
 Chuck got a reaction from KenW in HM Cutter Cheerful 1806 by Chuck - FINISHED - 1:48 scale - kit prototype
Thanks,
Today I started making the coamings for the hatch gratings. There are three, but only two need coamings. The main hatch is shown here. The second smaller grating will be just aft of the windlass.
The gratings were made using the Syren grating kits with camber already built in them.
Then the coamings were built up around the finished gratings. Too often I see folks build the coaming following the plans and then when it comes time to add the grating it wont fit. Sometimes you end up with holes along the coaming or have to shave down the grating too much to fit it into the coaming. By building the coaming around a finished grating I wont have this issue. Now my grating may end up being a hair larger or smaller than the plans but that is less important than having it look correct. We are talking about maybe .025" larger or smaller...thats acceptable.
The coamings were made with the usual lap joints. Note the fore and aft sides have a roundup. These coamings are 1/4" high. Others will be less and not as thick...they are all different but for the two gratings the coamings are 1/4" high x 3/32" thick. But dont forget that the planking will go around them so only 3/16' will be above the planked deck.
Then a right angle jig was used to round off the corners except for what will be the bottom 1/16". The jig is 1/16" thick which will be the same thickness as the planking. I added a strip inside the coaming on the port and starboard sides to create a lip to support the grating as well.
To finish it off I softened the hard corners all around the top edge of the coaming. I may or may not paint the coaming red and leave the grating bright. But I dont know yet. I have seen Cutter models done both ways. There will be a lot of other deck fittings painted red so I dont want to go overboard... . Tomorrow I will make the coaming for the smaller grating behind the windlass.
Chuck
-
 Chuck got a reaction from rafine in HM Cutter Cheerful 1806 by Chuck - FINISHED - 1:48 scale - kit prototype
Thanks,
Today I started making the coamings for the hatch gratings. There are three, but only two need coamings. The main hatch is shown here. The second smaller grating will be just aft of the windlass.
The gratings were made using the Syren grating kits with camber already built in them.
Then the coamings were built up around the finished gratings. Too often I see folks build the coaming following the plans and then when it comes time to add the grating it wont fit. Sometimes you end up with holes along the coaming or have to shave down the grating too much to fit it into the coaming. By building the coaming around a finished grating I wont have this issue. Now my grating may end up being a hair larger or smaller than the plans but that is less important than having it look correct. We are talking about maybe .025" larger or smaller...thats acceptable.
The coamings were made with the usual lap joints. Note the fore and aft sides have a roundup. These coamings are 1/4" high. Others will be less and not as thick...they are all different but for the two gratings the coamings are 1/4" high x 3/32" thick. But dont forget that the planking will go around them so only 3/16' will be above the planked deck.
Then a right angle jig was used to round off the corners except for what will be the bottom 1/16". The jig is 1/16" thick which will be the same thickness as the planking. I added a strip inside the coaming on the port and starboard sides to create a lip to support the grating as well.
To finish it off I softened the hard corners all around the top edge of the coaming. I may or may not paint the coaming red and leave the grating bright. But I dont know yet. I have seen Cutter models done both ways. There will be a lot of other deck fittings painted red so I dont want to go overboard... . Tomorrow I will make the coaming for the smaller grating behind the windlass.
Chuck
-
 Chuck got a reaction from egkb in HM Cutter Cheerful 1806 by Chuck - FINISHED - 1:48 scale - kit prototype
Thanks,
Today I started making the coamings for the hatch gratings. There are three, but only two need coamings. The main hatch is shown here. The second smaller grating will be just aft of the windlass.
The gratings were made using the Syren grating kits with camber already built in them.
Then the coamings were built up around the finished gratings. Too often I see folks build the coaming following the plans and then when it comes time to add the grating it wont fit. Sometimes you end up with holes along the coaming or have to shave down the grating too much to fit it into the coaming. By building the coaming around a finished grating I wont have this issue. Now my grating may end up being a hair larger or smaller than the plans but that is less important than having it look correct. We are talking about maybe .025" larger or smaller...thats acceptable.
The coamings were made with the usual lap joints. Note the fore and aft sides have a roundup. These coamings are 1/4" high. Others will be less and not as thick...they are all different but for the two gratings the coamings are 1/4" high x 3/32" thick. But dont forget that the planking will go around them so only 3/16' will be above the planked deck.
Then a right angle jig was used to round off the corners except for what will be the bottom 1/16". The jig is 1/16" thick which will be the same thickness as the planking. I added a strip inside the coaming on the port and starboard sides to create a lip to support the grating as well.
To finish it off I softened the hard corners all around the top edge of the coaming. I may or may not paint the coaming red and leave the grating bright. But I dont know yet. I have seen Cutter models done both ways. There will be a lot of other deck fittings painted red so I dont want to go overboard... . Tomorrow I will make the coaming for the smaller grating behind the windlass.
Chuck