Erik W
-
Posts
420 -
Joined
-
Last visited
Content Type
Profiles
Forums
Gallery
Events
Everything posted by Erik W
-
 Mike, The deck planking looks great so far. I'm enjoying these tutorial type posts of yours! Erik
- 450 replies
-
- 6
-

-
- cheerful
- Syren Ship Model Company
- (and 1 more)
-
Ed, I think your combo on the 1/72 scale framed Young American and your 1/96 scale POB ship are a great combo of techniques, especially since one will be rigged. It gives a builder interested in a clipper ship a tutorial on building either hull style, in either scale, rigged or unrigged. Lots of options to choose from! And . . . I blame your excellent build logs for casuing me to buy a copy of: The American-Built Clipper Ship, 1850-1856 by William L. Crothers. Erik
- 191 replies
-
- 9
-
-
- young america
- clipper
- (and 1 more)
-
Rusty, Great to have you join the Cheerful crowd! I've enjoyed reading through your other build logs. And . . . don't get too busy modeling to take photos! Erik
- 310 replies
-
- 2
-
-
- cheerful
- Syren Ship Model Company
- (and 1 more)
-
Mark, Chuck, Thanks! While I'm in no particular hurry, starting the fairing with 120 & 220 grit sanding sticks/blocks like I did seemed like an exercise in futility! Erik
-
I need some advice. I started fairing the hull. I'm curious what grit sand paper people are using for the initial fairing. The plywood bulkheads are much harder wood than the longboat bulkheads. So, I know this will take a while. My sanding blocks don't really seem to be working, so I'm using 7 inch 120 grit emory boards. They are flexible, so seem to handle the shape of the hull well, other than the bow area . . . which also needs a lot more material removed. So, my questions are what grit sand paper do you start fairing the hull with? And, what type of sanding block/device are you using for this? Thanks, Erik
-
Cathead, I'm not sure where my model railroading interest went the last few of years . . . it seems to have resurfaced as an interest in ships! Bob, Yes, space always seems to be at a premium doesn't it? Erik
-
Mike, Haha! That towel is not The Towel. The towel in the photo I use to wipe up some of the sanding dust. It's not nearly clean enough to be The Towel. I do my sanding at the desk . . . followed by much vacuuming. Erik
-
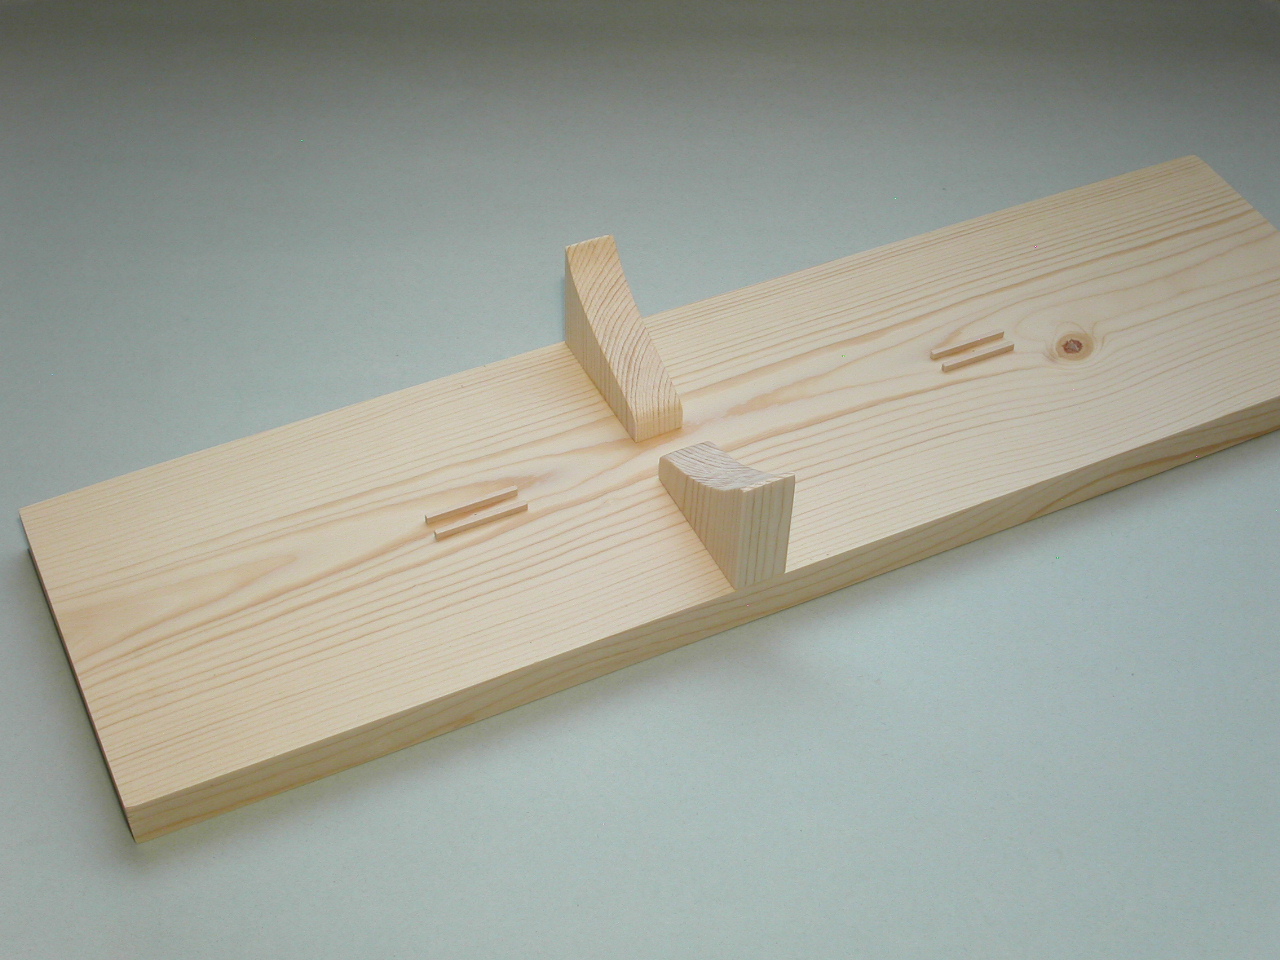
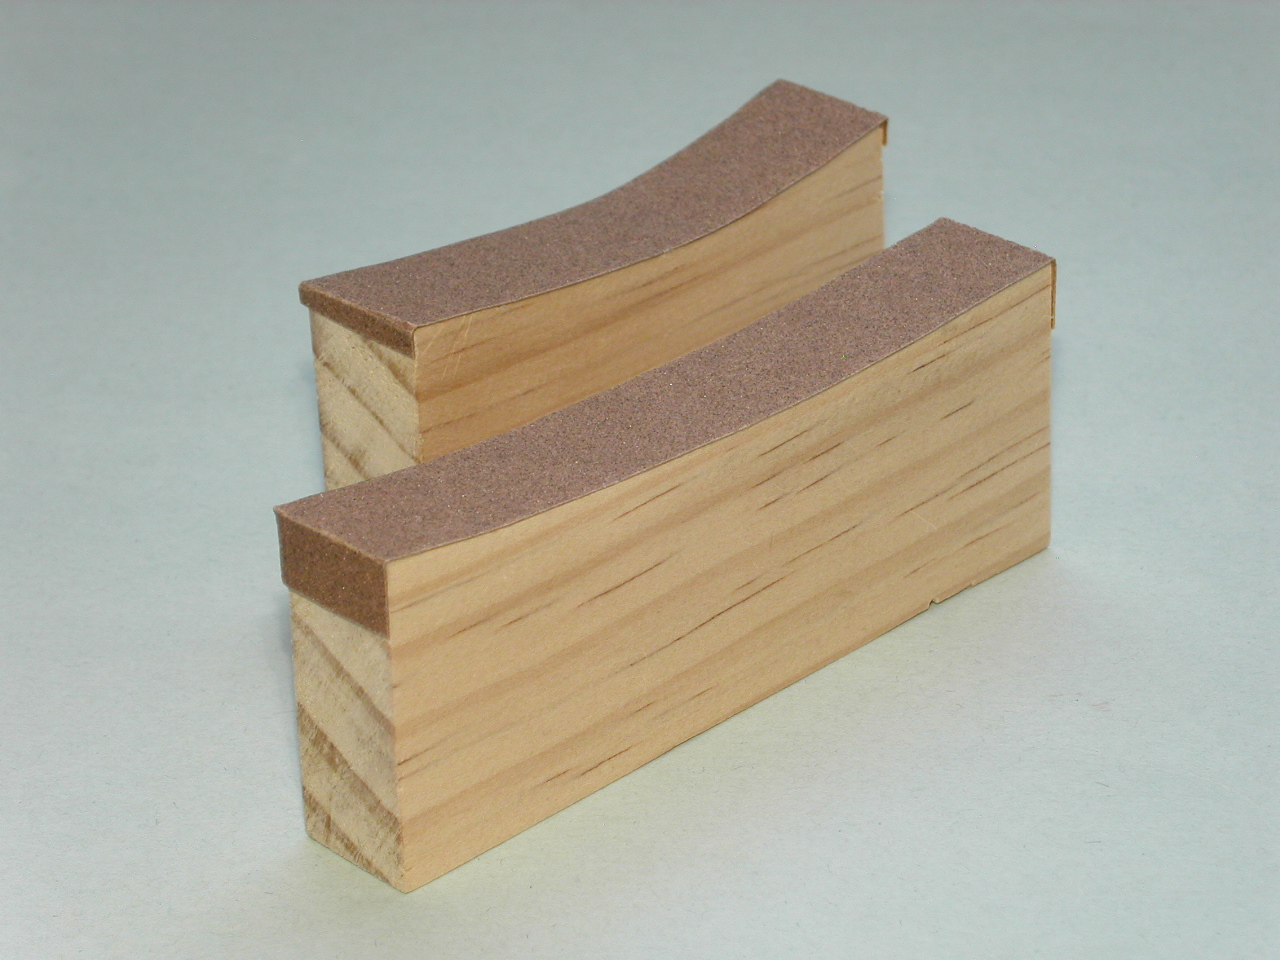
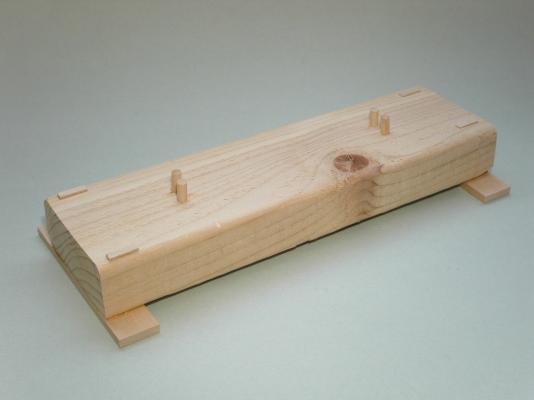
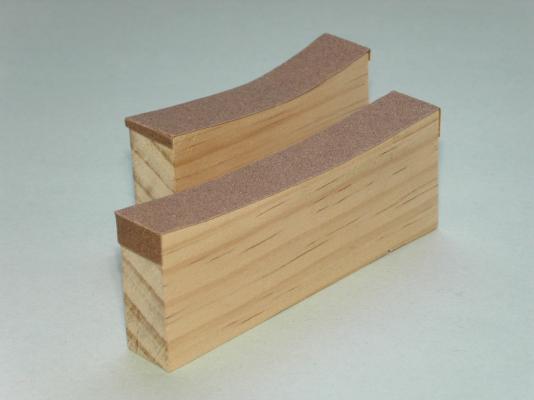
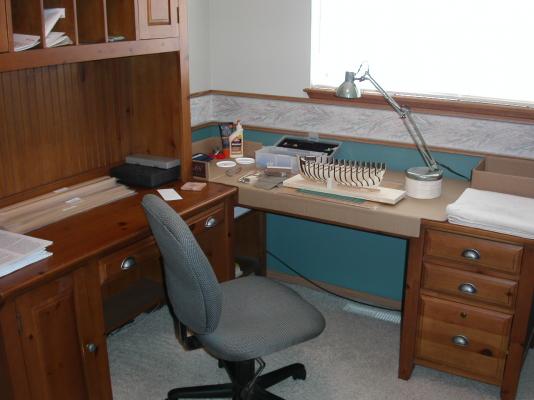
Now that the keel, false keel, and bulkheads are together, I thought it would be a good idea to build a build board/cradle to hold the Cheerful upright. I also built a jig out of scrap wood to gently, but securely, hold the ship upside-down when I need it held for fairing and planking. While I was cutting lumber, I also referenced the Cheerful plans to make two curved sanding blocks, one for the bow curvature, and one for the more gradual curve at the stern. I threw in a photo of my work area. This is in the spare room/office in my house. I model with a small footprint. I'm not typical of a lot of modelers . . . in that I'm a neat freak! I have a vacuum cleaner, and small shop vac in the closet of the room. You can see, with the larger size of the Cheerful, I had to adjust my lighting height by adding a stand for my lamp . . . made out of the same 1 x 6 I bought for the build board. Erik

-
Mike, Well done! The gun ports look great! Have you had any more low humidity issues? What part of the build is next? Erik
- 887 replies
-
- 3
-
-
- hahn
- oliver cromwell
- (and 1 more)
-
Chuck, Yeah, from here on out I plan on taking it slow. I know I have the easy part done. I had accidentally over faired the longboat a bit, so I plan on approaching that and the planking more methodically than I did on the last build. Erik
-
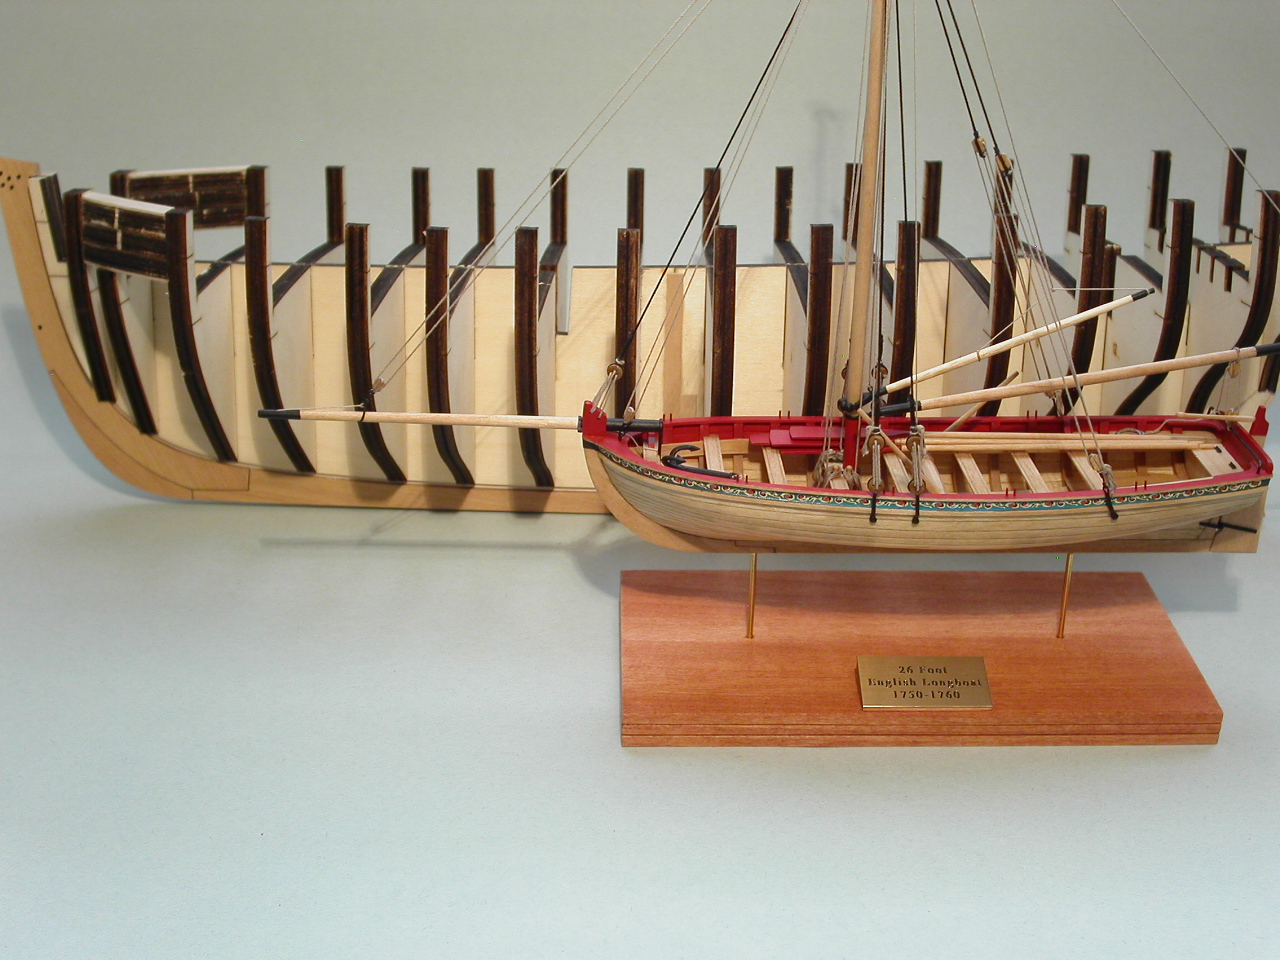
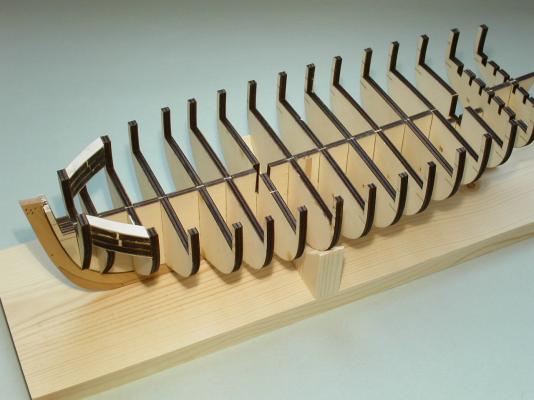
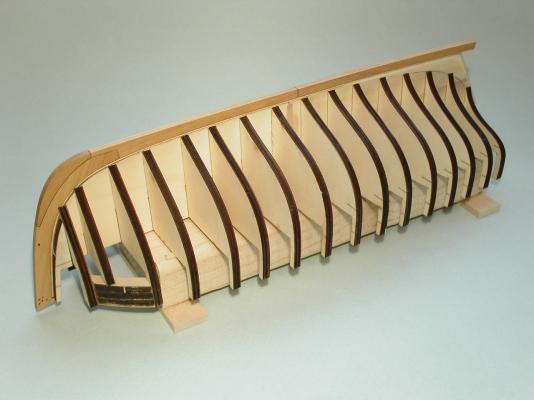
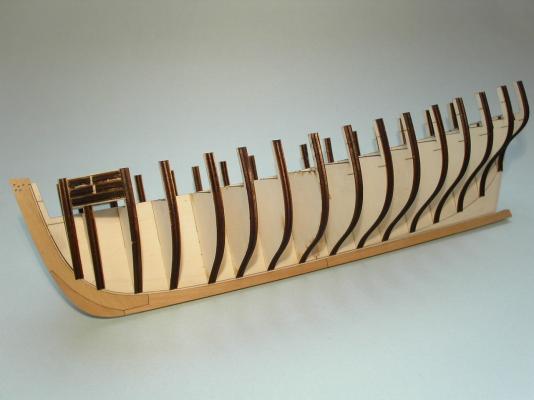
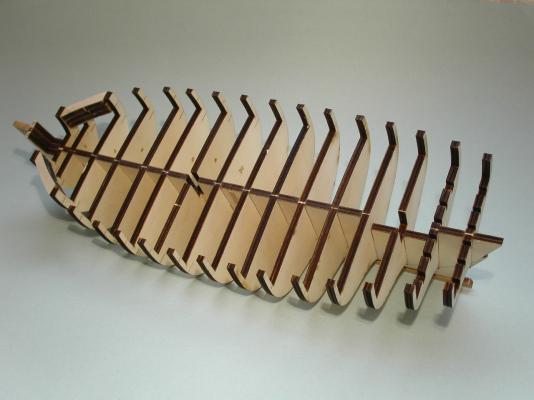
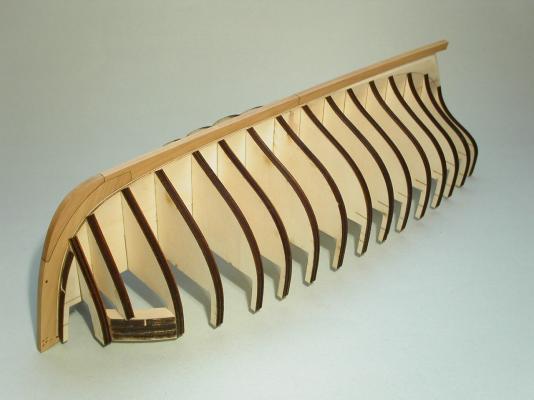
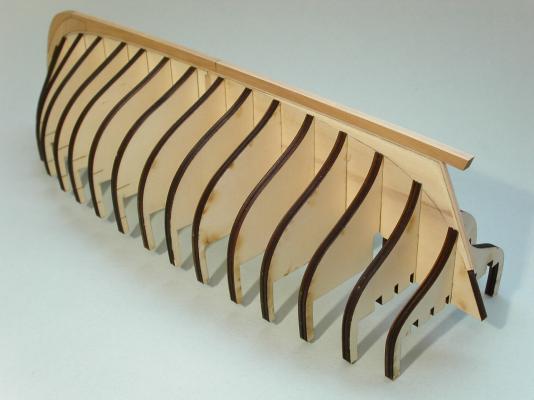
I glued on all the bulkheads and filler blocks. These went in easily. The notches on both the bulkheads and the false keel are nice and deep, so aside from making sure the bulkheads are 90 degrees to the false keel using a square, the assembly is a no brainer. I included a shot of my recently finished longboat with the Cheerful hull to show the size comparison. I have to say, when I built the longboat, I thought it was big, compared to the 1/160 model railroad stuff I've spent most of my life working on, but the Cheerful is positively HUGE! Haha! I guess it's all relative . . . Erik

-
I have close to 4 decades under my belt building plastic and resin models (see my latest stuff here: http://modelshipworld.com/index.php/topic/4423-what-else-do-you-model-besides-ships/?p=343803 ). The main reason why I wouldn't want to paint and weather a wooden ship model is wood is a wonderful natural material, and a wooden ship model is something I create myself from raw materials. I want to showcase what I created, rather than cover it up with paint and weathering. A plastic or resin model, on the other hand, is essentially already formed/shaped by the manufacturer, so there is no reason to leave it uncovered. I modify heavily every plastic or resin kit I've built. To me the art in plastic or resin model building comes from painting and weathering. In wooden ship modeling, I feel the art comes from the creation of a finished product from what is essentially a pile of sticks and string. That's my humble $.02. Erik
-
This week has been spent getting the keel put together and glued on straight and true. The laser cut keel parts fit together well, with minimal cleanup. I followed the instructions for the tree nails, using a pencil to darken the hole and then using Natural color Elmer's Wood Filler. The tree nails look faint in the photos, but are more visible in person. Once everything was glued together I sanded the keel smooth with 220, 320, and then 400 grit sandpaper and rubbed in Wipe-on-Poly (satin) for about 30 seconds, then immediately wiped it off. I'm enjoying this Castello boxwood! I like working with a small grain hardwood. It's refreshing after the fuzzy basswood I'm used to. Erik
-
Cutter Cheerful 1806 by rafine - FINISHED
Erik W replied to rafine's topic in - Build logs for subjects built 1801 - 1850
Awesome Bob. It looks great! Erik- 525 replies
-
- 3
-
-
- cheerful
- Syren Ship Model Company
- (and 1 more)
-
Buying an Expensive Kit and throwing most of it away
Erik W replied to pirozzi's topic in Wood ship model kits
One thing as a consumer I appreciate about the small size of this segment of the hobby, is the interactions between modelers/customers and these small manufactures (who are also modelers), are more personal. Ship modeling definitely has more of a family feel to it. That's one of the things that appeals to me. Ask a manufacturer a question, and you'll quickly get an answer. That said, I am conscious of the fact that if we all constantly email Chuck, and others, that it takes time away from them making great products for us! Erik -
Christian, Thanks for the kinds words! I'm happy with the results. And I'm looking forward to making progress on my more involved second build, HM Cheerful: http://modelshipworld.com/index.php/topic/12512-hm-cutter-cheerful-1806-by-erik-w-148-scale/?p=378598 Erik
- 222 replies
-
- 3
-
-
- 18th century longboat
- model shipways
- (and 2 more)
-
Buying an Expensive Kit and throwing most of it away
Erik W replied to pirozzi's topic in Wood ship model kits
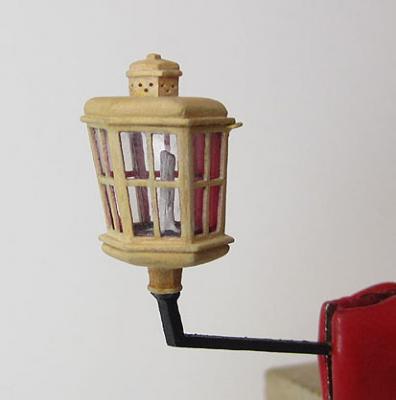
I entered into this hobby 6 months ago from a background of decades of model railroading and military modeling, working in plastic, resin, and brass. One thing I noticed right away was that the quality improvements in most commercially available wooden ship kits have been non-existent or not improved at nearly the same rate as the other hobbies I've been doing. When I selected the longboat as a first build, I was committed to building it as-is. The results were fine, but I really wanted to work with better materials on a second build, so chose Chuck's Cheerful. To me the Cheerful is the best of both words. The customer buys the materials a-la-carte, so there is no wastage, and they don't need to acquire expensive power tools (and figure out where to house them) if you don't want to. Clear instructions are also provided for those, like me, who admittedly don't know what they're doing. If there weren't small, cottage manufacturers like Chuck and Crown Timberyard, I wouldn't be getting into this hobby. To show a visual contrast, here is the stern lantern of the Model Shipways Essex, their newest kit, and what Chuck offers. I'm blown away that in the second decade of the 21th century, a manufacturer would actually include parts like that in their kit. That said, I agree with Blue Ensign, to each their own. Some of the best results on this forum were kits to start with, and examples of excellent modeling. Erik
- 72 replies
-
- 26
-
-
Ed, Great. I look forward to you progressing onto the rigging phase. The physical size of these ships is impressive when compared to the 18th century British warships I'm more familiar with. Your 1/96 scale build is a good size model in it's own right! Erik
- 3,596 replies
-
- 4
-
-
- young america
- clipper
- (and 1 more)
-
Ed, I've been following this build closely, and reading through both of your Young American build logs. You're doing superb work. It's a testament to your enthusiasm for this project, your writing style, and you photographing every step, that someone like me, who always was interested exclusively in naval subjects, now has an interest in clipper ships! Do you plan on rigging both of these? Erik
- 3,596 replies
-
- 7
-
-
- young america
- clipper
- (and 1 more)
-
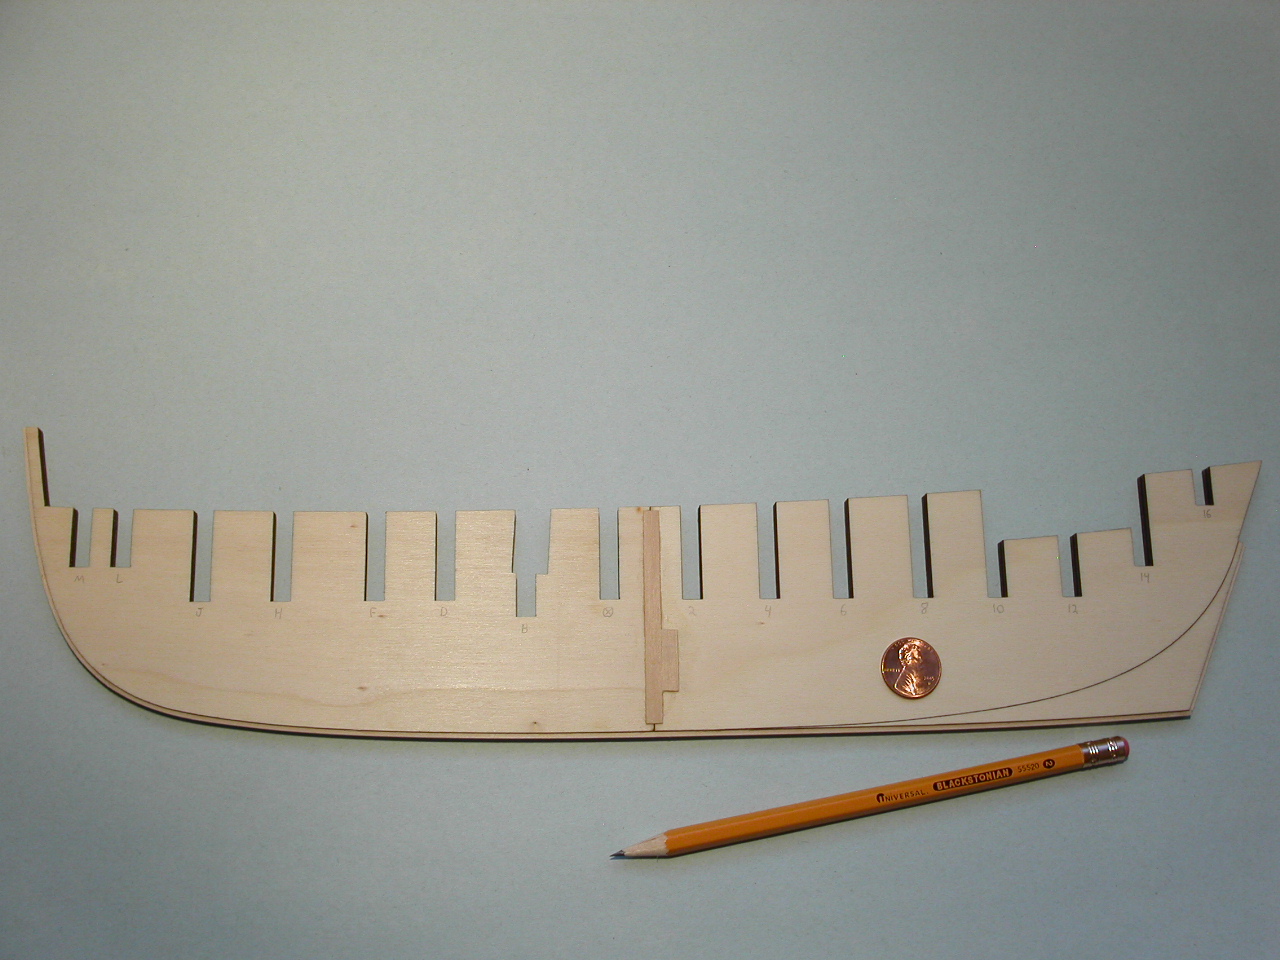
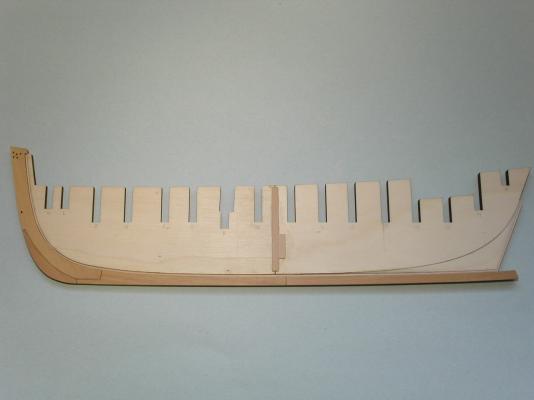
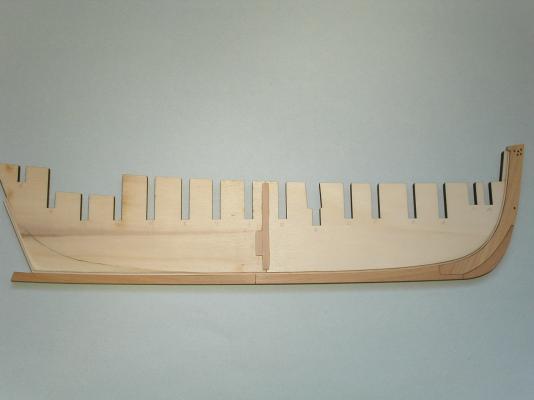
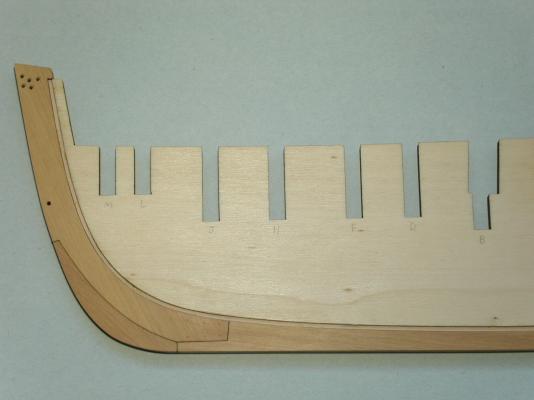
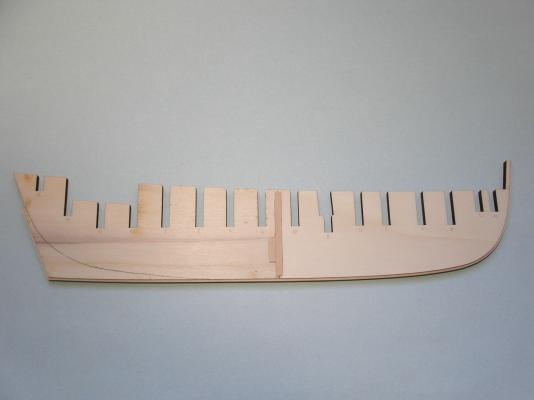
Humble beginnings. I glued the two halves of the false keel together. The plywood is perfectly flat and straight, so the false keel is absolutely straight. I added some scrap strip wood for reinforcement along the joint. I then glued on the 1/8" x 1/16" rabbet strip along the length of the bottom. I drew the bearding line on the starboard side of the false keel to match the line on the port side. I'll tweak it a bit before I start removing material. I also marked each slot, both sides, where the number/lettered bulkheads will go. I threw in a penny and pencil to give an indication of size. Erik

-
Mike, Y Yes! I know sailors are a superstitious group, so I can see how that would extend to those of us that build ships. The White Towel might be the secret! One great thing about jumping into the Cheerful build now is that I can learn from other's endeavors. Between that and The White Towel, I'll be unstoppable! I'm glad to have other folks following my build. It helps me motivate! Erik
-
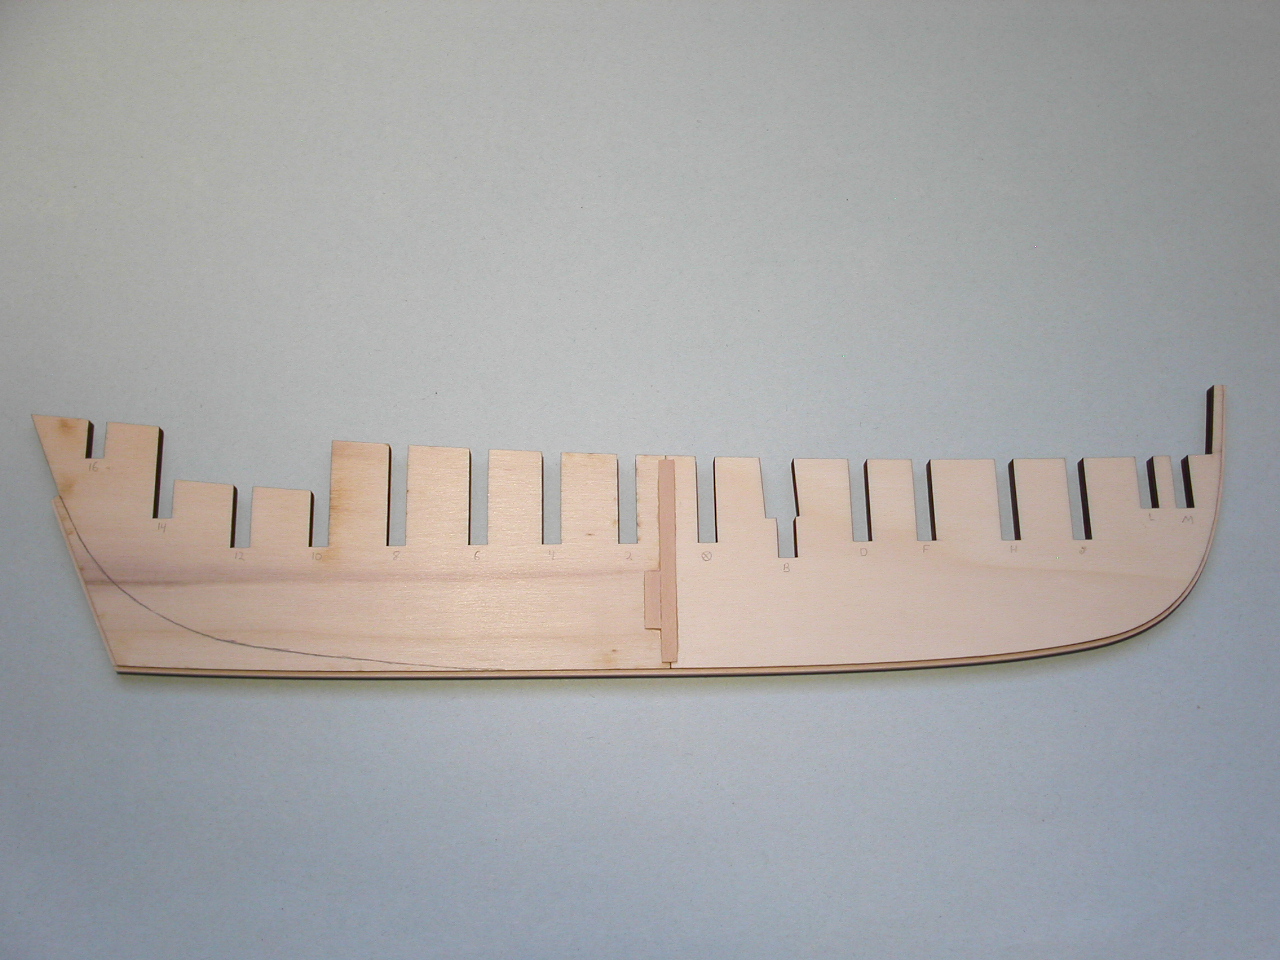
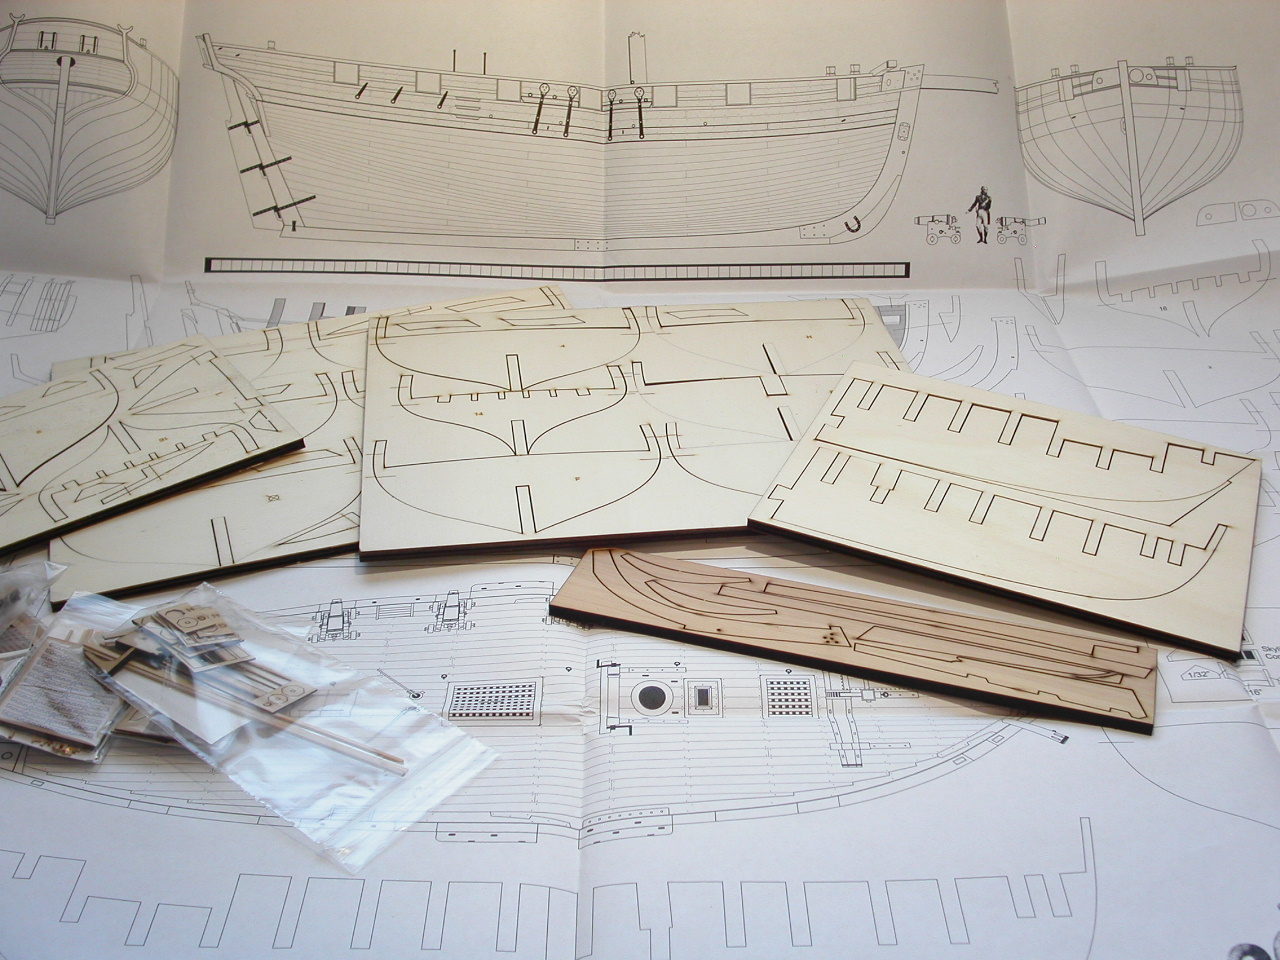
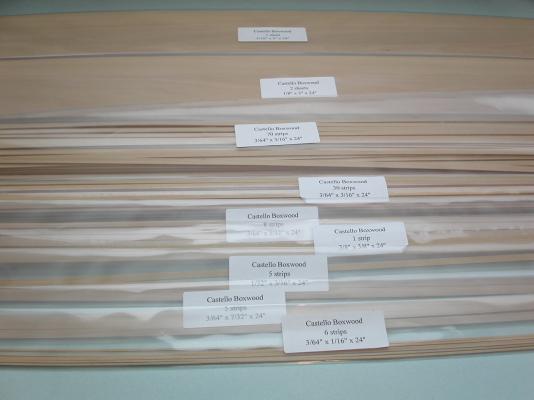
Welcome to my Cheerful build! Little did I know when I bought a Model Shipways longboat kit last summer that I’d get bitten by the ship building bug so seriously. I finished my longboat a couple of weeks ago (see here http://modelshipworld.com/index.php/topic/10743-18th-century-longboat-by-erik-w-–-model-shipways-–-scale-148-first-wooden-ship-build-finished/?p=374717). I quickly realized that I missed putting time in daily working with my hands and building something. Aside from a Dremel, I currently don’t own any power tools suitable for modeling. So, with what Chuck offers for the Cheerful, and with the availability of a new Cheerful timbering package, with milled strip wood, from Jason at Crown Timberyard, I can build a POB ship with accurate plans, castello boxwood, and high quality rigging materials and fittings. I hope I’m able to hone the skills I developed on my longboat build, and do the Cheerful justice. Chuck, Mike (Stuntflyer), and Bob (rafine) have set the bar pretty high! Feel free to comment and offer constructive criticism. I realize how much better my longboat turned out with the input and advice from others. O.K. Time to stop typing and start building. I received my order from Chuck at Syren Ship Model Company last week, and my wood order from Jason at Crown Timberyard arrived yesterday. Here are a few photos of the raw materials . . . which will be slowly transformed into the HM Cheerful! Erik

-
Cutter Cheerful 1806 by rafine - FINISHED
Erik W replied to rafine's topic in - Build logs for subjects built 1801 - 1850
Bob, It looks great though, The .5mm larger blocks don't look oversized at all. One last question. What diameter line did you use for the thick breeching rope? Thanks! Erik- 525 replies
-
- 2
-
-
- cheerful
- Syren Ship Model Company
- (and 1 more)
-
Chuck, I read through your tutorial on tree nailing, and was curious what specific Elmer's Wood Filler you used to be so close a color match to the castello boxwood? Also, how do you get the lines of holes drilled for tree nails straight? Temporarily line it out on the hull with tape?? Thanks! Erik
- 1,048 replies
-
- 3
-
-
- cheerful
- Syren Ship Model Company
- (and 1 more)
-
Cutter Cheerful 1806 by rafine - FINISHED
Erik W replied to rafine's topic in - Build logs for subjects built 1801 - 1850
Bob, Your carronades look great! What size blocks did you use for the tackles? Thanks, Erik- 525 replies
-
- 3
-
-
- cheerful
- Syren Ship Model Company
- (and 1 more)