HOLIDAY DONATION DRIVE - SUPPORT MSW - DO YOUR PART TO KEEP THIS GREAT FORUM GOING! (Only 20 donations so far - C'mon guys!)
×

ggrieco
-
Posts
276 -
Joined
-
Last visited
Content Type
Profiles
Forums
Gallery
Events
Everything posted by ggrieco
-
 Wow, I've been away from this build too long. There are so many new details it going to take me a while to catch up. Once the kids are in bed l'll be sitting down with a glass of wine and this build. Just beautiful! Glenn
- 2,625 replies
-
- 5
-

-
- kaiser wilhelm der grosse
- passenger steamer
- (and 1 more)
-
Steamboats and other rivercraft - general discussion
ggrieco replied to Cathead's topic in Nautical/Naval History
Great idea Cathead! And from the quick feedback already, it looks like you've opened a real can of worms - in a good way. I think there is going to be a lot of valuable info flooding in. Thanks! Glenn- 281 replies
-
- 5
-
-
- Steamboats
- riverboats
- (and 3 more)
-
Thanks everybody, Cathead, that is interesting news about the Malta. I don't think we have much archaeologically from the 1840s and it should really provide info for the gap we have in the developement of the vessel. I can't wait to see how it compares to Heroine and the later vessel as well. Good news about the river craft thread as well! I will be following it! Glenn
-
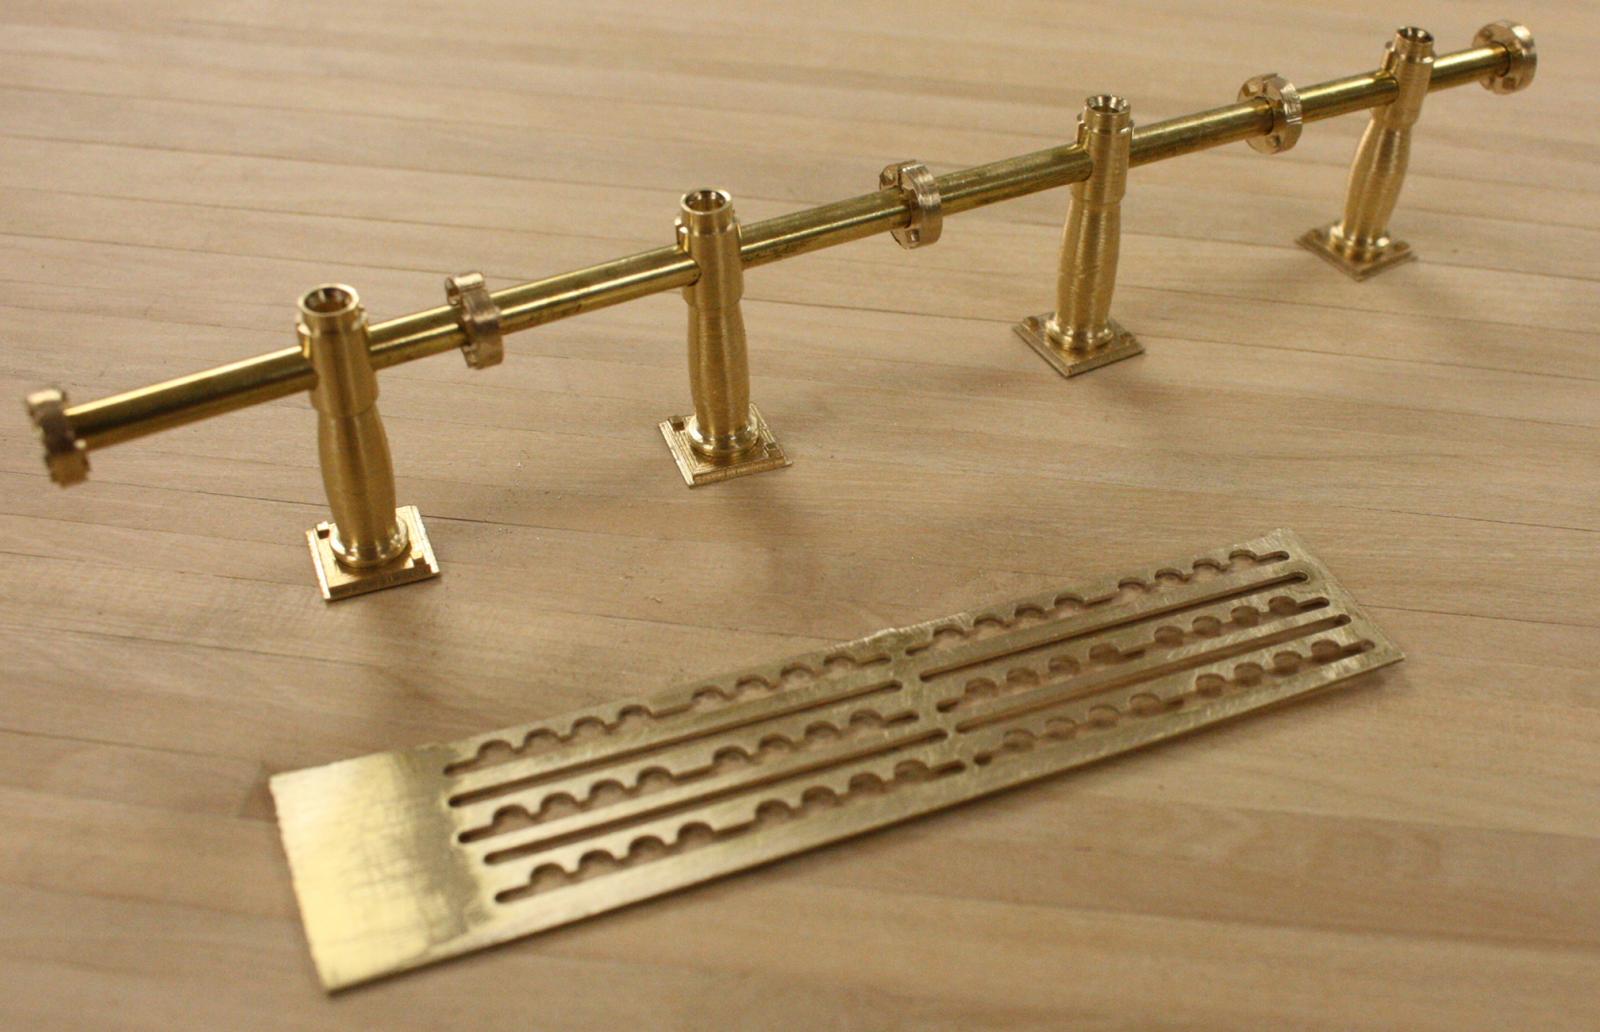
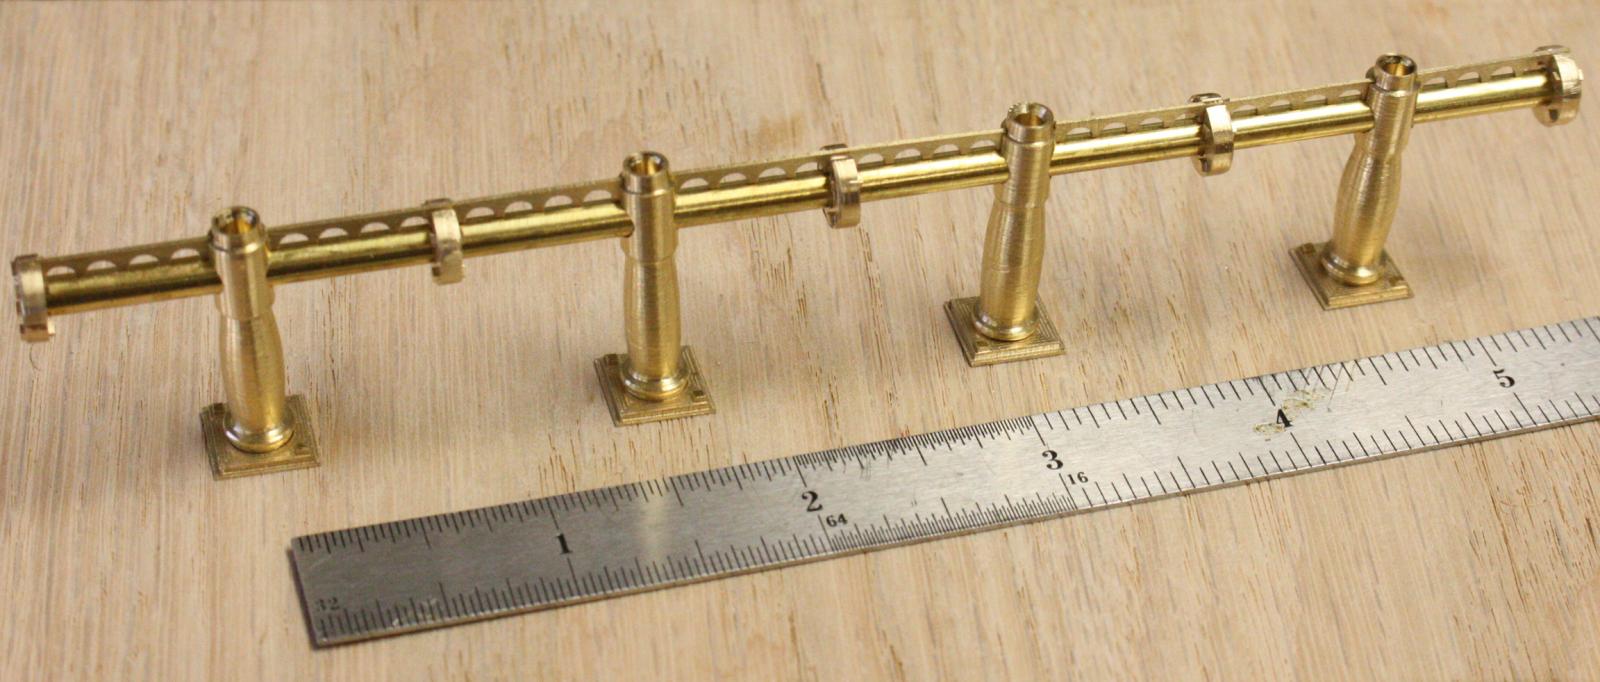
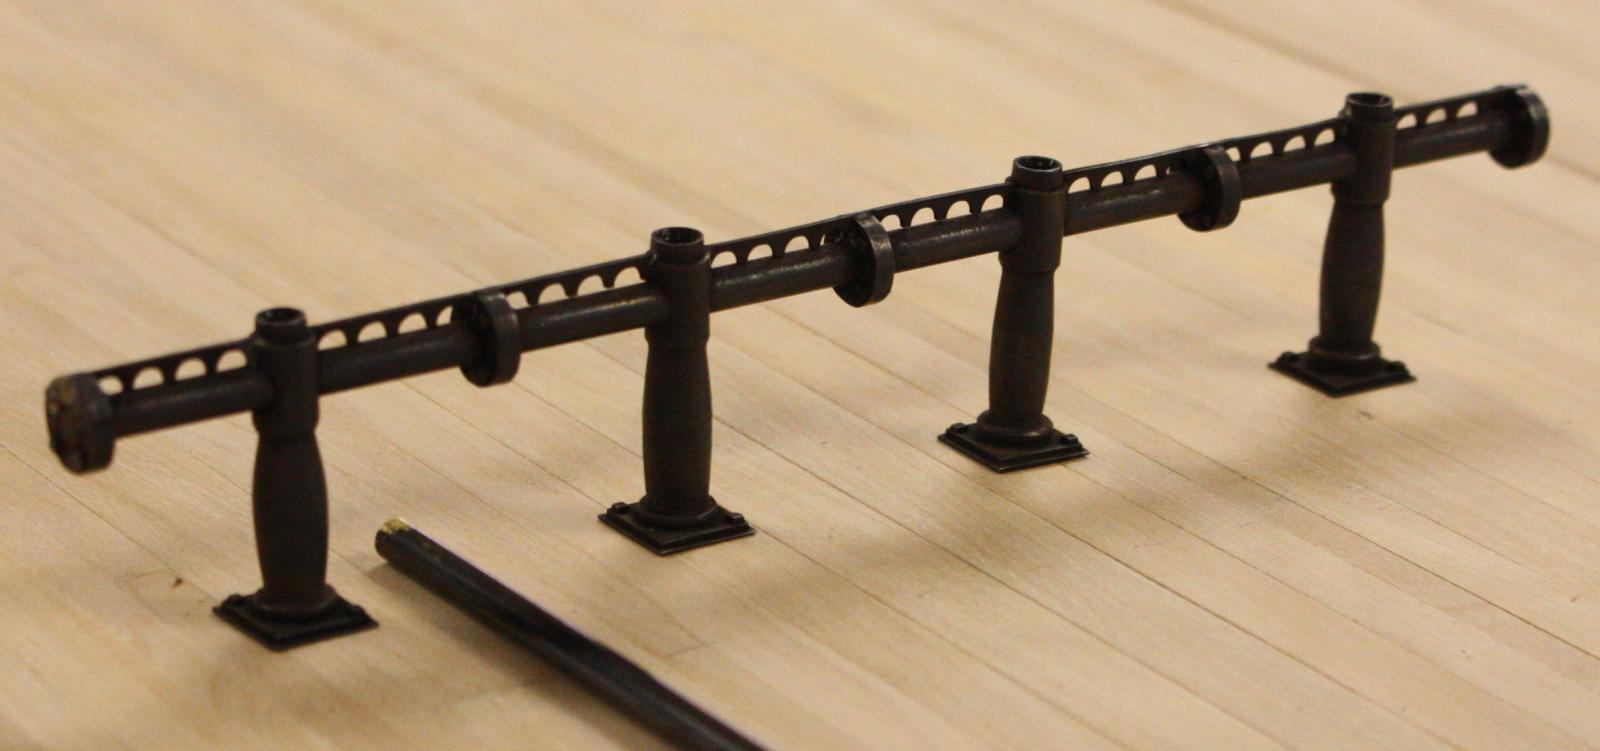
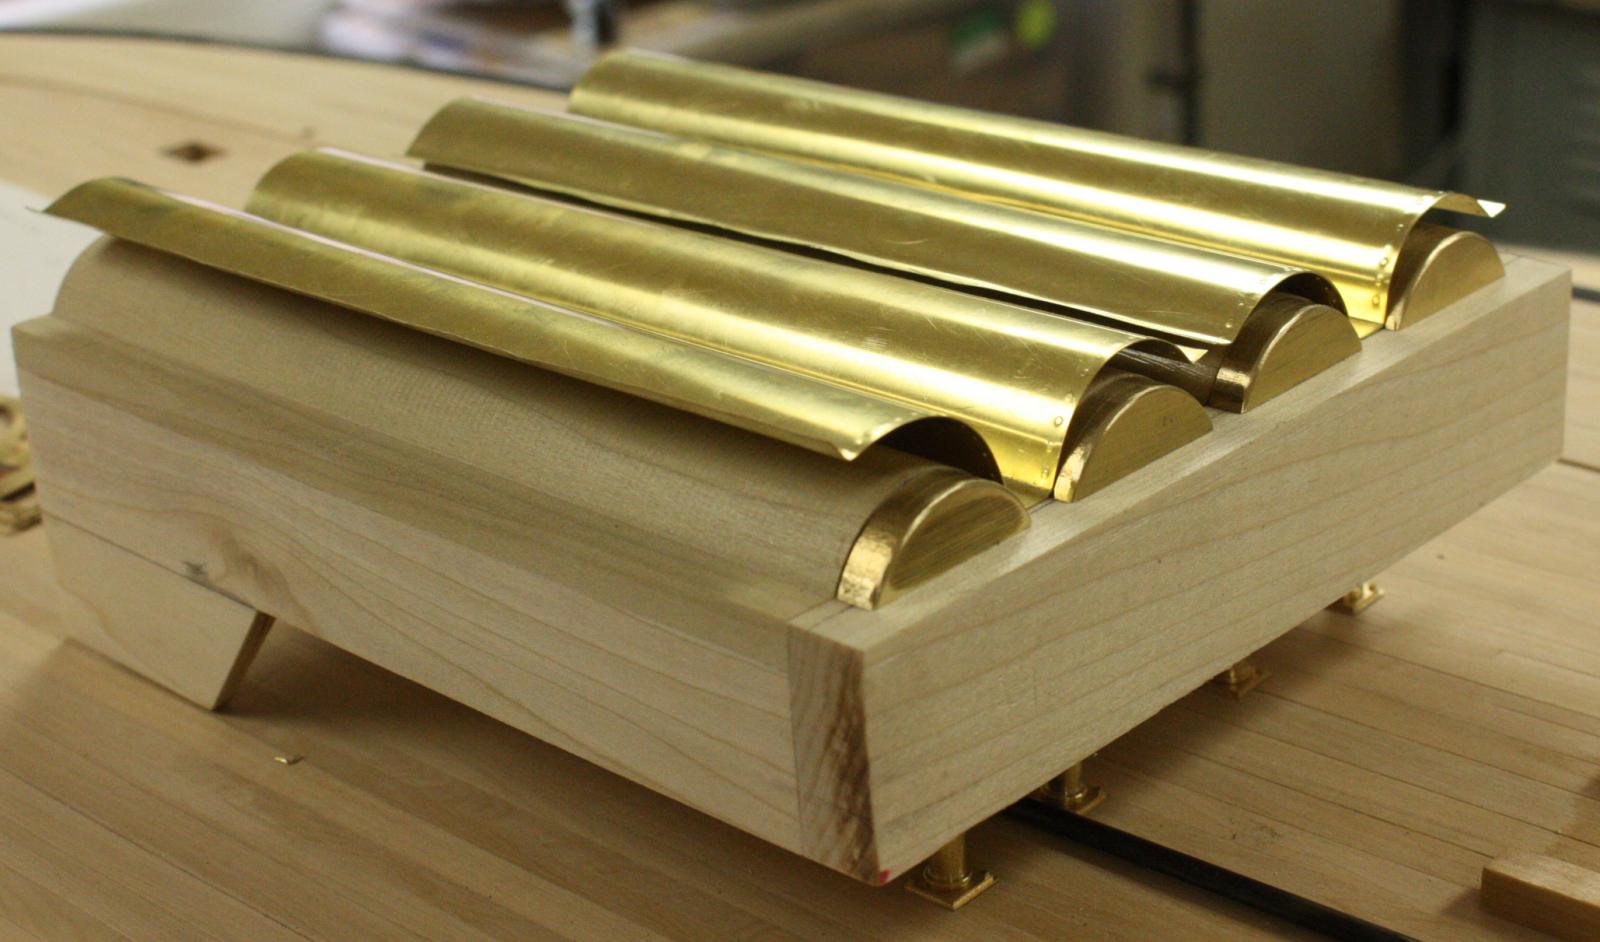
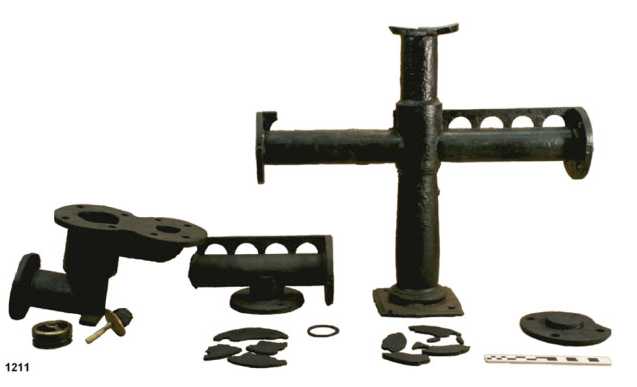
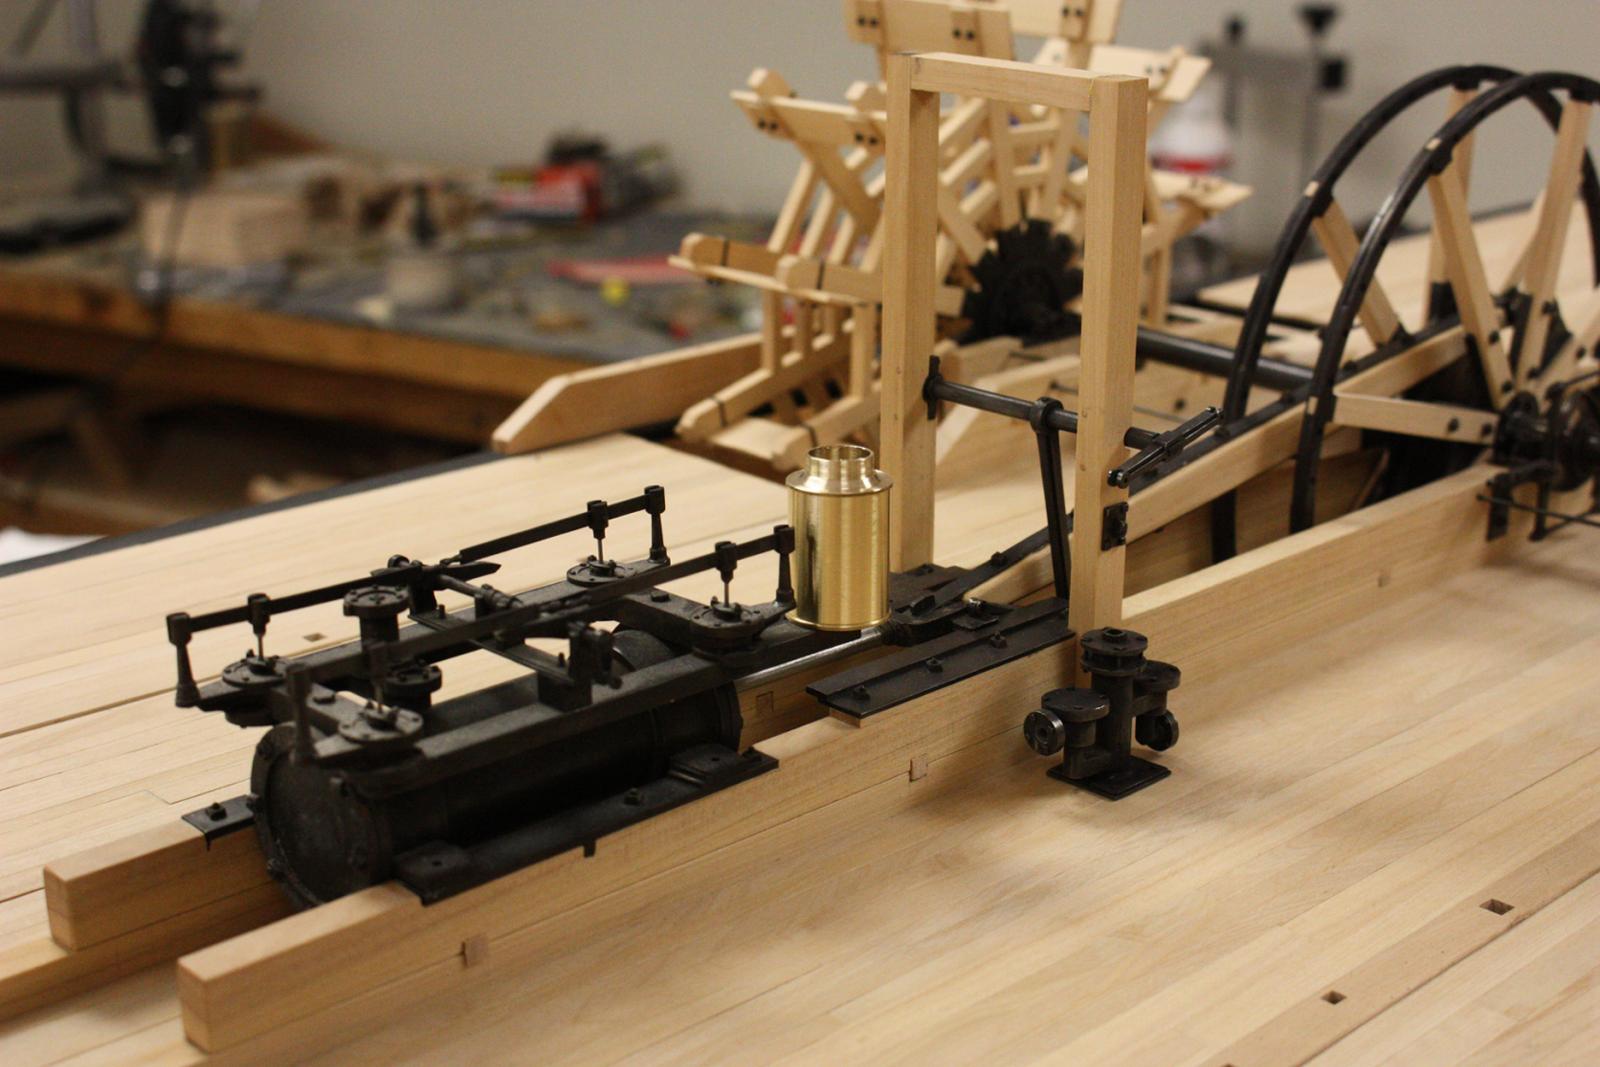
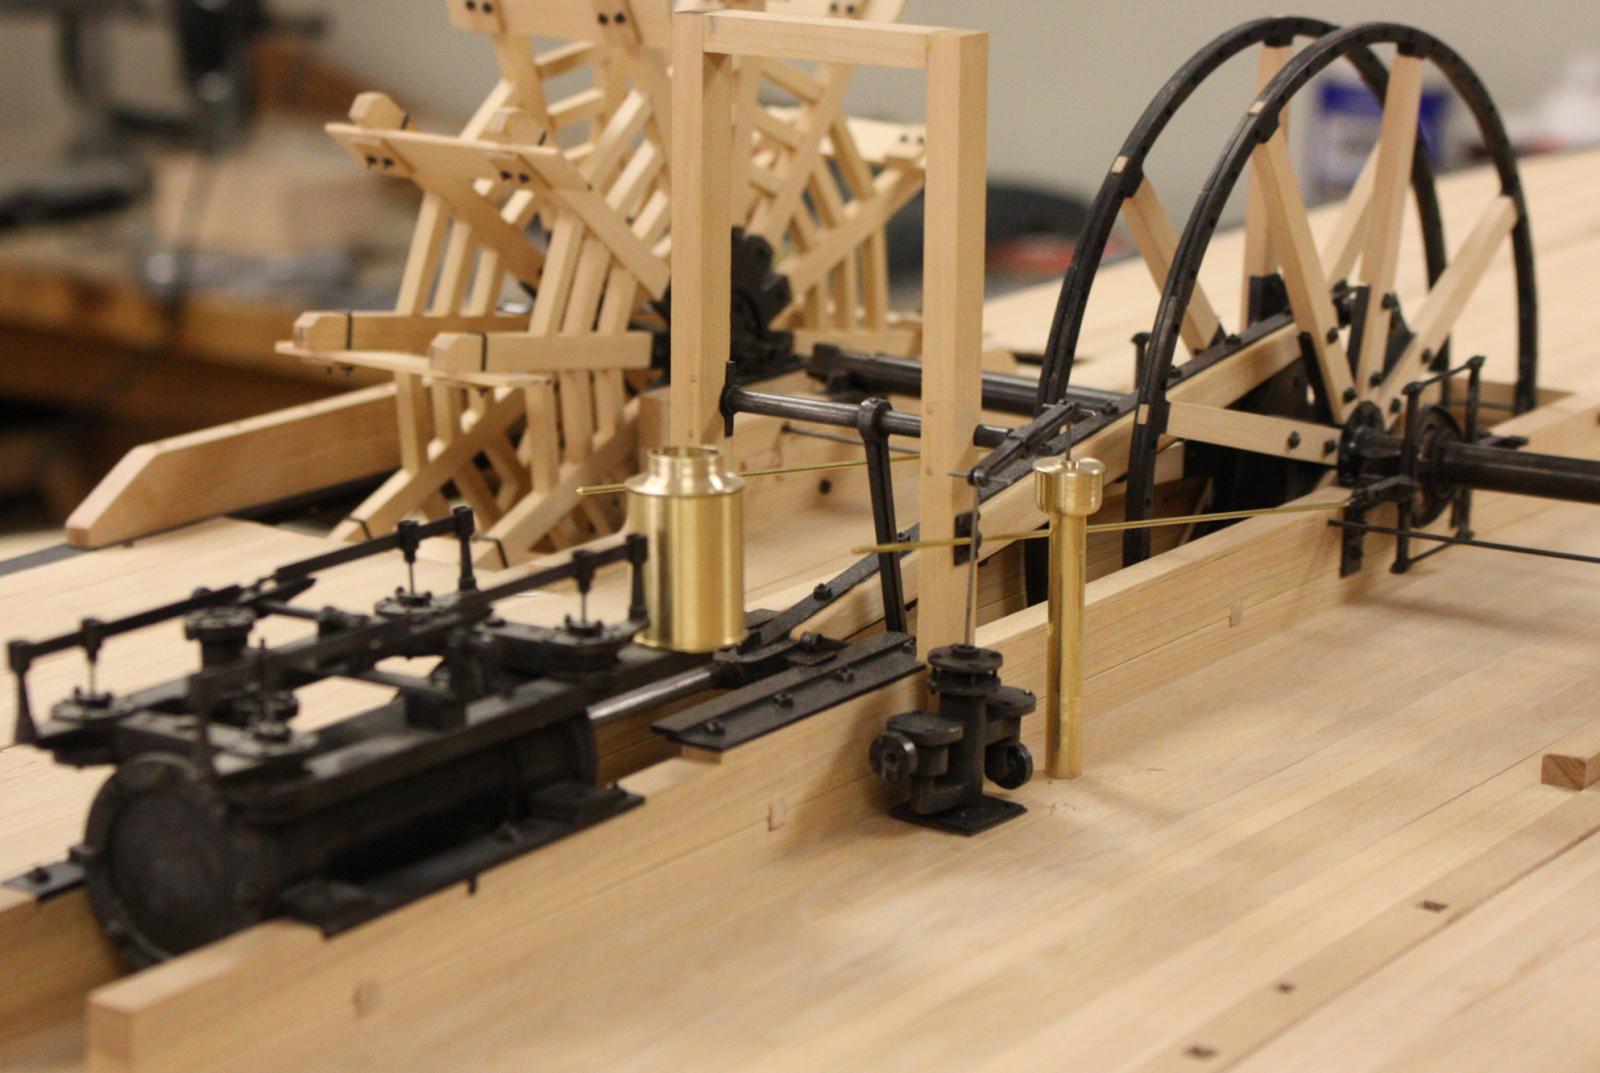
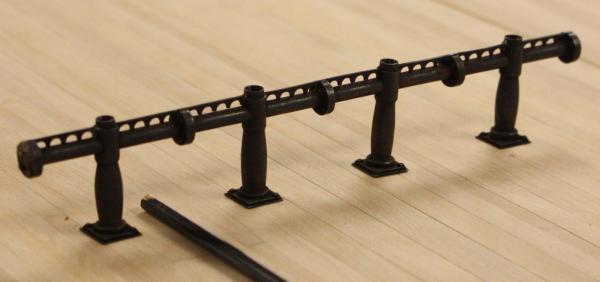
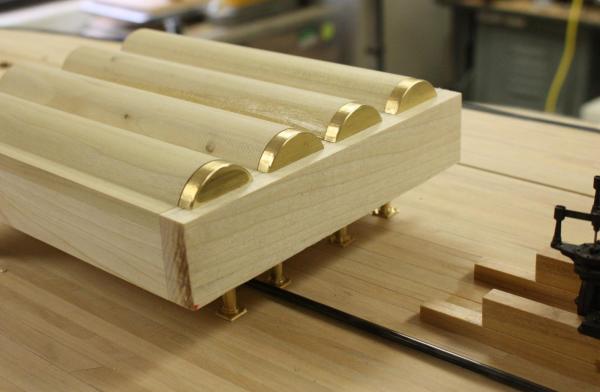
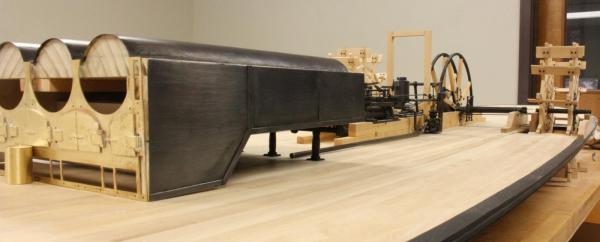
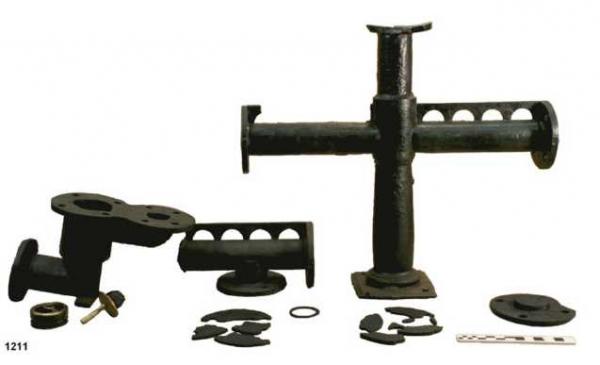
I got a little bit more of the boilers done this week. We have very little of the actual boilers so they will be a little simplified. I will be including the mud drums, steam drums and safety valves. Fortunately, we do have a standpipe and check valve for the feedwater line. I'll add the check valve next week. All the parts for the standpipes. The standpipes actually stood several inches taller and ended with a flange for the boiler tube. The sheathing of the flame bed sat on the arched webbing. Completed standpipes minus the checkvalve. I didn't notice until looking at the photos this morning that the webbing didn't seat properly on the tops of the tubes in a couple of spots. I'll have to correct that on monday. Making the mud drums and steam drums. Dummy endcaps for the boilers. Everything else will be sheathed in .01 thick brass. Covering the boiler tubes. Port side of boiler sheathed. I still need to add wide strips on the boiler tubes to represent the overlapping plates. The holes for the standpipes still haven't been drilled underneath so it doesn't sit flush on deck yet.


- 701 replies
-
- 33
-
-
Hello John, I just love the shape of this hull! And beautifully crafted as well! Glenn
- 745 replies
-
- 3
-
-
- francis pritt
- mission ship
- (and 1 more)
-
Hey Greg, I've been looking forward to an update on this one. Beautiful precision!! Glenn
-
She's going together beautifully Frank! That is going to be one fair hull when you're done. Glenn
- 649 replies
-
- 4
-
-
- dunbrody
- famine ship
- (and 2 more)
-
I had forgotten that this is going to be RC. At this scale she is going to be quite impressive on the water. I can't wait to see it! Glenn
-
Thanks everybody, I spent the day weeding the the flowerbed and my wife's herb garden and it is nice to finally sit down to MSW. Cathead, great question! Unfortunately, the entire deck area where the boilers were is gone -- not a trace in the remains. I forget what we estimated the weight of the boilers, fire brick and water would have been but it does seem like some reinforcement of the deck would have been necessary. Notches on the keelson indicate that there were stantions under every deck beam below the boiler but, this is all the evidence we have. The ash trough as well -- no evidence survives. We have the outboard planking on the port side which doesn't give us any clues. If I remember correctly, Bertrand's ash trough ran to starboard side and we have nothing remaining of the deck to starboard. It is a neat feature that I would love to model but, without evidence, I have decided not to assume we had one. this is one of the toughest decisions when we have archaeological remains that we want to showcase in the model. It would be nice if there were some way to highlight in the model what is represented in the remains and what is conjectural. As you say, it would be fun to represent all the details on the boilers as well. It is always the case that I wish I had just a little more time to research another detail. If I had to take a guess I would say that Heroine used three stopcocks aligned vertically on the boiler. The water level could be determined by opening them slightly in order from top to bottom. Again, without evidence I will probably leave this detail out. Michael and druxey, Thanks for mentioning the three model makers. I googled them and really enjoyed seeing their models. I hope to one day be able to come close to the quality of their work. Just incredible! Bob, S. Coleman and Gerhard, Thanks so much for the comments. Hopefully, once the boiler is sheathed and blackened it will be more convincing. Once again, thank you everybody for your comments and likes. Glenn
- 701 replies
-
- 11
-
-
Thanks Cathead, I know you have done a lot of research into the boilers and I would appreciate any comments or suggestions you might have. Glenn
-
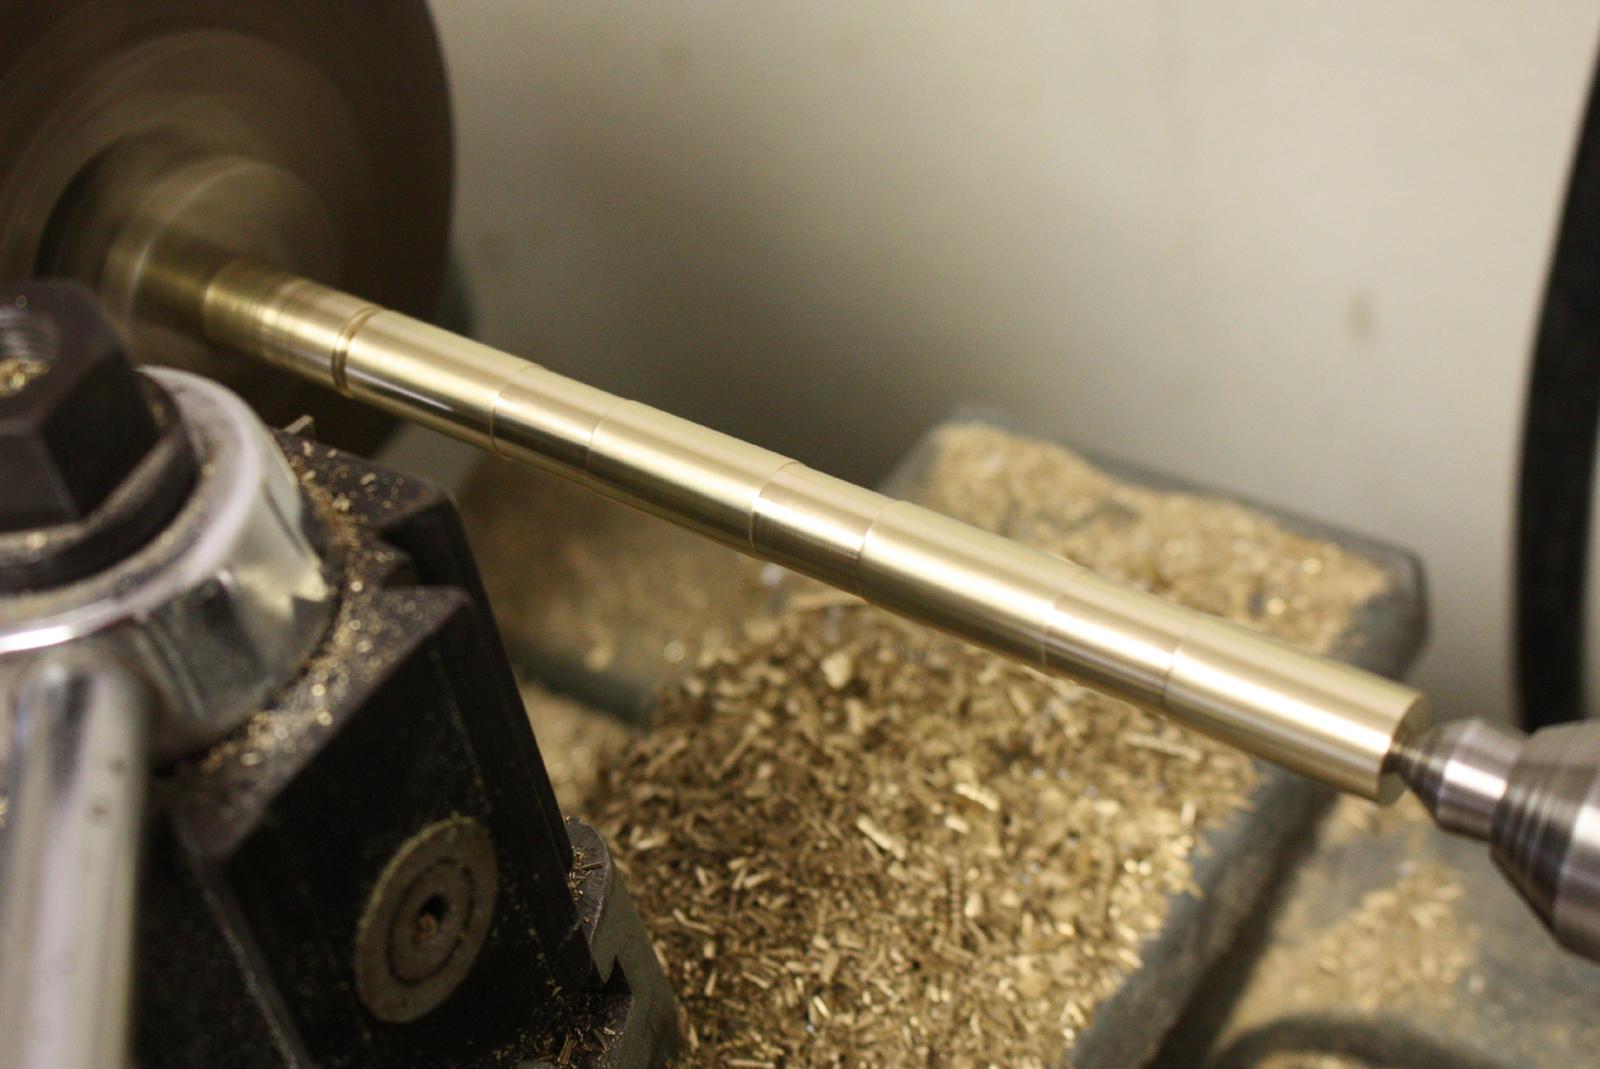
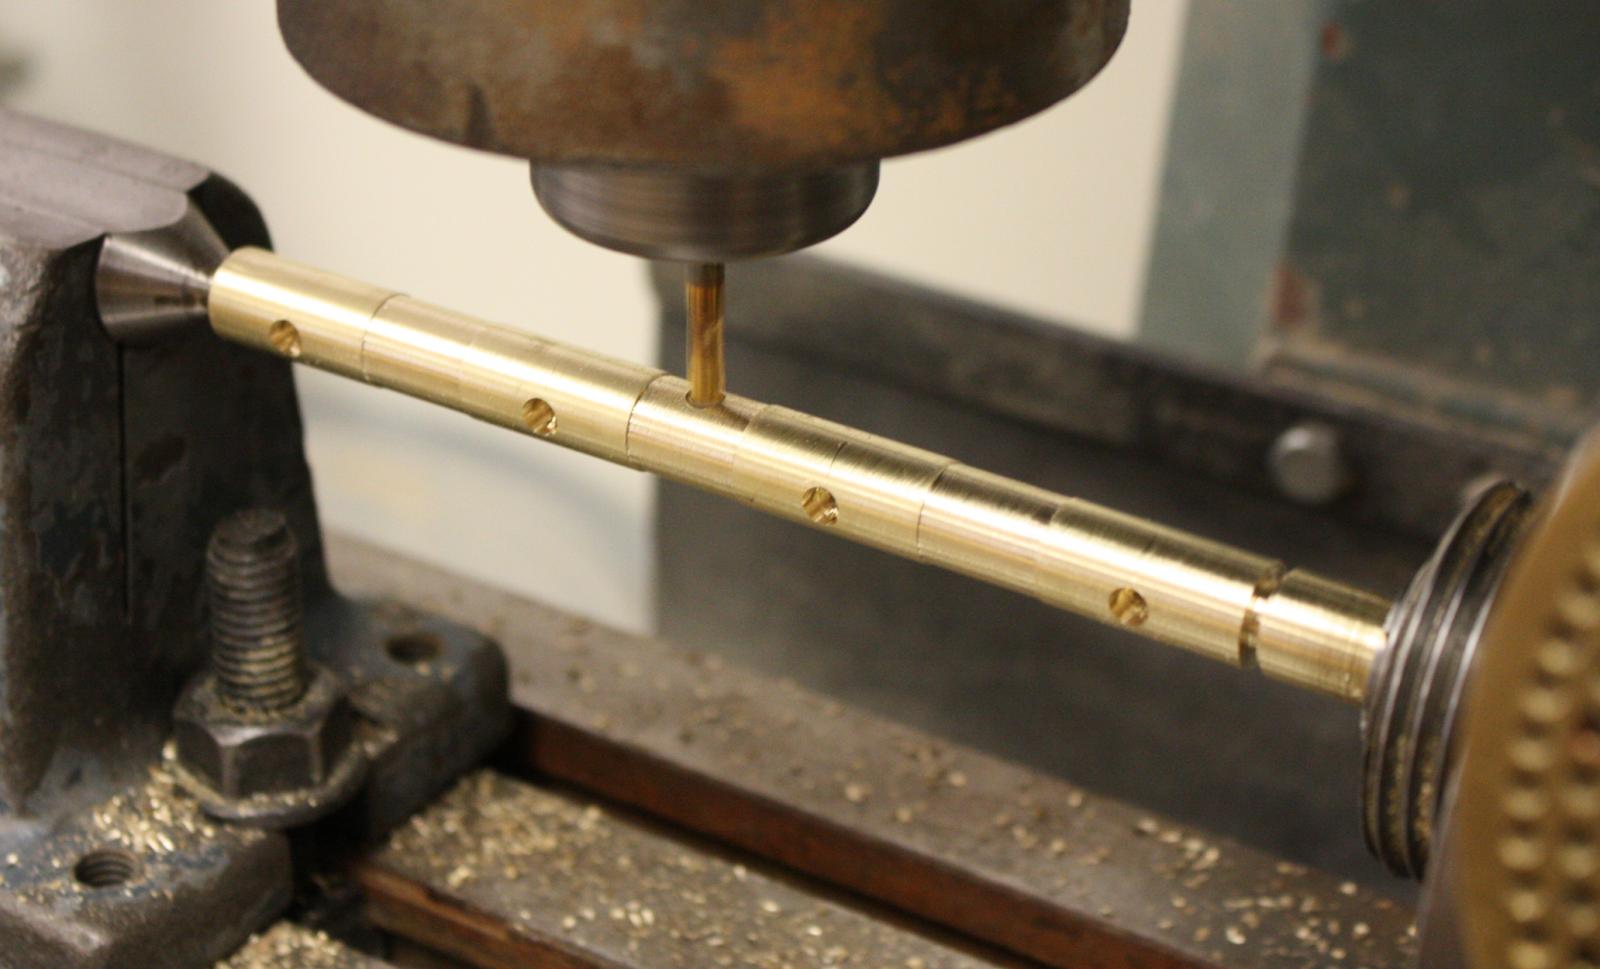
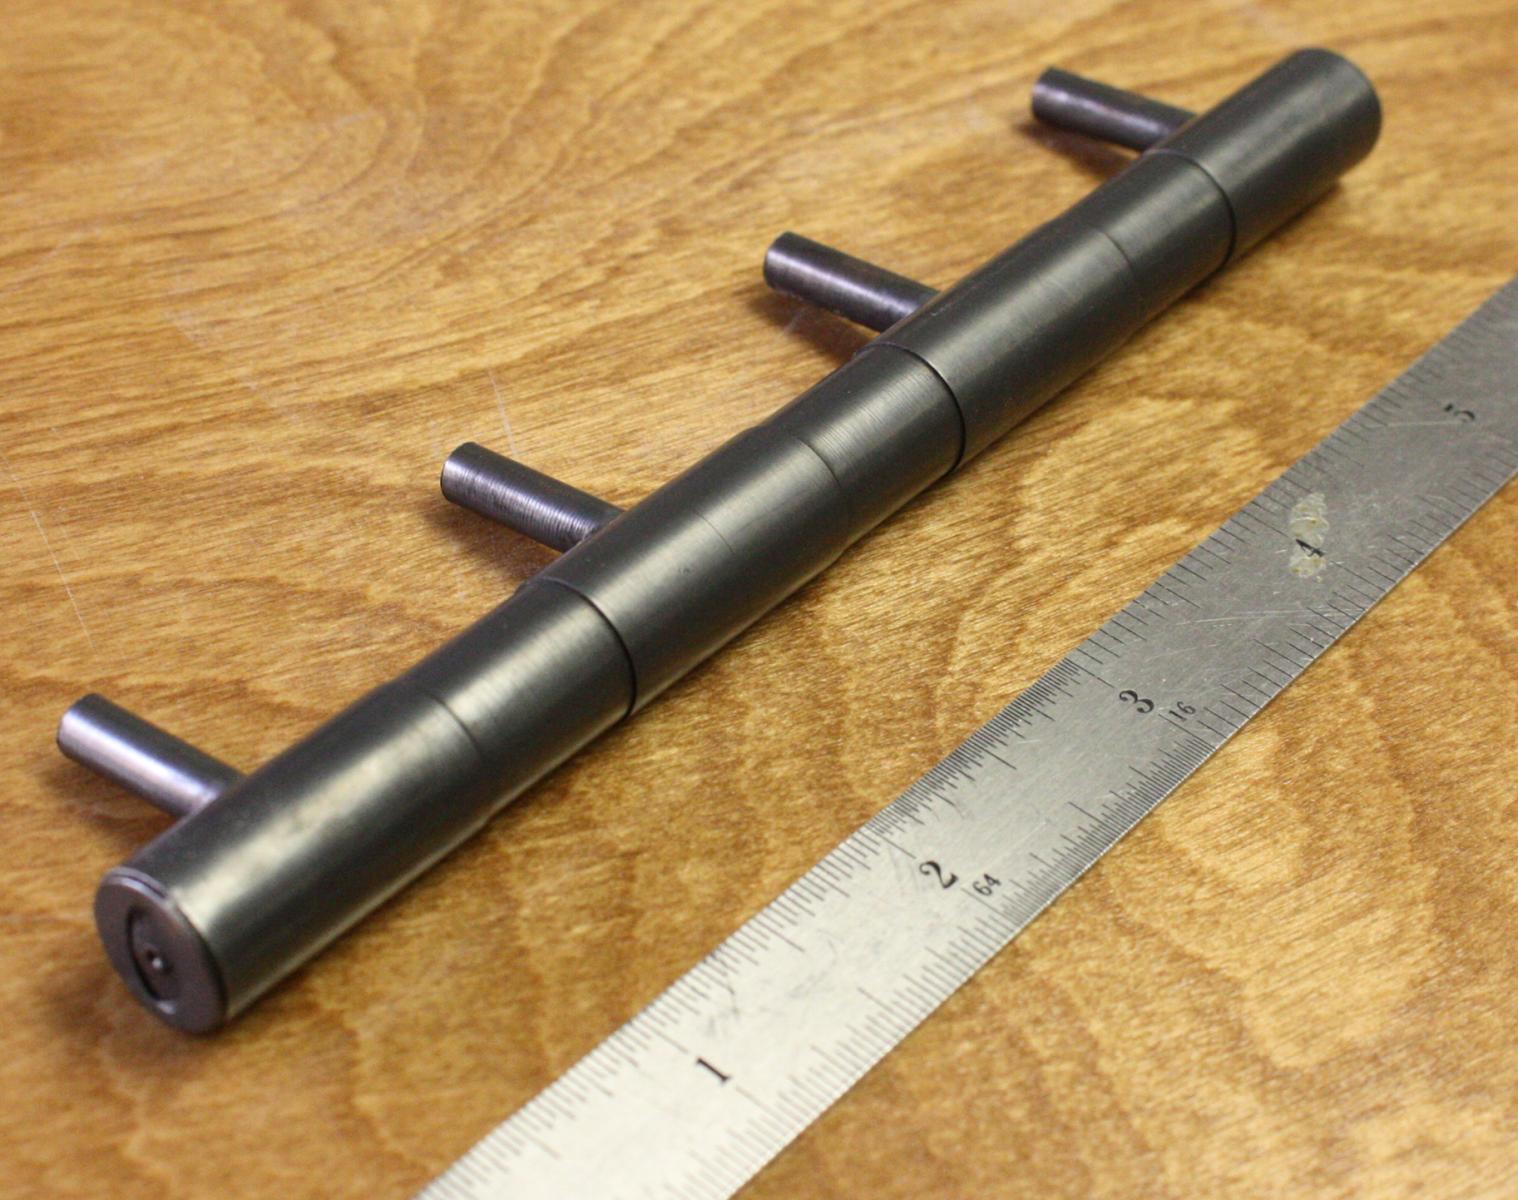
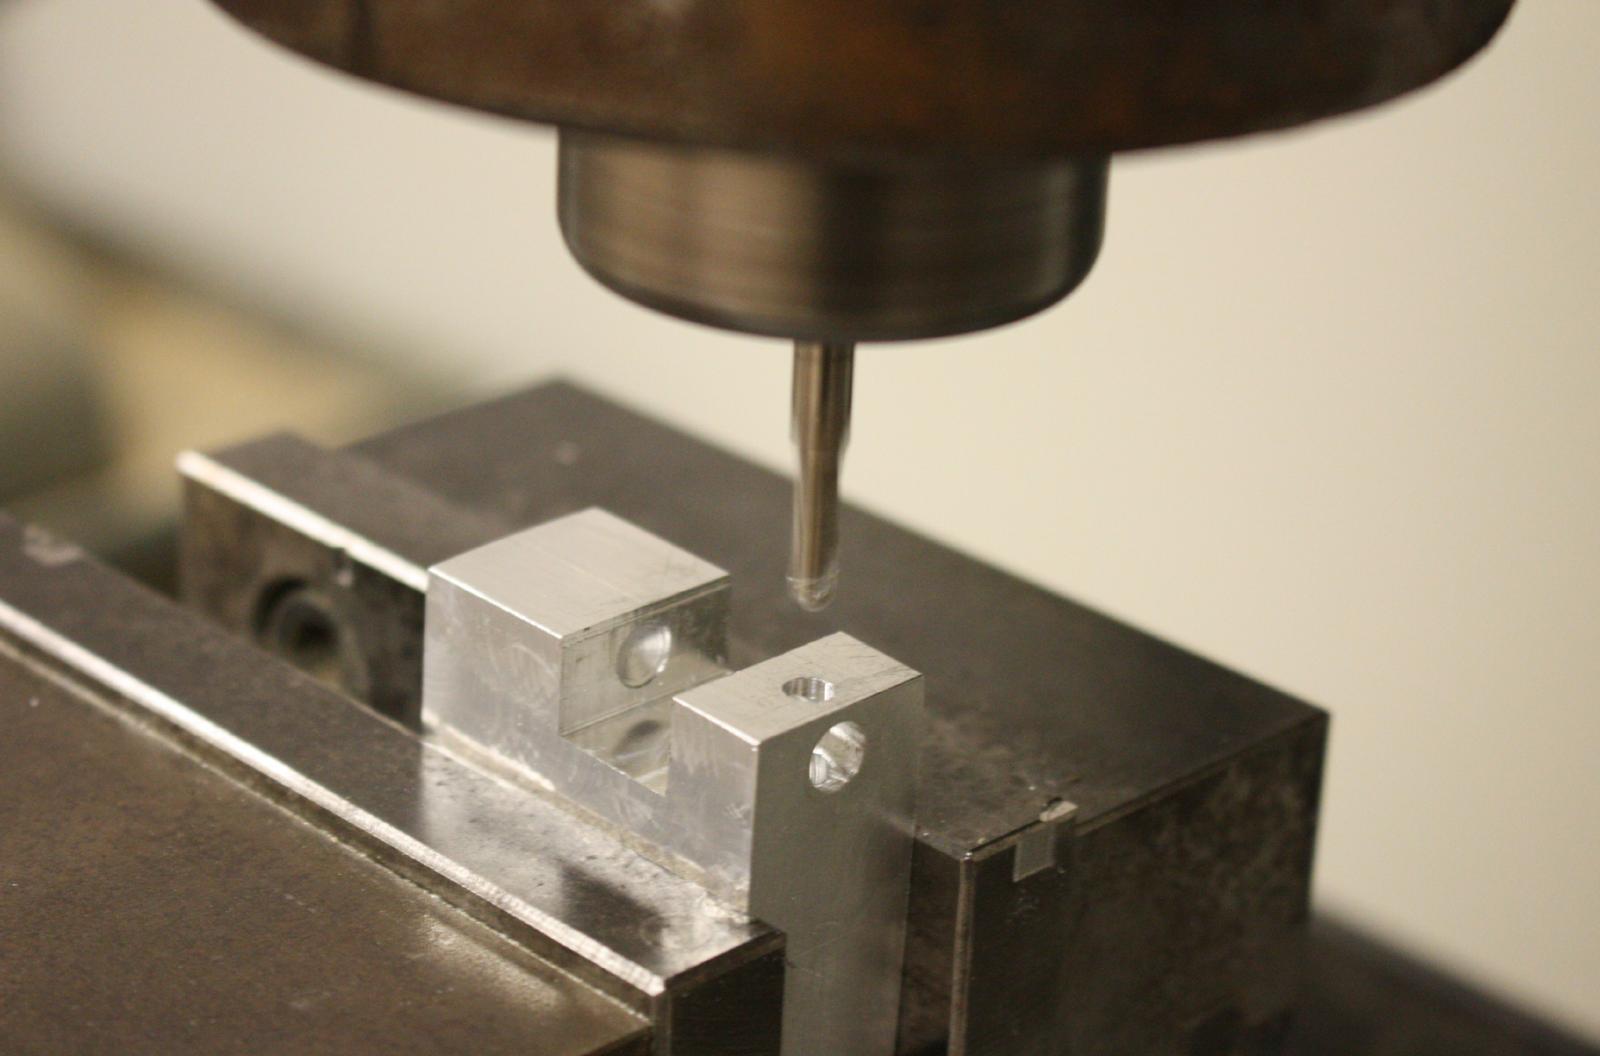
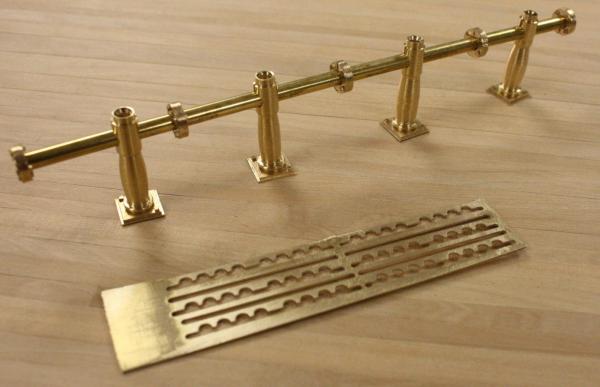
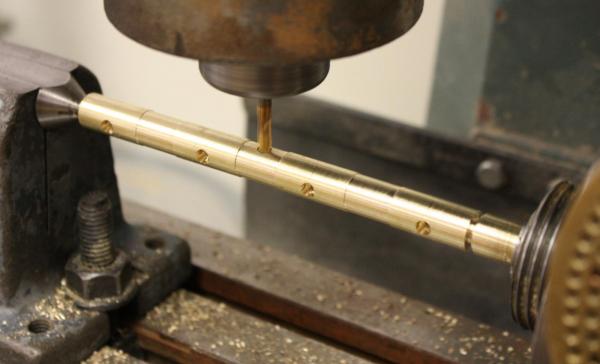
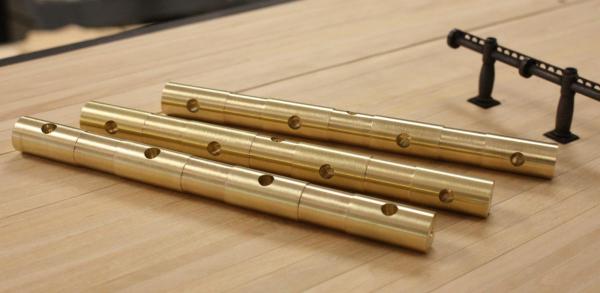
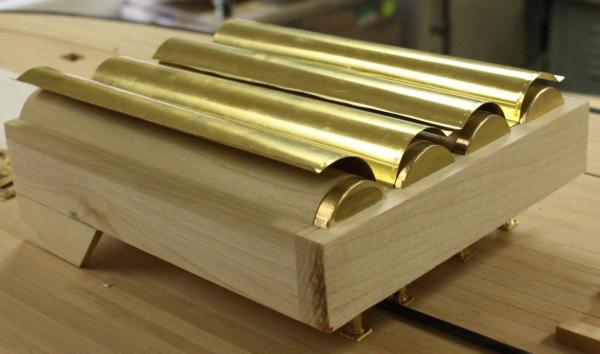
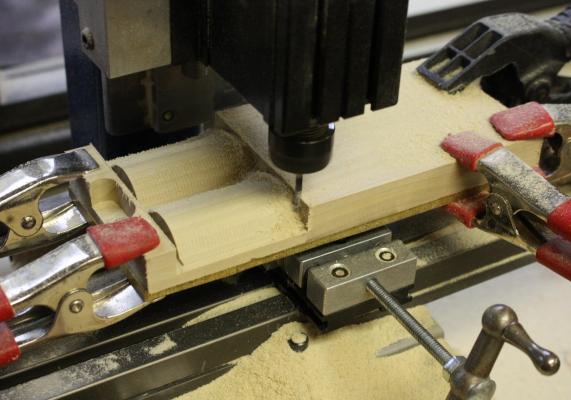
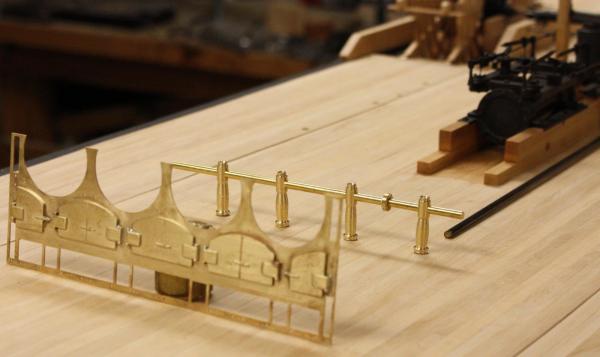
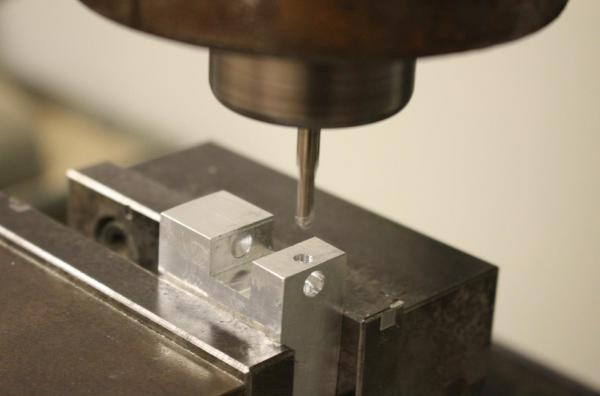
This week I finally got back to the boilers. We only have a handful of pieces for the boiler so the appearance is a little generic. I decided to go with a wood for that will be sheathed with brass and blackened. Unfortunately, I didn't get many photos this week so I wasn't able to show all the steps I wanted. Milling the boiler tubes. The capacity of the TAIG mill prevented me from milling all tubes at once so I had to mill them in pairs. First pair off the mill. I tried to mill these with a 10 percent stepover but only got through half of it in 3 hours. I switched over to 25 percent and you can see the difference about halfway through the part. The previous photo is being milled at 25 percent and you can see the rough finnish. Handful of pieces from the feedwater system. The top flange on the standpipe supported the boiler tube and the arched webbing on the crosspiece supported the boiler sheathing. Experimenting with the location of thefront of the boilers and the standpipes. The jig i used to crossdrill the standpipes. Standpipes with bases added. I still need to add the rest of the flanges and the webbing in between. Boiler ready to be sheathed.


- 701 replies
-
- 34
-
-
I can't wait to watch this one go together! You'll probably be interested in the project currently going on in our conservation lab. We have just received the remains of the CSS Georgia. She was originally scuttled, but an attempted salvage in the 1860s with explosives damaged the remains pretty badly. there may not be enough of the structure to be useful too you but artifacts may be very helpful for details. We've received over 142 tons of artifacts (that is not a misprint) that will have to be conserved over the coming years. The conservation has just started and it will be a little while before the info starts flowing but I'm sure there will be some useful finds. you can check out some of the artifacts at: http://www.sas.usace.army.mil/Missions/CivilWorks/SavannahHarborExpansion/CSSGeorgia.aspx If I hear of anything useful I'll let you know. Good luck with the build!! Glenn
-
Wow druxey, I'm always amazed to see what you have created by the end of the week. Just beautiful!! Glenn
- 641 replies
-
- 3
-
-
- greenwich hospital
- barge
- (and 1 more)
-
I finally got a chance to sit down with a glass of wine and go over some of your earlier posts. Loved every bit of it! Glenn
-
Thanks everybody for your comments and likes! I'm sorry that I didn't get a chance to respond earlier, I spent the day in Houston with the family. We took the kids to the Health Museum -- they have a strange fascination with germs. Anyway, your comments were wonderful to come home to! Greg, I guess you could say I just got lucky. I was an out-of-work industrial engineer that just happened to be in the right place at the right time when the Belle project came along. I realized early after graduating that I was more interested in the history of engineering than in modern engineering. Getting into the archaeology program gave me the opportunity to reverse engineer all kinds of old stuff. Although I've always loved building things and I had previously made a handful of ship models (thanks to Eric Rondberg and Harrold Hahn), I got pulled into Belle and have been lucky enough to work with all kinds of related projects ever since. I wish they hadn't used the term professional model builder on the website, I think department "handyman" seems more appropriate. Glenn
- 701 replies
-
- 15
-
-
Thanks everybody! I had some time to play with the camera on Friday. I took some one half second exposures with a tripod and got much better depth of field than before. I've always been a little lazy with the camera and just quickly took photos. I wish I had put a little more effort into it in the beginning. Next time I'll try to dust the model before taking the photos. Glenn
-
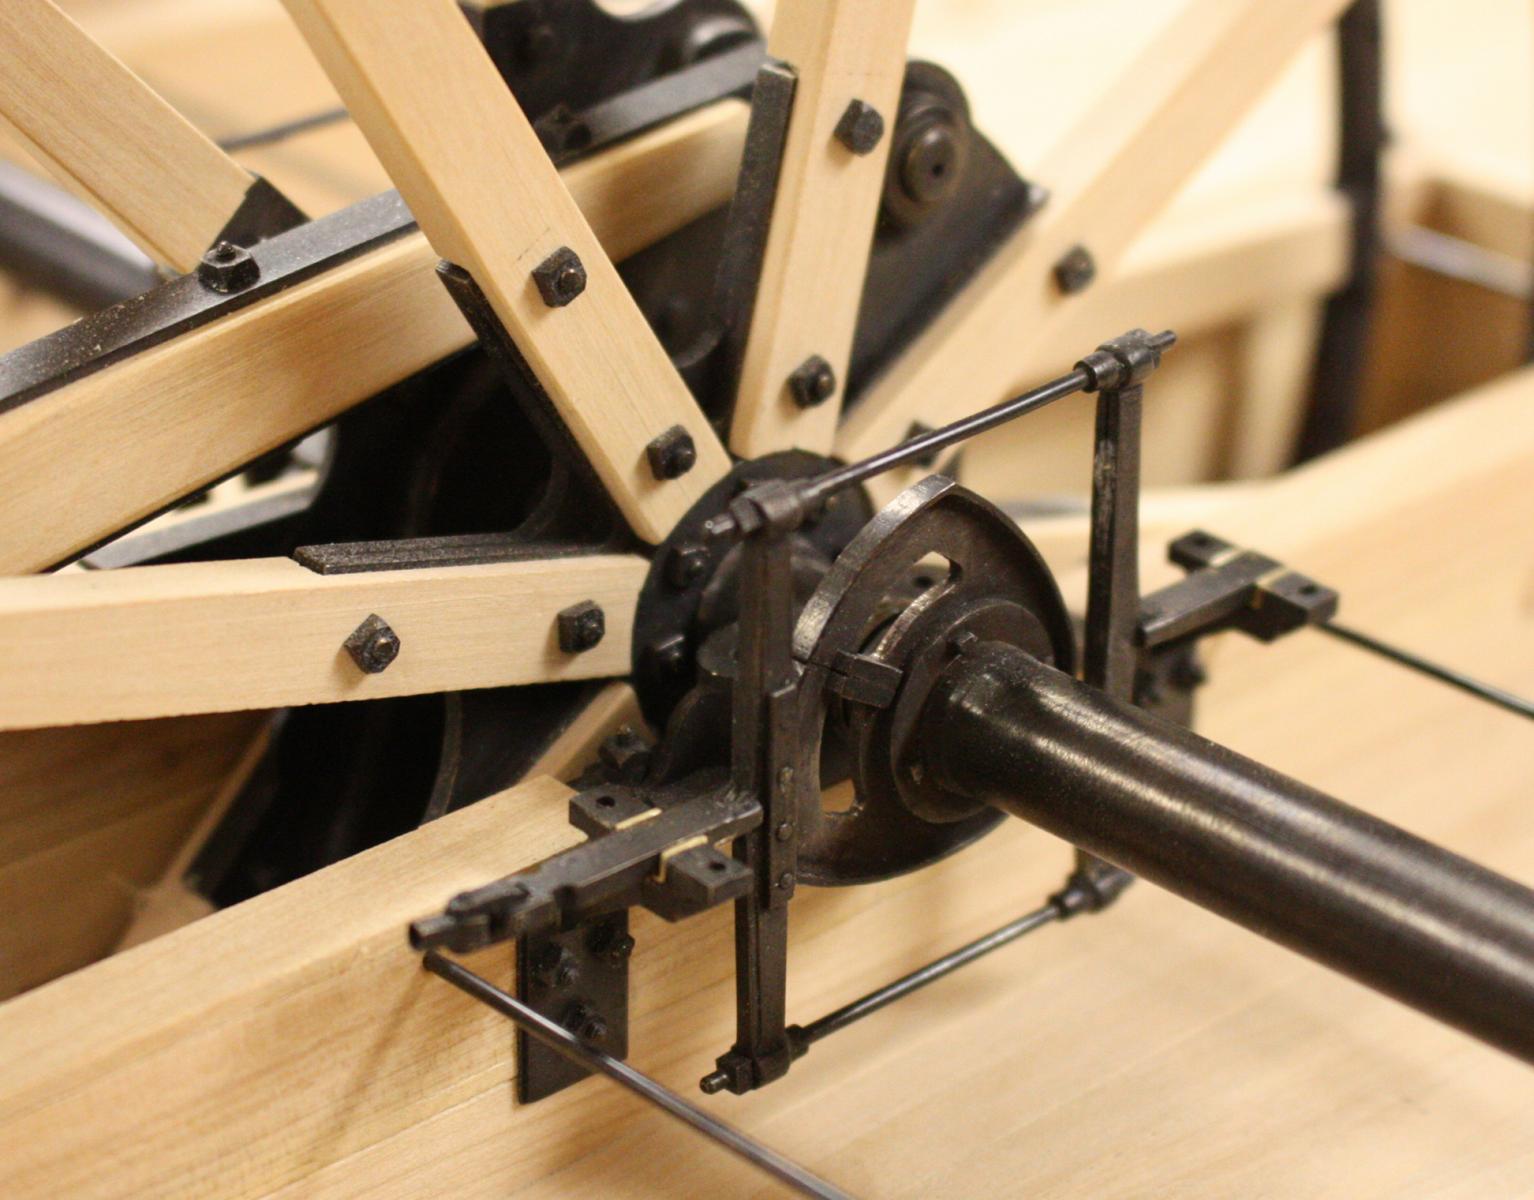
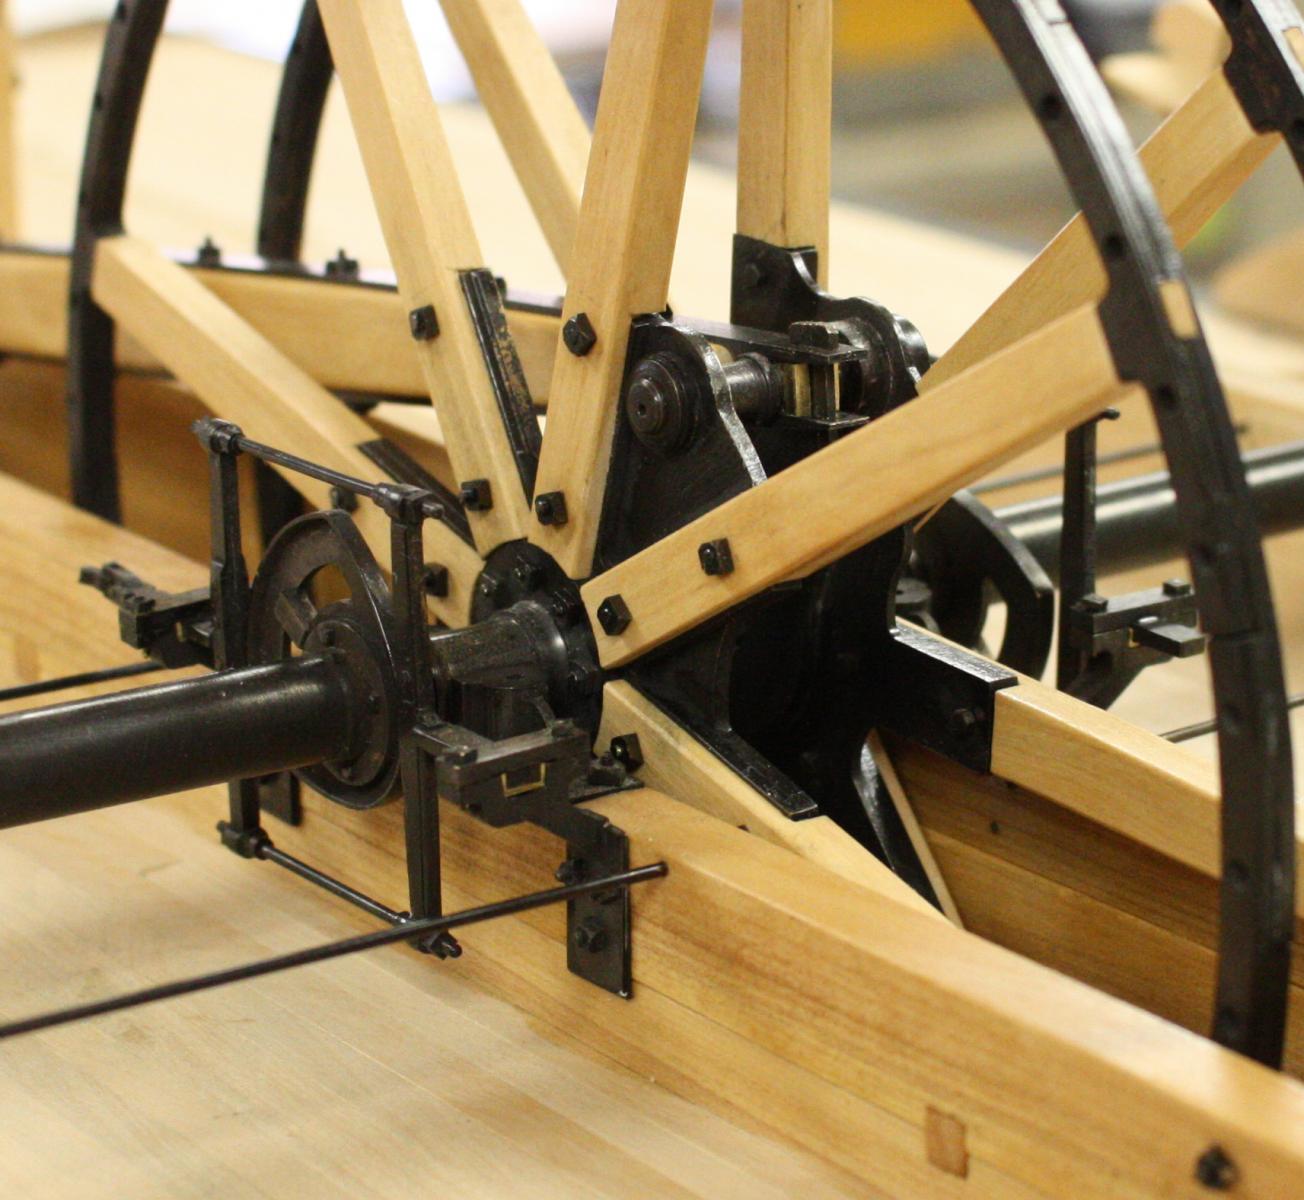
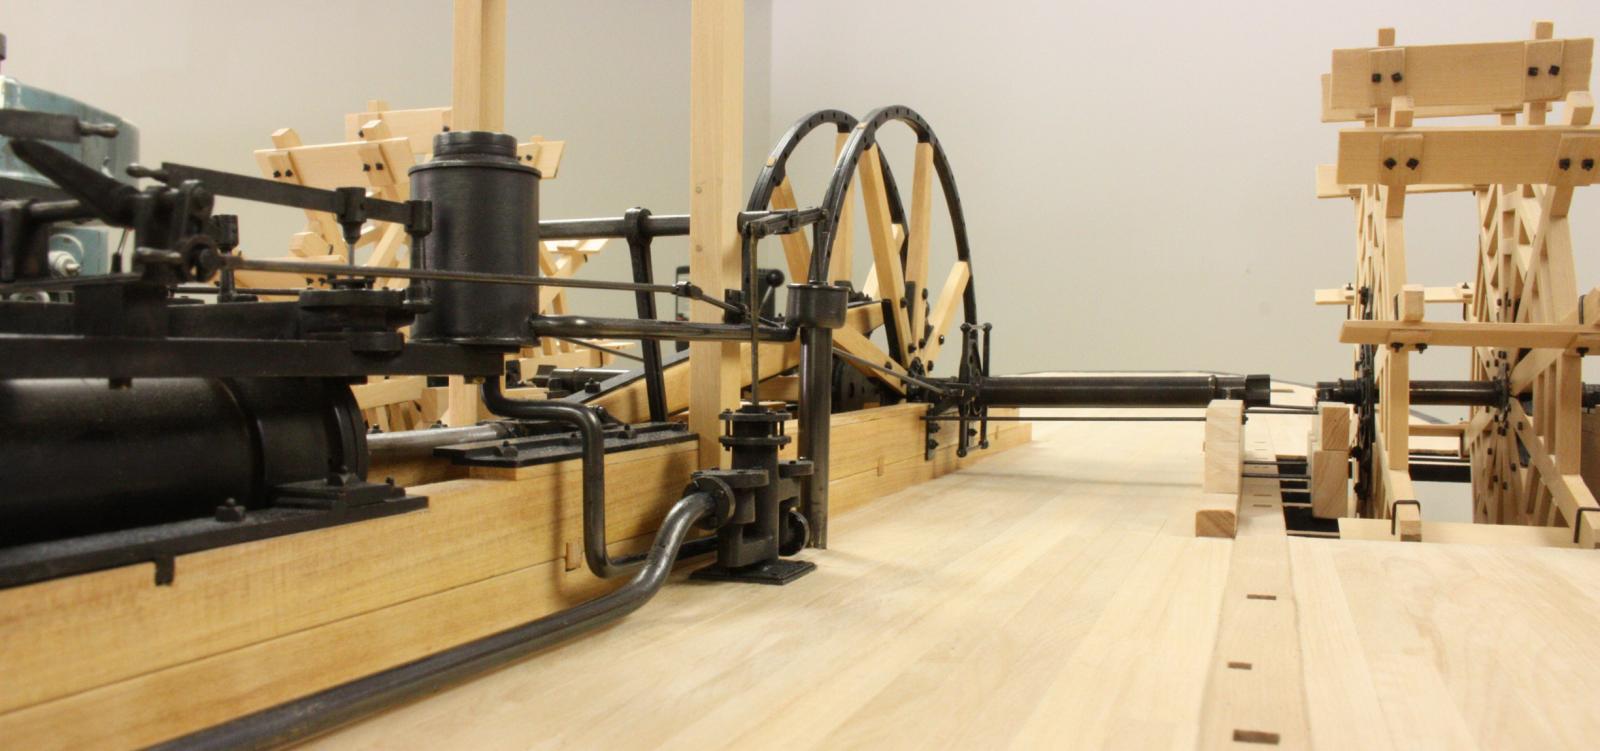
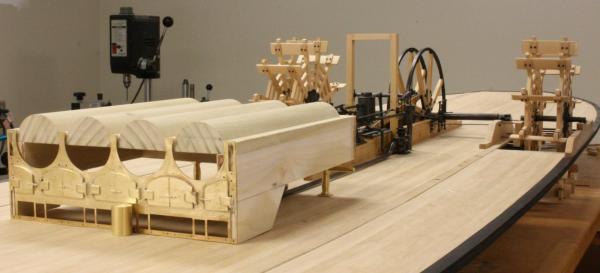
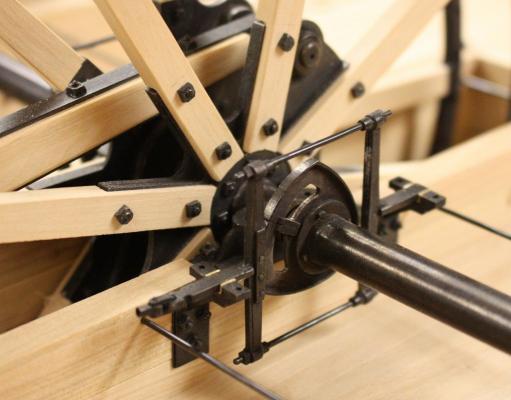
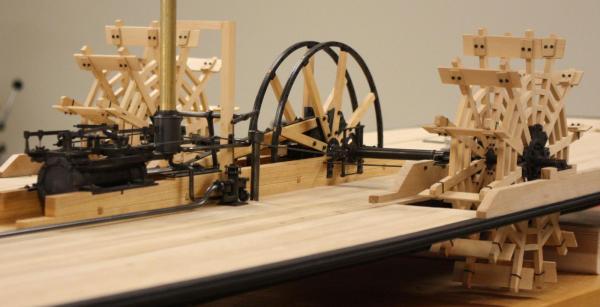
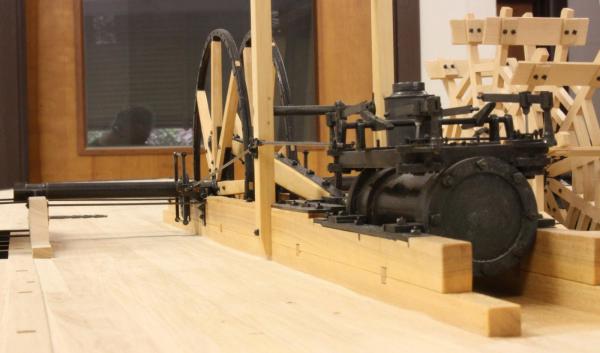
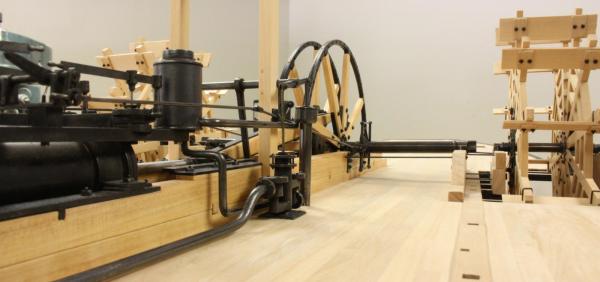
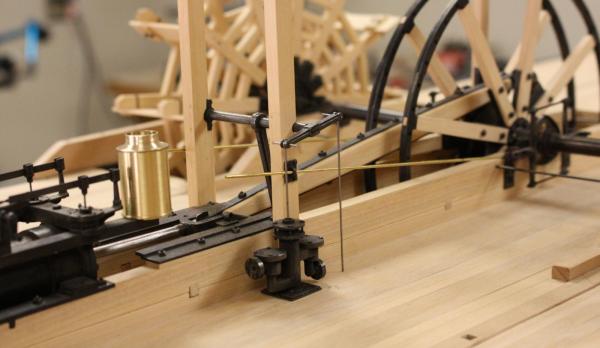
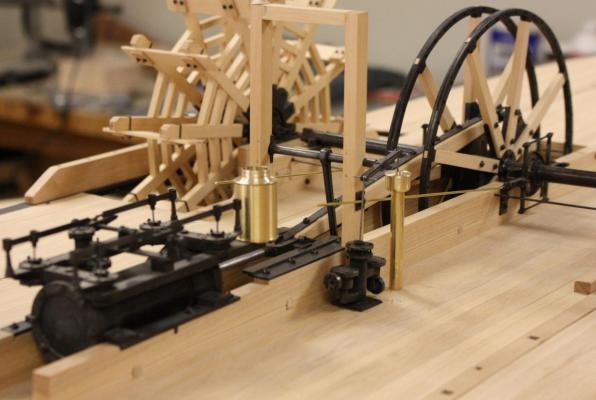
This week I finished up the plumbing, reach rods and the other bits that tie the engine to the main shaft. I decided to go with an oil finish for the wood and was able to oil the cylinder timbers, pittman and flywheel. It gets a little tight with all the machinery and I wanted to make sure I got everything before moving on. I'm leaving the throw-out bearings and bearing caps off until the upper works are a little farther along -- I may need to remove the paddlewheels temporarily. Bronze cam frame bearings and caps added. Cam rods in to determine the length of the reach rods. Reach rod handles. Engine just about complete. The steam exhaust stack will be blackened. Next week, on to the boilers. Feedwater pump and pre-heater. Starboard side. Port side.


- 701 replies
-
- 33
-
-
Great tip with the Copper Phosphorus solder. I never can get all the silver solder out of the tight corners. She's really looking beautiful! Glenn
- 3,618 replies
-
- 4
-
-
- young america
- clipper
- (and 1 more)
-
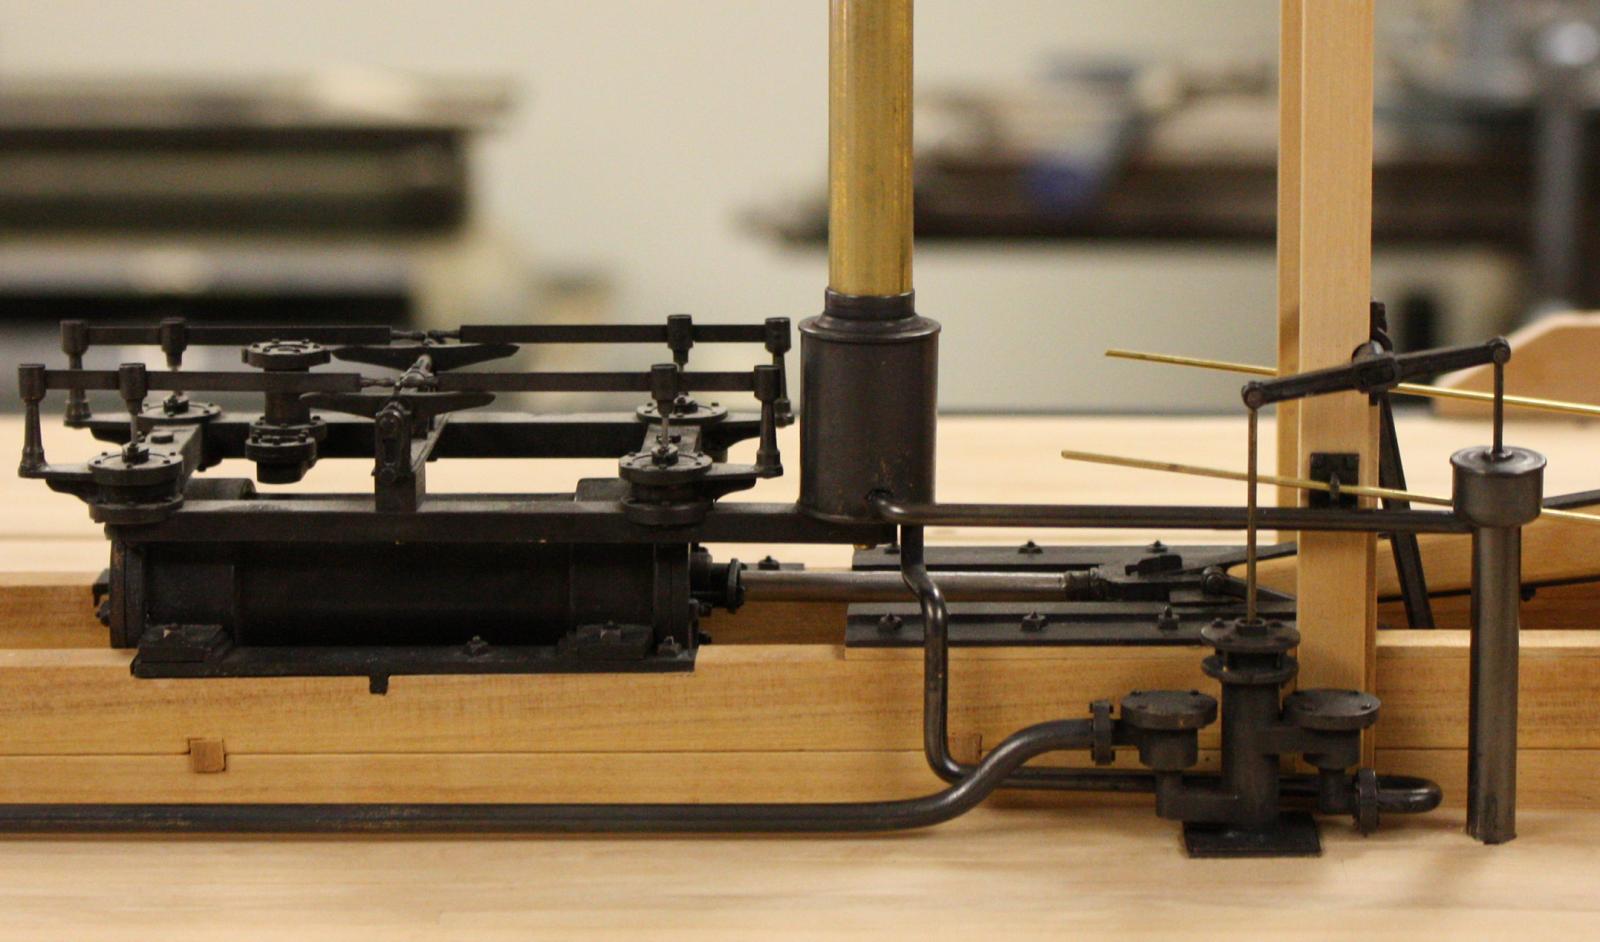
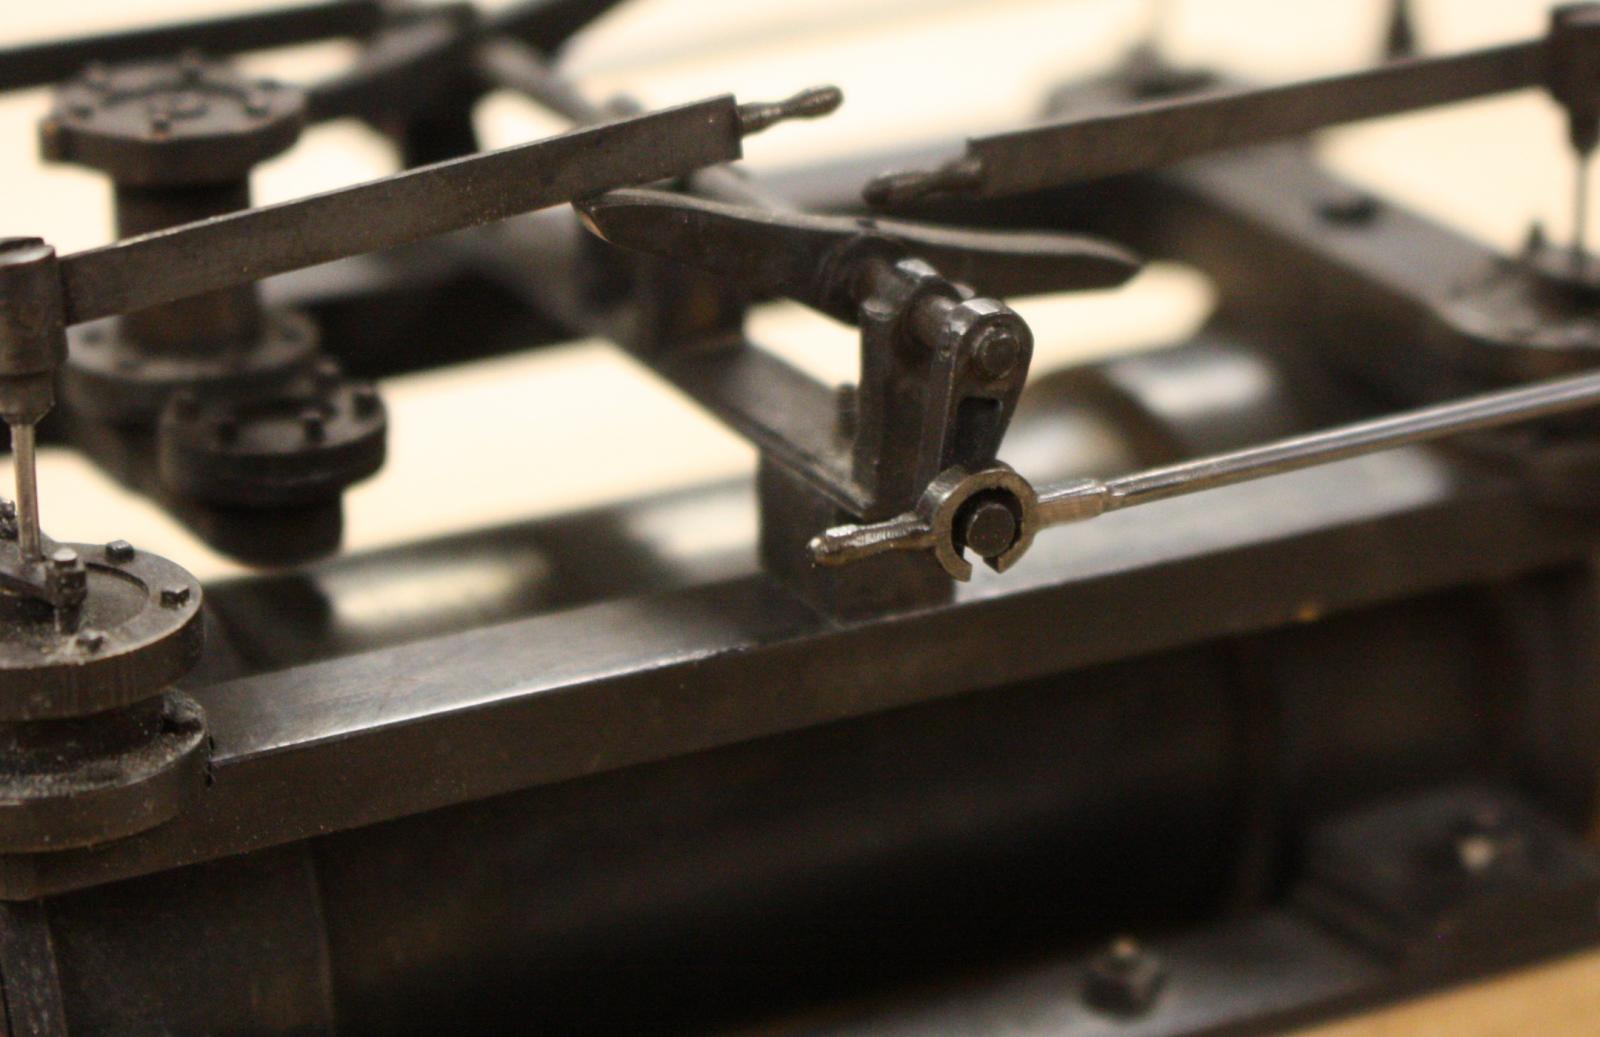
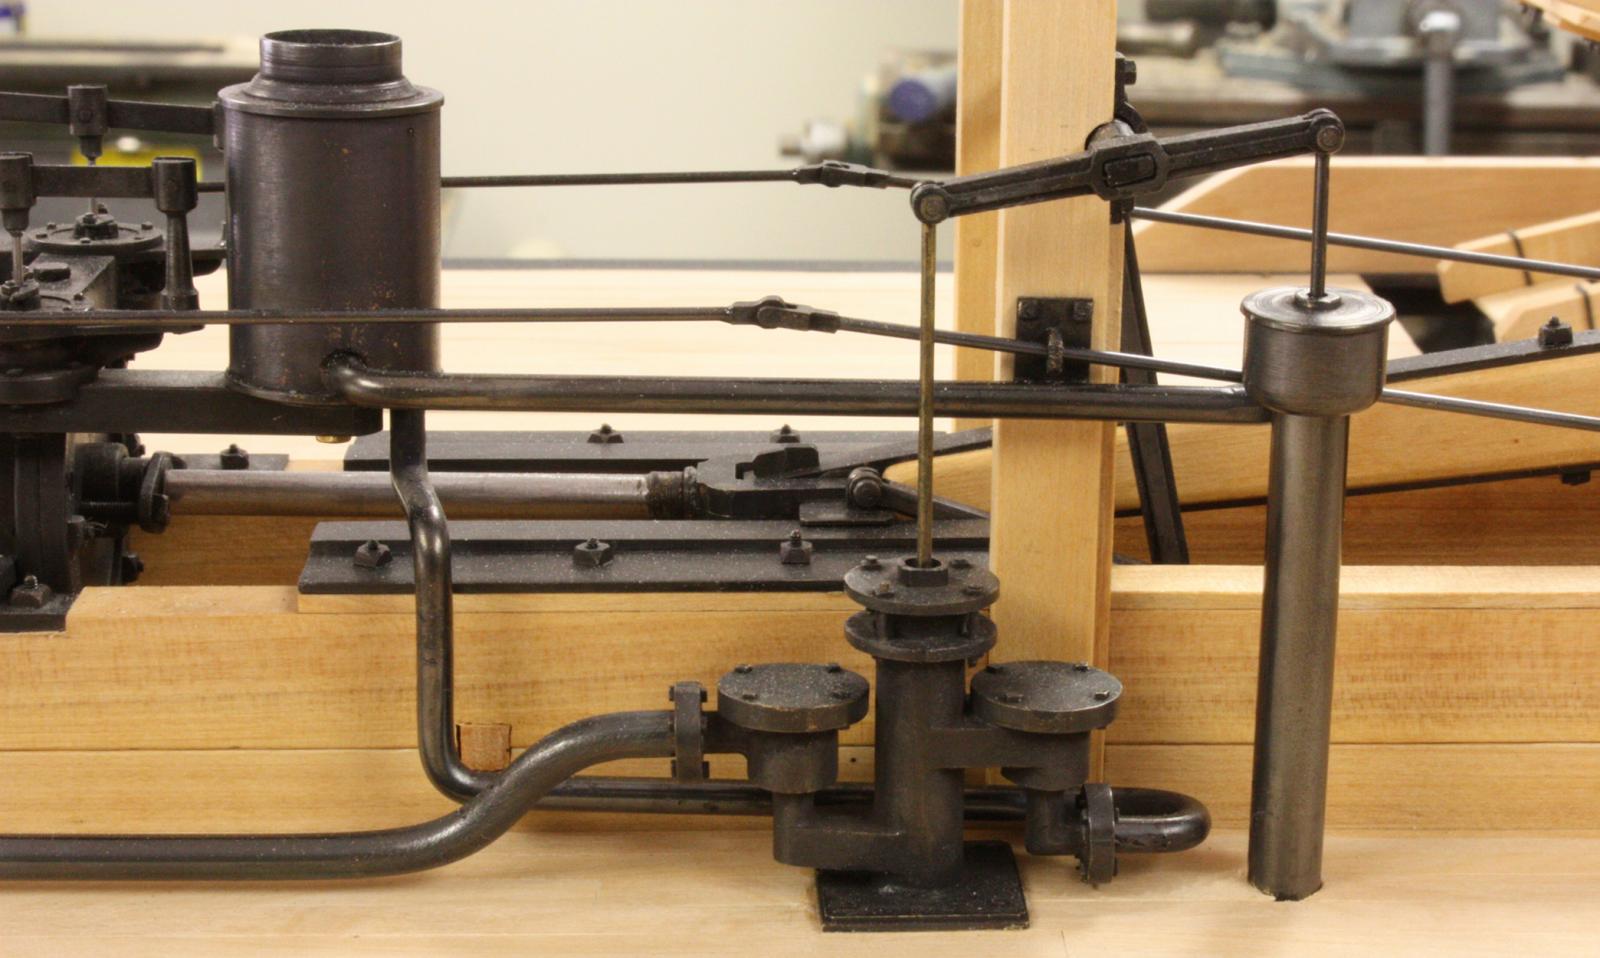
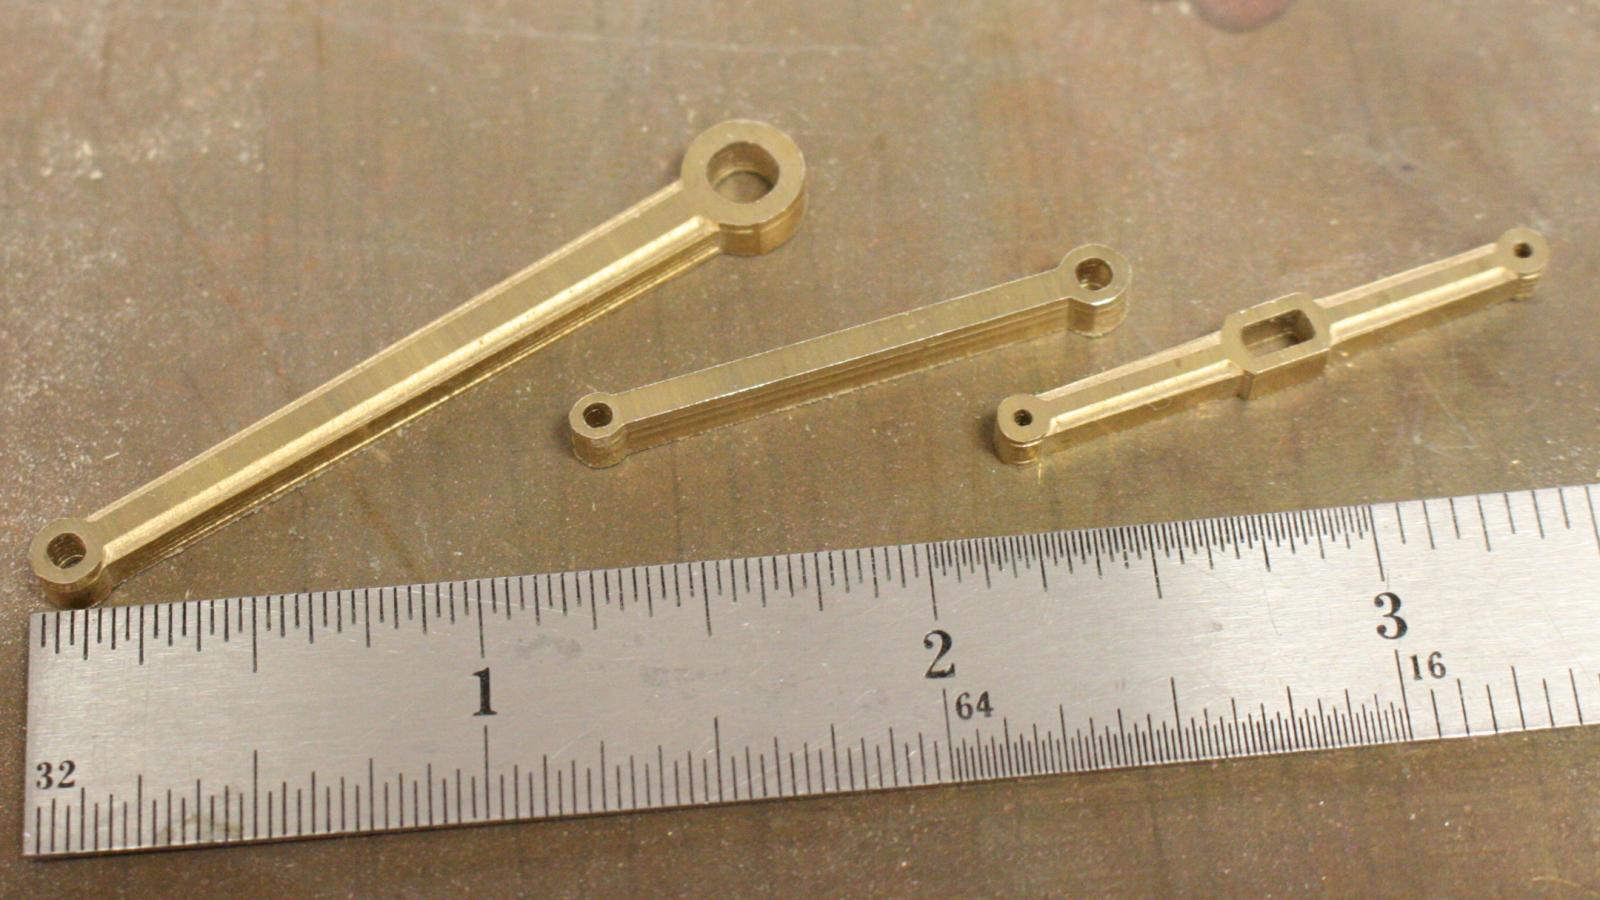
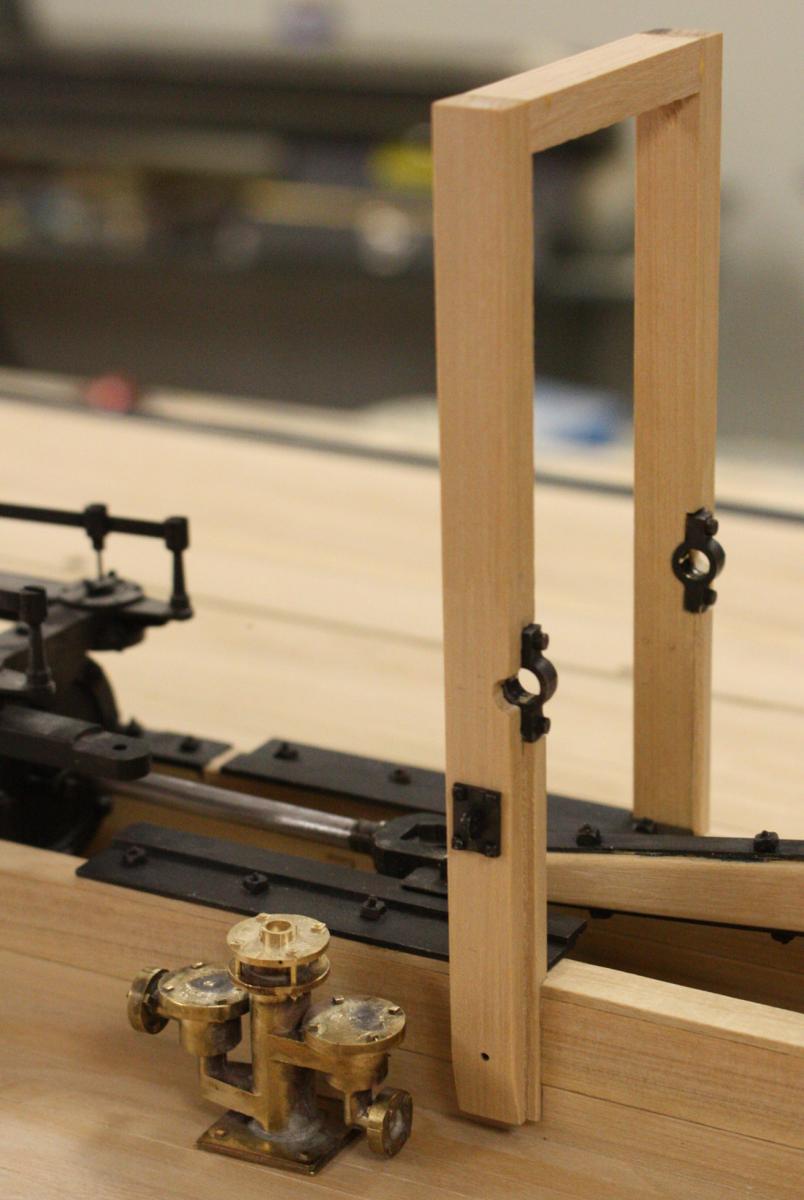
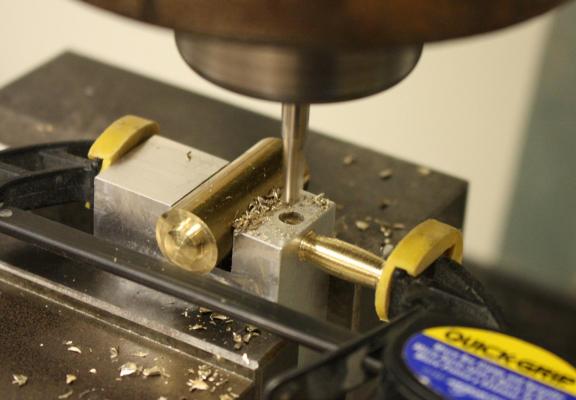
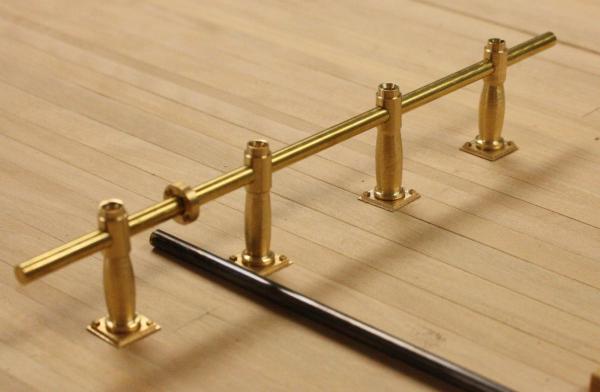
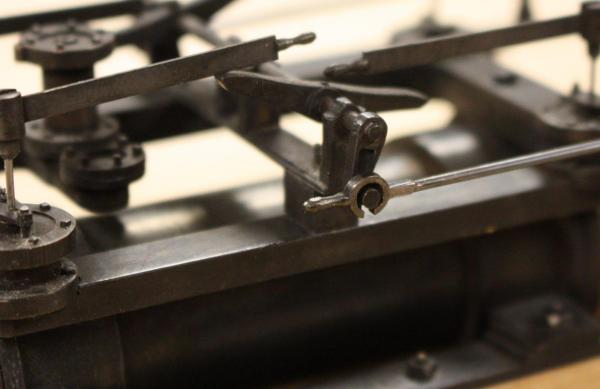
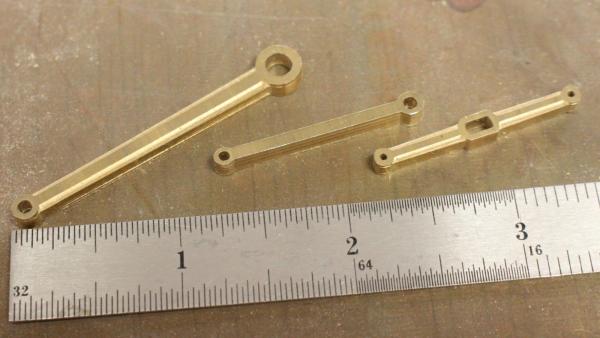
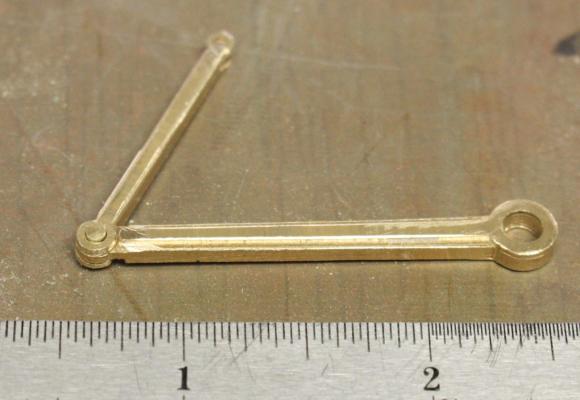
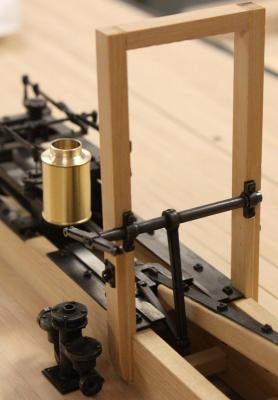
This week I nearly completed the feedwater pump. We know the type of pump and location from a post that is bolted into the cylinder timbers at the after end of the crosshead slide. A linkage to the crosshead would have moved a lever that activated two pumps. A low pressure pump (aft side of post) would have drawn water through the side of the vessel somewhat below the waterline and pushed it into the preheater (shroud around steam exhaust). A more heavily constructed high pressure pump then pulled the water from the preheater and delivered it to the boilers. Pumo lever and linkage. Support posts for the pump. I cut these a little long and the cross piece at the top is only temporary. The top end will be cut off at the upper deck and fastened to the upper deck beams. The plates on the sides of the post will guide the reach rods. Pump lever linked to cross head. Fitting the shroud around the steam exhaust. Determining the run of the reach rods and plumbing. With the water lines and reach rods it gets pretty busy in this area. I didn't quite get it all together and will have till next week to finish. The low pressure pump is still a little too tall but I left it in to give an idea about the whole set-up.


- 701 replies
-
- 36
-
-
Incredible work as usual druxey. It looks like your getting close! I liked your idea about the mica and may use it on my build. I have some large pieces in my shop but never thought about using it for a model. Split thin enough, it is clear as glass. Great idea! Glenn
- 641 replies
-
- 4
-
-
- greenwich hospital
- barge
- (and 1 more)
-
Brig Eagle by robnbill - 1:48
ggrieco replied to robnbill's topic in - Build logs for subjects built 1801 - 1850
Hello Bill, I'm sorry that I didn't catch this build from the start but I have really been enjoying it. Beautiful work and incredible details. I will be following if you don't mind. Glenn