CDW
-
Posts
7,755 -
Joined
-
Last visited
Content Type
Profiles
Forums
Gallery
Events
Everything posted by CDW
-
 What a fortuitous find! Indeed, this must be your lucky day. Well deserved with all that beautiful work you've been doing on this build. I am happy for you.
 -
If there ever was a QFT, it's this one. With Pontos sets, it is absolutely essential to have those plan PDF photos in front of you and magnified to see what the heck is going on. As for any kind of 'order of assembly', you just have to figure it out on your own. Can't believe how many times I've folded a piece in the wrong direction and broke it. As for the expensive rolling tool, try this one. It does the job and is half the price. By the way, this is a great online hobby shop to do business with. Super customer service. https://www.scalehobbyist.com/catagories/Tools/SMS00000014/product.php?gclid=Cj0KCQjwxYLoBRCxARIsAEf16-u1-zyc7z1wkju3Tud3wSOYsVARTJsbluvBKoaQB6slCqk0I-_HLnMaAvJdEALw_wcB
-
For reducing epoxy resin, I use denatured alcohol.
-
I've done it successfully many times in the past using epoxy resin. Not sure of any reason a polyester resin would not also serve the purpose of sealing the hull.
-
I once read that bad luck was in part responsible for the CSS Alabama's loss in the battle with the USS Kearsarge. An unexploded round was found to have lodged between the rudder and hull of the Kearsarge that may have sunk her had it detonated as it should have.
-
I am definitely aboard for this. A very unusual and interesting project. Civil War subjects are fascinating to me, I guess because so many of my long past relatives fought in that terrible conflict.
- 12 replies
-
- 3
-

-
- what is it
- torpedo
- (and 1 more)
-
Welcome back to modeling. 50-ish is a great time to start modeling again. More free time and greater patience. Hope you have a wonderful time doing it!
-
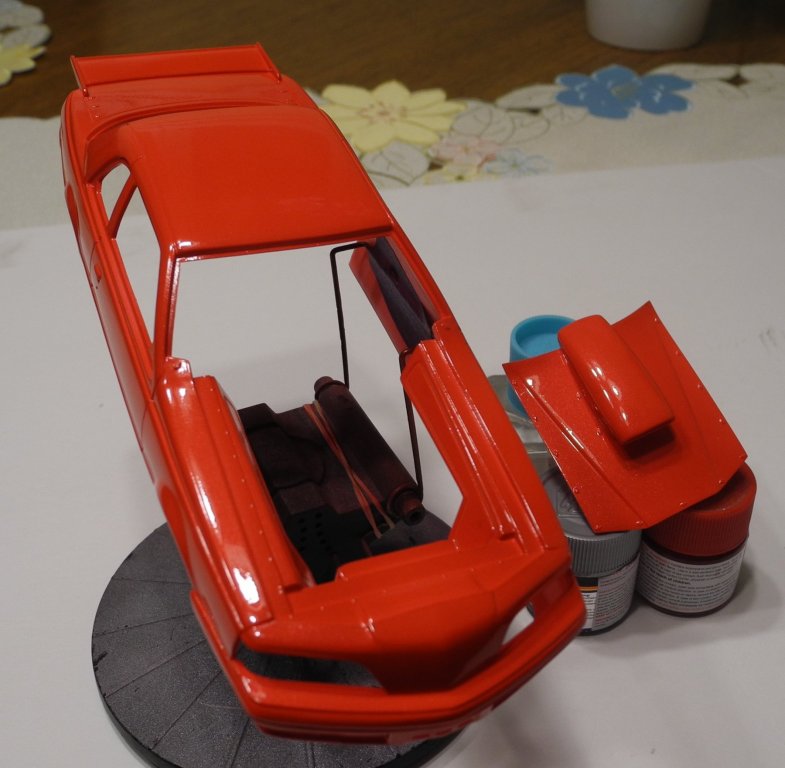
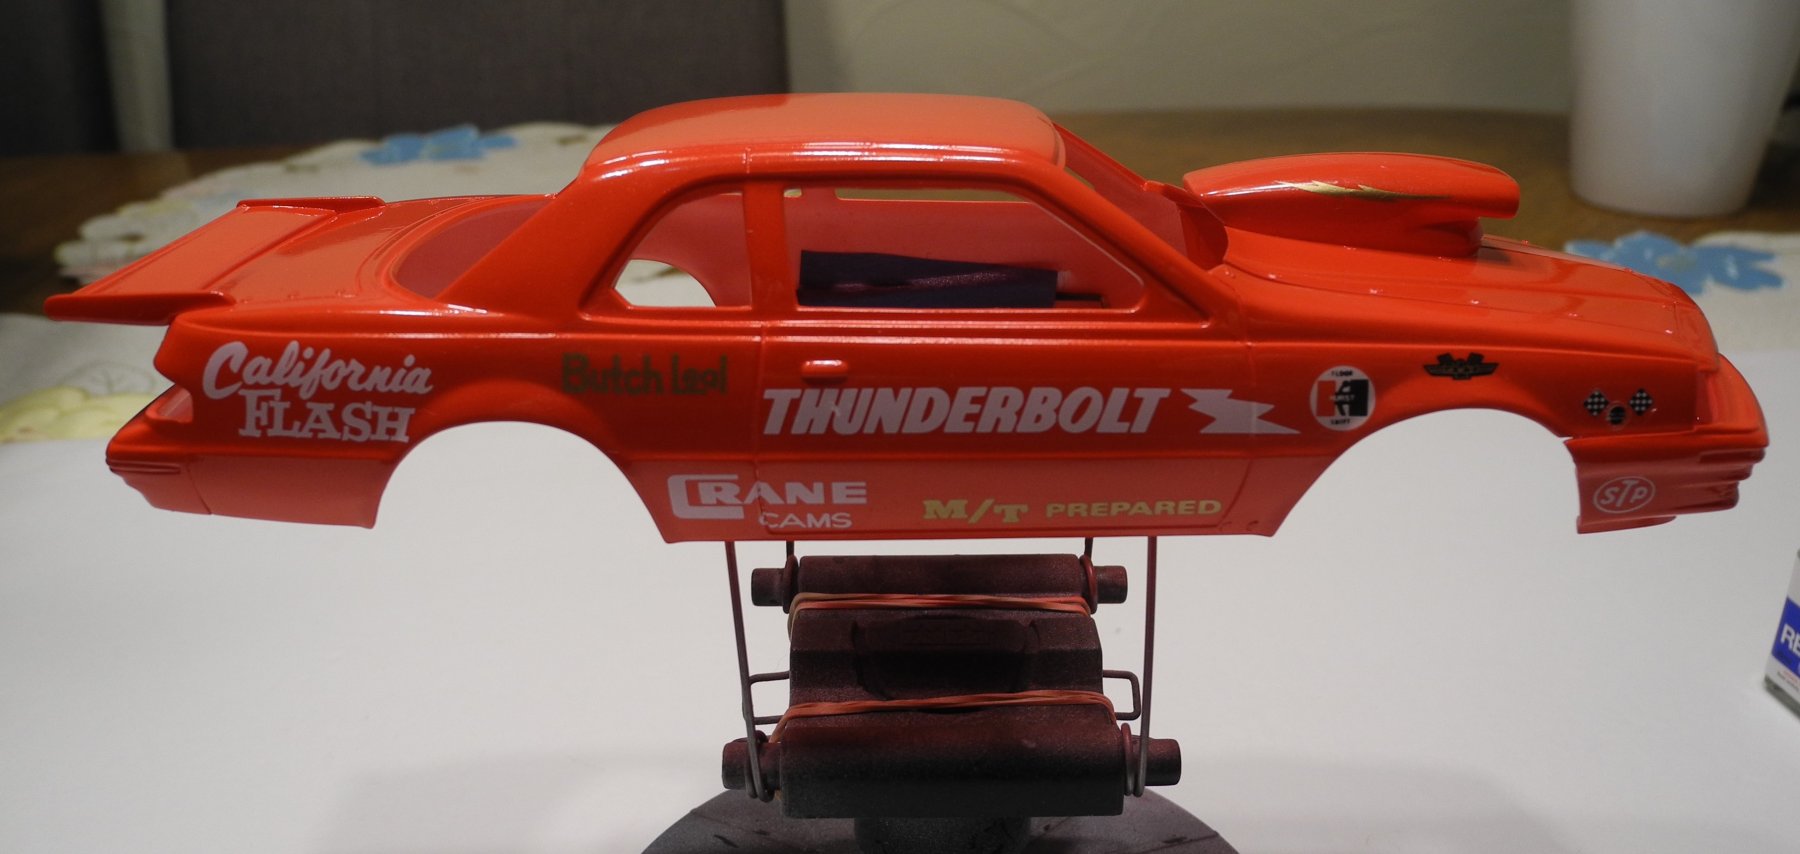
The side windows are posed for photos. Must file the edges a bit for a good fit, then touch up some of the red inside the window frames with flat back before cementing in place. A few other odd and ends needed to finish this one up.
-
NAPA Genuine Auto Parts stores that have a paint department can mix and fill any color you want to choose from (their color chip book) into a spray paint can. The cost is reasonable as well. Sometimes when you're trying to match a color, take a sample with you and give them a try.
-
Yep, Tamiya is great, use it all the time myself as well. If you don't mind a little longer drying time and want a smoother finish such as in a gloss finish, reduce Tamiya acrylics with Mr Color Leveling Reducer. Works wonders. But for my day-to-day painting which most often are flats, I use alcohol to reduce as well. The only down side to Tamiya acrylics are their lower color selection. I don't mind mixing their paints to get the colors I need, but I need to make a laminated card of some kind to write down the formulas.
-
I just watched the bikes on YouTube. Incredible.
-
Now the 1,000' change from 1320', I was totally unaware. That makes the E.T.'s a whole different story, although as you said, there was only .1 second between the Funny Cars and Top Fuel at that same meet. Locally at one track I've attended, they changed it from 1320' to 660'. I understand the reason why, but it still left me feelings rather sad to see this change. Additionally, I could not believe how fast the "rice-burners" have become...wow, is all I can say.
-
What paint are you using for your black parts? Looks great. I like those frames you made.
-
I just looked it up. The race was Topeka, the fastest time was 3.897, with a top speed of 330.88. 😵
-
I never saw a top end speed listed. But unless someone blew up, they were consistently running 3.8 - 3.9 second times. Now, I am wondering what times the rails are running.
-
The Admiral is in charge of the TV controller at home, which is well with me because there's little - nothing I want to see on television most of the time. But after Mass yesterday, she and I went to a favorite pasta restaurant to sit down for a meal and bring something home for the kids. They have these big television sets at the restaurant and I began watching Funny Cars competing through an elimination series. I was amazed at how fast they are now compared to when I last watched them. They were running quarter mile times in under 4 seconds almost every round. Astounding how fast and consistent these cars are today. And a blown Funny Car Toyota? You've got to be kidding me. Man, oh man, I am behind times. 😕
-
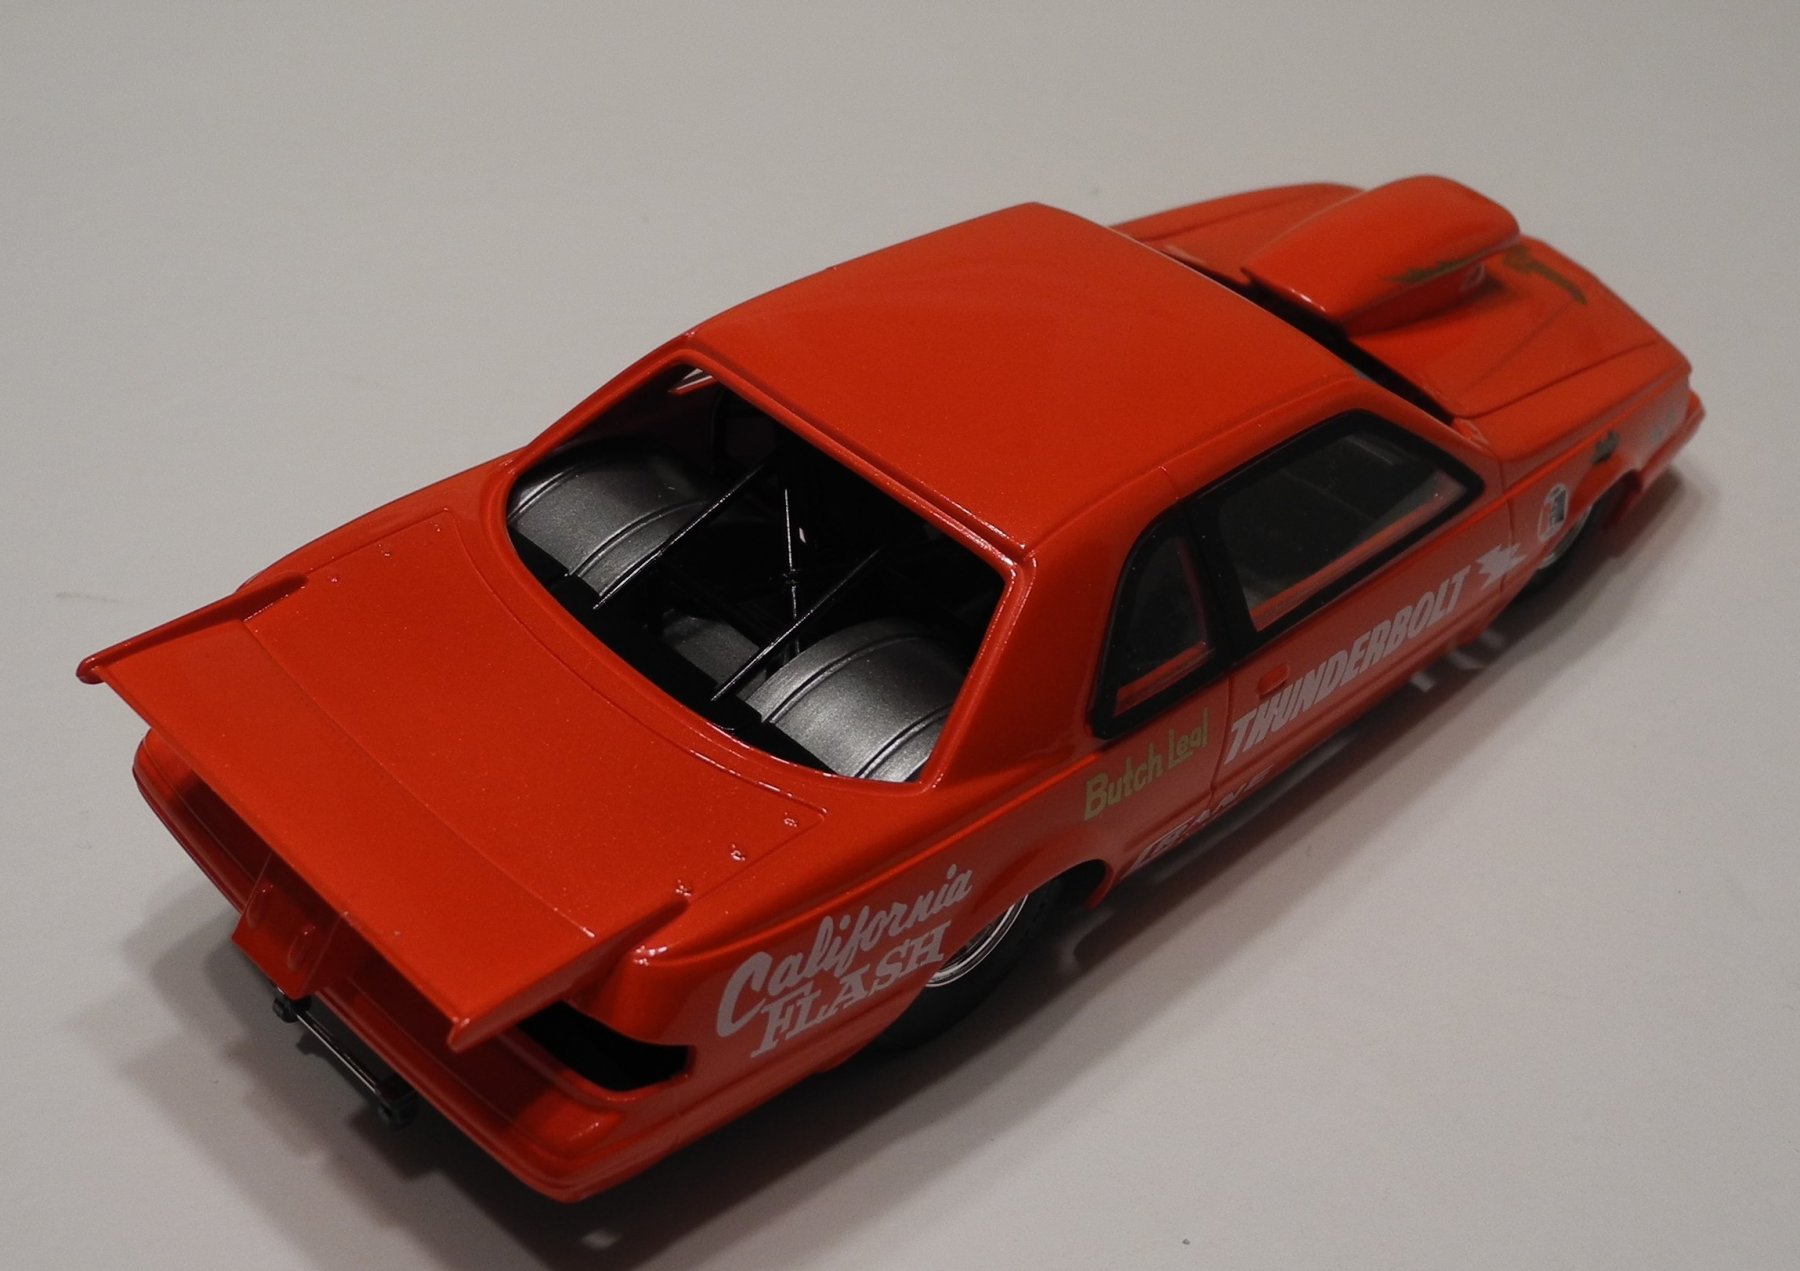
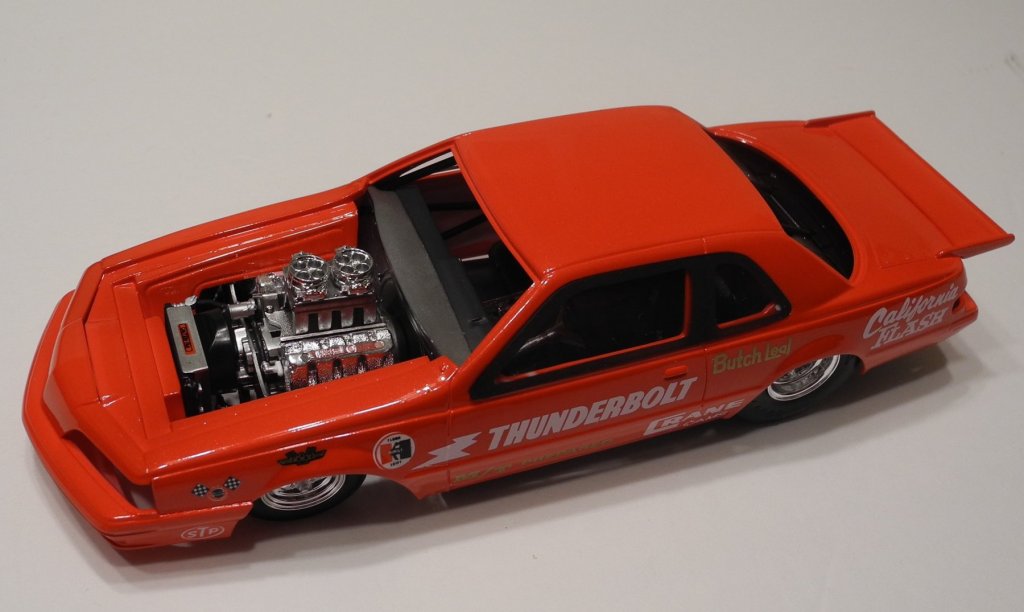
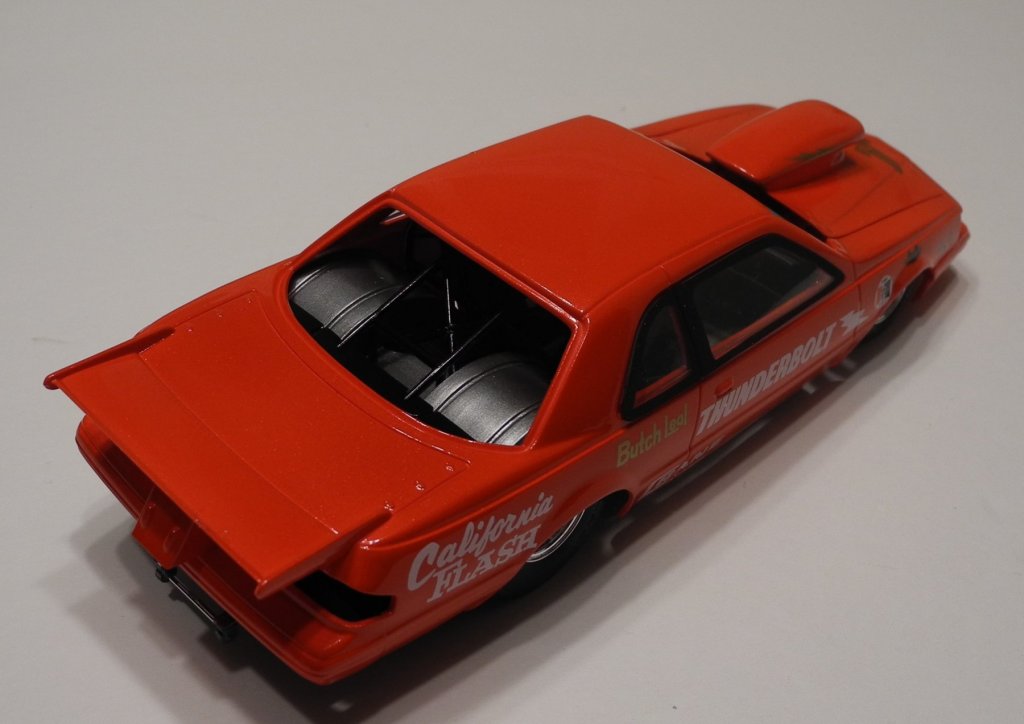
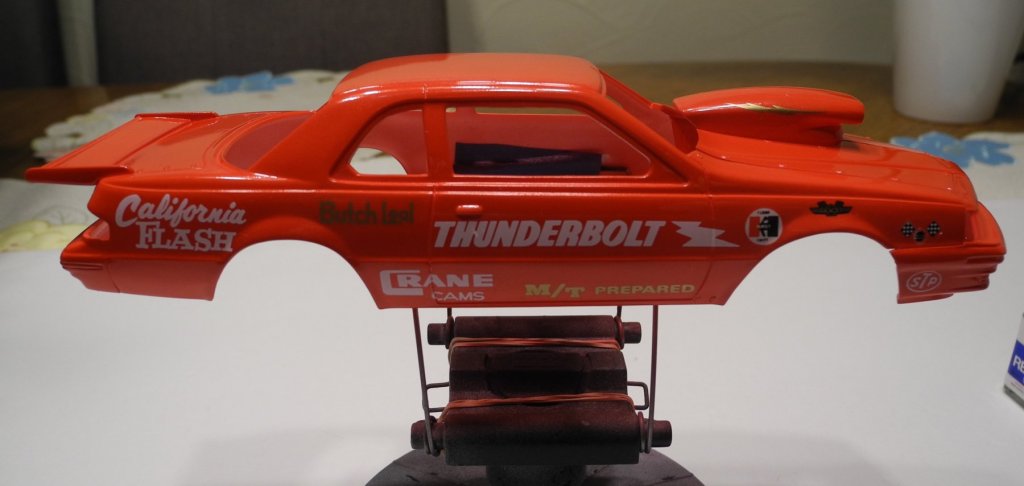
These are the decals I chose from my existing stock of aftermarket decal sets. They are from the old Fred Cady sheet for Butch Leal's '64 Ford Thunderbolt he campaigned as a super stock way back when.
-
Thanks Kurt!
-
Them danged old Yanks...done stole our General. Just goes to show old Fess Parker could sing battle hymn of the republic or whistle dixie equally well. Just makes me want to spit tobacco juice on his white sport coat lapel (Josie Wales). 😄
-
That's a great looking pup, ole Gibbs. I see you're using Frog tape. That's some good stuff.
-
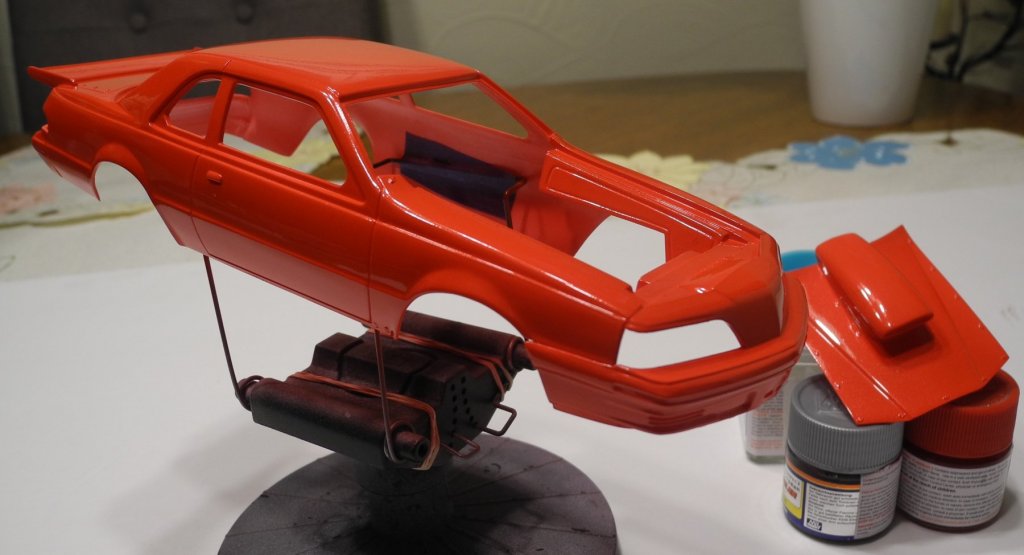
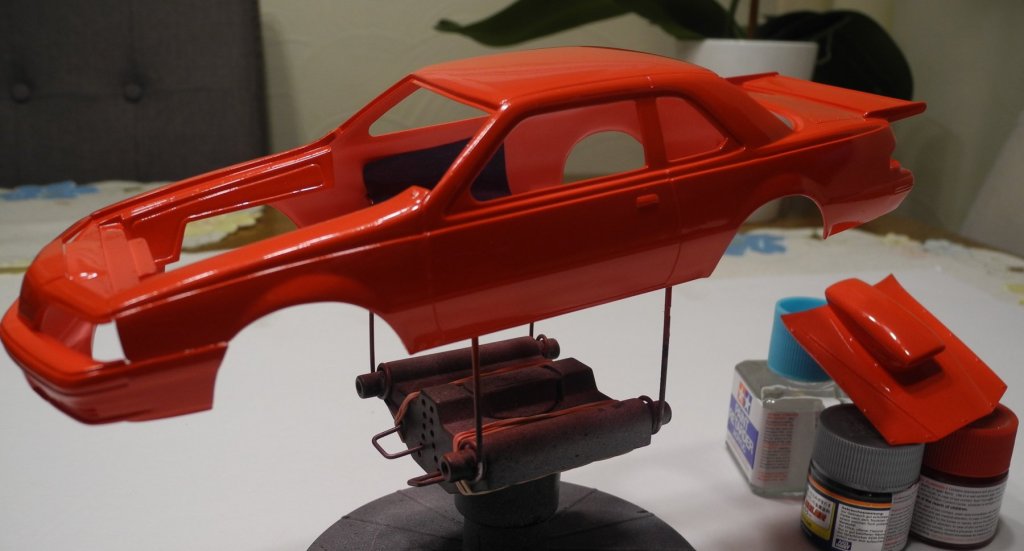
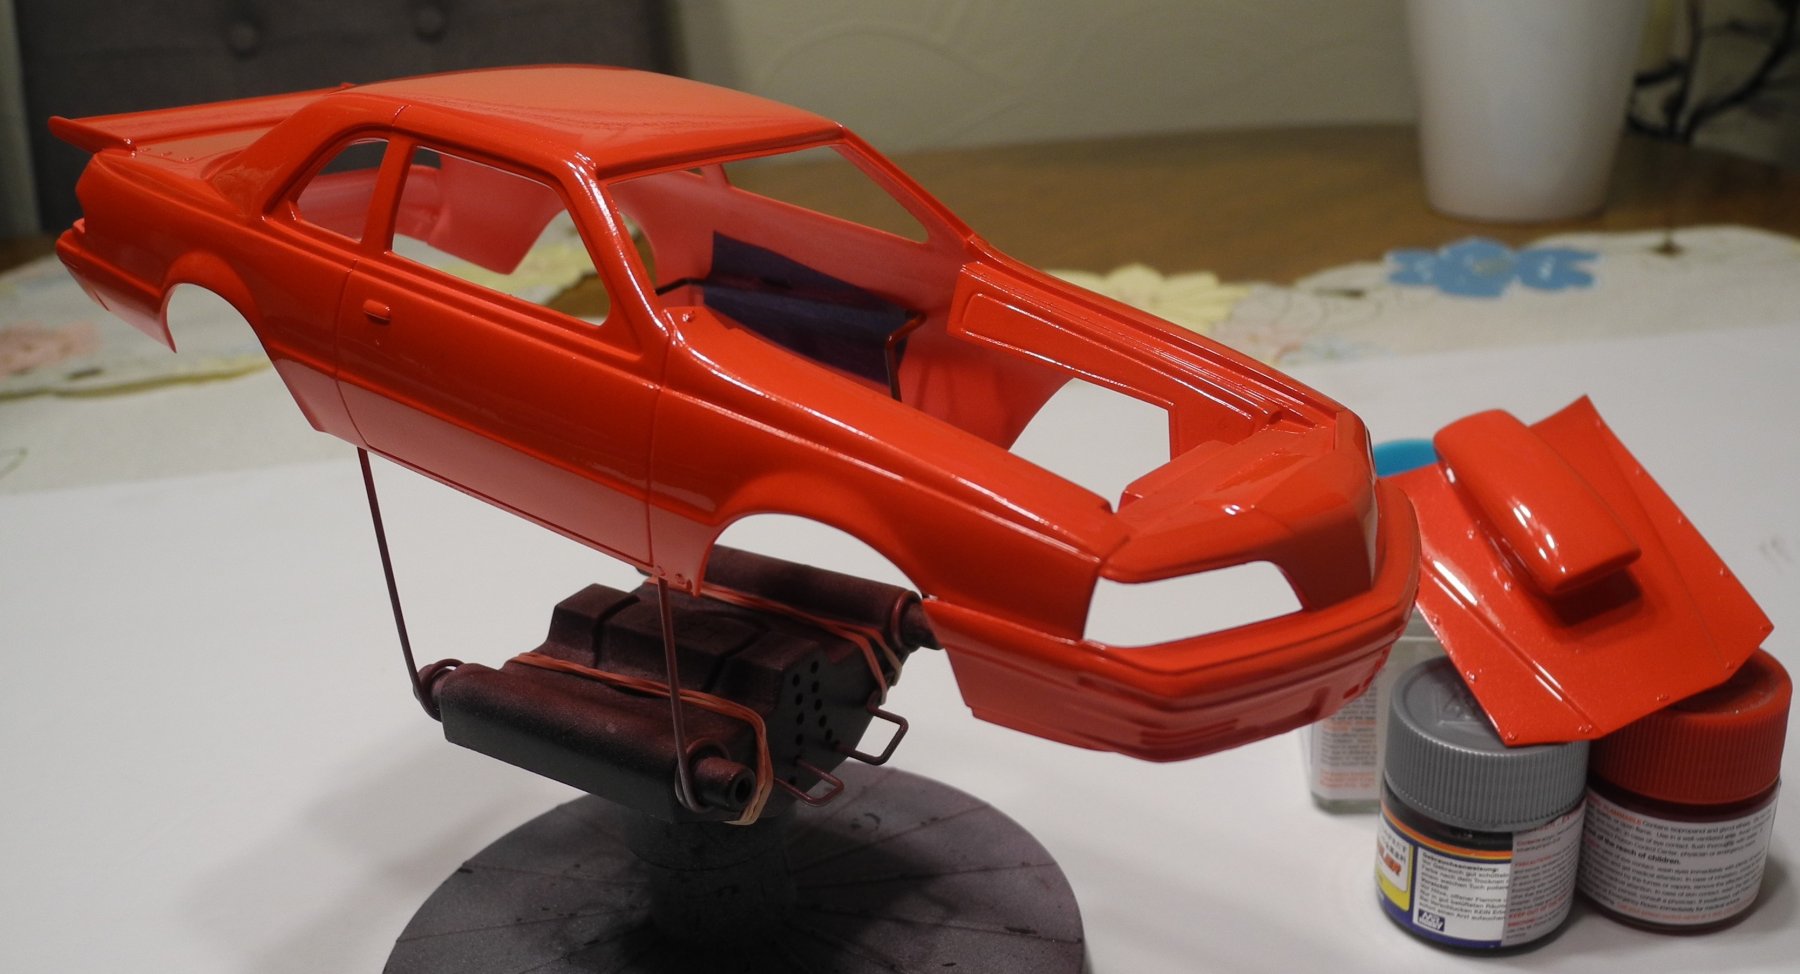
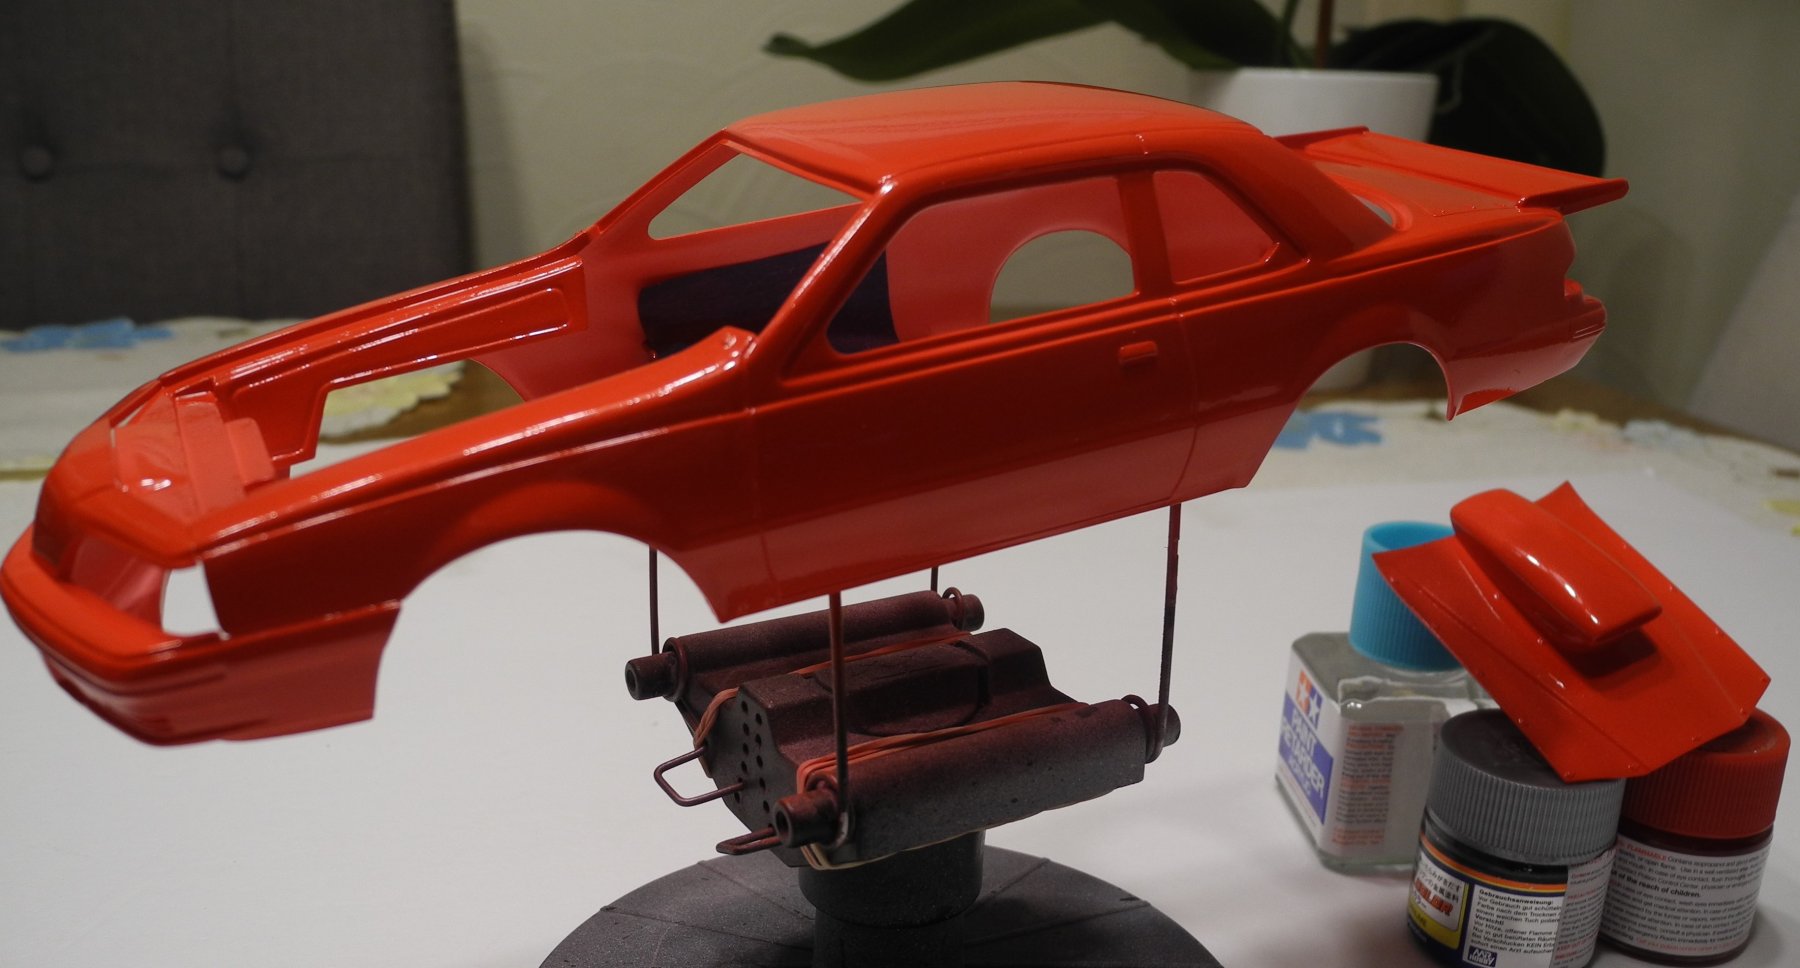
Sometimes, the very best solution to problems are something you make yourself for (almost) free. I have a few blocks of styrofoam that I poke bamboo skewers into and then attach small parts to the skewers with blue tack and use those as paint stands for small parts. But with the car bodies, I like to have something that secures the body so it won't fall off while painting it.
-
Thanks Denis. I bought that Tamiya paint stand quite a few years ago and it has lasted very well. it actually comes with two different stands. I'll take a picture of the other one it comes with. Both rotate like a lazy susan and it's handy to paint things while attached to it.
-
Here she is with a couple of urethane clear top coats. Next, will let this clear kick off (hardener) then polish it out a bit, apply some markings and wait for those to dry, then apply a couple more clear top coats.