CDW
-
Posts
7,760 -
Joined
-
Last visited
Content Type
Profiles
Forums
Gallery
Events
Everything posted by CDW
-
 My sentiment exactly but I wasn't certain whether the bomb bay is operable on this particular version IRL. This version has advanced targeting pods/capability for TV guided bombs/rockets that hang from wing mounted pylons.
 -
Sounds like a plan. On another note, what are you thinking about how to reproduce the spokes?
-
I am building the S.2D model as was stationed aboard Ark Royal. The kit provides the option for an open or closed bomb bay. There are lots of interesting details to see inside the bomb bay, but I am not sure whether an open bomb bay would be appropriate for the version I'm building. I don't intend to place bombs inside it but would like to leave it open so the details can be seen. What's your opinion/knowledge of it. Should I leave it opened or close it?
-
I must admit I have been admiring the curves of her beautiful body but wait until she's got legs. 😮 She will be irresistible.
-
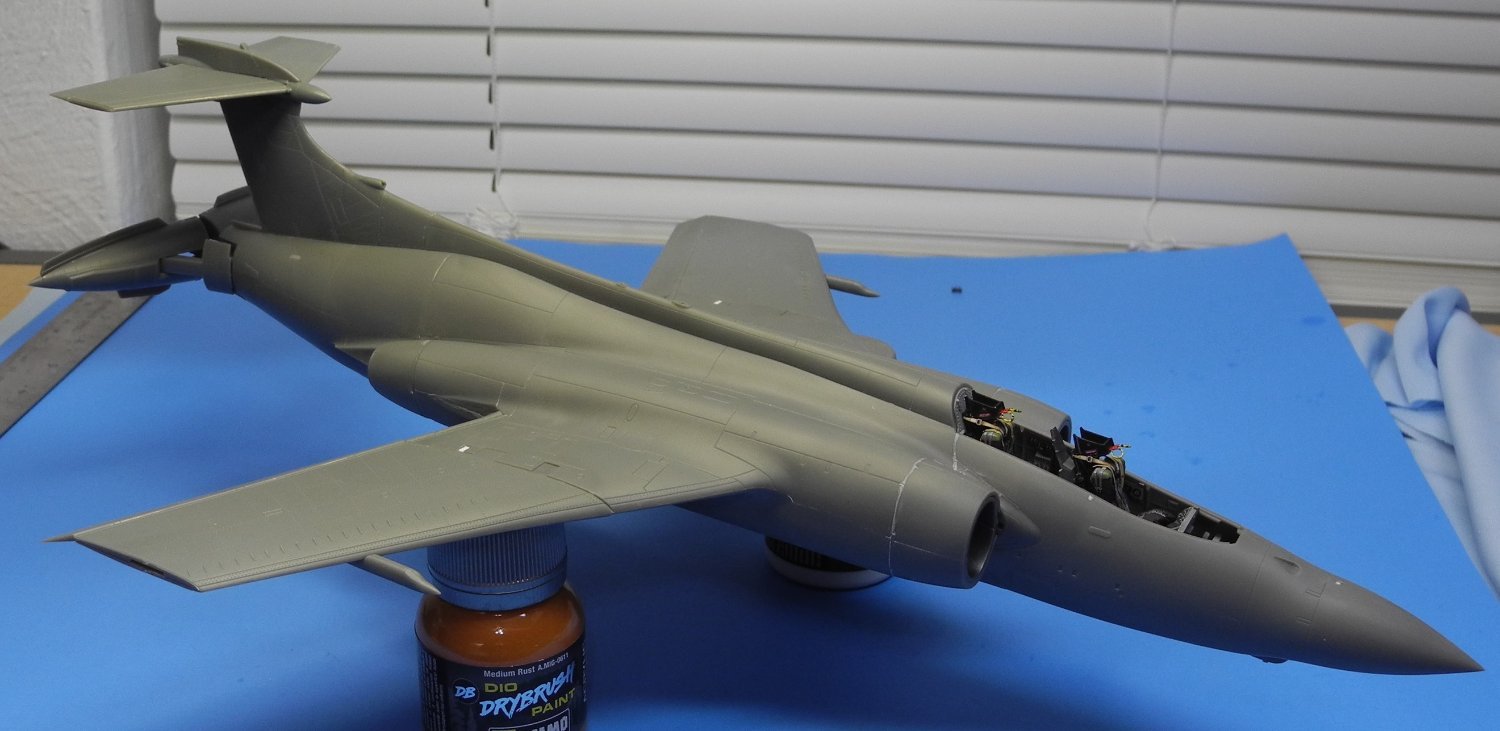
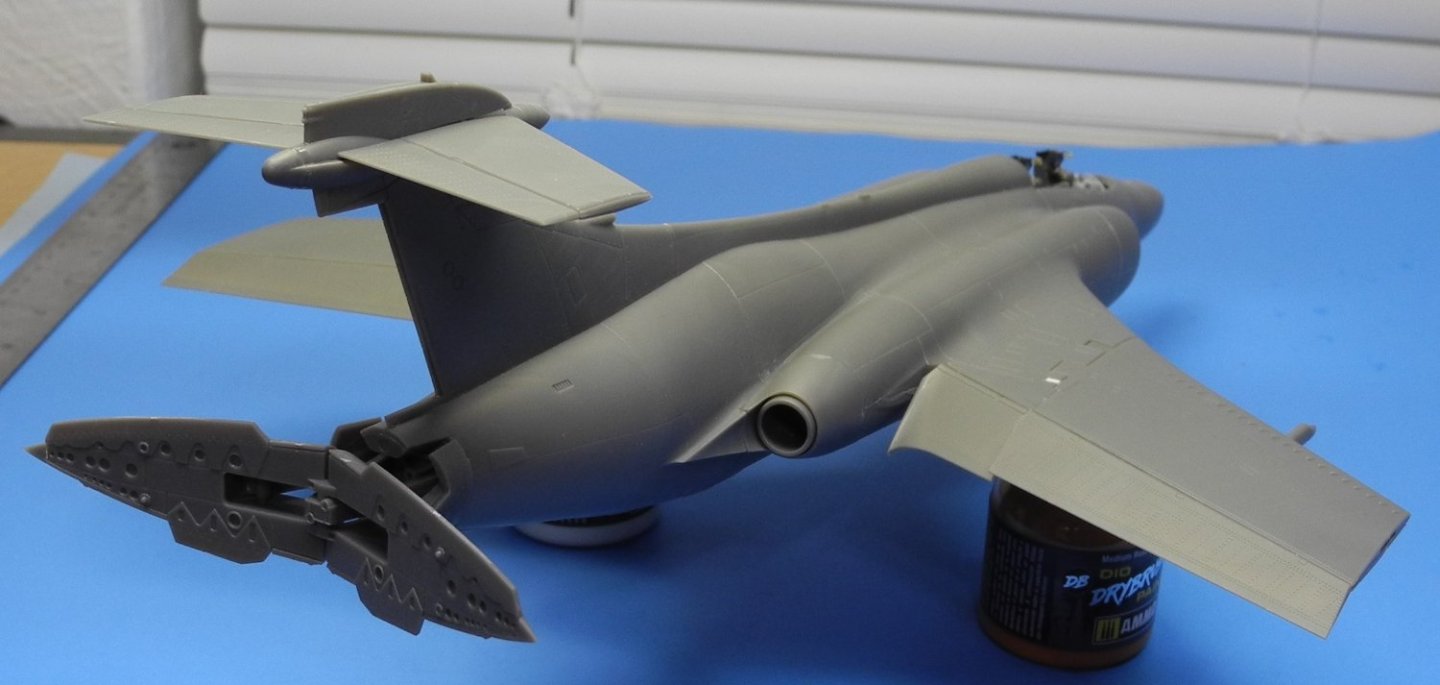
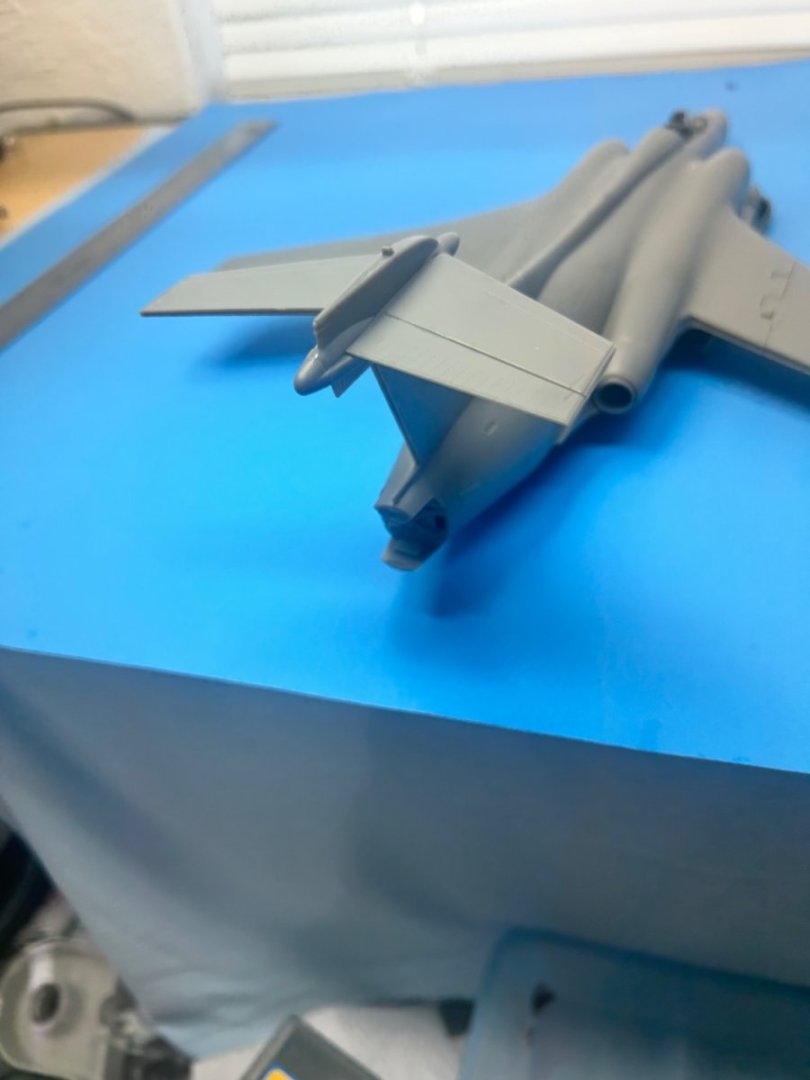
Not too many more small bits and pieces to add before it will be ready for some primer. Will spot check a few places with primer paint first before priming the whole model. The speed brake/clamshell assembly rests dry-fitted as I think it will be better to mask and paint it as a separate unit then add it permanently after all the paint work is done. The flaps sit at 40 degrees while the ailerons sit at 30 degrees as per plan. What do you know about the engine setup? There are no afterburner cans as are seen on many contemporary aircraft. No turkey feathers. Did I mention that this is a very large plane? Even in 1:48 scale it's large. 🙂

- 332 replies
-
- 14
-

-

-
If I was going to use leather, this is the way I would go: Leather Upholstery for Model Interiors 101 (italianhorses.net)
-
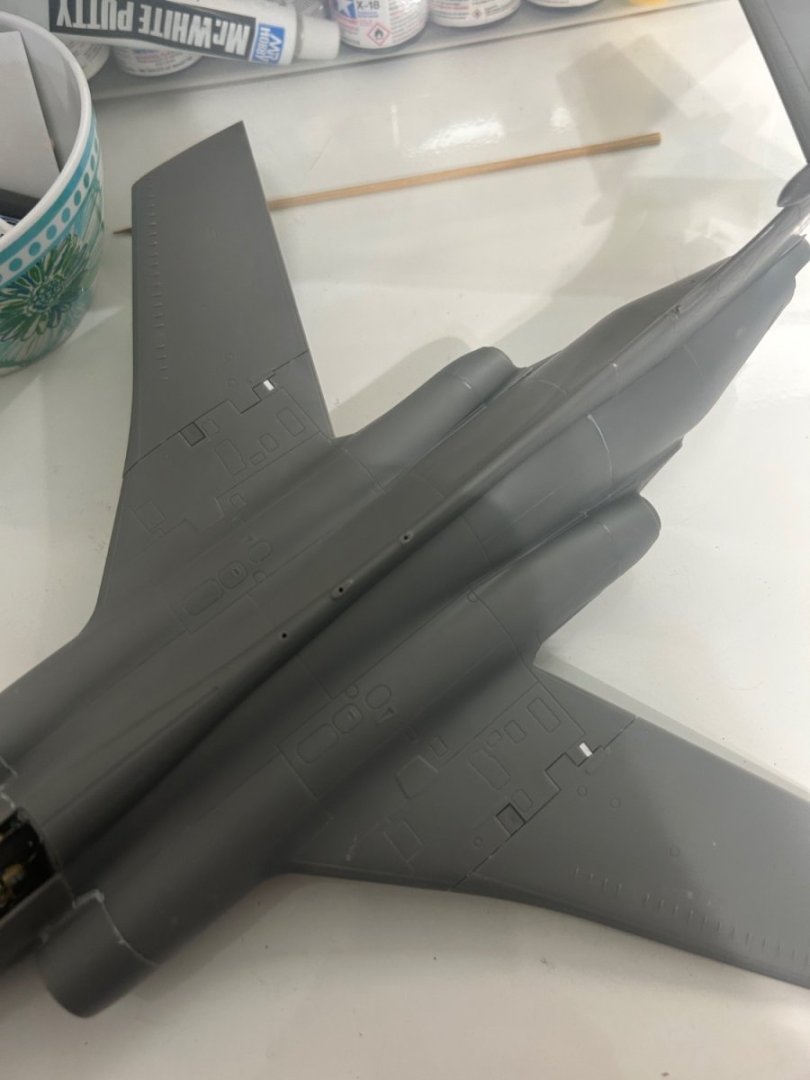
1.5mm Evergreen strip styrene is pretty much a perfect fit for filling those wing fold “holes”.
- 332 replies
-
- 10
-
-
I would not use paint thinner to strip the paint off. You will likely end up with a destroyed part. The paint you've used likely has reacted in a bad way with the material the seat is made from, and that's why it's not drying. I would get ahold of this product from Walmart and use it to strip off the paint: Super Clean Tough Task Cleaner-Degreaser 1 Gallon - Walmart.com First, test a scrap piece of the material, perhaps using sprue the part was attached to, to make sure the Superclean doesn't harm the material. I don't believe it will. I have successfully used acrylic paint on pieces like you are trying to paint. I regularly use Superclean to strip paint from plastic models and it does not harm the plastic at all. Paint thinner will melt the plastic, and your parts are likely a type of vinyl, not actual rubber, but either way I believe Superclean is the way to go.
-
Thanks for the photos Arthur. That clears it up for me.
-
Take a look at this video at/around the 23:08 mark. Here you will see the wingfold pieces being glued into the inboard side of the wings. Those open slots I'm talking about are there for the wingfold mechanism. IMO this kit was designed for the wings to be posed in the folded position where an opening would be appropriate. Building the wings in an extended position is offered as an option but it's not as well refined. If you look at the opening page of this video, you can see the model with wings extended, and there is that hole just as clear as can be seen, but that doesn't seem right to me. Look just forward of the yellow stripe at the aileron/flap hinge.
-
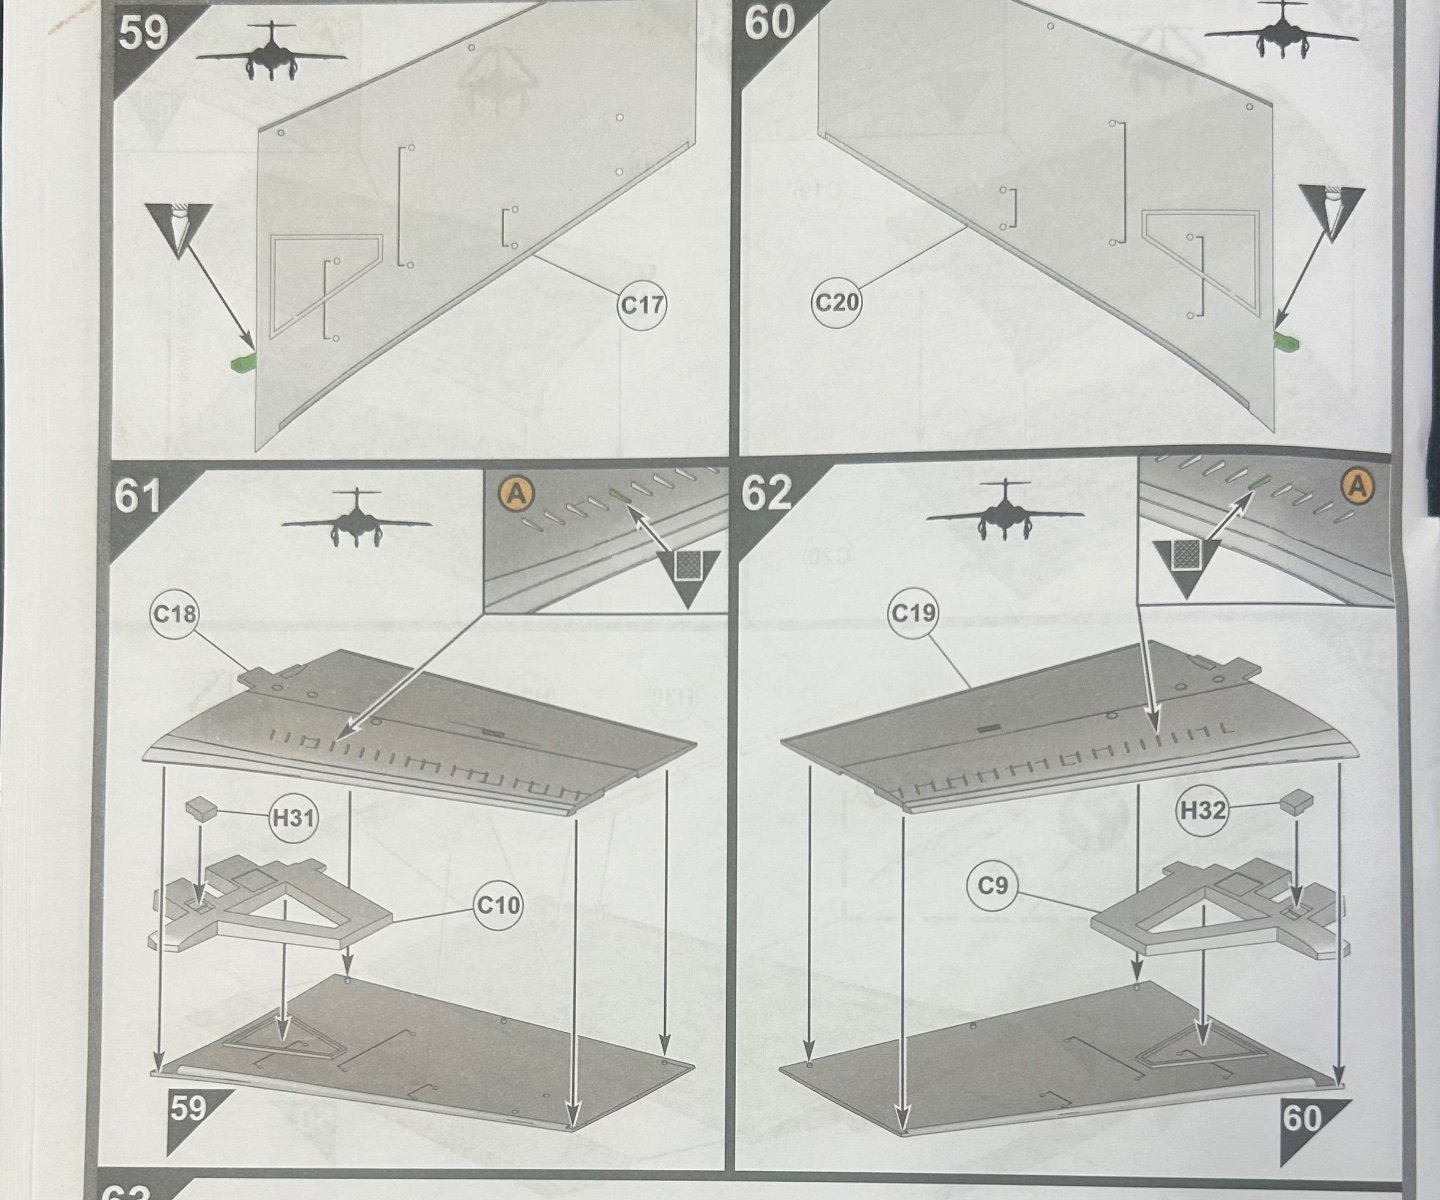
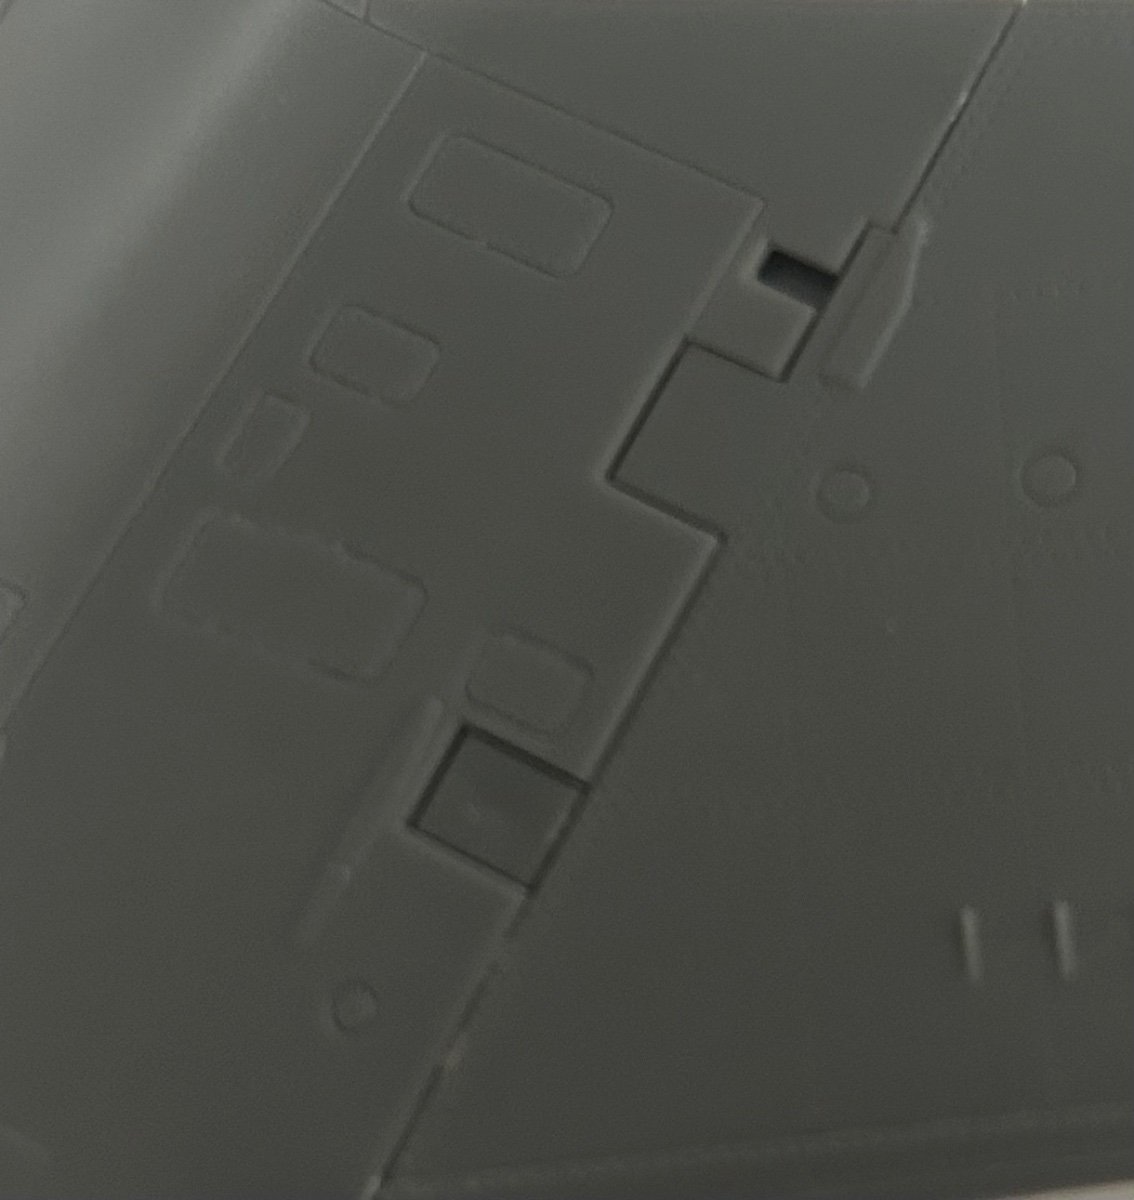
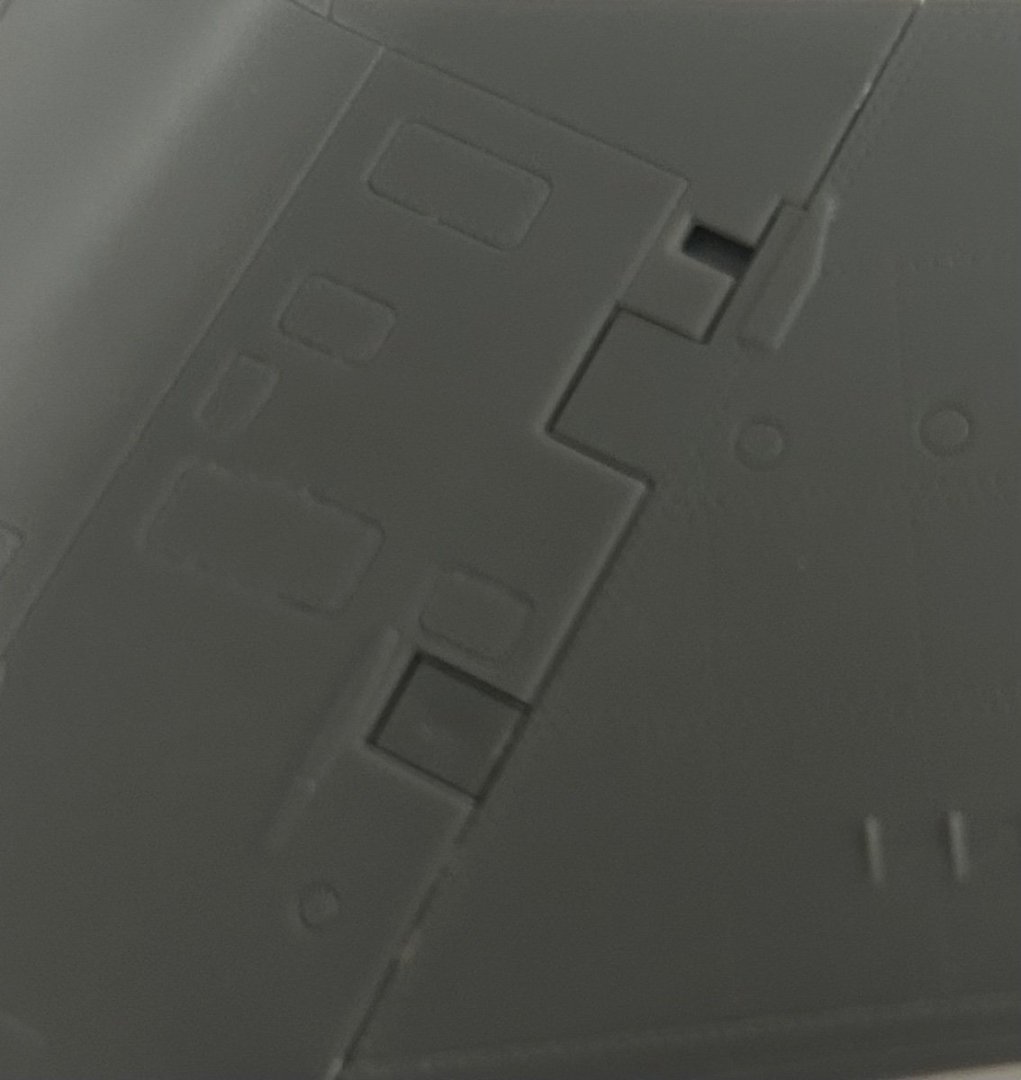
@AJohnson if you look at steps 61 and 62, parts H31 and H32 are the pieces with a sink mark in mine. Above it are steps 59 and 60 which indicate cutting off the protrusions (which I did) but that’s not what created the open slot seen in the prior photos.

-
@AJohnson these photos are for a heads up and as well to ask you for a favor. In the bottom of each photo the visible hinge attachment point has an ever so slight sink mark on both starboard and port wings. Wish I had seen these before I attached the wings as filling and sanding them now is more difficult with wings attached. Look carefully at yours to see if they need work. Secondly, at the top of each photo is an attachment point that appears to be missing (small ones). I’m thinking I may have inadvertently cut these off thing they were sprue gates. Would you kindly look at your wings and tell me if I did what I think I did? I can fix it with a little work but it’s not clear to me from the instructions I did what I think I did. As it is, it just doesn’t look right to me.

-
Handley Page Heyford by RGL - FINISHED - Matchbox - 1/72
CDW replied to RGL's topic in Non-ship/categorised builds
Yikes 🤓 -
Handley Page Heyford by RGL - FINISHED - Matchbox - 1/72
CDW replied to RGL's topic in Non-ship/categorised builds
Hey, the truth is, if we don't support the hobby there won't be any hobby. It's good because we make it good. -
Handley Page Heyford by RGL - FINISHED - Matchbox - 1/72
CDW replied to RGL's topic in Non-ship/categorised builds
True, they are pricey, but nowhere near the insane prices vendors were asking for on Ebay before these arrived. The current price is about the same as they were when WnW was still in business unless you hit one of their anniversary sales like I did one time. -
Handley Page Heyford by RGL - FINISHED - Matchbox - 1/72
CDW replied to RGL's topic in Non-ship/categorised builds
Don't wait too long, or else who knows when you'll find one. Recently, a batch of WnW kits hit the market here in the USA. They were hidden away in some warehouse on NZ, supposedly. Did they show up in Australia, too? There are the early Gotha models with a similar wing/fuselage configuration as the Handley, one on weel landing gear and one on floats. The later model Gotha's had a more convention wing/fuselage arrangement. -
Handley Page Heyford by RGL - FINISHED - Matchbox - 1/72
CDW replied to RGL's topic in Non-ship/categorised builds
This thing was so unusual, it was beautiful in its own way. You did a masterful job finishing it, Greg. Kudos! -
Handley Page Heyford by RGL - FINISHED - Matchbox - 1/72
CDW replied to RGL's topic in Non-ship/categorised builds
This makes sense. The German Gotha bomber was built similarly. @RGL, just found your log. Happily following along. -
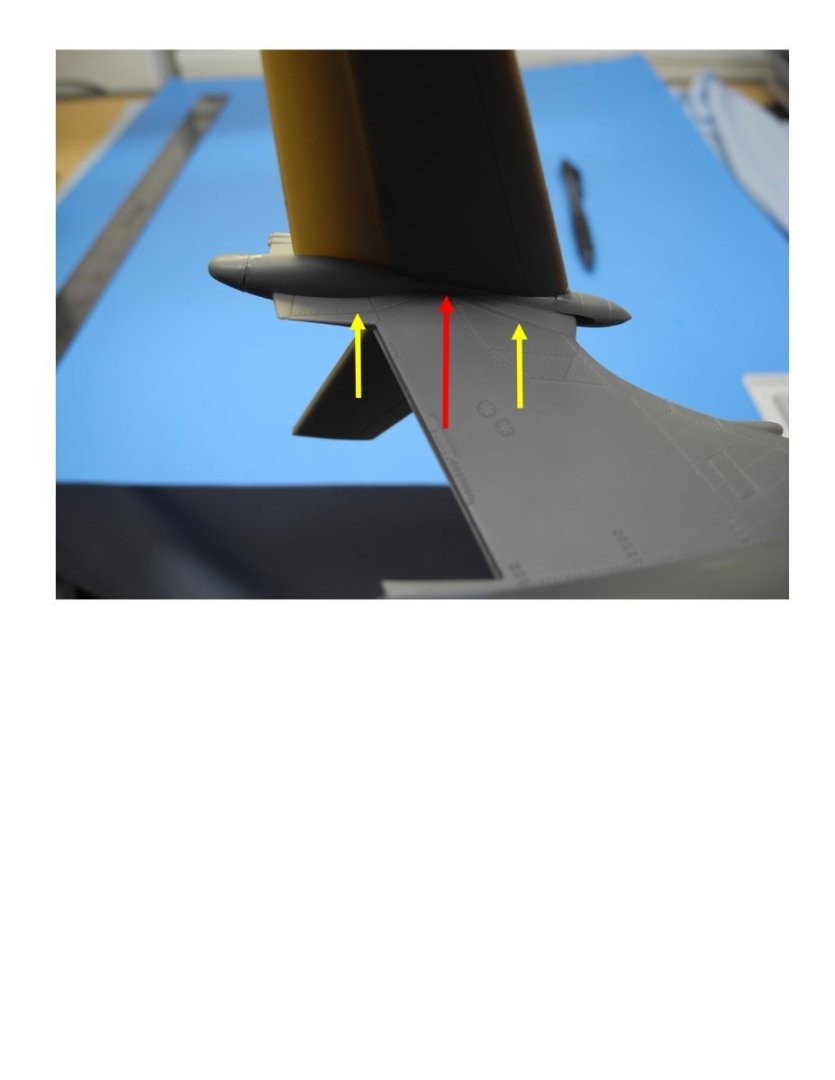
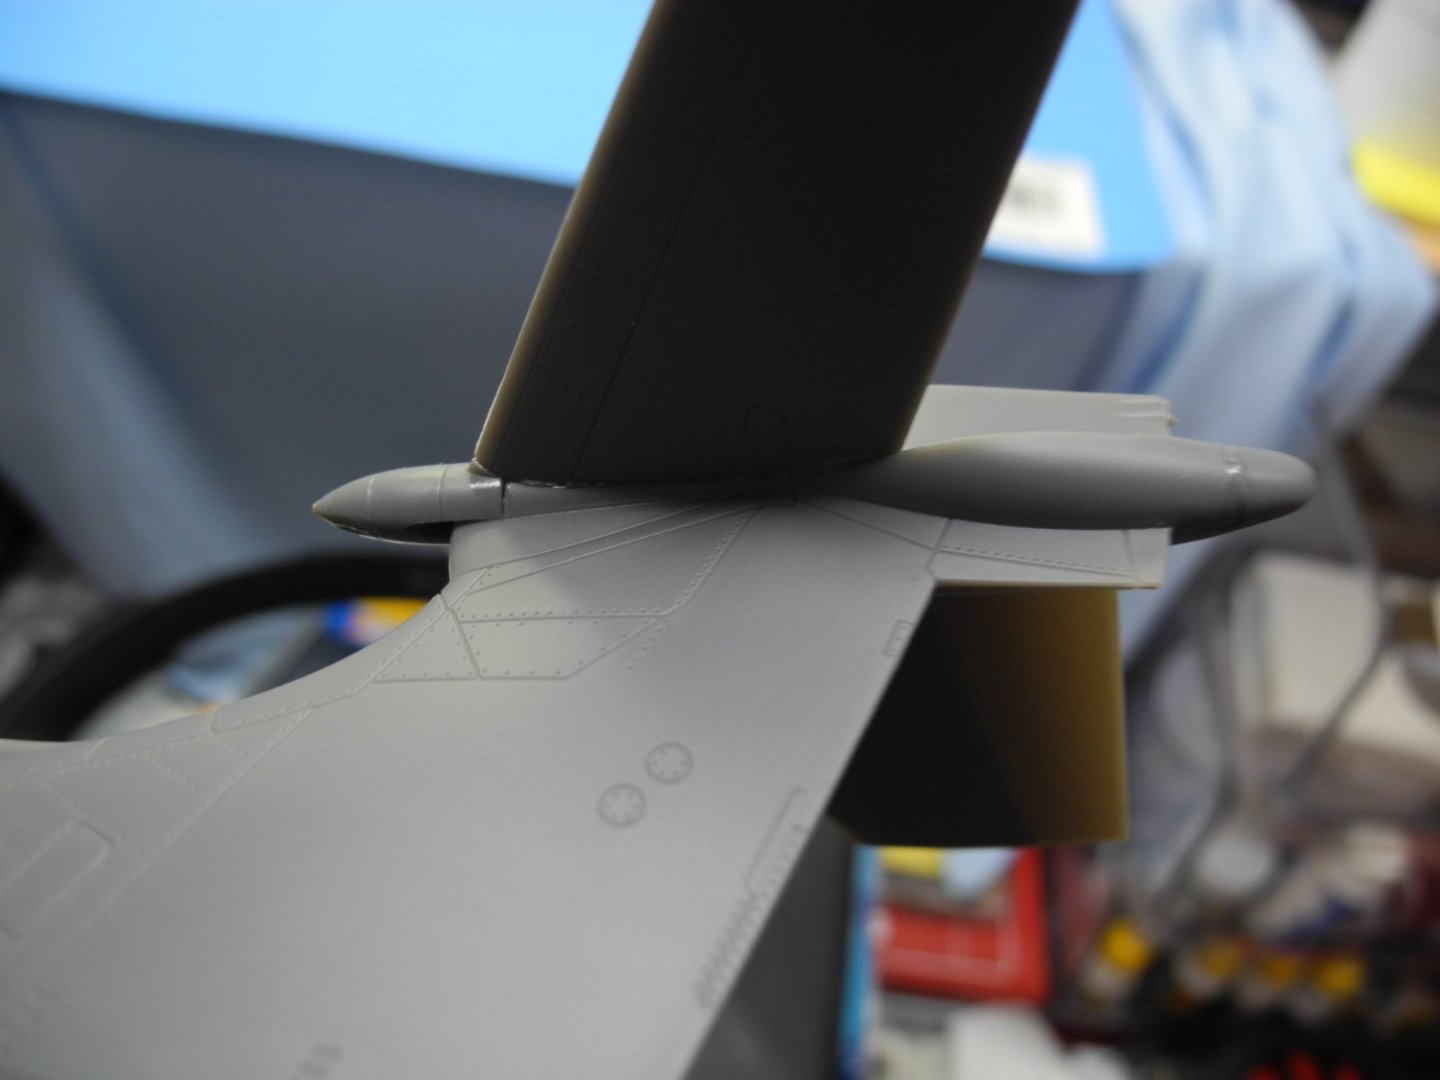
Yep. After hearing from you guys and upon closer examination, I can see it now. The red arrow points to the pivot point of the "stabilator", the yellow arrows to the limits of travel. Very interesting design. I would have not figured it out without your help. Thanks!
-
Thanks for that photo and information Arthur. That's a different feature than anything else I have seen before now. It looks like you can see the outline of where the elevators rest upon those "fins" in the photo. Very interesting.
-
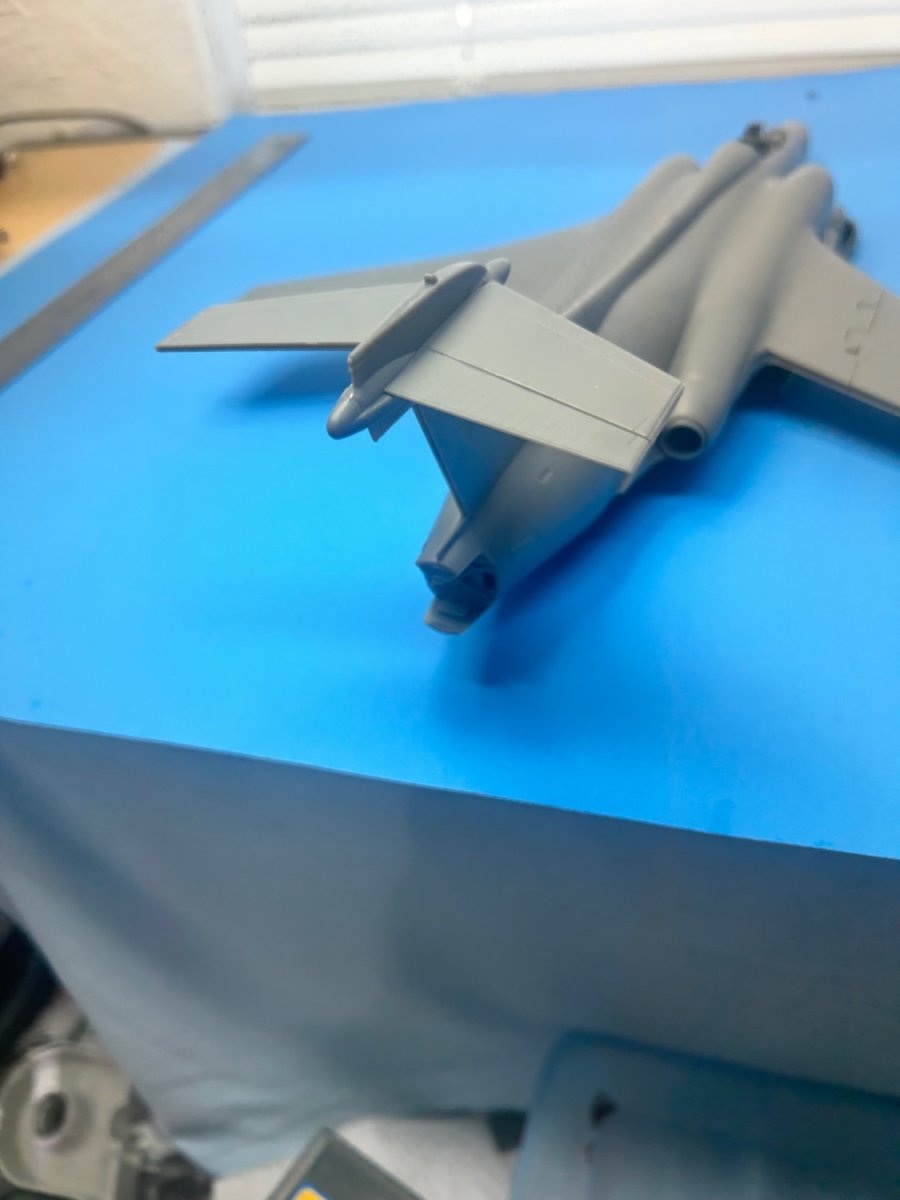
What’s going on here? Just below the horizontal stabilizers and attached to the vertical stab are a set of “fins” that protrude to each side. These would appear to interfere with the operation of the elevators moving in a downward motion.

-
Way back in the day when I first bought my Panhead, my engine stopped abruptly while riding down the highway in the dark of night. I kicked and kicked trying to restart it. My brother asked, are you out of gas? I replied that was unlikely as I had just put .50 cents worth in that day (gas was .25 a gallon then). To my dismay, I learned my avg fuel consumption was 25 miles per gallon. The fuel tanks only held 3.5 gallons, so my range was just 90 miles, max. Racing bikes probably sucked down fuel like mad.
-
Those early engines were not fuel efficient, so I agree, it's probably a reserve tank.
-
I suppose the tank could have been used to introduce a lead additive to the fuel mixture but then I wonder why it was not simply mixed in the main fuel tank. Pretty sure lead additives were developed as early as WW1 for aircraft engines, to prevent knock/pre ignition. Greatly improved engine performance.
-
Not with the kit provided parts but I’m sure it could be done with the right reference material and time/effort. It’s a fairly complex assembly. Will probably pose mine closed. PS: After looking some more at photos of it, the open position offers a lot of visual effect not seen in a closed position, so I may do it open. So much more to see that way.