mikiek
-
Posts
2,276 -
Joined
-
Last visited
Content Type
Profiles
Forums
Gallery
Events
Everything posted by mikiek
-
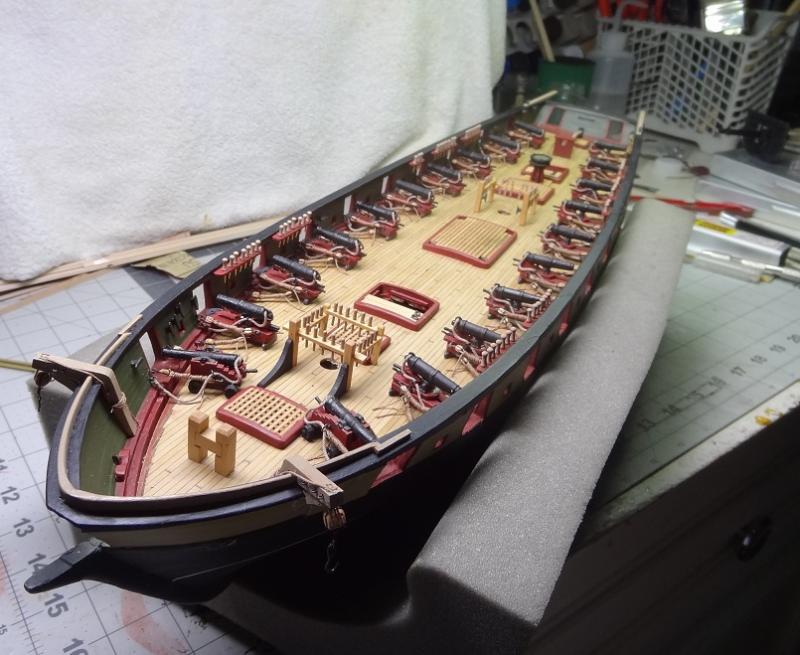
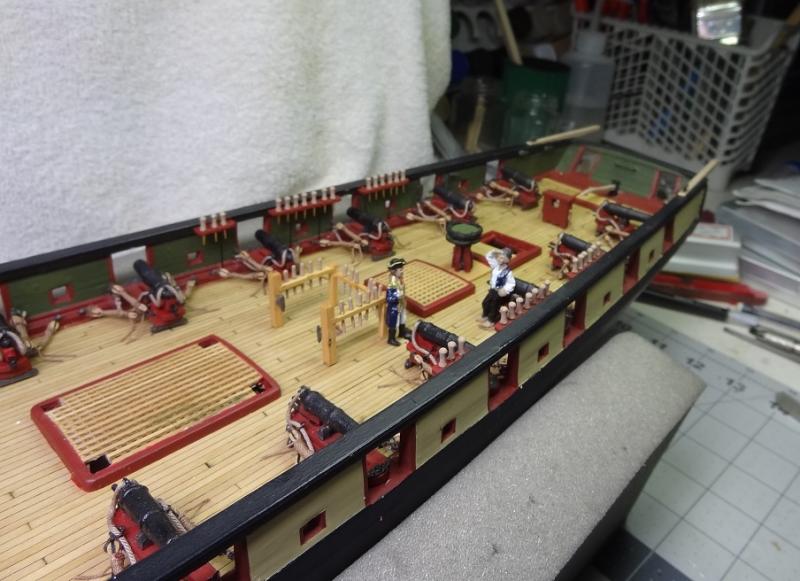
 Don, Darrell, Elijah - thank you for checking in and for your feedback! I am still a little uncertain about the pins but I am telling myself they will likely be 80%-90% covered by rope so I have some wiggle room. I prefer the smaller ones but the others should suffice, I was able to find the 1:64 figurines online - same scale as the kit. They are pewter and have been painted. I don't plan on mounting them permanently but they are a help in realizing the scale. In the interest of time, the original builders took some serious shortcuts when building supports for the deck. Several common practices are believed to be omitted. But still sturdy enough for the one battle this ship was intended for. I believe the Browns used the same techniques when they built Eagle on Lake Champlain a year later - a build they completed in something like 40 days.
- 843 replies
-
- 3
-

-
- niagara
- model shipways
- (and 2 more)
-
Thanks jdbondy - I will order some of both. Good timing too, as I will begin rigging Niagara in the next week or two.
-
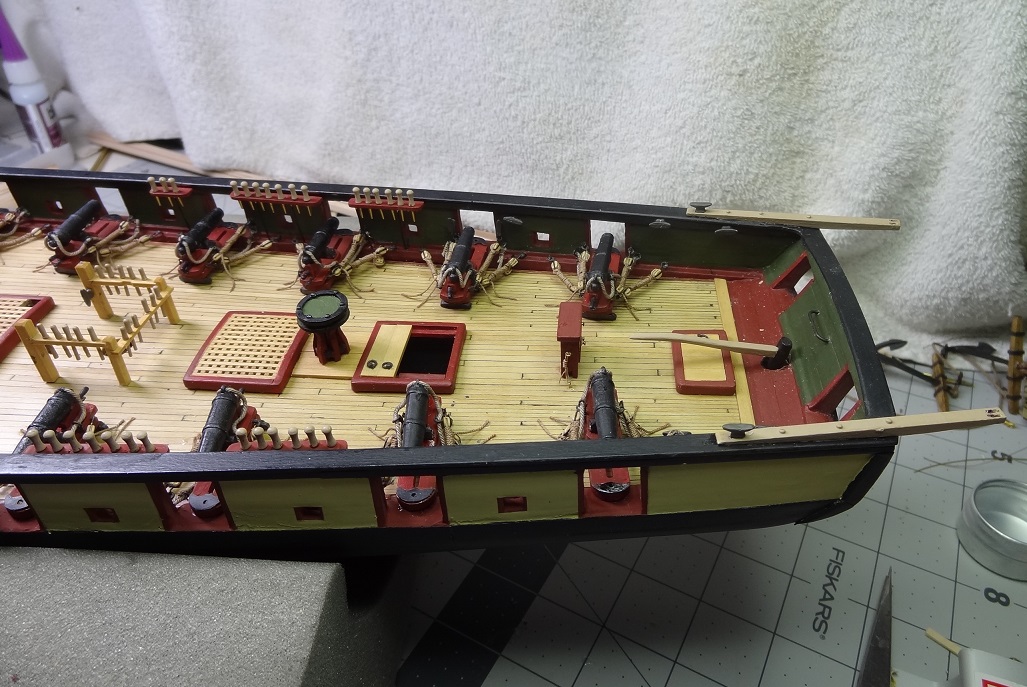
I thought this evening I could post that the deck is finished but I jumped over to Darrell's log and remembered I still had a galley stack to make. Also, in mounting the fife rails I had to take the pump off, and have not replaced it. Always something! Fife rails were built to plans but the cross pieces seem rather wimpy to me. I have my doubts as to whether they will take much of a load. I did run some thin CA on the underside but it didn't seem to help. Plans also called for them to be 'natural' in color, which I did, but I am not overly thrilled with that. Of course with my historical version there would have been few frills - even painting would probably be only out of necessity. Well the deck is more complete and I was about to move on to the channels and chainplates. Plans there call for 0.016" rod for the largest chainplate pieces. Again, this seems very wimpy. The smaller ones are supposed to be 0.010" - yeah right. And neither were supplied in the kit. The smallest rods I have are 0.020". I'm going to make a couple of test pieces and see how they look. I am definitely not going any smaller. I would appreciate your comments on the belay pins. I while back I posted about running out of the small kit supplied pins. I order some more but they are a little bigger and shaped differently. I ended up using the small pins on the fife rails and the larger ones on the bulwark rails. Here's the almost completed deck. It's getting rather busy. Hard to imagine a crew running around. Speaking of crew


- 843 replies
-
- 4
-
-
- niagara
- model shipways
- (and 2 more)
-
Thanks jdbondy - I tried some 3/0 for seizing. Perhaps I bought the wrong type of line as it very easily unraveled and proved difficult to use. Maybe there's a trick to it that I don't know.
-
Julie - in my log post 244 I preach about the use of proportional dividers. They were very helpful in determining the width of each individual plank strake. With the plank bands that you have drawn out you could determine the exact width of the next strake - even if the width varies (wider and thinner) in the same strake. You set the marker for the number of planks left in the band. Using the big end measure the remaining width of the band at known perpendicular intervals. The small end will tell you the strake width at those intervals. So after each measurement you mark your strake edge with the width of that small end measurement. Not as confusing as I have made it sound. It will make your plank shaping more accurate.
-
Well this wanna be lathe master researched a bit and the proper term in the turning world would be a taper. Different techniques produce different angles. You can offset the headstock or tailstock which will put the piece at an offset. Or you can use a compound slide which puts the cutting tool at an offset. Of course then there is the taper attachment. If I only knew what all that meant Seriously, the compound slide sounds like the way to go. I imagine Darrell will come up with something.
- 648 replies
-
- 3
-
-
- niagara
- model shipways
- (and 1 more)
-
I hear ya. I don't do any of those sites where you 'like' stuff so I rarely think to do it here.
- 287 replies
-
- 3
-
-
- niagara
- Model Shipways
- (and 1 more)
-
What a great idea on the wood! Or my favorite - styrene. I tried stamping some thin brass sheet, but I could never get the edges trimmed well enough. I do think you're on to something using an alternate material. Wondering if you turned some wood, would the process be similar to what I described or would you just put a file on the end of the piece and do it by hand?
- 648 replies
-
- 3
-
-
- niagara
- model shipways
- (and 1 more)
-
Knowing nothing about turning, but I was thinking something like this. I have a brass rod that is the diameter of the base of the cone. Cut off a piece and mount in a lathe chuck. Mount a cutting edge above and about 1/8" in from the right. Begin to cut at that point, moving the tool to the right and into the rod. So, a tweak to the right, a tweak downwards, repeat. It might take a few cycles but it seems like you would end up with something conical. Maybe some filing to smooth it out. Since the cone would be mounted with the point facing upwards, you probably would not need to bore out the underside. For full disclosure - I have no idea what I'm doing with a lathe. Do not try this at home
- 648 replies
-
- 4
-
-
- niagara
- model shipways
- (and 1 more)
-
Brian - My apologies for calling you Scott. He's another Niagara builder.
- 287 replies
-
- 3
-
-
- niagara
- Model Shipways
- (and 1 more)
-
I agree with you Bob. I've found with CA for the 'nails' and PVA down the edges there's virtually no waiting.
-
Didn't even notice the spile, but it makes sense that you would have to. No matter which way the planks run, the slightest bow in an edge gets huge a few inches away.
-
You are screaming along there Bob. Man, those deck planks look great for basswood.
-
E.J. , Dave - I don't want to hijiack Elijah's thread but I have decided that after my current build I will be making eyebolts and hooks. Sounds like a good activity for when you're bored and have a little time on your hands. Have either you made any posts on how to? Particularly hooks?
- 701 replies
-
- 4
-
-
- phantom
- model shipways
- (and 1 more)
-
Hey Darrell - Have you given any thought to how you are going to do the galley stack? That brittania piece leaves a lot to be desired. I can do the suggested pipe with the flat support pieces but I've no idea how to come up with a cone shaped top.
- 648 replies
-
- 3
-
-
- niagara
- model shipways
- (and 1 more)
-
Not sure if they were painted on purpose but given that a lot of deadeyes, blocks, etc. were in contact with tarred rope you can bet they were not squeaky clean.
- 701 replies
-
- 3
-
-
- phantom
- model shipways
- (and 1 more)
-
Wow Don - what a cool idea for scuppers! That bulwark area adds a lot to the overall appearance. So - I can blame someone else for 4 builds at one time?
- 653 replies
-
- 5
-
-
- trabakul
- marisstella
- (and 1 more)
-
I'm being slow I guess. How can a hole be drilled with the bit in reverse?
- 701 replies
-
- 2
-
-
- phantom
- model shipways
- (and 1 more)
-
I didn't go for the eggshell on the yawl (finished months ago) probably just because I didn't know any better. The instructions said thin but that is relative. I'm sure not going to kill myself sanding until I can see light coming thru. Not sure what I have achieved with that. If the boat is seen from only one angle - for instance it's upside down on the main hatch grating - what's the point? For that matter why even finish out the inside at all? Hanging off the davits might be a different story. I think even if thinness was the goal it would probably be easier to get the exterior the shape you want, plank it and then Dremel out the inside as much as you want. I remember trying (with the little knowledge I had) to find some way to get frame looking pieces for the interior. Nothing would bend as much as needed - the angle at the keel was too sharp. Carving frame pieces seemed like the only solution and I elected not to go there. That ended up being my introduction to styrene.
- 843 replies
-
- 3
-
-
- niagara
- model shipways
- (and 2 more)