
Supplies of the Ship Modeler's Handbook are running out. Get your copy NOW before they are gone! Click on photo to order.
×

dgbot
-
Posts
3,993 -
Joined
-
Last visited
Reputation Activity
-

 dgbot reacted to schooner in SS Stephen Hopkins by schooner - FINISHED - BlueJacket Shipcrafters - Liberty Ship
Opening up some cargo hatches
In thinking about how I want the finished model to look I decided that rather than have each of the 5 cargo hatches and their associated booms looking basically the same I will try to rig each one with a different style of rig and also show at least one hatch with the hatch covers removed. I decided to open up the #2 and #4 hatches.
Each cargo hold consisted of an upper and lower hold, divided by the Tween deck. I will only go down as far as the tween deck since anything below the tween deck hatch would definitely be too dark to see. As you can see in this drawing the upper holds were only about 1/3 the size of the lower holds:
The hatches were relatively small in comparison to the size of the holds so in order to give them some depth I wanted to remove as much wood as needed horizontally so that the holds are visible when looking down through the hatch at various angles (this is assuming there is enough light to see in there, if not then no harm done - at least as much as can be seen will be somewhat realistic). In order to figure out how far back from the hatch combings I would have to “excavate” I made a simple mockup from cardboard with the upper hatch cut out and 4 straws cut to the scale 10ft length to separate the decks. The graph paper on the lower piece allowed me to figure out how much of the Tween Deck could be seen.
After getting my estimates and adding a little fudge factor I marked the deck in red with the areas to be excavated:
Fortunately I already had a router attachment for a Dremel tool so it was much easier than chiseling, although it will take multiple passes since it can’t handle taking off much more than 1/8” of wood at a time (the final depth will be 5/8"):
Here’s the progress so far, both holds are at about 1/3 of their final depth:
I’ll hopefully be taking off a few days for a fishing trip. When I return I’ll bring the holds to their final depth, add the tween decks and lower hatches, add the fore and aft bulkheads (if they can be seen) and then start fitting 1/16” ply to cover the openings, cut-out the upper hatches and then move on to other things.
-
dgbot reacted to Mirabell61 in SS Kaiser Wilhelm der Grosse 1897 by Mirabell61 - FINISHED - scale 1:144 - POF - first German four stacker of the Norddeutscher Lloyd line
thank you very much Piet,
have now painted the long railing and mounted the aft cabin (removeable per screws).....
Nils
-
dgbot reacted to dvm27 in Speedwell 1752 by dvm27 (Greg Herbert) - FINISHED - Ketch Rigged Sloop
Here's a small update on Speedwell. Her main deck has been completely framed with beams, carlings, ledges hanging and lodging knees.That was rather routine but boring work which occupied me for a few months. As a change of pace I made most of the deck fittings but none are permanently affixed as yet. Currently, I am working on the capstan and have just finished the tapered barrel.
Just a tip for you novices regarding gratings. Ideally they should have full courses all around (see photos). It is easier to cut your gratings to the the size that accomplishes this first. Then build your coamings around them. If the result is a gratings assembly that is a hair larger or smaller than the plan so be it.
-
 dgbot got a reaction from Piet in SS Kaiser Wilhelm der Grosse 1897 by Mirabell61 - FINISHED - scale 1:144 - POF - first German four stacker of the Norddeutscher Lloyd line
I agree with everyone else Nils. It looks great.
David B
-
 dgbot got a reaction from Altduck in Steamboats and other rivercraft - general discussion
I drooled over that boat for quite awhile Kurt. I thought is was great.
David B
-
 dgbot got a reaction from EJ_L in Wood for planking and ribs
I think maple will be perfect for the frames. and beech for the planking. It is not that pricey and easy to work with. Plus it resembles oak at the smaller scales.
David B
-
 dgbot got a reaction from mtaylor in Wood for planking and ribs
I think maple will be perfect for the frames. and beech for the planking. It is not that pricey and easy to work with. Plus it resembles oak at the smaller scales.
David B
-
 dgbot got a reaction from Canute in Steamboats and other rivercraft - general discussion
I drooled over that boat for quite awhile Kurt. I thought is was great.
David B
-
dgbot got a reaction from Canute in How to make best use of your milling machine. Tips and techniques
What I never liked is one an endmill dulls out it is not easy to properly sharpen it wihout sending it out. At work we alway used carbide when we could get it and the guys in charge cried about the cost. But the stuf we worked with would dull a bit very fast. They finally gave in when the material started smoking and stinking up the entire shop. Polyethelene and HSSS steel do not play nice with each other.
David B
-
dgbot got a reaction from Canute in Wood for planking and ribs
I think maple will be perfect for the frames. and beech for the planking. It is not that pricey and easy to work with. Plus it resembles oak at the smaller scales.
David B
-
dgbot reacted to Chuck in Queen Anne Style Royal Barge by Chuck - FINISHED - Syren Ship Model Company - 1:24
Yes....but not as easy as just clicking a button. Which most would assume. After resizing the templates in the drafting software (the easy part)....the laser settings will then have to be adjusted to reflect the proper speed and power settings for the smaller thickness in wood. Depending on the parts, they also may need some tweaking to adjust for the larger kerf size in relation to the smaller part size (ie the carved decorations). Plus the five or six more elaborate carvings are being done as resin castings. I cant expect folks to scratch carve those so masters will need to be made for those. So there are plenty of hours of work needed to do it correctly for the best results. But once its done the first time, its done and all parts can easily be run as quickly as the 1/2" scale versions. But its still weeks of work.
After all that there are other considerations. This design concept works well for 1/2" scale. BUT
Lets consider that the frames are 1/16" thick at this scale. Reducing them to 1/4" scale means using 1/32" thick stock. Or at a minimum, going with 3/64" for strength. I think using 1/32" thick frames for this design construction method would not work as the frames would be much to fragile. So once you start altering those thicknesses...it means more alterations for the parts templates and it just snowballs from there. To simply reduce everything by 50% without thinking it through would be a disaster.
I know some other folks think its easily done and have talked about it in other threads. In my opinion its not as simple and a bit fantasy actually. Depending on the subject of course. Decisions would need to be made that may reduce its historical accuracy for MFG purposes or depending on the scale, a entirely different construction concept might be a better way to go. Lots to consider. I hate to be the fantasy killer to all those folks discussing the possibilities of kit production in that other topic. But its a little naive in my opinion. For most subjects anyway.
-
 dgbot got a reaction from Gerhardvienna in Steamboats and other rivercraft - general discussion
I drooled over that boat for quite awhile Kurt. I thought is was great.
David B
-
dgbot got a reaction from mtaylor in Steamboats and other rivercraft - general discussion
I drooled over that boat for quite awhile Kurt. I thought is was great.
David B
-
dgbot reacted to dvm27 in Heroine 1838 by ggrieco - FINISHED - Scale 1:24 - Western River Steamboat as she appeared before hitting a snag in the Red River
So how long does it take you to plank a wall. Is it one plank at a time, clamped with Tite Bond? Rapid fire planking with CA glue?
There was an episode of This Old House recently where they CNC cut the stringers for a staircase in a factory off site. The contracter looked green with envy!
-
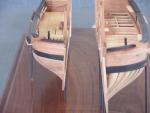
dgbot reacted to ggrieco in Heroine 1838 by ggrieco - FINISHED - Scale 1:24 - Western River Steamboat as she appeared before hitting a snag in the Red River
This week I started tying the two decks together with the side planking but, first I had to finish framing out the paddlebox.
Lighter vertical timbers were added between the main posts to frame out the windows and add support to the planking.
Before I could continue, I had to frame in the stairs. Since all the stringers were exactly the same, I decided to let the mill do the work.
First stringers going in.
Second stringers and starting to frame the paddlebox and forward deckhouse.
Planking the paddlebox and deckhouse.
Adding the stair risers and starting to plank the paddlebox.
Detail of the paddlebox planking. There were three strakes and then a moulding that continued the run of a short rail that ran the circumference of the deck. The rail, moulding and lower three planks were painted black. All the planking above was painted white.
-
dgbot reacted to aviaamator in La Jacinthe 1825 by aviaamator - 1:20 - schooner
Don't even know what to say... Hands are buzzing from tension! No one hears this hum?
-
 dgbot got a reaction from CaptainSteve in HMS Vulture 1776 by Dan Vadas - FINISHED - 1:48 scale - cross-section - from TFFM books
Congratulations and now time to break out that bottle of aged scotch and give her a toast. Beautiful workmanship.
David B
-
dgbot got a reaction from mtaylor in HMS Vulture 1776 by Dan Vadas - FINISHED - 1:48 scale - cross-section - from TFFM books
Congratulations and now time to break out that bottle of aged scotch and give her a toast. Beautiful workmanship.
David B
-
dgbot reacted to aviaamator in How to make best use of your milling machine. Tips and techniques
Will advise You beforehand to make cuts with a knife along the edges of the groove, I am confident that the groove will turn out beautiful.
-
 dgbot got a reaction from Aussie048 in How to make best use of your milling machine. Tips and techniques
What I never liked is one an endmill dulls out it is not easy to properly sharpen it wihout sending it out. At work we alway used carbide when we could get it and the guys in charge cried about the cost. But the stuf we worked with would dull a bit very fast. They finally gave in when the material started smoking and stinking up the entire shop. Polyethelene and HSSS steel do not play nice with each other.
David B
-
dgbot got a reaction from mtaylor in How to make best use of your milling machine. Tips and techniques
What I never liked is one an endmill dulls out it is not easy to properly sharpen it wihout sending it out. At work we alway used carbide when we could get it and the guys in charge cried about the cost. But the stuf we worked with would dull a bit very fast. They finally gave in when the material started smoking and stinking up the entire shop. Polyethelene and HSSS steel do not play nice with each other.
David B
-
 dgbot got a reaction from WackoWolf in How to make best use of your milling machine. Tips and techniques
What I never liked is one an endmill dulls out it is not easy to properly sharpen it wihout sending it out. At work we alway used carbide when we could get it and the guys in charge cried about the cost. But the stuf we worked with would dull a bit very fast. They finally gave in when the material started smoking and stinking up the entire shop. Polyethelene and HSSS steel do not play nice with each other.
David B
-
dgbot reacted to Tadeusz43 in Steamboats and other rivercraft - general discussion
Hi,
Ships models from Bodensee (Constance Lake) Navigation Museum In Kreuzlingen CH.
Paddle wheel from 1892
Tadeusz
-
dgbot got a reaction from Canute in HMS Vulture 1776 by Dan Vadas - FINISHED - 1:48 scale - cross-section - from TFFM books
Congratulations and now time to break out that bottle of aged scotch and give her a toast. Beautiful workmanship.
David B
-
dgbot reacted to Mahuna in How to make best use of your milling machine. Tips and techniques
Just thought I'd share a little lesson I learned this week.
My milling machine and all of the related tools were bought as used equipment - in the neighborhood of 15 years old when I got them. The end mills all seem to cut metal OK, but cause a lot of tear-out in wood. I thought this was normal, until I had to buy a new end mill of a size I needed and didn't have. The difference in cut is amazing, so I think the old end mill must be dulled by years of use.
Here's a cut using an old cutter.
And here's a cut with the new cutter.
Lesson learned - use a sharp end mill for cutting wood.