EJ_L
-
Posts
2,246 -
Joined
-
Last visited
Content Type
Profiles
Forums
Gallery
Events
Everything posted by EJ_L
-
 Marc, just incredible! What you are doing with this model is a whole new level of plastic ship building and one that in the end will reward with a great ship! I do hope you compile all your information on S.R., even if it is just in the form of this build log. There is a wealth of information here and I'm certain that by the time you finish this will be one of those indispensable logs for anyone looking to build Soleil Royal in any medium. The research you do combined with the explanations of how and why you are modifying and building certain ways would make a great companion guide once combined and edited a little. It would be something I would love to get my hands on for when I do a full scratch build of her.... many years from now.
- 2,699 replies
-
- 2
-

-
- heller
- soleil royal
- (and 9 more)
-
Very nice planking! I agree with the look of the wood. It is a shame to cover it up. Good to keep in mind though for another build.
-
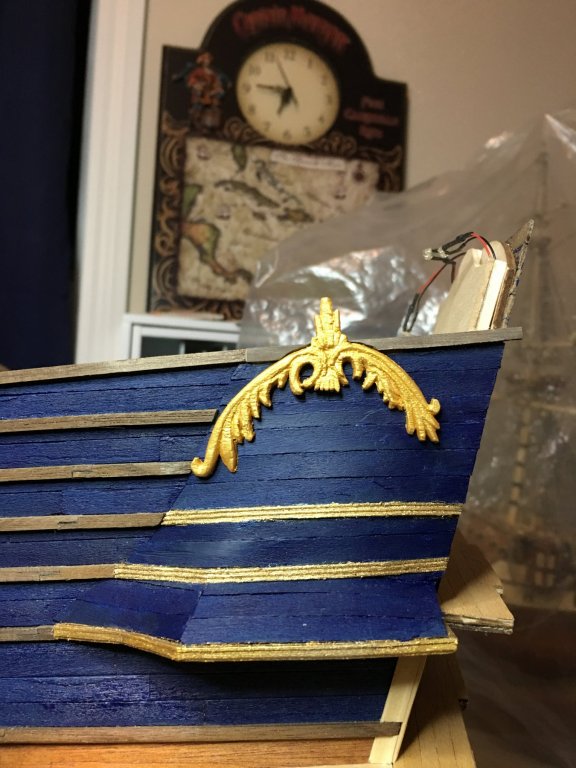
Finally back in the shipyard this weekend. Added a couple more decorations and started to build the starboard quarter galley. Now I can even up both sides and move forward with the decorations.
- 961 replies
-
- 10
-
-
Thank you all for the compliments and well wishes. I am getting better. Still have a violent cough and tired so I'm trying to just rest this week after work and let the medicine do it's job. I am hoping to be back this weekend and able to resume working. On the plus side, I am getting a lot of good reading done!
-
I like the contrast of the box wood. I always think that if you are going to make all those beautiful details, letting them be seen is a good thing. The contrasting colors allow that.
- 75 replies
-
- 2
-
-
- constitution
- mamoli
- (and 2 more)
-
Thank you for all the encouraging comments and likes. This is one of the most anticipated and dreaded portions of this build but I am feeling more and more pleased that I took the path to make my own decorations. Marc, you have given some very wise advise. I had originally planned on completing one side before switching to the other but now I am thinking that you are correct in thinking that it may be best to work them both together. As you said, that will keep the quality of the carvings more closely matched from side to side and as they (hopefully) improve over time, both sides of the model will improve as one. I think I will finish up with the pieces I am on now so I don't lose that train of thought and then fall back a little to catch the other side up so I can begin decorating evenly. I'll have some pictures of where I am at soon. I'm fighting another round of sickness (story of my life for the last 3 years) so I don't know when they will be up but probably within the next few days. Thanks again for stopping in and happy building!
-
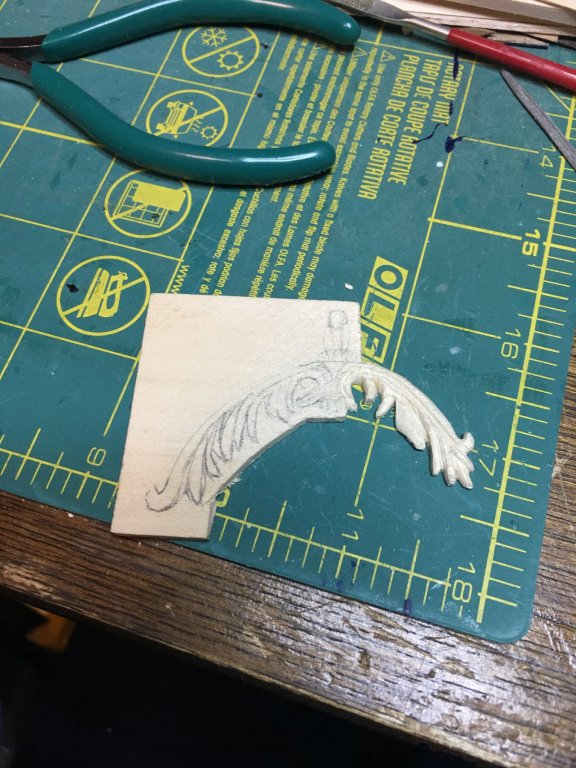
First carving has been completed and installed. A few defects but overall I’m satisfied especially considering my limited carving experience.
- 961 replies
-
- 14
-
-
Welcome to MSW! That is a great ship kit and one that many of us have built. You will be able to get all the help you will need and plenty of great ideas for building her. Best of luck to you and I look forward to seeing your work!
-
Welcome to MSW Oliver! Great to have you with us and I wish you the best of luck on your Santa Maria!
-
Welcome to MSW! Good to have you with us.
-
Welcome back to MSW!! Looks like you have yourself a couple of nice projects to work on. Have fun!
-
Ken, this piece is just basswood. I have a bunch of it laying around so I figured it would work for some of the simpler carvings. I'm probably going to switch to something harder like boxwood for the statues and ornaments that need to take on more detail.
-
Absolutely stunning work!
-
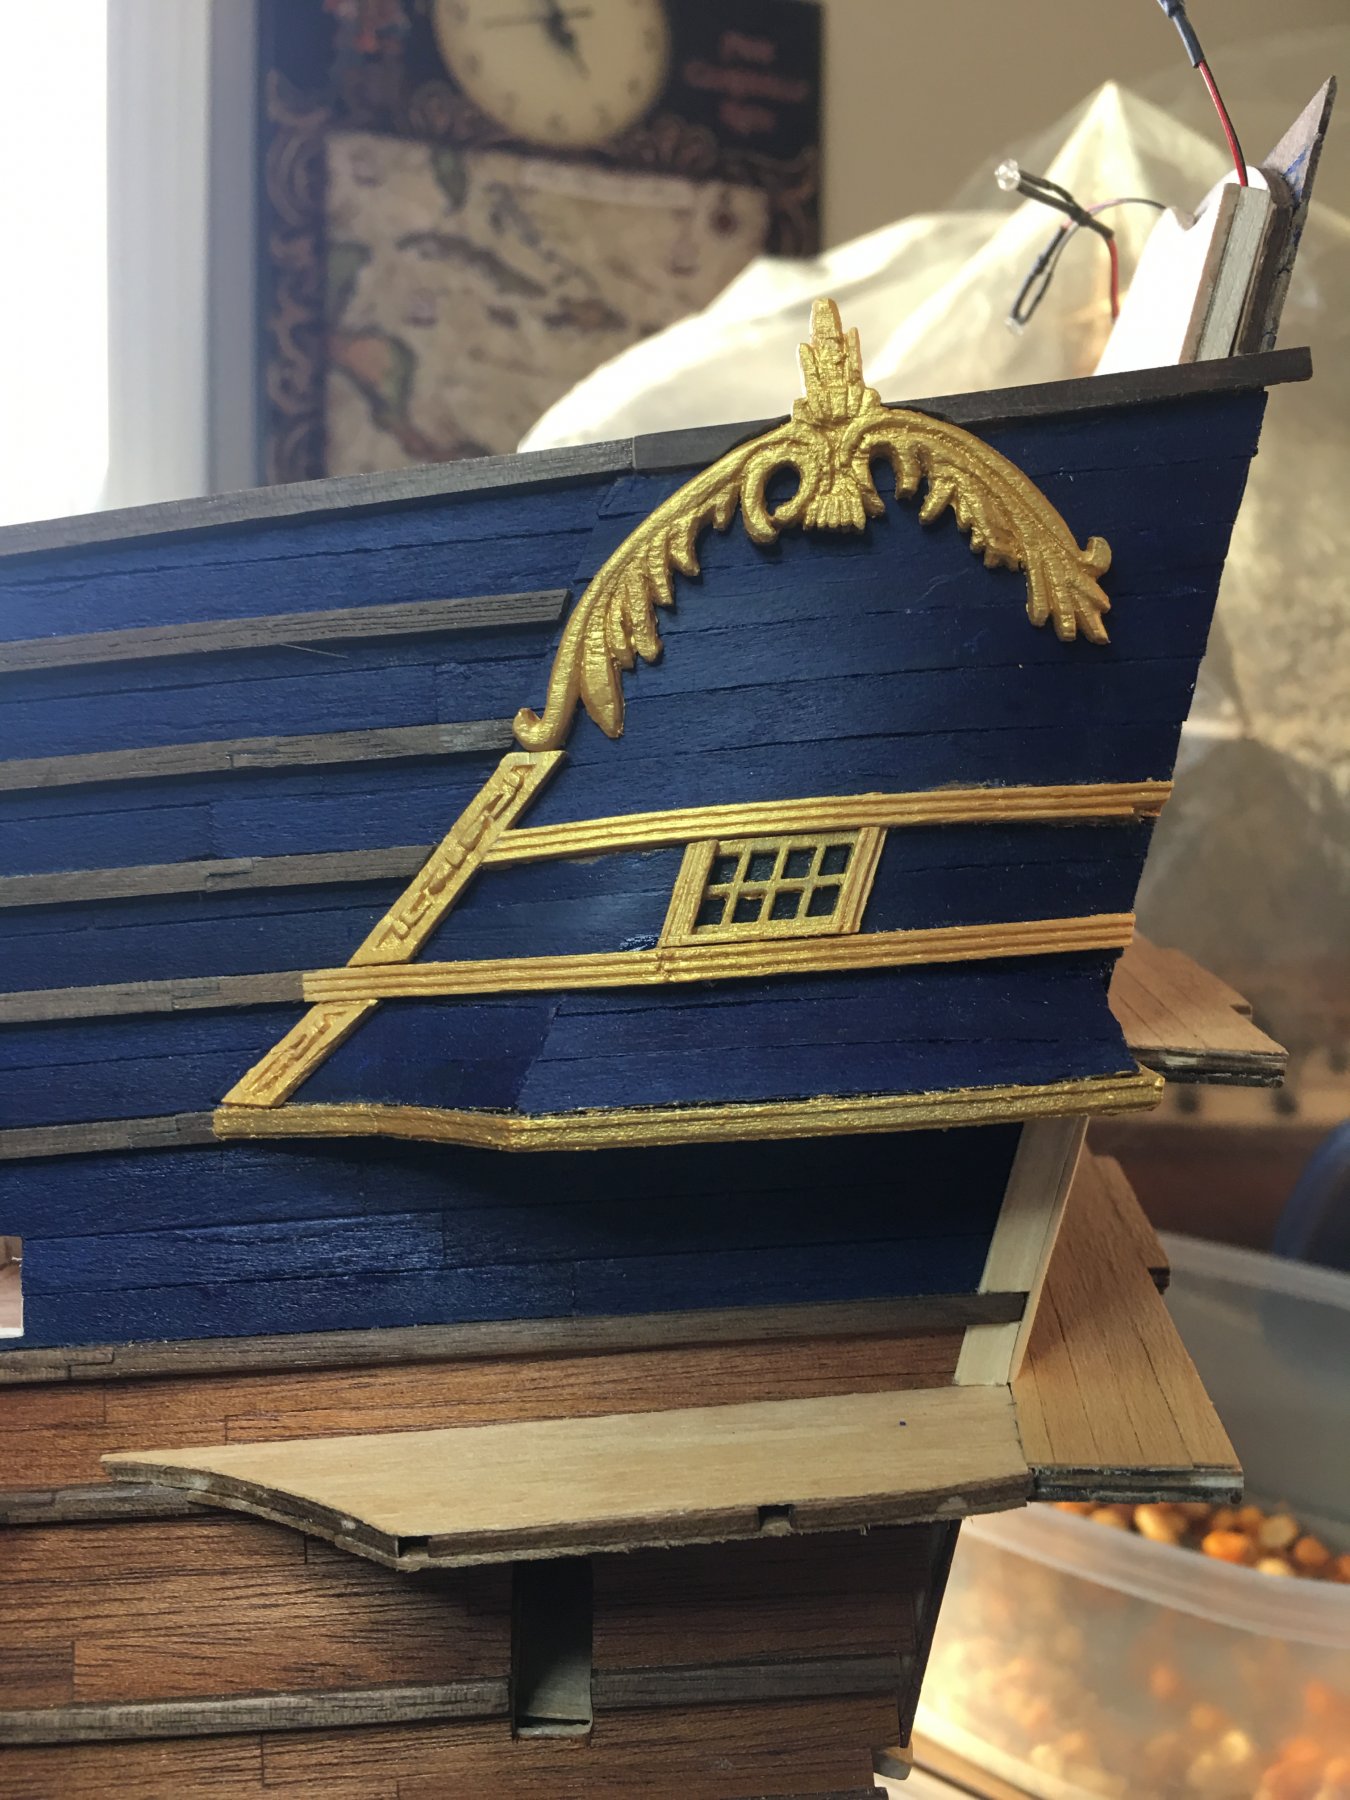
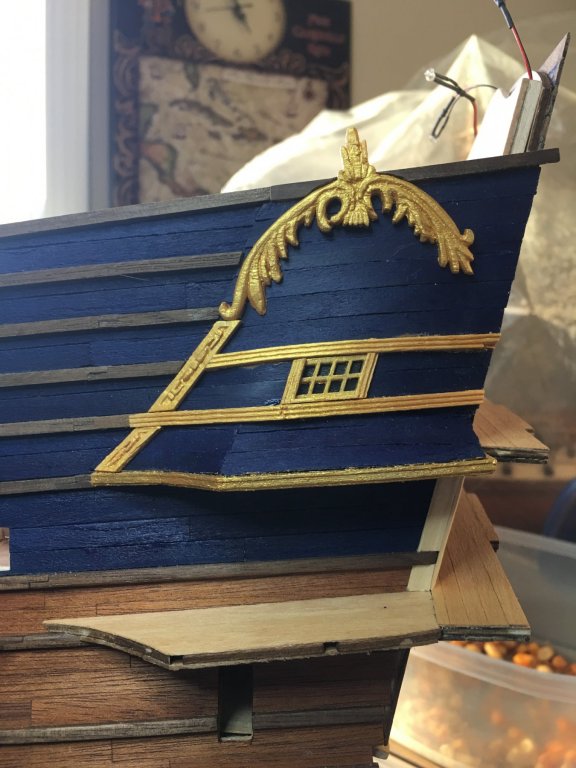
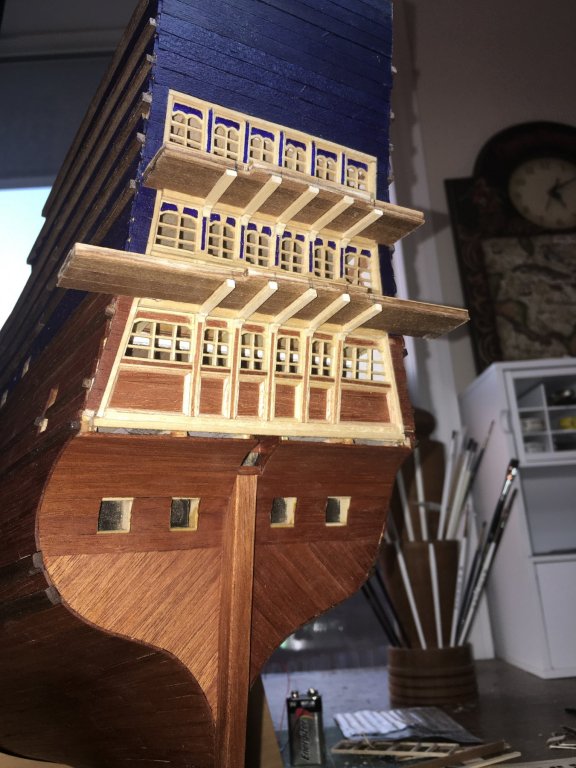
Here it is, the first completed quarter galleys roof. Starting to add the first of the decorative trim. I’ve also started to carve the upper wreath. So far so good.
- 961 replies
-
- 15
-
-
I do have a picture update coming soon. Last night I finished constructing one of the quarter galley tops. I still have the decorations to put on but the surface is built. It actually went a bit easier than I had anticipated which was a nice change. Tonight I am going to finish painting it and then I need to dig through the scrap wood box in the shop to find some good material for carving blanks.
-
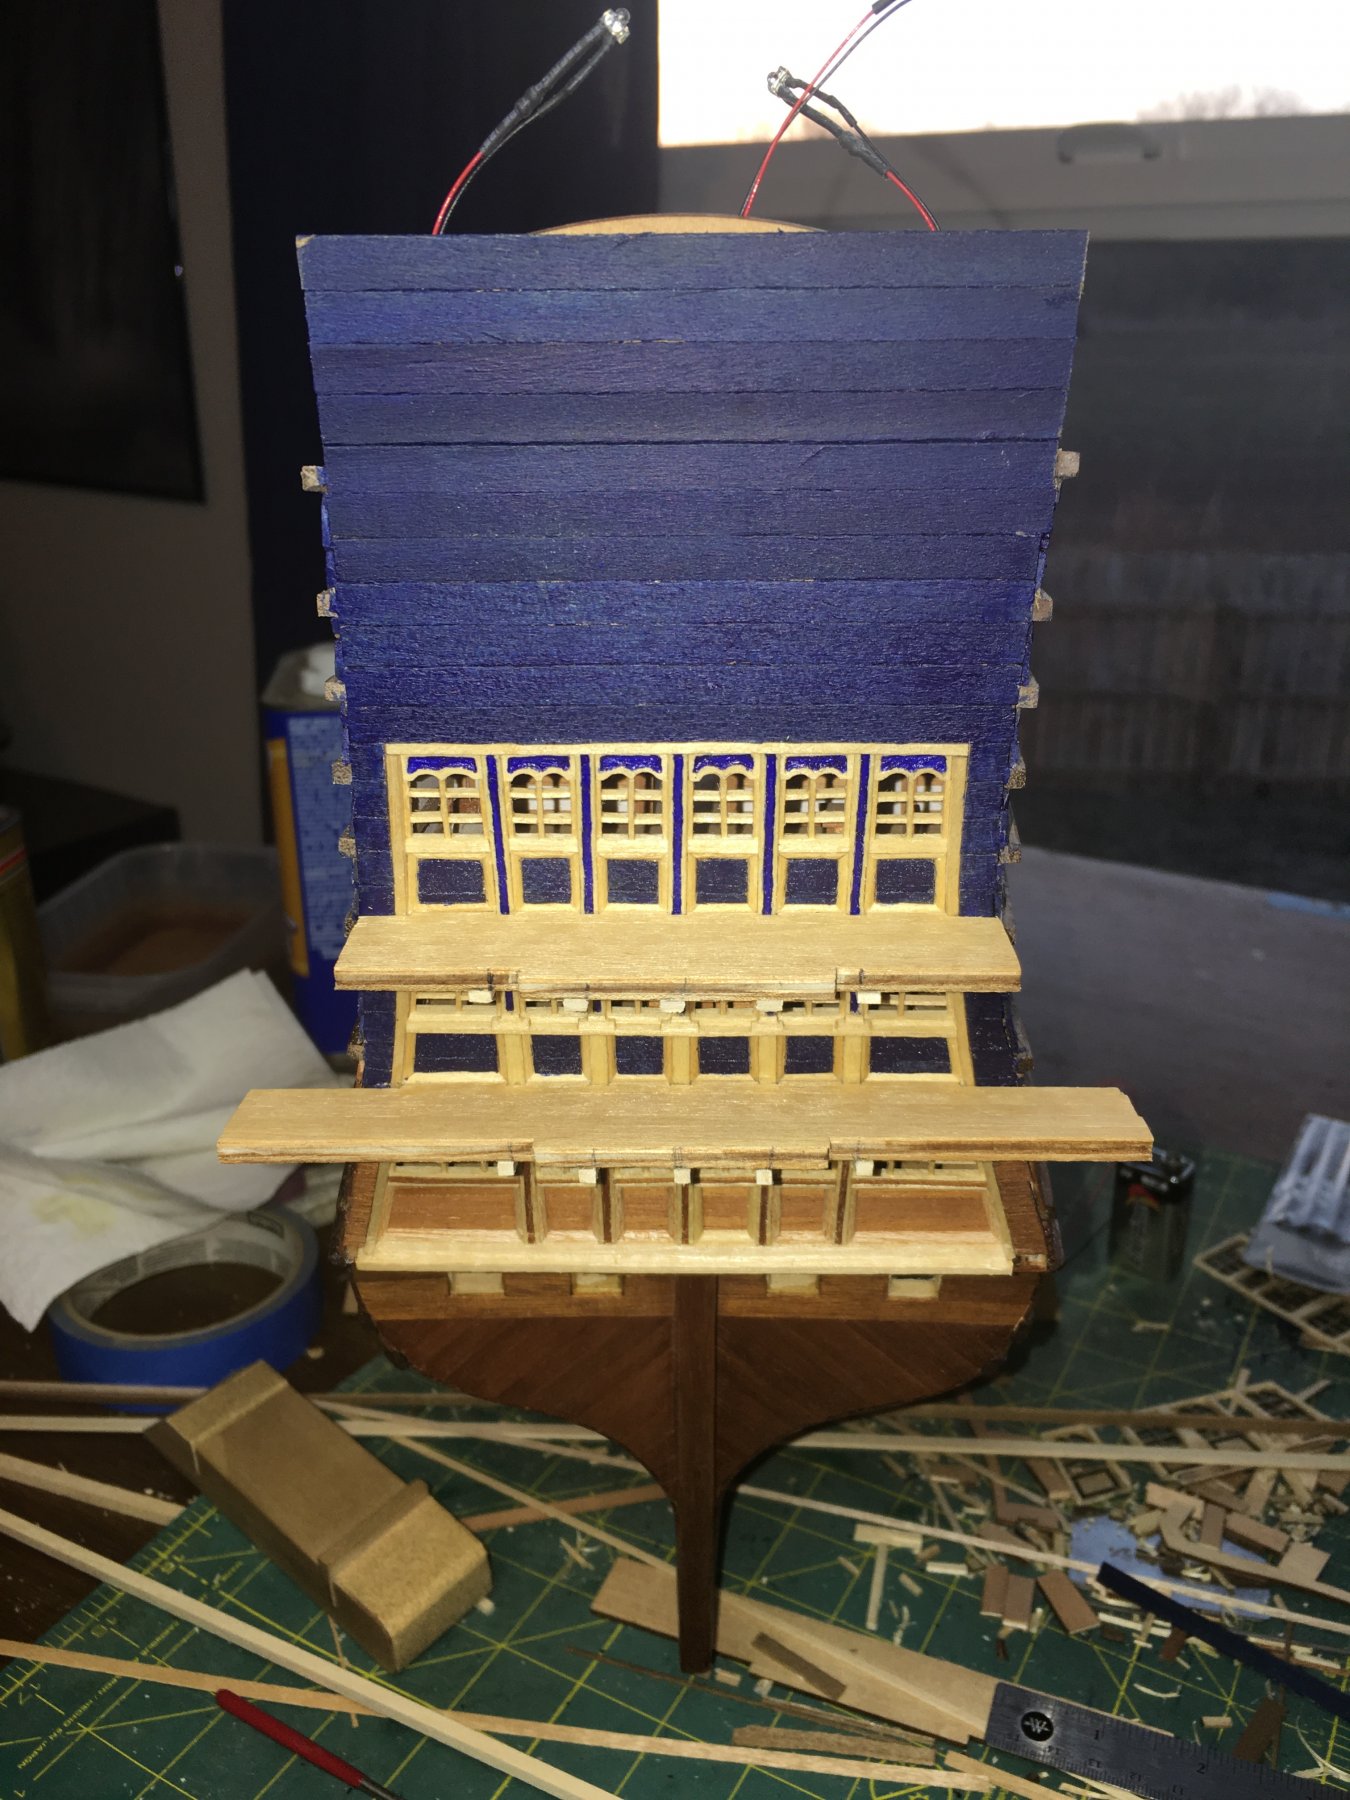
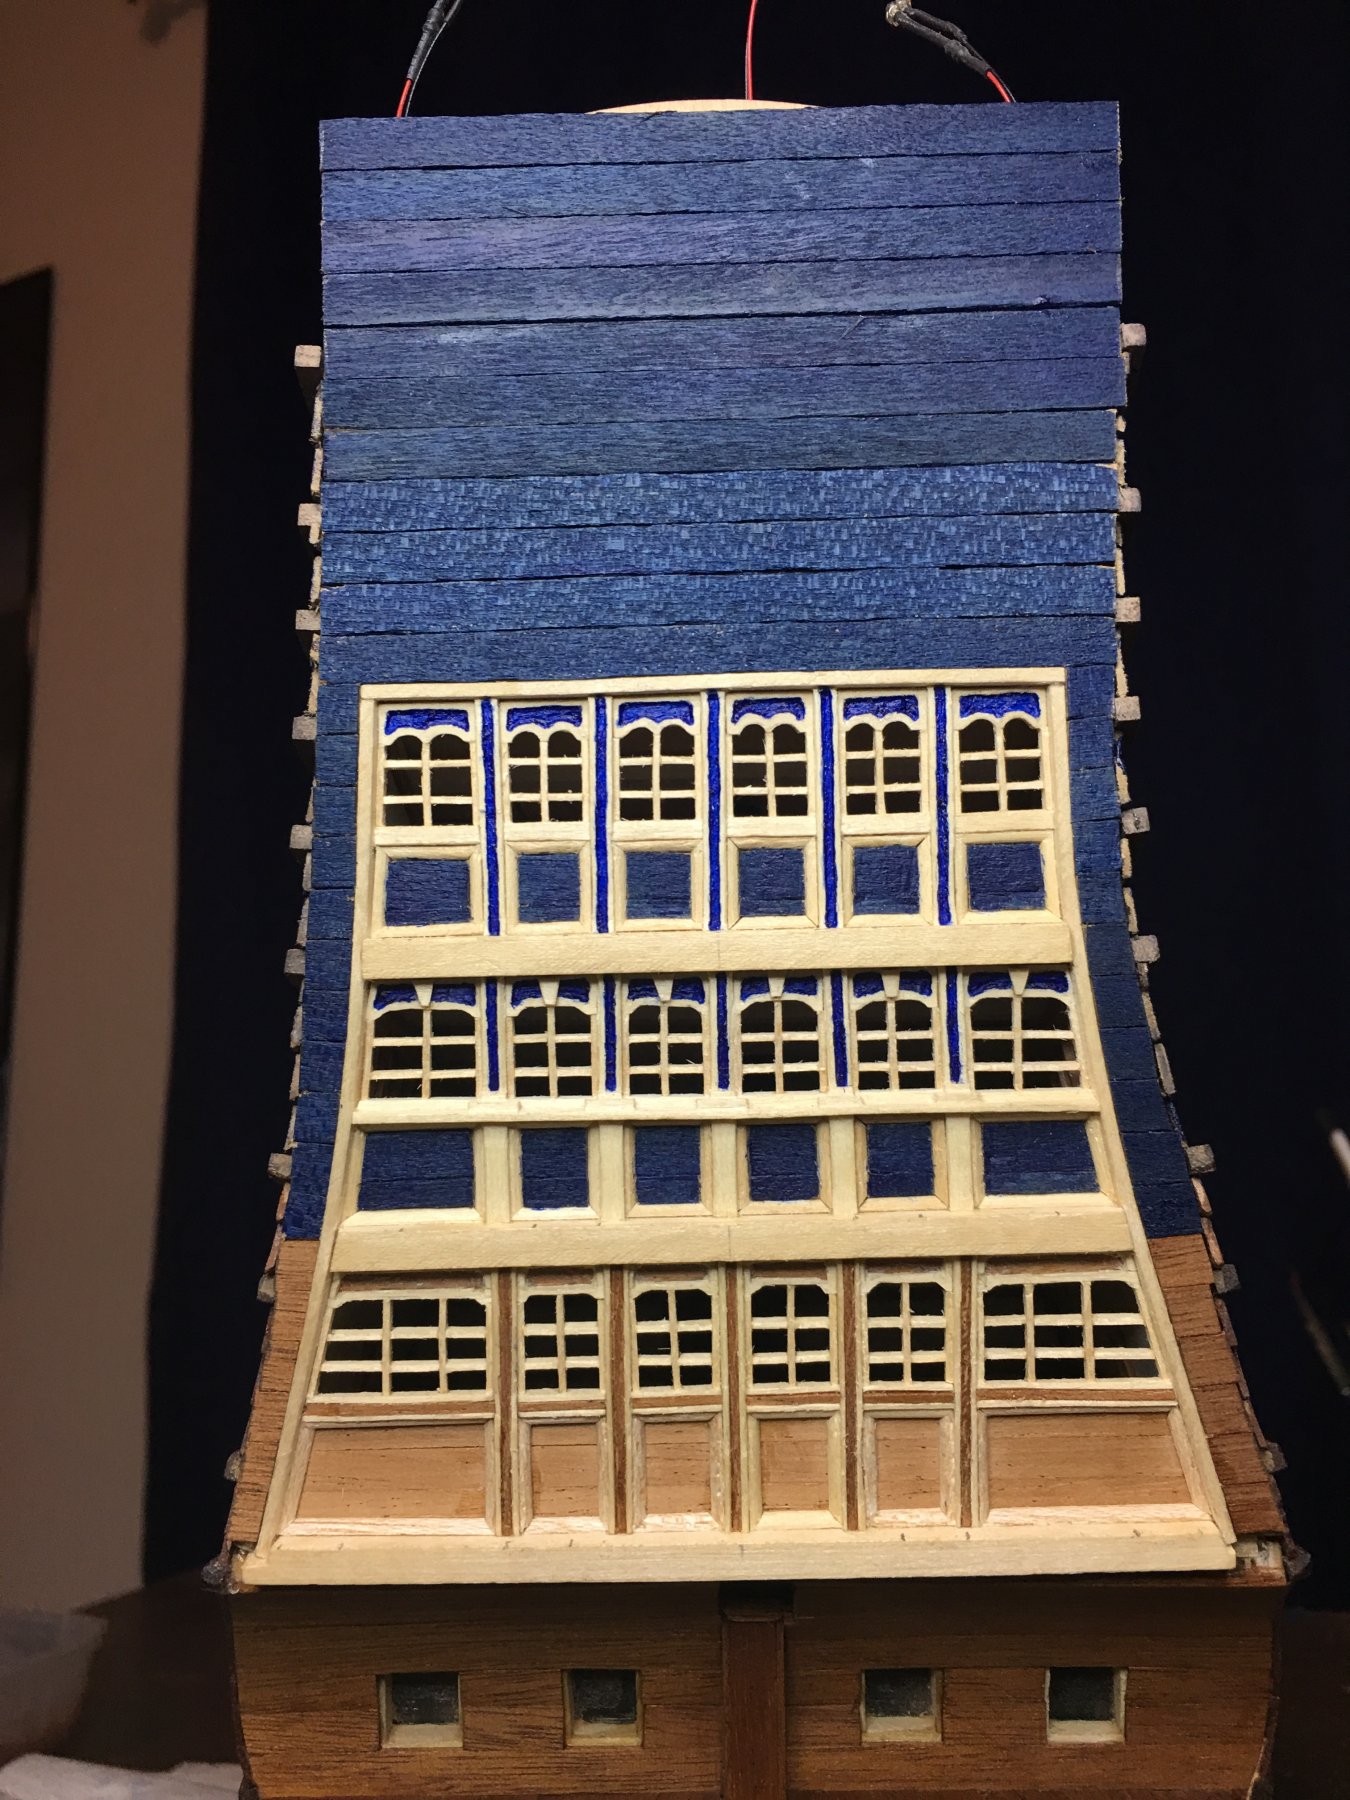
No glass in the windows. I thought about it a lot and tried a couple different materials and discovered that it is easier to look inside the cabins without the glass than with it and also I fear that the glass will get dust built up in the individual panes and I will have no way of cleaning them off. I decided that was a detail I could live without as its absence allows for better viewing of other details. Kind of like leaving the hull planking off to view framing.
-
Vic, No I did not follow the deck camber. Oversight on my part when I detailed the interiors that I thought about way to late to convince myself it was worth the change. Funny part was I made sure the rest of the decks did maintain the proper camber. Don't know why I did not translate that thought into the cabin builds. Thanks for still liking it though!
-
Tom, I'm not really sure how I would go about trying to bend the precast head rails. I havn't even looked at them to be honest as I intend to build mine out of wood. I would imagine that heating them up and gently applying pressure would give you the result you need if you are not wanting to build them yourself. Hopefully someone has a better idea or has done it themselves.
-
Thanks Marc! I'm still experimenting with the top of the quarter galley as I'm trying to figure out exactly how it is built especially on the aft side under the statues. I have a plan in place that I am trying since these photos were taken so I will let you all know how it turns out. I did think about carving the tops out of a solid piece and dug around in the wood scraps out in the shop yesterday to find some that may work. My current plan still has me planking the roof mostly out of stubborn persistence to see if I can do it this way and make it look good. As for the ornamentation, I am using the kit supplied ones for reference and spacing but my plan is to carve them myself. Not yet sure how well they will turn out but I am looking forward to trying! Anyway, probably won't be too many updates for the next several days. A friend of mine from the Navy is coming to visit over New Years and so there won't be much if any ship building going on. We are going to try to get the curio cabinet that will house La Couronne (and a bunch of the Admiral's collectables) built so there will be some ship related work happening. I hope everyone has a Happy New Year and I wish you all a wonderful 2018!
-
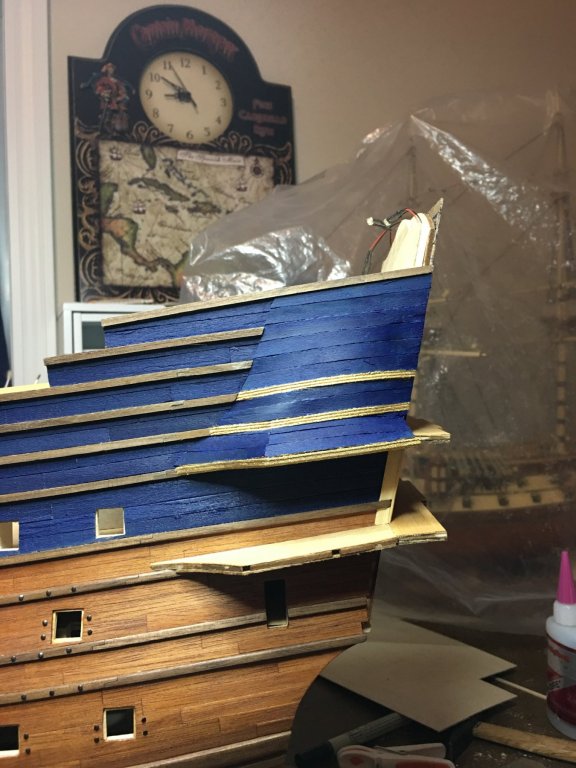
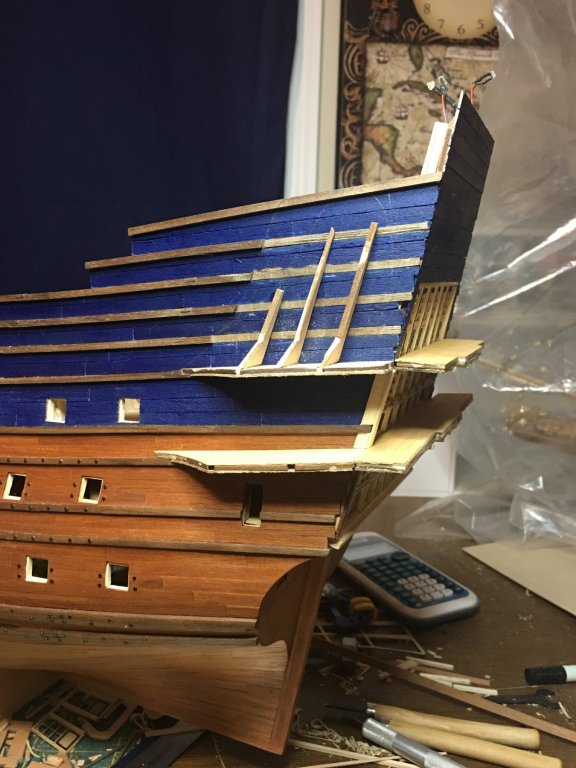
Started building the balconies and quarter galleys. Lots of guess work here and a bunch of building and rebuilding to try to figure out how but they are coming along. Yes, there will be a third one at the bottom. Just haven’t got to it yet.

- 961 replies
-
- 13
-
-
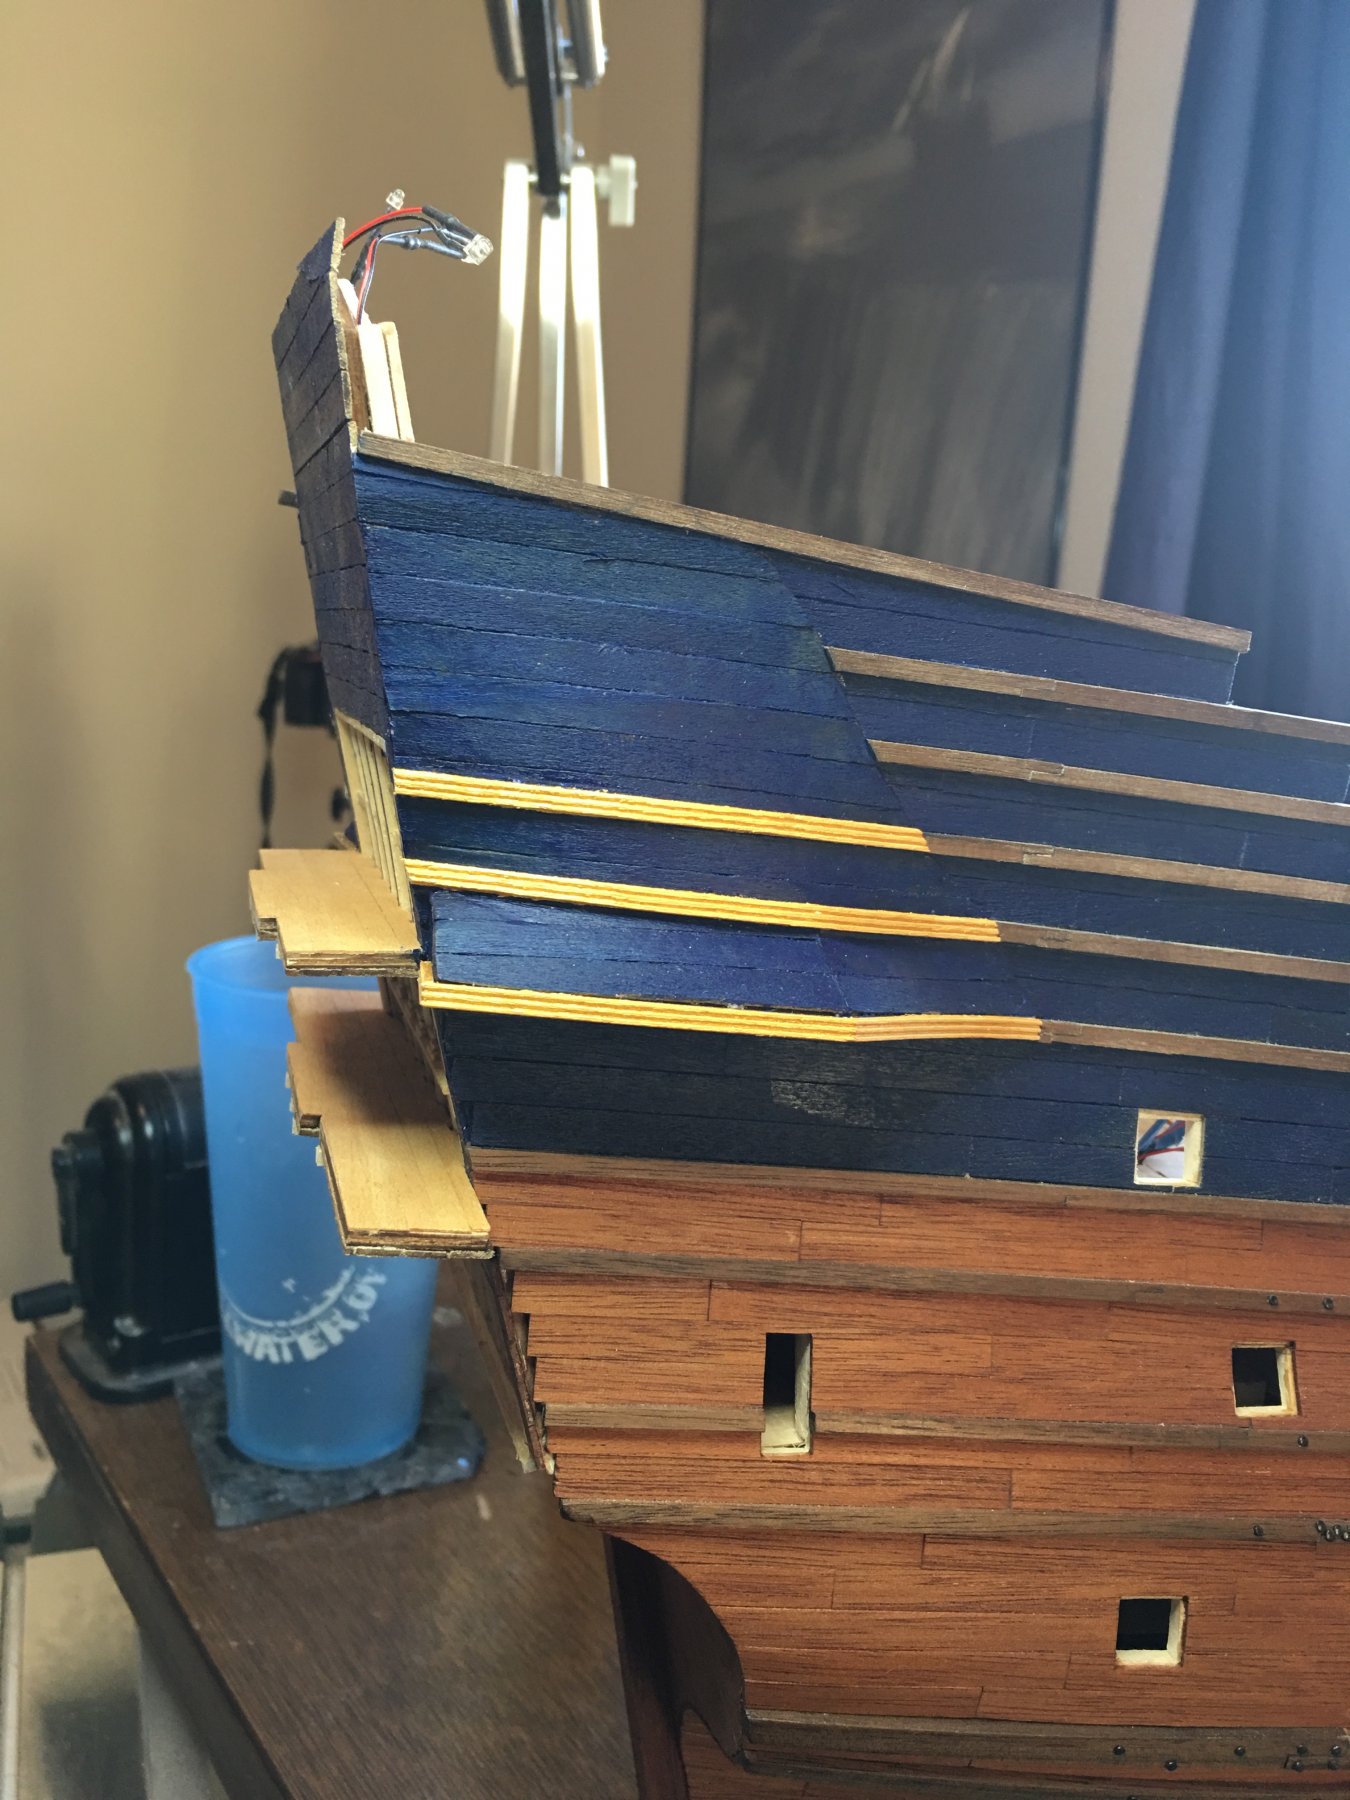
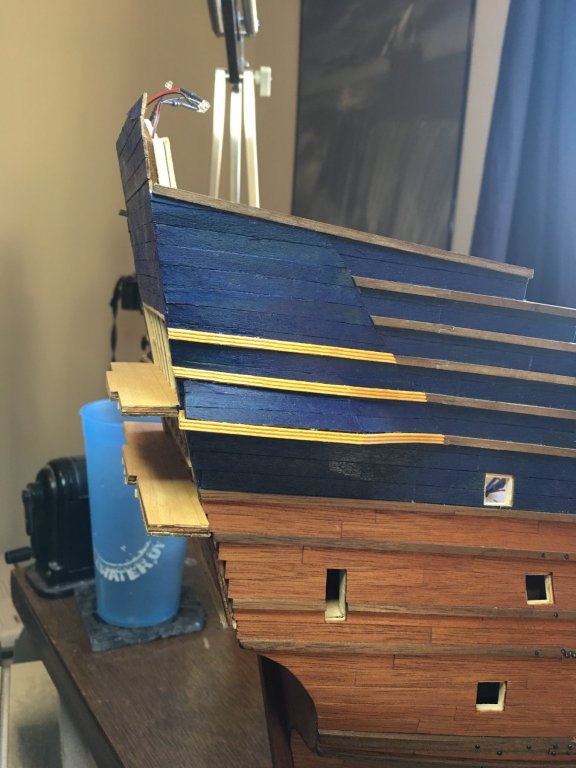
Just a quick update today. I have started to secure and close up the stern. Set the windows in place and started to plank over the substrate panel locking everything in. Almost all of this planking will eventually be covered up with the decorations but this gives me an even plane to start building them. Next up I will start to fit the balconies. This will allow me to establish deck and ceiling elevations at each tier so I can begin to cut the wood for carving decorations. My plan is to fully torture myself by attempting to carve everything. Needless to say, this will be time consuming and I will probably jump back and forth between this and rigging canons. As always, thank you to all those who have commented, liked and just followed along. More to come soon!

-
This should prove to be an interesting build. I'll grab a seat now to follow along!
- 75 replies
-
- 3
-
-
- constitution
- mamoli
- (and 2 more)
-
Welcome to MSW from another landlocked sailor just to your North in Wichita Kansas! Good to have you with us!
-
Welcome to MSW! Starting that first ship model is both exciting and maybe a little scary as there is a lot of unknowns on these types of models. No worries as you are in the right place! Plenty of knowledge here and friendly people to help you figure it all out. Take your time, read through the instructions many times and always look ahead when building. Above all have fun! I look forward to seeing your build!
-
Hello gentleman,,, I am a new member ,,
EJ_L replied to Jaan Ojala's topic in New member Introductions
Welcome to MSW! Good to have you with us and I wish you all the best of luck on your build! Have fun and I look forward to seeing it.