DONATION DRIVE - SUPPORT MSW - DO YOUR PART TO KEEP THIS GREAT FORUM GOING!
×


EJ_L
-
Posts
2,246 -
Joined
-
Last visited
Content Type
Profiles
Forums
Gallery
Events
Everything posted by EJ_L
-
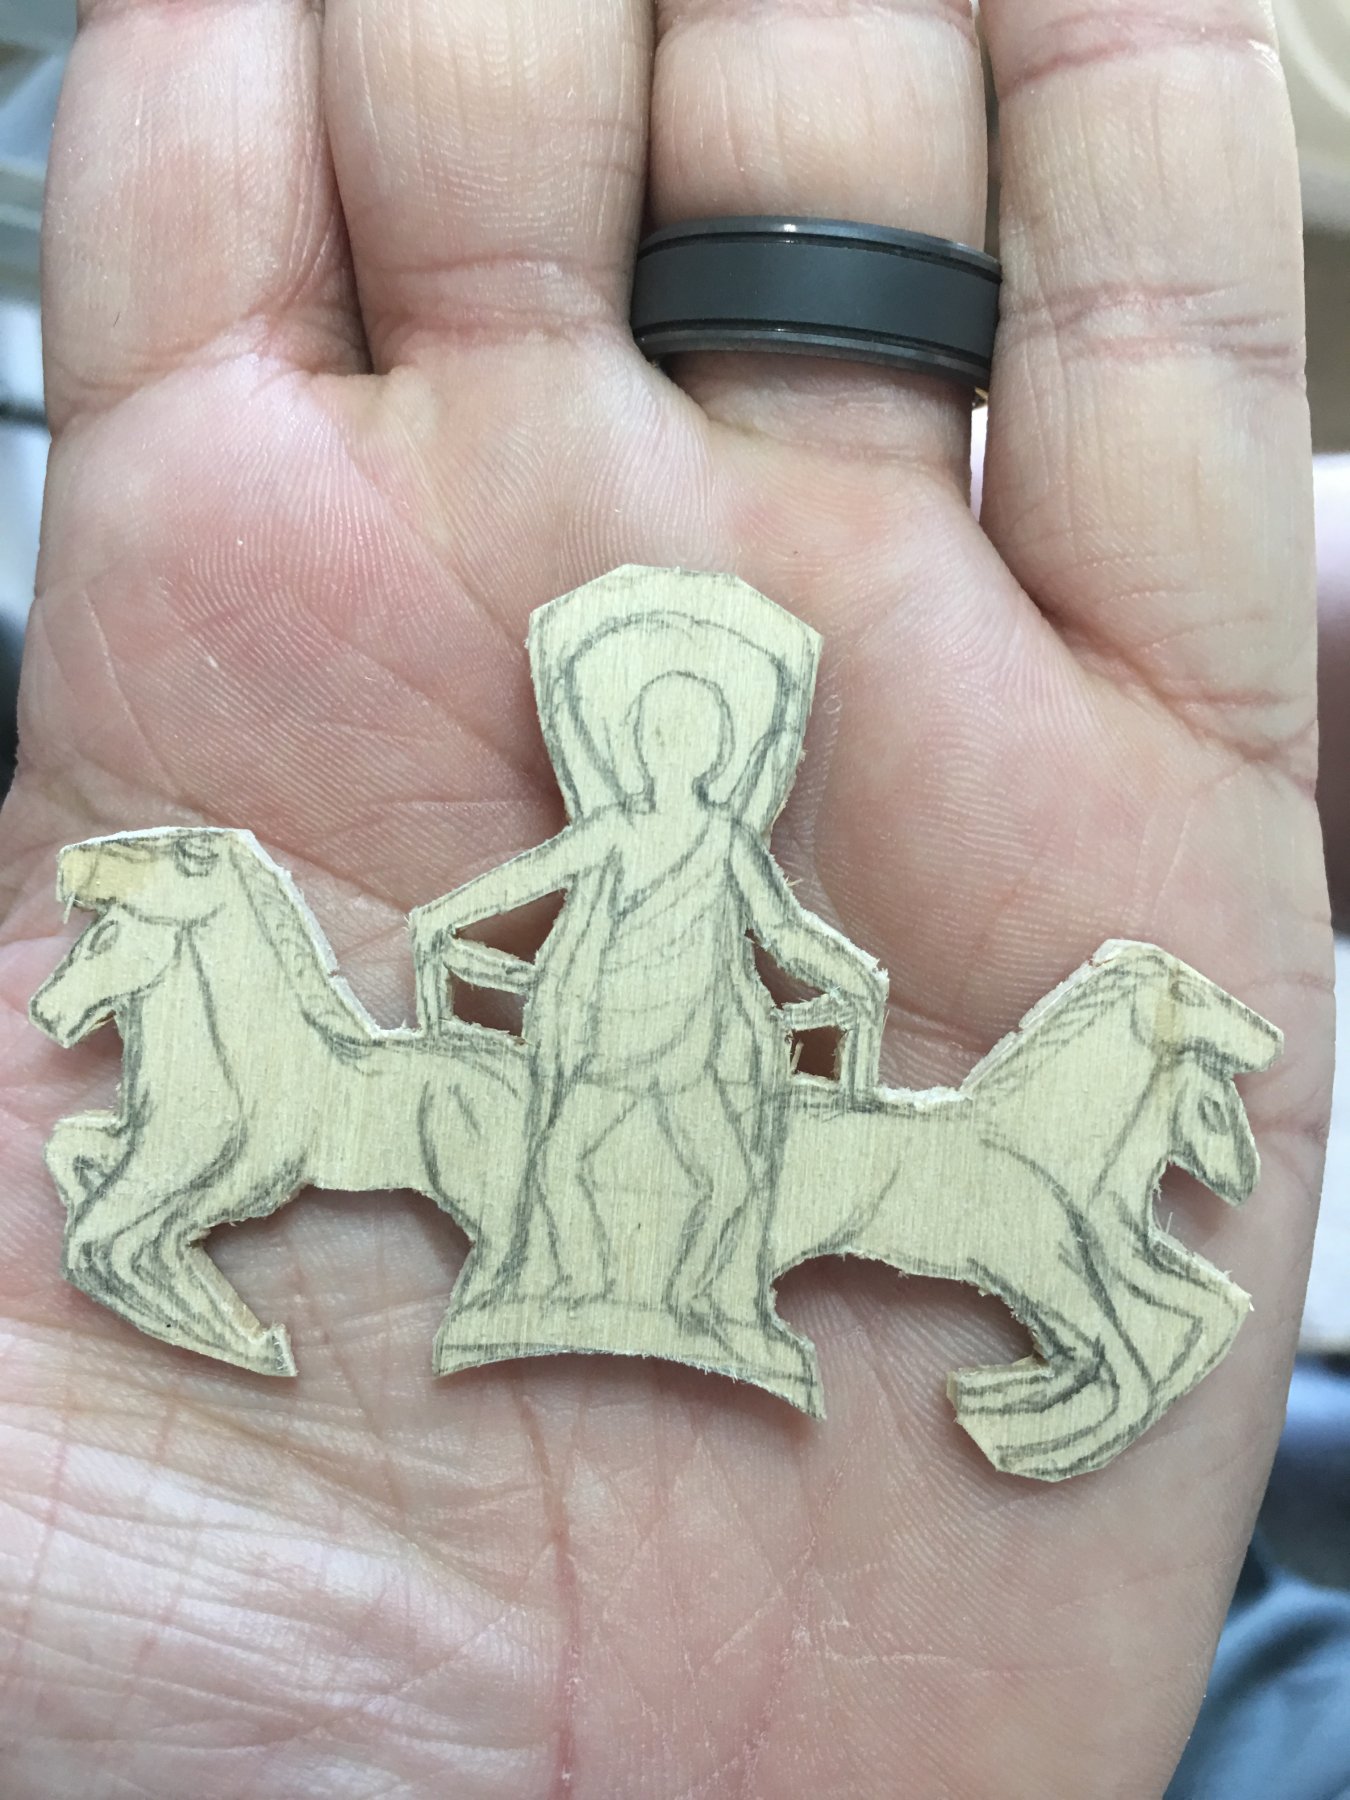
 John, Thank you very much and yes indeed it is basswood. I had a 50% off an entire purchase at Michael's one day and I bought their entire rack of basswood! It has been a great source of random materials and also great for practicing carving. It is really soft and yes, a bit "fuzzy" which is annoying. I've been digging through my cutoffs in the shop and I think I have found some better woods for carving the larger statues. Vic, Mark, you are too kind and I deeply thank you for those compliments. I too have been looking forward to seeing where I end up taking this part of the build. It is both scary as I worry about doing it "right" and also exciting as I never know how something is going to turn out. In all reality though, it is fun and I am learning more and more each time I sit at the table. Everybody refill your popcorn and stay tuned, there is a lot more ship to build!
 -
Vic- Hahaha!!! I bet the admiral wishes it had special powers... maybe electronic shocking to motivate me when she wants me to do something... Ken, Marc, Thank you both very much for the kind words. Wood carving, especially at this scale, is proving to be one of the harder skills I've had to learn and while far from perfect, I am still very glad I decided to take this route and give it a try. Honestly, it will be exceedingly hard to ever go back to using the cast fittings provided in a kit again which I guess is a good thing since my ultimate goal is to be able to completely scratch build these ships.
-
Thanks Vic! I wasn't really sure what the "ring" shape was supposed to be either so I guessed at a wreath since they are in high usage anyway. On the other hand, maybe it was a alien radio receiver. It was what allowed King Louis to control all his subjects.....
-
Continuing on with your incredible work my friend. Well done!! I have seen several discussions on what is to be considered true "hand building" or not. While arguments can be made on all sides of the issue, I personally feel that if you created it, regardless of the medium used, than it is "hand made". I know this debate has been around for a long time between full scratch builds and kits especially if those kits are plastic but, with the ease of accessibility to other techniques like photo etching, laser cutting and 3D printers all being able to be done affordably in home, I think we could be on the cusp of great things in model building. Even in casting pieces, you still had to make the mold and clean up the resulting pieces. The time and effort involved is still a skill set that requires practice and patience just like carving. You still created each one. Your hands and tools still plied their trade onto each piece making it ready to go onto your model. To me, that is the definition of hand made.
- 2,699 replies
-
- 3
-

-
- heller
- soleil royal
- (and 9 more)
-
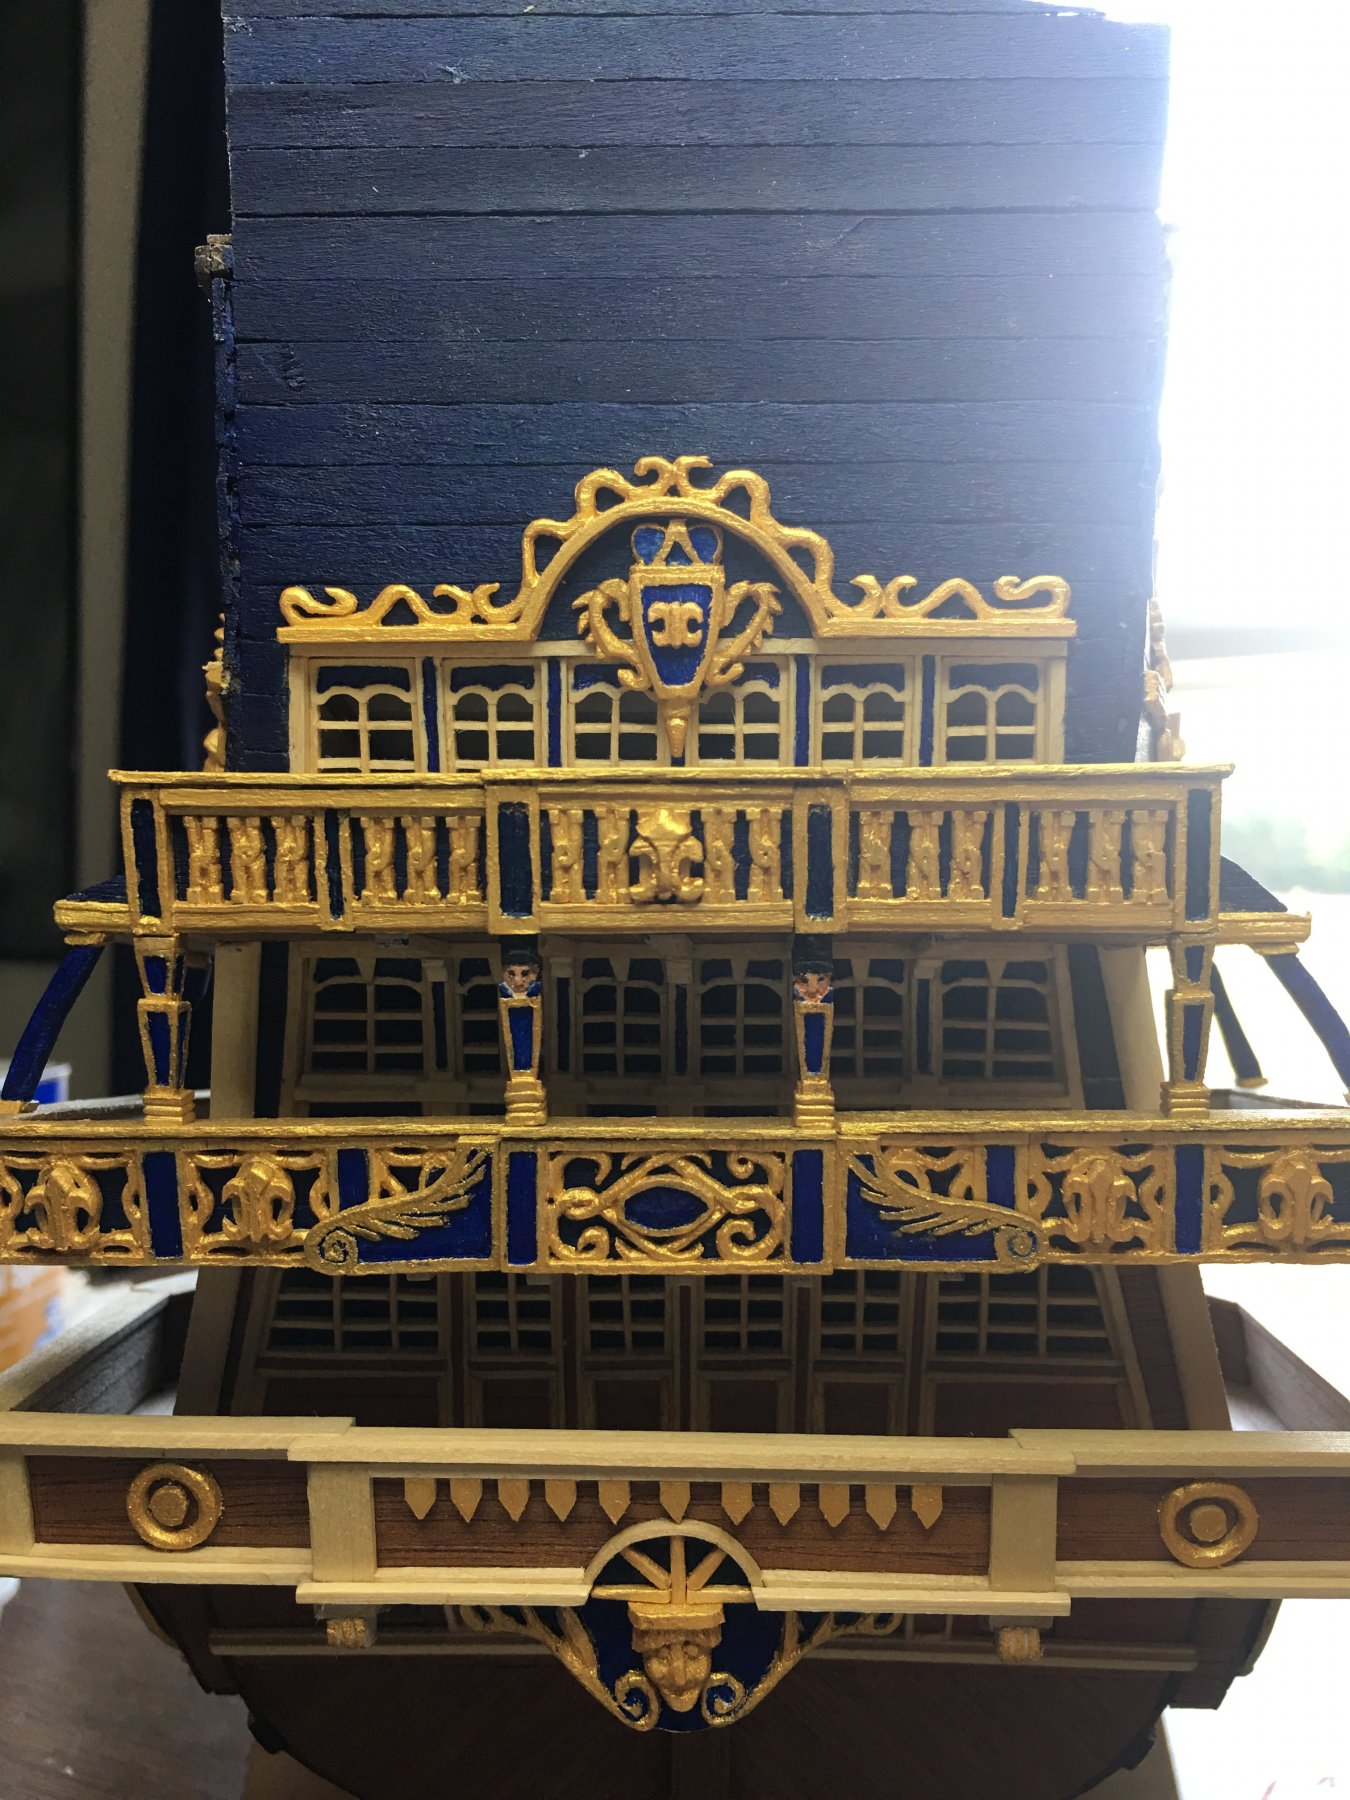
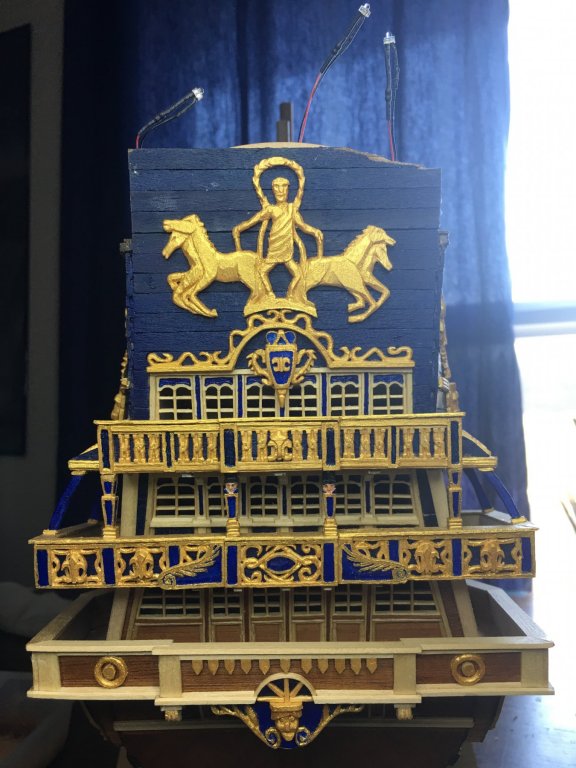
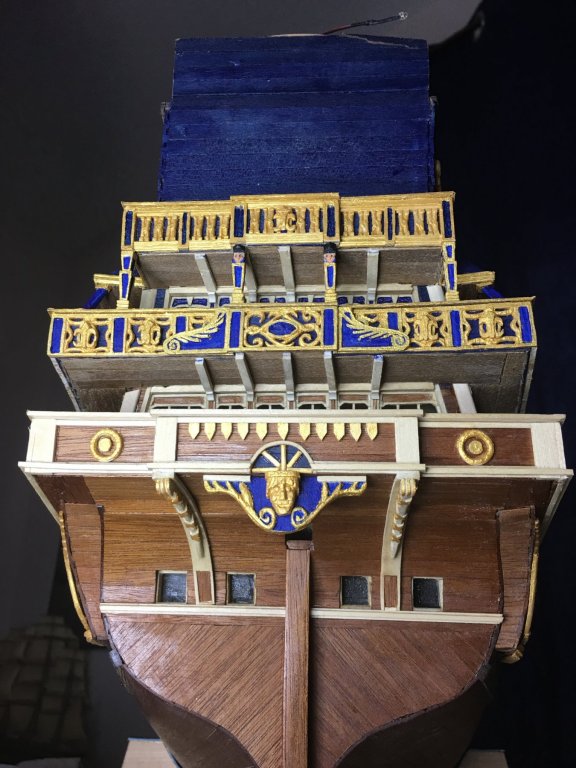
As always, thank you all for the nice compliments, suggestions, likes and following along. Passed a huge time milestone this weekend by rolling over 1,000 hours over 19 months. Still have a long way to go so there is no telling what the final numbers will be but, as there is no rush it shall take what it takes. The work that crosses that line was the frieze work on the upper stern. Still struggling with carving humans and faces in particular but, I am fairly happy with the horses. Up next is the trim trim on the sides and the cap rail trim. That will finally allow me to give the taffrail it’s final shape as well as giving the LEDs for the lanterns their final location. While I still have a lot of decorations to go, especially on the sides around the gunports, other areas will be entering into the build schedule. The rudder and stern chasers are probably up next and then I’ll be spinning the ship around to start work on the bow. Piece by piece she is coming together!


- 961 replies
-
- 13
-
-
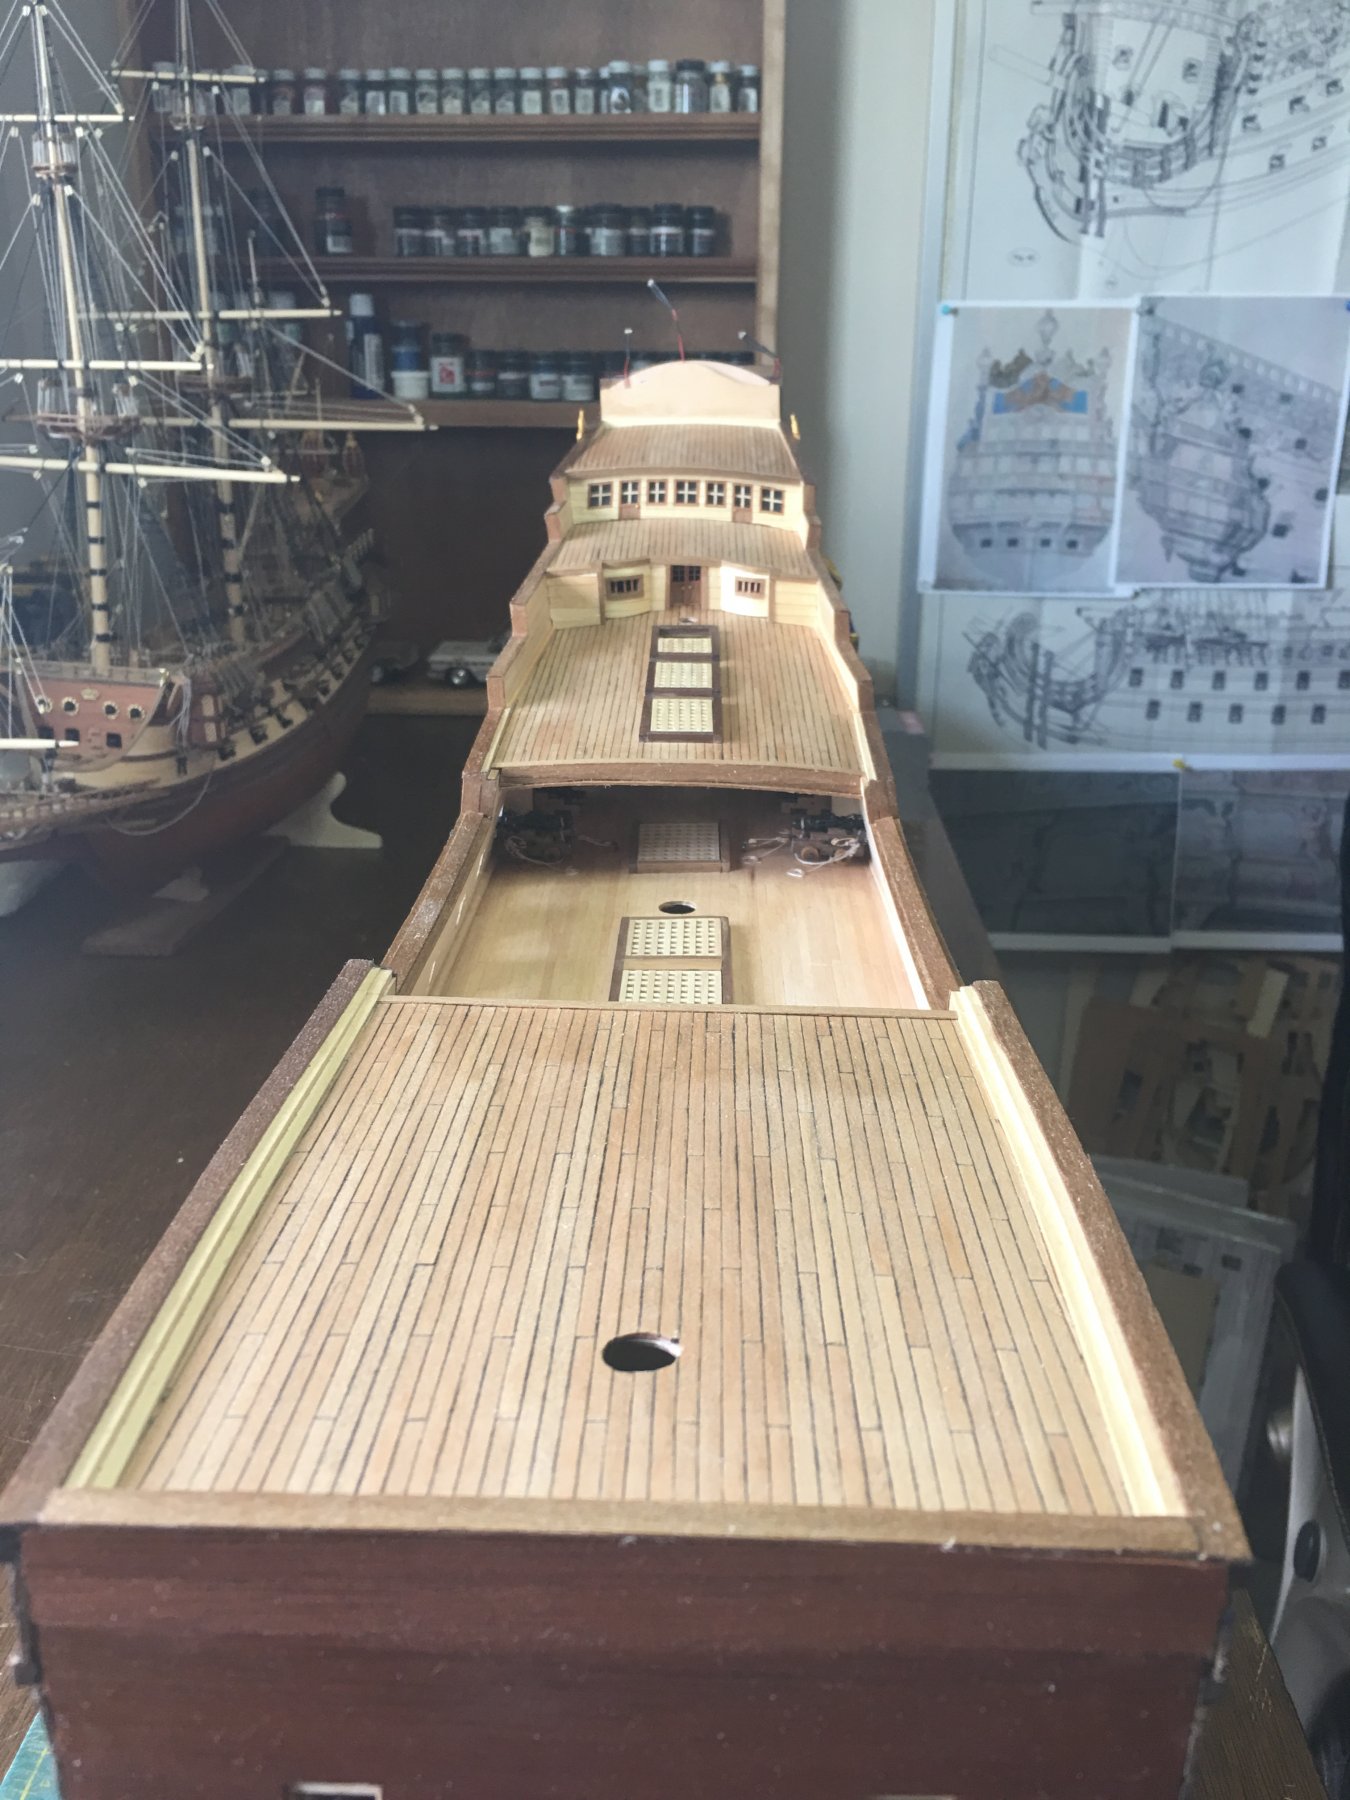
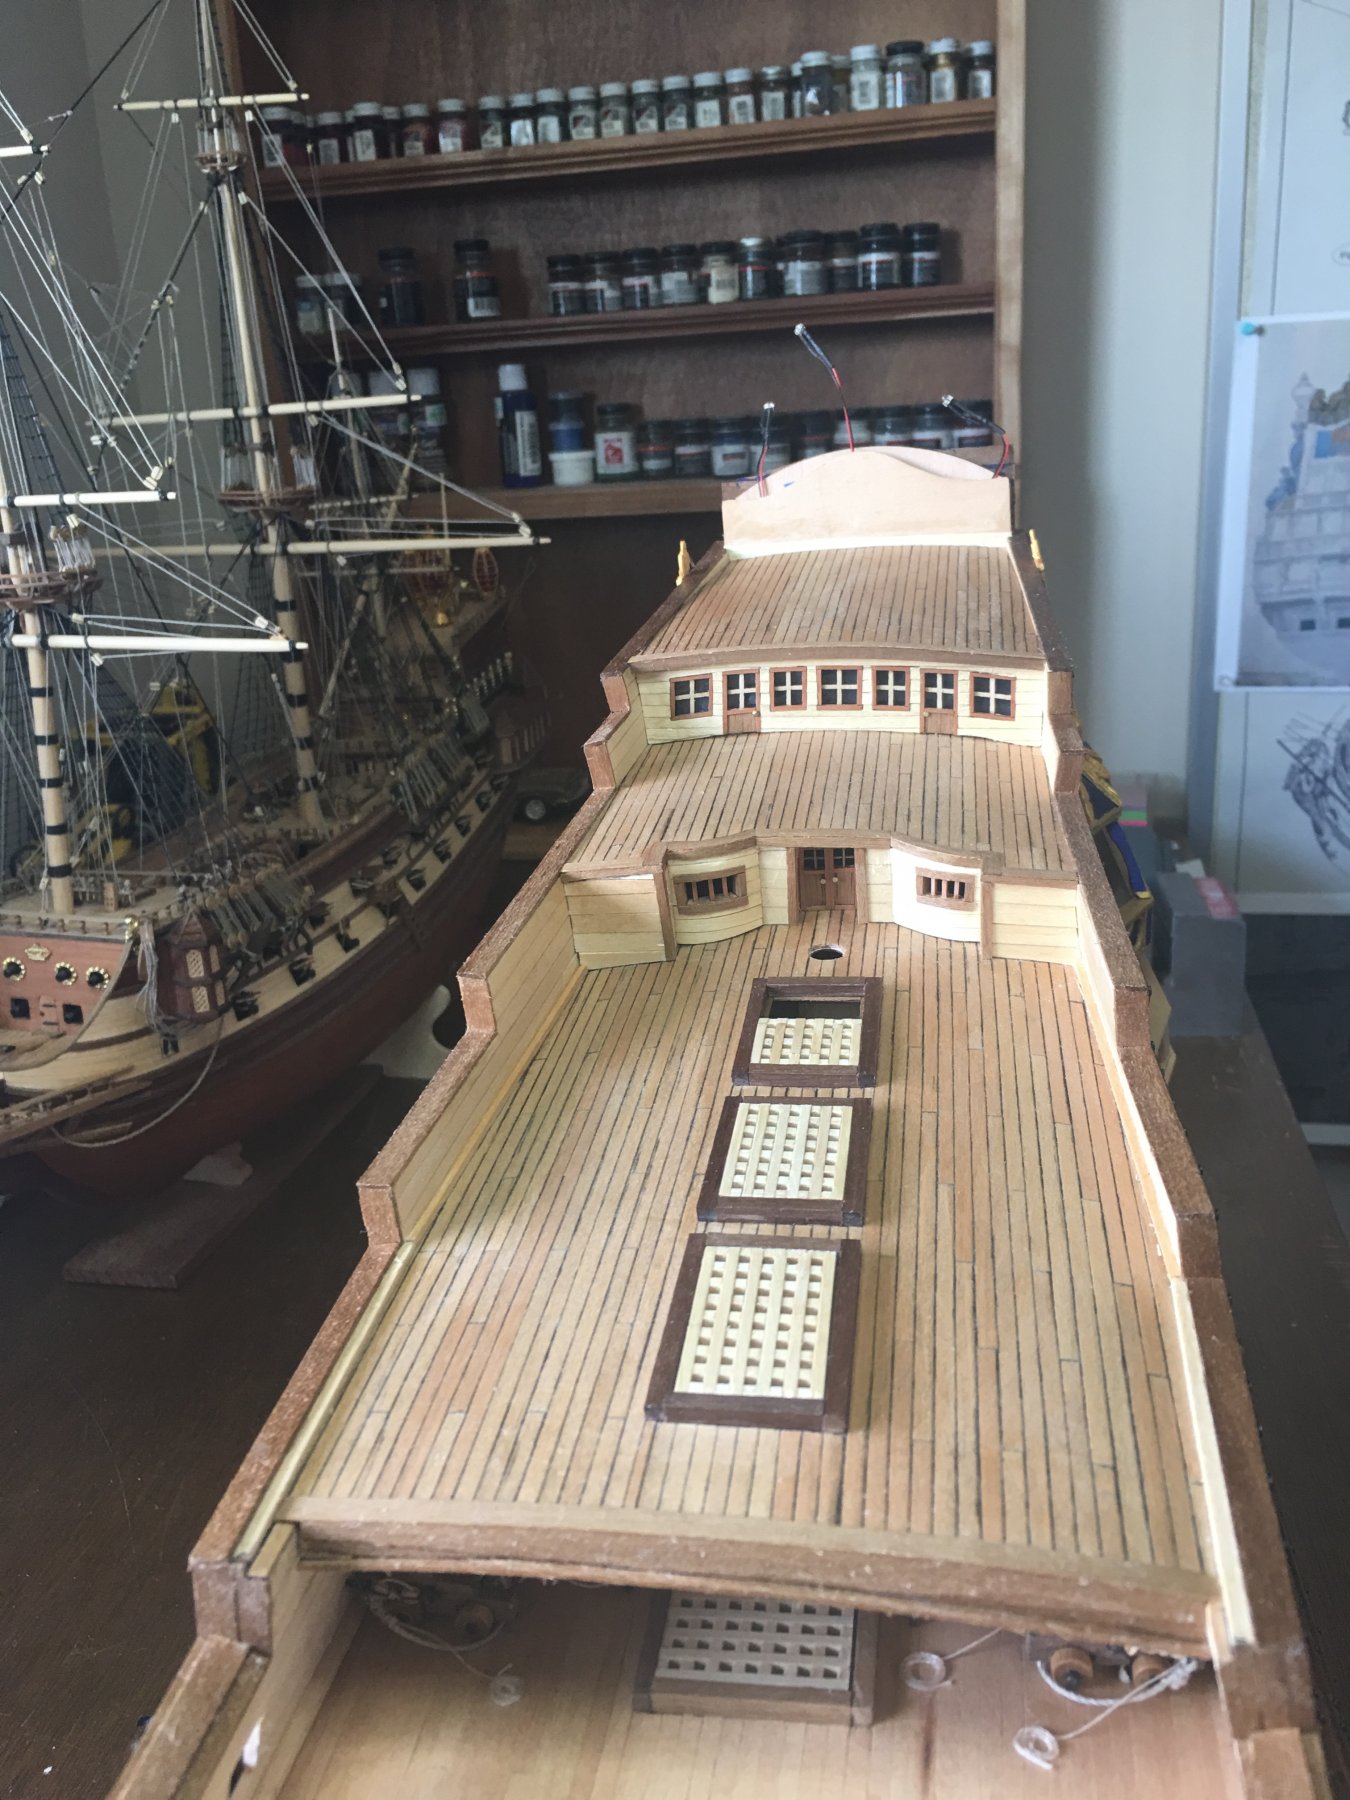
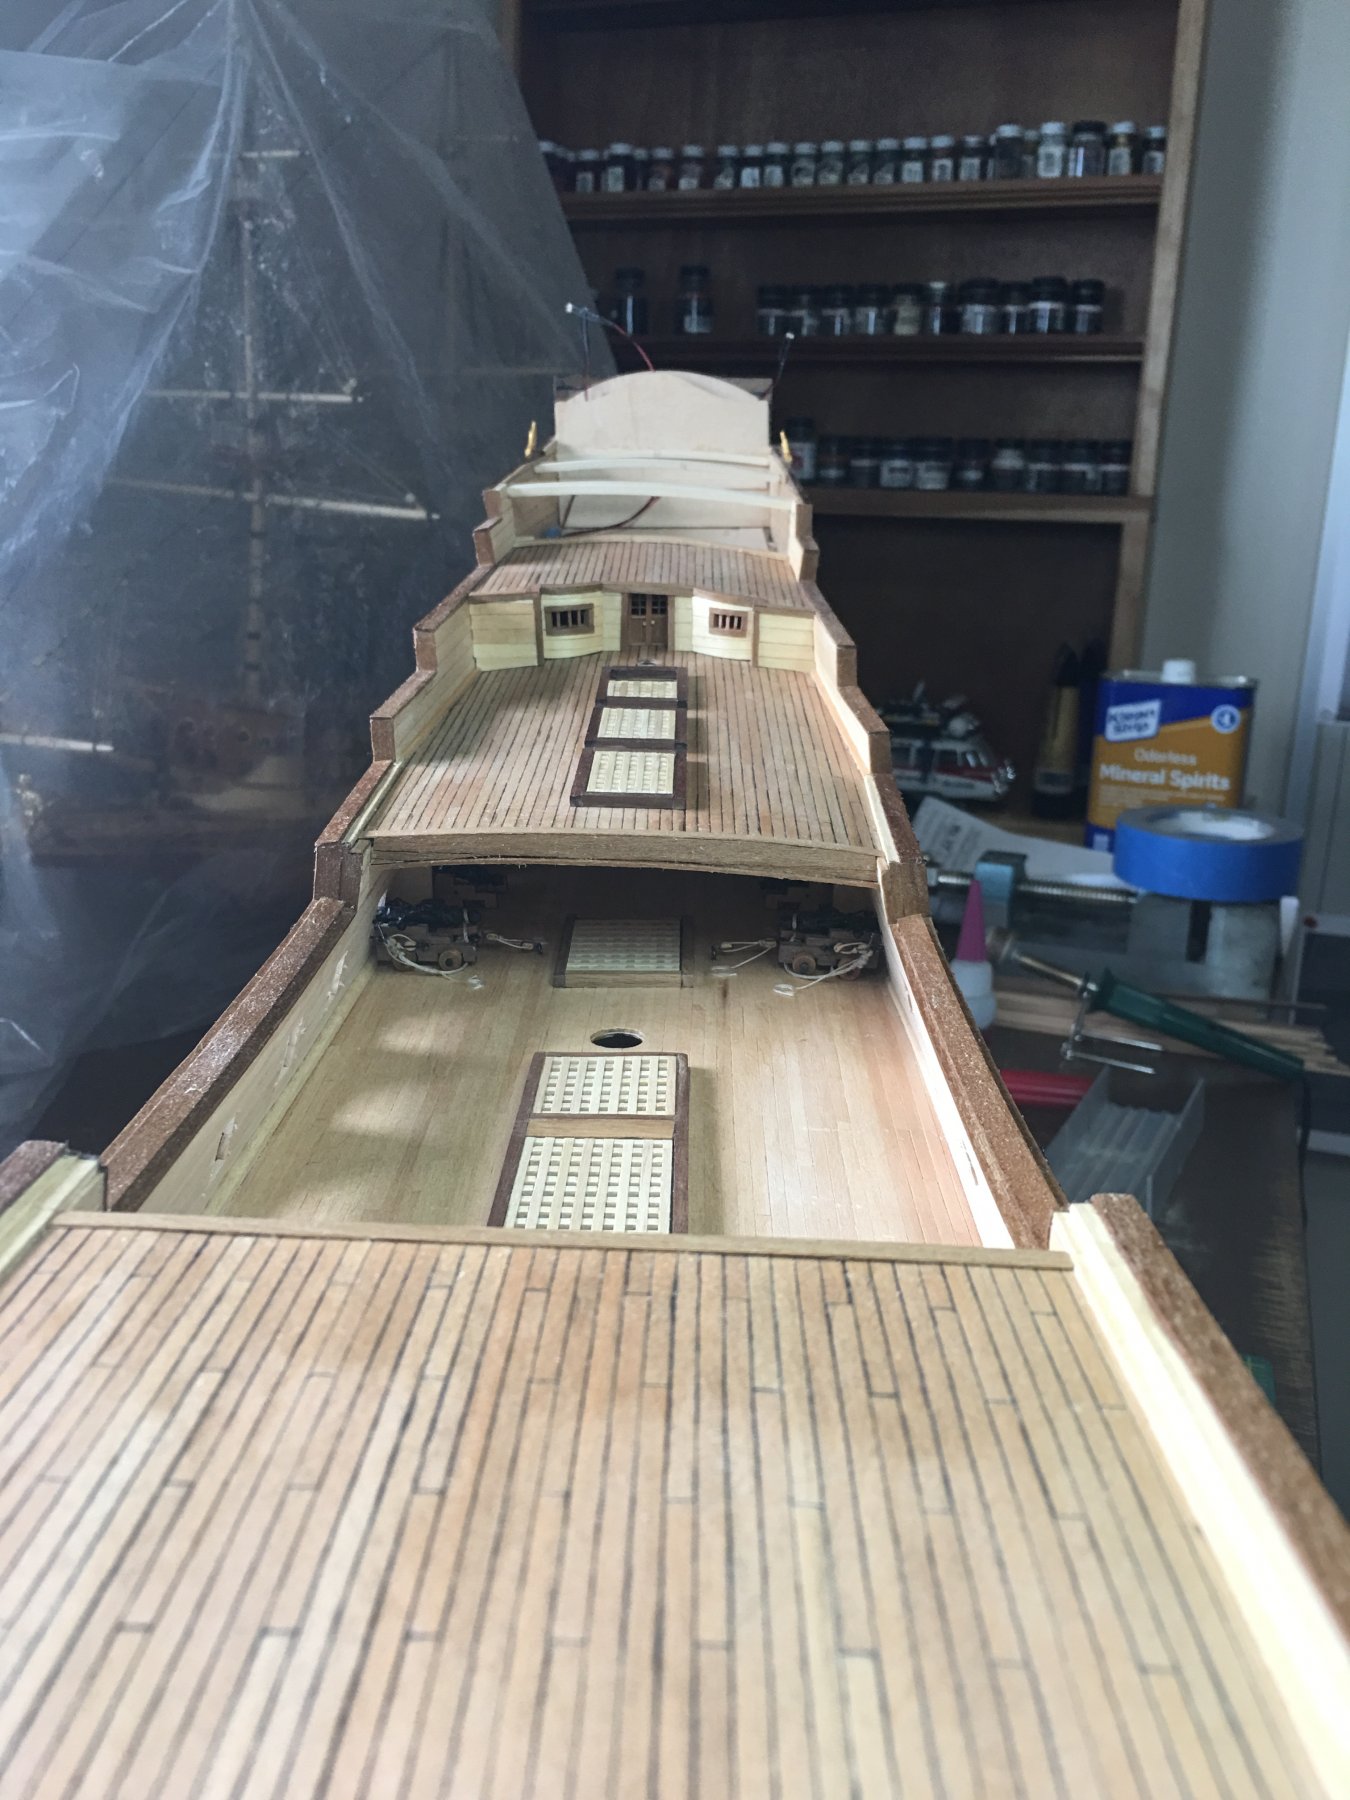
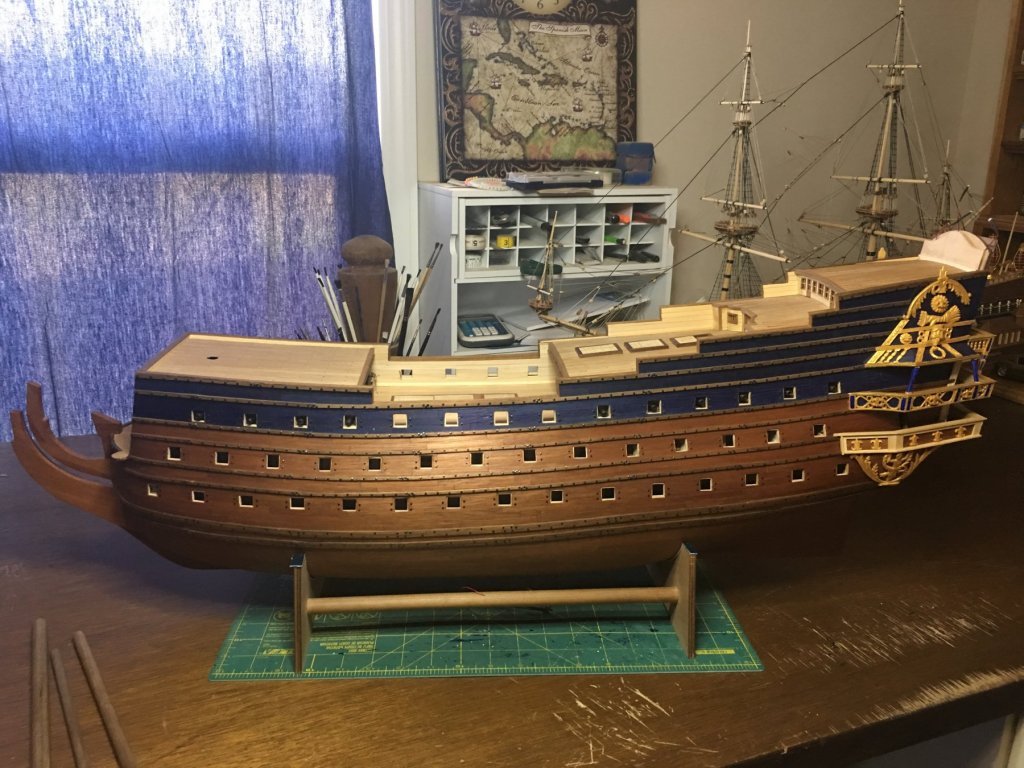
Thanks to everyone for the nice words, likes and stopping by. As always, your support means a lot to me on this build. All the decks are now in place! Major structural construction is now complete. Just got the little stuff now... Next up will be more carving work on the stern. I need to get the upper decorations started so I can finish shaping the taffrail.


-
Martyn, looks like I missed a lot of this one but, I must say that you have done very well on her. Excellent details and I'm glad you have gotten you lighting problem fixed. Looking forward to seeing her lit up. I'll be sure to hang around to see her through to the end! Well done!!
- 16 replies
-
- 2
-
-
- santisima trinidad
- deagostini
- (and 1 more)
-
I'm late to the build but I'm glad I found it! It continues to amaze me the vast improvement photo etch parts are bringing to models and especially models of such small scales. Awesome work! I'll be sure to stay glued to my seat and watch the rest come together!
- 122 replies
-
- 5
-
-
- tamiya
- King George V
- (and 2 more)
-
Hi John! Your Sultana is indeed a beautiful ship. I'm definitely looking forward to seeing what you can do with this one. I'll grab a chair and settle in. Good luck and happy modeling!
-
With all the work you are doing on this build, I think we can forgive a little laziness but, only a little.... One thing that has been both a frustration and a relief is the variance in the decorations between the artists of the time. I know that this is mostly due to the various refits as well as the distances and angles the ship was painted at not to mention the 300 years that have passed since then. Still the frustration sets in when thinking of historical accuracy as to what was there but, as I have not yet seen 2 models with the same configuration and when I add that to the differences in the artistic renderings we have, I do not feel too bad when I take creative licenses. That being said, I have a feeling that this build log will be held in high regard for guidelines on future S.R. builds and should be. The research you have done and your willingness to share both what you have learned along with how and why you are building the ship the way you are brings a lot of insight and guidance to a very famous though perhaps misrepresented ship.
- 2,699 replies
-
- 3
-
-
- heller
- soleil royal
- (and 9 more)
-
Great work! Won't be much longer now and you'll have another for the display shelf. I agree with the comfort of working on the larger projects. When I built the 1:150 scale Bounty, I had to keep everything very simple as I did not have the resources nor the skills to work with blocks and fittings that would have been scale appropriate. As such, while it turned out nice, it looks more on par with a "souvenir" model than a true model of the Bounty.
- 171 replies
-
- 7
-
-
- krabbenkutter
- authentic models
- (and 1 more)
-
Well done!! Display her proudly as you did a great job on her. Those first builds are always the toughest and we are our own worst critics. Like you said, you learned a lot and I hope it was overall an enjoyable experience. For what it is worth I looked up the Bowdoin and I think you can take her on and be just fine. There will be some new challenges but, I think you will meet them and do her justice. So, when you have cleared you head from this build and that urge to attempt another one sets in, go for it! We will be here to follow along and help out like always. Good luck!!
-
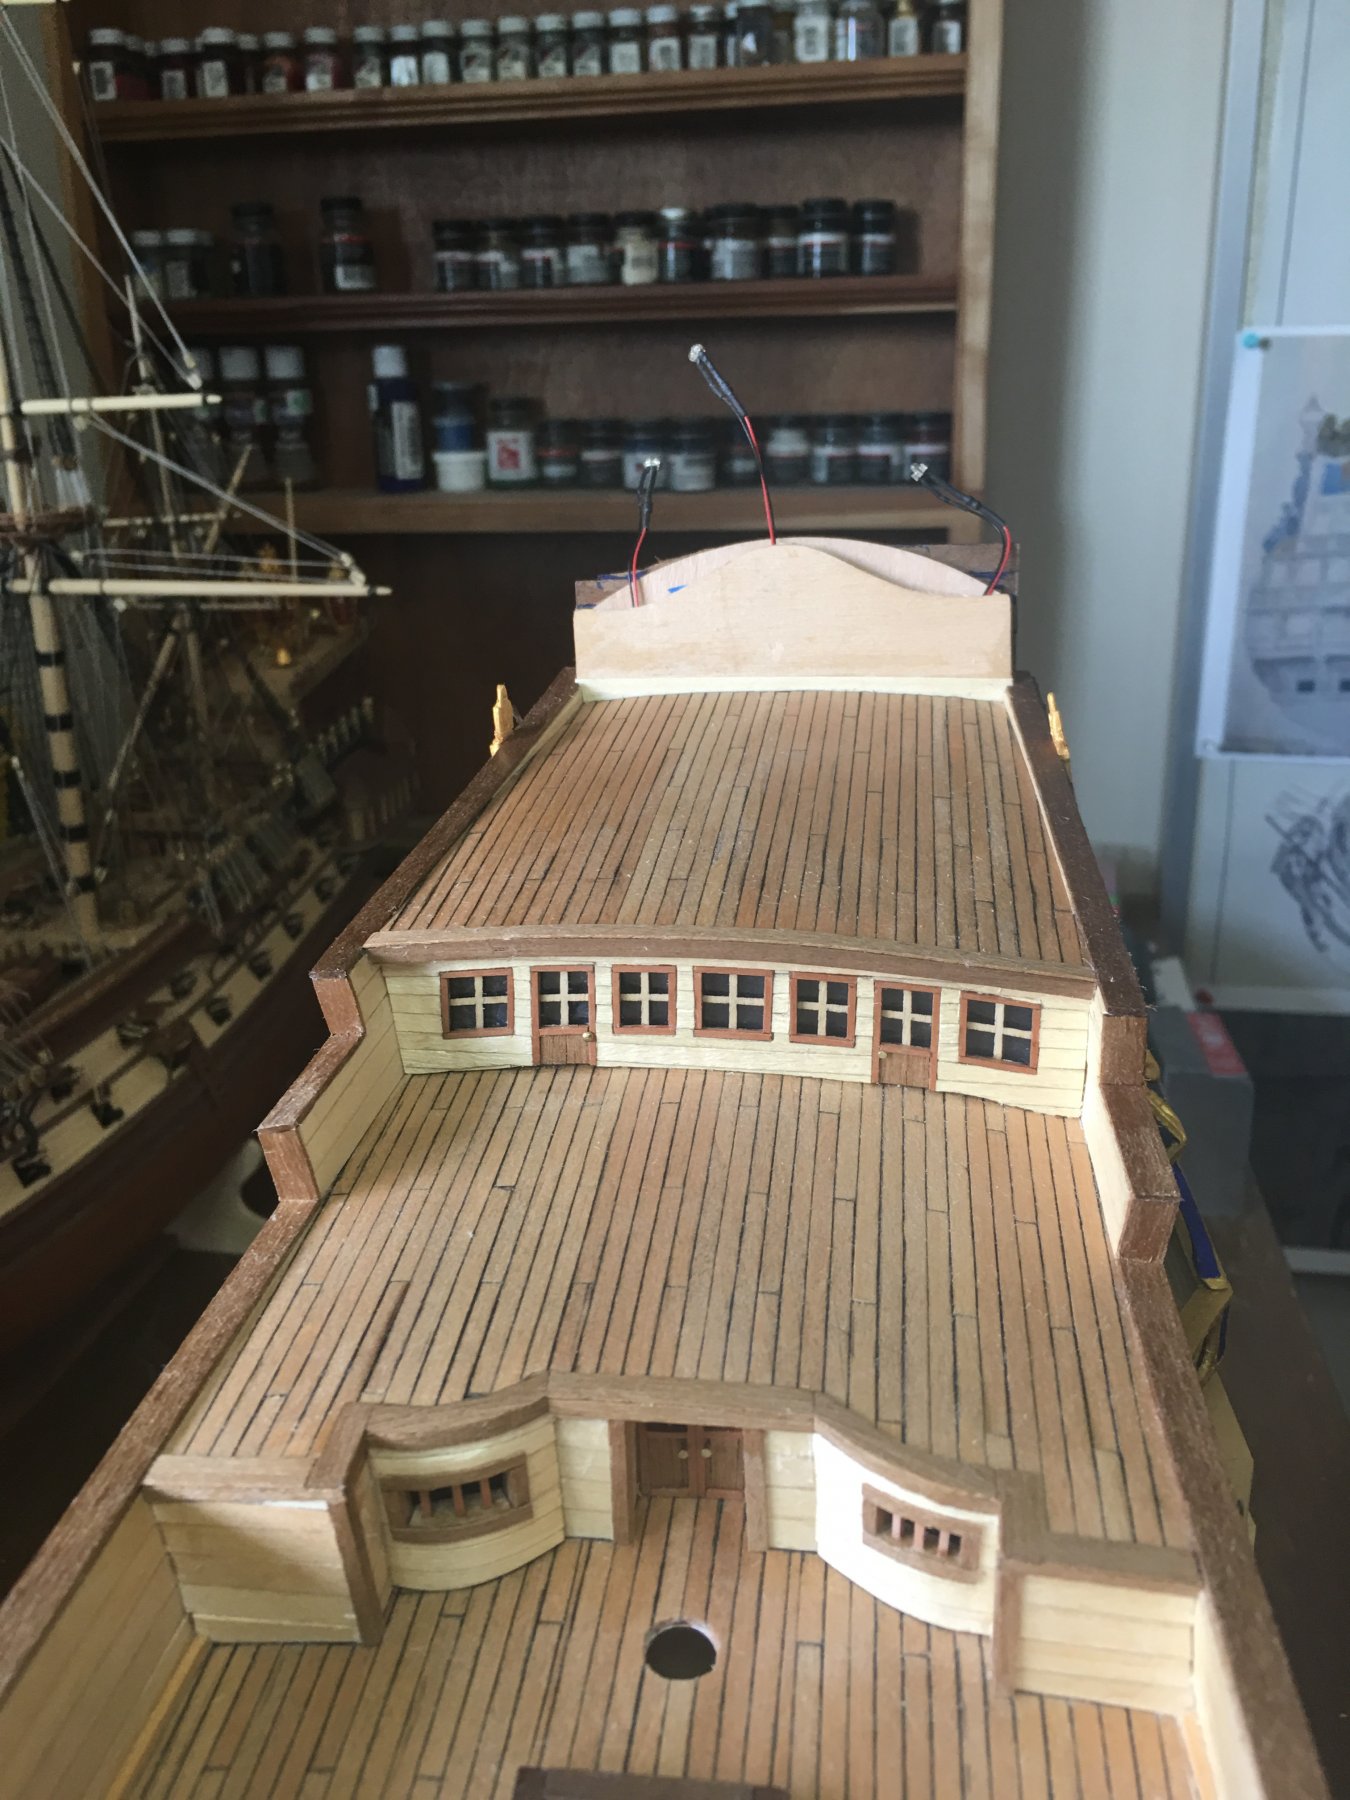
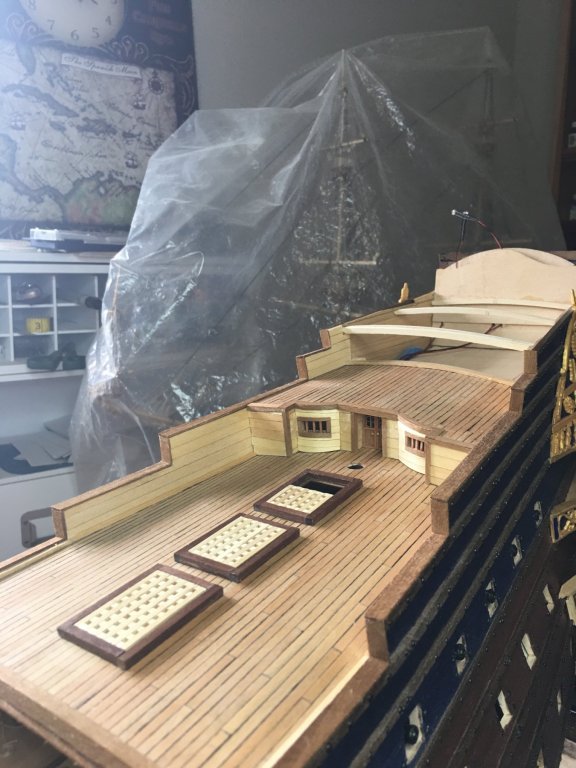
More deck work has been completed with one more to go. It is good to finally get the interior decks done as that means the bulk of the “dirty” work on the build is nearing the end. Still have a lot to do so that end is a ways away yet but, still visibly closer. Now to finish up with the royal poop deck and then back to more carving!

- 961 replies
-
- 11
-
-
Thanks for sharing these Marc! I had always assumed that the construction would be more of a "gilded" construction (fancy coating over a simple structure) mostly due to weight and stability factors. With the massive sizes of some of the QGs, especially on 17th century vessels, if they were a massive, heavy build and one was severely damaged or lost, the imbalance to the ship could have proven fatal. Keeping the construction as simple as a possible helps to lessen that. Of course that also makes it easier for them to become damaged... Hmm, lots to think about.
- 2,699 replies
-
- 1
-
-
- heller
- soleil royal
- (and 9 more)
-
Yes, the quarter galleys are extremely tricky on this ship and more so if trying to follow Berain’s drawing. One thing that I would love to see is a framing plan, obviously we don’t have an original but, even a modern interpretation of the framing on the QGs. That is something that is rarely shown on any plans or models. Even pictures of existing spaces such as the QGs on Constitution, Victory and Vasa showing the interior spaces are rare. I know that these are not really points of interest for the casual observer and tourist but, are of those mportance to those of us trying to understand and model them. Best of luck as you begin to plan, design and model yours. Looking forward to see what you come up with!
- 2,699 replies
-
- 2
-
-
- heller
- soleil royal
- (and 9 more)
-
Those dolphins look great! Trimming that top rail down does match the painting better than the previous design. How does it look in relationship to the deck? Reason I ask is that my plans are showing the forward edge of the royal poop to be at the bottom of the railing with the side bulkheads starting at 0 and rising towards the aft. Granted this is from memory as I am not at home to look at the plans so I may be mistaken but, I remember having this similar design on La Couronne. My concern comes in again with "safety" trying to keep in mind 17th century standards, the shorter rail, at least the forward quarter of it, would be more of a knee height hazard than a protection. Again, I may be off on my thinking or my plans could very well be off as that has proven true multiple times during the build so I was just curious as to how yours were lining up.
- 2,699 replies
-
- 2
-
-
- heller
- soleil royal
- (and 9 more)
-
That is an incredible amount of detail in such a small area. You are mastering that Death Star!
-
So this was an interesting piece to make. All I keep thinking while looking at it is that this really is nothing more than an expensive target for enemy gunners trying to disable the rudder. So now I have come to the statues that go between the bottom and middle balconies. Not sure how to do these just yet. May work on the quarter decks while I think it through. I need to get some more blades and I also want to maybe try a harder wood for these carvings. Something that might hold detail better.
-
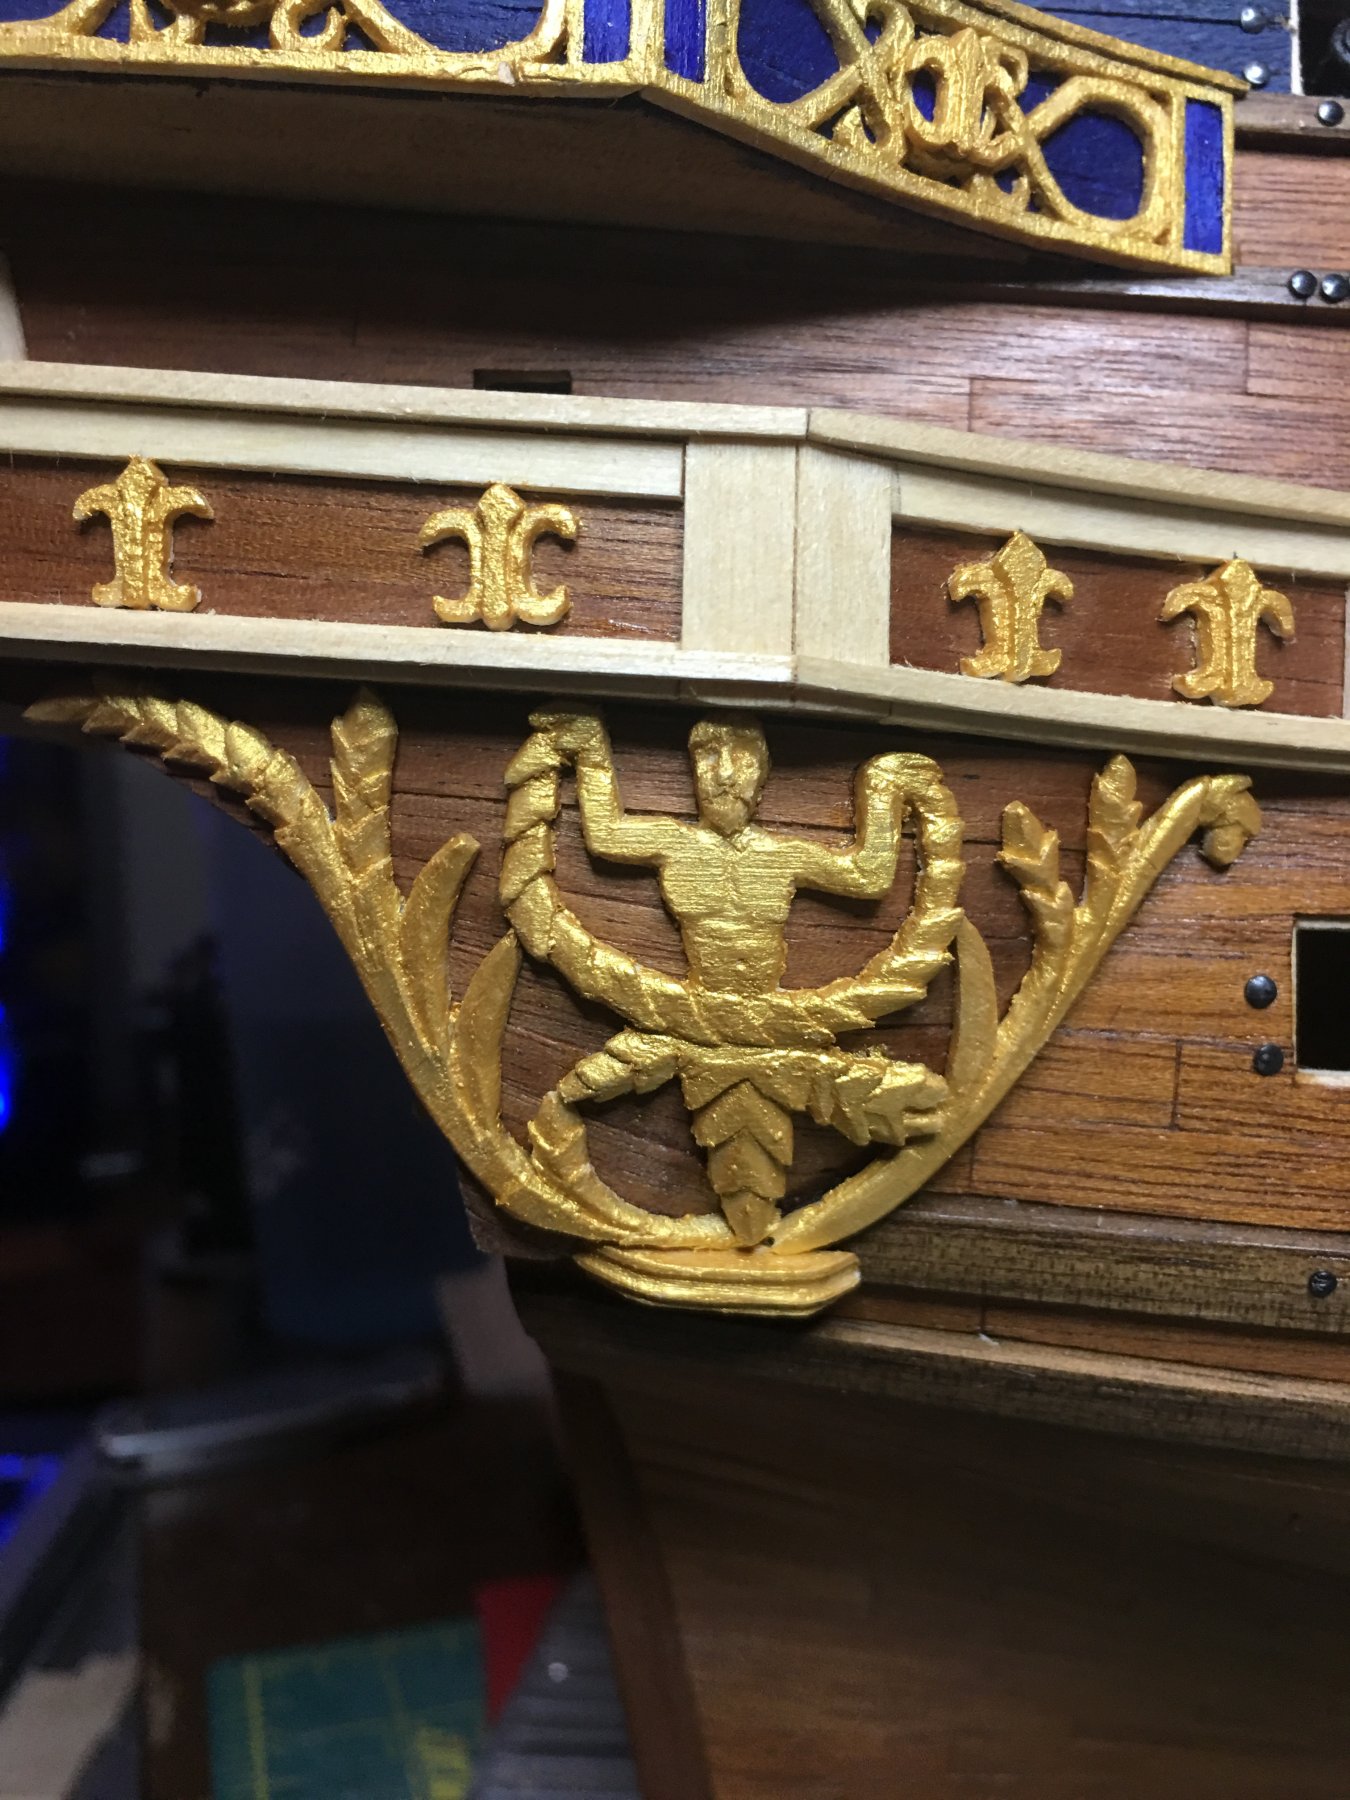
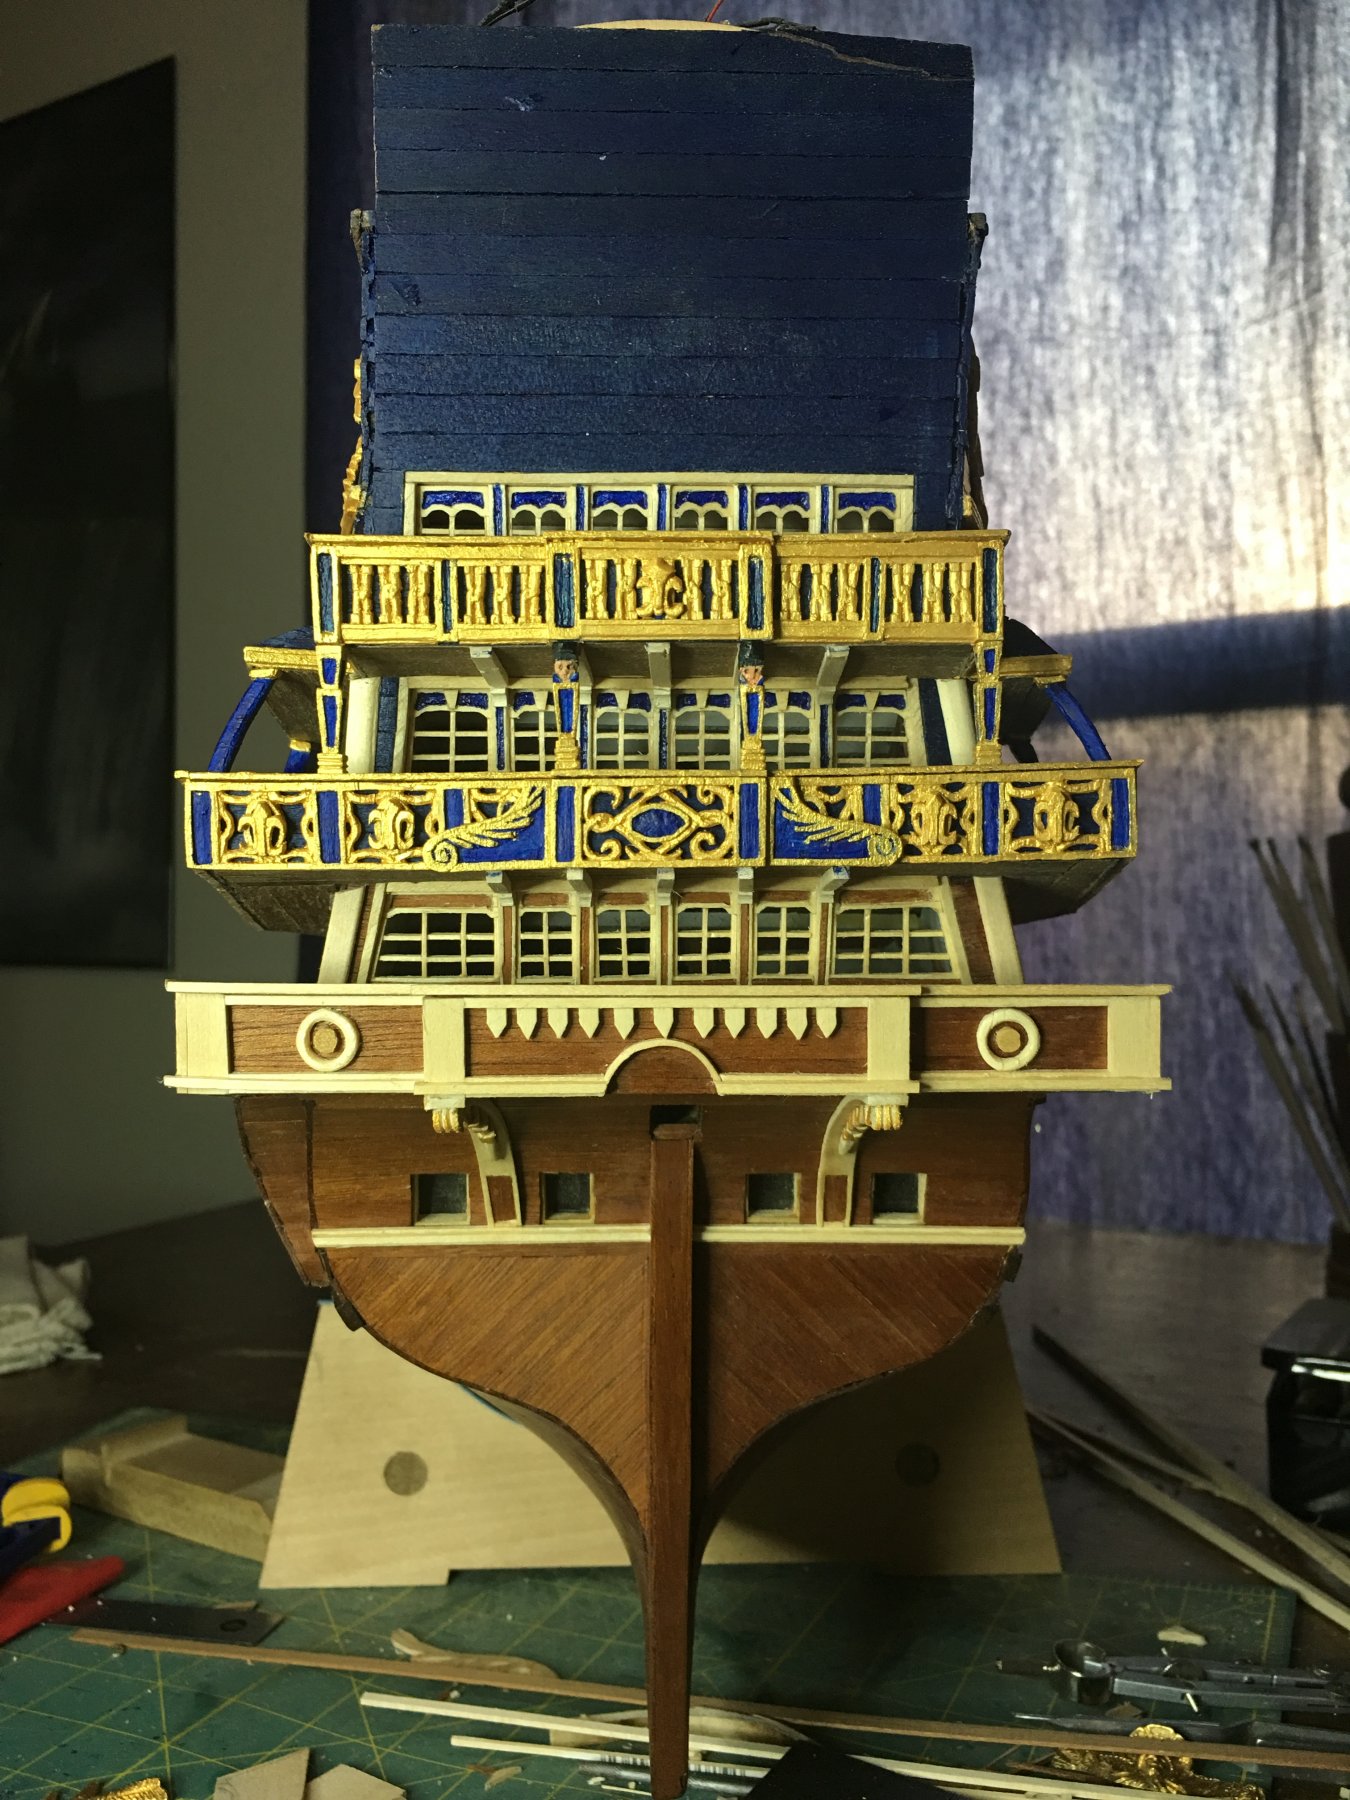
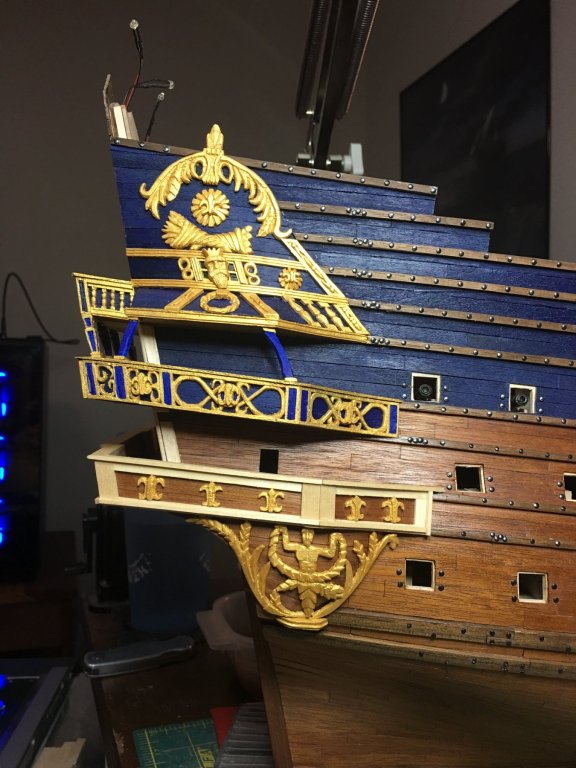
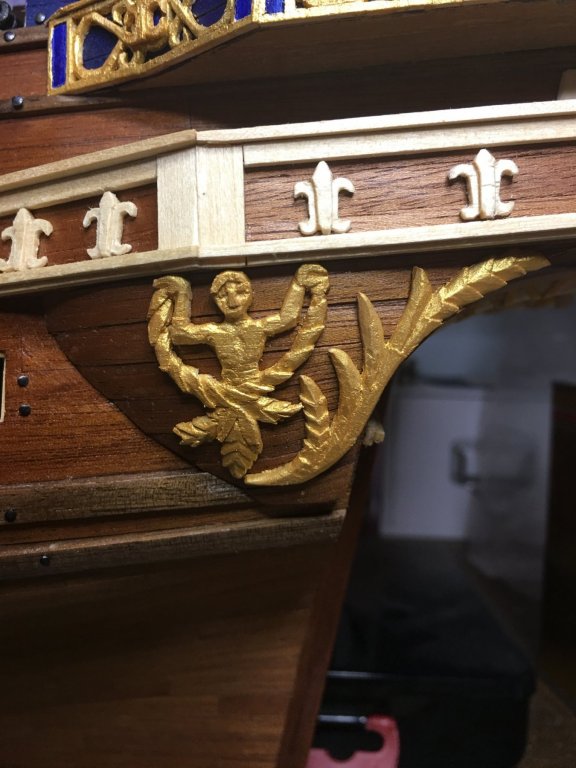
Finished both lower quarter galley decorations. The overall appearance is really beginning to have the wow factor now. Still have many more carvings to add but, it is nice to have the structural work in this area complete.

-
I’m still working out what the color scheme will be on that tier. I was going to leave that time be all white and mahogany but, I am thinking I am going to put the gold on the accent decorations and leave the trim work white instead of going all gold as I did on the upper tiers. I figure that will be a good starting point and I can always add more paint easier than removing it.
-
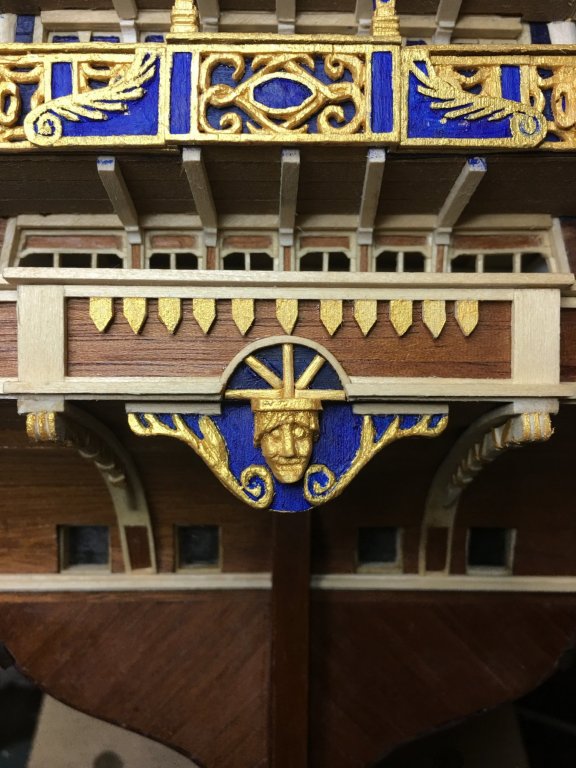
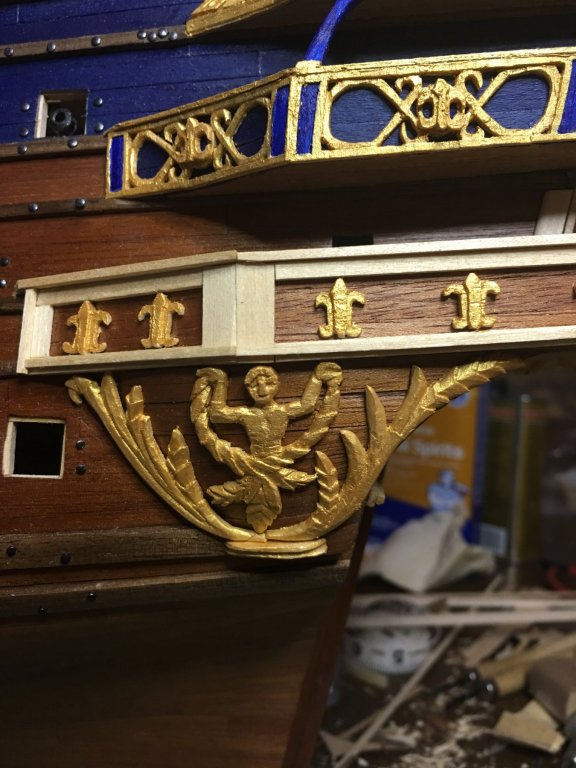
Thank you all so very much for the compliments and likes! A couple more carvings have been completed since the last update. Still have to make the forward branch and the the bottom trim piece. I’m still having a hard time with faces but I have several more to carve so I will definitely get practice!
- 961 replies
-
- 11
-
-
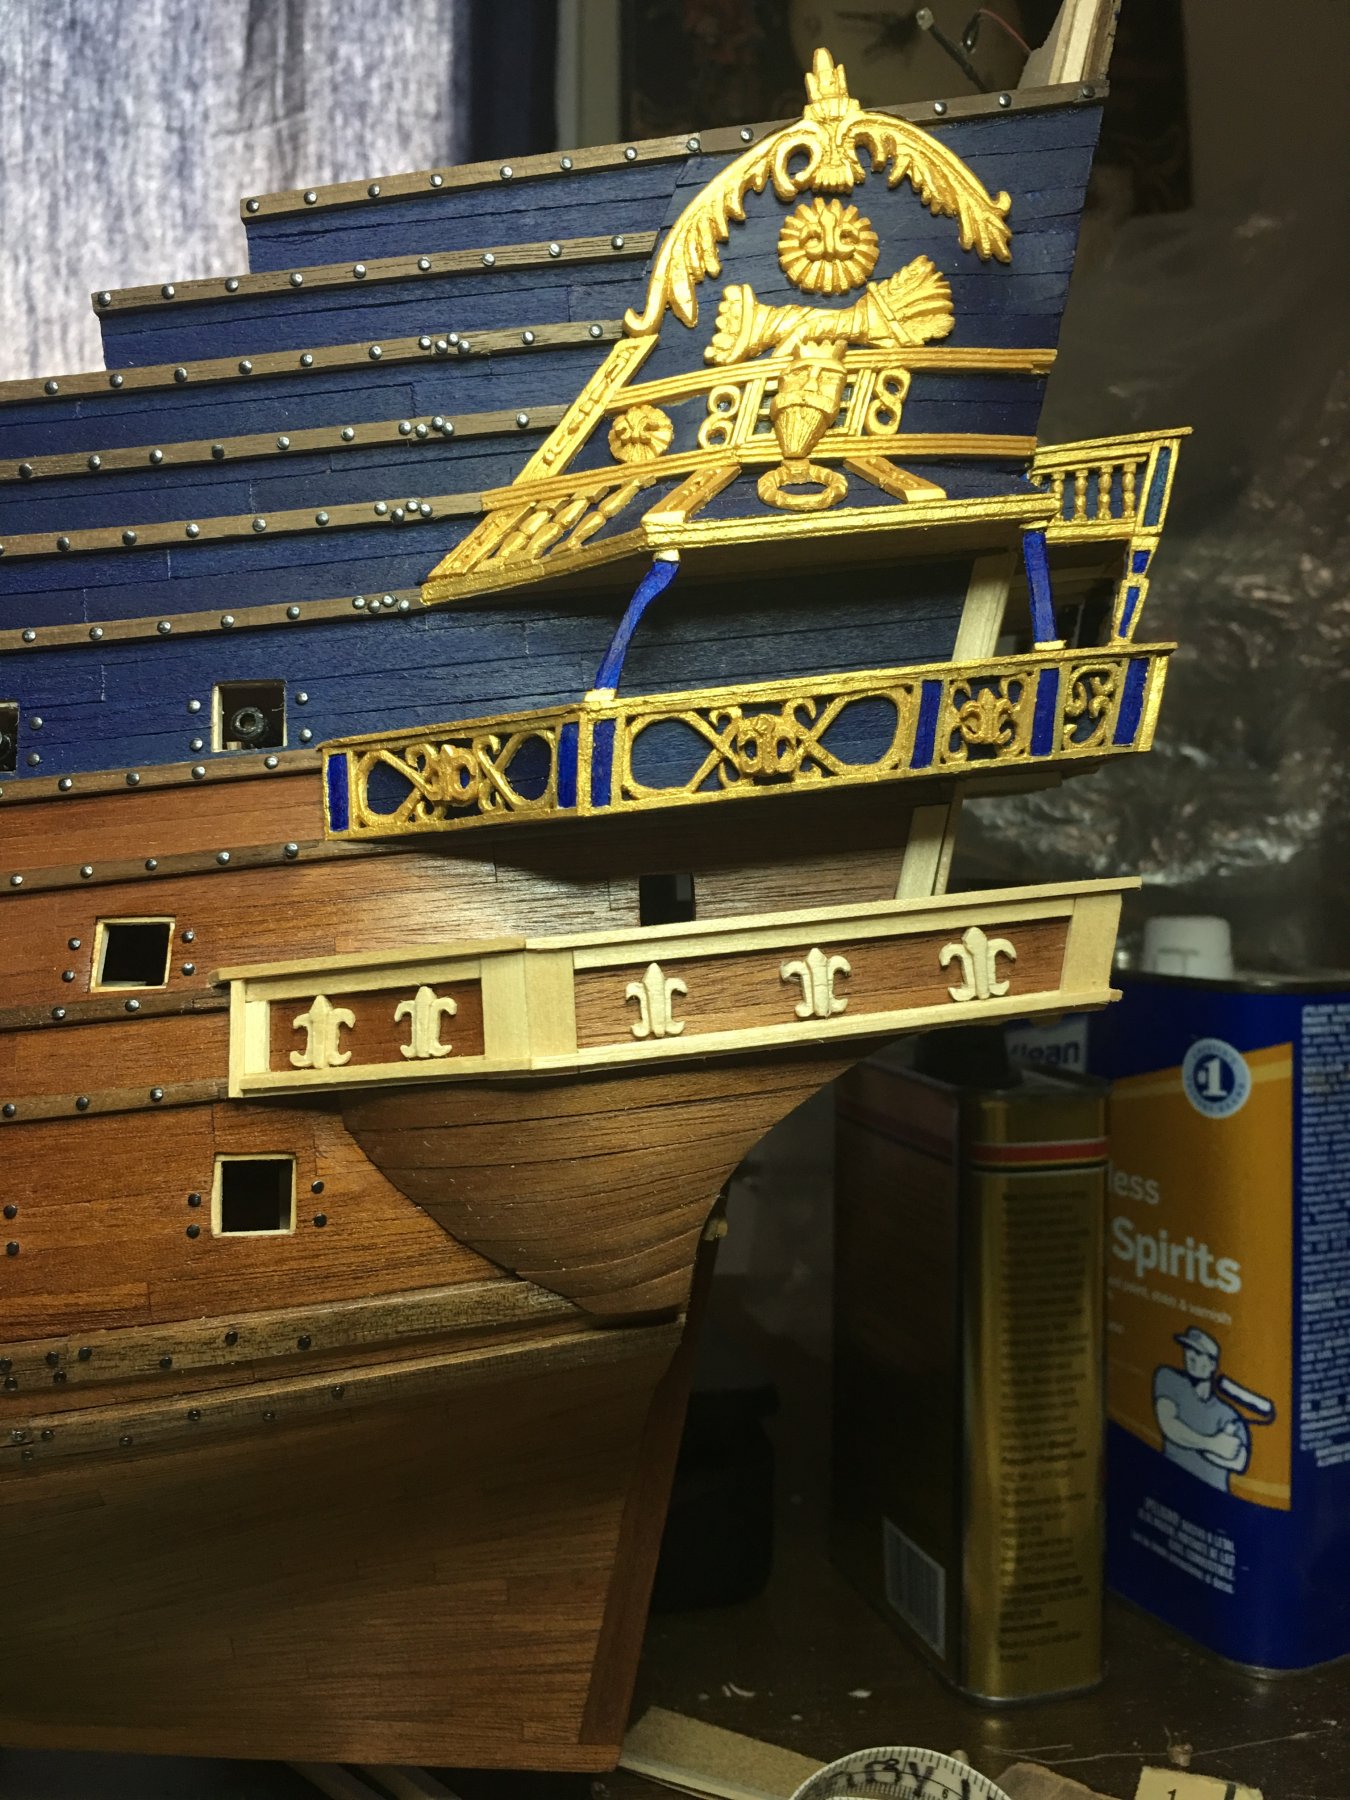
Couple more updates. Added a lot of the decorations around the balcony rails and have started to build the lower round portions of the quarter galleys. I wasn’t completely sure how the aft edge should really look. On one hand, a lot of the images I have suggest that it should be more rounded outward towards the stern but I chose to make it adhere more to the stern counter’s curve. This has been a trick to figure out how to build. I’ve never seen any real plans or images that show how these areas would have been constructed or if they were used for anything or just dead space in the ship. Hard to imagine dead space unless they just needed extra weight for balance so I imagine that there could have been stoarage in this area. In in any case, mine were carved out of a box wood blank and then planked over to match the hull. Carvings will go on next.


- 961 replies
-
- 10
-
-
Depending upon how sharp those curves are, a polycarbonate sheet may do the trick as it bends easier than an acrylic sheet will. That would be a cool looking display case! As for your maiden voyage, I would test her out in a bath tub or small pool if you have access to one so retrieval is easy. Also, you could possibly tie fishing line (or any other light & strong line) to her so that if something starts to go wrong you can reel her back in. I understand the nervousness though. While I want to make an RC ship some day, actually sailing her scares me.
-
Awesome work Johann! I can spend a lot of time looking at each one of your updates as the detail is always incredible!
-
Congratulations Vic on another very fine model!! Still hoping we will see La Couronne sail this summer!