HOLIDAY DONATION DRIVE - SUPPORT MSW - DO YOUR PART TO KEEP THIS GREAT FORUM GOING!
×


EJ_L
-
Posts
2,246 -
Joined
-
Last visited
Content Type
Profiles
Forums
Gallery
Events
Everything posted by EJ_L
-
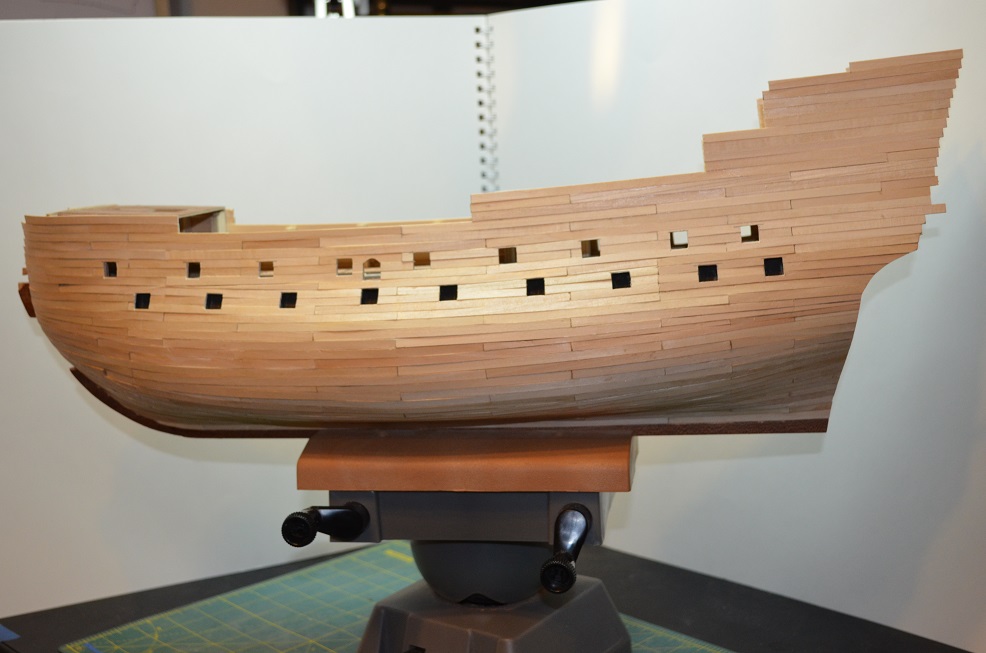
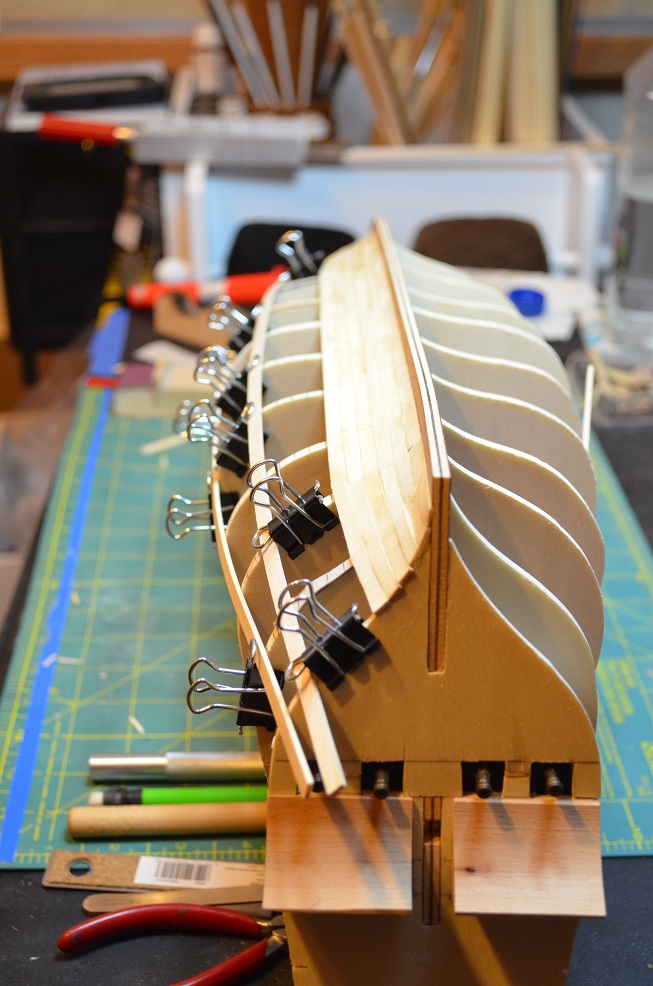
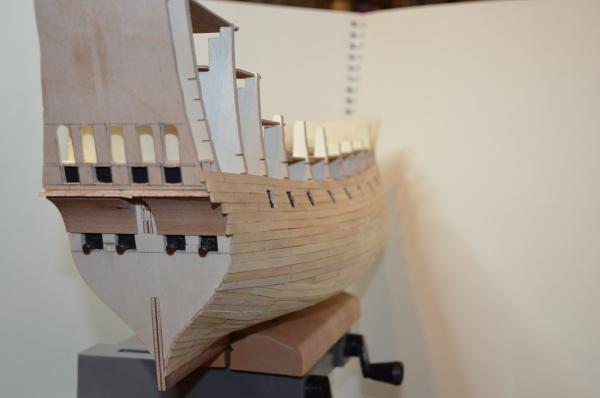
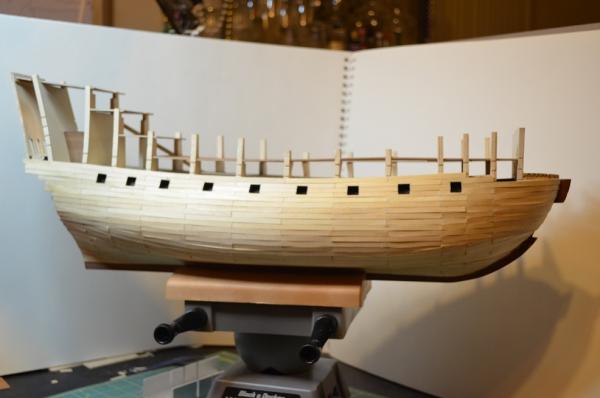
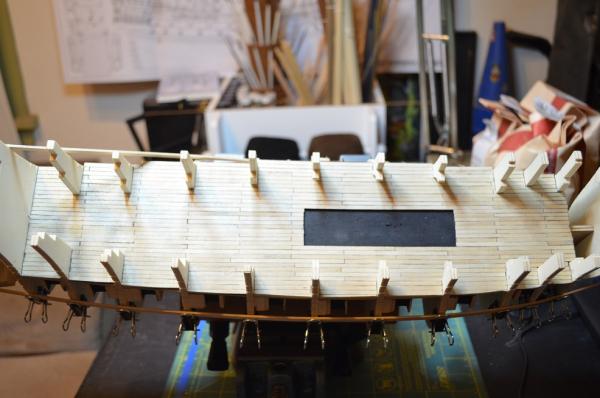
 More progress has taken place on la Couronne and she is showing her shape now. I have finish the first planking which I admit I am not really proud of and shows why I am still part of the group that double planks hulls. I have decided though that this will be the last ship I build in which I only rely on the framing supplied in the kit. There simply are not enough connection points and the spacing between the frames is too great and uneven to get the desired shape of the hull in one planking. There may be some people who are very good at planking that can do this but for my skill level I am thinking that if I add more frames, somewhere a lot closer to what would have been on the actual ship, that having those extra connection point would help in allowing the planking to come out smoother. As for this ship, I will now begin the "cheat" stage in which lots of smoothing, planing, and wood filler followed by lots more sanding will take place. I want my veneer layer to look great and I know what I will have to do to get it that way. I have also been test fitting many pieces such as the upper decks for spacing and preparing others such as the window frames on the stern for installation as they will need to be in place before or ready for placement as the final planking goes on. I will be removing the all the decks down to the main again so I can detail it out. Also many of the planks have run long and will remain so until I can get all the bulkheads installed. It is much easier to leave wood longer than needed and trim it back to fit than it is to try to stretch it longer. I keep my eyes open for the elusive wood stretcher but so far it has not been seen. Well, I'm off to create a lot of wood dust. Till next update, drink up me hearties yo ho!


- 608 replies
-
- 12
-

-
- la couronne
- corel
- (and 1 more)
-
As always I find myself staring wide eyed and breathless when I look at the pictures of your build. The beautiful work and amazing attention to detail is inspiring. I find myself looking over your pictures again and again and each time I notice some new detail or feature that I missed the previous view. It makes me look at my own build which on the table next to me and take note of how it;s looking. Even though it is not the same ship I still question did I think to look into this or that to see haw it should look or how can I make something look better. Throughout your build log you mention at how long it is taking. I feel that it should take as long as it takes to make it right. That is something that I struggled with a lot was slowing down and taking the time to make it right. I have several models that I have had to rebuild over the years as I was so unhappy with the job I did largely due to rushing through it that I could not bear to look at it any longer. I have had to repeatedly tell myself that I have the time. Slow down and learn a new and better way and be happy with the results. Seeing a build log like yours and seeing the fabulous work that it contains is proof that fast is not always better and the results are most definitely worth it. Keep up the wonderful work as it truly is an inspiration to the rest of us.
-
Ken, those carvings look great! Way better than the cast mold looks, I know cause I used it and have been seriously considering redoing it one day. Definitely worth the effort. Great job!
- 481 replies
-
- 1
-
-
- rattlesnake
- model shipways
- (and 1 more)
-
Very nice work. I was in school for 3D design a while back and I fell in love with the possibilities of 3D printing in model building. I have not used it on any model ship builds yet but while I had access to a 3D printer I did make many custom parts and even a few people for my HO scale railroad. I have been thinking about buying a printer myself and trying it out for making many of the decorative sculptures on the stern or even some of the extremely small details such as hinges. I also think it would be a great tool for making sailors in the wide range of scales that we often work in and are not readily available in stores. The printers are fast becoming more affordable and it is really rather easy to learn the programming to make them work. Design can be a bit more challenging but for some it may be easier to learn to design on a computer than carving or sculpting the parts by hand.
-
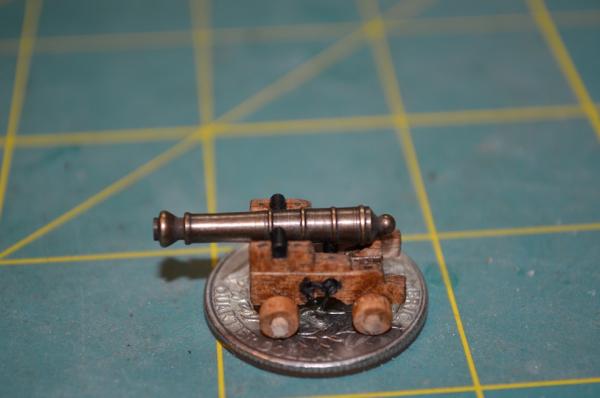
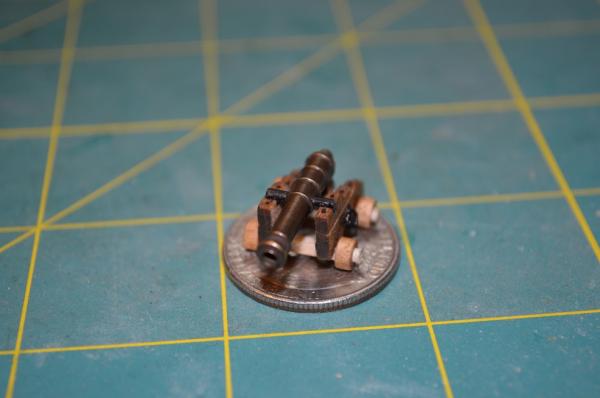
Today I built the first of la Couronne's canon. I needed one that I could use for laying out the main decks gun ports. I did not care for the kits supplied carriages so I ended up building my own that I am much happier with.
- 608 replies
-
- 12
-
-
- la couronne
- corel
- (and 1 more)
-
Very nice job on those canons. My grandpa has milling machines and I have just been highly motivated to go visit him and see if I can reproduce your results. I'm gonna need some of the canons for my Couronne build soon anyway. Thanks for the video!
-
I do love CA glue for a lot of my build but after using it on a ships rigging years ago I will not do that again. I'm not as concerned with not being able to untie the not as often by the time I realize I have messed up the threads have been trimmed and the only solution is to cut through the knot and start over. The white residue that it leaves behind is the main reason I dislike it. Watered down white glue does take longer to dry, (heat guns can help speed this up if it's in a critical spot) but as it dries clear without leaving a film it is much better. Plus If I am doing a lot of knots in one sitting I like to make a small puddle of the glue that I can dip the tip of a toothpick into so I do not get an excess of glue on the knot or small part. I have not tried rosin but, I will be calling my cousin who is a musician and plays the violin to see if he has some I can try or where locally I can buy some. I have always used beeswax and have been happy with the results it gives.
-
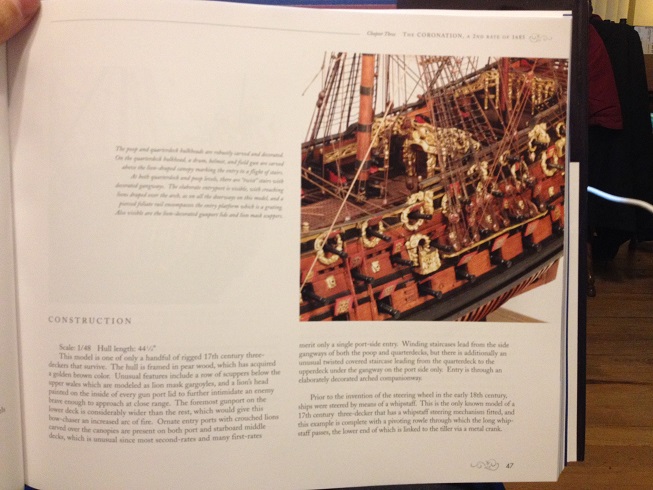
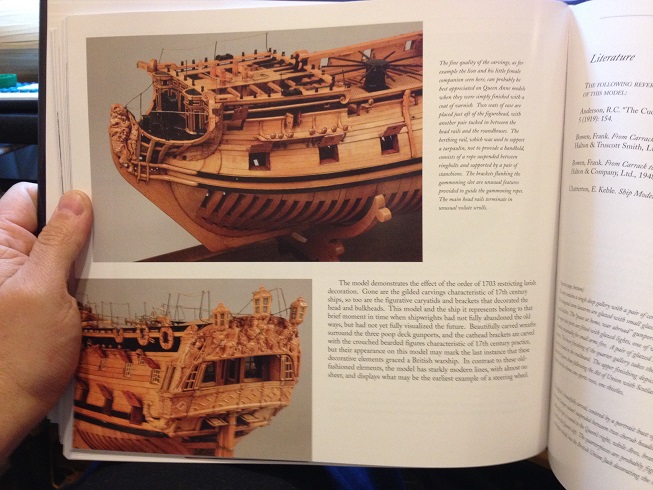
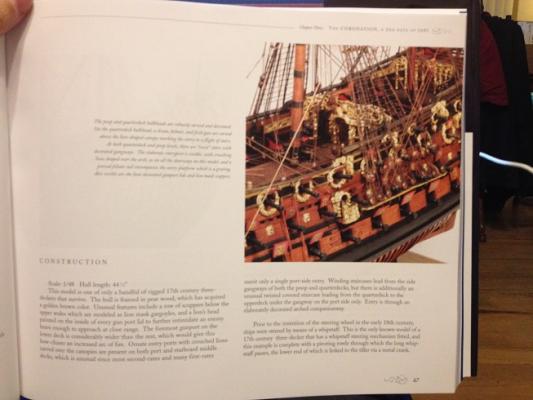
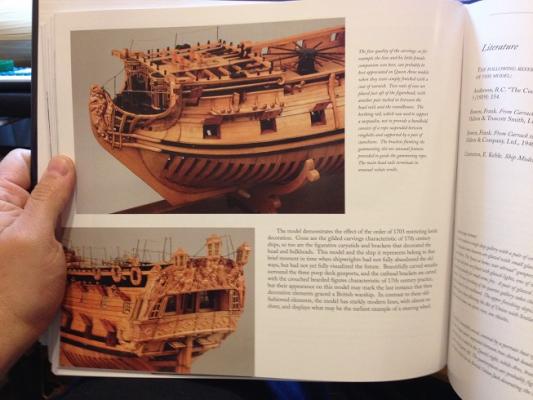
As an early birthday present I was given this book and although I have only skimmed through it so far I am impressed. I will write a full review once I have had more time to read through it. The model ships are very well photographed and the paintings have been cleanly scanned and with the pages being large it is easy to appreciate the models. I have included a few pictures from the book to show examples. I will gladly post more if anyone is interested.

- 4 replies
-
- 10
-
-
Nigel, I have noticed this as well on a few different ships. I guess if you were faced with losing some rigging and/or a mast compared to losing the entire ship then that would be a worthy sacrifice. Kings were more likely to forgive a damaged ship if she came back with cargo intact or mission successful than if the ship was sunk or worse yet, captured by the enemy. I'm also thinking that in the case of the forward canons on the Couronne, I am sure that there was enough play in the angles of fire to clear the rigging and planking if only just enough. I think that I've got a plan for design on this. I'm currently working on some deck furniture to let my head clear to look at it with fresh eyes and to see if any new information surfaces and then I will resume building the bow. That is the nice thing with these larger ships is being able to stop working on an area for a few days and work on another part to get a fresh perspective on a problem area. Had to do that with the stern layout also. For anyone who is looking at starting this kit, it is a good kit and nice ship to build but, the Corel plans do leave a lot of detail out that requires additional research. I know this is typical for ship kits at least in my experience but if someone new reads this you have been warned.
- 608 replies
-
- 5
-
-
- la couronne
- corel
- (and 1 more)
-
Thank you for the pictures. You did a very nice job by the way. I have also wondered how the lower guns would fire without hitting the planking Or even the bowsprit itself Especially if the bowsprit was stepped off to the side. Maybe it was more of an intimidation look than actual functionality Though, that would seem unlikely given the excess weight.
- 608 replies
-
- 4
-
-
- la couronne
- corel
- (and 1 more)
-
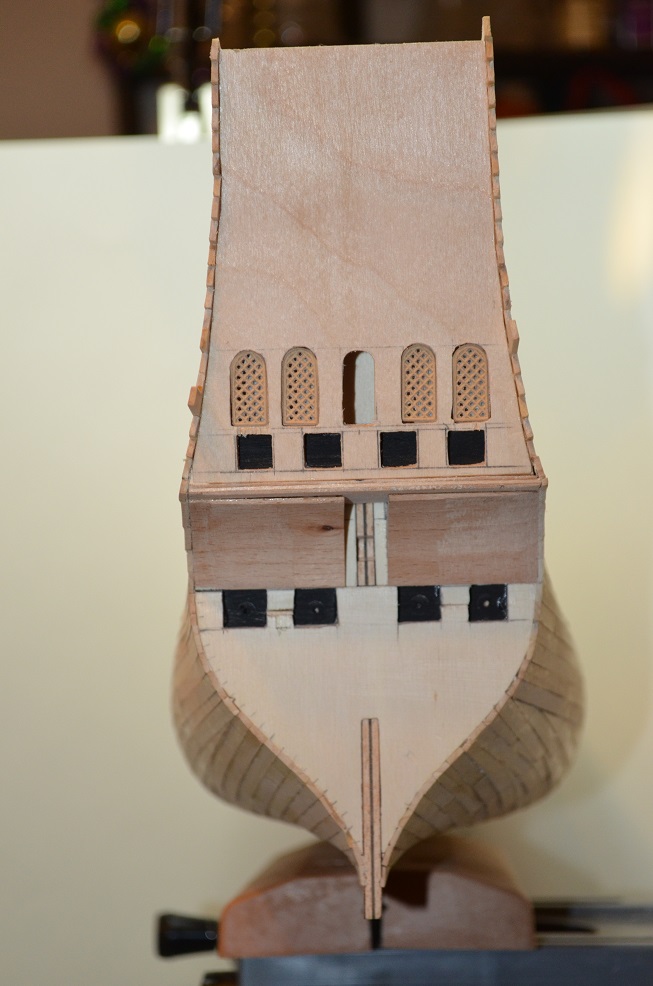
I've come across an issue that I'm having trouble with. I'm laying out the openings in the forward bulkhead for the forward canons, and bowsprit and I cannot get a clear determination on their location. Two main issues are causing problems. The first is the stepping of the bowsprit and the second is the location of the 8 forward facing canon. From my understanding of the construction of ships in the early 17th century the bowsprit would be stepped off just to the starboard side of the fore mast. I'm okay with this except it seems to interfere with the positioning of the lower canon locations. The canon on the starboard side are now blocked. With the canon port themselves I am not sure of their locations. 4 of them I can tell are on the spar deck. The other 4 are a mystery as they do not seem to fit anywhere. If they are on the main deck then the offset bowsprit blocks them as well as the hatch way to get onto the prow deck. If they are above that then is there a between deck that should exist? That is almost my though given the amount of space I have between the main deck and the forecastle. The only models I have seen either have the bowsprit centered which I do not think is correct or they eliminated the 4 lower canon and only use the upper 4. Can anyone help me out with this? Has anyone seen another model of this ship somewhere that might have a better explanation or know where I could look for answers. Thanks,
- 608 replies
-
- 1
-
-
- la couronne
- corel
- (and 1 more)
-
Your framing is looking great! Also thanks for informing us about ANCRE redoing their website. They have several books that I am interested in and will probably have to add a couple to my library soon.
-
Work station clutter
EJ_L replied to Senior ole salt's topic in Modeling tools and Workshop Equipment
I am going to get the privilege of designing a dedicated model room in the near future as we are in the process of building a new house. I will be looking closely at these modular units as they look promising but at the very least they give me some great ideas for the built in storage that I was already planning. Would be nice to see them become more easily available in the US as they look promising. I also agree with earlier posts that Jim's setup looks better stocked than my local hobby stores also. If you are into scrapbooks or RC anything they are great but other model hobbies are getting scarce. -
Thanks Ken! Yes, she is a very tall ship. Part of the era of ship building where ships were built much like fortresses were with tall turrets and high walls. Fortunately from what I have been able to read about her, she was a sound ship and did not suffer from inbalance much like the famed Wasa, which was of similar constuction did. Surprisingly though from her size she was actually considered a third rate ship of the line for only having a 64 gun armament. The first rates of the time carried over 100. This is largely, from what I can tell, what led to her short life span of only about 7 years before being decomisioned and scrapped. As with most things time moved on and ships got smaller and more powerful eventually making these larger ships unnecessary. Still, there was a beauty in their design that fadedaway also. And let's face it, if you were in the ocean staring at the broadside of one of these ships I think that the intimidation factor alone would at least make a person think twice before trying to stand and fight.
- 608 replies
-
- 2
-
-
- la couronne
- corel
- (and 1 more)
-
Your build is looking fantastic! The Rattlesnake, this exact kit actually, was the first wooden ship I built. I think that that was probably a mistake as I should have started with something simpler but that is not what I typically do. Still, I am very proud of how it came out overall and I learned a lot from building her. I have to say that yours looks a lot better than mine does. The clean lines and beautiful carvings are great. I've enjoyed reading through your build log and will continue to follow along as I look forward to seeing her come together.
- 481 replies
-
- 1
-
-
- rattlesnake
- model shipways
- (and 1 more)
-
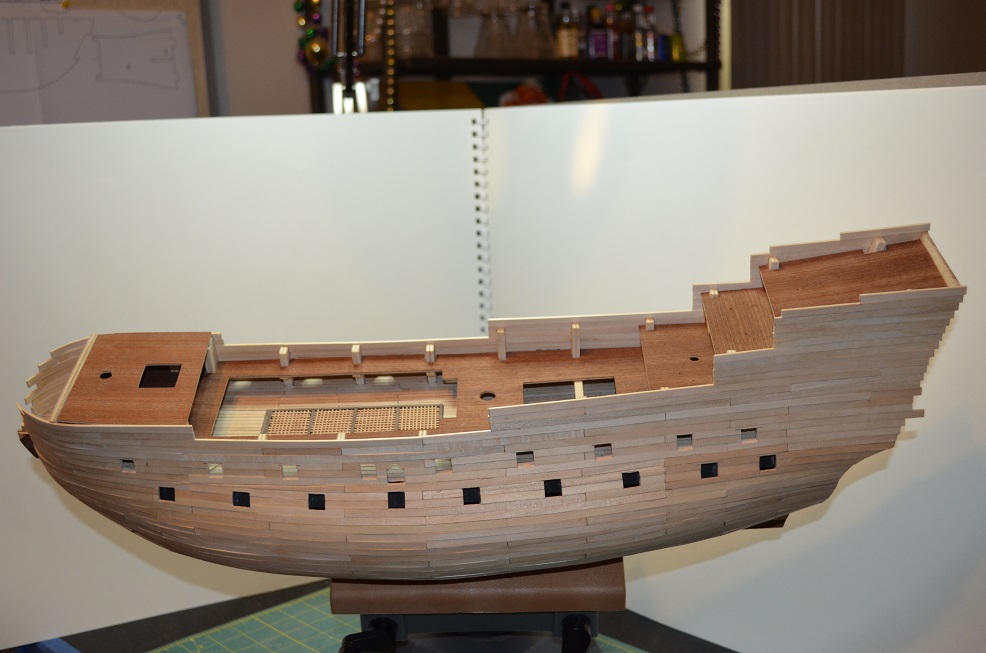
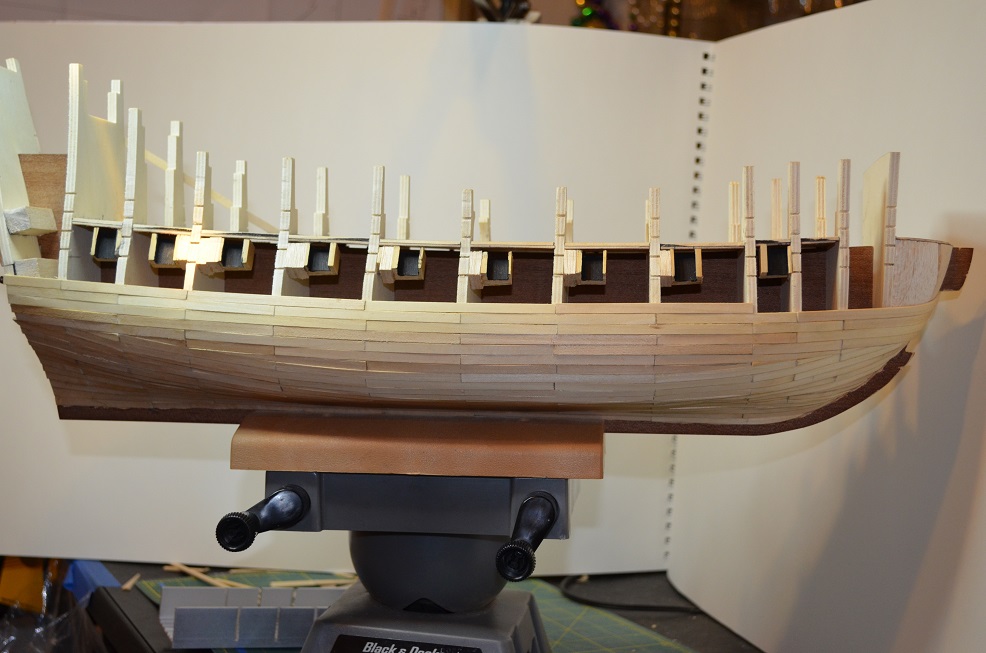
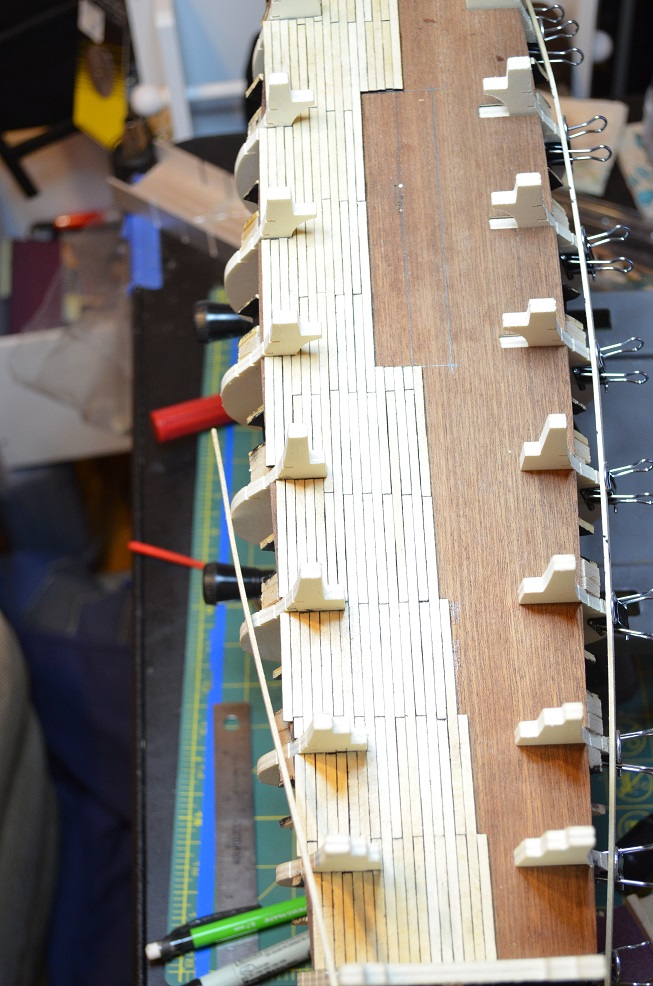
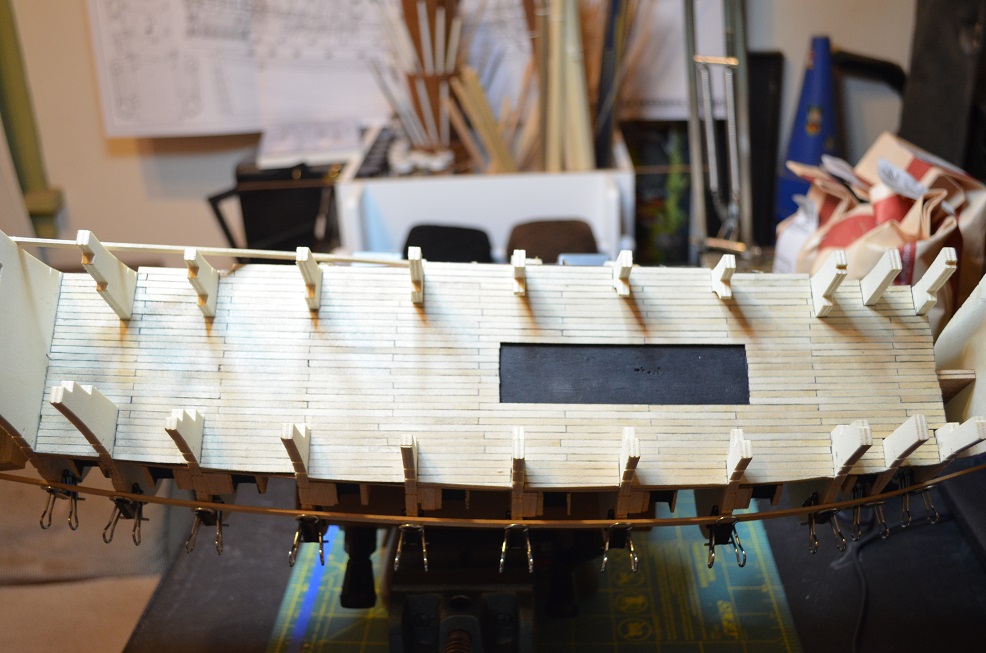
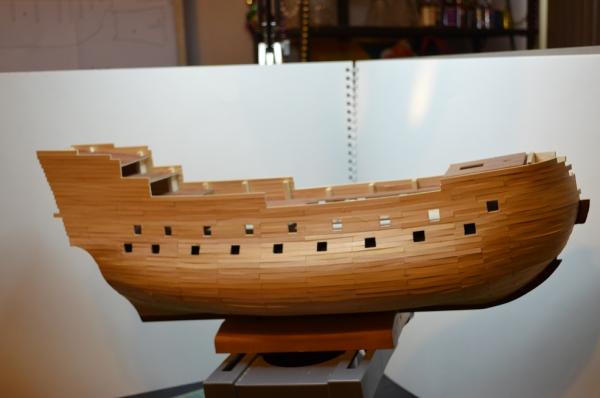
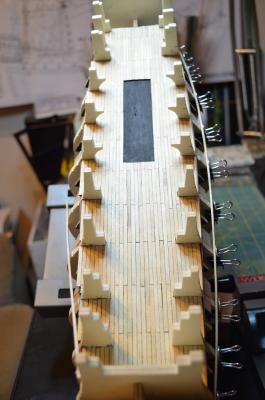
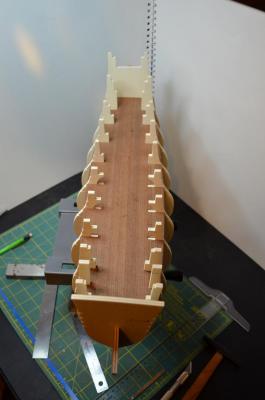
Planking has continued and has now climbed over the lower gun ports on the starboard side. I have paused it there as I have had to build out the stern cabin spaces and gun ports. I temporarily set the upper decks so I could verify the spacing for all the openings in the hull. I'm also making sure I have everything in place that needs to be before the planking covers it up. My plan is to bring the planking up to the upper gun deck then I will start detailing out that deck before I continue the rest of the planking.


- 608 replies
-
- 7
-
-
- la couronne
- corel
- (and 1 more)
-
Work station clutter
EJ_L replied to Senior ole salt's topic in Modeling tools and Workshop Equipment
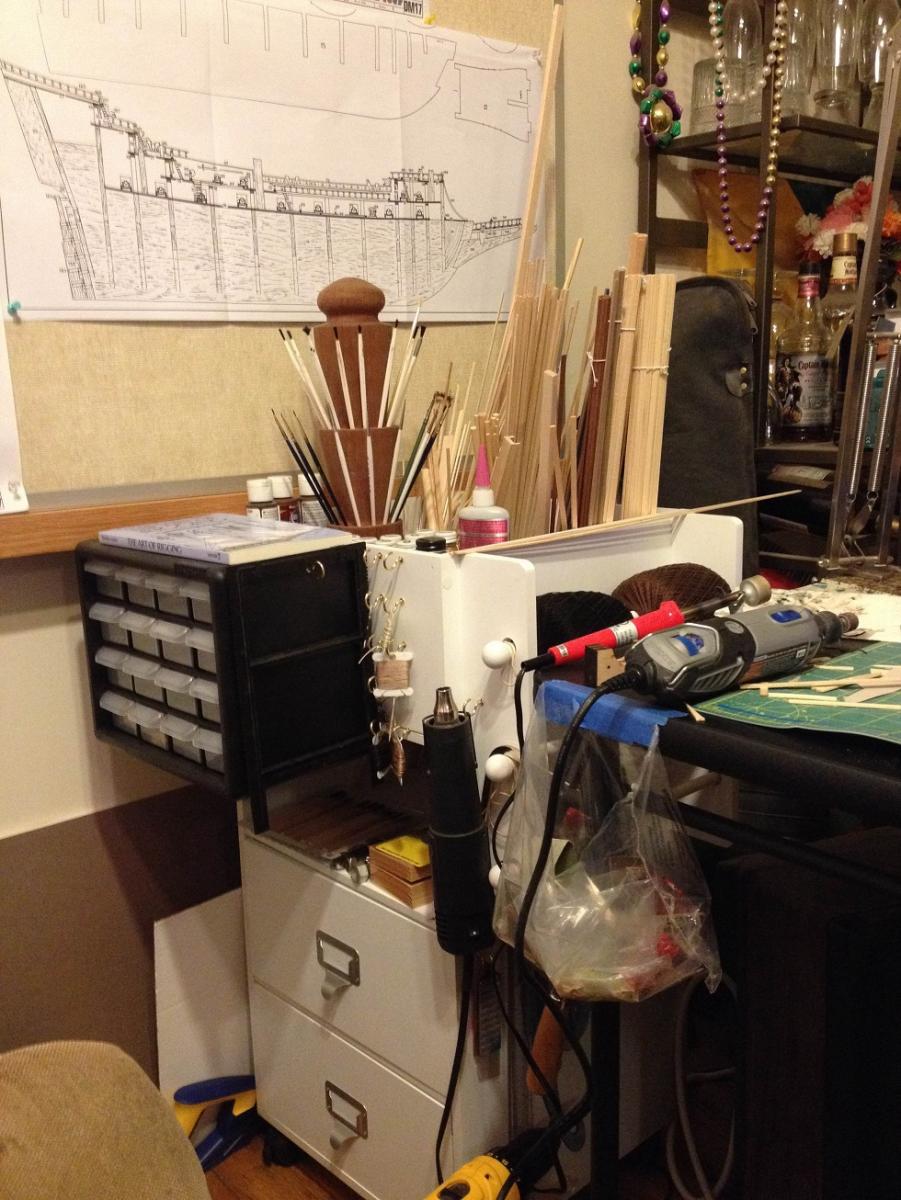
This is my temporary work station so it's far less cluttered than usual. I have a nice big area in my basement dedicated to model building but due to an illness that has made me much weaker than normal I no try to avoid going down stairs unless I have too. In the meantime I have set up a card table and along with this rolling cabinet that I modified to hold my materials and tools I am in business in my living room. I also got lucky at work and salvaged that 4'x4' tack board that has been great for a plan board.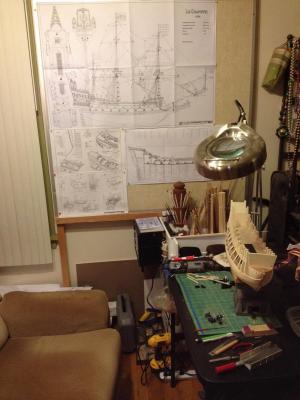

-
Work station clutter
EJ_L replied to Senior ole salt's topic in Modeling tools and Workshop Equipment
This is an issue that I feel all model builders struggle with. Over the years and largely thanks to my wife's love of shopping at craft stores I have received many different types of storage shelves, drawers, boxes, baskets, and a few things I don't really know what they are for. Using them remains an issue sometimes. What has helped to keep me organized the most is that I bought a small battery operated vacuum. I keep it directly under my table and try to use at the end of every session especially if I have been cutting and sanding. By forcing myself to clean up the dust and small pieces it also forces me to pick up tools and supplies so they are not in the way or don't get sucked up. So far this has been a fairly successful trial. -
Rigging tools how are they used
EJ_L replied to Telp's topic in Modeling tools and Workshop Equipment
I mostly just use my fine point tweezers but I did pick up a pack of dentist picks at Harbor Freight for a couple of dollars a few years ago. It was a 10 piece set that have a variety points and hooks that I have found useful on occasion. I have eyed that set that you are questioning and have been curious if it is helpful or not. I'm sure though that like most tools, it's what works best for you and trial and error is really the best way of finding out. If you do happen to try them, let us know how they work. -
Your ship is looking good. I had to chuckle when you described the canon flying off and becoming lost in the carpeting. In my basement where I have my model table set up I have an old piece of shag carpeting that I use a rug over the cold concrete floor. I cannot count the number of lost pieces that have done that very thing when I cut them off spurs or just pop out of my tweezers and disappear. About once a year I will shake out the carpet and I collect dozens of tiny blocks, eye bolts, cleats and many other small parts from my model train stuff. Over the years this has led to my spare parts drawers being an interesting collection of formally lost parts that have been reclaimed long after the project they were for has been completed. I have to say also that I commend your bravery for taking on such a small scale. The smallest I have done is a 1:160 scale Bounty and it didn't have nearly the detail yours does. My current build is 1:100 and I have done the Constitution at 1:96. Most of the ships I have worked on have been around this area. You are doing a great job with the scale of ship you are building. I look forward to seeing it progress.
- 32 replies
-
- 3
-
-
- constitution
- revell
- (and 1 more)
-
Great video Mark, Thank you for sharing that. I will be checking out his other videos as well.
-
Thanks for the compliments. As for the gun ports, they are not too bad. The dummy ports on the lower deck can be placed wherever they are needed to make the ship look right. The upper decks gun ports I haven't done much with yet as I have not gotten that far but, I'm not too worried as I have plenty of space to make minor adjustments if needed. That being said, I do not know how accurate these plans are. I have been searching for more information on this ship to try to confirm accuracy and have only had very limited luck so far. More often I find conflicting information that is forcing me to make best guess decisions. A more pressing issue to me has been the appearance of the stern as stated earlier in this blog. I have seen two different designs of it and although the overall look is the same, there are noticeable differences.
- 608 replies
-
- 3
-
-
- la couronne
- corel
- (and 1 more)
-
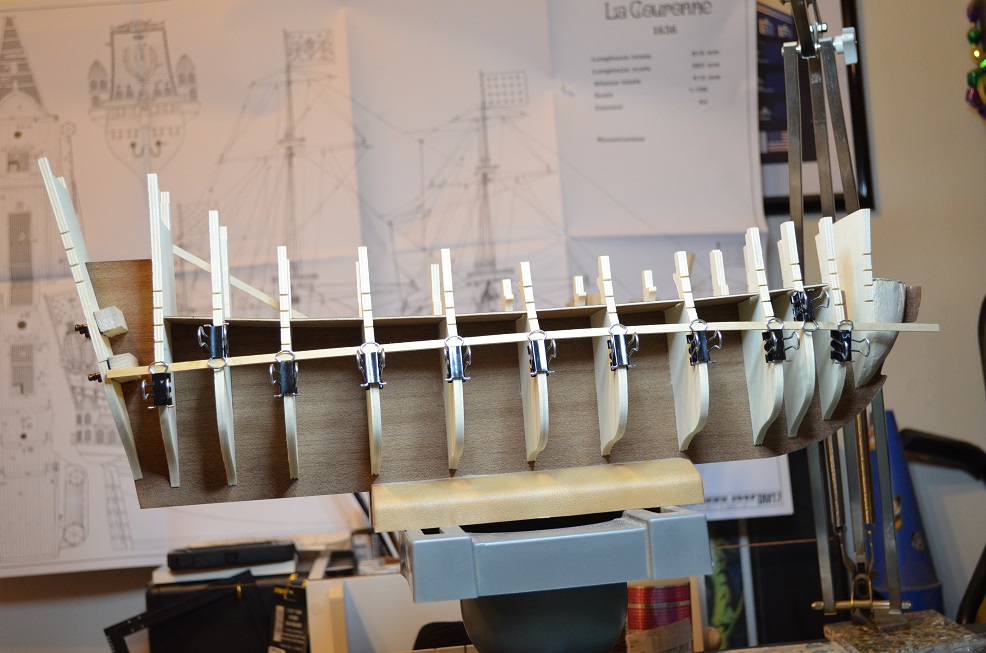
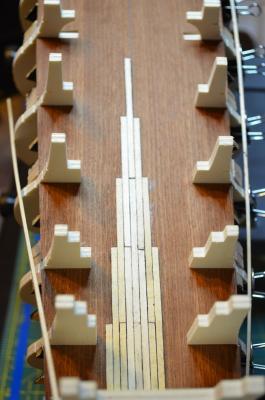
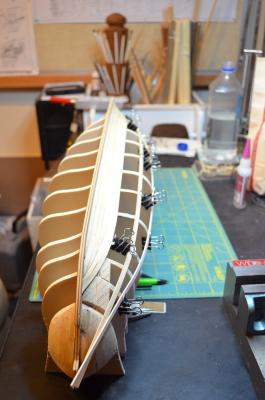
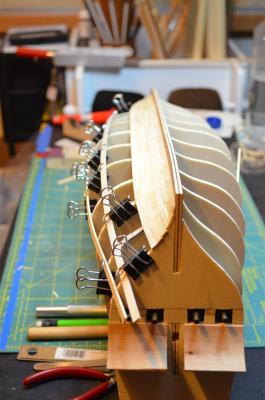
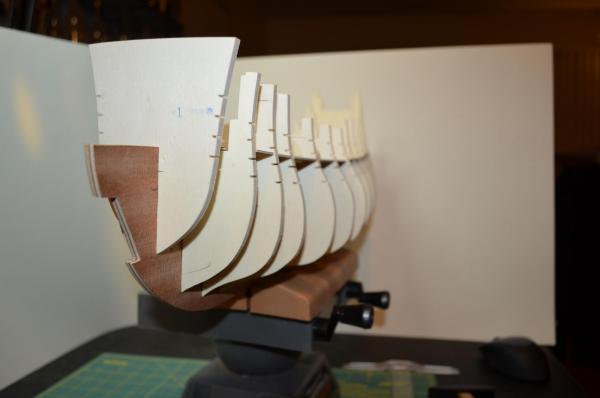
I've been busy over the last couple of weeks. Fairing up the ship and installing "dummy" blocks for the canon barrels that are on decks that do not get built. Also I have had to add extra filler blocks at the bow to help with the planking. None of this was unexpected as I've done it on all my past ships but it does make for a lot of work. I also went ahead and planked the upper gun deck first. Getting it installed helped with aligning the lower gun decks canon blocks as well as helping to square up all the ribs. I also figured it would be easier to plank before the hull closes it in. On the stern, I have been in a debate on what it looks like. I have seen two different images of it repeatedly. One shows it completely flat from the keel up with only the balcony extending over the rudder and the other, which is also the way the instructions with this kit shows, as having the cabins jut out over the rudder and the balcony come out further still. I think I am going to build it the second way mostly because I think I like the way it looks better and that is the way my stern is shaping up. However, if anyone knows the correct design please let me know and I will be glad to make the necessary changes. With regards to the planking. I intend to make this a double planked hull mostly because I know my planking skills are not where I would like them to be for a single planking. Also, since the second plank layer is really just a veneer, I like having the 1st layer to help support the second. One day I hope to become good enough to only plank the hull once but until then this is good practice. So without further ado, here are some pictures to show how the build is going.

- 608 replies
-
- 14
-
-
- la couronne
- corel
- (and 1 more)
-
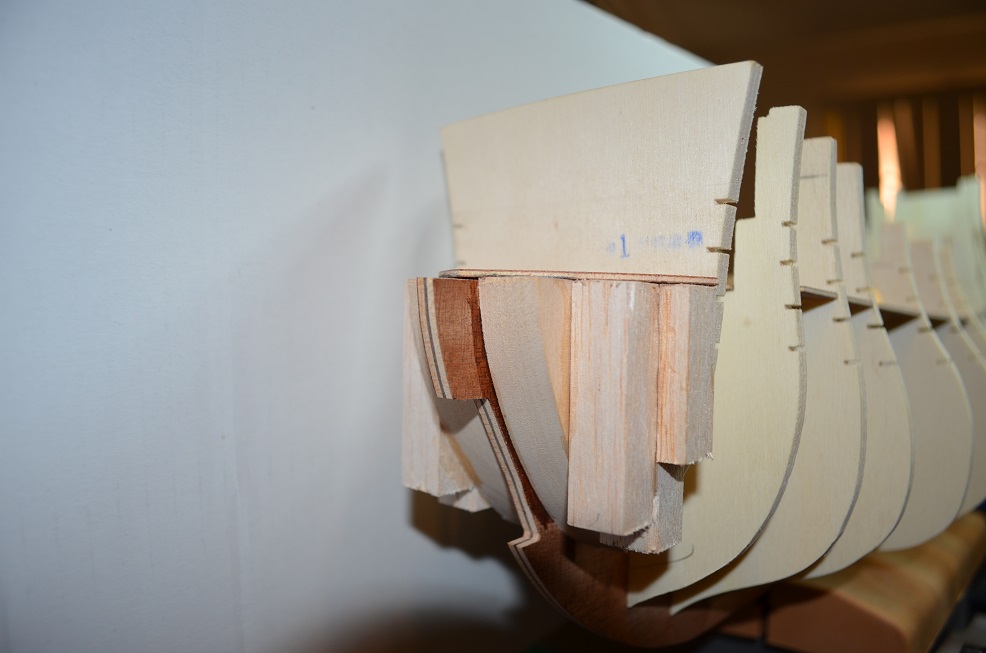
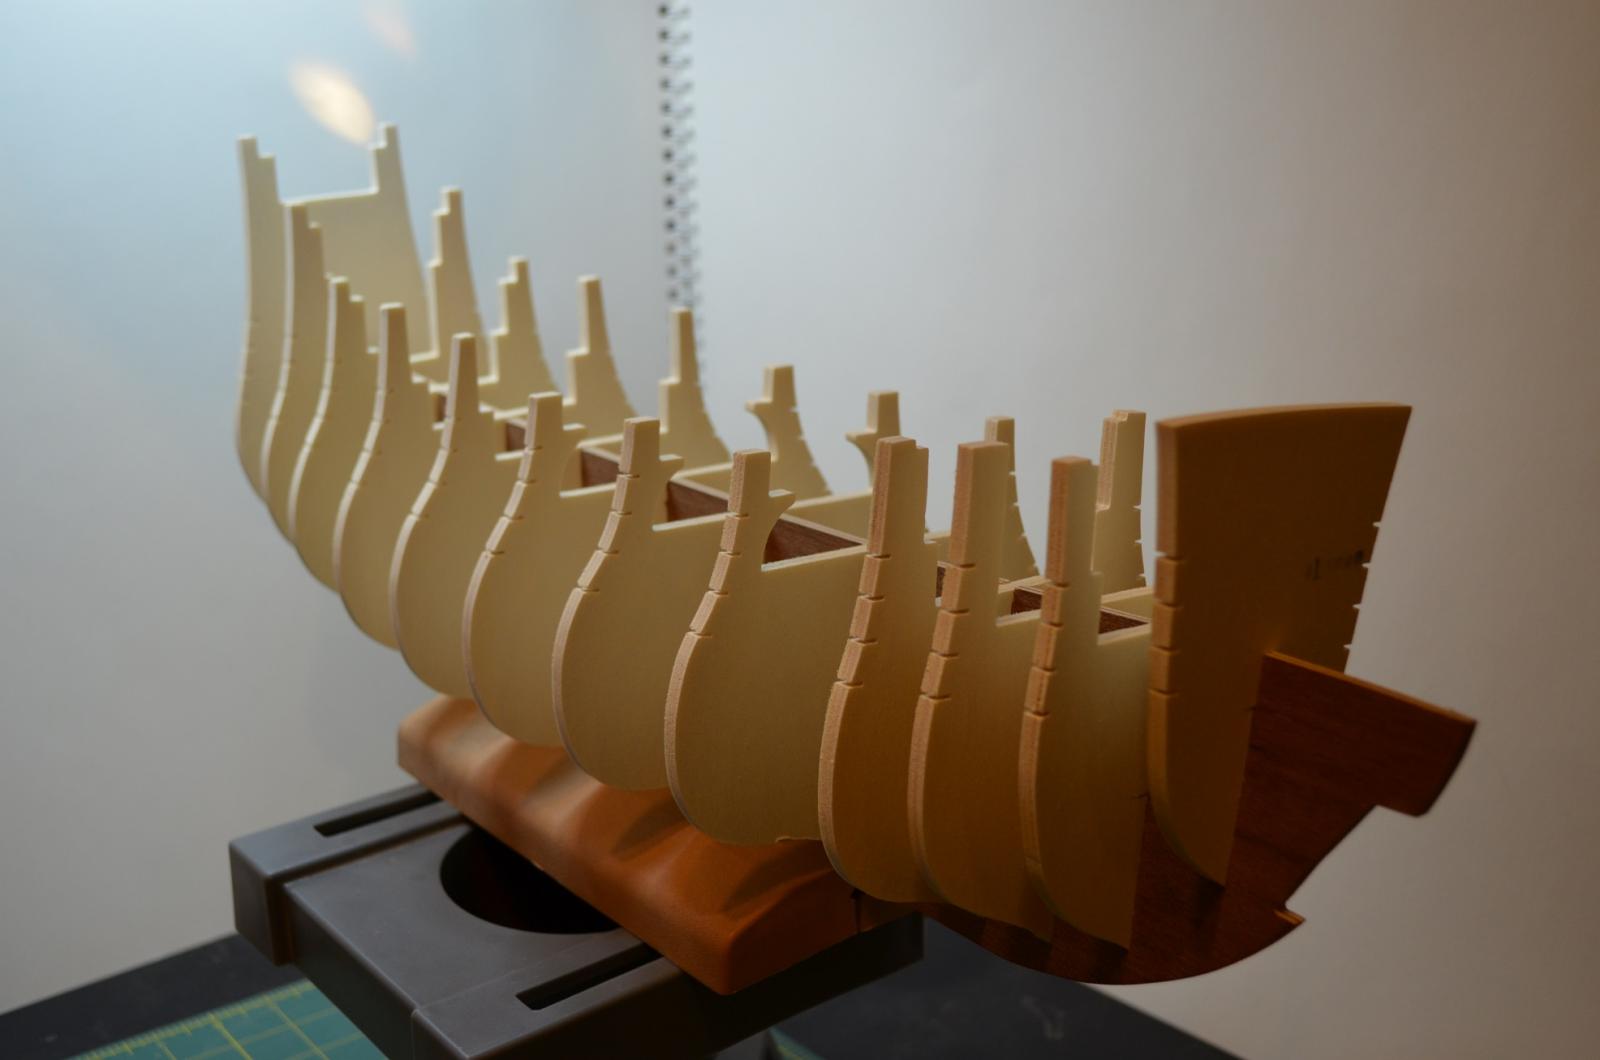
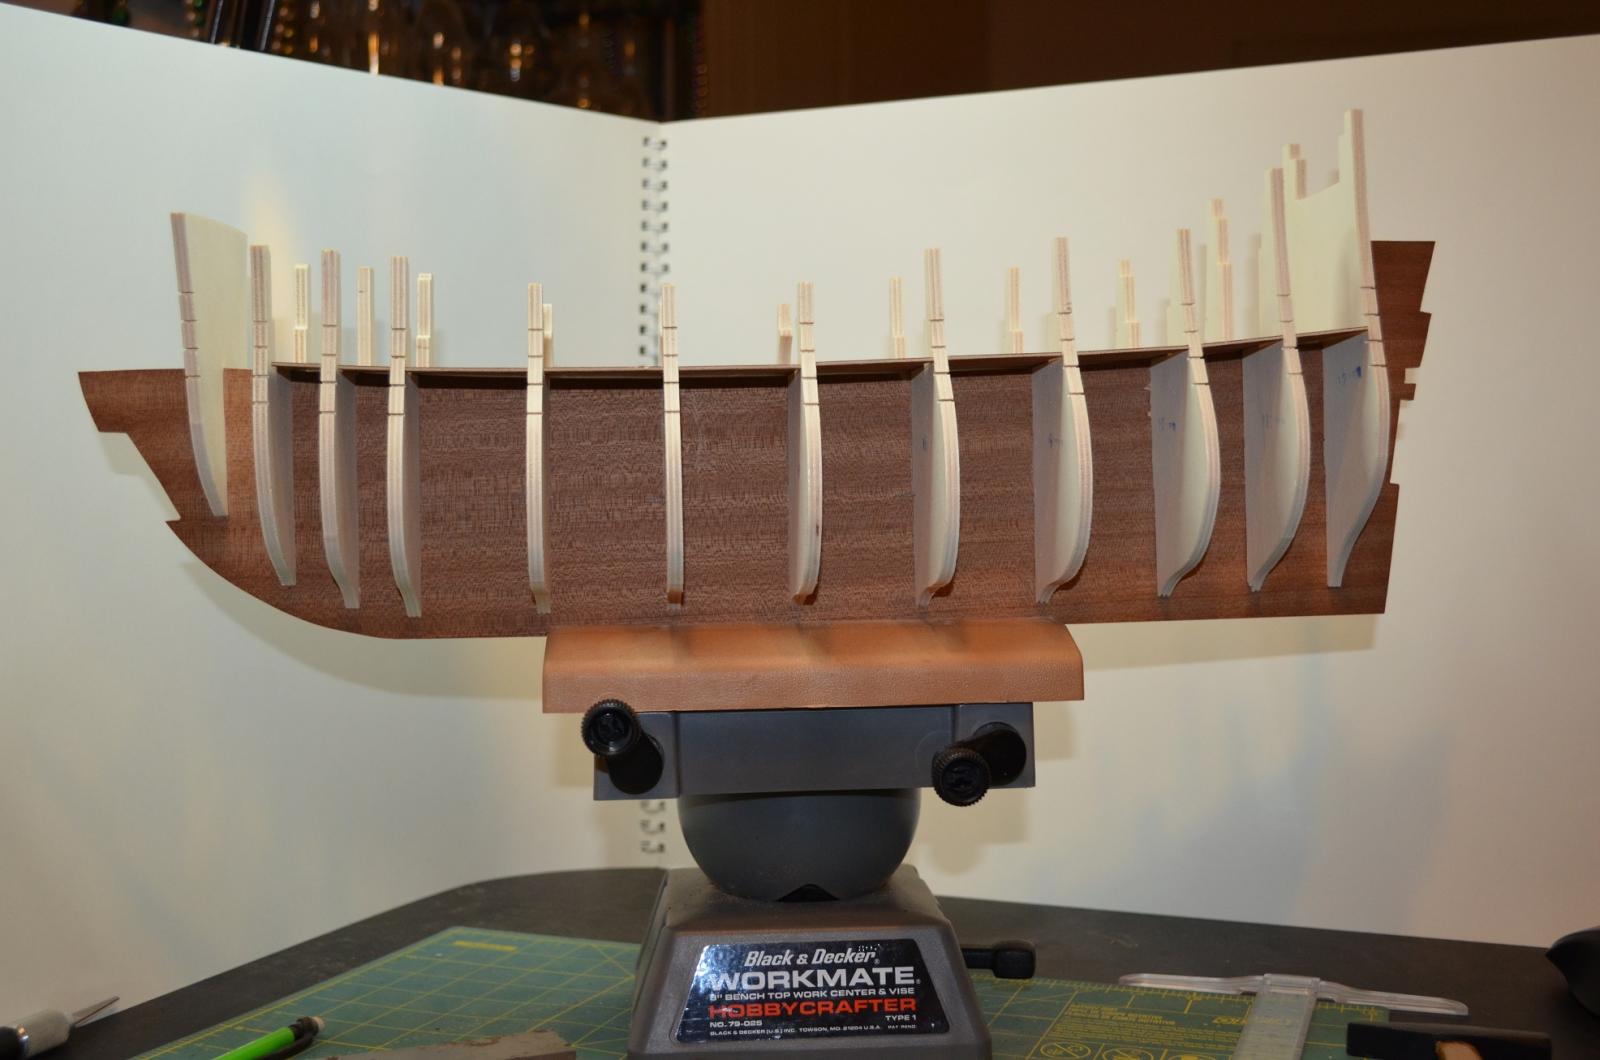
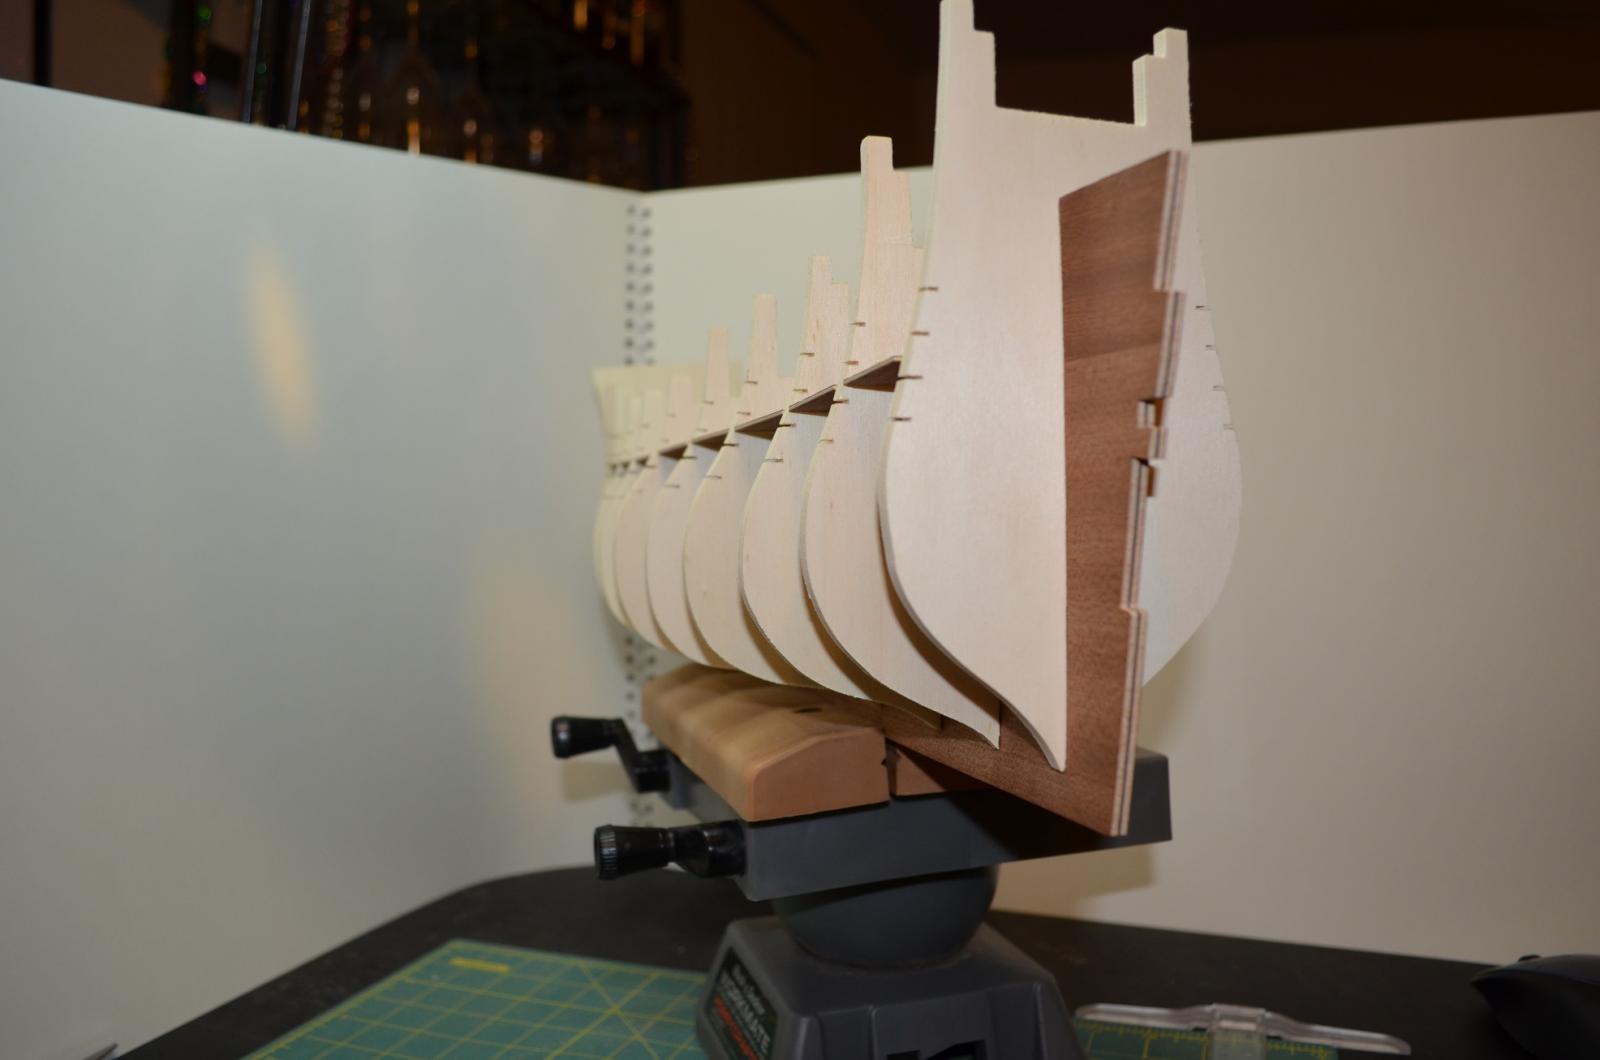
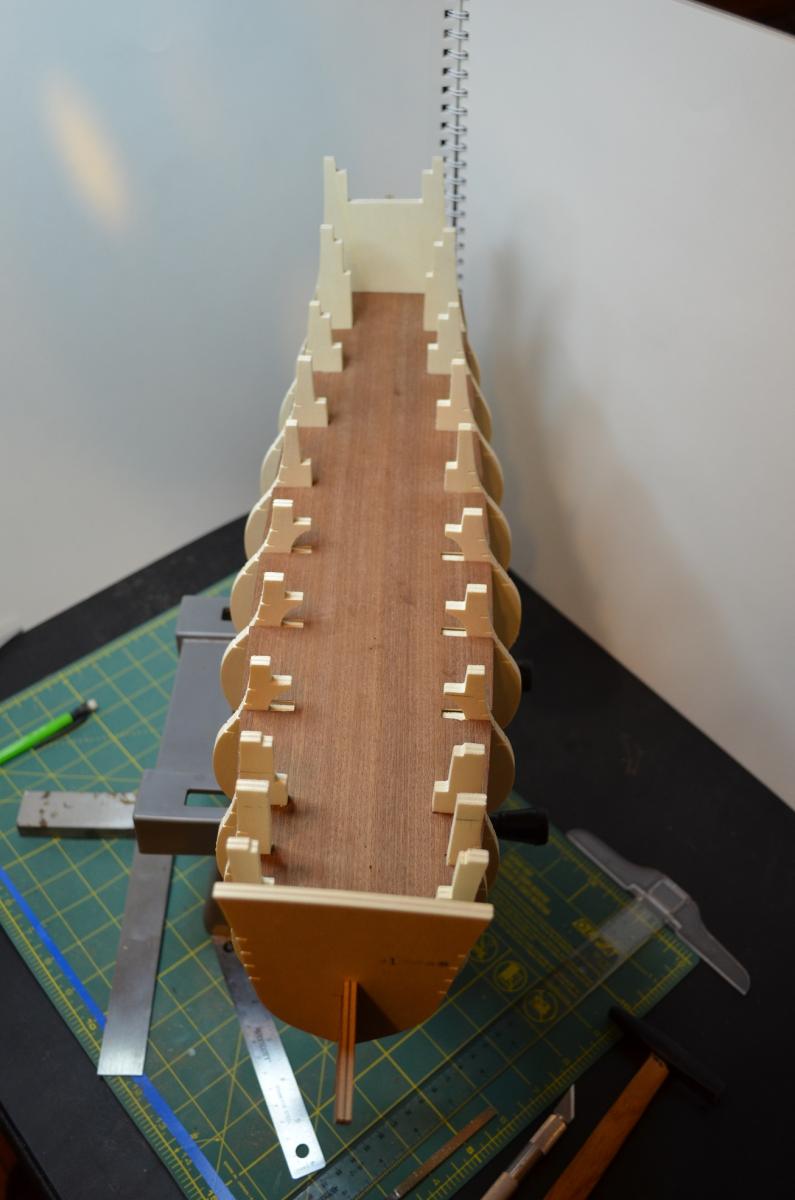
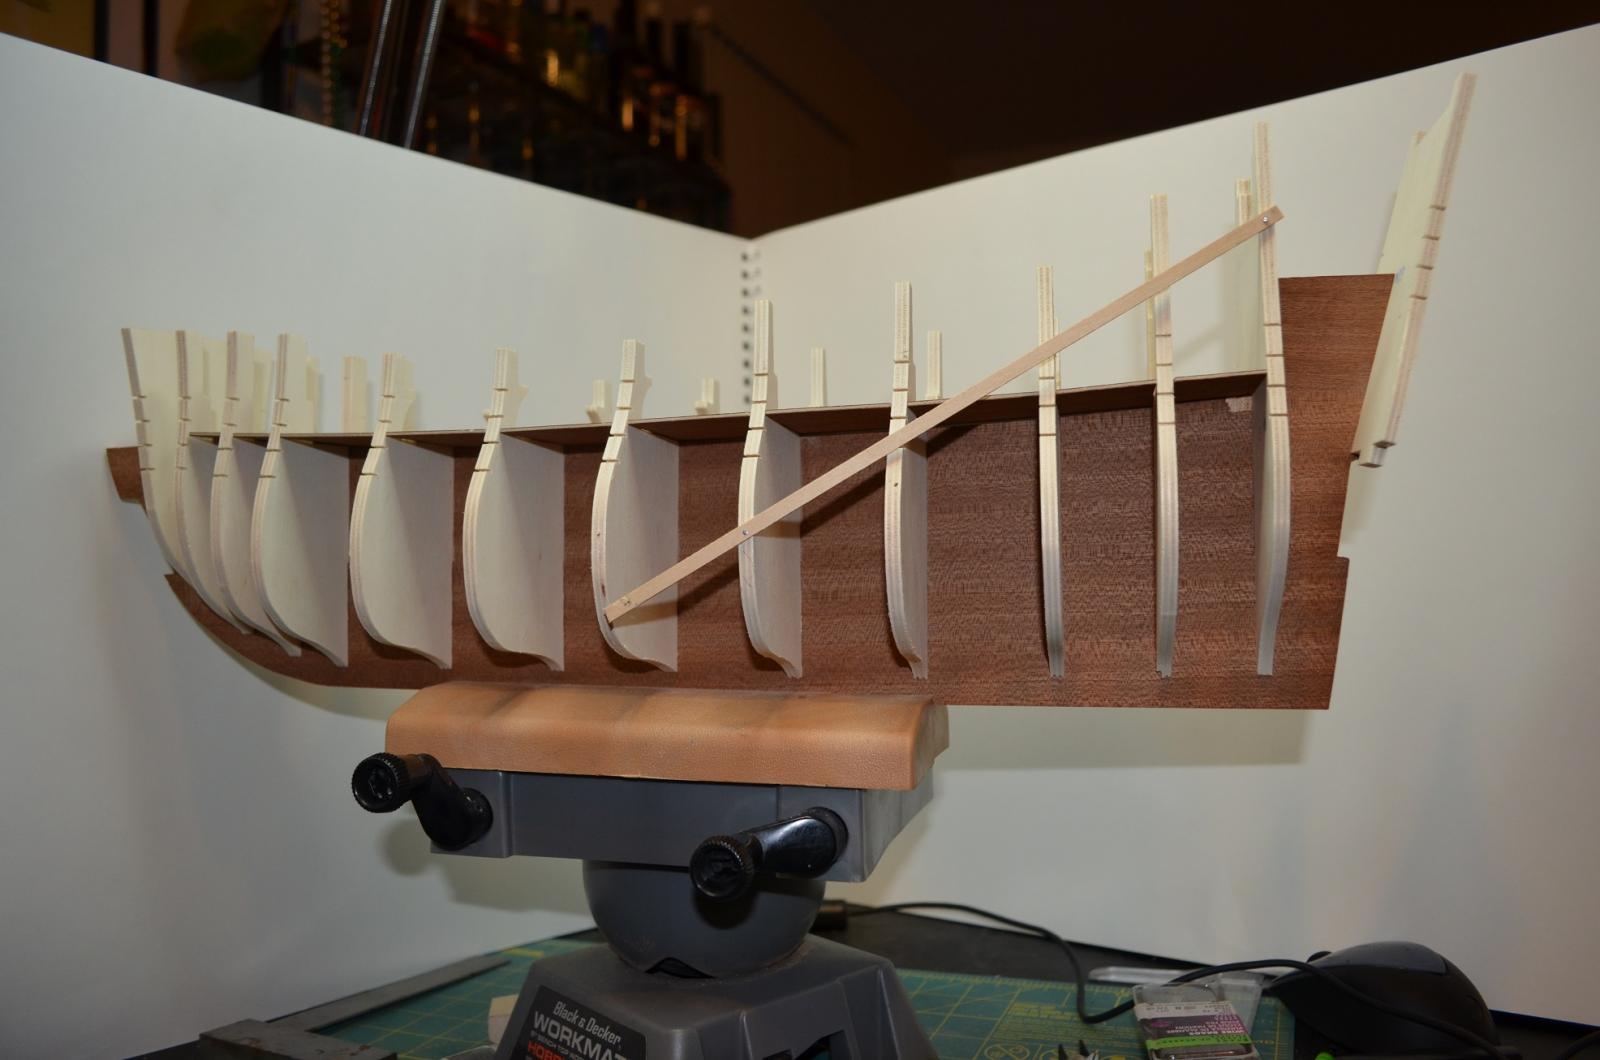
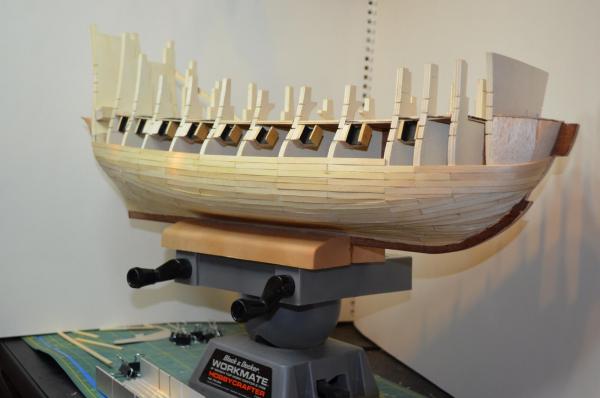
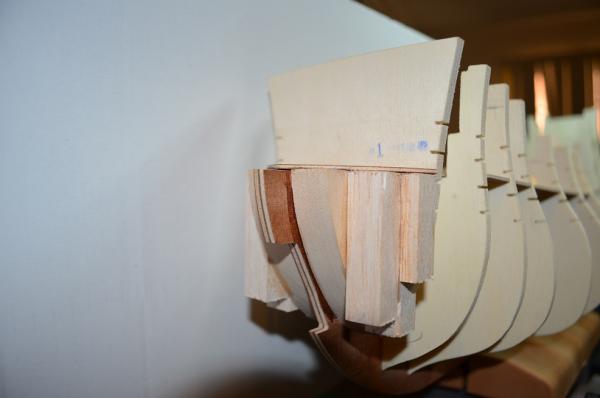
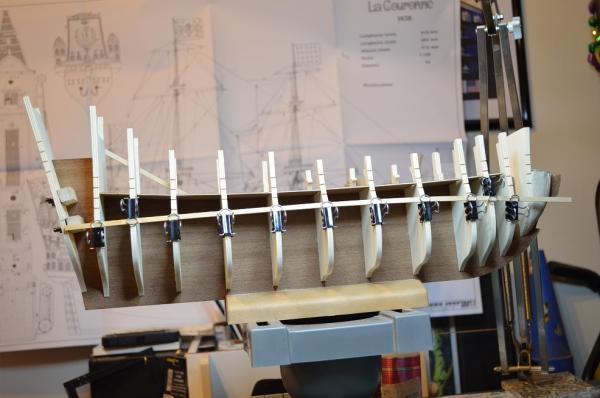
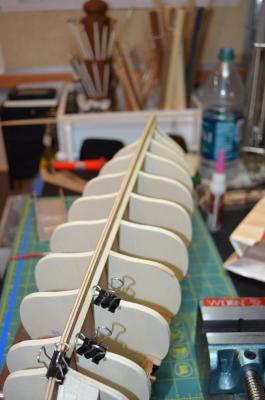
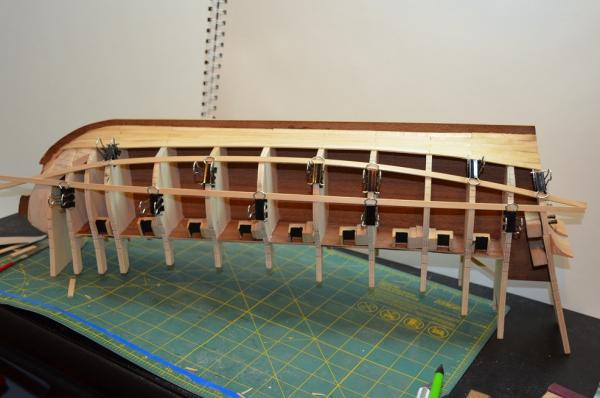
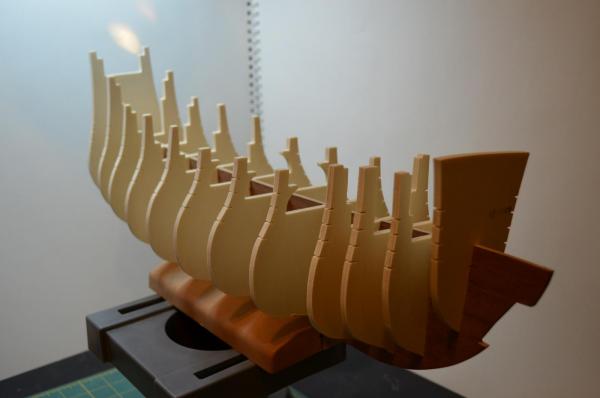
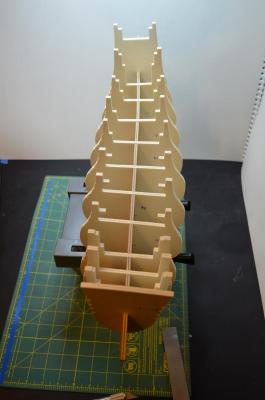
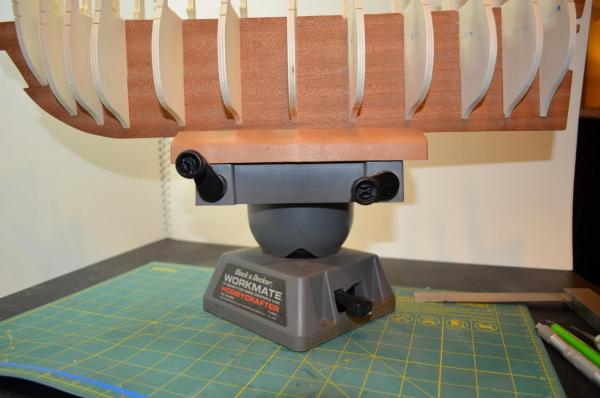
I have had a productive though slow couple of days. I have found that many of the cut ribs in the kit have needed a lot of trimming to make them fit the keel. The keel also has proven to be a problem as it was warped and my stern and bow when sighting down the length of the ship were pointing in opposite directions. After installing the false lower gun deck that helped bring them closer to alignment but it was still off. I have had to run a brace to bring the ship the rest of the way in. I will have to add some blocks to secure the ribs to the correct alignment permanently. On another note, years ago my dad came across these plastic bench vises by Black & Decker. I didn't know what I would use them for but while working on a ship and needing something to hold it by the keel I remembered I had it in a box under my table. It's been the a great device for ship building as it holds the ship securely while not leaving marks since the jaws are plastic. The vise body can rotate in 3 dimensions to allow me to position the ship any way needed. Also it has clips that can be inserted into the jaws that allow me to mount the ship upside down when it is time for planking the bottom. I will show that when I get to the planking. Another one of those items that I'm glad I held onto. Never know what will prove useful or when.


- 608 replies
-
- 8
-
-
- la couronne
- corel
- (and 1 more)
-
To paint or not to paint, that is the question?
EJ_L replied to ratskiss's topic in Wood ship model kits
This is always a tough question and I agree that it is largely the individuals choice. Painting can make a more dramatic appearance and can show off the country and era of the ship better but there is a beauty in natural wood colors as well. Another option is dyed wood. This can get pricier to buy and very time consuming to do your self but it adds an interesting element in that you can get the color desired while keeping the wood grain texture. I personally like this approach but as a warning, getting the colors the desired shade can be tricky.- 11 replies
-
- 1
-
-
- HMS Surprise
- Artesania Latina
- (and 1 more)