EJ_L
-
Posts
2,246 -
Joined
-
Last visited
Content Type
Profiles
Forums
Gallery
Events
Everything posted by EJ_L
-
Welcome to MSW! Best of luck to you on your first build. Take your time, read far ahead into the build to make sure you don't overlook something and above all have fun!
-
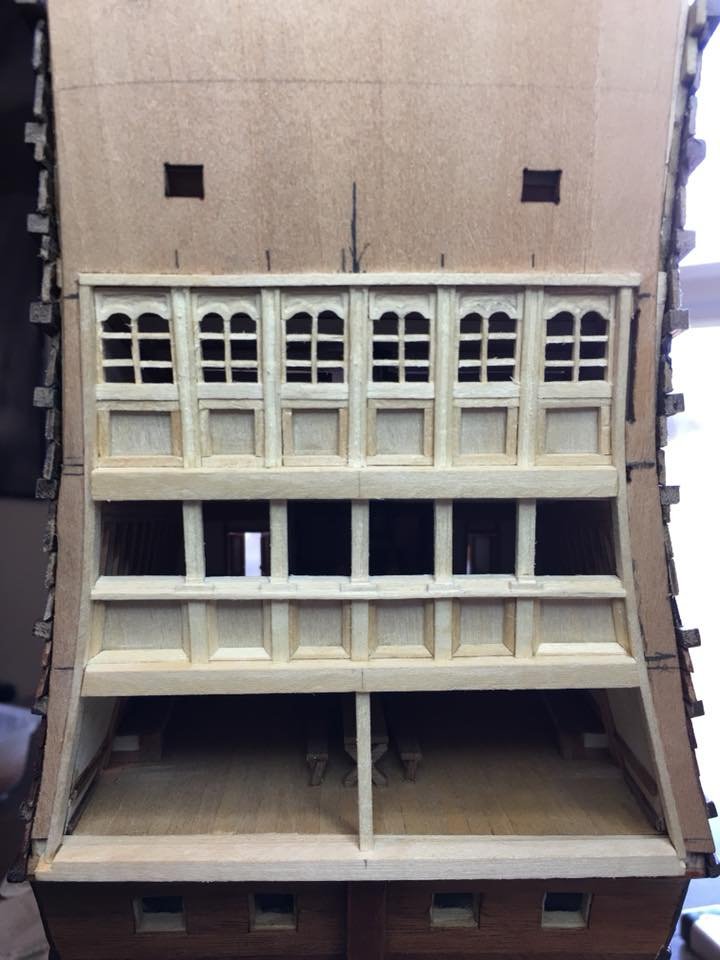
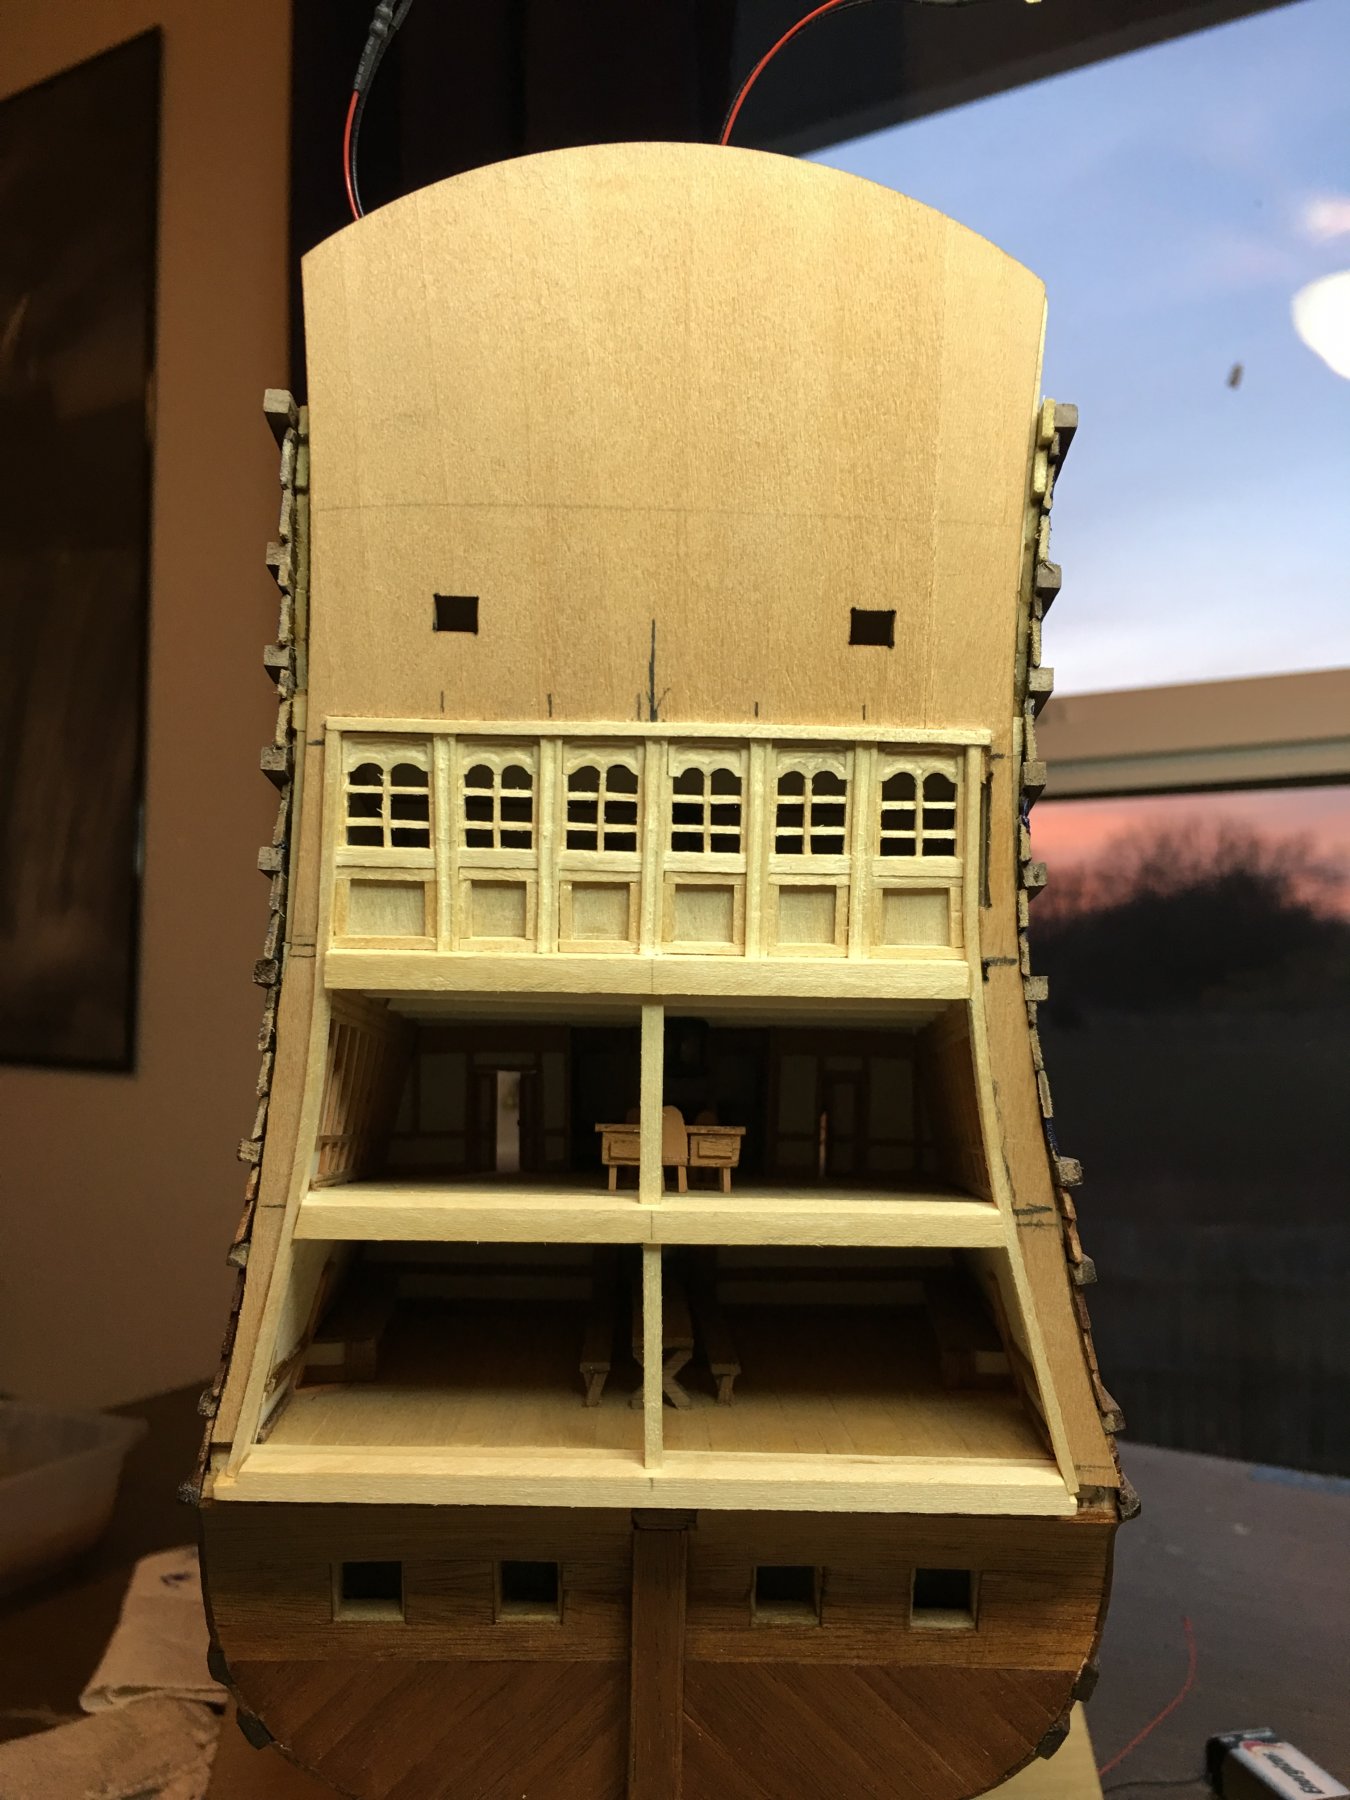
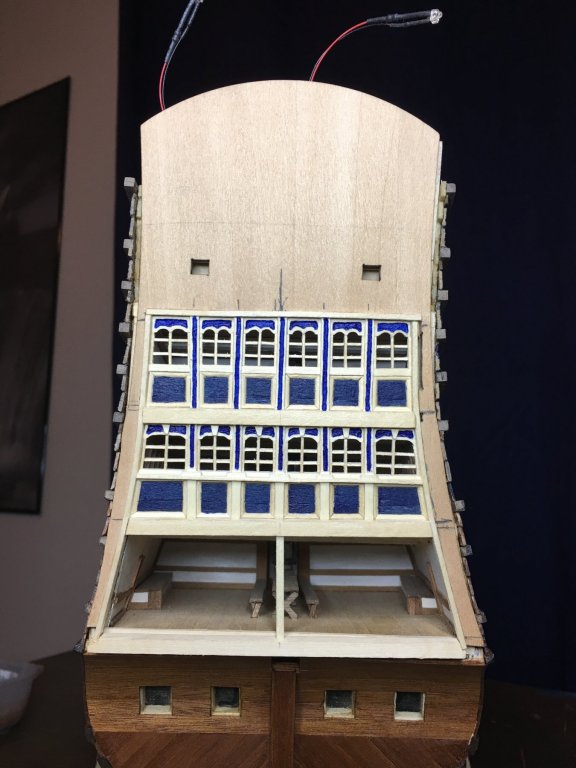
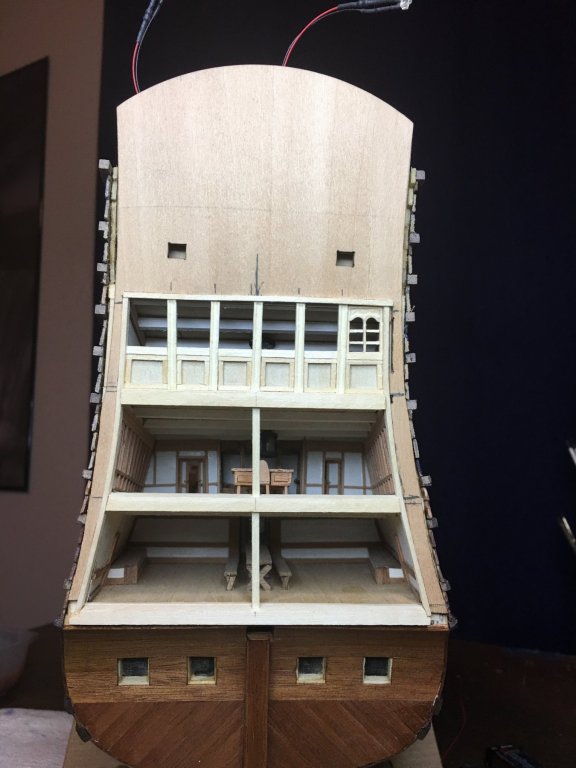
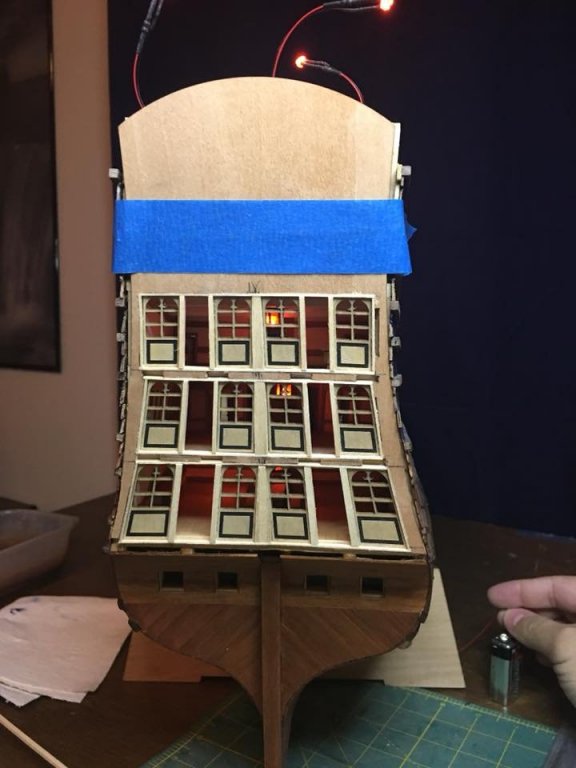
 Merry Christmas to all! Been a relaxing day for me which was nice and needed. Also got in some good build time which allowed me to finish up the lower tier of windows. Now I can install the entire panel to the ship and close out the stern planking. I still have several details left to model but many of those are dependent upon the balconies being set and the hull planking in place. Also, I have decided to leave out any glass in the windows. Seeing into the cabins is already becoming difficult and all the test pieces I used didn't help things. I also worry about dust getting on them in the future and obscuring the view further. I think that is a detail that I can live without in order to preserve the interior view.
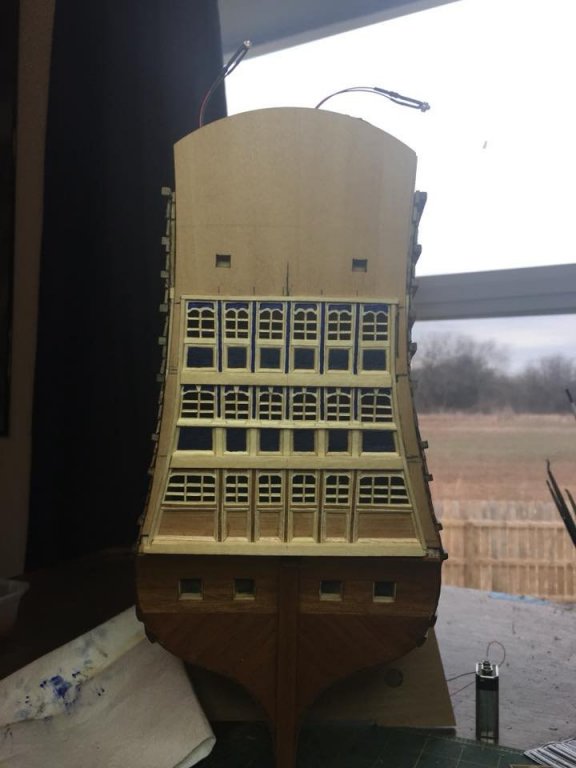
-
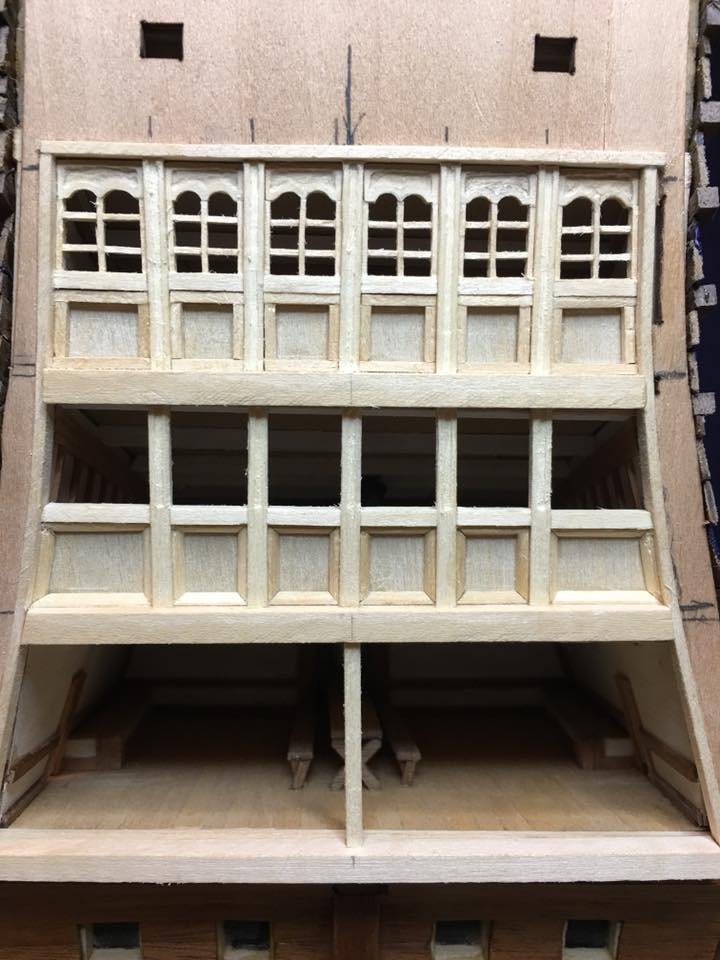
Don, I had not seen that site but I am very excited about it now! I was never very happy with the kit provided castings of the guns so this may take care of that problem. Thanks for keeping me in mind! On a quick update, I've been working on the bottom tier of windows. This one I am having to build a little different than the upper two as this tier is not going to have the blue paint but instead it will match the mahogany that is on the sides. I decided that I would wrap whichever color the sides are around the stern. Therefore the upper two tiers are blue while the bottom is mahogany. The issue with this plan is that finding a paint or stain to match the mahogany has proven difficult and so a new solution was chosen. I am now inlaying actual mahogany into the posts and panels to achieve the look I want. This obviously take a bit more time that just painting would have but, I get the color match I wanted. I will upload pictures soon.
-
She is looking great Vic! I've really enjoyed seeing your build come together especially while building my own. Truly a work of art and something to be proud of. Looking forward to her maiden voyage and seeing those canons firing will be a great addition! Merry Christmas to you!
- 213 replies
-
- 2
-

-
- la couronne
- 74 gun
- (and 2 more)
-
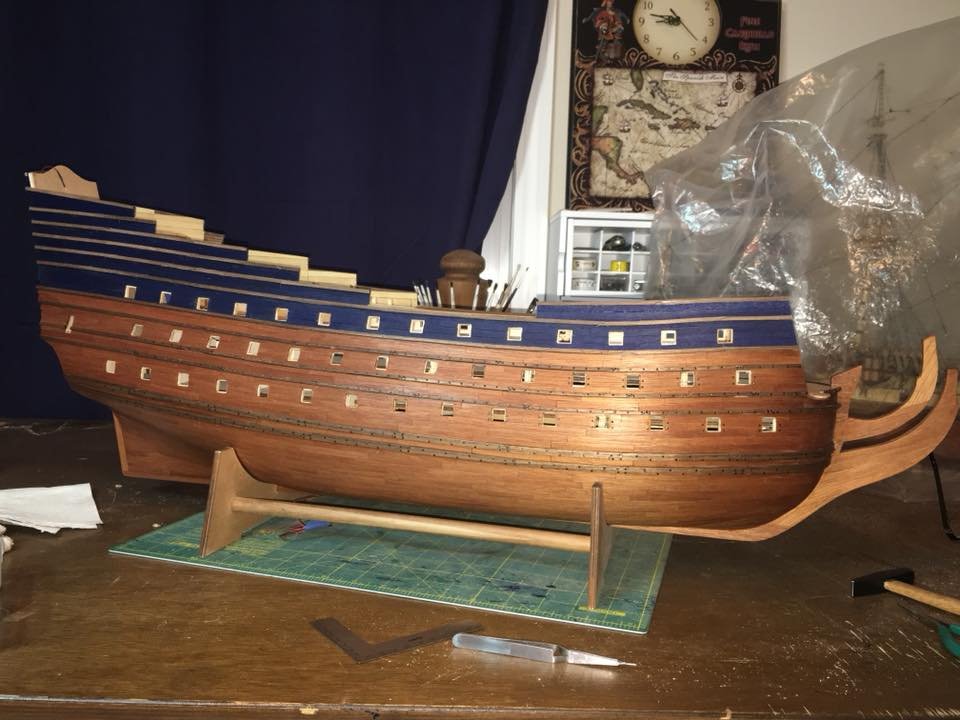
Added a little color the past couple days. Wanted to see how it would look with some paint. I think it turned out ok so far.
- 961 replies
-
- 13
-
-
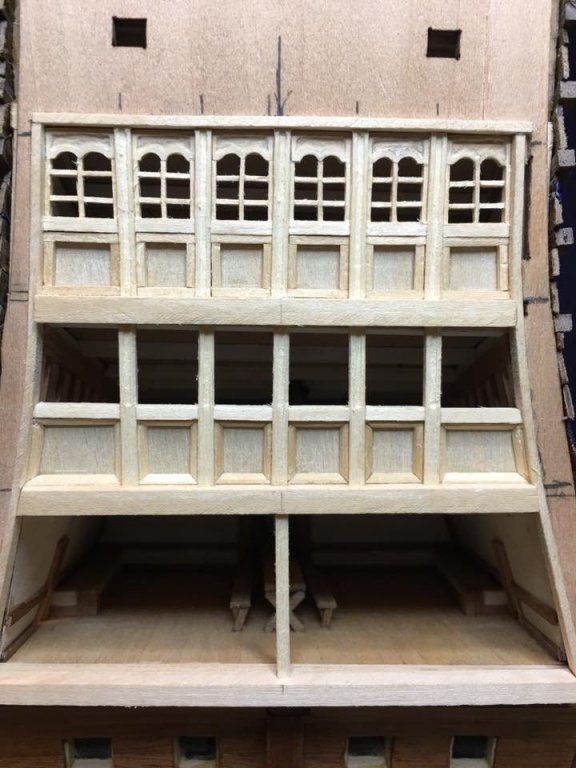
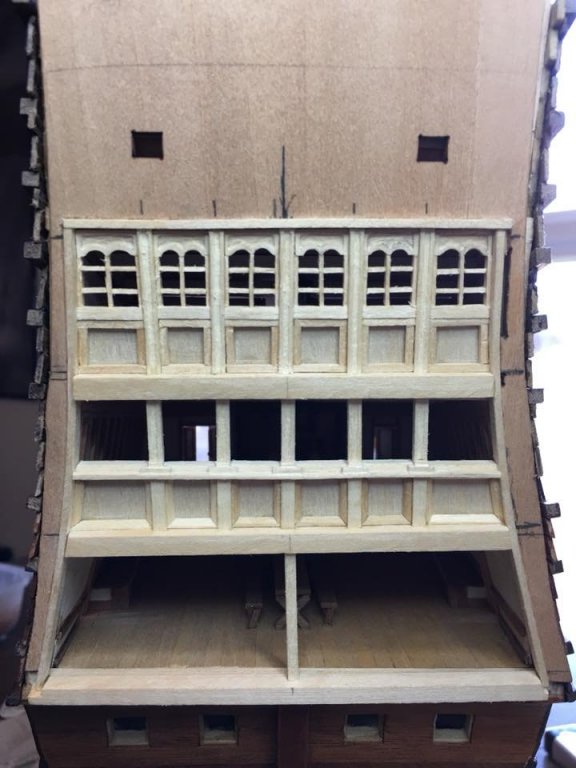
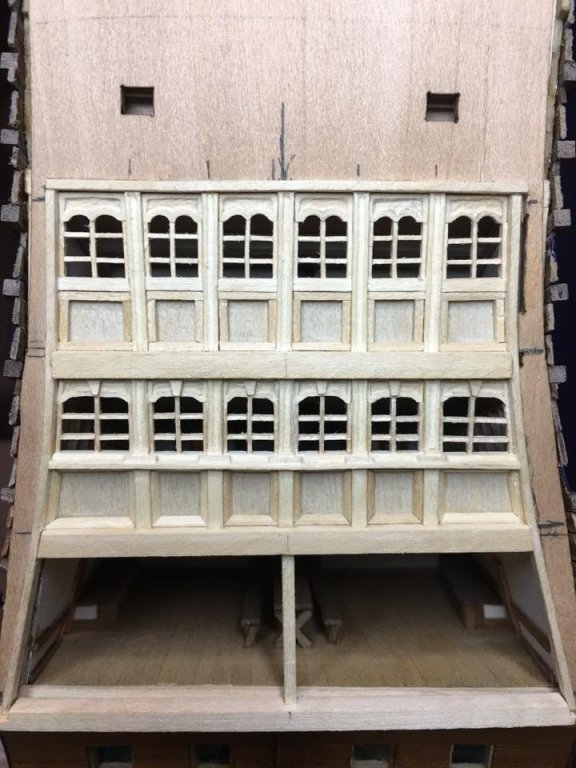
As always, thank you to everyone for the nice comments, likes and suggestions. They are always welcome and keep me motivated! Marc, you have asked the very question I keep asking myself, will I change the upper tier? Yes and no. First off, the problem with finding better ways of doing something means that the previous good work is now not good enough. So in the case of the upper tier's lower panels, I will most likely be changing out the squared off trim for rounded, mitered trim to match the middle. It is a much cleaner look and really what I wanted in the first place. However, in my endeavor to make each tier slightly different, the upper will not have quite as much ornamentation around the mullions as the middle tier. I want each tier to have it's own appearance and looking at the paintings I have seen, I feel this is representative of the ship as each tier appears to have a slightly different decorative style. On a similar topic, is there any known color scheme for the stern? I have seen a few renderings of it with color added but I do not know if these are accurate or if they are something that was done on a whim. Thanks!
-
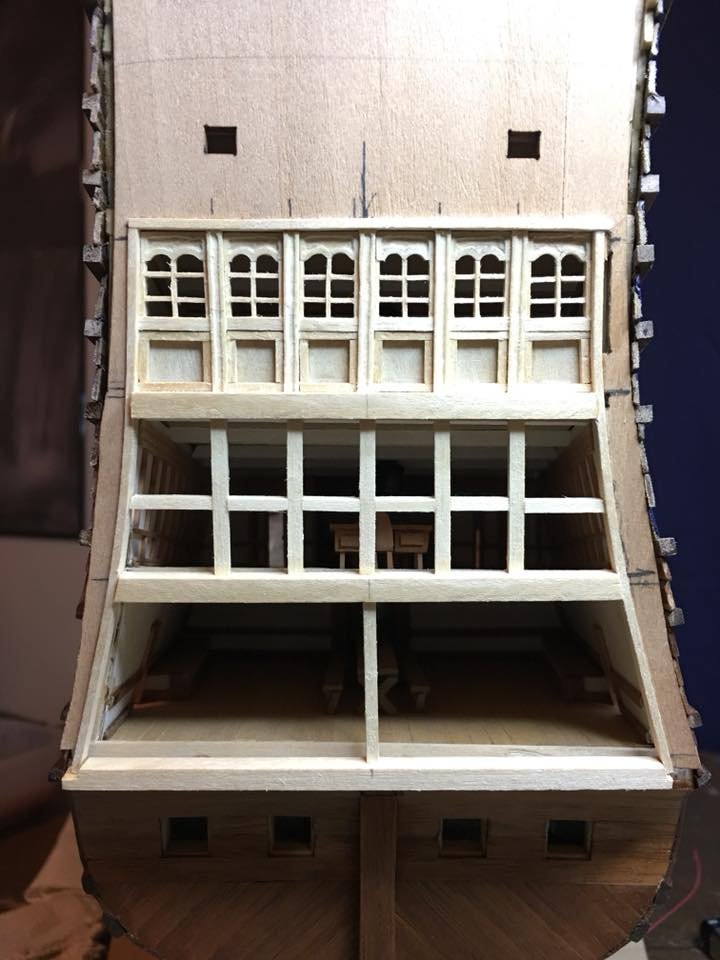
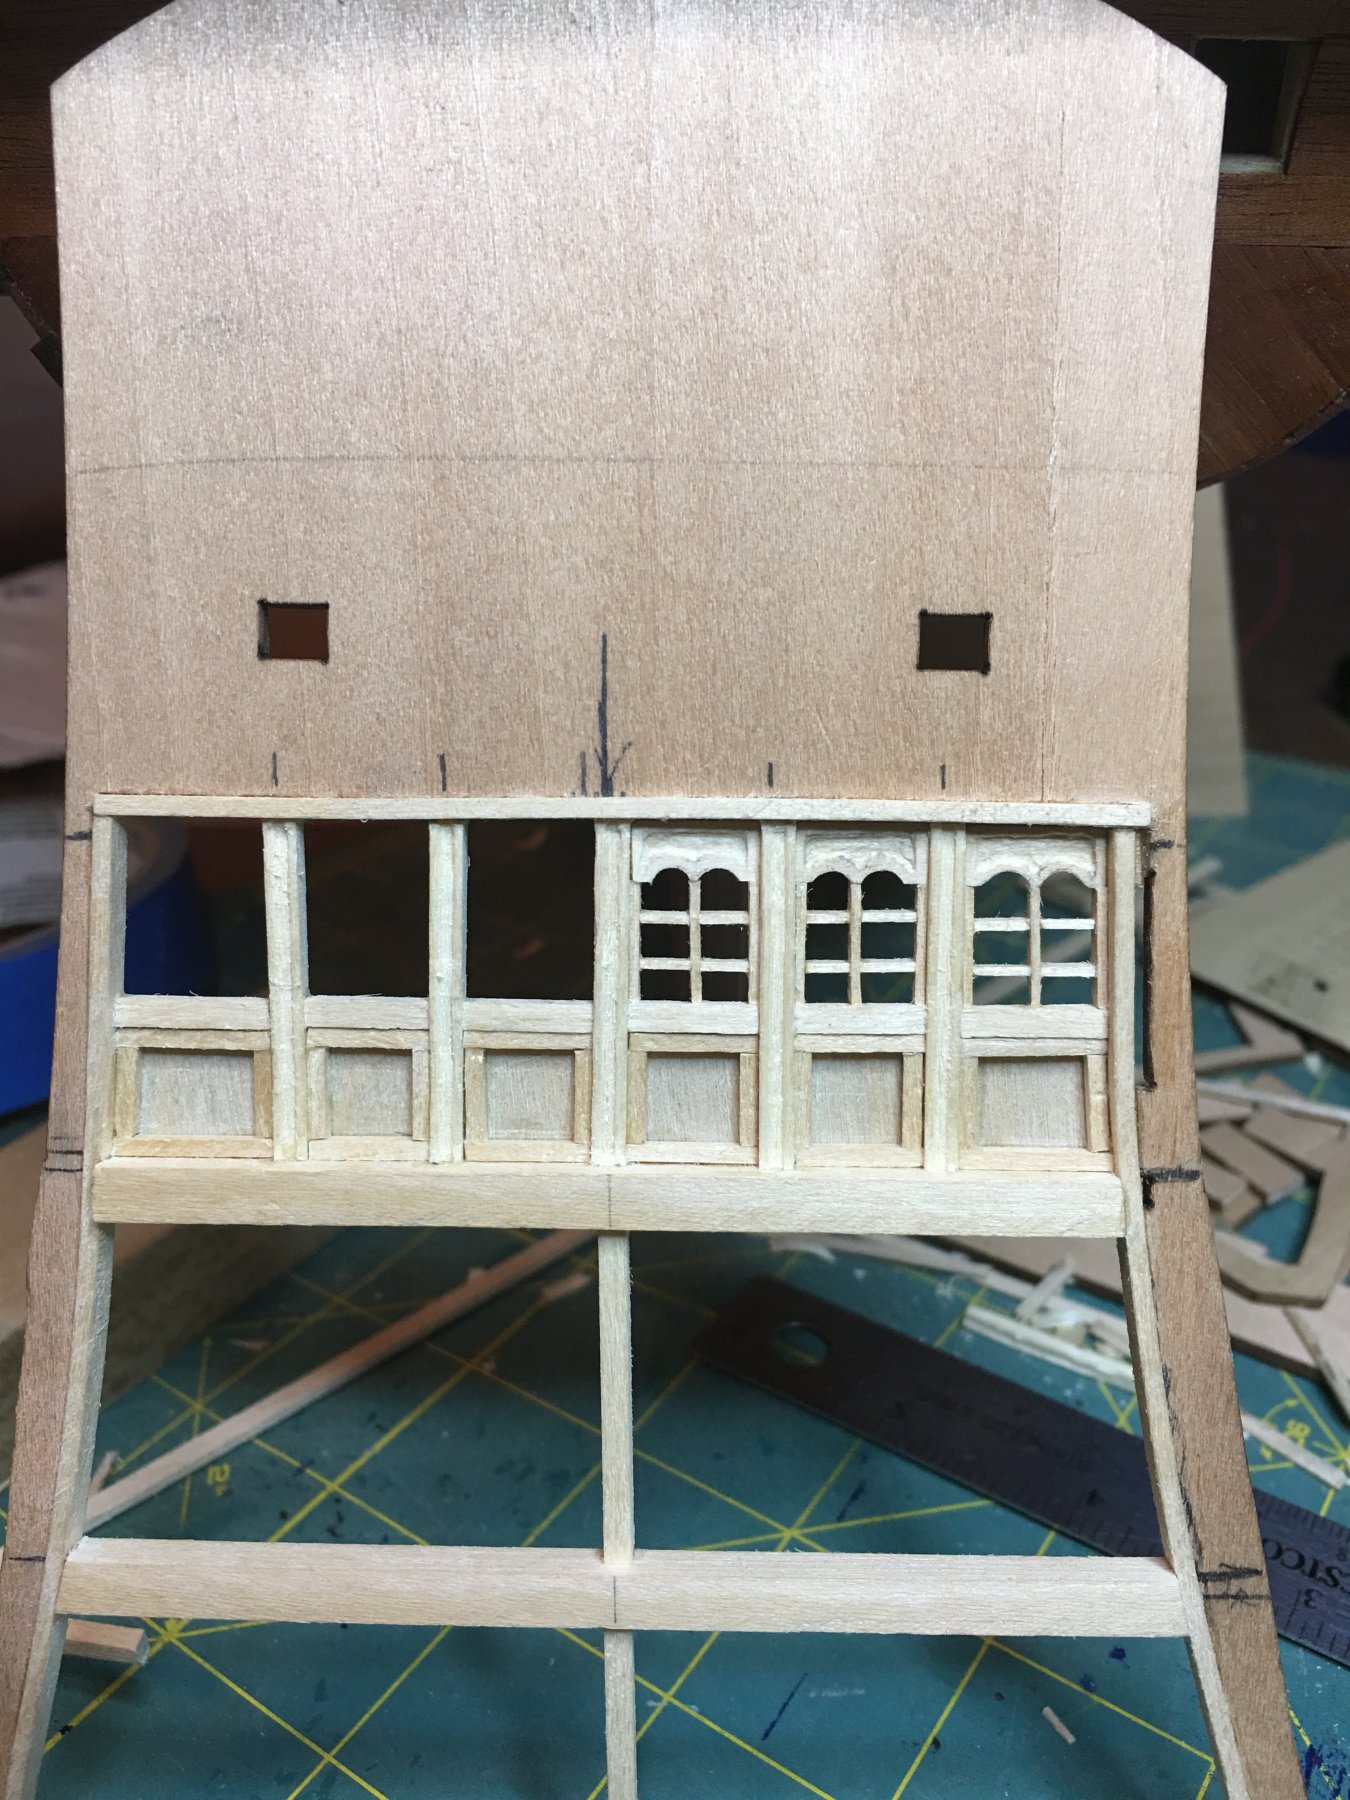
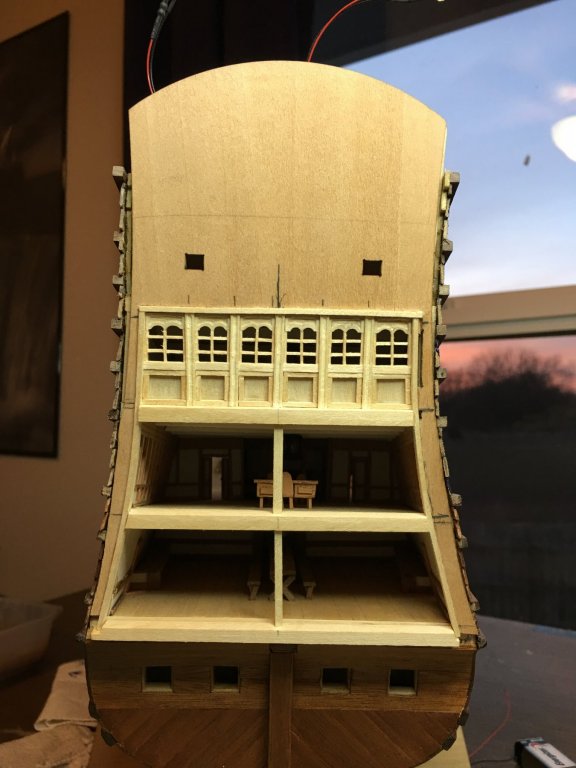
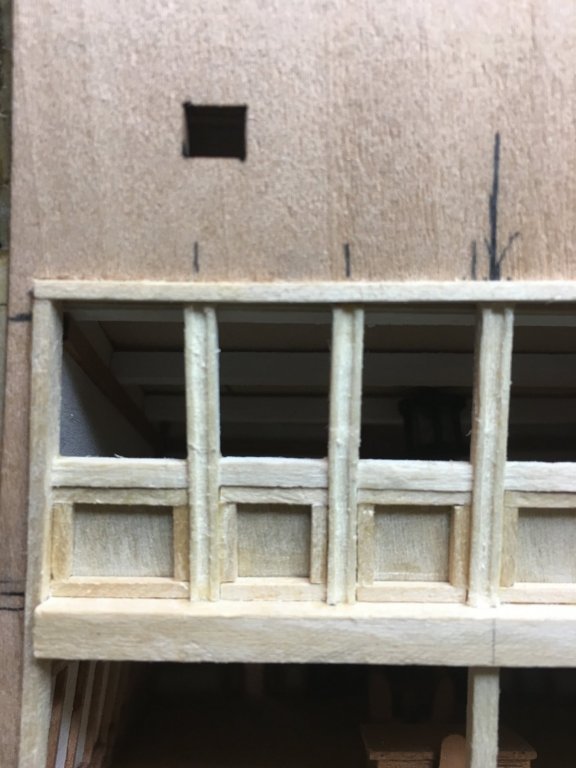
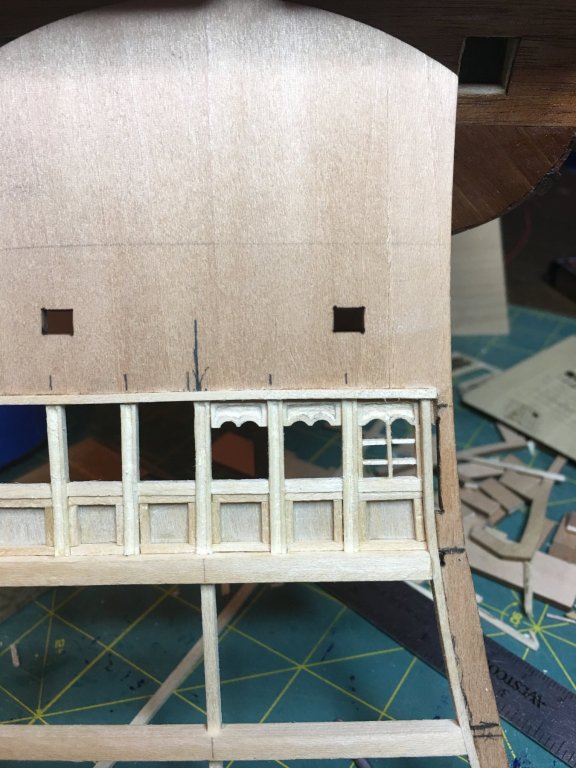
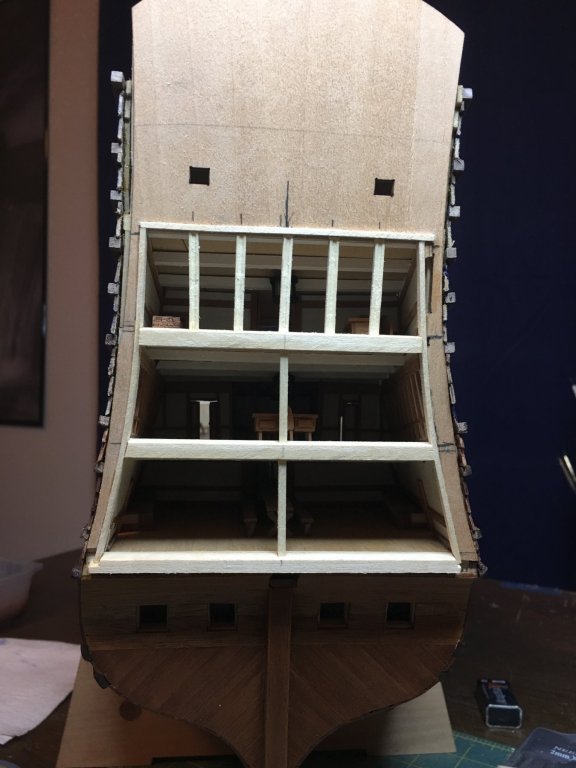
Working on the second tier of windows. I still have some ornamentation's to carve but I figured this was a good point to upload some more pictures. I went a little fancier on the trim work such as rounding the lower inlay borders and adding the step bases on the window mullions as well as the triangular details at the upper center of the window arches. This deck is rather detailed and since it is the Admiral's cabin balcony, it makes a lot of sense. I have an idea on how to carve the vertical decorations that rest on the mullions as well as the capitals at their tops. Also, for anyone wondering, no I am not building these in place on the ship. the entire stern bulkhead is still removable so I can work on it flat on the table then put it in place to see how it looks and for pictures. Once I am done with the windows and decorations in that area, I will then secure it in place and add the planking on the edges to clean it up. That is also when the really elaborate details begin...


- 961 replies
-
- 12
-
-
Good to see you back at it and well done! While I do not know a lot about 16th century ship designs, I do know that in the early 17th century they were in use and I would suspect that they were there earlier still. The time periods before the 1700's are tough to find good, reliable information on. The British were the only ones to keep decent records and even they were not great at it till around the 18th century. Use your best judgement and I'm sure they will look fine!
-
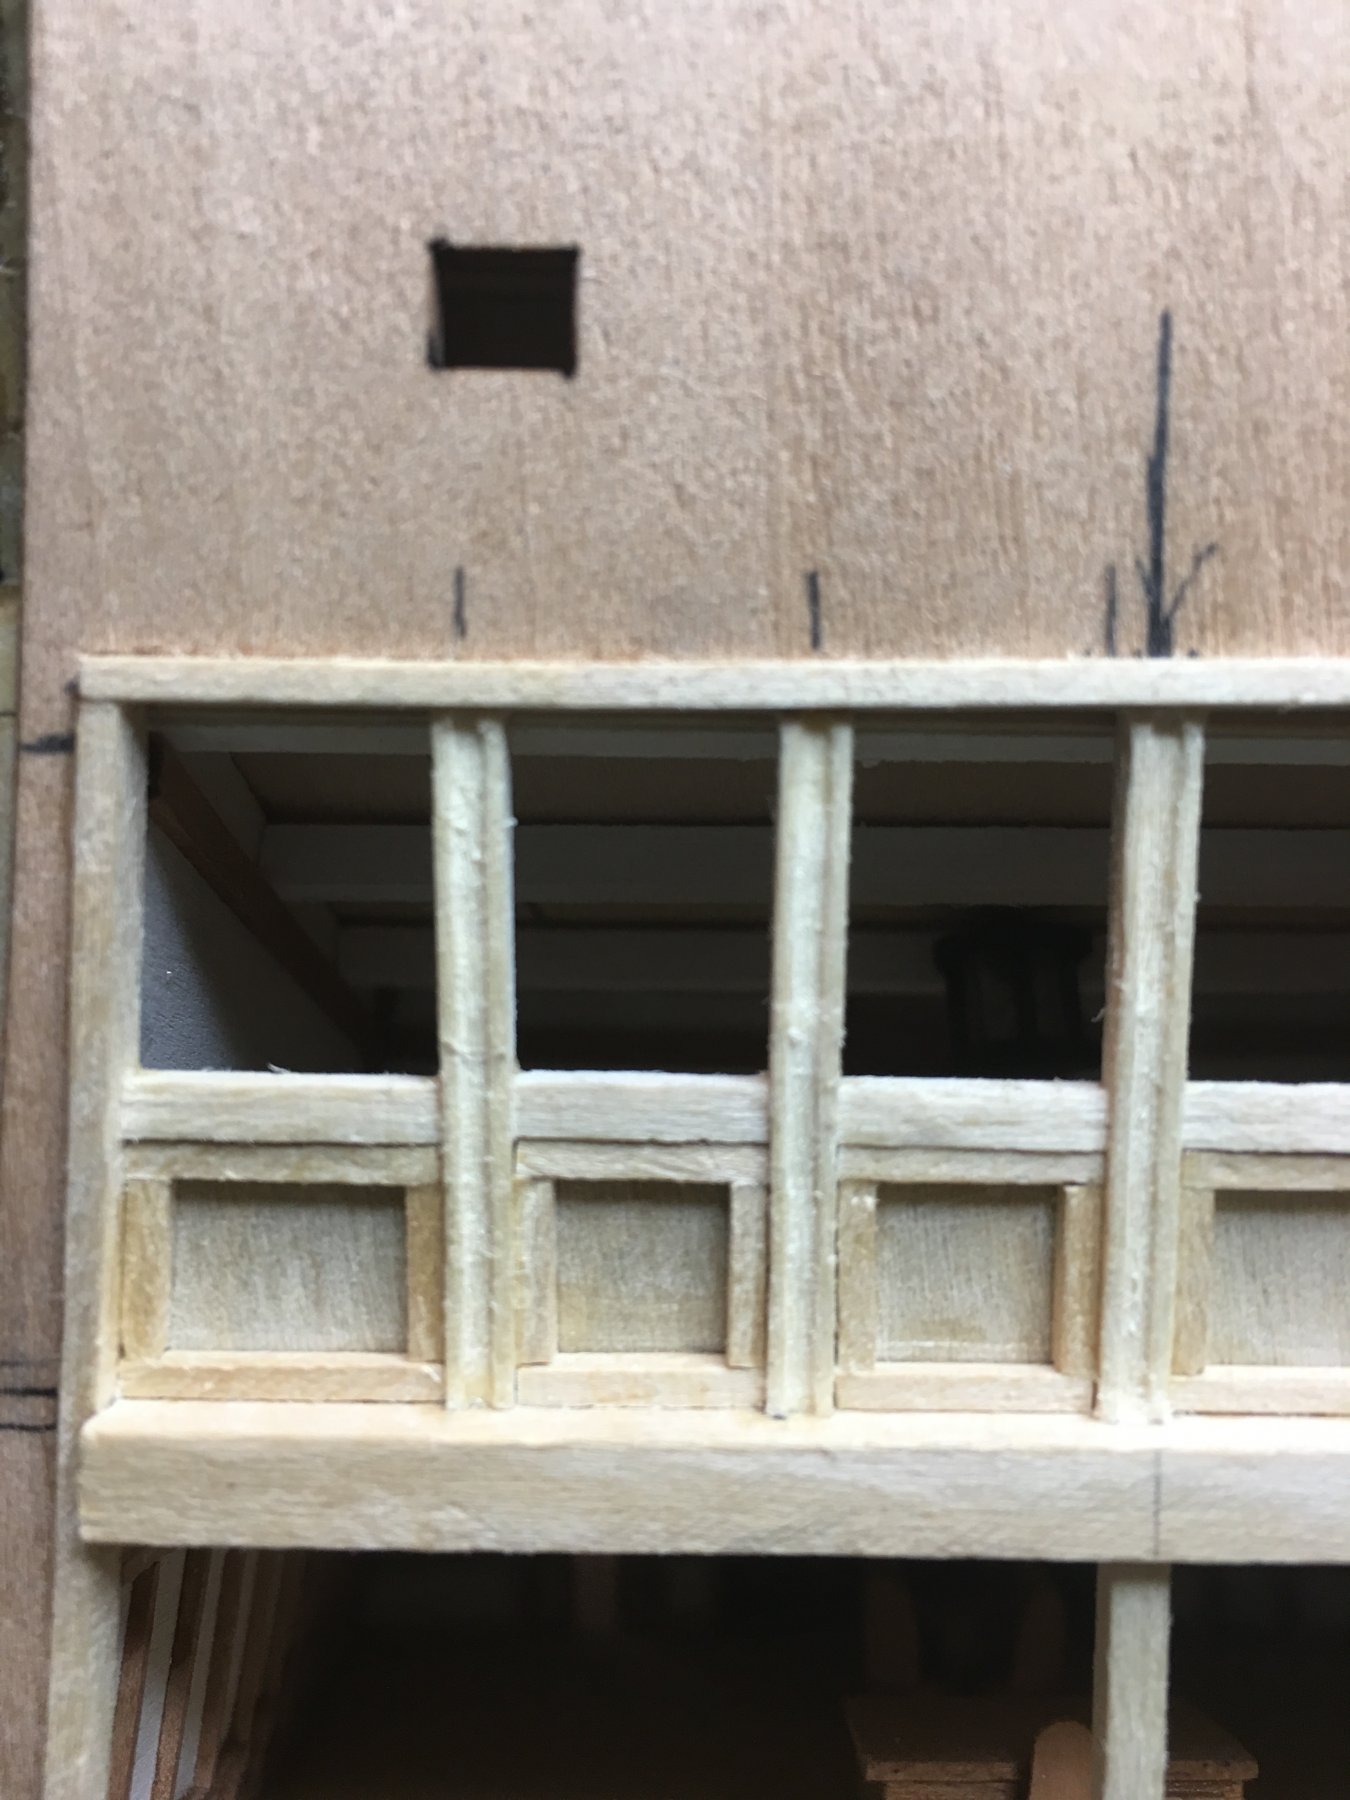
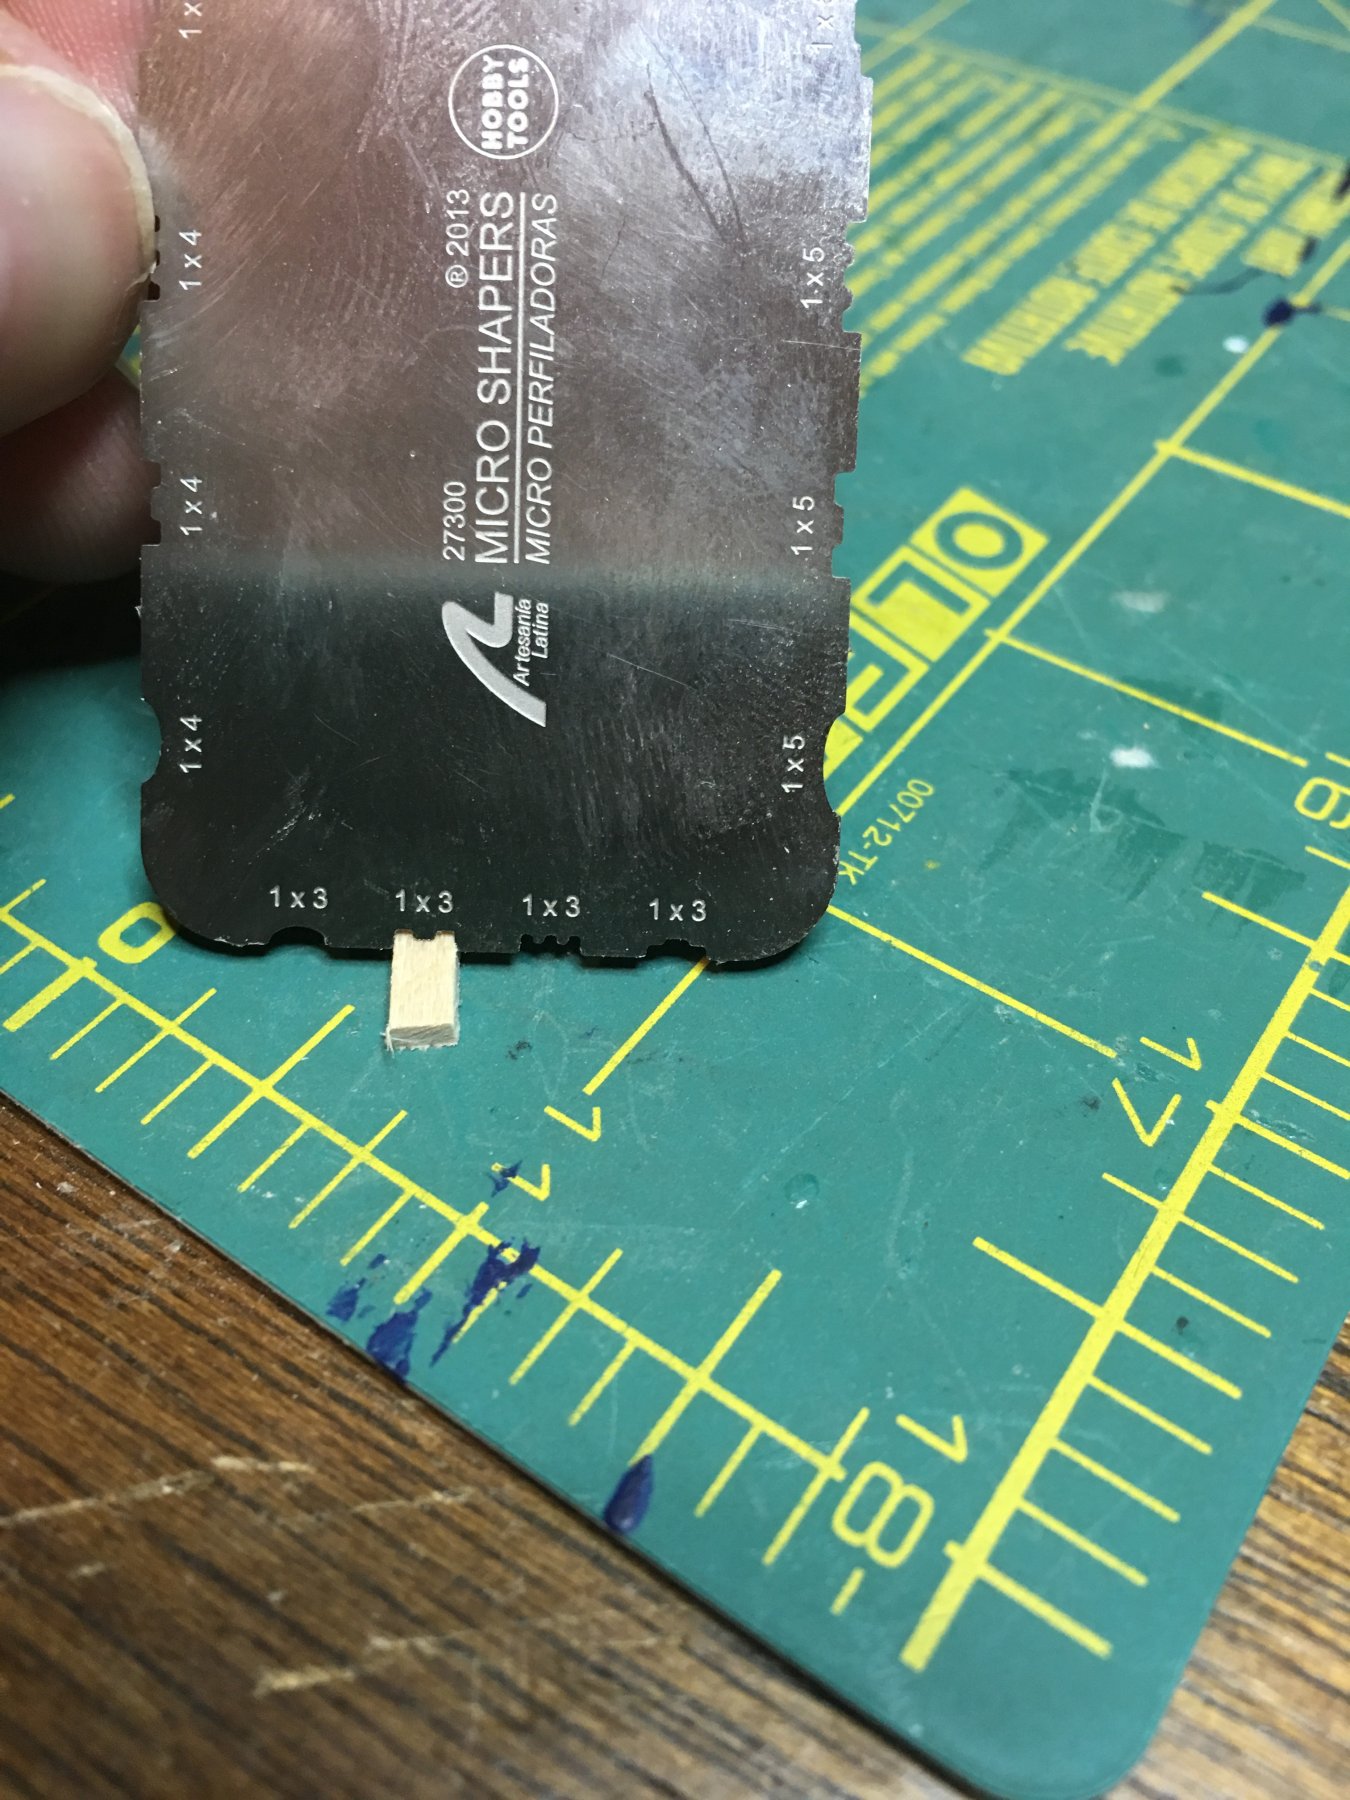
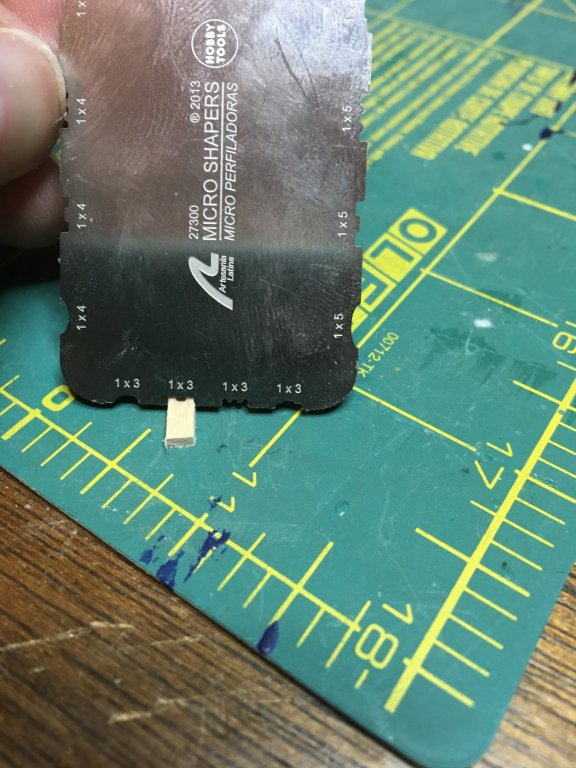
Thanks everyone for the nice comments and likes! I’m not sure yet if I am going to put any glazing in the windows yet or leave them open. I hadn’t thought about using microscope slide covers. That might be worth looking into as my current plan was to dig through the scrap and extra clear plastic I use on my model railroad buildings. I’m going to expirement a little and see what options look and work the best while still allowing the interior to be seen. Those shapers are a great set of tools to have on hand for this type of work. Definitely a good investment. Work update, the first row of windows is complete! Moving on to the second and this one has more details so new challenges.
-
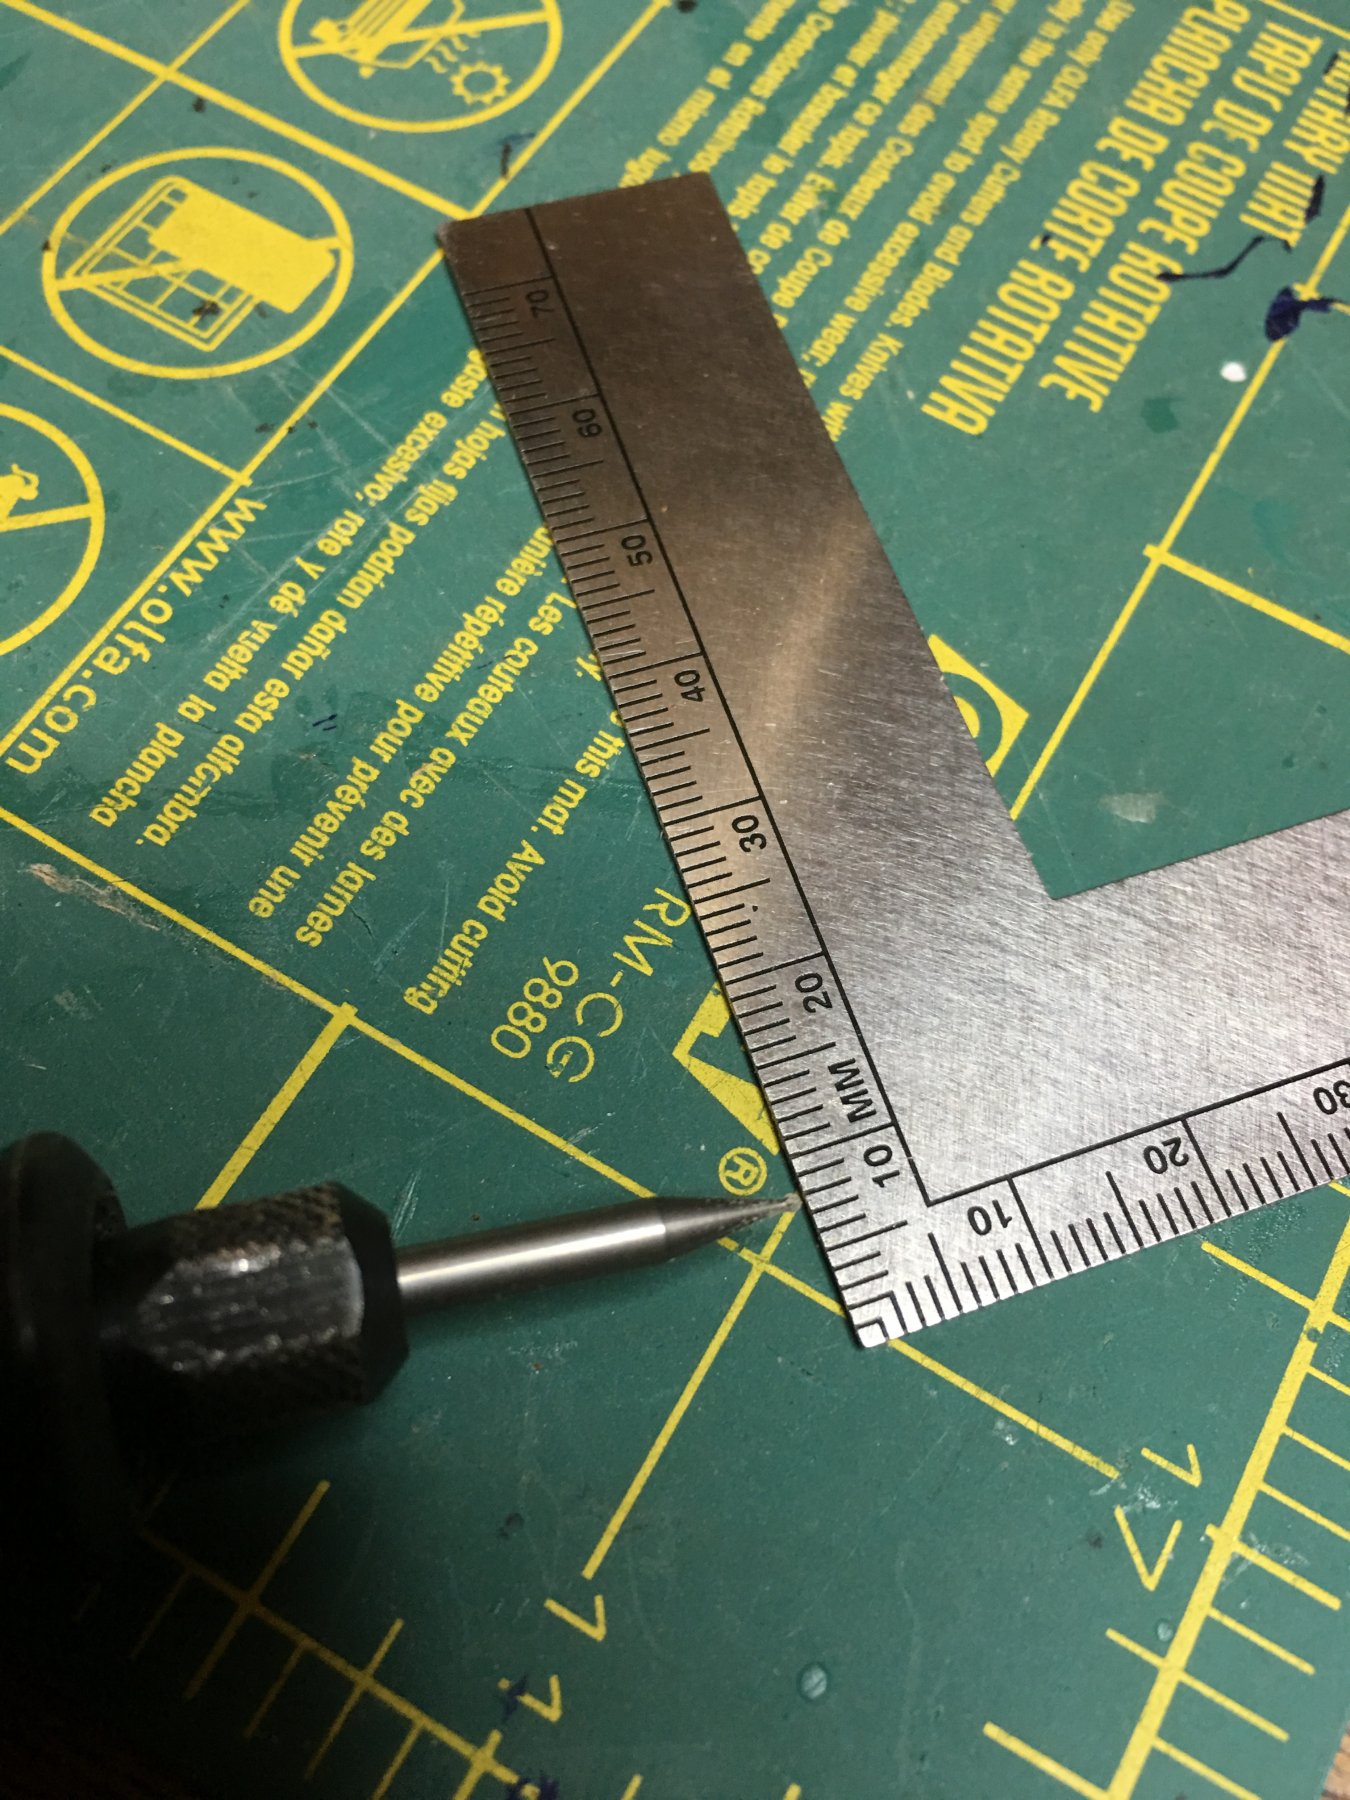
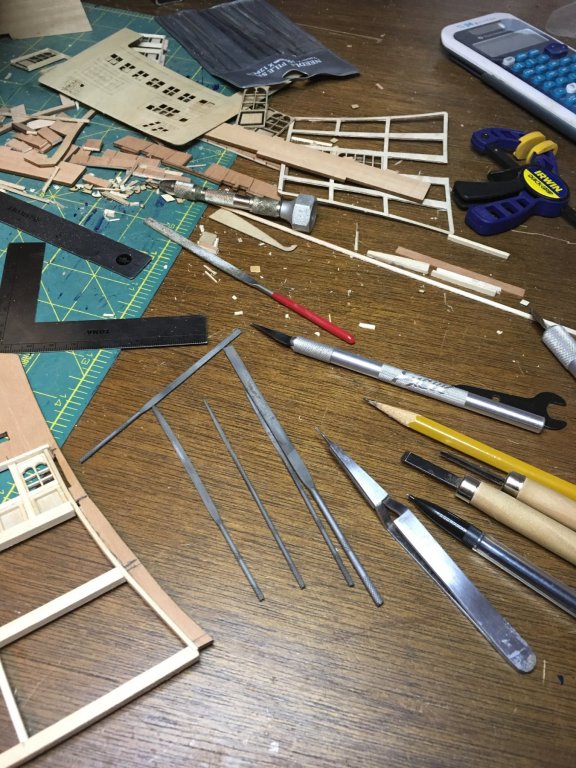
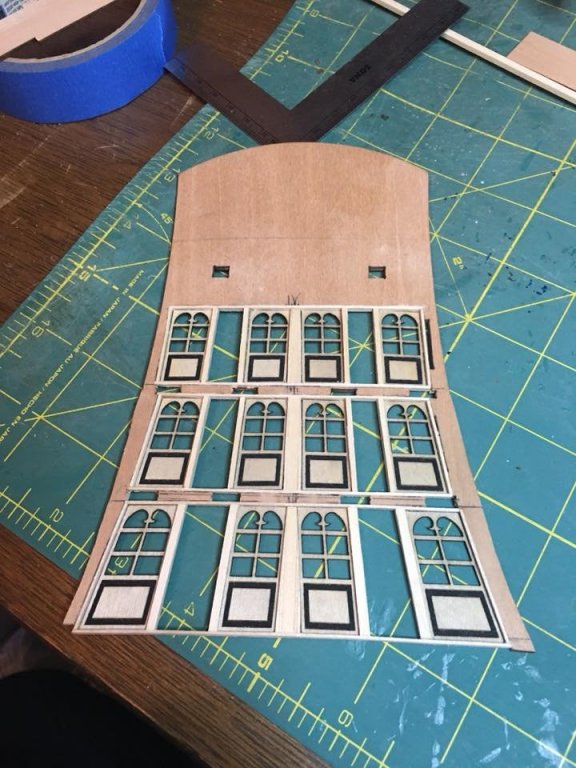
So here is a basic step by step of how I built the windows. First off, here are the tools that were used. Mostly a collection of knives, files and carving tools, plus pencil and something to measure with. The main specialty tools that I use to make the process easier but are not required are rotary carving bits and Micro Shapers. The rotary bits I bought fit in my dremel and I use a flex shaft on it for easier handling. The tip is less than 1mm wide, I forget the specific bit number as I am typing this away from the shipyard but I can find out if someone wants it. As I said, the bits are not necessary but they do speed up the carving process. The Micro Shapers are another great specialty tool that help speed up the carving process and is how I make some of the decorative moldings. I bought them in 2 packs of three scrapers each and each scraper has 16 different shapes and sizes so they will fit almost any trim board for the most common scales. They do work faster on softer woods but they will work on hardwood as well, just takes more time. Basically you just pull them along the piece you want to shape until you reach the desired depth and definition. Not much else to it. Using the shapers is how I made the mullions in between the windows. The main framing for the windows has already been done as have the solid panels below but they are easy enough to do. I divided up the space into half and each half into 3. The outermost space is naturally bigger than the inner 2 as the hull curves outward and so to does the space as it follows. Cut the vertical mullions to length and shape them, then glue in place. Next I squared off the lower half making the height the same as the width so it would make a square. Again the outer 2 sections will not make squares as the space is getting wider towards the bottom. OI inserted the horizontal piece that divides the window panes from the solid panel so now each vertical space is divided by 2. Using a thin piece of wood sheet I cut out the back pieces and inserted them into the lower square so it is now solid. Then it is just a matter of inserting the 4 pieces of trim inside the lower panel. Onto the upper half and the window panes. The decorative piece at the top I made by first dividing the upper section into thirds. The top third is for this piece. I cut a piece of wood to width and length and traced my design onto it. Then using the rotary carver I cut away the inside until I had the relief I wanted. Using a knife I then cut the underside of the curved area and filed/sanded till smooth. Then inserted them into place in the upper portion of the window. Next up it was time to build the framework for the individual panes. This is done with 3 vertical pieces of wood, 1 on each side and one in the middle. Cut, fit and insert these first gluing them in place then do the horizontals which are 4 pieces made the same way as the verticals and set evenly spaced to divide up the window into the 6 individual panes. That is basically it. I did not mention types of wood or sizes as those will have to be selected and adjusted based on the individual model. No single step in the process is hard, just time consuming. I can build a window in about 1-2 hours now that I know how I am building them. The first on took about 5 hours and had a lot of rework and changes. For reference though, each window on my build is only about 11mm x 22mm.


- 961 replies
-
- 12
-
-
Thanks everyone!! John, I will try to take some more step by step photos and give a run down on what/how/why I am doing. So far it has been a lot of trial and error but I think I may have a plan I can share.
-
The repair work to your car looks great but, the work on your ship is even more amazing!
-
Looking very nice Martyn! You are moving along very well on her. Won't be long now and masts and rigging will start.
-
Thanks Marc! I can now finally justify buying all those rotary carving bits a year ago. I knew I would want to have them for this build at some point!
-
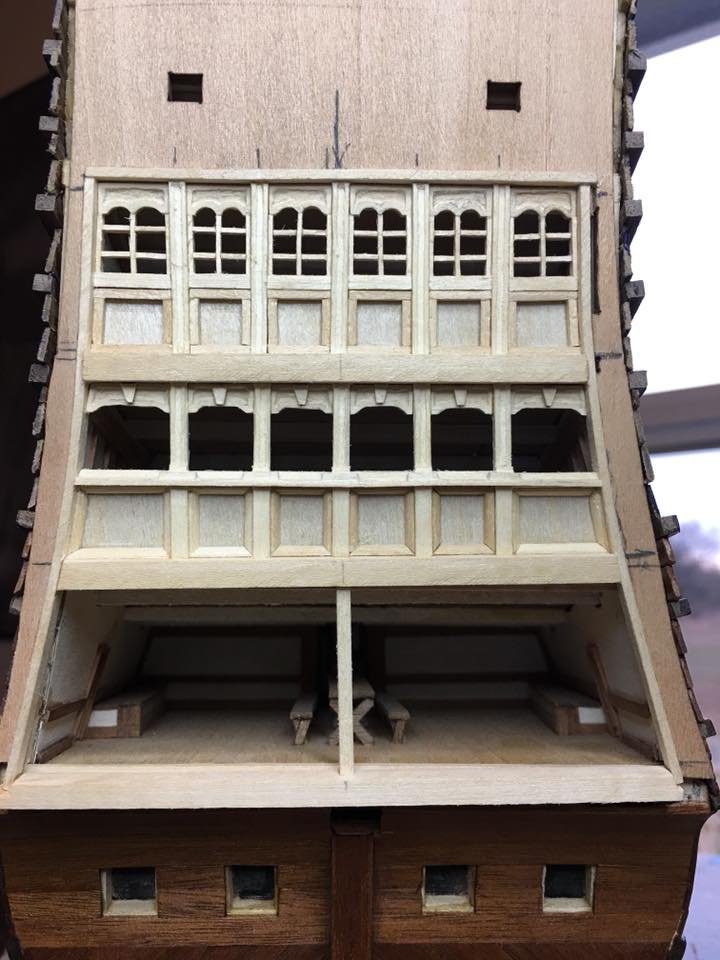
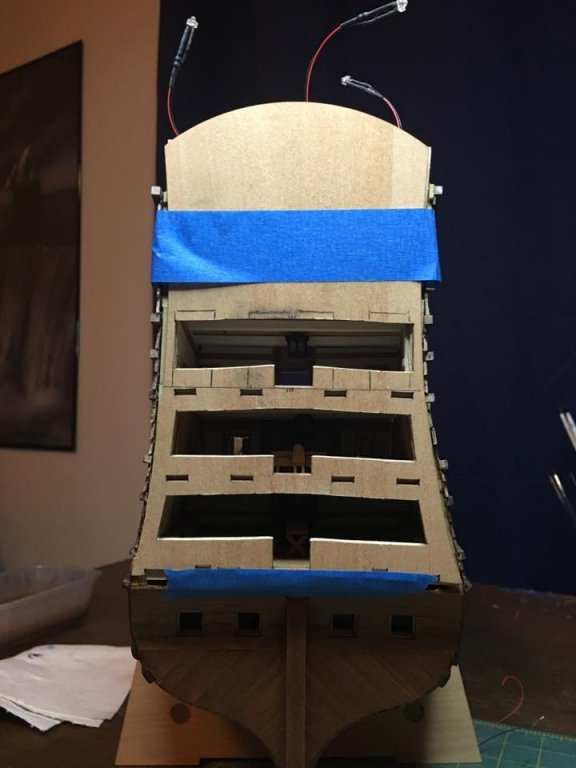
New windows are going in. With the new layout I was not able to reuse any of the laser cut pieces for this model so they are going in the scrap bin for a later day. Now all the windows will be completely scratch. Slowly but steadily they are coming together.
- 961 replies
-
- 14
-
-
Thanks OC! I do have that picture which is the basis of my design but that one is one of the cleanest renderings I have seen. Will have to print that out especially if I can get it to print out in scale! I've pushed out my frames as far as I can without having the glass inside the bulkheads. With the double hull planking, I lost 2mm of space which granted does not sound like a lot but in this case it is huge! As with many other problems I have run into in trying to kit bash this model, I have relied too much on the framing being what I needed it to be. For the amount of changes I intended to do to the structure, I should have resigned myself to doing a full scratch build. So since I cannot widen the hull like I need to, I think I have figured out how to make everything fit and while a couple of details may have to be sacrificed due to spacing constraints, I think I can still do her justice.
-
Rebuilding in process. This is going to be tough but in the end I will be happier and prouder knowing I did all the work from scratch.
-
Welcome to MSW Peter!! Good luck to you on your second build and have fun!
-
Very nice details and excellent painting! She is coming along very well indeed! While I do not recommend changing anything at this stage nor feeling bad about this, a couple of years ago, they discovered the actual coloring of Victory's hull and it was significantly different than the more common "bumble bee" appearance. See the link from HMS Victory's website here. Again, do not lose any sleep over the difference but I thought it might be an interesting read on her coloring.
-
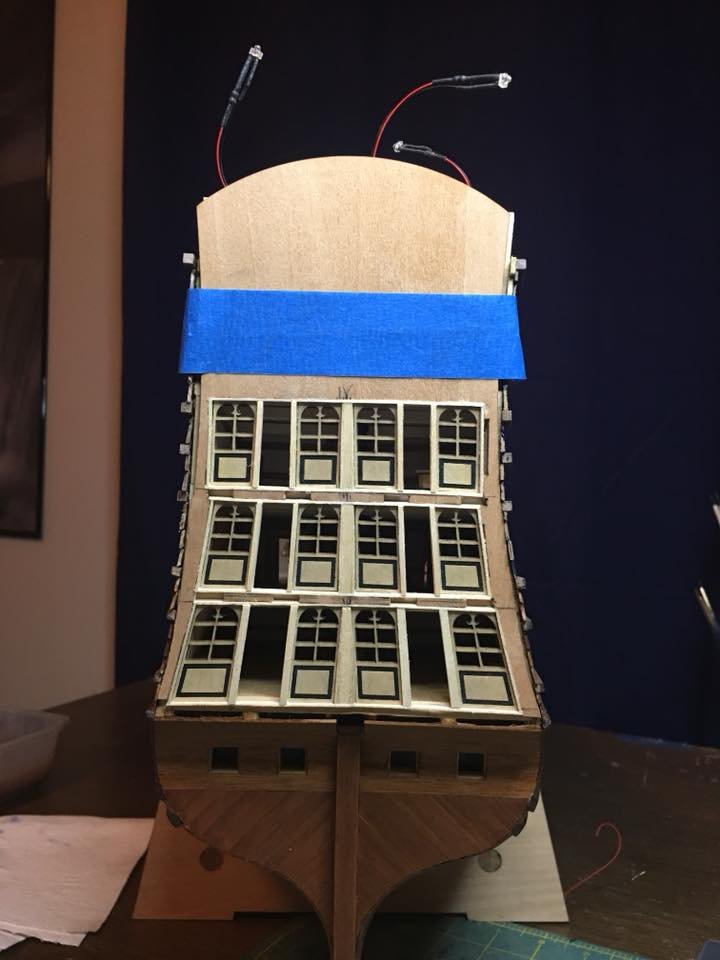
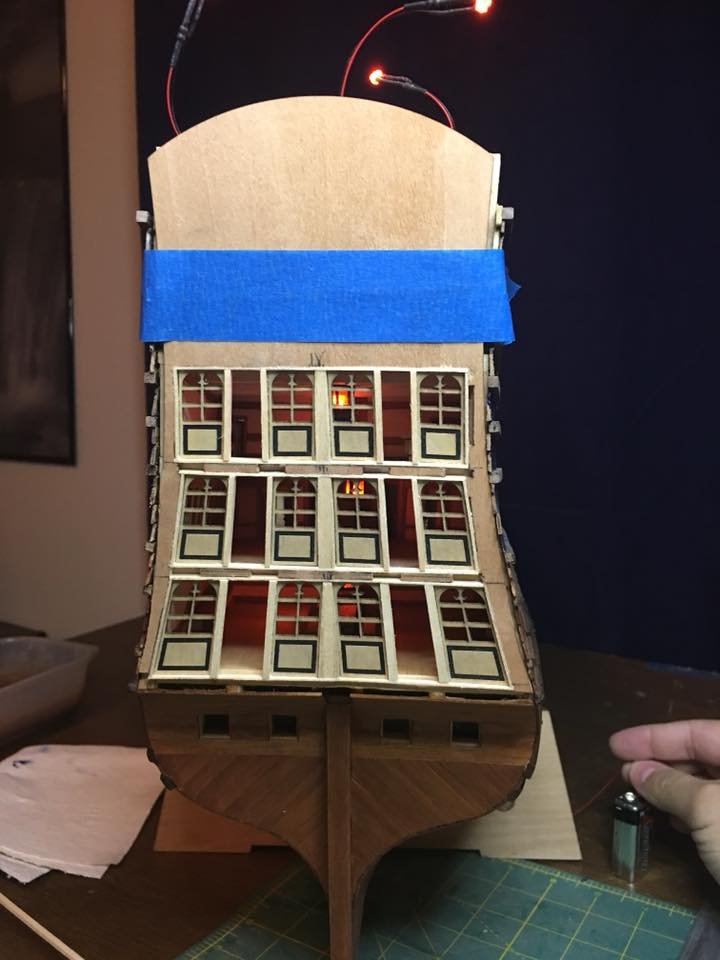
Finally made it down to the hobby store this afternoon for more nails and more drill bits. I also picked up a scalpel style knife as I have been wanting to try them out to compare to the standard Exact-o that I've always had. I already like the feel of the handle better as it is flat compared to the rounded Exact-o but full judgement will have to wait till I have logged some serious hours. This week has not been idle though while I have waited on more nails. I decided to start building the stern cabin windows and that has taken up many hours so far. I've also ran into yet another issue that has come up from modding the kit. The kit was designed for a 5 window layout which I am changing to 6 to better match the paintings of her. My hope was to use the laser cut window panes so as not to have to make them all from scratch only the ones for the doors. So after modifying the aft panel to accommodate the new layout and installing them in their new arrangement, I found out that the stern of the model is not wide enough for a 6 window configuration using the provided panes. I can get 6 sections but the door ways are narrower than the window spacing and also, there should be decorative mullions in between the windows but fitting those will be somewhat problematic as well. So, now I am at that critical junction of deciding what to do. I am sticking with the 6 window layout but do I rebuild all the panes to a smaller size to allow for the equal spaces plus mullions or, do I fudge the designs a bit and make it work as best I can? Every part of me says to rebuild them correctly even though that will be a huge pain the rear, the scotch is telling me to rebuild them and even the Admiral commented on the unevenness of the spacing and if she noticed it then it must be a problem as usually I only hear, "Looks good dear!" So I guess I know what I will be doing but apparently I just needed to see it spoken out loud. Anyway, here are the pictures of what I have done so far. I did turn the lights on to see how that would look through the windows and so far that is a decision I am very happy with. This will be getting posted again after the changes are made. Enjoy, and as always thanks for the comments, likes and just looking in!

- 961 replies
-
- 10
-
-
What colors/stains will wales or trim pieces be? I would use contrasting colors to make them "pop", so if the wales are going to be a dark color, go with the provincial. If lighter than stain the hull dark walnut. If they are all going to be the same then pick your favorite! I think the light, special walnut stain for the interior is a good choice as it simulates a well worn white color that in my opinion would be appropriate for the interiors.
- 228 replies
-
- 4
-
-
- gunboat
- model shipways
- (and 1 more)
-
1,000 nails have been installed and I still see a lot missing so onward and upward! While logging my time I realized that on November 29th I reached one year of building Soleil Royal and as of tonight I just marked 530 hours! With no other builds currently in the shipyard, although plans and ideas are appearing more and more in my head and even few on paper , but as none have come to fruition yet I will be able to continue a steady amount of time towards the build. So here is a quick update. As always more to follow and thanks for looking in!
- 961 replies
-
- 10
-
-
Don, I would say around 7. The process is not hard, mark out the pattern, drill the holes, insert the nails. Many aspects of rigging are far worse. It is the sheer numbers that get you. I am estimating around 1,500 nails just in the wales alone! Granted this is a huge ship so the scope varies on each model. The tree nails can become even worse as there are thousands more especially if they are shown correctly at each frame and not just at the ends of the planks like many modelers show. I have not yet made up my mind if I will show the tree nails or not. I doubt I will show them on the hull as they were rarely visible in real life anyway after painting. On La Couronne I did show them on the decks and I rather liked that look so I may do that again on S.R.. Scale also makes a difference, since if the scale of the ship is too small, the nails and bolts wouldn't look right. Looking at your Stefano I would say that it is probably big enough to model them with no problem! I recommend doing a test strip first, a scrap plank or something but either do it as 3 or 4 planks wide or close to the length of the model. This will tell you first off if you even like the way they will look on the model and secondly if the work involved is something you wish to pursue. If you hate doing it after only the test or it is not looking the way you want it then you have lost nothing. .
-
Hi Don! I decided to drop in and take a look at your build so I could better answer your question about bolts and nails on my own log. Very nice work so far! I'll pull up a chair and stick around to see how she comes along.