
HOLIDAY DONATION DRIVE - SUPPORT MSW - DO YOUR PART TO KEEP THIS GREAT FORUM GOING! (Only 13 donations so far - C'mon guys!)
×


EJ_L
-
Posts
2,246 -
Joined
-
Last visited
Content Type
Profiles
Forums
Gallery
Events
Everything posted by EJ_L
-
 Any hobby store, Michael's, Hobby Lobby etc. that sells drawing/drafting supplies has them and usually cheap. I bought a set of 3 different sizes for under $10.
- 701 replies
-
- 3
-

-
- phantom
- model shipways
- (and 1 more)
-
Very interesting to watch your build. Informative and motivational though maybe too much as my wife saw me reading through it yesterday and gave me one of her "don't you dare buy that" look. Lol. May have to approach this one with a bribe...
- 414 replies
-
- 4
-
-
- riva aquarama
- amati
- (and 2 more)
-
Flags look great! I will probably give this a try when I'm ready for flags. The ones that came with my kit are only single side printed and the fabric does not lend itself to shaping. Yours came out very nice and make for a great final touch on a beautiful model.
- 249 replies
-
- 1
-
-
- billing boats
- vasa
- (and 1 more)
-
She is looking great Matt. All the time you have been taking to get your framing done is paying off big already. Your lines look nice and smooth. Should not have too many issues with the hull shape when you start planking. Those compound curves can be very tricky on transoms. More than likely I would bet that your laser cut pieces are off some which is common. Also like you said it could easily be a combination of a few tiny errors. It is amazing how a few .05mm mistakes quickly add up. Thankfully we have wood filler and sandpaper to help correct those errors. Keep up the great work!
- 117 replies
-
- 4
-
-
- constitution
- model shipways
- (and 1 more)
-
Those belaying pins are great. Good idea with the toothpicks. I too am interested on how well they hold up under rigging. I would think quite well as they are intended to take some pressure when used for cleaning teeth or the hundreds of other uses they get tasked to do.
- 481 replies
-
- 2
-
-
- rattlesnake
- model shipways
- (and 1 more)
-
I wish more of them would have ended up preserved some way throughout history so they could have been made into a museum or if lucky enough to be preserved well enough after sinking, raised and restored like they did with the Vasa. More modern practice lately has been to scrap them down to the hull and sink them as coral reefs. I feel this is a fitting end for a ship that has done it's duty. To me it's symbolic of how we bury our dead. It is with respect and hope that even though they are no longer on the surface in life that they can rest in peace and still be a source of aid for the future.
-
Thanks Mark! It has been a bit slower this past week as life has been getting in the way of ship building. Combine that with the slow process of building canons and not much gets done. On the plus side I see some free time coming up this week and so I hope to have some more updates to share. Good to hear you are back at it with yours. I look forward to seeing what you have done.
- 608 replies
-
- 3
-
-
- la couronne
- corel
- (and 1 more)
-
You are moving along nicely. This is almost like watching a jig saw puzzle come together with all the pieces you have to fit. I agree with you that this is definitely one of the more intricate sub framing kits I have seen. Good to see that though when you consider the impacts and vibrations that she will take from the motor and when out on the water.
- 414 replies
-
- 1
-
-
- riva aquarama
- amati
- (and 2 more)
-
I had wondered about how they unloaded cargo as well. I knew that they used cranes to do it but I wasn't sure if they were dock side or ship side cranes. Having a crane on the ship makes a lot of sense for the reasons stated of many ports not having the equipment to unload or for areas where a ship could not pull alongside a dock. I would imagine that ship to boat transfers were far more common as there were probably many more trading cities and ports that did not have a deep enough harbor for a large ship to dock at than those that did. Granted the largest of vessels probably only traded with large cities with good ports but smaller vessels still have deeper drafts than what could be found at many smaller towns and villages. I would think that having a crane on board would be useful even when at sea for moving supplies between decks instead of carrying it up or down the ladders. This is yet another thing that movies and television do not show of life aboard ships. This was not the fun, adventurous or "romanticized" life that is most commonly shown. There are reasons why you rarely saw a fat sailor. The harsh living conditions and never ending work that took place aboard a ship was more than most people could handle.
-
Lots of great looking work taking place. Thank you for the many pictures and details. Always nice to see the steps in between stages.
- 414 replies
-
- 3
-
-
- riva aquarama
- amati
- (and 2 more)
-
That is a great little work space you have. The first model space I had was an old school desk with the lift up lid. Yours is way nicer than that!
- 701 replies
-
- 3
-
-
- phantom
- model shipways
- (and 1 more)
-
It is always kind of a nice shock when you take a moment to sit back and look at all the progress that has been made and the time involved. I always keep running time of actual hours spent working on my ship. I don't count research time though mostly because I'm not sure where to begin on that. I'm constantly reading articles, build logs, questions and answers, watching You Tube videos and talking to people about tips, tricks, facts, and ideas that it would be almost impossible to track that time. Time building a ship can be an interesting thing. I have some days when I spend 3 hours working on her and I can see a lot of progress planking. Then days like yesterday happen and I spent 5 hours working on canons and all I have are piles of parts waiting to be assembled. The fact that you are taking your time and building correctly without taking shortcuts will benefit you in huge ways later on. There are no set time frames to these projects and as you are building for your own enjoyment there are no deadlines to meet. I would rather a ship take me years to complete so that I can look upon it with pride and not regret. Sure, there are always ways we can improve upon a model but improving skills is always a good thing. It's those shoulda, woulda, couldas that we eliminate by taking time. You are doing a great job. Keep it up!
- 117 replies
-
- 5
-
-
- constitution
- model shipways
- (and 1 more)
-
I just got caught up on your build and I must say that you are off to a great start. I will agree with you and others that your kit does appear to have top notch parts in it as well as the laser cut pieces. I was just having a conversation on my own build about how often times kits are missing pieces or the quality is not the best and so we often have to replace items. You do not appear to have that issue which is great! I do hope you can make her "sea worthy" as it would be really nice to see her in action on the water when completed. I have pulled up my chair to join the others and follow along.
- 414 replies
-
- 4
-
-
- riva aquarama
- amati
- (and 2 more)
-
Michael, I completely agree with you in that I would hate to spend days on days counting out all those little pieces. I have had to order replacement part for kits before and have all ways had good responses from Model Shipways who I have bought a lot of models from over the years. This is even common in model railroad kits and model cars also. It's still frustrating but like you said, I have plenty to work on. The only time this was a major problem was several years ago I was building the Victory out of plastic and I received two starboard hull halves and no port side. It took a couple weeks to get a replacement from Heller but they did it for no cost. (If anyone needs an extra starboard hull half I still have it.) That wait slowed me down on that particular build but I still had other things to do. I think I built canons while I waited. Yes, we should all take lesson and inventory the parts when we get them, believe me, I'm counting the other stuff now before I order replacement canons, I had just assumed that I had 64 canons as this is a 64 canon ship. Everyone knows what assuming does to a person.... Anyway, I'm still moving along happily. I think to day will be a busy day building carriages and aligning the dummy guns.
- 608 replies
-
- 3
-
-
- la couronne
- corel
- (and 1 more)
-
Indeed, she is looking good. You doing a fantastic job Elijah. This is going to be a great looking model.
- 701 replies
-
- 3
-
-
- phantom
- model shipways
- (and 1 more)
-
I do wish I had some more options for local hobby stores. Aside from Hobby Lobby and Michael's which are fine stores for some things but not for scale models we only have a Hobby Town USA. They do carry a lot of good misc. supplies and tools and they do have a decent model ship selection but rarely what I'm after. Great for beginners though. This forces me to order online which is typically okay as I try to buy from smaller hobby stores and trustworthy people, mainly the stores located on the home page of this site. I don't think that the problems are with them as it is with the manufacturers. Even quality manufactures can leave stuff out or not specify what comes in the kits. Also, no matter what model it is, car, train, ship etc., what is typically kit supplied is typically a standard, cheaper product. This is so that the kits can be more affordable especially to newcomers. If there were no cheap model kits to start with would most of us be in this hobby? I do not think that I would have wanted to try something this complicated the first time out if I had to spend hundreds or thousands of dollars on one kit not counting tools and supplies. All that being said I do think that on these nicer kits that do cost hundreds and thousands of dollars that the manufacturer/distributor should do a better job of making sure that all the bits and pieces are included and up to a higher standard of quality. I know I would be willing to pay more for a kit that I didn't have to replace half of the supplied material. As things sit now I usually plan on spending about half the cost of the kit in extra purchases to meet my standards. However, you can make a perfectly nice looking model using just the supplies provided. It all depends upon a persons skill level and how far they want to take a build in terms of accuracy and detail.
- 608 replies
-
- 4
-
-
- la couronne
- corel
- (and 1 more)
-
I agree. When you are already paying hundreds of dollars for kit I would expect it to be a complete kit or yes, pay a little more to make it a complete kit. I have started to wonder and do some of the math to figure out if it's better to buy kits or try to piece them together by buying the materials and plans yourself separately. Most of us already replace much of the wood, rigging lines, blocks and trim pieces anyway. My biggest reason for not doing this is mainly due to my limited carving skills. I need all those tiny trim pieces even with their bad appearances as I have not yet got my skills up high enough to use my own. (I'm working on this!) Personally I am planning on one more kit purchase before I try to completely scratch build a ship. This isn't set in stone but unless I quickly develop amazing carving skills or someone starts selling just the trim pieces for all these ships, I think I will need to do another kit. I will just have to continue to plan on spending the extra money to replace or add those parts that are either missing or bad quality.
- 608 replies
-
- 5
-
-
- la couronne
- corel
- (and 1 more)
-
Brian, You just clarified a bunch of my questions on seizing and serving. Those pictures really help see what needs to be done. Thank you for that excellent response!
-
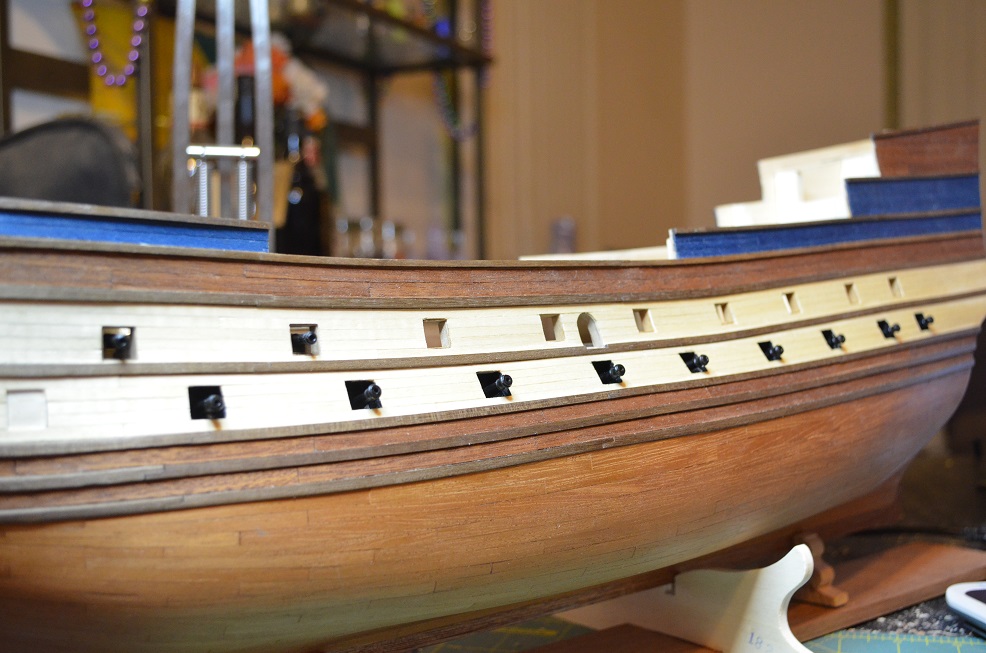
Just a quick update, I'm building and starting to place the canons. Getting all the dummy ones as well as the less detailed ones installed now. These have gone together quickly and so I'm enjoying some "fast" work for a change. Still have some angle adjusting to make on the dummy guns but as they are just dry fitted that id no problem. Also I have discovered that I am short 8 guns. Why you would package only 56 guns for a 64 gun ship I don't know. I guess they wanted me to close more of the gun ports. So I will not be installing either the bow or stern guns till I can get some more ordered. At least I can get all the gun deck ones installed so I can build the spar deck without holdup. I am hoping to log in some good build time this weekend as the past couple of weeks have been slower. The Admiral and I are have been busy with selling our house/starting to build a new one. Although this has slowed down the ship build, if everything falls into place, in 6 months give or take a bit I will have a brand new and much bigger shipyard! This has been about 8 years in the making so keeping those fingers crossed. Now to the picture! Better and more to follow.
- 608 replies
-
- 13
-
-
- la couronne
- corel
- (and 1 more)
-
Looking great! I'm sure it feels good to finally start putting pieces on her and not just sanding.
- 701 replies
-
- 4
-
-
- phantom
- model shipways
- (and 1 more)
-
I did a little searching real quick to familiarize myself more with your ship. From what I have been able to gather and since you are planning to copper the hull, it looks like the rudder should be close to the same thickness as your stern post. This would include the copper plating which appears to cover the rudder as well.
- 701 replies
-
- 3
-
-
- phantom
- model shipways
- (and 1 more)
-
I guess it would depend on the material it is made out of. Also when I say plank, it was more of a veneer covering. I used wide strips of the same mahogany that I planked my hull with to cover the stern post so that it looks like it is one large piece of the same wood as the hull. Otherwise I would have had an ugly strip of the supplied ply wood showing. In your case since you get to make it from scratch you can build the whole thing out of whatever material you wish. I believe that most rudders are the same thickness to just slightly smaller than then the stern post. They also tend to taper to a narrower edge than what is at the hinge pins. Hopefully someone can confirm this or correct me if I am wrong.
- 701 replies
-
- 4
-
-
- phantom
- model shipways
- (and 1 more)
-
Is your rudder planked already or is it just the wood cut out? I have always had to plank over the blank rudder that is supplied with the kit and doing so has kept it the same width as the stern post after it is planked.
- 701 replies
-
- 2
-
-
- phantom
- model shipways
- (and 1 more)
-
That hull does look great! All that sanding will pay off for you when you start planking.
- 701 replies
-
- 2
-
-
- phantom
- model shipways
- (and 1 more)
-
Thank you everyone for the compliments and likes. Mike, I agree with you that before the age of the internet this sharing of knowledge was far harder and slower. Word of mouth at hobby stores and magazines was primarily of I learned to build models. Having a site like this with the vast amounts of knowledge, pictures, helpful people and links to great suppliers has made a great hobby even better. Now if I only lived closer to where all of these great looking conventions take place.
- 608 replies
-
- 5
-
-
- la couronne
- corel
- (and 1 more)