


aliluke
-
Posts
1,320 -
Joined
-
Last visited
Content Type
Profiles
Forums
Gallery
Events
Posts posted by aliluke
-
-
Yes they look too bulky to my eye, I'd incline to 3/4 that size - a guess. Purpose - firstly a spreader for the shrouds and secondly a step on to the ratlines for the sailors but that's a guess too. One thought is that your sailors would have to have very long legs to get onto the lines. Your lanyards may be a bit long. Don't change them! Just a thought.
- ringbolt2013, olliechristo and egkb
-
 3
3
-
Looking really sharp Ollie. Is that kit supplied rope? It looks really good and if it came with the kit it would definitely qualify as better quality than most kits come with.
-
-
-
Whatever you do with the sweep ports I definitely wouldn't make them larger. They will look out of proportion.
I'd be wary of your cannon rigging plan. It will hard to get the breeching rope to look right by CA gluing it to the cascabel. The alternative is easy enough to handle. Tie or seize one end to the ring bolt that is going to go into the bulkwark. Thread it through the cannon with a single wrap around the cascabel. Work out the correct length to the next ring bolt (you could actually lightly CA glue the rope to that ring to temporarily fix that length). To give yourself room, unwrap the rope from the cascabel and pull the rope so that the first ring bolt is pulled through to the ring bolt on the cannon carriage. Tie or seize the second ring bolt. Re set the rope with the single wrap around the cascabel so the lengths are the same each side. Up to you of course but that's the way I'd do it.
-
Nice work Vitus - your deck planking is very good. I'm building up to this step. Good to see your planking layout and nice to see that you tapered and hooded the planks into the margin (much better than a straight run and butt). That is my plan as well although it scares me a bit. I'm also pleased to see that you have a bit of kink where the two, dreaded, plywood gun port patterns meet. I have one too and only just noticed it when I dry fitted the quarter deck - it made me angry. But I am not alone! and we will have to work through that together. That said it isn't a big issue and I think the cap rail will sort it out so that it is no longer perceptible.
I'm intrigued that you have the inner layer of the stern piece already on. Do you intend to glaze each stern window and then lay them in? Or are they already in and glazed? I'm going around in circles thinking of how to do this but your method - if you can explain it - was not one that entered that circle. My plan was to do the quarter deck with the stern transom off and then build that as a complete piece, curved, fully glazed and then fix it into place - with the last step being the most difficult...
-
Great outcome on the cannon rigs Ollie. Spot on to my eye. You're lucky to only have two to do but now you've cracked it onto a 74 gun ship for your next model?!
-
Lots of progress there. The stern looks good. One thought there though if the gladiators holding the bombs have flesh painted faces shouldn't their arms and legs also be flesh coloured?
On the cannon rigging - the breeching ropes go through a ring bolt on the side of the cannon. If you have tied them off to ring bolts and eyes at both ends then you won't be able to thread them through the ring bolt on the side of the cannon unless that ring is over scale. When I did them I threaded the rope onto the cannon and then tied them off at each end to a ring on an eye bolt. This is done while the cannon is off the model.
As for the sweep port lids - you could get away with no lid. It is a nice detail to add but, for instance, the Fly model I'm working on doesn't have lids. I considered adding them but have decided not to. Anyway it is a solution that will save you further grief with those tiny hinges.
-
Hi Ollie
The rig looks great.
John is right. Have a look at my post on KenW's Fair American of my AVS rig. The tackle is tensioned and then CA glued to the deck and cut (right hand side in the picture) the coil is laid over the top of the cut end (left hand side in the picture). Note that I think the coils I made are too big in diameter and there is too much rope on them.
-
I still favour the stern for the boat Ollie. But I'm into symmetry I guess.
-
Hi Brett
I wouldn't leave the walnut rough. To protect adjacent paintwork I suggest; make sure it is fully sealed with whatever clear finish you are going to use (I use Testors Dullcote) then cover it with a low tack masking tape e.g.Tamiya. Don't use high tack tapes as can take off the paint when you remove them. Even with low tack remove it very gently. Also try to avoid sanding the masking tape.
Are you painting the exterior? If you are another wee trick is to make the joints between the outer bulwark planks so that the joint is visible through the paint. I did this by putting a small bevel on the edge of the plank before laying them but light and careful scoring of the joint could work too. This can be seen on my log. I think it looks better than a solid painted surface.
-
Hi Brett
The big hurdles on the upper works are over. Good stuff. The lower hull outer planking isn't too hard. You have got past all of the set out relationships and now you can relax and enjoy.
One piece of advice - look after your waterway when you clean up the inner bulwarks - mask it. It a striking feature of the kit and would be a bugger to replace if it got damaged. Also hold on to the spirketing (sp?) plank thickness above the waterway - it should be slightly thicker than the upper bulwark planks and, again, is a nice detail to maintain if you can.
My little experience in this craft suggests that major re-works have to become increasingly minor as the work goes on. You are into the finishing stages of the hull and it will, very soon, become a precious thing. I tell myself the same on my current model but still go around in circles of fix/correct/re-fix/ correct....
Anyway, nice to see you pushing forward and it looks really good.
-
Hi Ollie
If I was you I'd leave them just the way you have them. It's only trainspotters who will take you to task. The added detail of the tackles is a nice one and I don't regret them on my AVS. I'll certainly add them to Fly. The configuration can imply; storing the cannon while at sea, making the cannon ready for battle or defense, laying out the cannon for inspection; etc. I reckon go for your visual choice. The frapping looks really hard and adjusting the rig buy using coils will be my repeat choice.
- ringbolt2013, olliechristo and KenW
-
3
-
Hi Ollie
Have to agree with John there. Too wide and too low. I wouldn't die in a ditch over it though...everything else looks really great - rope scale, blocks etc. There is a bit of discussion on tackles on KenW's Fair American build log at the moment - might be worth a look for you.
-
Hi Ken
Page 40 of Dafi's Victory log shows stowed cannons with the barrel elevated to be above the port and various lashings. No idea how correct it is but given his thoroughness it must be close - it is a nice page for other reasons as well...
Your rig looks great to me. I'm still going to go down the coiled route on Fly. As Gary says it is your ship!
-
Hell Bob - forget the tidy up the kit solutions - well done too. The fact that the curve of the kit made part exactly fits your bow curve is a testimony to your precision. It is looking very sharp. As for paint drying...I say to myself wait, wait, wait and then go what the....and then I regret my haste.
-
Good to see you progressing Ron. The hull planking looks great.
I see you are experimenting with blue. I can recommend Humbrol #157 matt mixed with a little grey. I found this recommendation somewhere here and really like the results. I also think the wales look good if they are polished off to a dull sheen. I use tissue paper to do this.
-
Hi Pops
Hair dryers draw more electricity than anything - believe it! I holiday in a place which is off grid. Solar and PV panels provide the only power. Hair dryers are banned! They'll suck the life out of a fully charged battery in seconds and then we live in darkness.
As per my PM, you don't need a hair dryer or any other device. Wet the wood, clamp it around a curved object - a cup or some such thing - and wait for it to dry all by itself. Slow, dull but very gentle on the wood and effective.
-
Good to see you back at it Vitus. Agree with Martin and B.E the quarter badges are really fitting in. The fit of the upper deck looks perfect and the cannon strategy is an interesting variant. Glad to hear you are dusting the deck! It sure looks dusty
 .
. -
Yes the red lines are probably more correct but no! Do not cut now! Wait until you get the decking, inner bulwarks and outer planking on and then make those decisions. The final adjustments of these parts only needs to made just before you fit the cap rails - hold off until then. Better to cut later when you have all aspects in place and can judge the correct lines. I have exactly the same issue with Fly.
You are much better off having stuff to remove than having stuff to add!!!
-
Great work on the dead eyes and chains Jesse. These things are amongst the hardest in my opinion but your method looks really sound and looks great as well.
I send to you an expression we have here - Kia kaha (it means - stay strong - and is pronounced key-ah car-ha).
- JesseLee, Salty Sea Dog and riverboat
-
3
-
Hi Ken
That is good thread that Gary pointed you to. The most common method on the photographed ships shows the ropes of the side tackles frapped (I think that is the term). Blue Ensign has done this on his Pegasus model and it gets rid of the coils. The advantage of the coils though is they allow you to adjust the tackles after placing them on the eye bolts. When adjusted the rope end can be glued to the deck and the coil used to cover that. If they are frapped I'd guess you have to get the length exactly right before placing the tackle on the hooks. While I'll be doing side tackles - I like the detail that they add - I think I will leave off the rear tackle. I might try frapping as it seems authentic and keeps the deck clear.
As for wire - the blackened copper wire I use is very soft - I don't know the gauge, it is very fine - but is unbreakable. Even worrying it back and forth to make it fatigue won't break it. It is called "Jeweiry Appropriation Copper Line" and is made by "Lucky & Lucky". The NZ agents are Craftrunner - www.craftrunner.co.nz.
-
Hi Ken
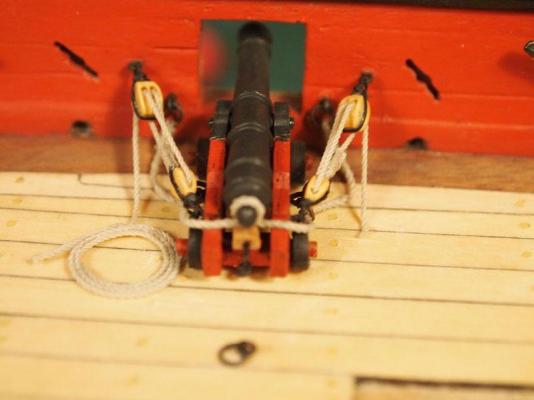
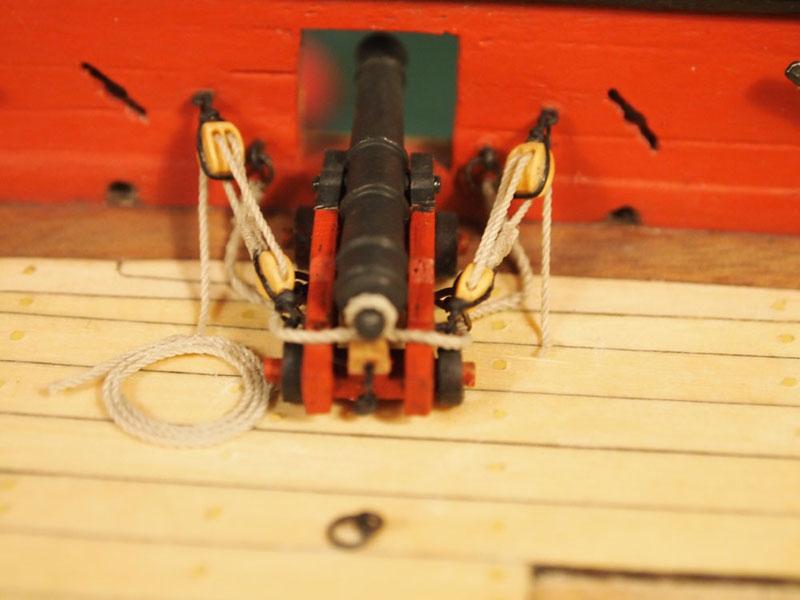
I reckon there are some good points made above. You need more room - Space the tackle bolts wider at the port than the breeching ropes. The eye for the tackle hook should be further back and behind the breeching rope eye and ring on the carriage. I use extremely thin blackened jewellery wire for wrapping the blocks. It probably should be rope but it is very easy to use and manipulate. I find that does not break or bend when rigging if handled gently. Here is picture of my AVS cannon rig. 2.5mm blocks, 0.25mm tackle rope and 0.6mm breeching rope. My mistake here is the double block for the tackles at the bulwarks - have since learned that it should be a single. My coils are also too big and too long.
-
Sweet Denis. The very few power tools I've looked at would head me here. Hate to ask but I will
 - how much was the shipping?
P.S. Any luck with Beechmark?
Frigate Essex by Rafine - FINISHED - Model Shipways - Kitbashed
in - Kit build logs for subjects built from 1751 - 1800
Posted
Exceptional work Bob. She's turning into a jewel.