


aliluke
-
Posts
1,320 -
Joined
-
Last visited
Content Type
Profiles
Forums
Gallery
Events
Posts posted by aliluke
-
-
It all looks really, really good RMC. A fantastic stern,
For lettering are you using PE brass or Letraset? If the former I'd recommend the latter but the former is good too. I think set out is by eye. Layout your "Vanguard" letters on a piece of paper with the right vertical curvature and letter spacing and measure where the centre point of the lettering is. Lightly mark the centre point on the upper counter. I'm guessing it will be between the "g" and the "u" but it depends on the shape of the letters themselves. Fix the first letters around that centre and then transfer the letters from that centre point out to the port and starboard. Letter spacing is a complex thing but easier when they are all capitals. For instance the second "A" should not be too close to the "V". Place them on paper and shuffle to you get the right feel for the spacing. Mine is easier - Fly!
I'm just thinking this up but that is how I'd do it and I work with lettering in another life.
Cheers
Alistair
-
Cheers all
Bindy - I use Tamiya masking tape. I like it as it has a low tack so it doesn't effect the finishes underneath it. It also doesn't leave a glue residue. That said there are any number of cheaper tapes out there but Tamiya seems popular here and is easy to get.
Jase - never heard of Micro-mesh but good advice. I'll have to see if we can get it here.
Cheers
Alistair
-
Hi Danny
No I'm not going to try the wheel at 1:64
 . It is the aft clerestory in the manner of the FFM, like yours, that I'm going to try and even that seems like a difficult prospect.
On a completely different matter - I notice your gratings and coamings are quite heavily cambered whereas some models show them quite flat. Is this all guesswork in terms of historical accuracy? I like your camber but went very flat with mine for no real reason and now I wonder what is more correct (I suspect yours is given the depth of your knowledge)?
Cheers
Alistair
-
Brilliant work Danny. I looked at the info on the wheel in the FFM and couldn't imagine how it could be done - you have proved it can be with the right tools and very good skills. The skylight is a treat too. I'm going to have a go at the same for Fly but don't fancy my chances at 1:64.
Cheers
Alistair
-
Glad you like my thoughts. That's a good addition Nigel. I might try those thinners for acrylics but I have found Polly Scale to be very easy to apply and easy to keep the coats thin. Certainly some other acrylics that I've used are more difficult. My Fly is the first time I've used enamel on wood - mainly chosen because of the vast colour choice you can get from Humbrol. The AVS that I did is 100% acrylic from a variety of brands - Admiralty, Polly Scale and Citadel.
It'd be nice to see other tips here. Painting the hull on the AVS was a challenge to get even and advice on white hull painting by brush would be interesting.
Cheers
Alistair
-
Hi
I'm a bit surprised by the very positive comments on my painting work on my Fly model. It is a quite easy process from my point of view so I thought I'd share my technique. Forgive me to all of you who know this already or do it better. My painting technique dates back to house painting in my student years, the principles are the same.
Brushes:
- Do not scrimp by buying cheap brushes. Get the best quality, sable hair, that you can afford.
- For painting a large area of your model use a square headed brush about 3 mm - 4mm wide with a tapered head and medium stiffness. Same as house painting but at a much smaller scale.
- Look after your brushes. Clean them in lacquer thinners, turpentine or water according to the paint you use. Do not let them soak in any of these solutions. After the first clean wash them in hot water and concentrated dish wishing liquid. The idea is to get rid of any paint residue in the brush and especially in its barrel. Always clean straight after you finished the area painted. Good brushes treated well will last for years.
- For clear finishes I use a larger, soft, round or oval head brush - these give a softer application and allow quicker application than a square head. I find clear finishes work best if they go on quickly. I use Testors Dullcote but that is just my choice.
Application
- Several or many thin coats are better than a few thick coats. If the wood behind is showing behind your first coat you are on the right track.
- Do not overload the brush with paint. I take the paint from the pot or bottle and lay it with the brush on to a piece of fresh paper. I then brush out the loaded brush on the paper until it is only lightly loaded with paint.
- Work in one direction from one end to the other of the ship - aft to stern or the other way round. Never start in the middle and then head aft followed by forward.
- Never go back to a perceived mistake behind you in a single application. The paint will have tacked and, especially with enamels, you will get pulling which will turn a minor mistake into a major mess. You can fix that perceived mistake on the next coat.
- Always allow the paint to fully dry. Enamels need at least six hours. Partly dried paint if processed will make a major mess. When you sand the paint should turn to dust. If it rolls into little slivers it isn't dry.
- After each coat lightly sand with 1200 grit paper. If this takes the paint back to wood it doesn't matter there is another coat to come.
Finish
- After your last coat of paint, leave it to fully dry and the rub it down with tissue paper. This will even out any brush strokes and colour differences.
- Apply a lacquer (or your favourite clear finish). I use Testors Dullcote. When dry, Testors can again be rubbed back with tissue paper to a dull sheen. I also do a second coat of clear and rub it back again. If you have any shiny spots 1200 grit plus a further tissue rub will get rid of them.
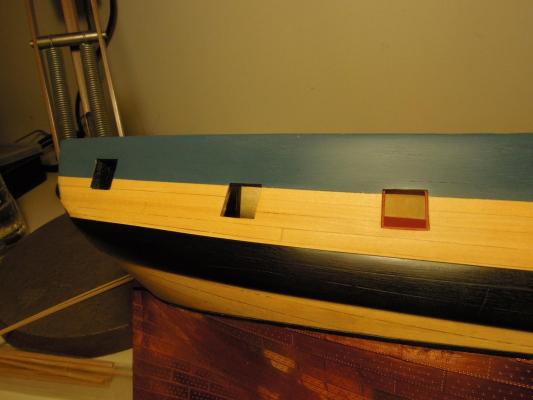
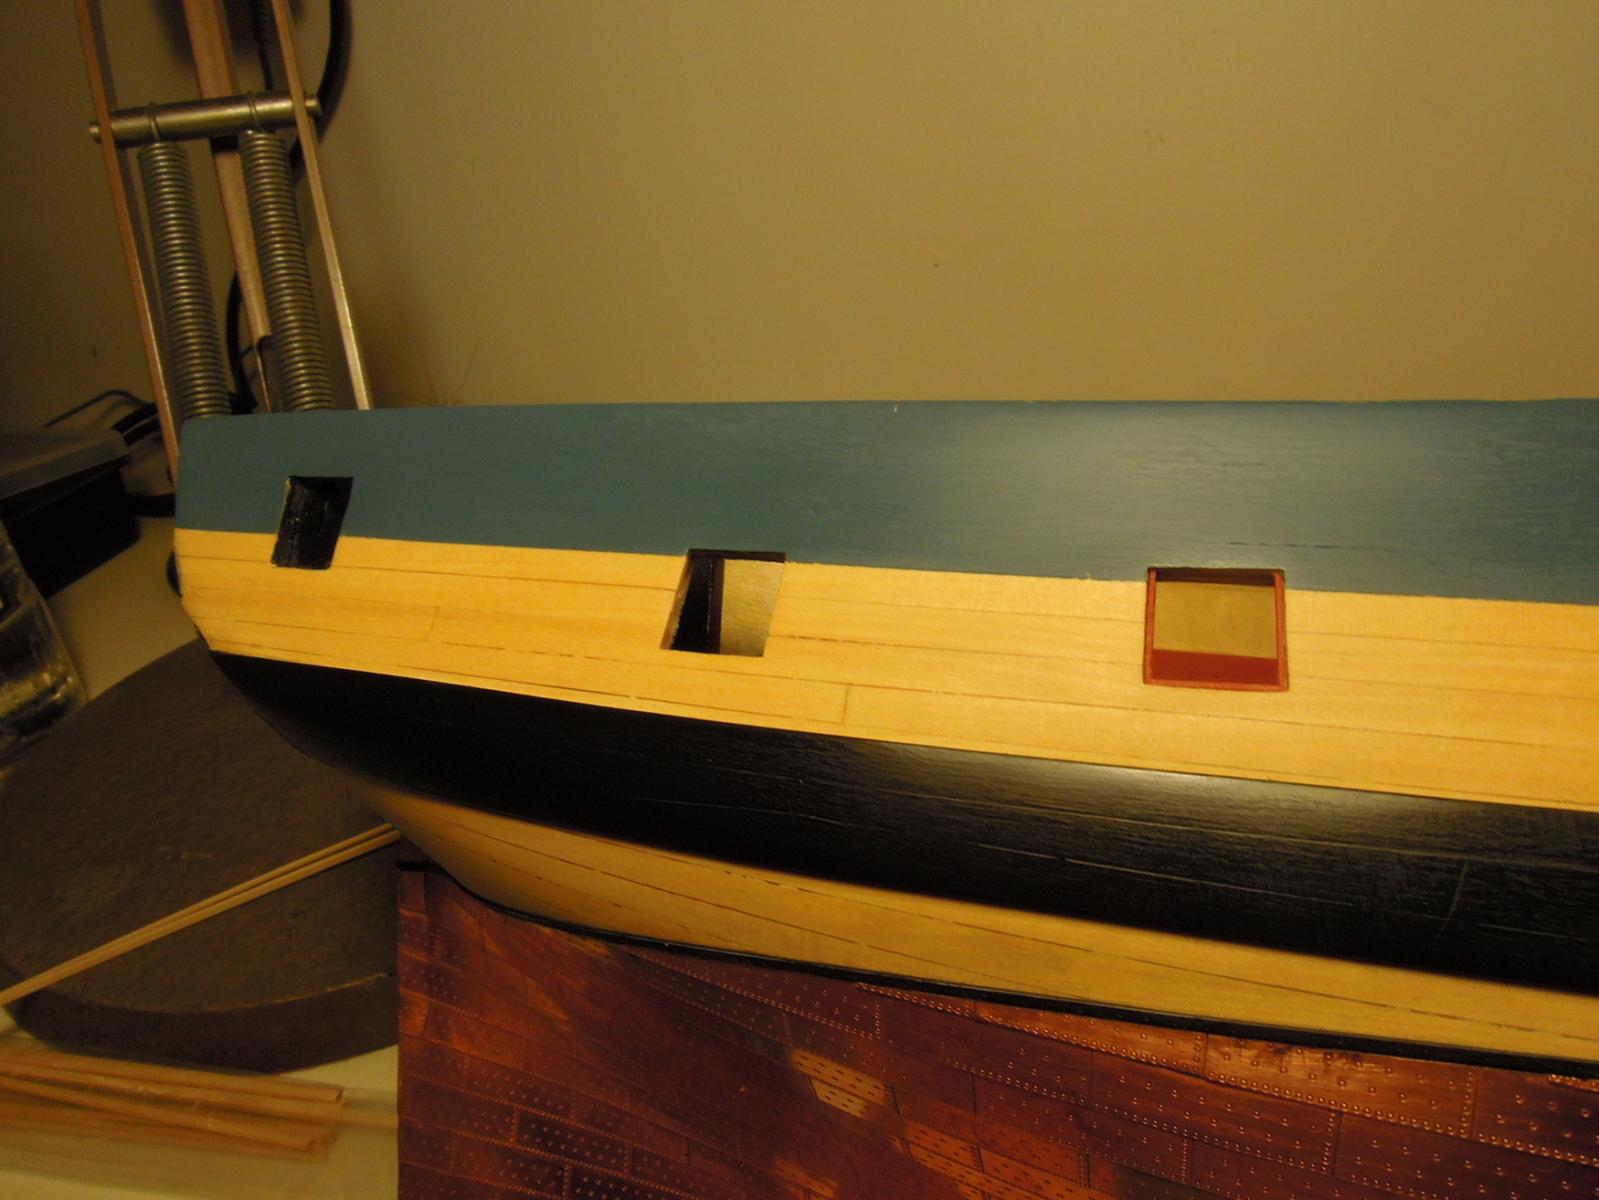
The above only applies to easily accessed surfaces. Strakes, fenders and other things in the way will make the rub off impossible. My theory is to get the base painting about right before those bits are added. I could be proved wrong...
Here is a picture of the upper works paint plus the wales paint. the upper works are a Humbrol enamel, the wale a Polly Scale acrylic. A little bit of grain shows through which suits me. This is more paint grain than wood grain. A too perfect finish would make the model too plastic looking (I'm not meaning to deride plastic models).
If any of you have better ideas I'd be keen to hear them - this works for me.
Cheers
Alistair
-
Very interesting and your technique there for reinforcing the bulkheads with dowel is one that I haven't seen before.
Your kits have some great subjects. I couldn't find any written description of kit contents though. What sort of timber is provided? Are they single or double planked?
Any way nice to find a new kit maker (but I see you having been doing these for quite some time) and I will follow this build with interest. Thanks for posting.
Cheers
Alistair
-
Congratulations Ken. It come out superbly - the sails are just great. Well done - I love this little ship.
Cheers
Alistair
-
-
Fantastic work Luca. The whole hull,strakes and bulwarks look great. Coppering next?
Cheers
Alistair
-
I went for Fly as I preferred the stern detail over Pegasus - much more 3 dimensional in my opinion. That said, I effectively upgraded to Pegasus through the upgrade kit. I further upgraded through Chris Watton by getting the Pegasus PE set - very reasonably priced but I don't think he is selling through his website anymore. The total cost was more than Pegasus but only just. My Fly will be a hybrid but I got everything that Pegasus has and two PE sets - makes mistakes easier to deal with! I did have to buy copper as another upgrade - slightly forced on me and an added expense that is avoided with the Pegasus kit. I guess in hindsight I'd go for Pegasus but I still prefer the Fly stern!
Cheers
Alistair
-
Also suggest a two part epoxy glue in combination with the above. Horrible stuff to work with but near on unbreakable. Epiglass Epiglue the very best of these two part glues. I hate it but when you use it right the wood will fail long before the glue does.
Cheers
Alistair
-
Brilliant work Ollie - first class in every respect. Yours is turning into the definitive model of Mermaid.
Cheers
Alistair
-
Doesn't look bad to me at all.
for the wale/fashion piece sequence have a look at my log. The sequence shown there worked for me which is the planks underneath the wale first, then a temporary outer wale clamped into position to get the right lines for the fashion piece then install piece and finish the stern and then do the first layer of planks. I'm sure there are other ways.
Cheers
Alistair
-
-
Hi Len
Truly superb work. Good on you for deciding to move on - I can imagine the feeling you describe. Hull models are very attractive in there own right - yours being no exception - and with the deck details you have added you can now be sure they are all seen.
Fantastic stuff and I'll sure follow your next build.
Cheers
Alistair
-
That looks absolutely superb Bob.
One question - wouldn't the anchor cable run through a series of ringbolts attached to the deck to guide its flow into the hold? I could be dead wrong about this but interested in opinion.
As for missing photos, I have the same issue. What I've just tried, successfully, is to the delete the missing image references using full editor on the concerned post and then reinsert the images. Bit of a pain though.
Cheers
Alistair
-
Hi Ollie
Hmmm. This is a complex subject. You'll find a better advisor than me here...The kit version looks too high but the window frames look right. The windows in the other versions look too modern. My Fly kit supplies a top lit skylight but the reality is it was probably side lit. I'd go for your Post 460. A lowered and more compact version of a top lit skylight. I have NO knowledge about this - just going by eye. In the end, know one really knows and much of what we make in respect of these things is just a best guess
A hopeless helper...
A
-
Hi Nathan
It occurs to me that the individual pieces in that billet may have only a very minor warp? Perhaps remove all the parts and check each one individually and then flatten any offending ones. I had a warp in my keel on Fly - it was plywood too. I soaked and then weighted with steal plates on a dead flat surface for several days. The warp went away but the wood looked really bad afterwards - covered in black stains from the steel weights. That didn't matter though as it is completely covered within the hull.
Hope that helps.
Cheers
Alistair
-
-
Fantastic work on those gun port lids Ollie and they look so much better than the cast ones.
I'd actually go for the paler mast. The Tasmanian Oak grain might look out of scale - you shouldn't really see anything but the slightest hint of grain I reckon. On my last model I painted the masts and was pleased with the result so that is another option too? Perhaps mount test masts and go with a colour that fits the rest of your work?
Cheers
Alistair
-
Wow - that looks superb in every respect. Strikes me that you have set THE standard for this kit. Great work.
Cheers
Alistair
-
Looking very good to me Timmo. Symmetry achieved - I wish I could say the same for my weekends efforts with copper tiles. Lusi was slow to arrive but here now with some fine winds and heavy rain - nothing that we aren't used to!
Cheers
Alistair
-
Hi Luca
Just found your log - very, very nice work, especially on the stanchions.
I'm just getting to the end of coppering with the Amati plates on HMS Fly. They are very nice although I have nothing to compare them with. I'm sure you have picked up that the sheets are different for the port and starboard. I also find overlapping the plates vertically - in clinker fashion - is the best (only?) way to get the plates to fit the curvature of the hull. I hardly ever lay them in full strips as they simply can't curve if laid like this. The longest strip would be about 5 tiles before it is forced off line. Cutty Sark will be different though with such a long straight hull. Have a look at my log for a copper ageing accelerant if you are interested in going that way. My experiments with this aren't finished yet and a few here are still laughing about it...
I will look forward to seeing your coppering - I find it very difficult and with only one strip left to do, I'm, soon, happy to see it behind me...
Cheers
Alistair
- olliechristo and coffeebeans
-
 2
2
Weathering/Eroding copper hull
in Painting, finishing and weathering products and techniques
Posted
I wanted a brown look for my copper rather than green. This is based on some of the contemporary models in the NNM collection. I used urine - my own - and this was the outcome after about 12 hours. The biggest problem is undetectable bits of glue which prevent aging. I may go back and rework these little flecks.
Cheers
Alistair