Hubac's Historian
-
Posts
3,316 -
Joined
-
Last visited
7 Followers


.thumb.jpeg.fc5d633a7b34428fcf19419a73d56d55.jpeg)


About Hubac's Historian

- Birthday 08/11/1973
Recent Profile Visitors
8,912 profile views


-
 Hubac's Historian reacted to a post in a topic:
Soleil Royal 1671 by EricWiberg - Heller - 1/100 - PLASTIC
Hubac's Historian reacted to a post in a topic:
Soleil Royal 1671 by EricWiberg - Heller - 1/100 - PLASTIC
-
EricWiberg reacted to a post in a topic:
Soleil Royal 1671 by EricWiberg - Heller - 1/100 - PLASTIC
-
Hubac's Historian reacted to a post in a topic:
Soleil Royal 1671 by EricWiberg - Heller - 1/100 - PLASTIC
-
Hubac's Historian reacted to a post in a topic:
Soleil Royal 1671 by EricWiberg - Heller - 1/100 - PLASTIC
-
Hubac's Historian reacted to a post in a topic:
Soleil Royal 1671 by EricWiberg - Heller - 1/100 - PLASTIC
-
EricWiberg reacted to a post in a topic:
Soleil Royal 1671 by EricWiberg - Heller - 1/100 - PLASTIC
-
 Can you please remind me what your lower deck port opening width and height are in MM? I’m assuming that the white framing are the port lid stops, and that you will plank up to and around these? Also, what is the distance between openings in MMs?
- 450 replies
-
- 1
-
-
- soleil royal
- Heller
- (and 1 more)
-
Hubac's Historian reacted to a post in a topic:
Soleil Royal 1671 by EricWiberg - Heller - 1/100 - PLASTIC
-
Hubac's Historian reacted to a post in a topic:
Soleil Royal 1671 by EricWiberg - Heller - 1/100 - PLASTIC
-
Hubac's Historian reacted to a post in a topic:
Soleil Royal 1671 by EricWiberg - Heller - 1/100 - PLASTIC
-
Hubac's Historian reacted to a post in a topic:
Soleil Royal 1671 by EricWiberg - Heller - 1/100 - PLASTIC
-
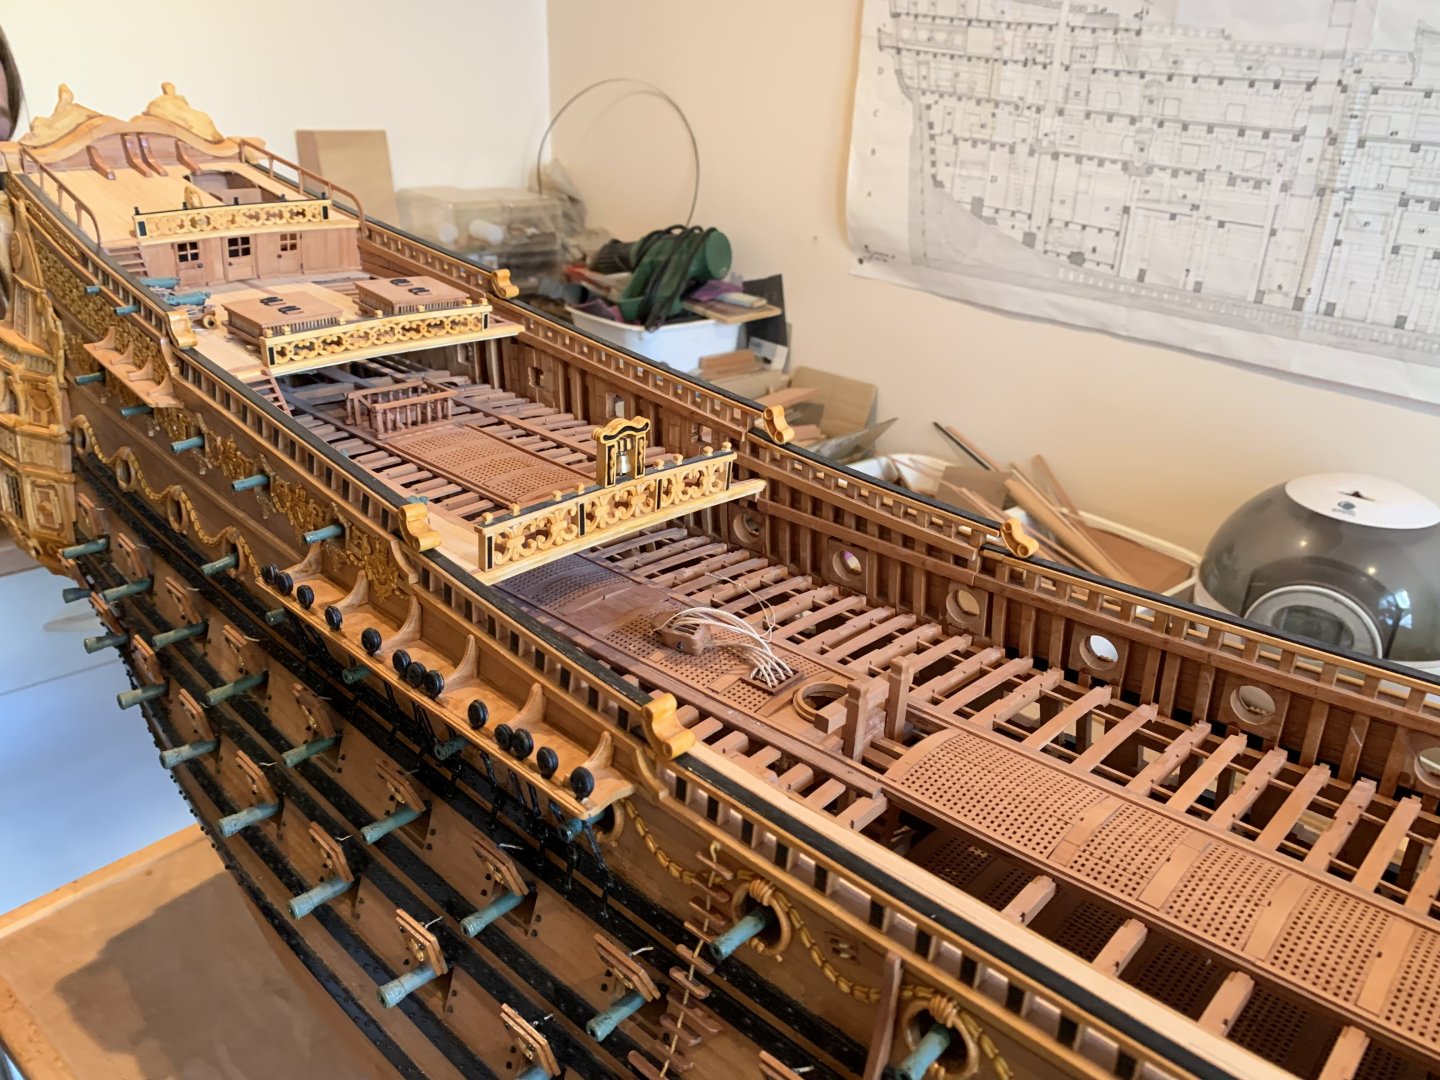
In fact, I didn’t catch it in post #428, but your layout there actually shows 17 piercings, including the bow chase port. Should be 16 in total.
-
As far as creating a more compressed impression between gun decks, I think you are succeeding, there. What has me confused about your layout is that you show 16 lower deck piercings (red squares), but the forward chase port is in the position of a broadside gun - too far aft, in other words. This has implications for the layout of all gun decks above.
-
EricWiberg reacted to a post in a topic:
Soleil Royal 1671 by EricWiberg - Heller - 1/100 - PLASTIC
-
I’m going to let this sit as well. Gotta really focus, and I’m not quite where I want to be.
- 450 replies
-
- 1
-
-
- soleil royal
- Heller
- (and 1 more)
-
GrandpaPhil reacted to a post in a topic:
Soleil Royal 1671 by EricWiberg - Heller - 1/100 - PLASTIC
-
Hubac's Historian reacted to a post in a topic:
Soleil Royal 1671 by EricWiberg - Heller - 1/100 - PLASTIC
-
Before you start cutting, might you want to be sure of the stagger pattern for your middle deck guns, and where that will all map out for the upper main deck guns?
-
Voila! And, I also agree that going back to 9MM ports will be appropriate.
-
Try increasing the spacing between ports 2 - 15 to 22 MM, this will be just under .875 imperial, or 7 scale feet at 1:96. Your current spacing looks a little crowded, and the space between the bow chase port and the next gun aft is too large. You are trying to impose 1671 dimensional parameters on a kit based off of 1693 dimensional parameters. It doesn’t have to “be” exactly right. It just has to look right.
-
Hubac's Historian reacted to a post in a topic:
Soleil Royal 1671 by EricWiberg - Heller - 1/100 - PLASTIC
-
EricWiberg reacted to a post in a topic:
Soleil Royal 1671 by EricWiberg - Heller - 1/100 - PLASTIC
-
EricWiberg reacted to a post in a topic:
Soleil Royal 1671 by EricWiberg - Heller - 1/100 - PLASTIC
-
At scale, if you end up in the vicinity of 6.5 - 7’ between ports, then that’s where you want to be.
- 450 replies
-
- 1
-
-
- soleil royal
- Heller
- (and 1 more)
-
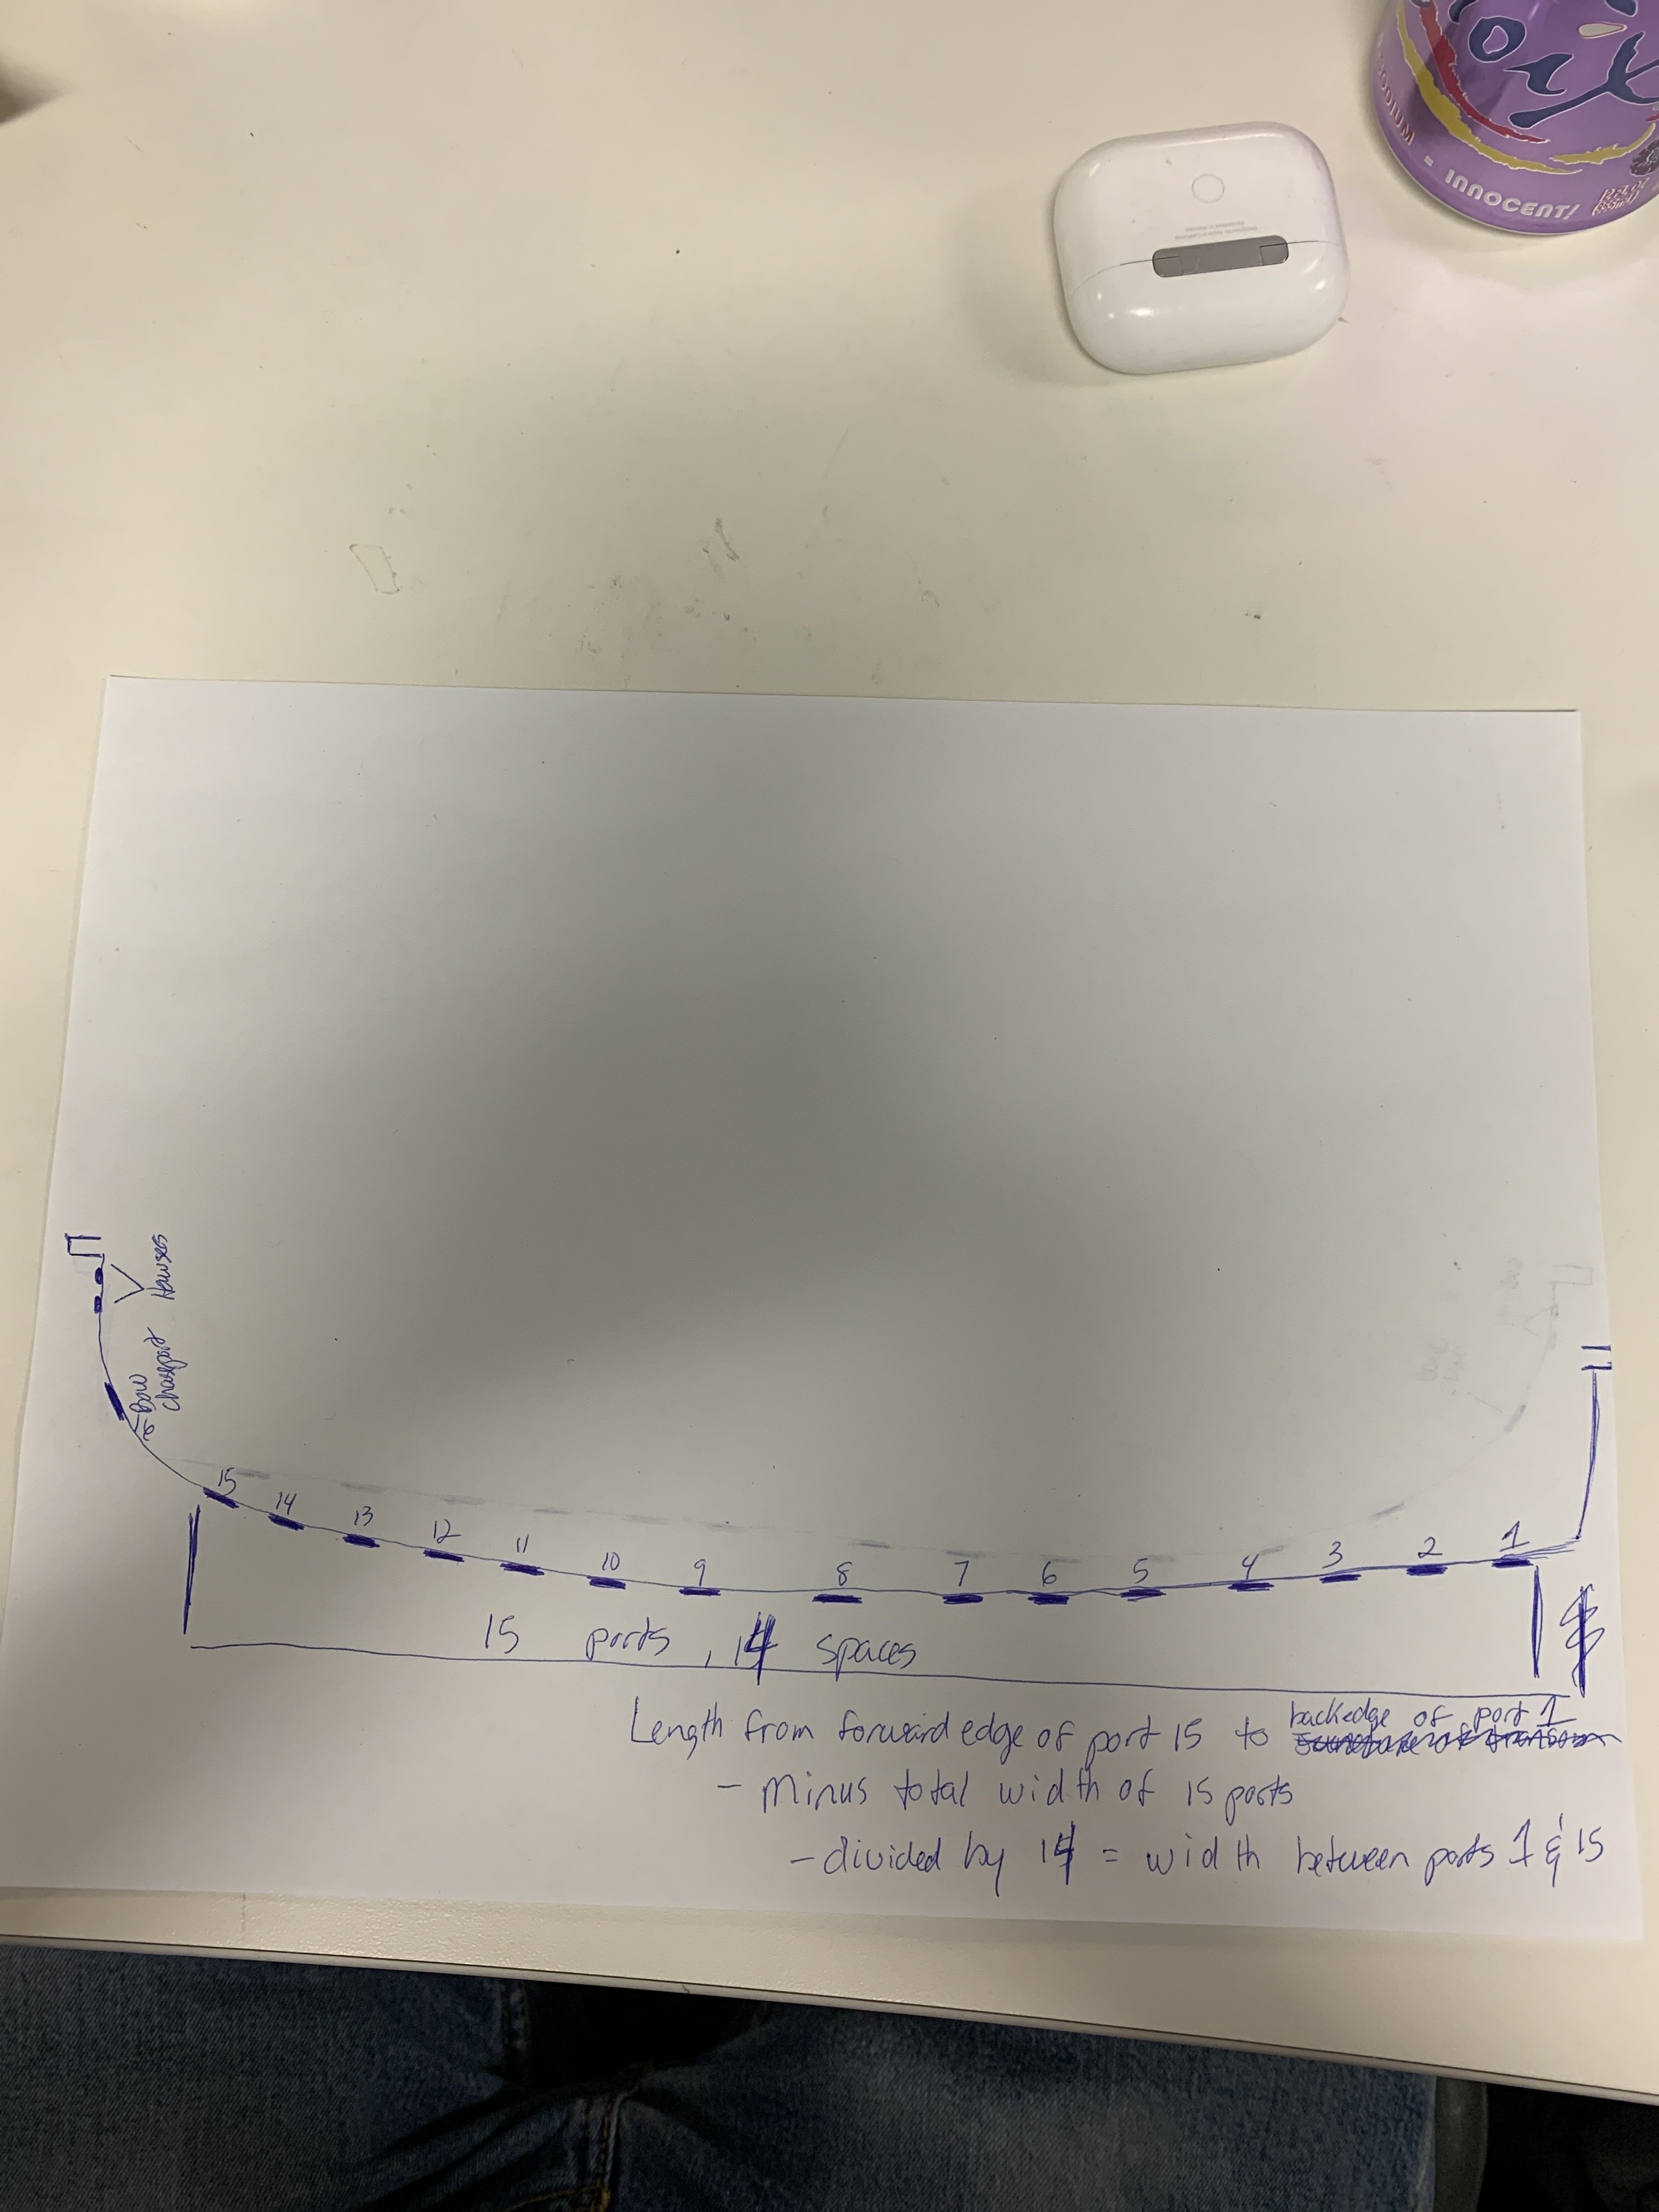
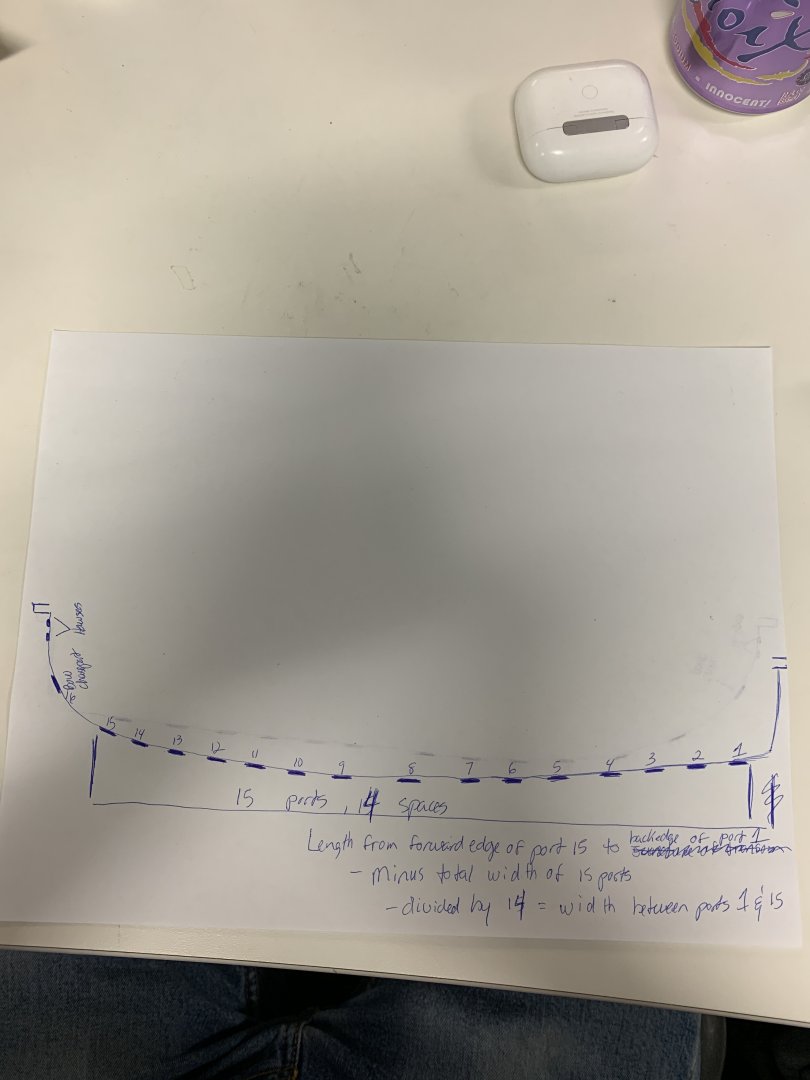
I think you measure along the outside of the hull. As you say, establish the position of port #’s 2 and 16, and then calculate even spacing for the guns in-between. A straight linear measurement of the deck length is not particularly useful, here. Here is a poor drawing illustrating the calculation. Port numbering not so important, here. You get the idea:
- 450 replies
-
- 2
-
-
- soleil royal
- Heller
- (and 1 more)
-
EricWiberg reacted to a post in a topic:
Soleil Royal 1671 by EricWiberg - Heller - 1/100 - PLASTIC
-
EricWiberg reacted to a post in a topic:
Soleil Royal 1671 by EricWiberg - Heller - 1/100 - PLASTIC
-
Archi reacted to a post in a topic:
Soleil Royal 1671 by EricWiberg - Heller - 1/100 - PLASTIC
-
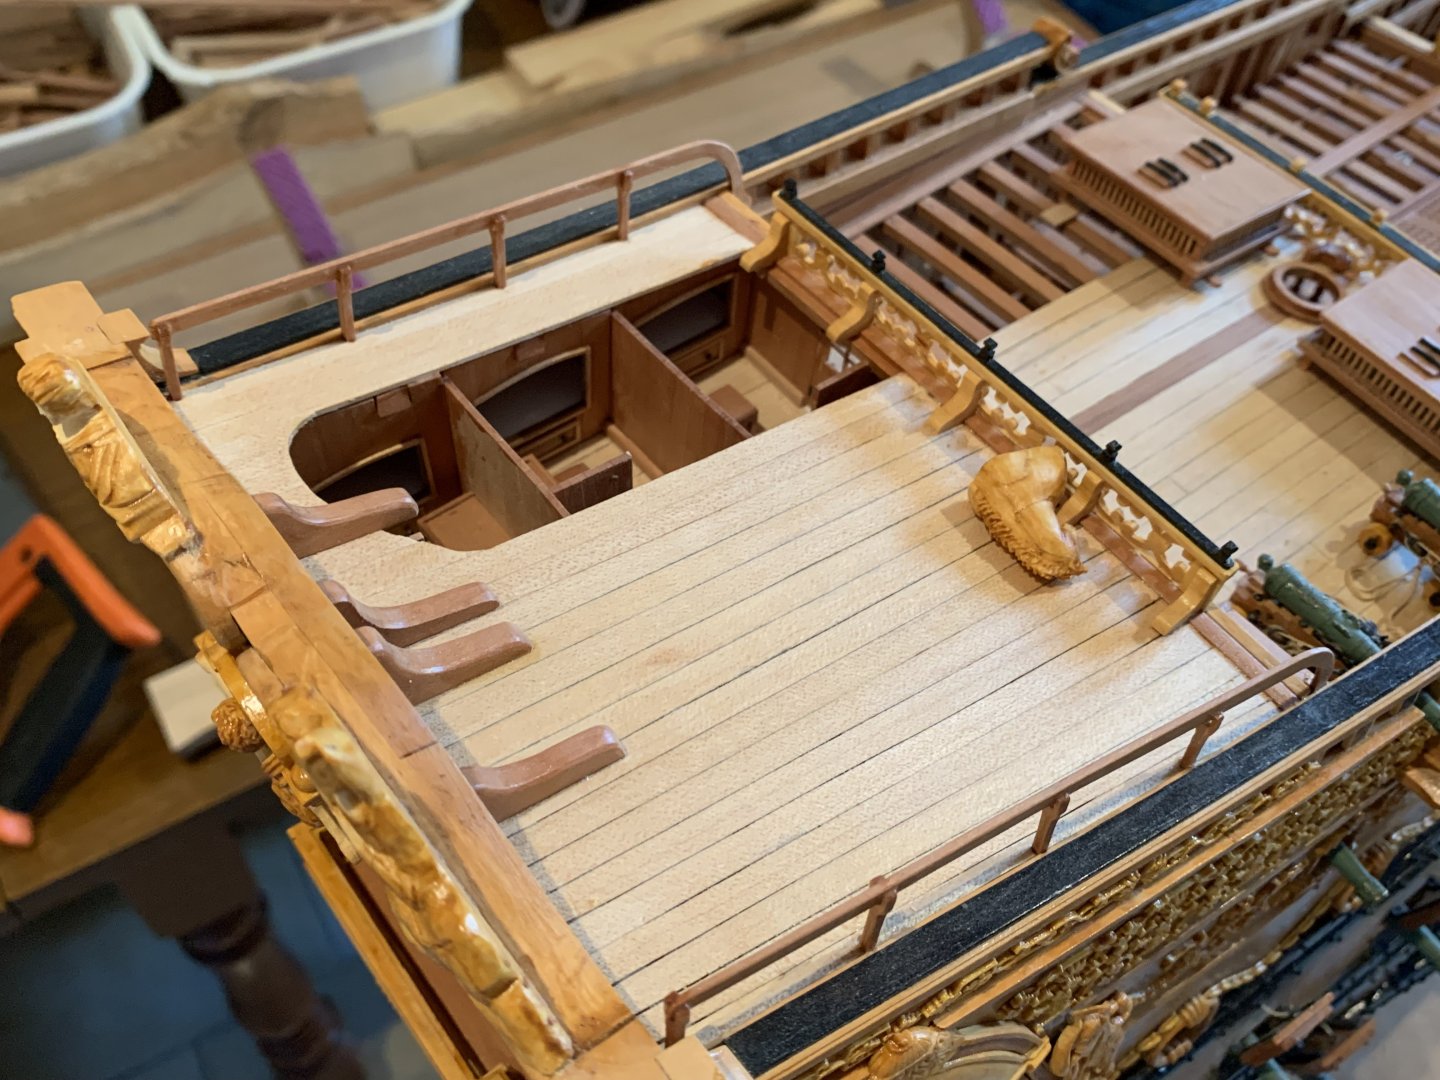
It’s a very small detail, Eric, but in your schematic of the proposed forward bulwark, where you show the lowered placement of the three round f’ocsle ports, I will make the following suggestion: Even though the open space will be negligible, you should not fill the gap between the top third of the round port and the underside of the caprail.
- 450 replies
-
- 1
-
-
- soleil royal
- Heller
- (and 1 more)
-
king derelict reacted to a post in a topic:
Amerigo Vespucci by Bill97 - OcCre - 1/100
-
My only real issue with pronounced pitch on the poop royal deck is that this is one deck that makes sense for the open chicken coops to reside on. However, you could always stilt the legs of the coops so that they are on the level.
- 450 replies
-
- 1
-
-
- soleil royal
- Heller
- (and 1 more)
-
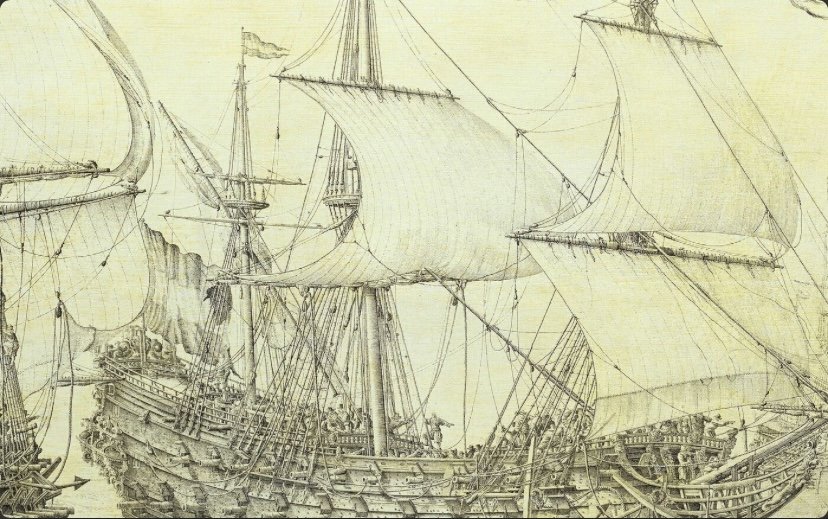
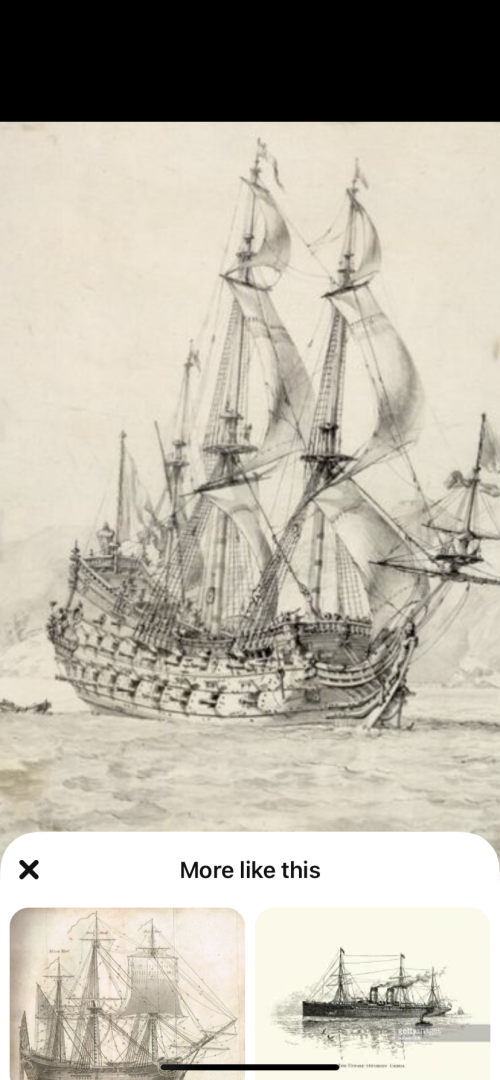
Generally speaking, Eric, your rise over run looks almost about right to me; maybe a little extreme though. I’m afraid this won’t be terribly scientific, on my part, but I would be inclined to nudge the termination points of the pair of lower main wales, down another 1/8”+. That way, you’ll have a better connection to the upper transom moulding that we discussed, above the stern chase ports. Honestly, I don’t think you were too far off on your previous iteration: As for the poop deck, which is carrying guns, it would not have any kind of pronounced forward pitch. The poop royal deck, though, may have had some pitch simply to increase headroom in these birthing cabins. Is that what is happening on the poop decks of these Dutch two-deckers: Hard to say, but it seems so. Or, what about this Dutch-built Frenchie, Le Neptune: Here’s a Puget drawing of a third-rate: I’m on the fence on this one, although Michel Saunier seems to have made a definitive choice on this question: photos, courtesy of Marc Yeu.


- 450 replies
-
- 4
-
-
- soleil royal
- Heller
- (and 1 more)
-
Michael, thank you so much for the kind words!