Hubac's Historian
-
Posts
3,314 -
Joined
-
Last visited
Content Type
Profiles
Forums
Gallery
Events
Everything posted by Hubac's Historian
-
 The leafing is coming along beautifully, Bill!
 -
Shipman, is this the Vasa model at the Science Museum with a telescope to the interior?
-
I have to say - I really like the Airfix St. Louis. It’s a fantastic basis for a really good scale model.
-
John, if you post a build log I will happily follow along. I am always interested to see what people do with this kit. I really like that you filled-in the butt joints of the wales. This is a simple upgrade and it makes a tremendous difference.
- 2,699 replies
-
- 3
-

-
- heller
- soleil royal
- (and 9 more)
-
Thank you, Mark. My mother was a great lover of puzzles and I suppose I have that gene too because that is exactly what Soleil Royal represents for me - a fragmentary puzzle. I’ll never find all of the pieces that fell off the table and are now hiding in the interstices of the furniture and flooring. I do enjoy looking, though.
- 2,699 replies
-
- 2
-
-
- heller
- soleil royal
- (and 9 more)
-
Sounds like it would be a good idea, Shipman, and another part of clearing away all of the interior bulkheads.
- 2,699 replies
-
- 3
-
-
- heller
- soleil royal
- (and 9 more)
-
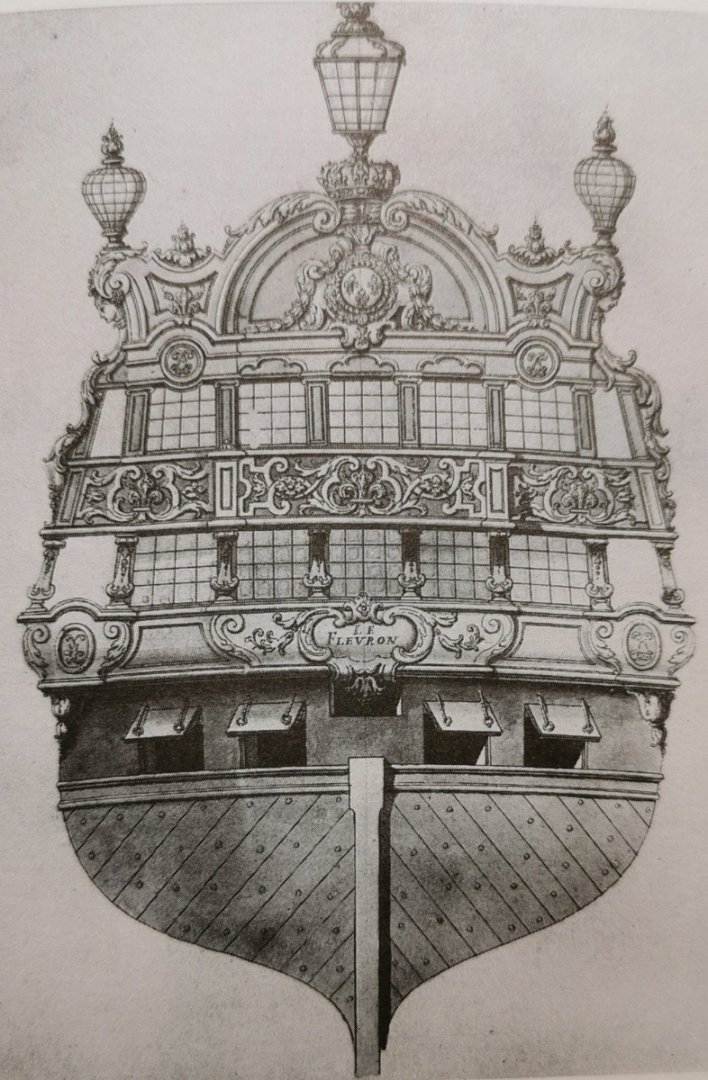
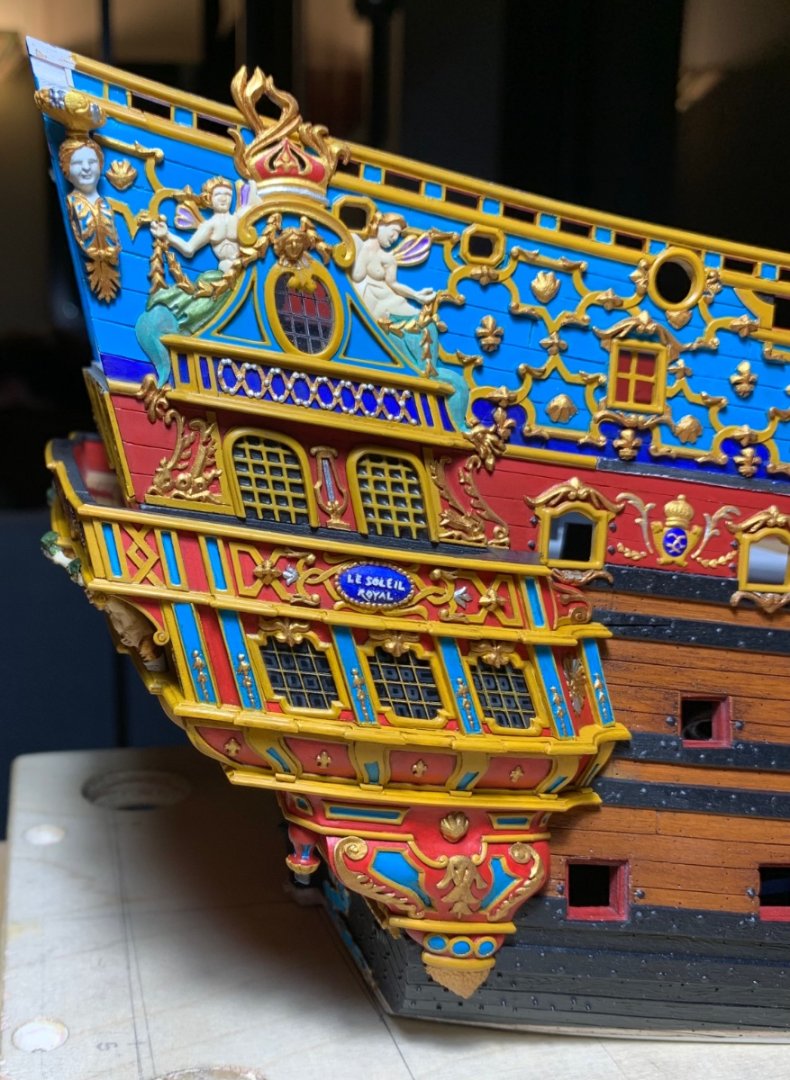
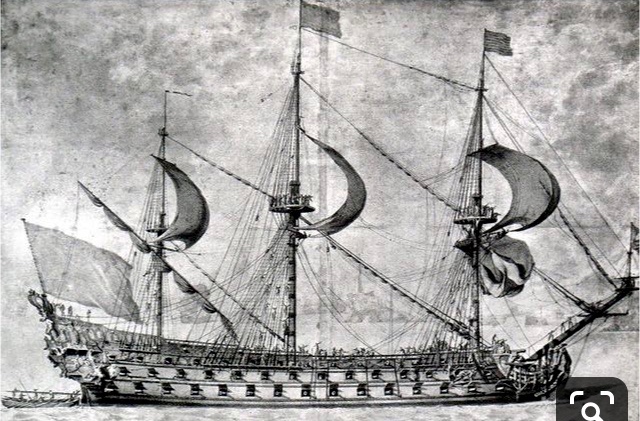
Yes, John, I have been very lucky that this project has attracted the attention of such a diversely talented group. I guess, at the end of the day, we all like our painted ladies 😏 I’m intrigued by your choice of avatar, John. Le Fleuron by Jean Berain: Are you planning a scratch-project of this ship? As for the question of removable panels that conceal gun ports, you are spot-on. The lowest tier of 3 lights, where the functional toilet resides, are all false lights. The forward panel likely conceals an additional gun port. The middle two lights, in the amortisement, are also false lights - the forward, of which, could also be an armed port. As a side note, I kinda wished that I had done all of the stern lights in this stylized black. The upper tier of balcony lights is giving me fits, at the moment, but I’ll address that more fully in the next post. The only real light in the quarter gallery is that of the Captain’s cabin on the quarter deck. Interesting side note: I had always assumed that this was the Admiral’s cabin, and that Tanneron had perhaps incorrectly placed the crenelated bulkhead on the wrong deck, when it should reside on the main deck below. Well, as with so many of my early assumptions, that proved to be wrong. The insight comes from the survey drawings of the cabins. These drawings, which include pre-refit drawings of the three cabins, as well as post-refit drawings with the new 6-window layout, illustrate dimensionally that the Captain’s cabin must always have resided on the quarter deck. I discovered these, dare I say, facts through a closer reading of Guy Maher’s research document. I wish I could take credit for it, but that is all Guy Maher. And, so, this is why Guy posits that Tanneron perhaps intended to build a model of SR as she first appeared upon launching; the framing of the stern that his model shows reflects the rather severe tumblehome that the pre-refit cabin drawings dictate. Tanneron chose a 5-window layout, as opposed to the five window + 2 half-light layout of the pre-refit great cabin. As discussed in earlier posts, Tanneron was not a stranger to simplifying window layouts on his other Musee models - see L’Agreable. Another assumption of mine has been that Tanneron adapted Berain’s design to fit within the reduced area of this taller, more narrow stern. Perhaps, though, at the time he made this model he had access to the mythical Puget drawing which was, itself, a reworking of the LeBrun conceptual drawing. Guy suspects that this drawing may still exist somewhere in the archives, but he has not yet located it. I have long believed the Tanneron model is a composite of the ship from 1670 and the second ship of 1693, as it shares distinct construction characteristics of both epochs. The quarter galleries share the overall shape of the 1690’s and beyond (see Louis Quinze model), however, their fully open, terraced design is an artifact of the 1670’s. That Guy is one sharp guy! I can’t post a link to it directly, but if one were curious to see his particular vision of the ship, just Google: “Guy Maher, Soleil Royal 1671” In my next post, I will detail my travails with my stern. Oh, and my liquid bitumen finally completed it’s epic pilgrimage from the shores of England! I’ll be able to resume work on the head soon.

- 2,699 replies
-
- 12
-
-
- heller
- soleil royal
- (and 9 more)
-
He must be doing okay because he continued to work on the St. Louis, which is nearing completion.
-
Really cool card model! I will happily follow along.
-
Thank you for having the interest! Yeah, 3 - 5’ is all the free-board they had at any given time.
- 2,699 replies
-
- 5
-
-
- heller
- soleil royal
- (and 9 more)
-
Yes, this is what I love about them: completely over the top Baroque splendor that distracts from the true purpose of these war machines. That is, until a broadside roars to life and all of that careful carved work explodes in a blizzard of splinters. It’s this brazen dis-regard for the excesses of the construction juxtaposed with the enthusiasm to repair and restore it all after battle that makes this epoch so fascinating to me. The allegories that inform the ornamental programs of each French ship are intended to reflect the virtues of the king, but really - monarchs of the time were brutal, savage killers. Battle injuries and casualties on a wooden warship were simply horrific.
- 2,699 replies
-
- 5
-
-
- heller
- soleil royal
- (and 9 more)
-
It might be the only snow we get, Michael. Wait ‘til the spring to dust.
-
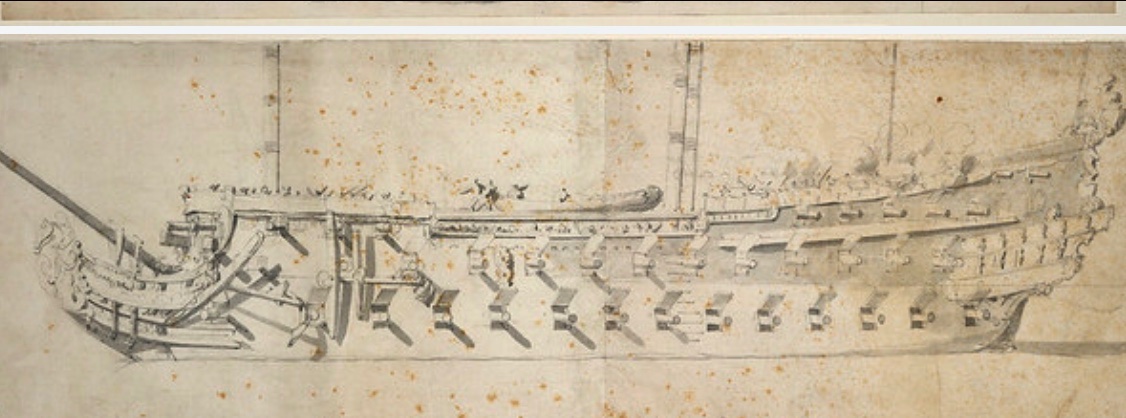
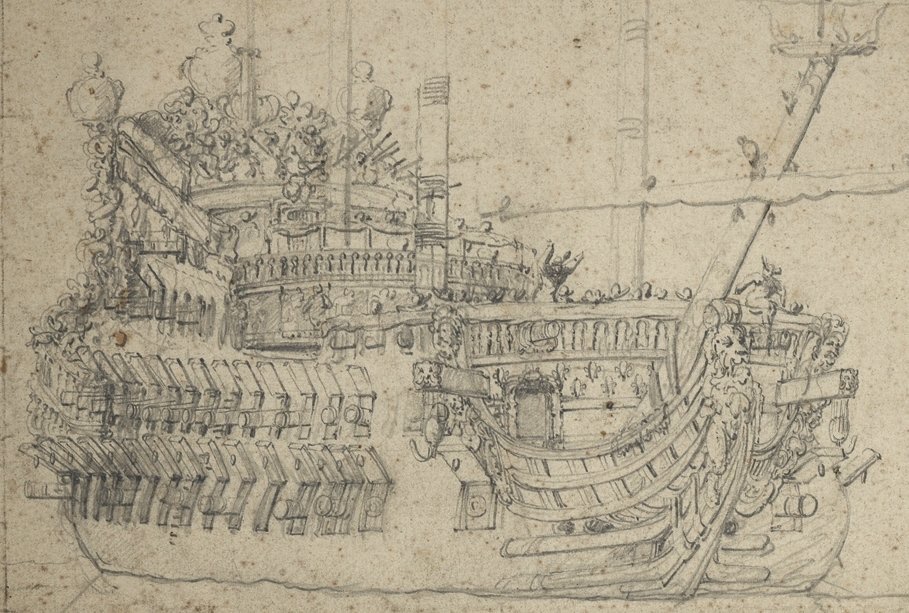
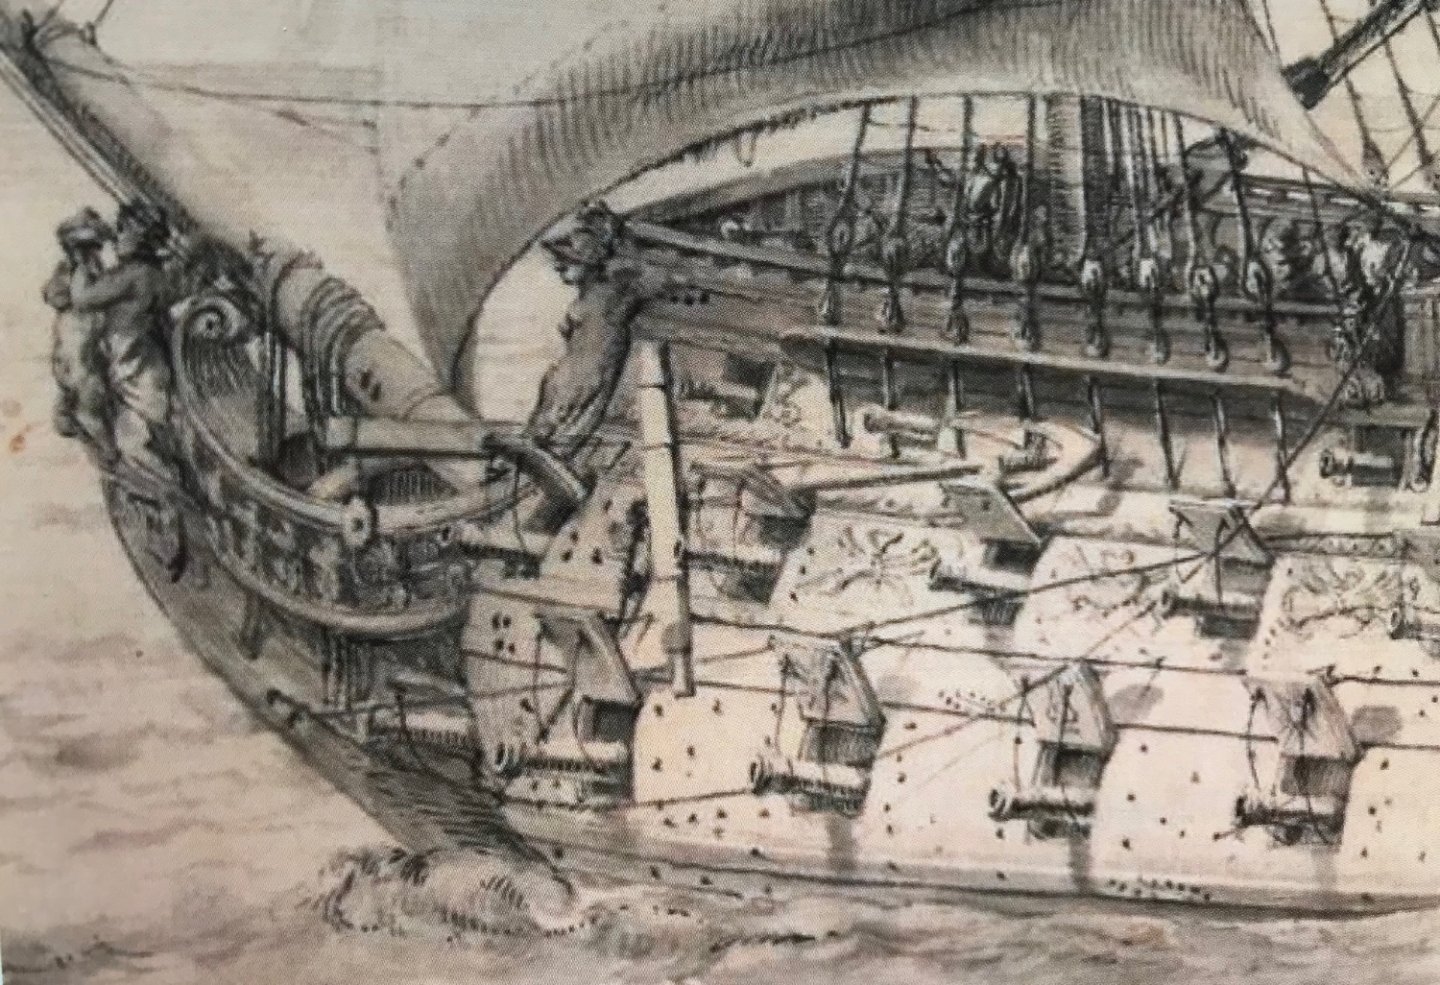
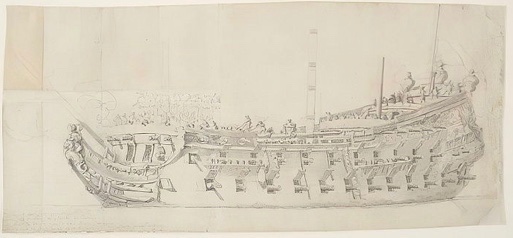
Hi Ian - for the ships of the 1670s and 80s, where the beakhead is more elongated, elevated and Dutch-like, the gammoning tends to be a little more removed from the waterline: Towards the end of the century, though, the head configuration changes, and the beakhead sweeps down closer to the water:
- 2,699 replies
-
- 8
-
-
- heller
- soleil royal
- (and 9 more)
-
I love the tassels and the overall excellence of the build, at this late stage, Frank. Personally, I would opt not to cover all the beautiful work under the canopy.
- 510 replies
-
- 2
-
-
- reale de france
- corel
- (and 1 more)
-
Looks like a go, Bill!
-
Well, this all looks pretty incredible! I will happily follow along on this one.
-
On a related tangent, following is a really fascinating look at the Jean Bart project at Gravelines. This is essentially a full interpretation of the 80-gun ship proposed in Album de Colbert, from 1670. The promotional model they made for the project is cartoonishly out of scale and proportion, but the lines plan they have developed for construction looks very good to my eye. After 20 some years, the builders have framed to just below the lower main wale. This is particularly instructive to me, as the shape and volume of the so-called “live-works” is now quite clear: Turn on captioning for a reasonable translation of what’s being said. As was the case with the Provincien project, this is an open air construction, necessitated I suppose for the crane to lower futtocks from above. I have my fingers crossed that the backbone of the ship won’t be rotten before the decks are framed and closed-in.
- 2,699 replies
-
- 6
-
-
- heller
- soleil royal
- (and 9 more)
-
Yes, Bill - the Knicks even have a professional E-team and the five guys that play the season schedule are all paid a living wage. As someone who has always preferred to physically compete in games, this is all pretty mind-blowing.
-
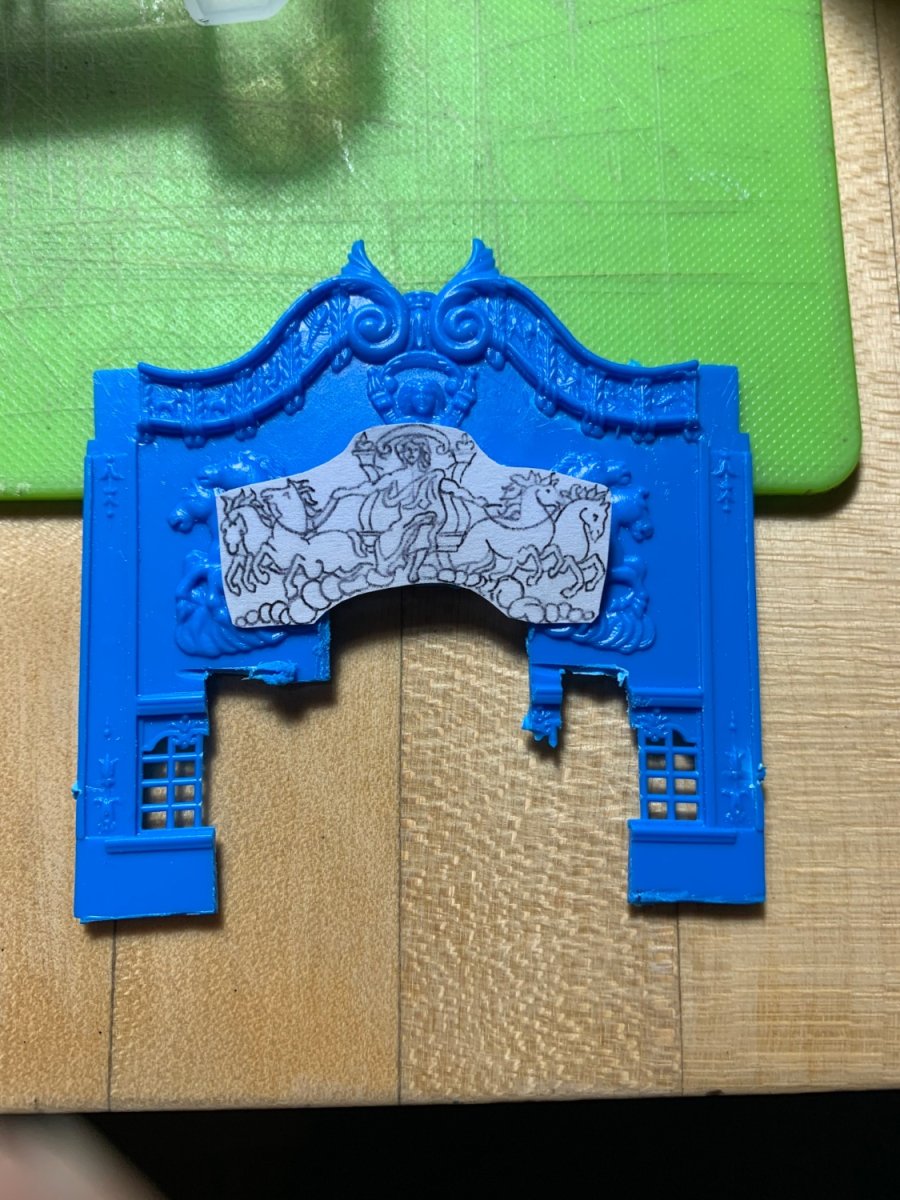
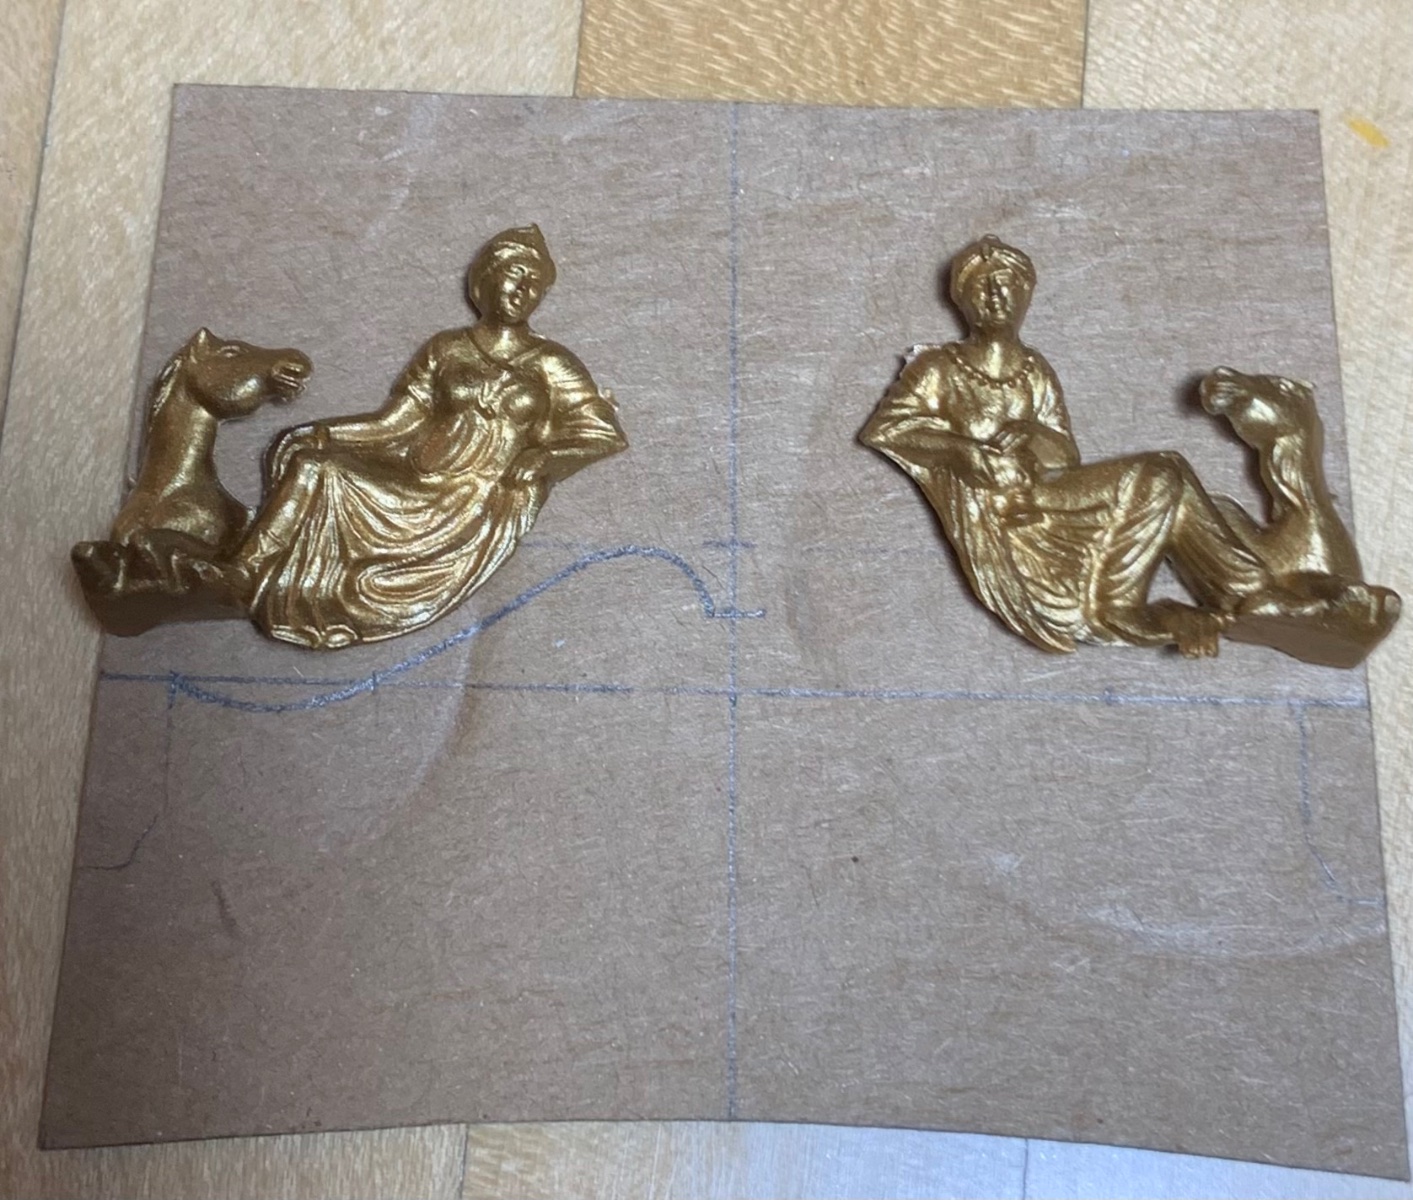
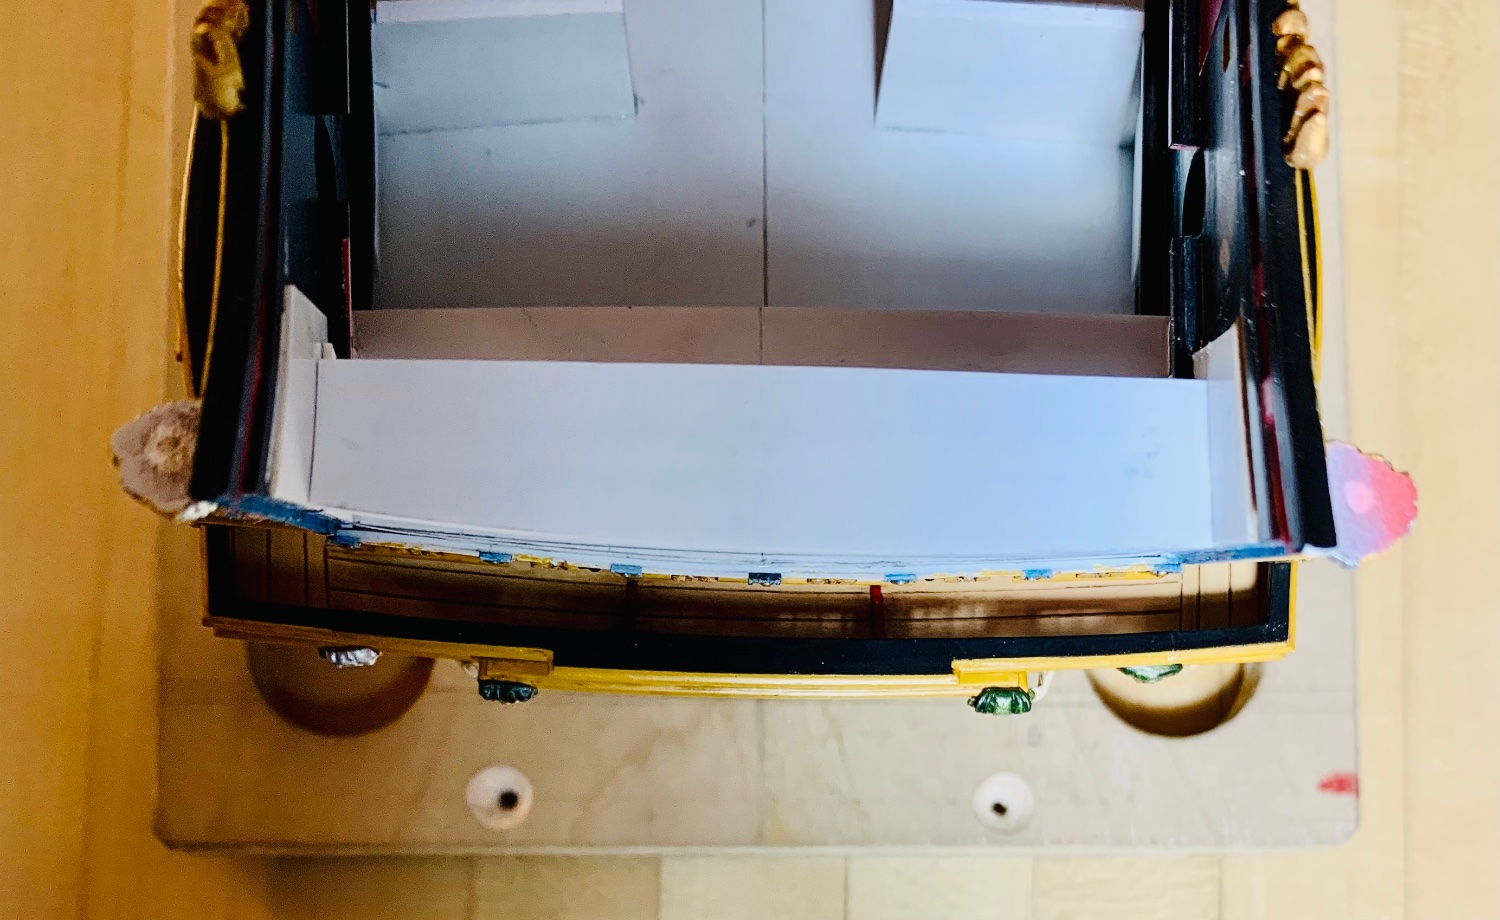
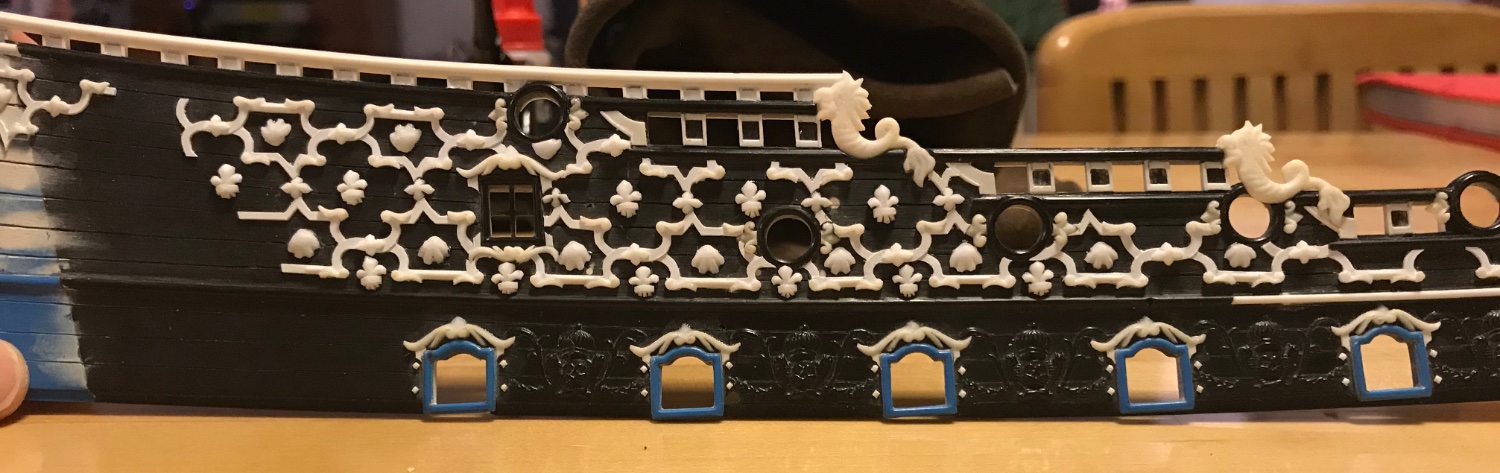
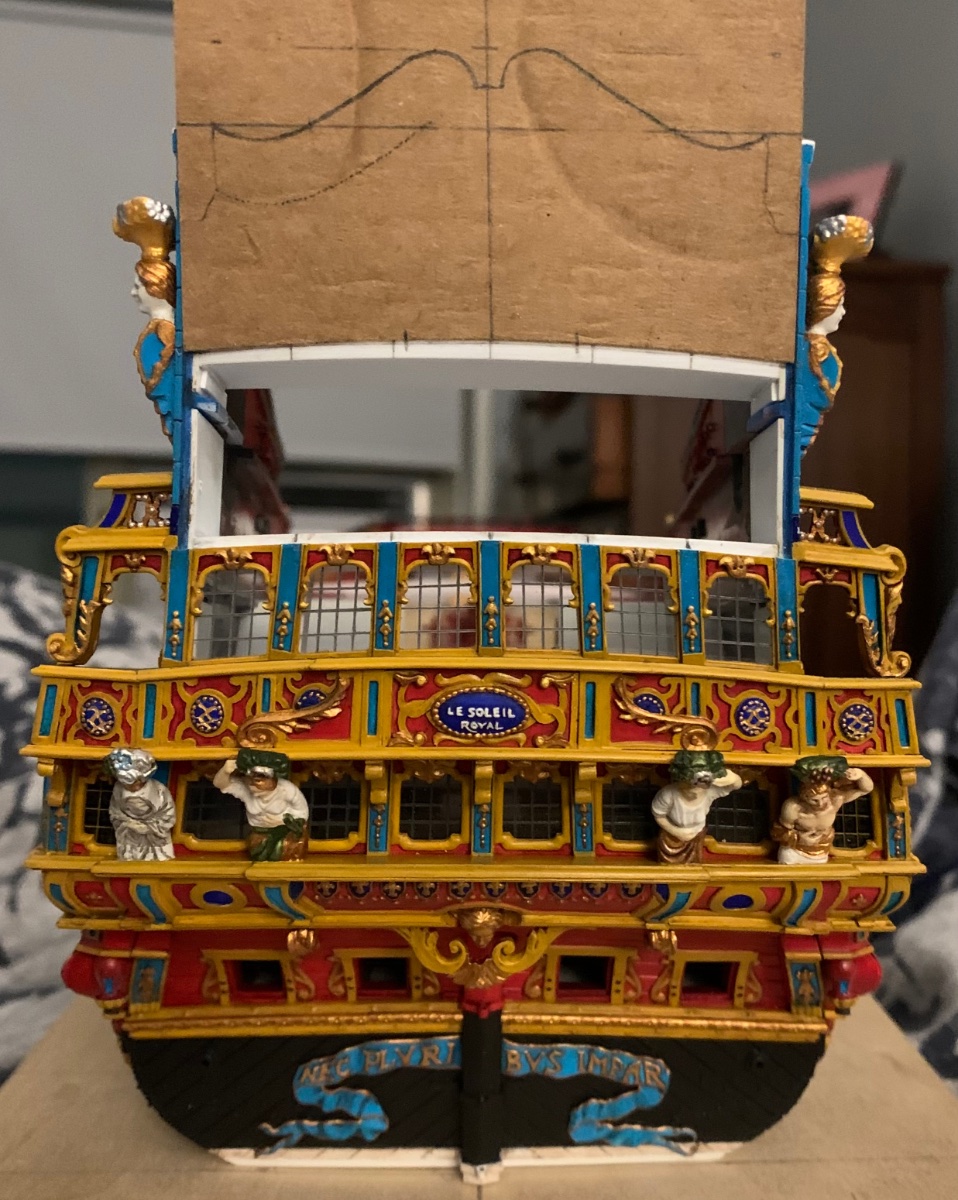
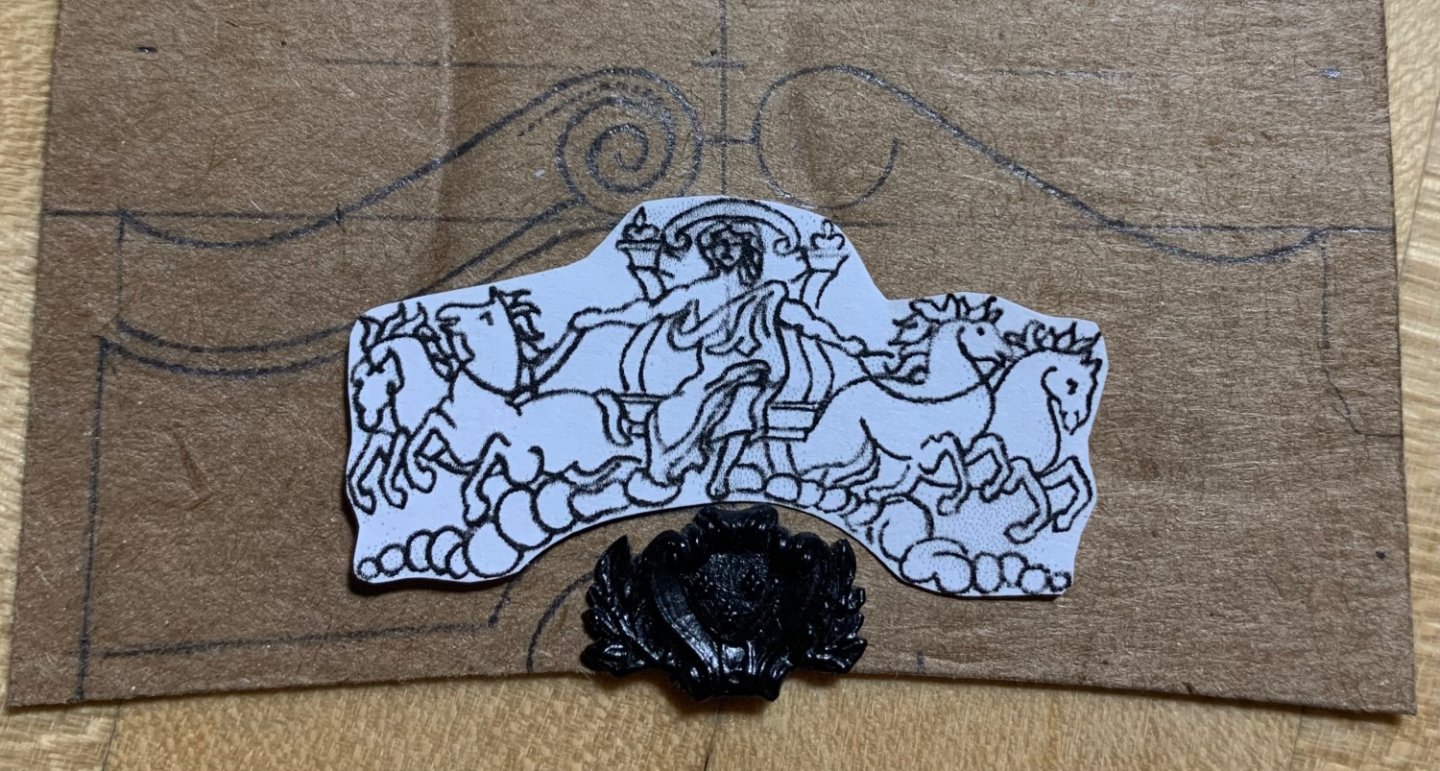
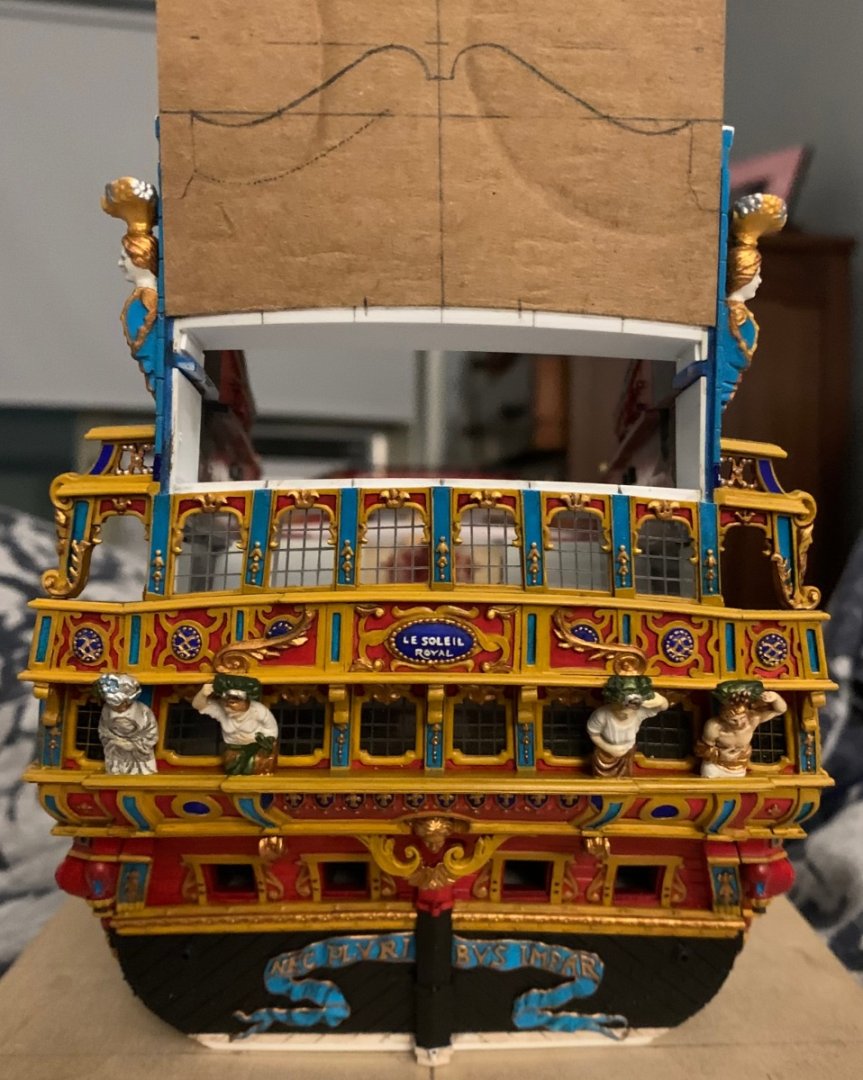
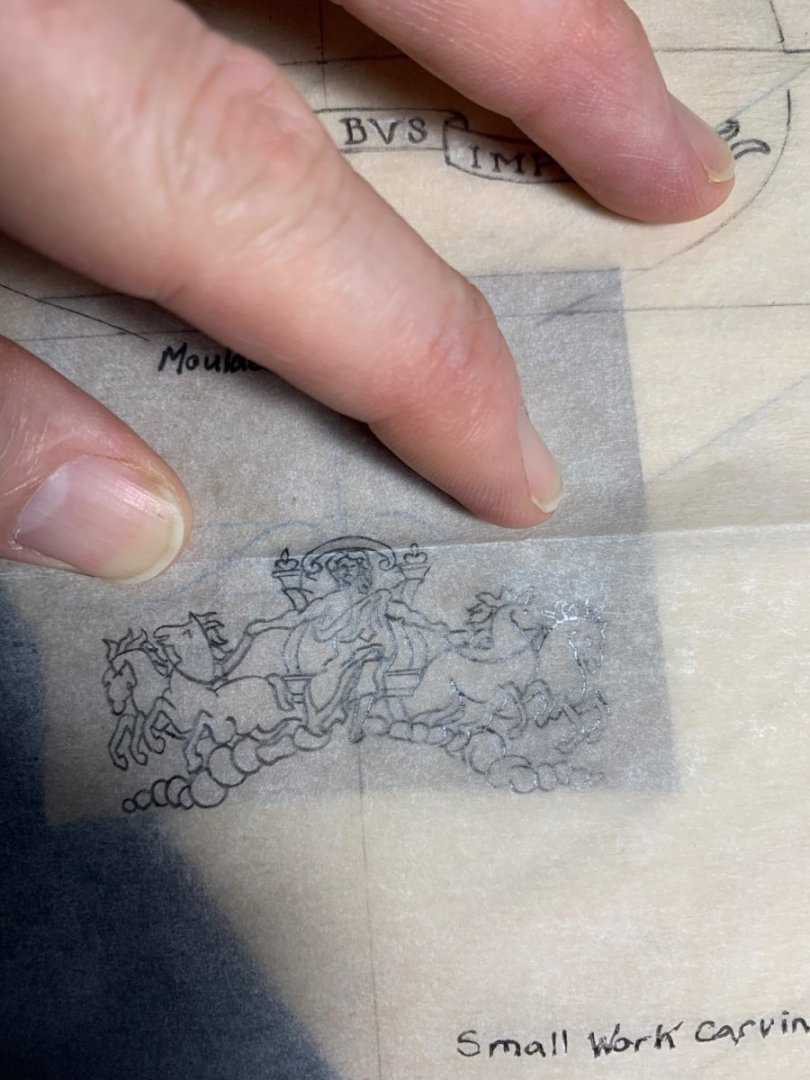
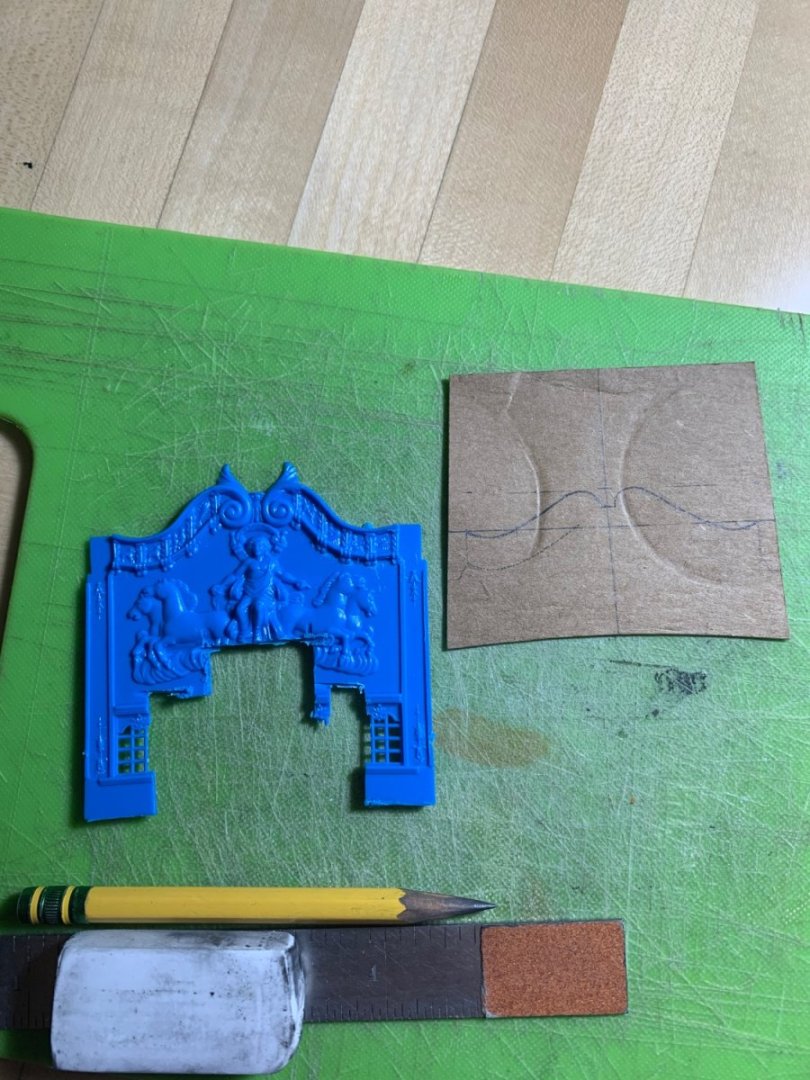
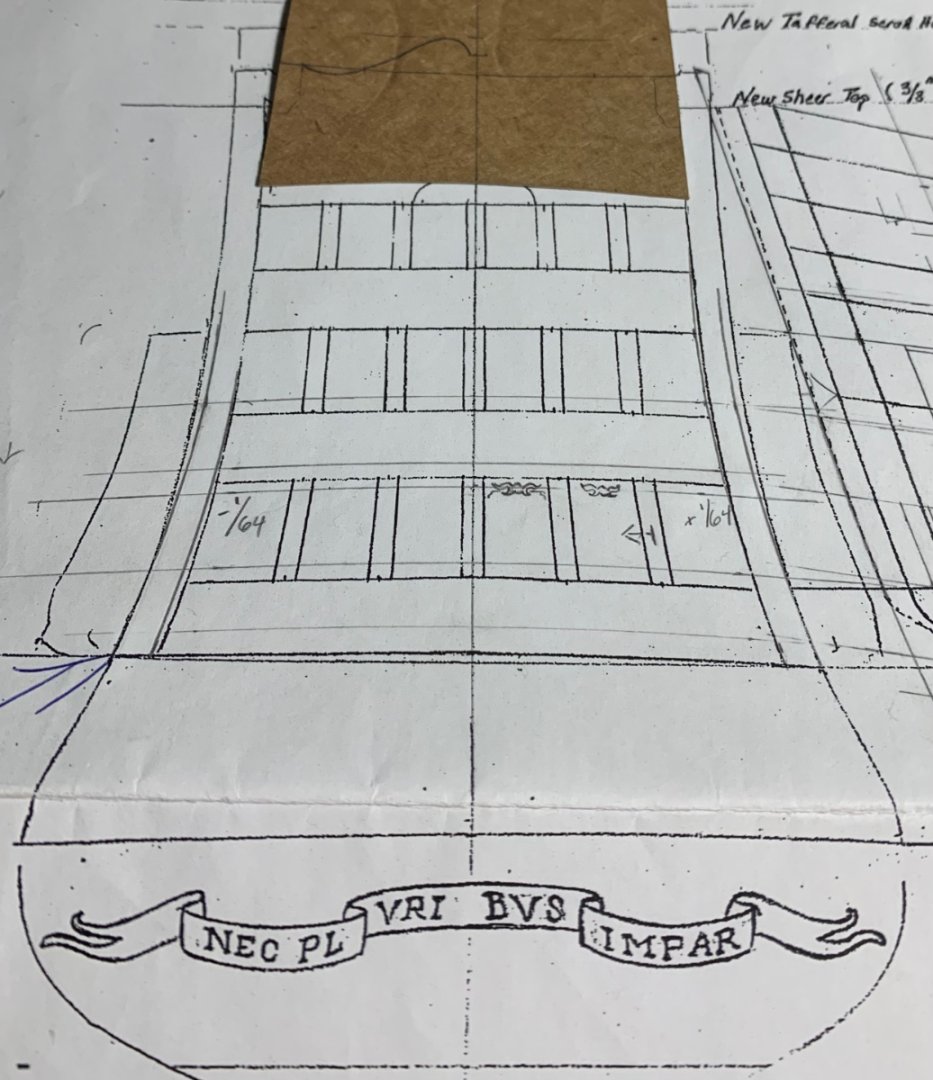
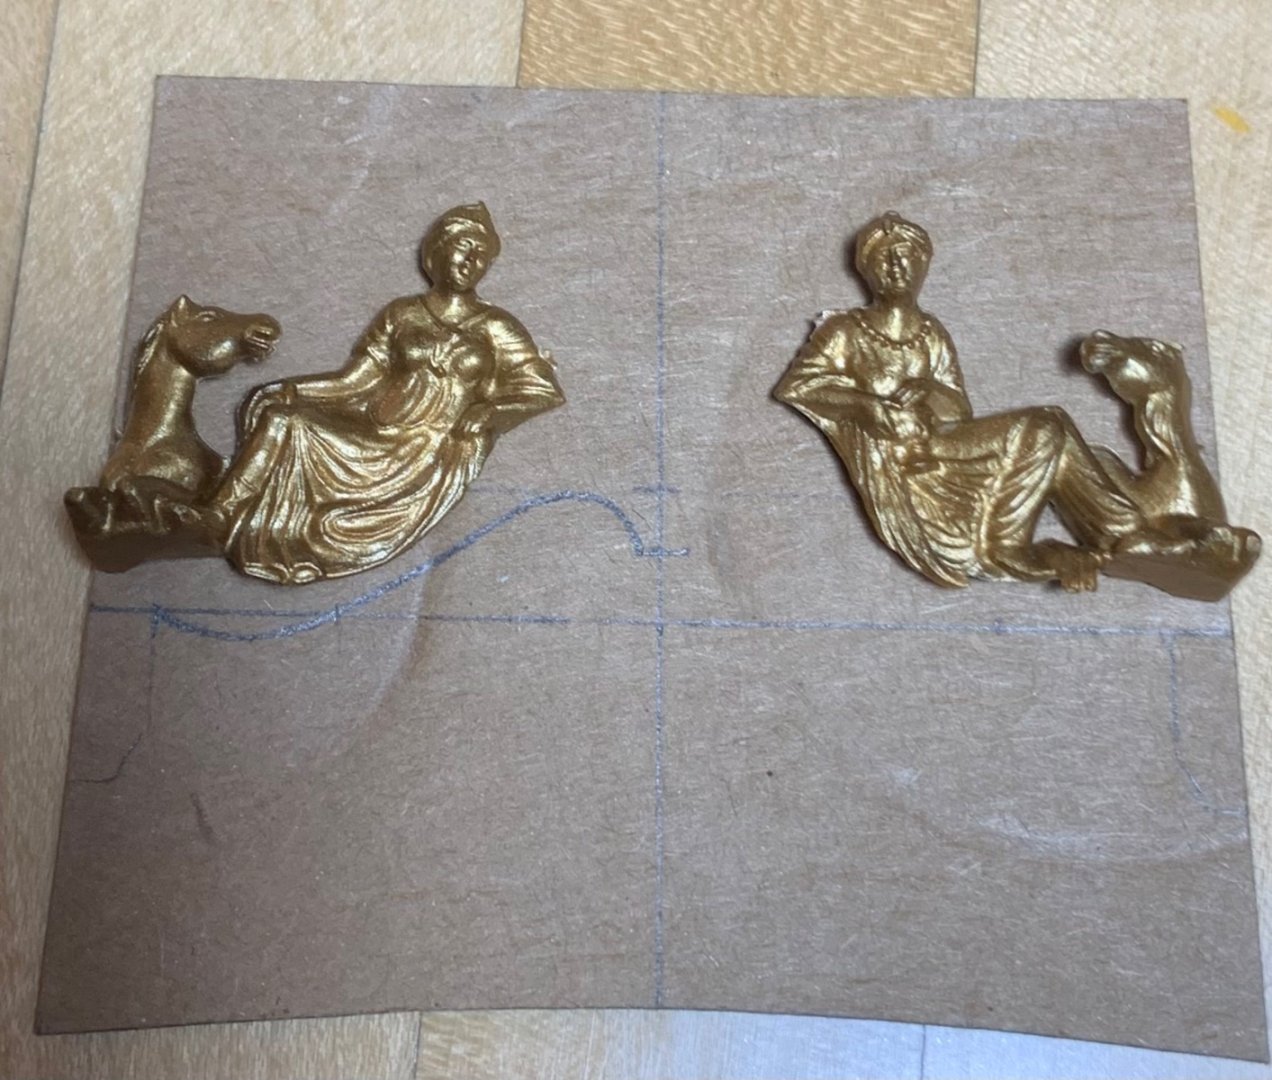
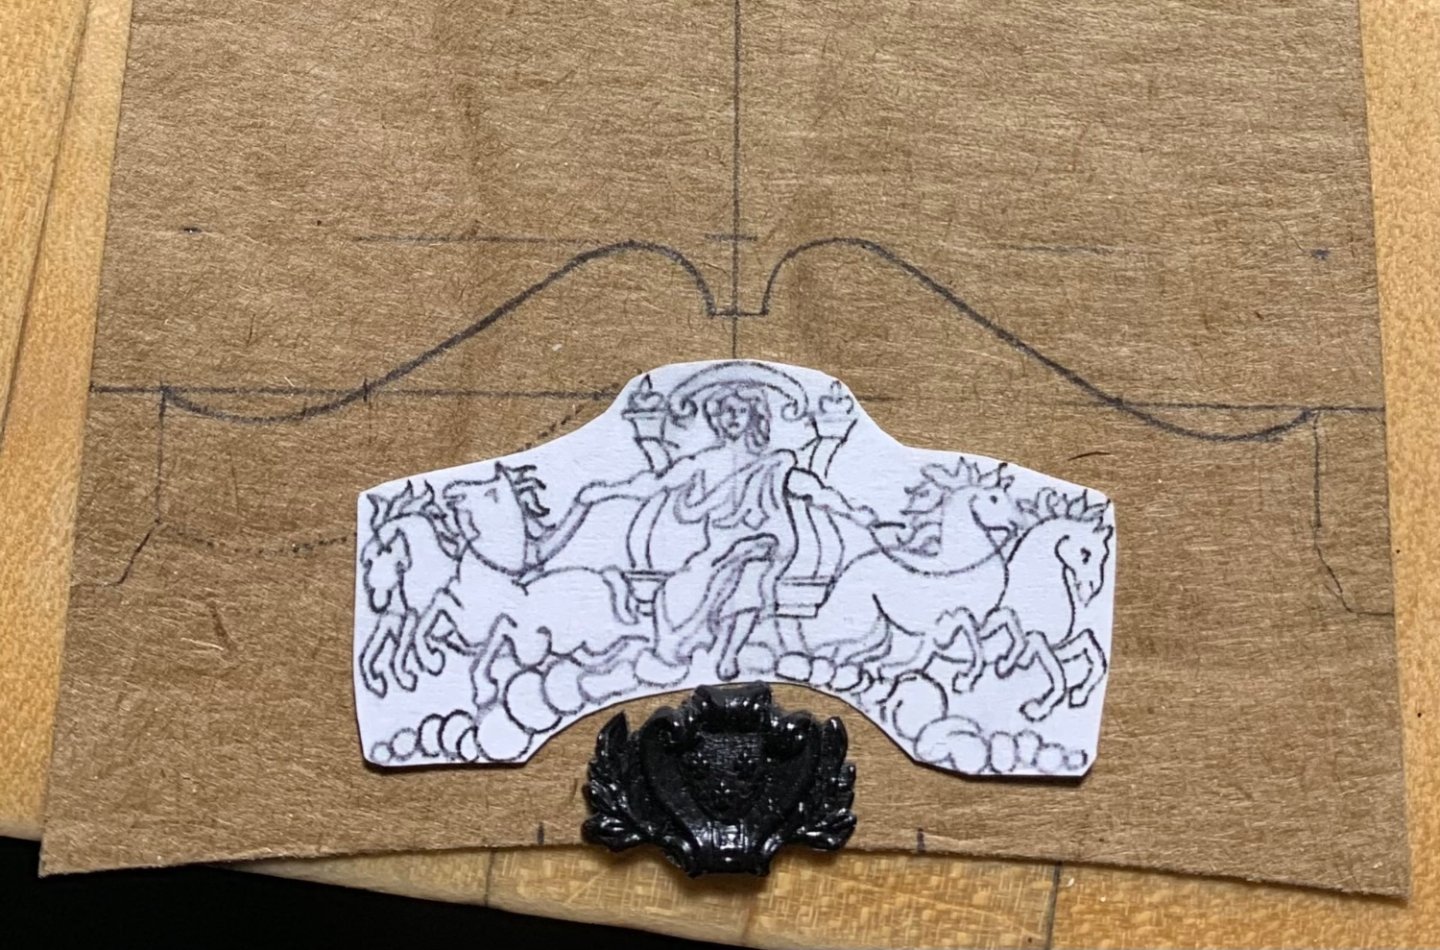
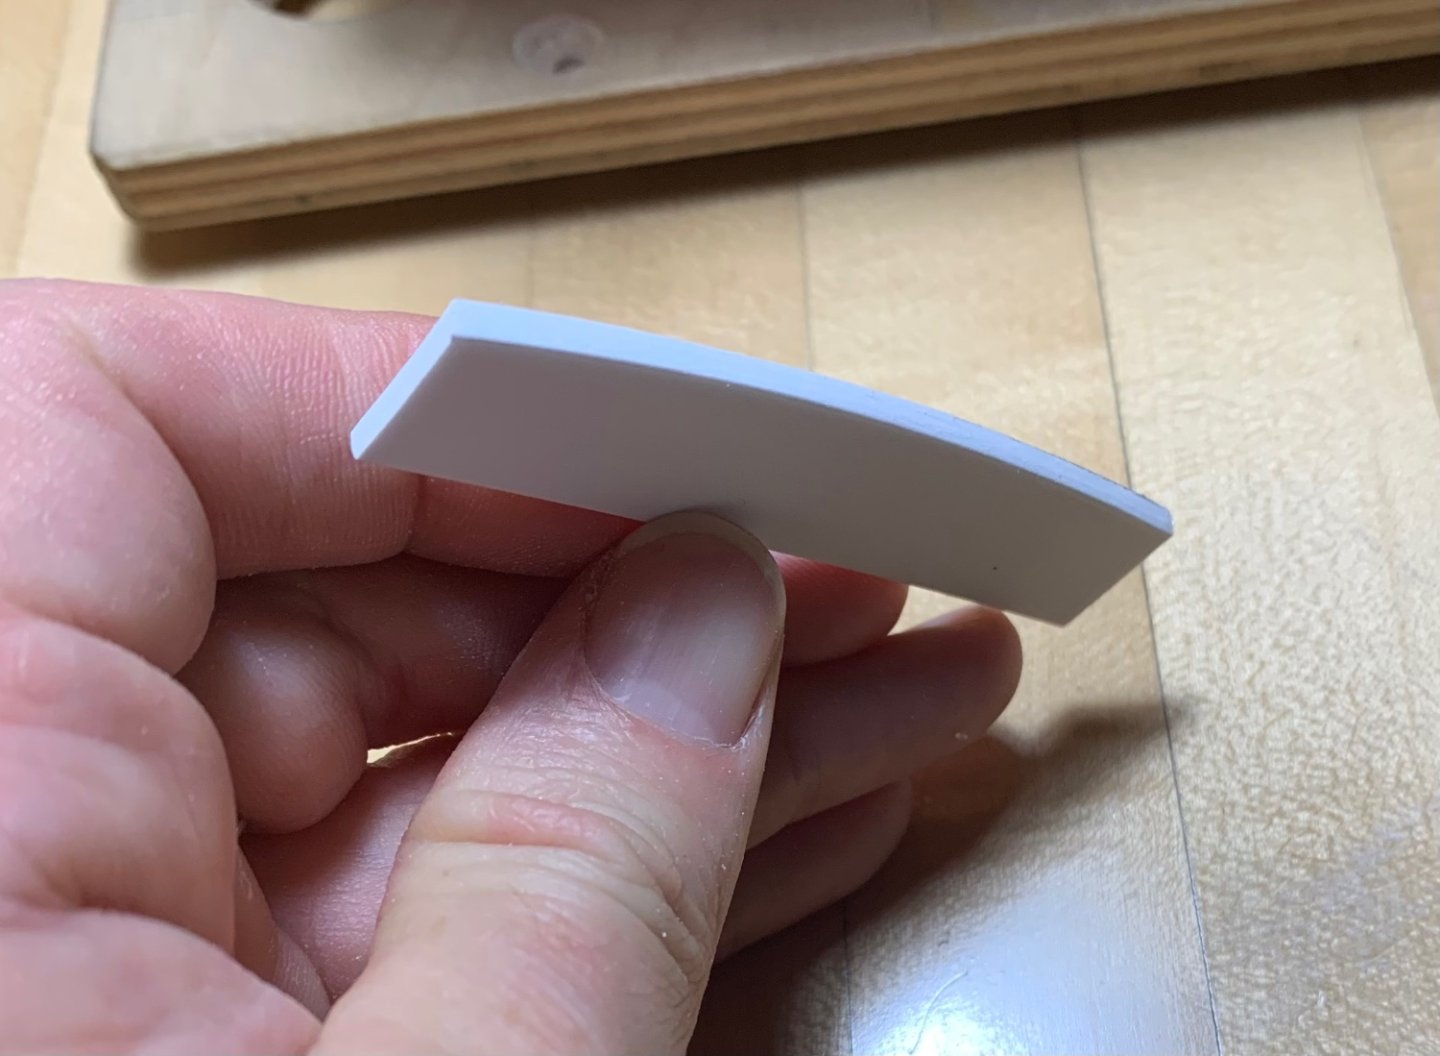
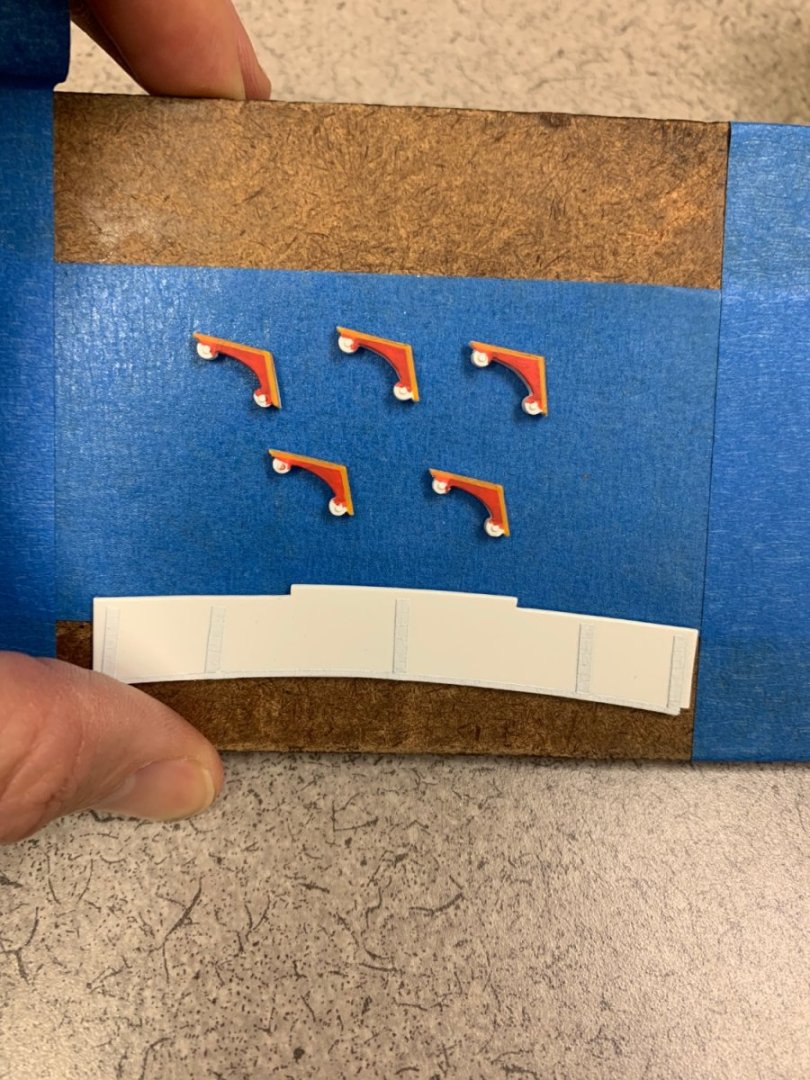
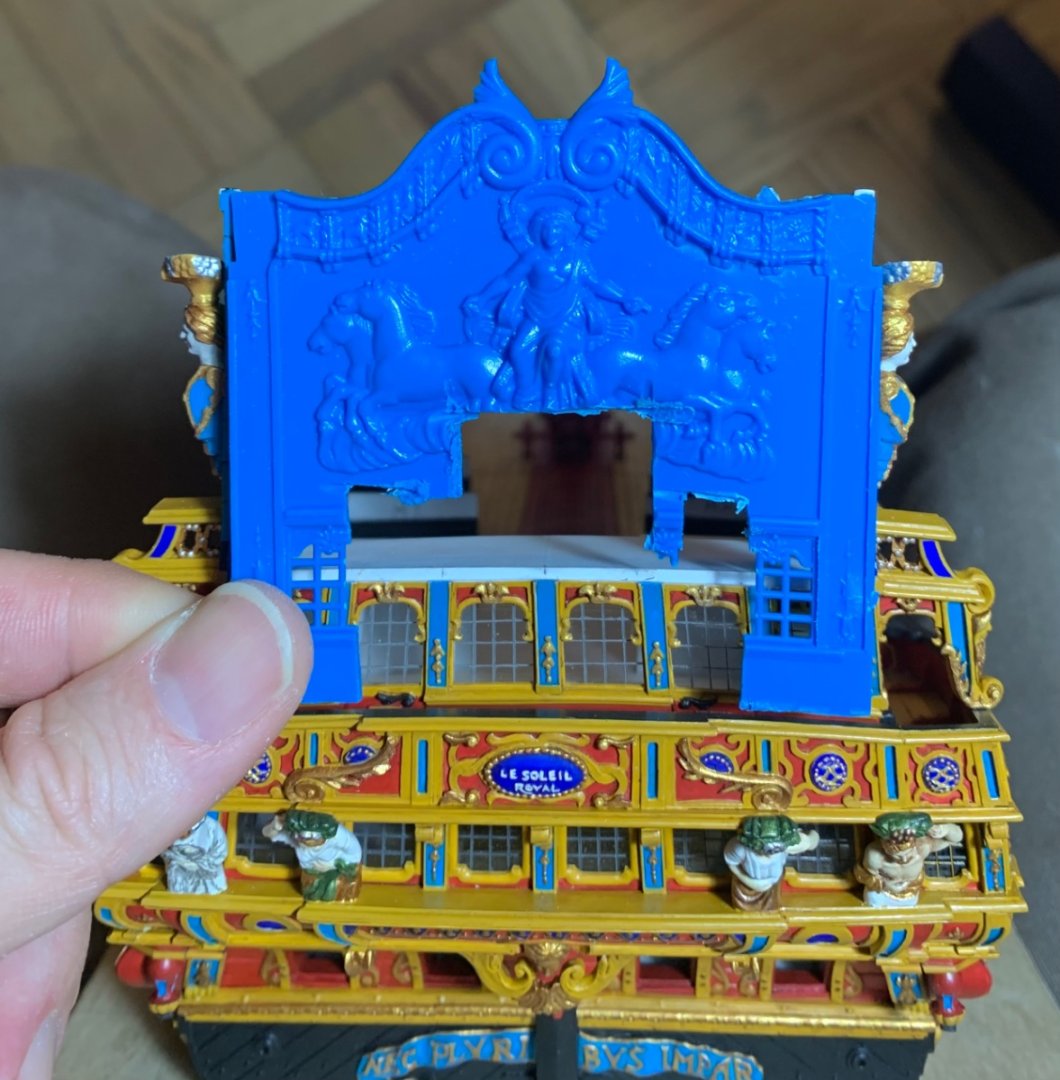
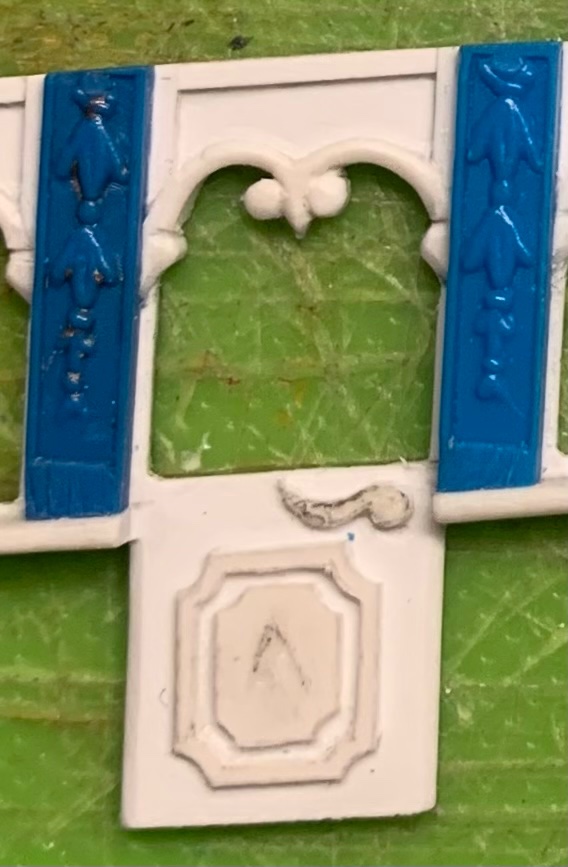
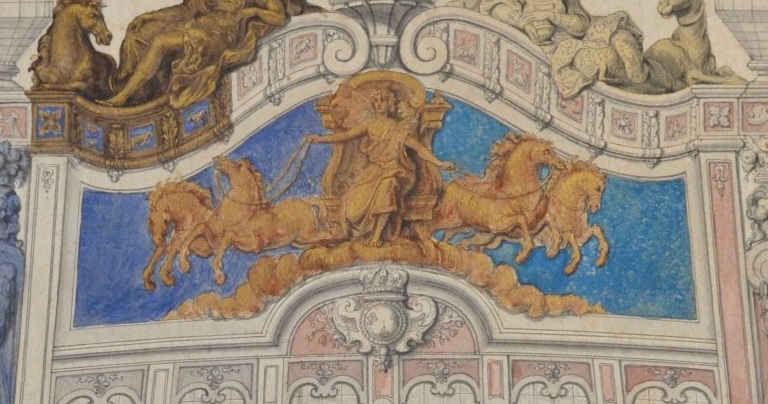
I have painted and distressed the corbels and the upper window tier. I found myself swearing early and often, as I repeatedly broke off the doors from the window tier. There isn’t much plastic connecting them, and until they’re glued into the model, they are exceptionally fragile. I appreciate the tip, T_C, but presumably my bitumen is making its long journey across the Atlantic like the swarthy pilgrim it is. As I wait, I continue to construct the stern. I made up and fitted the next transom header, so that I can glue-in the window tier: Although the winding out of square continues, it does so marginally and the eye really doesn’t see it: With the header in-place, I could begin to focus on the design of the most challenging aspect of the decor: as the French call it - the Couronnement. It is somewhat hilarious to me that after all of this effort to make the hull wider, the tafferal ends up being only fractionally wider than the stock stern plate: This development is the result of fashioning the internal gussets that support the aft bulwarks, at an angle that promoted a more realistic tumblehome for the after castle; the stock kit is a little more vertically slab-sided in its approach to this detail. Here, you can see the comparison between the tafferal width I thought I’d have (at the start of the project) and where I ended up: Despite this not un-satisfactory development, Tanneron and Heller (following suit) chose to represent the backboard (tafferal) as improbably tall for the refit of 1689. So, in other words, I was going to have to re-fashion this area anyway. Towards that end, much earlier in my modification of the upper bulwarks, I cut away the poop royal sheer-step (5/16”+), only to replace it by 1/2 that height of a more realistic, low, sheer rail that is more reflective of the times: However, the more significant shortening of the tafferal comes from lowering the side support for the outer lanterns, so that they are aligned with the sheer rail, as opposed to above it. The first step was to re-draw the goose-neck cornice because I never liked Heller’s interpretation of this detail: Next, I had to define the field for Apollo and his quadriga, which meant defining the height for the bar of astrological symbols along the top. On the stock kit, these are a continuation of the side lantern supports which I will re-cycle for this build. However, to follow the height of those boxes does not leave me with a large enough field for the main carving, below; see the dotted line proposed in the upper right. So, I decided to cheat that line upward about a 1/16”. It will necessitate hand-painting these astrologic symbols into these tiny paneled recesses, but that is okay. The really good news is that I will be able to re-shape the swagging vestments of Europe and Asia to fit the new cornice shape: This is really great because, as it is, I have to re-carve The Americas and Africa because the stock figures are too tall and Africa has the wrong posture. The next task was to see whether my original drawing of Apollo could be reduced enough to reasonably fit my field. Here is the full-size drawing: I did a series of reductions, at 50, 60, and 70%. Seventy percent was close: As compared to the kit carving: But, I felt it encroached too much on the upper and lower boundaries of the field. I settled on 67%: As compared with Berain’s drawing: I’m not totally satisfied with the scrolled vollute. It’s too big. I’ll have to re-work the clouds to conform more neatly with the lower moulding, but I am happy with the scale of Apollo and his horses. It is not as wide as Berain drew it, but this will allow me to better create my gradient sky from light cerulean blue to dark azurite, up top. radiating outward in all directions, from behind Apollo will be fine needles of sun-light in gold and silver gilt. Apollo and his horses will be all gold and the clouds will be temperamentally white and grey. Once I am satisfied with the scroll, I can photocopy the drawing and make a reverse copy, so that the port side can be matched to its mirror for a perfectly symmetrical pattern. My motivation is to have the stern fully framed and perhaps even painted by the time of Joint Clubs on April 30th. I think this would be a satisfying resolution to everything that came below: In other news and notes, I have made satisfying in-roads into Dassie’s Architecture Navale. I now have a pretty solid understanding of the proportional derivation of the principal elements of a ship, although there is still much translating to do. This essentially amounts to re-typing all relevant passages into Google Translate because the photo capture feature never results in nearly as intelligible a translation as the more tedious path. My French is improving though, as a result, and full transcriptions are becoming less necessary as I develop a vocabulary of French ship nomenclature. I am simultaneously doing the same translation work on the 1685 Le Have du Grace dimensional survey of what is presumed to be the pre-refit Soleil Royal. It is extremely helpful that this document (which I downloaded from Gallica) has a numbered drawing that details all of the principal parts of a ship and it’s framing. What is fascinating is that the neither Le Havre du Grace nor Dassie’s prescriptive formulas correspond with what was supposed to be SR’s original length of keel: As built: 142’ Le Havre du Grace: 140” Dassie: 136’ I have been applying Dassie’s formulas to SR’s particulars, as I go, and ultimately I will have a more complete comparison with the Le Havre de Grace document. This is all ground previously tread by Michel Saunier, and in-fact, I still have a copy of his exhaustive tabulation of all the dimensions of every aspect of the ship. He emailed this to me years ago. I still think this is a worthwhile exercise, though, to better understand how he arrived at where he did with his model. Anyway, it keeps me occupied. Thank you for your interest, your likes and your comments. More to follow!


- 2,699 replies
-
- 20
-

-
-
- heller
- soleil royal
- (and 9 more)
-
I used a sanding stick on the backside of the Kevel ears to make a little extra space for the lines to belay.
-
.030 is good. I looked back on post #292, and what you did looked picture-perfect to my eyes. At some point in the future, I will write a book about SR, but not the about the Heller kit, in particular. It is my belief that from the Album de Colbert, Dassie’s Architecture Navale (1677), as well as the Le Have du Grace survey of Soleil Royal (prior to her refit), and also the detailed accounting of the re-build estimate, that one can re-construct a credible hull form and interior configuration for SR as she first was in 1670. I am busily translating Dassie, at the moment, in an effort to better understand how, exactly, shipwrights of the time arrived at the proportions for all the various elements of a ship. It is slow-going, but many things become clearer to me each day. This book would include much of my research and observations about surviving contemporary documents and portraiture. It is a big project that will engage me for decades to come.
- 1,508 replies
-
- 1
-
-
- Le Soleil Royal
- Heller
- (and 1 more)