Hubac's Historian
-
Posts
3,314 -
Joined
-
Last visited
Content Type
Profiles
Forums
Gallery
Events
Everything posted by Hubac's Historian
-
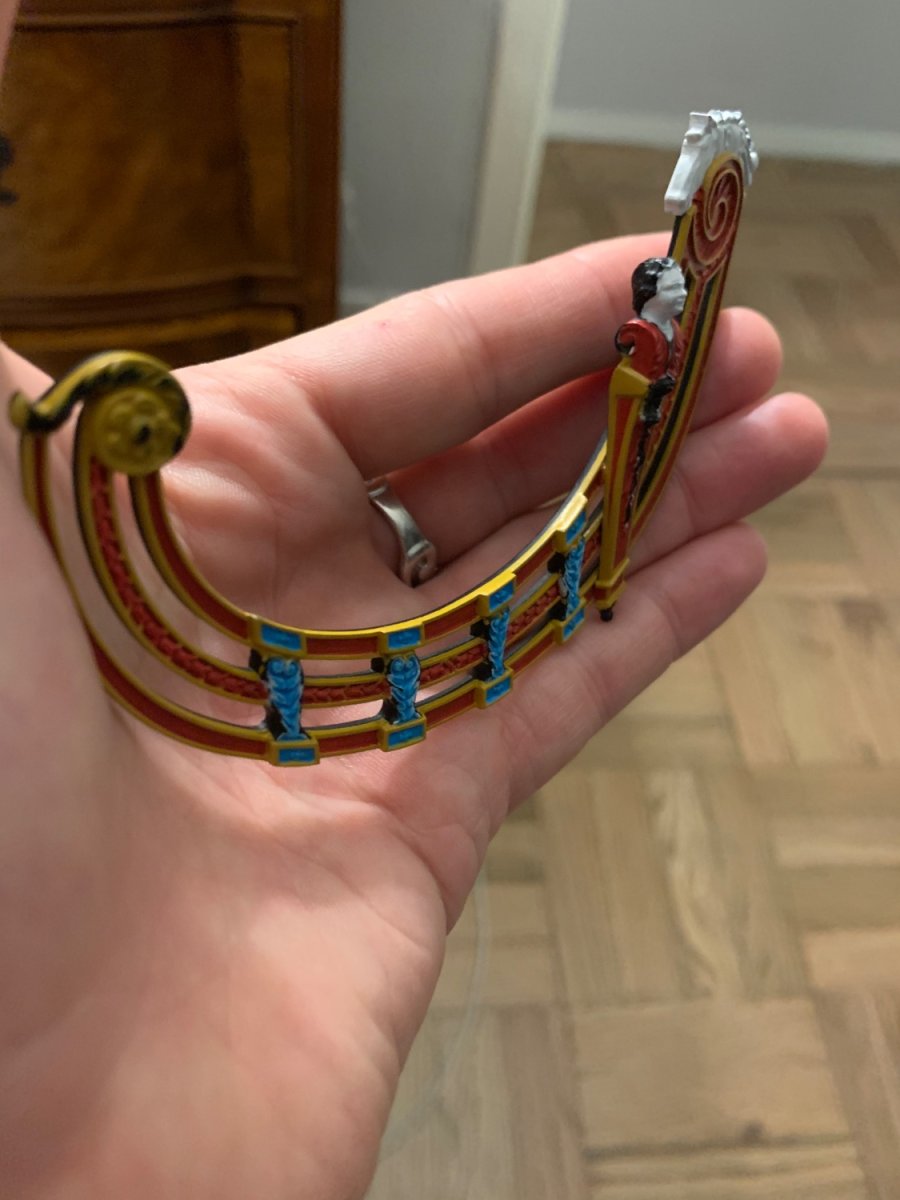
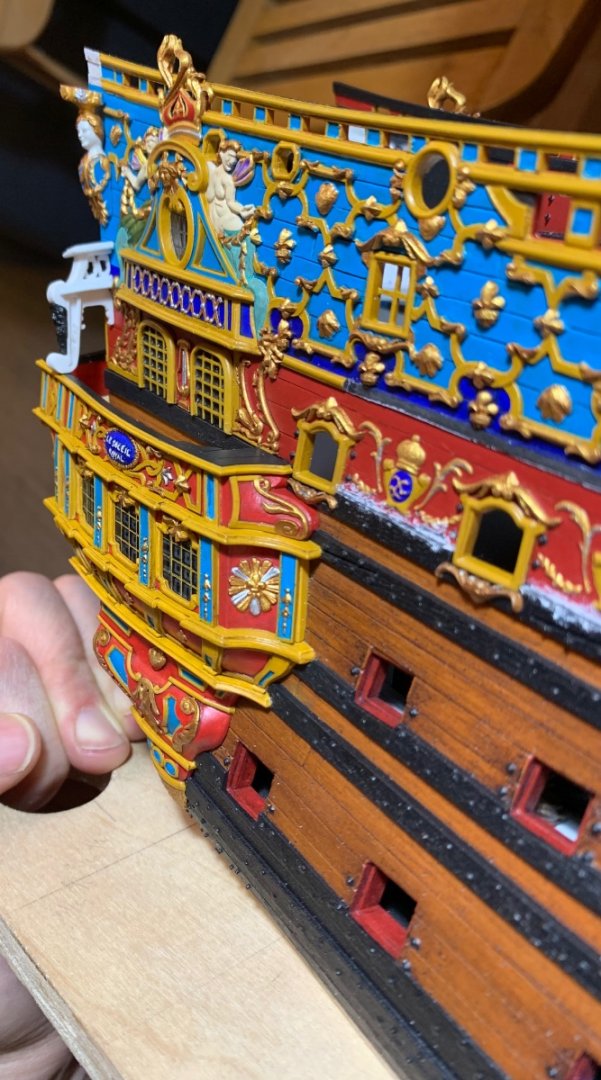
 Well, I’ve got the ocher cut-in on the port side, and I’m a third of the way through the ocher, starboard. You can’t really tape these lines because of the limited access and curved shapes: There is still much to paint here. I have to grey-wash the horse and the cathead figure. I still haven’t muted the colors of the red and yellow ocher, and of course none of the gilt work has been done. Little by little, though, we are getting there.


- 2,699 replies
-
- 21
-

-

-
- heller
- soleil royal
- (and 9 more)
-
Well, not exactly. In the 1680’s, the prevailing trend was to enclose the lower, functional section of the quarter gallery; to have an open walkable balcony above that, that wrapped to a walkable middle balcony on the stern; and above that, was a shallow amortisement that gave the impression of a fully-rounded structure, but that was really more of a surface ornament: Also, by this time, the walkable lower stern balcony had been eliminated as it was easily susceptible to damage in heavy following seas.
- 1,508 replies
-
- 1
-
-
- Le Soleil Royal
- Heller
- (and 1 more)
-
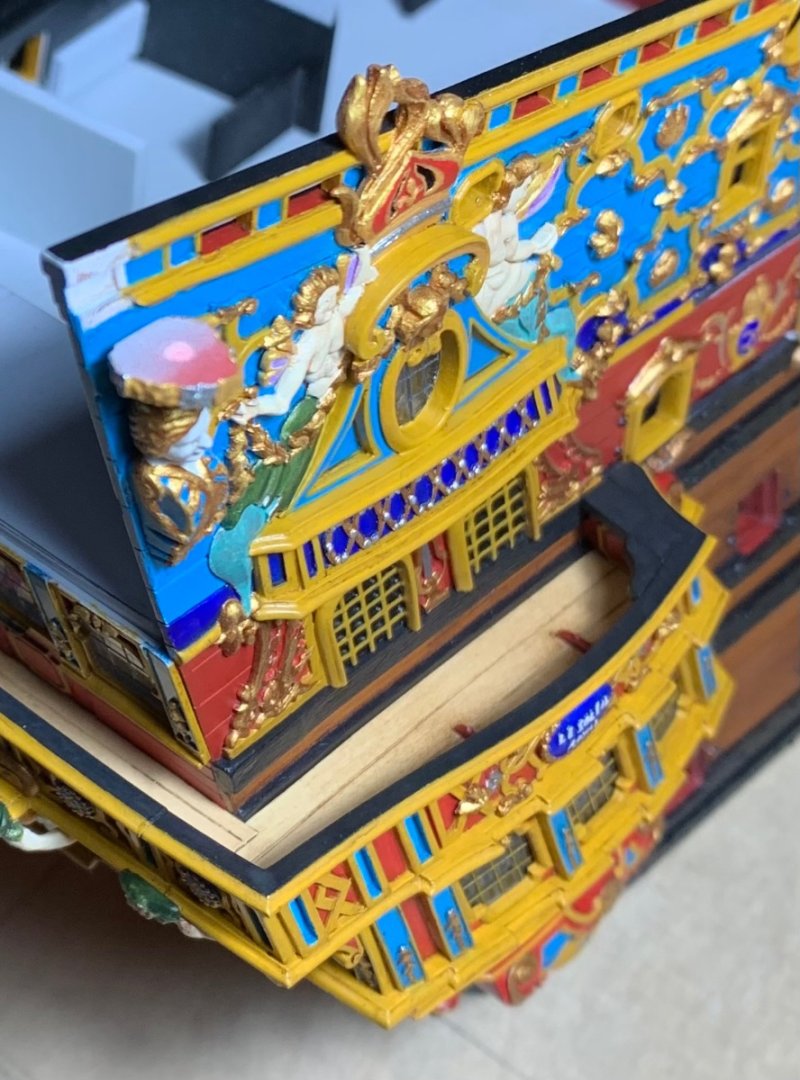
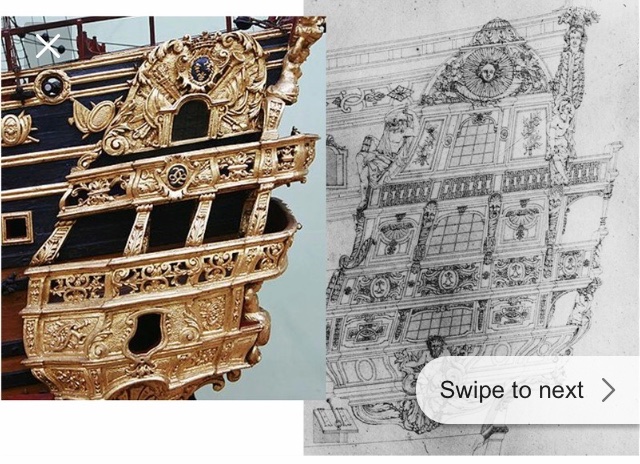
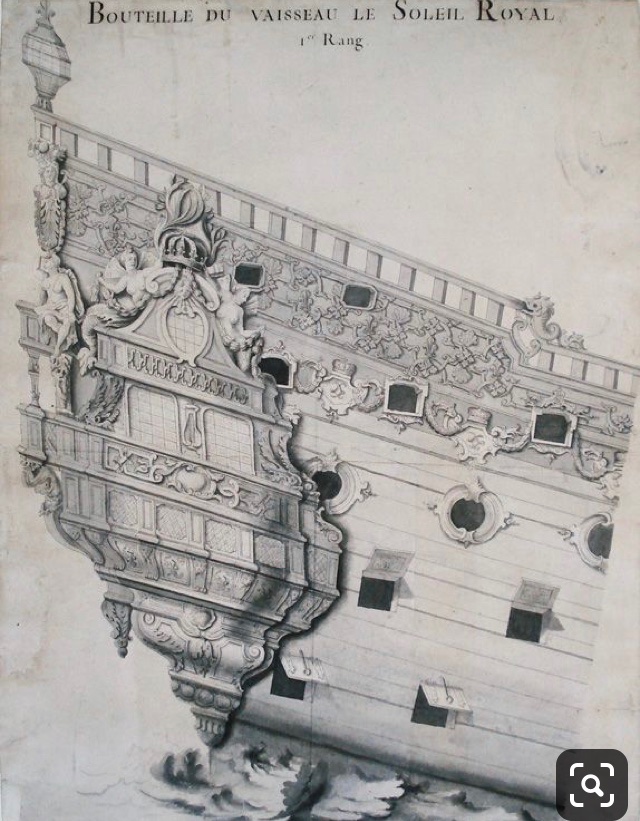
Well, Bill - the question of the galleries is a complicated one. It is my belief that, in many ways, Tanneron modeled SR after the better understood (perhaps) second SR from 1693. Heller, I propose, then made their prototype with closed galleries - perhaps using this drawing as a basis for that decision (right): Everything about this drawing is consistent with a French progression toward fully closed quarters, lower stern height, a more restrained and overall reduction in ornamentation. So, going back to Tanneron - the contextual evidence that remains from the late 1660’s/early 70’s suggests that he wanted to have his cake and eat it too. His model, in the Musee de la Marine, represents a kind of hybrid between what the ship may have looked like in 1670, and what SR2 may have looked like in 1693. I chose to discard (cannibalize, actually) the kit quarter galleries and instead make from scratch what I am pretty certain are the quarters and decor from the refit of 1688/89. I may be wrong about this, but at least it is an attempt to place the ship within a specific context. I have made certain specific variances, where it served me to maintain some of the Heller ornamentation, and I have taken some authorial license, but my interpretation is based directly on the above.
-
It depends on your preference. I chose not to arm any of my forward or stern chase ports because on this go-around I wanted to represent something more true to the times. If you don’t arm them, I’d just close the hatches.
-
If you are to arm these ports, Bill, the guns should be forward facing. The historic reality is that, in actual practice, when these ports were armed, they merely shifted the next adjacent broadside gun over to the chase port. The reason for this is exactly what you have illustrated; there is not enough recoil or working clearance to have these two guns rigged at the same time. Most of the time, these guns were not armed.
-
That’s an interesting thought on the block nubbies, Ian.
-
Yeah, it’s a crazy amount of blocks.
-
I believe those are length dimensions, although I have yet to buy replacement wooden blocks.
-
Yup, that is as the blocks have always been. What I don’t like about them is that there’s no channel to properly attach and seize the line to.
-
Just a general thought - you seem to be tearing through the project at a record pace. I realize you are at a place in life where you have more time available to you, but I wonder whether you are enjoying the journey that making this model entails. If so, then by all means rip-away at it. Don’t hesitate, though, to take extra time on the more detailed aspects of the build that are coming up, such as the upper bulwarks. A little extra time spent, here, pays enormous dividends at the end.
- 1,508 replies
-
- 1
-
-
- Le Soleil Royal
- Heller
- (and 1 more)
-
On castings as nice as these, that wash really makes the detail pop. I’m especially impressed by the quality of the figurehead. It is interesting that the standard alignment of the trailboard could be that out of alignment with the knees of the head. Once again - a masterful job at bringing it all together cohesively.
-
I agree - I love the sense of depth and shading! It’s good to be a little impulsive, sometimes.
-
I don’t know why, but the most recent update I can see is from September 7th. This, even from a direct link from the email alerting me to new content. Weird.
-
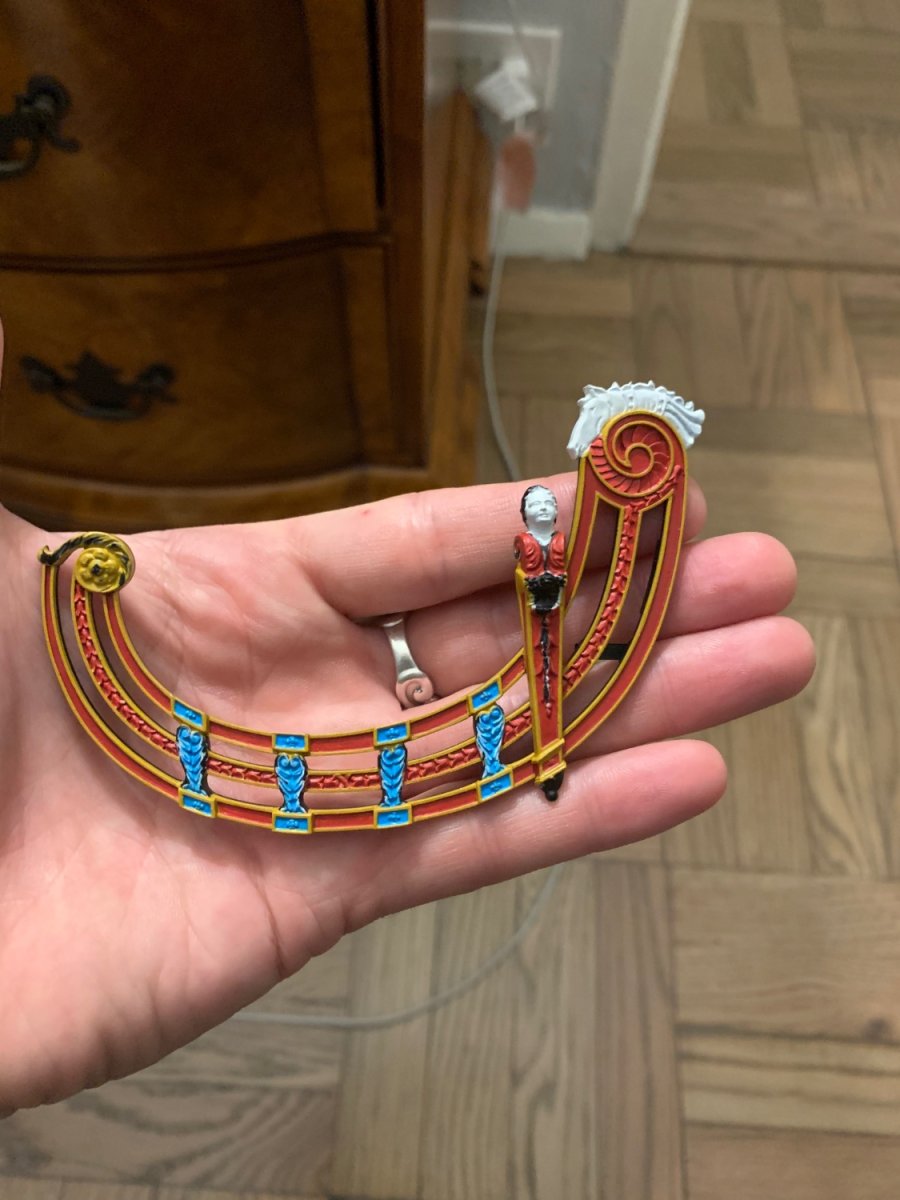
Thank you, Marc! I think you are referring to the headrail support timbers. I think that all of this effort to create reasonable clearance beneath the headrails will result in a nice upward sweep of these support timbers. It has been a lot of fiddling and fussing about, but the effort seems to have been worthwhile. I will reserve judgement until after it has all come together. Painting of the headrails is a very slow business. The yellow ocher, in particular, has to be cut-in by hand and maintaining fair lines around these curved parts has proved especially challenging. It will get there, eventually.
- 2,699 replies
-
- 5
-
-

-
- heller
- soleil royal
- (and 9 more)
-
It’s non-sensible what Heller drew, there, but part 162 is actually the fore-halliard knight for the forecastle deck on step 14. I have no idea why they are showing it with the quarterdeck assembly. I suppose it is the same forward-thinking that has you assembling the main deck long before necessary.
-
Michael, do you use a combination of laid-up scale rope, as well as various standard thread weights?
-
Since you are doing this model as recovered and re-constructed, might you consider doing an as-recovered sail?
-
The blocks are dummy carriages that enable me to install the middle and lower deck guns at the end of the build; less opportunity for breakage and it saved me from having to make all of those extra carriages that can’t be seen, anyway. Because I cut away the lower hull, I had to make mast steps for the fore and mizzen masts on the lower deck. These steps enabled me to adjust the height of the fore and mizzen, relative to the main mast, which I raised by about a 1/2” higher than the stock kit.
-
Yes, Bill, that is basically my plan. I’ve secured the in-board end of the haul-down to an eye-bolt at the top of my dummy carriage blocks. Happy Thanksgiving to all! There is much to be thankful for, here on MSW, and I appreciate everyone’s unique contributions to the forum. All the best, Marc

- 1,508 replies
-
- 2
-
-
- Le Soleil Royal
- Heller
- (and 1 more)
-
To be honest, I’m not sure what I really know - I can only draw inferences from the best primary sources I’ve found. I like Henry’s idea about half-drilling holes and using stiffened thread or wire for the lifts. If I were going to show my lids in the more realistic 1/2 or 3/4 open view, this would be my approach. Personally, I’m going for the less realistic fully open view because I spent too much effort detailing the inner lids to hide them. I’m only doing a single-lanyard haul-down, which is also, apparently, less realistic.
-
Extremely well done, Mike. It is fascinating that this area of supporting timbers is more of a “splay” than a rigidly parallel construction. This is art infused with the science of the thing. Very impressive!
- 607 replies
-
- 1
-
-
- winchelsea
- Syren Ship Model Company
- (and 1 more)