Keith Black
-
Posts
6,728 -
Joined
-
Last visited
Content Type
Profiles
Forums
Gallery
Events
Everything posted by Keith Black
-
 That looks nice, Simon.
 -
The constant nagging question, If I do THIS will I be able to get my hand in THERE? John, the restoration is coming along nicely.
-
Gunboat Philadelphia 1776 by tmj
Keith Black replied to tmj's topic in - Build logs for subjects built 1751 - 1800
Hey, it's got built-in dental floss. -
Nice job, Simon. Hurry up and drink more coffee!
-
Questions about Artesania Latina HMS BOUNTY
Keith Black replied to felix nadeau's topic in Wood ship model kits
https://modelshipworld.com/search/?&q= bounty&quick=1&search_and_or=and&sortby=relevancy -
My very worst nightmare. I got the 6X glasses specifically to paint the figures but now I use them all the time when working on the Tennessee. The ole 2.75 reading glasses don't hack it anymore. The 6X work so well I'm considering buying a pair of 8X. Glen, great job on the shrouds and ratlines.
- 235 replies
-
- 4
-

-
- Banshee II
- Bottle
- (and 1 more)
-
18th Century Iron nails
Keith Black replied to tmj's topic in Building, Framing, Planking and plating a ships hull and deck
Equals .047, rounded up. At 1:24 a fastener would be visible at arms length viewing distance but replicating a fastener head detail would be a tall order. I admire Tom's detail work on replicating caulking seams but that's a running length, not a single point. Tom, it'll be interesting seeing your solution. -
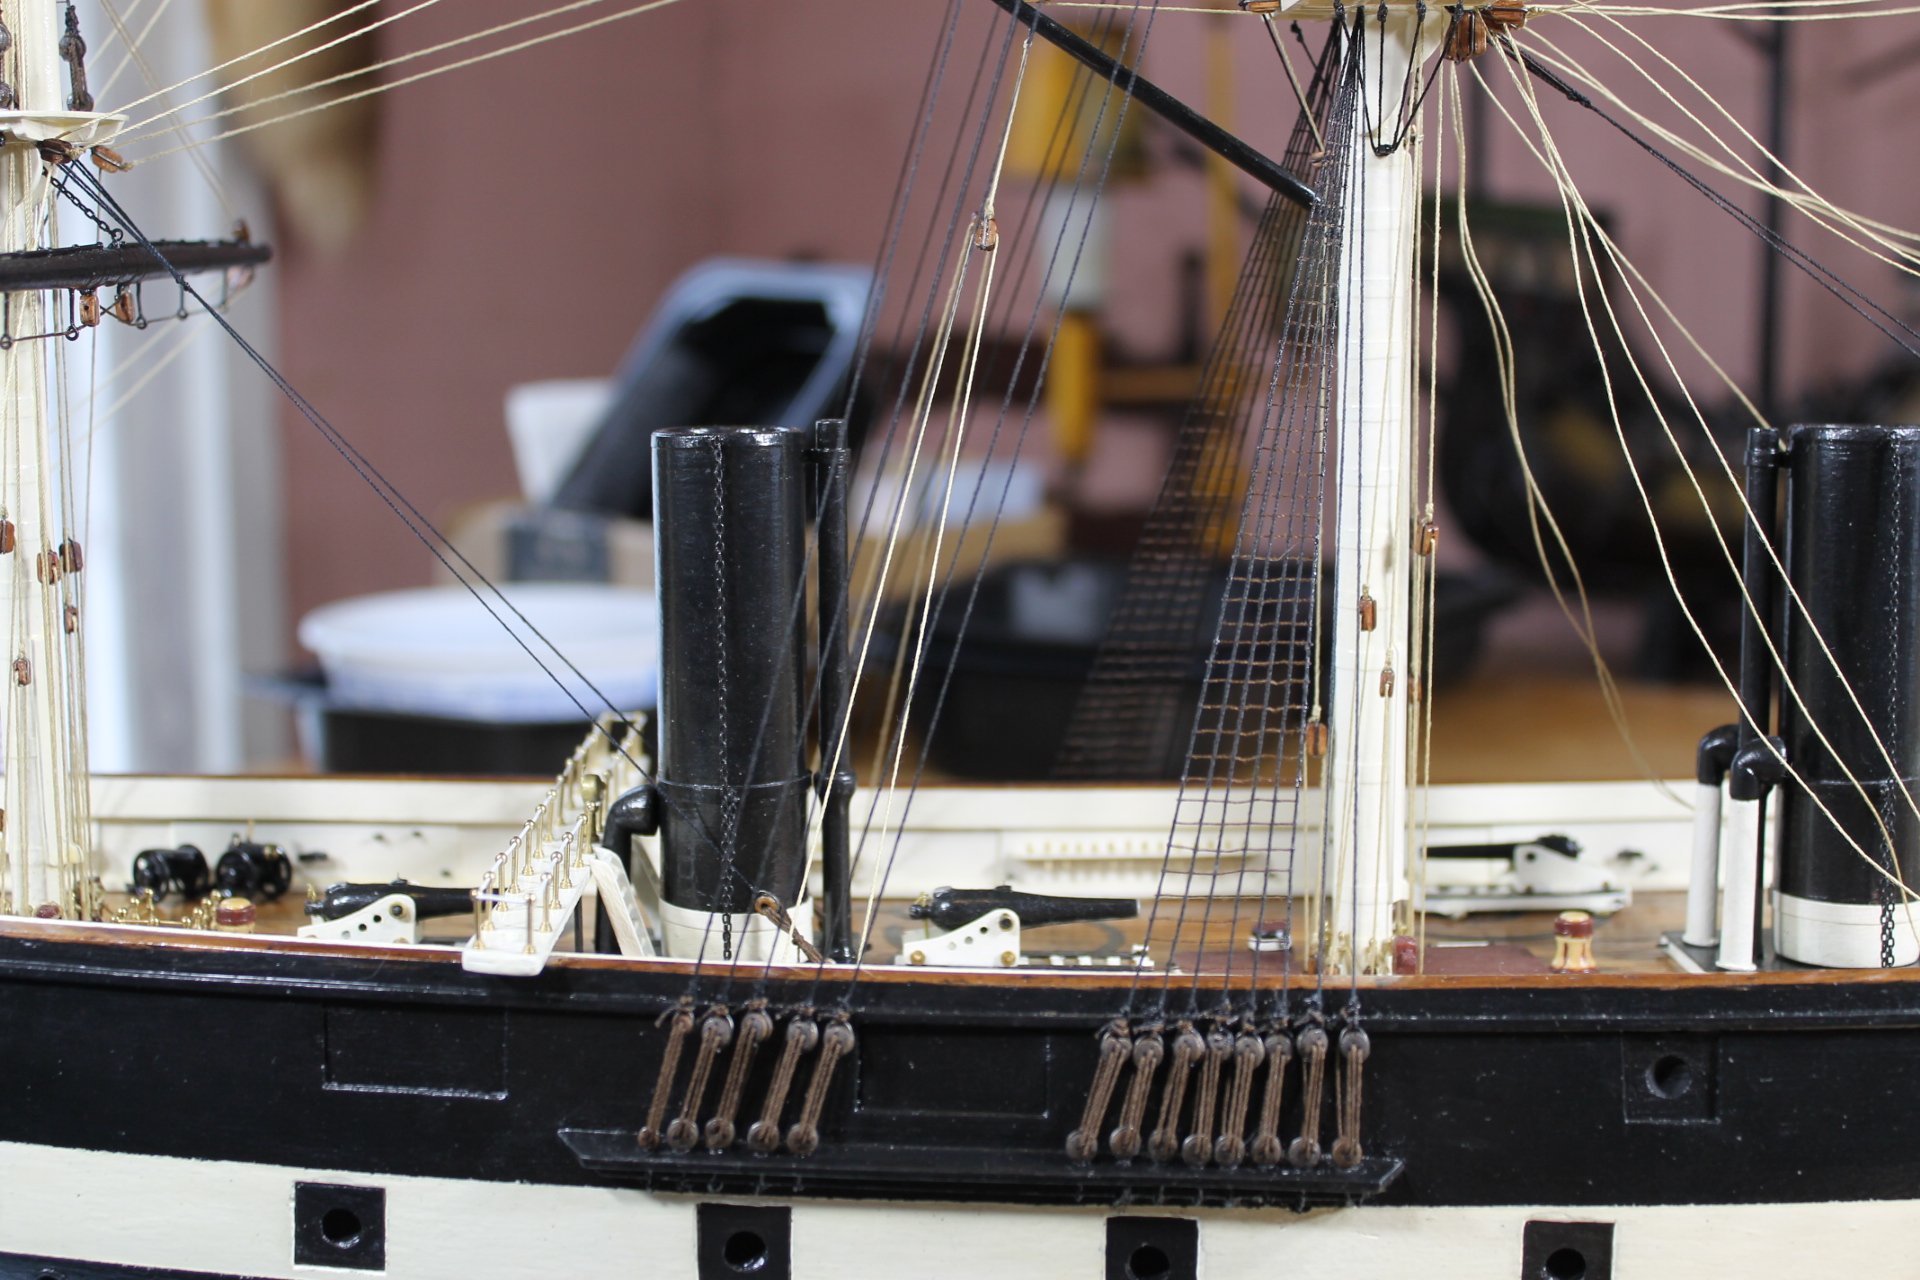
Thank you to all for the comments and likes. Tom, the 6X glasses make a huge difference. The starboard side ratlines are woven in. Next up is CAing the main's main yard in place and then running the rigging. Before I'm able to run the main yard braces I need to place what figures will be going on the flying bridge. Once the main is completed I need to strop the deadeyes for the fore's lower shrouds. It's going to be awhile before I can get to those lower shrouds. and thank you to everyone for following along, Keith

-
Questions about Artesania Latina HMS BOUNTY
Keith Black replied to felix nadeau's topic in Wood ship model kits
Felix, welcome to MSW but I don't speak french. Glad to have you aboard. -
18th Century Iron nails
Keith Black replied to tmj's topic in Building, Framing, Planking and plating a ships hull and deck
Chuck, at scale would a 1.125 nailhead be visible? Of course it depends on what scale you'll be working in. I see too many extremely well built models with fine wood details only to be spoiled (IMHO) with treenails/nails/spikes that are visibly out of scale. One can't see the plugs on a wood deck standing ten feet away. Once again, IMHO, new builders see a great model done by an older/experienced hand done with treenails so they think they need to follow suit and out comes the pencil. They're try to replicate treenails with a pencil because their skill level doesn't allow them to actually make treenails to scale and in the end they make a dog's lunch out the task. It seems to me to be fashion and builder's preference. -
Joanne, welcome to MSW. Glad to have you aboard.
-
18th Century Iron nails
Keith Black replied to tmj's topic in Building, Framing, Planking and plating a ships hull and deck
When we left Texas for Michigan we were living in North Dallas. I grew up in Arlington as a kid and of course we didn't have air conditioning, just a few fans. I remember sleeping in front of the screen door trying to get some relief from the heat. God forsaken country, 94/95 degrees at 3 AM. that's just stupid hot. My wife was from Michigan and when she said she wanted to retire up here I was all for it. Tomorrow, high of 84 and low of 64. There, at 4 am 84 degrees. -
18th Century Iron nails
Keith Black replied to tmj's topic in Building, Framing, Planking and plating a ships hull and deck
I once plied the waters down there where you live, born in Dallas in 47. We retired to Michigan in 13. -
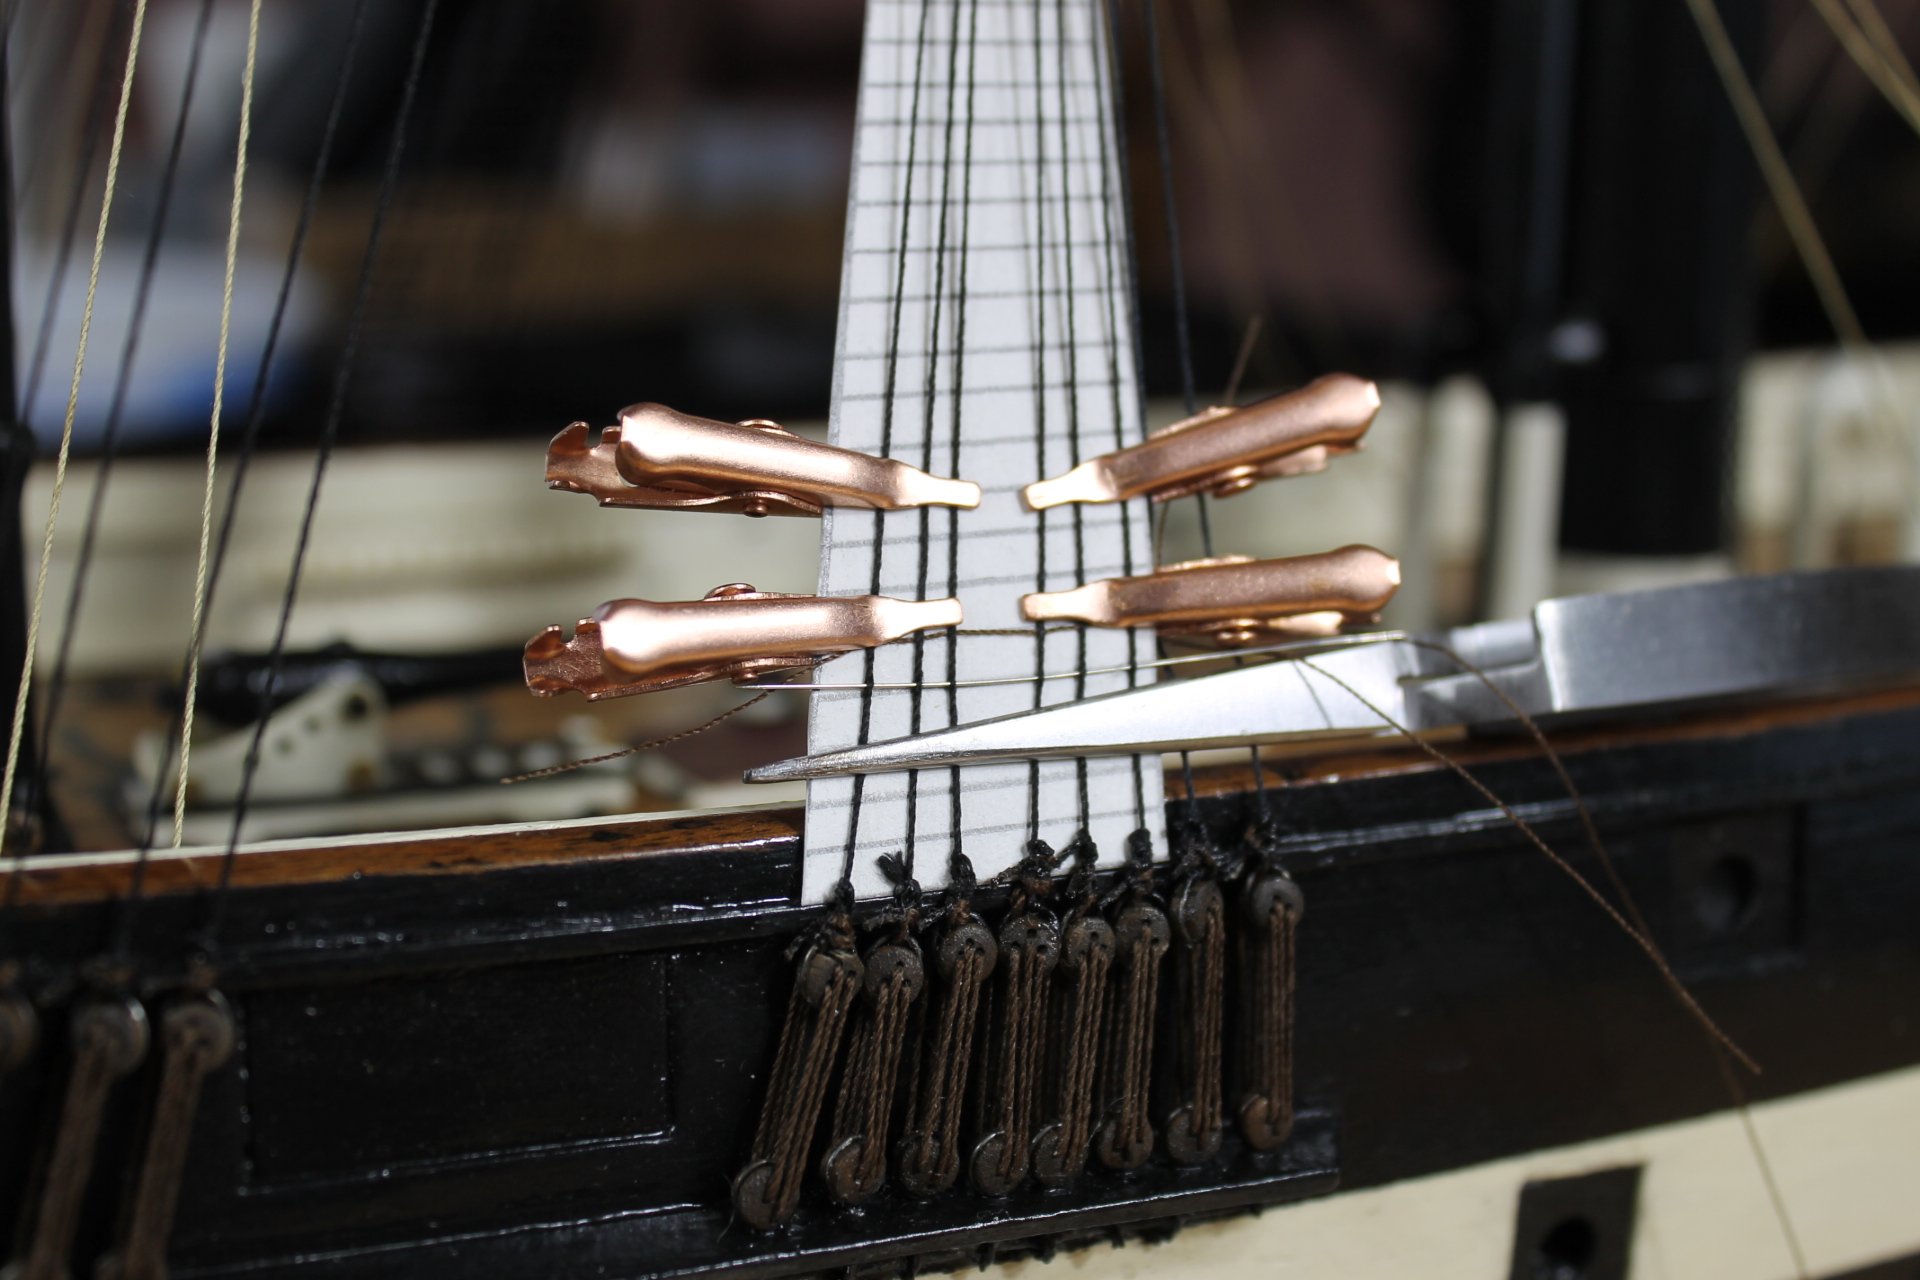
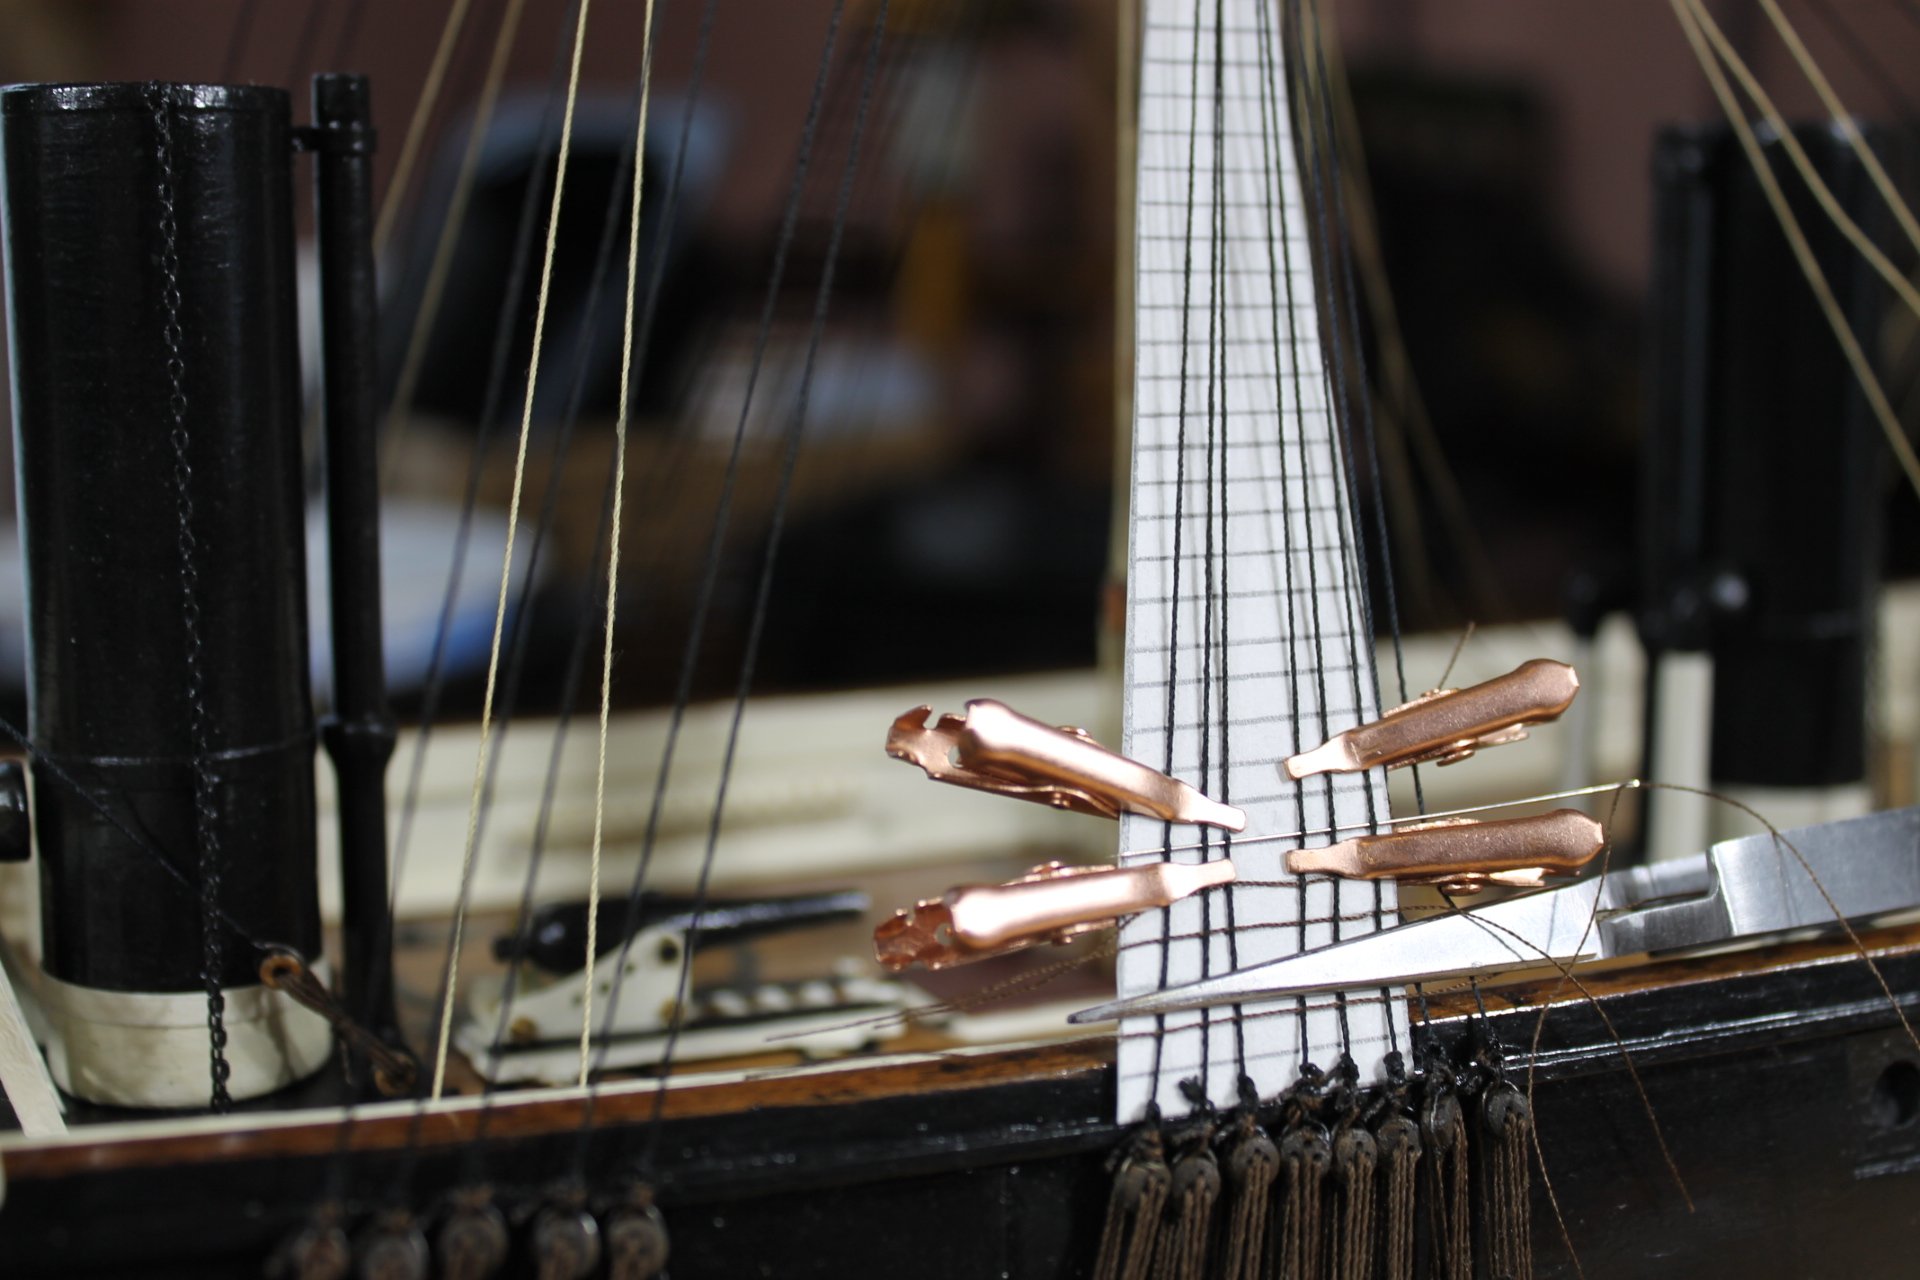
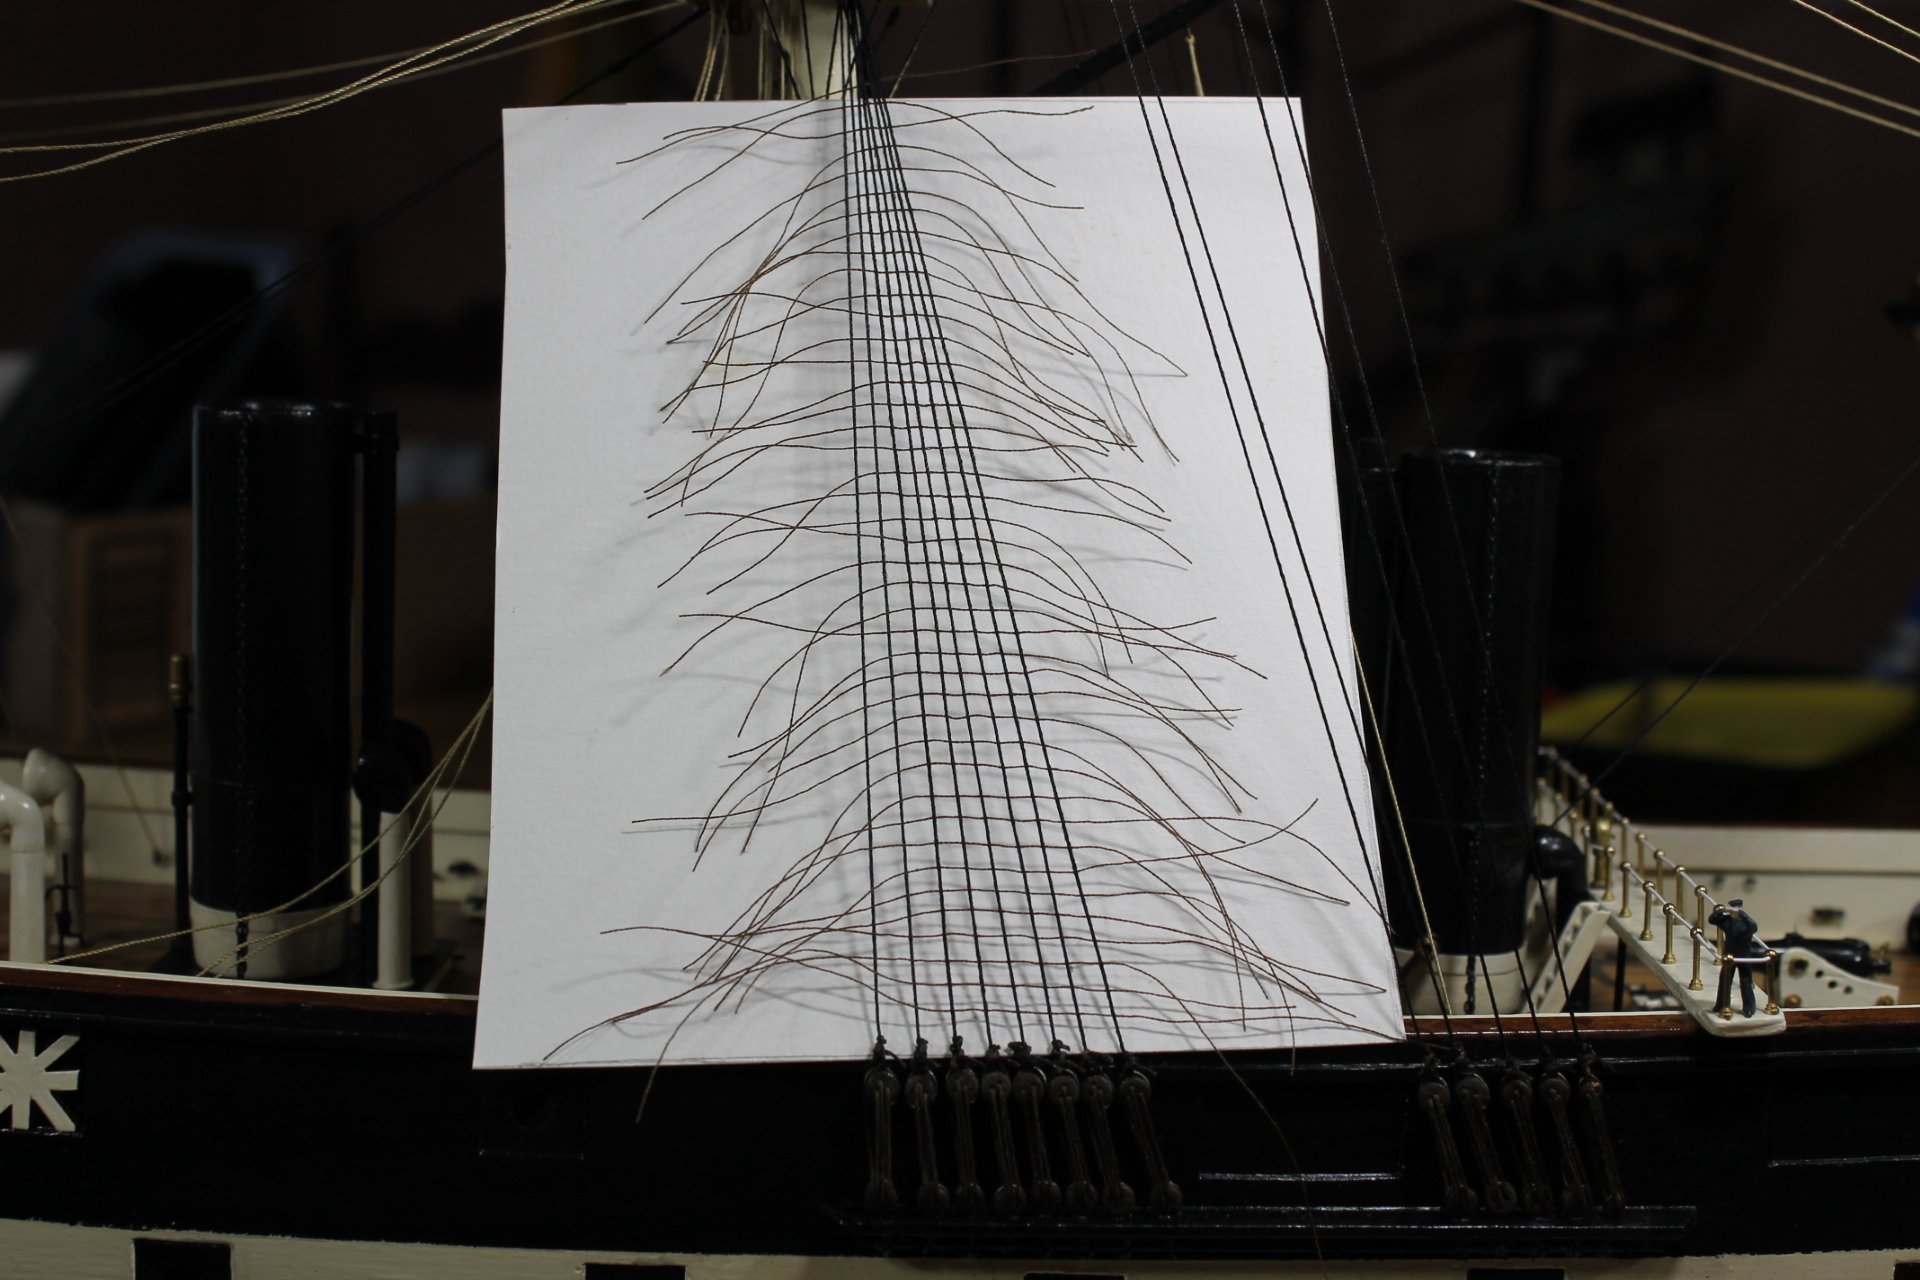
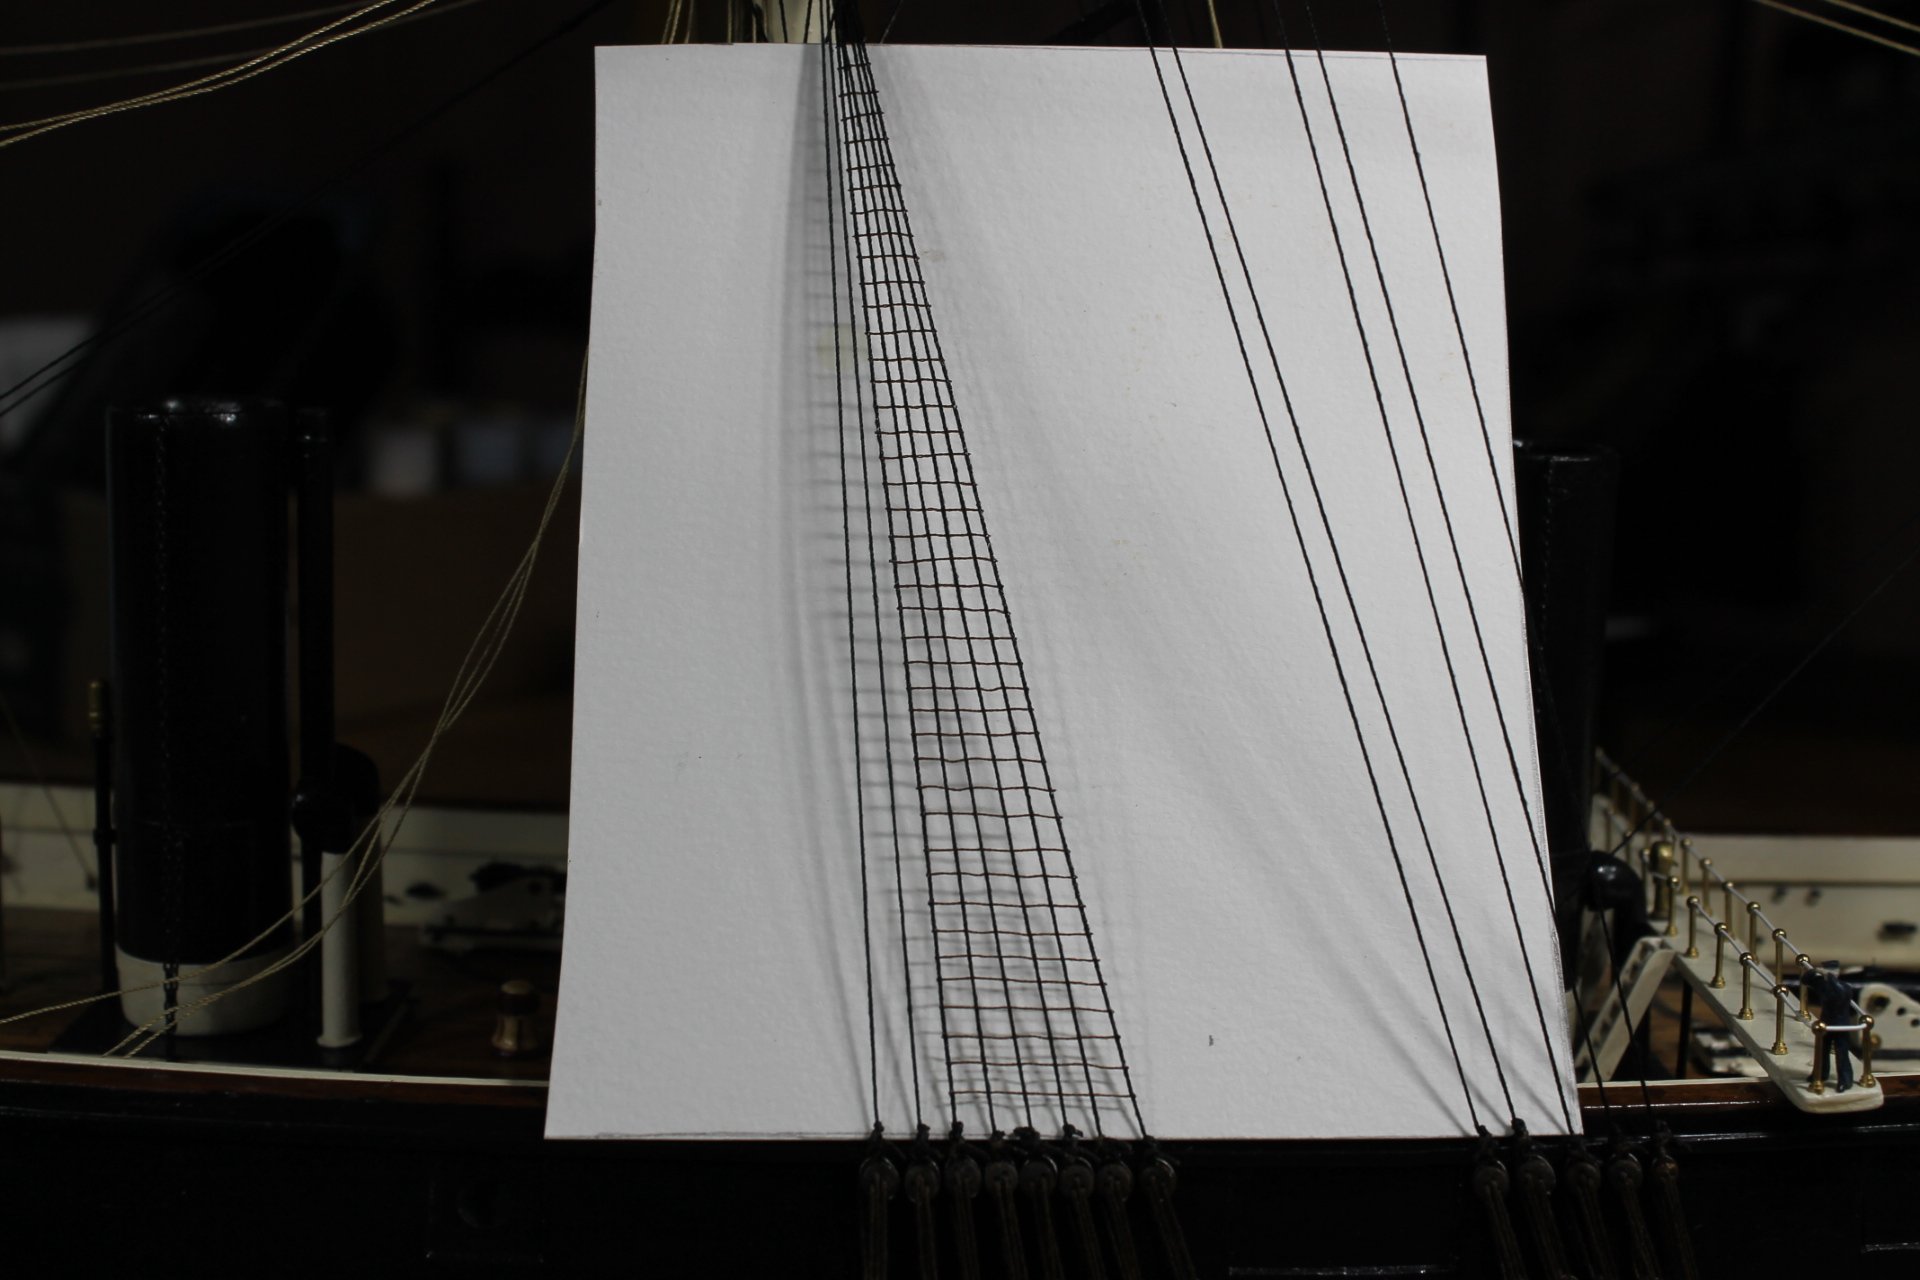
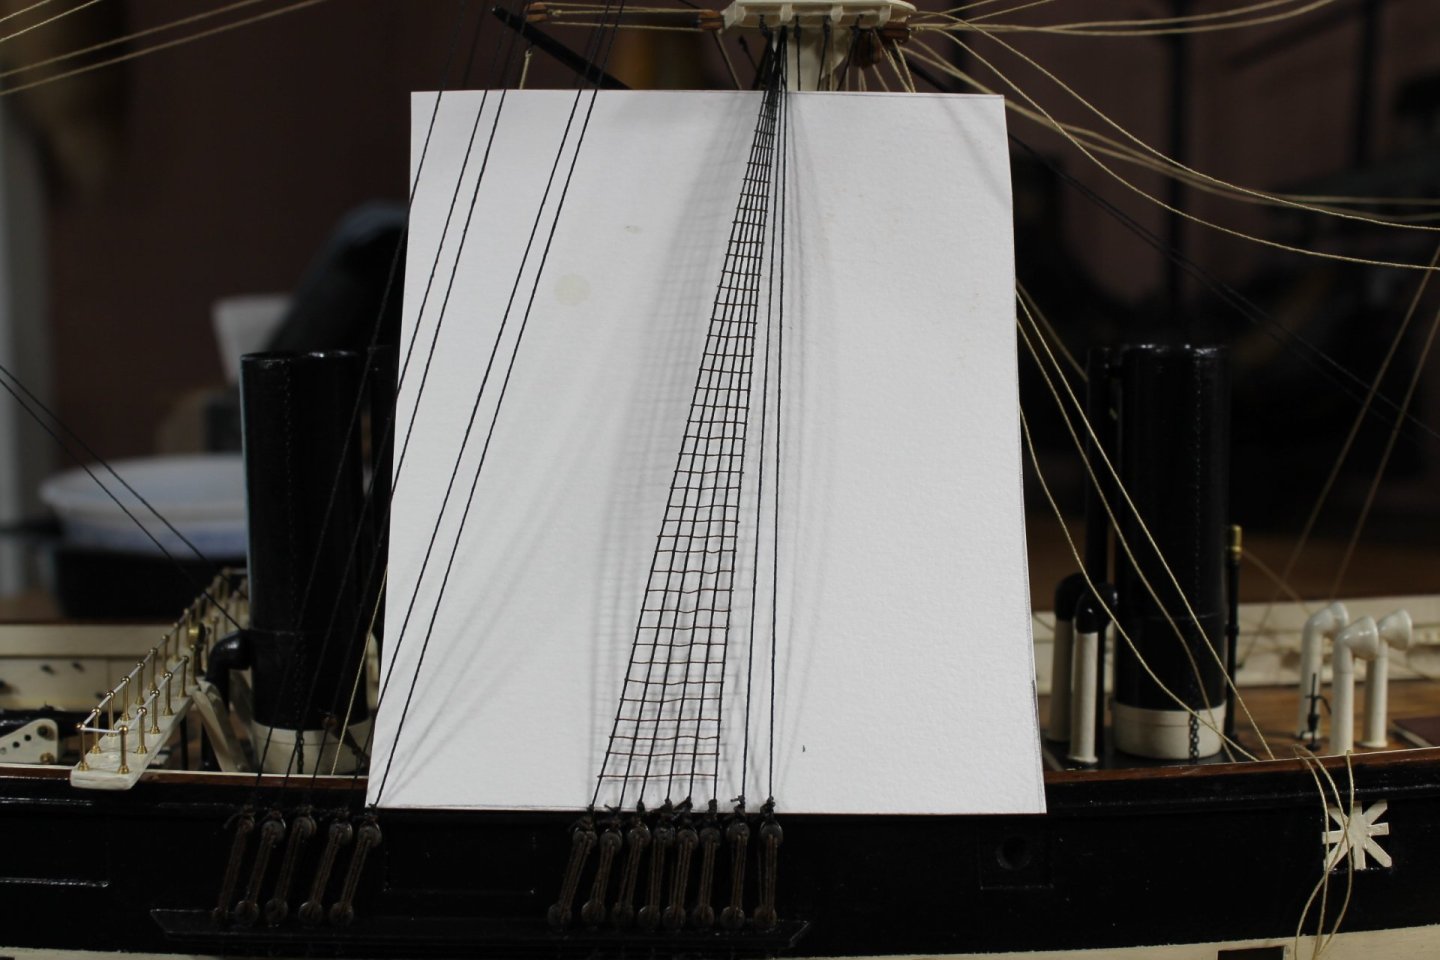
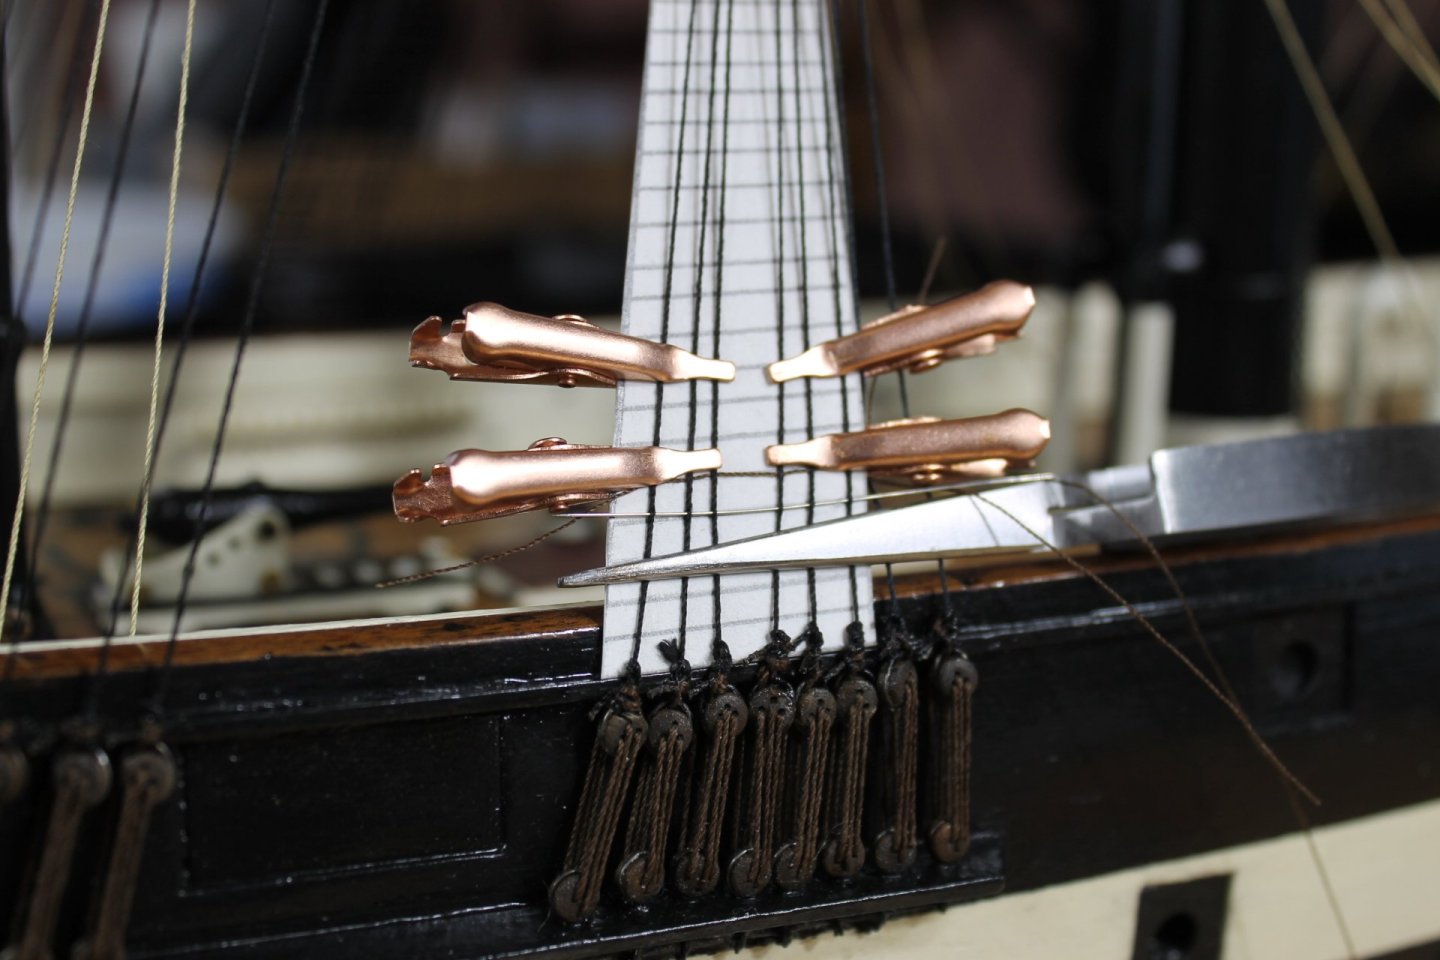
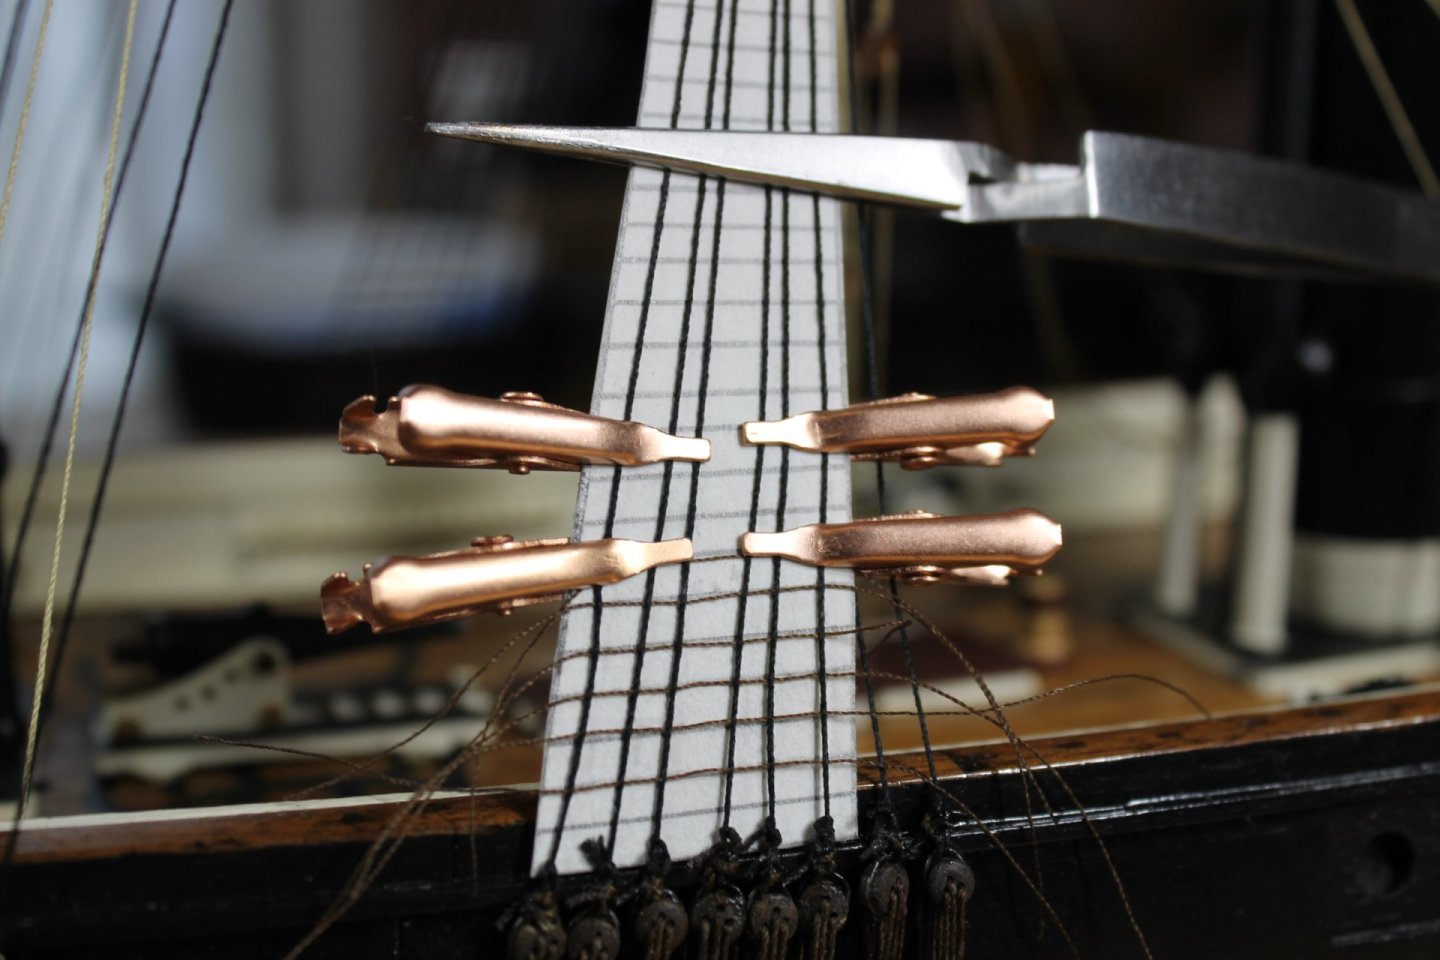
Thank you to all for the comments and likes. The weaving process in a bit more detail for Phil @GrandpaPhil and anyone else that may have an interest. This is not my idea but to whoever thought of it, THANK YOU! The reason I chose the weaving process is because there are too many knots to tie at this scale. On the main's lower shrouds the starboard (and port) have 42 ratlines times six shrouds equals 252 knots. It would be a herculean task for me to tie 252 knots at this scale, I'd go stark raving mad. I use a #12 beading needle for weaving. Obviously if one is working at a larger scale you can use a larger needle. The #12 has a very small eye and one of the most difficult aspects is threading the needle eye. I use a needle threader and when pulling the captured thread and threader back through the eye, the eyes can break or the thread fray and not pull through successfully. The #12 also bends easily which can work in your favor, more later. One must make a guide card to place behind the shrouds as normal except the guide needs to be fairly narrow where the clips can grasp the shroud lines. The first couple of ratlines are the most difficult because of the guide width. The clips must securely clasp the shroud lines to the guide for the needle to pass through the middle (or as close to as possible) of the shroud line. I normally start two or three ratlines up from the first line to help stabilize the shrouds in a straight line making absolutely sure to leave at least an inch tail on the outside shroud lines. I then go back to the bottom ratlines and work up to where I started the weaving process. Because the clips are a bit difficult to attach, most of the time a clasp above and below two lines. Sometimes that doesn't work out and I have to adjust the clips closer to the point of entry. About the needle being bent....in trying to hit center of the shroud line one must move the needle either in or out because the thread wants to roll away from the point of the needle. It's tedious work but not as tedious as tying knots it takes practice and patients. And you slowly work you way the ladder till all the ratlines are woven in. Once all the lines are woven I start on the bottom right side and place a small amount of CA using my needle applicator at the top and bottom of the ratline of the outside edge of the shroud. I proceed to CA first five lines starting at the bottom and trim off the thread tails. and proceed all the way to the top. DO NOT CA the inside shrouds, only the two outside shrouds. Before CAing the left shroud I adjust all the shrouds width to their correct angle and all the ratlines are as horizontal as possible. One that is done I CA the left shroud and ratlines starting bottom up, five at a time. And that's it, it's actually a pretty easy process. Any questions, please ask. Thank you to everyone for following along. Keith


-
He seems to be completely consumed with flying. I do wish he would take up where he left off.
-
Such a neat little model.
-
1876 Parcel van by michael mott
Keith Black replied to michael mott's topic in Non-ship/categorised builds
Absolutely breathtaking work, Michael. -
Pat @BANYAN, Rick @Rick310, and Andy @FlyingFish thank you for your kind comments. Keith, will that get past all the check-in hoopla? Tom, yes we're about 23 miles west of Ann Arbor. This sounds like the makings of an MSW/NRG Noggin n' Natter and I'm up for it!! Our house sits on two lots, 3/4 of an acre in total. The lot on the west side is empty, plenty of room for car and camper parking. We've got a 7 foot fire ring that I burn brush in but we can make it tidy, a quarter cord of firewood and we can stay up all night making S'mores donuts and campfire coffee. Gawd, that sounds like so much fun. Thank you for the likes and for following along. Consider yourselves invited. Keith