
HOLIDAY DONATION DRIVE - SUPPORT MSW - DO YOUR PART TO KEEP THIS GREAT FORUM GOING! (Only 36 donations so far out of 49,000 members - C'mon guys!)
×


rwiederrich
-
Posts
5,518 -
Joined
-
Last visited
Content Type
Profiles
Forums
Gallery
Events
Everything posted by rwiederrich
-
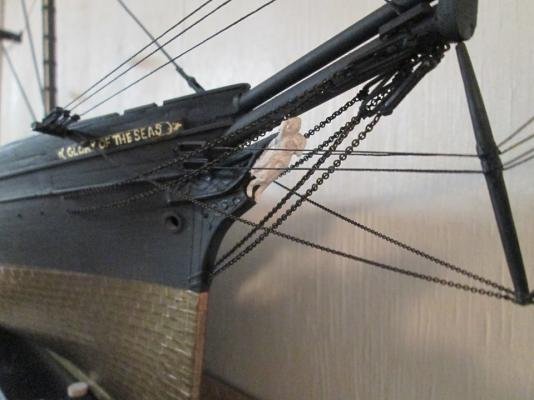
Well, I’m going to paint her black with a pearl white gunwal and houses and a soft blue waterway. She will probably have varnished yards and top masts. I will build her lower masts and probably paint the recesses between the iron bands white.
- 3,560 replies
-
- 1
-

-
- clipper
- hull model
- (and 2 more)
-
Well there you go. I was sure there was a nautical term aloof to us all....identifying the condition. Thanx Sailor for enlightening us. Almost sounds frontierian...then nautical. Maybe so. Rob
-
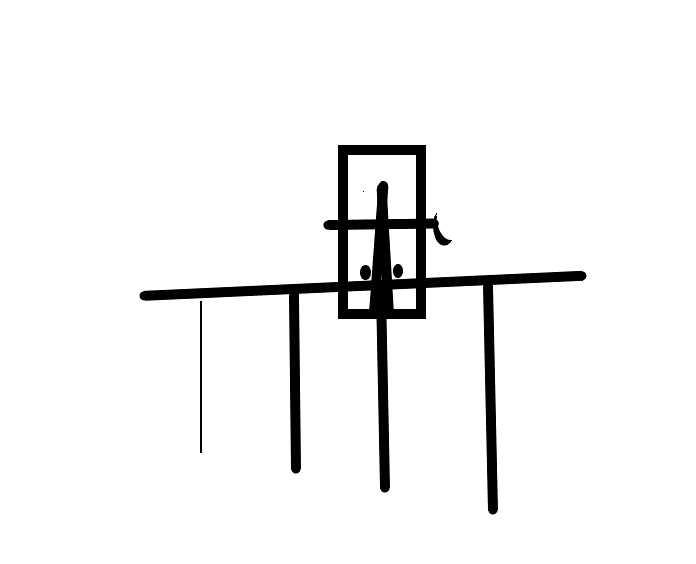
Model shipways makes a similar clamp. It clamps onto the bulkhead and the pins press down against the newly applied strake/plank. Basically the clamp does two things. It holds the new plank against the bulkhead while your glue sets...doing this by holding itself to the bulkhead just below the plank. The design is sound.....however...when the hull begins to curve at the bow and stern...the pins if not adjusted to the offset pin hole...will NOT comply with the bend of the hull. So I made some mods to accommodate that issue. Here's a crude drawing
- 3,560 replies
-
- 1
-
-
- clipper
- hull model
- (and 2 more)
-
You are doing a wonderful job for sure. The top three images you chose to model....and I can see why..the sails are fuller and appear more active in the animation of their design....where as you suggested the last image the sails are trim and taught. This is easily seen by the fact the top 3 images the sheets are relaxed...allowing the sails to billow...where as the last image the sheets are drawn in tight and the sail is fully bent. In your example your sails are fully bent and you still achieved the fullness of the first 3 images. Sail(I know) can be arguably subjective. The point that you added them...and with functional accuracy demonstrates a knowledge of their function and control. And a sailing ship without her sails is either in port(where they would be stowed) or the modeler left them off to allow better viewing of their rigging details. Like yourself....I preferred to present my model(Great Republic and Glory of the Seas) as they would appear at sea...where she would have been most at home. The discriminating eye can find the finer details if they are modeled.....and sails and their rigging, make up part of the finer details. One last question: Did you add the jackstays to the yards then lash the sails to them....in your search for the *Finer* details? (And what about those gin blocks?) Rob
- 399 replies
-
- 5
-
-

-
- cutty sark
- revell
- (and 2 more)
-
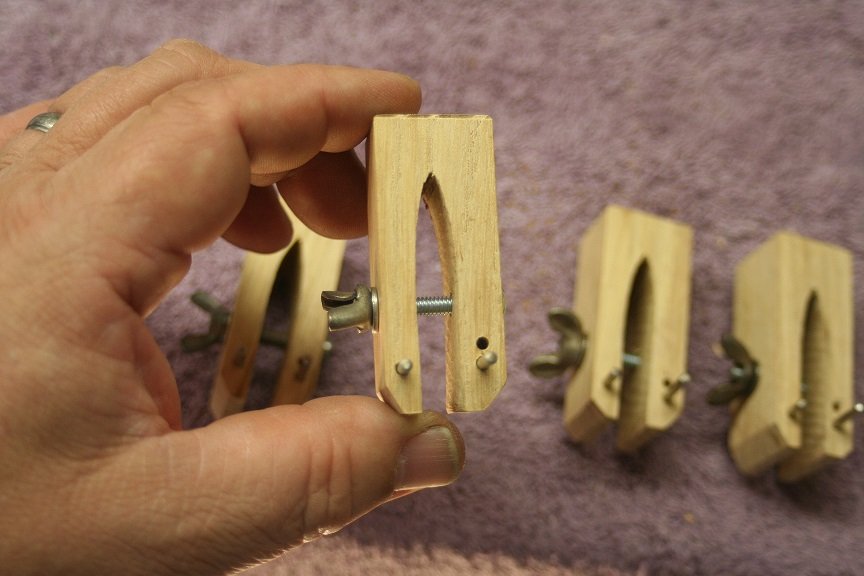
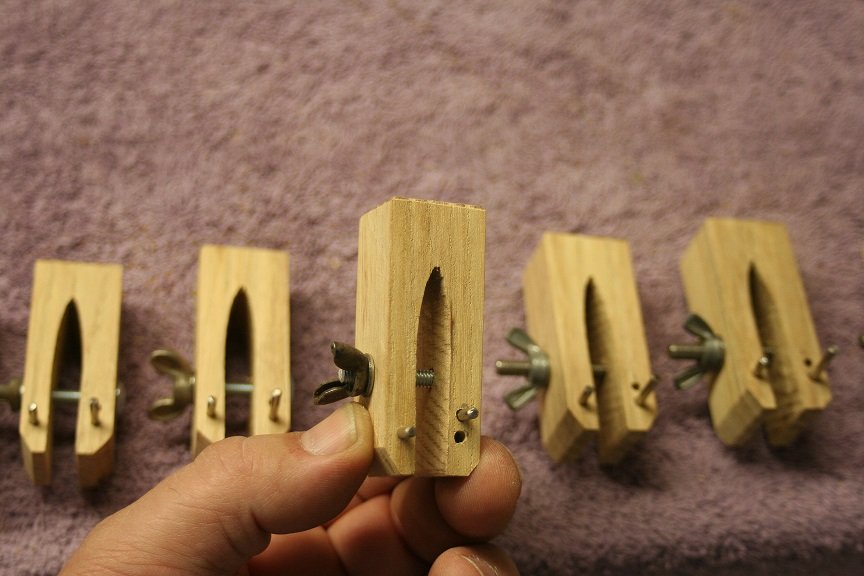
This image shows the right pin in the lower slot for flat strakes......and the right pin removed and placed in the upper slot for strakes following the deep curve of the bow or stern. I modeled the clamps after one I saw on ModelExpo. They are made of hard maple. I'm getting as much done in preperation for this fantastic build. Rob
- 3,560 replies
-
- 5
-
-
-
- clipper
- hull model
- (and 2 more)
-
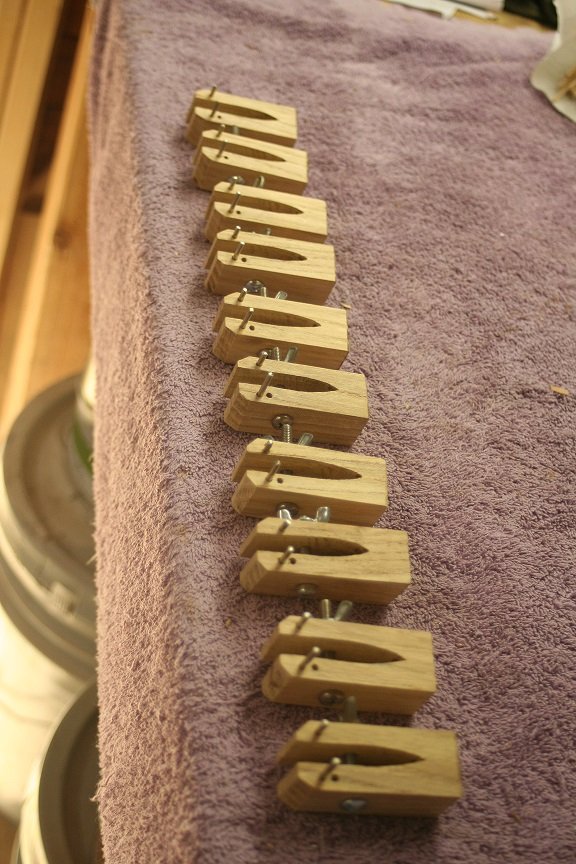
In anticipation of getting some bulkheads from Vladimir...I have ordered decking and strake timbers for my Glory build. I ordered from several suppliers..wanting to ensure a good quality and quantity of timbers. In preparation..I spent some time in the shop today and I designed and made 10 identical planking/bulkhead clamps. They work by clamping onto the bulkhead and by way of steal pins...press down on the strake as it is drying to the bulkhead. In makign them I included a feature by way that the same clamp can hold strakes flat against the bulkheads that are amidship and by way of the right hand side pin that has two slots...I can use the upper slot for the strakes that are following the curve of the bow and stern...but maintaining a parallel clamping surface to the bulkhead. Here are the ten clamps all in a row. They use a wing nut and bolt to clamp the wings together against the bulkhead. Rob
- 3,560 replies
-
- 2
-
-
- clipper
- hull model
- (and 2 more)
-
Wonderful work Bruma...excellent. You said you scratch built each yard....did you also make the gin blocks as well. I see you fashioned the truss for the lower topsail instead of using the Revell solution. Wonderful attention to detail. Will you be belaying all the sheets and bunt lines to their pins? She is coming along nicely. I am interested in your assembly approach....I constructed my Great Republic mast and yards off model for ease...did you do something similar? Awaiting your next install. Rob
- 399 replies
-
- 2
-
-
- cutty sark
- revell
- (and 2 more)
-
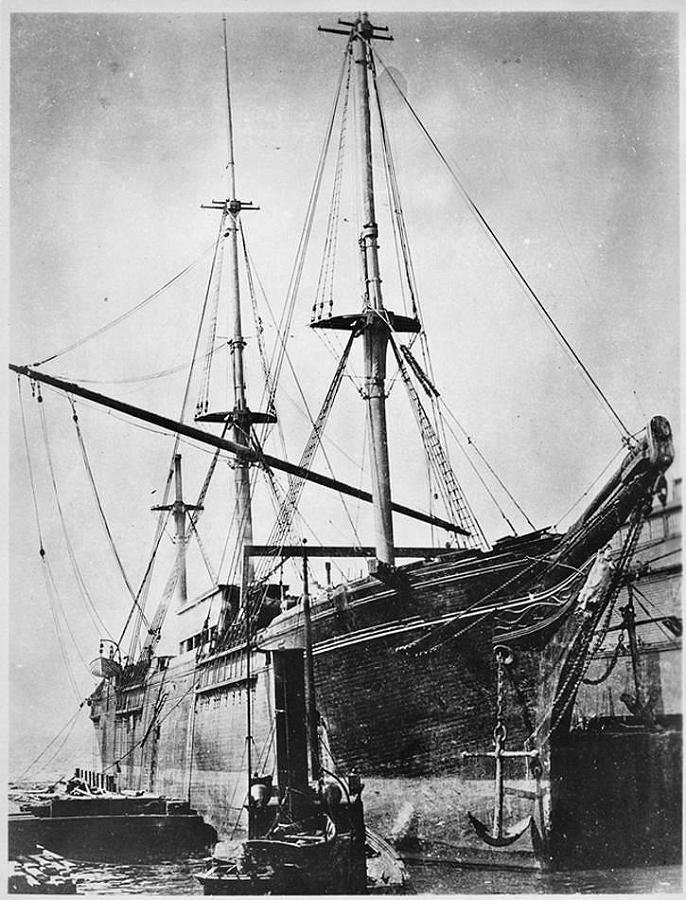
Interesting....however...I tend to believe this is just another optical illusion we are seeing. The curve of the bow viewed from below the profile can give the illusion it is bowing down...when, if you look at the drawings it does no such thing. The half model of the James Baines only reinforces this phenomena...because it to is viewed slightly below the profile. IMV....all we are seeing is the curve of the bow and from this particular angle it appears to bow down....going in its natural curve. Just hold a cup up and look at it from the side...its edge is flat...but then rotate it slightly so as to look at it from below its profile and the edge begins to bow down. My observations anyway. Rob
-
Great pictures guys....really amazing stuff. I spoke to Mike as we prepare to meet again for another book signing and some good conversation. He informs me that he has been " 'revisiting' the construction period when Glory was under construction. It's going to help him understand better, fifty years removed, how she was actually built and what was entailed in doing so". In addition to Duncan Mcleann's accounts. It sounds exciting and I'm looking forward to any new conclusions. Rob
-
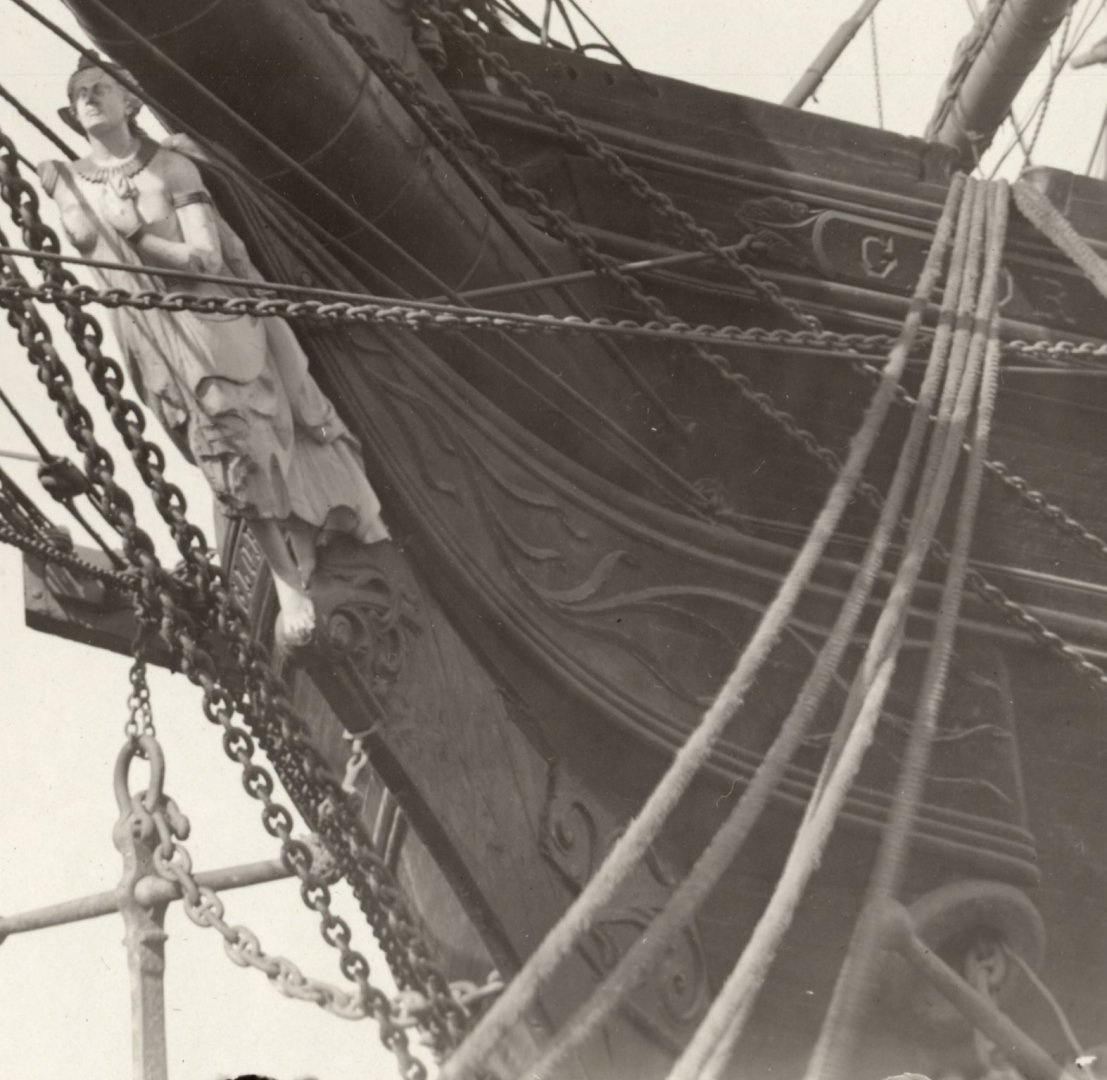
Interesting for sure. I made 2 figureheads in that scale before. One of Athene on my 1/96 mod version......and the Highlander of the McKay clan for the Donald McKay
-
And that means when using the laser cut bulkhead plywood for the keel and stem..you will need to sand it or replace it to just half of the 1/4 plywood thickness. If you want to be accurate. At up to this point we have been trying to be as accurate as possible. Rob
-
Oh man.....that is running your own business math....I get to work and I forget everything....cept what I'm doing at work. Thanks for setting me straight Nic. Rob
-
Thanks Nic....I knew it was 1/8"=1ft...an 3/32" I originally wrote those but changed them...cuz I was at work working from memory...an my memory is slippen it appears. Thanks for helpin an old man out. Hey...by the way...can I order just the wood strakes for planking the hull from say..... your Red Jacket kit? Rob
-
Anything new.... Rob
-
? Let me get that right. My great Republic was in 1/128...where 1/32"=1ft. So 1/96...3/16"=1ft? Or somewhere there abouts? I'm assuming the plywood used in making the bulkheads is about 3/16" thick. And if my calculations are correct...I will need to reduce the stem and stern boards by half.....to keep things in scale. One thing I dislike...is when a modeler(Myself included in the past) doesn't reduce the provided keel to keep it in scale...although every other aspect of their model is in scale. See what I mean from my own error...even though I had no choice to make this change with the Revell hull...it still looks out of scale and clumsy compared to the real ships stem. Rob
-
One blaring issue I want to tackle with this new build....is. All these kit designs call for a pretty hefty keel. Cut from the same plywood the bulkheads are cut from. The only problem is, is the stem is not to scale. It is much too wide to be accurate. By reviewing the cutwater and stem of the Glory in her many photographs of them...you can see it is quite thin. 5"~6" probably. I'll most likely be adding the keel and stem after the hull is planked...and great care must be taken to fare in the bow and stern so as not to make the transition out of scale or unruly. Any input on this issue? Rob
- 3,560 replies
-
- 1
-
-
- clipper
- hull model
- (and 2 more)
-
Indeed...my first was a mod of an existing molded hull...my second was a test run to see the shape and accuracy of the hull Mike and his friend in Australia designed...that is why I used gypsum to sculpt the hull. Now I hope to begin again with a good foundation...based on far more extensive research...by a team of devoted Glory enthusiast's...to include the original Glory hound...Mike Mjelde. Rob
- 3,560 replies
-
- 1
-
-
- clipper
- hull model
- (and 2 more)
-
Great job Vladimir...clean work. I thought..Cutty Sark was your first ship model?...or was she your first clipper? Beautiful work. Rob
- 3,560 replies
-
- 1
-
-
- clipper
- hull model
- (and 2 more)
-
I know...and I'm not insulted. BlueJacket..sells planking from their kits separately...you can buy in bulk from even model railroading outfits. I'm thinking I'm going to use my maple veneer and cut them into 1/16" planks. They go on easier and they conform far better to the curves. Ed actually cut all his small planks from a block of wood...like a 4X4...... Rob
-
I can tell you...he milled it all from larger stock....every last piece. Yeah.....now you see what we're up against..... Rob
-
Exactly. Now I need to get the strake material and what I plan on using for decking. Rob
-
Isn't that cool...she's taken you over....hasn't she? McKay ships are amazing and doing the historical research makes it all the more fun. Thanks again. Rob
-
Snug...we are beyond just drawings..we have then laser cut out now. Thanks for looking in. Rob
-
1/96 if that is OK for me..not sure about Rich. I'm sure it will be OK too....I'll try to get his feedback. OH I understand about the book...the copy I had him sign had great value to me...even before he signed it. I plan on getting another copy anyway for myself and having him sign that too. I can't thank you enough Vlad. Rob
