HOLIDAY DONATION DRIVE - SUPPORT MSW - DO YOUR PART TO KEEP THIS GREAT FORUM GOING! (Only 72 donations so far out of 49,000 members - Can we at least get 100? C'mon guys!)
×


rwiederrich
-
Posts
5,518 -
Joined
-
Last visited
Content Type
Profiles
Forums
Gallery
Events
Everything posted by rwiederrich
-
Interesting. Restoration is more important then correction in this instance. Even if Grandpa built his model inaccurately..it should be *restored* as it was originally created...to retain the actual patina of the model. I would venture to suggest that if the main shrouds and ratlines are intact and without great damage...I would not replace them...but merely clean them. These are original to the model...thus original material and they reflect work actually done by Great-grandpa. It represent more folk art then an actual scale model of an actual ship. IMO. Rob
-
Good point Druxey. Altering a model to *bring* her into compliance is not the restorers job....however, I am simply trying to ascertain its lineage and a possible identification to aid the restorer and most importantly the *Owner*, in any history of the models actual ship. Rob
-
I failed to answer this specific question in my earlier post. I can't tell from the pictures of the model if she had 6 or 7 yards per mast. That is devised from what you said the model had when you acquired her. My conclusions are based upon the fact the model had 7 yards per mast and from what I know about the typical arrangement on clippers. From what I recollect there have never been a clipper with 7 yards on all three masts. As mentioned earlier...I will do further research but I think there was one that might have had a seventh yard on her main mast only. Typical clipper designs had 5~6 yards per mast. Some, 5 on all masts...some with 6 on all masts, and still others with 5 on the foremast 6 on the main and 5 on the mizzen mast. Generally a combination of these designs could be found. Even on some of the largest sea going cargo carriers...the big 4 and 5 masted German vessels...only carried 6 yards per mast. Rob
-
Mike....typically with Howes rig the main sail yard is fixed to the lower mast via a metal truss. The Howes rig comes into play with the top sails. Early clippers only had a single top sail, that could be raised and lowered the full length of the top mast. The Howes design(actually designed by Forbes) affixed a second topsail to the lower mast cap...via a crane and iron support(the lower topsail)...permitting the upper topsail to easily be lowered down and *Over* the lower....quickly reducing sail area. This double yard(Howes), system was also employed in the topgallant yards in similar fashion in later clippers and larger sea going carriers. The Forbes design(Later to be adopted and improved by the Howes design)...quickly permitted the sailors to reduce sail by lowering the top yard/sail onto and over the lower sail/yard. Quickly reducing sail area, in essence hiding it in the air shadow of the lower sail.. This method was far easier to manage then the earlier very large single topsails of earlier models. Especially during dangerous high wind events. Rob
-
7 yards per mast....mmmmm. Do you have an original photo of her before you began the restoration? Being Howes rigged, She either had a single main, upper and lower topsails, upper and lower topgallants a royal and a skysail....or.. Her main, double topsails a single topgallant, a royal, a sky sail and a moon sail. Do you know....Is this model suppose to replicate an actual vessel or is she fictitious?(I know you probably already answered this) *Fairland*...interesting. She was most likely British...she appears to be of that pedigree. No American clipper was rigged with 7 yards per mast. Still trying to figure out what British vessels did, if any. I do think I recall, a ship having 7 yards on her main....but I'm not sure of her origins....I'll do some research. Rob
-
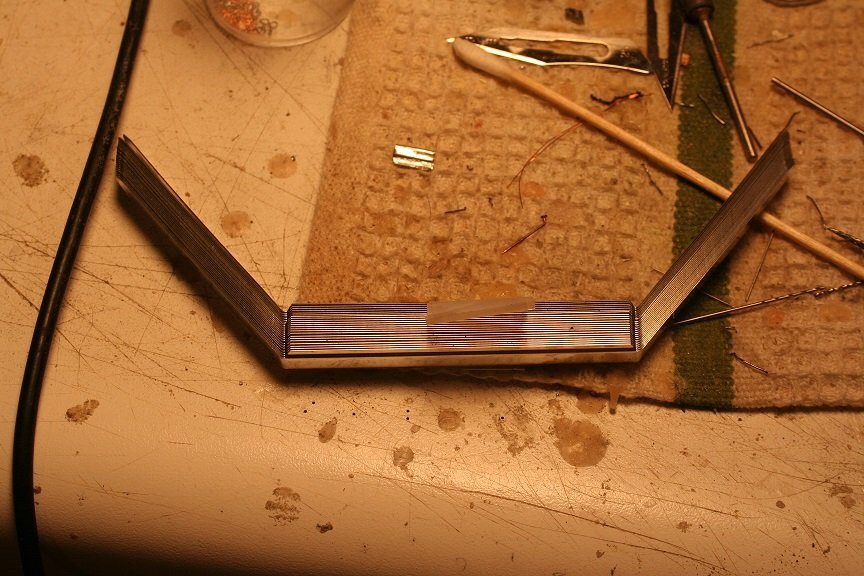
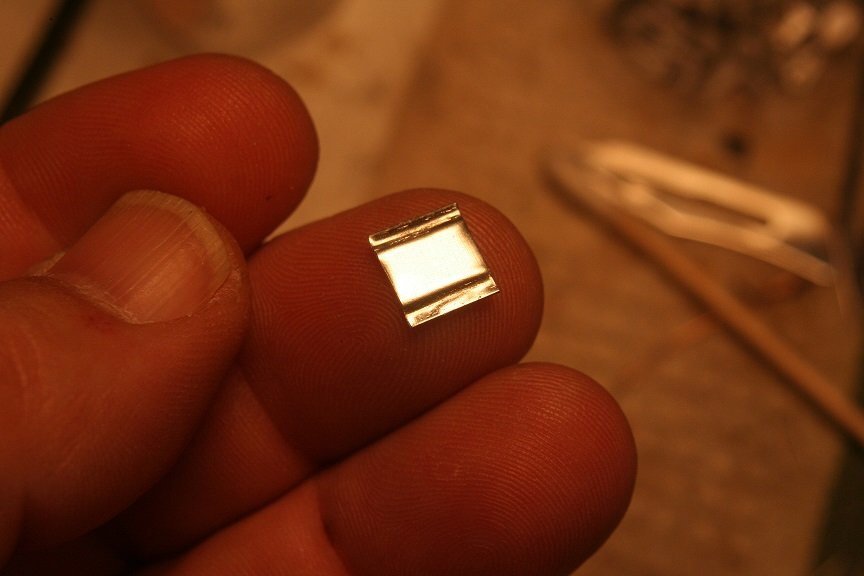
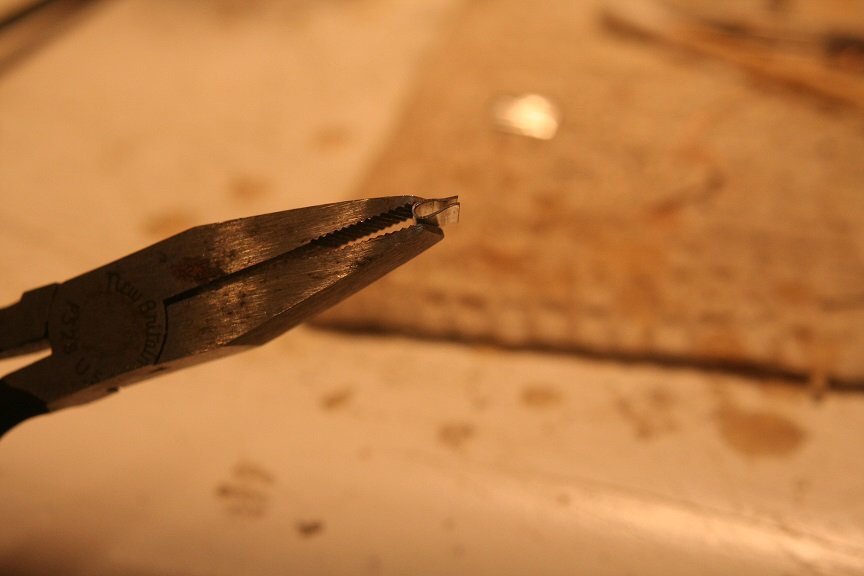
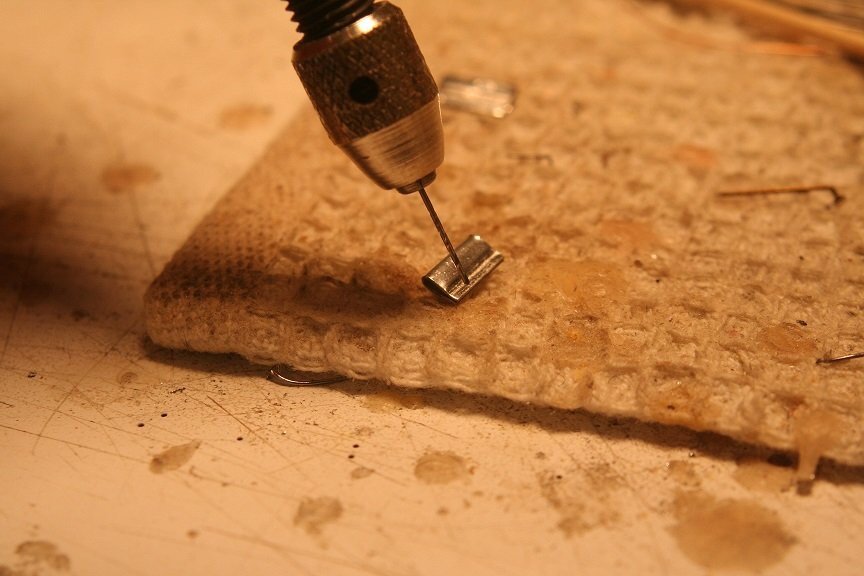
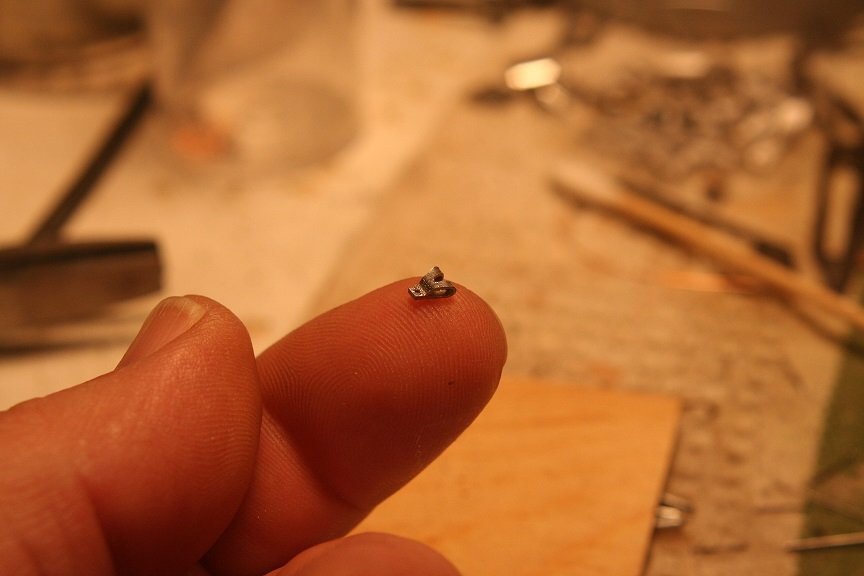
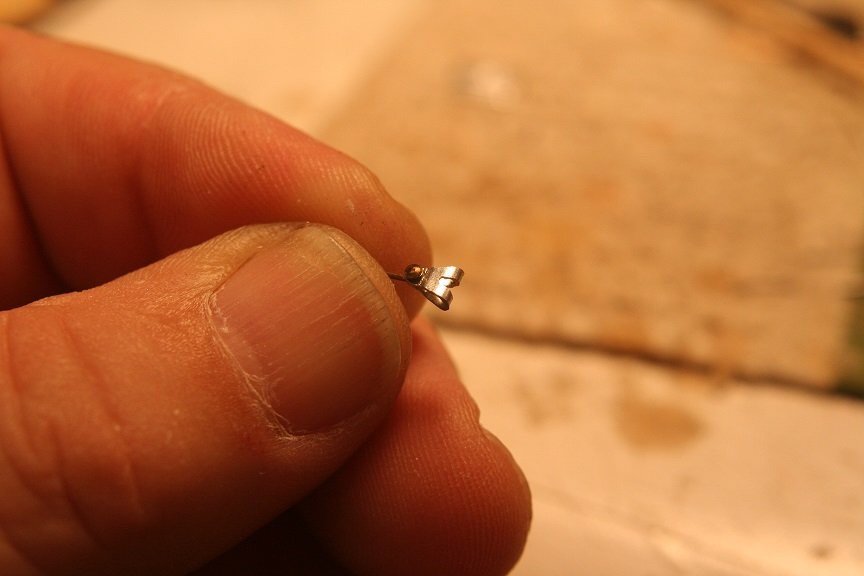
I’m so sorry for not originally posting any images. Here are some to show my process. I take a metal folder tab, cut it….bend it, then cut to shape and drill and add securing pin. paint black and run the chain sheets through. This model is the Great Republic. Rob
- 3,560 replies
-
- 9
-

-

-
- clipper
- hull model
- (and 2 more)
-
Good job George. It took me a couple attempts to make mine right too. The first time I ever made a composite mast was for my first attempt to only cut out the chapel grooves from stock round material. The technique worked real well. Didn’t need a lathe…….just a mini table saw. Good job George. Rob
- 602 replies
-
- 4
-
-
- Flying Fish
- Model Shipways
- (and 2 more)
-
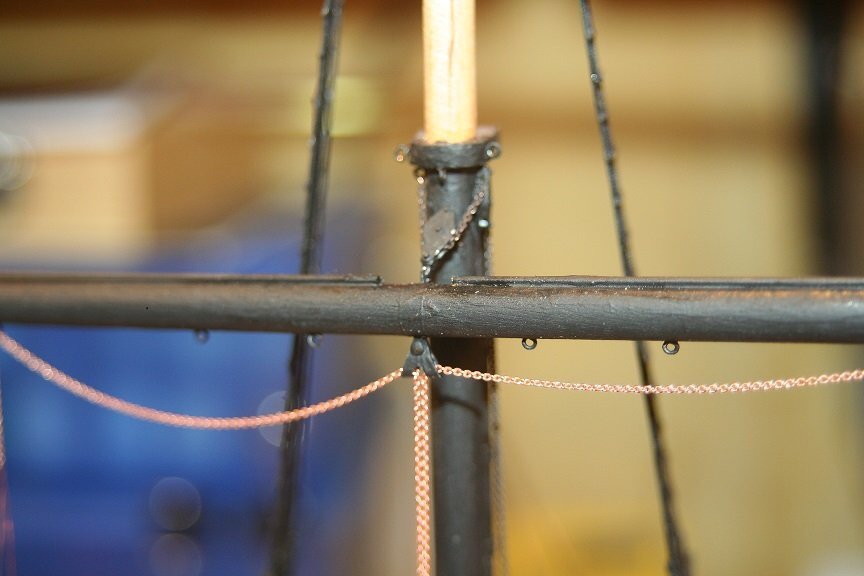
I made the eye bolts and the blocks and hung all 18 head bunt line blocks under their prospective tops. The pics are of the mizzenmast and main masts. Rob

- 3,560 replies
-
- 5
-
-
- clipper
- hull model
- (and 2 more)
-
I’ve built a 6”f/15 refractor and a10”f/15 refractor. And in my younger days, staying out all night and enduring the cold was a passion. Now…..not so much. My 7” Mac is much easier to set up and put away. Less time freezing by myself. Long after everyone has hit the hay. Rob
- 3,560 replies
-
- 2
-
-
- clipper
- hull model
- (and 2 more)
-
Indeed. Creating something from total scratch or modifying something from some totally different other thing is a testament to a strong mental prowess….. a fruitful imagination and ingenuity. 3D printing like Astro photography lend heavily to good computer skills and adeptness to combining software to hardware for good results. I praise masters of both……..I’m old school….a simple man. Thanks again Rob
- 3,560 replies
-
- 2
-
-
- clipper
- hull model
- (and 2 more)
-
Kevin…….I appreciate your fine comments. Im a scratch builder and I haven’t done any 3D printing. I have friends who do and it’s amazing. You can create via a computer almost any 3D object. Make your own parts. That is pretty cool. I make my own parts, but from Lots of previously engineered things. I love creating from what’s around me. Again……thanks for the likes and fine compliments. Rob
- 3,560 replies
-
- 2
-
-
- clipper
- hull model
- (and 2 more)
-
Wood is actually the easiest to scratch build with.....and metal and plastic comes in second. I'll have to scratch build for each yard the sheet blocks and the gin blocks. I like to use pre-engineered stuff...it makes the task that much easier. I use the metal office folder tabs as the basis for my sheet blocks. I cut out a section....fold it over on itself(this forms a natural pocket). I then use a separating disc and cut it to the desired shape. Drill a hole for the mounting pin...paint and there you go. A nicely fabricated replica of a sheet block. All about 1/8" wide. I'll need 12 of these little boogers. First...cut it...then fold it ..shape it and finished product...mounted. Rob
- 3,560 replies
-
- 1
-
-
- clipper
- hull model
- (and 2 more)
-
Thanks Vlad...I appreciate that. Rob
-
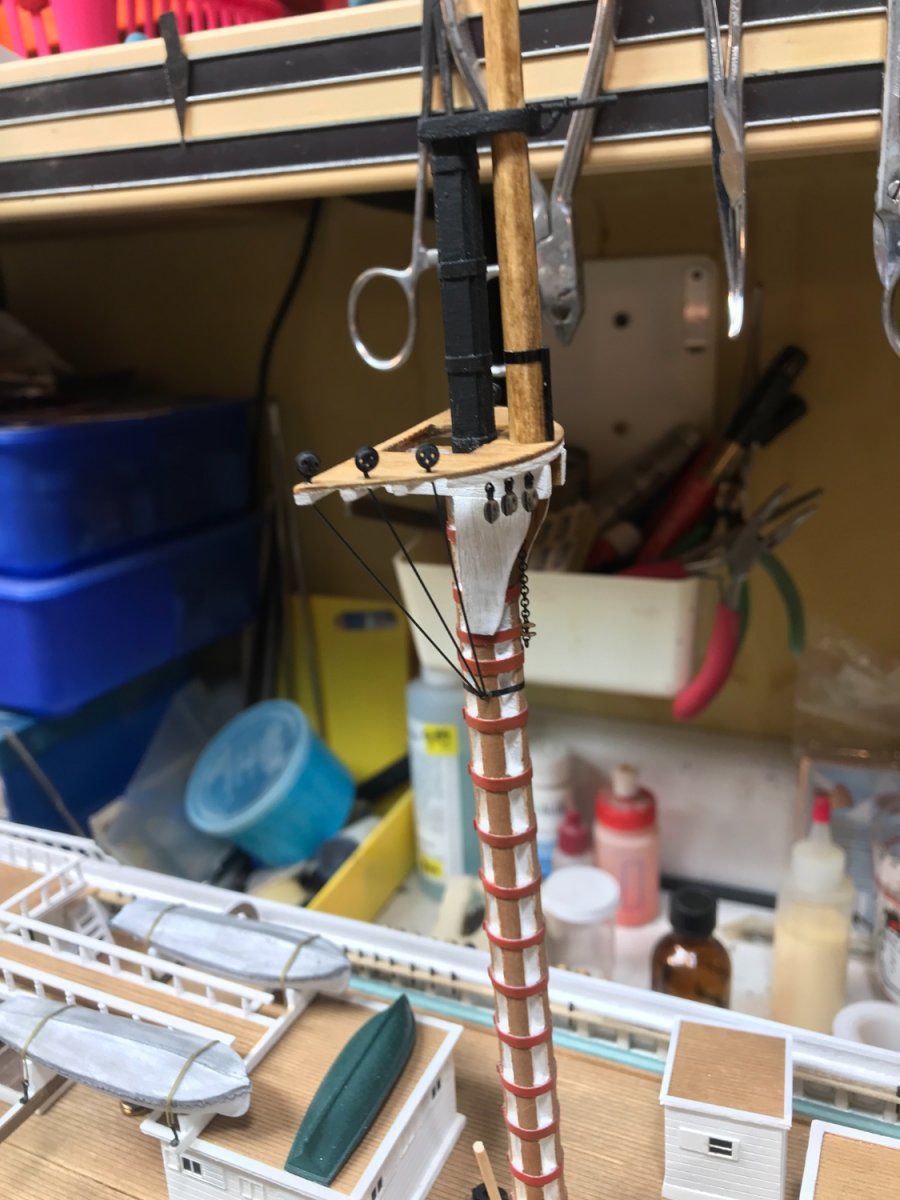
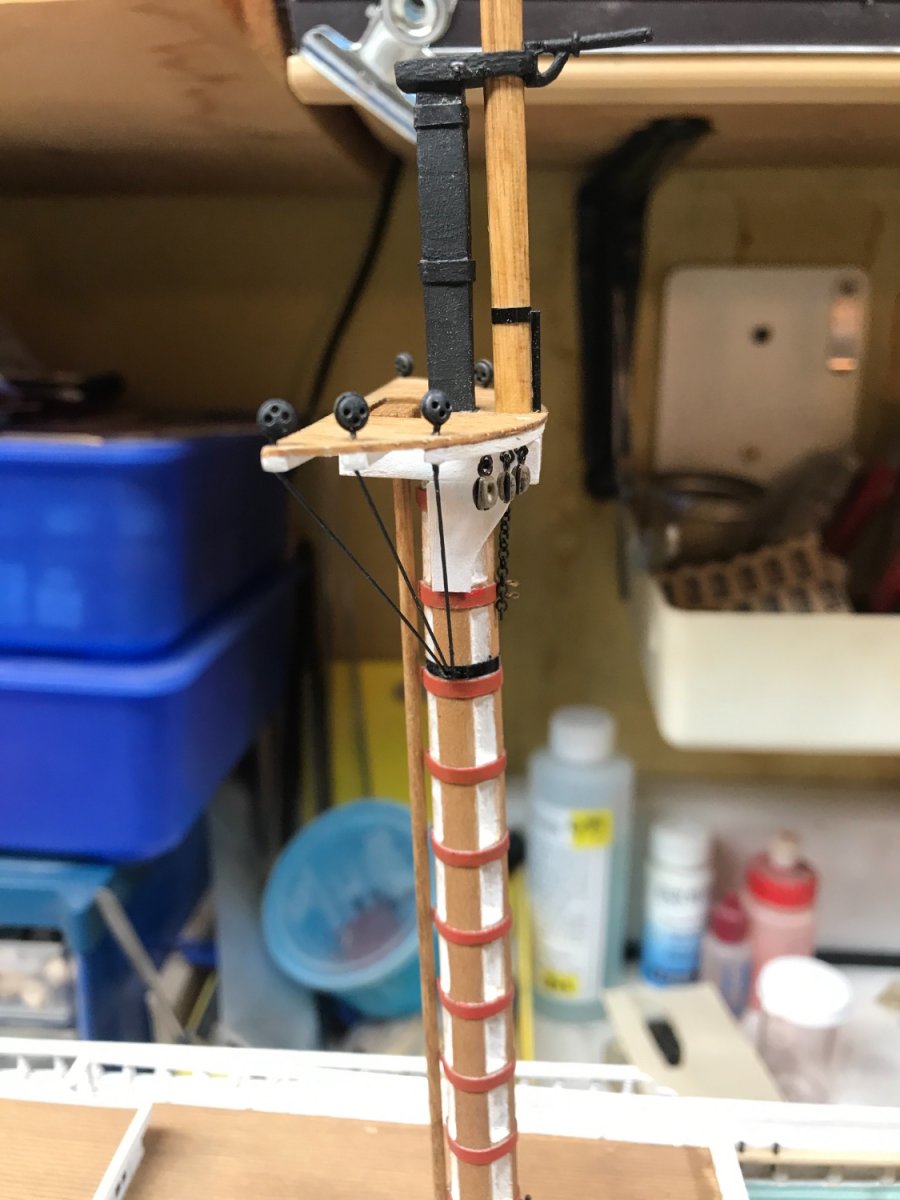
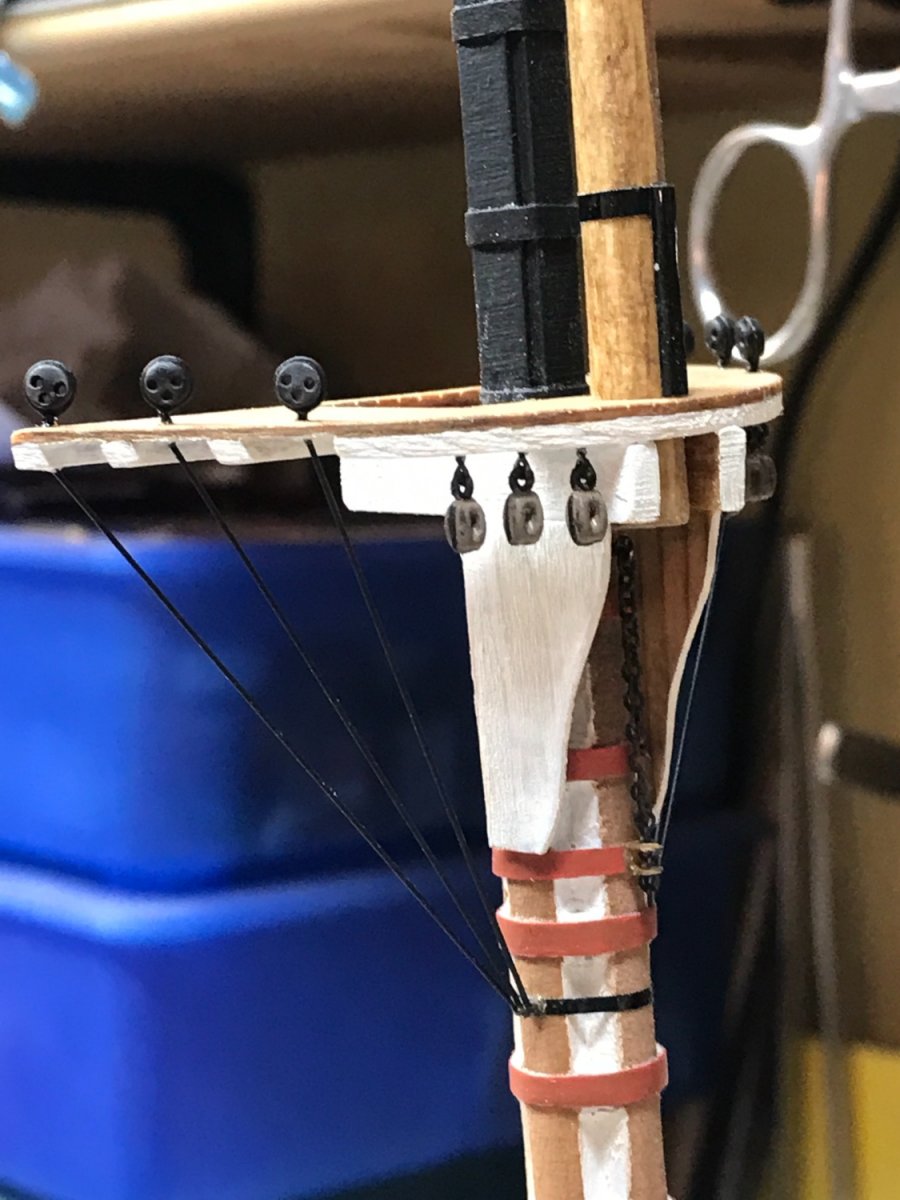
I had to work that over a couple of times to get it right. It's so small and I had to do the work after the fife was already mounted. It took some doing to hold the mast and rotate it to cut in the sharp bottom edges to permit the rail to be thin enough to allow the pins to fit and extend beyond the bottom to secure rigging. The wood is quite thin and carving it after it was secure proved to be the wiser choice...since it kept crumbling apart when it was in my hands being carved, while unmounted. You can compare the first images I took to these final images. I was reviewing the procedure I used on Great Republic to prep for the next phase of additions. I'm, going to move to the foremast and begin adding eyebolts and blocks. I'll do that before I add the top and royal shrouds. It just makes sense to keep things clear to have room. Rob
- 3,560 replies
-
- 2
-
-
- clipper
- hull model
- (and 2 more)
-
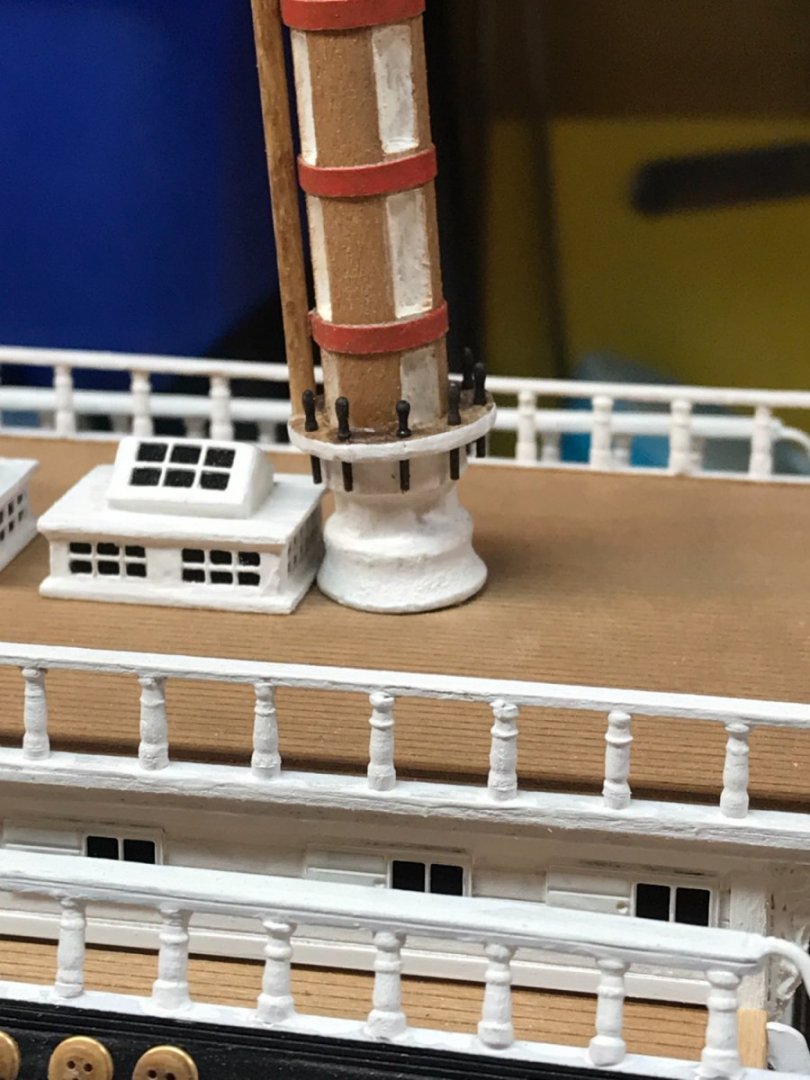
Spent just a short time carving the mizzenmast fife rail and adding pins. Rob

- 3,560 replies
-
- 7
-
-
- clipper
- hull model
- (and 2 more)
-
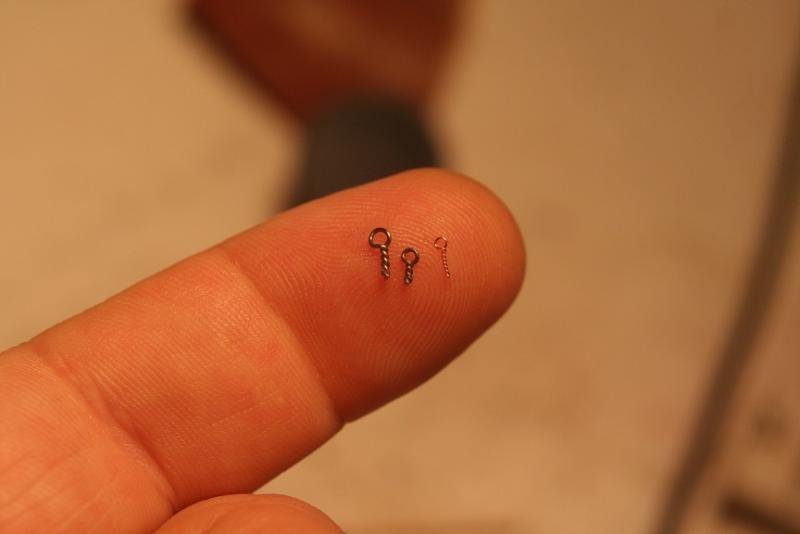
Beautiful pics Rich. Just informational. I make 3 sizes of eye bolts for the masts and yards. Tiny little things. Rob
- 3,560 replies
-
- 4
-
-
-
- clipper
- hull model
- (and 2 more)
-
I believe the chain from this outfit is the naval center lug type chain for anchors. Perfect stuff for anchor chains. Indeed check them out. Rob
-
Adding the fine deck furniture is an important part in the finished detail. Don't worry about being behind....building our prospective models has never been a race between us. However, it can be a race within yourself, if you have an internal time clock about such thing My scale is too small for this, but you will need to use accurate chain for your scale....check out this site to get the right chain for your model...it will make a world of difference. They're called the "Floating Drydock" look them up and check out their scale accurate printed chain. Rob
-
I've spent years determining that 1/96 is the best scale for me. One: it is large enough to present an imposing model with great detail and can command a space. 1/96 is also small enough that detail is not lost, but not so large that attention to fine detail done poorly doesn't give itself away. 1/96 is just right for me...small enough to be able to cram in lots of detail but still avoid what a larger scale demands in wood carpentry and fine metal detail work . And since I paint all my models....I am free to use whatever material suits me to accomplish the task at hand. Not fearing exposure... that I fell from the PURISTS faith.
-
Wow……..you are flying now Vlad. Great work indeed Rob
-
Thanks Pat for you detailed explanation. I would have explained it further myself when Keith asked…..but I kept it simple for the answer he needed for my particular modeling method. Thanks for your help in explaining. Rob
- 3,560 replies
-
- 2
-
-
- clipper
- hull model
- (and 2 more)
-
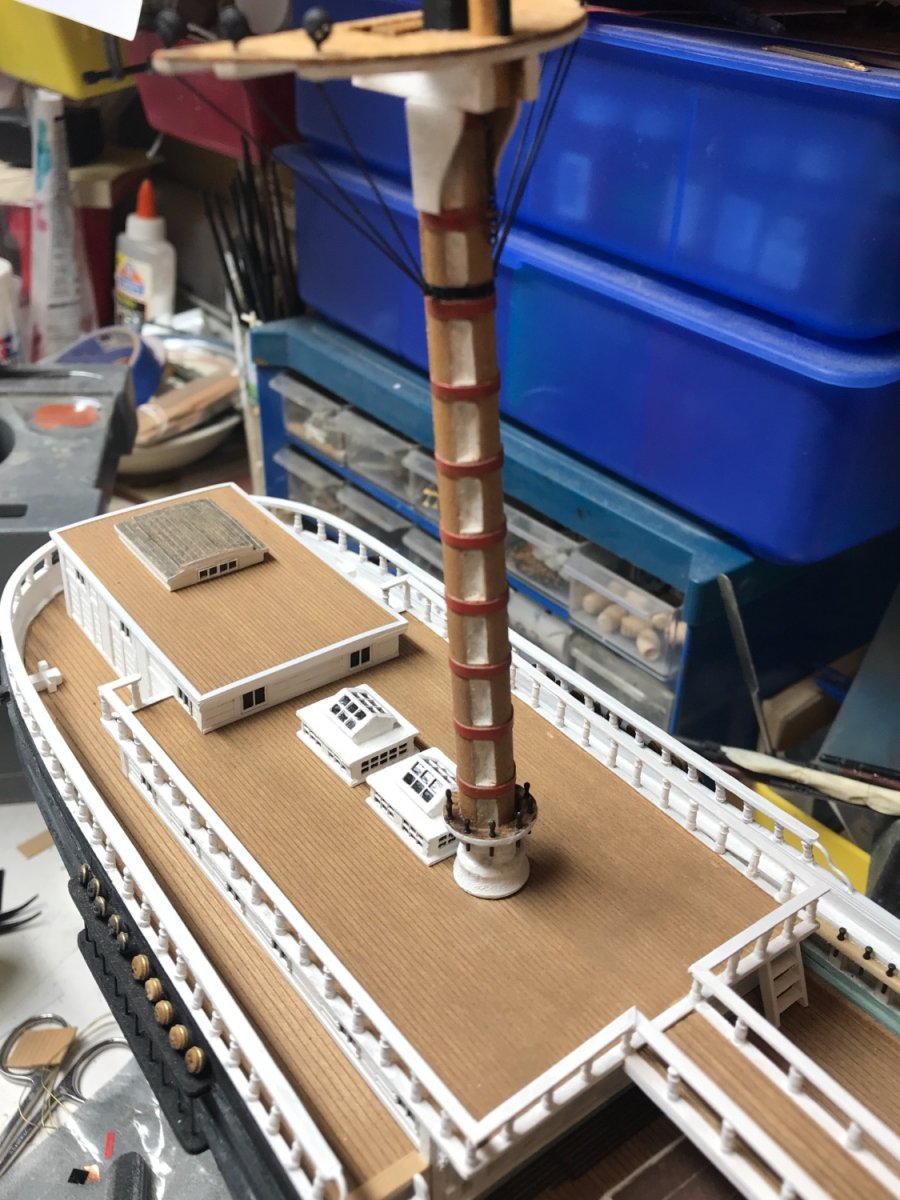
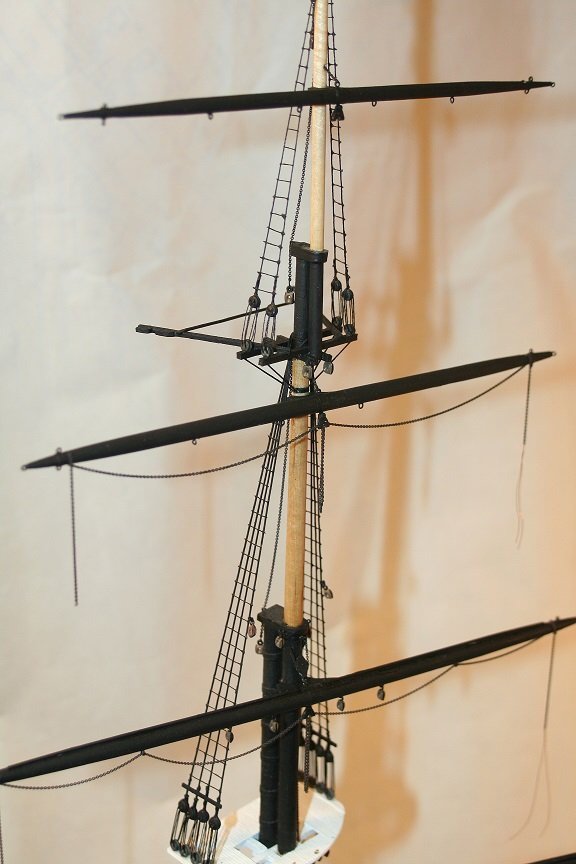
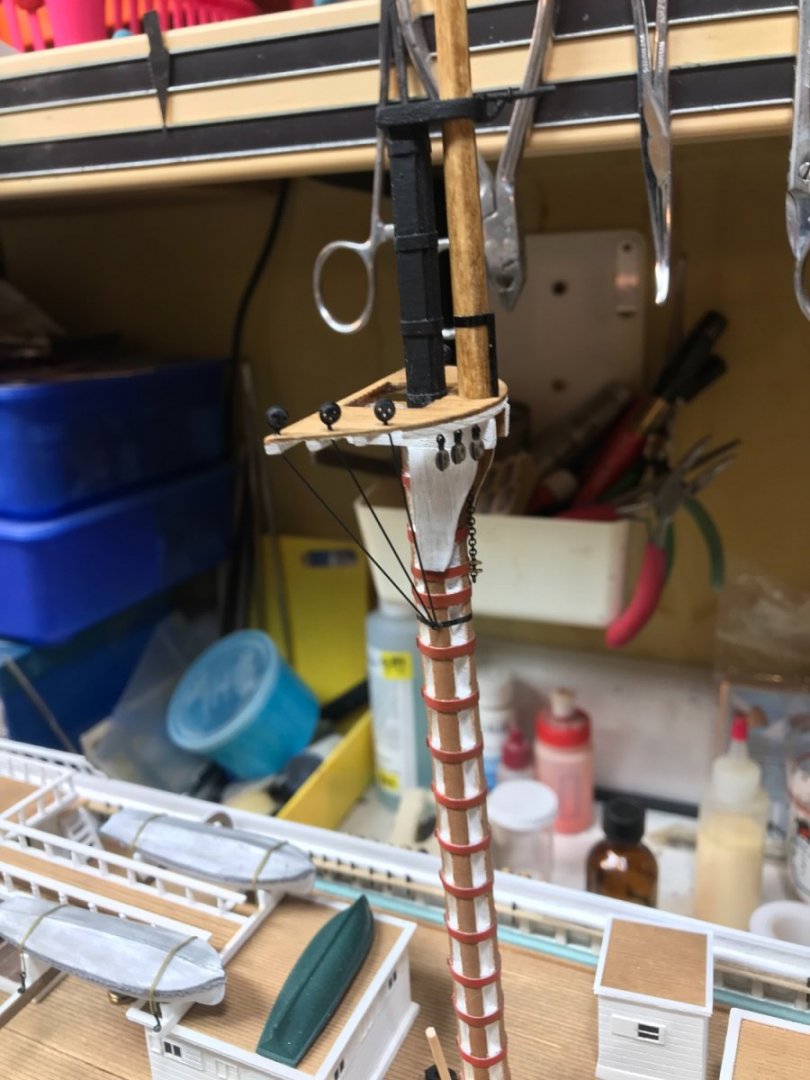
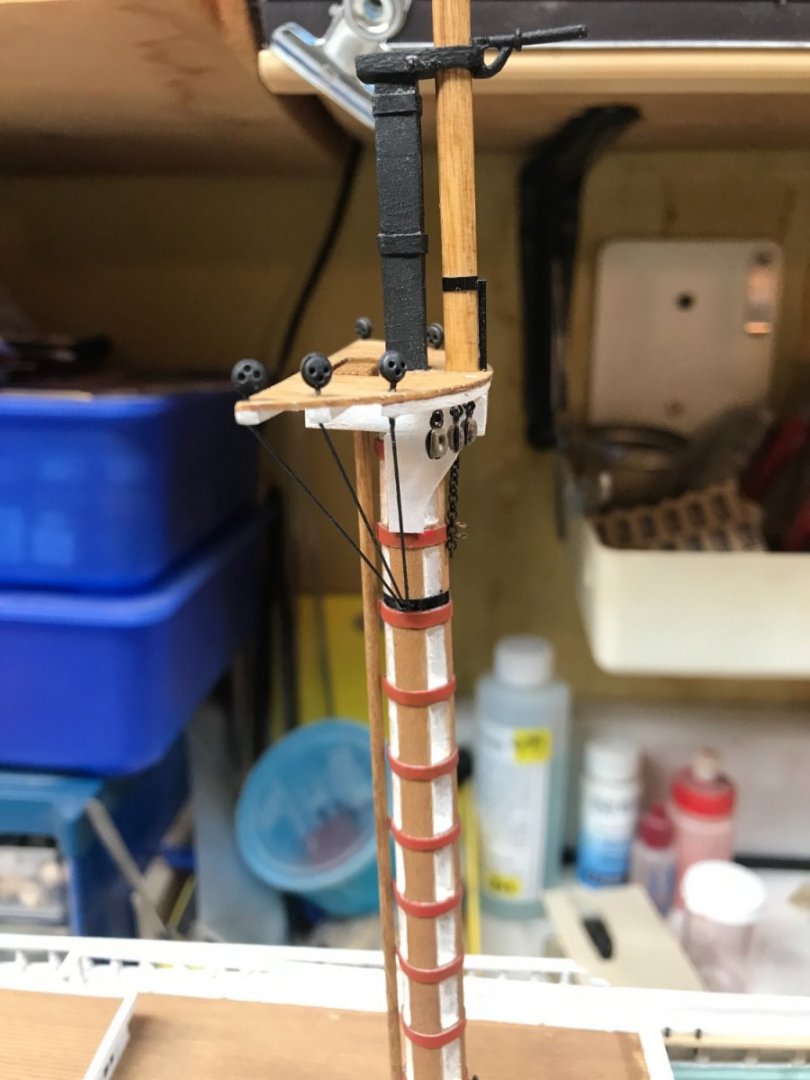
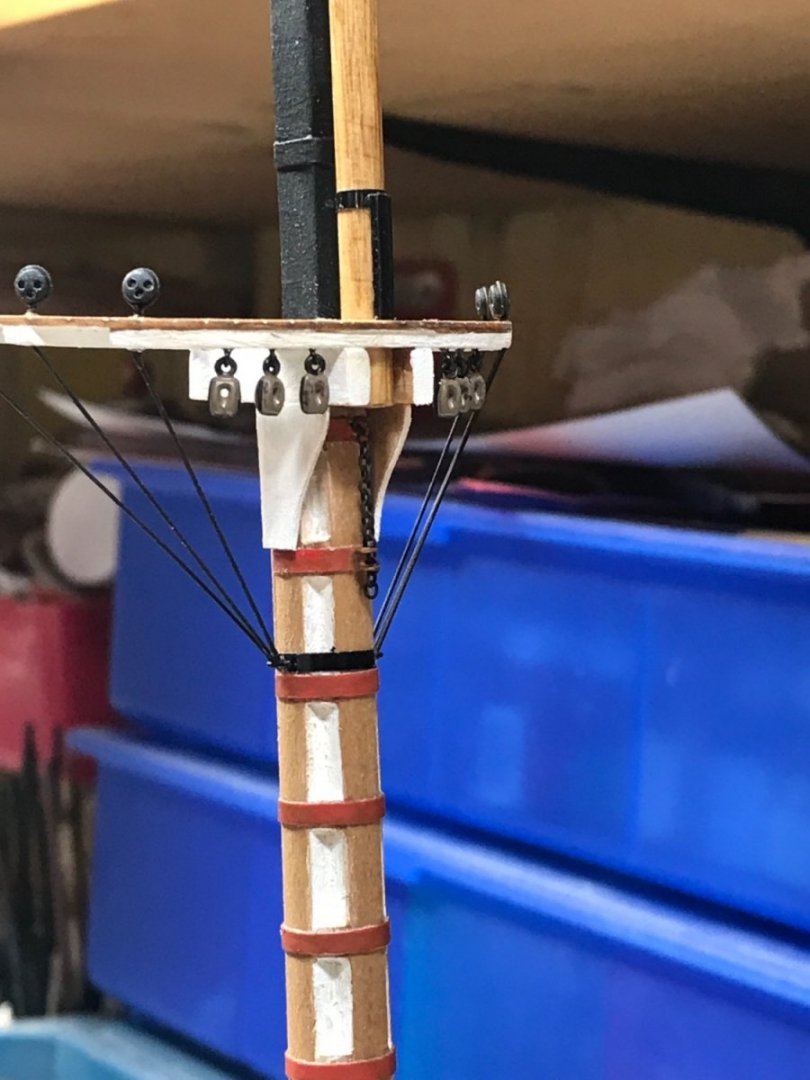
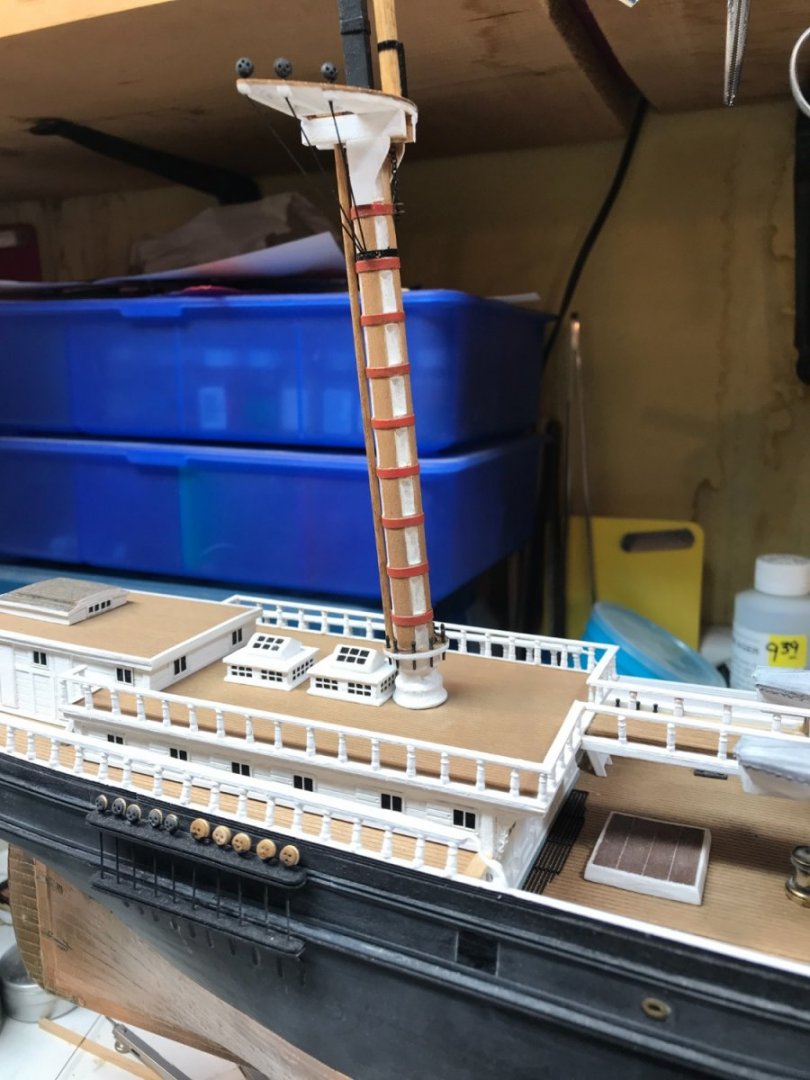
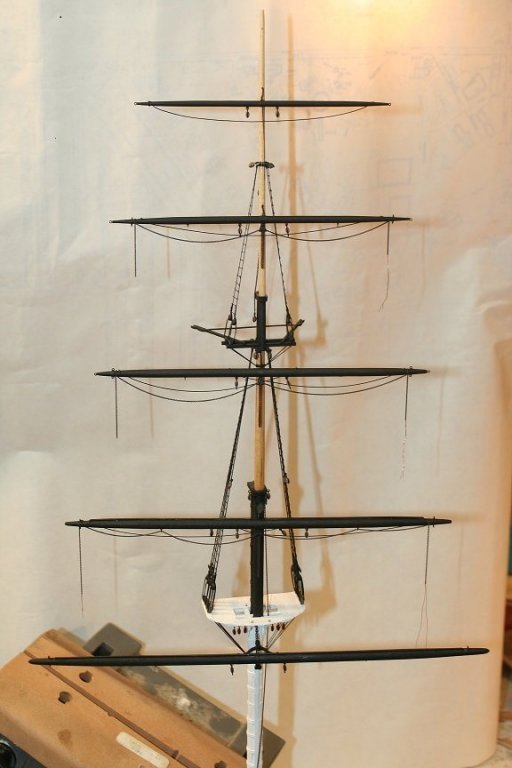
Yes....rigging is quite complicated...especially, when you have to build and rig each yard...with eye bolts...banding , jackstays and blocks. Not to mention parrells and cranes/truss's. Each mast........main, topgallant, royal, sky...needs their own banding and eye bolts to affix backstays, haulyard and downhaul blocks. Meticulous study and pre-work needs to go into each mast....Before you begin rigging shrouds. I will follow my previous method and rig each mast along with its yards prior to gluing the mast to the hull. Each will kinda look like this example from the Great Republic...prior to install. It just makes assembly way easier. Rob
- 3,560 replies
-
- 2
-
-
- clipper
- hull model
- (and 2 more)
-
I love the use of that old friction grip belt driven dental handpiece. Rob
-
Great job. I take it that second external line on each forward and aft bulkhead is the chamfer line that when using the proper thickness plywood gives you the proper chamfer for that bulkhead? I noticed the line was absent on the final cut bulkheads. Sweet job.....glad to follow along. Rob
-
Keith…..I ran 3 shrouds to one eye bolt affixed to the single futtock band. Rob
- 3,560 replies
-
- 2
-

-
-
- clipper
- hull model
- (and 2 more)