

Heinz6672
-
Posts
202 -
Joined
-
Last visited
Content Type
Profiles
Forums
Gallery
Events
Posts posted by Heinz6672
-
-
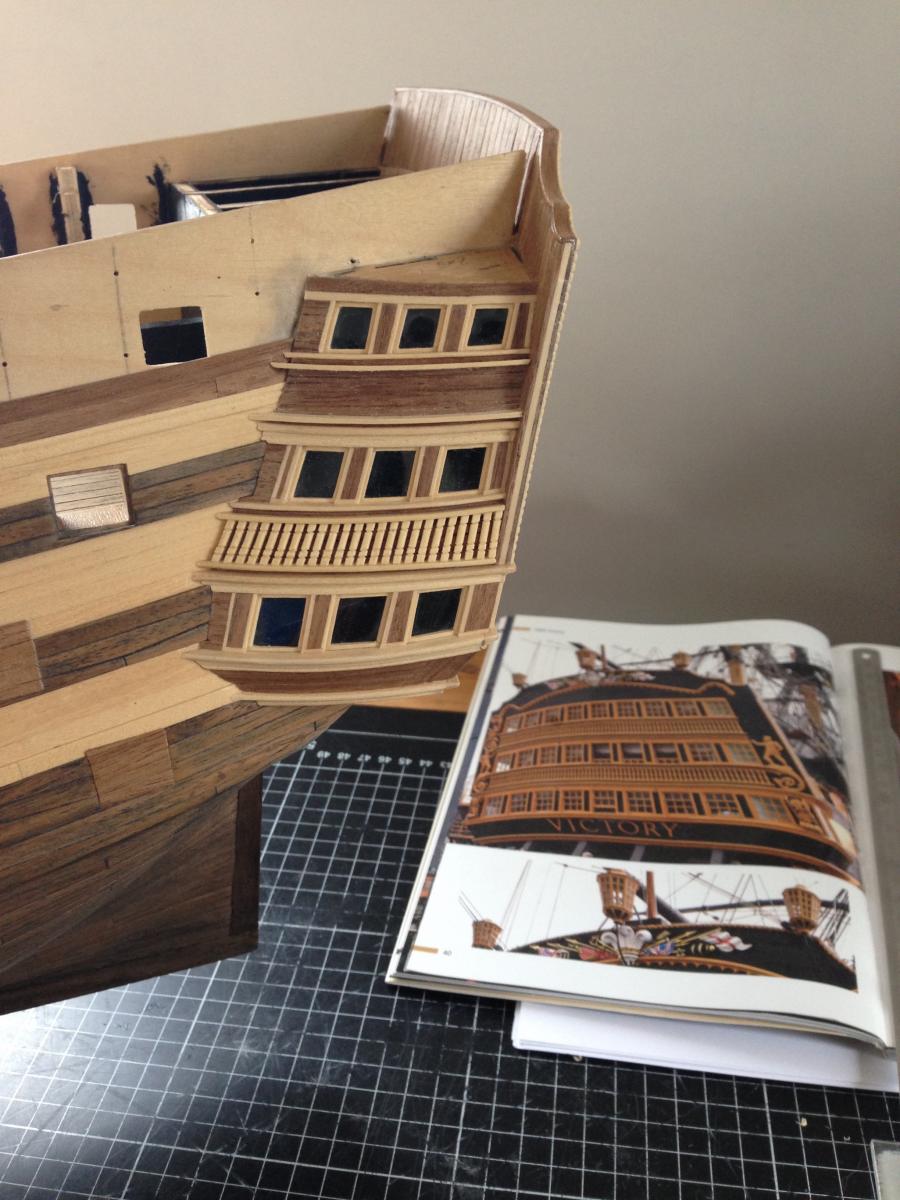
Hello friends,
another update from me.
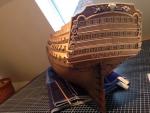
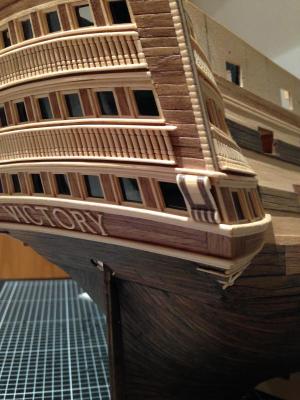
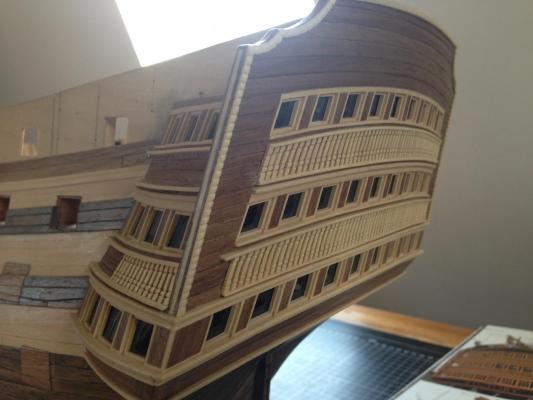
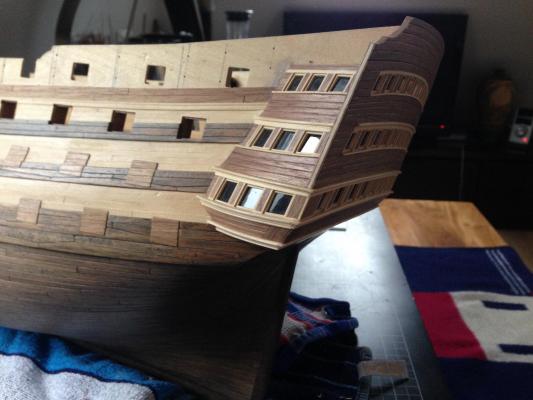
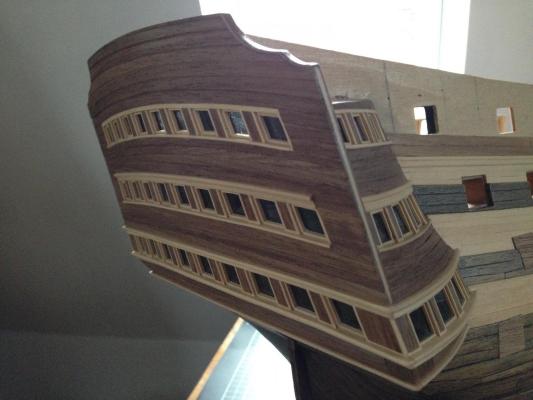
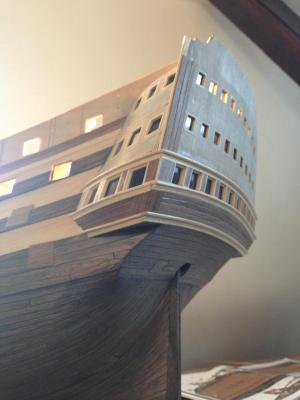
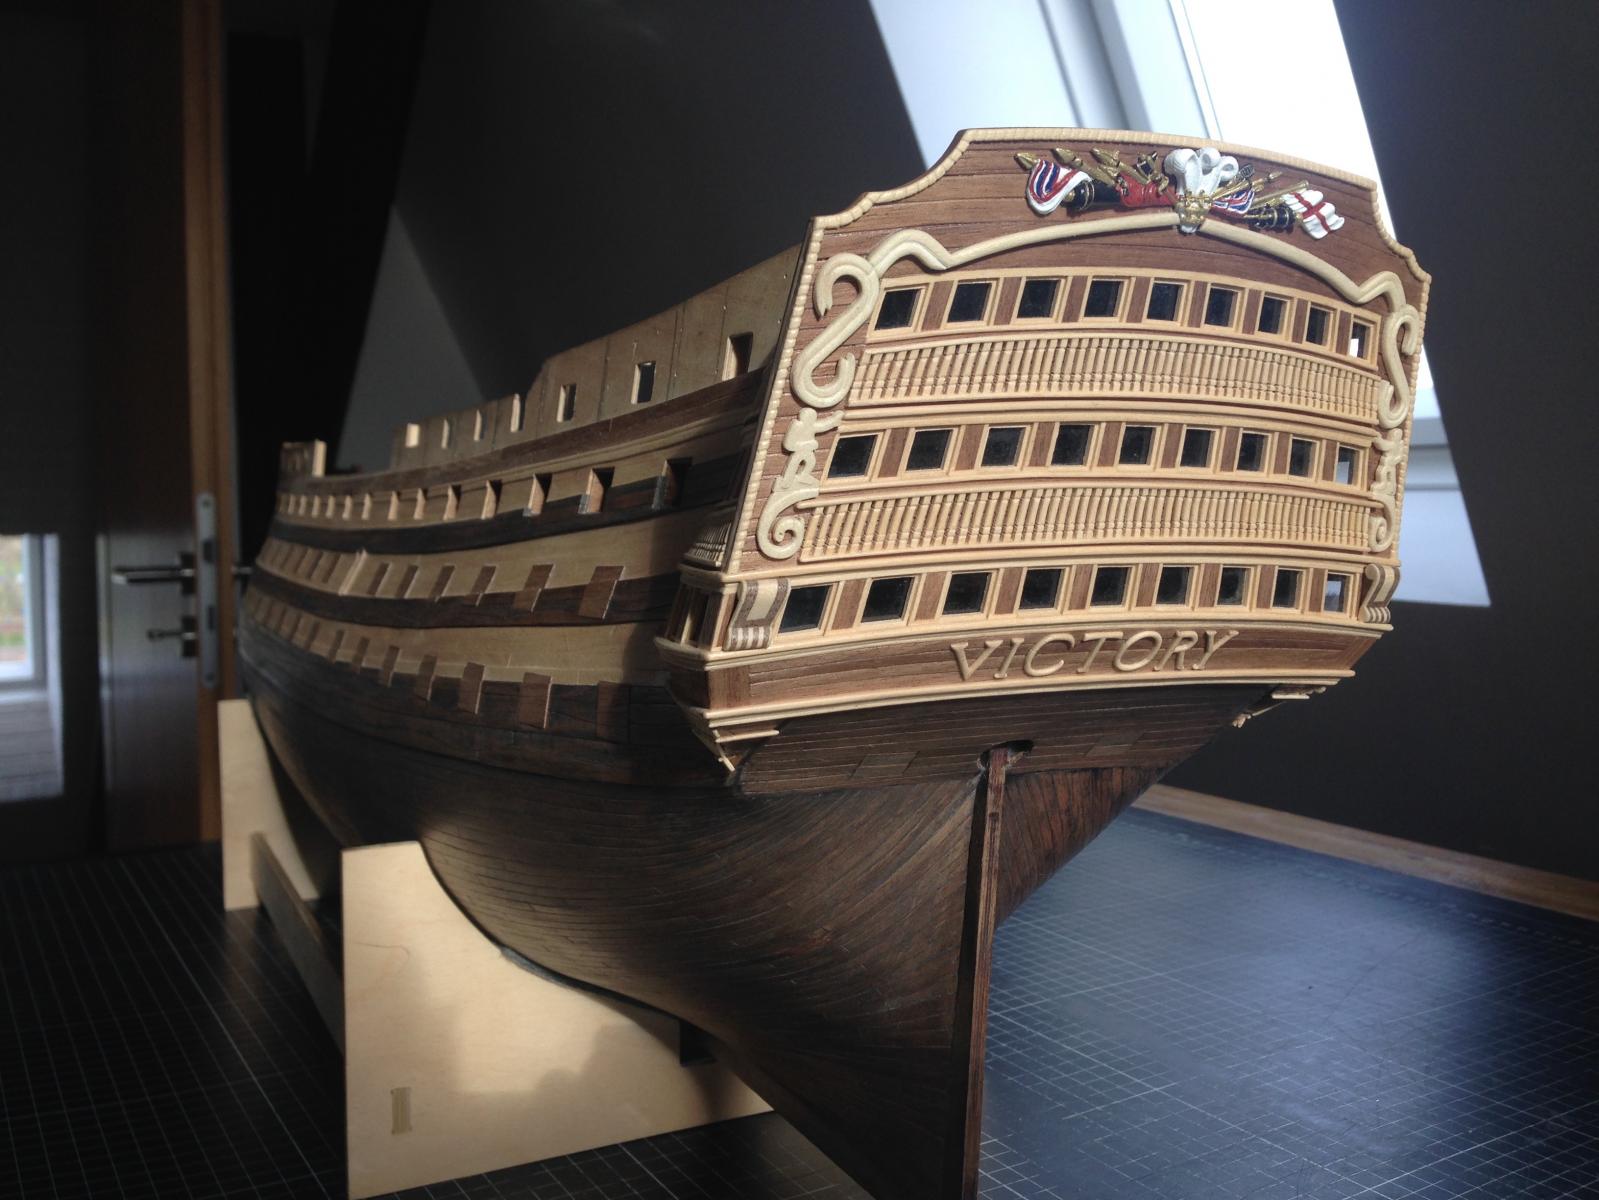
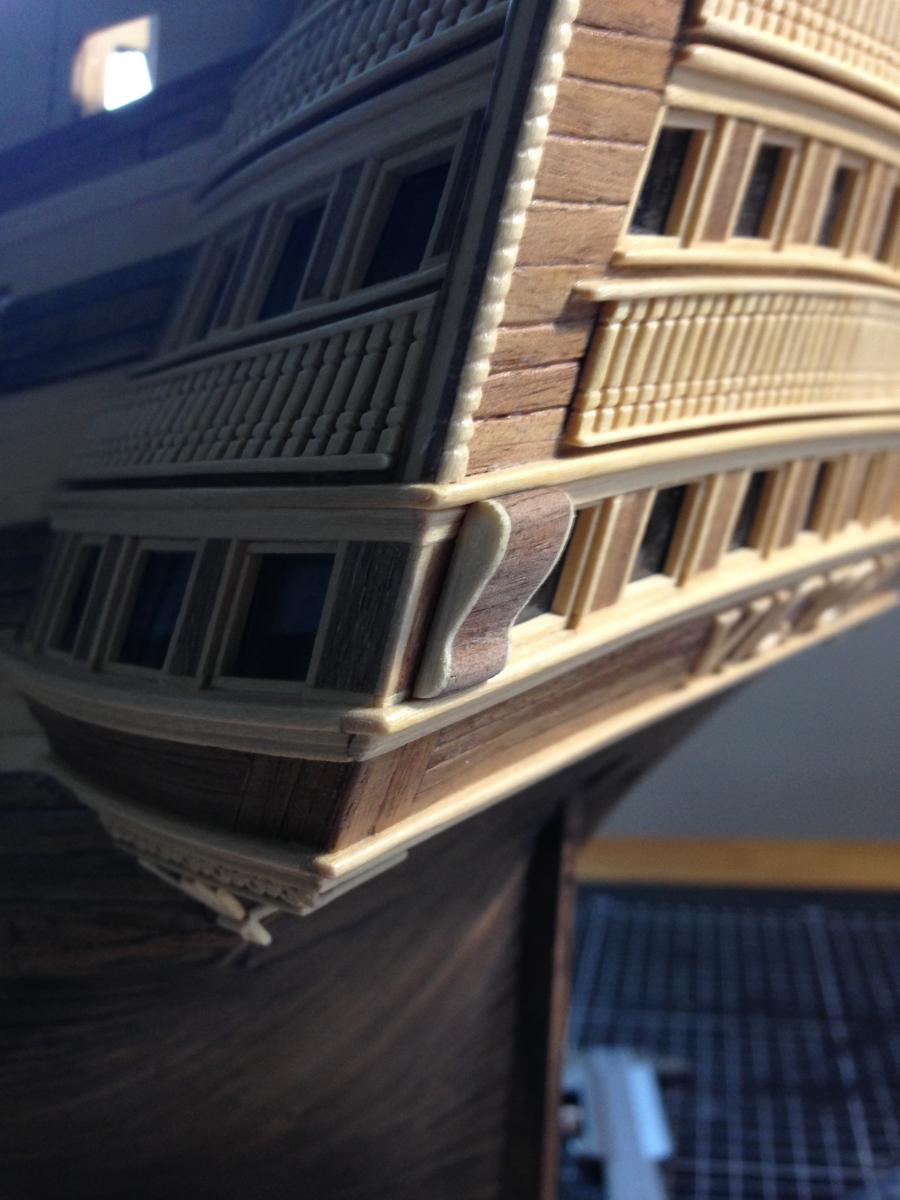
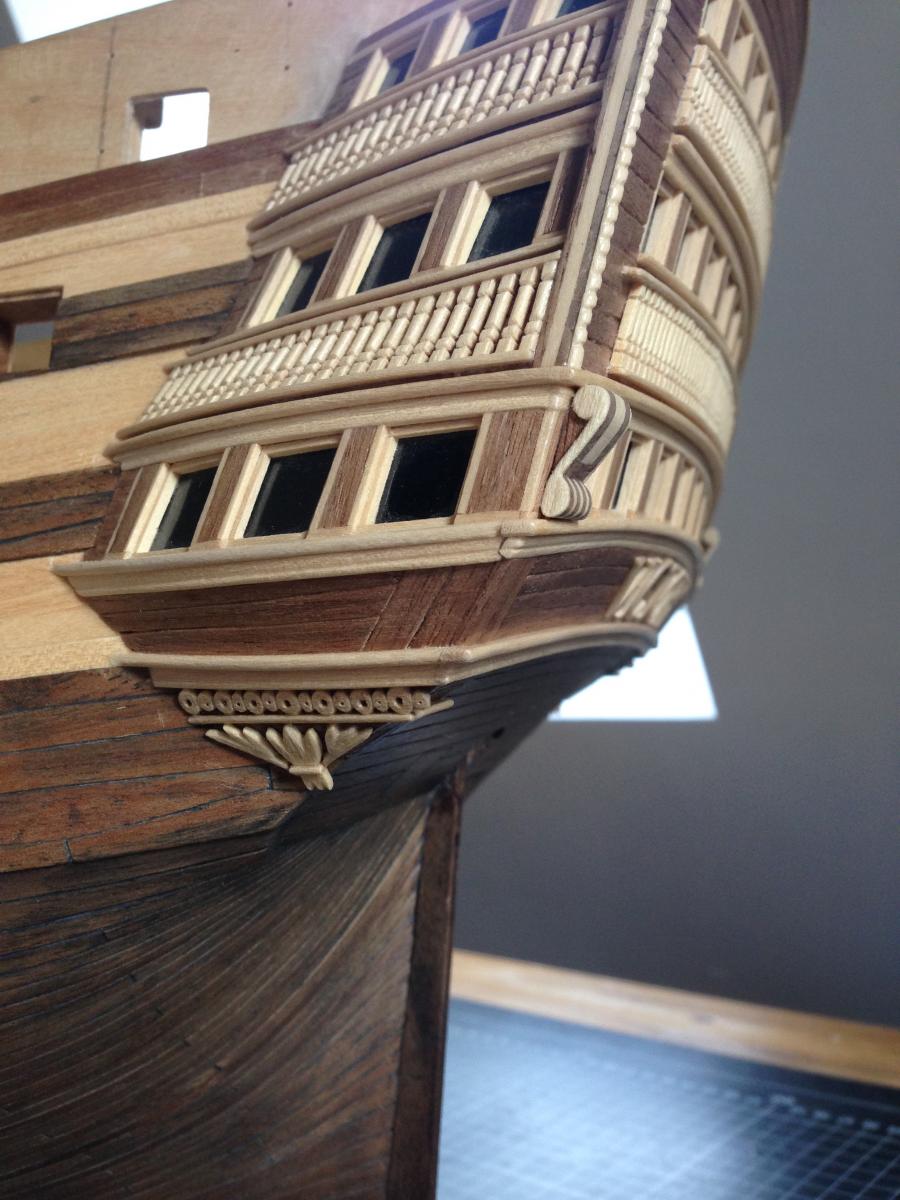
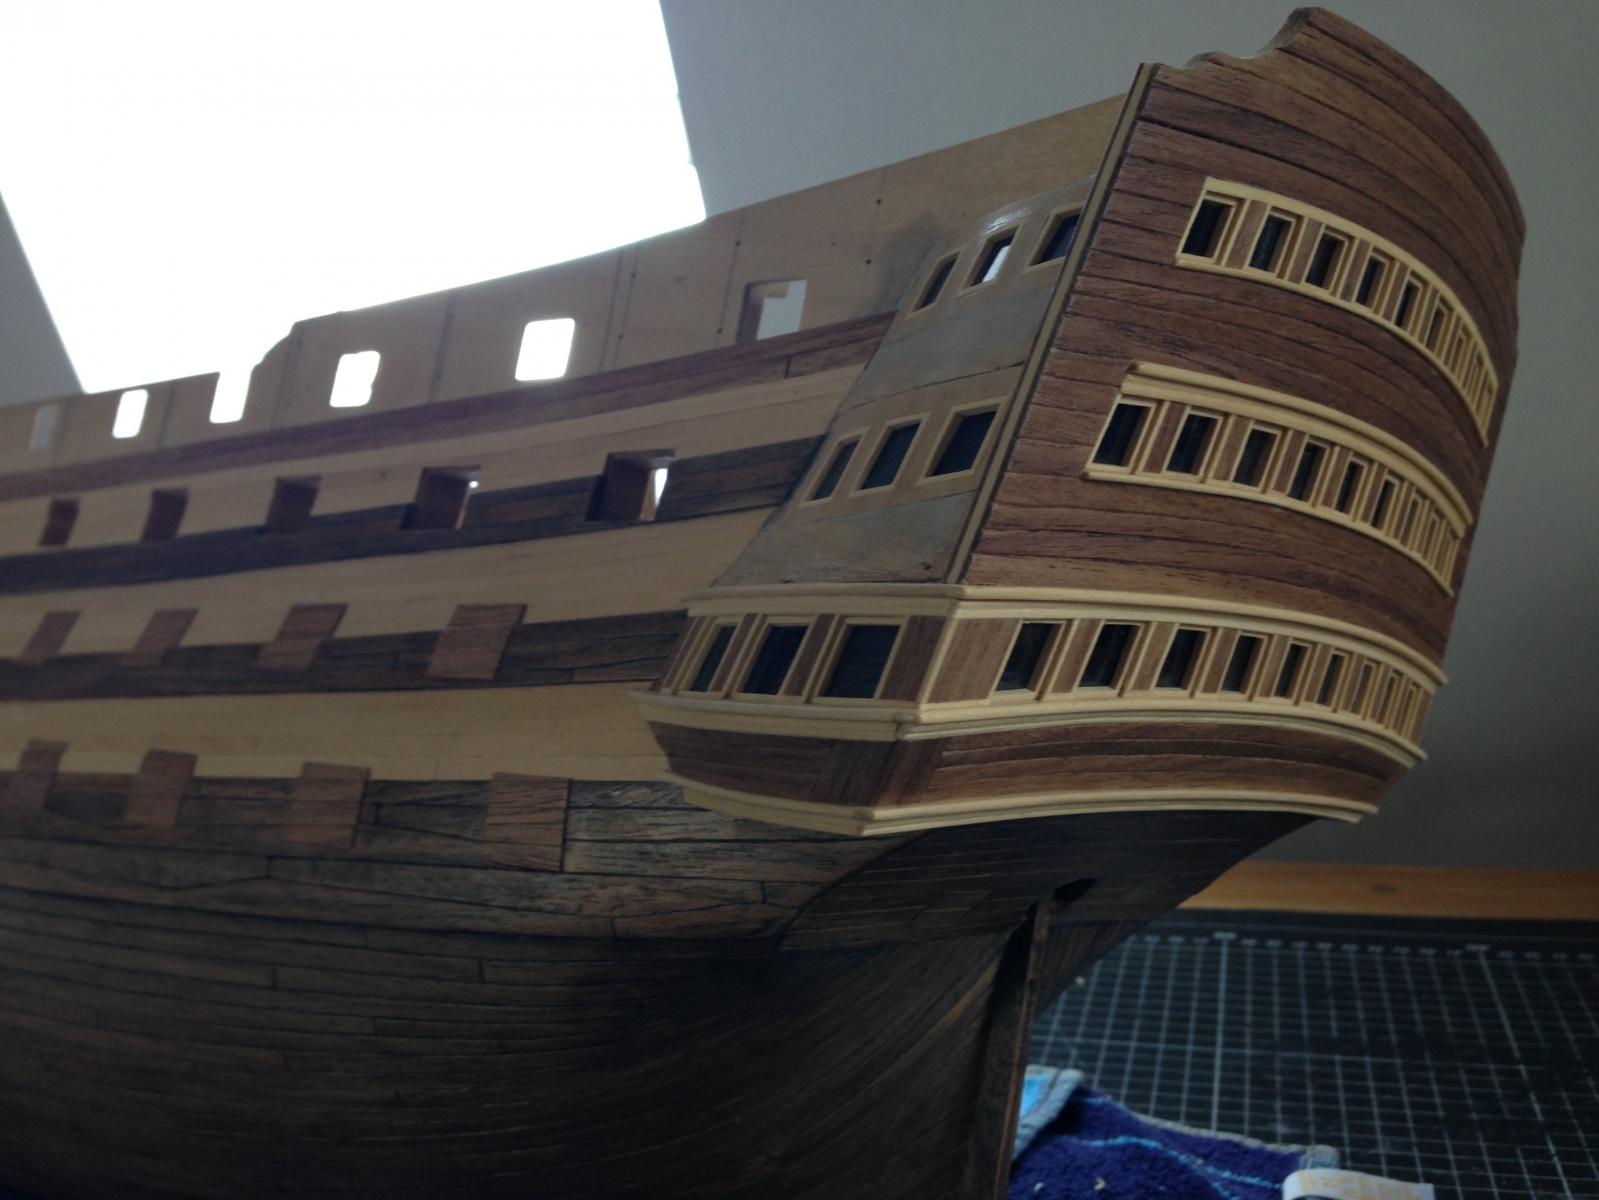
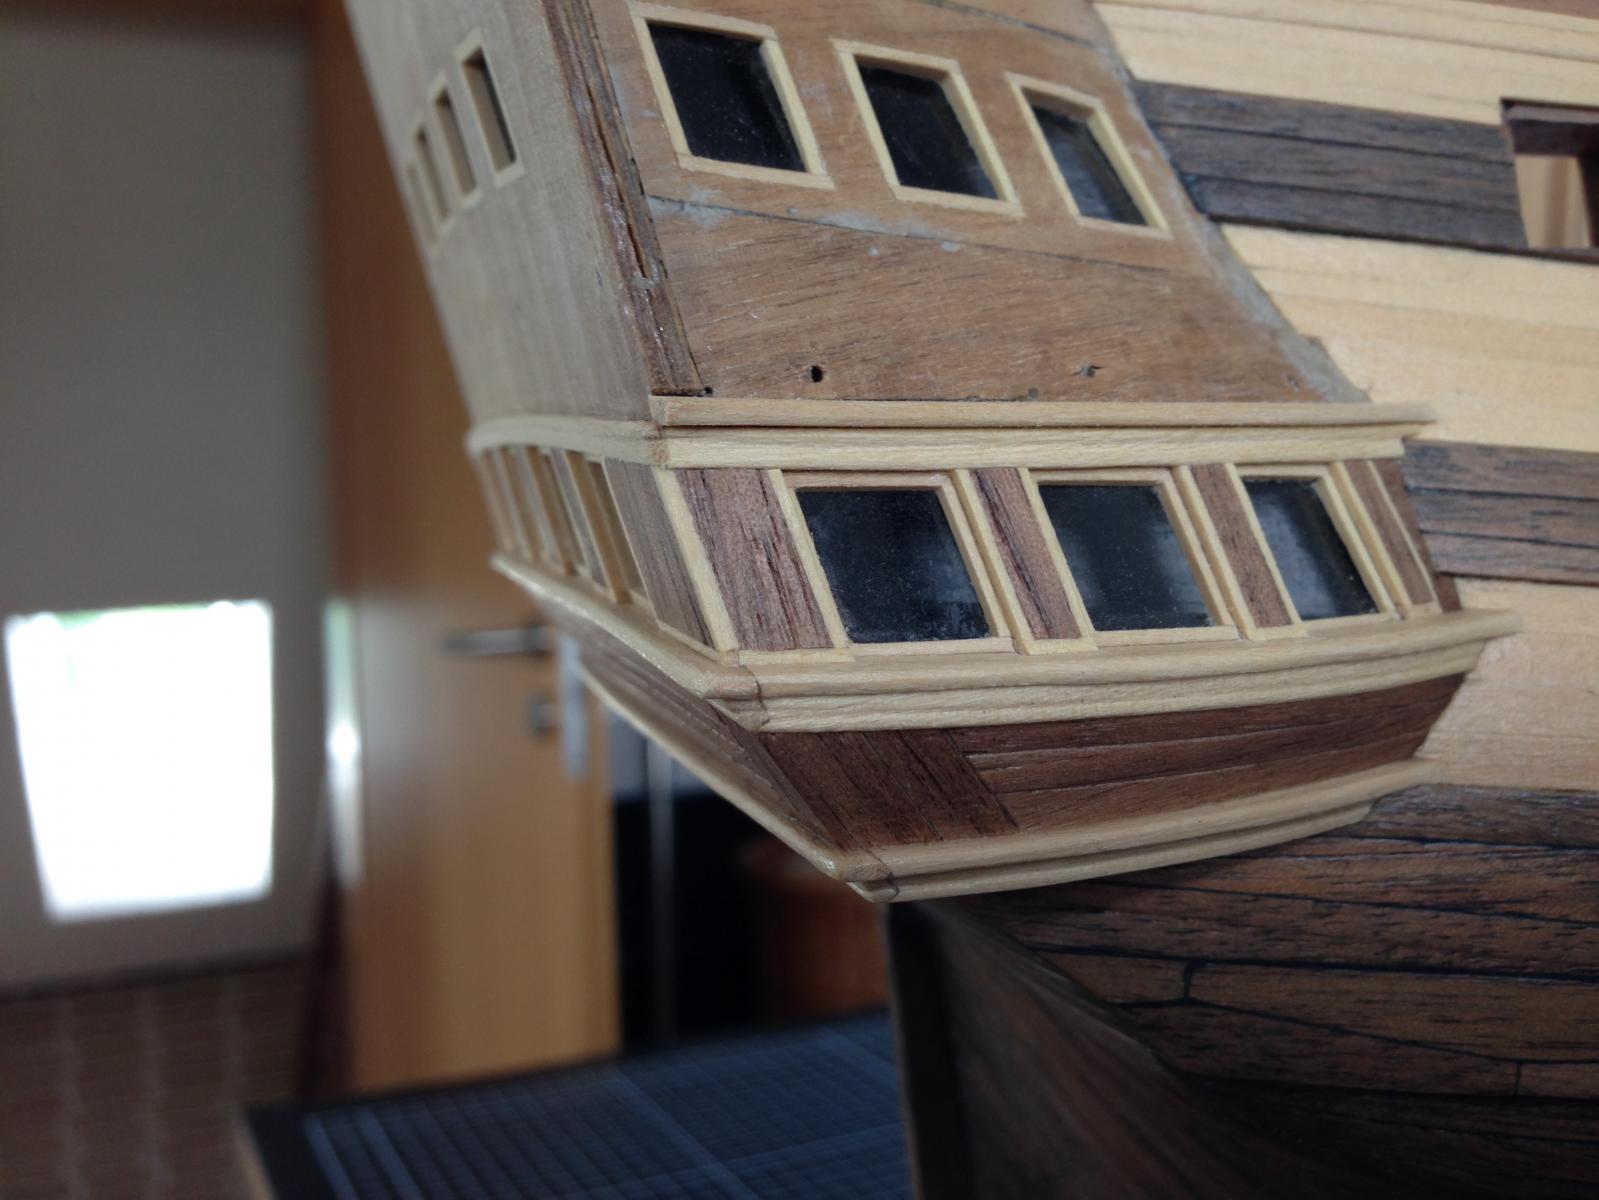
This is the first time I am not totally happy and satisfied with the result. As I told you before I found out, that all the ornaments does not fit. So I had to build them on my own. I knew that this would be a big problem, cause I am not a sculptor.
I ordered some new and bigger strips of wood. Unfortunately they were notably brighter than all of my older strips. But the main problem was, that I had to find out that elderberry wood is not good for carving. Every time I tried to build smaller bows it breaks. You can see on the lower ornaments that I have to glue this parts. It doesn't look very clean.
I tried it several time, but the result was always the same. I came to the point to accept it and tried to build the upper ornaments in a different way. I made 2 big "S". They were too big to brake. Unfortunately they were too big to look good and to decorate them with leaves as you can see it on the real Victory. I tried to file a slit along the "S" to make them look smaller. Hmmm, it looks better but not good. I hoped that the look will change with the upper bows and the top ornament. And yes, I think I keep it as it is. It does not look like an exact copy of the real Victory. Otherwise it´s not so bad at all... What do you think? Please give me your honest opinions!
At least one thing: the top ornament is the one from the kit. I filed a little bit and painted it. I love it :-)))
Have a nice weekend!
- Heinz -

- Dimitris71, shihawk, mort stoll and 7 others
-
 10
10
-
Hello Dimitris!
First of all: thank you for your nice words on my build log. :-)))
You made me curious to watch your build. Until now I have never watched out for the Amerigo Vespucci. Maybe because she is just too "modern". Now, after watching your build I have to say: this was a big mistake. She is beautiful! And your build make her special!!
The first thing I thought when I see the beginning of you build was: WOW, that is too good for a first-planking. Later, with color, I did not believe that it was a model. :-)
Keep on that good work. I am excited to see more of your model. Dimitri, you teaches me one thing: even a different type of model from another age can have a lot of charm and soul. Sorry, my english is not good enough to exactly describe what I feel by watching a good model. It´s like diving into another time and feeling the ship, the sea, the wind...
Best wishes to you
- Heinz -
-
Hello Nigel,
Shame about me. I did not know Dimitry Shevelev so far. I found some pictures of his work at shipsofscale and have to say that I am more than just impressed about it. Also I took a fast view to your build of the Sovereign of the seas. I don´t think that I can compare myself with you and Mr. Shevelev.
These work is amazing! It´s an incentive to me and shows me what is possible to do.
Thank you very much!
- Heinz -
-
-
Hi Ian, I would first like to compliment you for your great work. You work very clean. So it is only natural that the whole thing costs a lot of time. If you want to quickly finish a Victory you would have to buy a plastic model. But that would be a real shame ......
You once asked me to tell you my honest opinion and to give advice. Even though I'm not the most experienced modelers, I want to tell you my thoughts. As already said, you work very clean. I think we have the same attitude to our model. Namely that the coppering should be our last solution. We only want to copper the victory to rescue the hull if it´s necessary to do. I don´t think that you should think about it at this time!!!
I have to admit that I don´t have a solution to let the different color disappear. I don´t think that staining would work. In my opinion the only solution is to remove these planks and renew them with the same wood you use to build on the midship. I know it´s quite hard to destroy the work of days, maybe weeks, but I know that someday you will be glad for making that decision.
Don´t be afraid of using the same wood. Even if its thicker than the 1 x 16 mm wood you use, it´s possible to work with it. Look at my build. I use walnut with 2 mm thickness.
Something different: For me it looks like you do the planking line for line. You look if your plank fit to the one above and than you start the next line. I did it the same way on my San Felipe. Every time I tried it this way I came to the point the curvature of the bow gets to heavy. The planks seems to run up to heaven. I had to cut them in a way that could not be the real way. And it looks terrible! I am afraid, Ian, that you will get to this point soon. So what to do?
You have to split the hull in maybe 4, 5 or 6 parts. Than you have to.... Sorry Ian, I can not explain it in english. Look here:
http://modelshipworldforum.com/ship-model-framing-and-planking-articles.php
(especially: "Planking tutorial - Lining off a hull")
Ian, keep on your good work!!!
Best regards
-Heinz-
- Seventynet, shihawk, Canute and 1 other
-
4
-
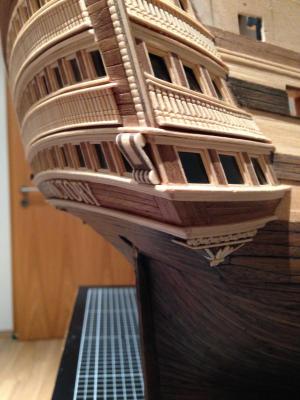
I tried a few things with the ornaments. I know they don´t look like exact copies from the original Victory. But let me tell it like this: I was inspired by it :-)
Have a nice weekend!!!
- Heinz -


-
Hello Gil,
thank you for answering! I hope you had a really wonderful journey!
I am not sure if its allowed to place links here. But this is the link to my log:
http://modelshipworld.com/index.php/topic/7706-hms-victory-by-heinz746/
I am very excited about your opinion of my Victory...
- Heinz -
-
Hi Ian,
thank you, thank you, thank you, thank you
thank you soooo much!!!
:-)
Heinz
-
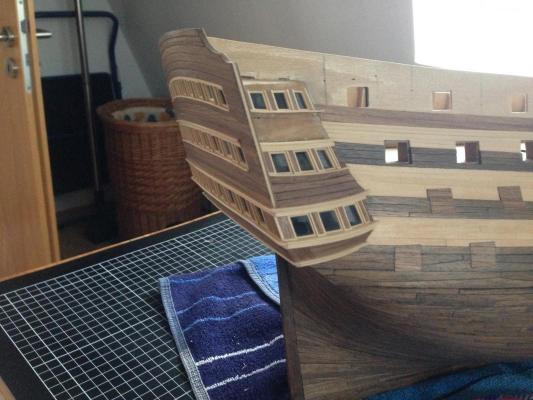
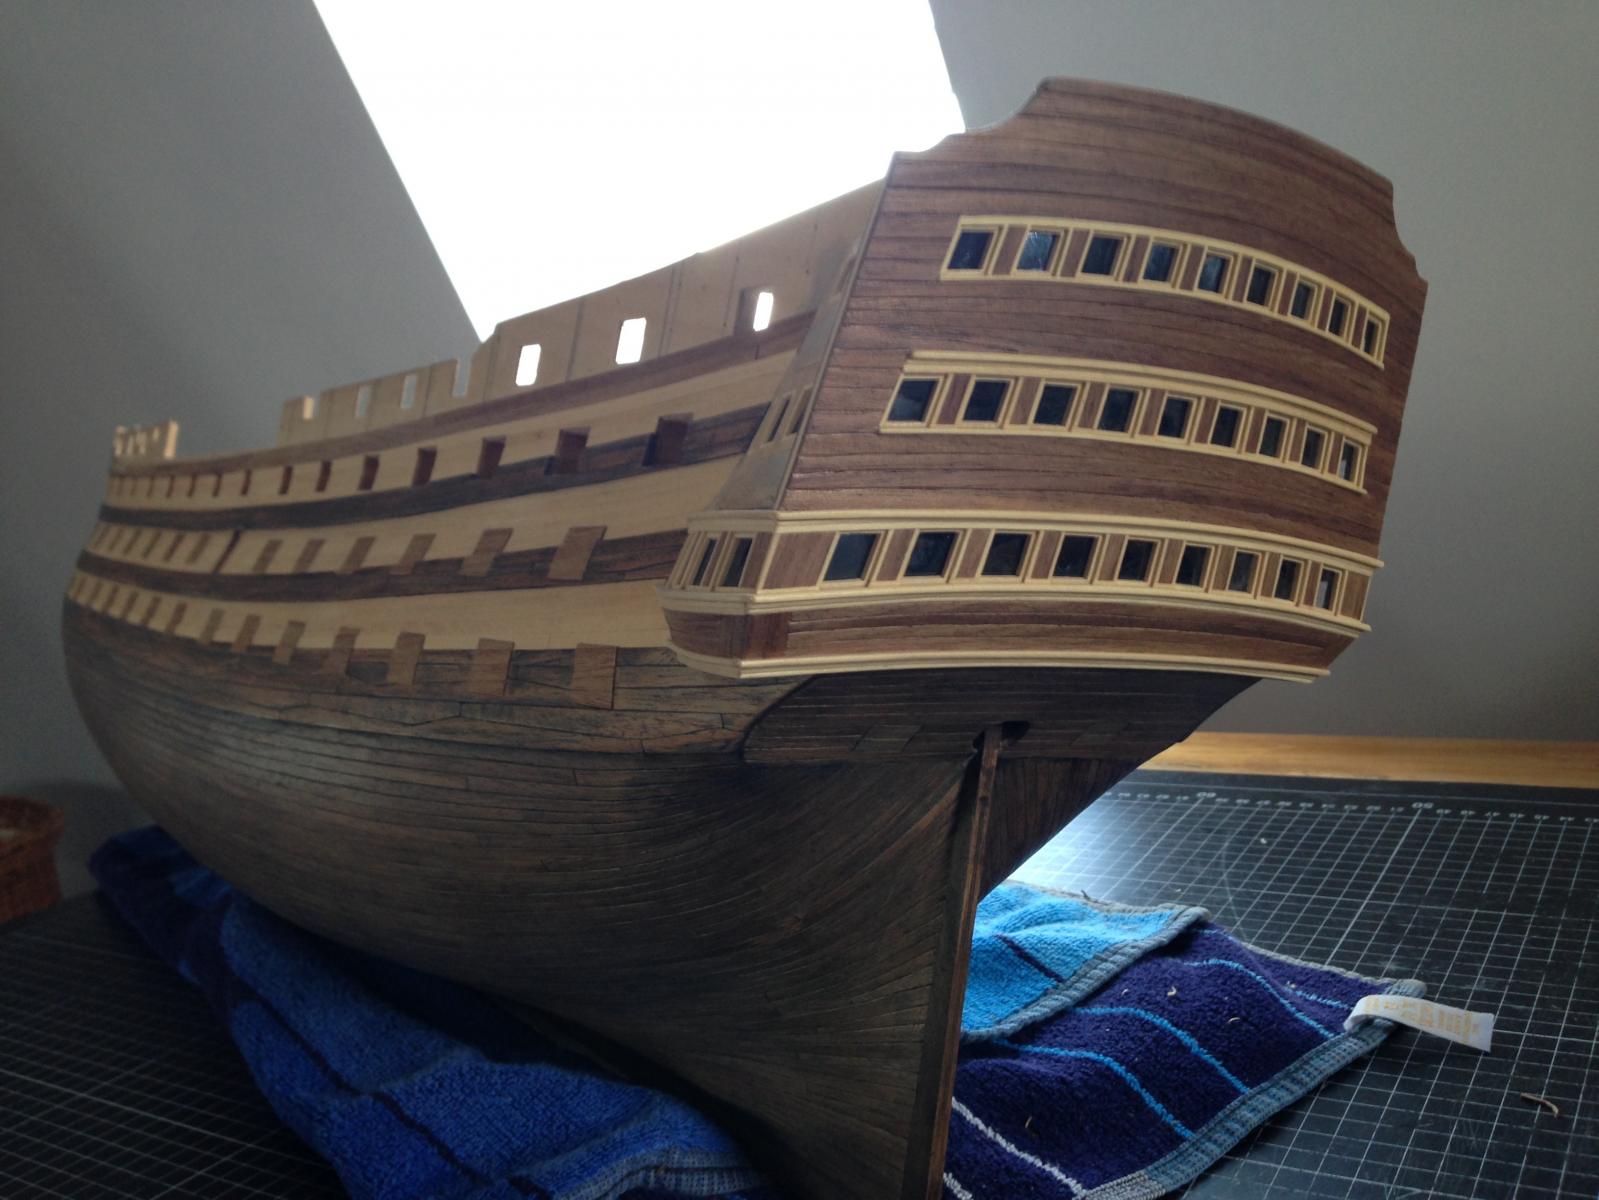
Hello friends!
Another update from me on a wonderful sunday afternoon :-)
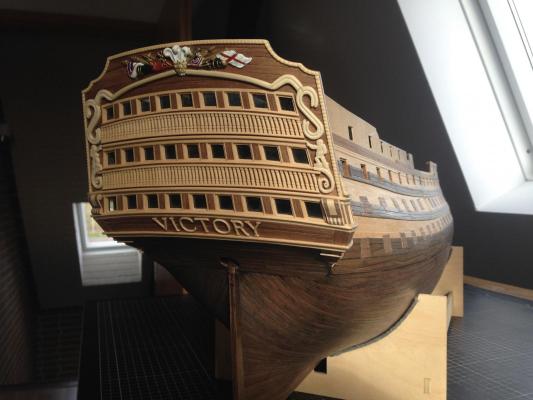
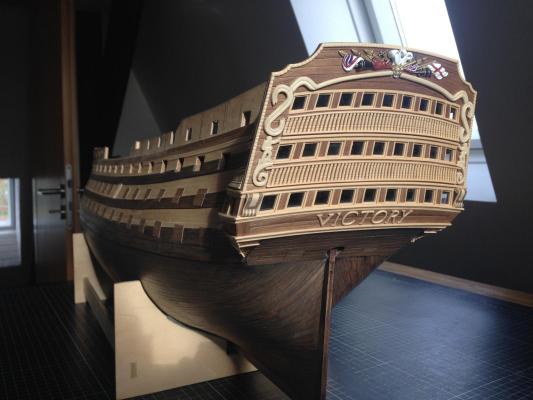
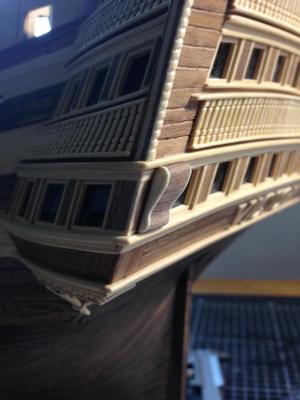
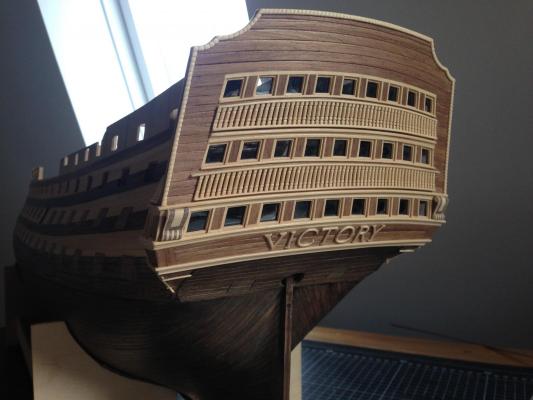
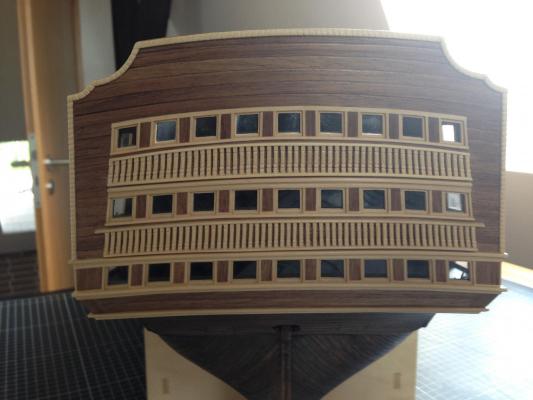
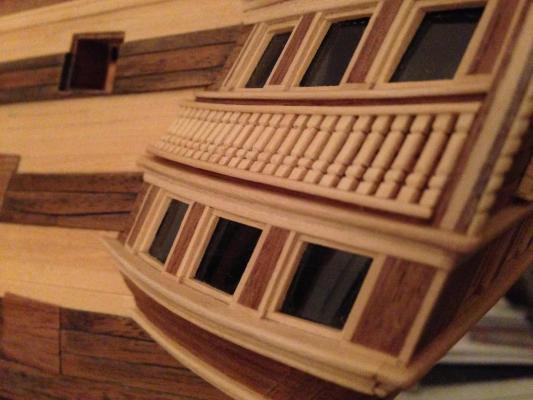
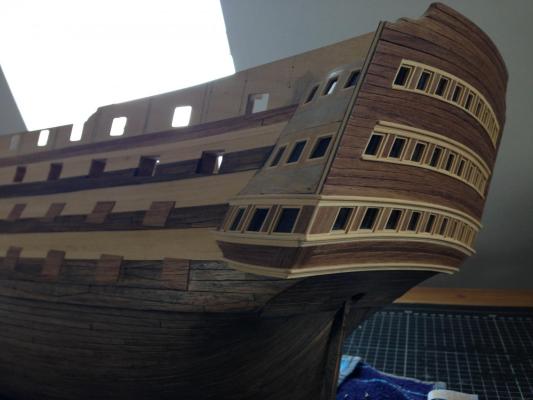
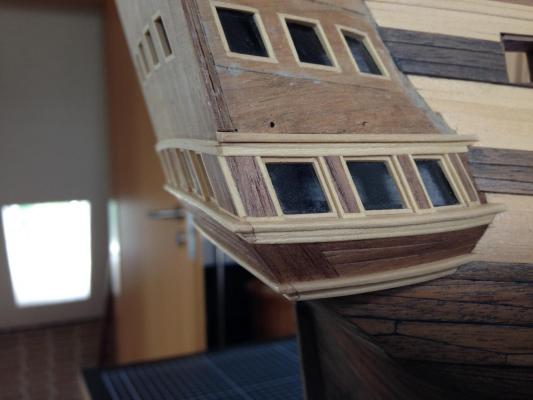
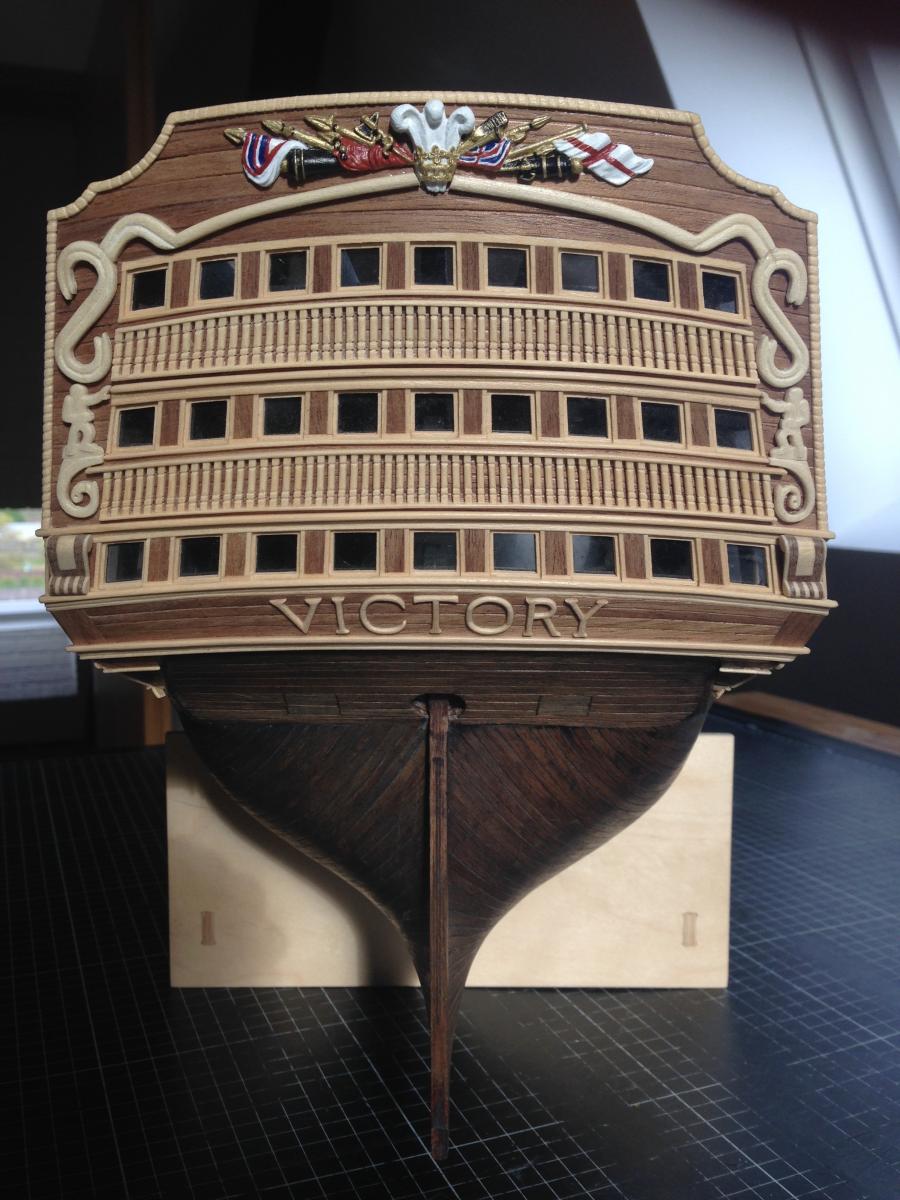
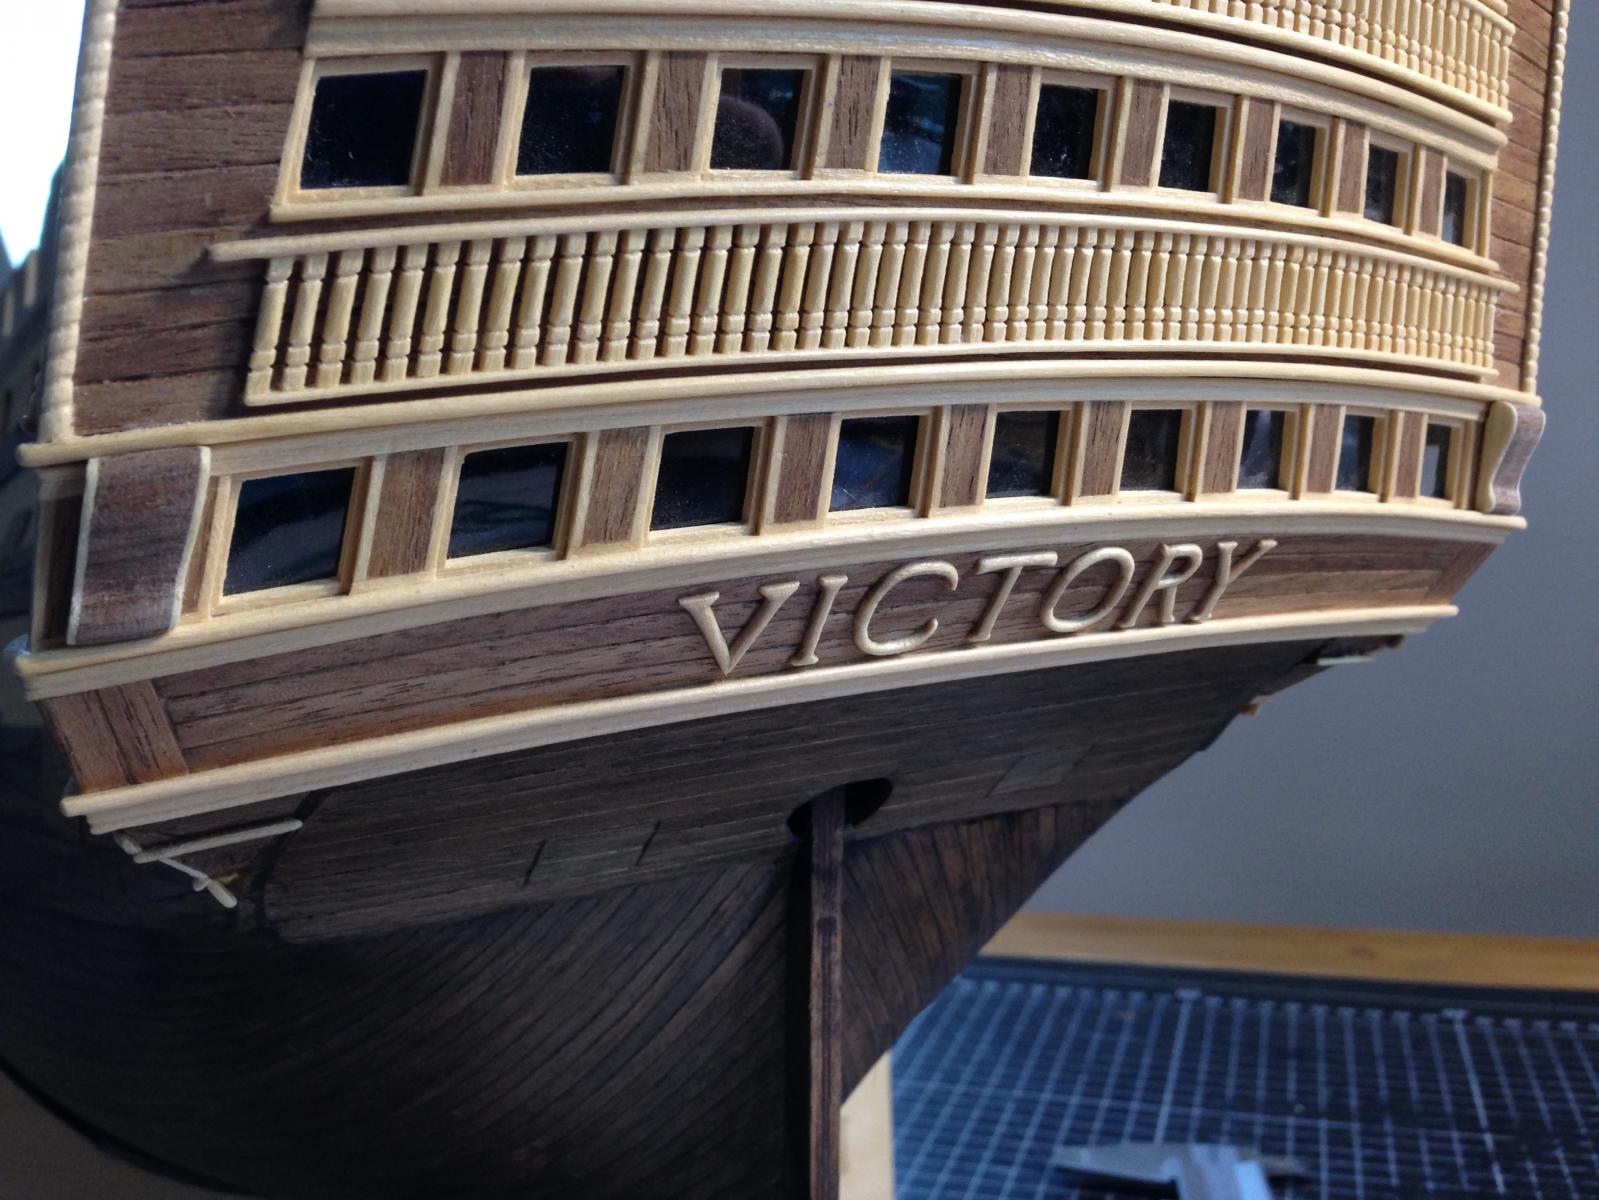
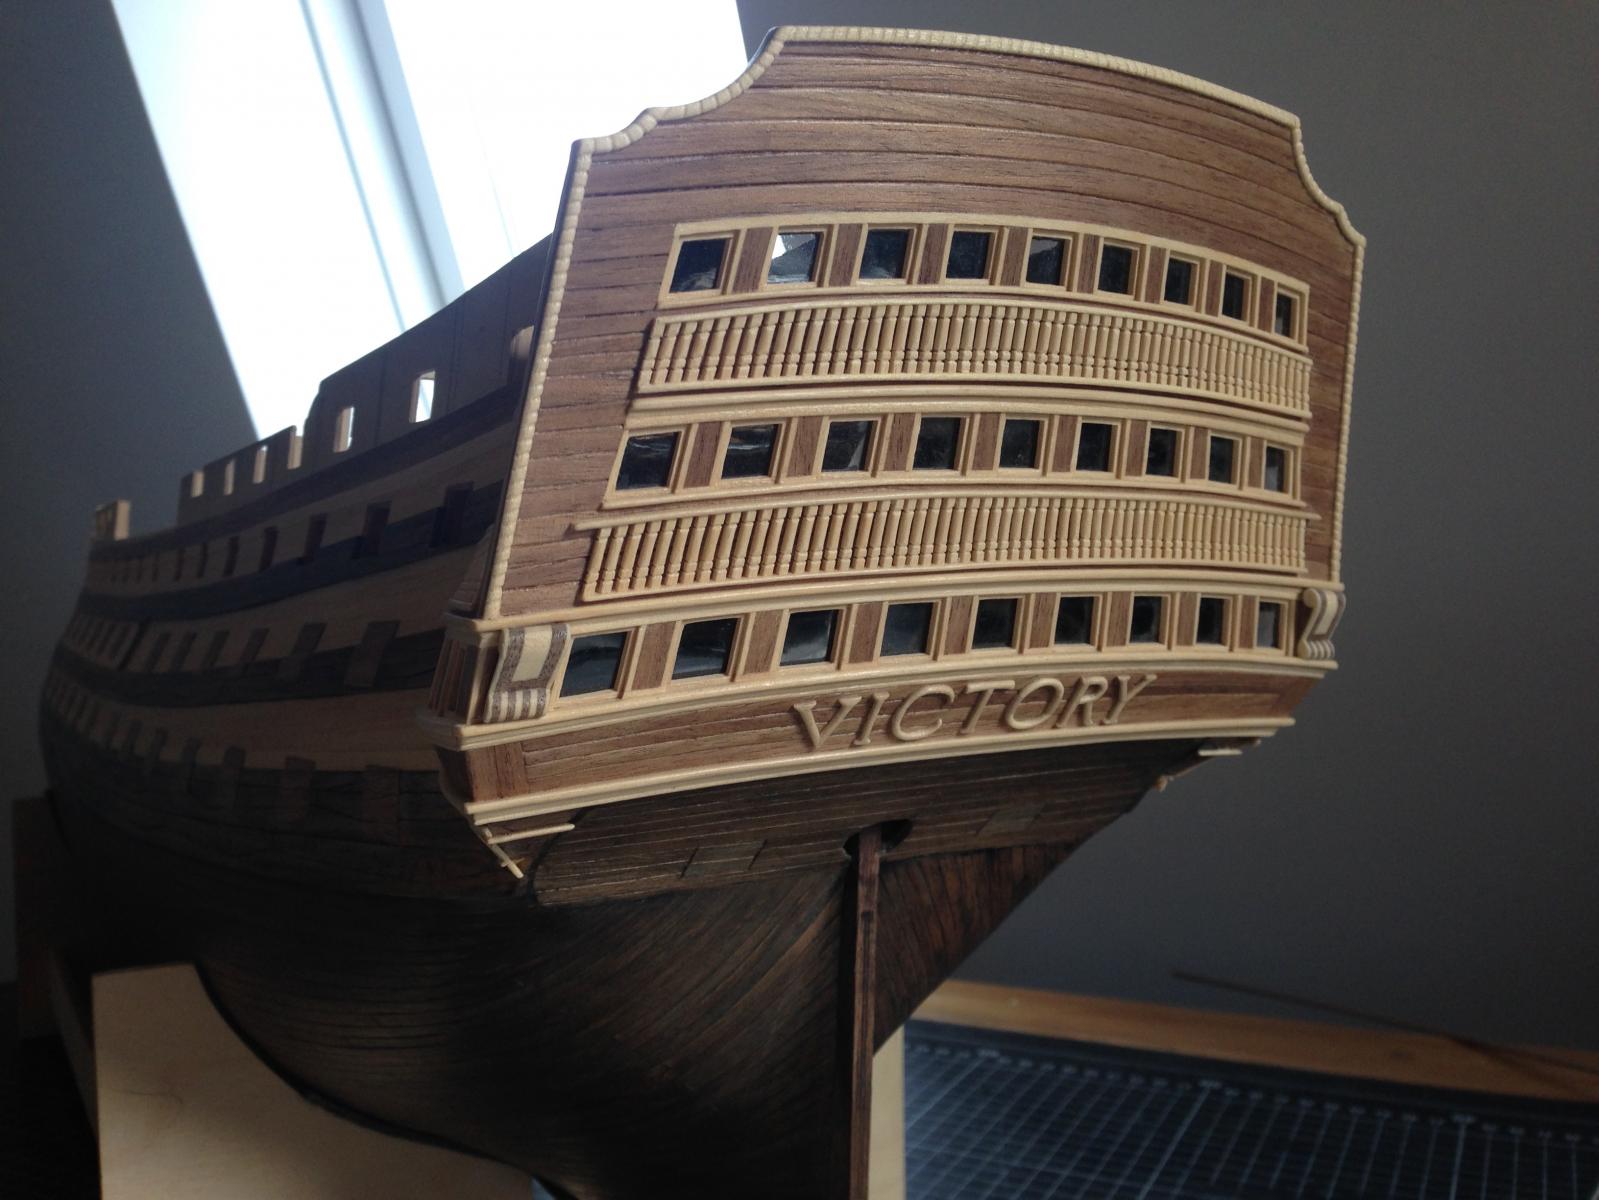
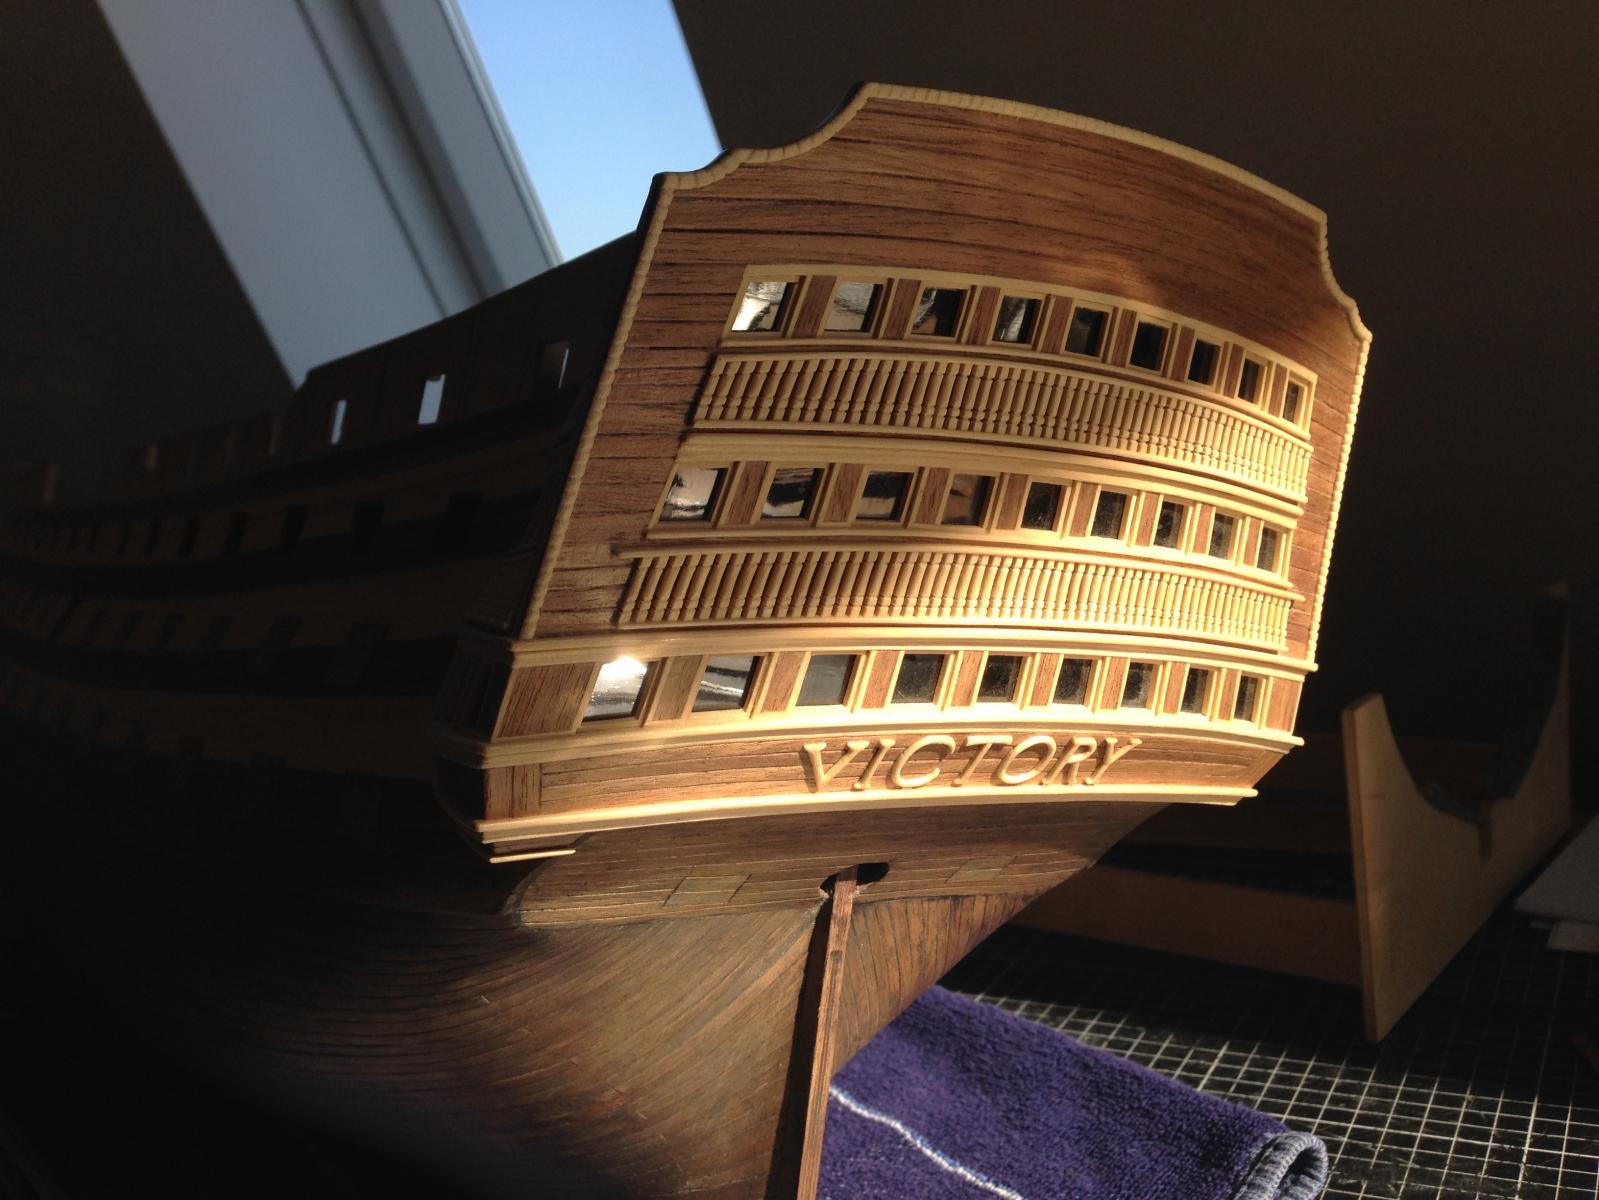
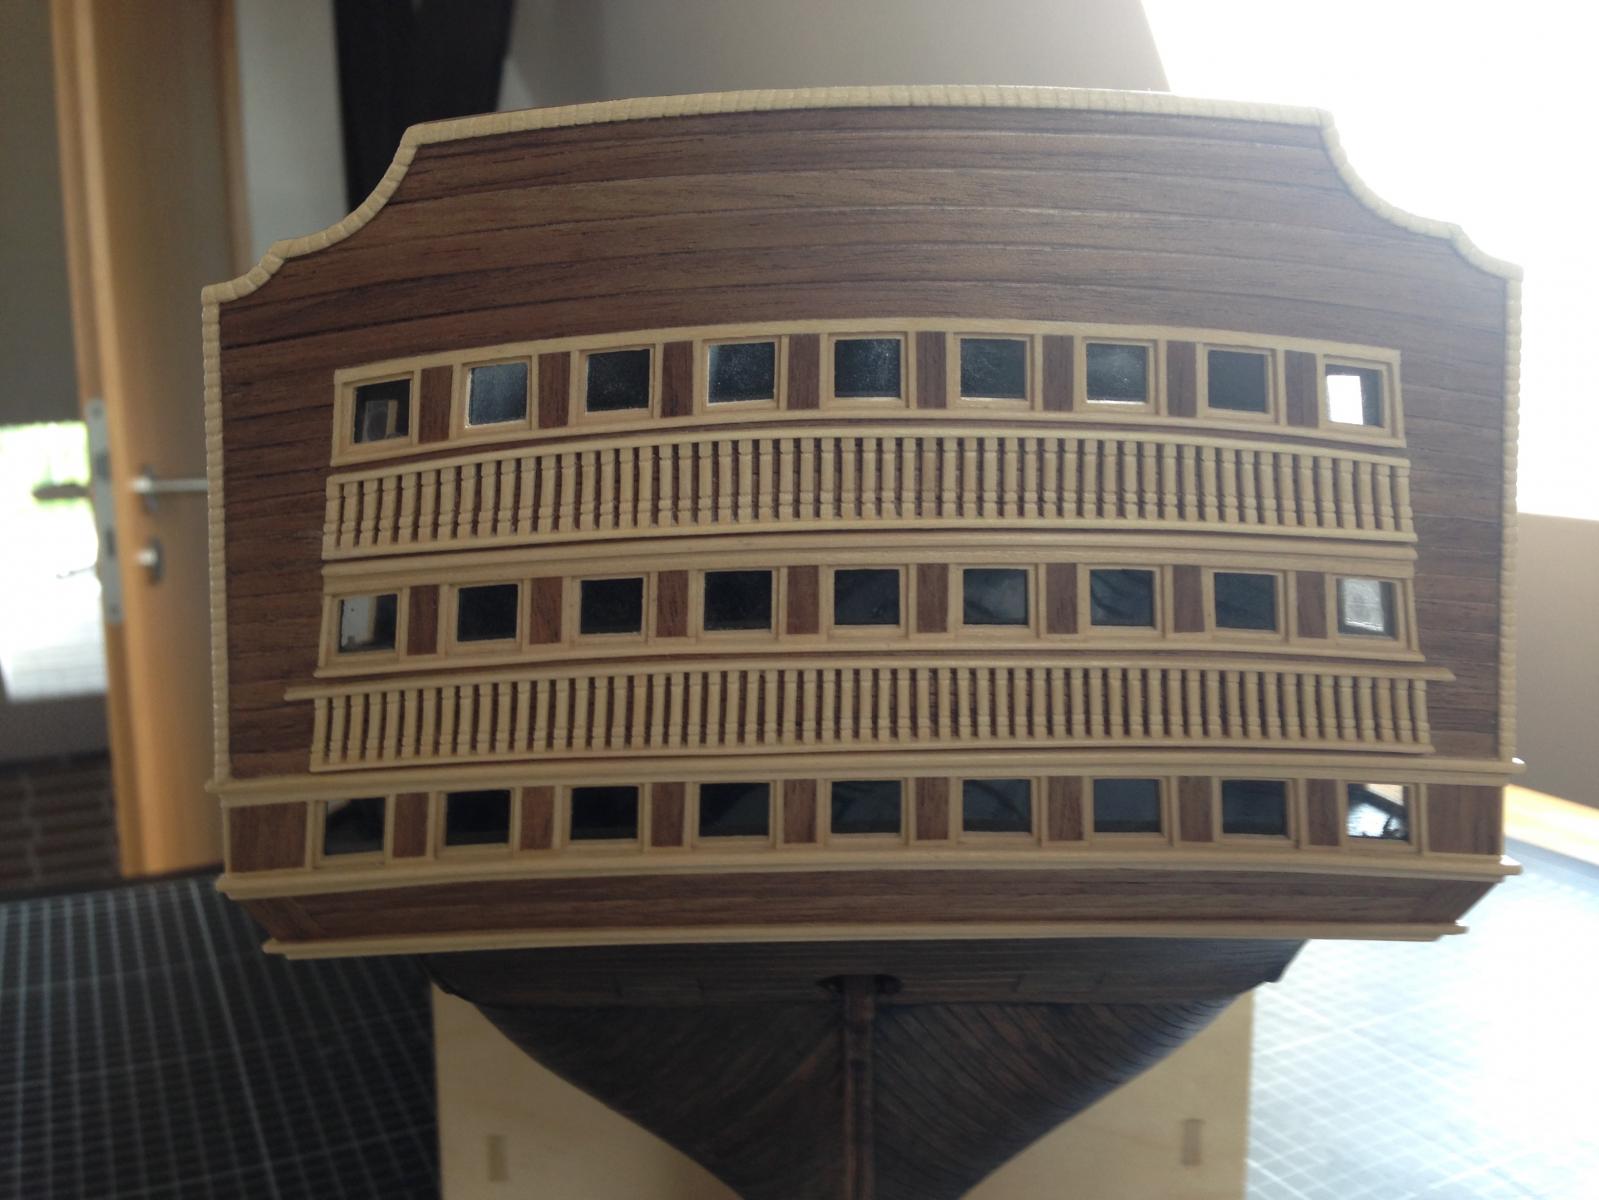
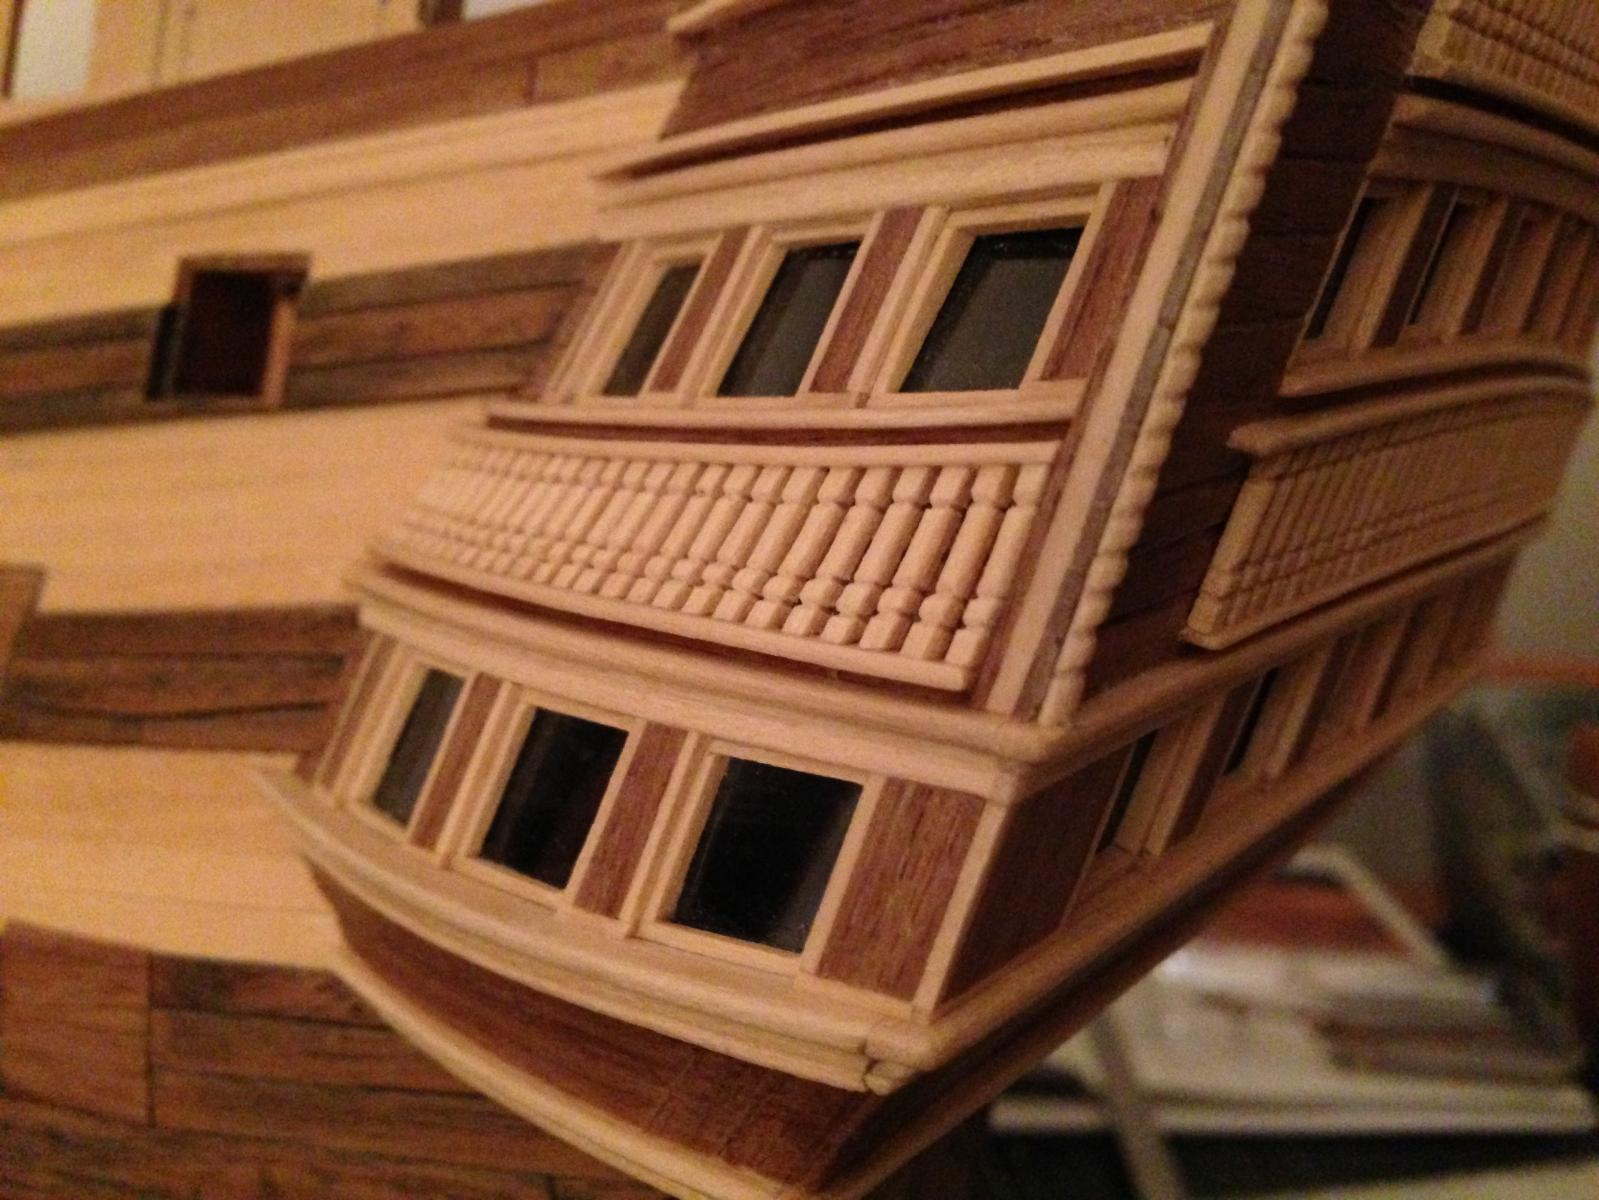
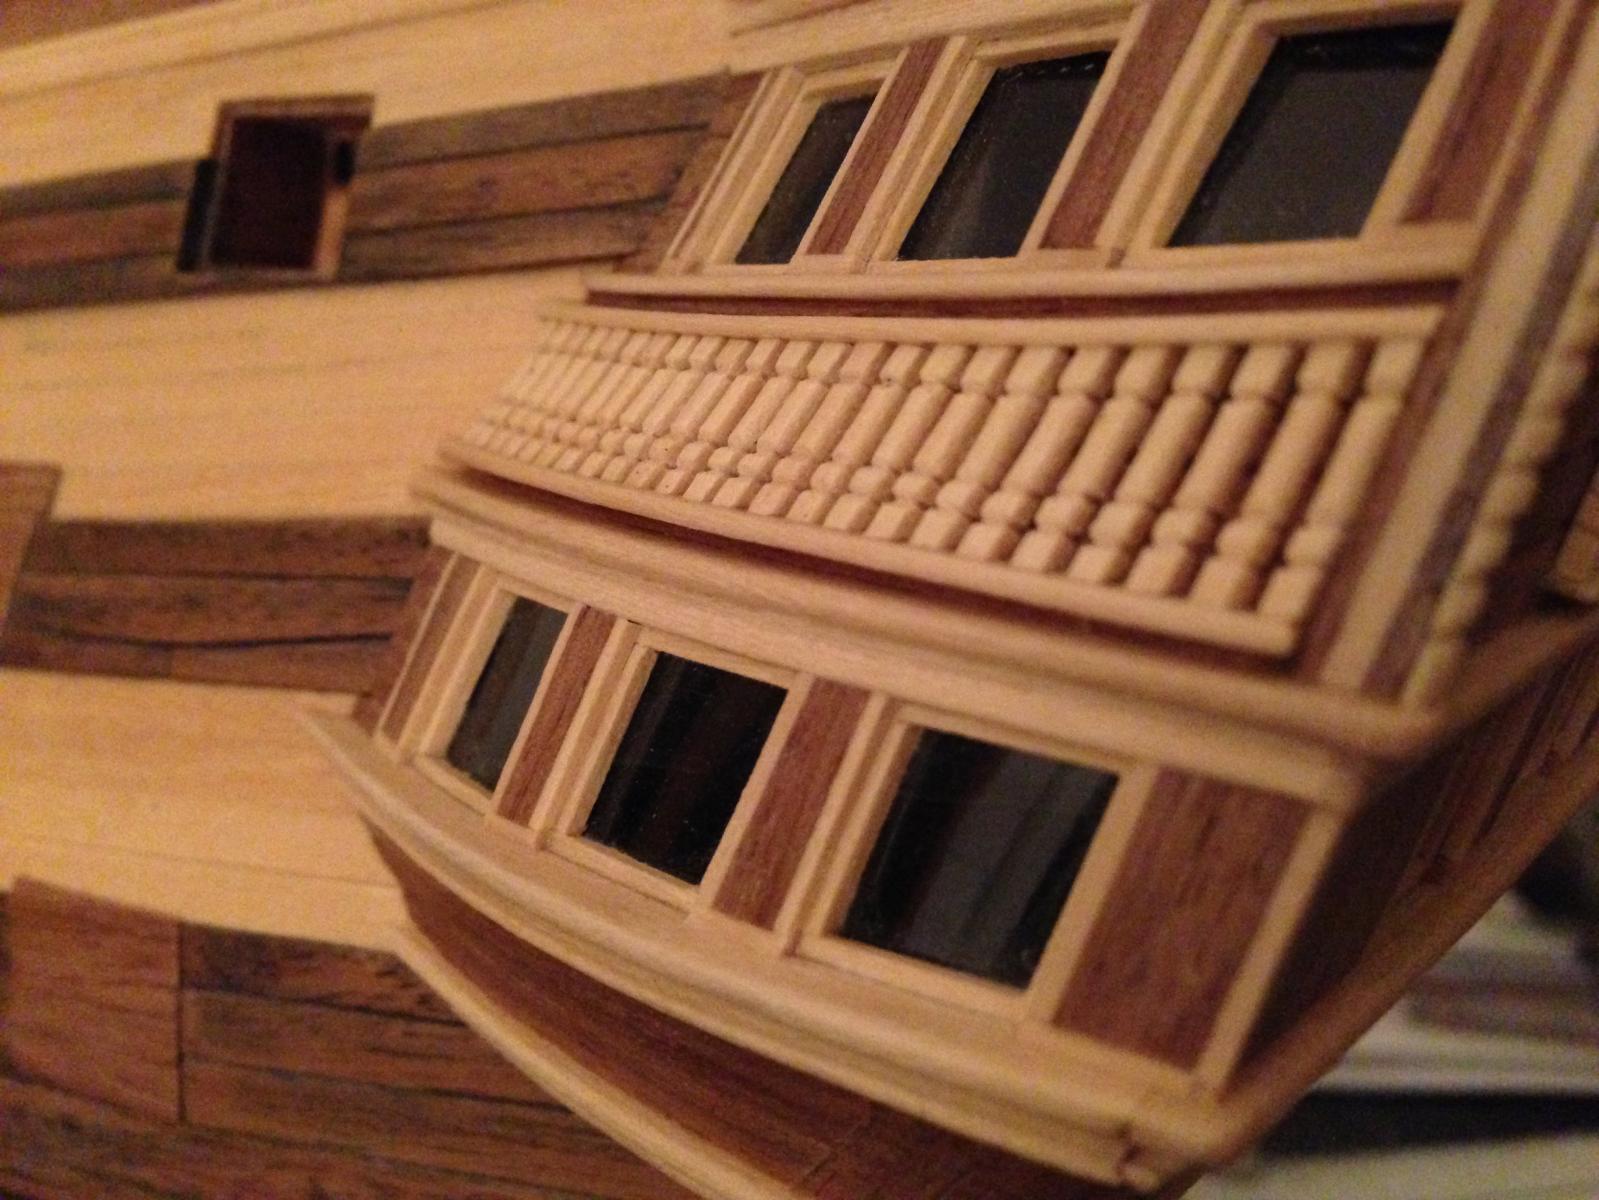
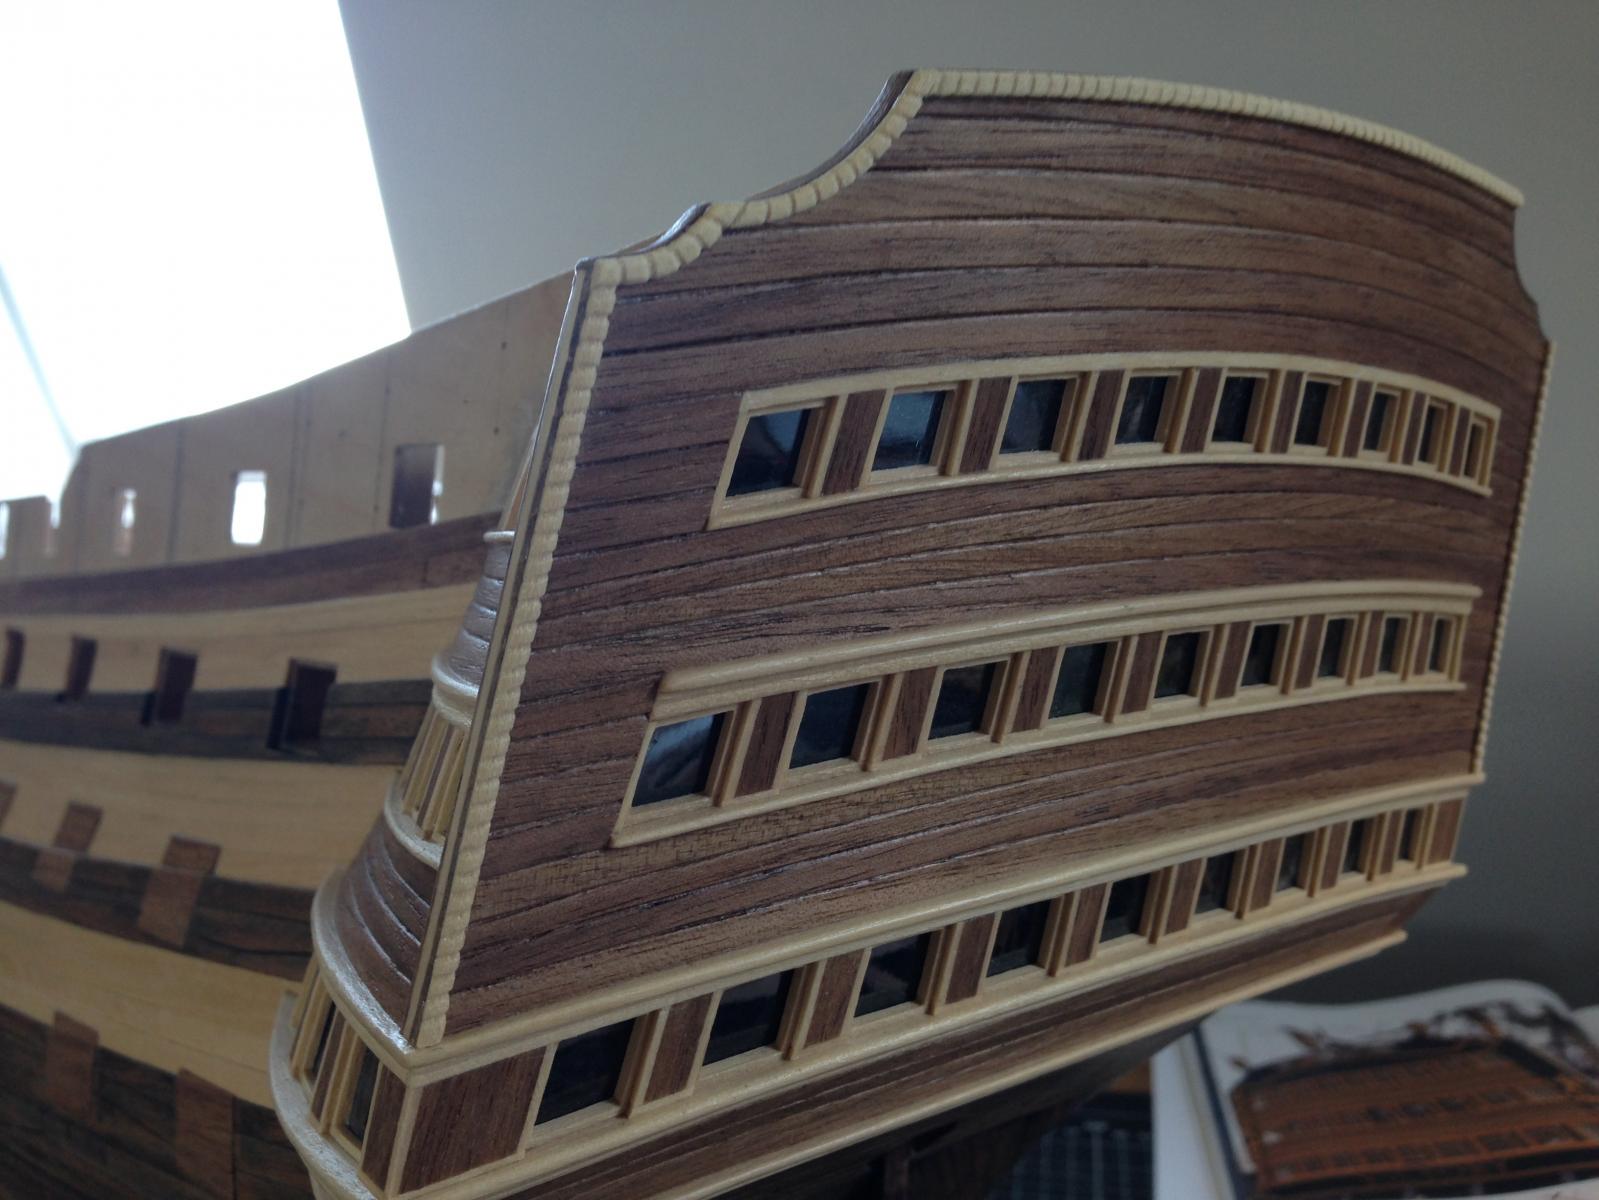
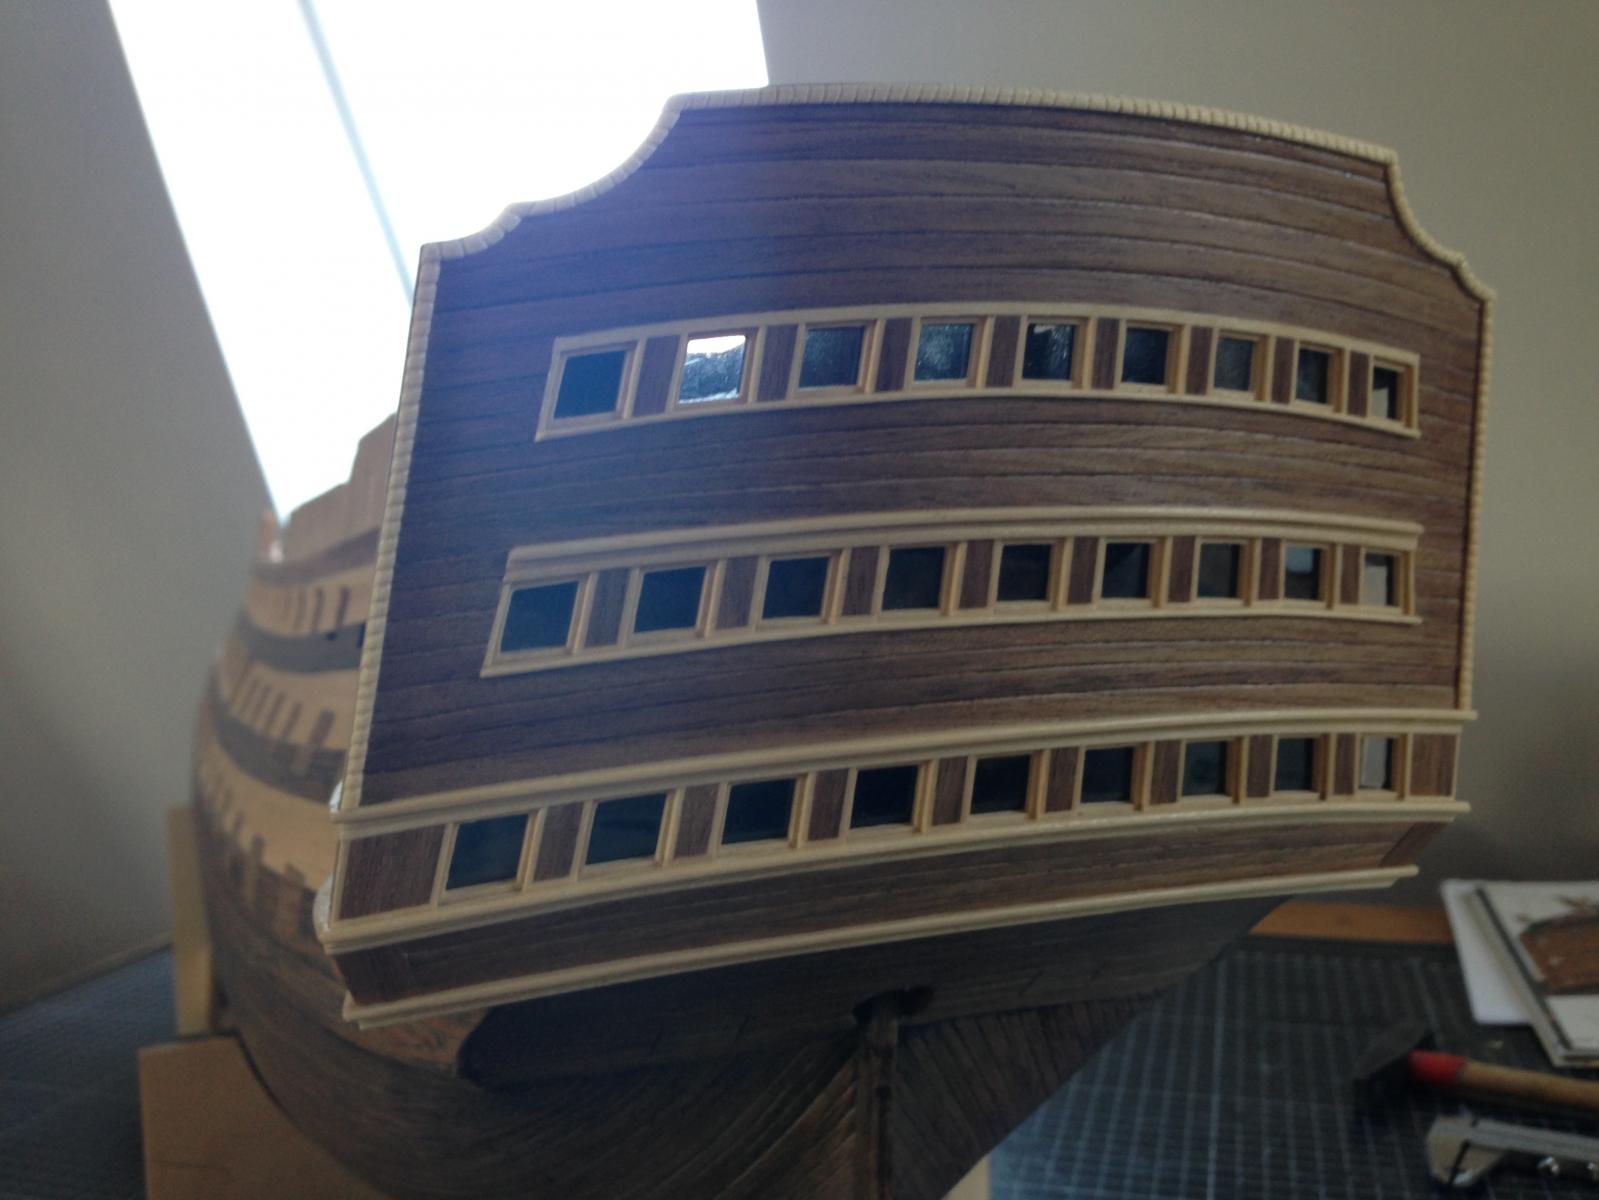
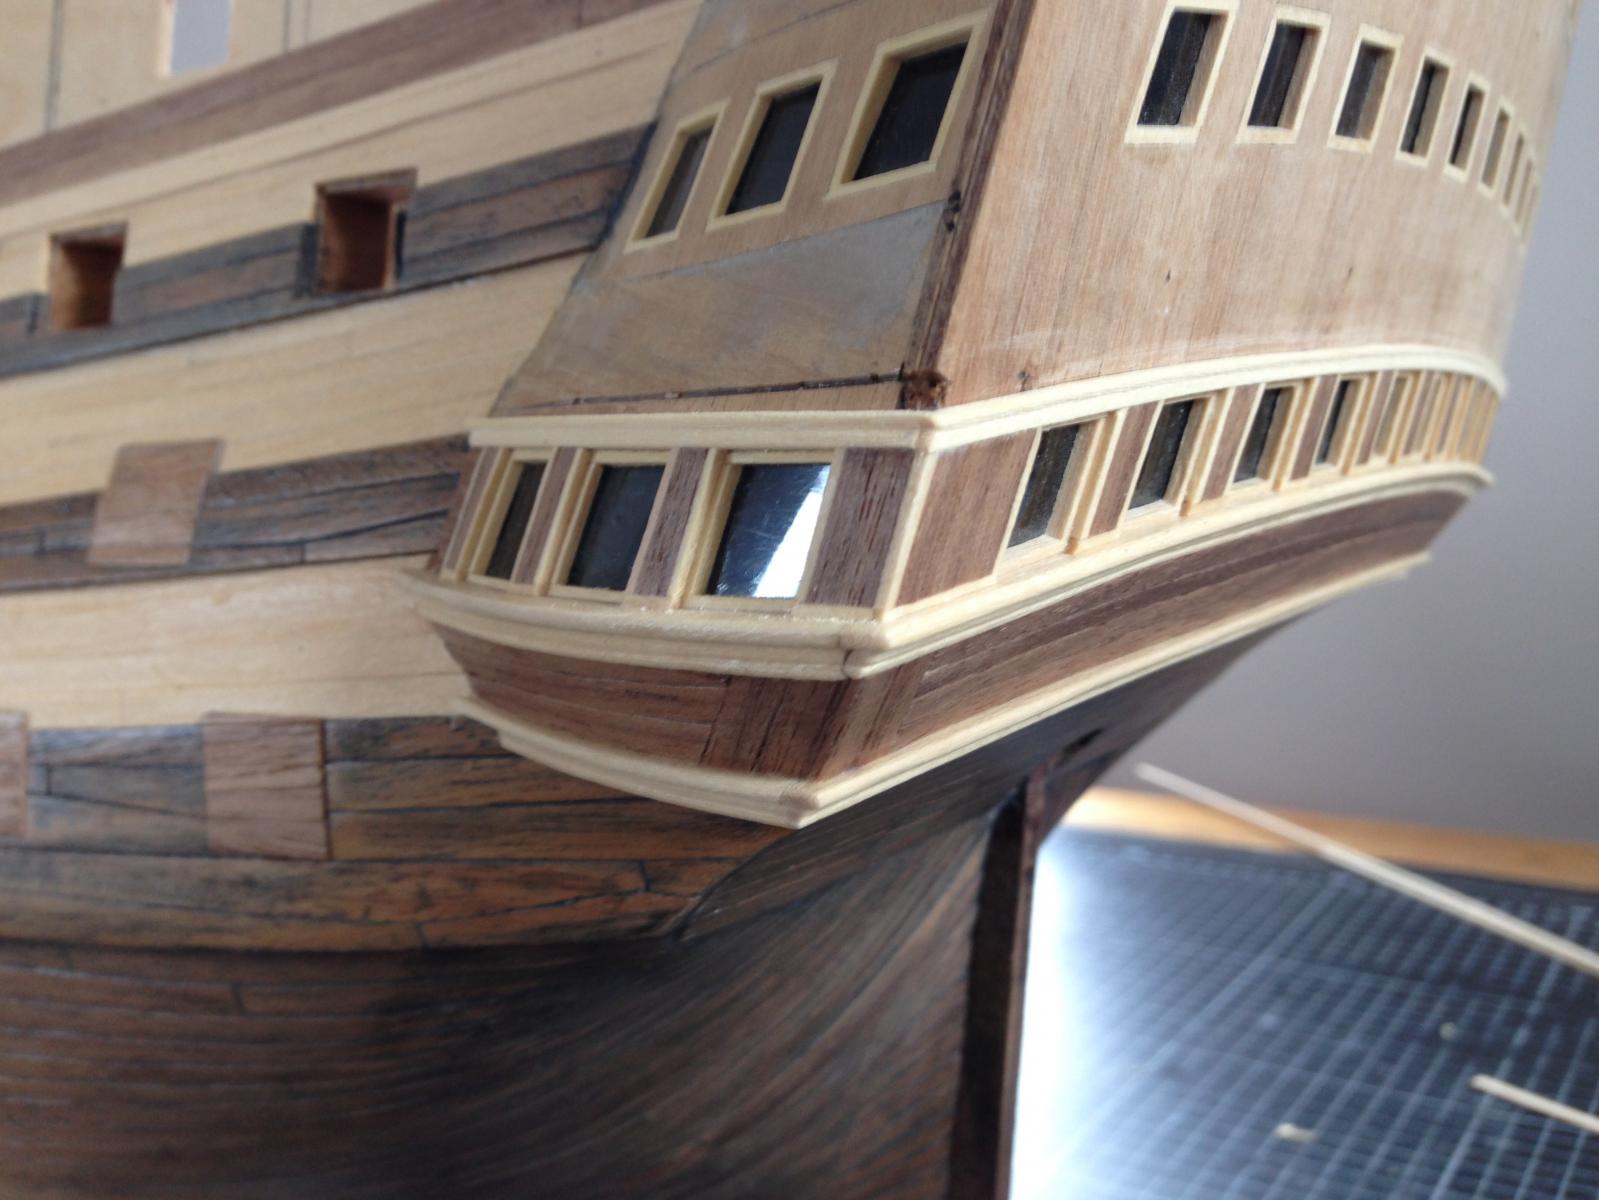
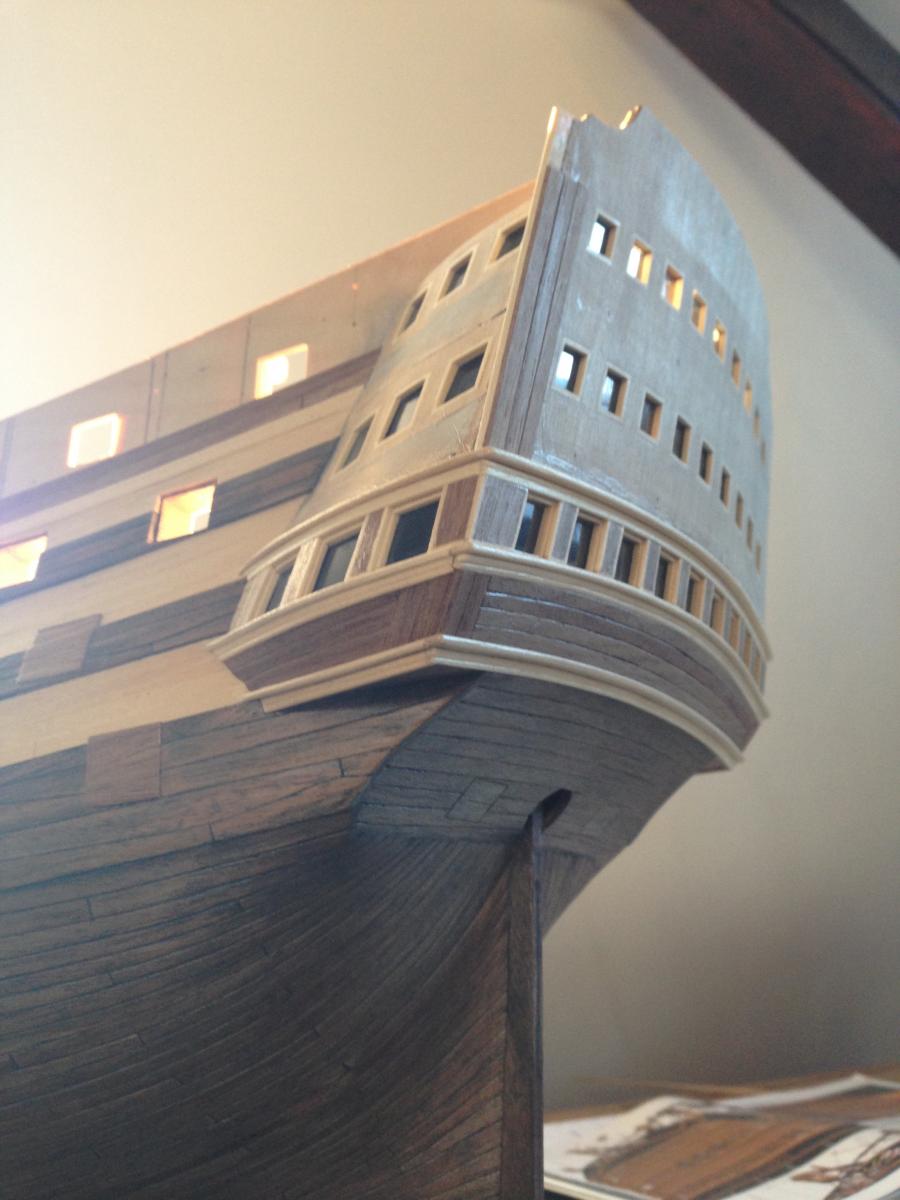
I am happy to say that I finished the balustrades on both sides of the stern. Time to take a closer look to all the ornaments. What should I say... they don´t fit. I know that this is my own fault. I builded the stern in a different way than it´s written in the instructions. So I could not blame anyone instead of myself.
I started to finish the stern with the logo "VICTORY". I did not think about using the sheet-letters from the kit, so I had to build my own ones. My elderberry strips are not wide enough to build them in one piece. I had to split them and build every letter from several peaces. Unfortunately you can see this very well when you look close to it. But is this really so bad??? I try to take care of copying the typeface of the letters and let them fall to the sides to give the logo a swung look (I hope someone understand what I want to say...)
The last picture shows how I started to build the lower peak on the left side of the stern. I have an idea how to build it. But I am not sure if it works. But I will know it soon....
Have a nice weekend!!!!
- Heinz -


- ulrich, Seventynet, GuntherMT and 6 others
-
9
-
What thickness did you have the walnut planking milled to? The kit supplies 1 mm thickness but I may go a little thicker say 1.5 mm if that makes it easier. I've had some success in milling my own planks and I have a nice piece of walnut that I could use.
I would be honored if you would comment critically on my build as I progress to this next stage.
Hi again :-)
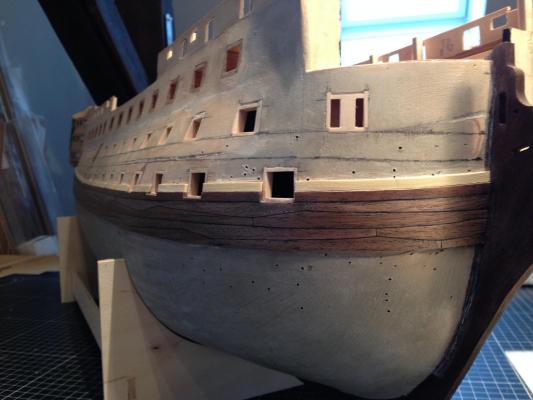
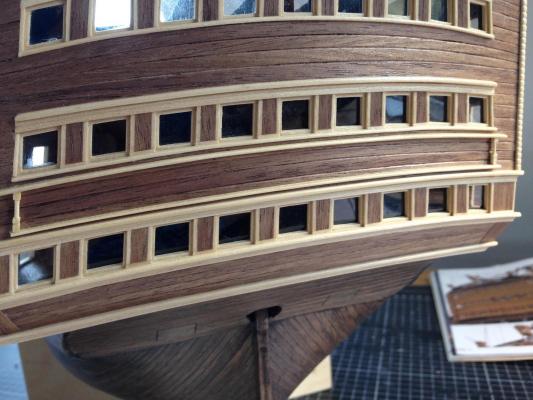
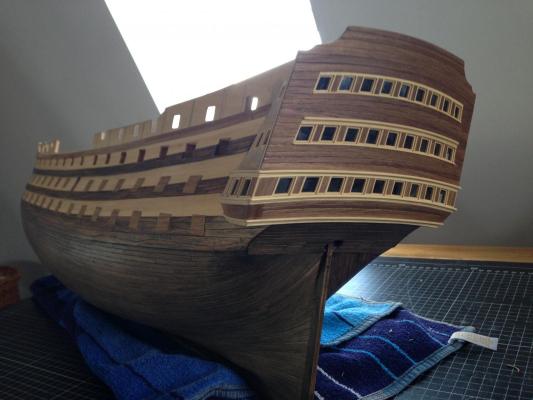
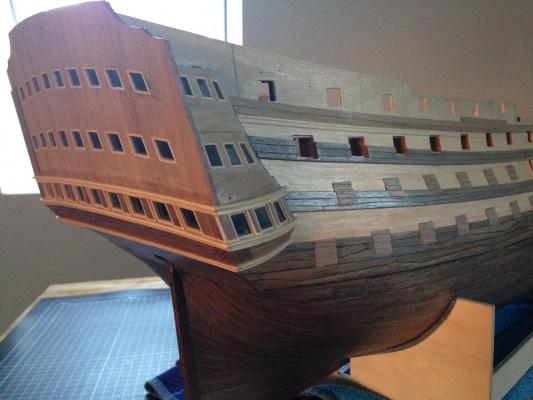
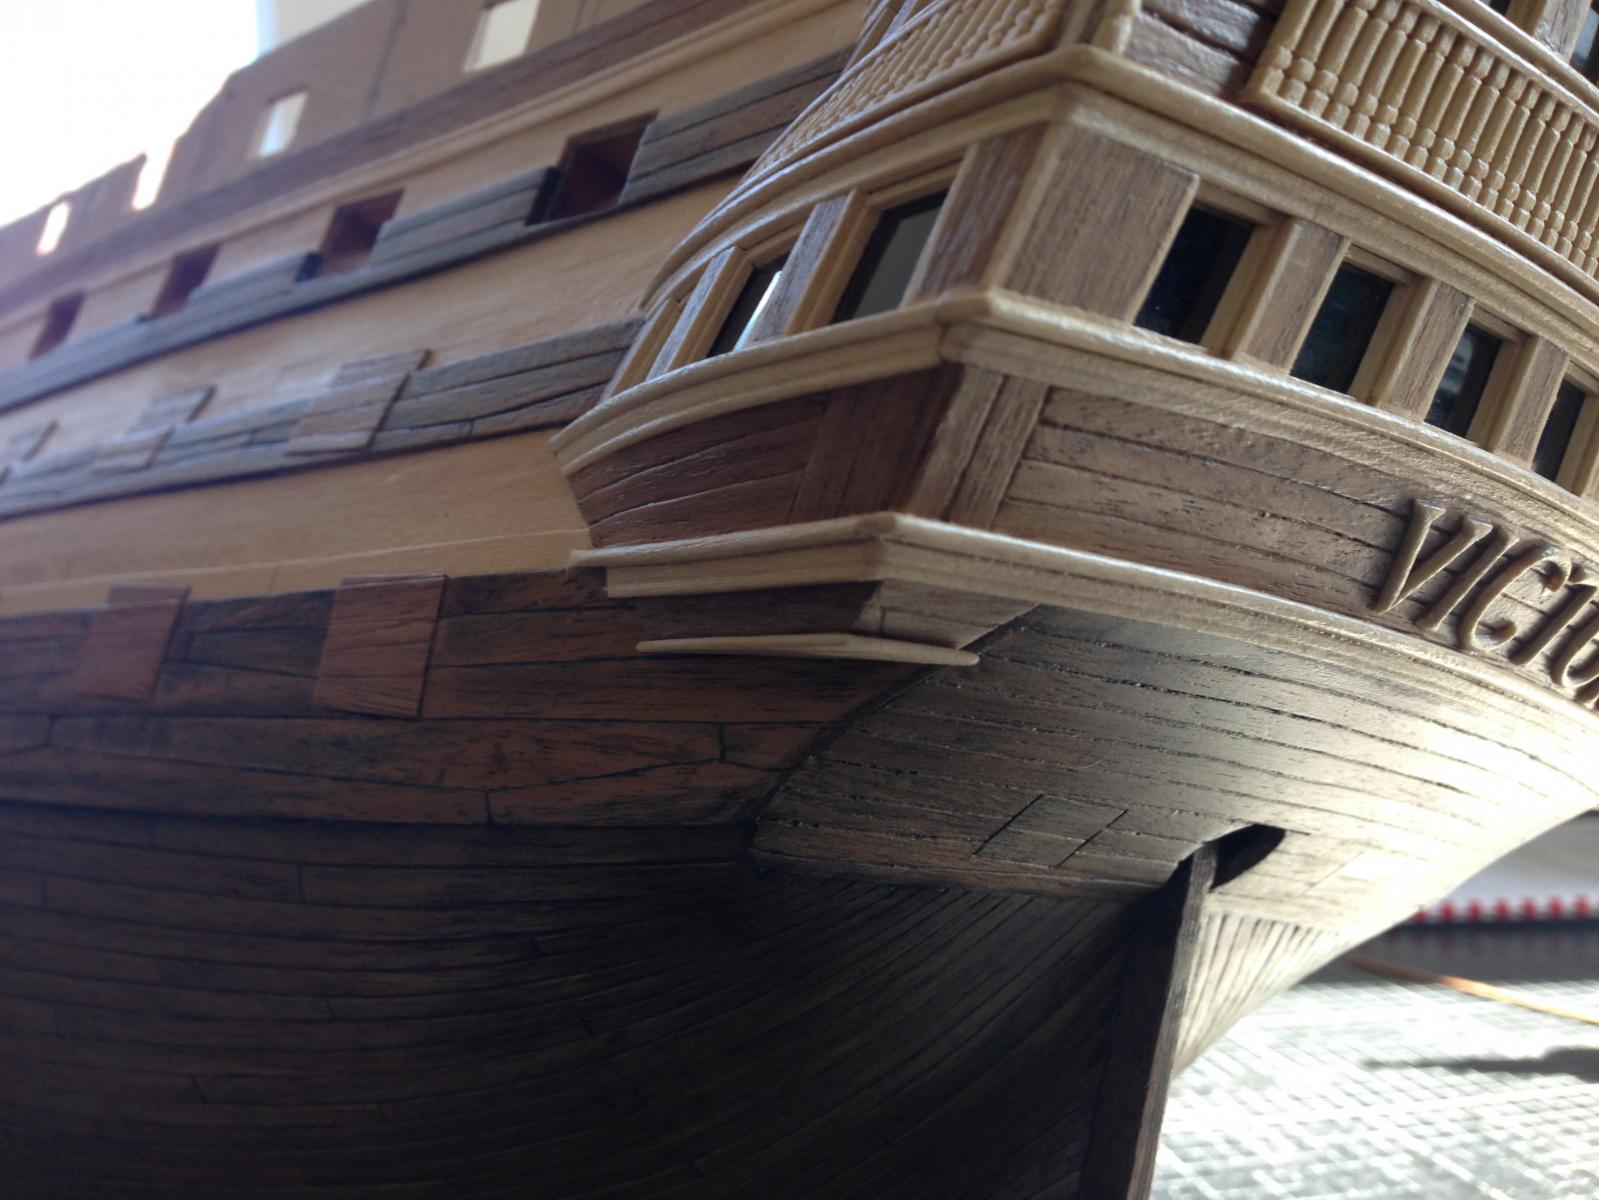
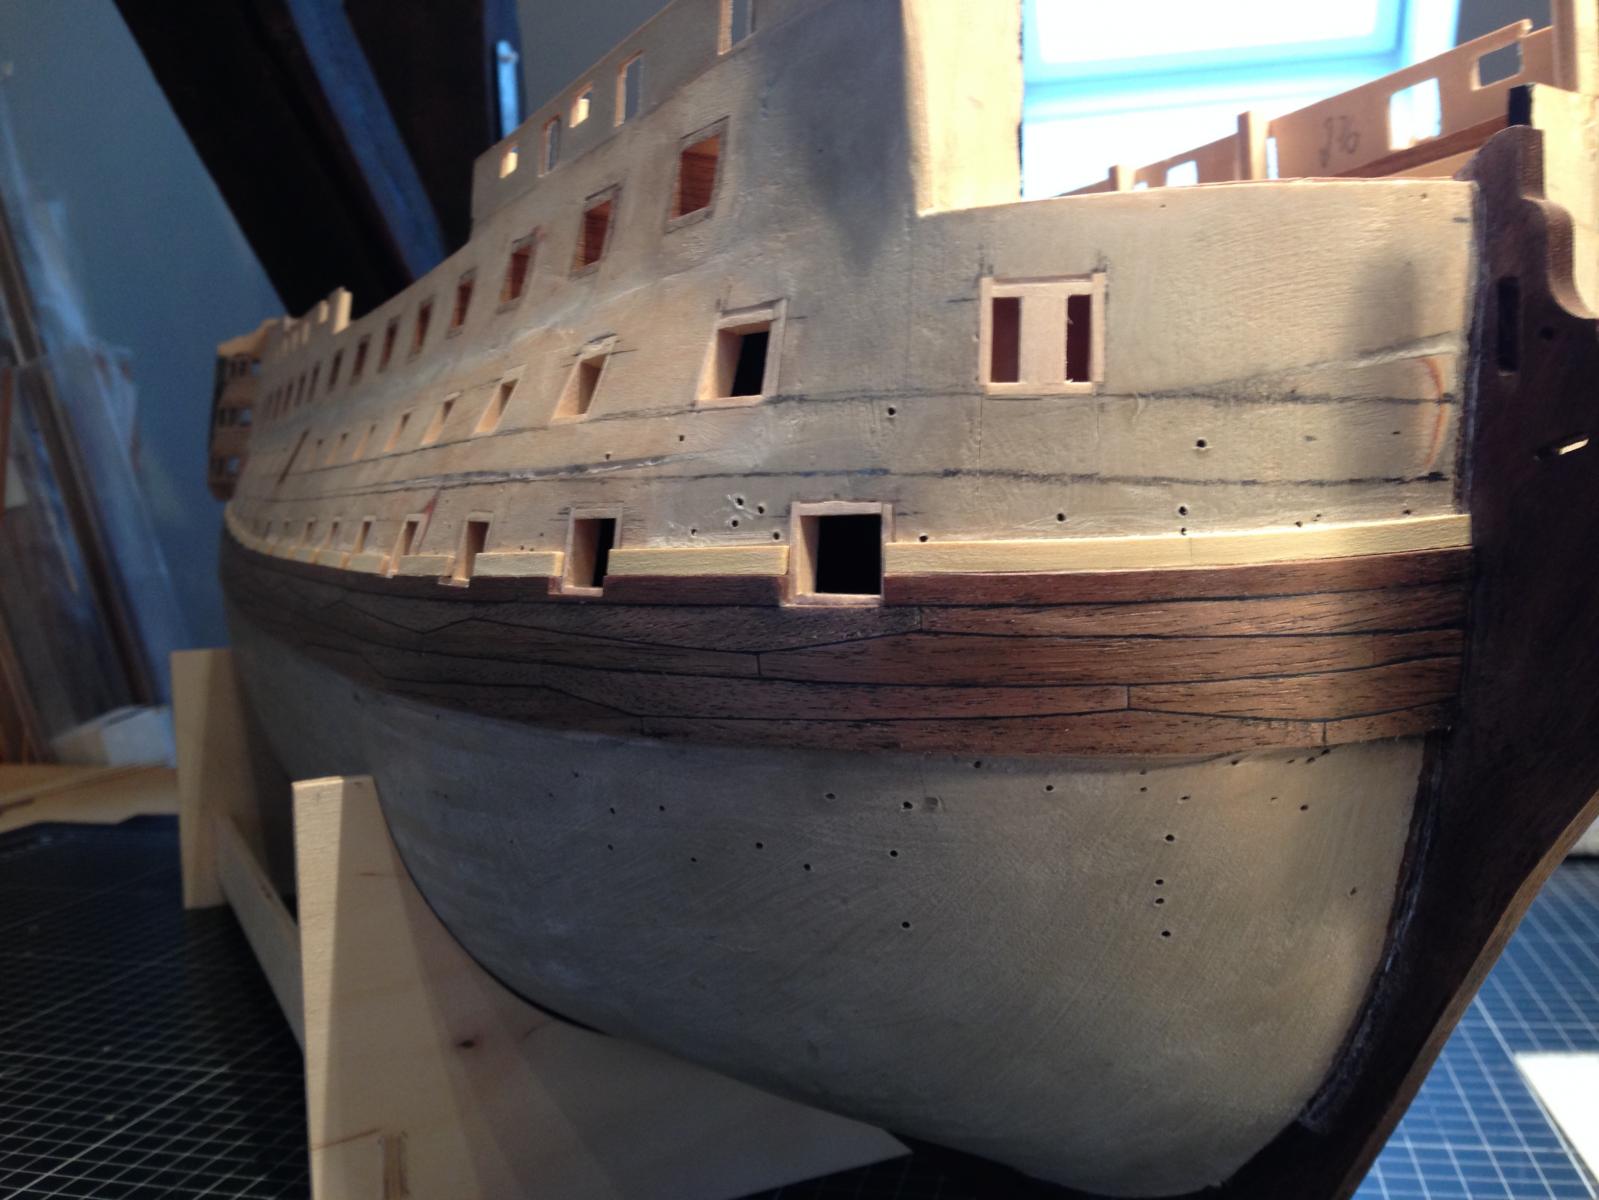
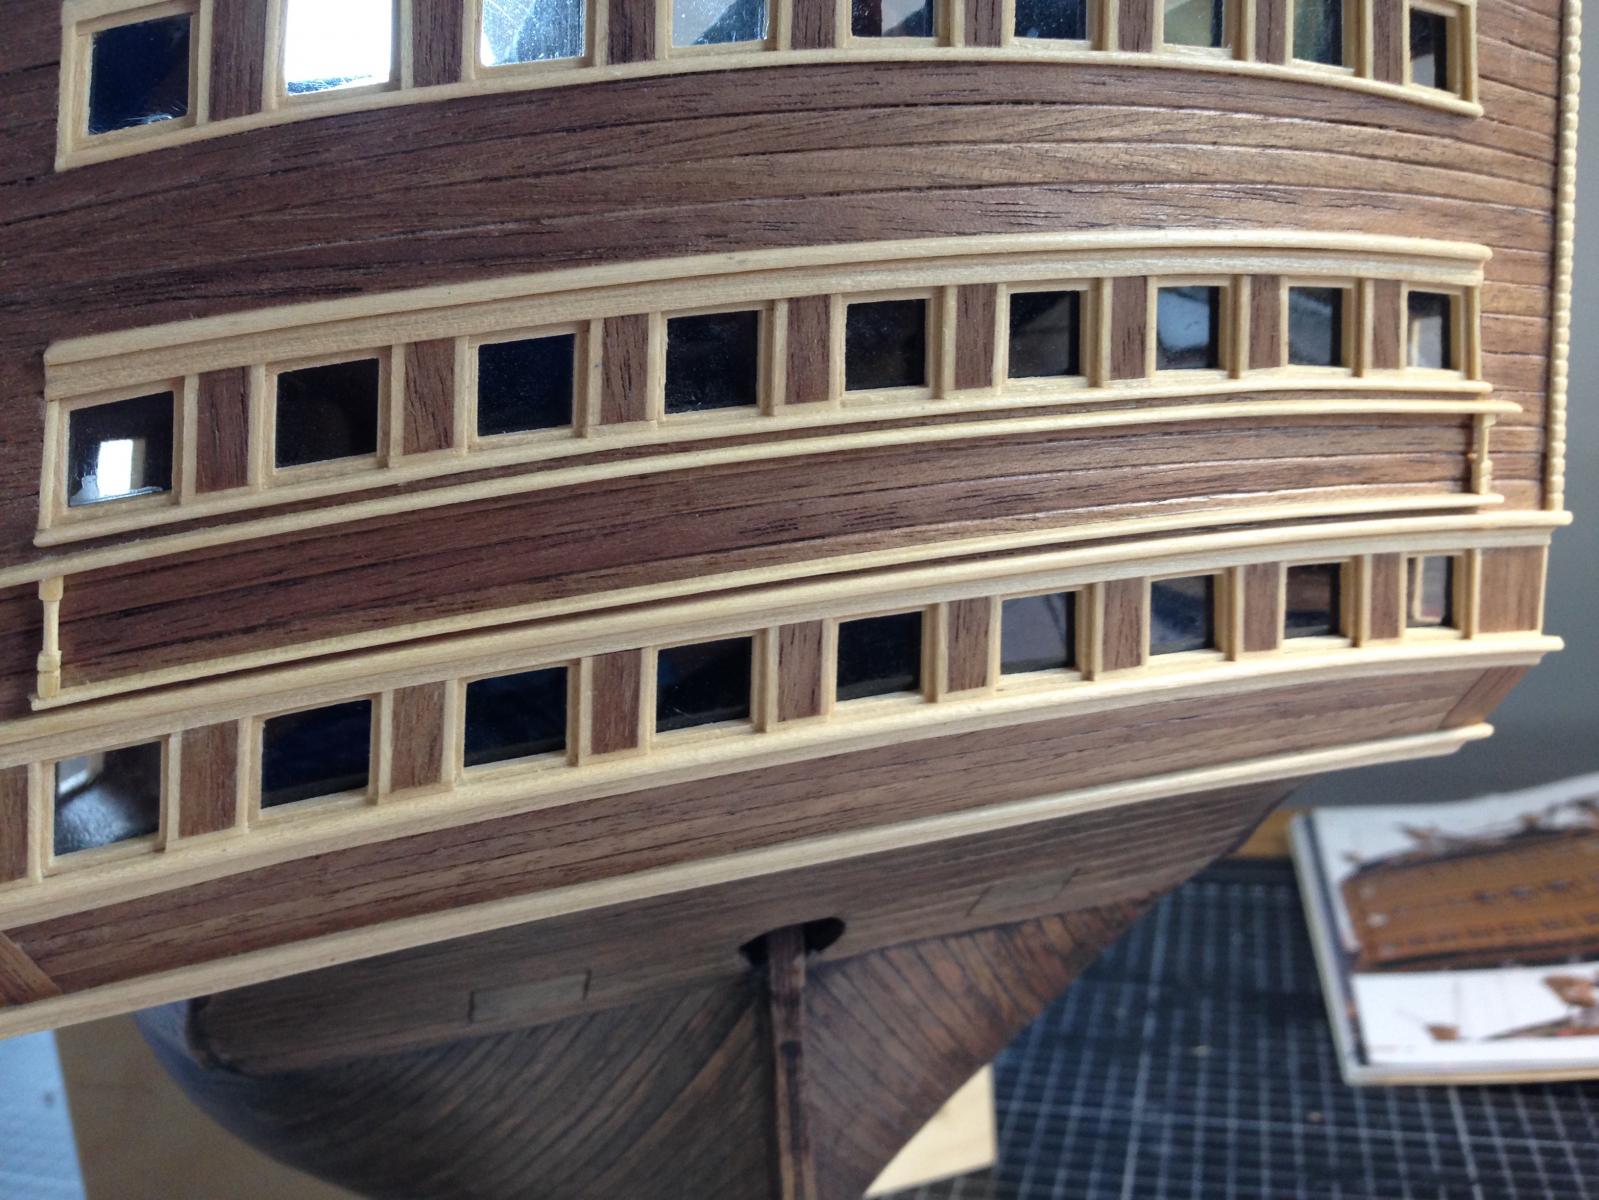
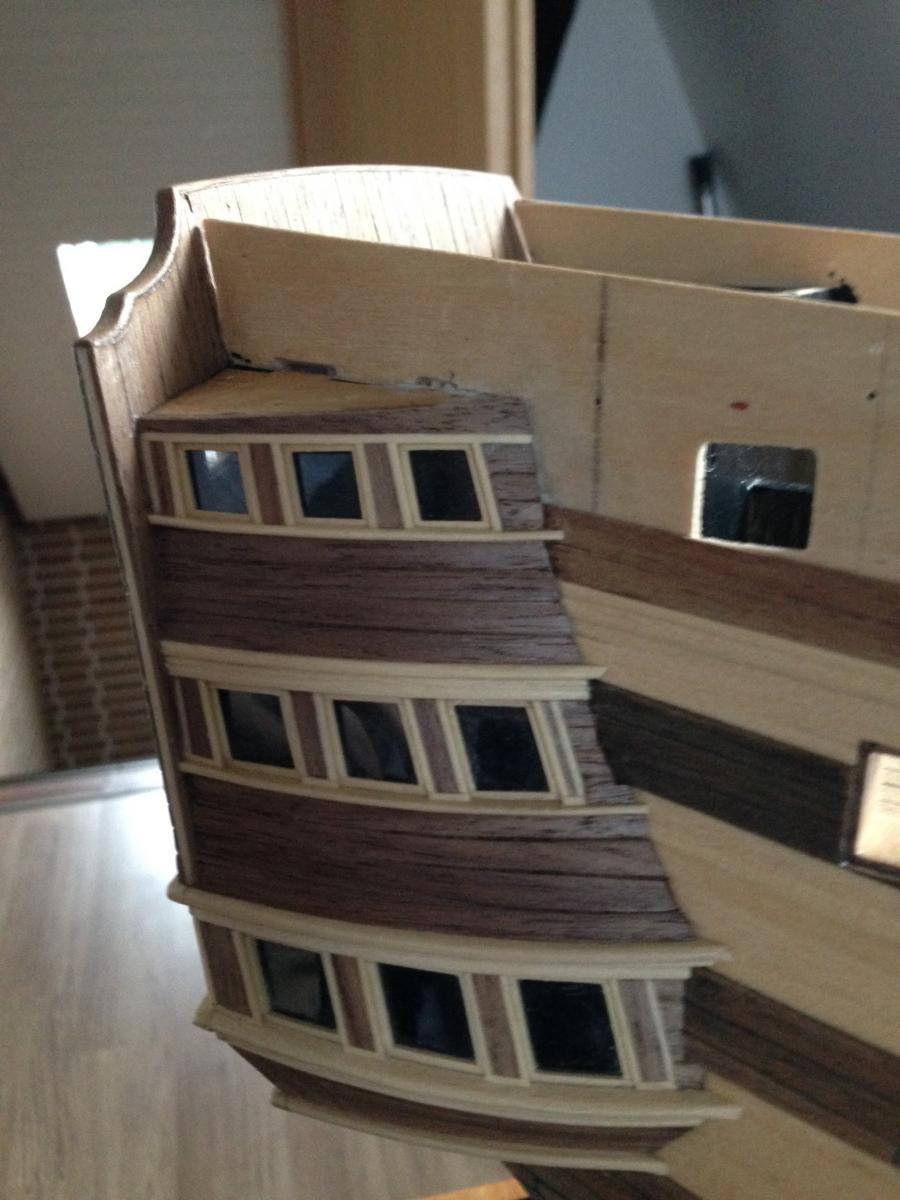
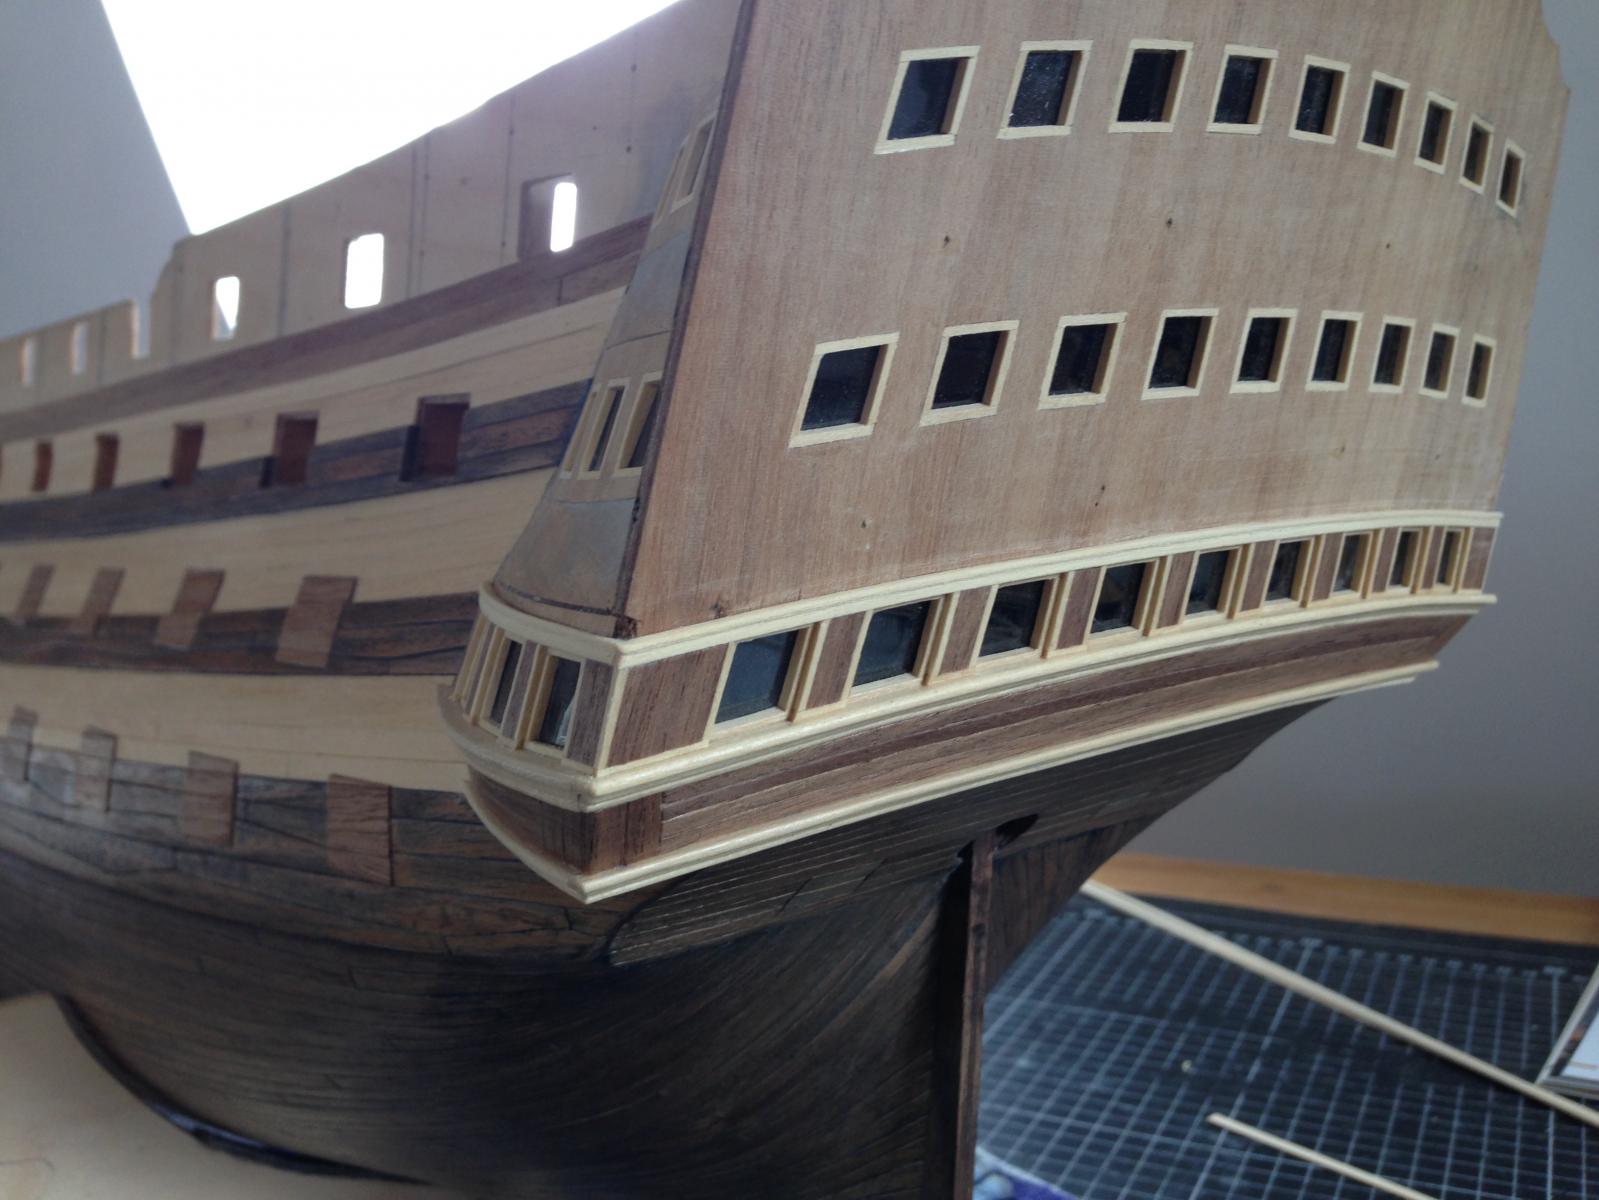
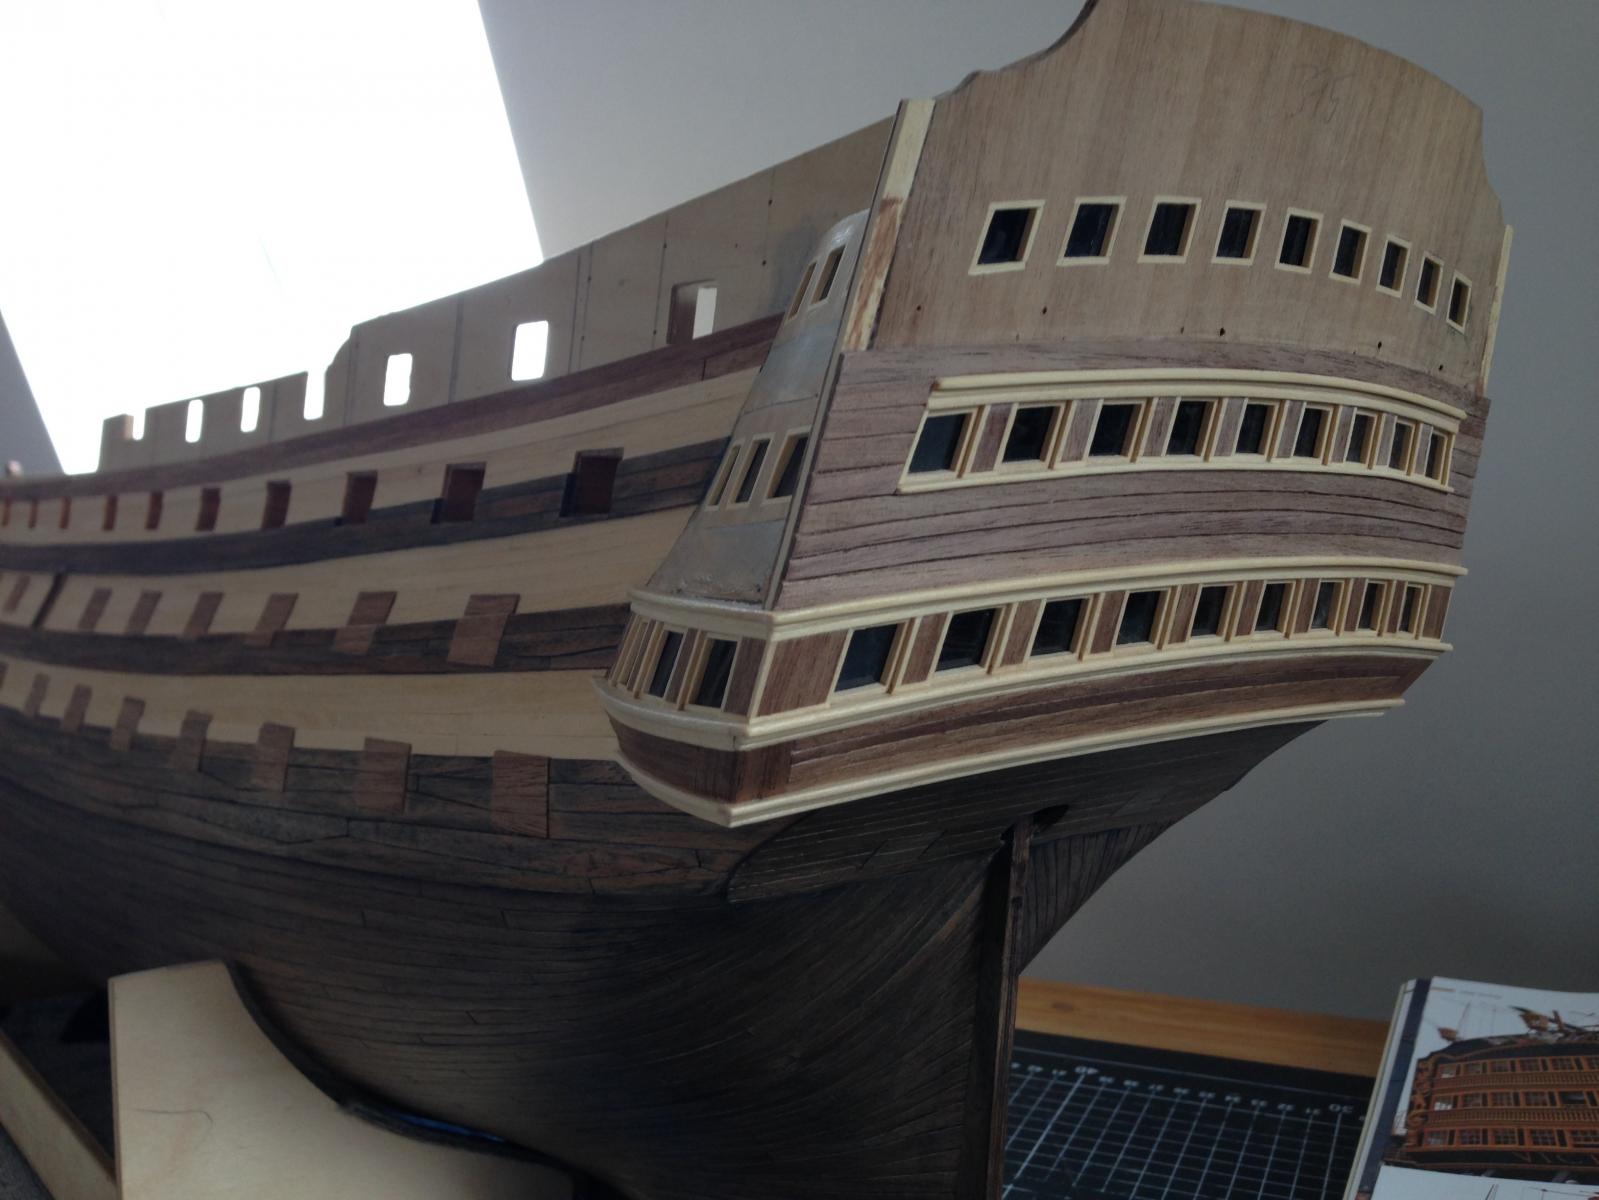
I did not use the wood supplied in the kit. I have my own wood. And all the whales are made from 2x15mm walnut. Please don´t forget that I builded it in a different way. The kit "tells" you to make a second planking with the 1mm walnut and than build the whales as a third planking on top, using the 1mm walnut again. I have decided to fix the 2mm whale directly on my first planking, so I did not have to milled it. The thickness is the same -> 2mm.
The major reason to do this was the fact that I don´t wanted to paint the hull. I mean without any "covering" color you can see if the whales are not build as it was in reality, namely as extra thick planks. You can see that they are only glued as a third layer on the hull. My way of building them is the more correct and better looking way (in my opinion).
Ian, it would be a pleasure for me to comment your build. But I am not an expert. I call myself a beginner. I have a vision of how I want to build my victory and get many inspiration of Alexandru´s victory (look at his build and you will never talk to me again...) and I try to realize my visions. But I would never say that my way is the own and best way to do this. To say the truth: I am surprised about the result for myself and very proud about all the nice comments here. So I would really love to discuss with you and all member of this community. But if you decide to build it in another way, it´s absolutely o.k. (and maybe better :-) ).
Hello Heinz..
The purpose of this post is threefold. I wanted to say hello, to give you an update on my admiral's HMS Bounty and to tell you that your English is excellent.
Charlene has finished planking the first layer of the hull and has done all the wood filling and sanding. She is getting ready for the walnut planking but first has decided to run a styrene strip around the hull to locate the waterline. She'll use the copper plates, you were so kind to send us, from the waterline down and use walnut strips from the waterline up.
Keep up your wonderful work.
Best,
Jerry
Hello Jerry!
Thank you for your greetings and update of Charlene´s HMS Bounty. I am a faithful follower of her build log and can not wait to see "my" copper plates
 .
. The HMS Bounty is a beautiful ship and I am sure with your advice, Charlene is building something special.
I will do my best to keep up my "wonderful" work. I am near to fulfill the galleries of the stern and can not wait for the next step. But my victory is growing. Very, very slowly....
Best to you and Charlene!!!
- Heinz -
-
Hello Ian,
thank you for your questions. I am very proud that you want to build your victory in the same way I do. You are right, english is not my first language. So I am not sure if I understand everything correct, but I do my best to explain the way I builded the whales.
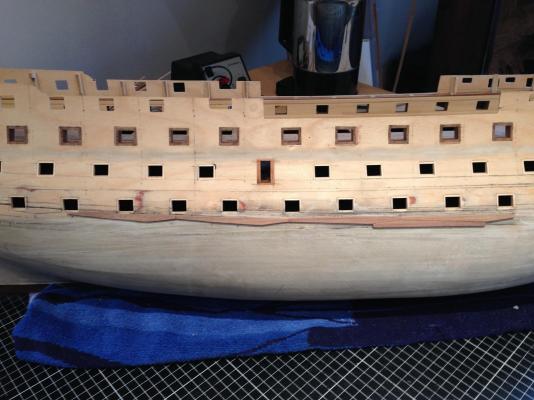
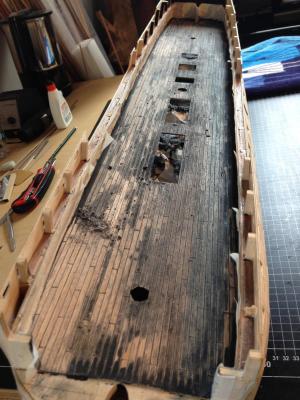
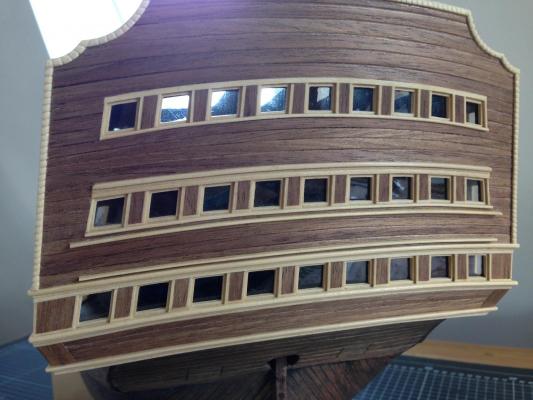
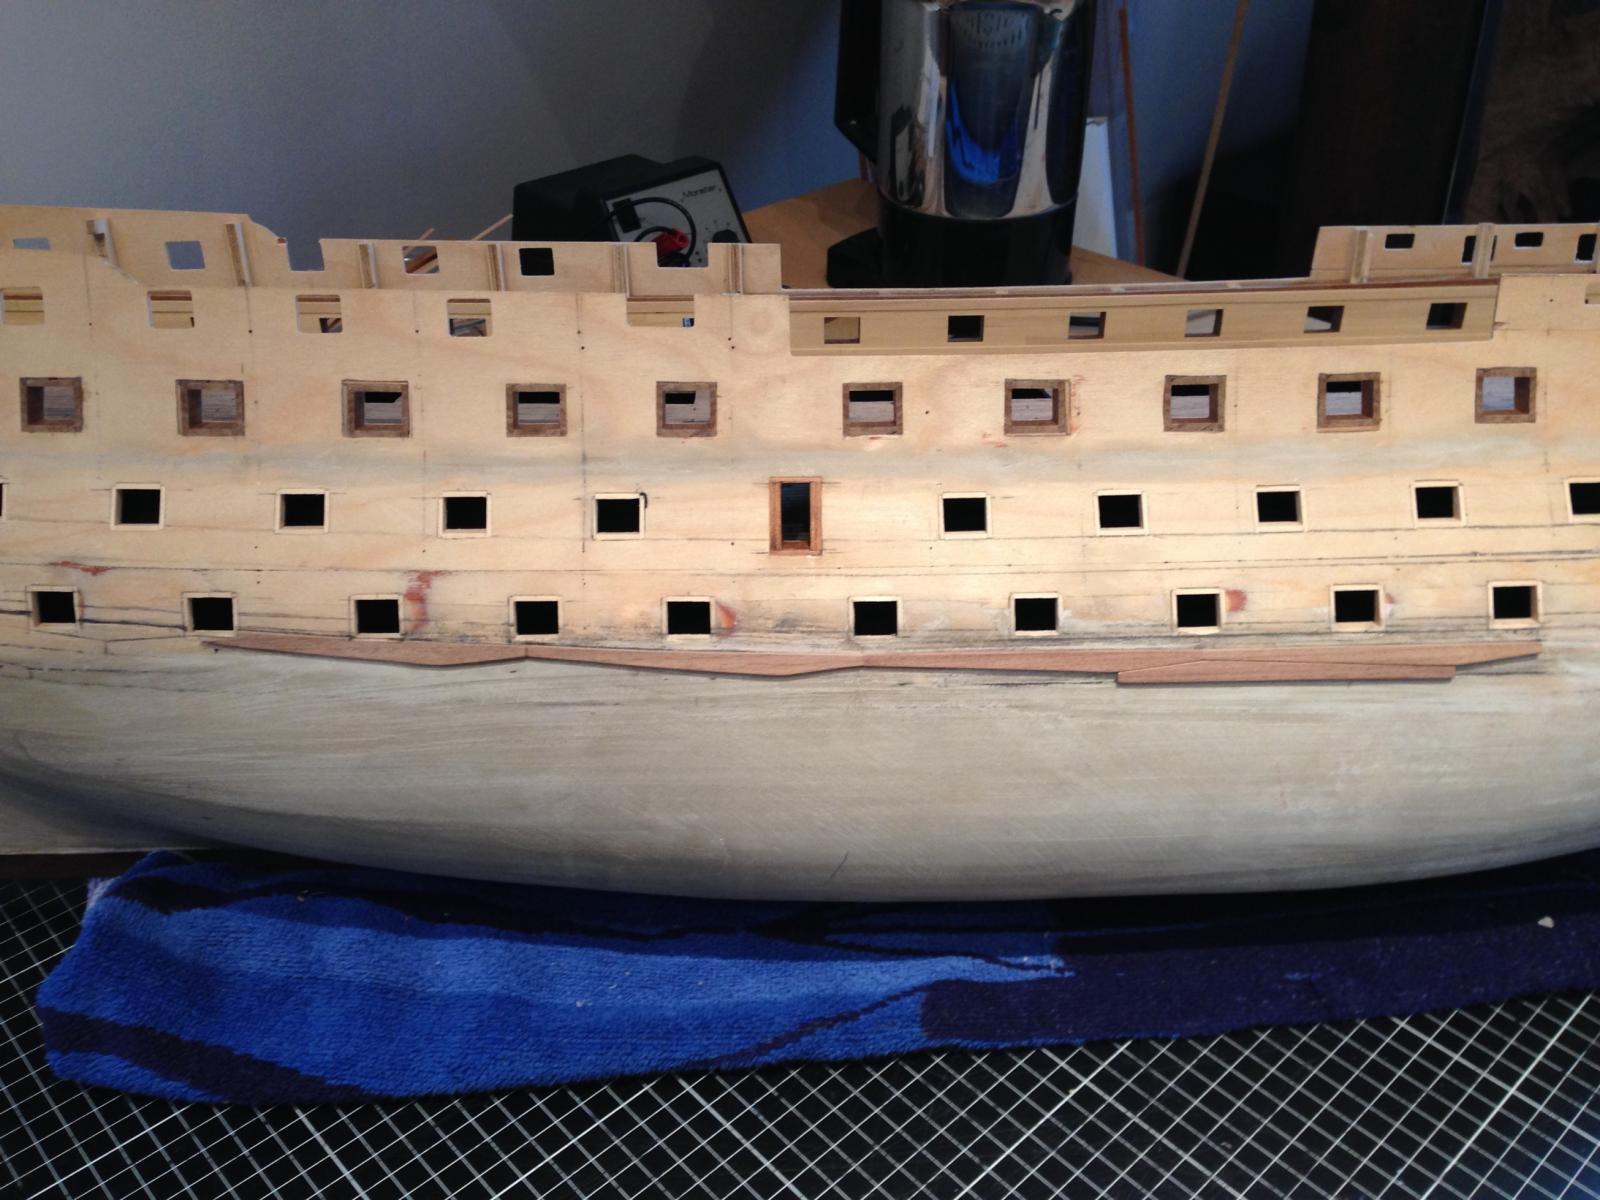
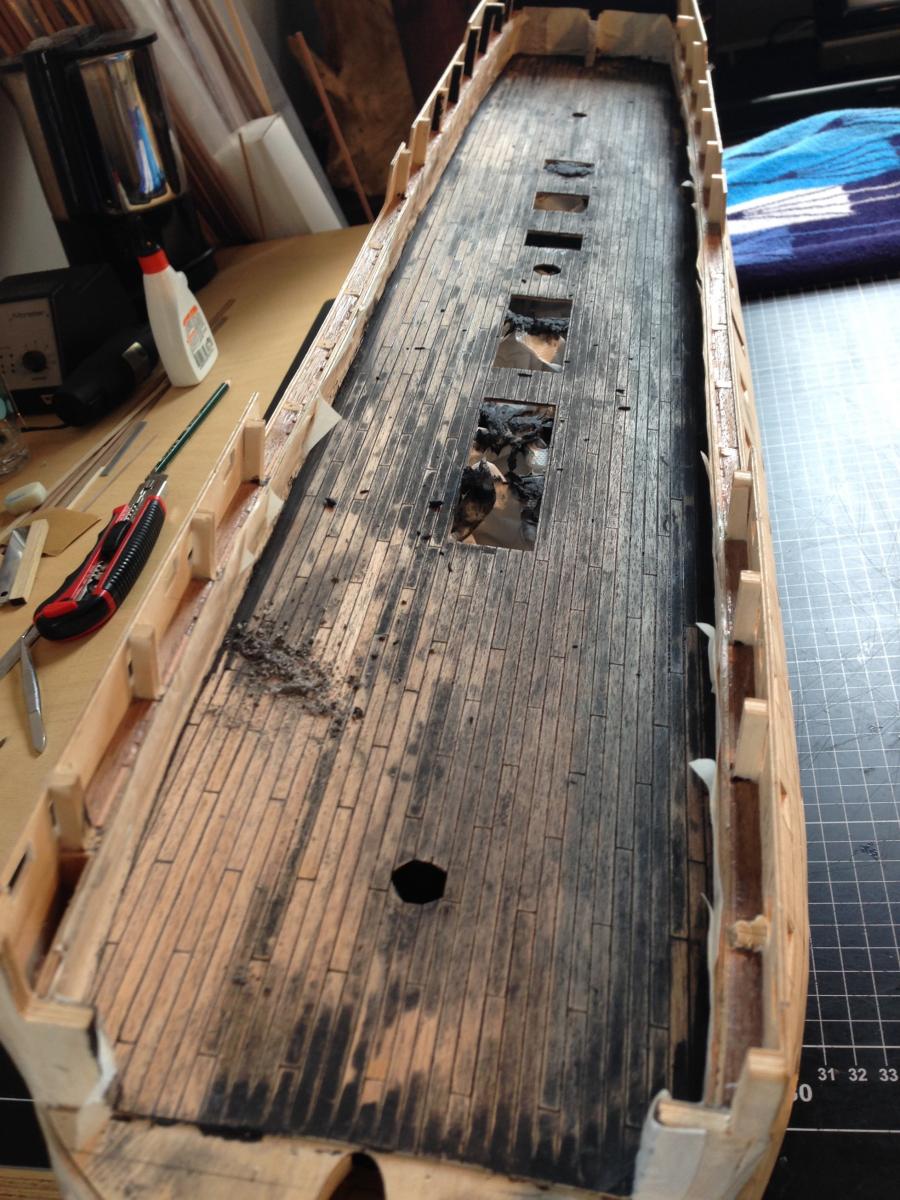
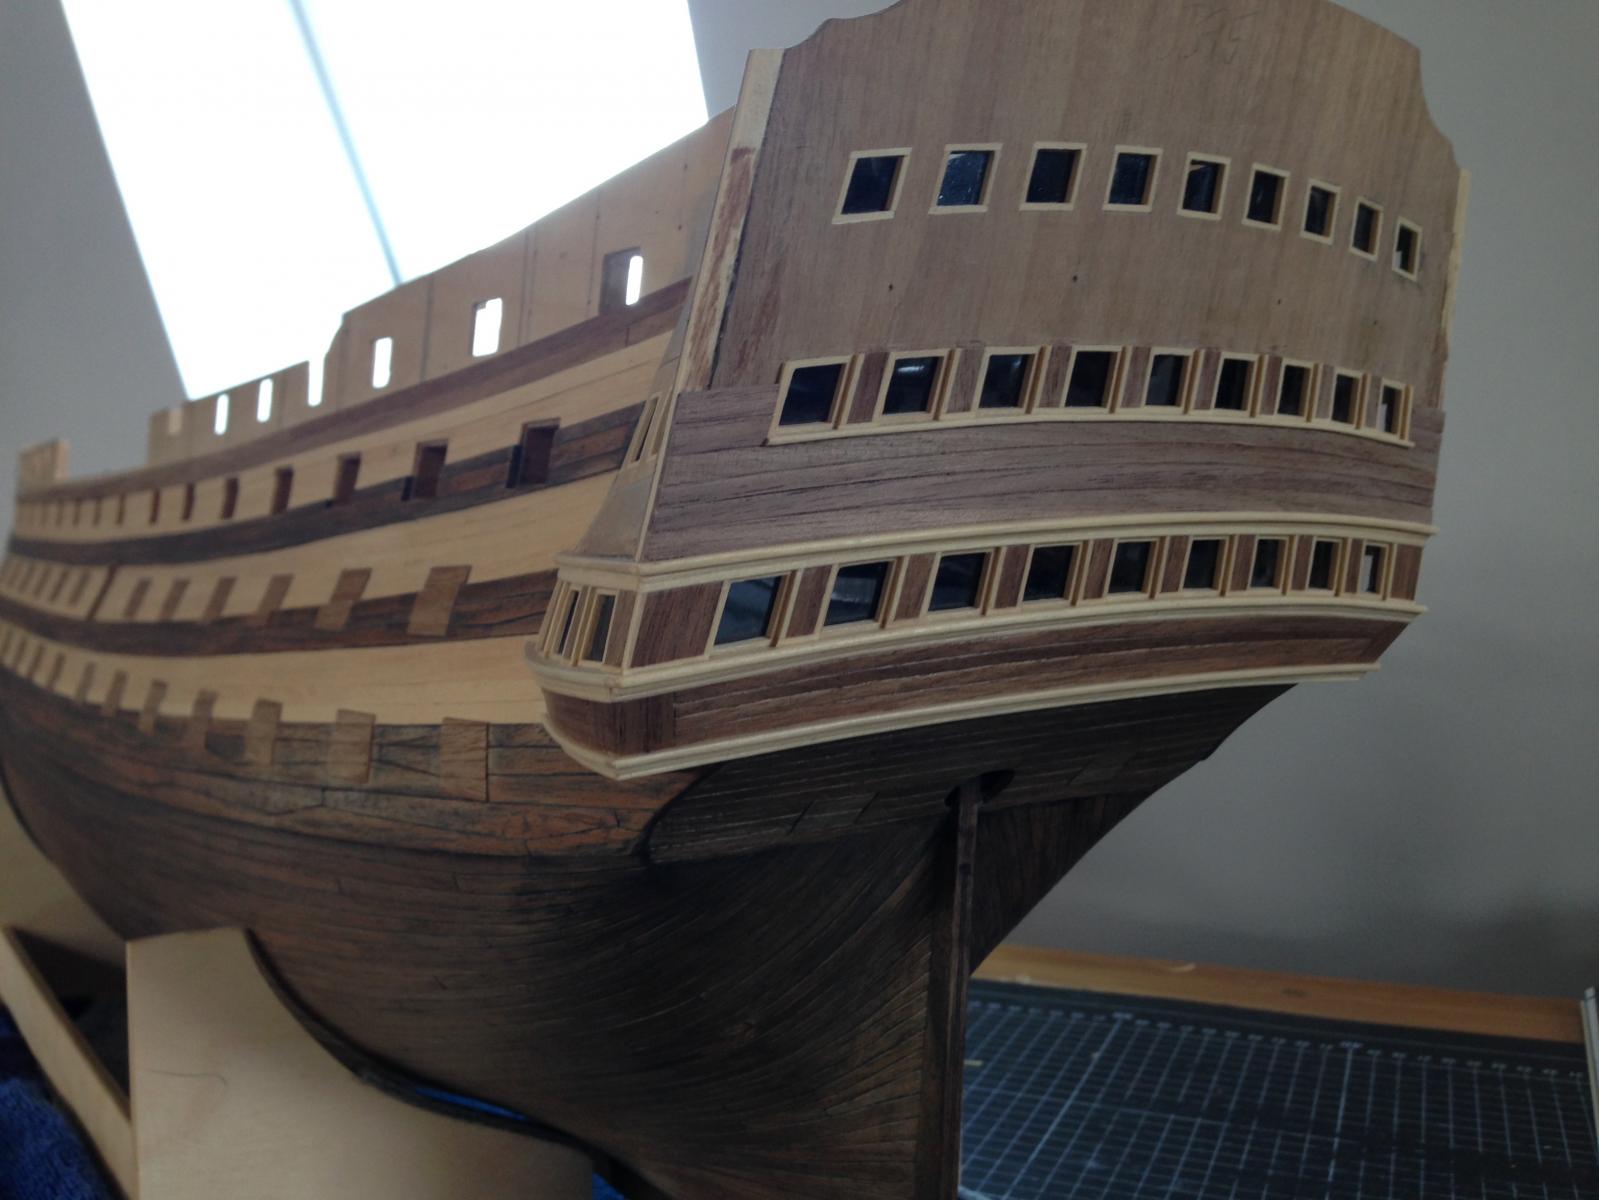
Your first question: you are right. I did not apply any kind of dark coating on my first planking. To say the truth: I simply did not have such an idea. After my first experiences with the planking on the upper deck I decided to fill the spaces with black wood filler. I realized that this method has two benefits. First benefit: all spaces disappear. The second benefit is: the walnut wood gets an old and used look because the wood filler gets into the pores of the wood. It looks kind of dirty. And maybe a third benefit: it looks like the caulking of the hull :-)
But you need really good nerves if you try to work with black wood filler. Look at picture No.35: I was shocked and afraid that I have destroyed my model. I scraped off the filler with a razor blade and rubbed it down with a wet sponge. It works well and the result surprised me.
With a growing experience I intentionally builded the planks with spaces, cause it´s easier to fill them out (second picture). There is no place for the filler when the planks are build too close to each other. So in case I worked to exact I cut a slit between the planks to make space for the wood filler.
To answer your first question: I am not so exited about your suggestion. In my opinion there are two possibilities: 1) you want to hide the cracks between the planks. But that means that you don´t work clean. Maybe it even seduce you to not take care enough. I think if you can see the first planking between your planks you have to rebuild it. Sorry! 2) if you want to make the spaces look like a caulking you have to work extremely exactly. I think it only looks well if all the spaces are equal to each other. I don´t believe that this is possible to do for my skills. So if you like the result of my Victory... do it in my way :-) .
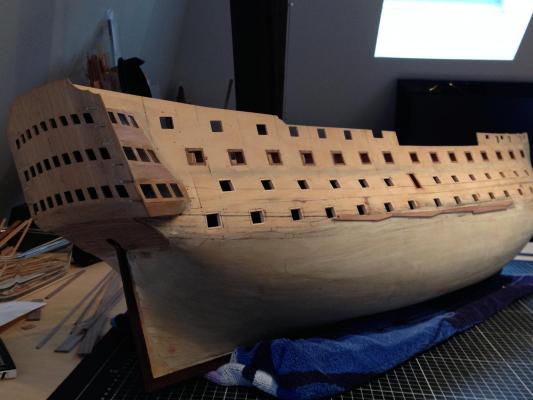
Your second and third question (I am not quite sure if I understood the second question - sorry): I did not use the wood supplied in the kid. I found a carpenter able to cut wood in exactly the thickness I need for my model. I used the same wood for the inner surface of the gun ports and the whales of the hull: 2 x 15 mm walnut. If the walnut strip isn´t so thin (1mm or less) it´s much better to work with (no brittle and crack prone). But you need patience to curve it.
The biggest problem for me was the fact that the way of the planks does´t follow a "natural" way. I mean not only you have to curve them lengthways, you have to curve them upwards. It´s not such a problem when you work towards the stern. But I did not get it in the bow.
The solution was to draw every single plank on my 15mm wide wood strip in the way I needed it and cut it out with a knife. I hope you understand what I mean. Every plank was exactly build for the place it deserves to be. I found out that it´s much easier to first draw the future planks on the hull and than transfer this sketch on my walnut strips using my sketch as a stencil.
After building the planks in that way I only had to curve them lengthways and glued and fixed them without any problems.
Ian, I hope I could answer all your questions and helped you with my advice. Feel free to ask me if you did not understand a word of it
 ...
...- Heinz -

- oscarmate and mort stoll
-
2
-
-
Hello friends,
thank you again for all the nice words :-)))
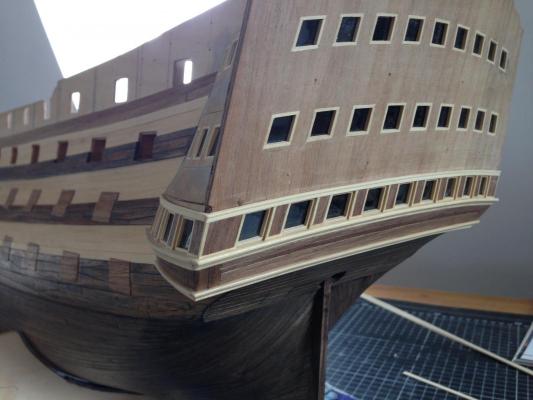
I can show you some progress. The stern is growing slowly. After finishing the back of the stern I decided to renew the lower line. I changed the distance of the pillars (I built them closer to each other) and took more care of the overall impression - sorry, I couldn´t even explain that in german - impossible for me to write that in english. Anyway, it took 1 week of my holidays and I think it was worth every minute.
I keep on going this way. And it´s a long, long way... Sometimes I talk with my workmates about my hobby and i show them pictures of my Victory. No one can imagine how much time it took to build all the details. Everyone tells me that they would not have the patience to do this. The most common question is: "can your model swim?" That is the moment when I lose my patience too. I am close to jump out of the window...
Best wishes for the weekend :-)
- Heinz -


- Dimitris71, mort stoll, de_kryger and 6 others
-
9
-
hello Boyd,
I love your work. It´s really beautiful! You give me so much inspiration to keep on building my model :-)
Keep on your good work!!!
- Heinz -
- GLakie, Mike Dowling and shihawk
-
3
-
-
Hello Heinz..
How much will you take for the copper plates?
Best,
Jerry
How much does the postage? If someone pay me 10 Euro I will send it. I don´t want to make money with it... (if you want to give more... don´t hesitate); ideally you send me a personal mail...
-
Hello David,
thank you very much for your nice words!
Definitively I will not copper the hull. I never wanted to do it. It was just an opportunity if I would not get the hull planking right. But I am more than just happy with the result. No need to hide it with copper :-)
If somebody is interested in the copper plates, please tell me. I don´t need them anymore!
- Heinz -
- Seventynet, shihawk and Shipyard sid
-
3
-
Hello Jparsley!
Hello Jerry!
thank you so much for your compliments. This means a lot to me :-)))
- Heinz -
-
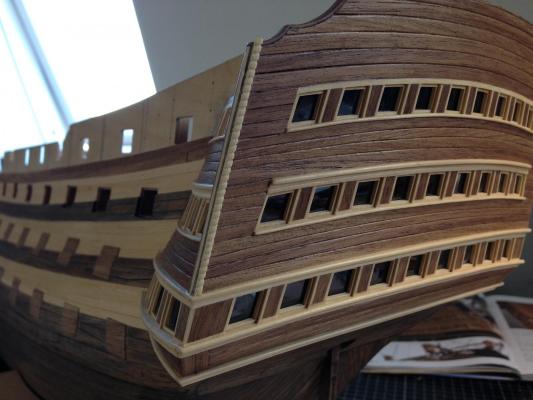
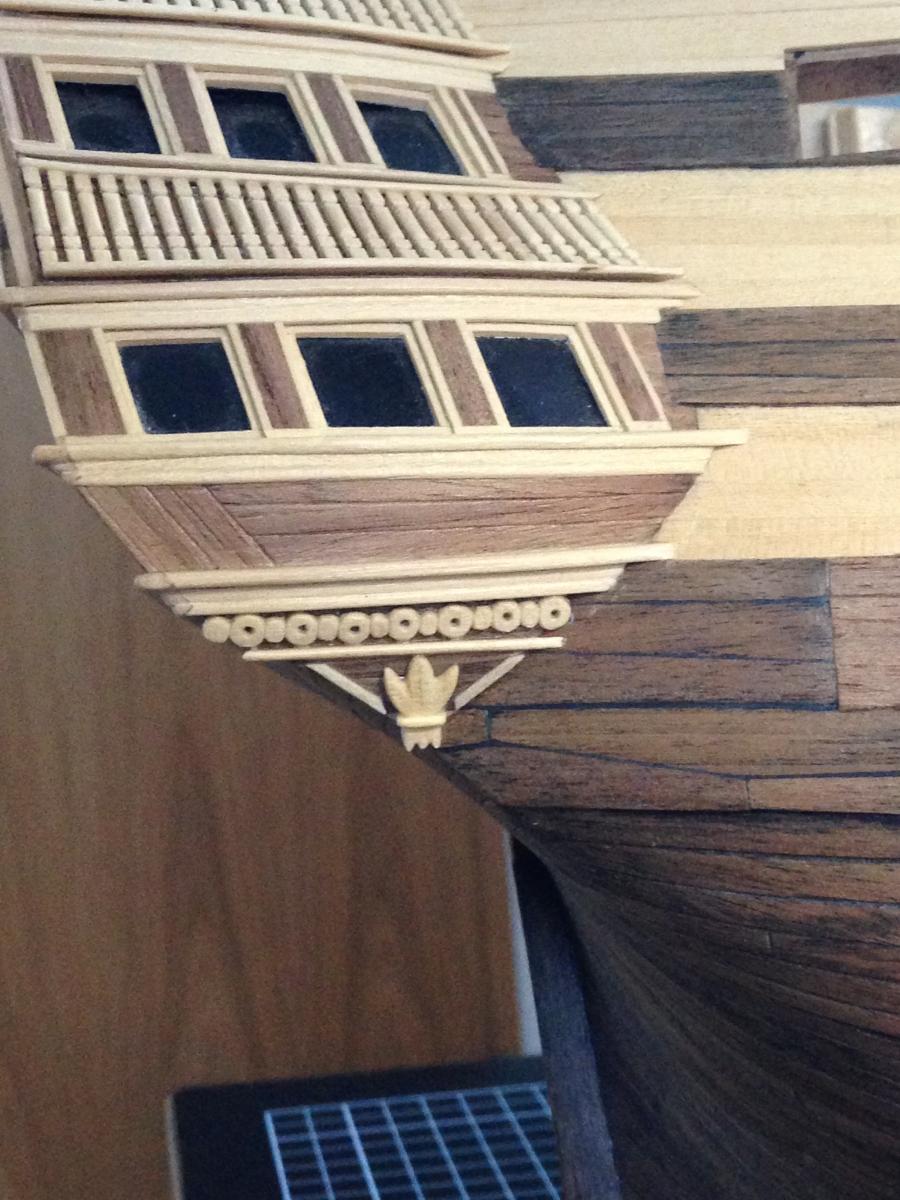
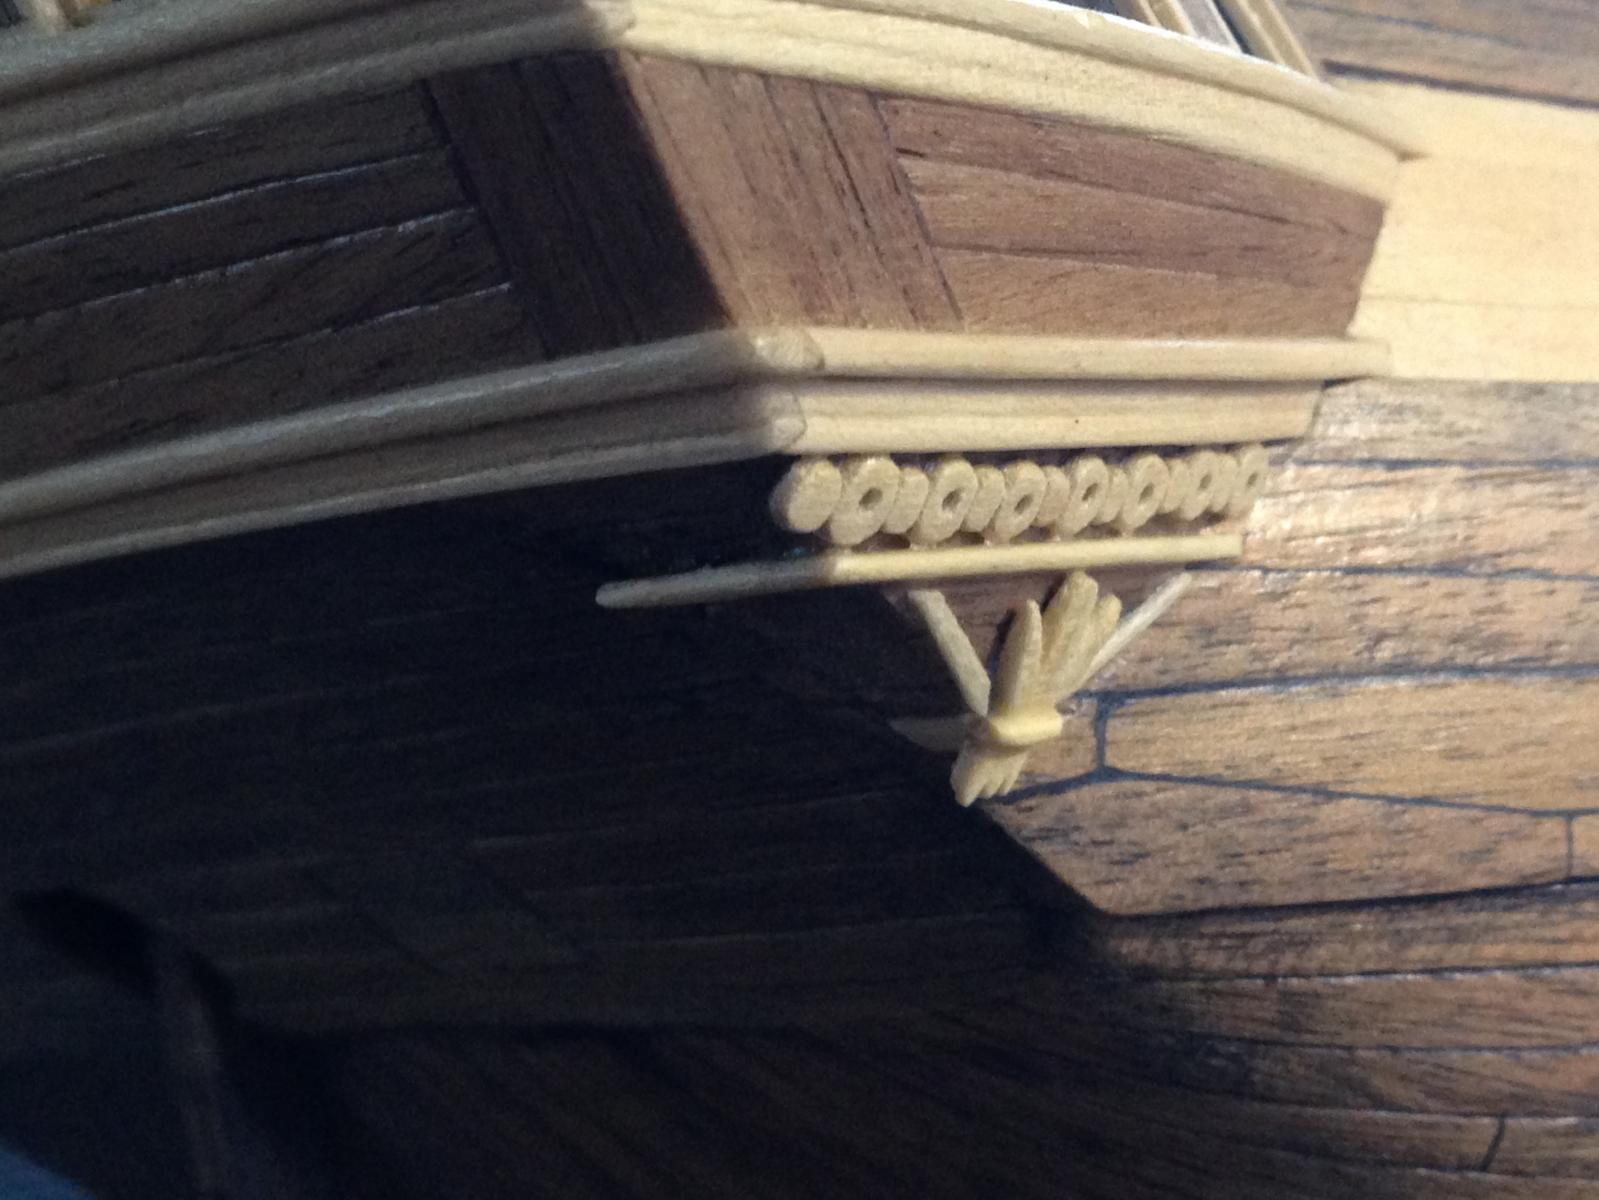
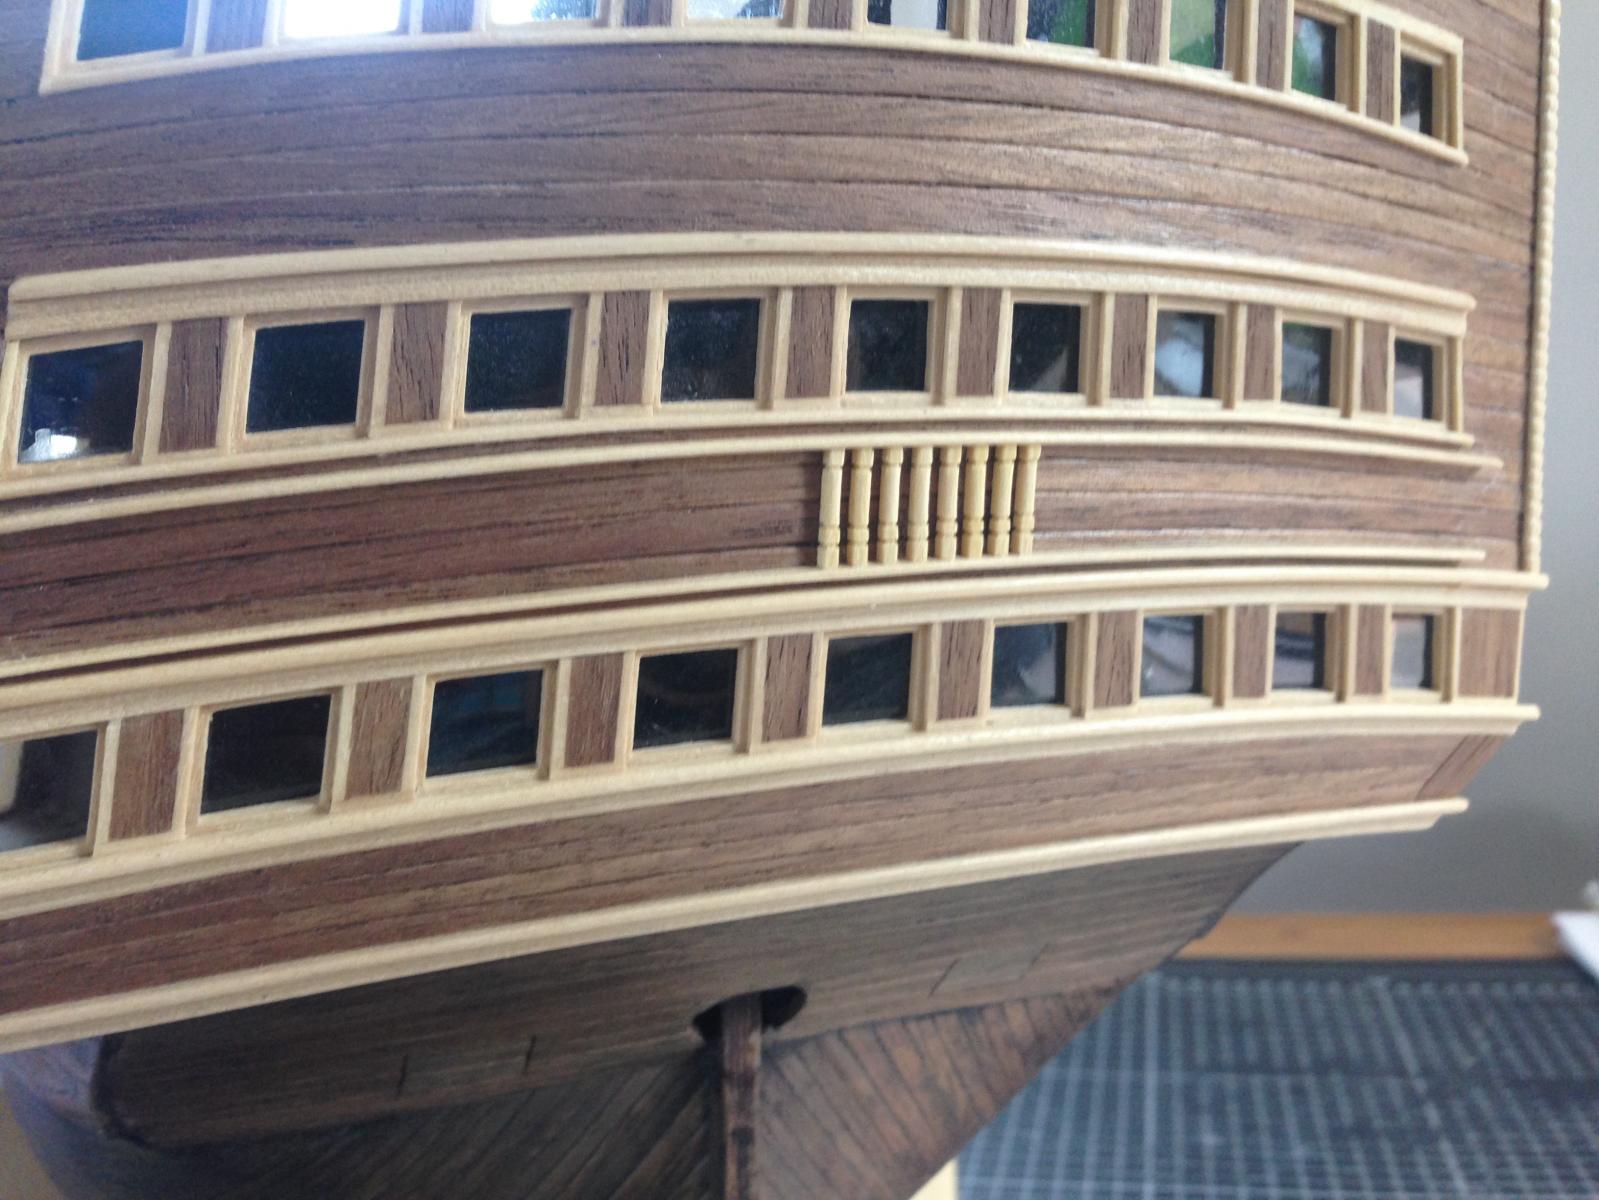
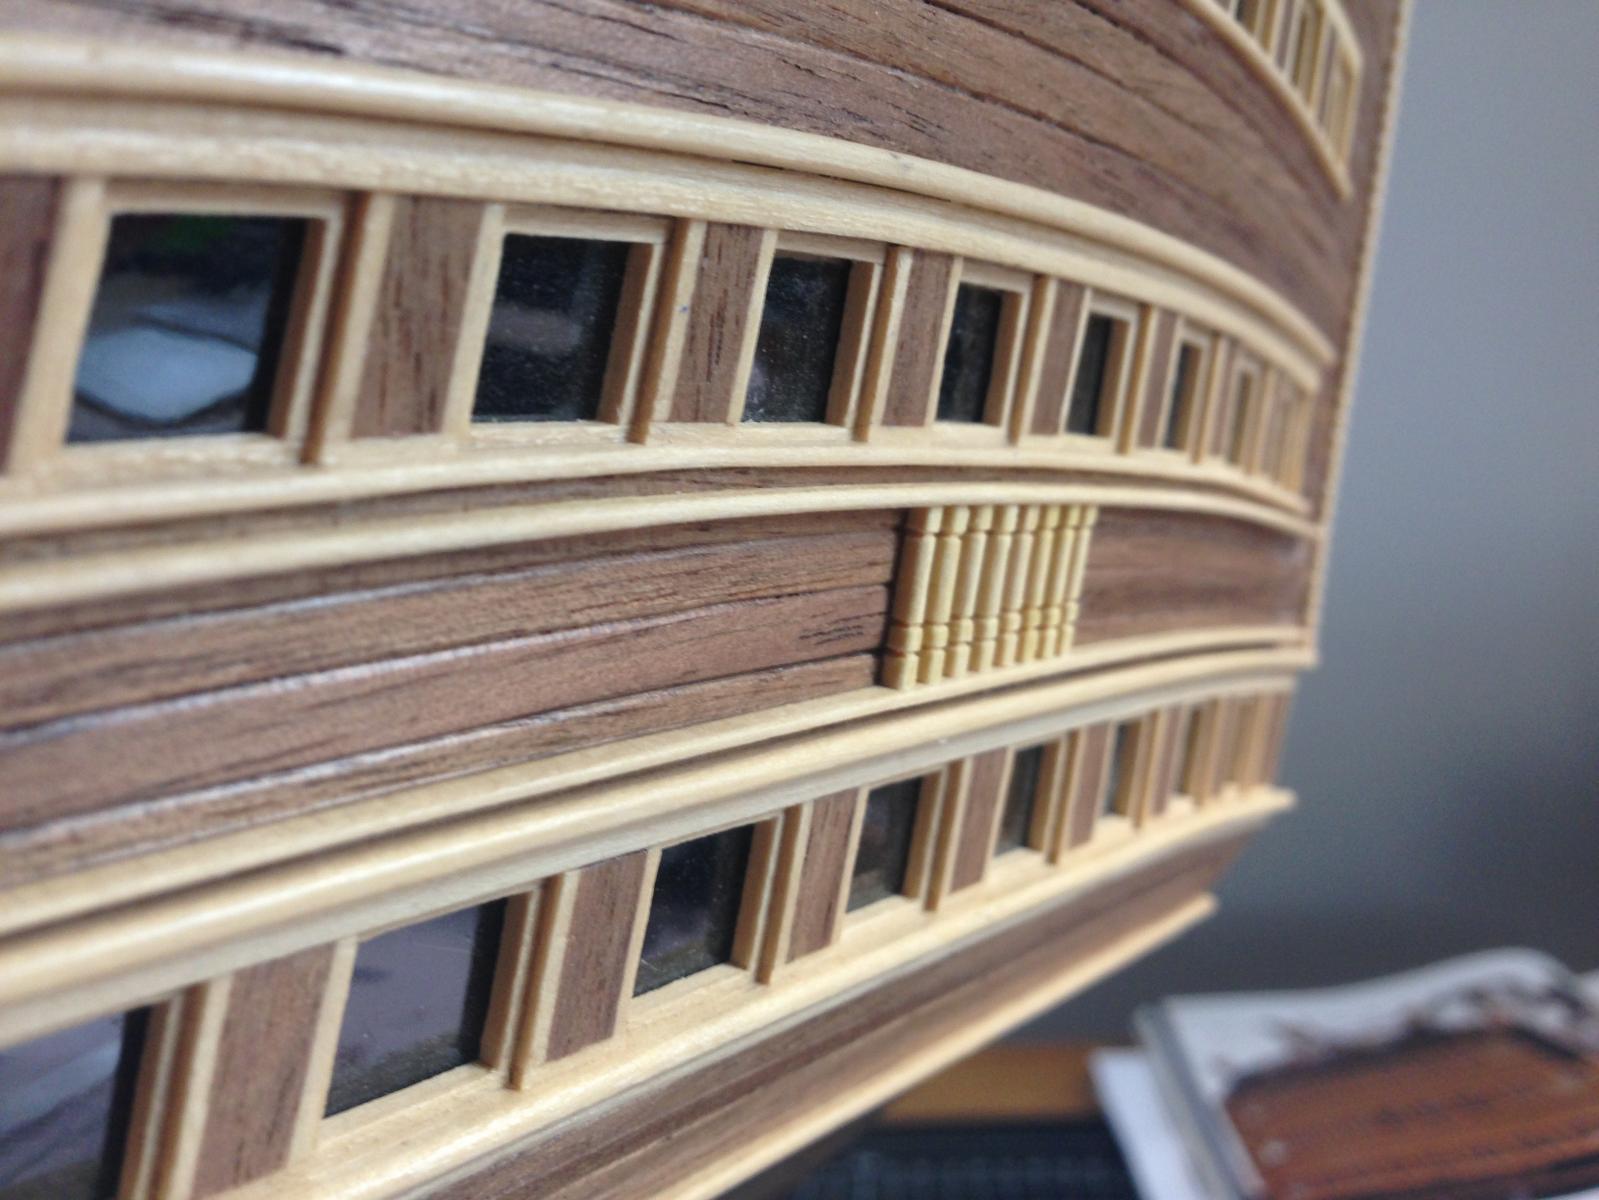
Good morning, friends!
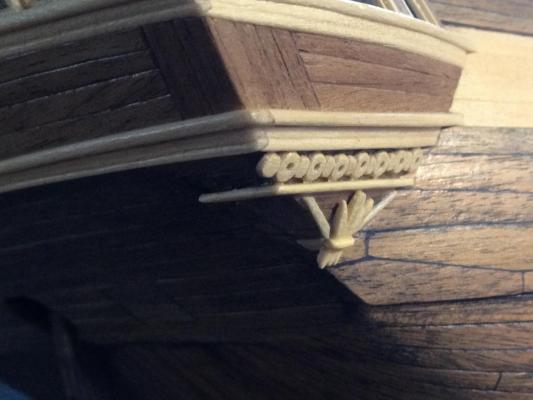
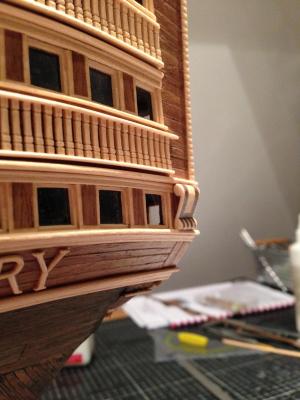
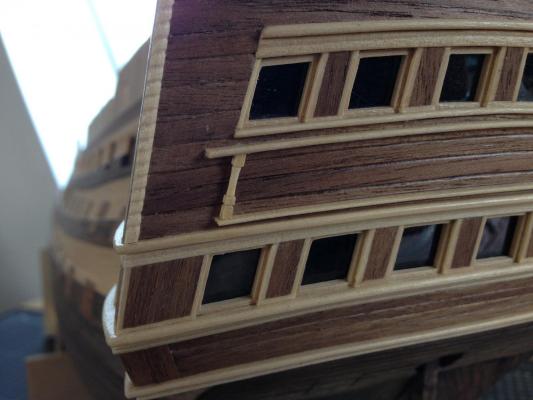
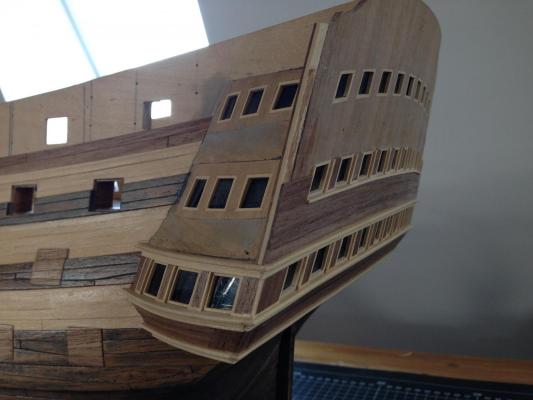
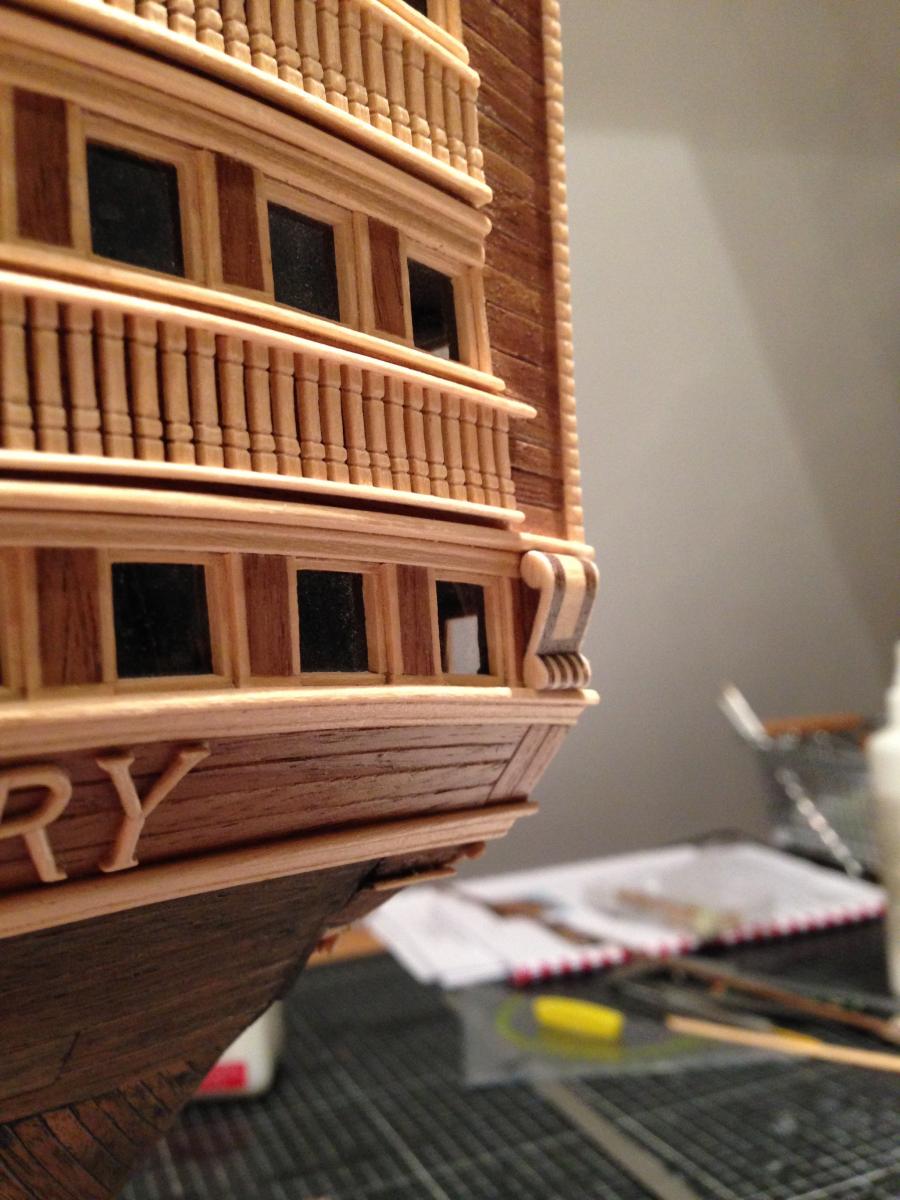
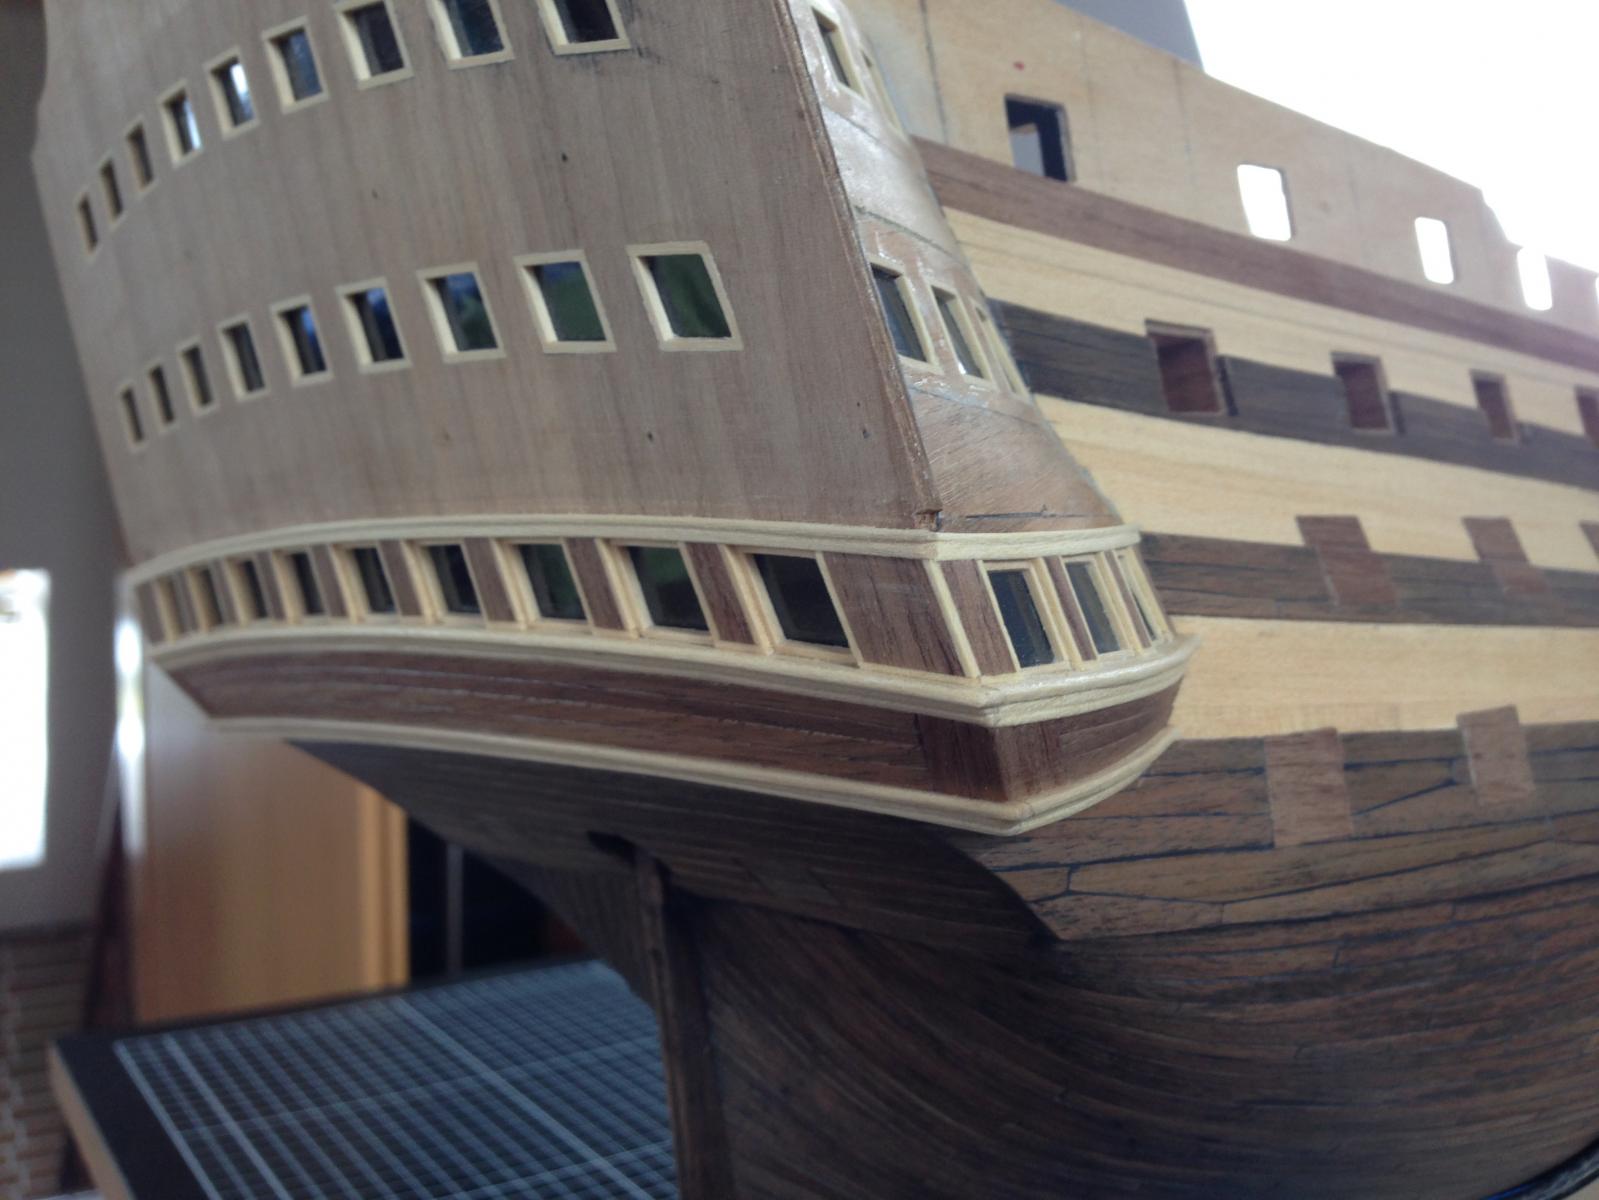
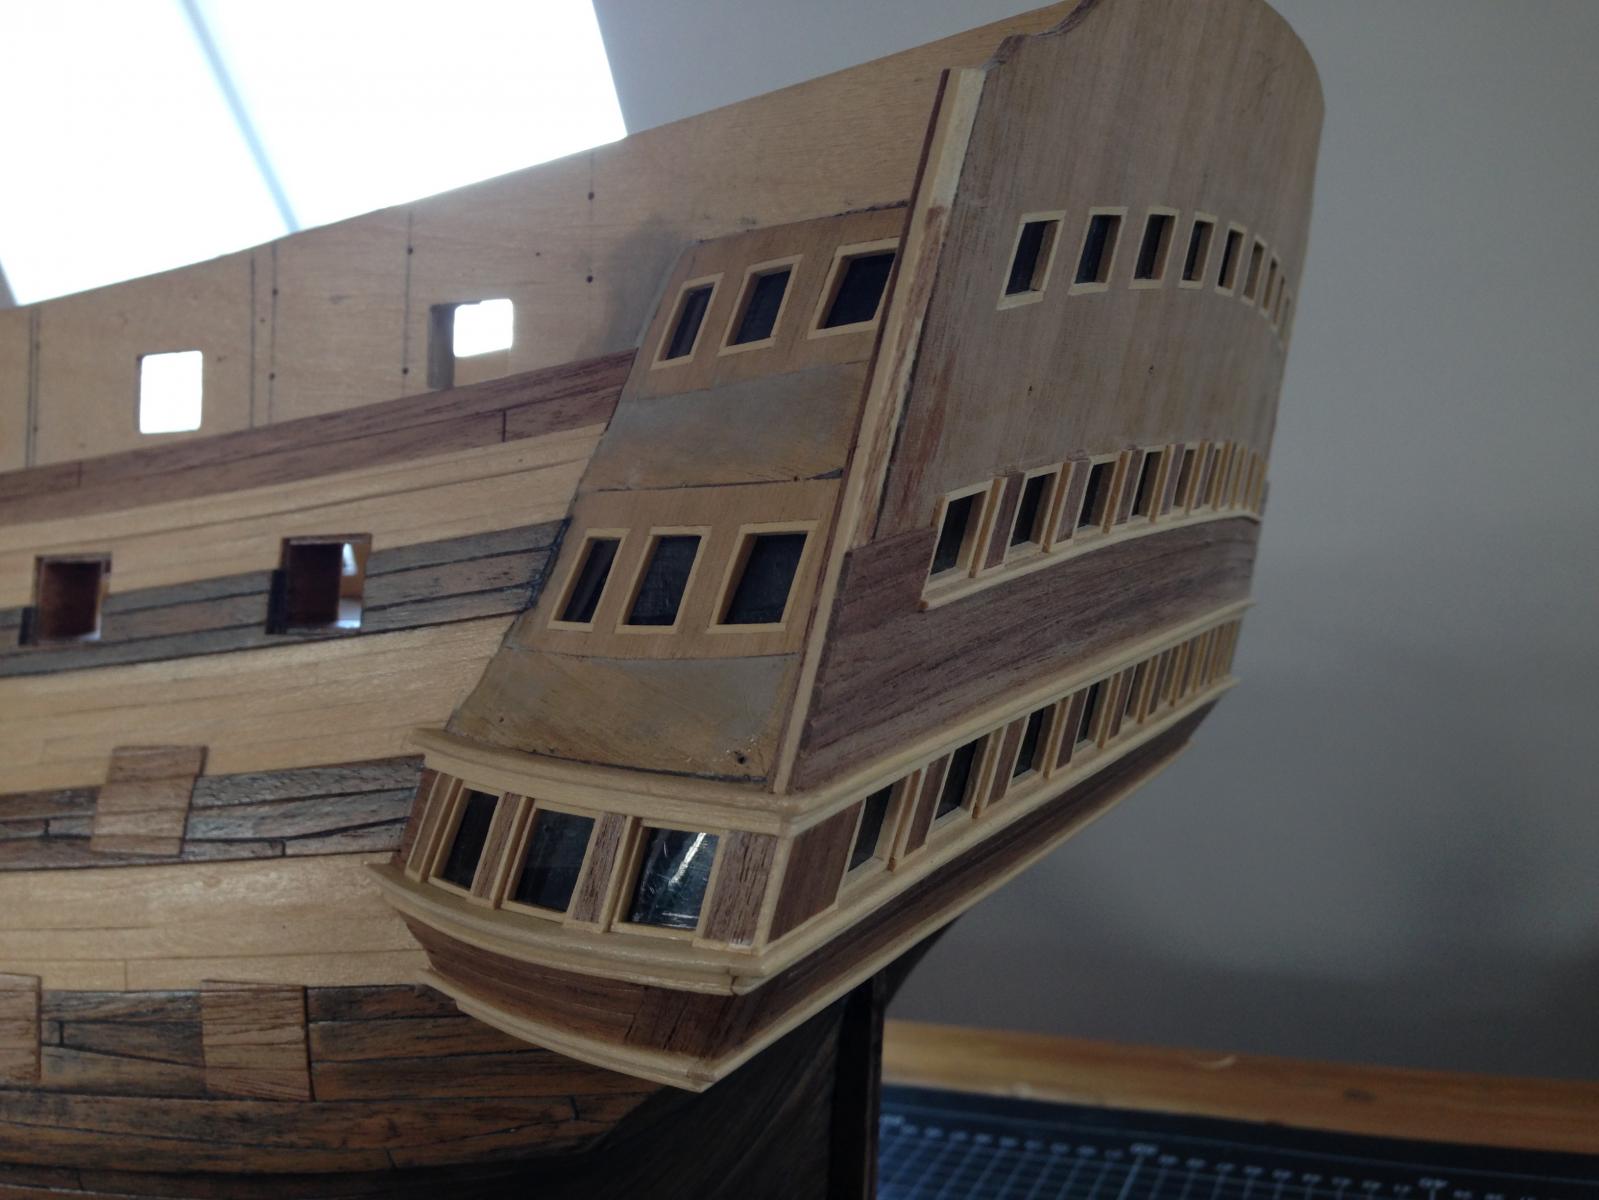
I used the last days to start with the decoration that looks like a balustrade. I did not know how to create them. The only thing I was sure about was the fact that I don´t want to use the ugly sheet metal things from the kit. I decided to start and look what will happen...
The first things I created were the 2 strips that should build a frame for the balustrade. That wasn´t so easy as I thought it would be. I couldn´t work with pinboard tacks to fix them, cause I don´t wanted to damage the ground. So I had to curve them as good as possible and and hold the strips on place until the glue hold it. The problem was that at the same time I had to hold 6 or 7 little wooden pieces on place which I used as spacer. Why do we only have 2 hands???
Then I started with the pillars (is this the right word for it?) between the two strips. I build several of them in a different way to decide what will look the best for me. I put one of them on the left side and one on the right side. I thought this was a good idea because I can put them in a perfect line with the windows below and above. I started to calculate how many pillars I need and the width of the spaces between them. I realized that I will get a problem. How should I place the pillars with a space of exactly 2,03 mm for example? And can I be sure that every pillar is equally thick?
The second problem was as I realized I will not be able to build all the pillars looking the same. For that I would need a lathe. No chance with my tools. So I made them in a different and easier way and start in the middle of the stern working towards both sides.
And this is what you can see on my last 2 pictures. And I have to say: I like the result :-) And I hope you will like it too!!!
Greetings
- Heinz -


-
Thank you so much, David!
Yeah, it´s much fun to see her growing. In a few days I have my holidays. 3 weeks of nonstop building :-). Let´s see what happens in this time...
- Heinz -
-
Hello friends,
please look at my newest update.
I wish you a wonderful sunday evening!!!
Greetings
- heinz -


- Kevin, GuntherMT, Shipyard sid and 5 others
-
8
-
another update with the newest pictures ...
It´s so much work... and so much fun :-)


- seamymcnally, shihawk, Robert29 and 7 others
-
10
-
Thank you Jerry,
it´s nice to get so much positive feedback from experienced builders like you are. This really means much to me!
Of course you are welcome to watching my progress. And I am happy about every tipp you can give me. As I already told in former posts, I´ve never been at this point before. I´ve tried two models but never finished the hull. That means from now on I walk on unknown territory :-)
Some books, some pictures and your logs are my most important tools!!!
Greetings
- Heinz -
-
Hi Gil, I'd like to give you a very big compliment for your Victory. Even though I may build it in a different way, namely without color, I am excited about your log and the way you work. How accurate you work - especially in the small details of the ship. WOW! Not least your photos have convinced me to take the step and to build a Victory on my own.
I would be very happy, if you take a look at my Victory and give me a few tips. Many Thanks and respect!!!- Heinz -


HMS Victory by Heinz746 - Caldercraft
in - Kit build logs for subjects built from 1751 - 1800
Posted
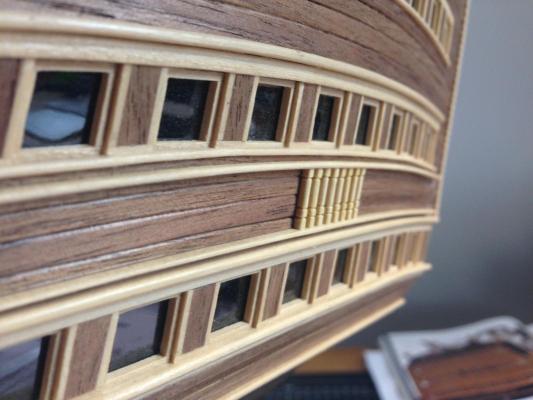
another little update...
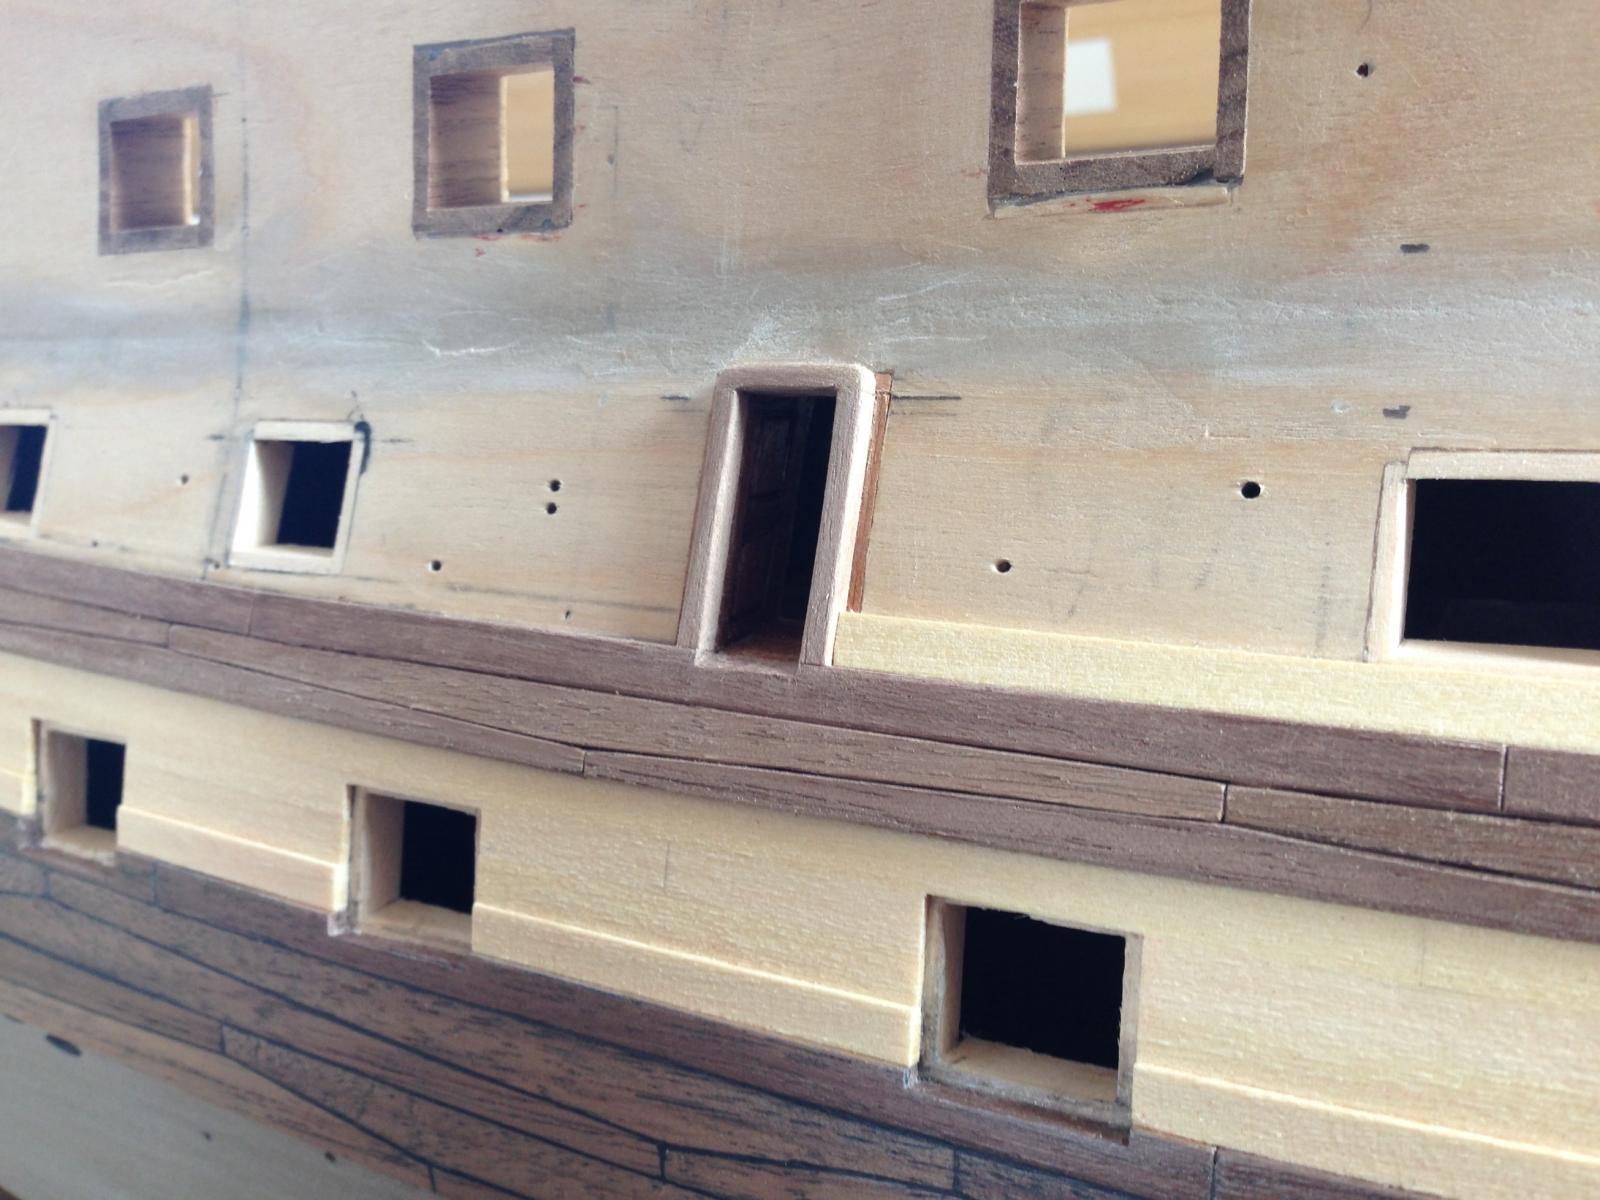
I finished the first window...oh my God... these parts are sooooo small....
@Dimitris: thank you for your compliment :-)))
- Heinz -