hollowneck
-
Posts
1,591 -
Joined
-
Last visited
Content Type
Profiles
Forums
Gallery
Events
Everything posted by hollowneck
-
 You're off to a great start, Brian, swimming in the deep end now...however, there are many life preservers nearby, so enjoy!😊 Seriously, this is a superb kit that will reward you every step of the way.
 -
…a reaction to DejaVu… many here will recall what happened a decade ago. My post was an after-the-fact, tounge-in-cheek.
-
Excellent work, Grant. Nice touches. I've just come across your thread and your work is very impressive. I've attached a photo of the SierraWest Diorama that was built a few years ago by a colleague in my ship modeling club. I thought you might like to see how he finished-off his "module" which he added to his larger model train layout.
- 333 replies
-
- 12
-

-

-
Or "Elon" or "Jeff"....
-
This is an excellent read, like all of Willis' books.
- 57 replies
-
- 3
-
-
- Trial
- Vanguard Models
- (and 1 more)
-
Thank you for a nice set of photos from the N.M.M. @Gregory. These pics of legacy models are always very informative.
- 57 replies
-
- 3
-
-
- Trial
- Vanguard Models
- (and 1 more)
-
Keep your mind and heart in good shape, Chuck - please pay closer attention to your body. Good advice from the Admiral.
-
@Blue Ensign, you have nothing to fear but fear itself...
- 648 replies
-
- 4
-
-
- Indefatigable
- Vanguard Models
- (and 1 more)
-
Very dapper, fashion-forward! Can't wait to see her with her copper bottom and chrome fenders.
- 80 replies
-
- 6
-
-
- Grecian
- Vanguard Models
- (and 3 more)
-
I spot a couple boxwood octagonal sticks! Good job on jigging-up the square stock, Brian. When the Proxxon arrives, keep the ShopVac nearby as you'll be generating lots of fine sawdust. Don't forget that the Proxxon chuck has a through hole that can accommodate up to about 10 mm diameter material; this becomes especially important when maintaining the central octagon and turning (sanding)the symmetrical round tapering for the spar ends. Nice cabinet; I'll bet you can keep all kinds of things in those drawers...😬
-
J.D., just be glad Johann doesn't grow hemp for making his rope...
-
I look forward to seeing lovely boxwood planking next! Very nice 1st planking job on this formidable task.
- 587 replies
-
- 2
-

-
-
- Indefatigable
- Vanguard Models
- (and 1 more)
-
Plastic or Wood models? Your Favorite?
hollowneck replied to Bill97's topic in Modeling tools and Workshop Equipment
A ModelExpo kit would be an excellent place to start. Just as important as the selection of a "beginner kit" is this forum. If you run into difficulties or have questions, you'll get supportive - and in most circumstances - immediate feedback and help. I've modeled both plastic and wooden ship kits and I've found pleasure in modeling both. You'll soon discover that wood models do require more skills as well as a few more bench hand tools you'll need. Good Luck! - and welcome to our community... -
Previous post translation: Дякую Olha, за ваші журнали та пости!! "Thank you Olha for your magazines and posts."
-
Very nice. I love my Proxxon DB250. I use it for nearly all my masting & spar work. I'll see if I can build this from your plans with odds n' sods in my shop (I'll need to buy the ball bearings!). Many thanks for the detailed instruction files. Like myself and others here, you must have an engineering background: good photos, quite clearly explained. Great CAD plans!
-
My thoughtful and generous wife bought me a Dremel tool many years ago for a holiday gift. It took up valuable space on my bench for awhile until I found a use for it grinding off some rust on an old cast iron outdoor lighting fixture; I keep it around for the odd grinding job (in a heavy tool drawer) but haven’t used it for modeling.
- 648 replies
-
- 2
-
-
- Indefatigable
- Vanguard Models
- (and 1 more)
-
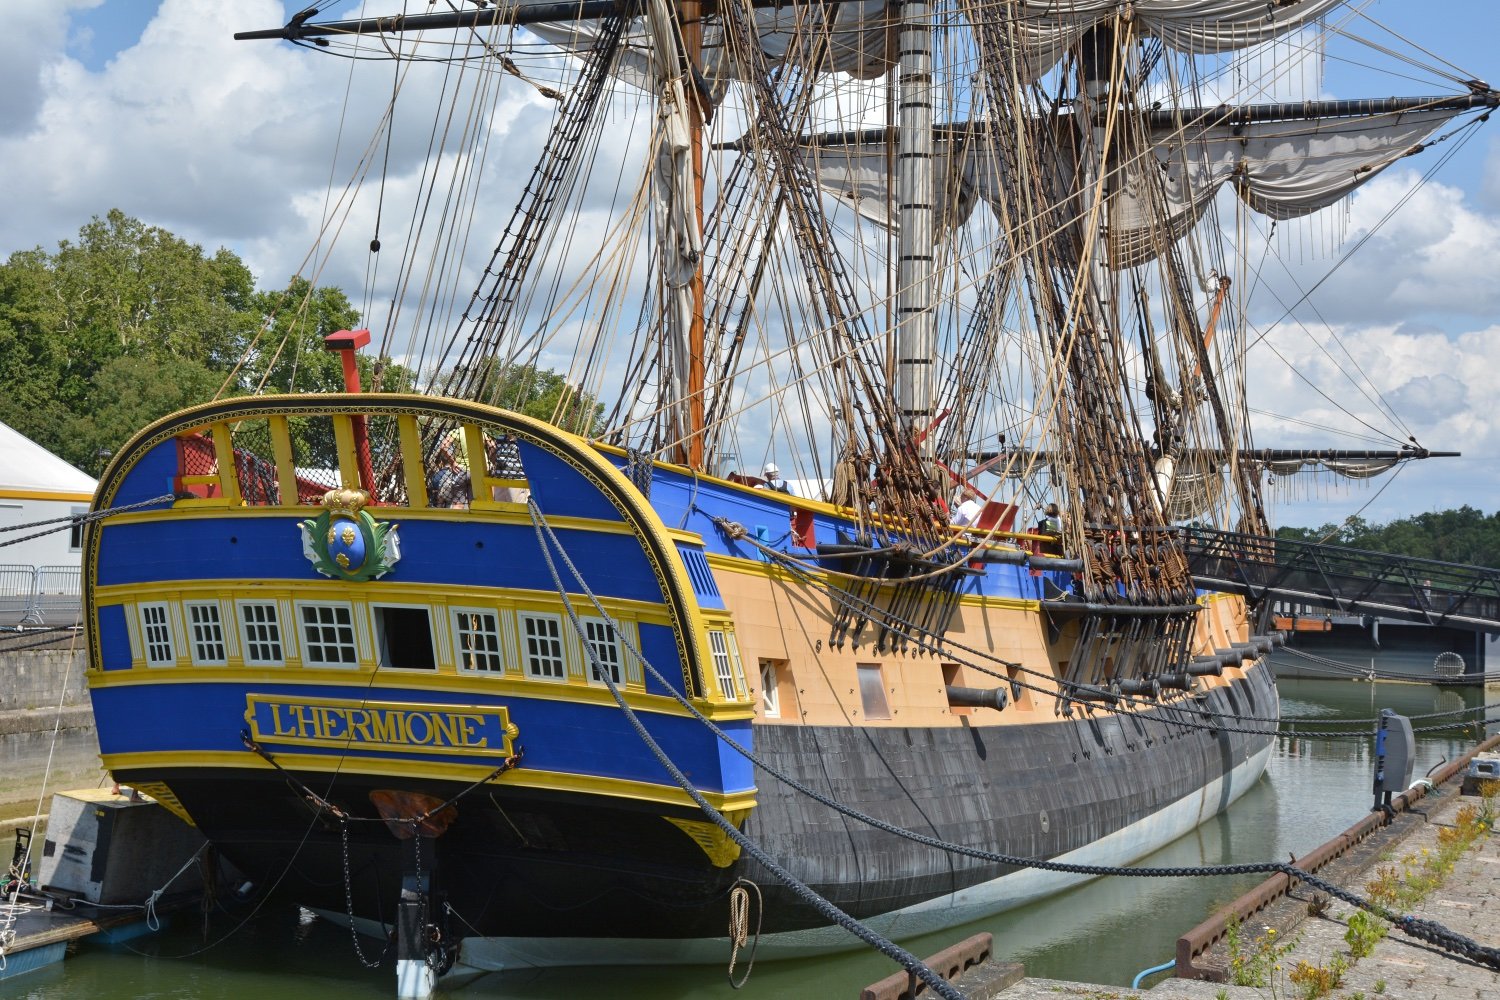
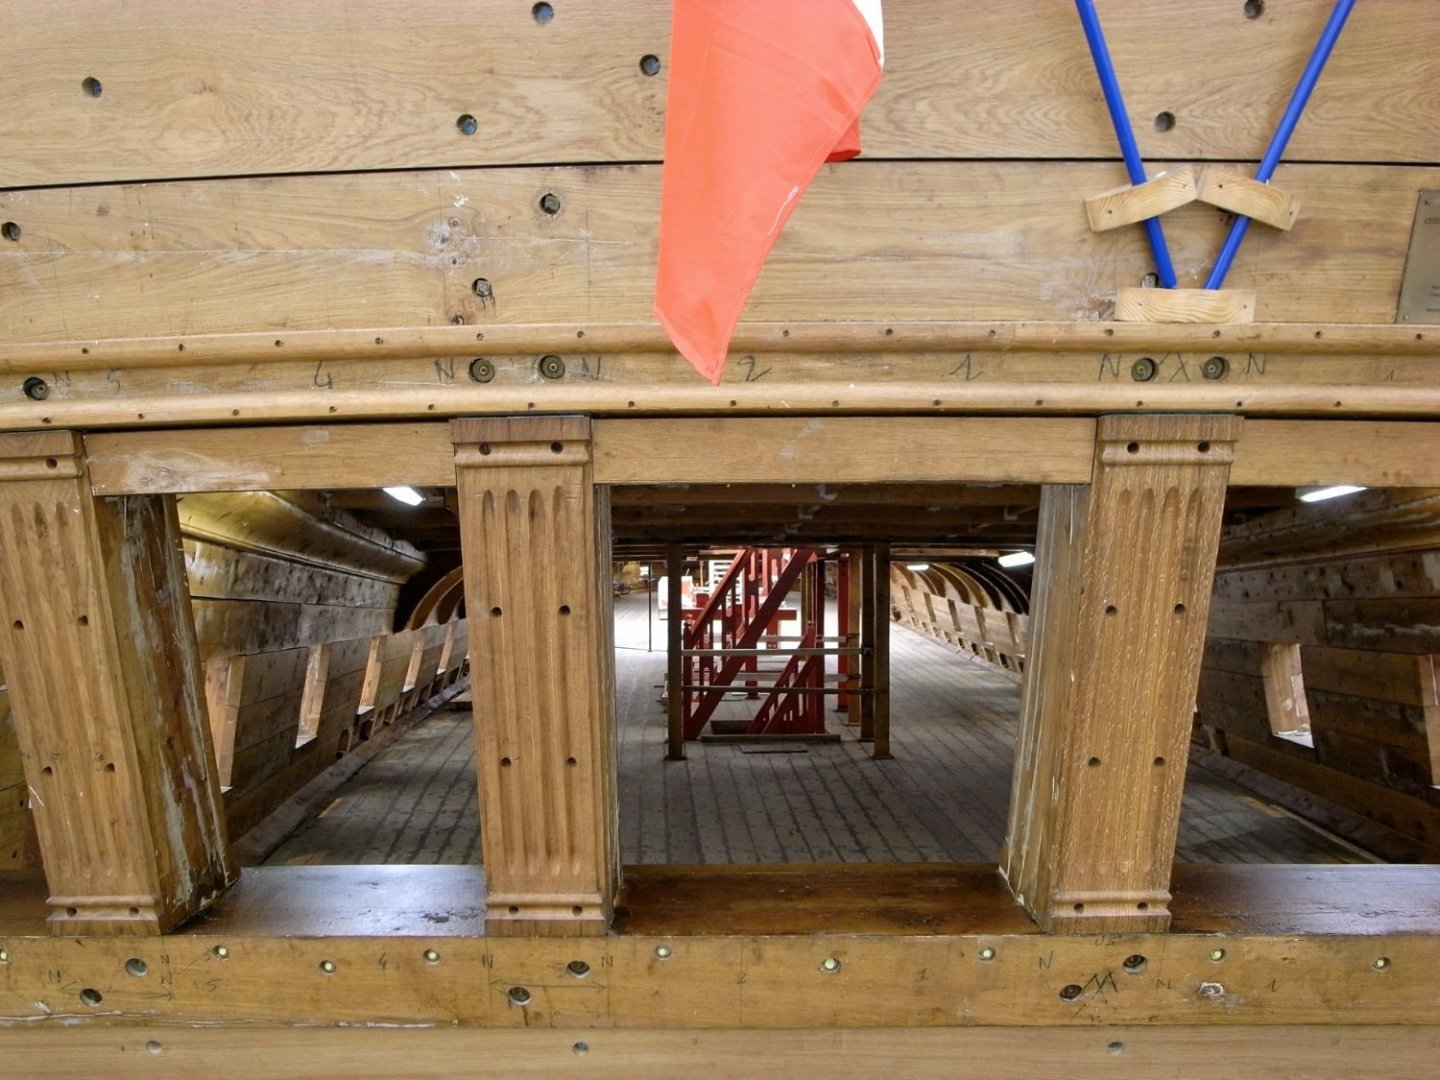
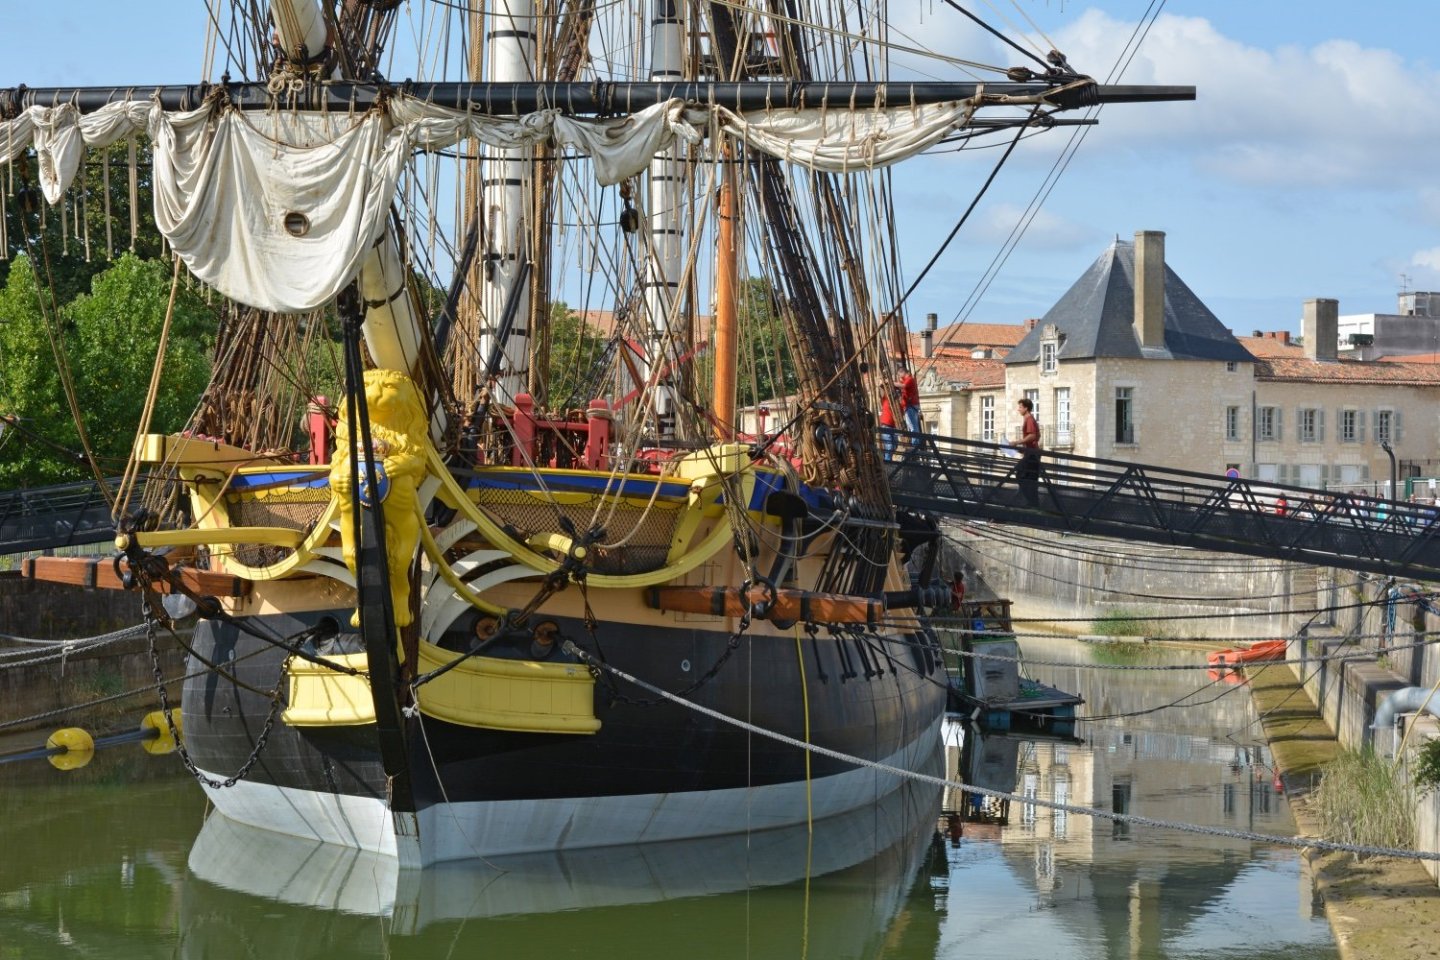
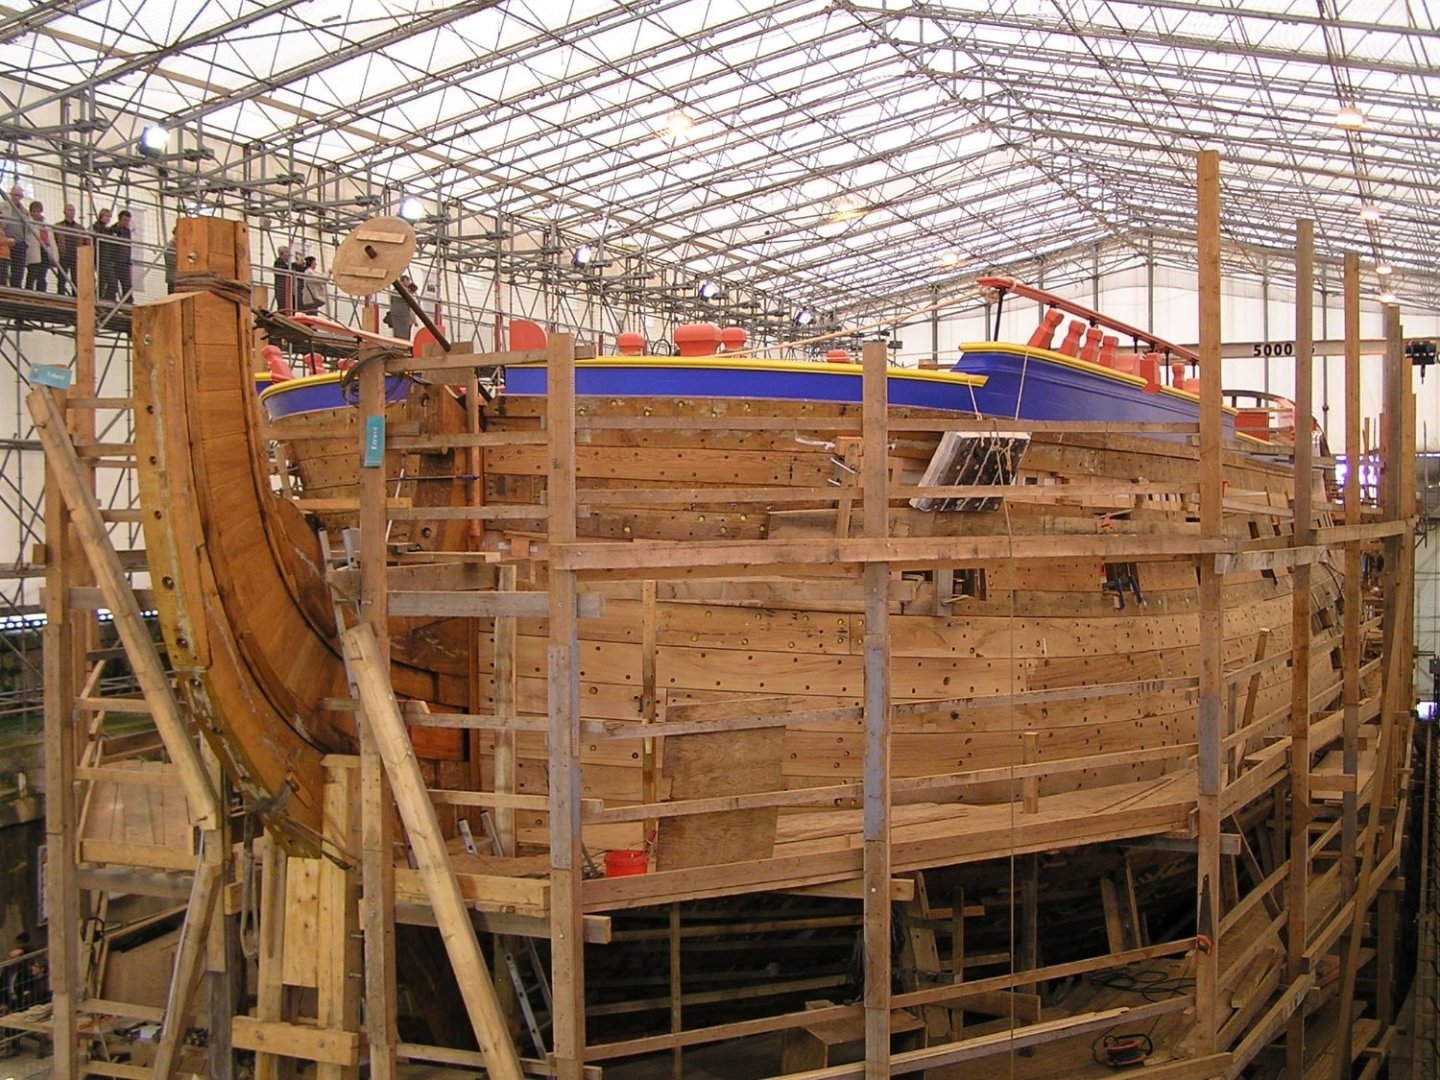
Here is another set of visual references to consider. These photos are of the 2014 recreation of the French frigate Hermione, available on the the ship's website: https://en.wikipedia.org/wiki/French_frigate_Hermione_(2014) With the first two photos, the holes for fastening the hull planking are quite evident at this stage of the ship's construction. The second of these two photos shows some of the holes filled with what are presumably lag bolts (some with washers). I'm surmising that these very visible holes were finally "capped" with wooden plugs and as such, the execution is a thoroughly modern invention/solution; in the earlier Age of Sail, these fastening holes would be filled with treenails (and plugs) made from wood - regardless of the ship's country of origin (as mentioned earlier in this thread). The second set of photos of the completed ship show nearly the entire vessel painted and thus, no immediately visible indications of how any of the superstructure was held together. I have not been on deck of this ship so I don't know how the deck fastening was handled; presumably, it was done with "treenailing" but not necessarily with the same methods employed in the 17th century. Indicating this level of detail with one's model is a matter of choice first, and second - if even depicted - should be reasonably scale-accurate. I've seen some models of the era where the hulls appear to have the "measles"- clearly an unnecessary visual distraction (too much of a contrast in wood coloration); the same holds for deck planking. At smaller scales for most ship modelers (@ 1/72 or smaller), I would not recommend trying to simulate these details, whether hull or deck. Attempting to create realistic fidelity can result in wholly unnecessary distraction. In 1:48 and larger scales, it's a whole different ballgame. My personal preference (at 1:64 scale) is to subtly indicate both these fastening conventions on the hull and deck when and where bare wood is exposed (sans paint).

-
You're in trouble @dunnock. Ten years ago my Diana case (in acrylic) was close to $1,200.
- 206 replies
-
- 3
-
-
-

-
- Vanguard Models
- Brixham trawler
- (and 2 more)
-
A nice case, whether acrylic - and especially glass - will cost more than one's model kit in most cases (pun intended).
-
Very nice interpretation. I’ve posted other compliments and comments in your gallery. This kit is nicely designed and offers lots of opportunities to make it one’s own as you have shown so well. Congrats!
- 16 replies
-
- 1
-
-
- Higaki Kaisen
- Woody Joe
- (and 1 more)
-
I'm loving this model's development. The unique design of the schooner itself, the history. It incorporates many of Chris' most recent engineering innovations in a smaller "package" that'll comfortably fit into a unique presentation. I'm thinking the Grecian can possibly be set into my next diorama depicting a cutting-out action in the Chesapeake (now within a stone's throw to my new home near the same). I'm also thinking a completed model and diorama might be appropriately called: "Asleep At The Helm."
- 80 replies
-
- 8
-
-

-
- Grecian
- Vanguard Models
- (and 3 more)
-
I'm pleased you keep Wallace in your shop for inspiration. That new build board is brilliant, very inventive! But I still like that you doubled-down on another (bargain) Amati keel clamper. And I must add....mmmmmm (lip-smacking sounds)...Wensleydale with cranberries on cream crackers. Nearly as good as scones with clotted cream at teatime .

- 648 replies
-
- 1
-
-
- Indefatigable
- Vanguard Models
- (and 1 more)
-
Oh My! I was wrong and spoke too soon: There's Wallace! May I suggest you consider asking him if he'll volunteer to be your Indy's figurehead? I like your simple solution on the deck fitting; I recall my HMS Ardent (Chris' Agamemnon - a 64) build presented a similar issue: glue drying before both halves were properly in-place. I remember using long paintbrushes with diluted PVA to reach into the nooks n' crannies to ensure the deck was adhering across the (minimal) beams.
- 648 replies
-
- 2
-
-
-
- Indefatigable
- Vanguard Models
- (and 1 more)