hollowneck
-
Posts
1,589 -
Joined
-
Last visited
Content Type
Profiles
Forums
Gallery
Events
Everything posted by hollowneck
-
 "...which is the toasted cheese and plum duff is catching a cold, Sir!"
 -
As the saying goes: "Better to ask for forgiveness, than permission." Love this illustration. Posted on Amati's new website....
-
The waterway looks great and should be represented with this detailed model: I also add them and pierce for the scuppers. I have a suggestion on the color problem: try doing a "white balance" with your camera. Your camera's software should allow this adjustment. You'll basically have your camera's sensor look at a "white" (or Gray) card and you'll make subsequent adjustments to correct for the tone it shows you. You can also Google this term. A number of options will explain what can be done to correct your camera's output. Pentax also should have directions available.
- 332 replies
-
- 1
-

-
- Harpy
- Vanguard Models
- (and 1 more)
-
Impressive recovery work CWO Highlanderburial. I can't wait to see your restoration in person at the next Philadelphia Ship Model Society's monthly meeting! Nice - ah - nice... Ron
- 32 replies
-
- 2
-

-
- St Louis
- 3D Printing
- (and 2 more)
-
Nice exposition on your copper patina trials; close - but no cigar (yet). I agree that the coppering on your Harpy looks just fine as it stands. Mother Nature will do the rest. Your chemistry trials reminded me of my own that I also abandoned. This photo taken after approximately two years after placed on her pedestals. These are the questionable "domed" copper plates from Caldercraft, circa 2012/13.
- 332 replies
-
- 5
-

-
-
- Harpy
- Vanguard Models
- (and 1 more)
-
Good call. The batten definitely helps the aesthetics. A 1.0 mm strip is all it takes. I did the same with my old school Caldercraft 64 that has the golf ball sized bumps on her otherwise accurately-sized copper plates.
- 332 replies
-
- 1
-
-
- Harpy
- Vanguard Models
- (and 1 more)
-
Kit review 1:25 Drakkar ‘Oseberg’ V3 - Ships of Pavel Nikitin
hollowneck replied to James H's topic in REVIEWS: Model kits
Good Karma, either way.- 14 replies
-
- 1
-
-
- Pavel Nikitin
- viking
- (and 2 more)
-
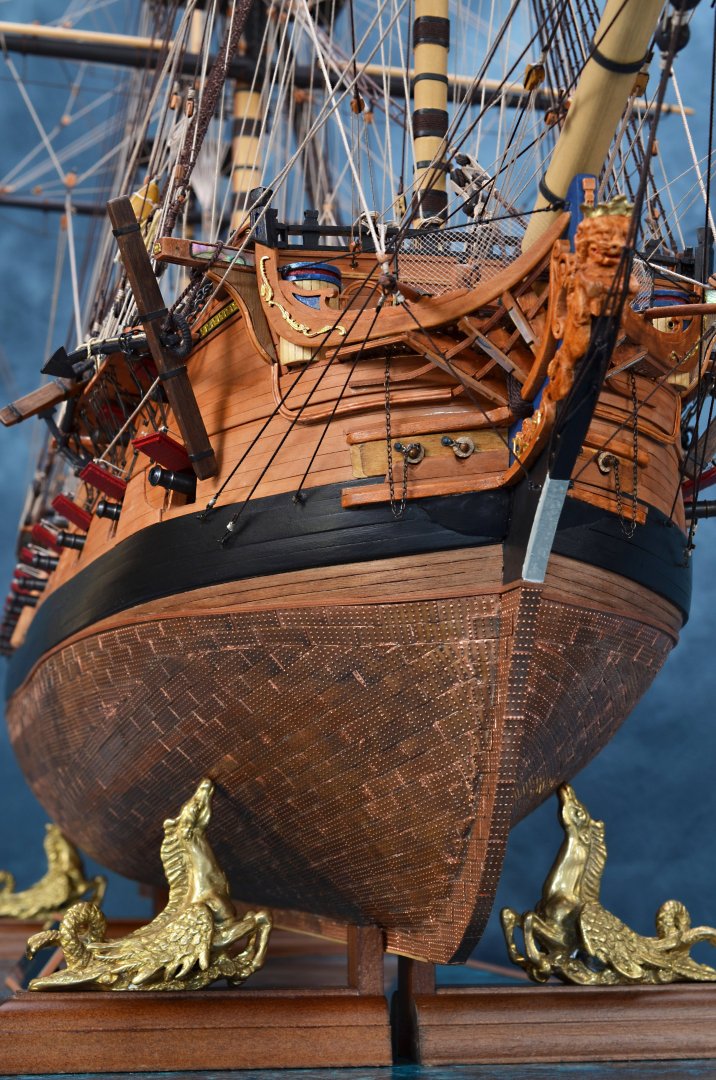
Here is my old penny HMS Ardent's coppering after 11 years. When completed she too was an eye-watering, bright sea scoured pink. Perseverance + Patience = Patina
- 332 replies
-
- 11
-
-
- Harpy
- Vanguard Models
- (and 1 more)
-
For picking-up and attaching small items like copper plates, I found that this dentists staple works really well. It features a waxy rounded tip that is extremely long-lived. I haven't encountered anything small (in our small scales) it can't reliably pick up. It works especially well to assist in applying thin laser cut or P/E decorative elements. One source: Amazon (where else!) - Pulpdent Pic n Stic

- 332 replies
-
- 4
-
-
-
- Harpy
- Vanguard Models
- (and 1 more)
-
"Resistance Is Futile." The Borg, Star Trek Maurice, have you started on that room addition to your home yet?
- 332 replies
-
- 1
-

-
- Harpy
- Vanguard Models
- (and 1 more)
-
I really like your solution for the stern's finishing pieces, well-done! Exposed end grain on planking is a shipwright's "no-no!"
- 332 replies
-
- 1
-
-
- Harpy
- Vanguard Models
- (and 1 more)
-
Chris, you may want to consider adding gunport linings; I've done this on a number of my models. 1.0 -1.5 mm thick pear will do the trick; it can appear to be scale-conforming and not reduce the size of the openings too much (the stock can be sourced from some of the "empty" laser cut patterns in your kit). This is a lot of very precise cutting and fitting work, but in my estimation it is well worth the effort. The photo here is of my Mercury brig (Russia- circa 1820) that illustrates my point. In this instance I used boxwood for the linings to match the upper hull works (the lining edges remain visible in spite of the red lining treatment). The bulwarks planking is also boxwood, a substitute for this Amati kit's too dark wood. Of course, you can leave the linings unpainted which I have typically done with later models I've bashed.
-
@etsinko 's Build log for MK's "Polotsk" is a reference I used for my (incomplete) build. Near the conclusion of his build, he mentioned to me the following: ...there were a few custom parts involved: 1. I used aftermarket lasercut grating 2. I made my own ropes 3. I used aftermarket wooden belaying pins instead of brass one that came with the kit Personally, I lament the inability to purchase scale-accurate belaying pins from Russia. The available brass ones that are close in scale work but one must paint or chemically treat them.
-
Your work on this very nice kit is excellent, Chris. It is truly unfortunate that we can no longer acquire this kit (or any others from this Russian manufacturer). I purchased a Master Korabel kit pre-Ukraine/Insane invasion; it was a superb kit that was developing into a very nice model when I suspended work on it (schooner Polotsk kit, 1788). The 1:72-scale innovative kit design came with high-quality materials throughout (laser cut pear and excellent P/E) as well as a decent visual, non-English manual. I wonder if the company has survived the madness? IMHO, Russian and Ukrainian ship modelers are some of the finest in the world. I'll be very interested to see your work on the rigging. Sails?
-
Bit of a problem! HMS Speedy, Vanguard Models
hollowneck replied to JohnEvans's topic in Masting, rigging and sails
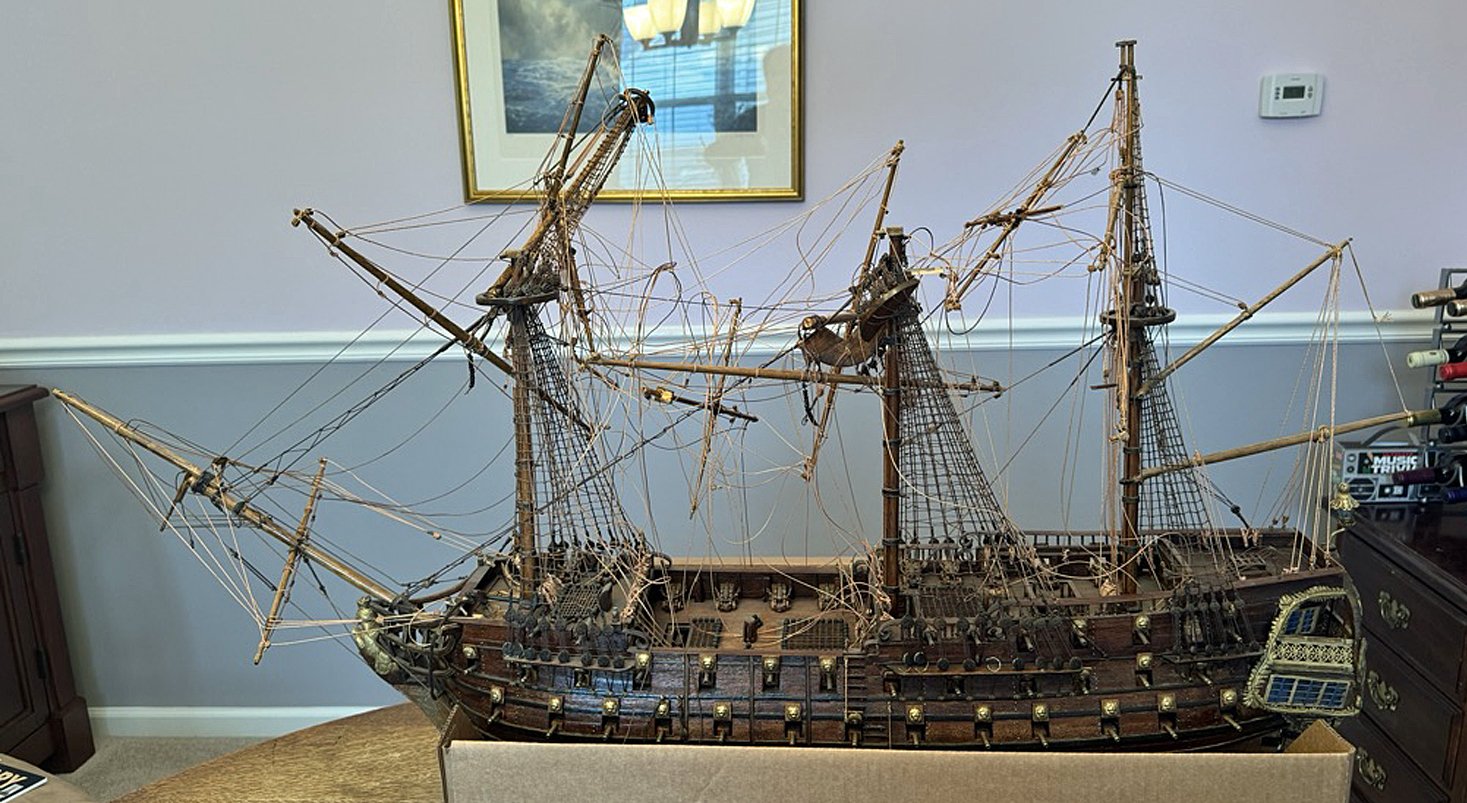
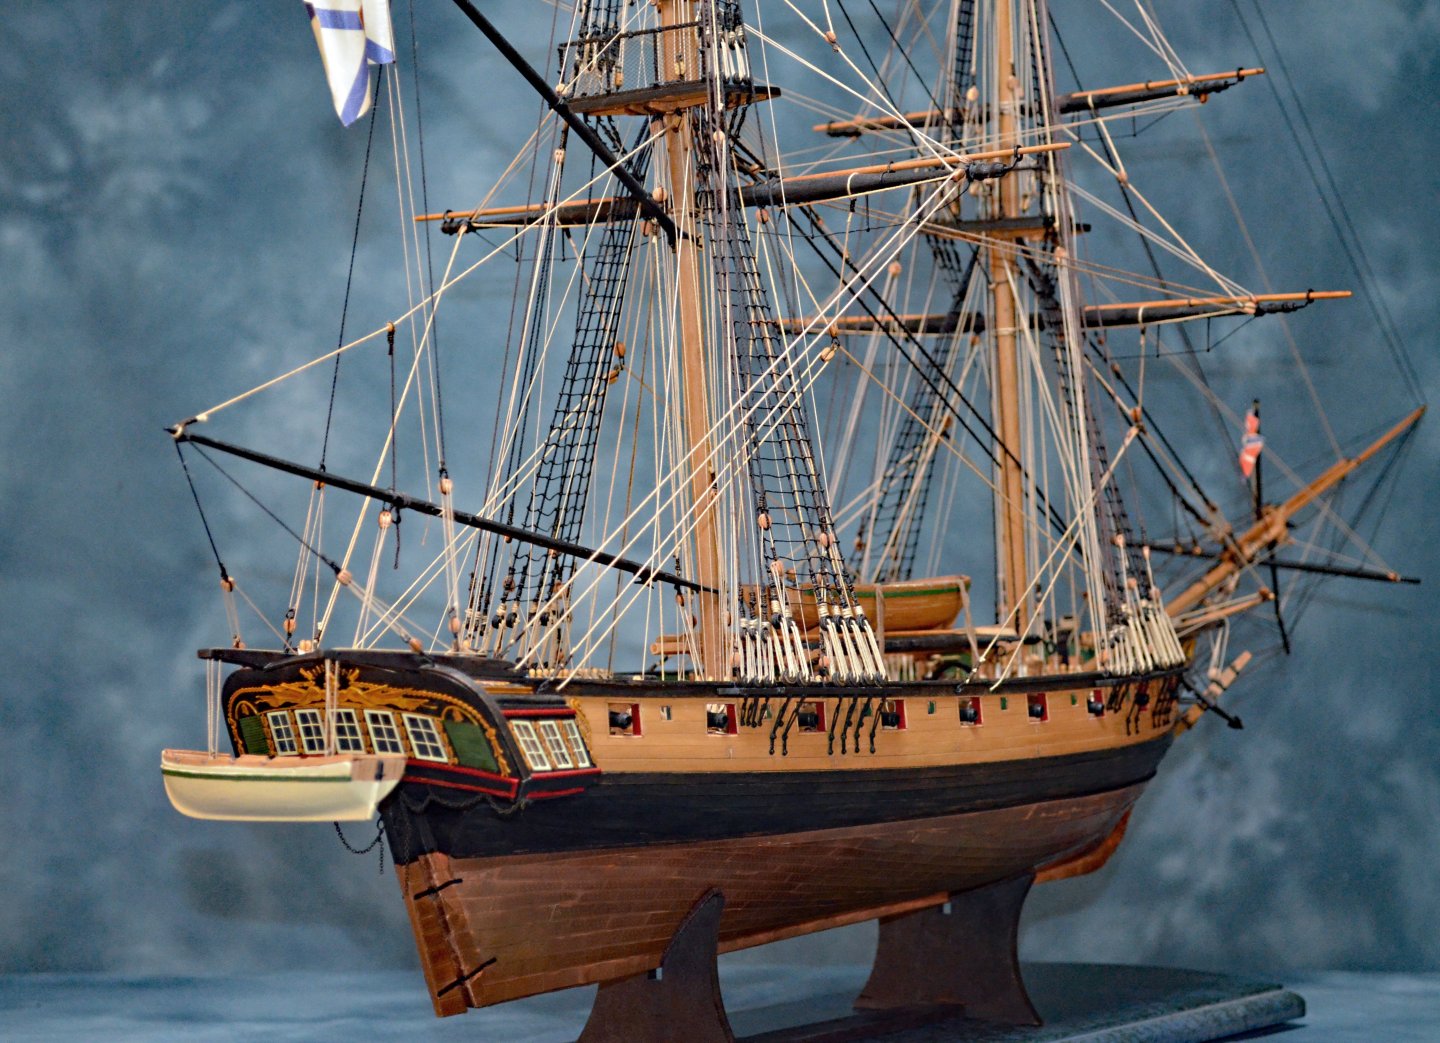
No. The model was rigged entirely with a single diameter of 3 stranded cotton thread that is no longer available. The original builder paid a lot of attention to reeving the stays properly, however he applied what seems to be a variable coating of shellac to most rigging lines (standing as well as running) including where lines terminate: cleats, belaying points, but more problematical, where lines reeve through blocks! Once fully-rigged, the builder apparently wanted to insure the rigging wouldn't go anywhere nor absorb moisture (? a guess). The builder loved doing rigging (one of the better aspects of this particular "old school" kit model) and I believe he wanted it to survive for centuries! Unfortunately, the rigging's shellacing didn't prevent the family cat's other plans... Looking closely at the model's crushed mainmast top, the shrouds and stays are nicely reeved. The same light colored rigging line used for running lines was darkened somehow for the standing rigging.... and then, coated with shellac where it terminated (to keep it in-place is another guess). I'll close this out now, since I'm getting (WAY!) off-topic from @JohnEvans original query.
-
Bit of a problem! HMS Speedy, Vanguard Models
hollowneck replied to JohnEvans's topic in Masting, rigging and sails
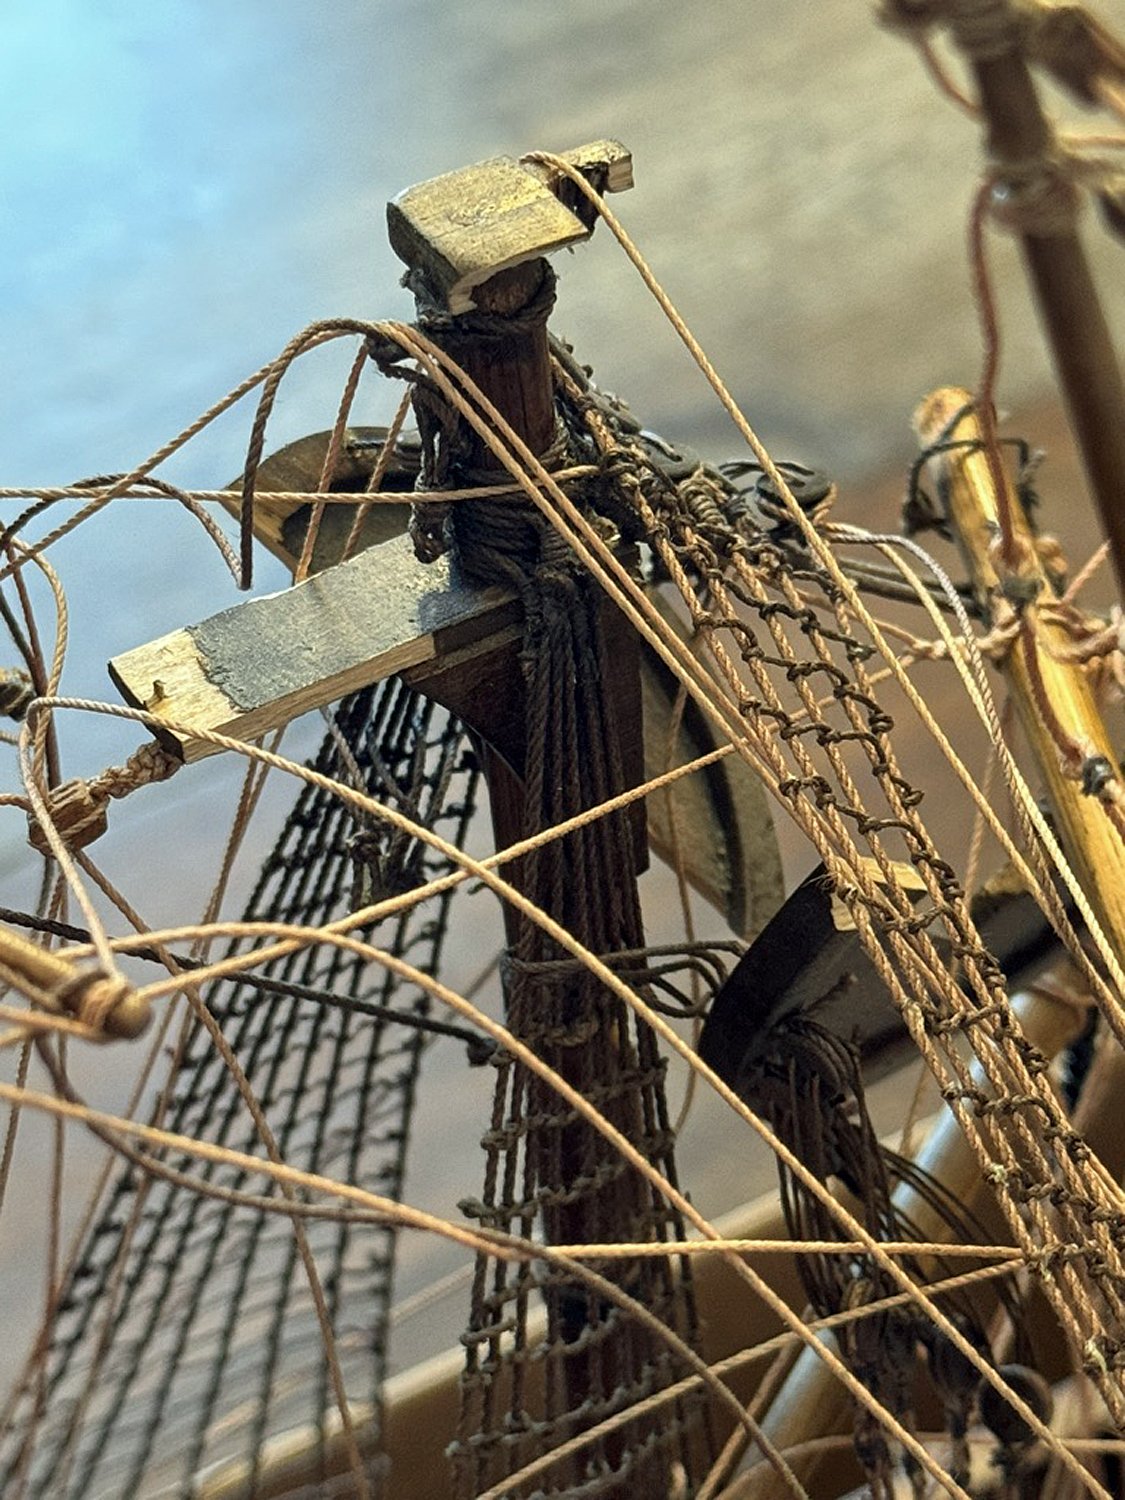
The topgallants are going to be the most challenging to repair. I'm planning on employing an internal "splint" (thin brass wire with a daub of clear Gorilla glue) to connect the thin, broken dowel surfaces to one another. Re-tensioning the existing backstays, shrouds and braces will help stabilize these delicate dowel pieces. One of the principal issues on a restoration commission is to return the model to its original configuration as best one can. This restriction means I can't use certain materials like modern rope for rigging repairs. -
Bit of a problem! HMS Speedy, Vanguard Models
hollowneck replied to JohnEvans's topic in Masting, rigging and sails
One mast. One spar. One rigging line at a time. I'm Keeping Calm. Carrying On. I've added an overhead "gantry" to my workshop's ceiling to suspend the model's rigging mess while I repair the broken masts and spars. Three clamps on the glued maintop that is in four broken pieces. Intense lighting also helps.
-
Bit of a problem! HMS Speedy, Vanguard Models
hollowneck replied to JohnEvans's topic in Masting, rigging and sails
When I picked the model up from my client I saw no evidence of any household pets. Plausible deniability!
-
Bit of a problem! HMS Speedy, Vanguard Models
hollowneck replied to JohnEvans's topic in Masting, rigging and sails
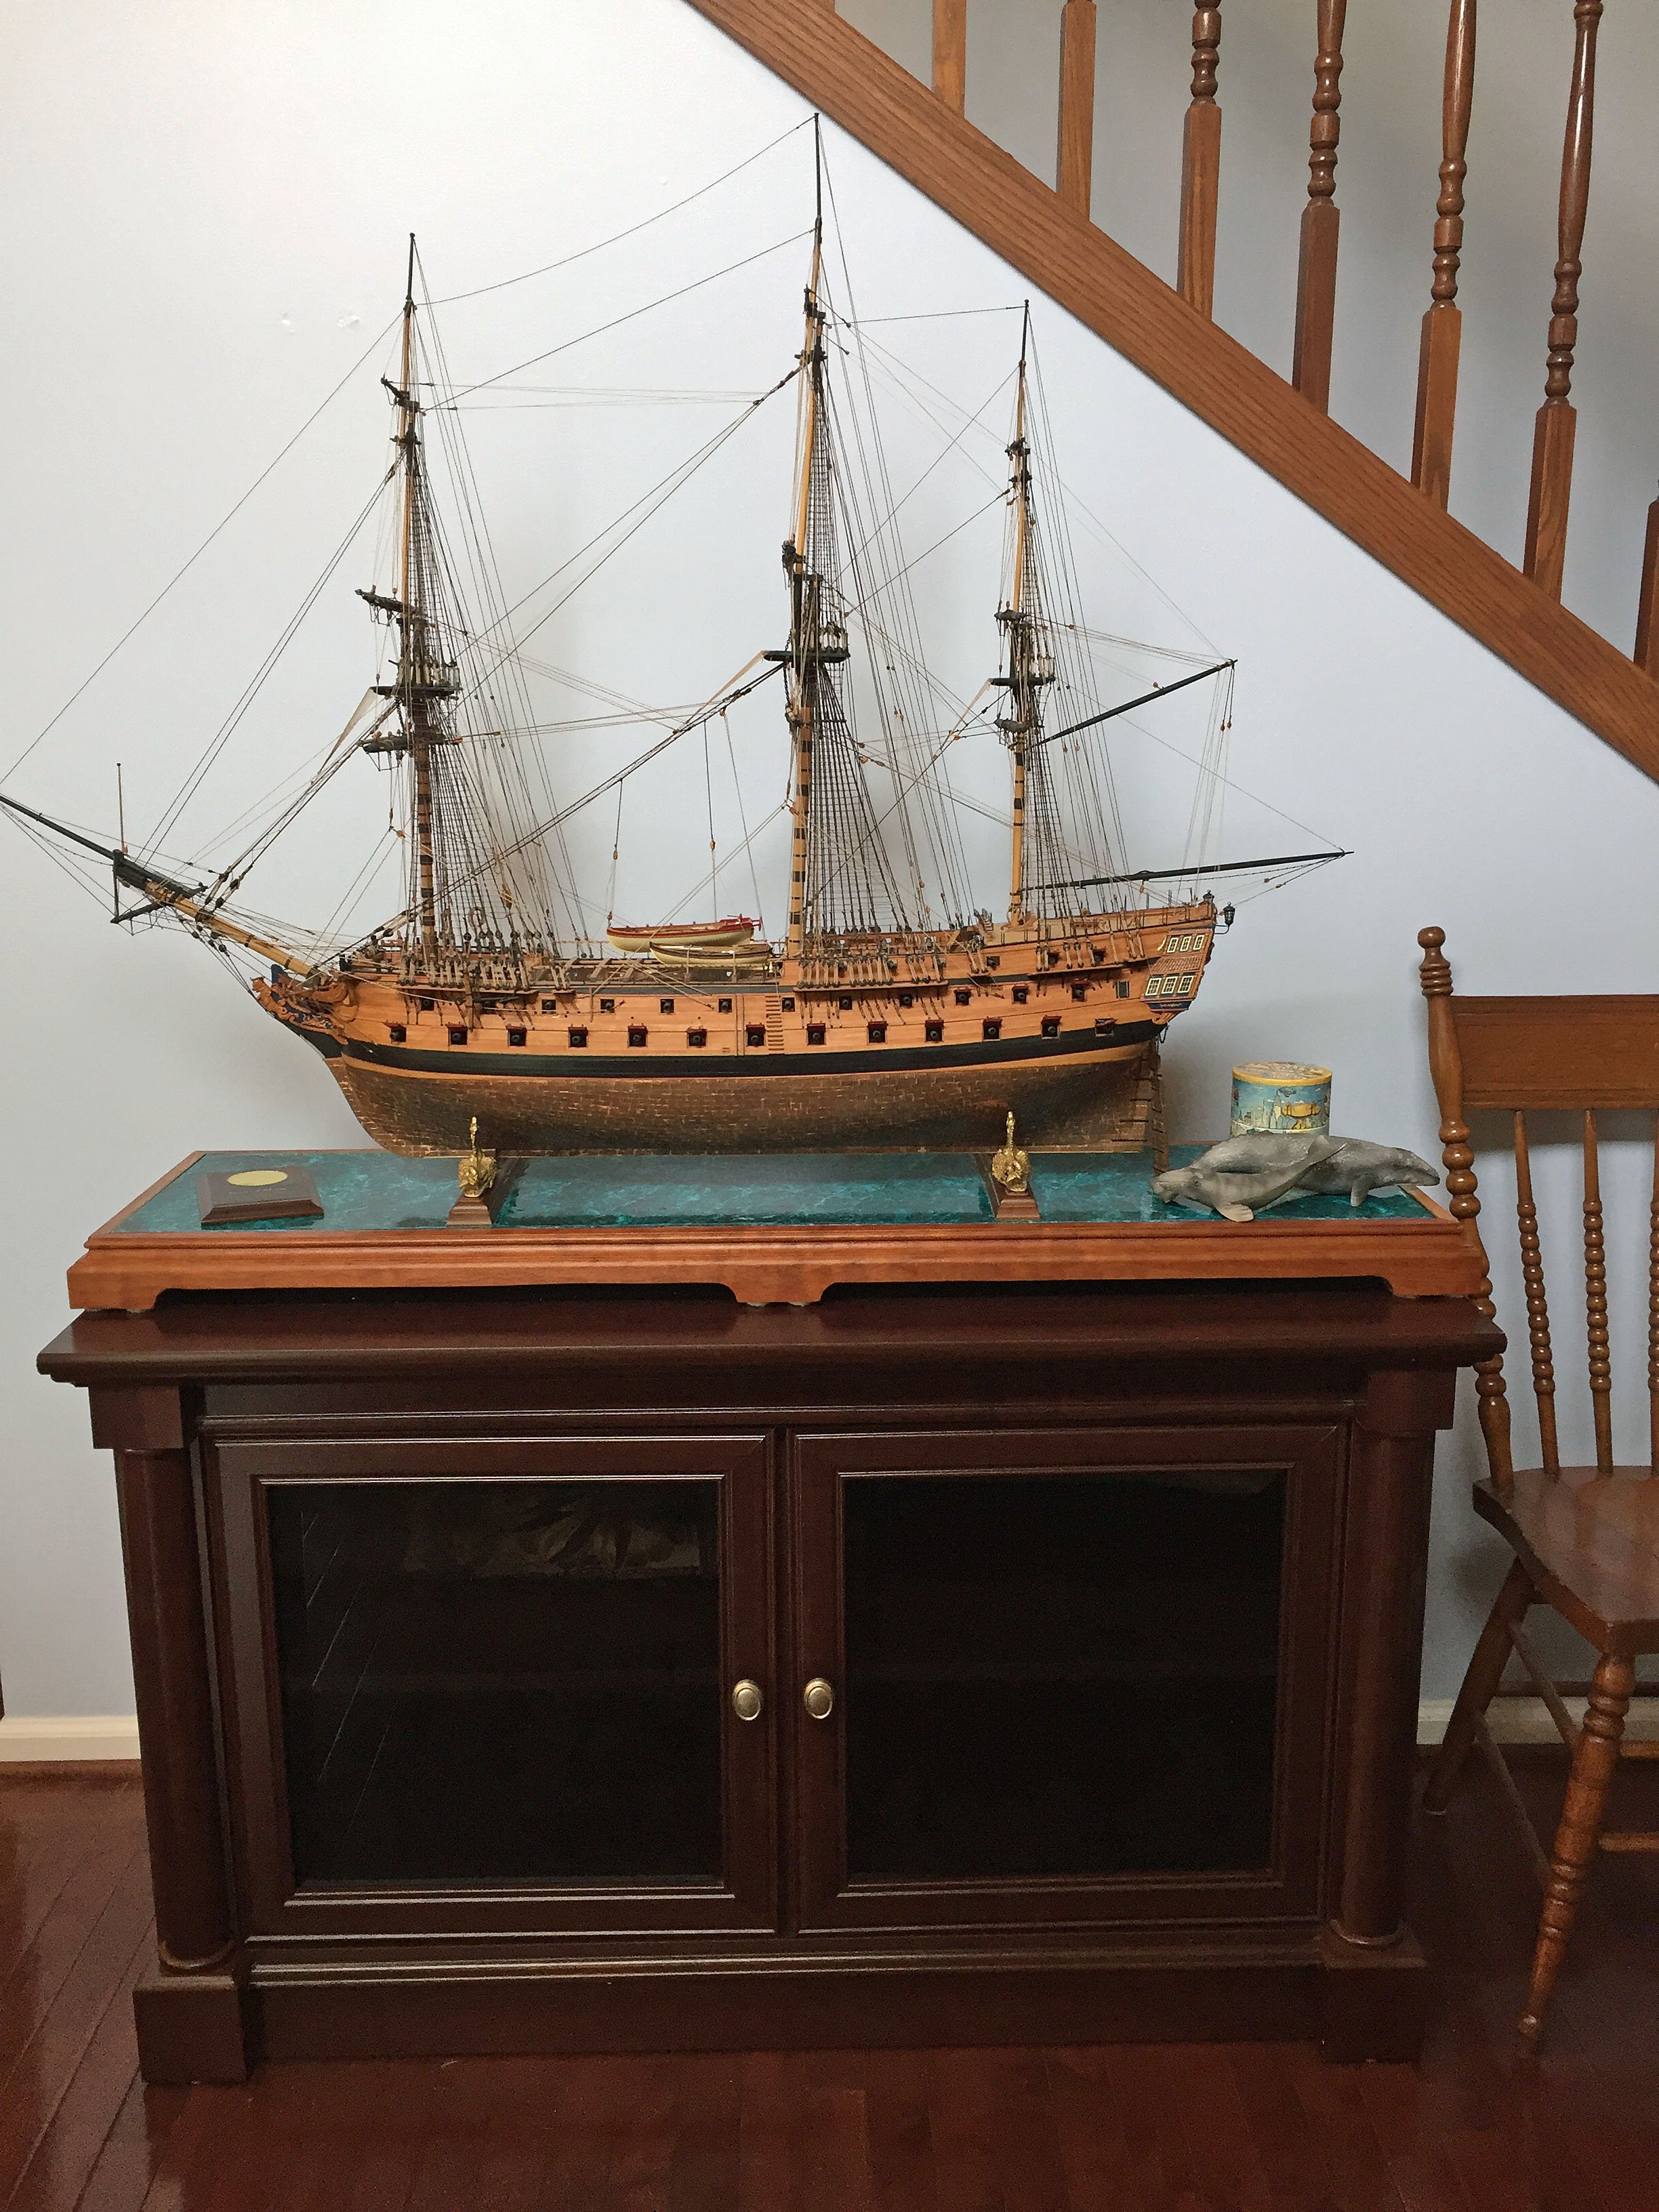
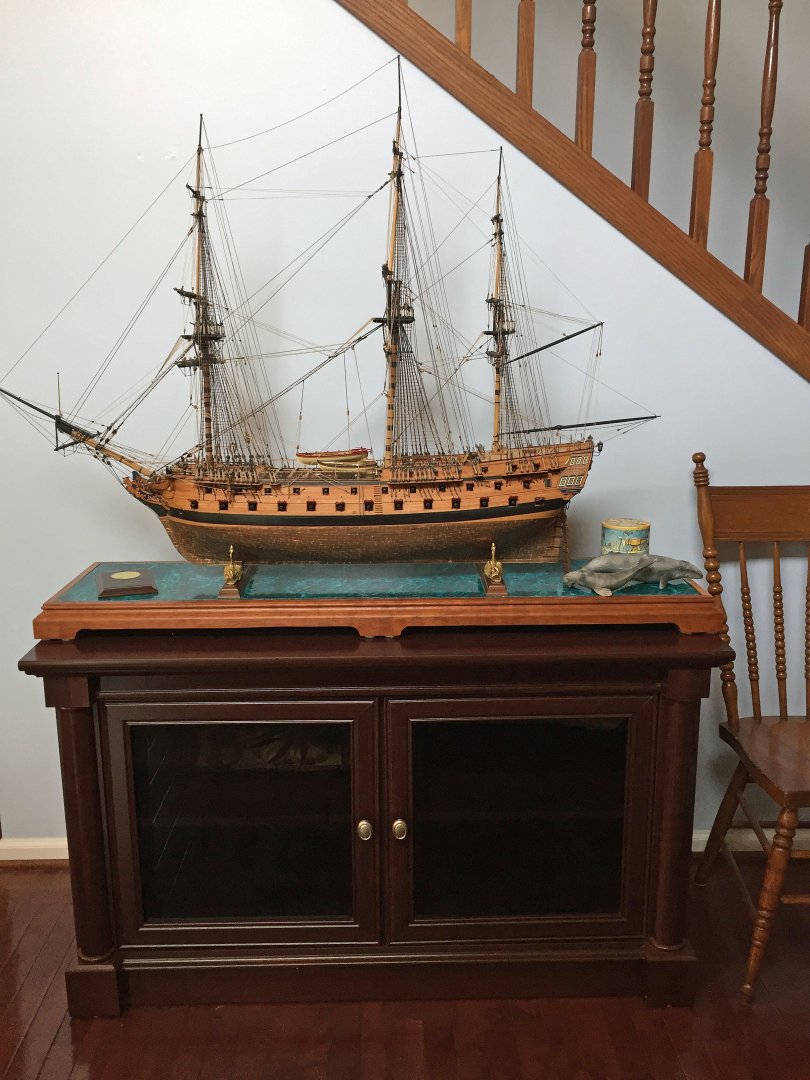
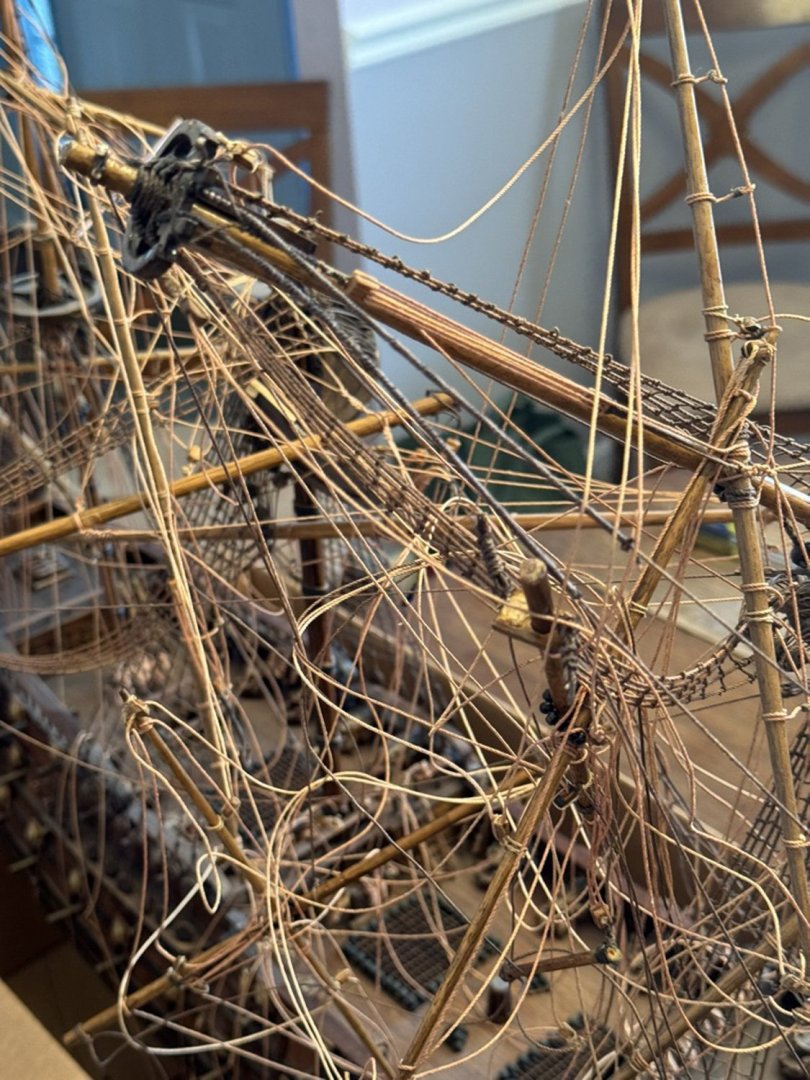
Good decision, John. Sometimes a do-over is the best option. Console yourself with the thought that you haven't added the standing rigging. Attached is a photo of my current commission to restore a vintage model with several broken masts and spars that need dramatic repairs (prior to sorting-out the rigging mess); a family cat jumped on my client's glass case, collapsing the top panel onto the ship. I show you my challenge to perk you up, accentuate the positive! It could be worse. Ron
- 26 replies
-
- 10
-
-

-
Very nice conveyance, indeed!.... your Shallop is fit for an Admiral (and a Post Captain).
-
I hate it when that happens...
-
I'm keeping my powder dry for a possible Build Log for Harpy this winter, so no log for gun brig Adder/"Cracker." I just noticed Chris posted the Harpy kit release for November with a base price of £425.
-
My sentiments too, Andrew. Great job. I see that your Trial is populated with Captain Hornblower, the two rope manning tars, a complete gun crew and two lobsters at the ready! Is the cook below deck? Nice job on the sails. I just ordered a set of similar figures from Vanguard for my version of Adder, keel just laid as "Cracker." Keep Calm. Carry On.