hollowneck
-
Posts
1,589 -
Joined
-
Last visited
Content Type
Profiles
Forums
Gallery
Events
Everything posted by hollowneck
-
 Aha! time traveller Bob must have a Sassanach and a Bairn waiting at home, whatever the century. Congratulations Maurice, you've done your typical amazing work with Harpy. Another aspirational, top-drawer Build Log.
- 332 replies
-
- 2
-

-

-
- Harpy
- Vanguard Models
- (and 1 more)
-
Pray tell, does Topman Bob have a twin brother I could convince to jump ship?
- 332 replies
-
- 2
-

-
- Harpy
- Vanguard Models
- (and 1 more)
-
Another planking tip, one I use: drill a tiny "starter" hole for the planking pins, this helps minimize the effort to seat the temporary pins. This is a lot more work but well worth the effort IMHO. You'll end up bending many fewer pins as well as fewer expletives! In some areas of the planking where the tension wants to push the plank from the bulkhead I also drive the pin(s) flush. This helps insure there is better contact while the glue dries. HOWEVER - I have a pin pulling plier tool that can grip the flush heads of the pins to extract them. The tip of this tool will make a slight indentation in the wood surface around the pin's head, but so what? This only works for the first planking where small impressions from this extraction process will be covered. The small marks around the holes will also be filled-in once the filling and sanding work commences.
- 20 replies
-
- 3
-
-
- Sherbourne
- Vanguard Models
- (and 1 more)
-
Thanks for the clarification, Chris. A nice touch to furnish both black and white decals for the carriages.
-
Jim, Nice post on the gun assembly details. I'm curious about the yellow color you've chosen for the carriages. How do we know that they were painted this color for the Surprise?
-
Looking excellent, Maurice. Indeed, the ecstasy of toiling with ratlines awaits you. Suggestion: you can avoid this task by simply threading and weaving more sweeps between the shrouds...you've got a good start on the port foremast!🤣
- 332 replies
-
- 5
-
-
-
- Harpy
- Vanguard Models
- (and 1 more)
-
David, Please don't forget to create an album for your personal gallery with an active link at your signature; your completed photos are well done, sir!
- 310 replies
-
- 1
-
-
- Diana
- Caldercraft
- (and 1 more)
-
Beautiful work. I've come to your Build Log quite late, but as one says: "Better late than...."
-
"Bollocks! That rigging bloke is as thick as two short planks!"
-
..like more 3D pear blocks.
-
Two bags worth just ordered (and some other 3D gubbins)...
-
Very nice detail work on your rigging, Maurice. Thank you for sharing these techniques.
- 332 replies
-
- 1
-
-
- Harpy
- Vanguard Models
- (and 1 more)
-
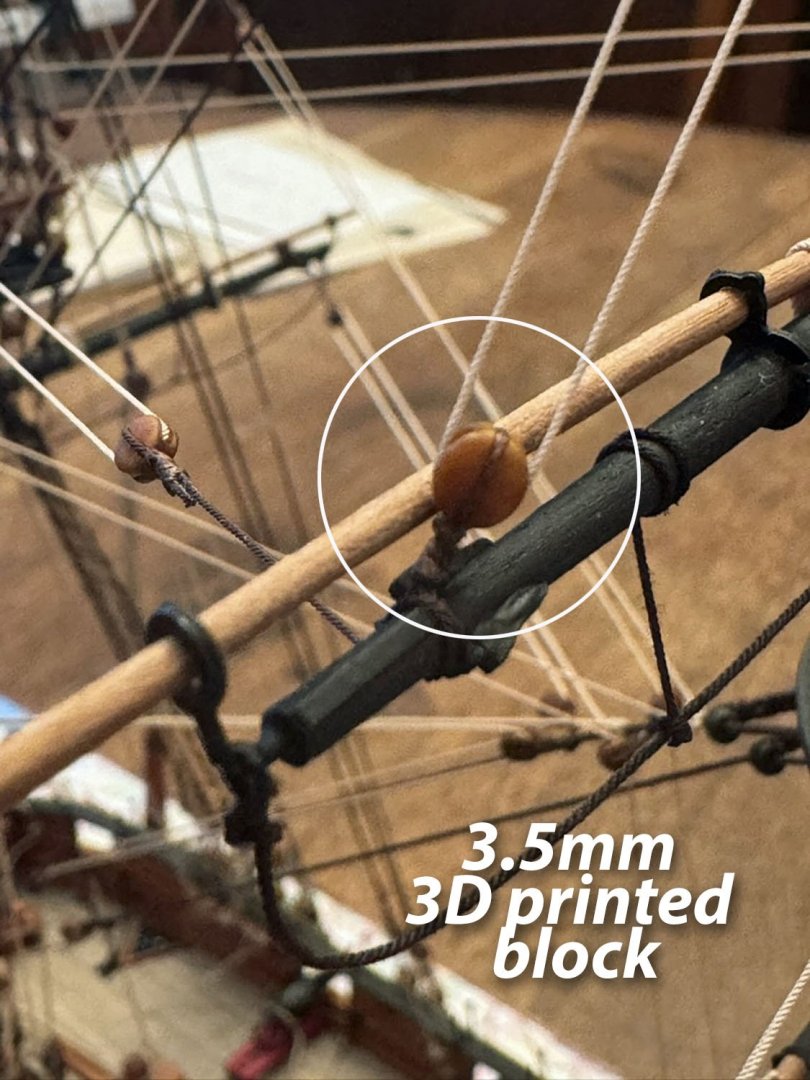
Excellent. I've added a number of your 1:48 pear wood pins to my latest model. My scale is 1:64, but the 9mm ones don't look terribly out of scale. However, as soon as you've stocked the 7.4mm in pear wood color I'll jump on my next order! To see how good Chuck's new 3D belaying pins look I'm attaching a close up of my just completed HM Cracker gun brig. Keen eyes will note that adjacent to these pins are slightly smaller ones with rigging lines tied off to them; these are the smallest available (old school) brass ones: I paint these guys brown. I also use them because I have been paranoid that tying-off to the resin ones might be problematical with taut rigging lines. I'm anxious to see if the smaller 7.4 mm ones will hold the belaying line tension and not break. AND – your new 3D swivels look wonderful. A tip: I apply a light dusting of metallic weathering powder to black 3D resin (as well as some P/E parts) to create a more convincing metallic finish. The plastic modeling guys use this stuff everywhere. The photo here also shows this effect on the carronades and the straps on the gaff jaws.
-
A problem, for sure. But – a good one to have.
-
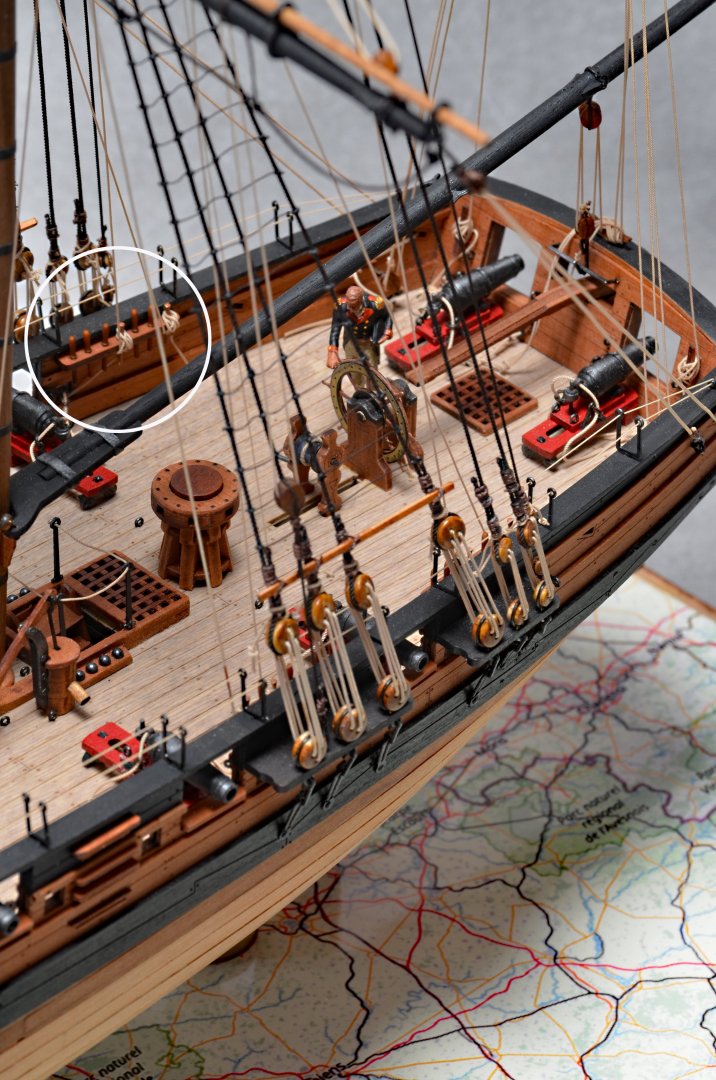
Decidedly esoteric. But that's what many of us do! I don't see that the ship's boat are too obscured by the topmasts on the gallows; I like this detail given your choices on a minimized rigging presentation. Looking wonderful!
- 332 replies
-
- 2
-
-
-
- Harpy
- Vanguard Models
- (and 1 more)
-
What a nice looking model, Clare. Suggestion: make your own silkspan "draped" ensign. It's a lot more work but worth it, especially for a non-rigged model like yours. I just did one for my latest, a gun brig (attached quickie shop pic). BTW: really nice baseboard, did you make and finish it? I like it. Please tell me it's not made of paper!🤨

-
Ah-Ha! Your humor went right over my head. Too subtle. I'm fond of San Diego BTW. A large contingent of my family lives a couple miles away in Warminster. And many members of my modeling club (Philadelphia Ship Model Society) live in (Southern) Jersey. As a recent Connecticut to PA emigré, I still have much to learn about the various tribes of the Mid-Atlantic...e.g. South Jersey vs North Jersey, Delaware vs PA (and NJ).
-
Thanks for the recommendation Chuck. Good to know there are other vendors. I guess I didn't make it clear that there was no tariff to pay for my wood shipment from Europe. I don't mind an extended delivery from Europe, or the additional shipping cost. I've been very pleased with the vendor I use since they consistently maintain the tight metric tolerances I require and they can also supply hardwoods that offer color choice and consistency within the same species.
-
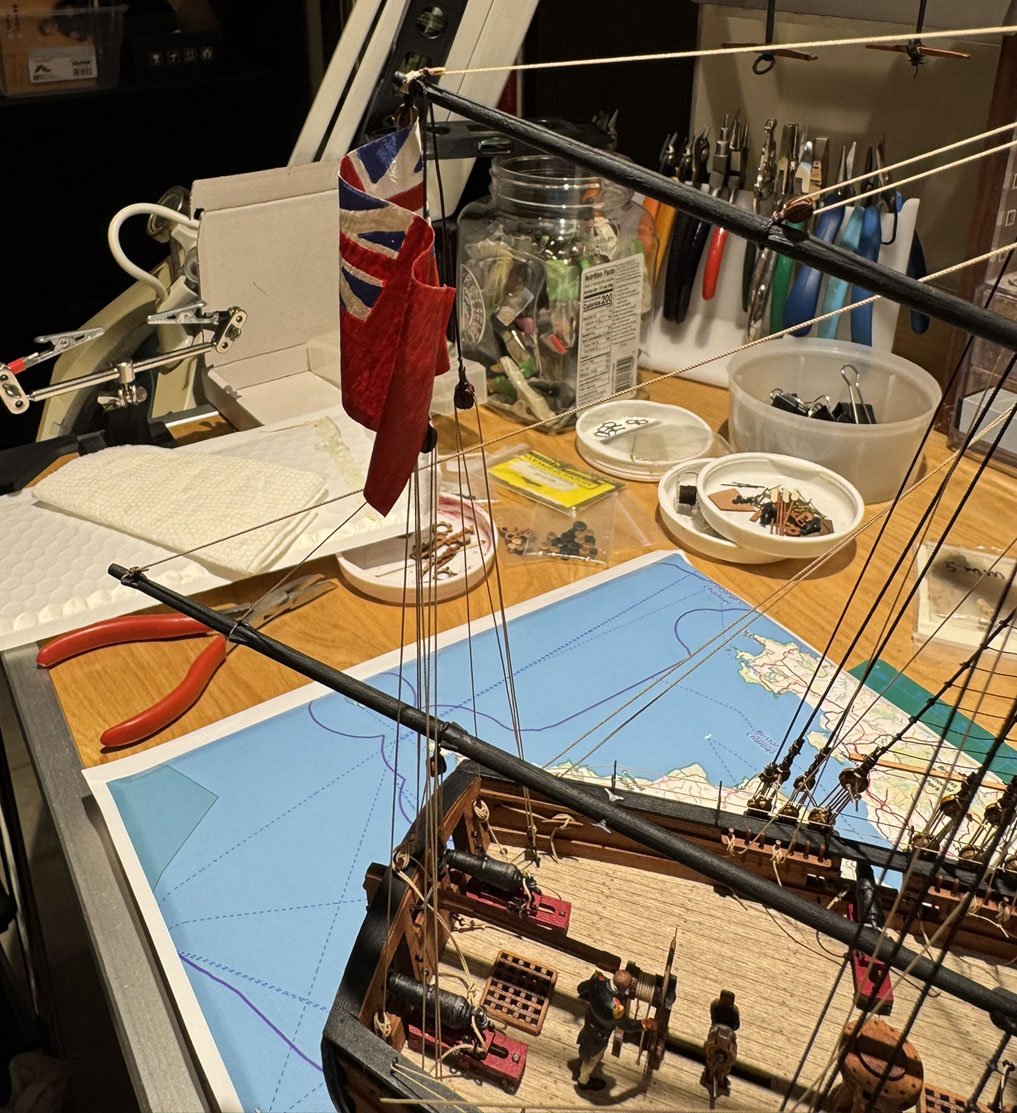
Helter Skelter Time my friends. I just received a shipment of milled wood from Estonia by regular post (mail). It took 19 days to arrive since it sat in U.S. Customs for about a week. I figure they couldn't figure out what to do on tariffs since it was a box of wood when they opened it (and didn't re-seal it well). Another fact: I've ordered rope from Canada and since it (com)packs into a normal letter-sized envelope it sails through to the USPS and usually within 7-10 days to my doorstep. No tariff nonsense, so far... For U.S. Customs Declarations (all packages), most of our ex-U.S. vendors know to indicate that their shipment contains "hobby parts."
-
Ditto, I concur! 3D Printing is changing our game dramatically: from stoves to blocks and deadeyes, from boats and scale-accurate figures. Excellent work on your small boats. They are yummy, like a dollop of Devon clotted cream on a crumpet.
- 332 replies
-
- 4
-
-
- Harpy
- Vanguard Models
- (and 1 more)
-
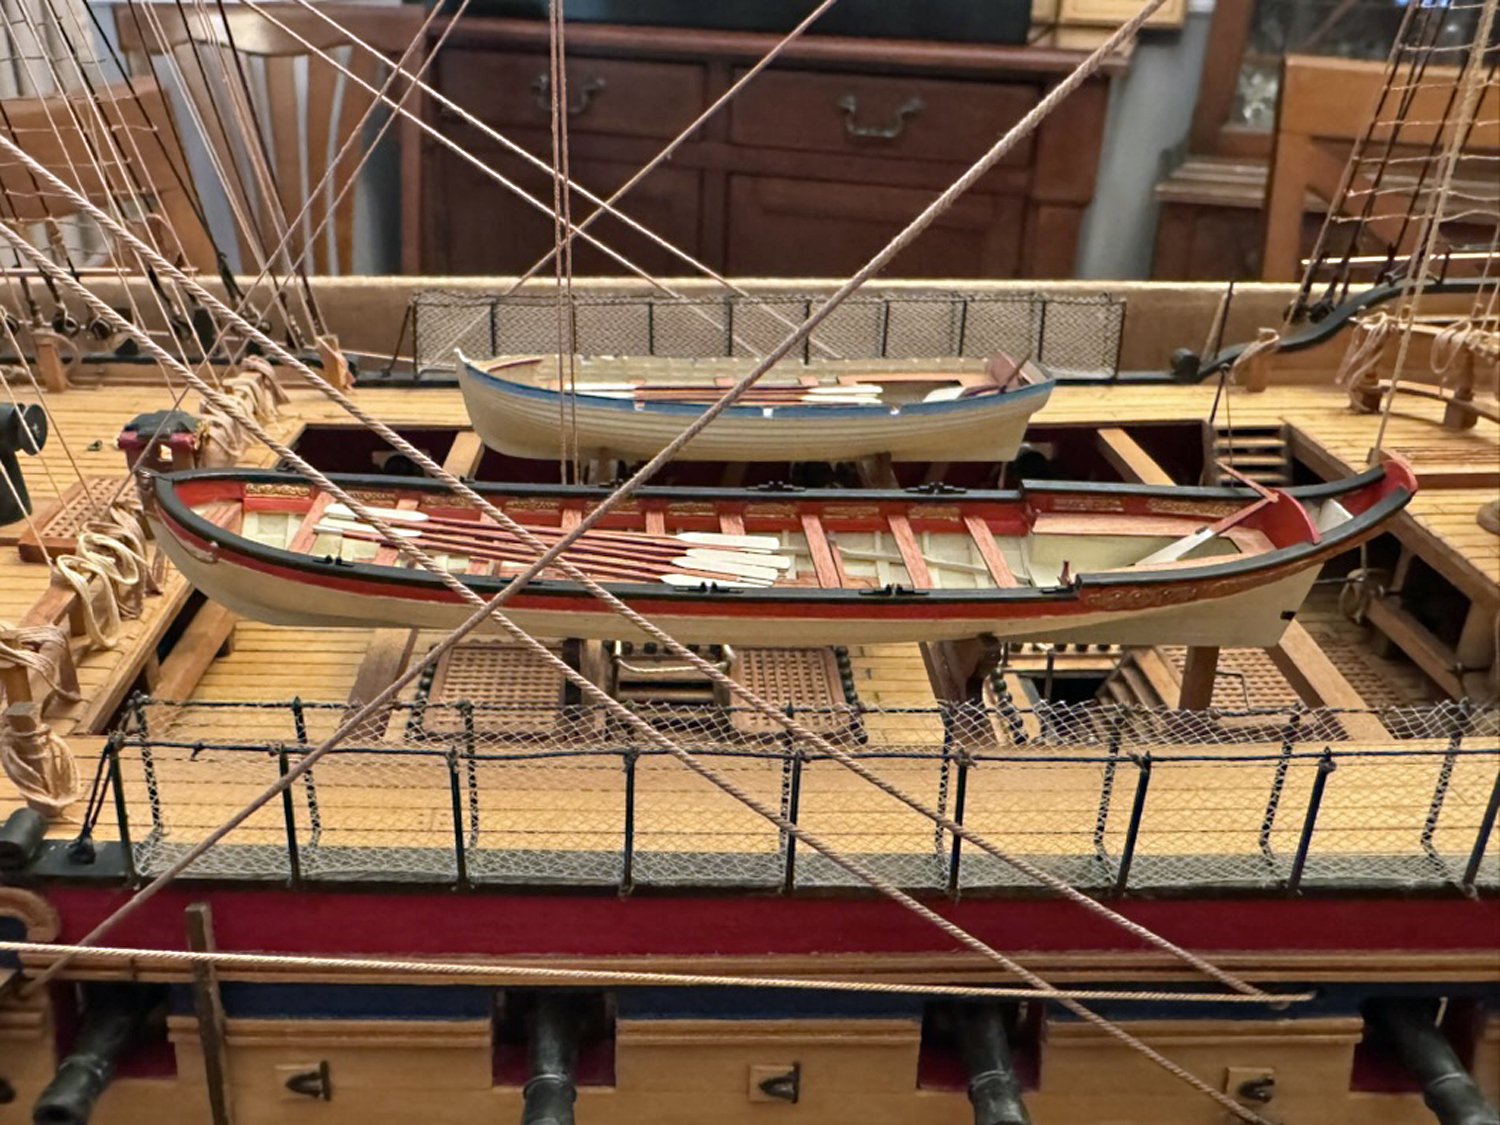
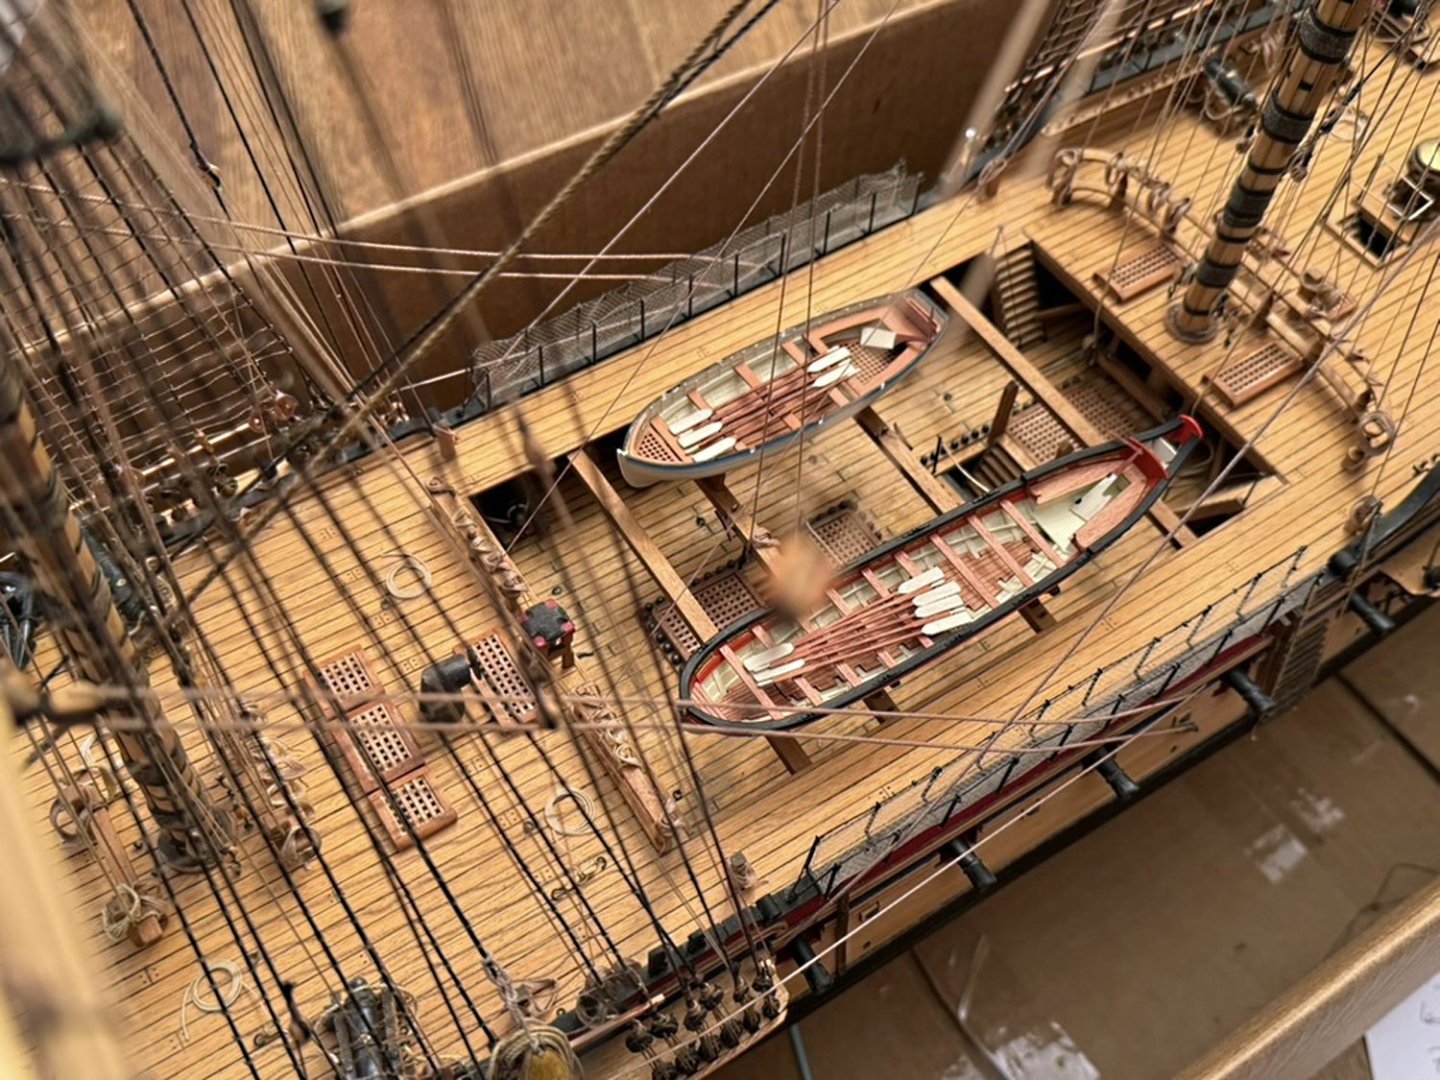
Nice job. Vanguard's 3/D printed boats are gems. I agree: a thin color stripe (your choice) would look good. Good decision to retain the inner natural wood tones and paint the exteriors white. I would surmise this is a more accurate color scheme for the period. Perhaps the only exception would be the Captain's barge (pinnace). I recently added two Vanguard ship's boats to one of my favorite, older models designed by Chris: the HMS Diana (Caldercraft). I believe they make a nice addition. Only two added midships since a normal, larger complement would hide much of the midship's deck details!

- 443 replies
-
- 9
-
-
- Indefatigable
- Vanguard Models
- (and 1 more)
-
Congratulations on your Sphinx and allow me to congratulate you on your next project: new fatherhood. You've done a superb job with this superb kit and made it yours. I like many of the choices you've made along the way, especially your color palette which tells me you lean toward being an artist, like myself. I've posted previously on MSW that documenting one's work on a Build Log will roughly double the amount of time involved with the completion of the model. It's more than taking photos and uploading them; there is also necessary prose to explain and detail one's decisions and implementations. With a new child on the way, you're going to be very busy and have limited hobby time for a while: I'm certain you'll understand your new priorities.
-
Linus Napoleonic shipyard
hollowneck replied to Linus Spjutsberg's topic in New member Introductions
Linus, Thank You, much appreciated. My HMS Camilla diorama is 1 M (37" wide) X 27" deep. Allow me to give you two MSW links on this model: The first is for my photo gallery in my profile that shows many other angles of this competed model. The second link is for my HMS Sphinx Build Log which has 19 pages of details on my build, including making her sails, the additional and required sail rigging and the crafting of the diorama's presentation base. Good luck on your build of this elegant and superbly designed kit from Vanguard. Many hours of pleasure. Guaranteed! https://modelshipworld.com/gallery/album/2658-hms-camilla-1775-vanguard-models-hms-sphinx/ -
Linus Napoleonic shipyard
hollowneck replied to Linus Spjutsberg's topic in New member Introductions
Impressive models! I too like your gaming mat. You will find that your Vanguard Brig model is a perfect "step" into a larger wooden ship model world. I've attached a photo of my Vanguard HMS Camilla (Vanguard's HMS Sphinx), in her full-sized, seascape diorama. I hope that you won't mind me posting this photo on your thread. If I'm wrong, my apologies in advance. Also, I posted a lengthy Build Log here for this model which also detailed how I fabricate my sails and the water. Ron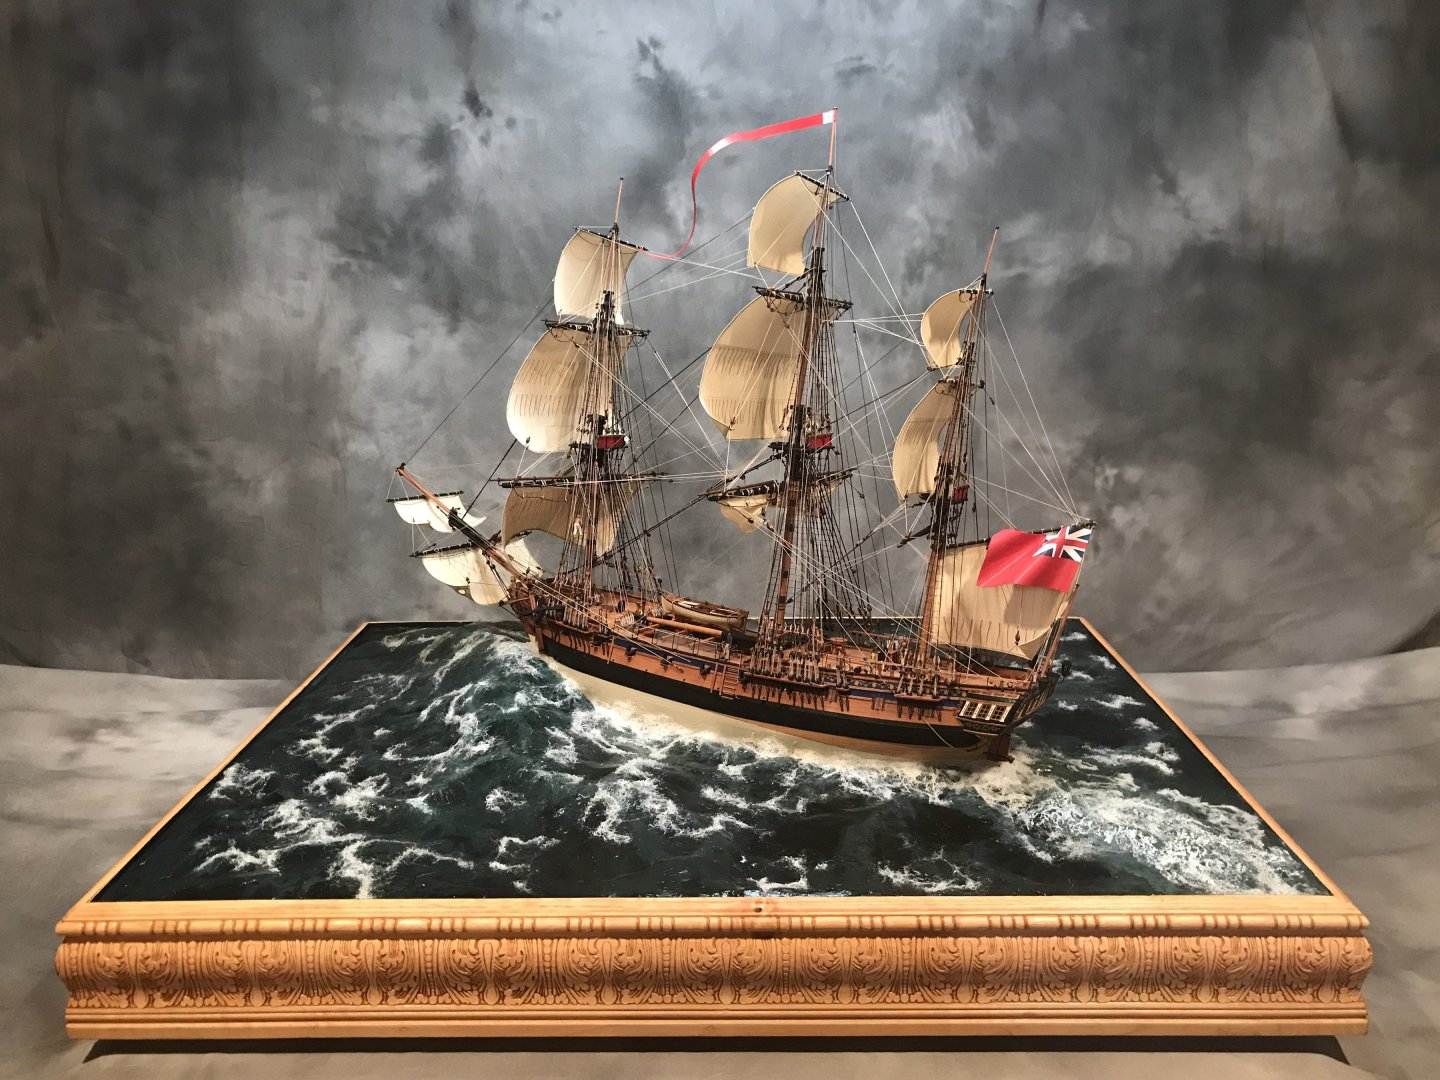
-
...and Bacon, courtesy of their close barnyard friends... Great job on this restoration, Glen. Congratulations on an excellent job!
- 301 replies
-
- 4
-
-
-
- Constitution
- Bluejacket Shipcrafters
- (and 1 more)