


VTHokiEE
-
Posts
1,528 -
Joined
-
Last visited
Content Type
Profiles
Forums
Gallery
Events
Everything posted by VTHokiEE
-
 Thanks! I have been looking at pictures of cannons this evening and they did all appear to be pushed right up tight. It’s good to have some confirmation to my research. This is an interesting idea that I may play around with and see which I prefer. Thanks again!
- 436 replies
-
- 1
-

-
- vanguard models
- alert
- (and 1 more)
-
Congratulations! Any other pictures of it? What are you planning next?
- 50 replies
-
- 1
-
-
- lady nelson
- victory models
- (and 2 more)
-
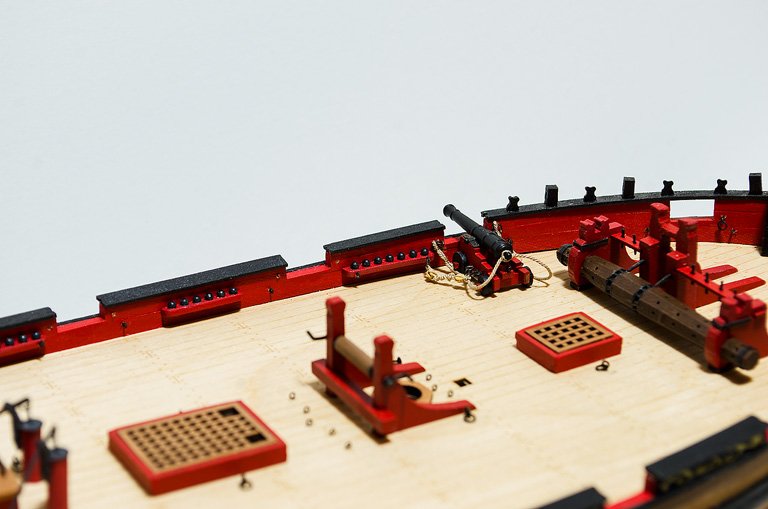
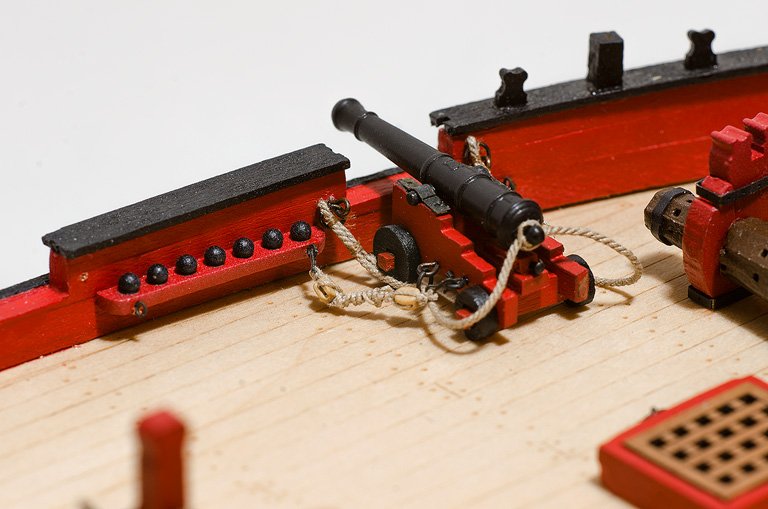
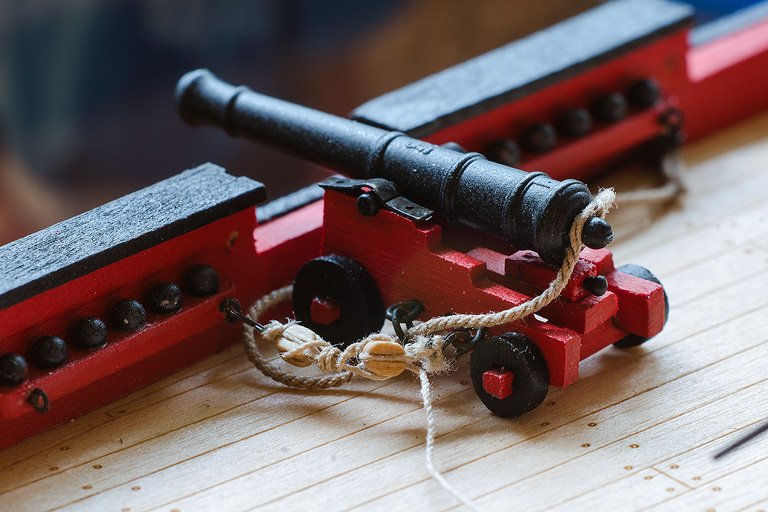
I prepared one cannon and decided that one of my side tackles is a little longer than I want going forward (the visible tackle is the long one). Should the cannon trucks be right up against the bulwa rk? This isn't glued in yet. Edit: Currently redoing the longer tackle, it bothered me too much already 😂
- 436 replies
-
- 6
-
-
- vanguard models
- alert
- (and 1 more)
-
Thank you! I started using your false splice technique for the eye loop on blocks and it’s really a wonderful technique (thanks again for the tutorial at the end of your log, I’m not certain that I would’ve gotten to this point without it).
- 436 replies
-
- 2
-
-
- vanguard models
- alert
- (and 1 more)
-
Thanks Derek; I have two tackles “finished” so I’m going to try to get one of the cannons situated next (hopefully today but we’ll see). I’m very antsy to get one completed gun on the deck (it feels like a huge milestone at this point).
- 436 replies
-
- 3
-
-
- vanguard models
- alert
- (and 1 more)
-
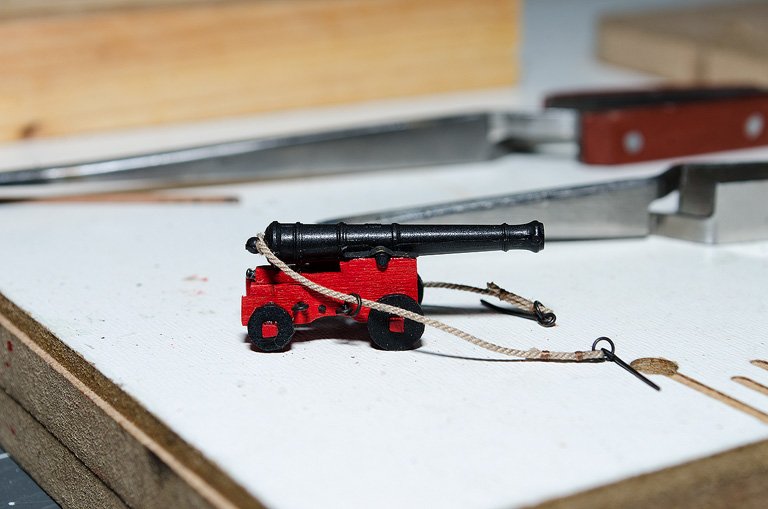
I gave a side tackle a test run (don't mind the poorly cut fluffy rope 😬, I added some white glue after the fact and it's harder to see at normal viewing magnifications), I'm curious if you all think the side tackle is the right length or if it should be a little longer? A little longer may rest on the deck if I'm not as precise so I'm leaning towards keeping it this length (I also noticed this moment that the cannon isn't pressed against the bulwark as much as I thought so there may be a little more droop then as well). I'm going to give the frapping a few more turns before tying it off once I have a finalized length (I don't think that I'm going to add a coil). I assume the hooks are left unglued?
- 436 replies
-
- 8
-
-
- vanguard models
- alert
- (and 1 more)
-
I’m glad I’m adding the details (I know I’d wish I had if I skipped them). It is time consuming and does feel like it is slowing the whole build down because I don’t have tons of time to devote to the build each day; but I remind myself that I’m not on a time line and then I can get back to enjoying it. Somewhat surprisingly making all the blocks is quite relaxing to me. I’m about half way through the blocks. I think I’m going to try to put together the first side tackle to see what it looks like this weekend 🤞.
- 436 replies
-
- 5
-
-
- vanguard models
- alert
- (and 1 more)
-
At the top of this page (originally on the previous page) is a recipe. It calls for 5 minutes at 350F.
-
Ordered a Syren Rope Rocket, some garage pulleys and some Mara thread to give this rope making a go. When you bake the thread does it give off a scent at all (do I need to buy a small toaster oven)?
-
Are you doing this on the model or have you made a jig off the model? It may be easier off the model if you can. I'm starting to think that I might not include the coils and go for a look like the second picture in this post (assuming the link works): https://modelshipworld.com/topic/22783-hms-speedy-by-delf-vanguard-models-scale-164-master-shipwright-edition/?do=findComment&comment=731381
-
Any parts more frustrating than others? I’m currently at this stage and doing it for the first time following two references from build logs. Both have helped me immensely, but there’s no getting around doing it 🙂. H.M. Cutter Alert by Blue Ensign HMS Speedy by Delf Both have great insight.
-
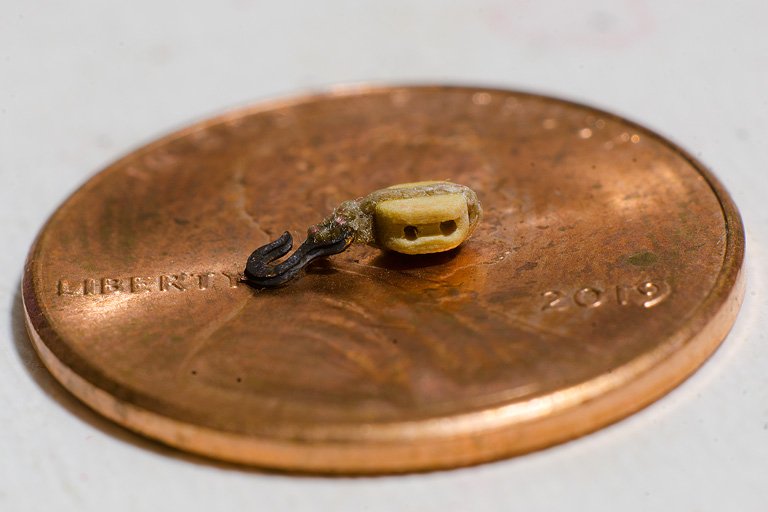
I apologize for all these minor updates, but after 4 tries I was really happy with this block (attempt #3 is in a holding bin in case I loose steam towards the end). Wow these are small and intimidating, but I'm following B. E.'s tutorial at the end of his Alert log and so far so good. I had to drop down to two strands on both lines to thread the hook and I'm using a fly tying glue for the knots, but I'm really appreciative of that tutorial. I don't think I would've continued without it. Now to gather my motivation for 47 (47?!?! What am I thinking, this is going to take me at least a month to make the blocks 😂...) more
- 436 replies
-
- 6
-
-
- vanguard models
- alert
- (and 1 more)
-
Nice job! A CAF model is certainly on the list of future purchases.
- 322 replies
-
- 2
-
-
- enterprise
- caf
- (and 1 more)
-
Ha, that’s my thoughts exactly. I’ve been forced into this! I’m looking forward to it, but I fully expect some extreme frustration before I get the process down. I’ll be re-reading B.E.’s process a few time before giving it a go.
- 436 replies
-
- 2
-
-
- vanguard models
- alert
- (and 1 more)
-
Minor update, today I finished the breeching line for the 12 cannons (and yes by the time I was done I was much faster at making the seizings). I've also decided that my garage is way too hot this time of year; nothing to be done about it but wow. Anyway, now I'm staring at these teeny tiny blocks and hooks for the side tackle and trying to determine exactly when I lost my sanity. My plan is to assembly line these by making the 48 blocks first (well probably one of each type first to see how the tackle looks before going all in on the assembly line), please wish me luck!
- 436 replies
-
- 11
-
-
- vanguard models
- alert
- (and 1 more)
-
Oh yes, sorry I forgot that you mentioned that. I’m the same way about ordering - May as well order them just in case rather than wait on them if you get there and wish you had them.
-
I have a lot of trouble with the eyelets, I think its because they are copper and not brass. I need to experiment more for them (or watch what you do very closely and hope I can source what you end up with). Did your kit not come with the black resin cannons?
-
I’ve gone back to my build log and I can’t readily think of any reason not to. I have seen some people build up a cannon carriage to test it on the deck with a gun port become continuing (I did not do this but it would require the deck to be in).
-
That looks beautiful! Nice job! I wish I had done this, there was one spot where I didn't get the tape down well and had slight leakage. I cleaned most of the paint off but I can still see if and it bothers me. I may end up putting something down to cover it when I get close to the finish line.
-
I’ve looked at this line a few times - What do you think of it so far? Instructions, parts, etc
-
Sorry for the initial misdirection at first 😬
-
Welcome and I hope you enjoy the build! Other logs (of the non-first step version) are in the 1751-1800 period so I would put it there. Example: https://modelshipworld.com/topic/13627-adventure-pirate-ship-by-sexyauthor-finished-amati-scale-160-wooden/ Edit: Hmm... here is a log in a different era: https://modelshipworld.com/topic/15932-pirate-ship-1710-adventure-by-itschnatt-amati-scale-160/
-
That’s my biggest FL gripe; everyday I wish for a basement. If your attic is anything like my attic the surface of the sun might be cooler this time of year 😀.
-
Looks really nice. My only suggestions is that the stern post area looks like the thickness varies somewhat significantly from top to bottom and you may want to even that out at some point. If you don't take the first planking layer all the way to the edge there you could do it later though. (If I messed up any terminology I mean the part in the back)