VTHokiEE
-
Posts
1,528 -
Joined
-
Last visited
Content Type
Profiles
Forums
Gallery
Events
Everything posted by VTHokiEE
-
 Really liking that paint job. Not to push you in either direction, but first builds can also be a good time to try the repair 😉. Nice tweezer and nice files are really good tools to have. I’d consider at least filing down the frames that extend to far on the left window when you are facing them.
- 87 replies
-
- 5
-

-
- bluejacket shipcrafters
- red baron
- (and 3 more)
-
There was a thread today regarding people having issues resizing. Personally, I prefer to resize images before uploading (but I understand the convenience of doing it in the editor). Looks like an interesting build! Edit: Link to thread:
-
Nice touches and the hinges and door pull. They look really nice.
- 87 replies
-
- 3
-
-
- bluejacket shipcrafters
- red baron
- (and 3 more)
-
Thank you! That’s quite unfortunate that yours fell apart; Chuck’s machine seems quite nice so I would recommend taking a look at it.
- 436 replies
-
- 1
-
-
- vanguard models
- alert
- (and 1 more)
-
I “think” there are some methods to add to impressions to the tape, but it’s good advice to not get too lost in the detailing.
-
Doesn’t look too bad for a first attempt. I’ve never done any coppering so take this with a grain of salt, but I feel like the tape loses some definition without the vertical bolt emulation (no idea what the proper word is). Have you considered using a batten at the waterline as shown here: Keep at it though, looking quite good. Edit: I’m not certain that link went to the right comment. It starts at the April 2 post on page 5.
-
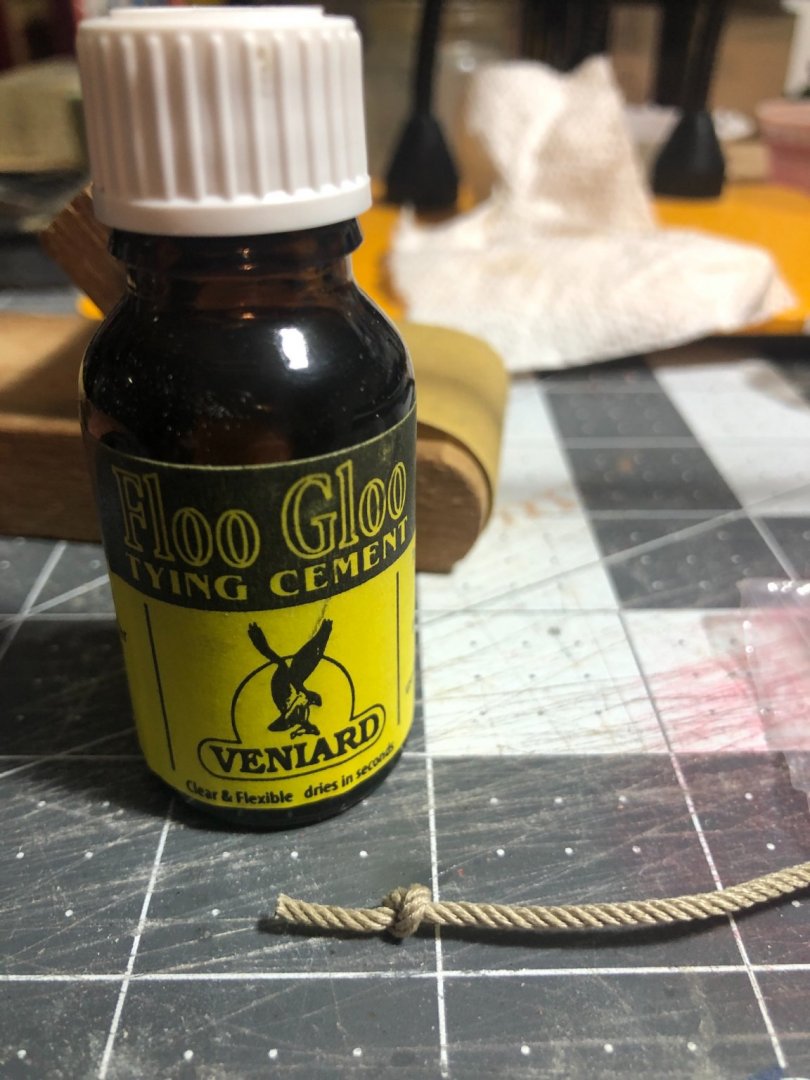
This morning I added a drop of the fly tying glue that @DelF recommend and I think it worked perfectly (I should have bought two bottles 😁). Low quality iPhone shot but it shows the results on the thicker rope.
- 436 replies
-
- 7
-
-
- vanguard models
- alert
- (and 1 more)
-
Thanks Derek - I wasn’t using a cotton thread to start so I had to add some heat to help the unraveling. This is the recipe link for Mara: What thread do you use? I was having trouble finding DMC which seemed to be a favorite. That’s a good suggestion, I’ll have to give it a try. A touch of glue has been suggested as well and I may give this fly typing laquer a try as well.
- 436 replies
-
- 2
-
-
- vanguard models
- alert
- (and 1 more)
-
Oddly enough I found the second planking (while nerve wracking at first) to be somewhat easier with the solid base of that first layer down. I’m certain yours will look great (and if you’re painting below the waterline white you can cover up some issues if they do rear their head).
- 26 replies
-
- 2
-
-
- First Build
- lady nelson
- (and 2 more)
-
I picked up a rope walk from Syren a little while ago and in order to postpone tapering the mast I put it together and tried my hand at making some rope today. I wanted to replace the anchor rope (really I may end up replacing all the rope either with my own or some from Syren for consistency) because it was a significantly different color than the rest of the rope I will be using. I wanted to end up with about 1.6mm rope so I used Chuck's Mara recipe for .055" (~1.4mm) rope as a starting point, but I ended up closer to 0.047" so I tried again using the 0.065" (~1.65mm) recipe as a starting point and got much closer, 0.06" or ~1.52mm. I'm still debugging the process a little (my rope unwinds even after baking so I'm asking Chuck what I did wrong). The darker brown rope in the pictures in the kit supplied anchor rope.


- 436 replies
-
- 6
-
-
- vanguard models
- alert
- (and 1 more)
-
Thank you both; I’m very glad this log is helpful to you both!
- 436 replies
-
- 3
-
-
- vanguard models
- alert
- (and 1 more)
-
Unfortunately I don't think there are any (or at least none that I've seen). I've mainly been hunting for milled sheets and (aside from Syren) I haven't seen anything outside of cherry in the US. There are some more options coming from overseas, but I don't think Alaskan cedar is one. Small table saws aren't "that" big but I can definitely understand not having space regardless.
-
Congratulations! Beautiful hull and really nice photography to show her off!
- 778 replies
-
- 4
-
-
- cheerful
- Syren Ship Model Company
- (and 1 more)
-
This is absolutely astounding to me, beautiful work!
- 117 replies
-
- 1
-
-
- vanguard models
- yacht
- (and 2 more)
-
The waterline looks sharp! Nice painting!
- 87 replies
-
- 2
-
-
- bluejacket shipcrafters
- red baron
- (and 3 more)
-
Beginner Suggested Ship Model and Brand
VTHokiEE replied to ChilliBeanz's topic in New member Introductions
This thread might help you make a decision: There is a link which you might overlook accidentally that also would be valuable: -
This is really incredible! Great work on that cockpit!
-
Very nicely done! Is there a good resource for determining what parts of lines are served? I’m getting close to the rigging stage and knowing what to serve seems like a mystery to me at the moment.
- 1,039 replies
-
- 2
-
-

-
- ballahoo
- caldercraft
- (and 2 more)
-
Thanks OC! Thanks Rusty! I agree (and really it is quite enjoyable once I get past the mental block of “how am I going to do this?”). I’ve been doing some research to try to create a wood pile so I can allow myself a higher reject rate but so far I haven’t really found the perfect choice, especially for something like this where I wanted to keep with pear wood.
- 436 replies
-
- 3
-
-
- vanguard models
- alert
- (and 1 more)
-
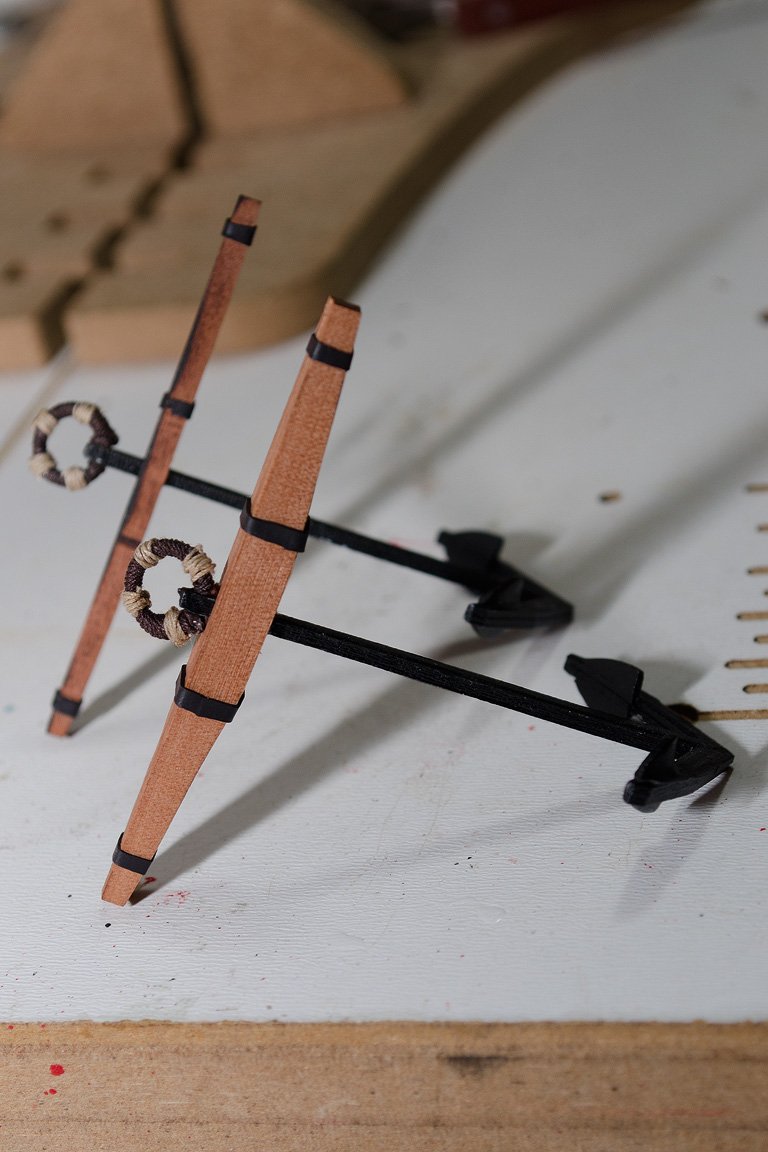
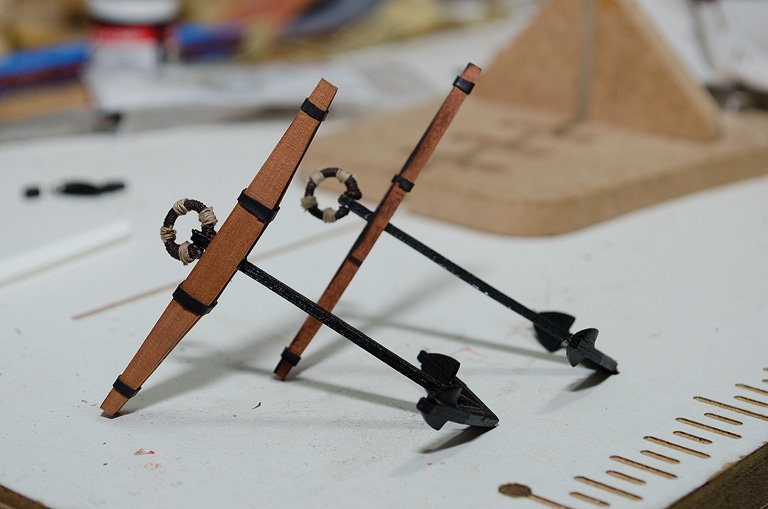
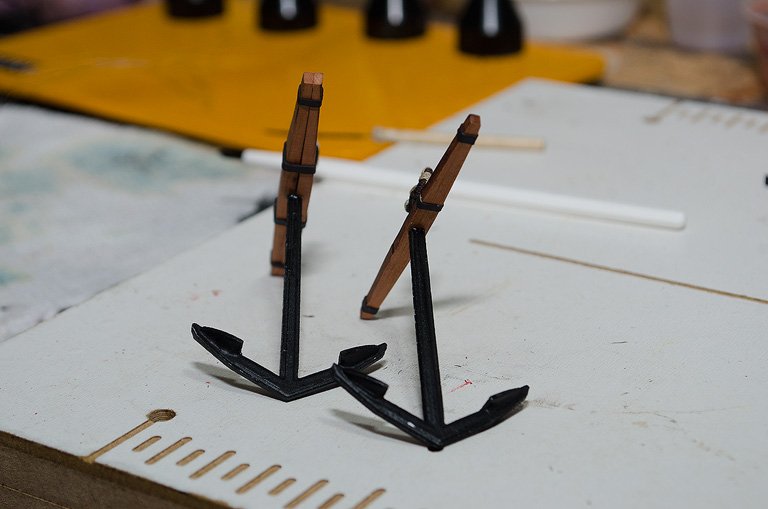
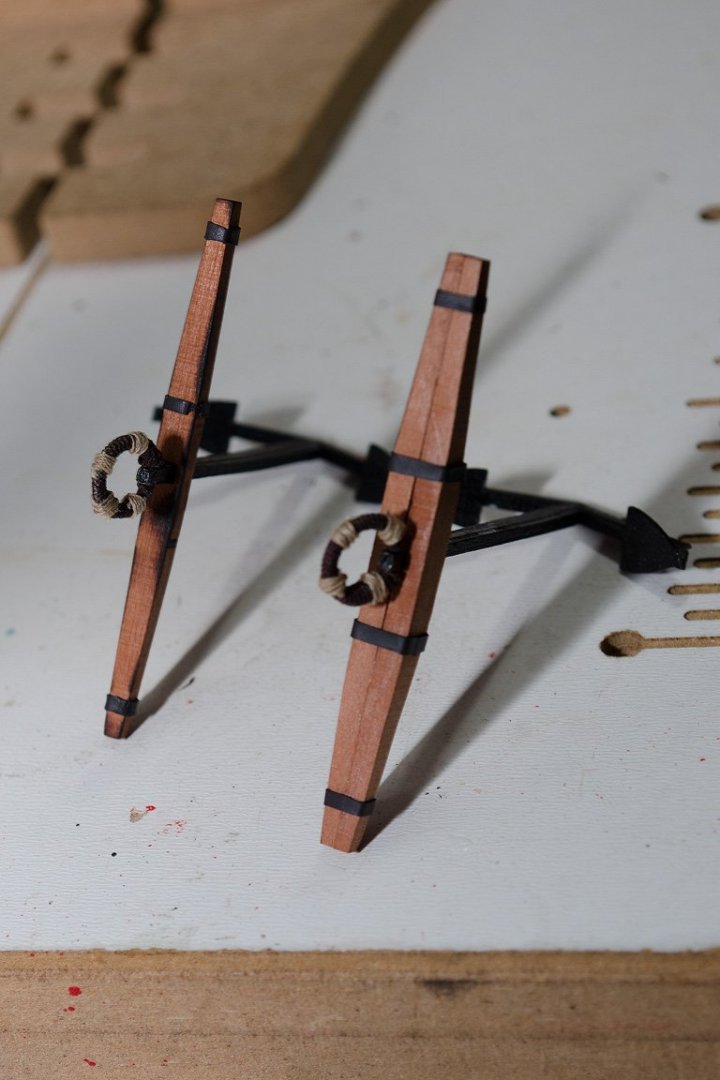
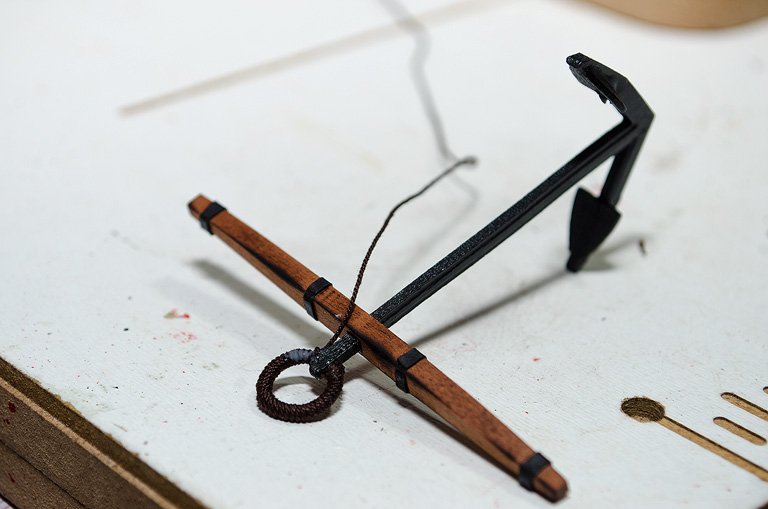
The saga of my anchors is drawing to a close. I kept one anchor with the kit supplied stock and one with my new stocks to demonstrate the difference (I think I would highly recommend scratch building these now as the update is a nice touch in my opinion). My stumbling block is how to get wood into sheets of the proper thickness. I think I could build exclusively in AYC though, which may be a good starting point since Syren has a good selection of sheets.

- 436 replies
-
- 10
-
-
- vanguard models
- alert
- (and 1 more)
-
I used CA on my cannon trucks because the trucks were painted black. I wouldn’t worry as much about masking off all these areas though. You could do a test, though to be certain (apply more coats of WOP than you think you’ll use to be certain and try gluing two pieces together). Are you mixing your own WOP? I was under the impression that water based WOP wasn’t sold? Regardless, I’ve had good results with non-water based and plan on sticking with that moving forward. This would make me nervous, I unfortunately don’t have a better suggestion though. Did you give any consideration to laying shorter planks on the deck? Your deck looks really nice as is; I’d be tempted to leave it alone for fear of messing up the butt ends. With the guns and other things on the deck you may not really notice the missing butt joints.
- 26 replies
-
- 3
-
-
- First Build
- lady nelson
- (and 2 more)
-
Help for the Noobies
VTHokiEE replied to drjeckl's topic in Using the MSW forum - **NO MODELING CONTENT IN THIS SUB-FORUM**
I would definitely endorse this as well, I have reached out to members (who are currently active) and all have be very helpful. I have also found it useful to post questions in their build logs (even if completed) of the same kit, or similar step, asking how they accomplished a certain step. Even when a log has some activity, and a following I’ve seen questions not always get answered. I hypothesize that this is due to people being humble about their knowledge so I usually butt my head into their logs 😁- 66 replies
-
- 14
-
-
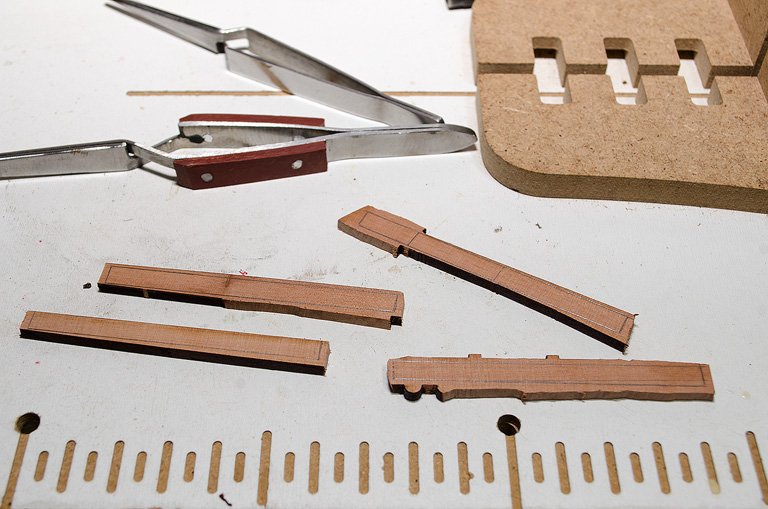
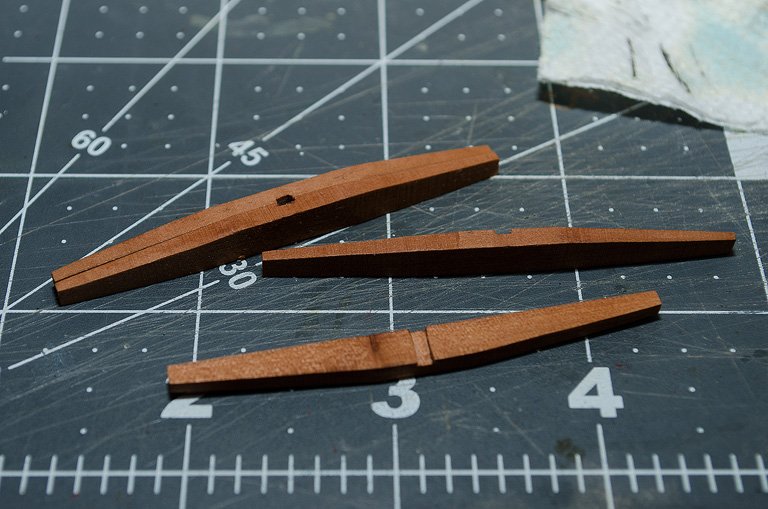
The saga of the anchors, I have finished up some new stocks for my anchors and I think they came out quite reasonable. Here is the lesser of the charred anchors. This one concerned me, but after I scorched the second one I really had no choice but to remake the parts. I measured the pieces out on the 3mm scrap pear wood and roughly cut then out with a jeweler's saw. Next I sanded then down to the lines. Finally, I shaped them, filed out the channel for the anchor and applied a touch of WOP. Now I can get back to the puddening and the seizing (which now I'm fearful of since it caused this all in the first place). I think I could get behind scratch building if I can find a way to do it without purchasing a bandsaw in the near future.

- 436 replies
-
- 13
-
-
- vanguard models
- alert
- (and 1 more)
-
I do believe you're right. I drew out some rectangles on the scrap 3mm pear (really it should be about 2.25mm so I may sand it down to look better). I think I need to find a supplier for some wood sheets in case I mis-cut 😬.
- 436 replies
-
- 1
-
-
- vanguard models
- alert
- (and 1 more)
-
I may have done something similar as well... of course now I'm staring at the scraps of pear wood and wondering if there is enough to remake the parts.