VTHokiEE
-
Posts
1,528 -
Joined
-
Last visited
Content Type
Profiles
Forums
Gallery
Events
Everything posted by VTHokiEE
-
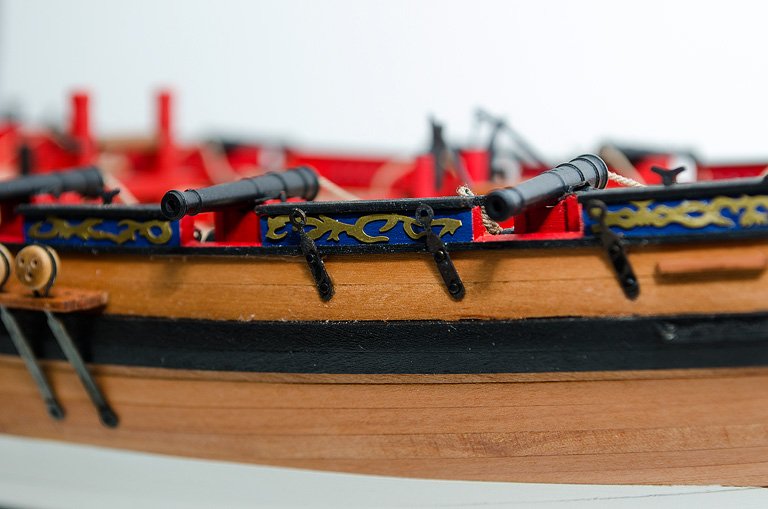
 Thanks OC! I appreciate all the likes and comments. Added the back stays, chainplates, deadeyes, and a few cleats. The back stays gave me a small struggle - I wanted to attach the upper pin into the molding which worked fine on one side, but I split the molding twice on the other side and gave up. Also the pins had to be shortened significantly so they wouldnt go through, but this made it a little tricky to get everything glued in place. Next up, I think the swivel guns. I'm have a little trouble getting the bowsprit so that it fits on the back end (I'll get there and I have plenty of wood, but I'm not mounting that iron ring on it until I get the bowsprit in place, I can't for the life on me see how I would get the bowspirt in there afterwards).
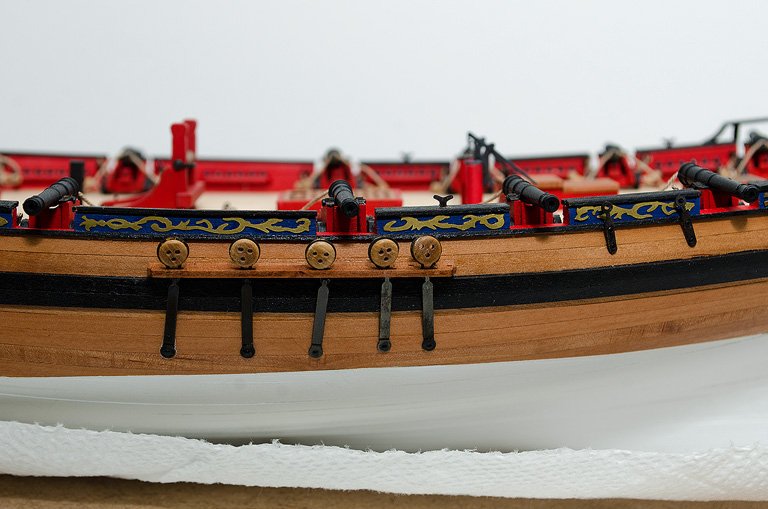
- 436 replies
-
- 11
-

-
- vanguard models
- alert
- (and 1 more)
-
What keeps jumping out at me are the cannon carriages look like they were built backwards. Hope someone is able to restore it though!
-
Really? I didn’t think CA needed a porous material as it is often used for metal bonds (I understand epoxy is another choice). Now PVA on the other hand I’ve always heard needed a porous surface.
-
This is usually this is done outside the bearding line. You’ll want to do some research into this (I’m still a novice so I may not be spot on) but I’m pretty certain the bearding line connects the aft bulkhead bottom points. There’s a planking tutorial kit from the NRG that have a build log that goes into some more detail. I’ll try to dig it up. Edit: Hopefully this helps:
- 82 replies
-
- 1
-
-
- Fly
- Victory Models
- (and 2 more)
-
Ha, yes I think I blew past the low end of that estimate during planking 😂. To be fair though, the manual skips rigging the cannons (I would recommend at least doing the breeching line though). I do like the manual. My one minor critique is that I wish the included photos aligned with the build stages of where they are in the manual. Overall though it’s a great manual and a great kit!
- 436 replies
-
- 2
-
-
- vanguard models
- alert
- (and 1 more)
-
Thank you all for the comments and likes, they are all appreciated and encouraging!
- 436 replies
-
- 1
-
-
- vanguard models
- alert
- (and 1 more)
-
The idea is to seal the tape line. If there is a painted color under the tape painting that same color at the tape line before painting your new color will seal the tape and any bleed under the tape will be the same color as the paint originally there. In the same vein if there is no paint under the tape you can use a clear coat to seal the tape and prevent bleed. I’ve only done this on larger paint jobs, but I’ve seen it recommended for models as well (can always do a test or two on scrap wood to see).
- 87 replies
-
- 7
-
-
- bluejacket shipcrafters
- red baron
- (and 3 more)
-
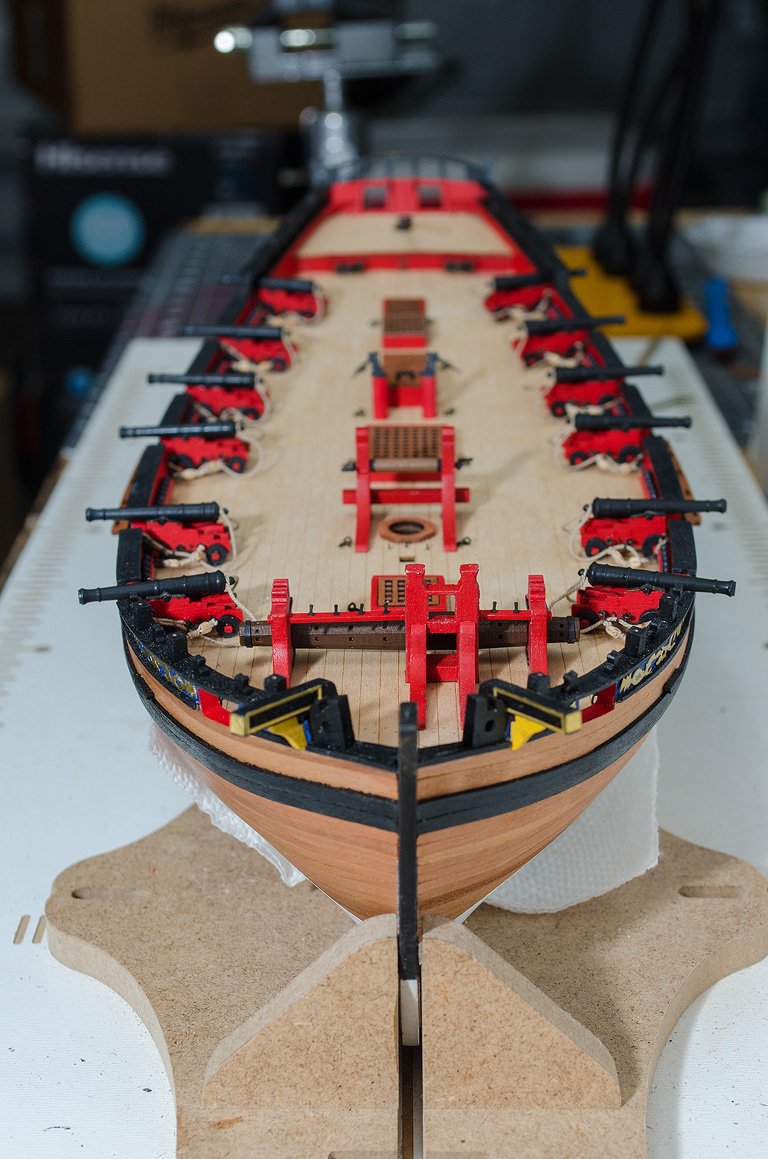
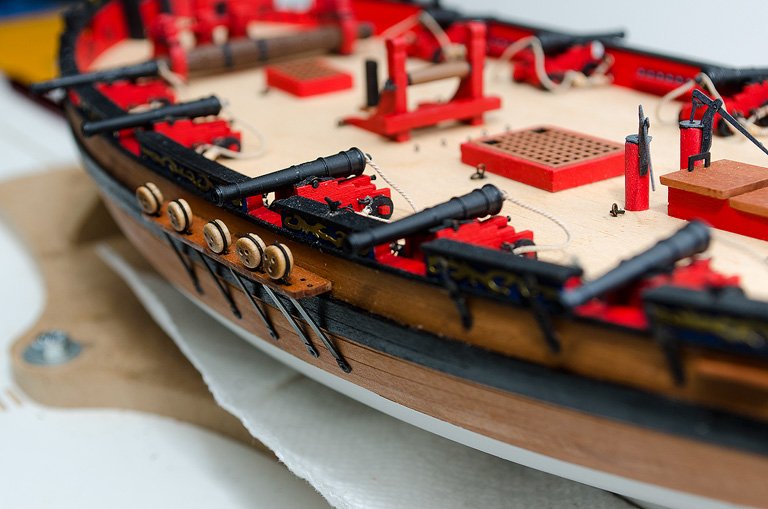
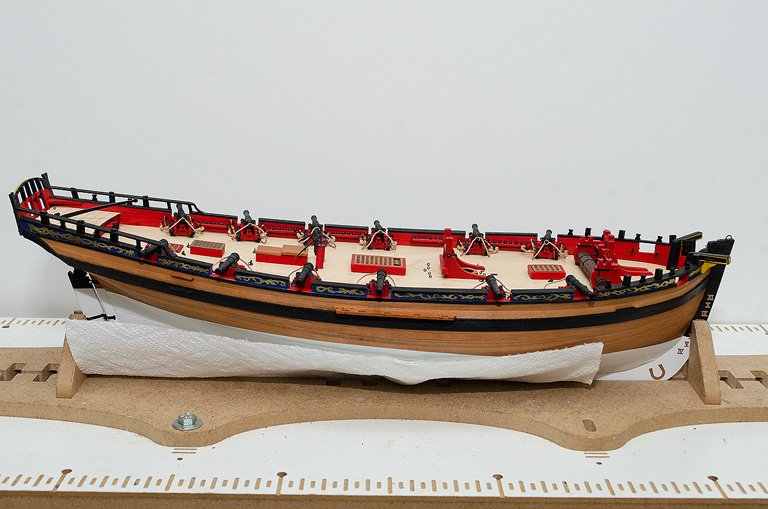
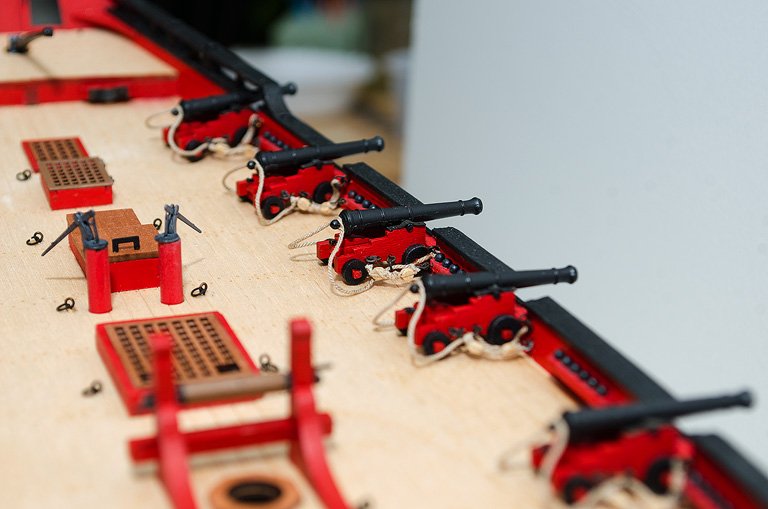
Drum roll please... I have all my cannon rigged and on deck! It feels like a major accomplishment, but now I almost feel lost about what to do next (time to dust off the manual I suppose). My personal observations are that I made the breeching lines a little longer than I should have and eventually I will need to glue at least some of the cannons to the quoins (I feel like I am running a high risk of knocking them loose if I do it now), but overall I'm very satisfied with how the effort came out. I didn't even loose a single tiny block (which is a good thing because I only had two spares and Chuck has been out of them since I placed an order almost immediately after he reopened).


- 436 replies
-
- 17
-
-
- vanguard models
- alert
- (and 1 more)
-
Looks pretty darn good from here.
-
I honestly don’t know, I have seen people claim that it’s better but I don’t know (of course with tape I have found that there is differences among brands and not all blue painters tape is equal - I’ve become a proponent of name brand tape it seems to work better in my experience). The big advantage, to me, is that I have the Tamiya tape is 6mm and 10mm widths making it easier to do curves. You could cut the blue painters tape down as well though.
- 87 replies
-
- 2
-
-
- bluejacket shipcrafters
- red baron
- (and 3 more)
-
These areas probably don’t matter if you are going to paint over them later, bat have you given any thought to using painters tape to mask the areas? I find that Tamiya masking tape works well. If I need to mask out a larger area (deck) then I’ll put some blue painters tape on the inside of the Tamiya tape and maybe tape some paper down to prevent daisies with stray drips.
- 87 replies
-
- 5
-
-
- bluejacket shipcrafters
- red baron
- (and 3 more)
-
Welcome! How far along into the longboat are you (a current picture perhaps)? Any particular style of ship interest you (cannons/no cannons, sailboat/work boat, era, etc)? I’m currently building the HM Alert from Vanguard (it’s my first planked ship) and Blue Ensign’s build log on it has really helped me.
-
Beautiful decking! She's coming along very nicely (and I completely agree about avoiding remaking the timberhead pieces). Did you do this by hand? and if so how did you achieve a nice even reduction is thickness?
-
Does that mean that you may have a mind to build this beast?
-
It’s wonderful they all exist - such variety and choice! Even including other makers too... I think it’s great to have so many options. Edit - Very grateful for your novice approach. I don’t think I would’ve been as happy with a first “serious” build.
-
Traitor! (J/k of course 😁)
-
Looks really awesome! I really am amazed that you can do all these developments this relatively quickly “on the side.” Sphynx looks really impressive! Looking forward to seeing her development unfold (and then James build her hopefully).
-
Thanks Glenn! This is what I ended up going with. I’m still slowly churning out side tackles. I ran into some extreme frustration all because some CA glue was starting to set in the bottle and I didn’t notice. I had my 0.008” thread and my 3/32” blocks from Syren and I couldn’t get the thread through the blocks holes (which are spec’d for one size of thread larger than what I was using). In order to create a rope needle I used some CA glue on the rope (standard practice). I quickly realized that in glueing the knots together I had sealed some holes on the block so I drilled out each hole but still no dice. I began to get really annoyed because I knew that the rope and blocks should work but what was I doing wrong. After struggling through a few side tackles it finally dawned on me that my CA was now really thick and gooey instead of runny (like it was when I opened the bottle whenever ago). I opened my second bottle, made my rope needle and BOOM - back in business. I tossed the bad bottle (it must have started to set) and am still a little annoyed that I didn’t notice this sooner, but now I’m moving a bit faster and not dreading the remaining rigging 😂.
- 436 replies
-
- 4
-
-
- vanguard models
- alert
- (and 1 more)
-
Welcome aboard! I think you may want to ask that question here: https://modelshipworld.com/forum/16-masting-rigging-and-sails/
-
Thanks Greg! It really is an enjoyable build and I'm certain that you'll have a fun time with it. I look forward to seeing what you do with your build!
- 436 replies
-
- 1
-
-
- vanguard models
- alert
- (and 1 more)
-
Welcome aboard! Do you have your eyes on a specific model for your first ship kit?
-
I agree! Congratulations getting through it, that’s quite the milestone in my opinion and you did a great job!
-
I'm not certain how if they would work as replacements but several different manufacturers offer small boat kits. Master Korabel has two ship's boats and a yawl of different sizes, Vanguard models has an 18 ft cutter and I would guess there might be more that I can't think of off the top of my head that you might take a look at (if you want). I think Model shipways has some options as well, but I've read that those are a little tricky.
-
I don't have a perfect solution (and would recommend waiting for feedback from others), but that piece (I believe) is oversized to accommodate building differences. Therefore I don't think you want to line up the top part at the stern, I would align the bottom end (not the higher end towards the back) to see how it looks first.
- 164 replies
-
- 2
-
-
- vanguard models
- flirt
- (and 1 more)