HOLIDAY DONATION DRIVE - SUPPORT MSW - DO YOUR PART TO KEEP THIS GREAT FORUM GOING! (Only 53 donations so far out of 49,000 members - C'mon guys!)
×


iMustBeCrazy
-
Posts
971 -
Joined
-
Last visited
Content Type
Profiles
Forums
Gallery
Events
Everything posted by iMustBeCrazy
-
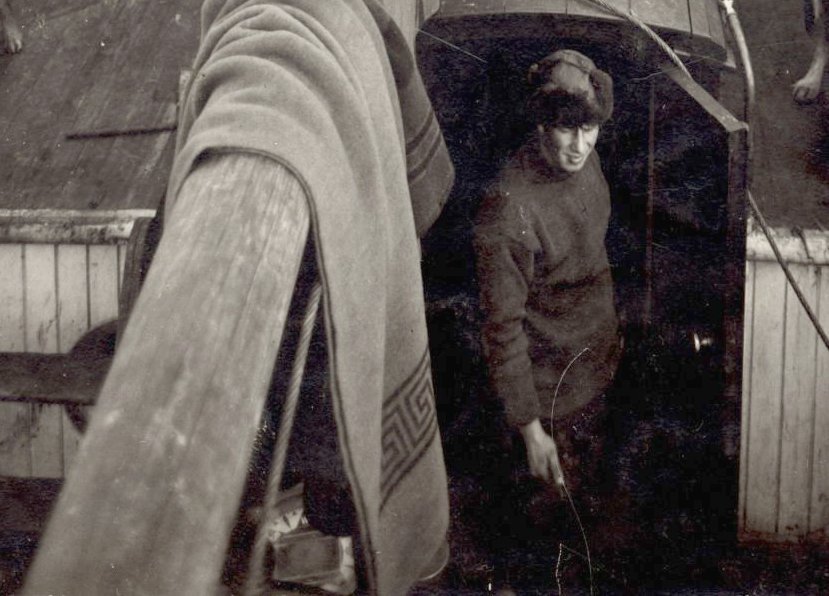
 The aft companionway would appear to have two doors, the first two shots aren't conclusive but the third shows the left door still hanging: And a brightened version of your last shot:

-
https://commons.wikimedia.org/wiki/File:Excellent_(1787)_RMG_J0723.png The bracket seems to be quite common amongst the few drawings I have. The only reason I can think of for it is to stop the axle rotating but...............
-
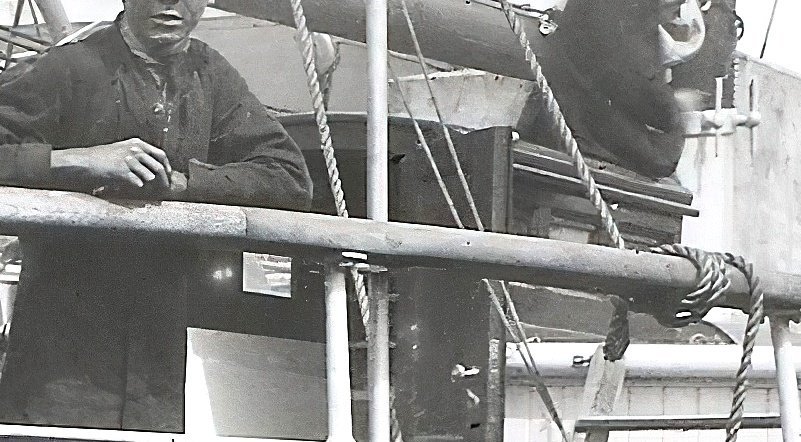
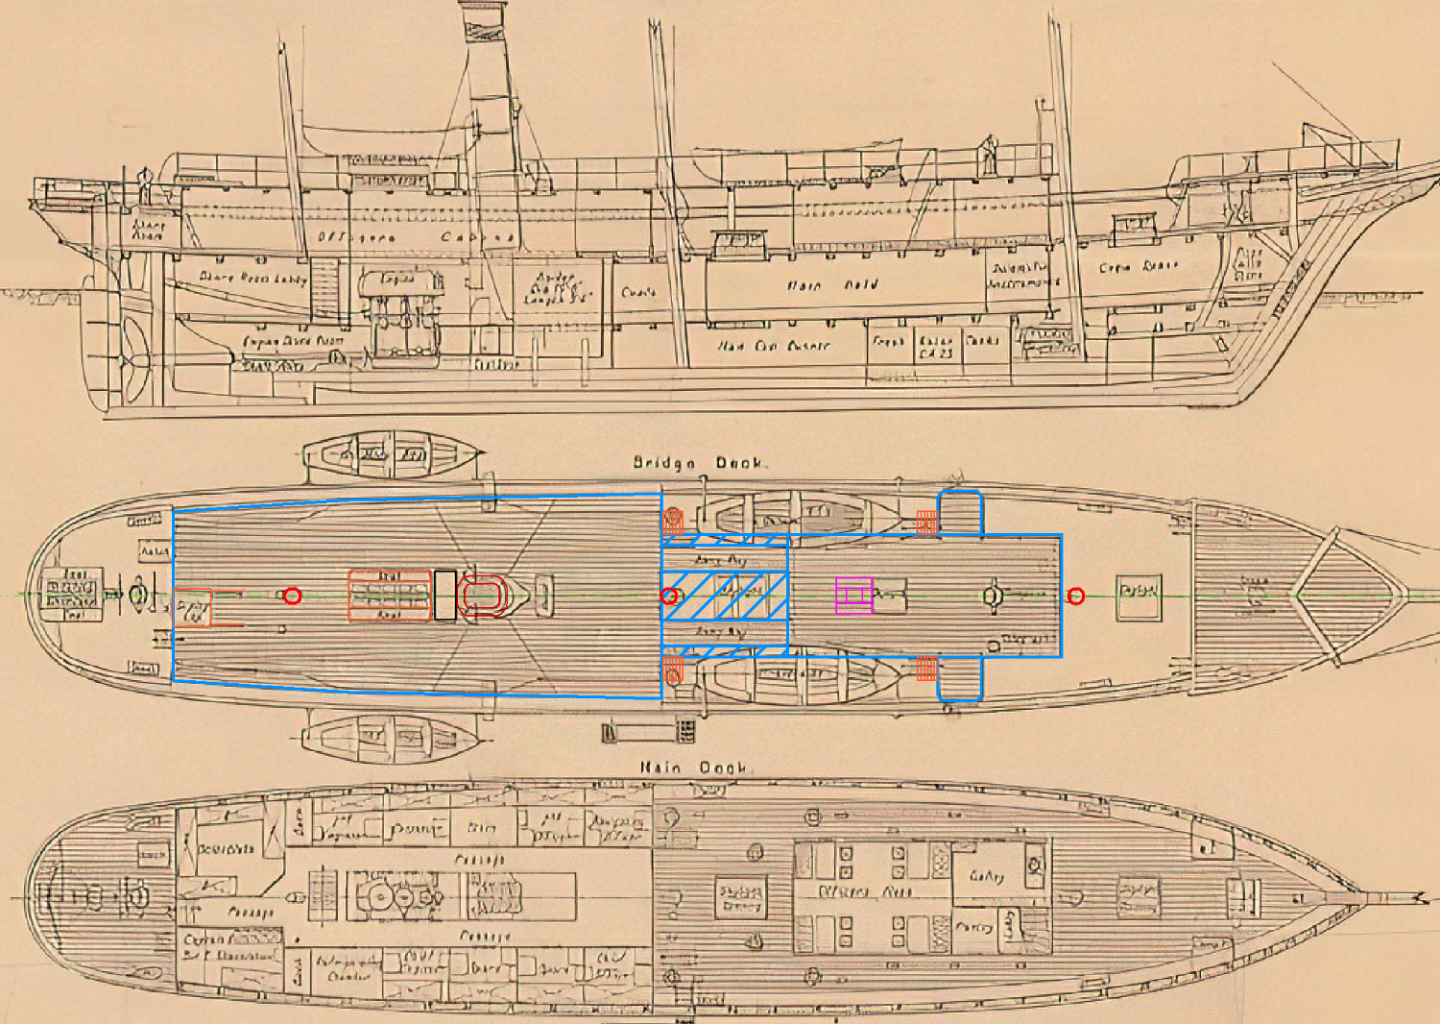
Keith, we basically have two situations, pre and post departure. We have photos from both but we don't always know which they represent, for example the one above with the cat and rectangular window could be either. That shot also shows a round porthole aft of the galley door and there is another showing a cook skinning a penguin and a porthole forward of the galley door. Another of the wreck shows a round porthole in the forward galley bulkhead inboard of the galley stove. These I am pretty sure existed post departure. Of the rectangular windows or any other windows in the 'ritz' I think we only have the following pre departure shots. EDIT: The shot above has the cook skinning a seal, obviously post departure. These shots are facing aft (unless I'm really wrong) with the galley behind the photographers right shoulder. The shot below is also facing aft. The 'ritz' has been stripped, two rows of columns have been added along with partitions down each side (the left one has a sign reading 'The Billabong'). The area behind the partitions can only be 2-3 feet and probably have bunks you crawl into from the end, but that's a guess. The partitions also hide any windows/ports. EDIT: The door at the end is new and opens to the main hatch. This shot is looking forwards. The photo below is facing forwards AFT, it again shows the partitions left and right, it shows the table top hanging from the right hand columns with the trestles behind the man on the right. It shows a heating stove with a water boiler on top and a doorway which could access the pantry or perhaps a W.C. In the forward right is the entrance to the galley an office?. Now, a couple of questions: What happened to the skylight or is it still there? Where does the chimney for that stove come out, the stove must be nearly under the binnacle?
-
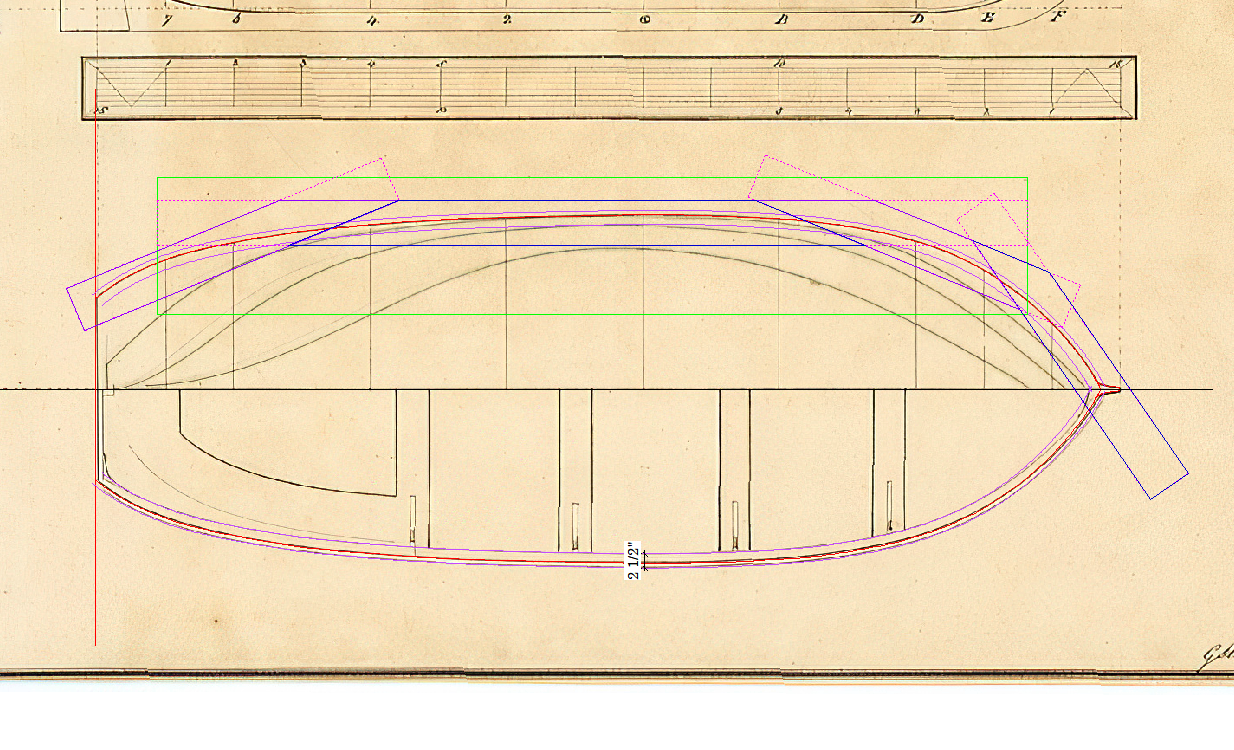
Those are the 'ritz's' windows, two per side, originally over the tables (see post #11 and also marked on the plans). Three per side. Each one about 3mm long at 1:70 at a guess. The plan sort of suggests it slides but that might be my brain making suggestions, anyway it has sufficient head height that it doesn't need to slide.
-
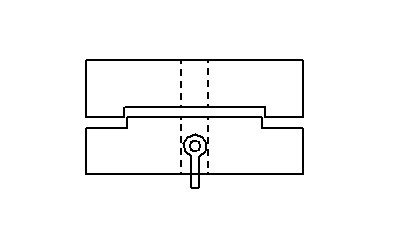
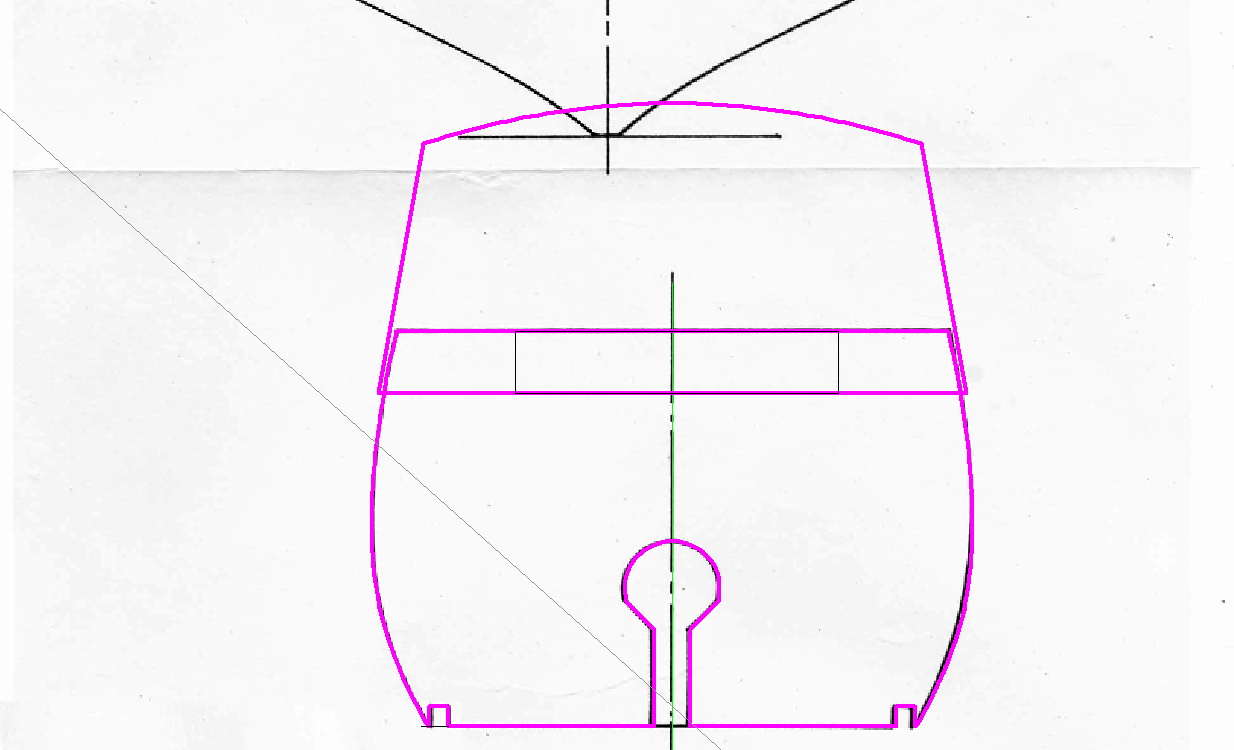
I think I have it (maybe). The dashed (yellow) line had me puzzled. I think it shows 'C' rebated into 'B' so that 'B' can only slide in a straight line. End view. Pin(2) is actually just indicating the stowage position for the fighting pin(1). So to stow the gun you remove the securing bracket(3), lift pin(1) until it clears the yellow line, drag the slide(A) ('B' comes with it due to pin(1)) back until pin(1) can drop in to position(2), refit securing bracket(3) and swing the gun to the stowed position. That's my guess anyway.

-
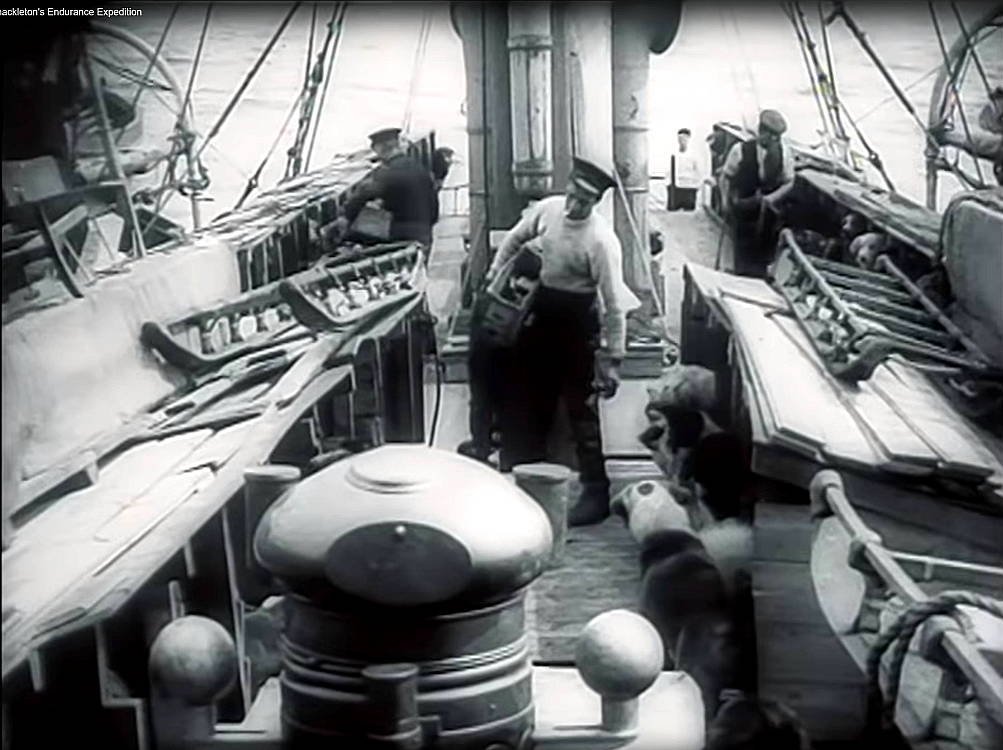
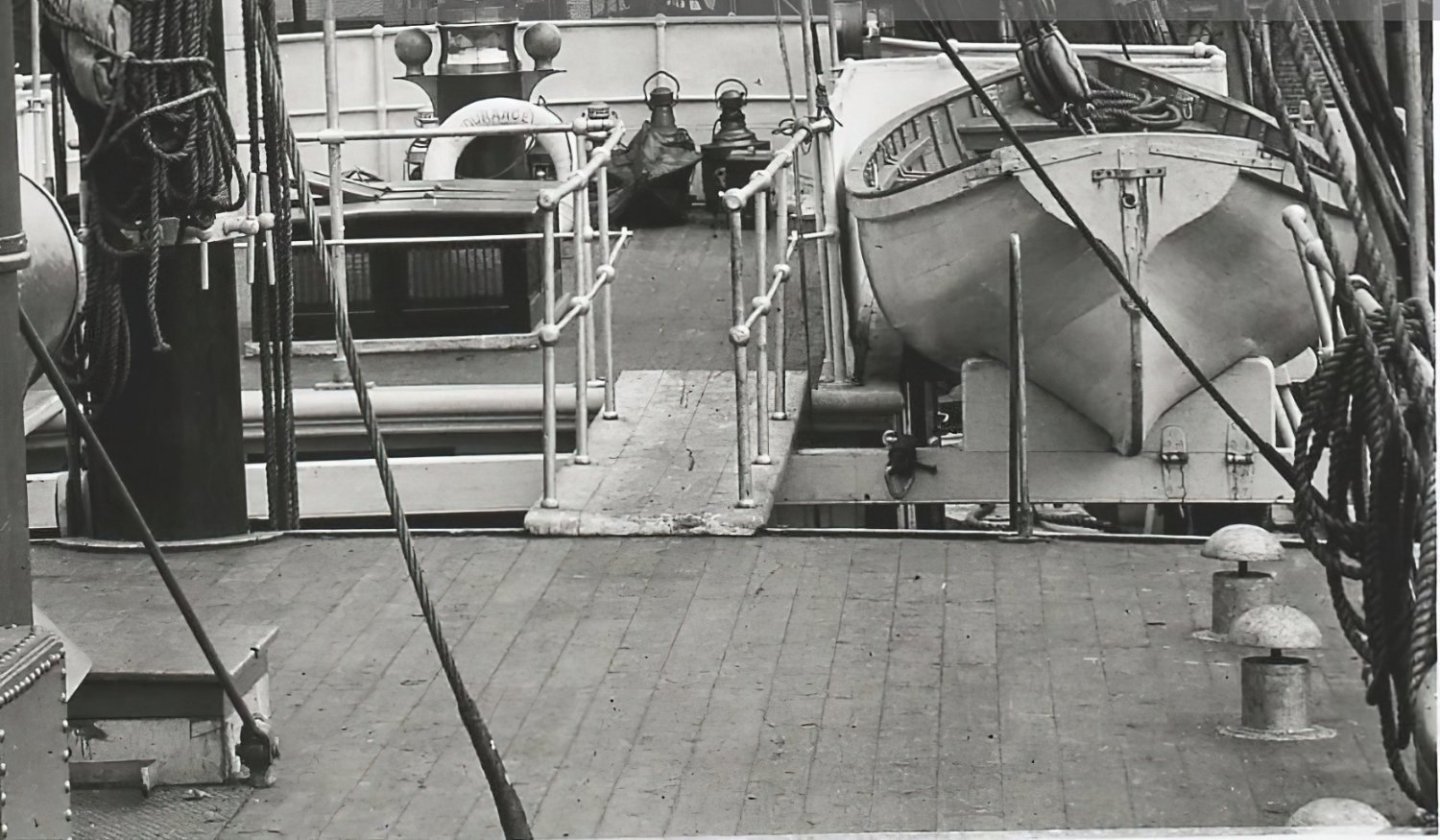
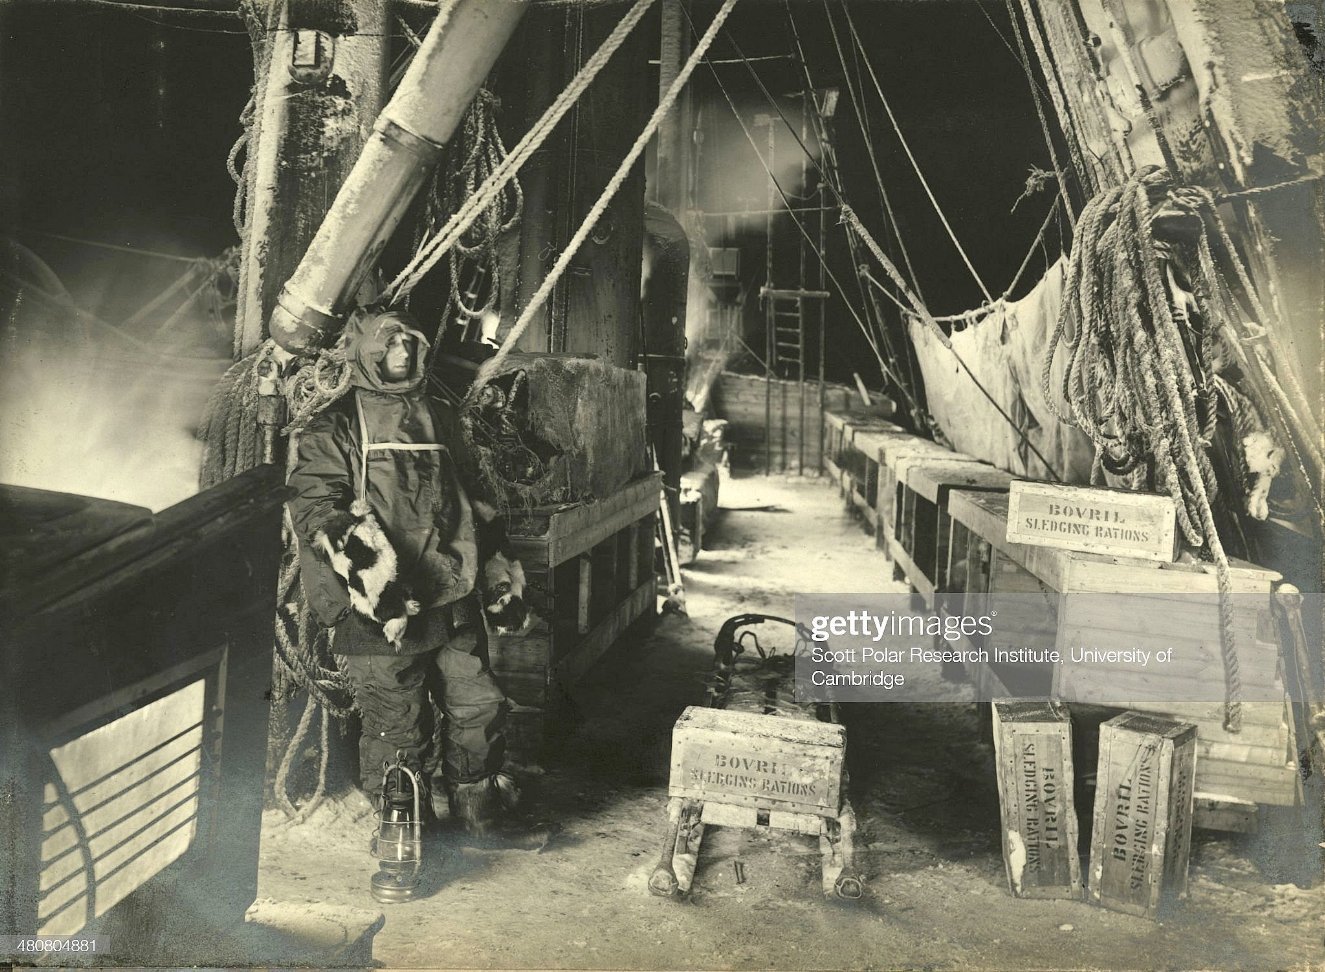
A few more photos: The interior of the 'ritz', obviously gutted during the fit-out and I think modified during the voyage. Note the door in the aft bulkhead (I'm happy to see it as it just had to be there), no ladder and no visible skylight (but it's shown in exterior shots actually I'm not sure about that now, I think we only see a canvas cover on the voyage which could be covering stores ??? Not sure.). Strangely it looks too wide but that must be an illusion. https://www.gettyimages.com.au/search/2/image?family=editorial&phrase=endurance ritz A view forward along the bridge deck (is/has anybody added the skiff to their model?) : The galley door, port wing bridge and companionway:
-
Makes my 3D work look very amateurish (which it is ). The were accurate at one point in time, note that they should overlap the roofs though.
-
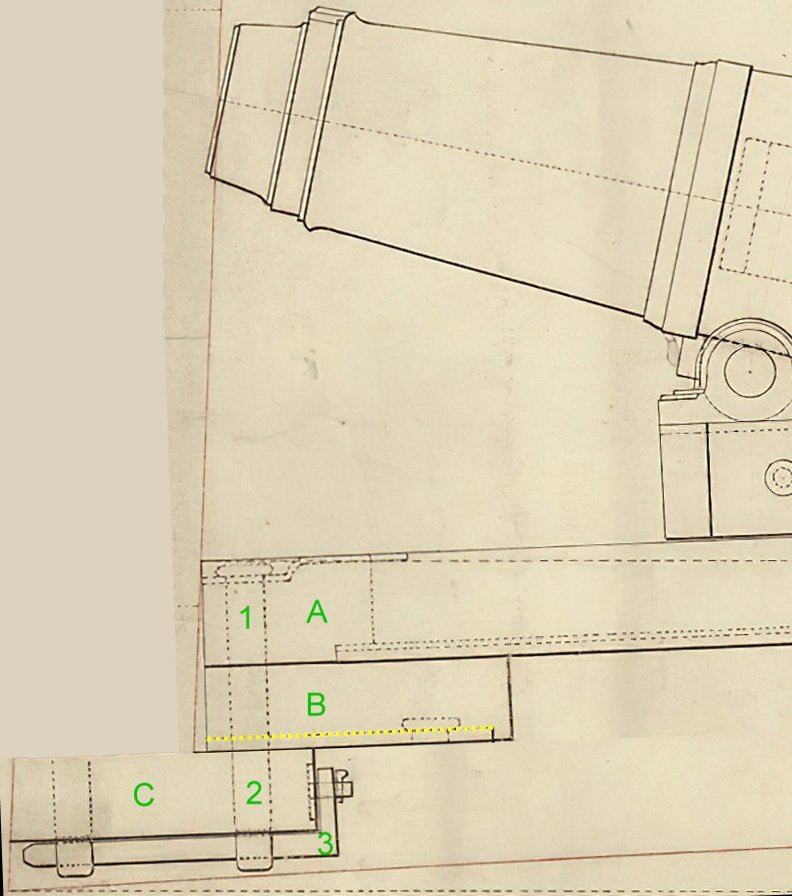
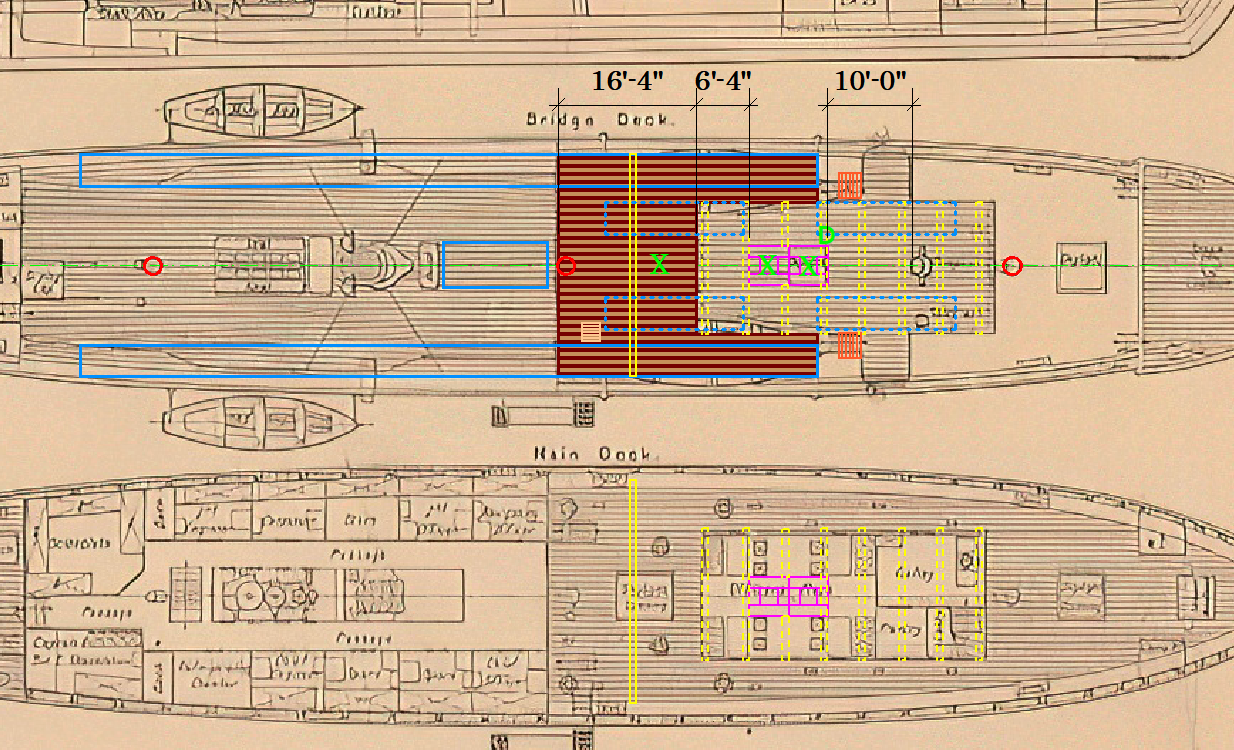
Actually what I was saying was that although the dog appears to be next to the binnacle it's actually about 10 feet closer to the camera ('D' in the images below). It's probably under the tall canvas but I'm not sure. It could be or it could be through the skylight, again I'm not sure. Note the 'X's. Man, they kept moving everything didn't they. I suspect the 'small pic' was taken after they offloaded the dogs on to the ice which would explain the skis. Crane for the main hatch? Yeah, they're a nice touch. That last pic shows the foreshortening by the camera again, the beam under the gangways is about half way between the cabins and the 'ritz' or if you like, the middle of the gangways.
-
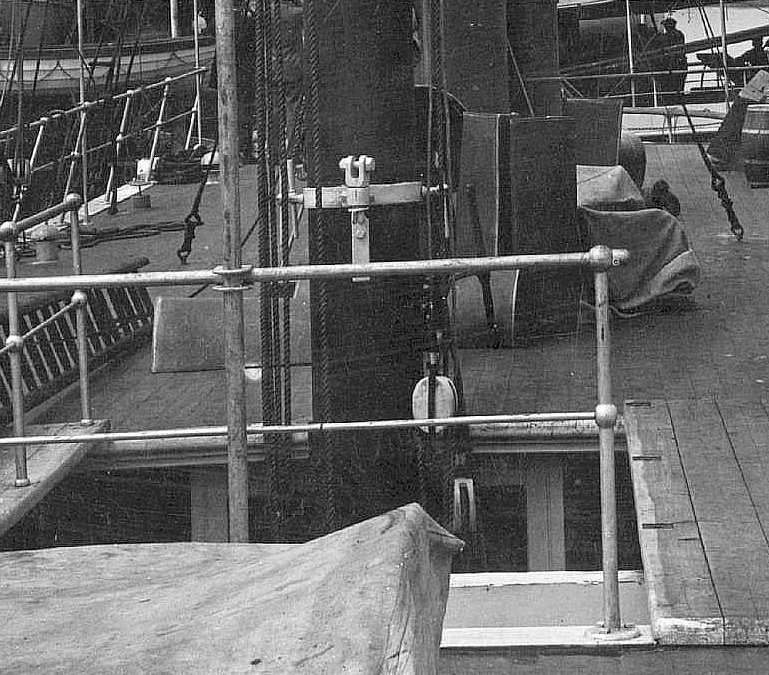
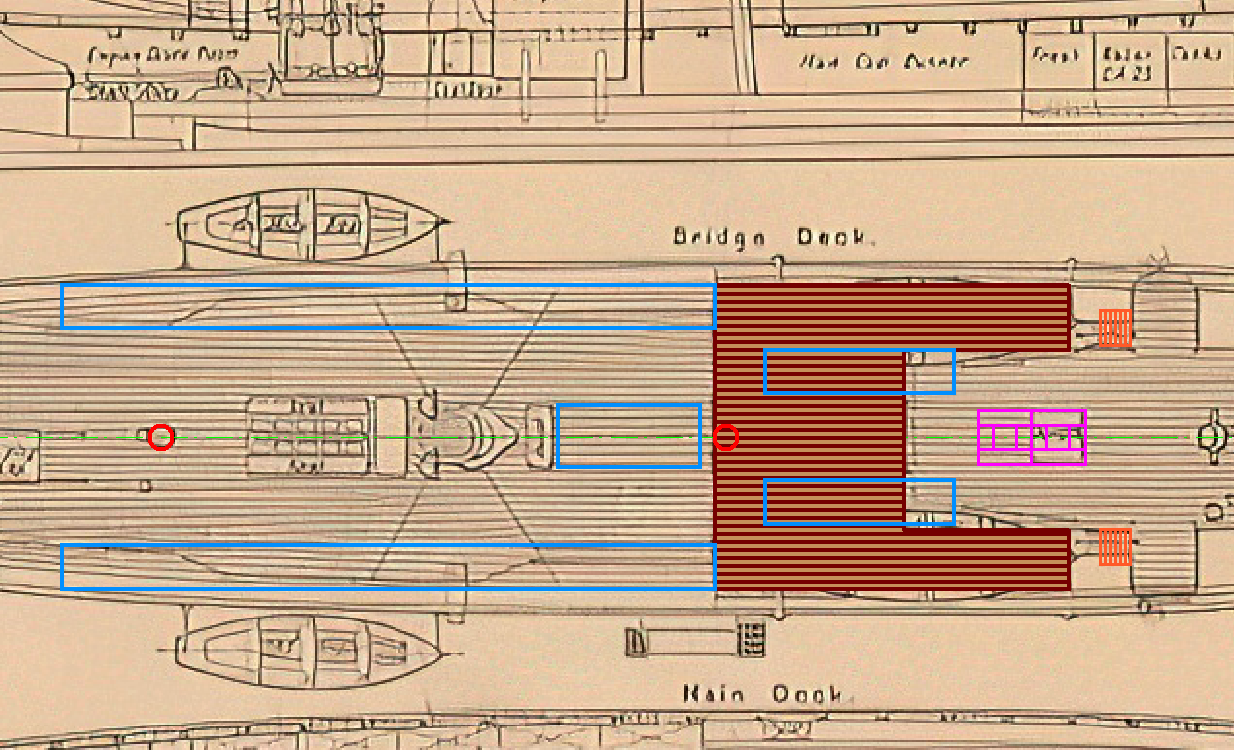
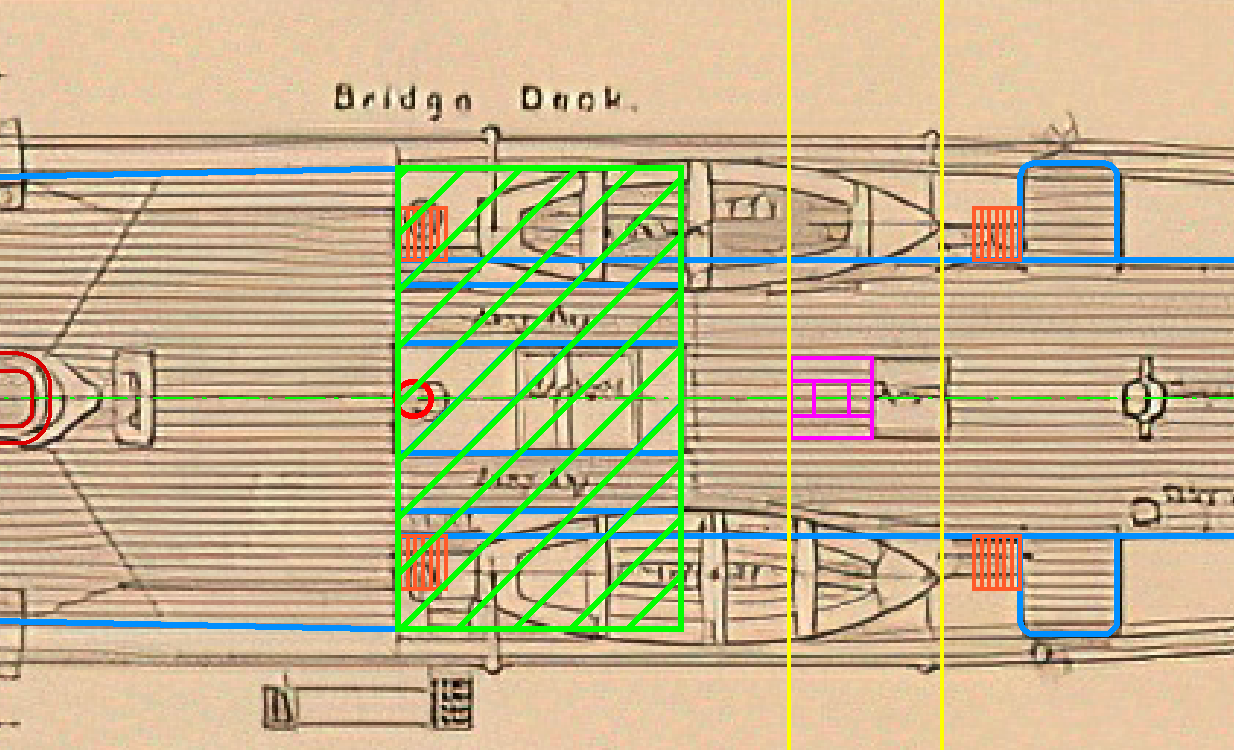
I said above that there was a lot of foreshortening in these photos, in the following shot the dog has it's paws on the 'ritz' skylight roof and looks to be just in front of the binnacle but the plan shows the skylight to be 'half a boat length' (about 11 feet) aft of the binnacle. Some of this is shown in the second photo. Not also that the binnacle was changed at some point. The first photo also shows kennels running from the skylight past the binnacle blocking access to the wing bridge companionway helping explain the need for a new way to access the bridge deck.
-
The model is a clue but we don't (yet) know why they built it that way, so it's interesting but not definitive. The 'Bovril' photo has a stanchion in the lower right which I initially thought was at the corner of the 'ritz' roof. However it is about two 'man lengths' from the mast which likely makes it the corner of the cabins roof . The same photo shows the area in front of the mast decked in at least as wide as that stanchion. It might extend forward either side of the 'ritz', perhaps as far as the bows of the boats as the model depicts (heck, perhaps even as far as the wing bridges) since they have chosen to store the boats outboard on the davits and there is 'stuff' stacked outboard of the 'ritz' kennels. Something like this perhaps:
-
Unless he is standing on the skylight? Maybe maybe not. Whatever, the kennels would get in the way of accessing the new structure. Why don't the 'ritz' kennels show up in the other photos? 1/ there is a lot of foreshortening in these shots 2/ he is standing on the now decked in area between the cabins and the 'ritz', his back is against the mast, but why does the planking run port/starboard instead of fore/aft? 2a/ the skylight is under the white canvas cover between the dog and the binnacle. What it certainly does show is the difficulty of access to the bridge deck. I am currently thinking that the area in green was fully decked (maybe):
-
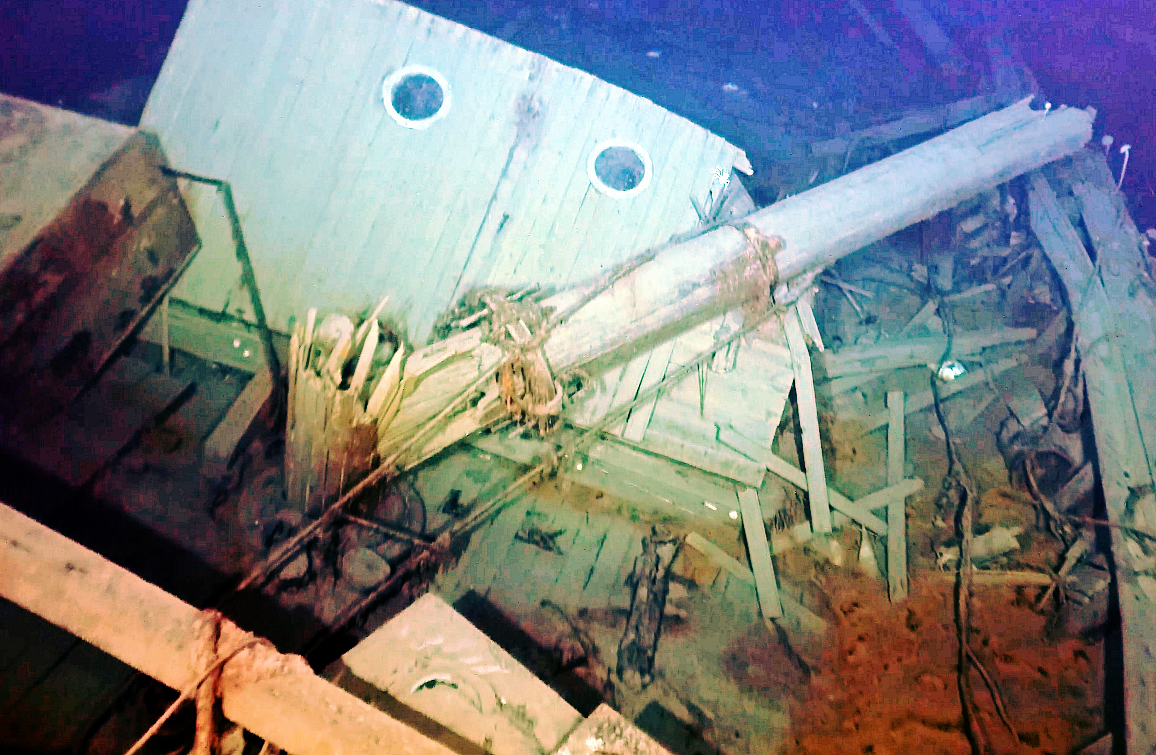
Nothing adds up at first glance, that's what makes it interesting (think of the Chinese curse "may you live in interesting times"). First up Getty has a larger version of 'the small pic' And I can see my piece of wood is actually a ski, oops. But note that the new structure is made from salvaged pieces, where did they come from? It also seems obvious in the second pic in my post above that the structure has been very roughly assembled, then presumably rebuilt opening the other way. It is also sitting on a curved 'something' proud of the deck, where did this come from? Note the join between it and the new structure. Now lets look at this photo taken inside the 'ritz' We can see the skylight spans more than one pair of beams (probably two, the beams, windows and tables are shown on the plans in my post above). It would appear that during the fit-out it was extended to twice the original length. As to why no ladder, this photo was obviously taken during the fit-out. Now, this opens another can of worms. The new structure sits on a square base but the skylight is a rectangle. Either the square base is new or the skylight has been modified. If the square base is new why bother with it? Why not build the new structure directly on the deck? If the skylight has been halved in size (keeping the aft half as shown in purple in the plan in my previous post) it could have provided materials for the new structure (maybe). Lots of questions, few answers so far.
-
Why is it that vessels after the invention of the camera pose the toughest questions? Given that the above two photos are taken from almost the same spot, it would appear that during the voyage the area between the 'ritz' and the cabins was fully decked in. It would also appear that the 'ritz' skylight was rebuilt (note that the man in the small pic in post #11 has his foot on the old roof of the skylight (he is also carrying or passing down a piece of wood suitable for making a ladder). Compare that with the following pic. So it looks like the roof was taken off, the glazed panels removed and the roof re-fitted. My guess is that it was getting difficult or dangerous to access the Bridge Deck using the external companionways.

-
Yep, if only they had added 10mm at the aft end of all strakes 😞 It was a while ago so I don't really remember and my photos don't show everything but I think the strake next to the garboard is the shortest. Having say 2mm overhang (not more) on the garboard will help with the length and hopefully the extra 0.5mm you took off the moulds will fix the width issues. (or you could take off a little from the inside of the next strake, shown in purple below, which will also pull that strake back a bit).
-
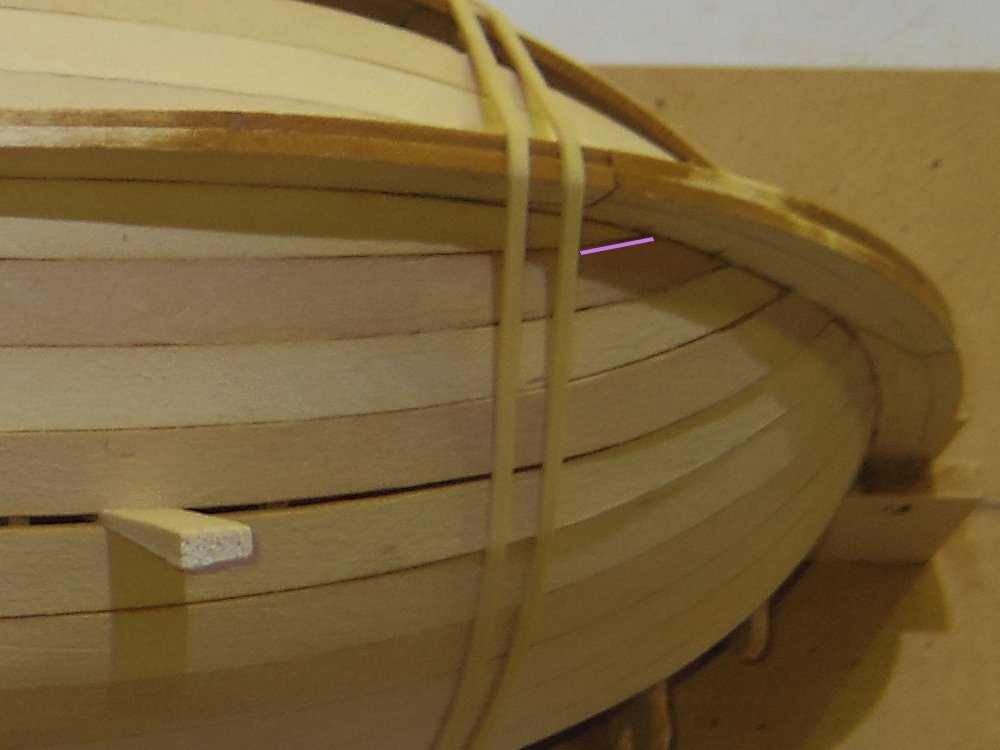
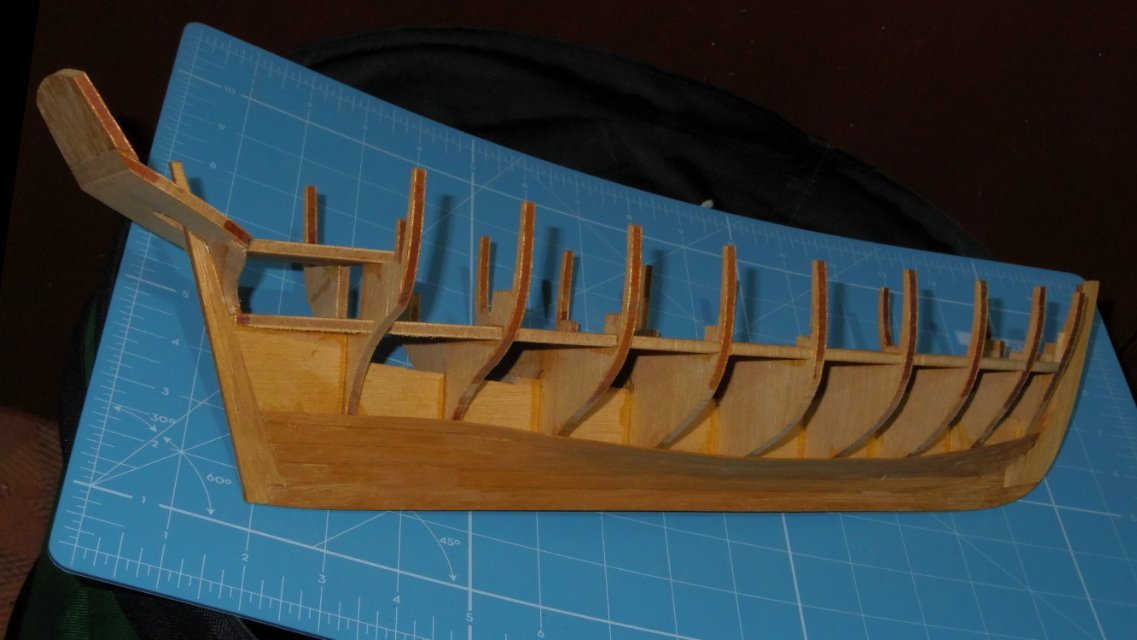
I bet that feels better. This model will spread if not restrained until you glue the thwarts in. I made a cradle for it to sit in but that was overkill. For my 16ft cutter I just glued three bits of wood together to form a frame that hung over the sides, it doesn't have to be fancy. A little fairing of the ribs themselves might be a good idea. Remember the laser cutting puts a bevel on the edges, unfortunately they are all cut from the same side, good for one half of the hull bad for the other. So you have to fix the 'bad' side and then fix the 'good' side so the widths are the same. Remember you don't really have any spare width and also that the bevel varies with the curvature of the hull.
-
Given the scale, the width of the cap rail for the yawl would be less than the thickness of a one cent coin with those of the cutters about twice that of the yawl. I suspect your 'planking' is thicker (mine would be). (Yawl 2 1/2" - 4", Cutters 4 1/2" - 6") Otherwise, simulate scarph joints with diagonal joins.
-
Tim, I can't think of any reason you can't just screw something (or some things) to the false deck. I gets covered up anyway. I think I just stood mine on the top timbers (bulwarks) but I think the above would be better.
-
Well, it was a valiant attempt and certainly a success in it's own way but I suspect that even if you churned out kits on a CNC mill it would be difficult to show a profit. Meanwhile a couta boat. There used to be a few in varying states of decrepitation and perfection on Mordialloc creek. If the sun comes out and I'm down there I'll see if there's any left and grab you some shots.
-
Tim, the one I started in 2018 is about 1mm out either side and when I re-drew it just now I get the same. Yours also seems to sit a bit high, have you joined it the same as Thunder did? EDIT: Maybe you did and I'm wrong, it's hard to tell.
-
And you should find the 'card' for Rattle Snake at No 116. On it in the lower left you will see the reference 'F 18'. As there is only one reference there is only one drawing. To access the drawing open the link Bruce provided in post #17 and search in the left column for F 18. You should find a F14-F31, click on the plus symbol, nothing but numbers, number 1 is F14, 2 is the back of F14 etc etc (most of the time) 9 is F 18. It's a real pity that they made this wonderful resource so hard to navigate. Anyway, have fun.
-
Months and months of fun at a guess! But for some of us your hard work (actually 'Diligence' seems more appropriate ) paid off. Thank you again. Lapwing (1816) Kite Fancy (1817) Racer Sprightly Nightingale (1825) Speedy (1828) Snipe (1828) Vigilant (1821) Swift (1821) Basilisk (1822) Bramble (1822) Skylark Diligence
-
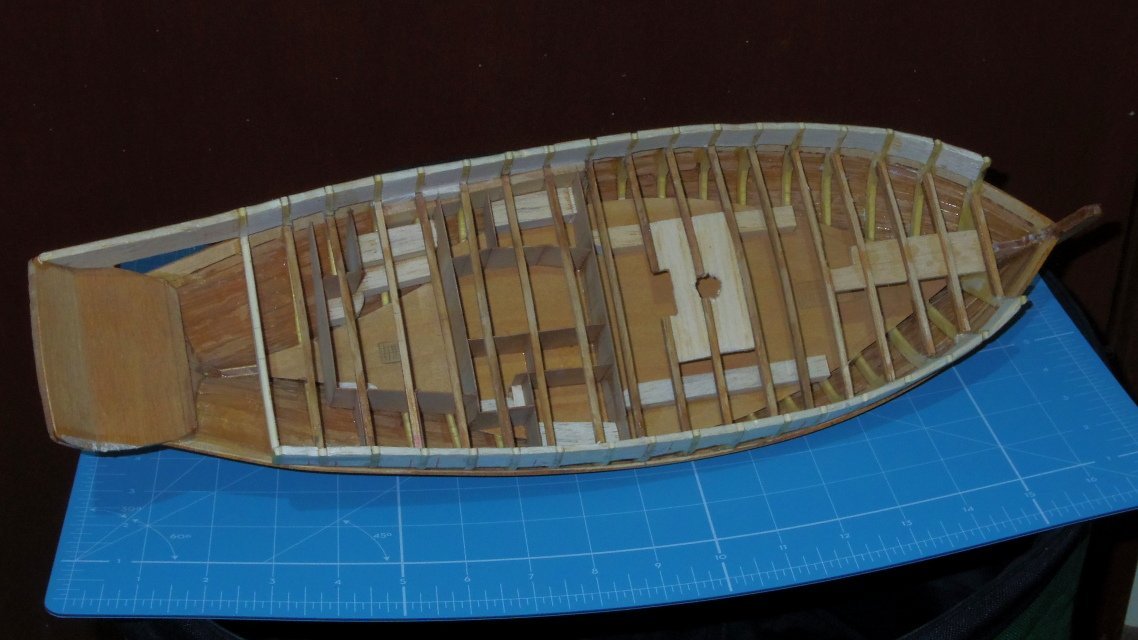
Umm. Earlier was 2018, before I found this forum. First ever 'build' and I wasn't happy with what I was doing and with the family connection I wanted to show more of the interior. The moulds/bulkheads were corrected. Which lead to something more like Bruce is suggesting: But I still wasn't happy, so I bought a Bounty Launch kit and found this forum and started learning. But I still wasn't happy, so I designed and built my small Cutter and learned a lot. I was quite happy with that so I designed and am building my Bounty Launch (and 'Kitty'). Which brings us up to date.
-
Here's one I made earlier
-
True, but the plans Tim has will build him a cutter, just not Speedy. For me, my great grandfather sailed out here on Lapwing so I'm more inclined to build her and get her right, unfortunately.