ObviousNewbie
-
Posts
211 -
Joined
-
Last visited
Content Type
Profiles
Forums
Gallery
Events
Everything posted by ObviousNewbie
-
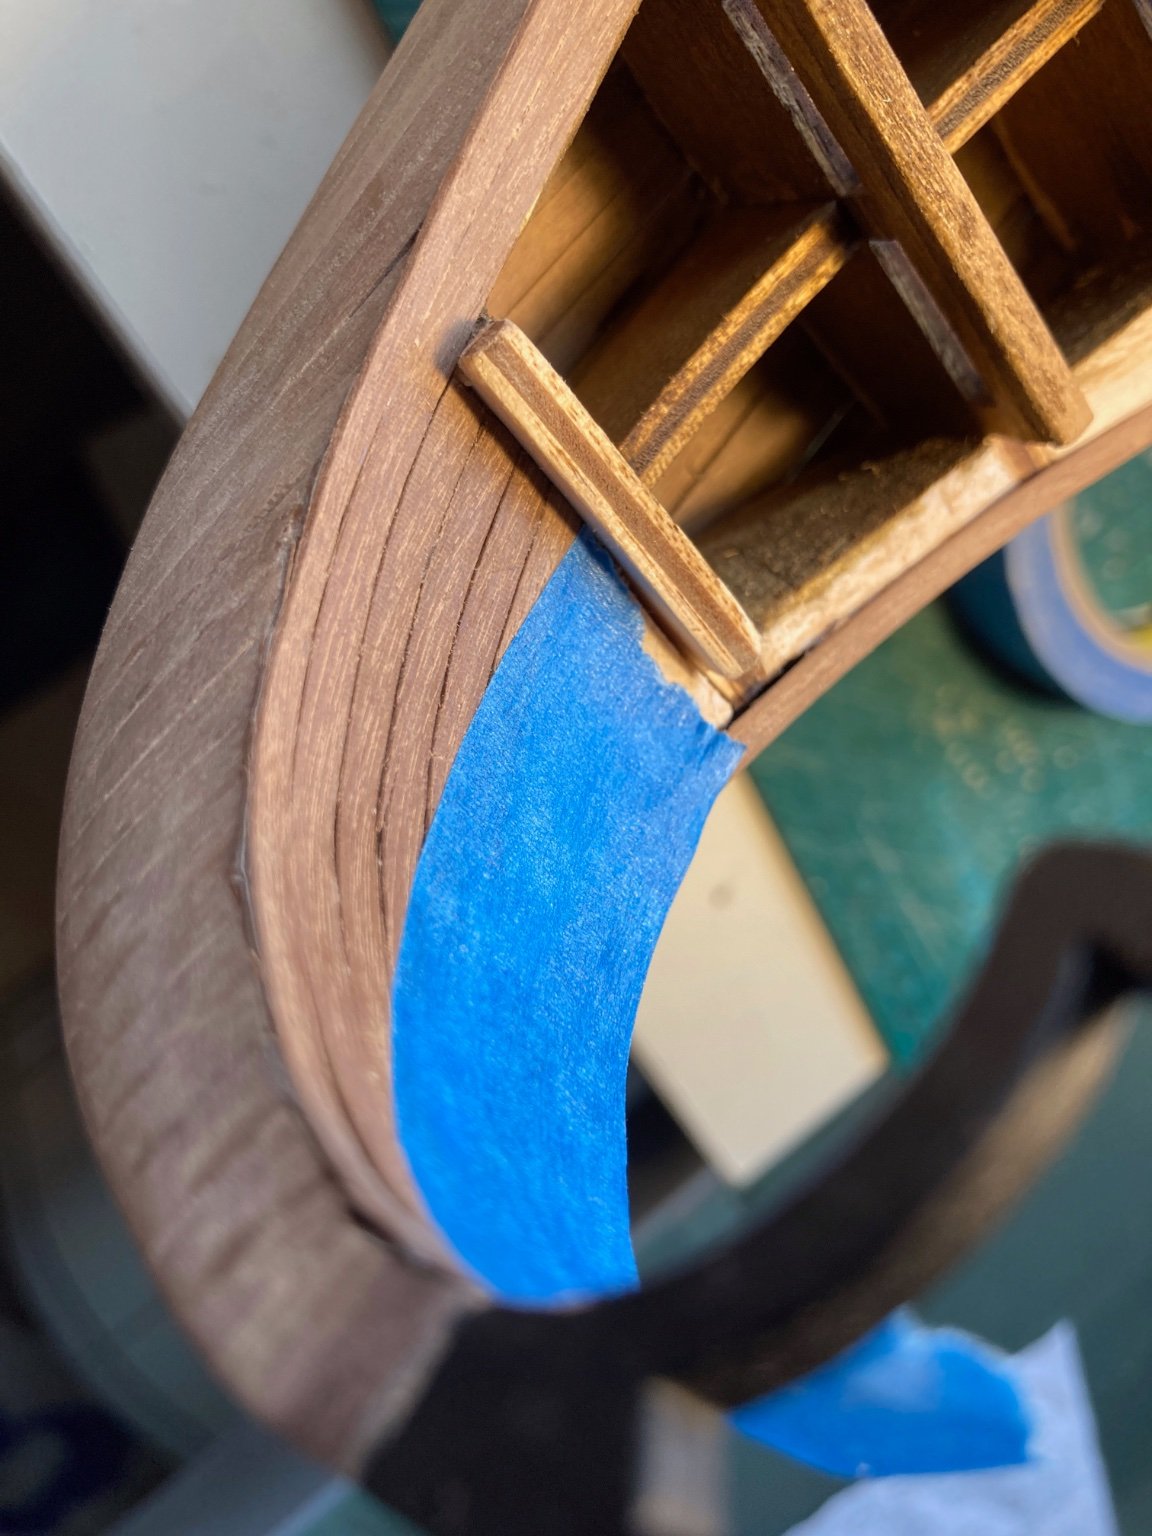
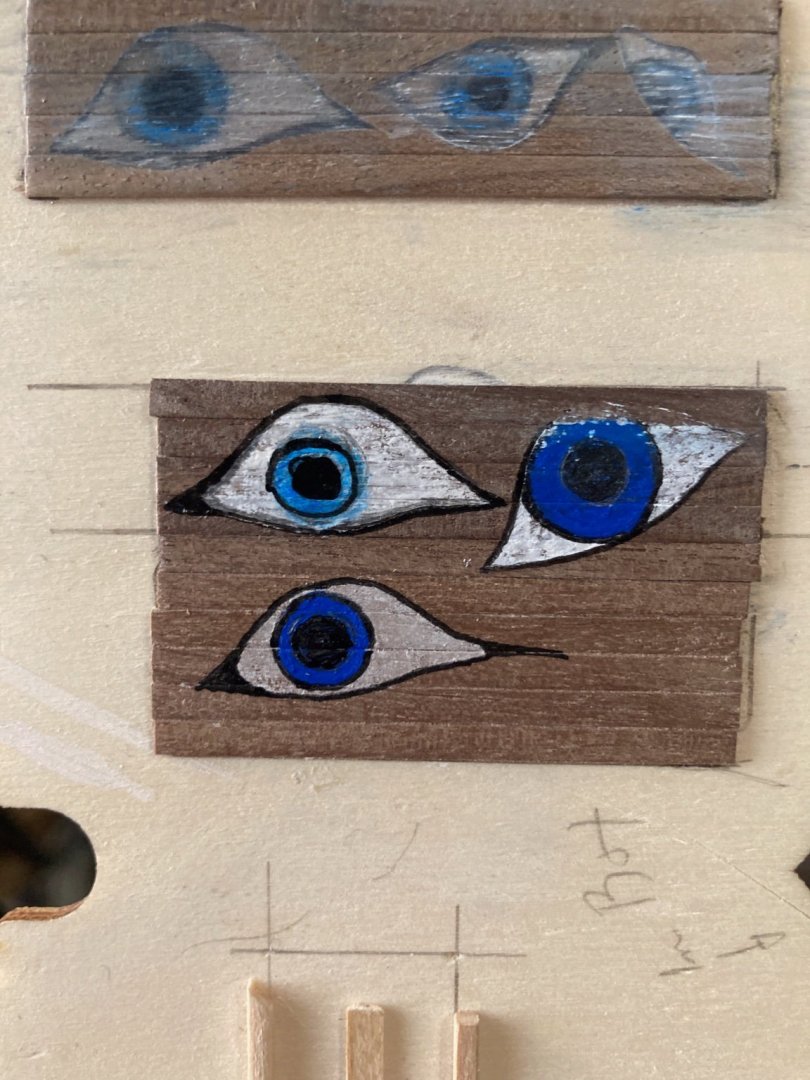
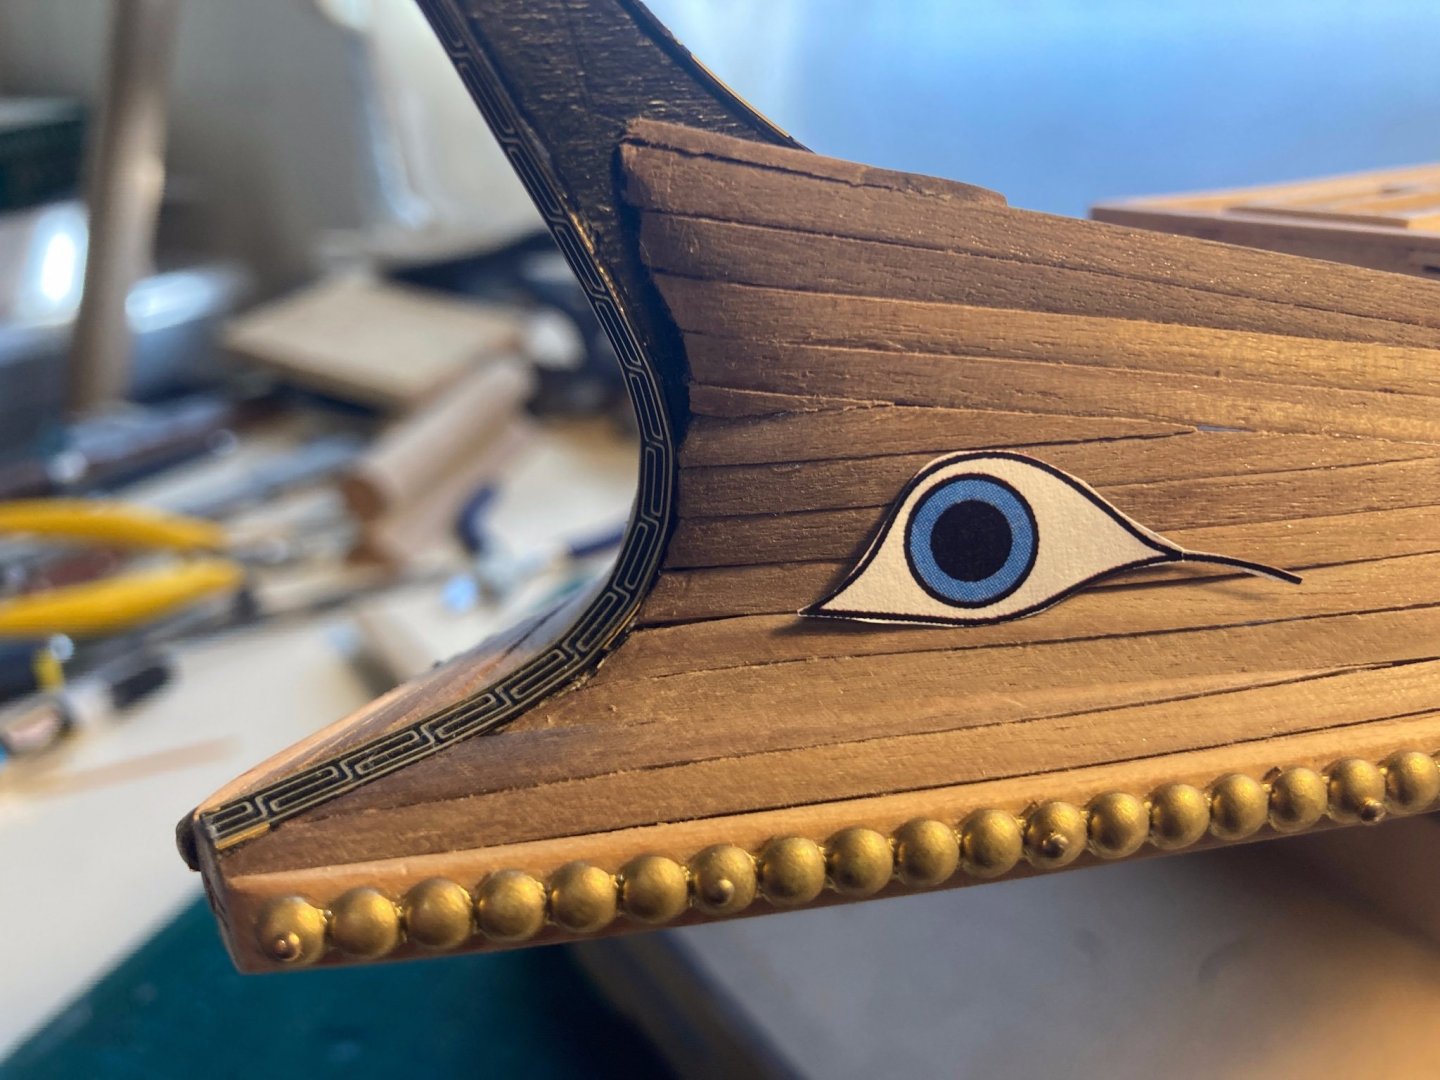
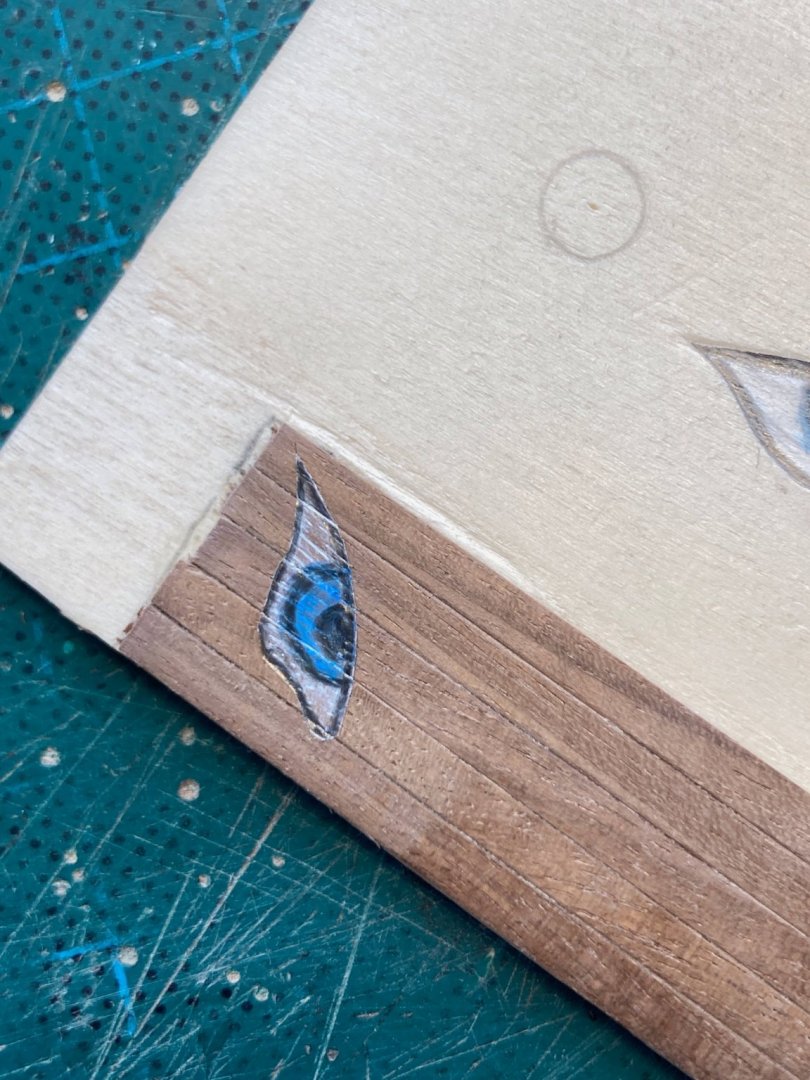
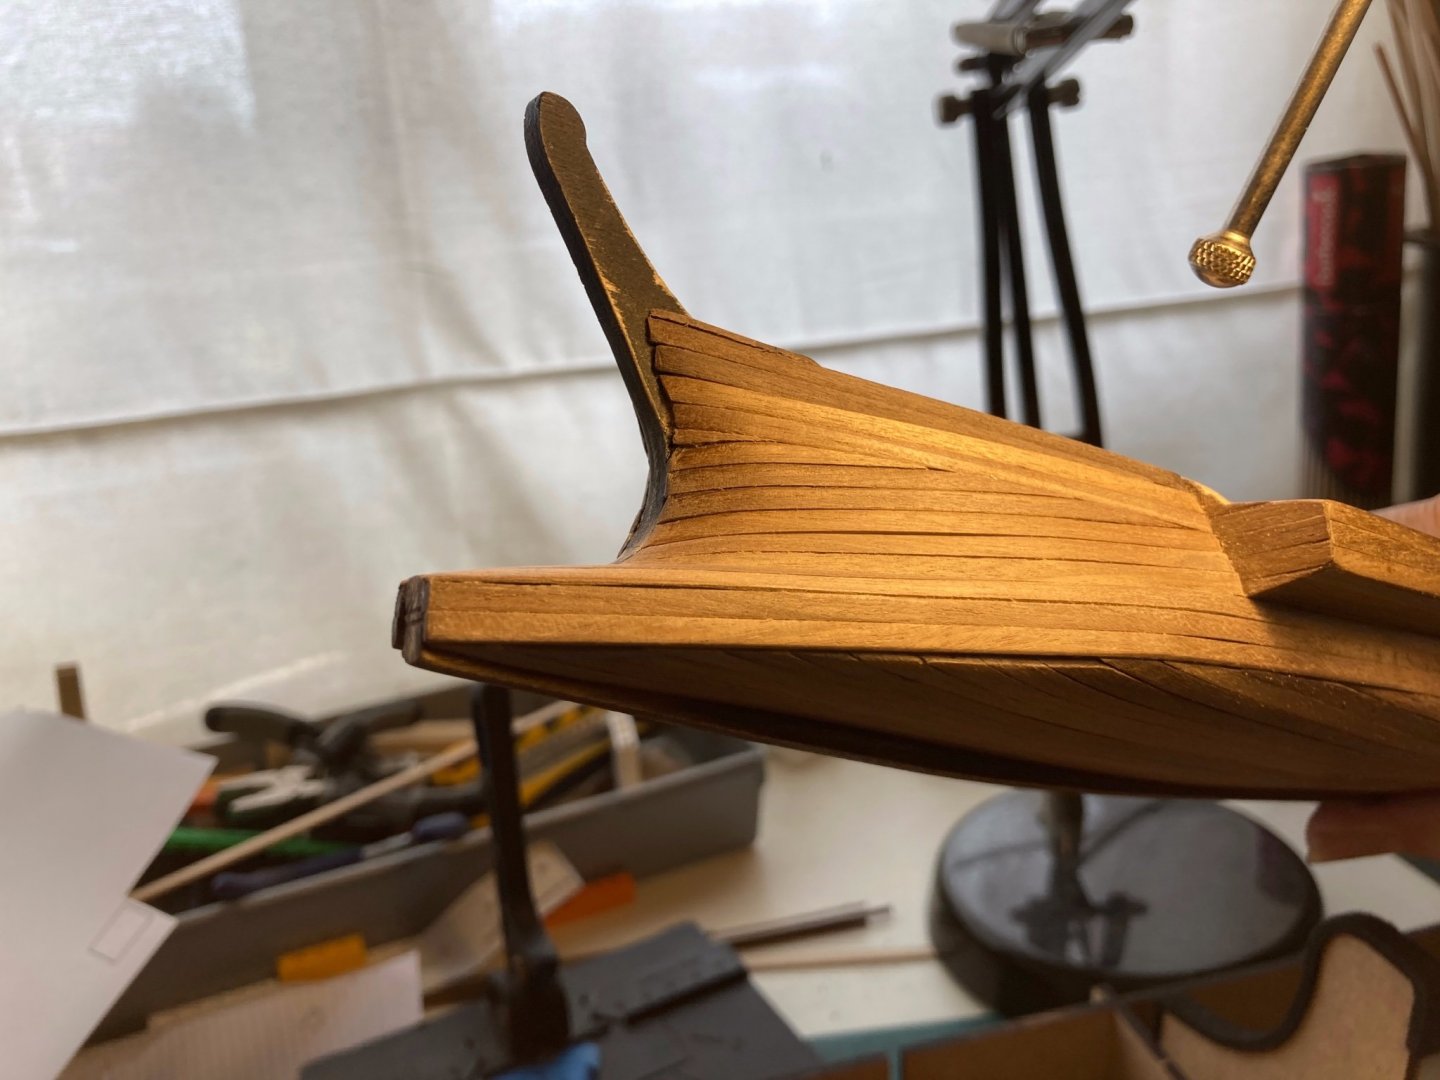
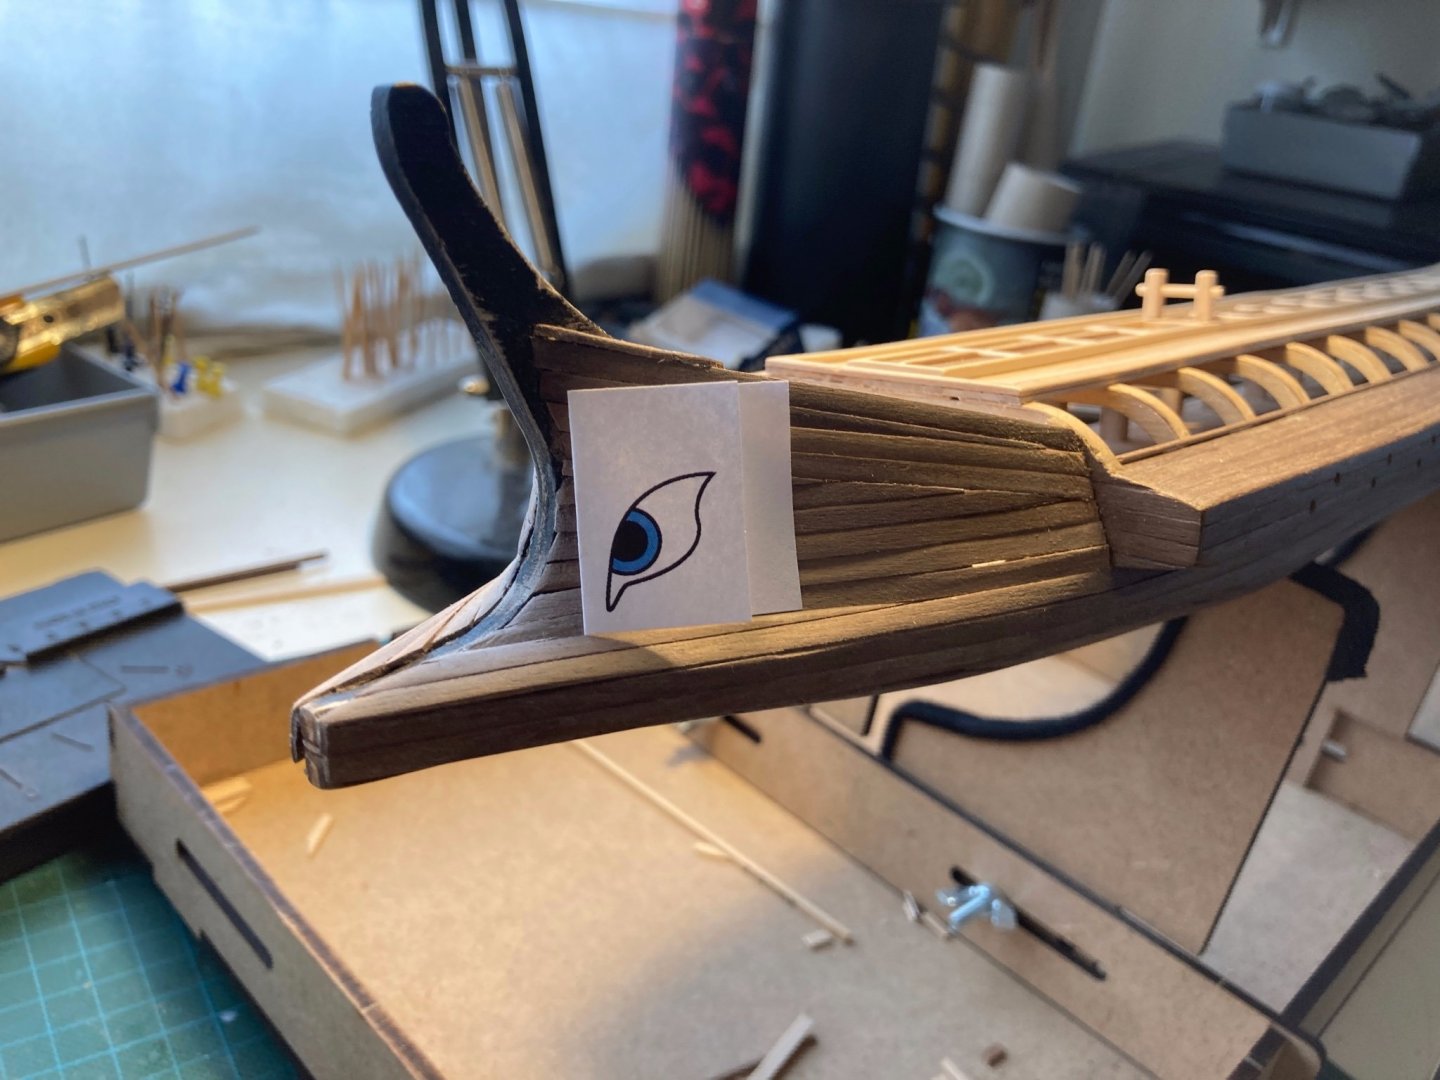
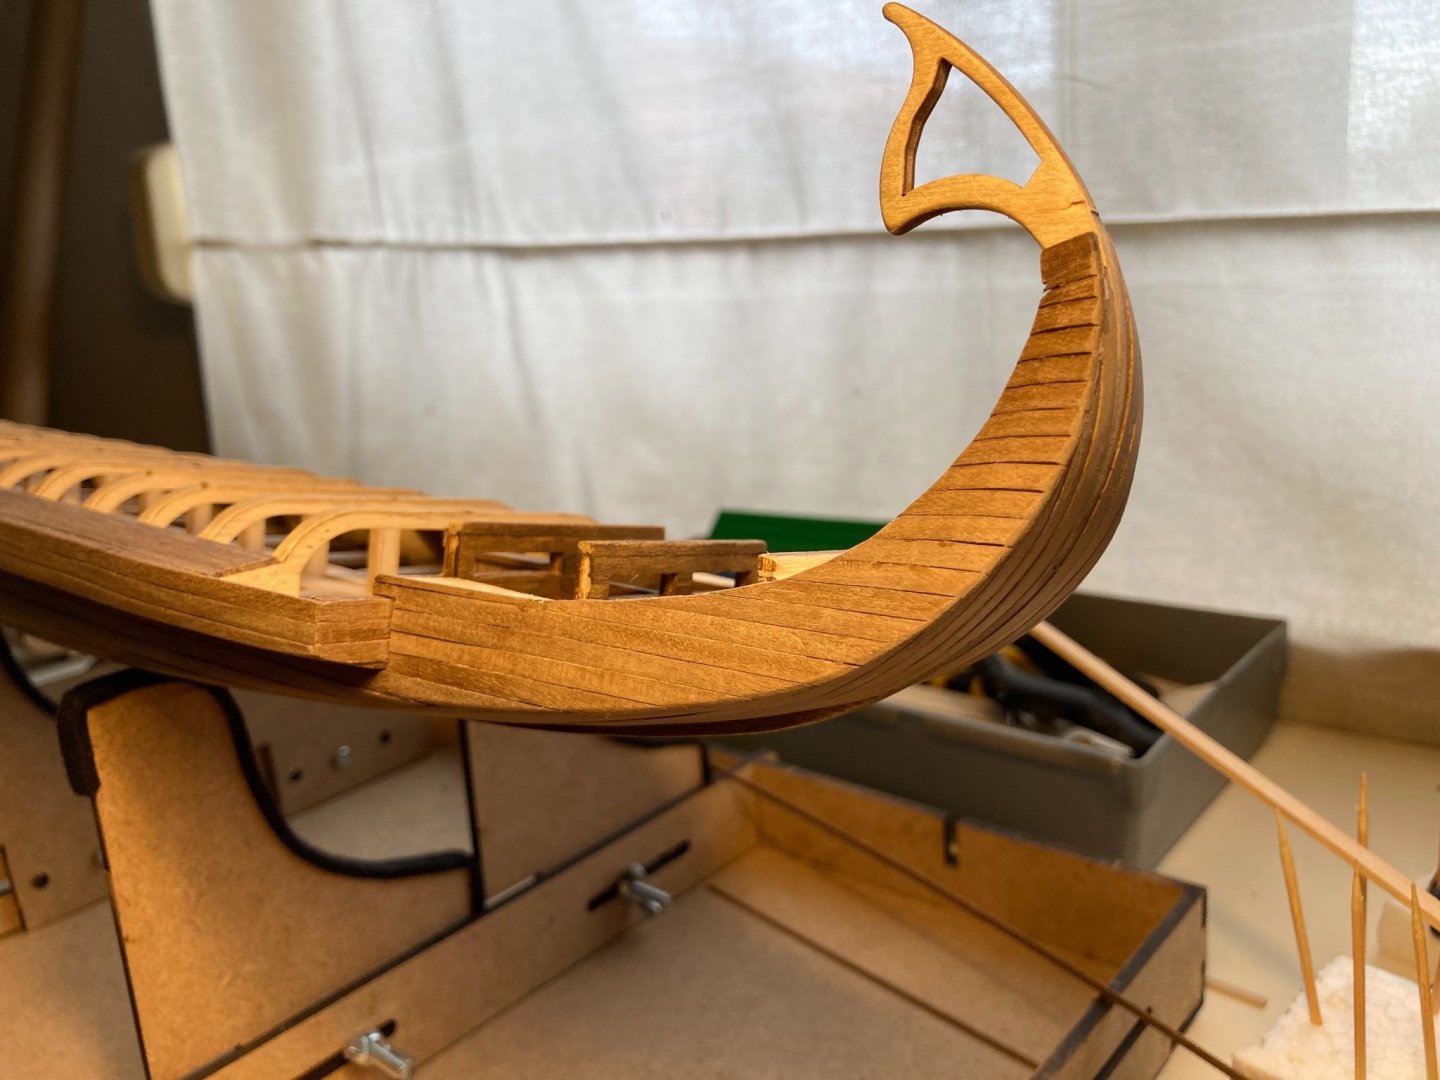
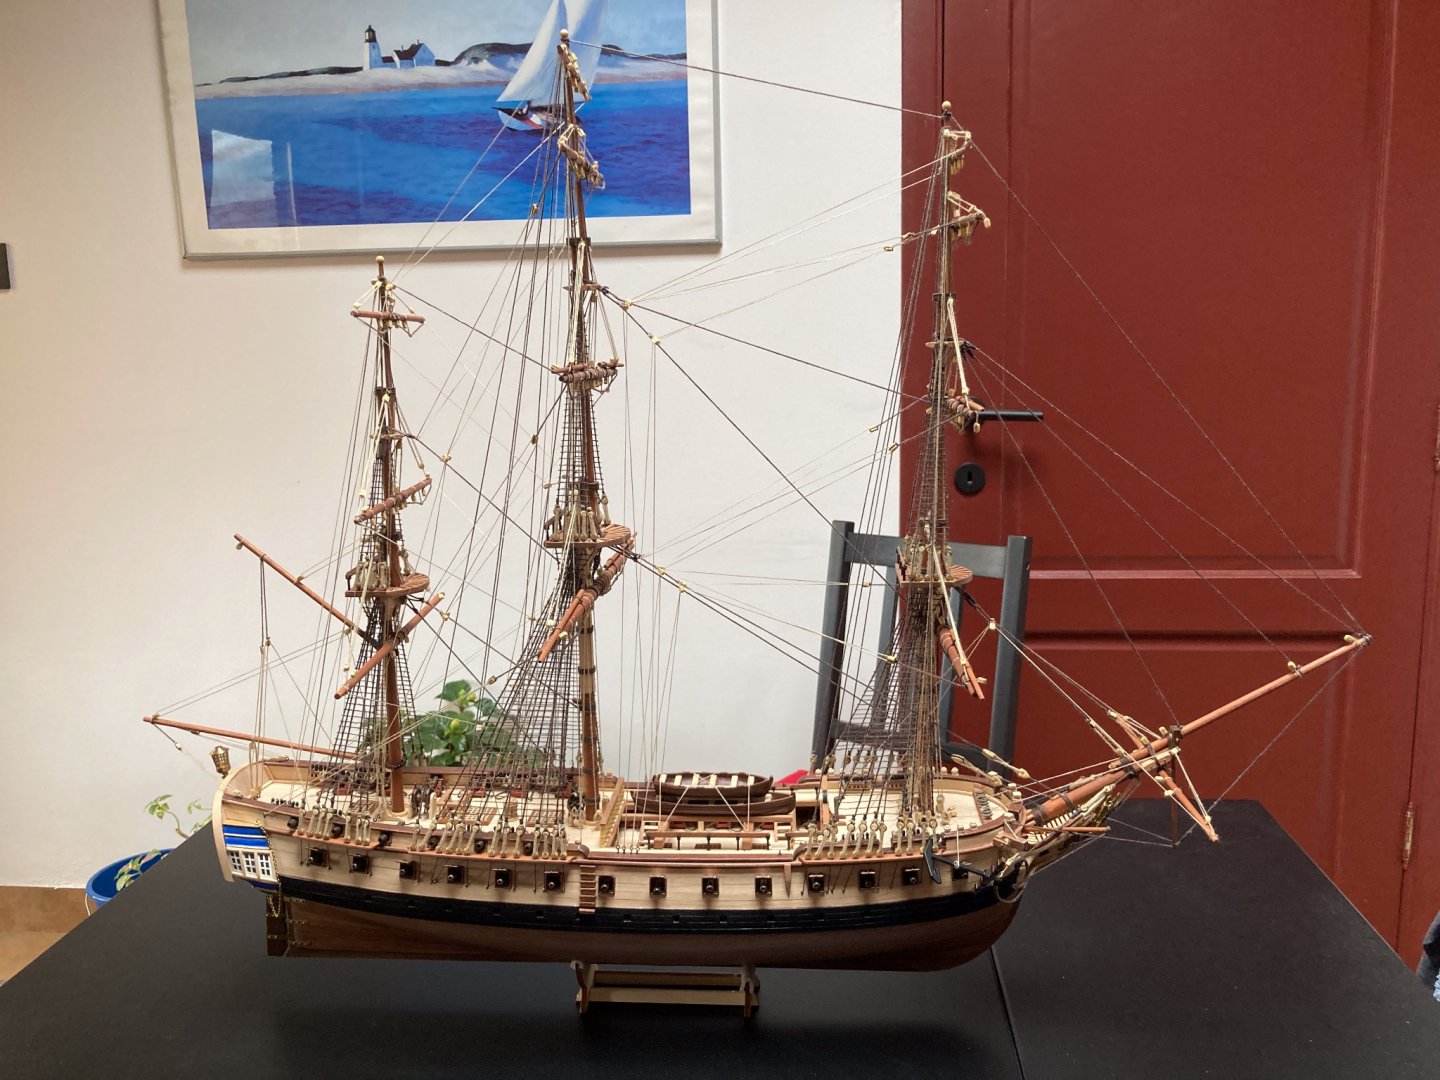
Hi all, thnx for checking in. Quick update, testing for the eye is ongoing, with some setbacks but a lot of lessons learned: Top two versions were done with coloured pencil, but as soon as the varnish went on, most of the colour disappeared into the brush and the rest got smeared out. Not a good start. I then tried with painting the white and adding the eye on top in pencil (middle three, top left). That didn't work out too good either. It has to be said that I don't consider myself as a painter, more as a smearer, so I try to avoid brushes whenever possible (the irony is: one of the ships highest on my wishlist currently is the Vasa, try getting that one built without touching a paintbrush 🙂 ). Took a deep breath and decided to forego the pencils and use actual paint. I was assisted for the black lines by some Molotow blackliners of 1 and 0,5mm. Top right was a first try, also tested how well the paint would come off by with sanding if anything went wrong. Bottom left is the last test, which I think works out OK. Now to finalise a process to ensure the positioning is identical on both sides of the bow, and then convincing myself to actually take a brush to Ephialtes itself... Take care and stay safe!
- 62 replies
-
- 9
-

-
- amati
- greek bireme
- (and 1 more)
-
If I remember correctly, when you request them, Occre will replace the plastic deadeyes with wooden ones free of charge. Best to contact info@occre.com for more details. Build looks fantastic so far!
-
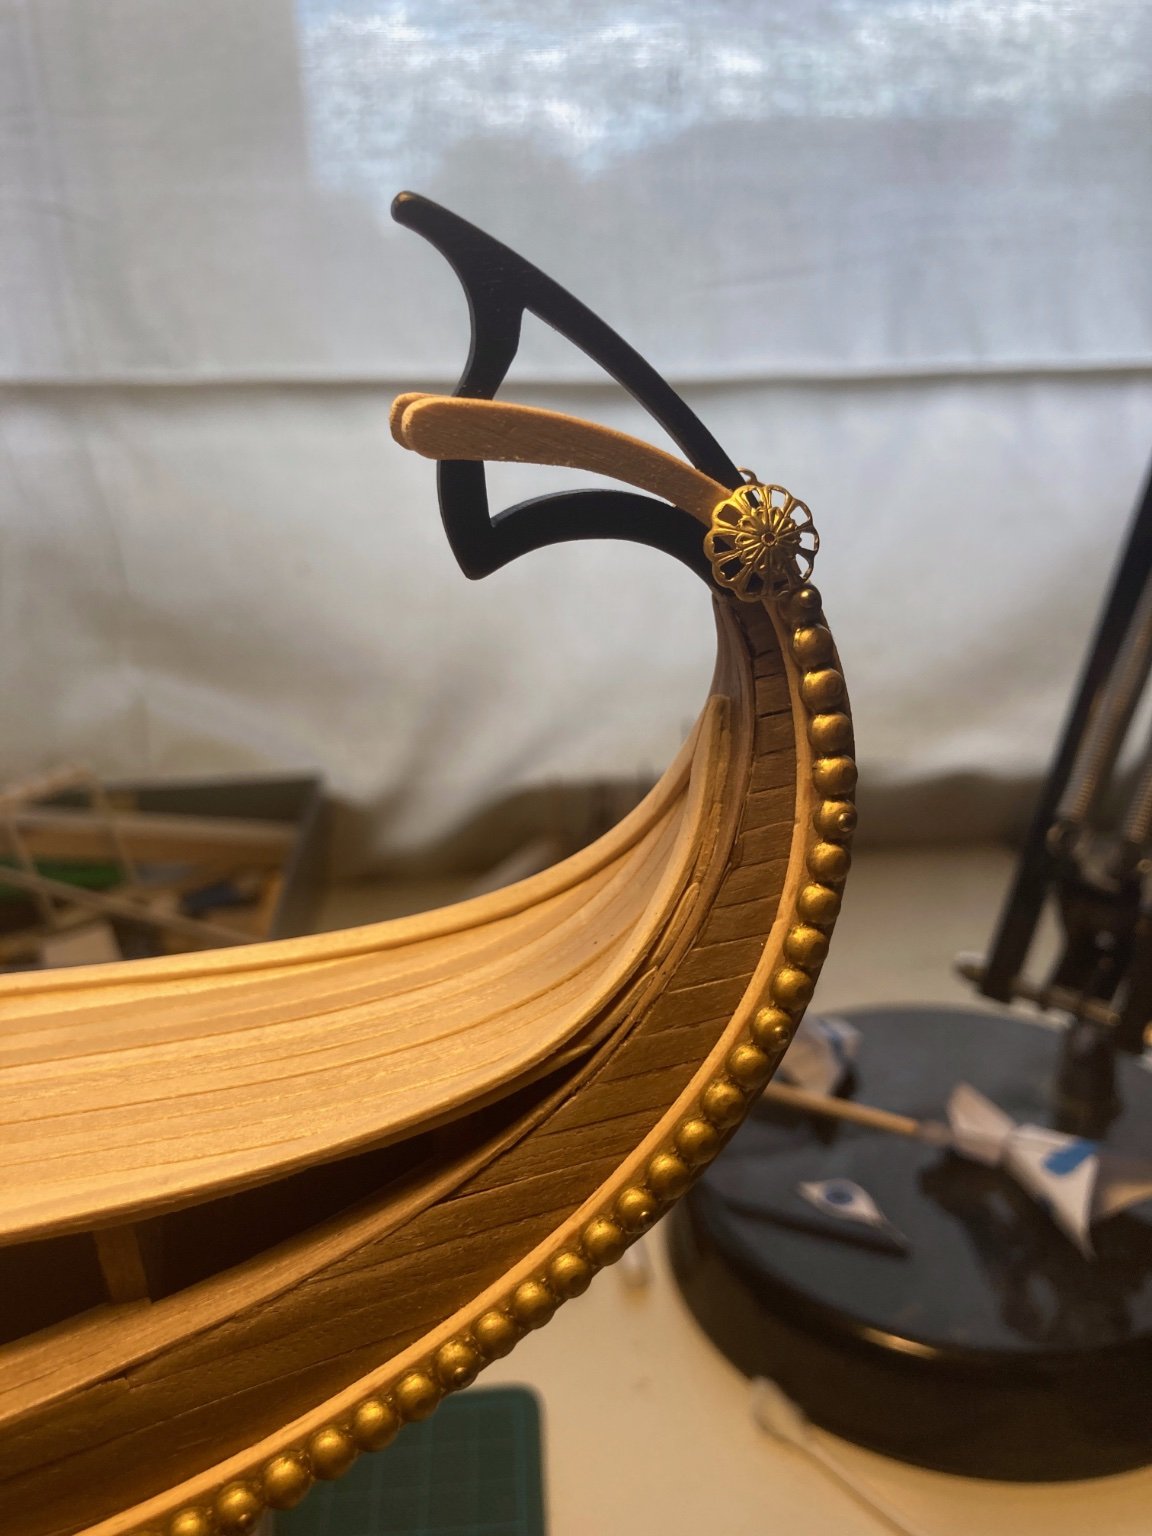
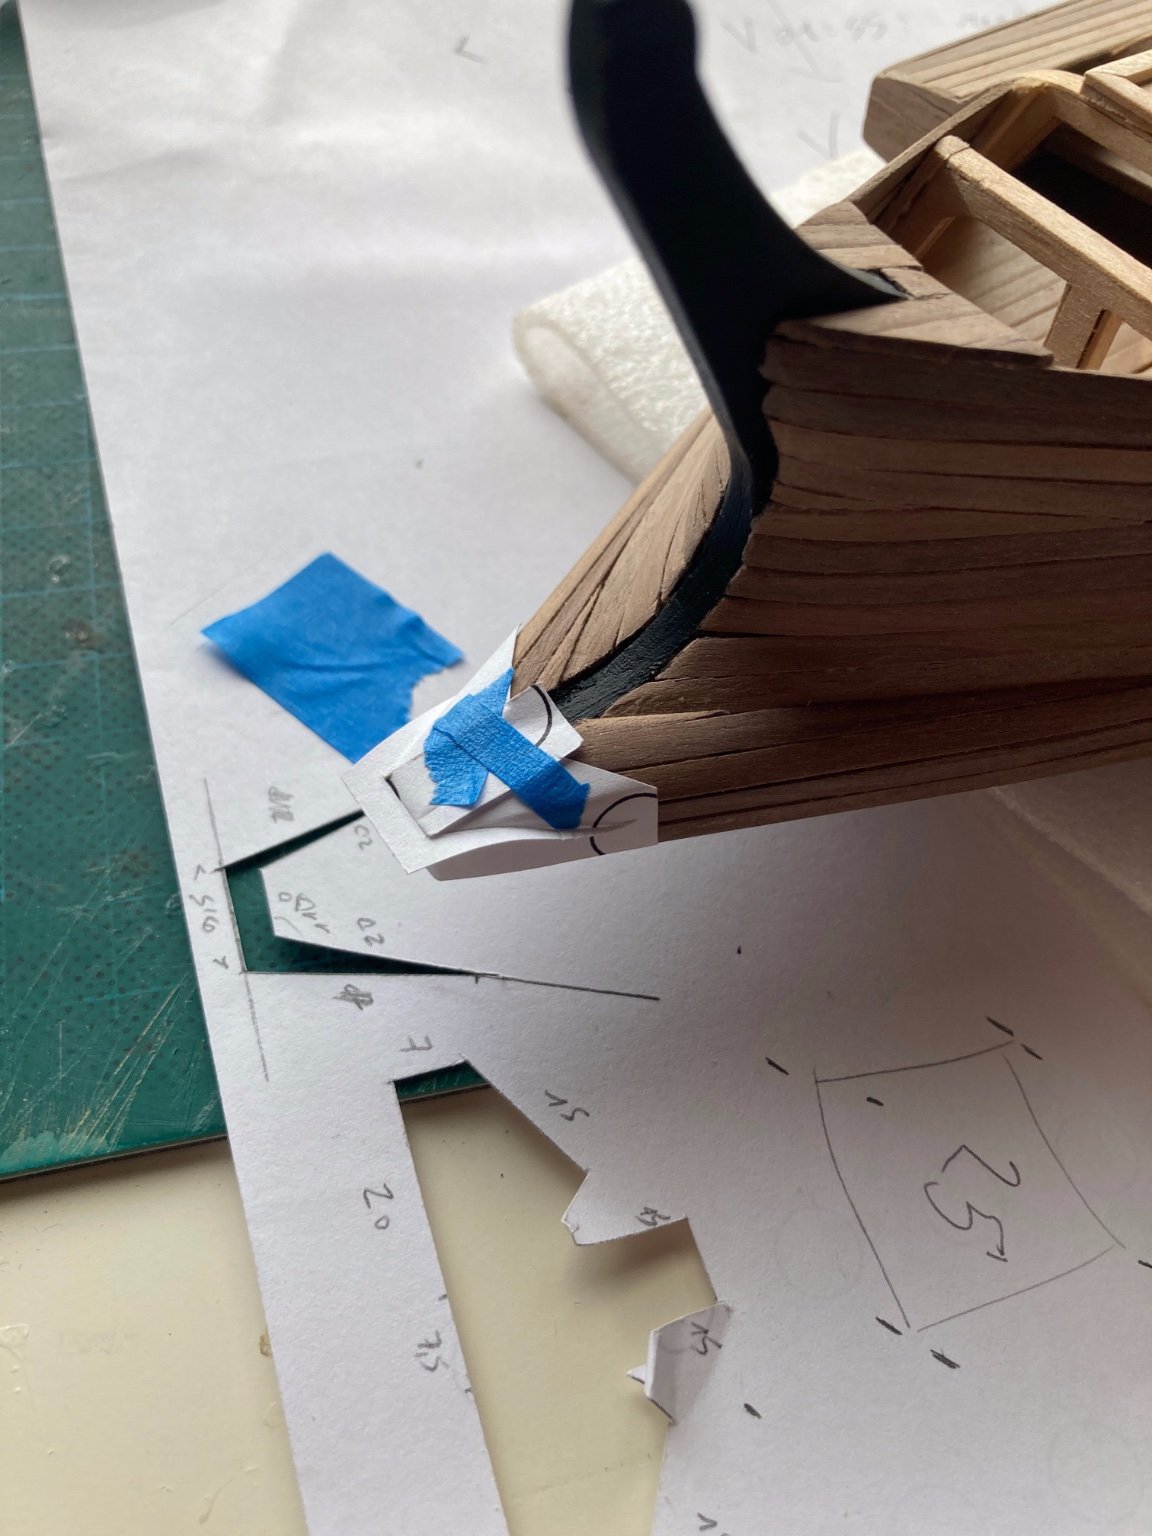
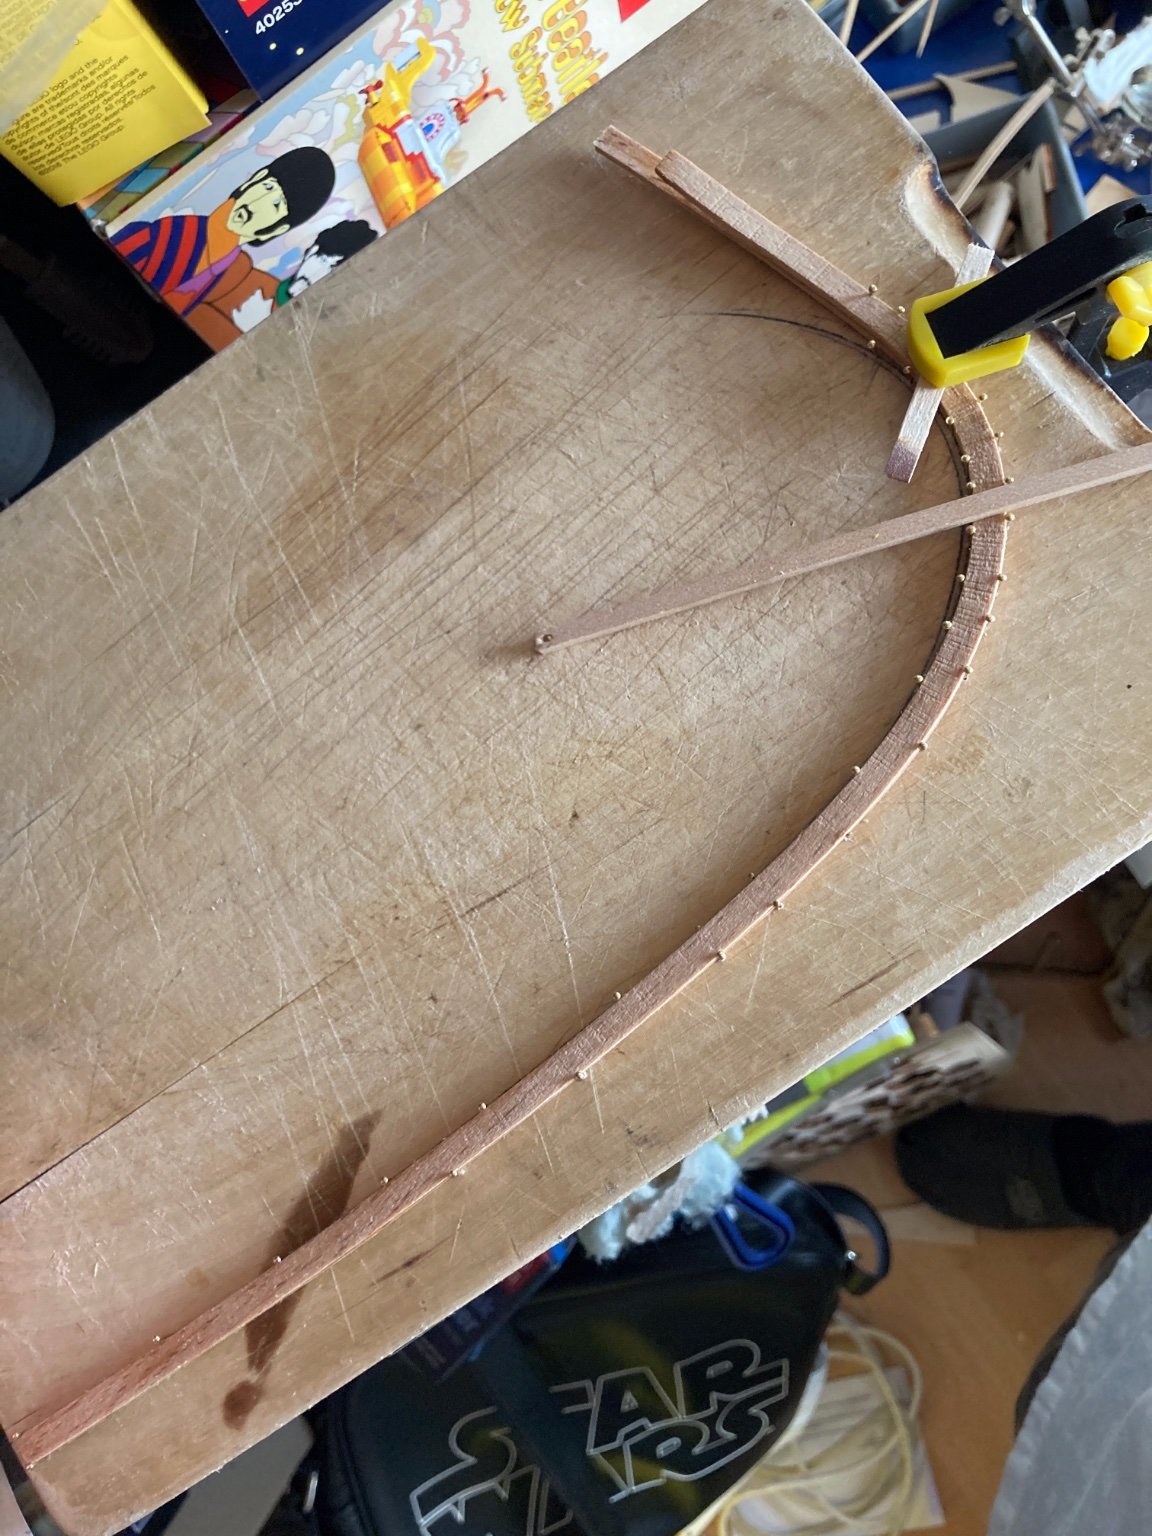
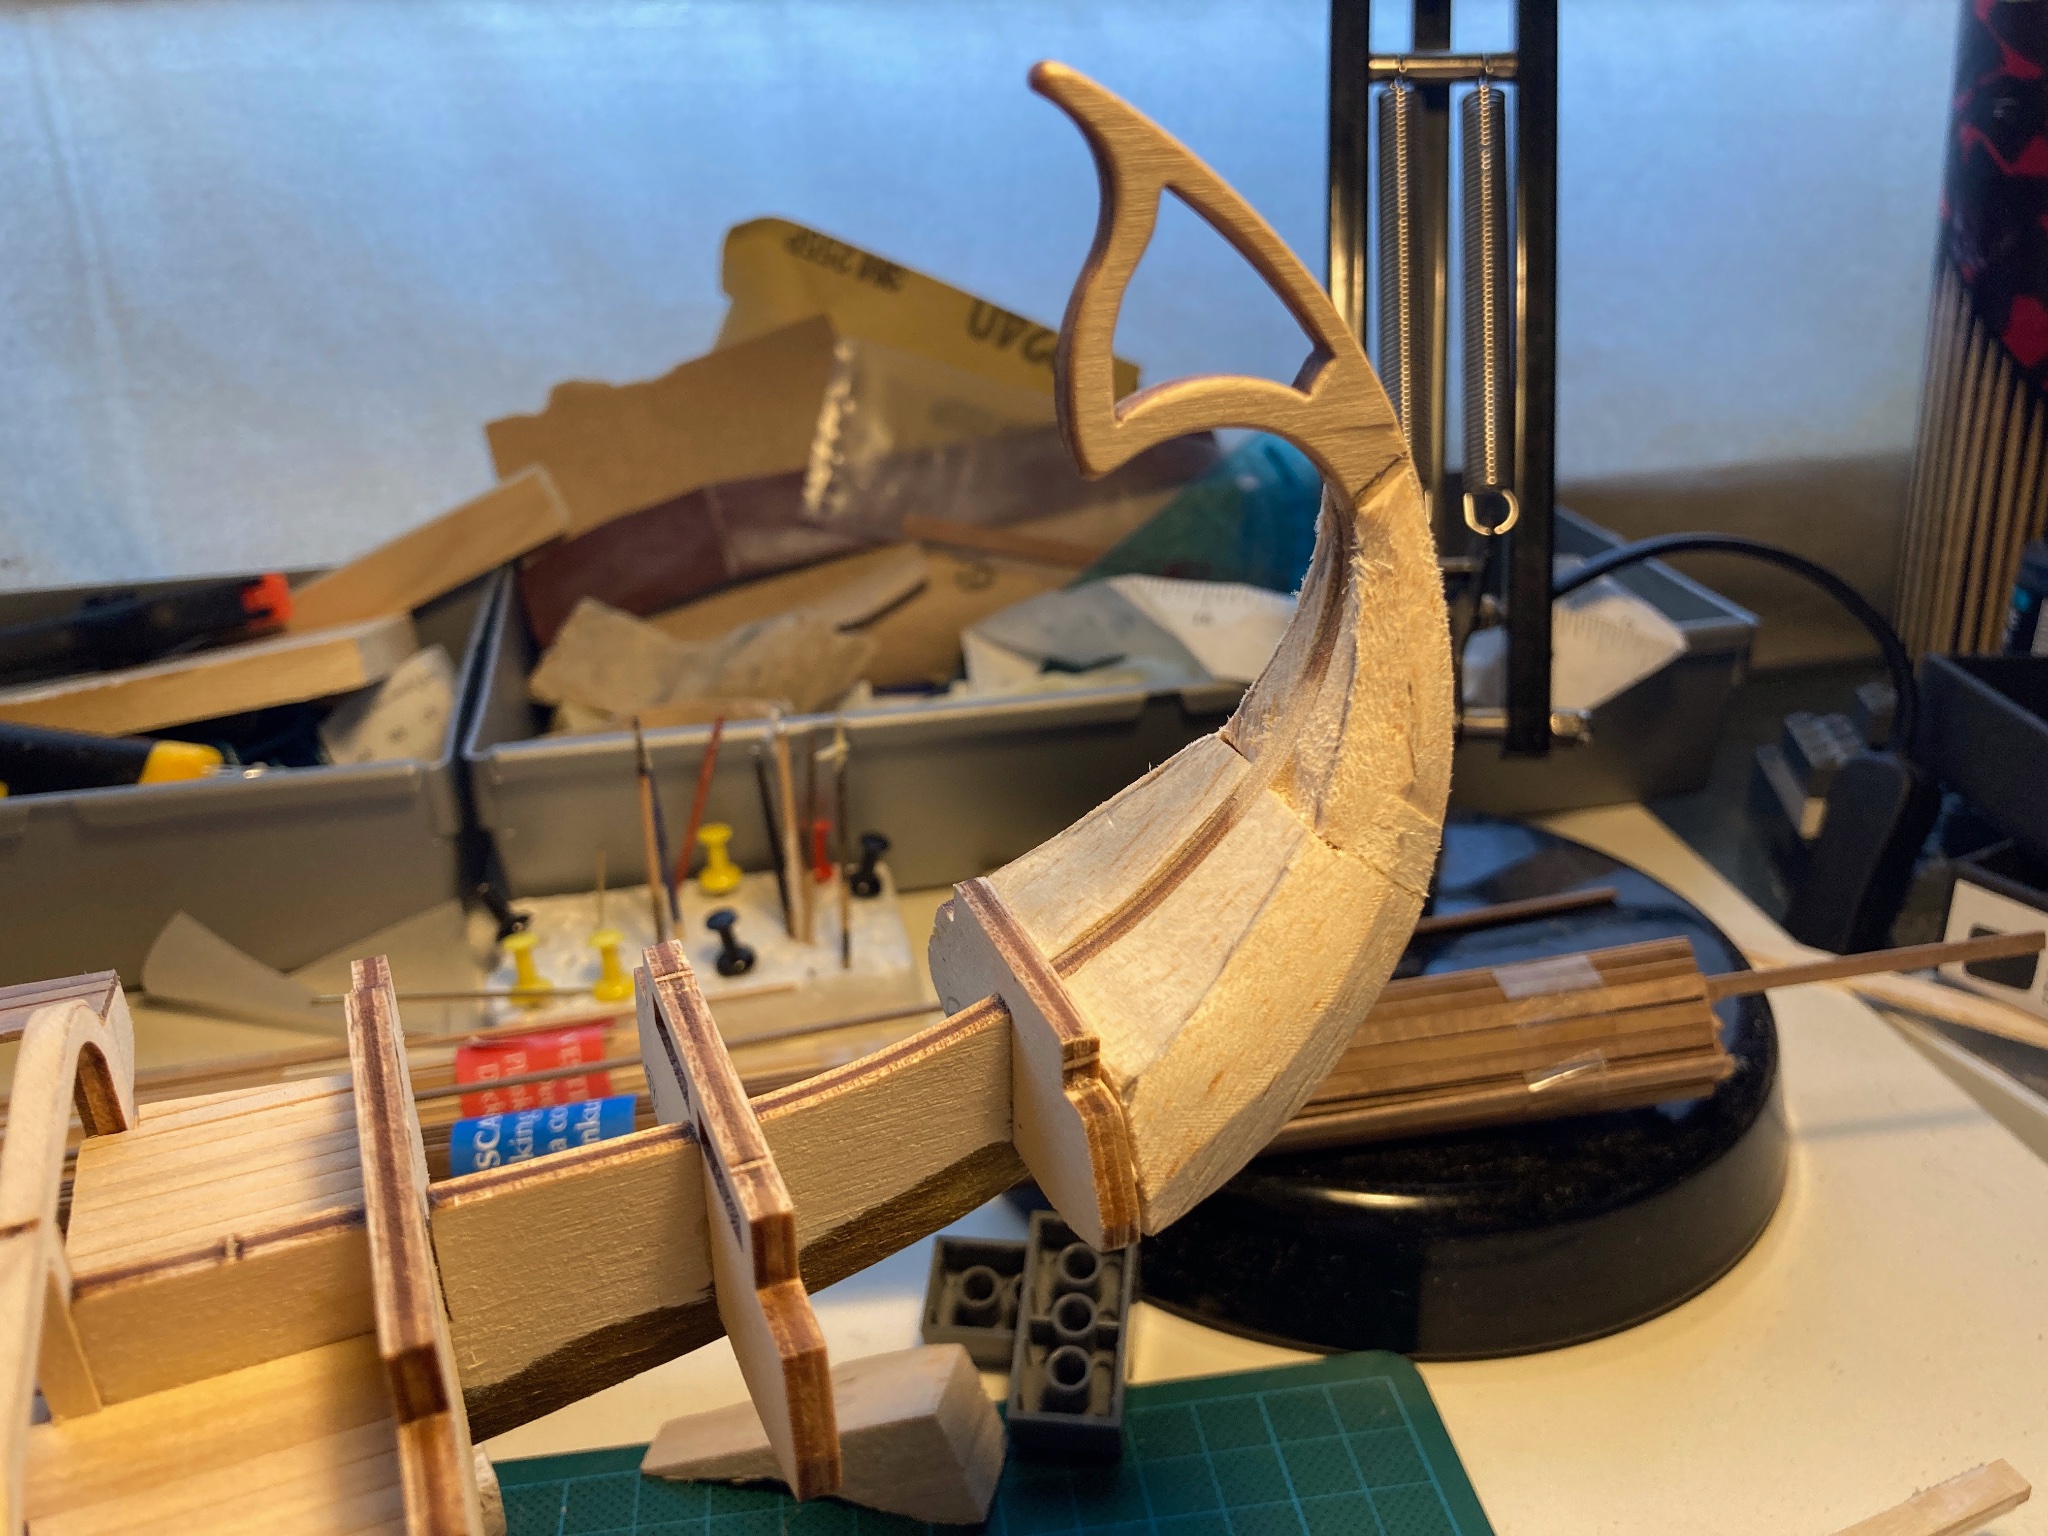
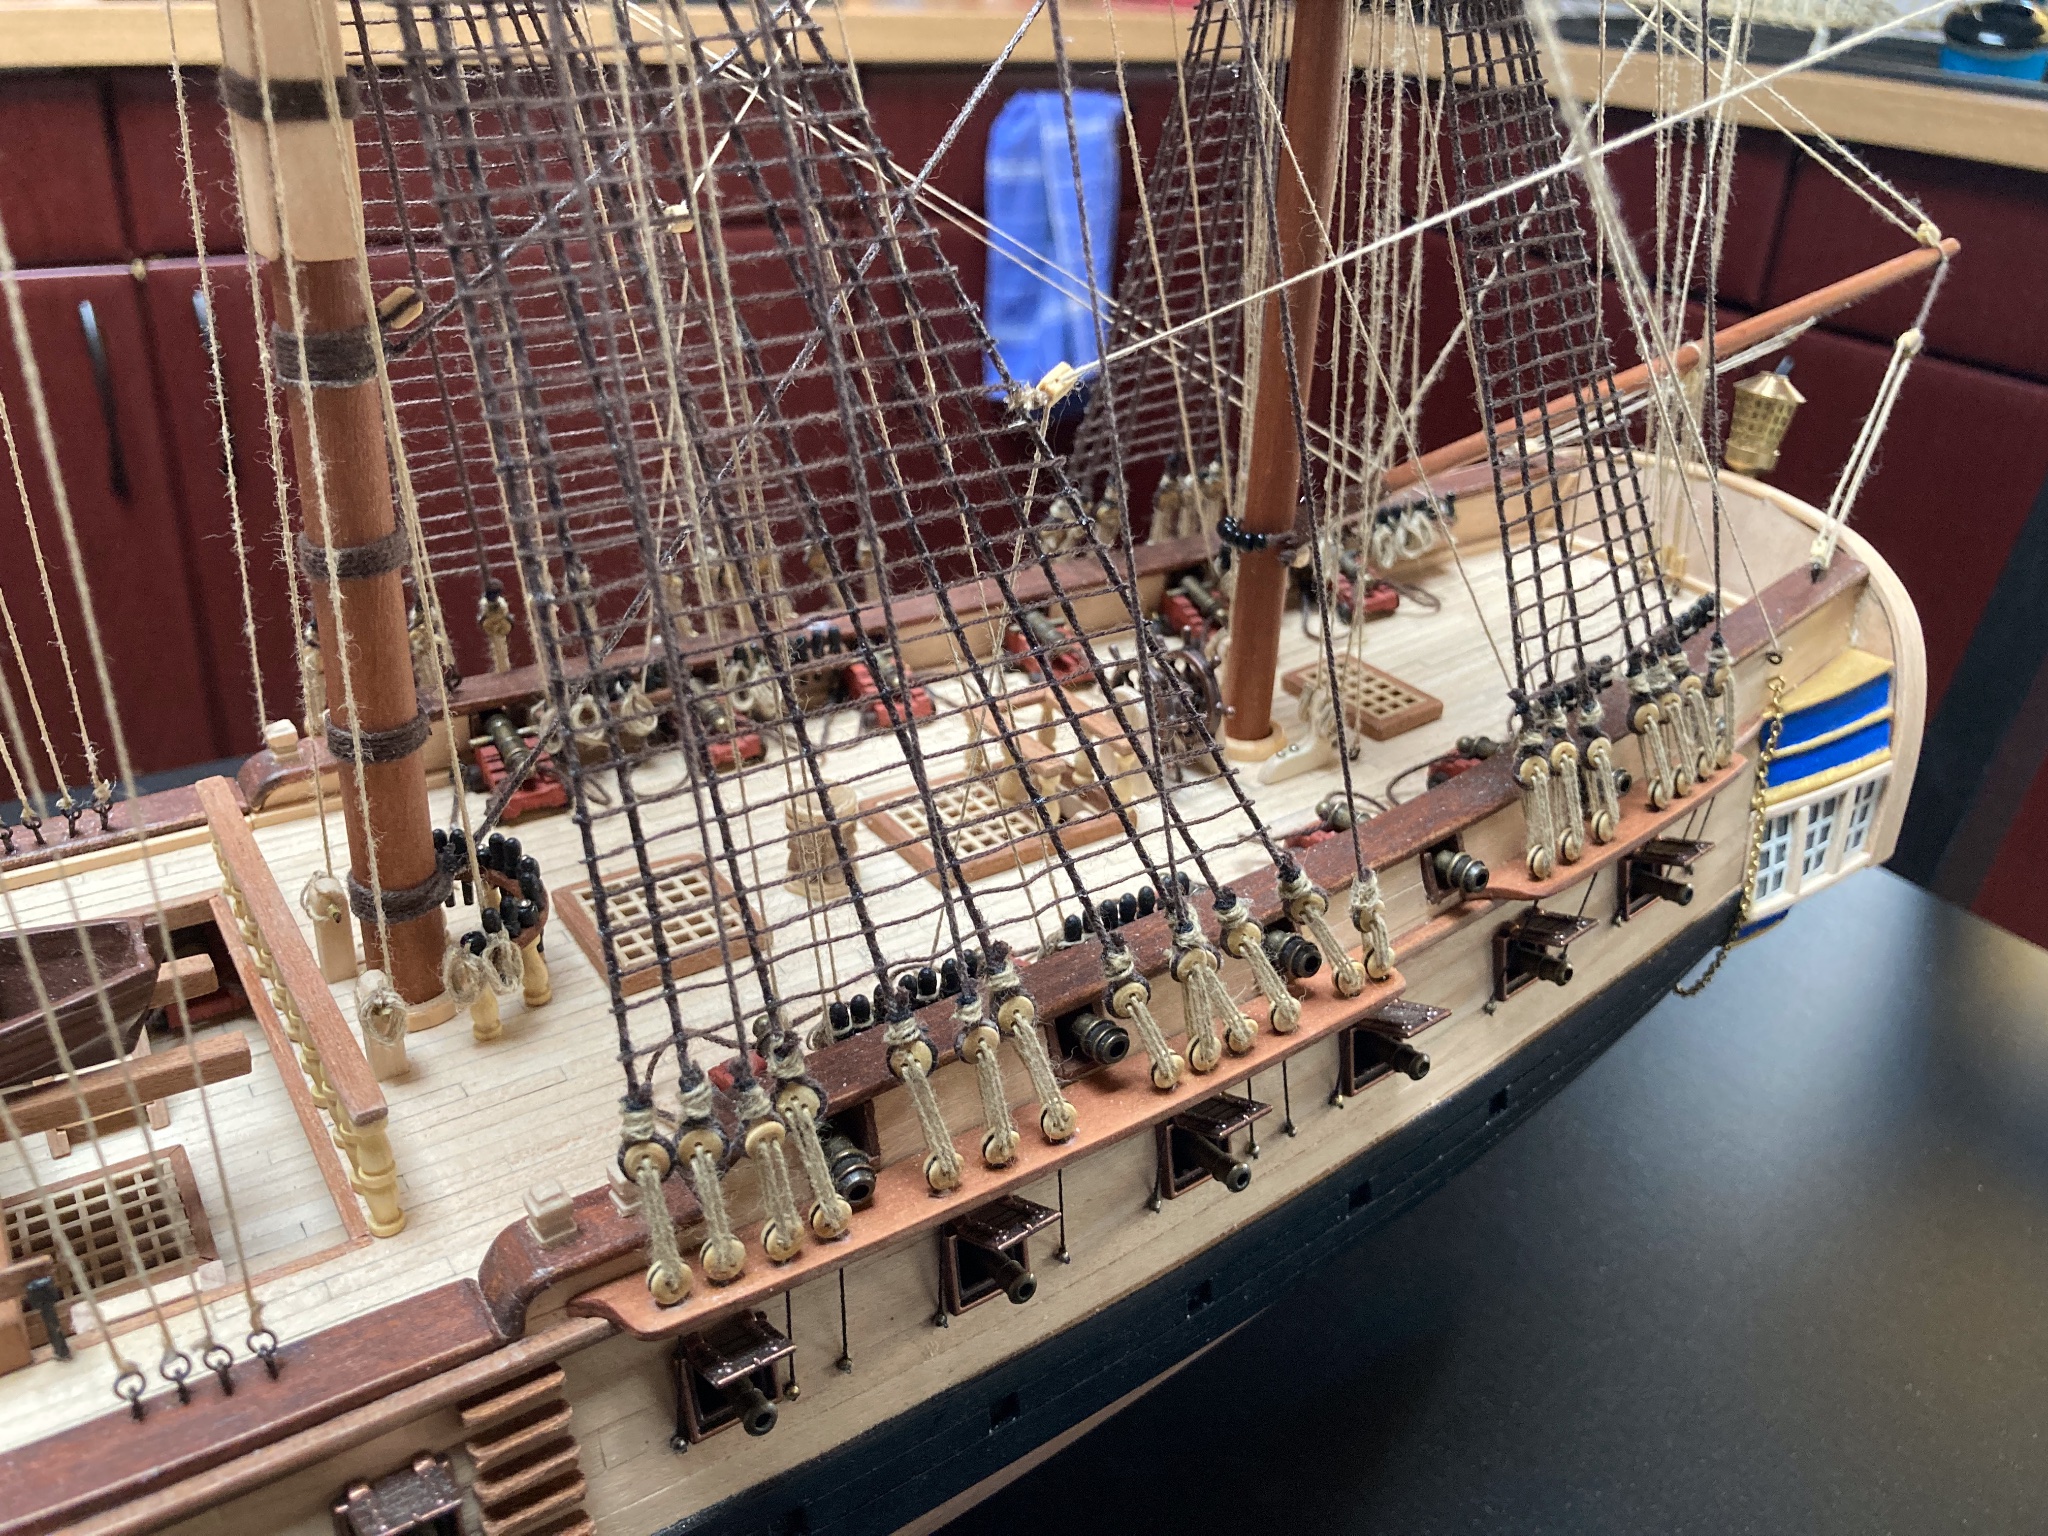
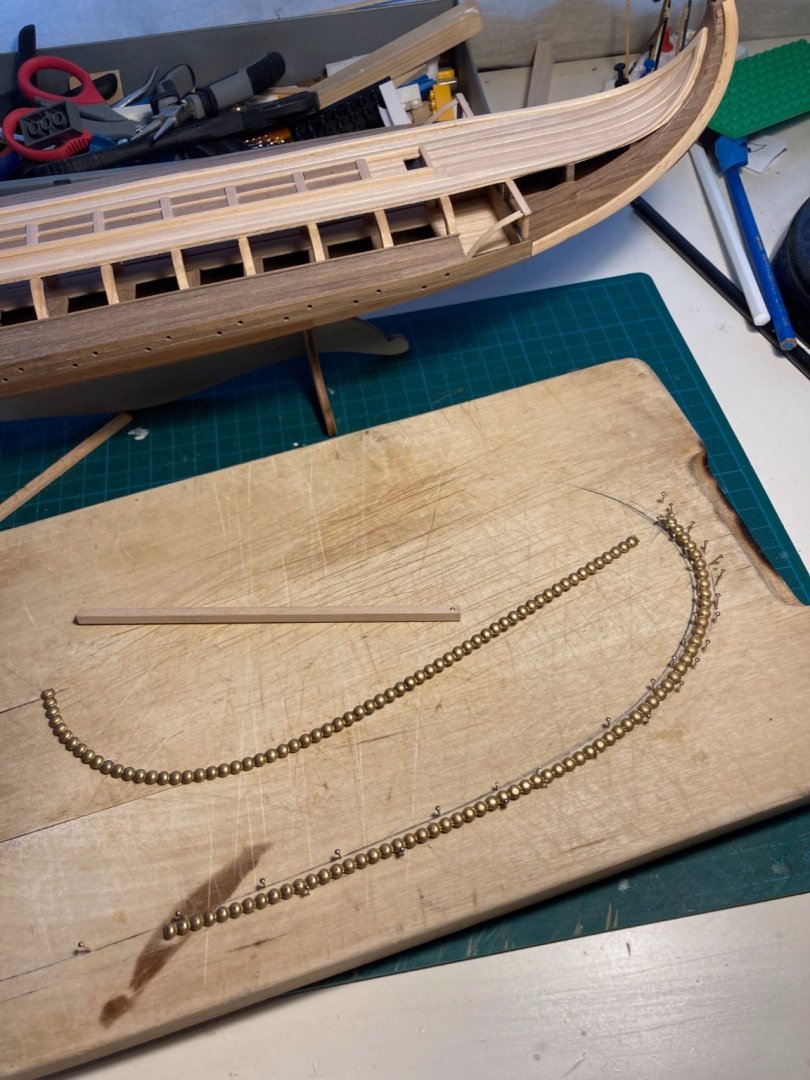
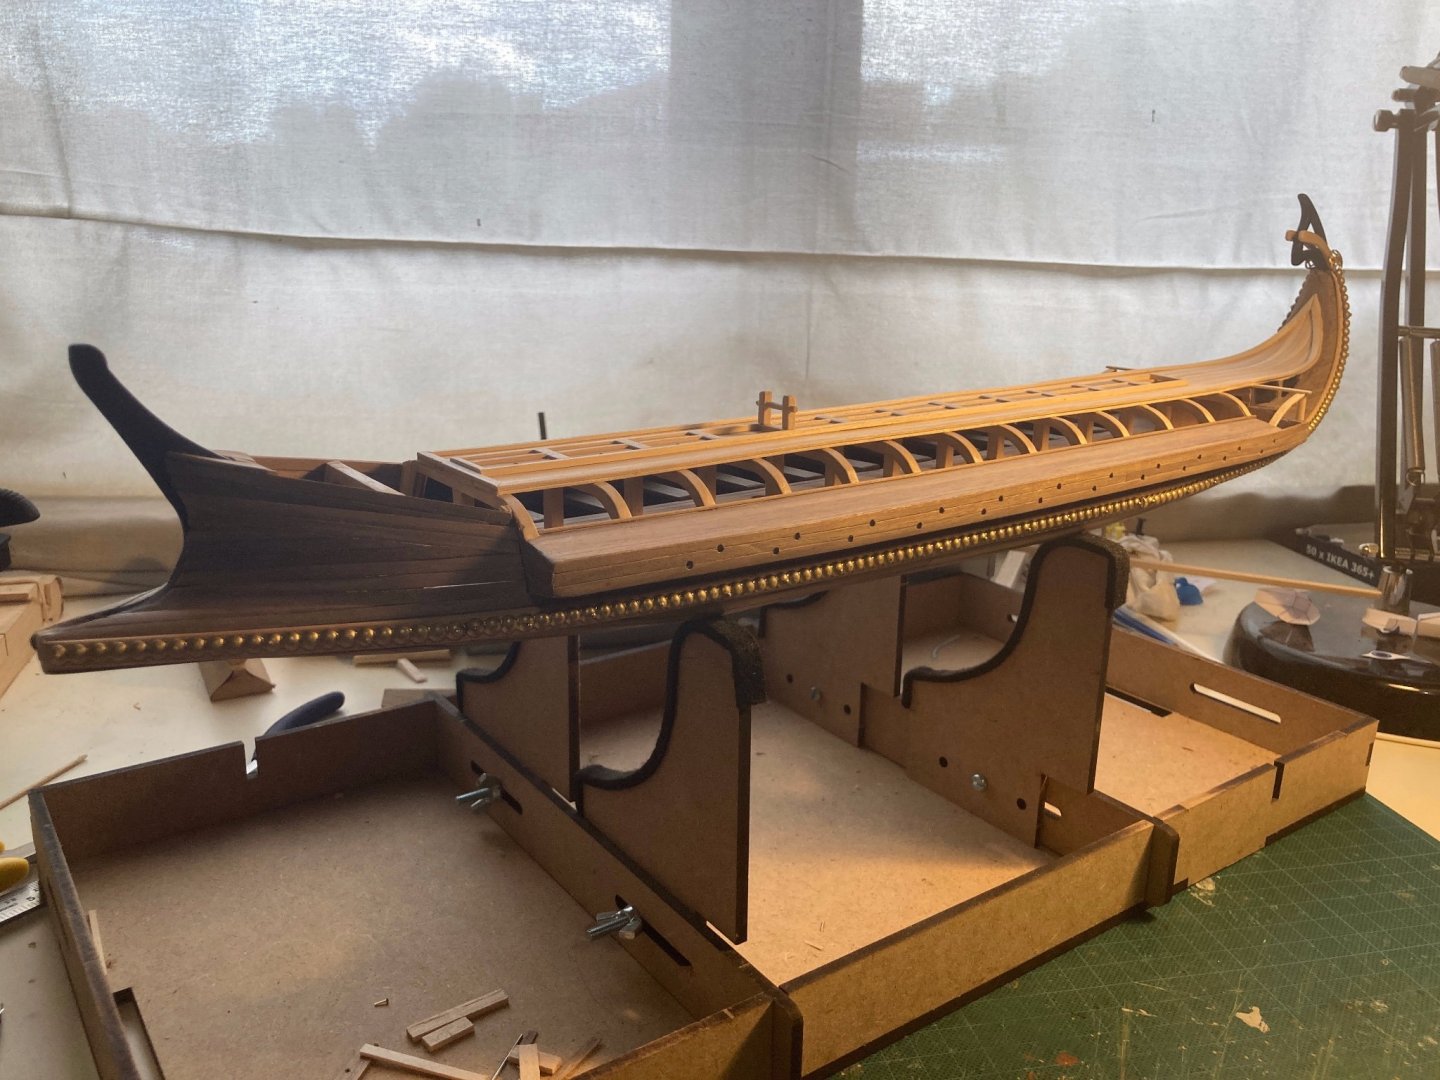
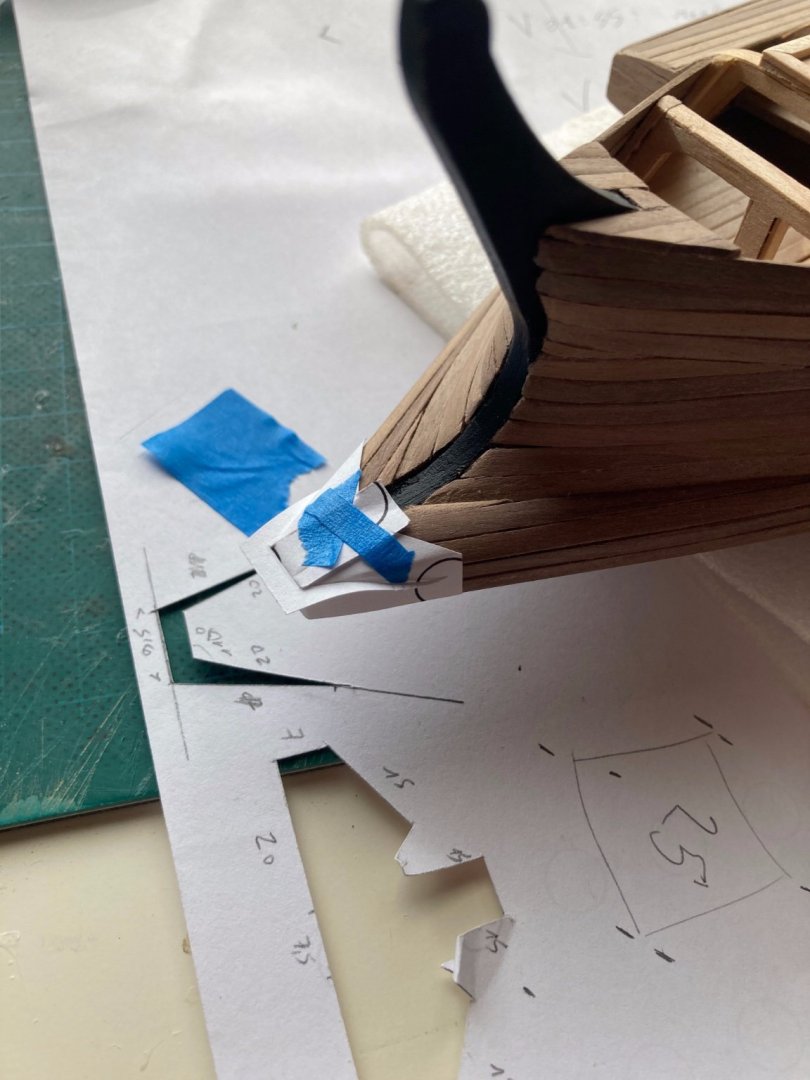
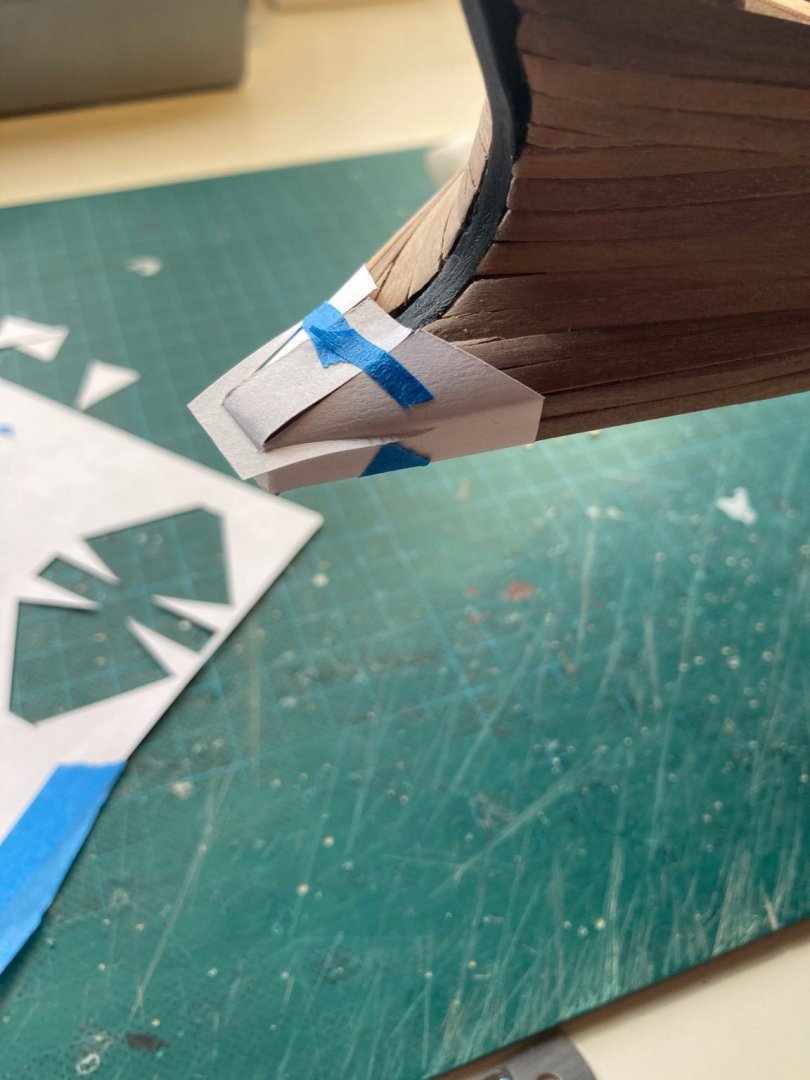
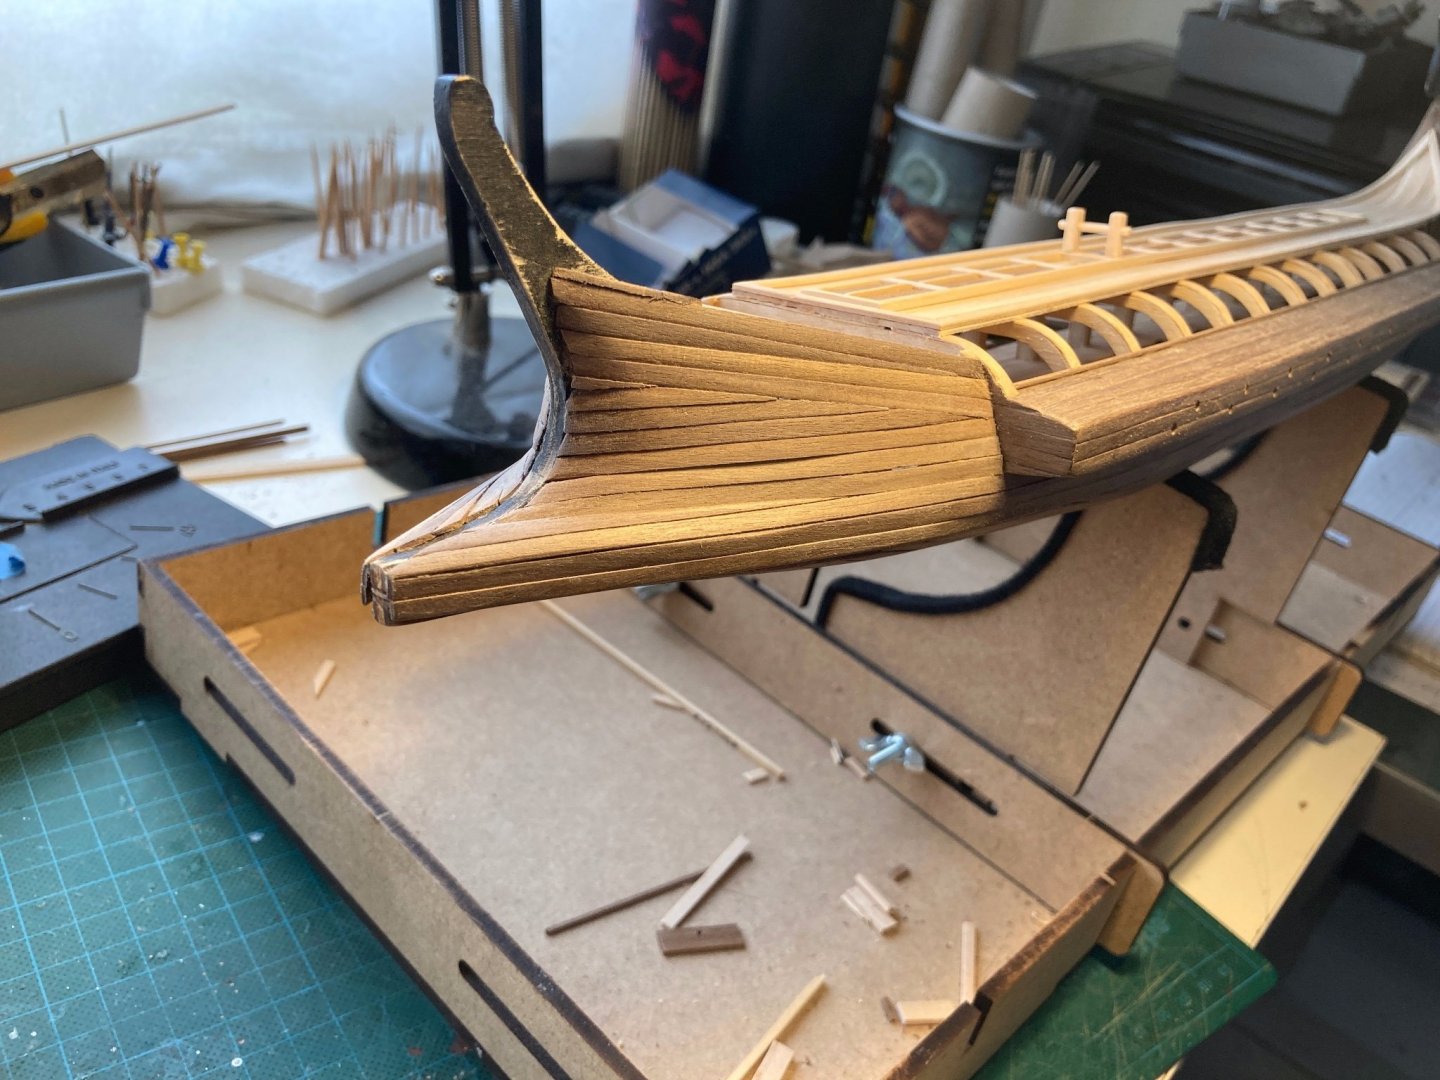
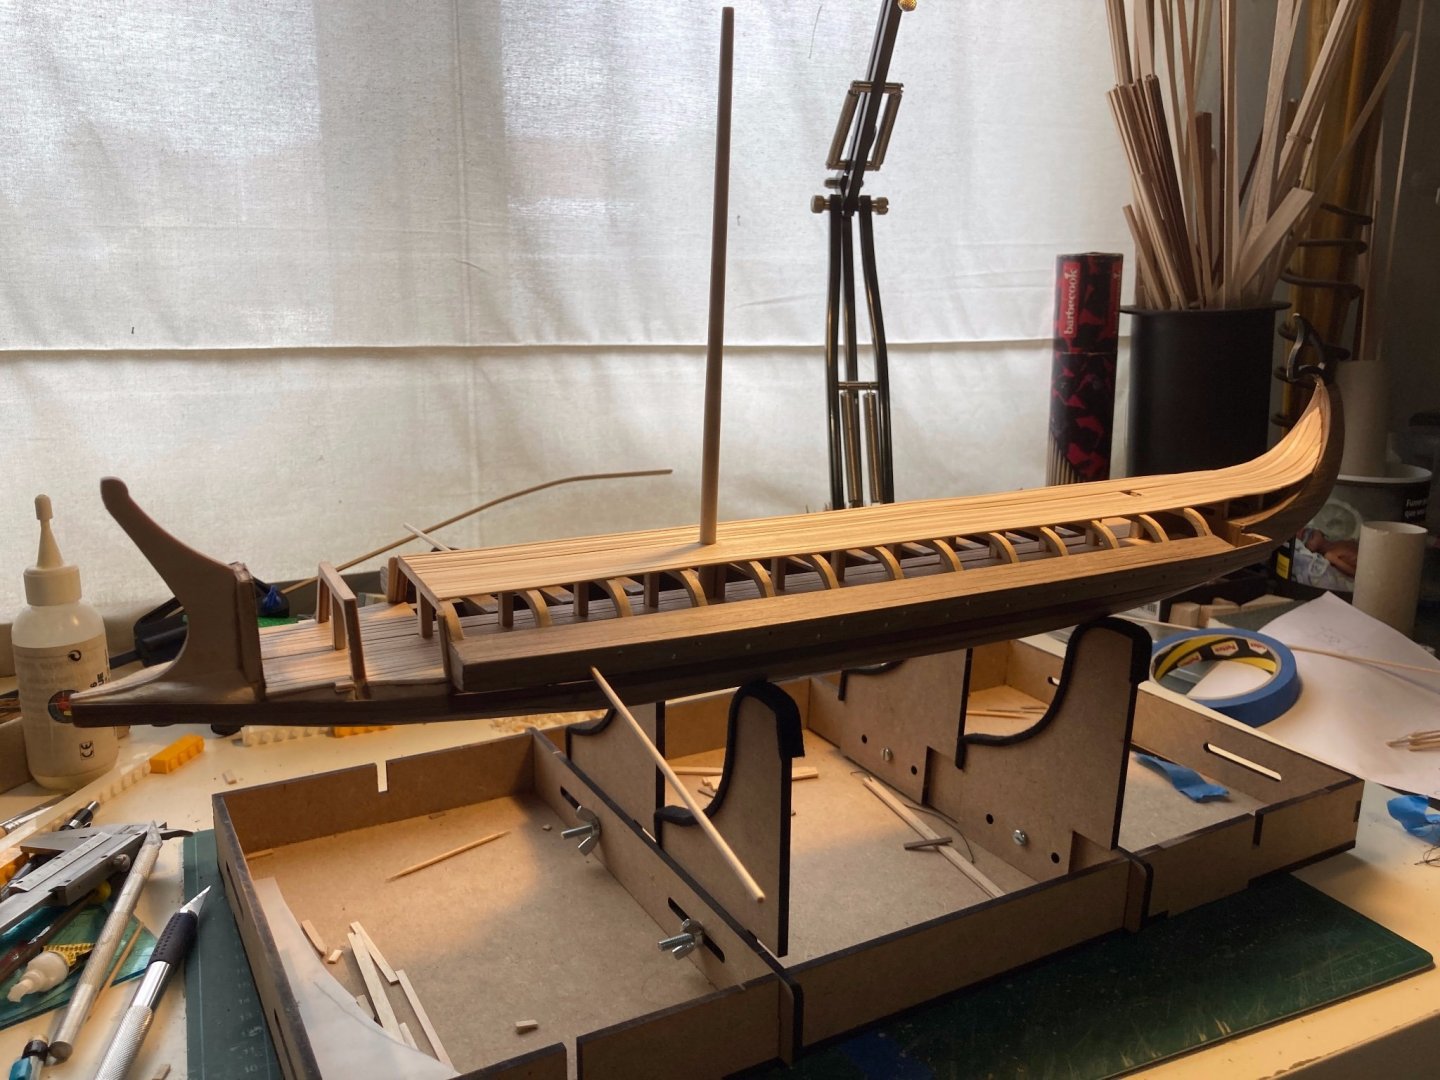
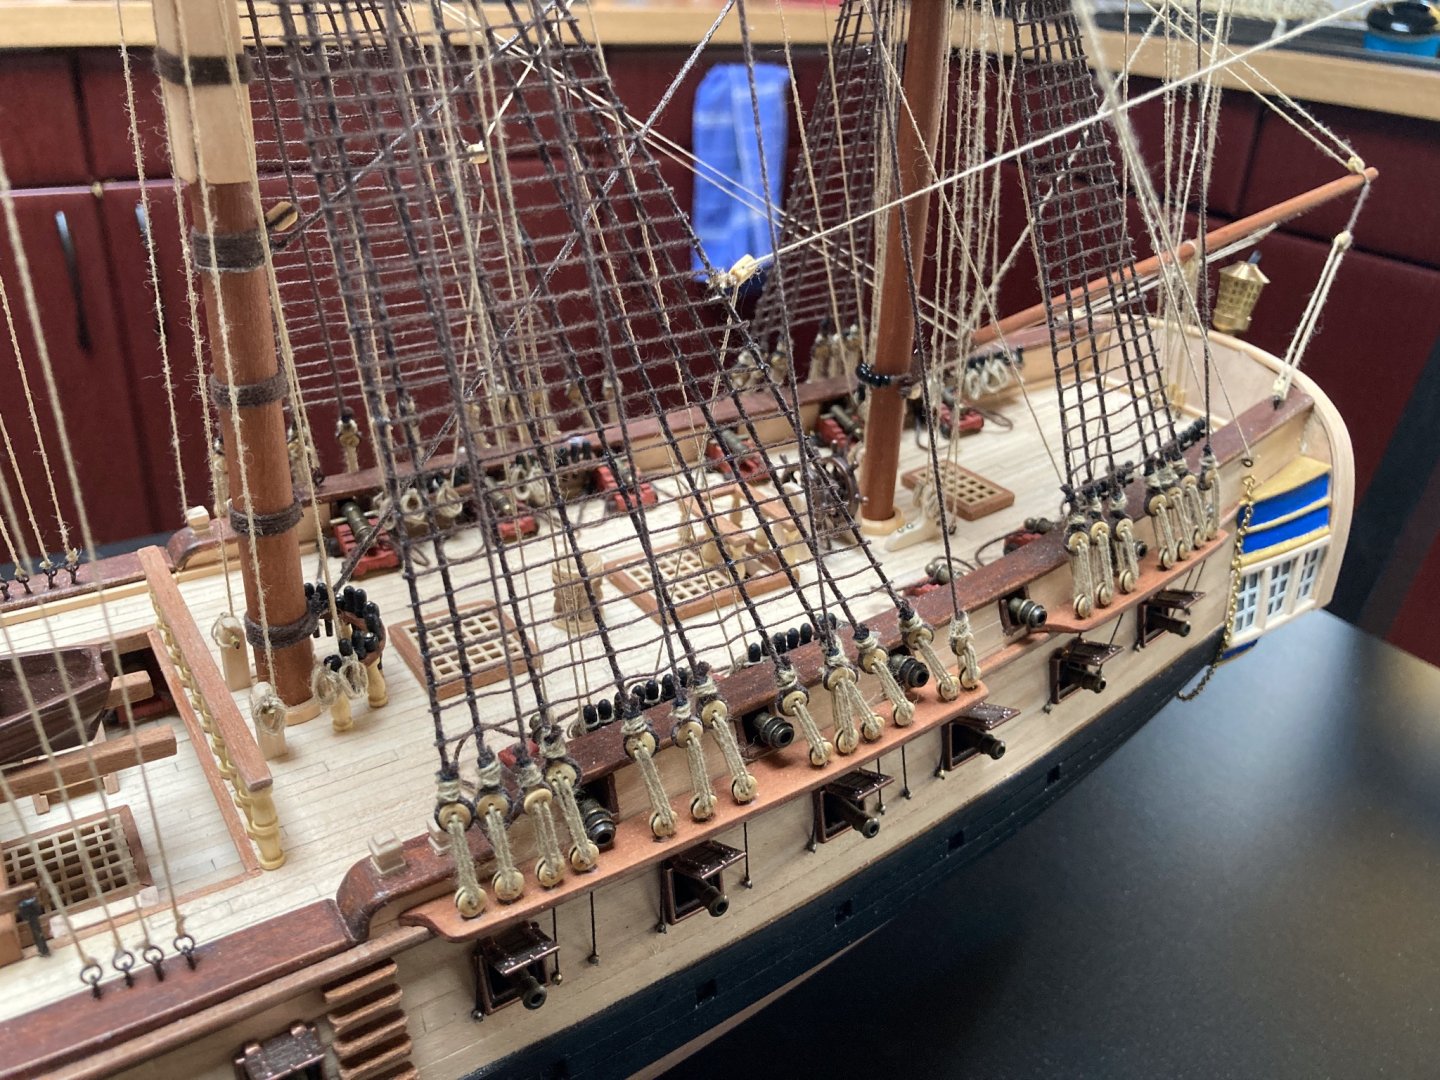
Hi all, thnx for checking in. It's been very busy in non-shipyard activities, so progress on Ephialtes was slow. However, managed to get some work done, installed the rubbing strakes after bending them and re-used the cutting board to bend the brass decorations which go on top: After that, had another look at the ram. Made paper prototypes both large and smaller than the ones I had, nothing seemed to really work looks-wise. Got a bit of a feeling the entire bow section wasn't really made for this kind of construction, so decided to give the little Amati ram a go. that seemed to make more sense, so decided to go for that one and adjust the wales and decorations accordingly. I realise this is not the way some of you have gone, but at this point, with all the changes and additions I did, I got the feeling more and more this wasn't supposed to be an historically accurate version, but rather my own interpretation. After bending the decorations, proceeded on the stern and worked my way forward: I used @moreplovac's trick to attach the decorations, spacing the nails at equal distances. This also marked the first time I went electric: got a bit tired of trying to drill through thick brass and got out the Dremel. Thank you @Danstream for the advice on the eye. I found it odd the eye on Olympias was drawn this way, so tried out some variants in paper. This is the one I'm going for: Attached the meander decoration as well, and finalised all 44 oars. Now it's clean-up and correction time, and then waiting for the sail to be delivered. Stay safe!

- 62 replies
-
- 10
-
-
- amati
- greek bireme
- (and 1 more)
-
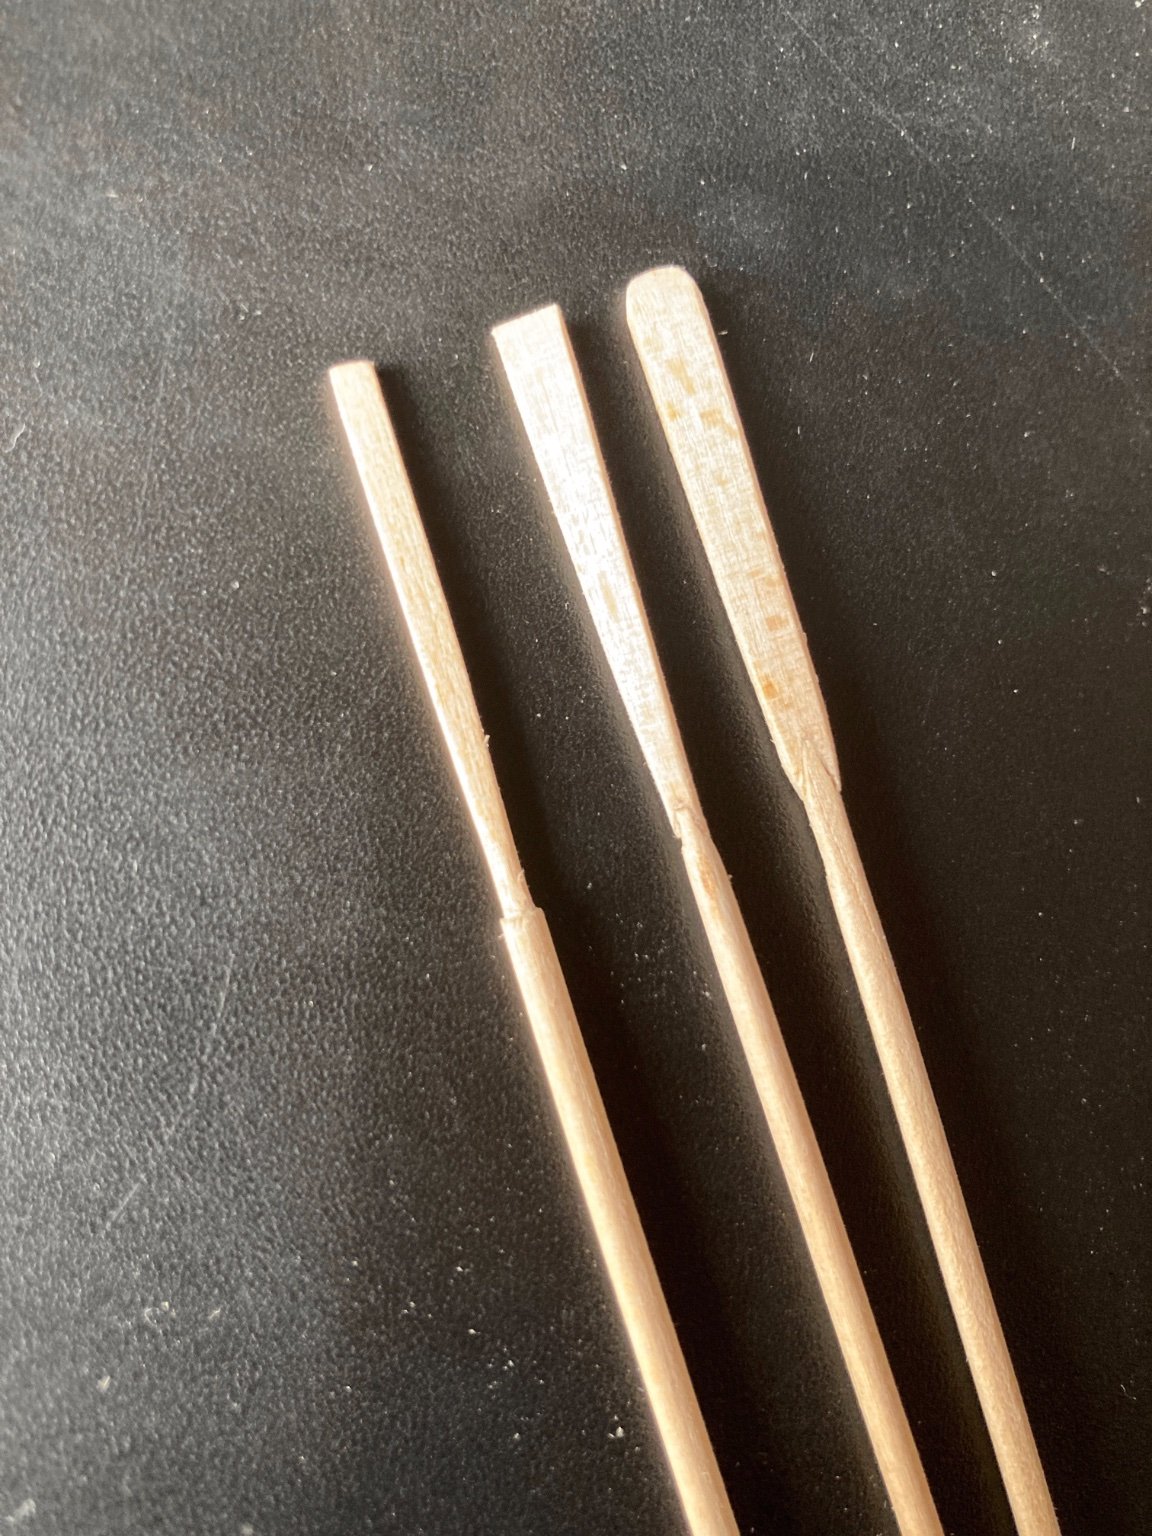
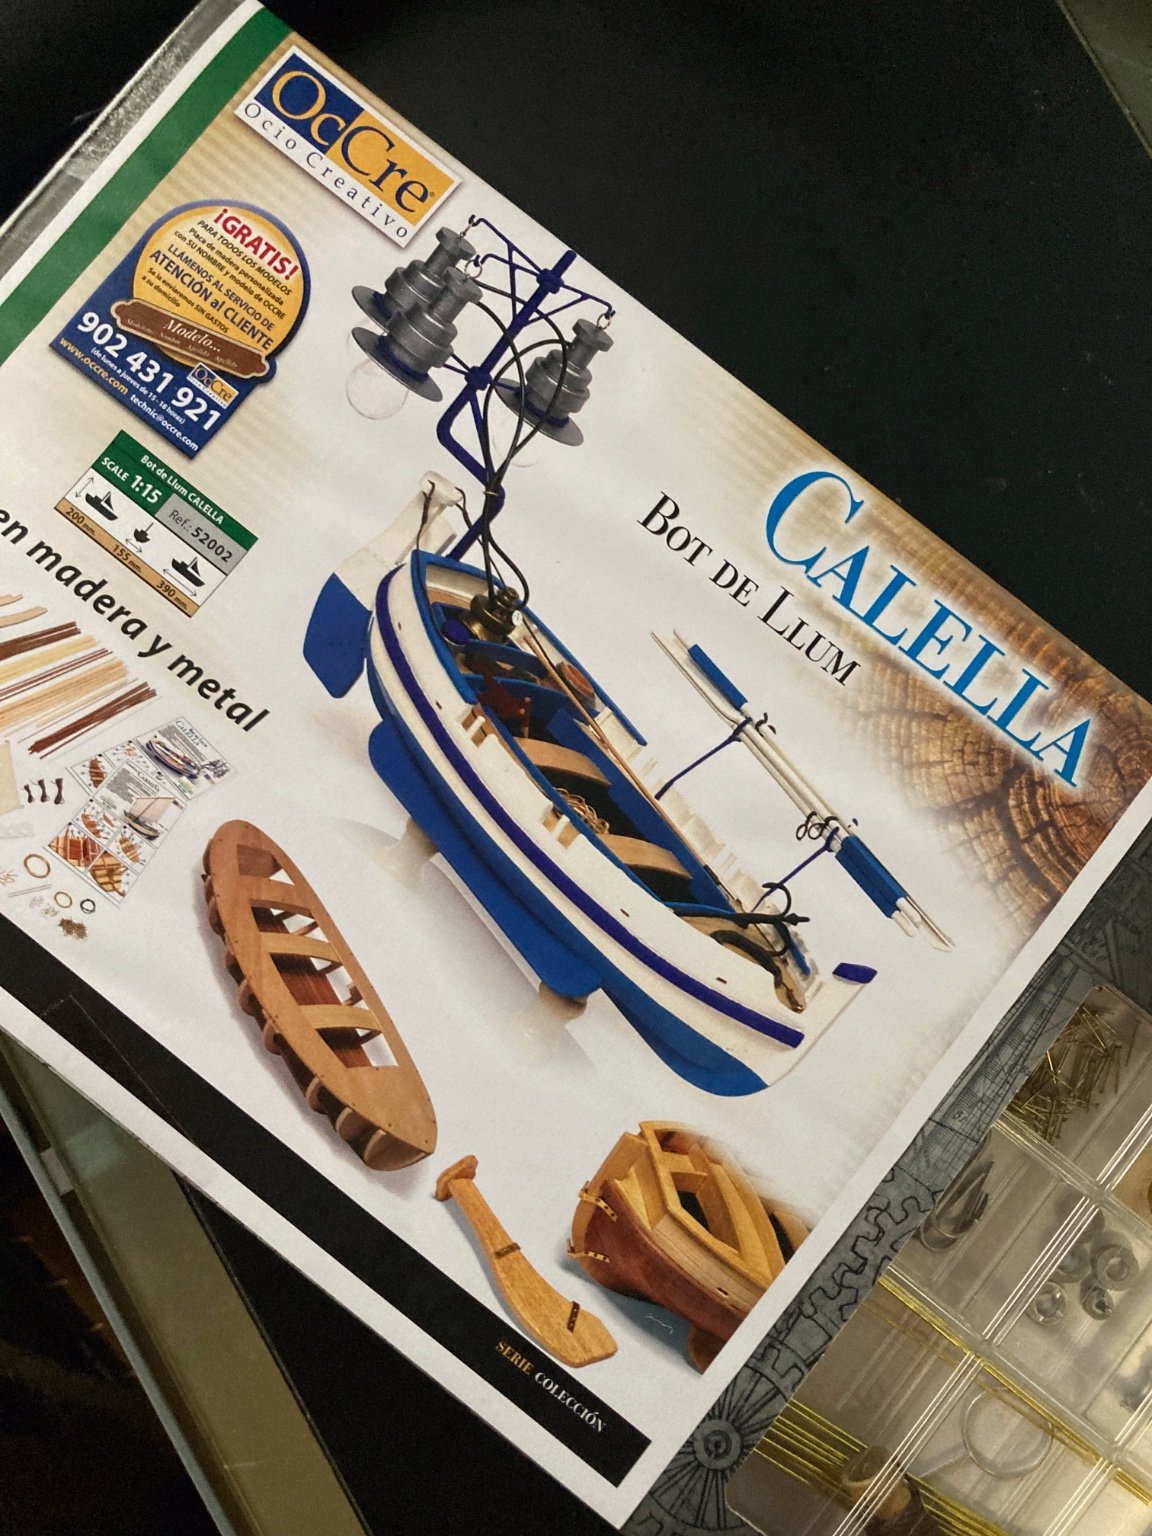
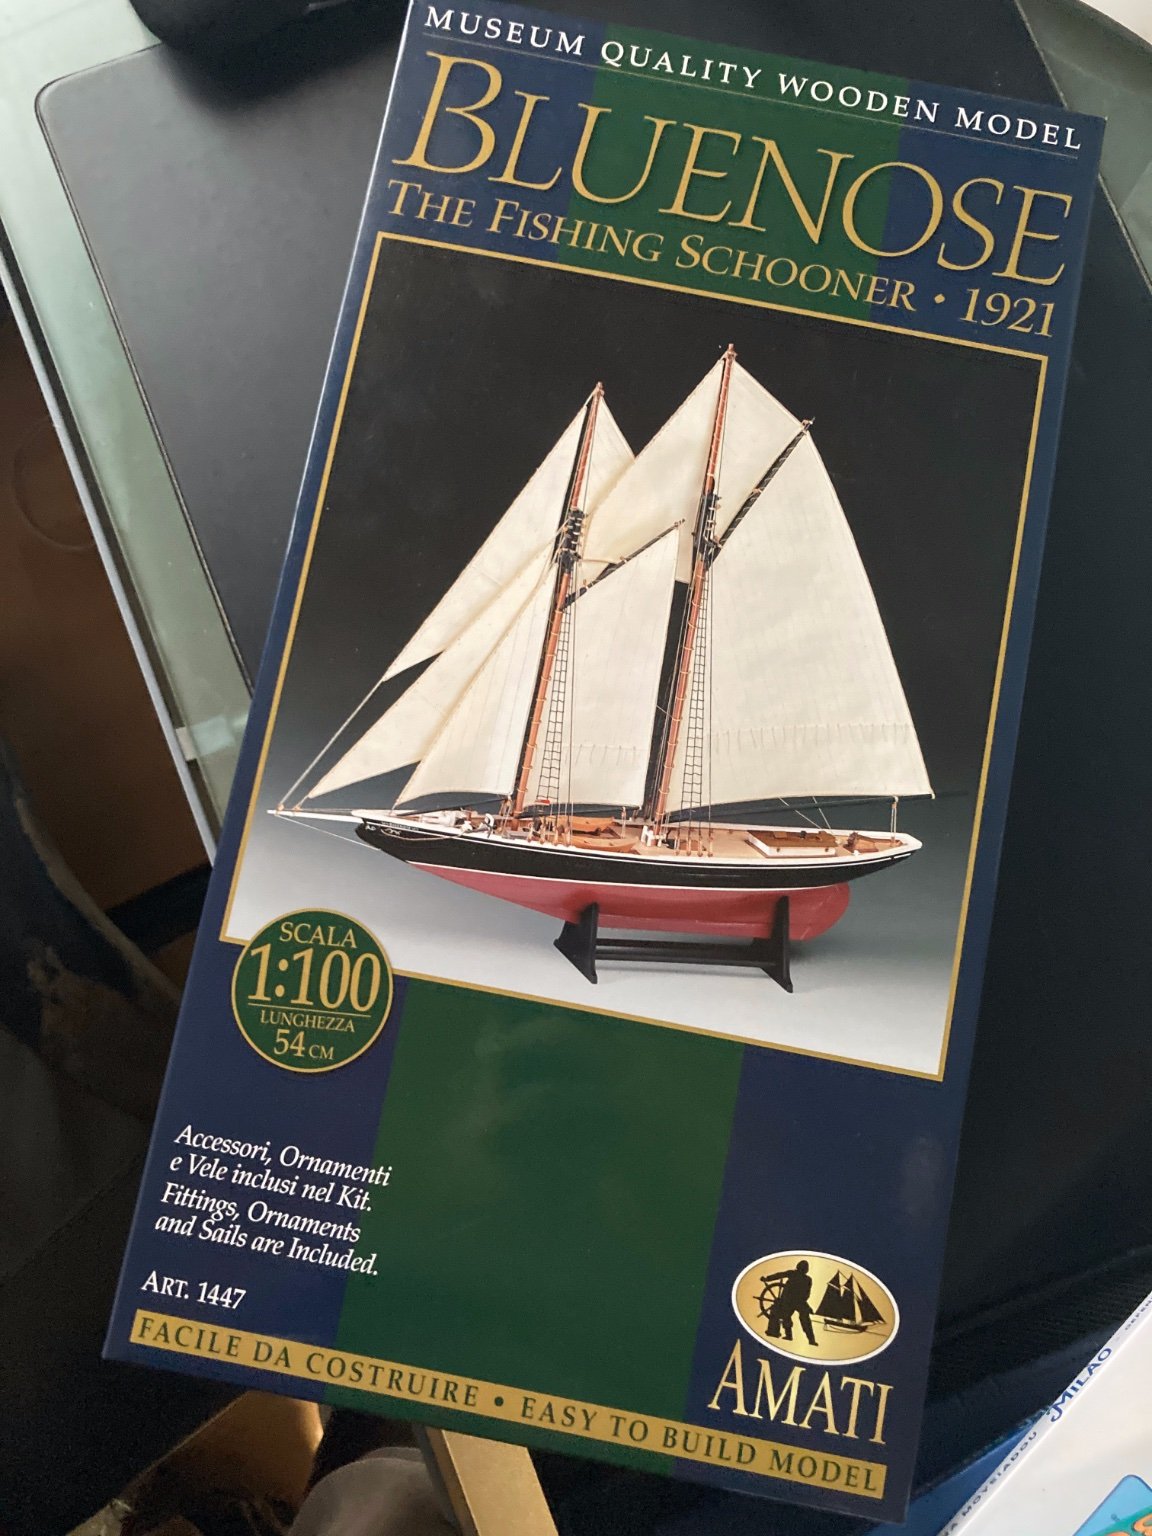
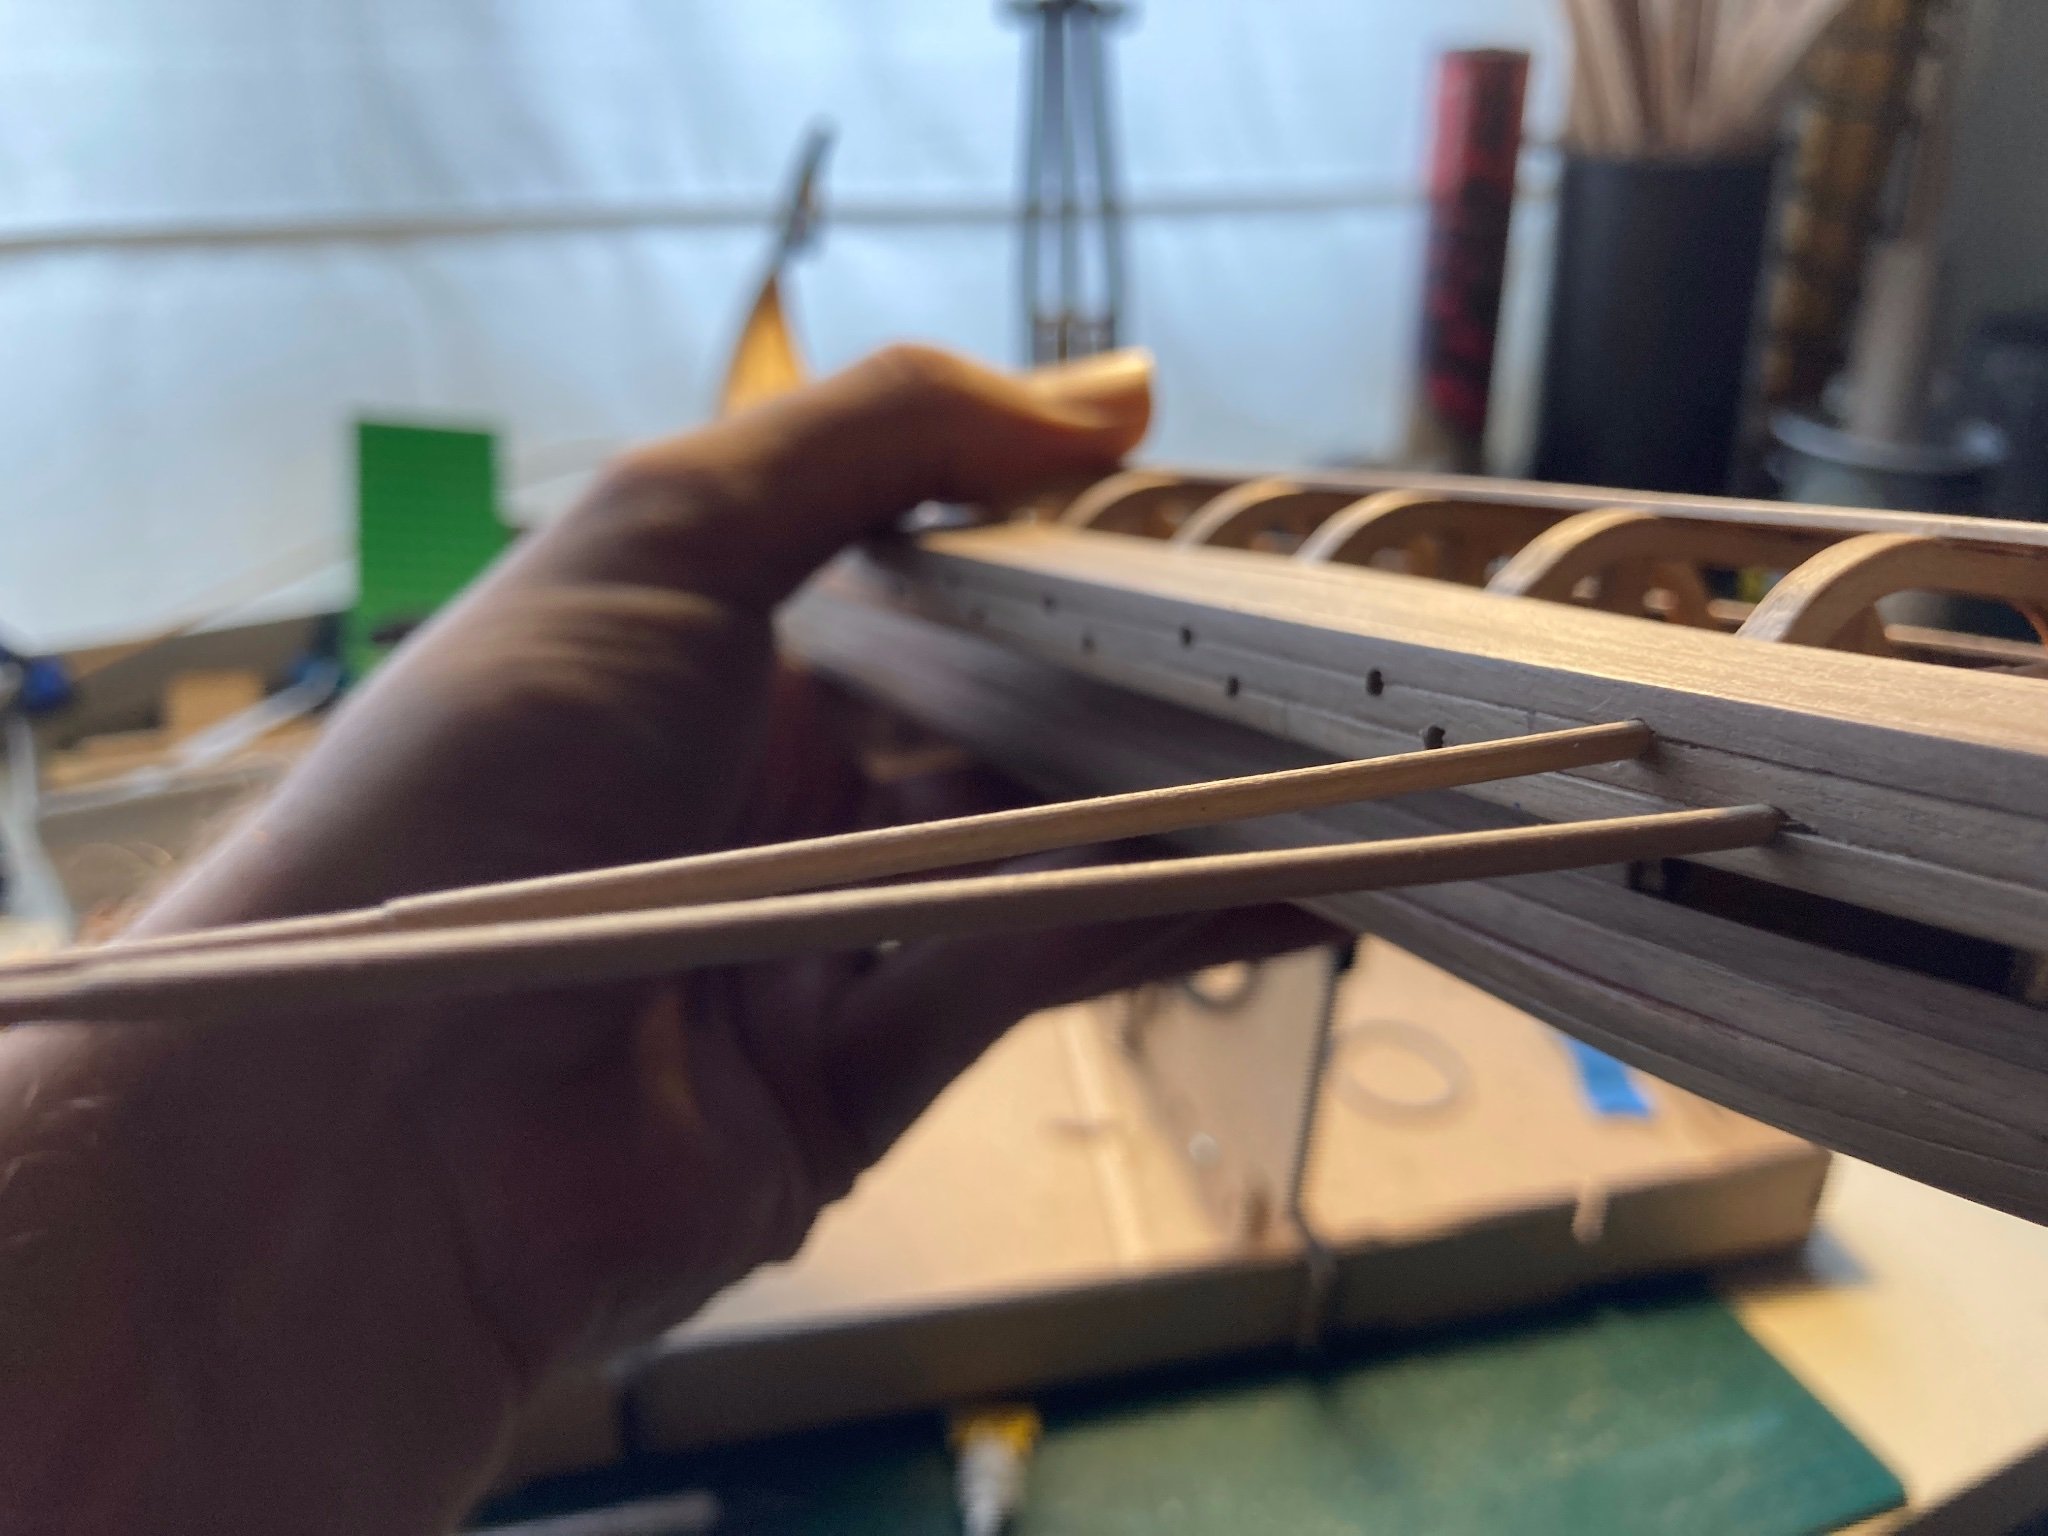
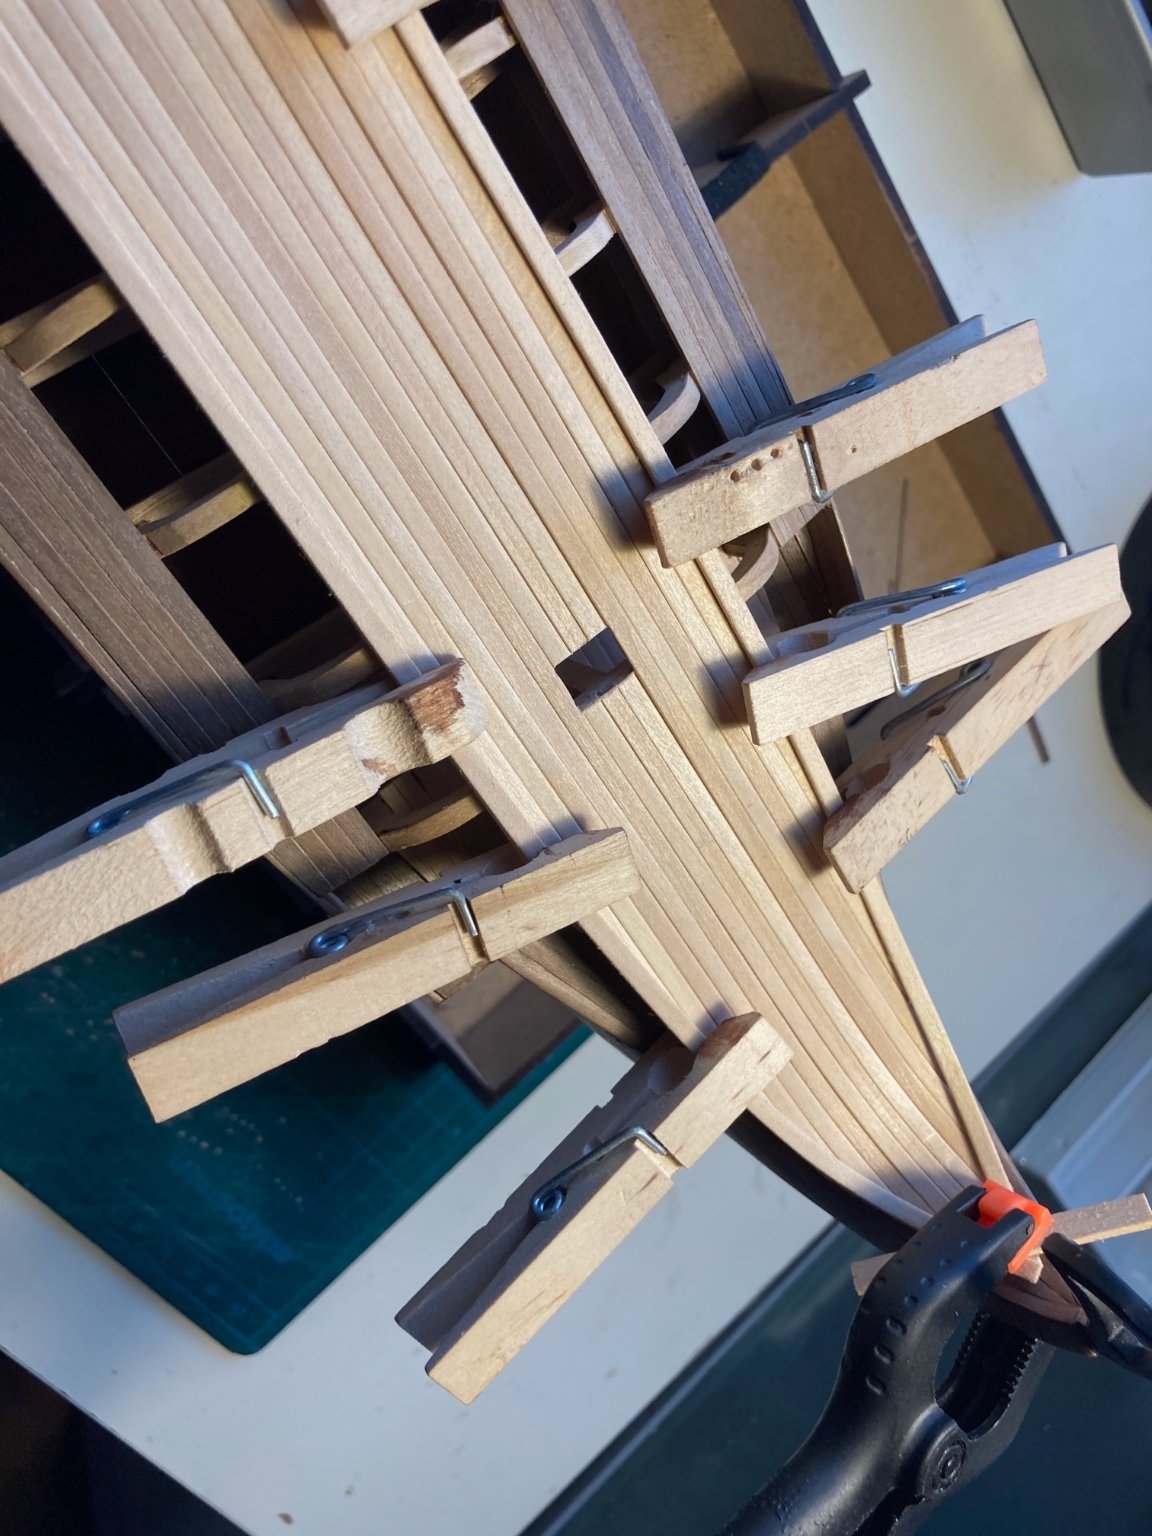
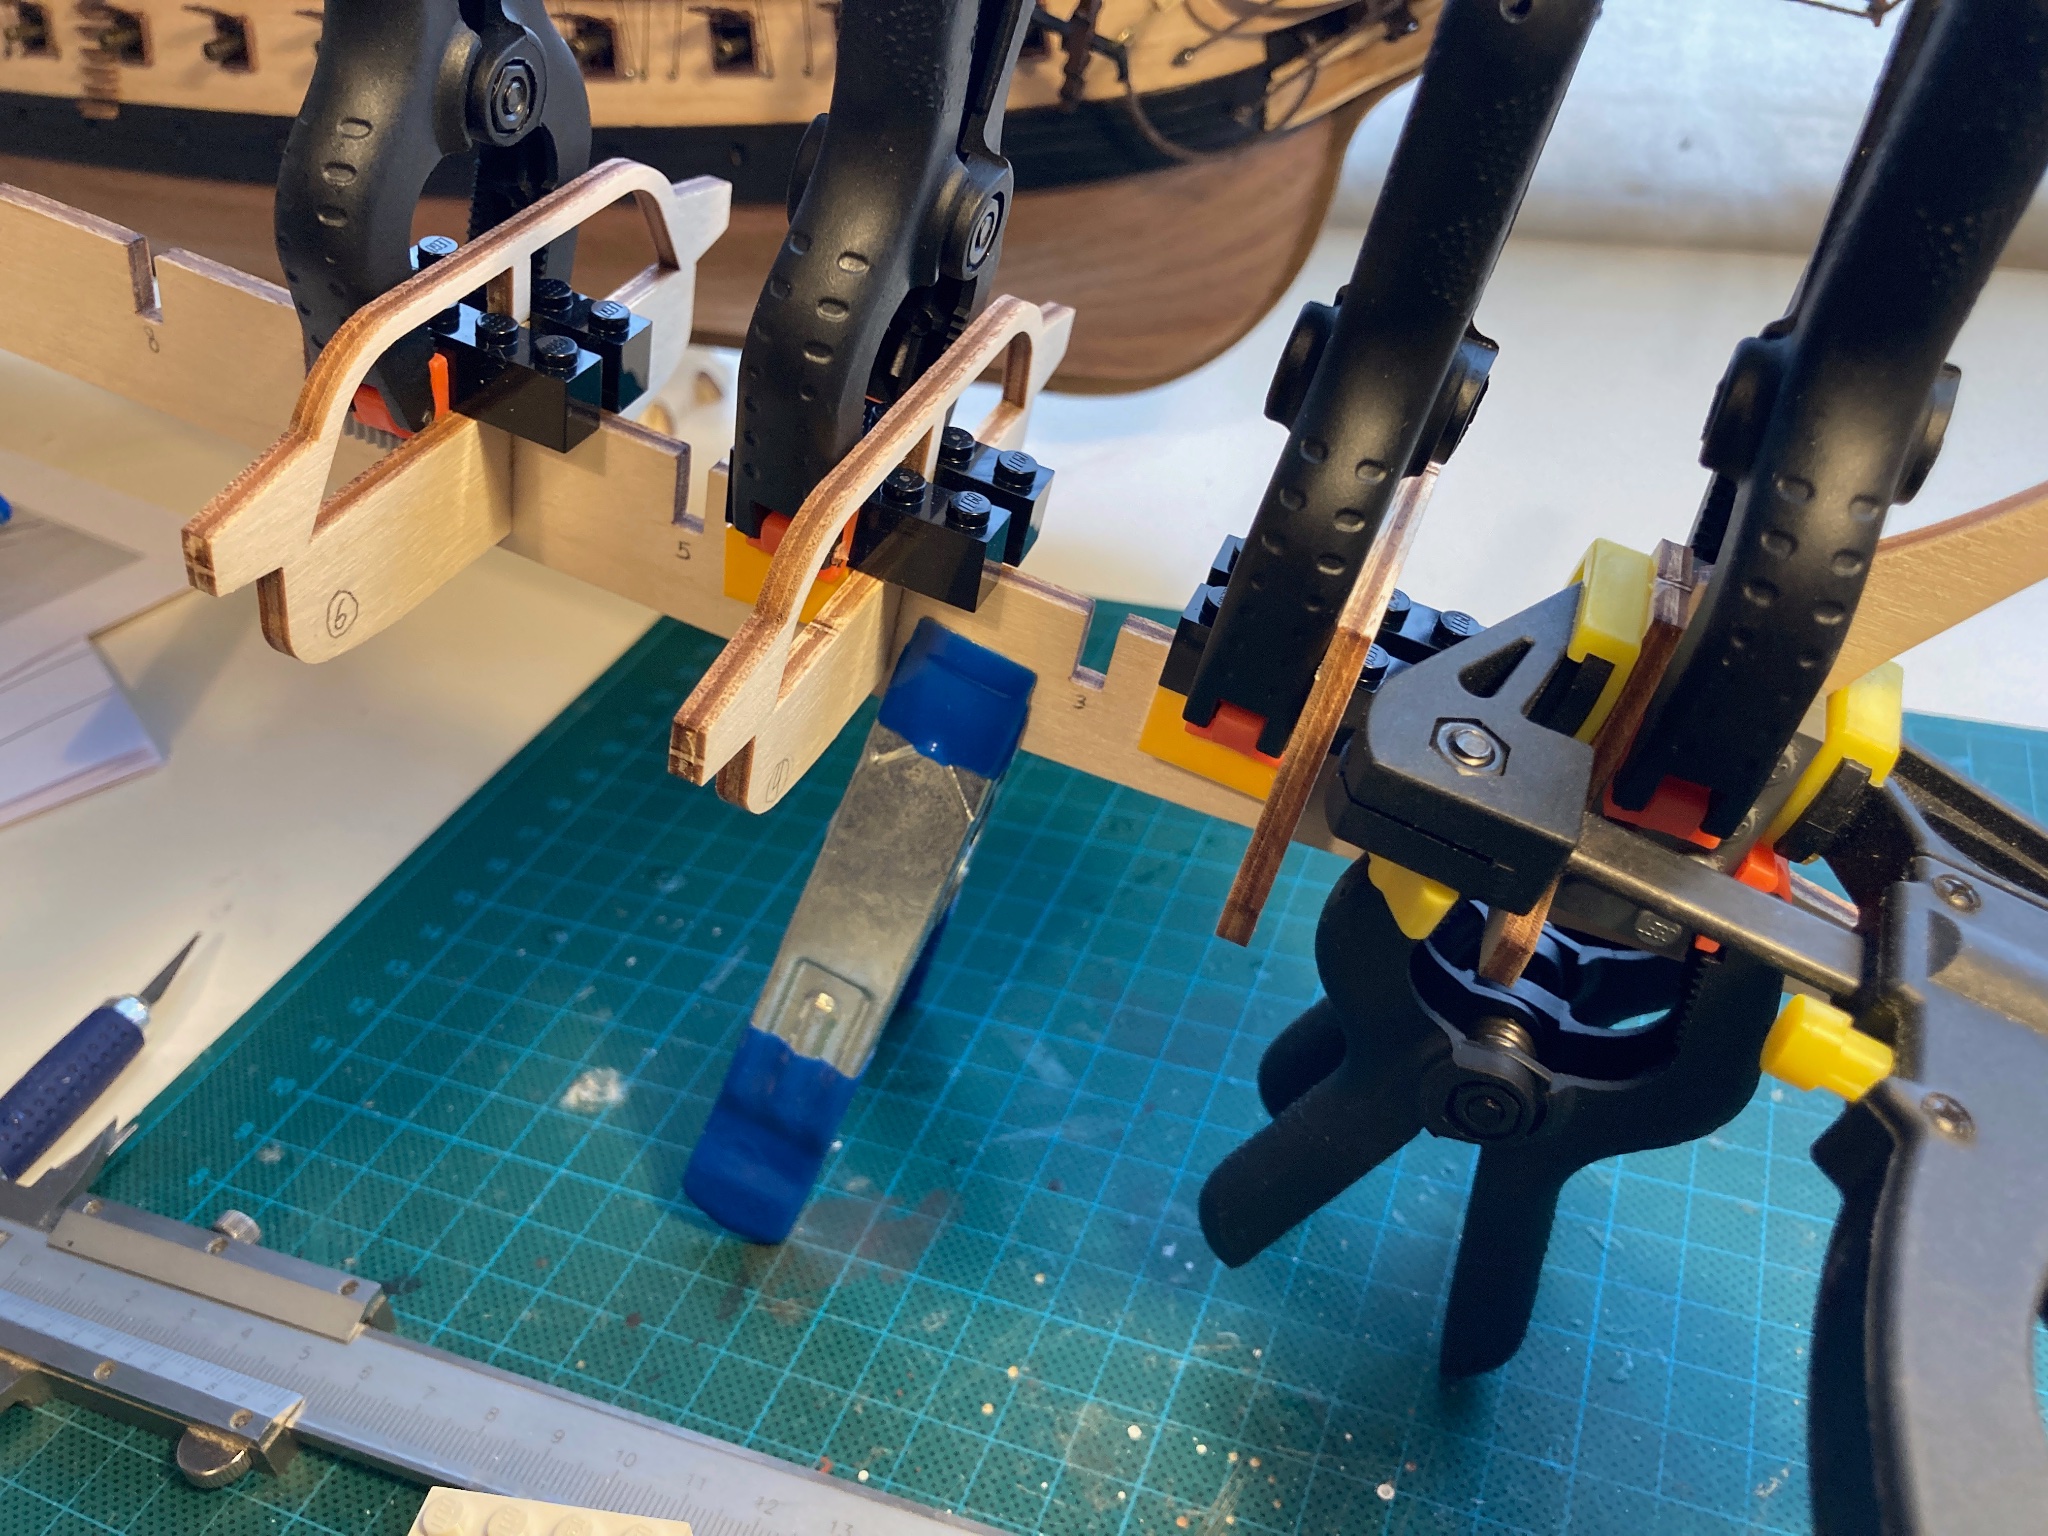
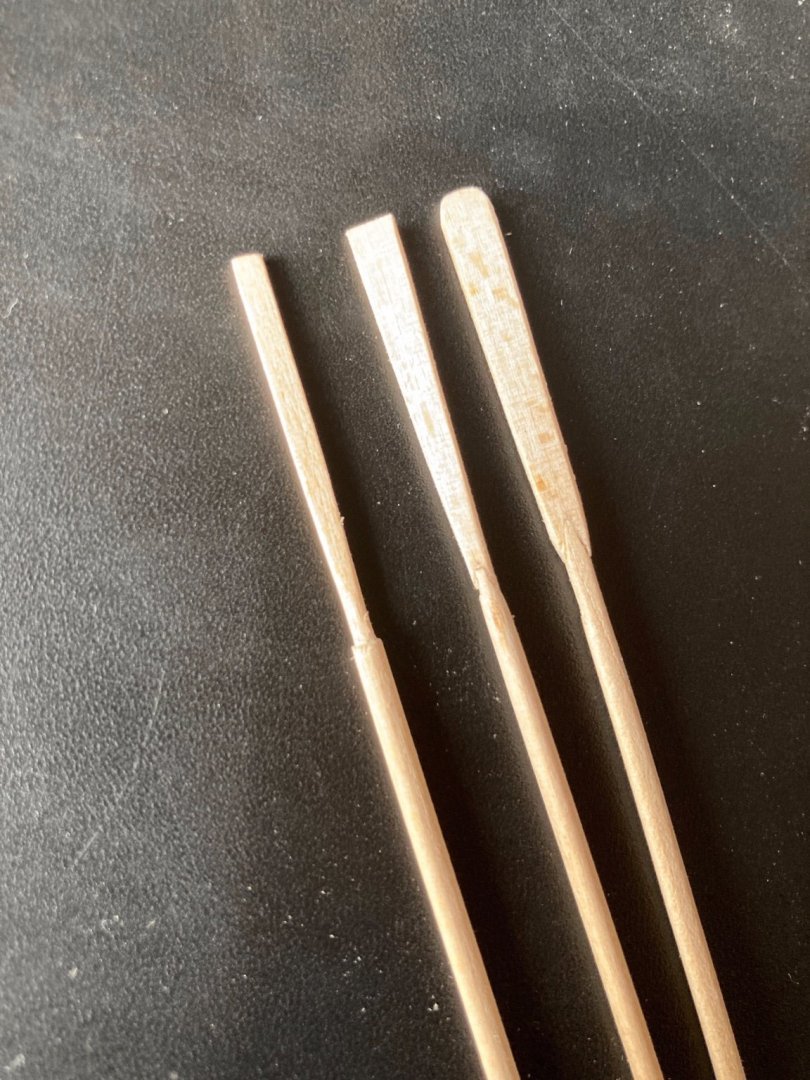
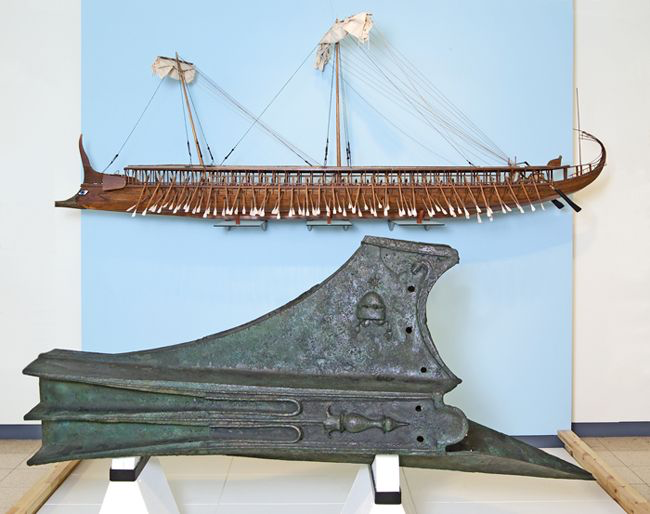
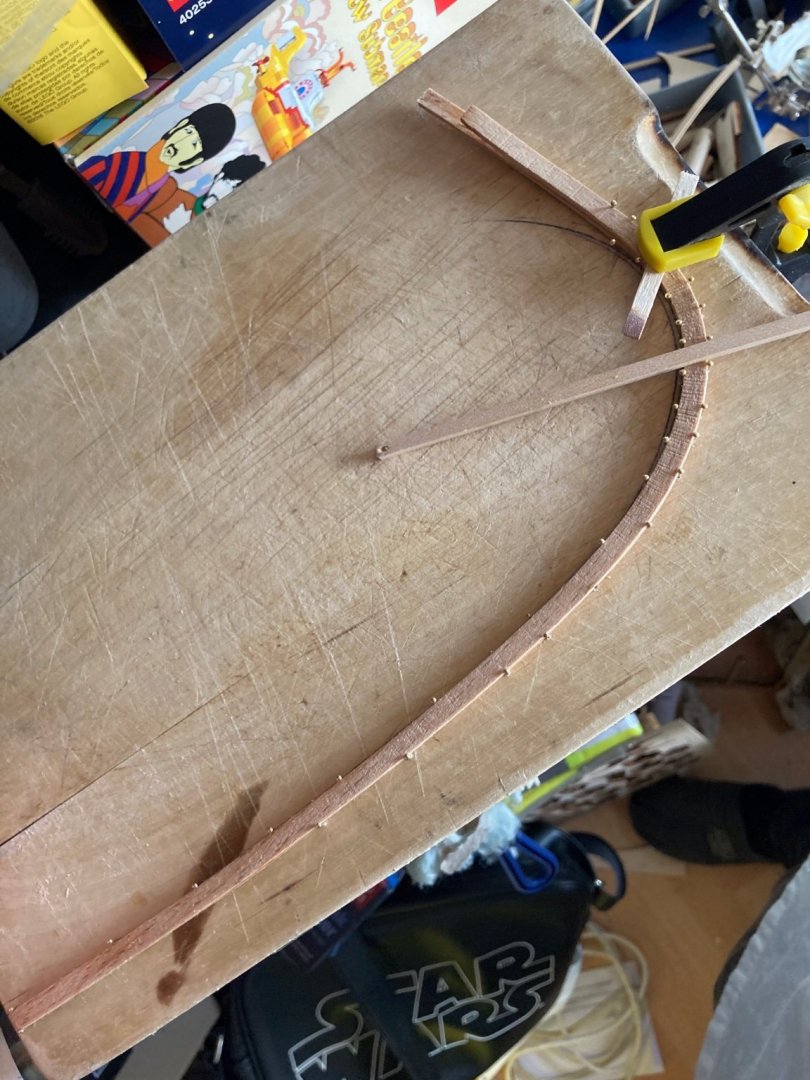
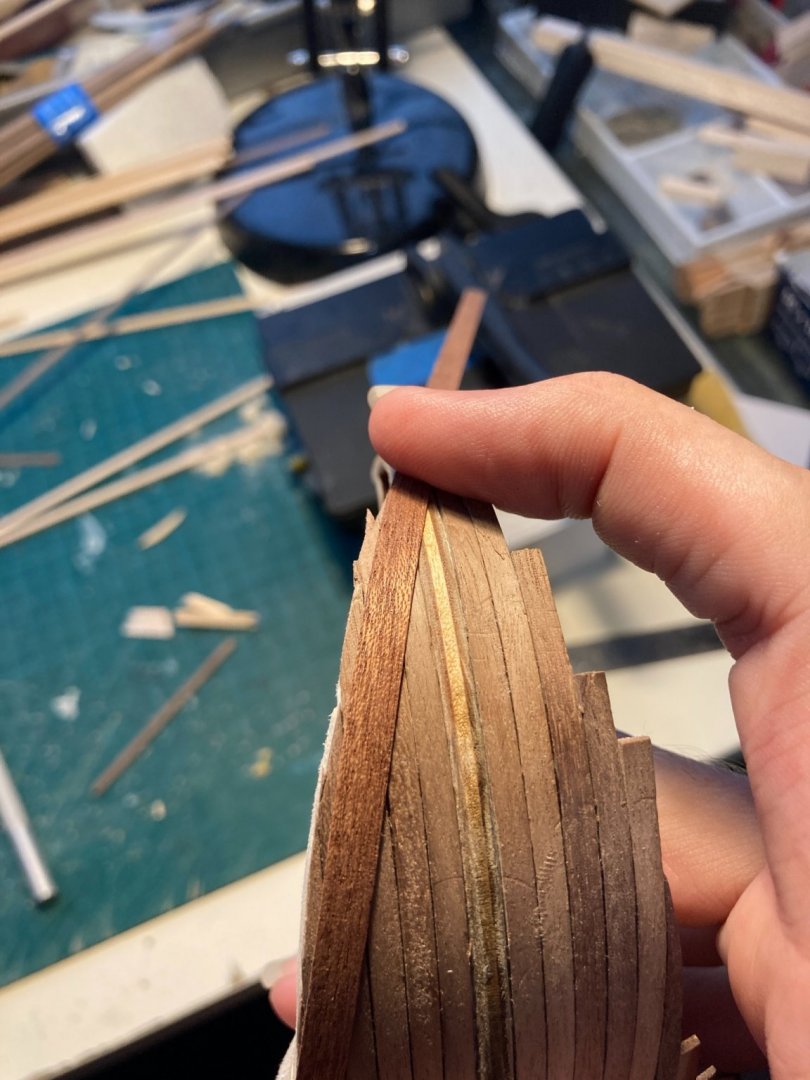
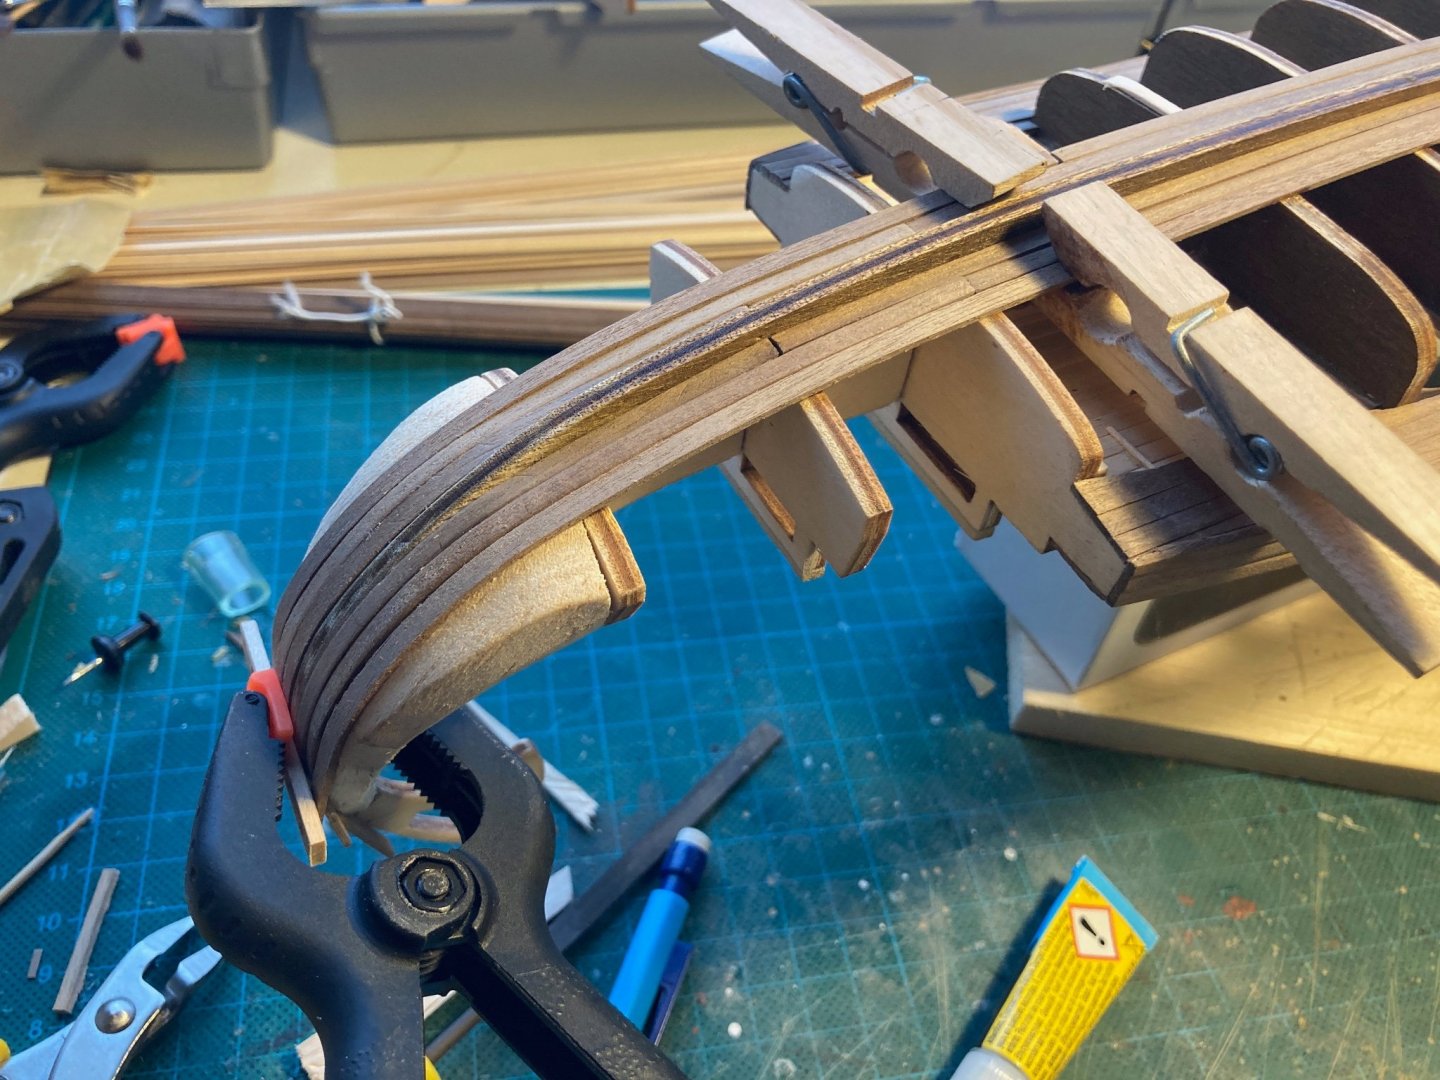
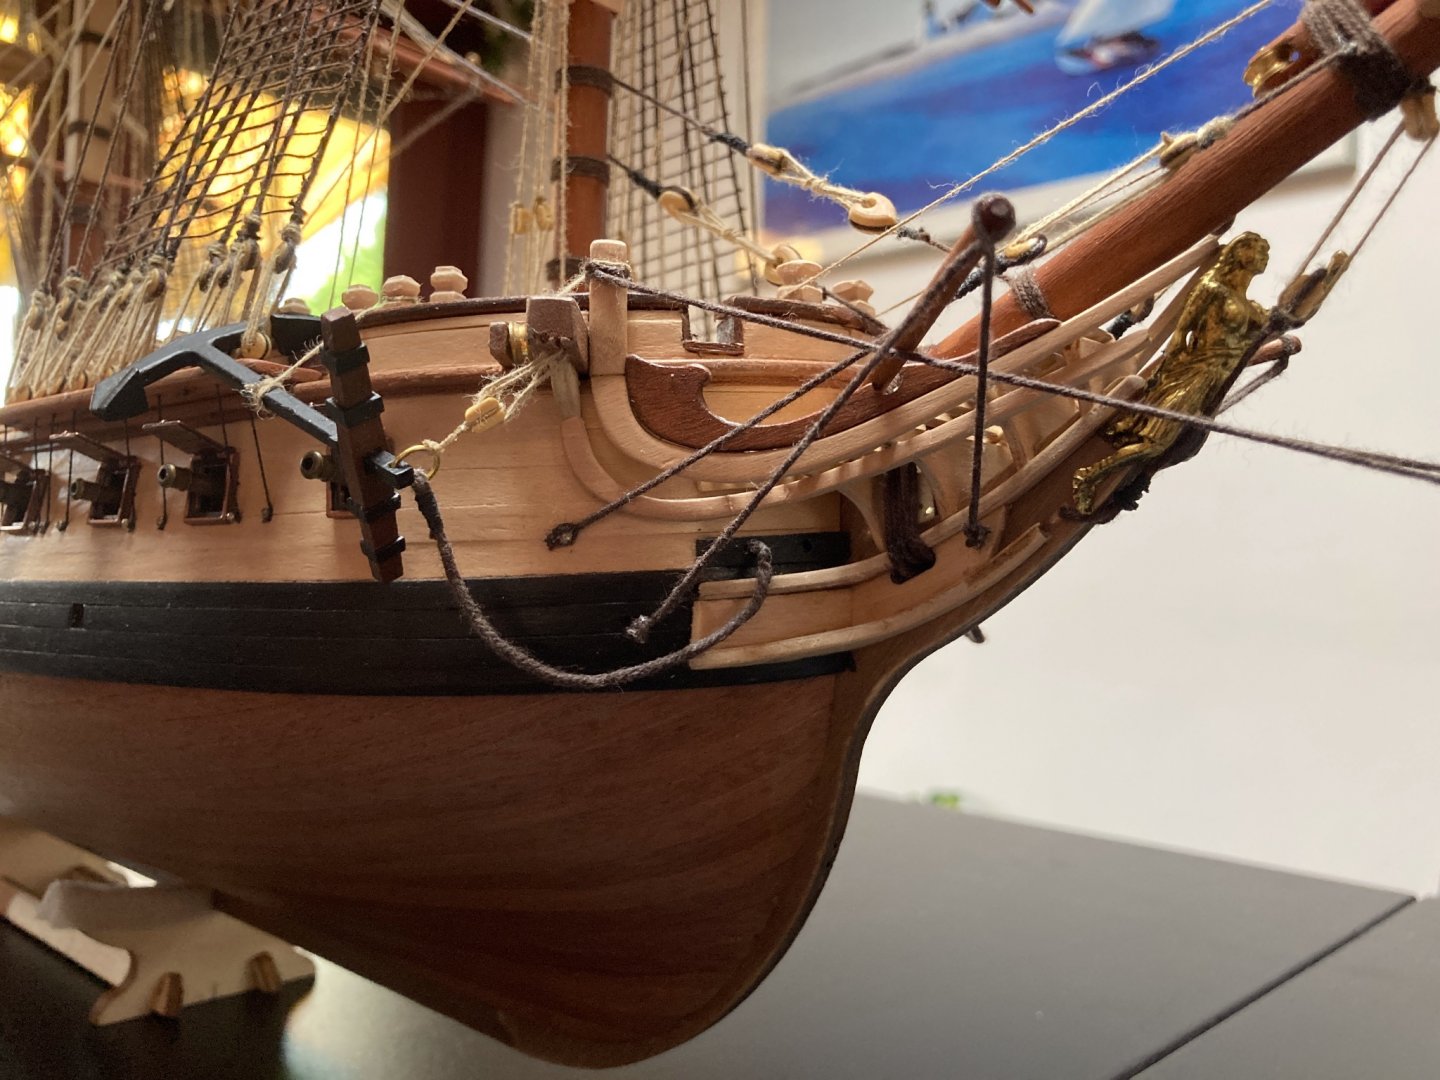
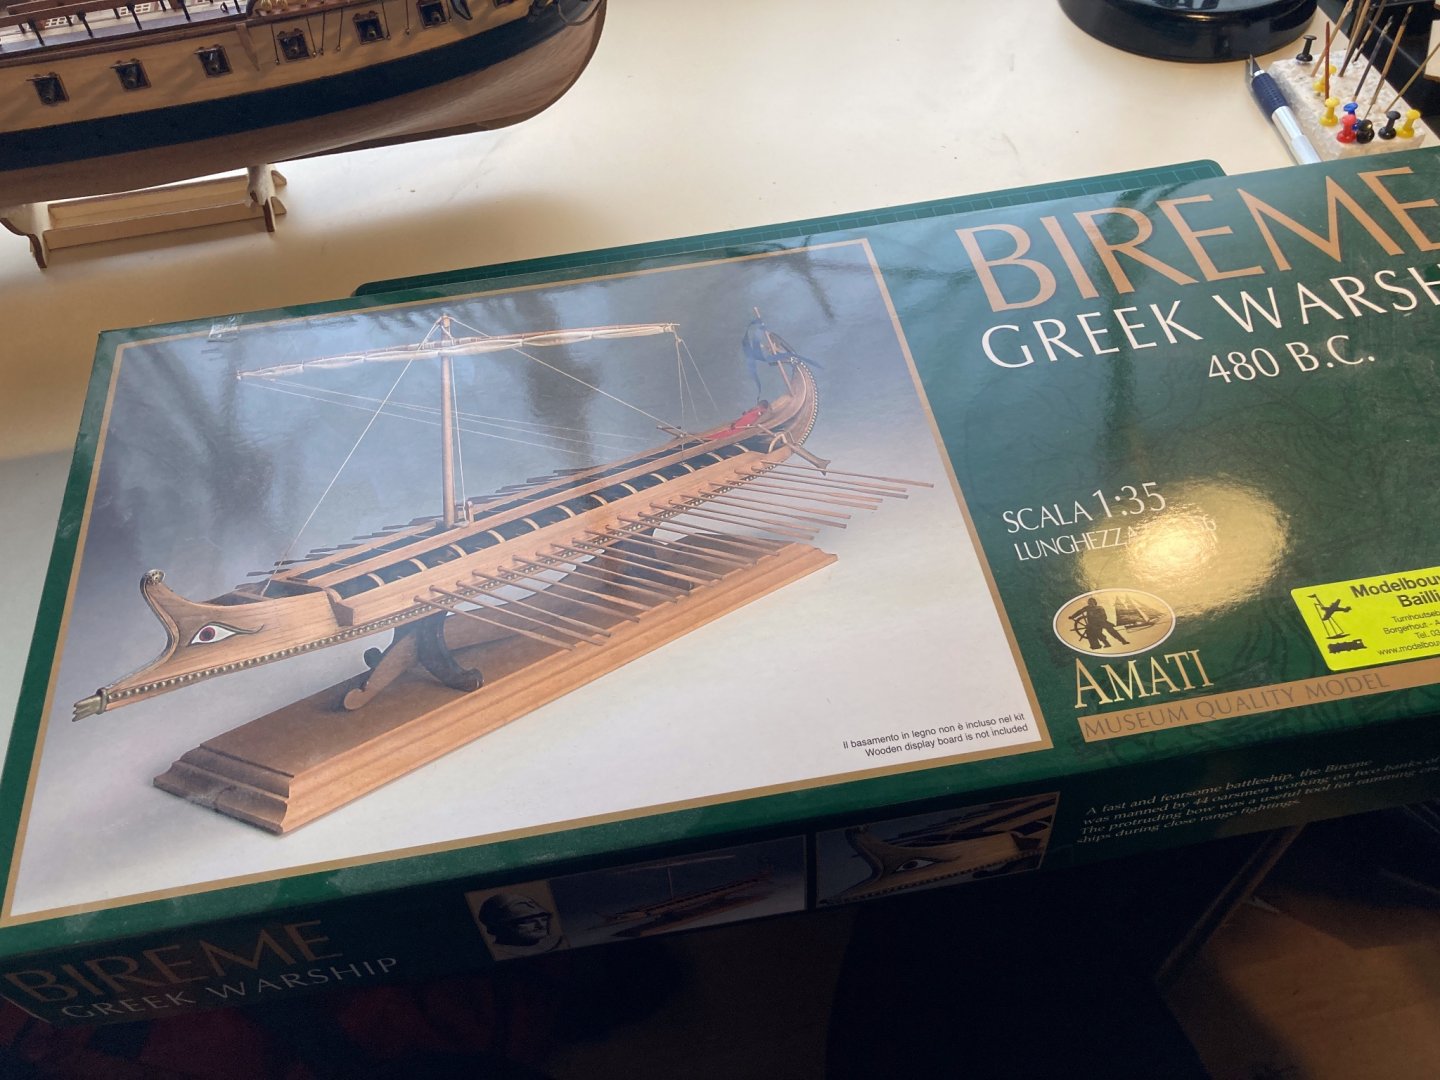
Hi all, thnx for checking in. After a couple of weeks holiday the shipyard is open again 🙂 . Been reading through your comments while soaking up some mediterranean sun, and that got my mind working on testing all sorts of things. Decided to ease into the build gently with the oars. Wasn't too happy with what the "instructions" suggested, so freewheeled a bit: Left is the version from the instructions, middle and right I added some 1x4mm limewood sanded into shape. Going for option 3! An important part of the bow was still left to be done: the ram. The one provided by Amati felt a bit lacking, so decided to go look for some real world examples. Found out that, although cargo ships from that age are found regularly, hardly any military vessel is ever recovered. Apparently that's because these ships did not sink that easily, because when hit, the ballast (ie the rowers), abandoned ship, lightening the load and in most cases keeping the ship afloat to be captured by the opposite navy (found that out in a Youtube lecture from the person responsible for the Olympias reconstruction some years ago). Nevertheless, a ram was recovered and is sitting in an Israeli museum: Important to note: scholars believe this to be a trireme ram, so fitted on a vessel much bigger and heavier than the bireme. Decided to try out some stuff with paper before committing: Above is version one, a bit tiny compared to the reference material I gathered, so tried again: Sizewise seems to be better, going to try now and add some curves to the sides, maybe extend the top a bit and round off the business end. Also thought out under the Greek sun: the eye. Thanks to @Louie da fly@Thukydides@Cathead and @AVBiker for you input, in the end the reasoning I had was that decals might be too perfect to convey what I wanted to do, so tried out the coloured pencil approach (commandeered some pencils from the Rear Admiral). Tried it out on some plywood before moving to some test strips in walnut: First try, but I really like the weathered look of it, gives it a bit of character 🙂 Still need to see how this will hold with varnish on top, that still needs to be tested. Last mayor build on the hull are the wales. these run across the entire side of the hull and bend with the stern to the decoration on top. Luckily some cutting boards were up for replacement, so.... I really should learn to ensure my clamps can actually reach the bent wood 🙂 Letting these dry for 24 hours, so looking forward to fitting them tomorrow. I outsourced the sail to a friend with a sewing machine, that should arrive early next week. Also, not related, went to my supply store with the Admiral right before leaving on holiday, and this came back: As the Admiral is into making Mediterranean diorama's, this caught her eye. So another build commission came up 🙂 Also, this came home: I know I know, I said never again, but Bluenose has been on my wishlist for a long time, and I did some research before buying AND checked the contents of the box at the store, and lo and behold, it came with extensive instructions! And detailed plans and schematics! Looking forward to this one. Found out that the ornaments on the bow and the name were not included apparently, so I fired off an e-mail to Amati customer support 20 days ago to check. Still did not get an answer. Must be an Italian thing 🙂 Take care and stay safe!


- 62 replies
-
- 10
-
-
- amati
- greek bireme
- (and 1 more)
-
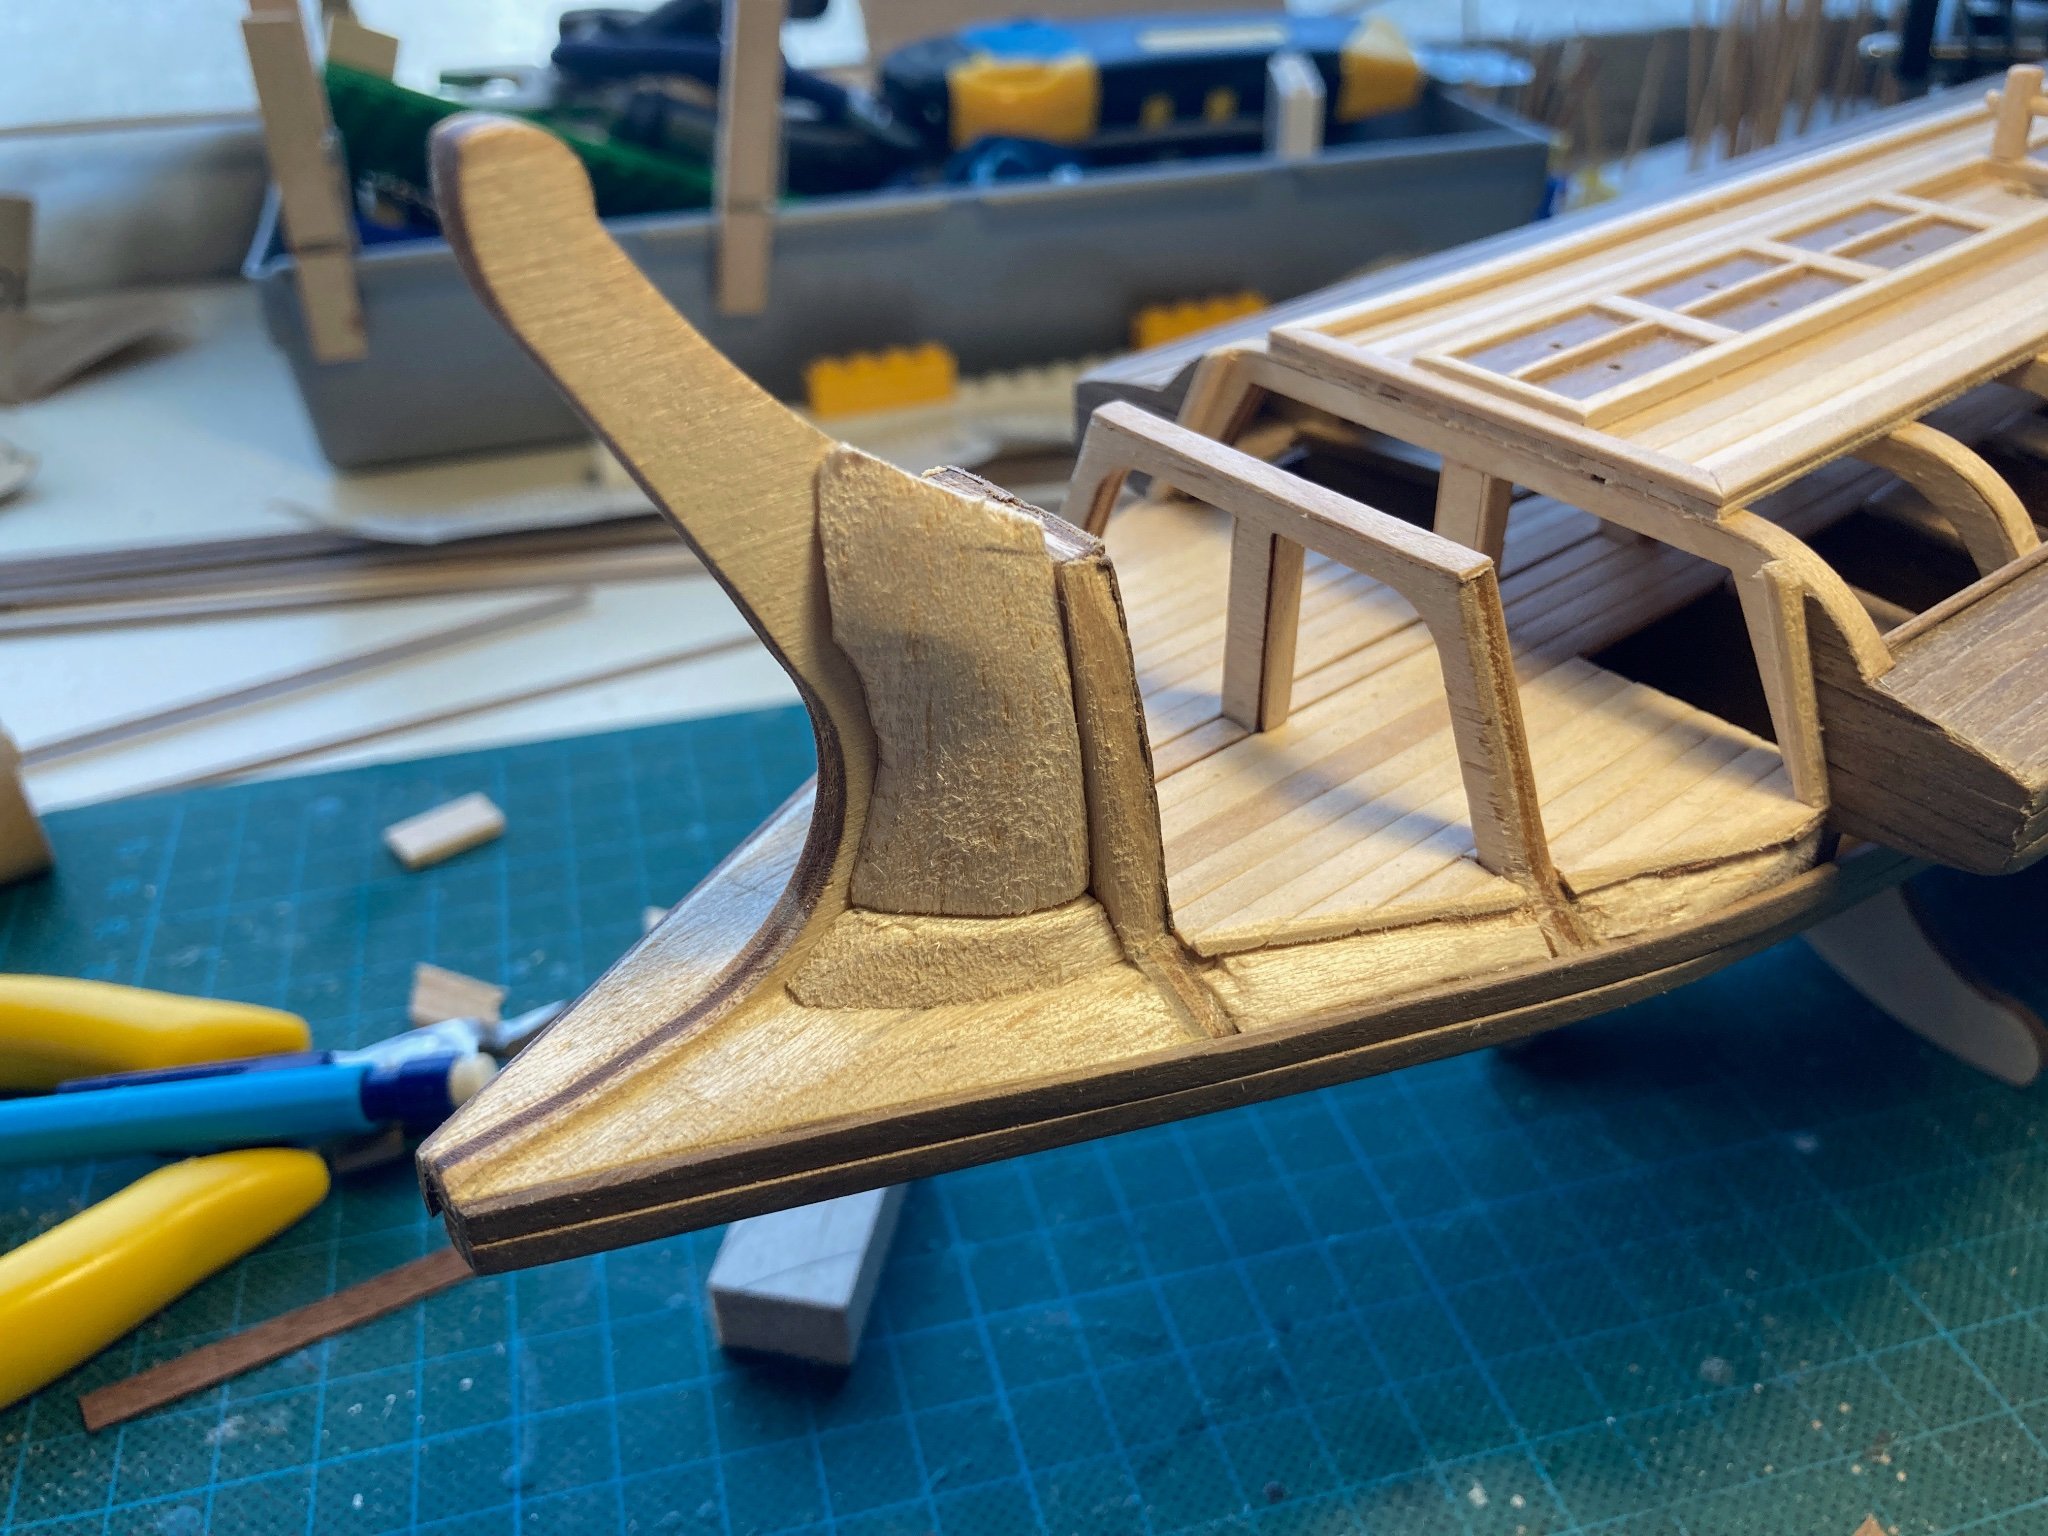
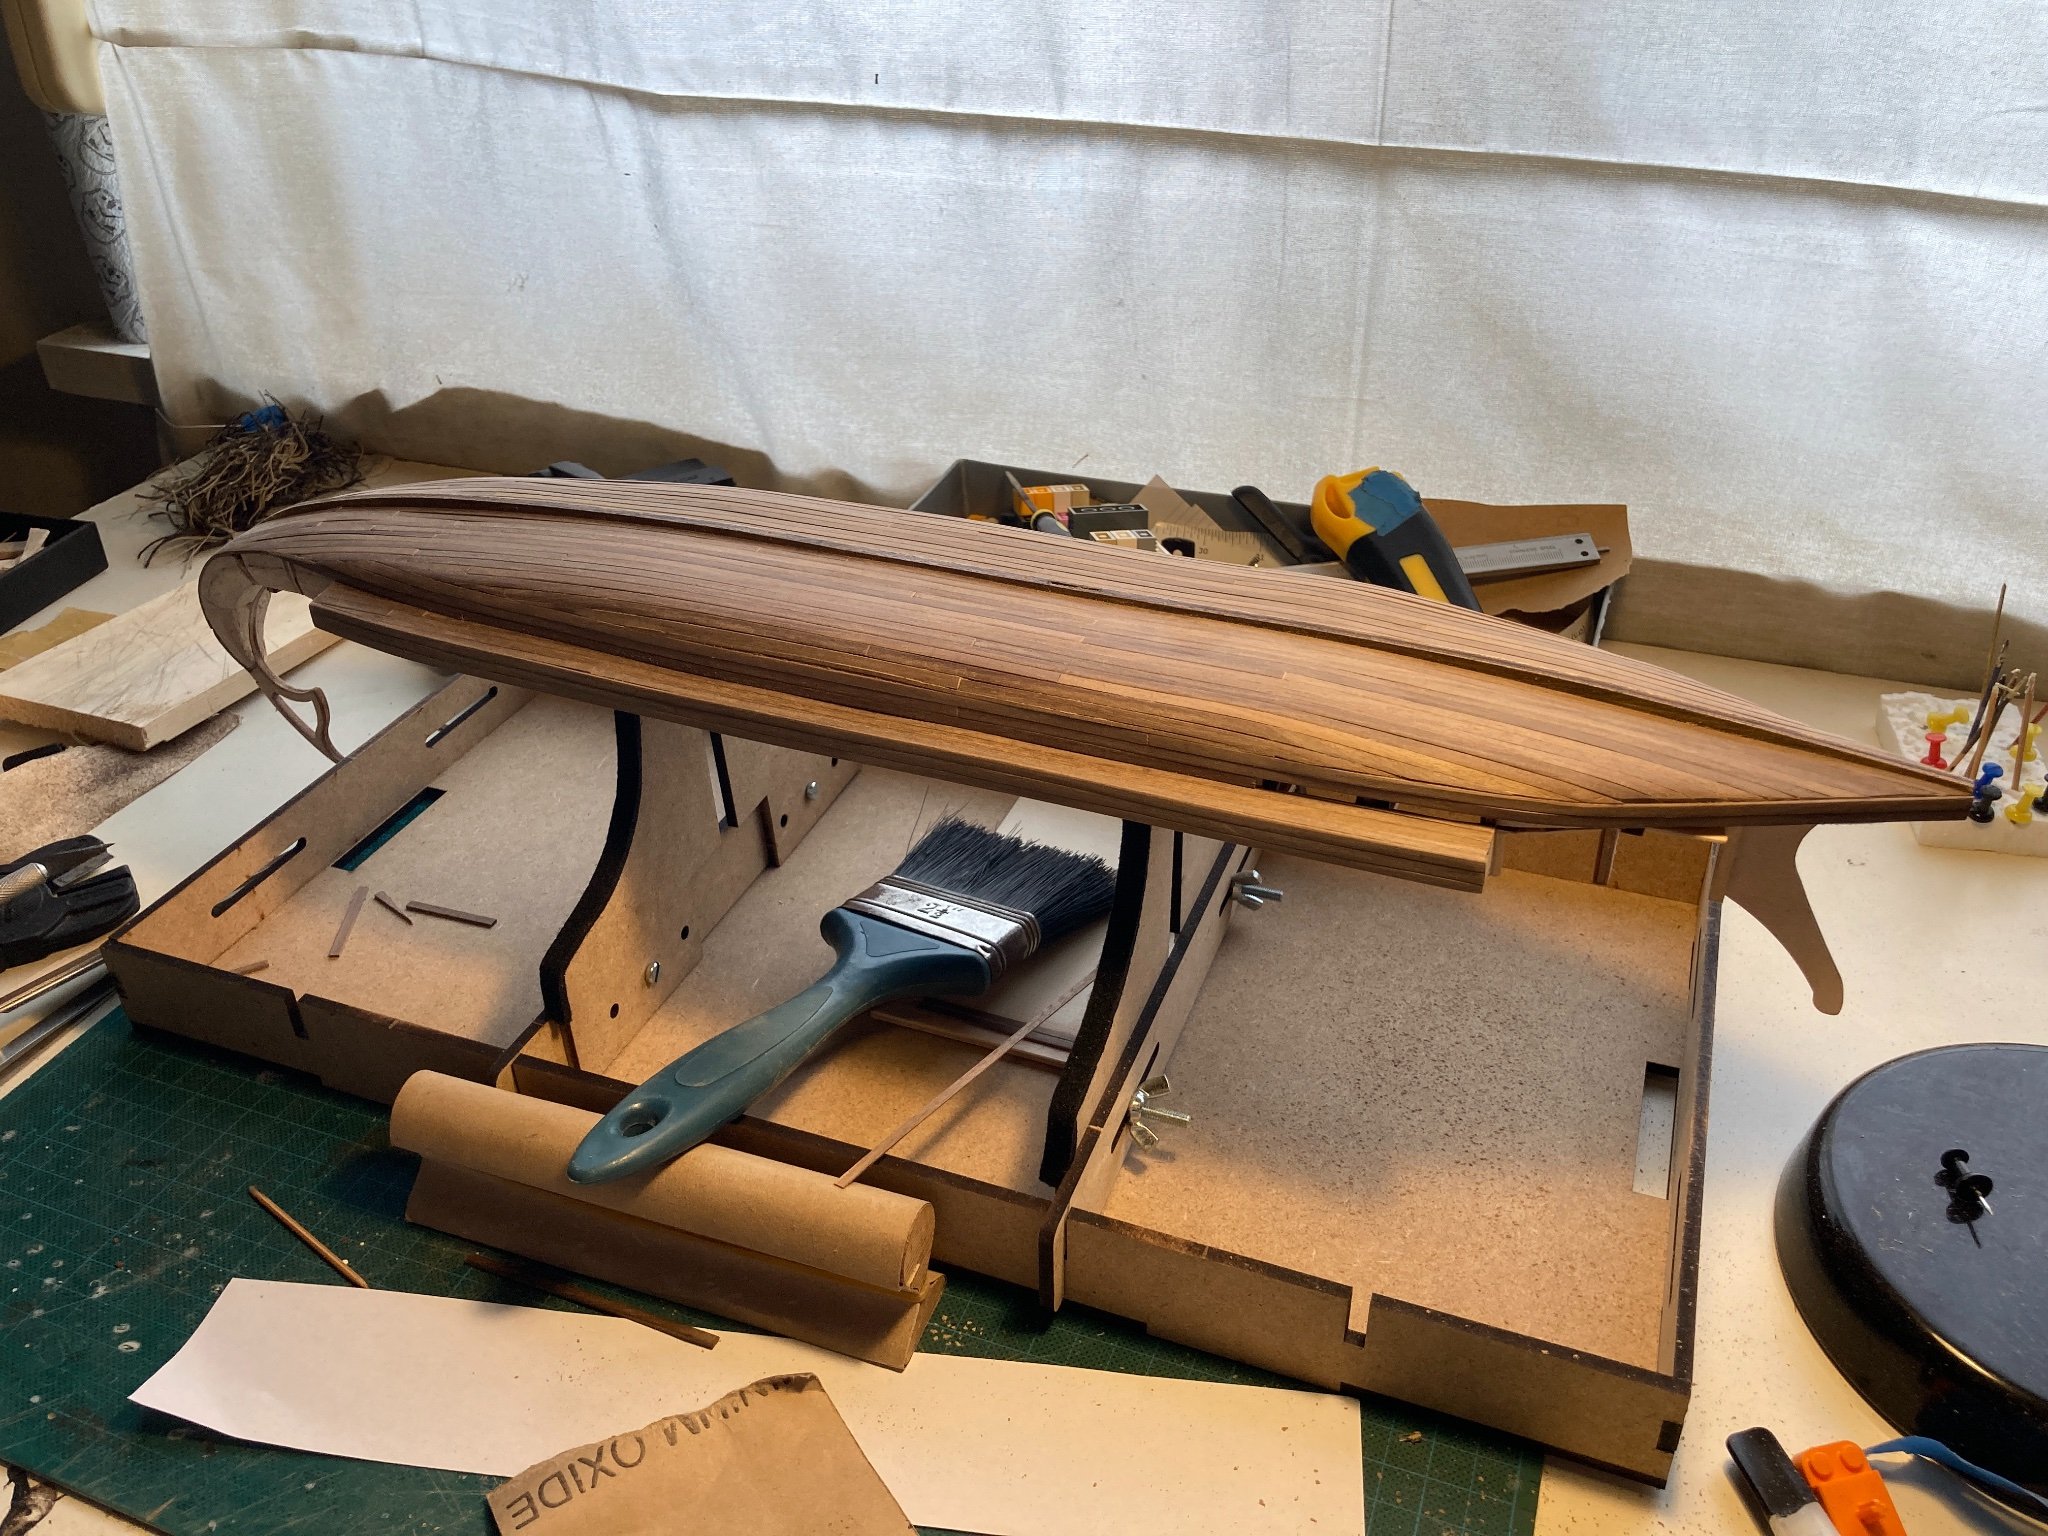
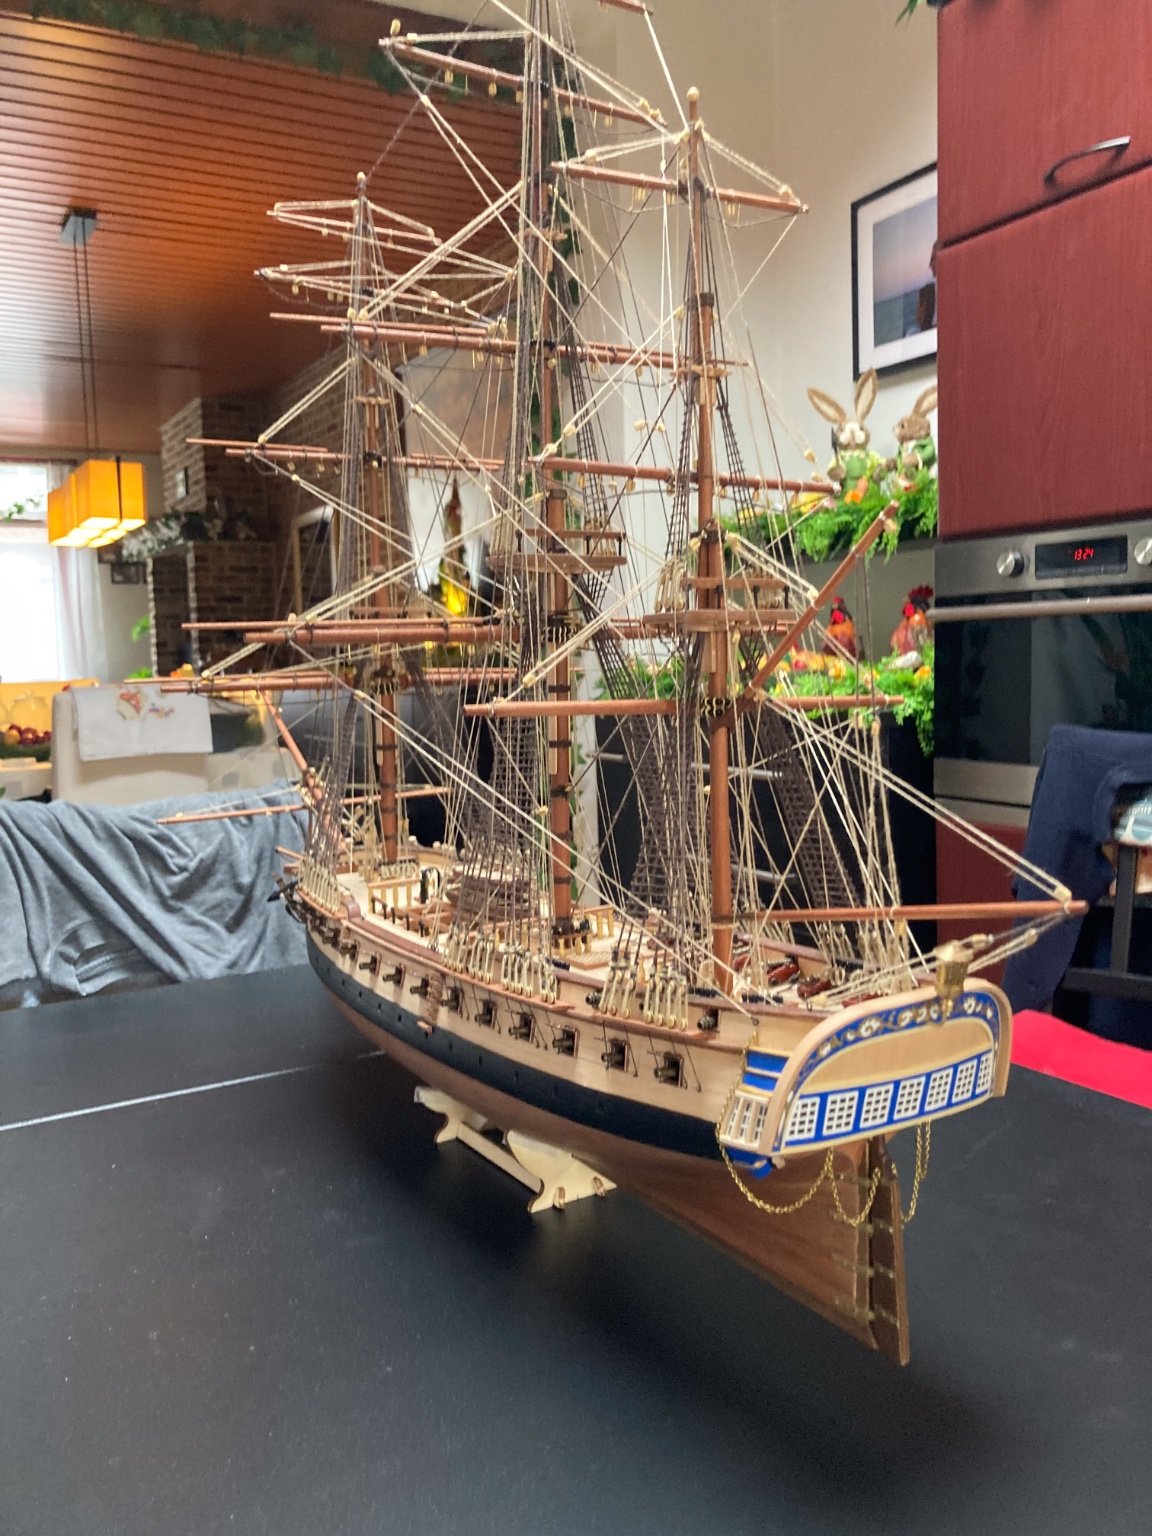
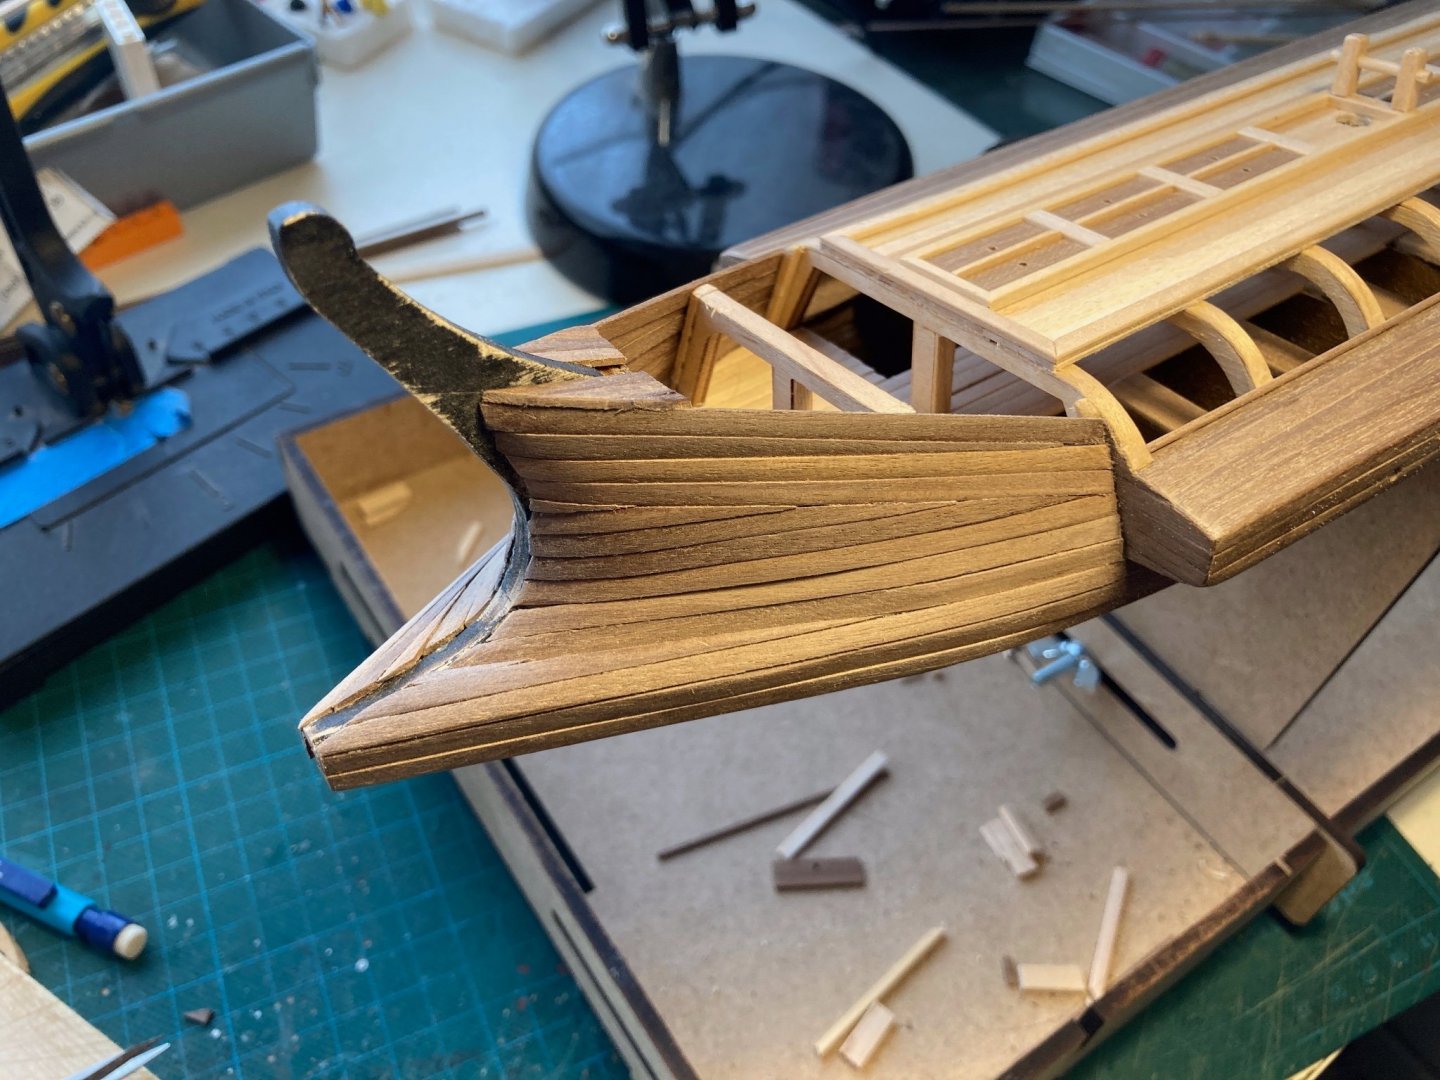
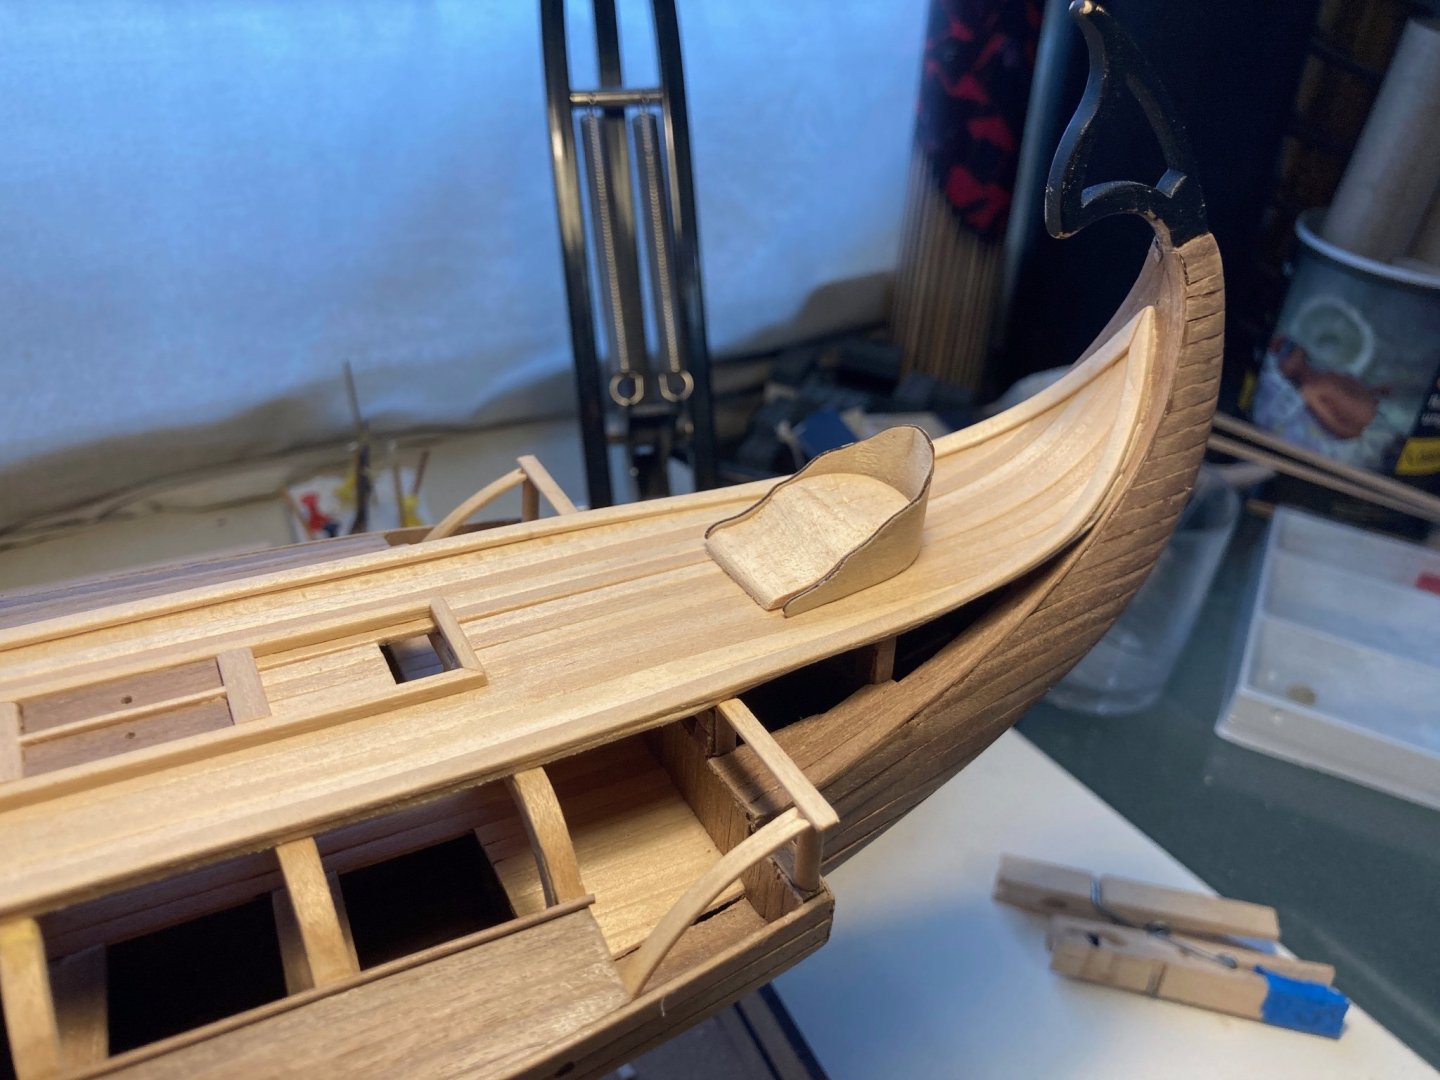
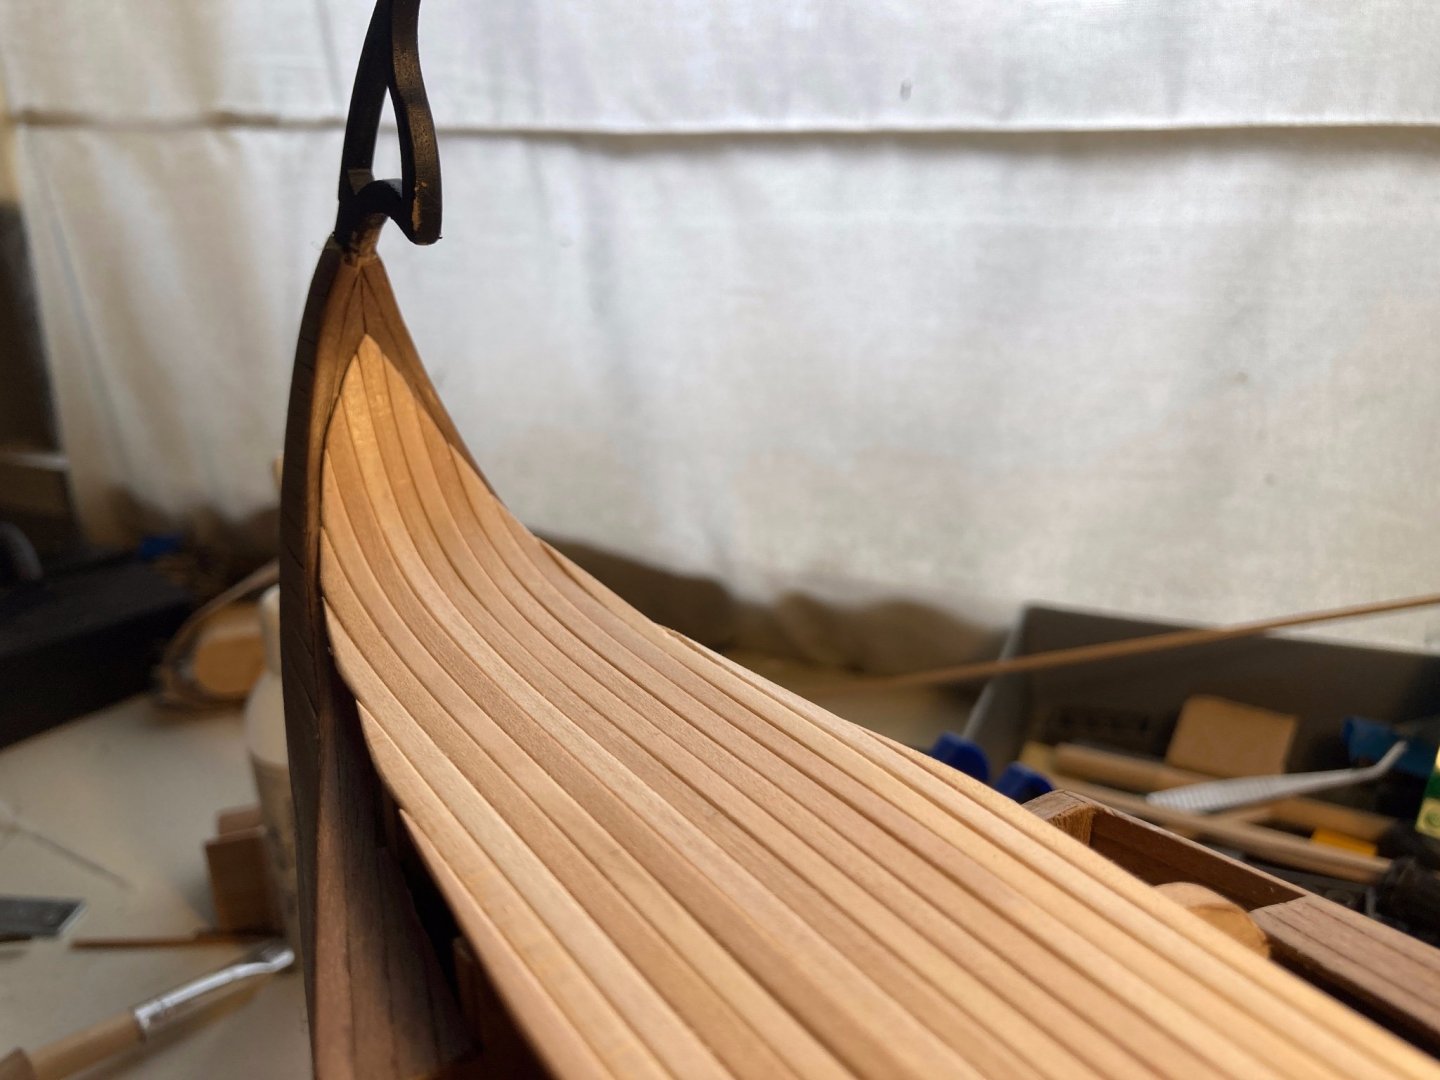
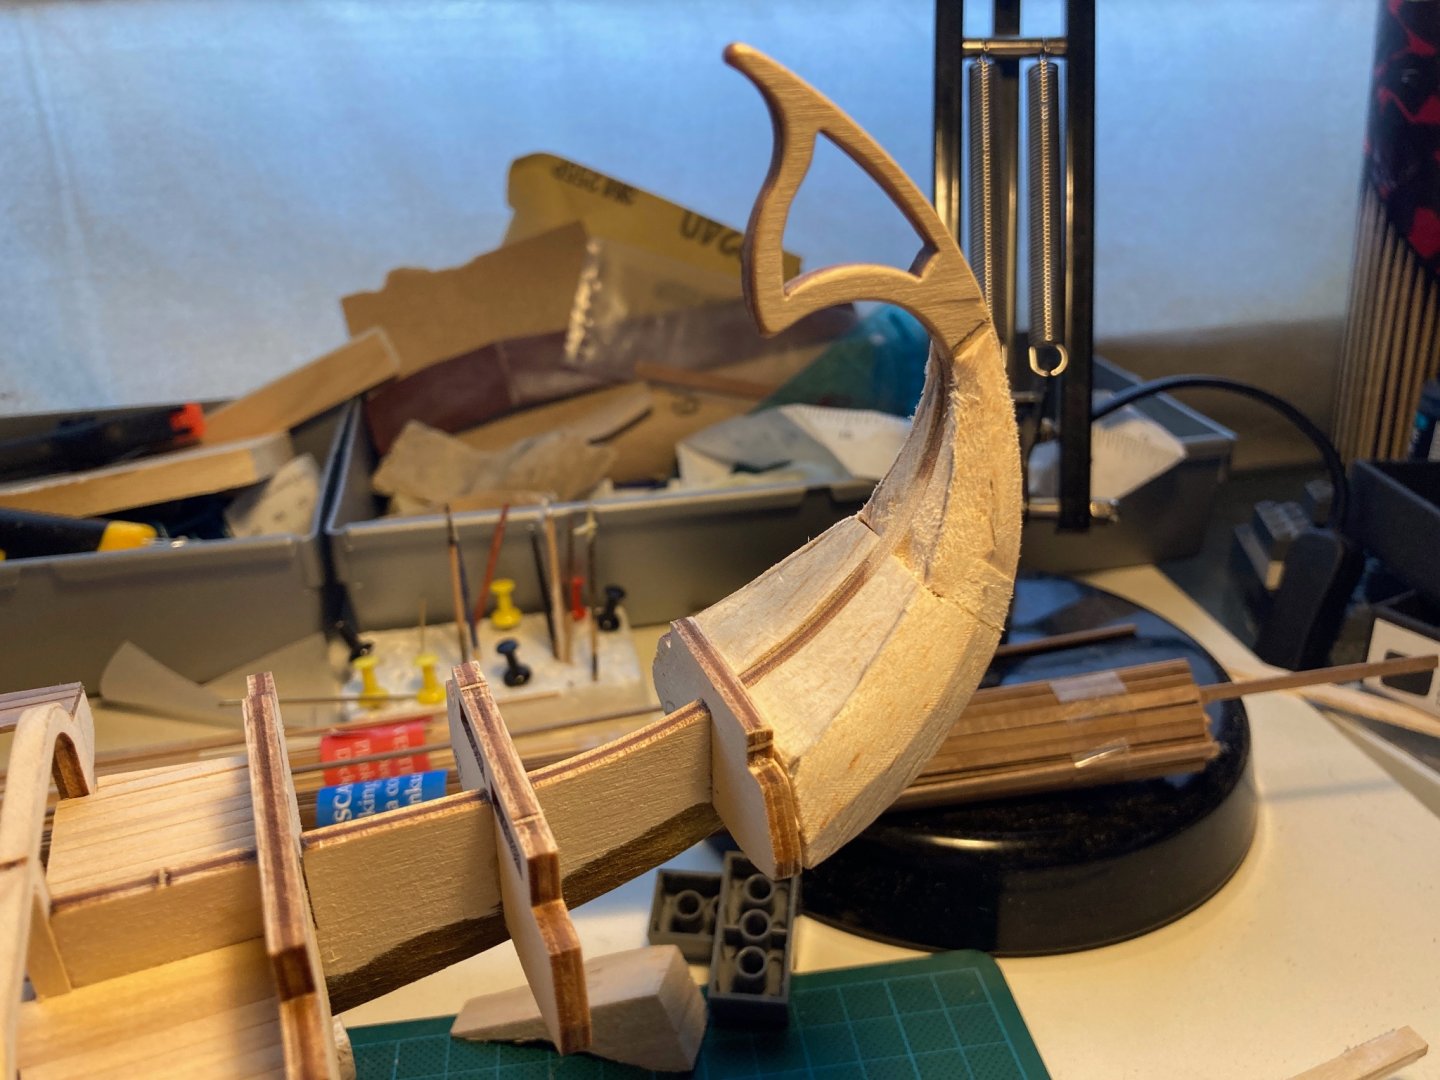
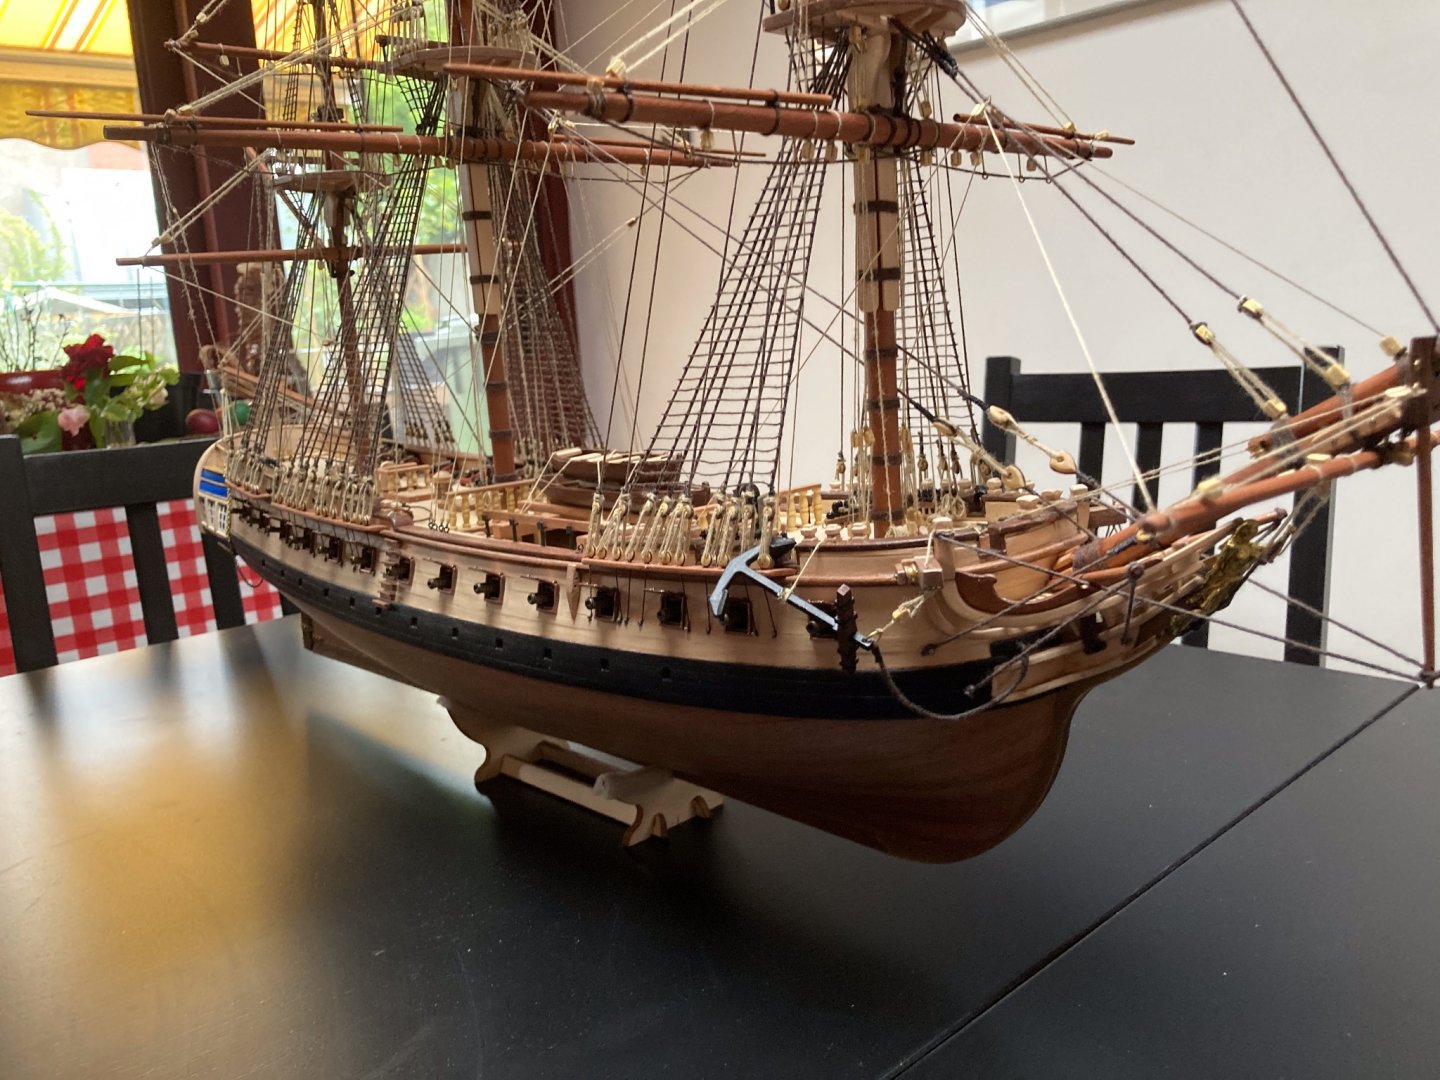
Hi all, thnx for the support. Big news: the bow is finalised: Some sanding and restoring the black paint, and then we're done. Started with the difficult plank at the bottom (involving a 90° twist), working my way up a bit because I wanted the flow from horizontal to vertical as sooth as possible. Then started from the top and worked my way down. Question: does anyone have any experience with putting slide-on decals on wood? Reason I'm asking: the Eye. I'm lousy at freehand drawing or painting, and I don't want to mess up the face of the ship, so to speak. So I designed the eye based on footage I found from Omympias, the trireme replica built some time ago: I'm quite sure I need to varnish before applying the decal, just wondering if that's the right way forward and if there's anyone else who attempted to work with this material. Meanwhile, working on the finer details, mast and yard are done, rudder supports are on and the captain's chair is getting along nicely: The shipyard will be on annual holiday as of next week for the next two weeks, stay healthy and safe 🙂
- 62 replies
-
- 8
-
-
- amati
- greek bireme
- (and 1 more)
-
Thanks again for all your support and feedback 🙂 @BobG I've been going through the instructions which are available on the Vanguard Models site, and indeed, they're top notch, even picked up some pointers for my current build. Love to order one of Chris' models, just to experience the premium feel. Saving up, hopefully I will be able to place my order soon. @Danstream Indeed, there's very few illustrations on how the finished model should look, other than the box art and three copied black and white pictures. I guess that's also in the nature of the model partly, as there are no plans or pictures to reference back to. Nevertheless, a simple numbering of parts and some consistent description should be the bare minimum. The Bireme kit seems to be an exception, as other Amati kits provide better documentation, as far as I can tell.
- 62 replies
-
- 3
-
-
- amati
- greek bireme
- (and 1 more)
-
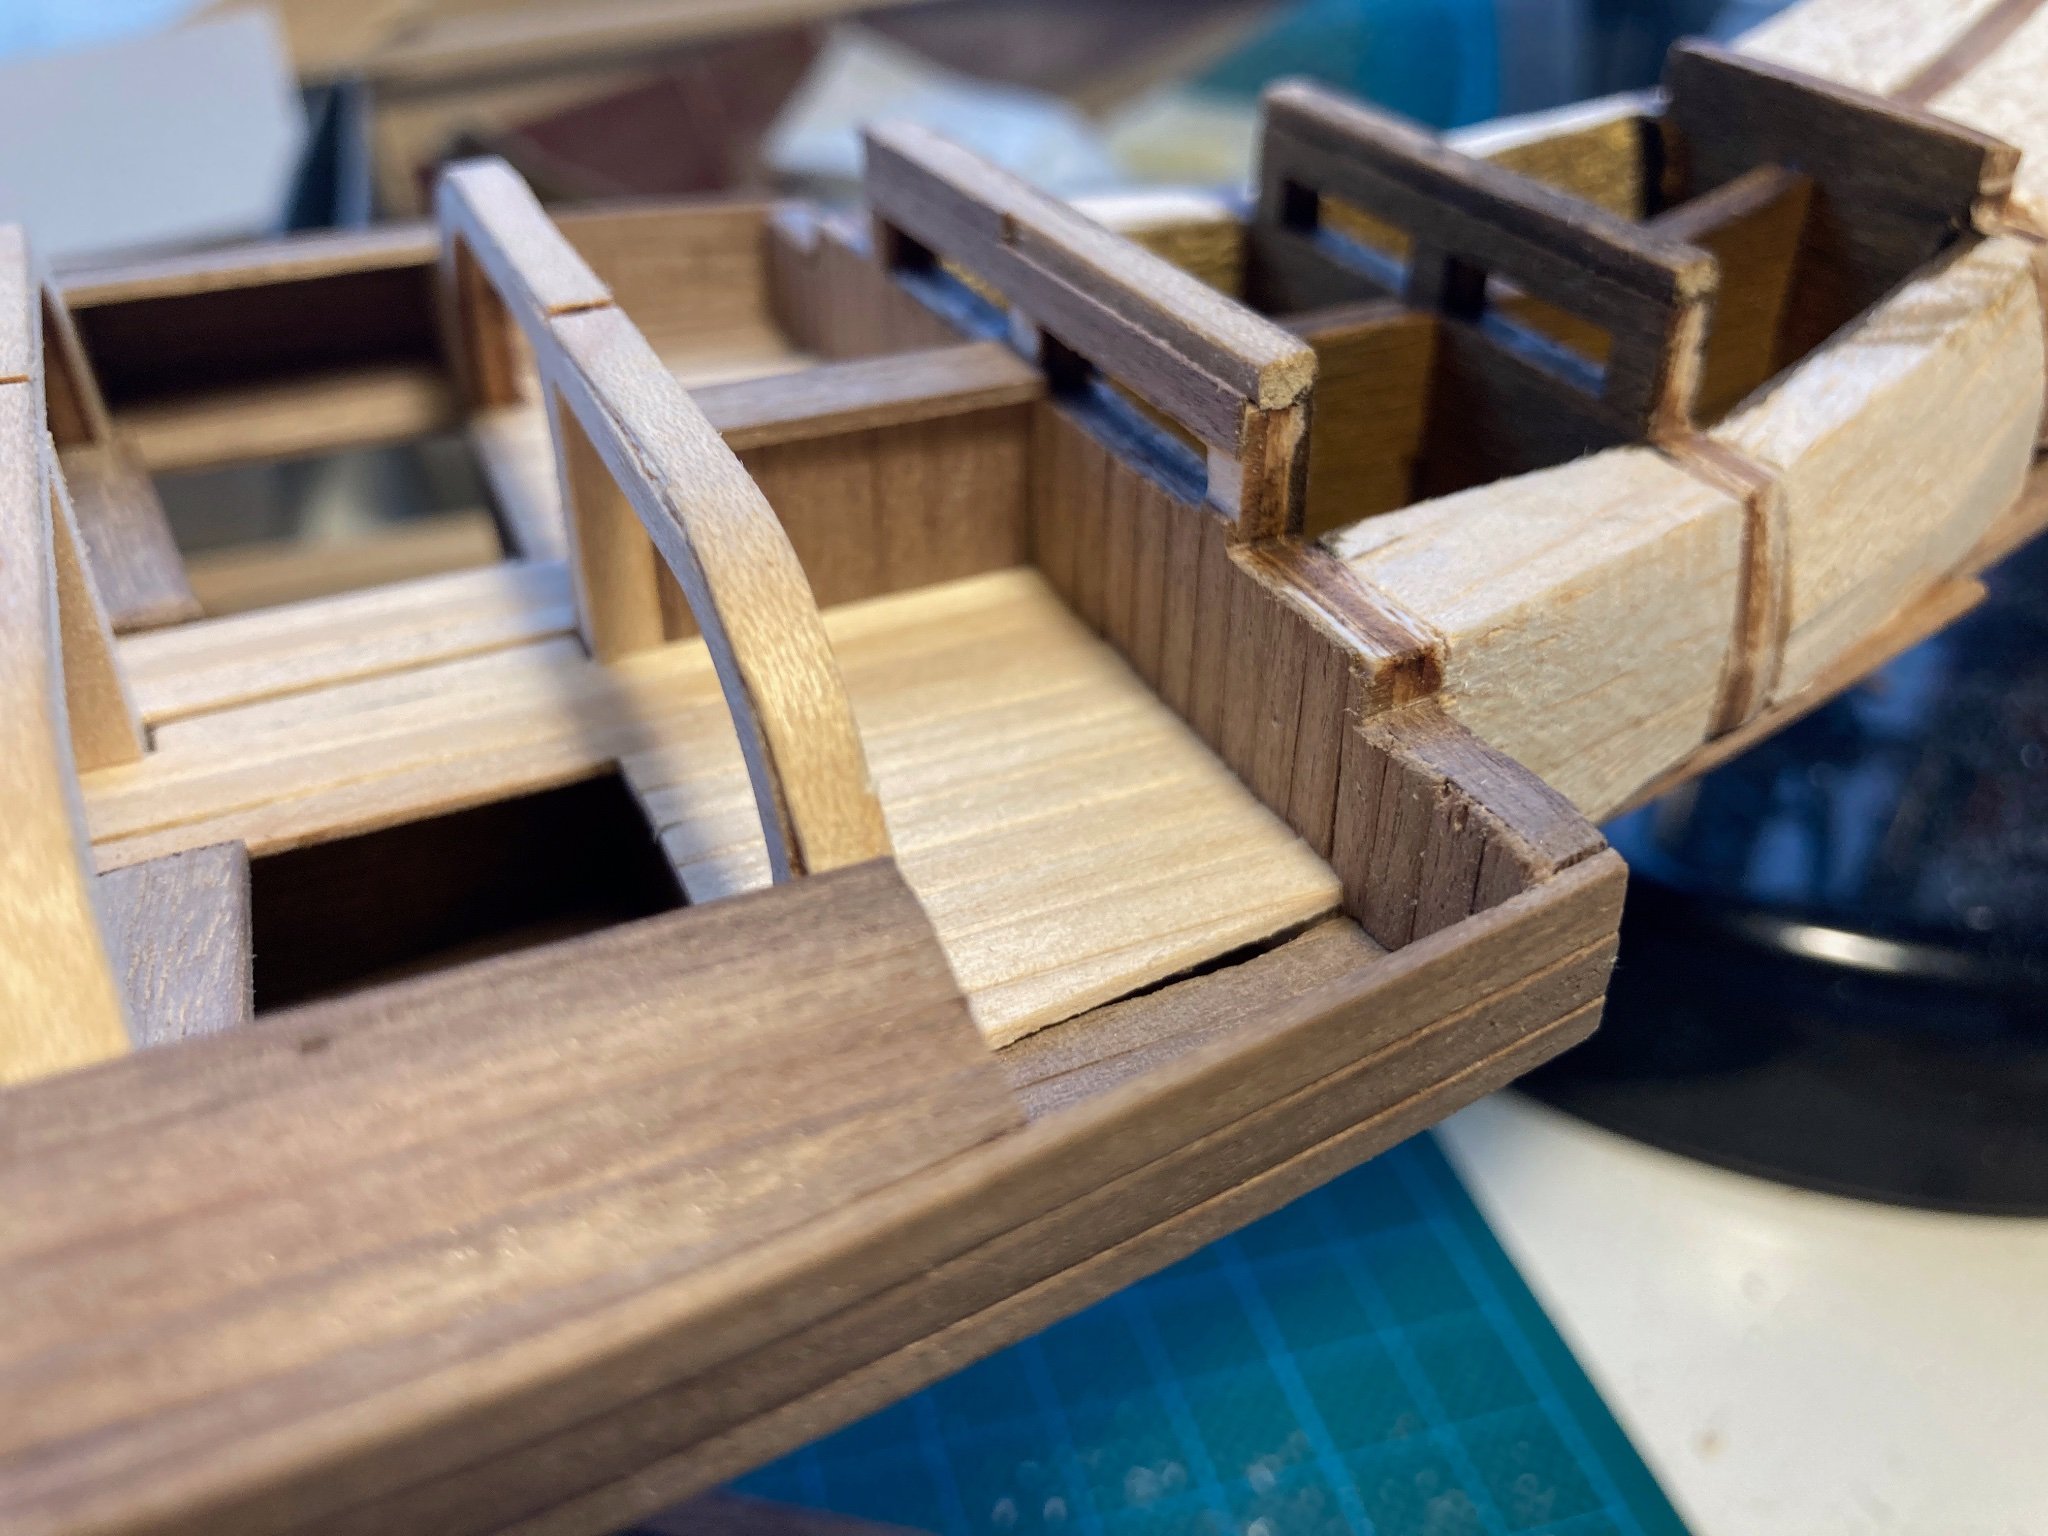
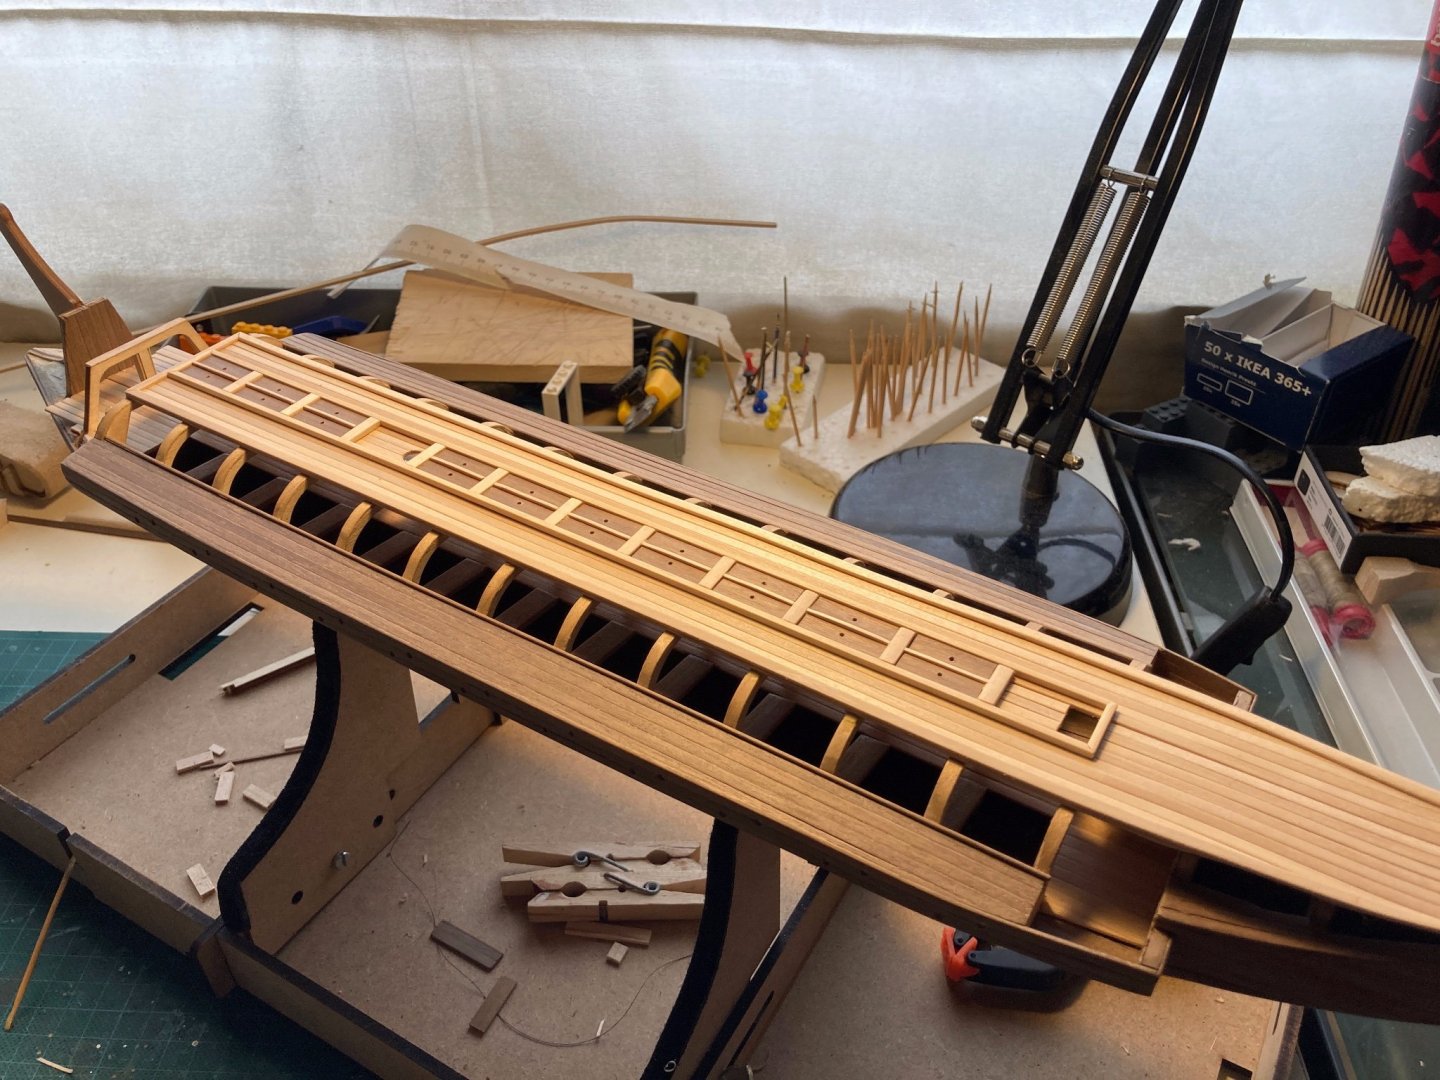
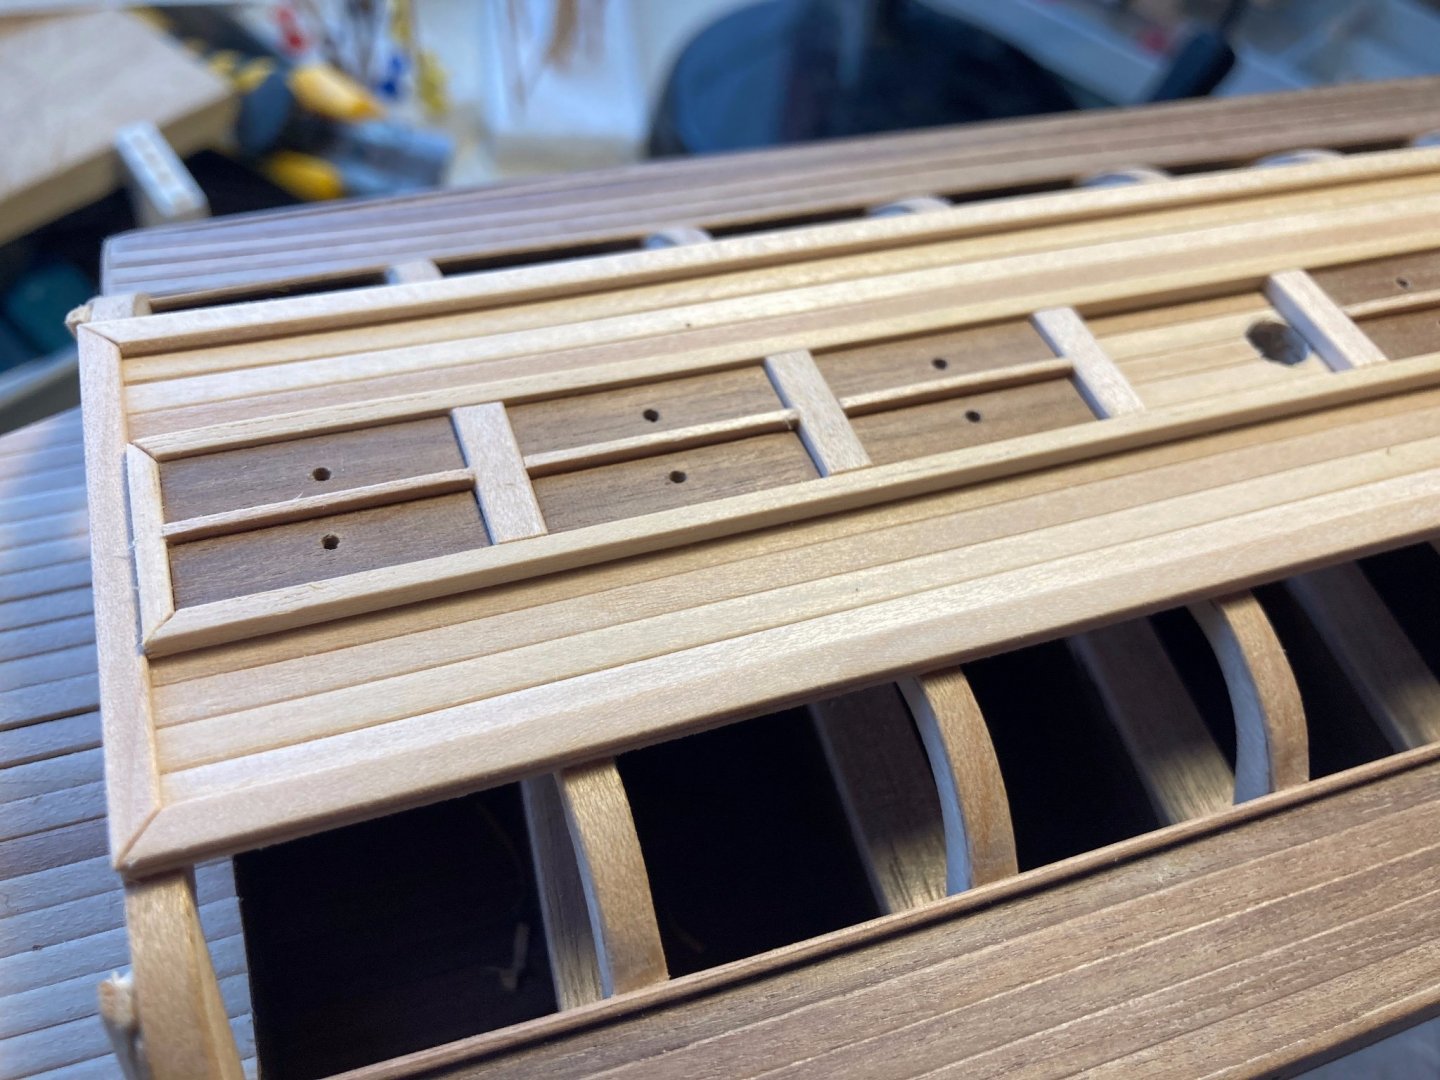
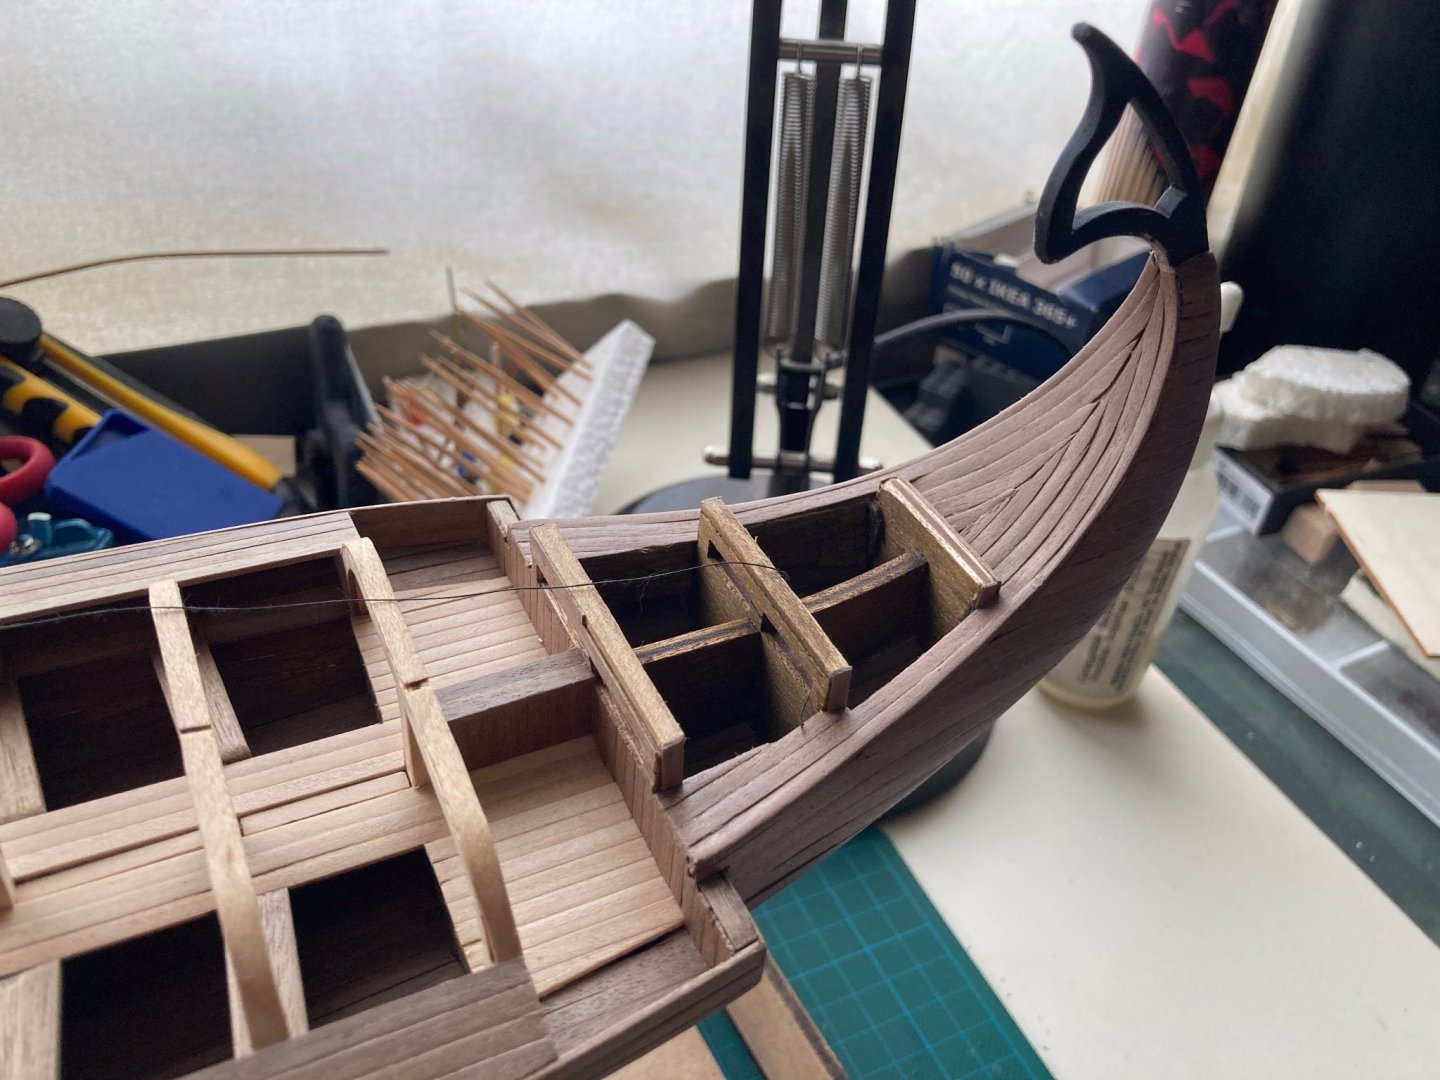
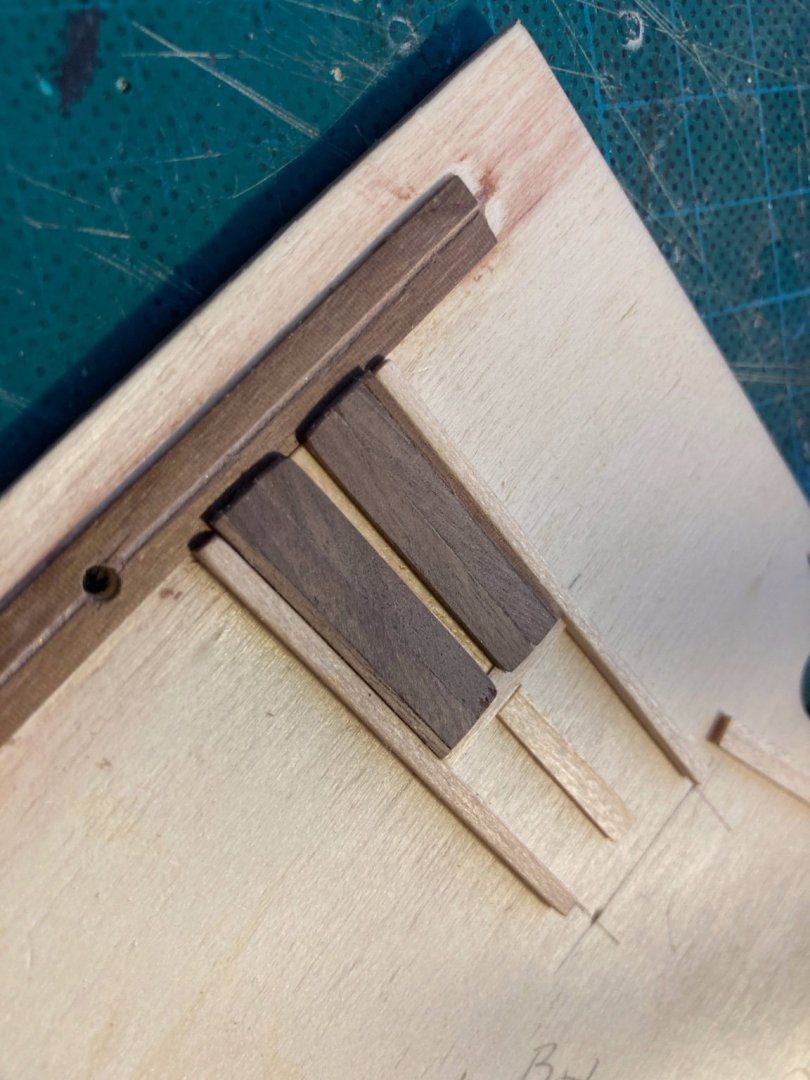
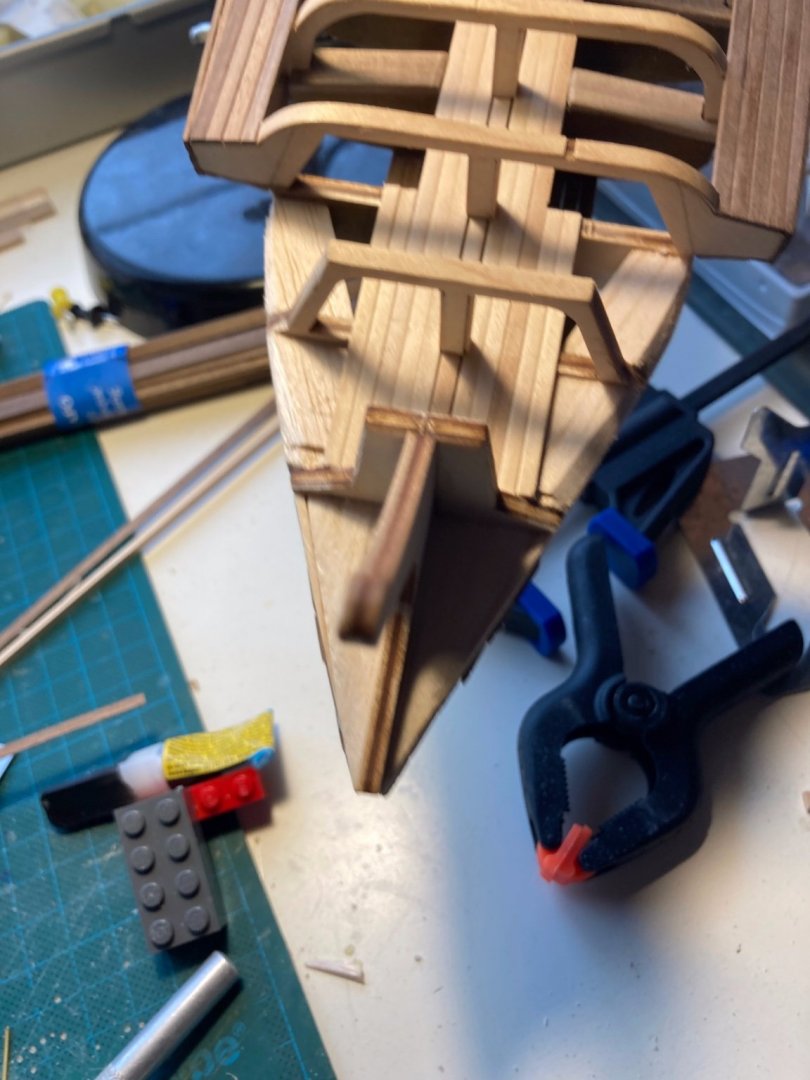
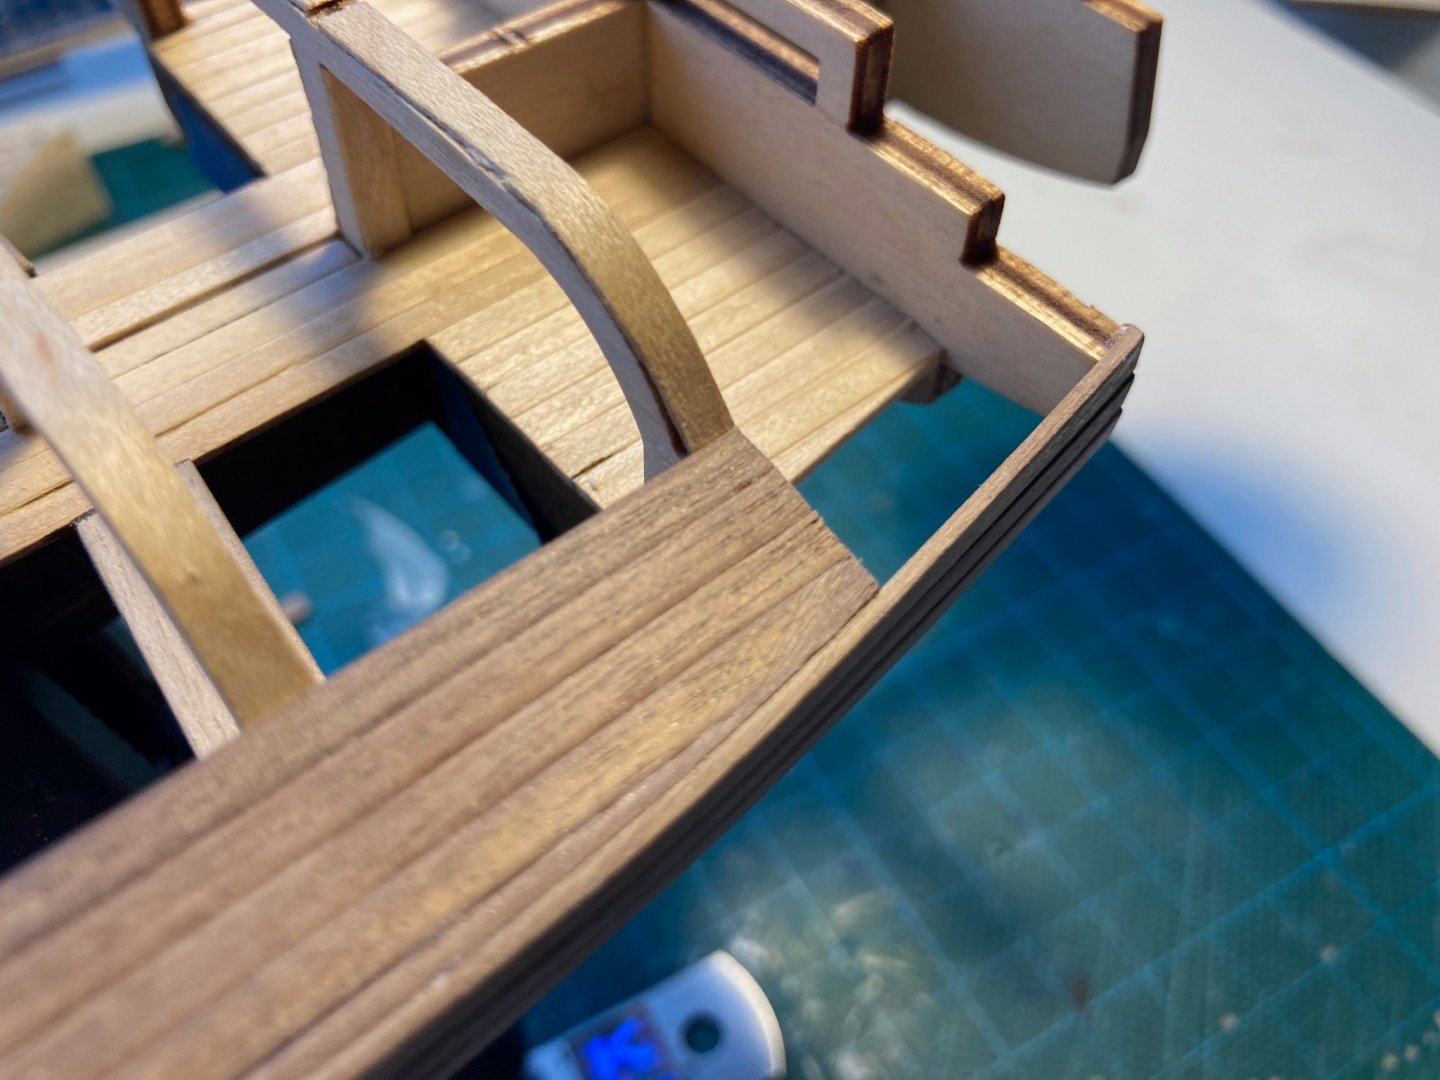
Thanks for the feedback and the support everyone, much appreciated! Meanwhile, work on the deck continued with installing the hatches: Used Moreplovac's build log as inspiration, but took a bit of a different direction, hatches are now recessed (I liked the depth effect) and drilled holes as handles instead of installing them on top. Sanded everything down and gave it a coat of clear matt varnish. I will coat the entire ship again with a second coat after the bow is finished. The bow... I've been postponing this part of the build for weeks, pondering on how to approach this. In the end, I took GrandpaPhil's signature as the motivator: "The hardest part is deciding to try", took a deep breath and started sculpting the balsa: Wish me luck 🙂

- 62 replies
-
- 12
-
-

-

-
- amati
- greek bireme
- (and 1 more)
-
Thnx for your kind words! Currently working on the access hatches in the top deck, getting a bit creative 🙂
- 62 replies
-
- 1
-
-
- amati
- greek bireme
- (and 1 more)
-
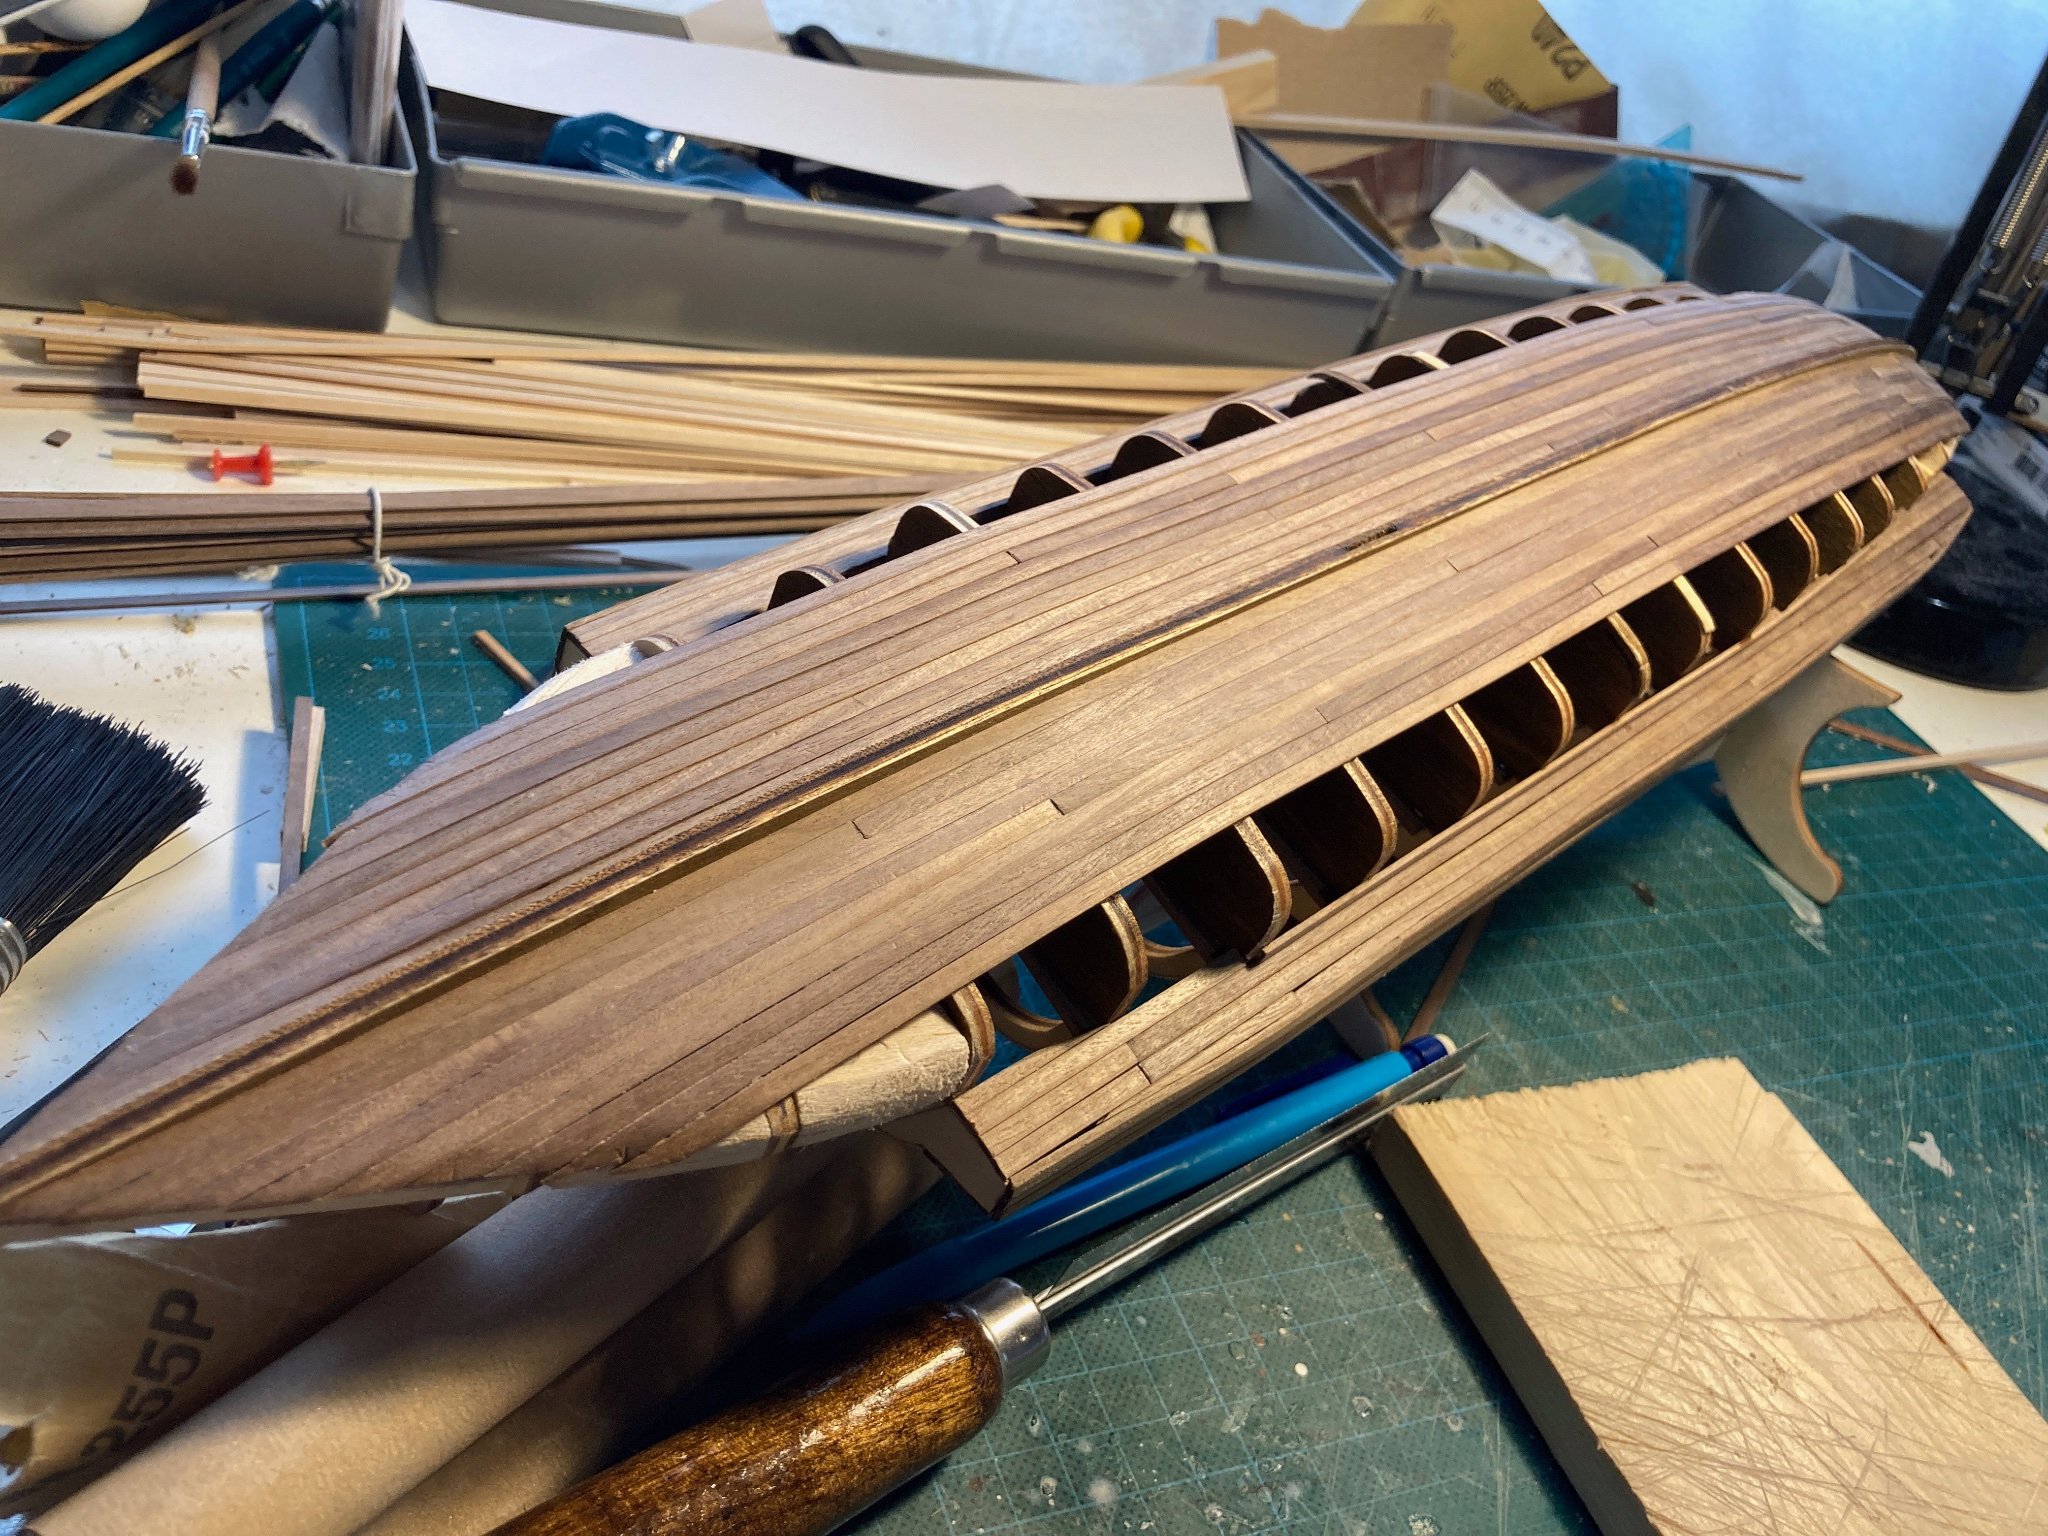
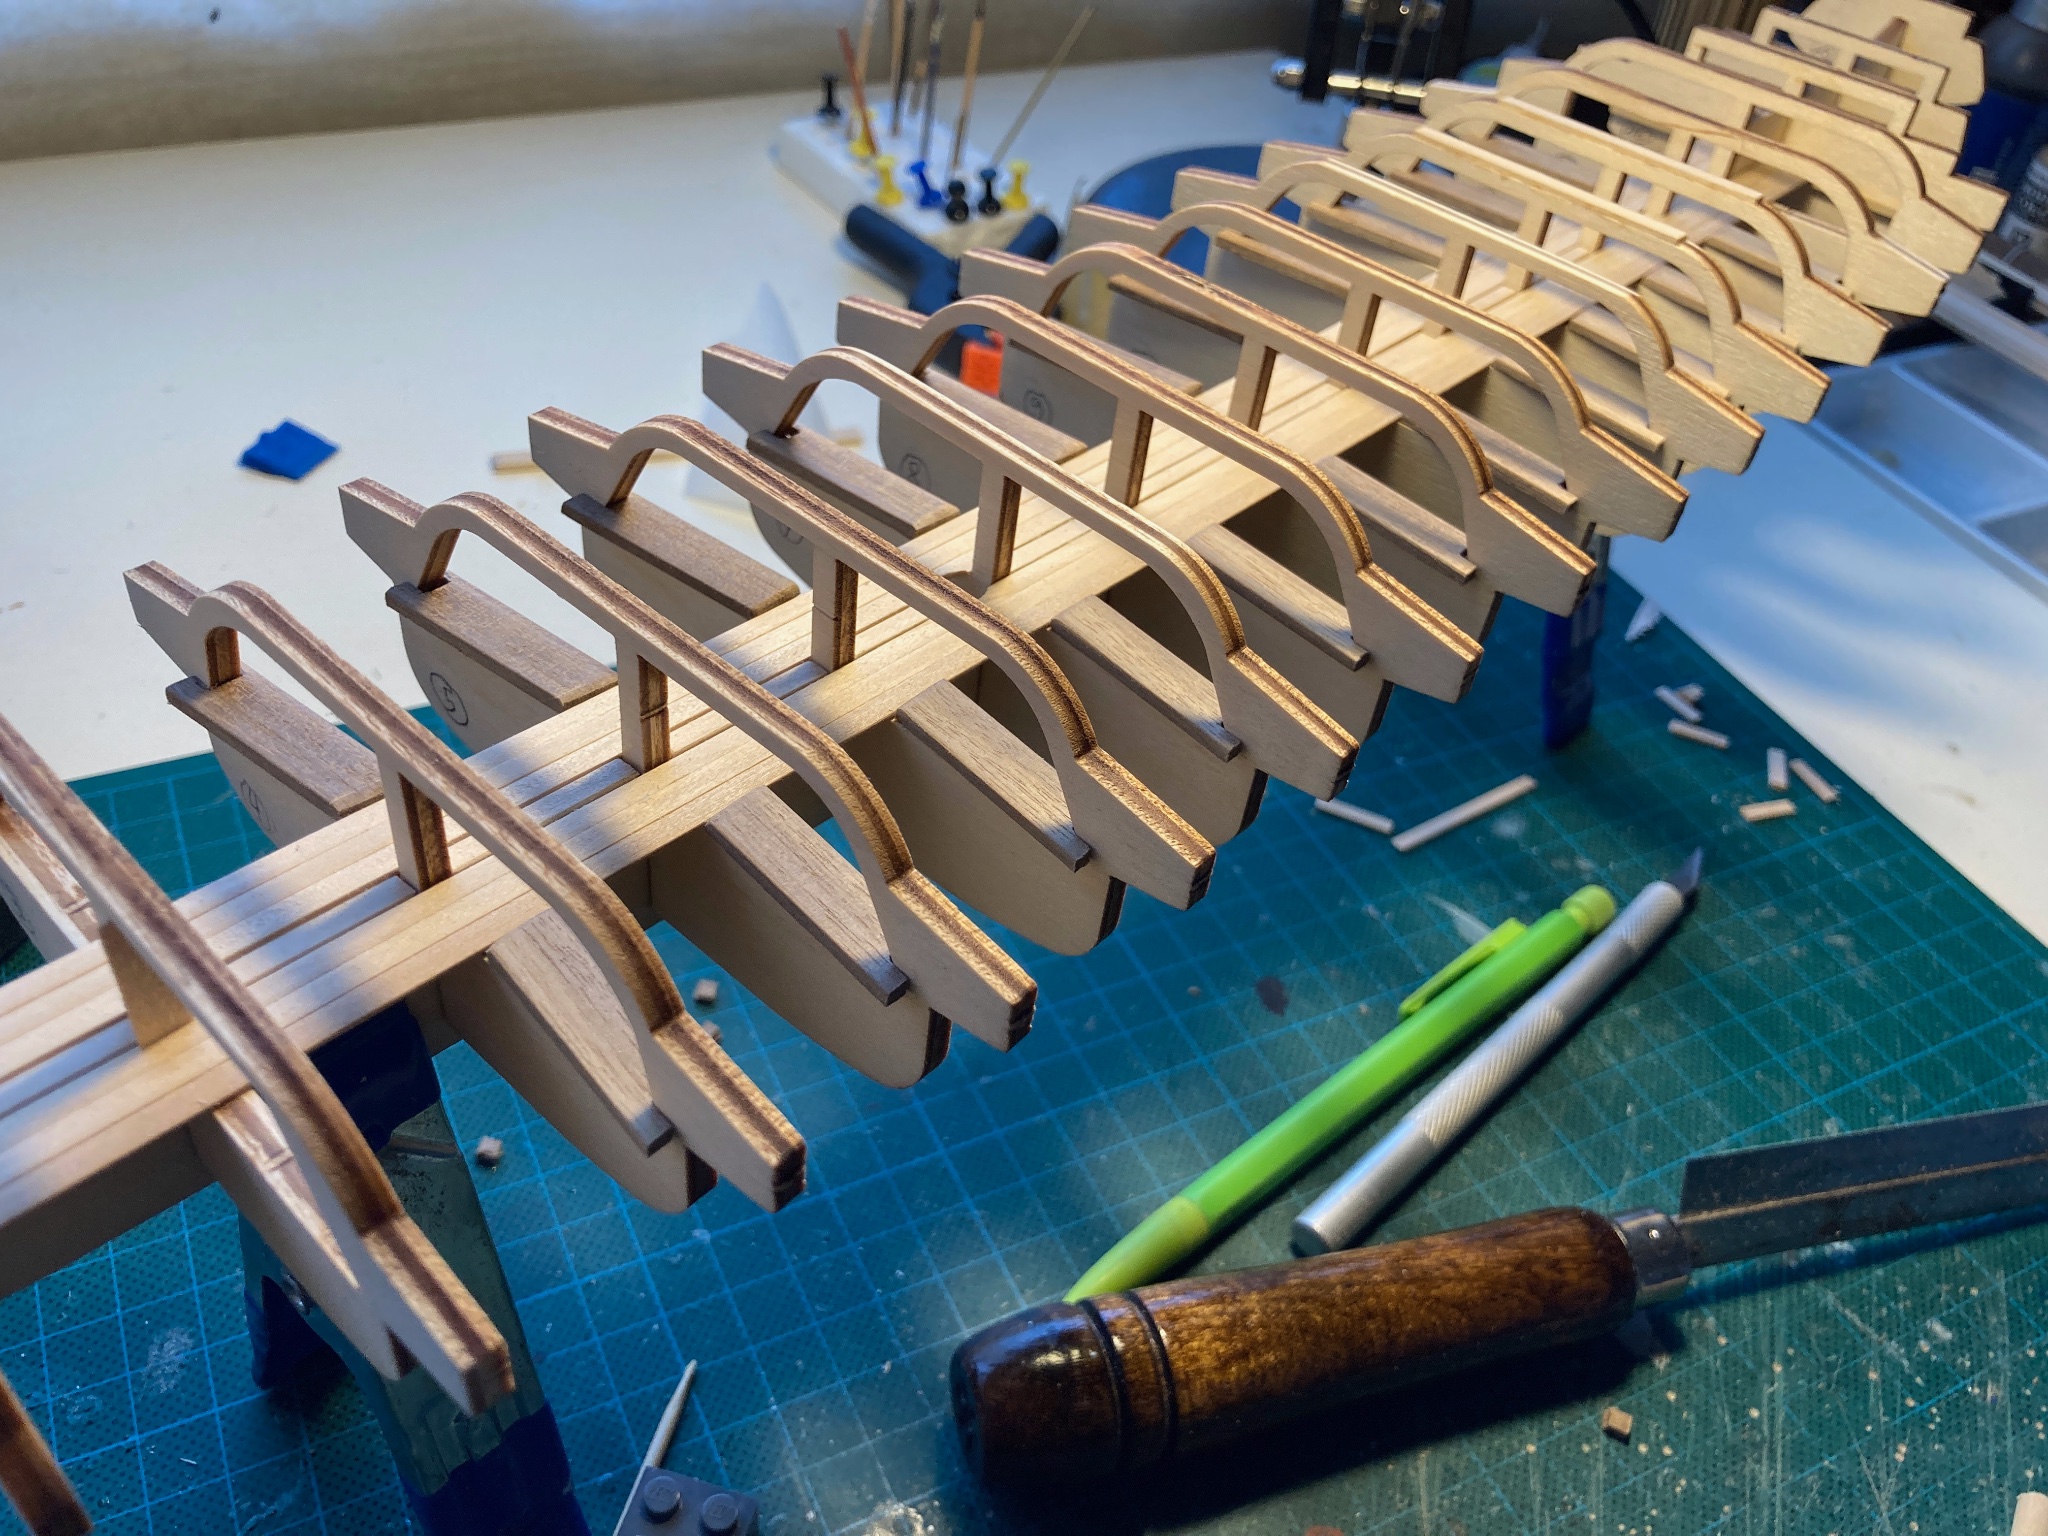
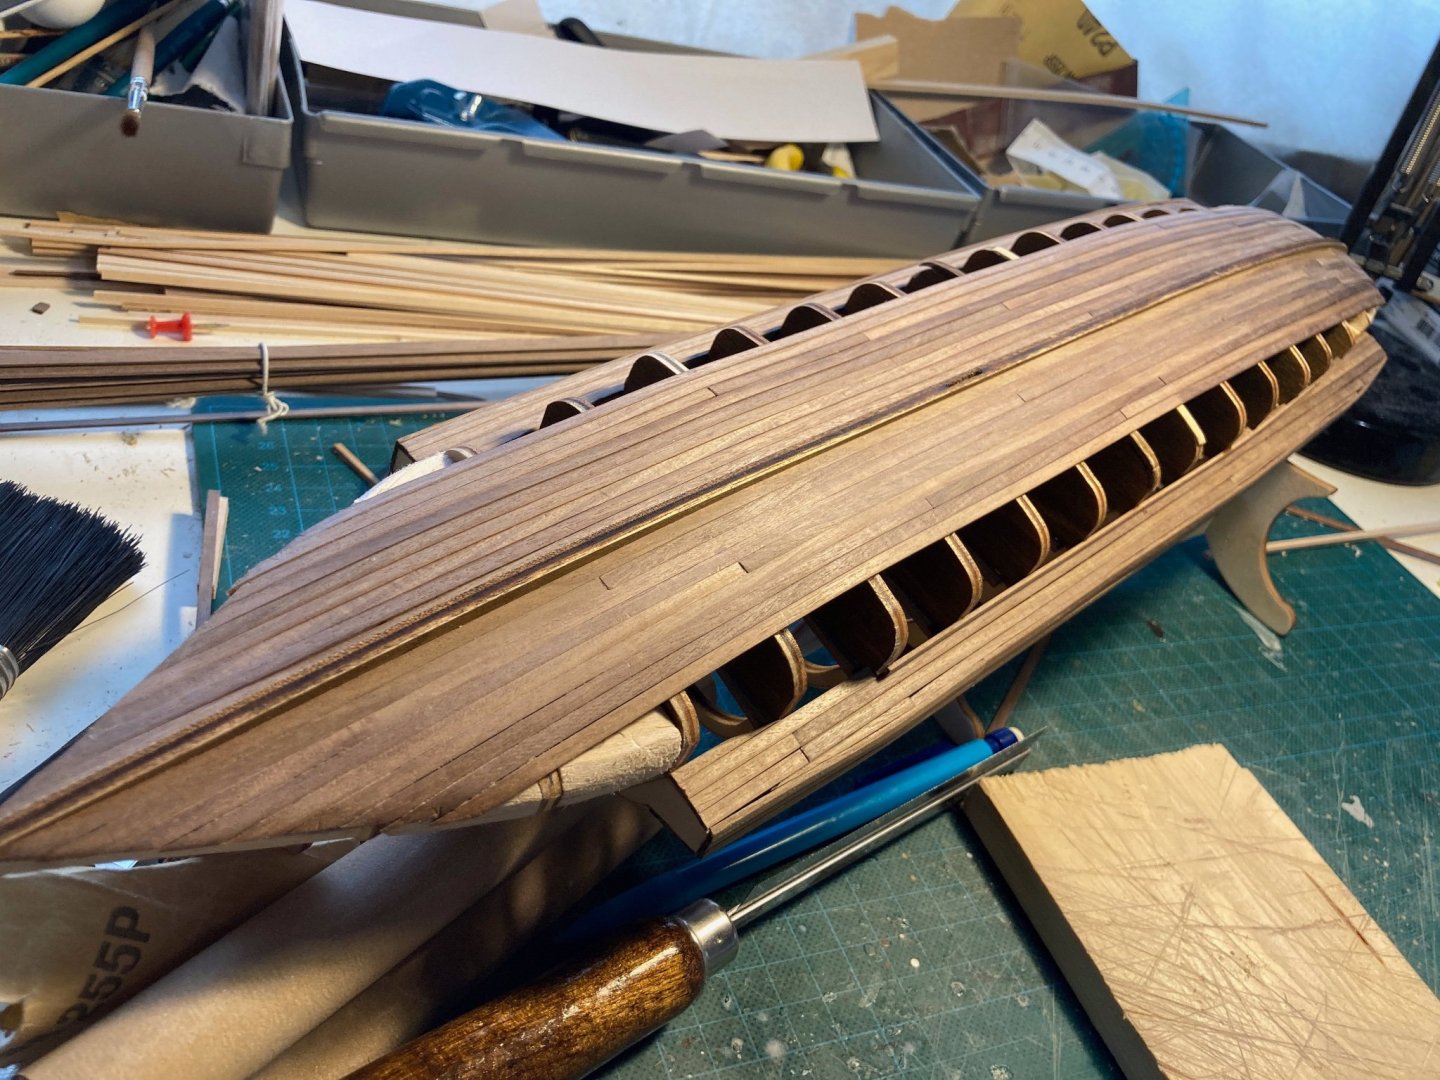
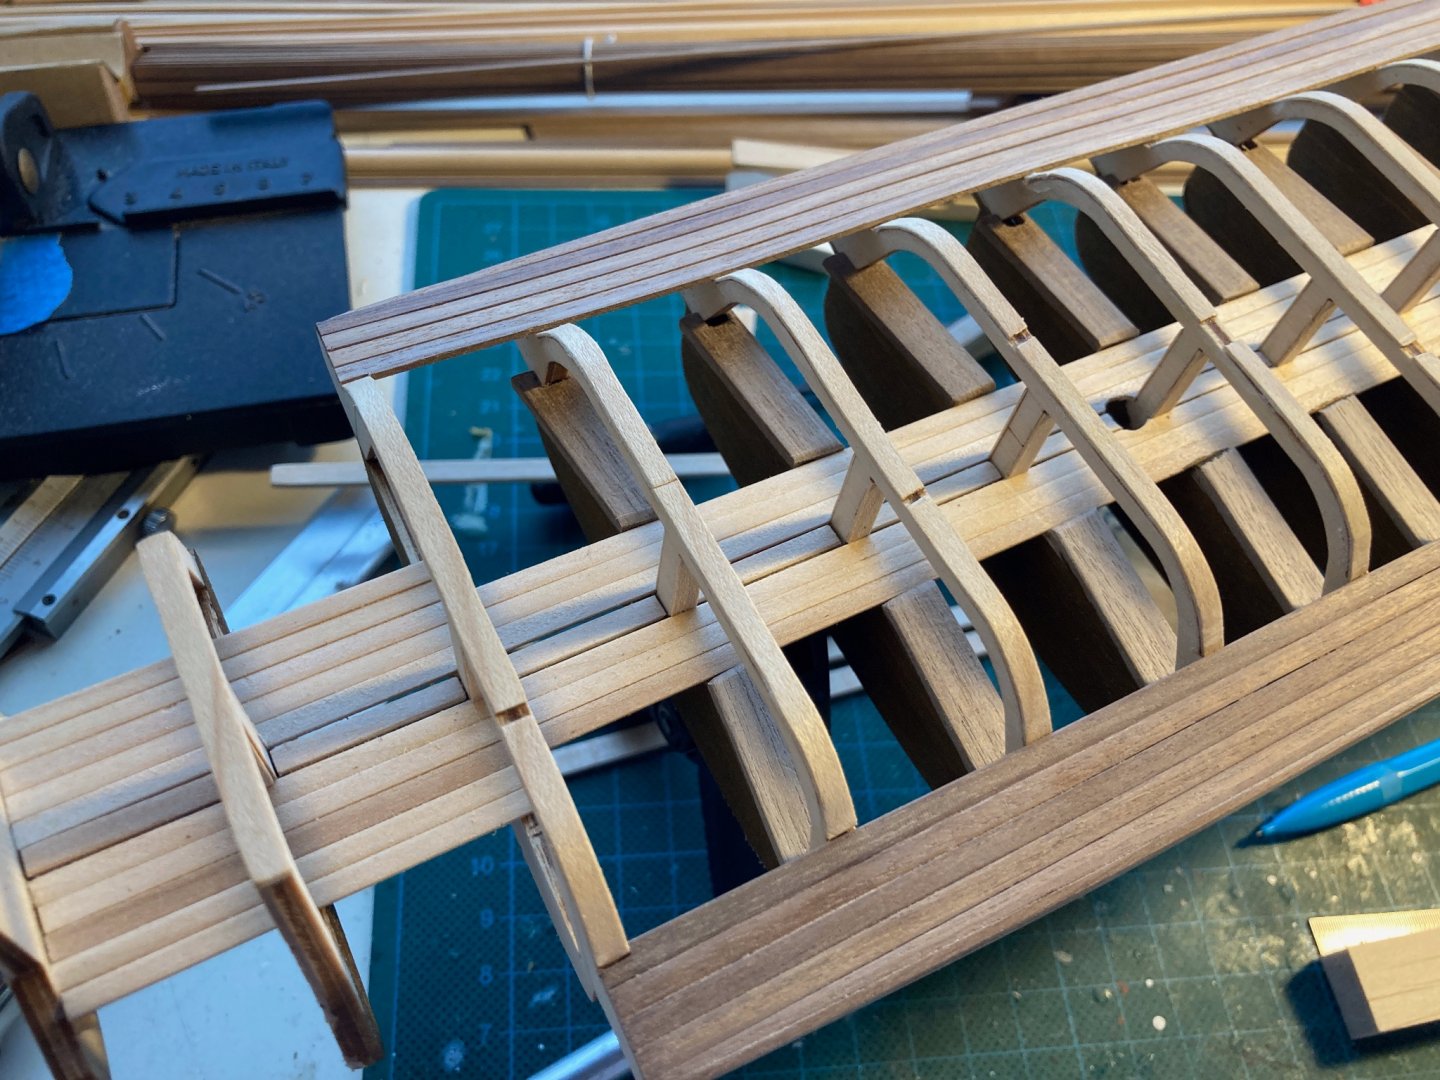
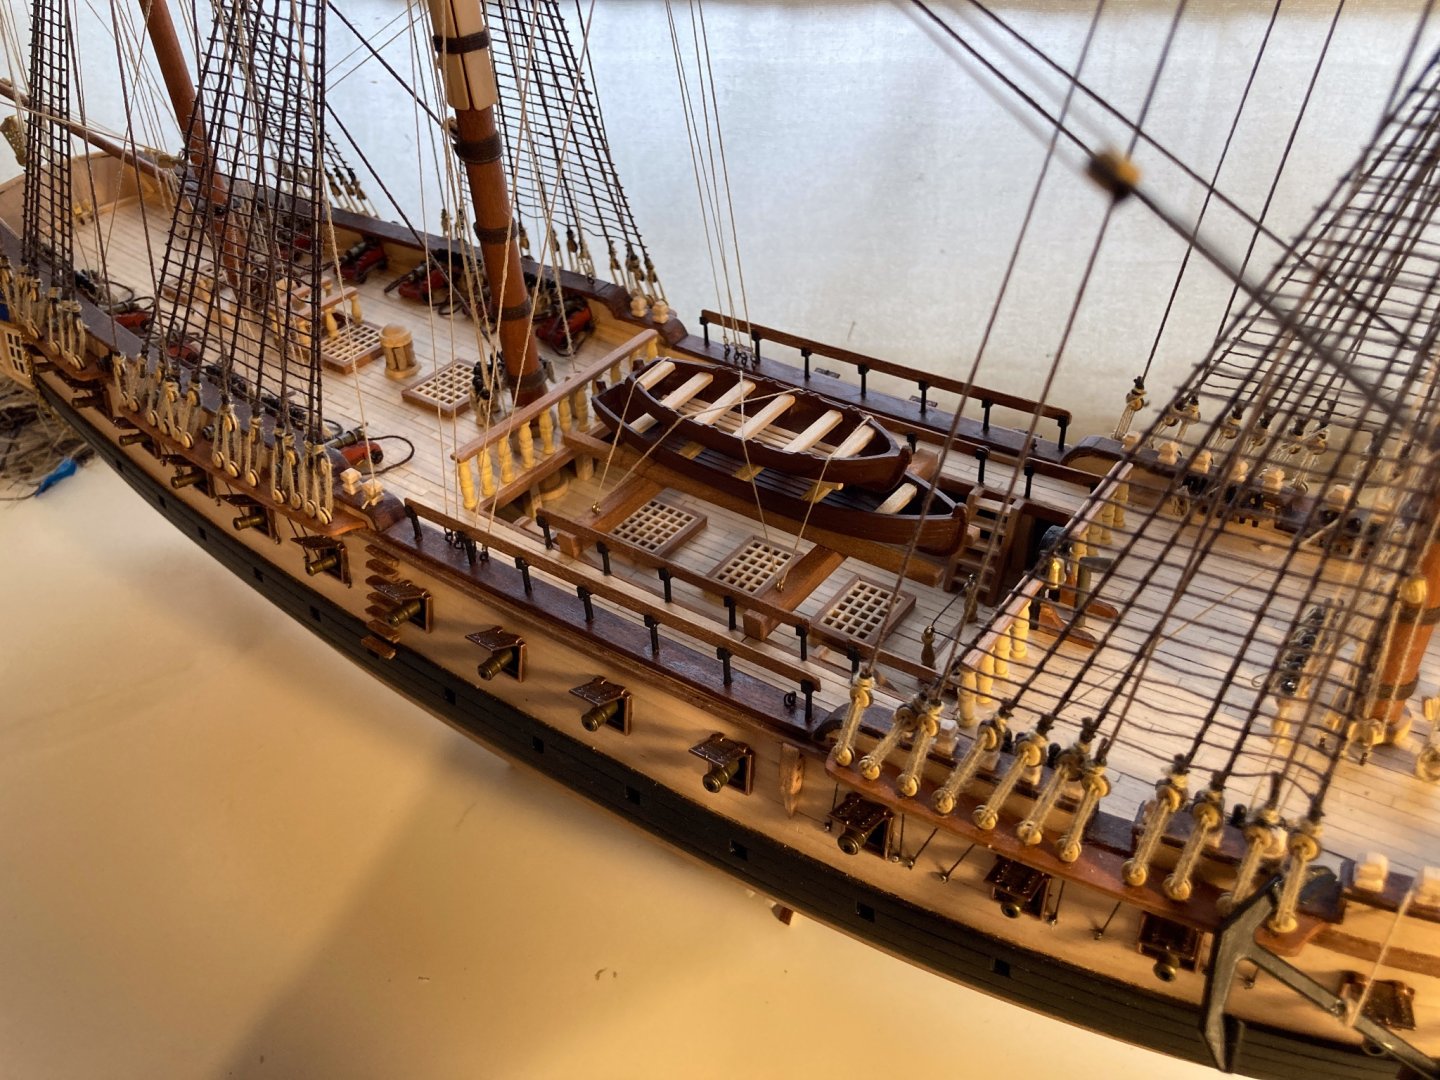
Hi all, thnx for checking in. It's been busy at the shipyard, after the last update we got to finish the starboard side of the stern, and planked the top. I used tape to ascertain the middle of the stern and cut accordingly: And this was the result: Enjoyed the view, quite happy with this (picture taken before sanding). After that, started working on the top deck. I wanted to use full strips to emphasise the length of the ship, as well as no caulking (not sure the Greeks knew about that). So Ephialtes is going to be more of an idealised version of a bireme than an accurate reconstruction. After some in-situ plank clamping: After that, my favourite: drilling holes in my ship! More than usual, as the holes for the oars came next, very carefully though (0,8mm drill, then working up to 2mm via 1,2 and 1,6mm) Started on the mast as well, using my plane to get it into shape. Works a lot better than just sandpaper 🙂 After looking at finished builds, got a bit frisky and decided to try something new: lateral plank bending. Fortunately the woord was compliant after half an hour in warm water: And while that is drying, experimenting with the deck furnishings, which are next: Take care and stay safe!


- 62 replies
-
- 9
-
-
- amati
- greek bireme
- (and 1 more)
-
Indeed, that was my initial take, from what I read on Pegasus and Fly I was quite confident buying this kit, but the instructions are close to non-existant. I did some more research and the plans for other models seem to be of a much better quality, so at the moment it’s either Bluenose or Pegasus. Wood quality is excellent though, no complaints about that. Just wondering what happens to builders buying this as their first model… I’ve been eyeing Chris Watton’s work for a while, and it’s really top notch indeed. As soon as I have the budget available, and the Admiral finds me some space, I will certainly give them a try. On the plus side, I learned an enormous amount, from handling walnut to analysing building steps before diving in.
- 62 replies
-
- 4
-
-
- amati
- greek bireme
- (and 1 more)
-
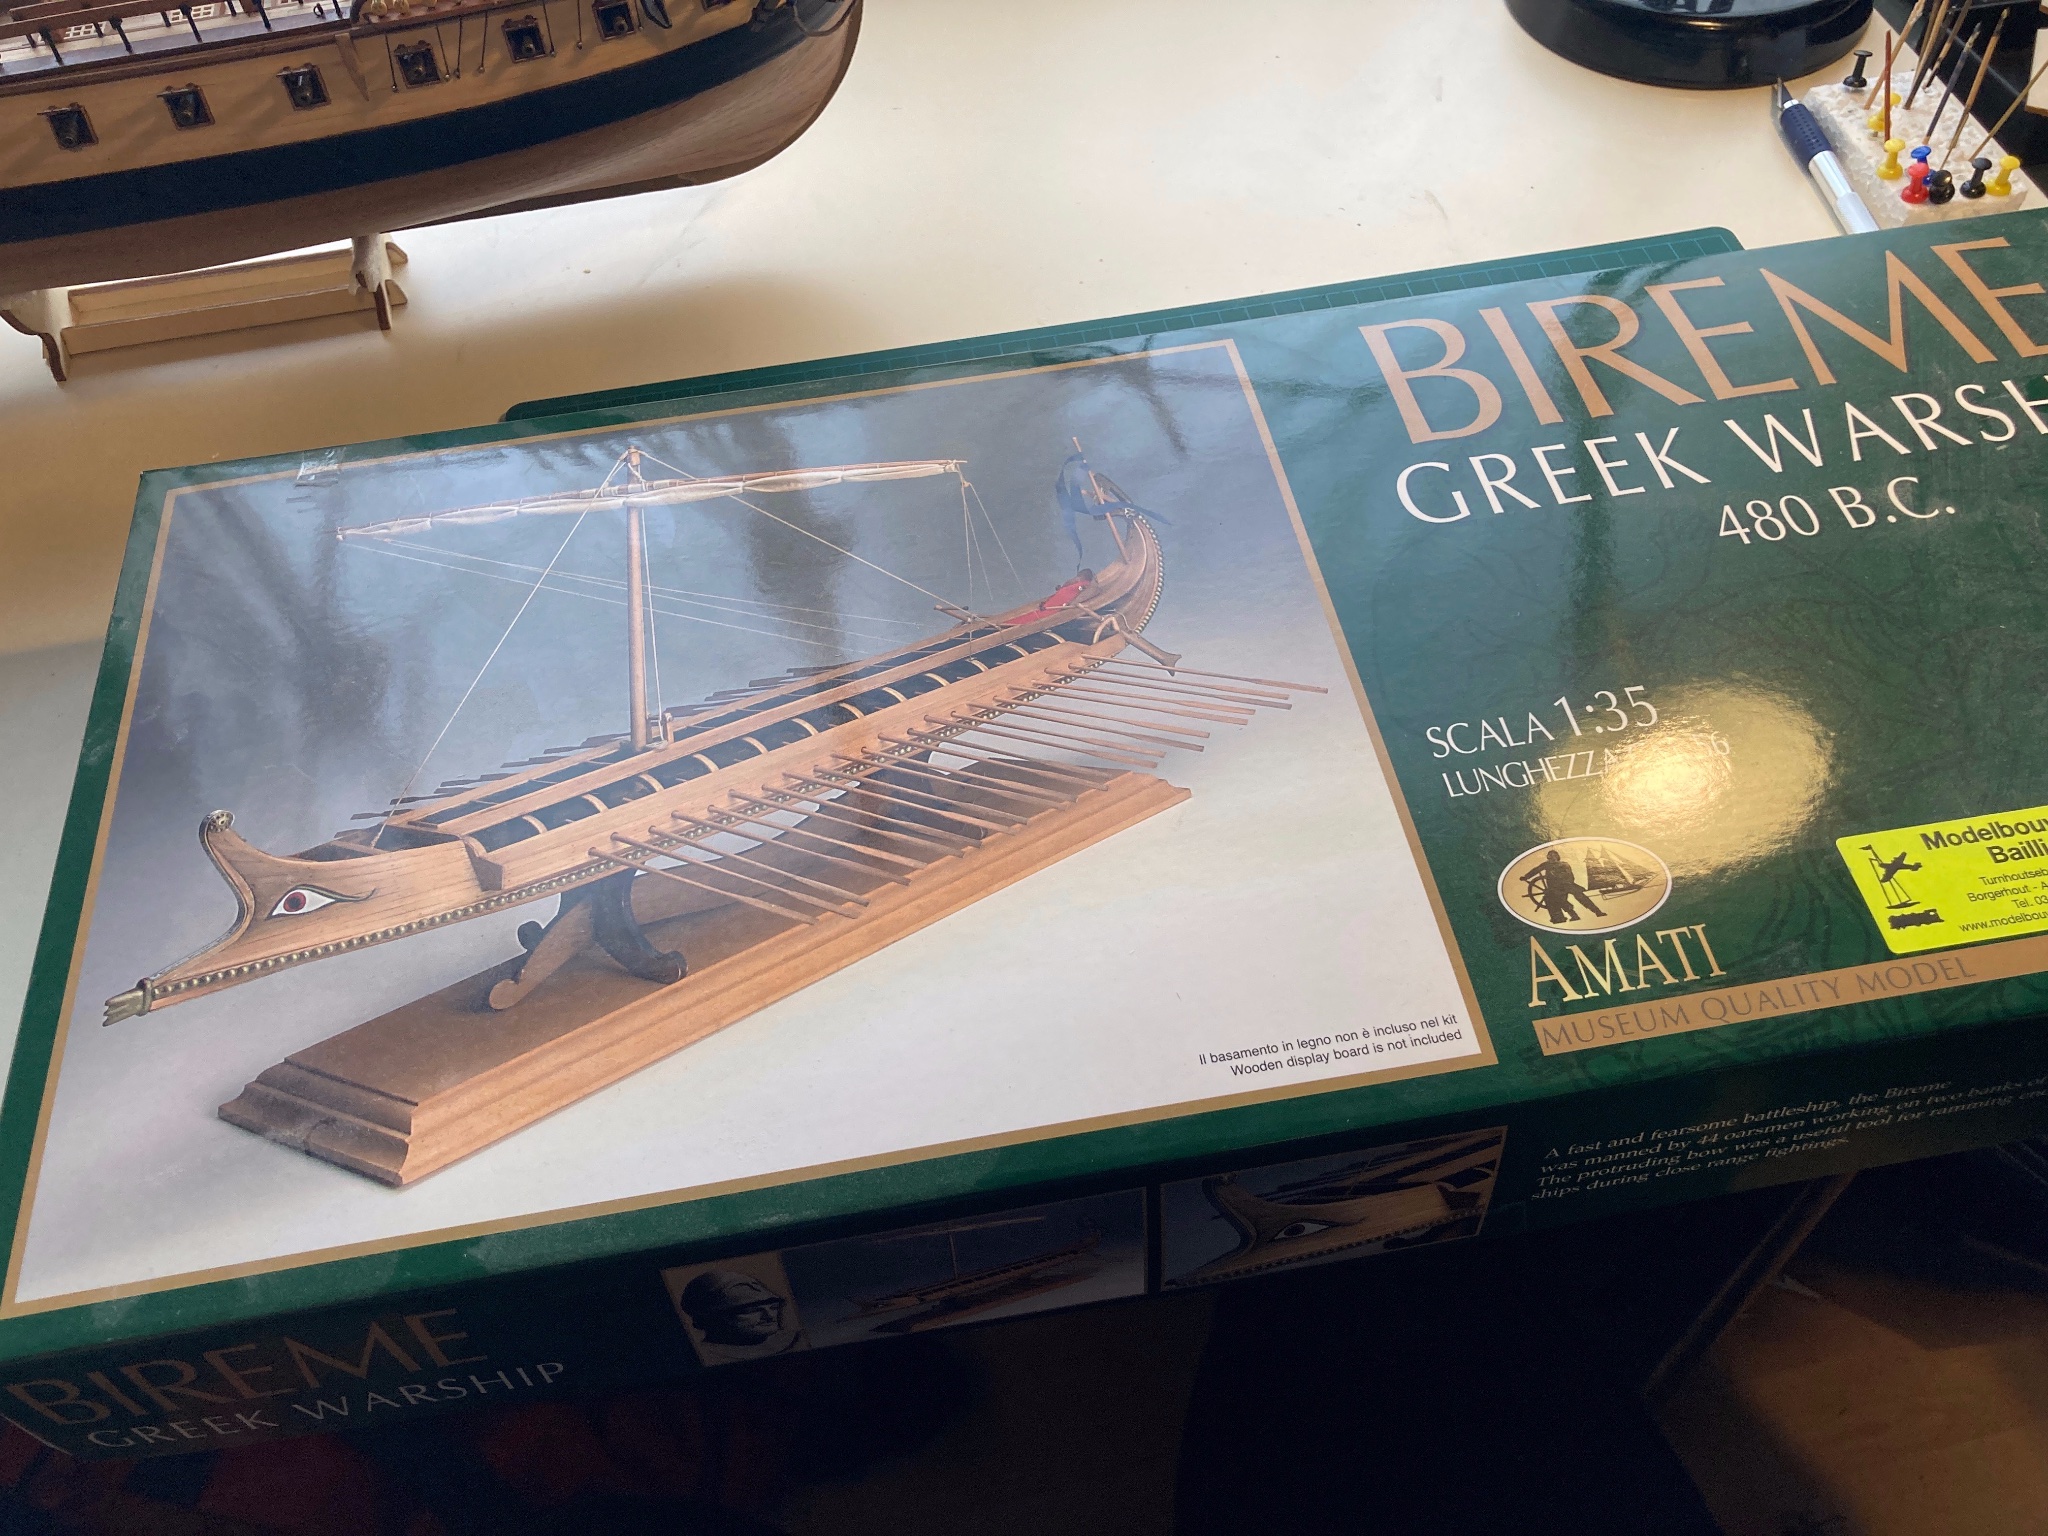
Thanks! "Enjoying" the Amati Bireme now (which I've dubbed "Ephialtes", the Greek word for nightmare 🙂 ). Challenging without any instructions to speak of, but I'm learning a lot!
-
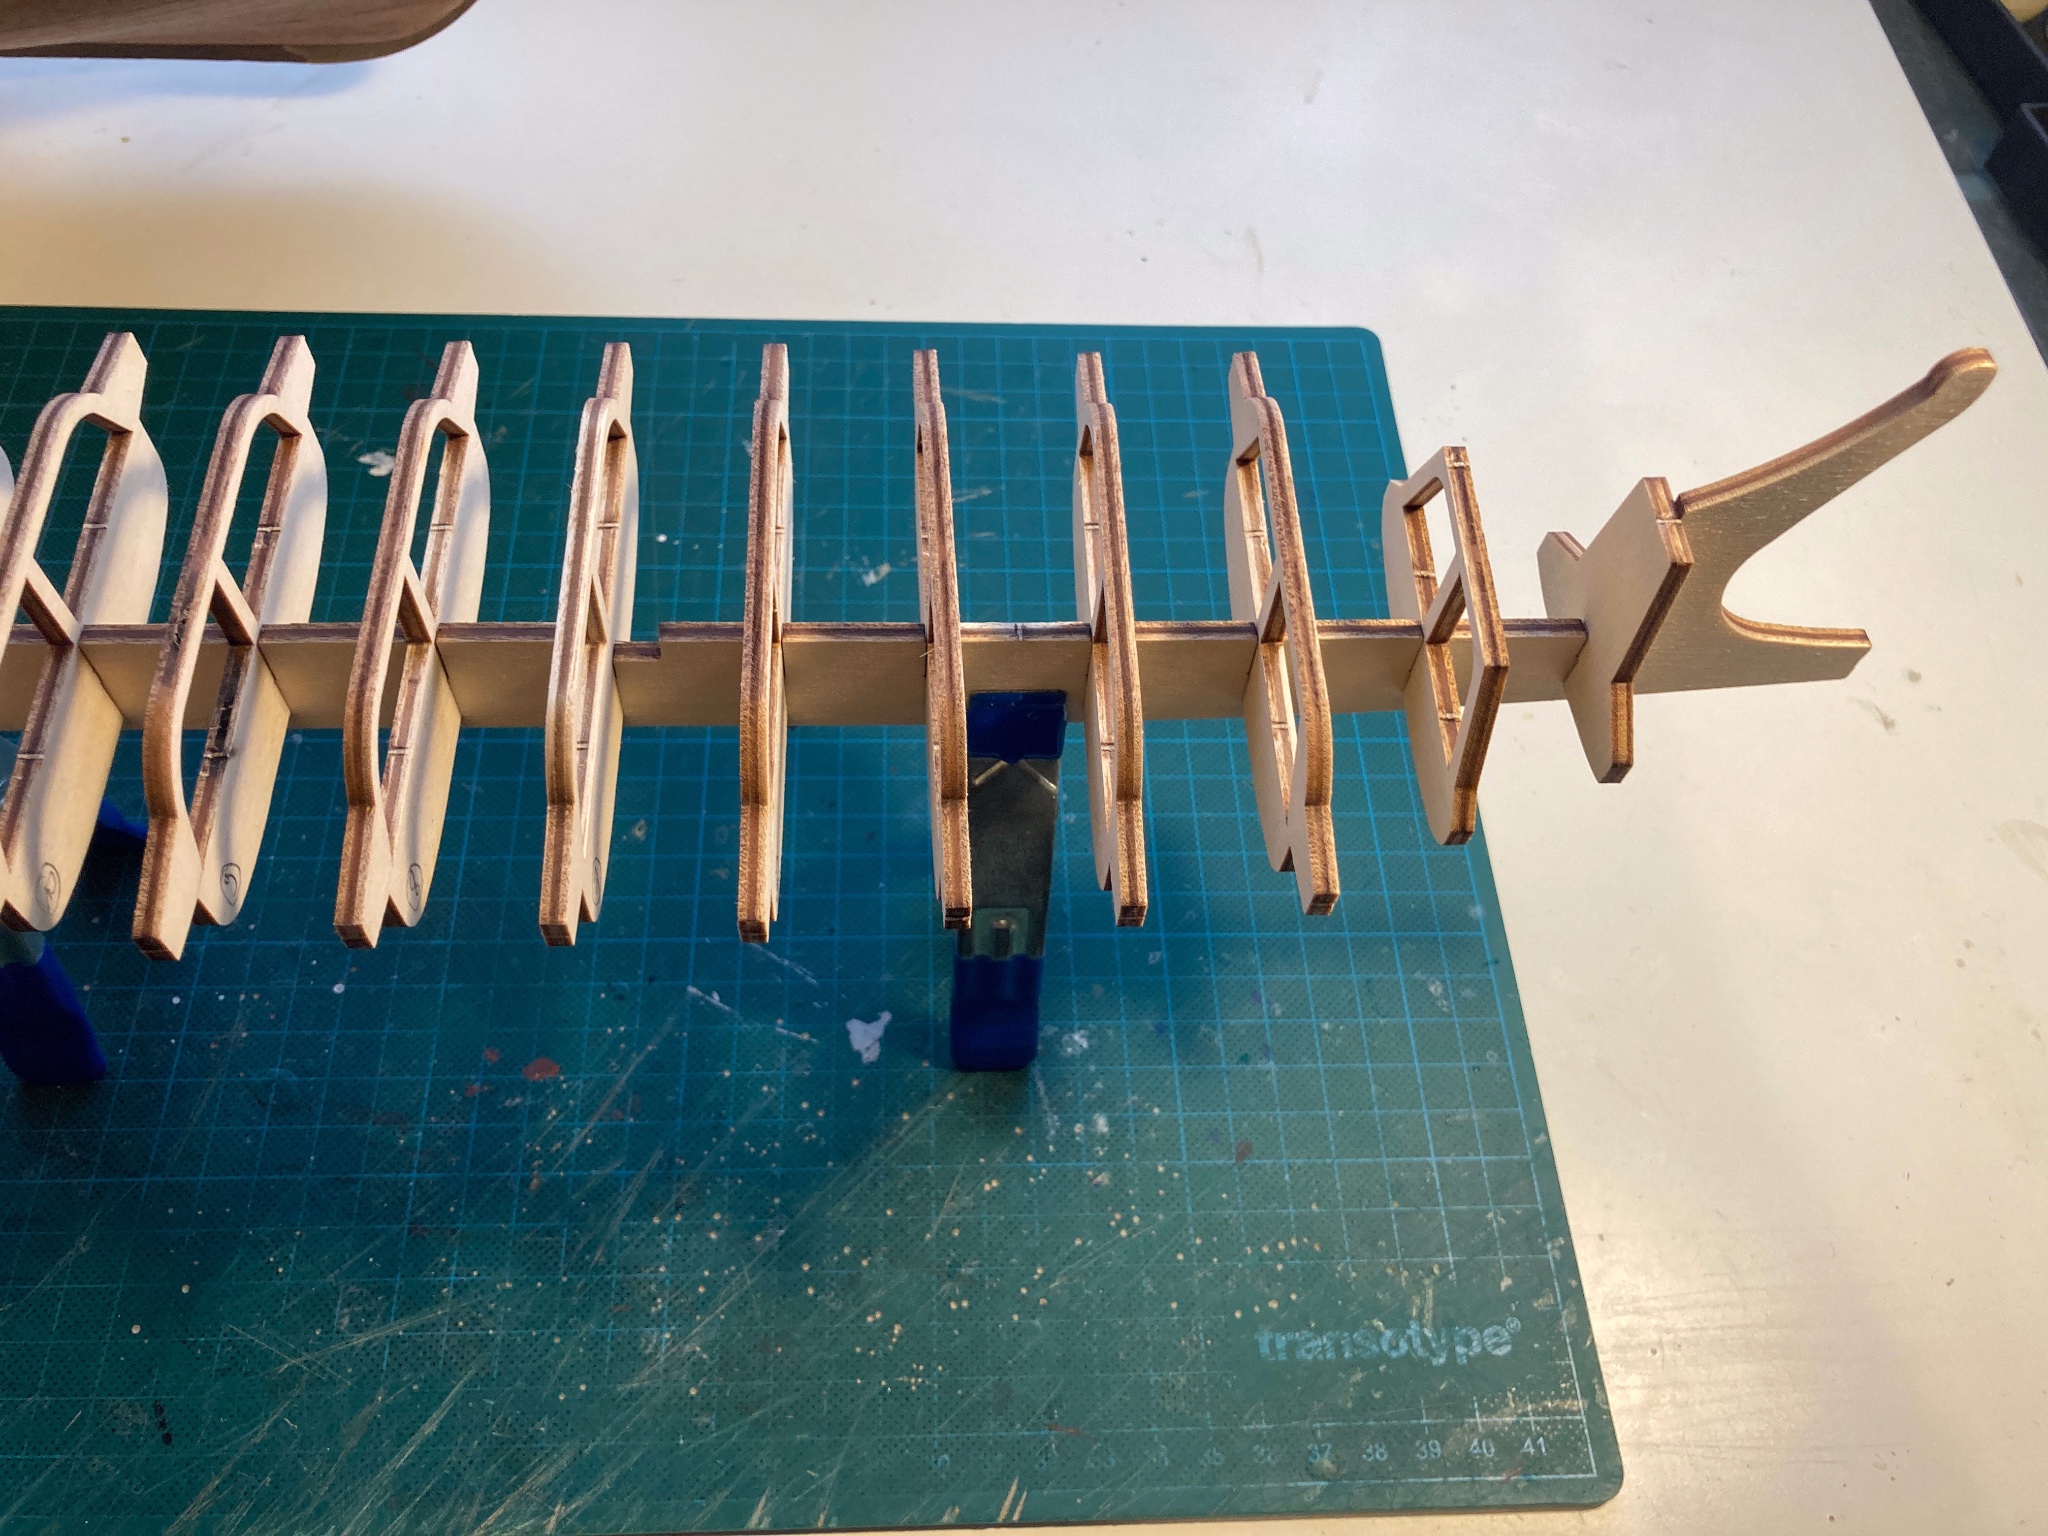
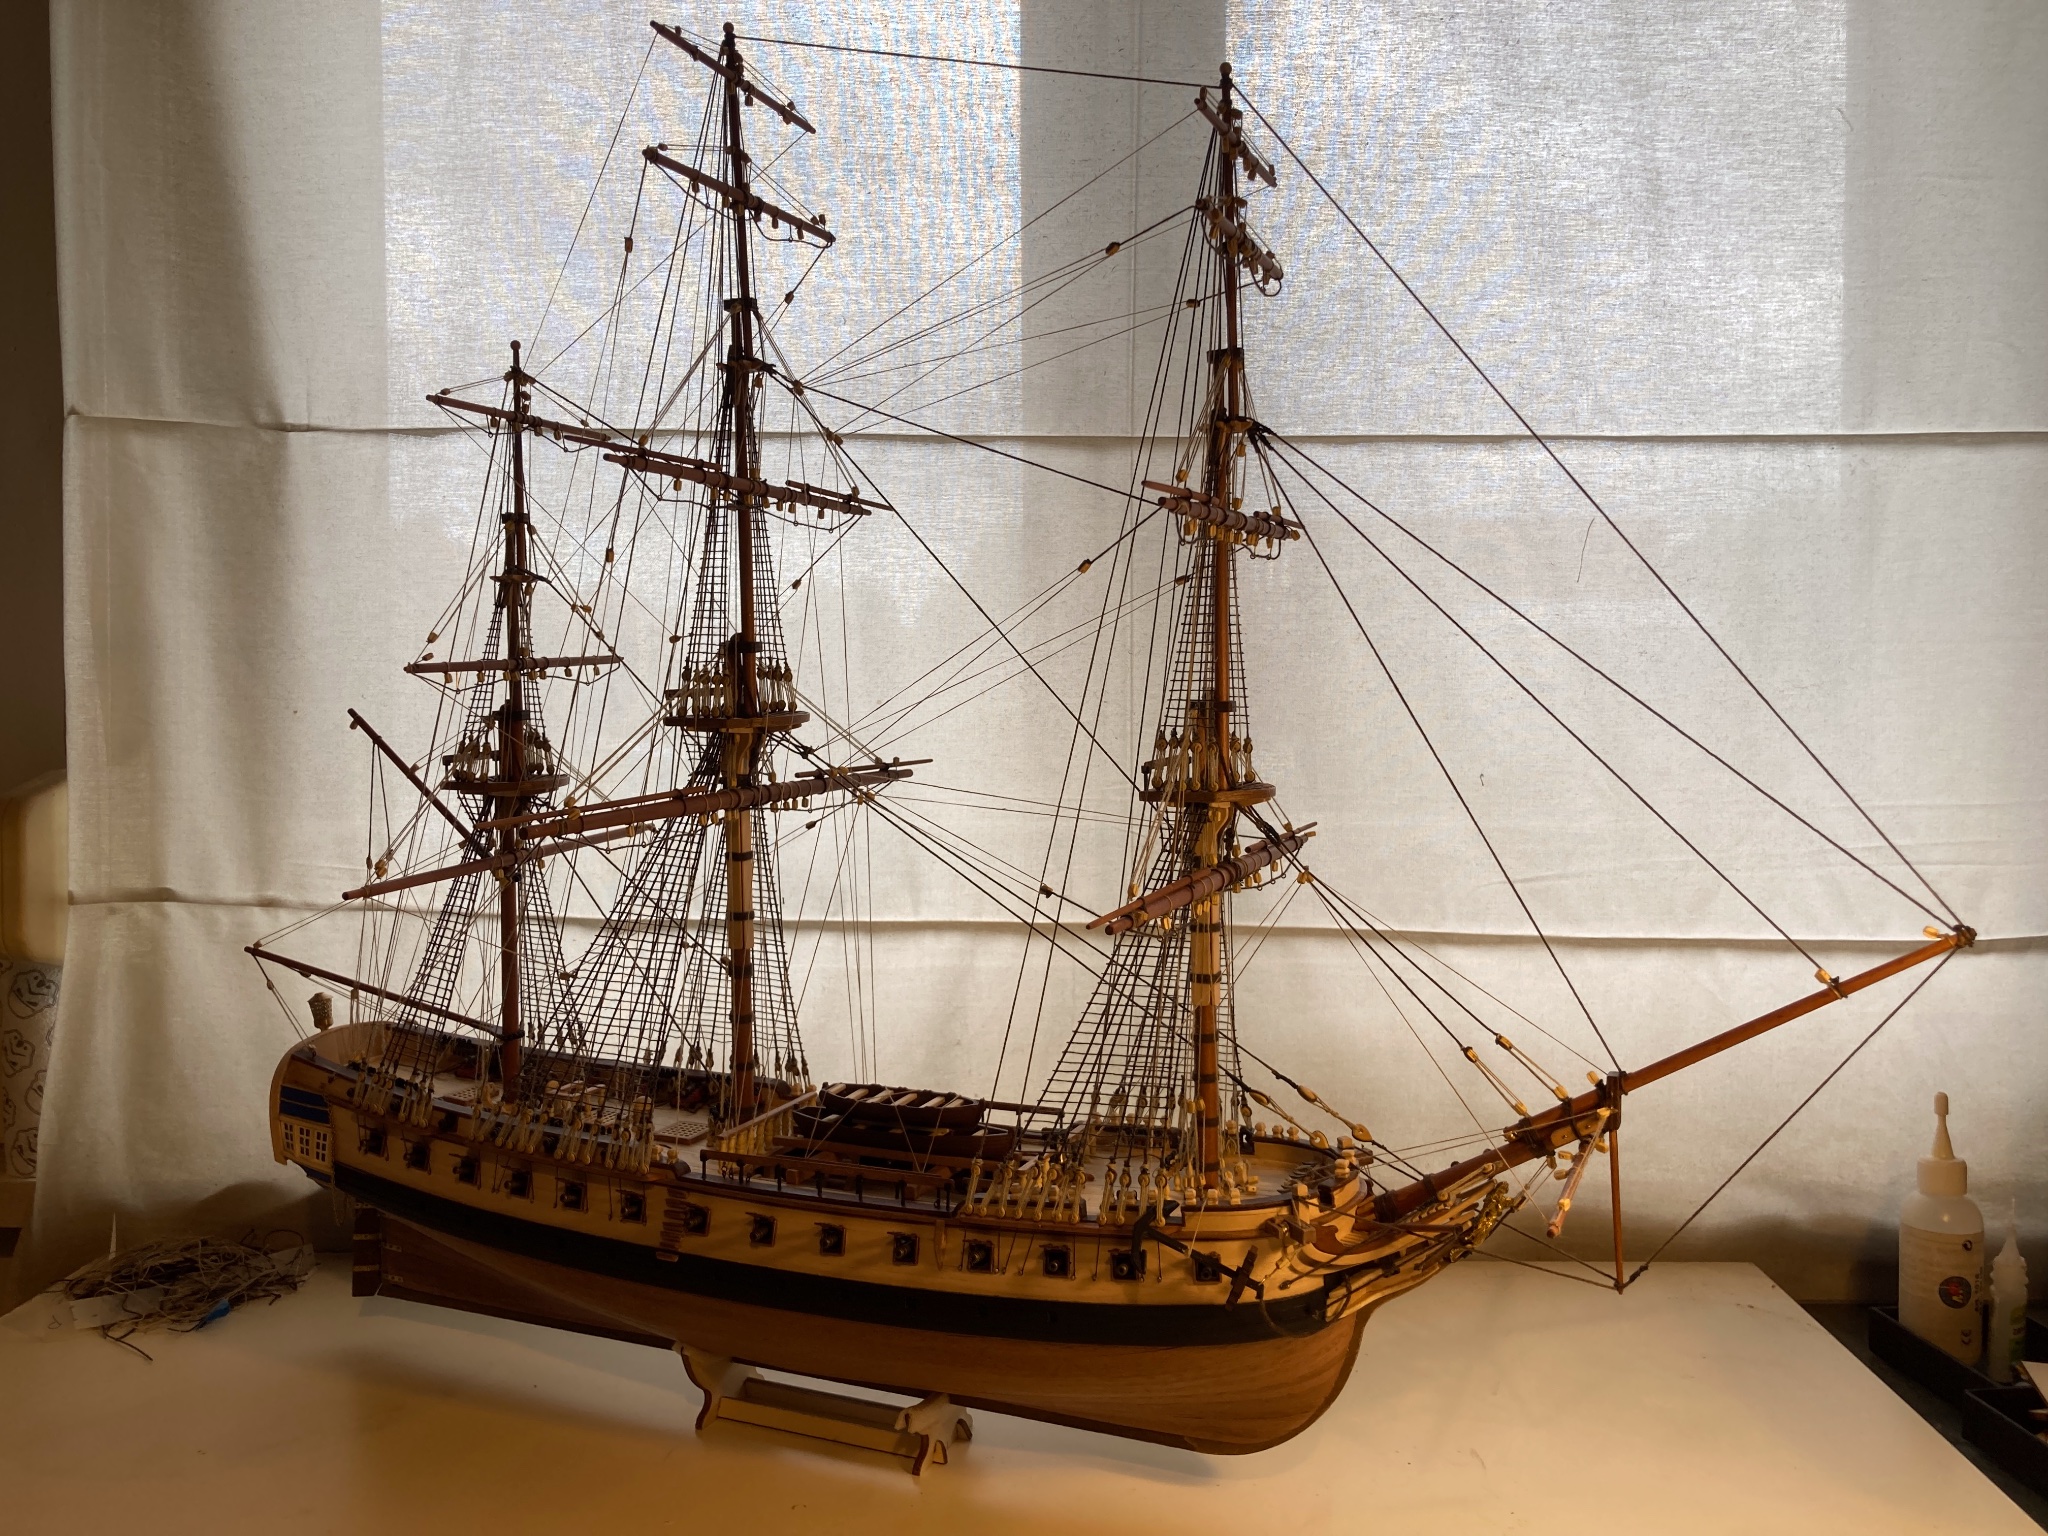
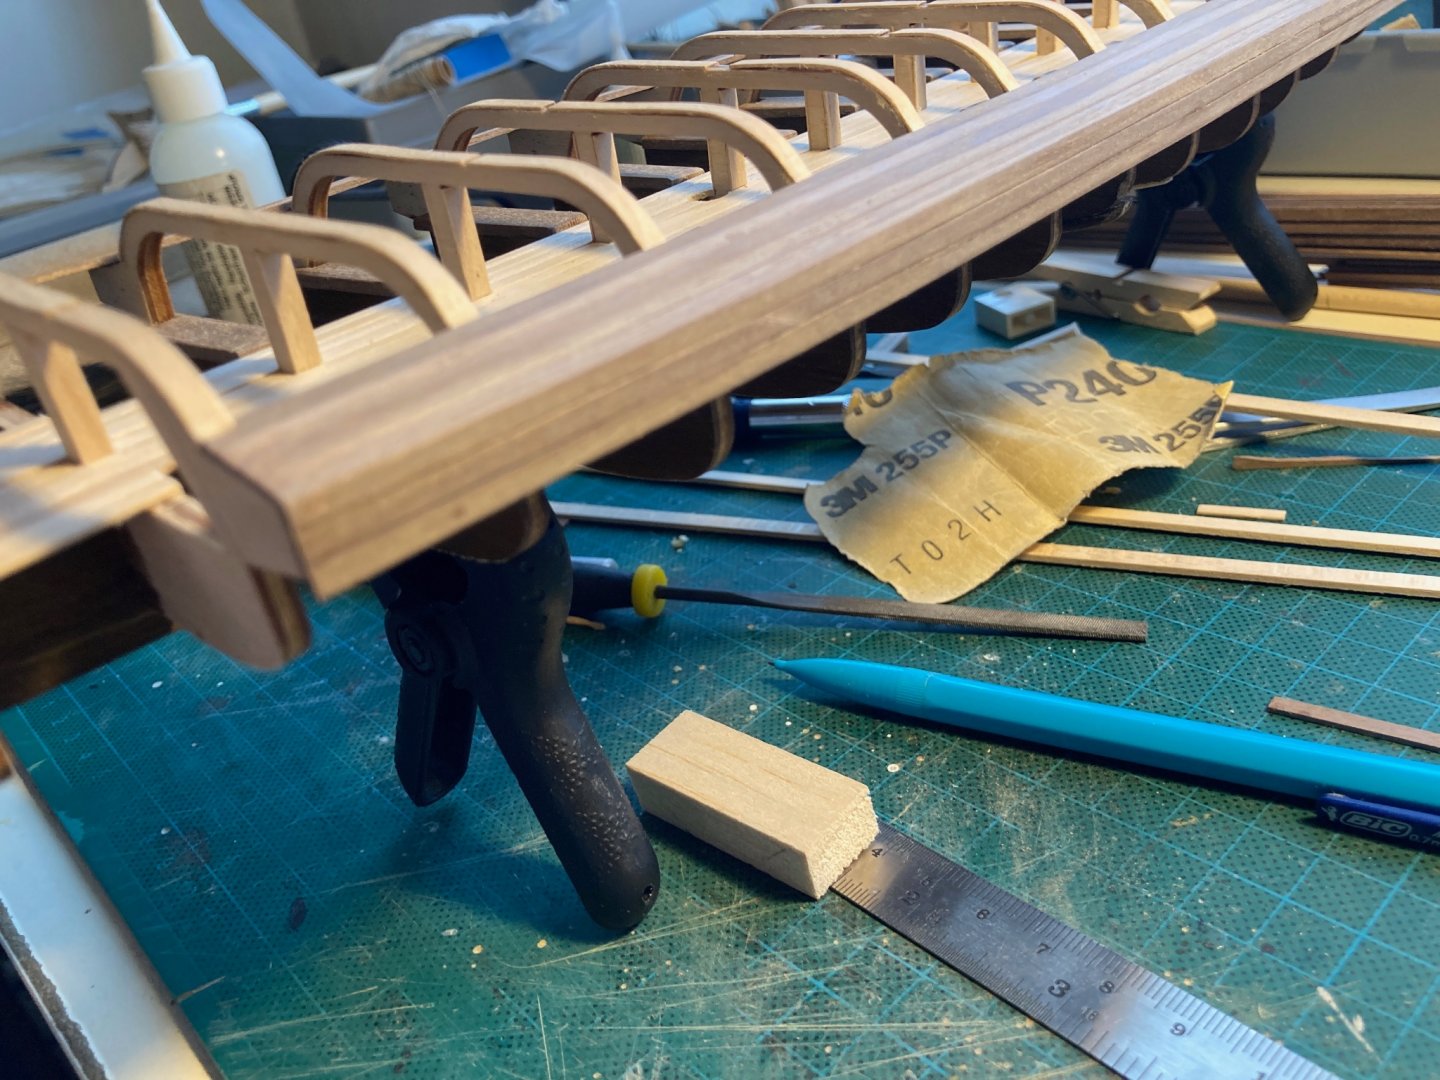
Hi all, thnx for checking in. It's been a while, progress has been slow on Ephialtes, but I reached a major milestone: lower hull planking is finished! I added the wales after a long time pondering the best way to proceed, and planked upwards from there. Be gentle, it's my first time on a single planker 🙂 After that, I looked at the stern, checking the build and my balsa pieces. Found out that there was a bulge by putting a 0,5mm strip on the curve: Another time pondering as this is all new to me, in the end I attacked the bulge with a P60 pad and straightened it out. Tried to laterally bend the planks to follow the curve but gave up after a couple of failed tries. Also, as there's an indentation on the top of the stern, I couldn't make diagonal planking work, so decided to plank horizontally: End result seems OKish, now on to the starboard side. After that, covering the top of the stern, for which I got some 0,5mm walnut. It seems I bought more extra wood for this ship than all my others combined, already decided that this will probably be my last Amati model (pity though, they have some nice models, been eyeing HMS Pegasus for a while). Also started on the oars, prototyping and testing, so far 4 oars have been completed, only 40 more to go 🙂 Next up: finalising the starboard side of the stern, then the top, then on to the deck planking and then the bow! Stay healthy and safe!

- 62 replies
-
- 8
-
-
- amati
- greek bireme
- (and 1 more)
-
Hi all, Thanks for checking in. Progress is slow on Ephialtes, but she's slowly coming together. Continued on planking, trying to get the stern in the correct bend. I bought an electric plank bender, which was a bit of a stretch, as I set out over a year ago telling myself I would not use any electric tools. When soaking the walnut in hot water, I found out however that it's surprisingly flexible. I put the strips in place, clamped them and then let dry overnight. Seemed to hold so I slowly moved forward. Found out I needed more balsa on both bow and stern in order for the strips to sit, so got to cutting an (lots of) filling and sanding: Meanwhile, I dyed the interior of the stern in walnut and added more balsa: Also added some 0,5mm walnut strip to the inner walls to cover up the plywood. Good thing the shop I'm buying my supplies has ample walnut strips in stock. And this is where we are today: Most of the planking done, just trying to decide how to tackle the wales. Instructions are very unclear, in one spot they tell you to add the wales on top of standard wood strips, in another the tell you to put down the wales first and then plank around them. Decided to add the wales last, as that will allow them to cover the edges of the planking strips. Still trying to make up my mind on whether to use walnut and then add the lime wales, or just go straight to the lime. Also I have a question: in order to laterally bend the wales to fit onto the stern, I saw in some logs other shipwrights using a plank with drilled holes and pegs. Any idea where I can find measurements for this so I can make this? Thnx for your help!

- 62 replies
-
- 7
-
-
- amati
- greek bireme
- (and 1 more)
-
Hi all, thnx for checking in. Work continues on the Bireme, which I decided to name Ephialtes (catchy, and also the Greek word for nightmare 🙂 ). As mentioned in the titel of this thread, there ara again a lot of firsts for me in this build: - Fist Amati kit - First experience with "summary" instructions - First single planking kit - First experience with balsa wood After some general cleanup and making sure whatever still needed fitting would indeed fit, experimented with balsa for the stern: Tricky work, but very easy wood to manipulate. filing like crazy got some kind of shape in there, still need to figure out how to do the vertical planking. After this I got a bit sick and tired of filing off balsa, decided to start planking the flanks where the oars will be mounted to give me an idea if my methods I learned during pay previous builds would work on a single-planked ship. Went better than expected, frankly, so forged on, covering more of the surface and taking care of some deck details: Still a long way to go, and verrrry carefully, but that seems to pay off. After finishing these areas, it over to the bow. Still a but uncertain how to tackle this, as my original balsa fillers did not leave space for the thickness of the walnut planks, so need to reorganise and make new ones. and then the wales need to be tackled. Stay safe!
- 62 replies
-
- 6
-
-
- amati
- greek bireme
- (and 1 more)
-
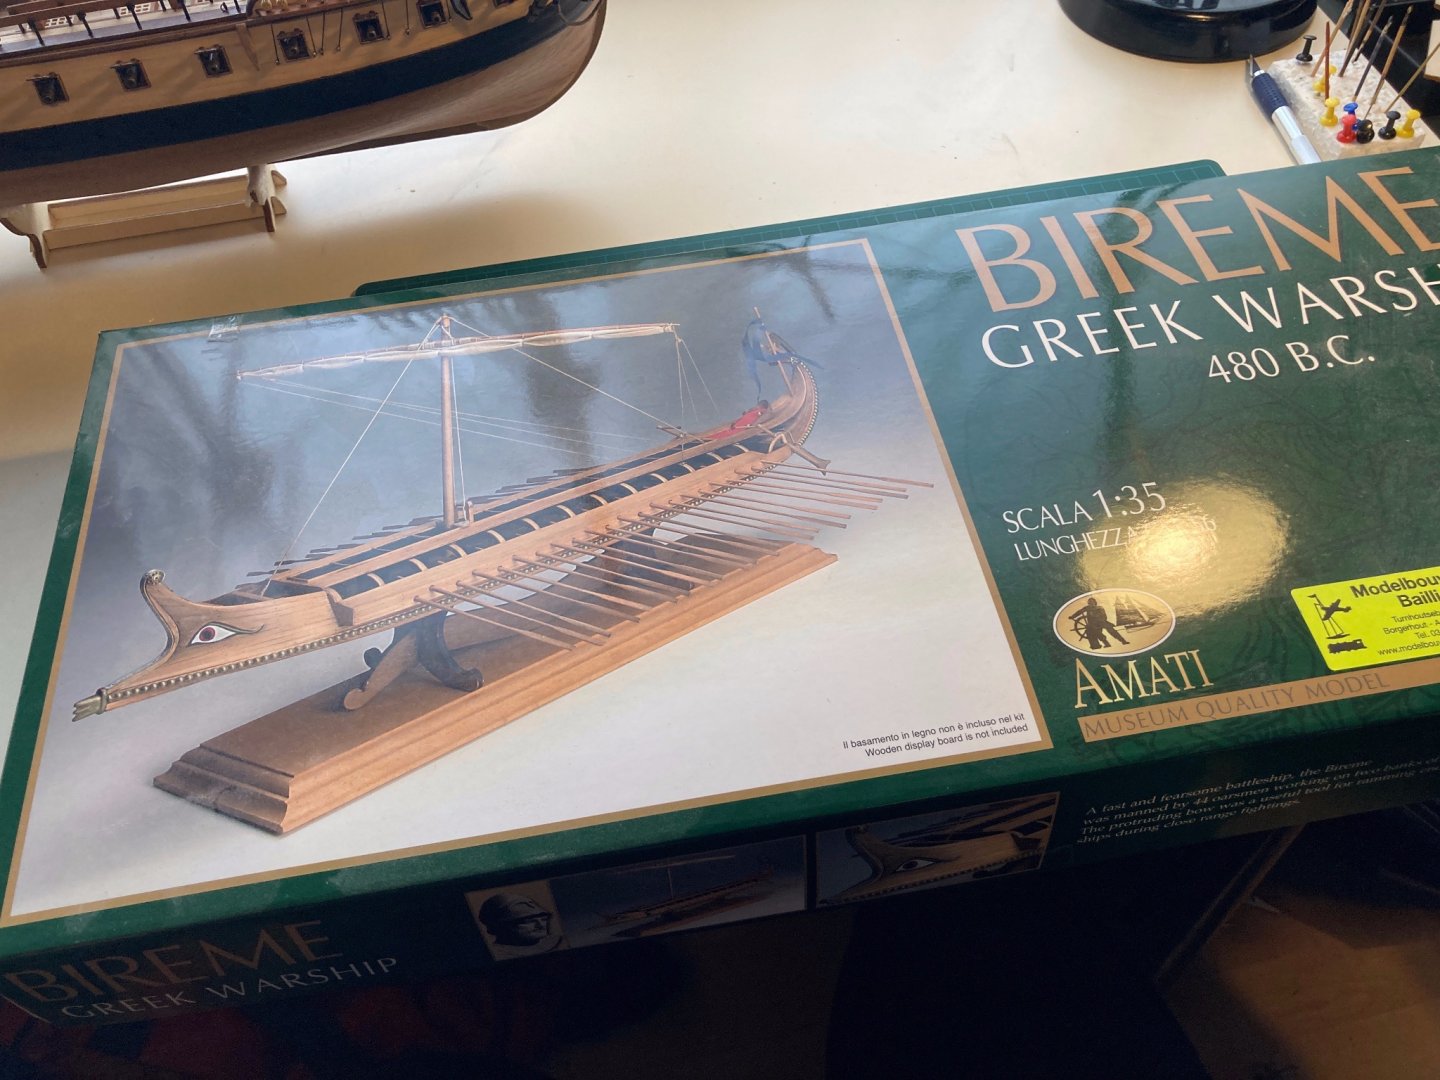
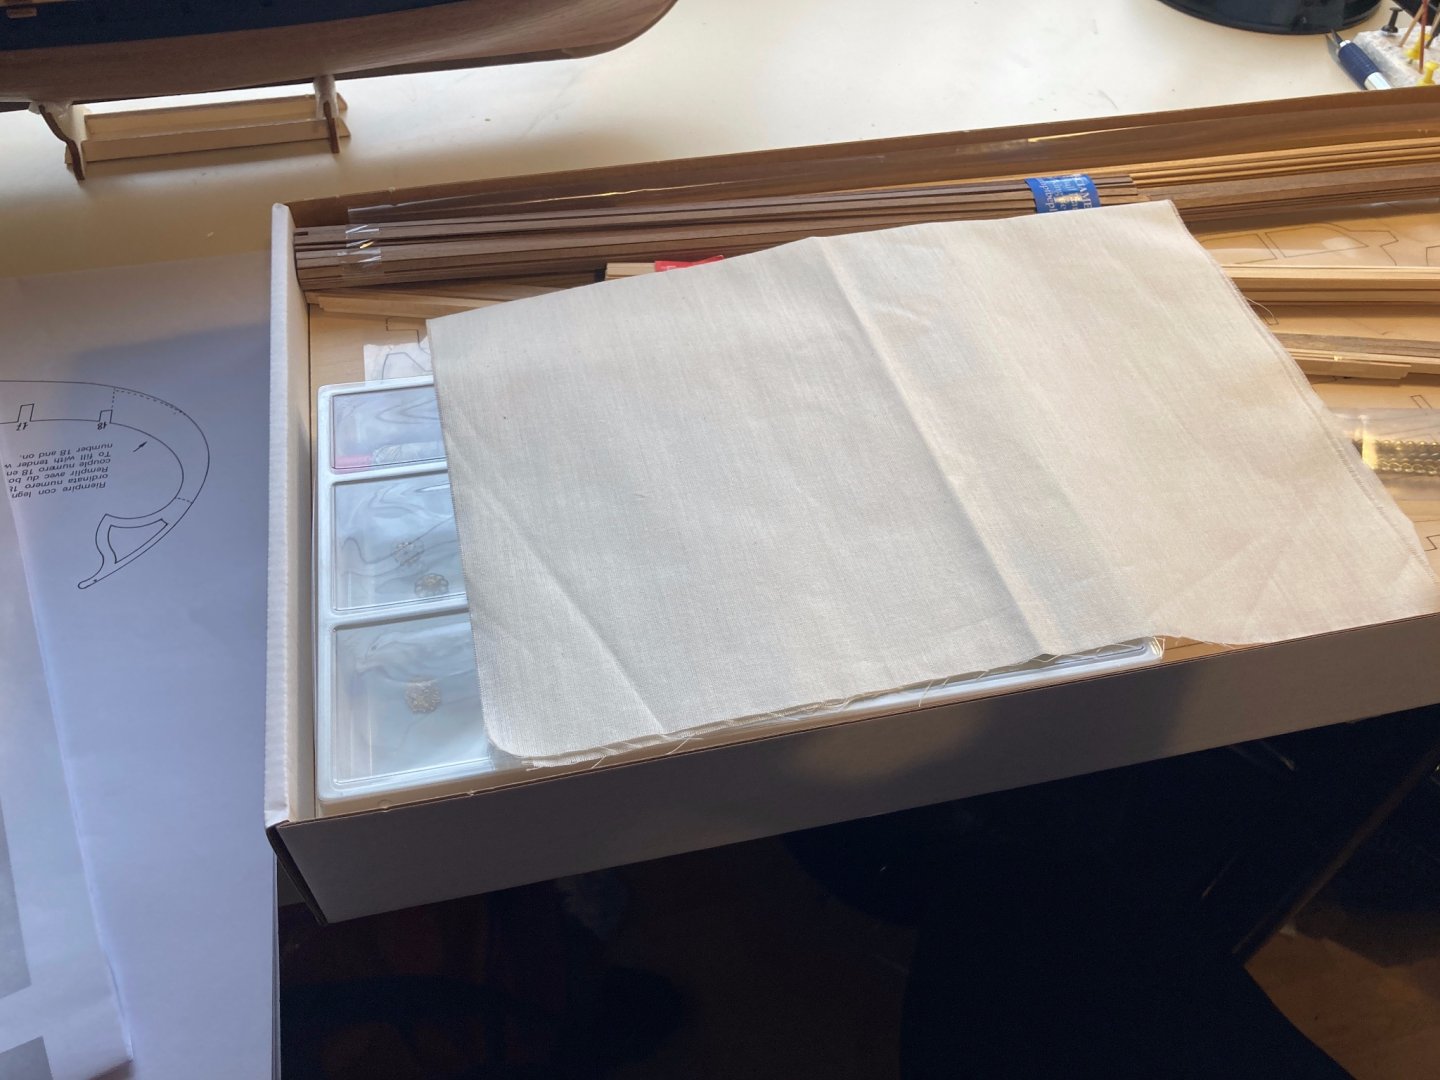
Well, what was I thinking... After finishing Frigate Diana (Build log), I turned my eye on one of my favorite ships since first heading about it in school: the Bireme. Amati's kit was available in the store, and after sitting on the shelf for a good ten months while Di was being built, the day was there to open the box: If I had to make an unboxing video of this kit, the whole thing would be over in about 20 seconds. Surprisingly little in there, especially instructions-wise, with 2 single sided sheets strewn with several drawings. I read in other reviews and logs that Amati instructions are top notch, so either I'm getting it wrong or this is the one exception to the rule... The sail is obviously unfinished, and some ornaments are in the plastic box, including a very rudimentary rendition of a ram. Bit disappointed really, excepted more. But on we went, forging on with confidence. At least I had 2 builds under my belt so I should have an inkling of how to build without a safety net. Cut out the bulkheads and the false keel for dryfitting: None was a snug fit, so had to devise some special clamps to hold the bulkheads true in all axes: Had to do some corrections as well because some bulkheads were not high enough, some filing on others, but in the end it got sorted out. Missing the Occre fits though. I'm using Moreplovac's excellent build log to have at least an idea of what's coming my way. While studying it, thought it might be a good idea to handle the interior of the ship first, so I started working on the seats for the rowing crew. With the help of a little jig, the seats were all cut to the same size and attached to the bulkheads. This was also my first confrontation with the walnut strips in this kit, which seem to be made out of concrete 🙂 Installed, it looks like this: After this, used some walnut dye to darken the space beneath the seats, nd started on the extensive task of hiding the burn marks on the top of the bulkheads and the central columns, as these could not be removed by sanding. now working on the bow and Stern balsa pieces, getting them in shape, as well as starting to fair the bulkheads for planking. Well, at least I don't have too many masts to worry about 🙂 Take care & stay safe!


- 62 replies
-
- 8
-
-
- amati
- greek bireme
- (and 1 more)
-
Hi Allen, thnx for your feedback, I took a picture of the mizzen mast and its yards so you can have a better look: As you said, kit is built (mostly) straight out of the box, so the parrels for the cross jack were installed as to the plans. Thnx for clarifying the actual situation. Rigging instructions are sometimes confusing (had a lot of issues with the Martingale).
-
Thnx for the clarification Mr Watton, very helpful. I'm looking forward to seeing it appear as a finished model on the site 🙂
- 355 replies
-
- 3
-
-
- vanguard models
- Sphinx
- (and 1 more)
-
Thnx for your feedback Paul, if you have any questions with Mercedes, don't hesitate to get in touch, I'll try to help as much as I can with my limited knowledge 🙂
-
Verrrrry interested in this, kit quality seems exceptional. Just a bit concerned with import duties to the EU😕
- 355 replies
-
- 2
-
-
- vanguard models
- Sphinx
- (and 1 more)
-
Thank you for your kind words, got it sorted out with a small messing pin in the mast, worked like a charm 🙂
-
Thnx for you comment, top tip: compromise on the sails 🙂
-
Thnx! Indeed, I'll start thinking about it.... If I can get my head away from the stern of the Bireme 🙂
-
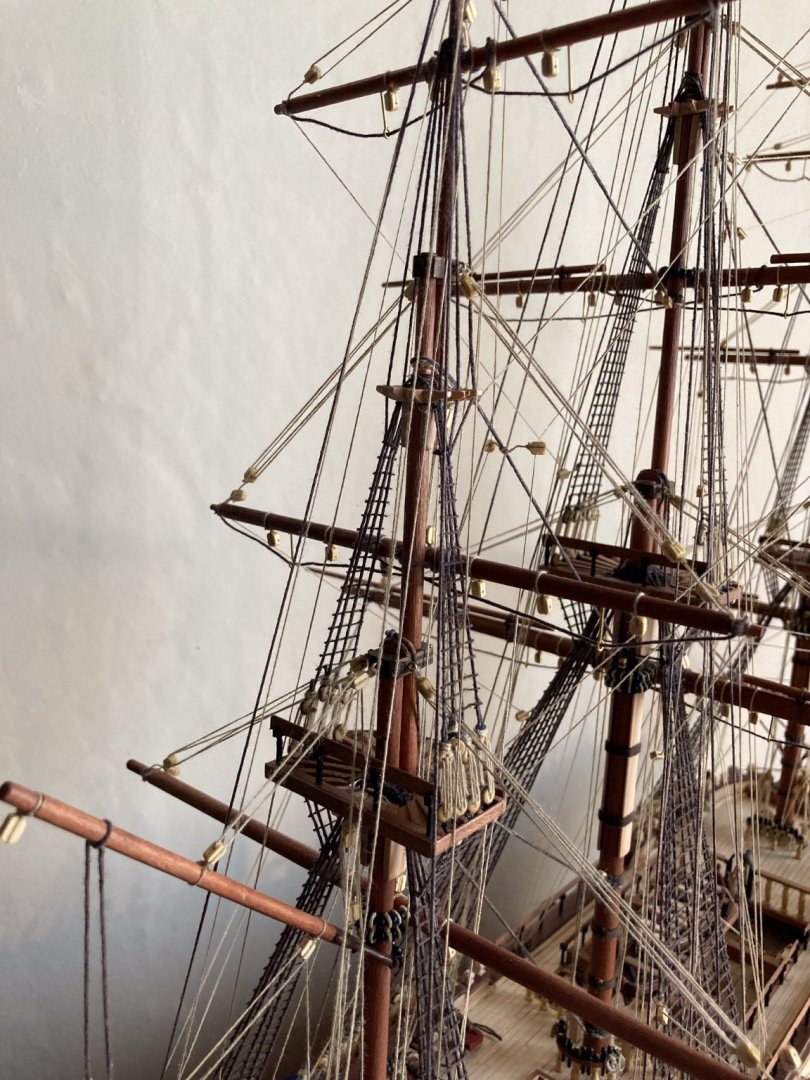
Hi all, thnx for checking in. It's been a while, but we're there, Frigate Diana is finished: Quite a challenging build experience as a second ship, but incredibly gratifying. Learned a lot of new stuff, including new techniques from all of you scattered over this forum (and some of my own), tried out and tested a lot more, and built my first scratch build pieces 🙂 The Admiral took a long look and then this happened: Admiral: She's gorgeous, beautiful job! Me: Thnx! Admiral: now you only (!) need to put on the sails. Me: Errmm, no... Admiral: But she's a sailing ship, she needs to have sails! Me: But all my rigging will be hidden! Admiral: yes, but you'll see sails 🙂 In short, we compromised: the next one will have sails 🙂 Thnx to everyone for the help and support in this 10 month build. On to the next one, a bigger challenge still: Single planking, hardly any instructions, walnut planks... What was I thinking? 🙂 I'll cover this in a separate log, for sure. thnx again all, the model shipwright bug has certainly caught!


- 96 replies
-
- 14
-
-