HOLIDAY DONATION DRIVE - SUPPORT MSW - DO YOUR PART TO KEEP THIS GREAT FORUM GOING!
×


Kevin-the-lubber
-
Posts
1,230 -
Joined
-
Last visited
Content Type
Profiles
Forums
Gallery
Events
Everything posted by Kevin-the-lubber
-
 So an older kit is probably better than a new one. I may just do a saved searched on eBay and wait for an old kit to come up. I don’t really want to feel I must re-make a lot of parts via 3D printing, at least not at the moment, because that would just be more of the same as I’m doing with the Heller Victory. After a while that becomes quite boring. I’ve never tried a real wood model, not sure I have the skills for that!
 -
Yes, them’s the chaps. I’ve played with the free version of zbrushcoremini previously and, as it is just sculpting I want to do, for resin printing, I’ll have another look at it. And thanks, I may well come back to you with some really basic questions if you don’t mind. I was the same with fusion, once I understood a few fundamentals it all came easy.
-
Are you familiar with the Victory? Actually, this is common to many ships, but on Victory there are two figurines forming part of the figurehead at the bow, and two more in relief on the stern. While the overall sizes need to be fairly accurate, certainly to within 0.5mm, that’s the only important dimensional parameter. Right now I’m looking to do the stern figurines using the Forms function in F360 as I at least know how to begin with that, but even there I suspect i’ll spend many, many hours of being frustrated and fed up! I won’t even try to do those for the bow until and unless I can get my head around a proper sculpting package like Blender. BTW, I’m not at all hinting at ‘could you do them for me’, I could buy them easily and cheaply enough, but would much rather learn how to do it myself so that, at the end of the day, I have the satisfaction of knowing ‘I made that’.
-
Ditto the weathered decks, I really like what you’ve done there. Bill, your log is going to be absolutely invaluable for me and probably many others, as it’s shaping into a true step-by-step walk through. Back at the beginning, before I got side-tracked by 3D, I was positively worried that I’d get the assembly sequence wrong and be unable to rig properly, etc, and I don’t think I found any other log that did what you’re doing. Especially one that raises and resolves the many head-scratchers along the way. So, keep it up! (I also eventually remembered the wrap-around gubbins (technical term) that hide the gap between the heads and hull, and, when I last dry fitted the bow, thinking I’d need to take a lot of care there to ensure good alignment).
-
Alternate Views
Kevin-the-lubber replied to Patrick Matthews's topic in CAD and 3D Modelling/Drafting Plans with Software
Now that I’m maybe 9 months into F360 I’m finding it pretty good on the whole. There are some terrible ‘traps’ you can fall into, that will have you turning the air blue, like patterning in sketches (it hates that and will freeze at will) and cack-handed copy and paste functionality, but other features, such as sheet metal, that are godsends. I still haven’t got a grasp on forms, but know it’ll come. On reflection, I’d say it has a short steep initial learning curve, after which you’ll be able to do a lot of stuff, and then a long, long, steady incline as you learn how to do things more effectively. Patrick, why do you say it’s poor for hull lofting? I’ve seen your work, which is fantastic, and you seem to have successfully lofted your hulls. I don’t have anything that I can compare against so maybe there are better platforms out there, but the lofting, sweeps, spiralling etc functionality seems pretty good to me. -
I may be wrong but I don’t think it would be that difficult to model that propellor blade in F360. Provided you know the angle of twist and dimensions, it should be fairly straightforward via lofting through a series of profiles on offset planes, using splined rails to maintain the constant curve along the blade length. How true it would be to the genuine thing would be down to how accurately it’s dimensioned in the modelling, but I’ve done comparable shapes recently without too much trouble. I hadn’t heard of delftship until now, one to look at when I’m back on a pc.
-
Hi Kurtis, I’m intrigued - you’re doing all this in Blender? Even after several attempts at learning the absolute basics, I cannot figure out that programme. Any suggestions on good beginners tutorials? I’d like to be able to model figures that are dimensionally accurate. I use F360 a lot but it can be heavy going on stuff that, I’m sure, is a breeze in blender.
-
Hi, interested to see you progress this. I’ve thought about doing a whole hull and, presently, will play around with small boats as I think I’ve probably learned F360 well enough for that now.
-
I too stumbled across your log just this morning - I saw a part-built kit going cheap on eBay, hadn’t realised it’s available as a 1:96 (the smallest scale I’ll ever use!). Very nice work there. How do you rate the kit in terms of quality, fit accuracy etc? Like you I don’t mind doing a bit of resin printed part replacement.
-
Do you mean the gap in the bows? If so, mine was like that OOTB, but these days, for dry-fitting, I have a couple of strong elastic bands running across the bow, hooked through the first set of gunports. This made it pull in and meet, and the decks now look fairly snug. I’m pretty sure this plastic moves with time as I remember going through all sorts of daft hoops to try to get them to meet when I first started the kit. These days they come together quite easily and I’m sure will be fine once everything is glued up. if you mean the piece you’re offering up, mines’ the same so it must be by design. I’ve noted to self, previously, that it doesn’t seem to ‘snap’ into place in any way.
-
I'm sure you've read them, Bill, everyone on here seems to have done so, but in case not, Patrick O'Brians Aubrey/Maturin series should get you into the mood and the Bolitho series is pretty good too. Come to think of it, it must be a good two years since I finished re-reading O'Brian, feels like time to do it again!
-
Yes, that's the plan. I think there's a fair chance I won't use that much of the kit (2 kits actually), just use the parts for reference and sell them off on ebay when I don't need them anymore. I'm sure plenty of people have 'oh no!' moments where a spare part would save the day. It's proven to be a bit expensive while learning but that's just one of those things - if I'd foreseen the end cost I'd probably never have even started the ship and definitely not gone into 3D, but in the event it's given me a new interest so I don't really mind. What's bringing you to Scotland? Vacation, relatives? Been before?
-
Currently I’m trying to stick to an old discipline I learned as a tradesman - do the most difficult things first, leave the easy stuff until last. So, I’m working on the scrolls, figurine and trophy (the hardest parts) before going back to the side windows, balustrades and decor, which I already have a proven methodology for. It’s a long, steady learning curve but I’m sure it’ll all pay off down the line and stuff like a new side entrance should be relatively easy when I come to it.
-
That’ll be worth a go. And if it doesn’t work out I’ll have a plentiful supply of slug barriers for the garden!
-
I like the look of the taped bottom a lot but I've always had it in mind to have the green-ish/blue-ish patina effect, which I think looks beautiful on models. I guess I'll buy some tape and ageing solution and play around.
-
Sat in a very dull online meeting - my workshop is also my office these days - so here you go. Most of them are through holes so I expect are visible from the inside. Photos (12).zip
-
No problem, I’ll do that this evening. On a scale of 1 - 10, how difficult was it to do the coppering?
-
Bill, if you need photos of an untouched hull section just post a picture of the area(s) you want and ask, it's no trouble and I'll probably welcome an excuse to take a break from F360. (coming along, coming along, slow but steady). I like that copperwork and, as Ian said, you certainly have some determination 're the nails. It took me about three or four sessions to just line the gunports first time round and I've still only partially done those on the 'good' hull. And you have a good eye for spacing, too.
-
Daniel, he overtook me on about day 2. Even if I was building straight out of the box I don’t think I could keep up. Bill, it’s really good to see someone going through from the start, I’m learning a lot. But don’t listen to Daniel, I blame him entirely for my lack of progress, by setting such a high benchmark and making so many irresistible modifications.
-
Much nicer Bill, out of interest what paint did you use? ps. Like the base as well, nice job, goes well with the copper.
-
Agree Bill, if the photo is true to colour it looks closer to brass. What about weathering it? I think either Foxy or Bishop did some very lovely weathering of the hull.
-
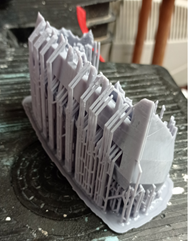
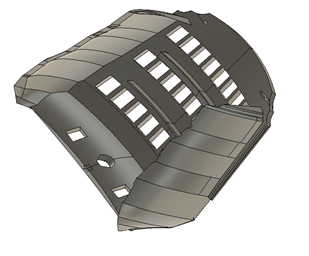
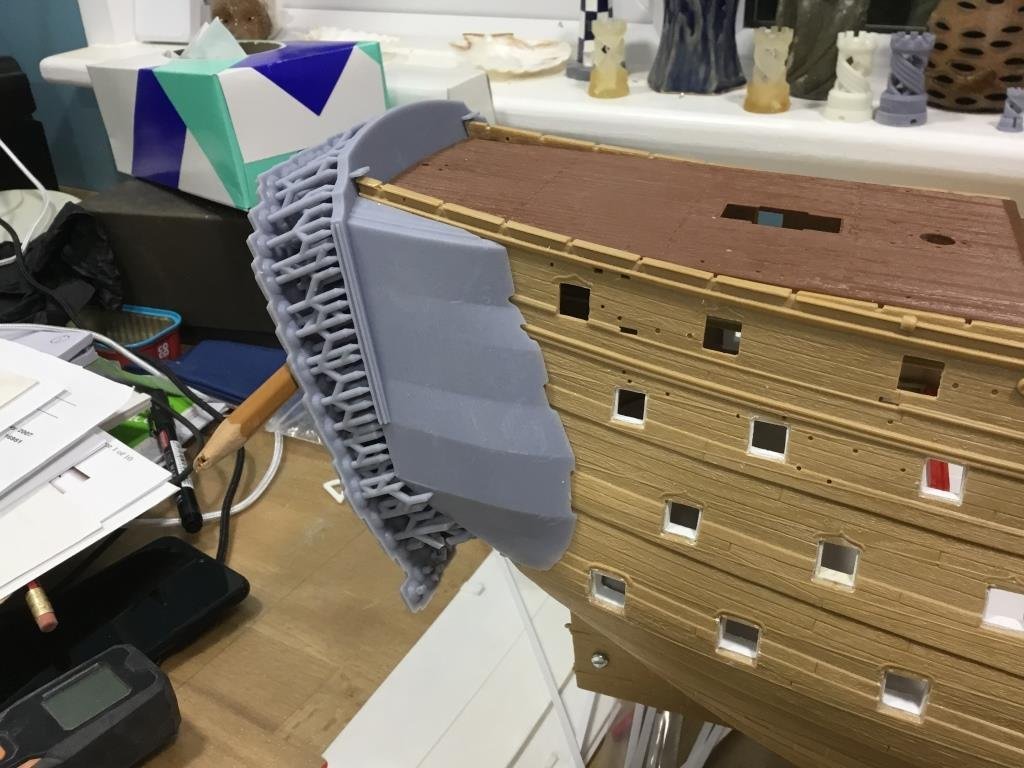
Good progress. This is the 'good fit' test body. All that scaffolding on the back is the printing support work, which I've kept in place to help keep the piece as rigid as possible when test fitting; as I'm using an ABS-like resin there's a fair bit of flex (which is good), so this allowed me to slip feeler gauges between the quarter galleries and hull to get each segment snug without the edges flexing outwards and giving false readings. The photo shows it in a 'relaxed' position, not glued, just held in place by an elastic band through one of the rear windows. At glue time, the body will squeeze in easily for a tight fit. From here, it's a case of now going back through the CAD modelling bit by bit, finalising the windows, balustrades, scrolls and rails. I've managed to turn a 3 piece section into a kit with around 50 or 60 parts 😂. No wonder it's taking so long!
-
I was going to say something much more flattering - that it looks like marble - but on reflection it does look good enough to eat. I think the detail and relief shows up even better just primed, either way it’s an amazing bit of work.
- 2,696 replies
-
- 6
-

-
- heller
- soleil royal
- (and 9 more)
-
It does seem a shame that, when painted, the rigol detail gets somewhat lost in the bee lines (which is why I probably won't bother with improving them) and, at the end of the day it's your model Bill, to do with as you wish!
-
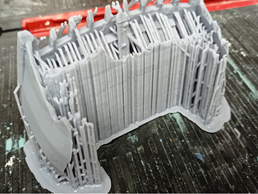
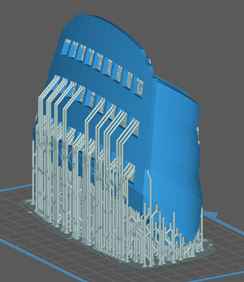
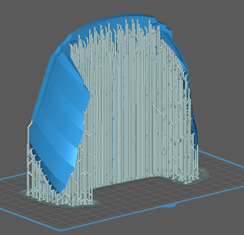
7th August 2021 Remember I said at the outset that my log is all about a novices journey, warts and all... All is not well in the KTL shipyard. This…. Is supposed to have been this… … the consequence of which is this…. An expensive print failure, £70 worth of LCD printer screen destined for the recycling bin. This screen should look like a brand new, straight out of the box, tablet screen. That grey stuff is resin very firmly welded onto the screen now, making it useless. For those who have no knowledge of 3D printing, all that ‘scaffolding’ is pretty much exactly that, it supports overhangs in the object as it gets printed layer by 0.05mm layer, but also, as this is a tall, thin structure, it supports the walls and edges. The object is orientated this way, for printing, to get the best result for the important edges and faces. What’s happened here is that, at a certain point, the partially printed object has lost the tug of war with the resin vat, the new layer of cured resin has stayed stuck to the bottom of the vat (it needs to peel off and be stuck to the object), a few more layers have joined it for good company, then at some point all of that build-up has re-attached to the object and the force of separation has torn holes in the super thin, delicate layer of clear plastic that forms the bottom of the resin vat (the FEP), allowing resin to leak onto the screen and become duly cured. Very frustrating. Screens are treated as consumables and I have a spare, but £70!!!!! And not even a finished object!!!!! I know this is 'operator error', the frustration is not yet understanding what I can do to avoid a repeat. What I’m trying to do here is print the bodies of the stern and quarter galleries as one piece. All the décor gets printed separately (basically everything that isn’t painted black). The reason for a single piece body is because this solves various alignment problems with a three piece (stern + 2x quarter galleries). Or it will, once I get it to print. This print is/was intended to be a ‘fitting’ stage, that allows me to make some final, minor tweaks to the quarter gallery profiles so that the whole assembly is a nice snug fit to the hull. The windows and rails are already modelled but their final shape is contingent on that of their respective quarter gallery segments. I have to admit, with this being the second such failure (though the first didn’t wreck the screen), that I’m tempted to look again at just sanding off the Heller decoration and settling for new windows, balustrades, filigree etc all round. Except I think mine, if I can land it, will be better, because of the changes I’ve been able to add i.e. a better quarter gallery profile, thicker stern plate, counter running directly into the bottom of the quarter galleries. Plus I’ve been working on this for months and months and months now and to some degree getting a 'perfect' stern is a deal-breaker in terms of continuing with the model. (I use the term 'perfect' in a context that I'm sure every one of you will understand). Despite the miserable weather here today, a weekend of gardening or, if it rains too much, interior decorating, methinks, while I seek advice from those who know a lot more about printing with resin.