Kevin-the-lubber
-
Posts
1,233 -
Joined
-
Last visited
Content Type
Profiles
Forums
Gallery
Events
Everything posted by Kevin-the-lubber
-
 The worst of it is that between you, you have got me thinking all the wrong thoughts. It probably isn't nearly as difficult as I'm making out and it's oh so tempting to just play a little. Especially as I've just received a very large wash'n'cure machine which seems to be begging for particularly large prints. A thought that keeps recurring, as a way around the size limitations of hobby printers, is a plank on frame approach. Imagine: a resin printed frame, to avoid what looks like the hard parts of that (not that I've ever made a plank on frame), the getting it absolutely true and absolutely accurate to the 'drawings'. Then 'plank' it with sections of faux planking, but with the plank sections keyed into the frame so no creep through fractional cumulative error. No bending to shape, no cutting, able to design in all the detail (admirals entrance, proper side steps, rigols, wales, thickened gunports, internal framework, no woodgrain).... The big question is whether the resulting model would have any soul. I'm reminded of the anecdote about the very best handmade persian rugs, that they always contain one tiny, deliberate mistake, because that virtually undetectable 'error' is what brings them to life. Whether this is a true story or not, I agree with the sentiment - machine made art is rarely quite as beautiful as that made by hand. Anyway, I will at least concentrate on finishing work in hand first, and on getting to a stage where I can finally make some progress with the kit hull.
 -
I didn’t know that (calibrating the sketch), useful. One thing I wish I could do in F360 is annotate sketches. Is there a way? I haven’t found one myself. The kind of thing you’d add in a box on paper drawings. As far as I can see, the ‘notes’ function is good for adding info about the version, but not what I’m describing here. Even on my potty little stern section I have literally hundreds of sketches now and, as I work through finalising everything for printing, even though everything is named, it can be really hard to remember why I’ve put this or that line ‘there’, or what I used as the reference for ‘that’ sweep path etc. It’s always possible to figure it out but adds hours to the project. One thing I’ve learned (the hard way of course) which I would certainly try to apply to any future complex f360 projects, is to write an end to end workflow plan at the beginning. Very boring, but it will probably save me hundreds of hours. Of course it’s not the writing that’s of value, it’s the thinking it through. I have about 60 components on the stern section, all inter-related and I developed these in a logical ‘woodworking’ sequence. Turns out that’s not necessarily the best sequence in f360. As I tidy up now, I’ve been surprised to find myself moving (now derived out) components to quite different places in the timeline, because they need to happen before or after this or that other component. If I’d written a plan I would perhaps have foreseen this, though I probably needed to learn the lesson first! I probably haven’t explained this very well but suspect very experienced users will nod sagely and know what I mean.
-
Learning from mistakes is my speciality so I have no fears there, plus I have a huge stock of offcuts from various DIY projects on which to experiment. I’m more or less at the same stage as when I was first thinking of buying a 3D printer, I wouldn’t know a good laser from a bad one, don’t know if it really is that straightforward to hook up to the ender (I have a total mental block when it comes to any electronic work, to me it remains a dark art) or if the ender conversion is really worthwhile. It turns out there is a makerspace quite nearby and this might be something I’ll try first. I hadn’t thought about all the ventilation etc, but remember how lethal these things can be from using industrial kit 30 or 40 years back.
-
I’m a sucker for experimenting and am now thinking about adapting my Ender3 FDM printer for laser engraving. Cutting would be even better but I understand that level of kit is a bit more expensive. Any advice, recommendations?
-
Hi, have any of you added a laser engraving attachment? I’m curious as to how well this works and getting tips on what’s worth buying, how to do it etc. In passing, worth taking a look at Yves Corvette on here, he is doing an amazing build using an Ender 3 (IIRC).
-
I'll say it again, that woodwork goes so well with the printed parts, and the weathering is superb. Maybe it's partly because one is 'primed' to see the plastic as angular metal, and the whole to be metal juxtaposed with timber but, whatever the reason, it just works.
- 321 replies
-
- 5
-

-
- Finished
- Flower-class
- (and 1 more)
-
What did they get wrong Marc? Though at £800 for entry I won't be going there anyway.
- 2,699 replies
-
- 3
-
-
- heller
- soleil royal
- (and 9 more)
-
3d printing process
Kevin-the-lubber replied to henrythestaffy's topic in 3D-Printing and Laser-Cutting.
Chuckle here too, partly because that's exactly what the younger me used to do... but with a rope; I'm not entirely stupid! But also partly because I simply cannot get through the initial hump of blender. Like you I'm an engineer, by nature, training and temperament. When in Paris, while my wife viewed the Eiffel tower as a fabulous piece of art, I was looking at the castings, the webs, the compound angles, visualising the drawings and processes to make them. A different kind of heaven. So F360 makes perfect sense to me; when it says ' no can do', I understand that it is my fault because I haven't, for instance, correctly expressed my design intent. But Blender... currently still beyond me. Which is irritating because I sure could do with being able to do some basic sculpting. I see your point about FDM vs resin, I guess that's how I treat them these days. Filament for when the properties matter more than the aesthetics, resin the other way round. Which is why I'll probably hang on to the FDM, as a tool just like the rest of my workshop machines. besides which I wouldn't get very much for it anyway. -
3d printing process
Kevin-the-lubber replied to henrythestaffy's topic in 3D-Printing and Laser-Cutting.
Ps. I can be a lazy so-and-so and have left resin in the vat for a week or two without any probs, rather than have the hassle of cleaning the vat. I just carefully stir it before I next print. I’ve also left prints sat on the plate for many hours before removing them, if I go out for instance, also without any issue. In fact I try to be patient and let them sit for a good couple of hours anyway, so all the unused liquid drains back into the vat, otherwise you’re just rinsing away perfectly good, expensive, resin. While I wouldn’t leave a print while I went on a two week holiday, I’d certainly leave it for a couple of days. -
3d printing process
Kevin-the-lubber replied to henrythestaffy's topic in 3D-Printing and Laser-Cutting.
Indeed it is, and it will probably be good that most of us are at more or less the same stage (the blind leading the blind!), as newbie questions can be baffling for seasoned hands but often make perfect sense to a peer. I went down the Fusion 360 route, purely because it looked good, has a great support forum and, most importantly, is free. It’s immensely powerful, is easy to learn to do simple stuff, and not even that hard, in retrospect, for more complex stuff. It’s probably all a lot easier if you can get some interactive tuition rather than rely on the plethora of online content, in part because no-one ever seems to have quite the same problem as you. I suspect that even after 8 or 9 months of constant learning I still only know how to use about 30% or 40% of it’s capability. But there are some very valuable ‘tricks of the trade’ that are worth learning early on. At some point I’ll put my head above the parapet and start a topic here along the lines of ‘The beginners guide to F360 according to Kevin’, to share my own experience and then learn how I could have done it all so much more easily… I’ve looked at Freecad… insufficiently shiny for a visual person like me… and SolidEdge, also free, potentially as good as F360 and, while I have periodically become sufficiently exasperated by F360 to just explore SolidEdge a little, it feels like I would have to learn everything all over again so I haven’t pursued it. Completely different menus, options etc. As it was, I felt utterly embarrassed at having to ask, on an F360 forum, how to draw a box. Those first few steps are by far the hardest. The downside of getting into the CAD side is that everything’s possible but it can suck up all those hours, and more, that you thought you were going to spend actually making stuff. In my mind, now, the actual printing is just a small end process. Plonk the stl into the slicer, add supports, pour in some resin and come back an hour later. I should also mention Tinkercad for anyone just about to start. It’s free and a wonderful, easy intro to the design side. Also a lot more capable than you might think. And, once you start finding it’s limitations, then look at proper CAD software. -
3d printing process
Kevin-the-lubber replied to henrythestaffy's topic in 3D-Printing and Laser-Cutting.
This is a thread I've been in need of for the past 9 months! I now have three printers - a Creality Ender 3 FDM machine, an Elegoo Mars2 resin and and Elegoo Saturn resin. That's a story in itself but here's the short version. I started with the Ender about 18 months ago. A wonderful intro and adventure but I could never get the fine results or level of detail I was seeking. Patrick's observations persuaded me to buy the Mars2, in January this year I think. I was immediately blown away on two levels. Firstly, the incredible level of detail and quality of finish you get with resin. Secondly, how easy it is compared to filament printing. After a period of messing with the settings - of course I'd know better than the experts (not) - and some expensive mistakes, I did what the technicians at elegoo told me to do and now just use the factory/recommended settings and it all works just fine. However, I rapidly discovered that the build size on the Mars2 is just a bit too small and limiting, so I bought the Saturn a few months ago. The stated plan (to the Admiral) was that I'd sell the others to offset the cost, and one day I will.... maybe. It is quite handy having all three though! The Ender is useful for bigger, functional, usually non-modelling stuff; custom brackets for mounting my crazy man garden watering system timers, one of a kind finials for my greenhouse ridge, that kind of thing. Whereas keeping the Mars just mean I can run two prints simultaneously, I don't have all the time in the world you know, do I 🤪. Lessons learned, observations; 1. Do buy a resin printer rather than filament, for modelling. Unless you're doing very large scale like Yves' corvette, filament will likely disappoint. My own experience was one of more frustration than satisfaction. Forever chasing a good setting, probably because from day one I was trying to work at the absolute limits of what's possible with FDM. Big parts that didn't need great detail, finish or accuracy, no problem, stock settings work fine. Small, finely detailed, blah. A glass bed helped, so did using hairspray on the bed, and changing the bowden tubing for a much better quality one (can't remember the make, but it's blue and all roads lead to it); likewise, mounting the spool off the printer and making some of the custom parts like a filament guide. 2. Buy a bigger resin printer like the Elegoo Saturn or Anycubic Mono from the outset. I have no first hand knowledge about how they compare side by side but there is basically only one moving part, the screens are probably all made by the same chinese factory and nothing I've read suggests there is the slightest difference in results. The Elegoo was way cheaper, hence my choice and the build quality is great. I gather there is an even bigger one on the way, the Jupiter, but I'd be careful there as the consumables - replacement screens, FEP - are likely to be expensive and availability of consumables can be an issue with elegoo, though I think they've got a handle on that now. I had a big leak on the Saturn and thought the screen was wrecked so bought a replacement, turns out it had a screen protector factory fitted, you just have to look very carefully for the edge. The elegoo techs suggested just using a FEP sheet as a replacement protector but I've read of people using kitchen film. 3. I now always spray the FEP with Silicone / PTFE oil before a print session. It seems to help, at least I stopped seeing failed prints. 4. I do use a magnetic build plate on the Saturn. Absolutely no negatives, sticks fine, prints are just the same, but equally, I'm not sure there are particular advantages. The prints seem to stick to it like the proverbial to a blanket and flexing the plate to release them, as often as not, results in the model snapping, so I still prise them free with a scraper. I've bought a second build plate for an upcoming session as it's easier scraping them off a rigid surface. 5. I've also bought a spare tank for the Saturn, just because it's a pain having to stop everything to replace the FEP, would rather do that at my leisure. 6. I've tried 3 different resin types, all Elegoo; standard, water-washable and ABS-like. Standard is much more brittle than ABS and the print quality is identical. Water washable, IIRC, gave a less good finish and was a lot more expensive. ABS-like is the bees knees for me, all I'll use from here on. Though I do plan to try some AnyCubic when I next see it on offer. Sirayatech blue, way, way, way too pricey at this stage. Maybe when my designs are 100% proven. 7. Between you, you've convinced me to now buy a wash'n'cure machine. I go through gallons of IPA, which is not at all cheap, but more importantly, even though I do a lot of cleaning up, my printer workbench becomes quite 'tacky' and has to be put out in the sun periodically to cure, and there's not a lot of that (sun) here in the UK right now! Plus I never really know how long to cure for and maybe the machine can educate me. 8. Ambient temperature. I think maybe this also connects to the 'popping' and 'thumping' issue. Logically, if the ambient temp' is on the low side then the resin won't flow so easily. Now that I know resin is not quite as hazardous as I thought, I'll move the printer out of the unheated garage (getting cold in the UK now) and into my heated office, and just ventilate a bit. 9. Slicers: I mostly use Chitubox as I know this is entirely local to my machine and it works fine for me - again, why would I know better than Elegoo, who ship Chitubox with the machine? I've also used Lychee when a print needs fixing but I don't like that it connects to the web... I don't like anything that tracks what I do for no good reason other than that they can, or want to sell me stuff I neither need nor want. 10. Supports: bigger is sometimes better. I think sometimes the print fails because the chosen supports aren't strong enough and break, so I increasingly use medium or large supports and have less trouble. Initially, especially with very small parts, I would try to get away with the very lightest and least number of supports. Now, I just accept that one face of the model will need sanding, filling etc if it'll be on show. Apologies for such a long download, and I'm looking forward to learning from everyone else on here as we all come to grips with this amazing technology. -
I read the whole log last night and I'm impressed in all sorts of ways. You have absolutely hit the sweet spot for SLA printing both in scale of subject and printer set-up. From the photos, it looks like, at this scale, the layering does not detract from the look of the model, whereas if this was, say, 1:100, I think it would. And I really like the mixture of bought in parts like the stanchions (easy to print with resin, but would they be strong enough?) and the wood. A great combination of technologies and methods. I gave up on sanding PETG (my preferred filament) very early on, as you say it's tough and 'furs up', in fact I went the whole hog and now print almost entirely in resin. But for those thinking of going in this direction, do yourself a favour and buy something like the Elegoo Saturn, the build size of the Mars (and other entry level resin printers) is a bit too small. And note that Elegoo will shortly be retailing the Jupiter, another step up size-wise, but there are some risks in going this big. I'm amazed that the designer is selling the STL kit for $50. Sooner or later someone is going to buy the kit and make good money on the back of that designers blood, sweat and tears. It's akin to selling the patterns and files for photo-etching, the moulds for resin casting or programme files for CNC machining (or, taking it to the extreme, the extrusion dies). This is going to be an interesting area of 3D modelling development i.e. if you are trying to make model designs for an income, how do you protect your copyright other than doing the printing yourself? How do you avoid the files simply being shared so you only make one sale instead of fifty? I think resolving those issues will be key to what happens in this area of modelling because, while most people on sites like this would probably a) be honorable and b) mostly do it for fun, the CAD development is where the work takes place and, unless the designer is an absolute pro with CAD, many, many hundreds of hours will have gone into those STL's. Even now, when I am starting to have some proficiency with CAD, I would expect a kit like yours to take me at least 3 months at 8 hours a day i.e. £5k - £10k worth of labour even at very modest rates. Personally I'd love to see a plethora of print-it-yourself kits and love it even more if you could buy the CAD files and make your own modifications. But I suspect that, unless there's a way of protecting the IP, development will probably be confined to small networks of trusted peers. But I'm equally sure CAD+3D printing is the direction of travel. Just imagine if the files were open-source - imagine what would be happening on forums like this! Within a few years many, many people would have further developed sections or parts, resulting in some fabulous kits!
- 321 replies
-
- 9
-
-
- Finished
- Flower-class
- (and 1 more)
-
That sounds like the sort of help I’d best decline for the sake of my sanity😬.
-
Ooh, I'll be wanting to read all of this log. Yves, you must have really nailed the settings on the creality printer, I rarely got that quality of finish, and it's a fabulous looking model. I've only skimmed this and the first page so far, following someone mentioning your project in my log (I'm also into 3D).
- 321 replies
-
- 5
-
-
- Finished
- Flower-class
- (and 1 more)
-
I'm in good company though, aren't I 🤪. But no; if I had access to the original Heller drawings I'd be tempted, but reverse engineering the contours of the hull, I think not.
-
Thanks for looking Pete. Yes indeed, this has become quite a project and I can’t wait to be through with it. I’m just glad my printers are nowhere big enough to support re-making the hull, as that would have been irresistible!
-
Agreed, they're lead, same on the top of the stern, but personally I still quite like the thought of copper instead. Though I hasten to add I haven't yet tried this.
-
Out of interest, Ian, did you have to provide proof of purchase on the spare part request? I like the idea of copper instead of lead, it may not be true to history but it'll look nicer.
-
Only one last little bit of making left now, the little bit of architrave on the corner of the counter, then lots and lots of fiddling with fitting grooves and pins. Quite a slow process at this stage, you need the patience of all the saints combined as, due to the complexity (and probably my poor workflow) Fusion 360 takes ages to compute each minor change.
-
I'm sure this will be the star of the show, extraordinary detail. And enjoy the break!
- 2,699 replies
-
- 5
-
-
- heller
- soleil royal
- (and 9 more)
-
That’s just me learning how to use this site better and procrastinating rather than getting on with the job! If you don’t know the St Andrew’s area, it’s a lovely part of the world, though likely to be a bit wet and cold at this time of the year. At the very least I too will stick with yellow ochre but I love the colour and interest Marc has put into his SR. Part of the attraction of doing the Cutty Sark, at some point, is that this too is very easy for me to visit, but I’ll want to be a long way into Victory before I even start on that. The Beagle will probably go back on eBay, it’s such a poor kit.
-
Mystery solved!
-
I wouldn’t be so sure that the Heller model is totally accurate in this respect. From earlier work on the Admirals entrance I know the fore-to-aft positioning of the middle (I think) gunports is a little wrong. Likewise, from various photos and reinforced by yesterday’s ‘inspection’, Hellers’ laterally flat decks means the curvature of the stern windows is probably a bit less than in real life. Every deck has a very noticeable lateral curve, to let water run out, especially the lower gun deck as, apparently, Victory sat much lower in the water than was expected and shipped tons of water through the gun ports when in battle. The wales are very different on the real thing and barely protrude. I’d guess that the head rails absorb the difference, that their vertical dimensioning is fitted to the gunports so it all looks right despite being technically inaccurate. None of which is meant as a criticism of Hellers’ modellers, but a 1/16 here, a 1/32 there, all adds up without detracting from the overall look. Who’ll finish first? Well, I did only say ‘probably’!
-
From the outside I think it would just be a little lip, but the difference in deck heights must be around 2 feet. I really wouldn’t worry about it, to make the model true to the ship you’d have to lower the entire gun deck by about 1/4”, and yours is as good a compromise as any other. All of my photos apart from one or two are detail shots, 99% from the outside or on the quarter or poop deck. I just went around a couple of times letting detail catch my eye and then shot it, for reference as I go along. Interior shots were tricky as you can’t use flash or a tripod, but if there’s an exterior detail you need, I might have a photo! I’ll be going back sooner or later, it’s only 50 miles away. It’s just a shame that I’ll have probably finished the model before they ever re-rig her.
-
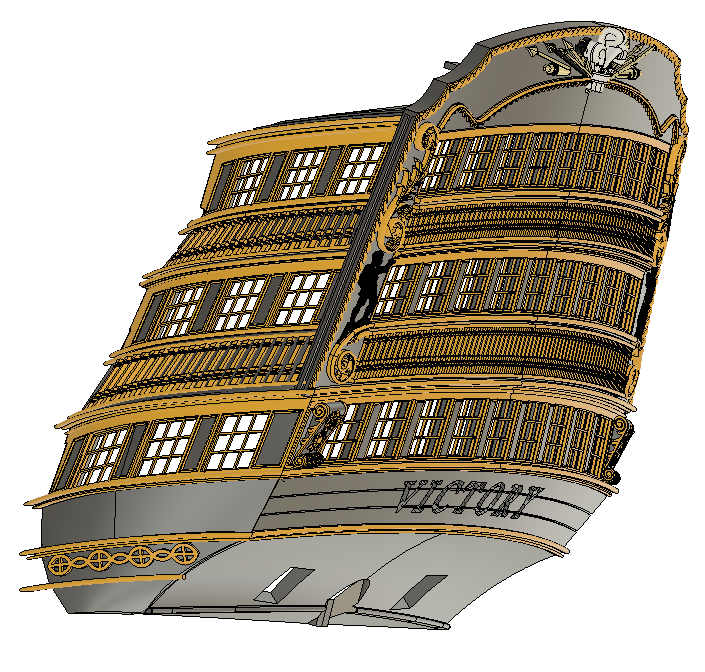
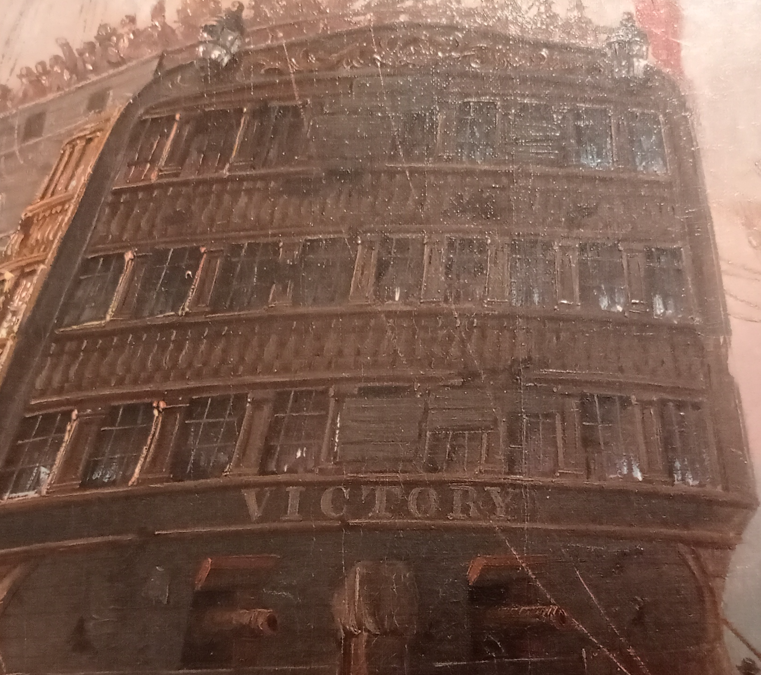
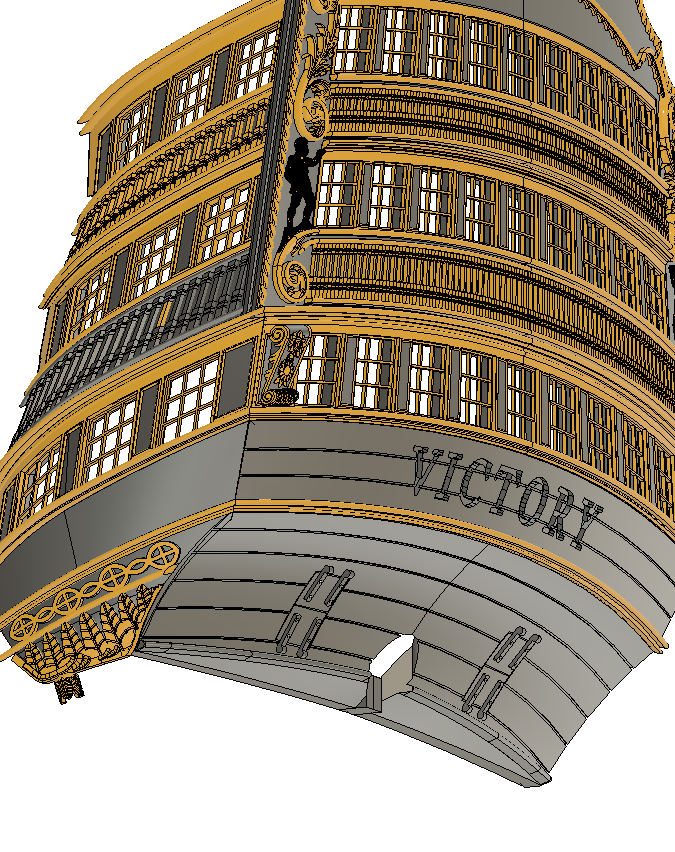
Kind of on the home straight with the stern section now. I have a few small details to model, some minor adjustments to make everything seamless, then prepare it all for printing. I guess it'll still be a few weeks before I'm ready to start printing again, as I want avoid making mistakes through too much haste. I spent today on the real Victory. She's looking a bit uninspiring right now. As you can see, they recently removed the main mast completely and from what I overheard, it'll be several years before it'll go back on. And they've re-painted the ochre (which at least hinted at a touch of bling) in that hideous pinky-fleshy colour. Not for the first time, it has me thinking that, if yellow ochre would be historically incorrect in the first place, then why tie myself to any particular colour scheme, why not go french and give it a bit more colour, a la Marc's Soliel Royale? I also had a look around the Victory museum, largely to get a closer look at the figurehead, which has been removed to there. This picture caught my eye though, or to be more precise, this section of a much larger painting by John Wilson Carmichael, of Victory moored off the Isle of Wight with Nelson's body aboard. Since John was only 5 years old at the time I don't suppose this was contemporaneous, either that or he was quite a talent, but either way, there's no trophy of arms here, just a moulding that's in keeping with the scroll-work we see today either side of the stern. Though oddly, the latter is not present.