


Kevin-the-lubber
-
Posts
1,233 -
Joined
-
Last visited
Content Type
Profiles
Forums
Gallery
Events
Everything posted by Kevin-the-lubber
-
 Fresh back from a visit, I can shed a little light on the position of the doors and hatches, see picture below. There's a big difference in height between the upper gun deck and the small deck section in front of the bulwark. Makes sense, bearing in mind the guns here would be quite elevated. Obviously this isn't the case on the model. Unfortunately the main mast has been completely removed and that area is covered over so no photos of how they dealt with the line going through gratings etc. I'll talk more about todays trip over on my log.
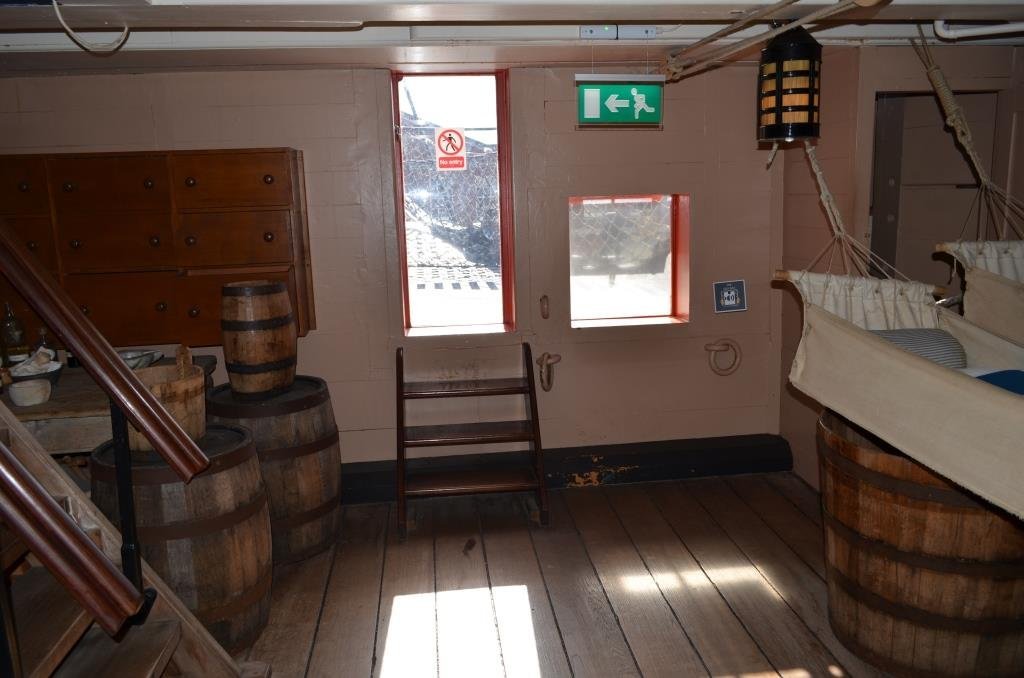
-
I’ve booked for monday so, if there are any details you’d like photographed, sing out and I’ll do my best. You’d best give very plain descriptions, I wouldn’t know a jeer from a shear at this point. This will be my first non-family trip, just me and a camera, purely for info gathering. Sadly I think it still doesn’t have the upper masts or rigging, I was very disappointed at that when I first visited 8 or 9 years ago but maybe I’ll see them back on one day. postscript: just occurred to me that, therefore, I don't suppose the rigging talked about above will be present... but at least I may be able to see how they handled the grating and fixings (I googled Hackney following Ian’s tip, horrifically expensive on some sites…. But then looked on Amazon and saw a copy for £1.50 - about $2 - needless to say I couldn’t get my wallet out quick enough).
-
Incredible progress Bill. Your log is turning into essential reading, a go-to for future builders. I now understand the discussion about the lines running through the gratings and why some think the gratings should be omitted. I’m hoping to make a trip to Portsmouth on Monday, if the weather improves, and that’s something I’ll try to look at. It seems like a strange arrangement in principle, I’d have thought there’d be a risk of the ropes rubbing against the gratings and fraying, but I’m sure they knew what they were doing. I like your rope coils, looks natural and convincing.
-
Thanks Bill. I've got a bit sick of doing the flags, too complicated for my brain this week, so have switched to the now relatively easy windows etc for the side galleries. Two done, third to go some time over the weekend. Bit by bit....
-
You may want to put a ring of people barriers around it, come the show. It draws you in, makes you want to look ever closer at all the exquisite detail and, if it was mine, I’d be terrified that someone was going to get TOO close!
- 2,699 replies
-
- 3
-

-
- heller
- soleil royal
- (and 9 more)
-
Same here. The hammock cranes would be way too fragile made from plastic so I'm keen to see what you do, otherwise I'll probably buy some from Daniel.
-
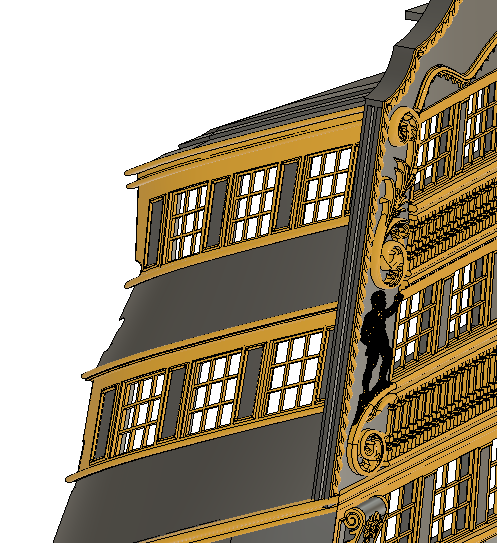
Oh, you don't want to be doing that Bill, not unless you're planning on living a very long time. I have it all mapped out in my mind how I'm going to race through stuff once the stern is finished but I thought that would only take 2 or 3 weeks when I started on it 9 months back. And I'm so close to the end that I really want to just soldier through before I start playing with more interesting things. (It has become extremely uninteresting of late, just a never-ending series of technical obstacles). Bearing in mind that sketch is of the 32lb gun, the largest she shipped, there's precious little space for the blocks on the smaller guns, and of course it's those that are on show. I suspect I'll cheat - from an appearance perspective, you only need one hole in a (single) block as the rope would hide the other... that offers possibilities. BTW, I'm sure you know and this is deliberate but you've got the blocks hooked to where the big rope goes. (Leave me alone, I'm still working on my naval terminology).
-
Interesting - this is where our quite different media (for modelling stern galleries) coincide. For Victory I too chose a blend of art and science, using the kit part as a start point but developing a contour that pleased my eye and made technical sense; and by coincidence I'm at this very moment fiddling the spacings and sizes of windows. It's quite surprising, isn't it, how a difference of 0.15mm (1/64th) can have such a profound effect on the look.
- 2,699 replies
-
- 3
-
-
- heller
- soleil royal
- (and 9 more)
-
Very sensible Bill.
-
Bill, in between times I've played around with these blocks over the last few days and got something reasonable. In truth these are 2.3mm which, for me anyway, will be close enough. I wouldn't say I'm particularly happy with them, I had to make them more square-ish rather than ovoid in order to gain a little thickness, as 0.15mm walls were proving fragile and they are still a bit clunky. I'm sure, when I come to using them a good few months from now, I'll tweak further. Regardless, if you're inclined to re-visit with thinner rope, I'll send you some of these. That rope in my pictures seems just the right size. It's about 0.15mm thick. No idea which kit it came from, I have a little stash off ebay and people sometimes throw in all sorts of stuff.

-
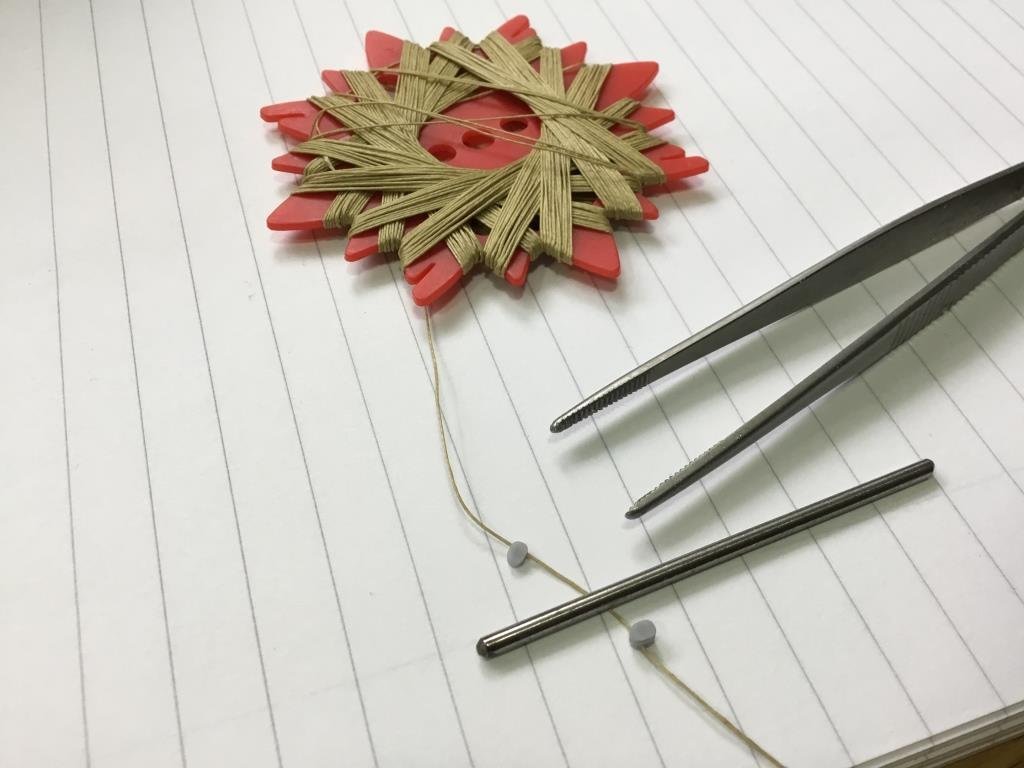
That looks better, Bill. I tried threading the 2mm earlier but couldn’t get my smallest thread through it so I’m seeing what happens with enlarged, ovoid holes. Though that opens another can of worms, that the rope itself becomes out of scale. Ian, I agree, 1.5mm is just too small. And to answer the question, will they hold, to be honest I don’t yet know but I don’t see why they wouldn’t, the force on them is minimal. It’s probably possible to come up with a jig to make stropping easier, that looks like a nightmare freehand. Bill how have you found that with the filed down blocks?
-
I have a plan. I don't think 1.5mm are practical so will park those in favour of 2mm, even though that could those which should be 1.5 would be 30% out of scale. For the 2mm, the issue is that the walls of these are only about 0.15mm thick - that's just less than the thickness of a decent quality bit of paper. So there's no room to widen the holes, which at this scale are about 0.2mm - 0.3mm. However there is room to turn these into slots which might just allow threading using one of those sewing kit things. Ian, have you used blocks this small or seen anyone use them?
-
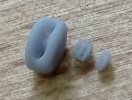
They do look too big, don't they. I've printed off some scaled down blocks at 1.5mm and 2mm as per Ian's excel sheet and these are incredibly small; this looks like real 'threading the needle' stuff and you'd definitely need magnification and a lot of spares! Bill, in the small picture below, the big block is a 5.5mm, so you'll be able to compare shortly. I'm not even sure if I could thread the micro's, something to try this weekend.
-
Bill, just looking at the cannon ‘problem’, what about making the coil as the last step, coiling from the inside out. I would try making a little jig which would simply be a very short bit of round evergreen or spruce set vertically on something like a small piece of evergreen sheet, with a slot or hole through the middle to hold the end of the rope while coiling. If you coil as a mirror image you could glue the coil and, once dry, pop it off the jig into its proper position and the glue might not even show as it would now be on the bottom of the coil. Then tease the starting end into place or snip it off. I’d expect to have to do a couple of dry runs to work out how much rope was needed. There’s a handy thread on using matt nail varnish instead of glue, below. Zulu “Lady Isabella” by EKE - FINISHED - Vanguard Models - 1:64
-
This is the thread, I think it’s one or two pages from the end. Sorry but copying hyperlinks defeats me on an iPad, so just the title. Zulu “Lady Isabella” by EKE - FINISHED - Vanguard Models - 1:64
-
I received my 1:96 Cutty Sark today, bought at a good price off ebay. Very exciting, particularly as it doesn't appear to have an endless array of parts so maybe won't take quite as long as the Heller Victory. However, not something to start for a while, I'll wait for a sensible break point on the old lady. I haven't fully checked it over yet, something to do a little later this evening, but I noticed that my shrouds are pre-made using thread, i.e. they look a bit different to yours and probably better than anything I'll do by hand.
- 82 replies
-
- 1
-
-
- revell
- cutty sark
- (and 3 more)
-
The sirens are especially incredible. I would so like to see the finished article in the flesh when it's completed.
- 2,699 replies
-
- 3
-
-
- heller
- soleil royal
- (and 9 more)
-
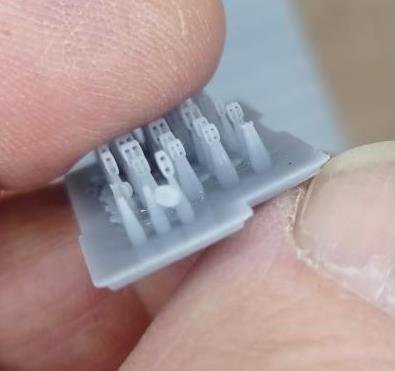
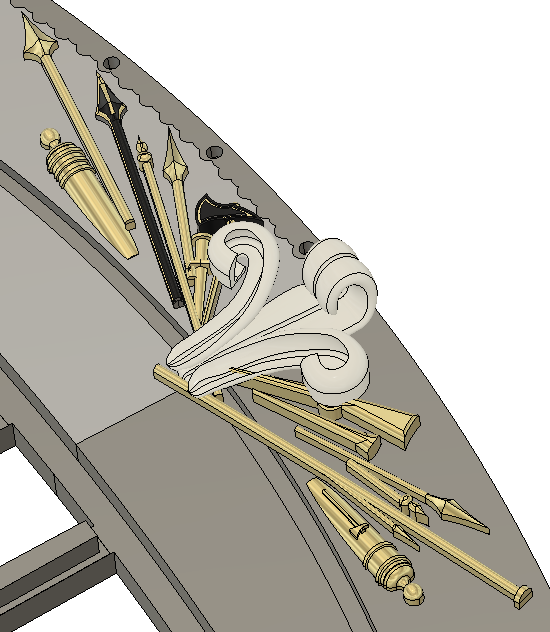
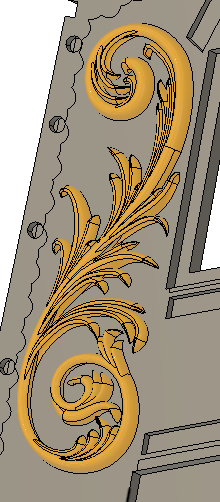
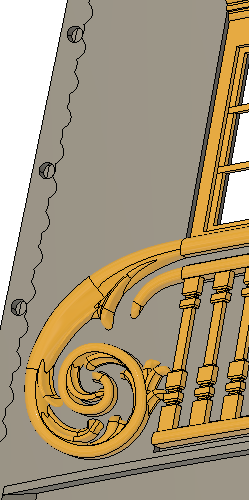
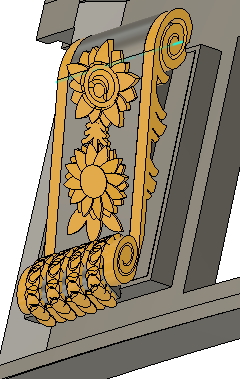
Quite heavy going lately. Modelling the feathers so they look more or less like fleur-de-lys, rather than like a pair of ram's horn with a blob in the middle, has been testing but I think I've finally got close enough this evening. Still needs some finishing at the tips but had enough for tonight! This may be a part that requires a little post-printing hand work, to scratch some 'feathery' lines as I haven't been able to find a good way of doing this programmatically. I've already decided, for now at least, that I'm going to gold paint all of the arms, apart from the feathers and flags. Otherwise they just won't show up, besides which there is precious little gilt-work on Victory. The scrolls and corbels are also done. Sadly a lot of the really, really fine detail doesn't really show when printed as this does push the limits of even resin printing. Next is the flags, which I know will require more learning (as will the figurine). I've been reading on making decals recently and may play around with that rather than paint the flags, see if it's possible to get them to mould to the flags 'casting'. The same applies to the admirals entrance, when I return to this, there's some incredibly fine scroll work there that might benefit from decals if they work. I didn't even know, until a couple of days ago, that you can make them yourself so any experienced hands, comments very welcome.
-
And probably a lock of her hair… in a locket mind, and we’re expecting to be able to see each strand. Go to it, young Bill, inspection in the morning.
-
Lovely stuff. I made the Wasa a few years back, while helping my daughter make the Revell Viking ship for homework (i.e. I made it, she stuck the decals on the shields 🙂 ). Made a dreadful job of the Wasa but it whetted my appetite for modelling proper, and here I am. All of yours look fantastic, the Mayflower in particular looks very elegant with the white hull. Fully succumbed today, bought the Cutty Sark cheap on ebay, which I'll probably do as a hybrid of CS and Thermopylae. And it was the Beagle rather than Bounty I bought earlier this week, though apparently it's just the Bounty in disguise. As that only cost £20 that'll probably be the 'for fun' project, something to experiment and learn on without worrying too much about the end result.
-
Compliments to Mrs Bill, that's some very fine needlework. And I meant 'furled' of course, not 'curled'. Blasted spell-checkers.
-
Looks entirely logical, with my engineering hat on my head. Both of those models look very nicely done. The sails on the CS look great, are they self made or from the kit? I’m planned on mine being curled, but that’s way down the line. I have a tutorial somewhere by Maurice Wilcox (AKA Blue Ensign), which I think he included in his log for his very beautiful HMS Pegasus, using tissue for that look. I half-succumbed and bought a Revell 1/96 Bounty yesterday - it was going ridiculously cheap and even comes with a laser cut deck.
-
Somewhere on this site, in the last 2 or 3 months, there was a thread (no pun intended) on rigging and the use of various media to glue coils, end etc. (I really must start bookmarking these things). Anyway, I think one of the advantages of using a matt nail varnish sealer/topcoat (rather than for instance CA) to hold a rope shape was that it looked more natural, was more or less invisible. So, if it was me, I'd try printing up a little former to get the shape I want, see if a wet rope will dry to shape wrapped around this and then try the nail varnish thing. Something like this below. Your ship looks stunning. I'm resisting for now, I know I'd get just as sidetracked doing a Thermopylae (love that green hull), but it's something to look forward to.

-
The constitution is on my list, along with the cutty sark/Thermopylae, in fact I came close to buying the latter this week as something easier and quicker to do when I need a break from victory. The constitution seems very hard to get hold of here in the UK and ridiculously expensive for a plastic kit. However, what you’re suggesting sounds like a decent plan. Personally I’ll probably take liberties when I come to this stage, as I’m going for appearance over accuracy. It’s weird, isn’t it, that Heller took the trouble to make what is generally seen as the finest plastic large scale age of sail model, but did such a shocker of a job on the instructions. And no-one would bother writing a step by step guide for re-sale now, as they’d be pirated within days.
