


Keith S
-
Posts
339 -
Joined
-
Last visited
Content Type
Profiles
Forums
Gallery
Events
Posts posted by Keith S
-
-
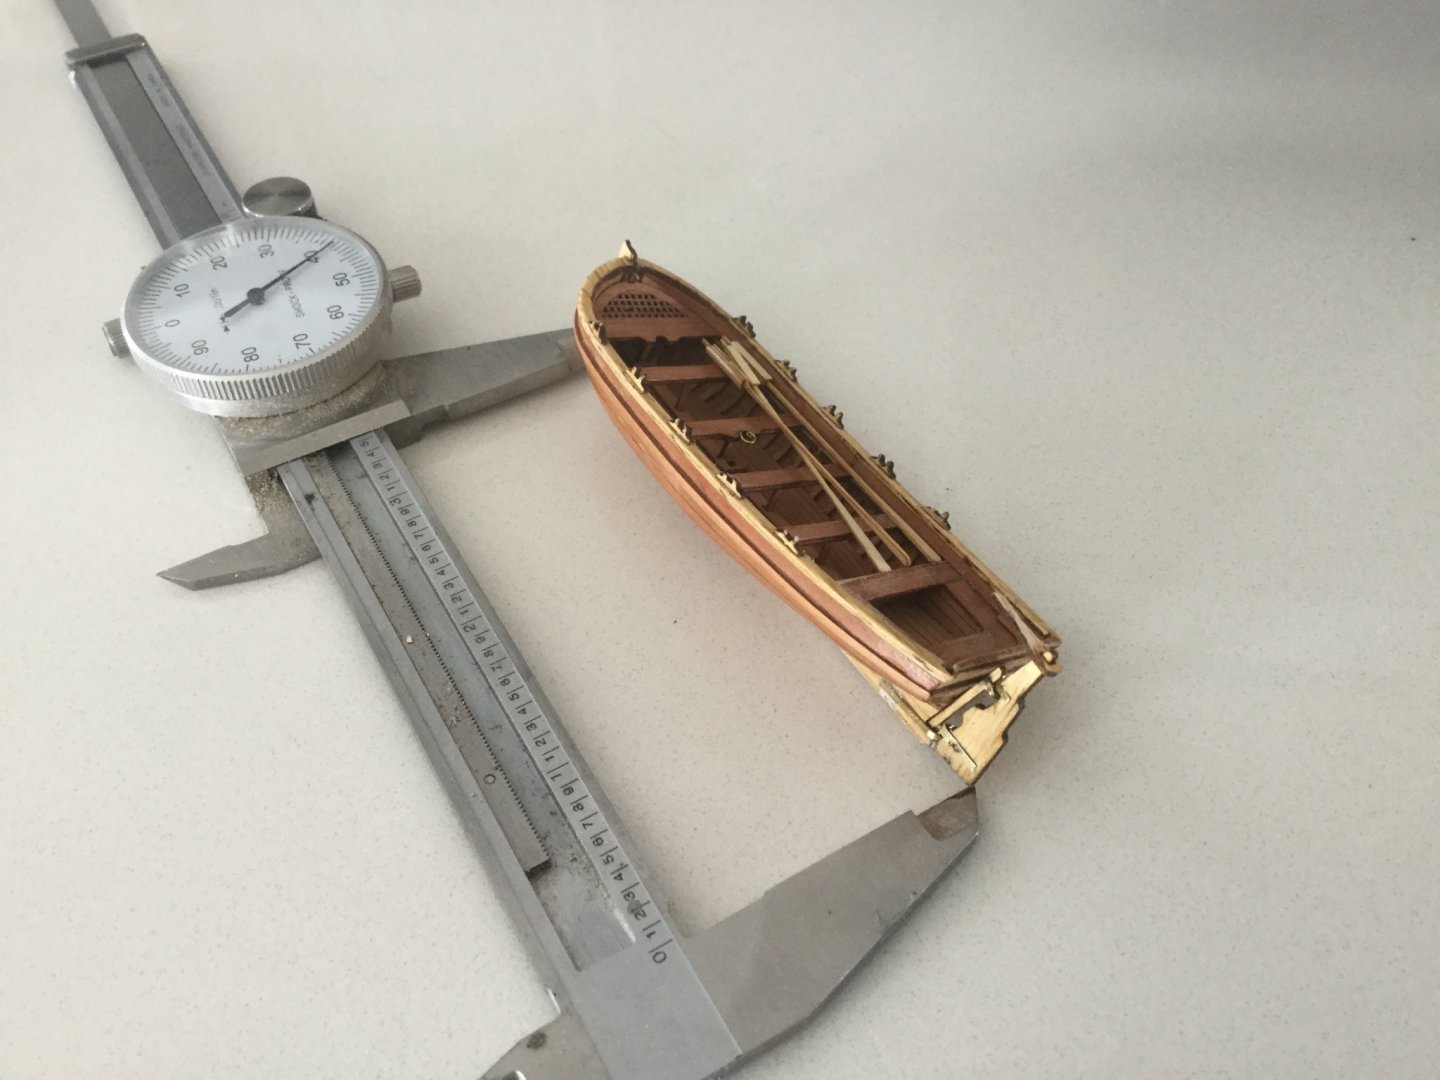
I'm looking forward to seeing this go together. I built the little three-inch "ship's boat" and I was absolutely astonished at the level of detail in the model. I thoroughly enjoyed building it. It really is one of the coolest kits I've ever seen. I'd like to build another one and scratch-build a sailing rig for it, to display alongside my ship.
- GrandpaPhil, yvesvidal, Moab and 2 others
-
 5
5
-
5 hours ago, clearway said:
yep i read through his blog and found that - i would love to see details of davits and chainplates though.
Keith
I have the impression he intends to fully rig the model eventually. He stopped building it because the Canadian Museum borrowed it to display around the world in their "Death in the Ice" exhibit. I actually feel pretty silly with respect to that exhibit. I was in Greenwich when it was there; but at the time my reaction was "meh, I can see that stuff any time" (I'm from the Northwest Territory). Little did I know I'd be building a model of one of the ships eventually!
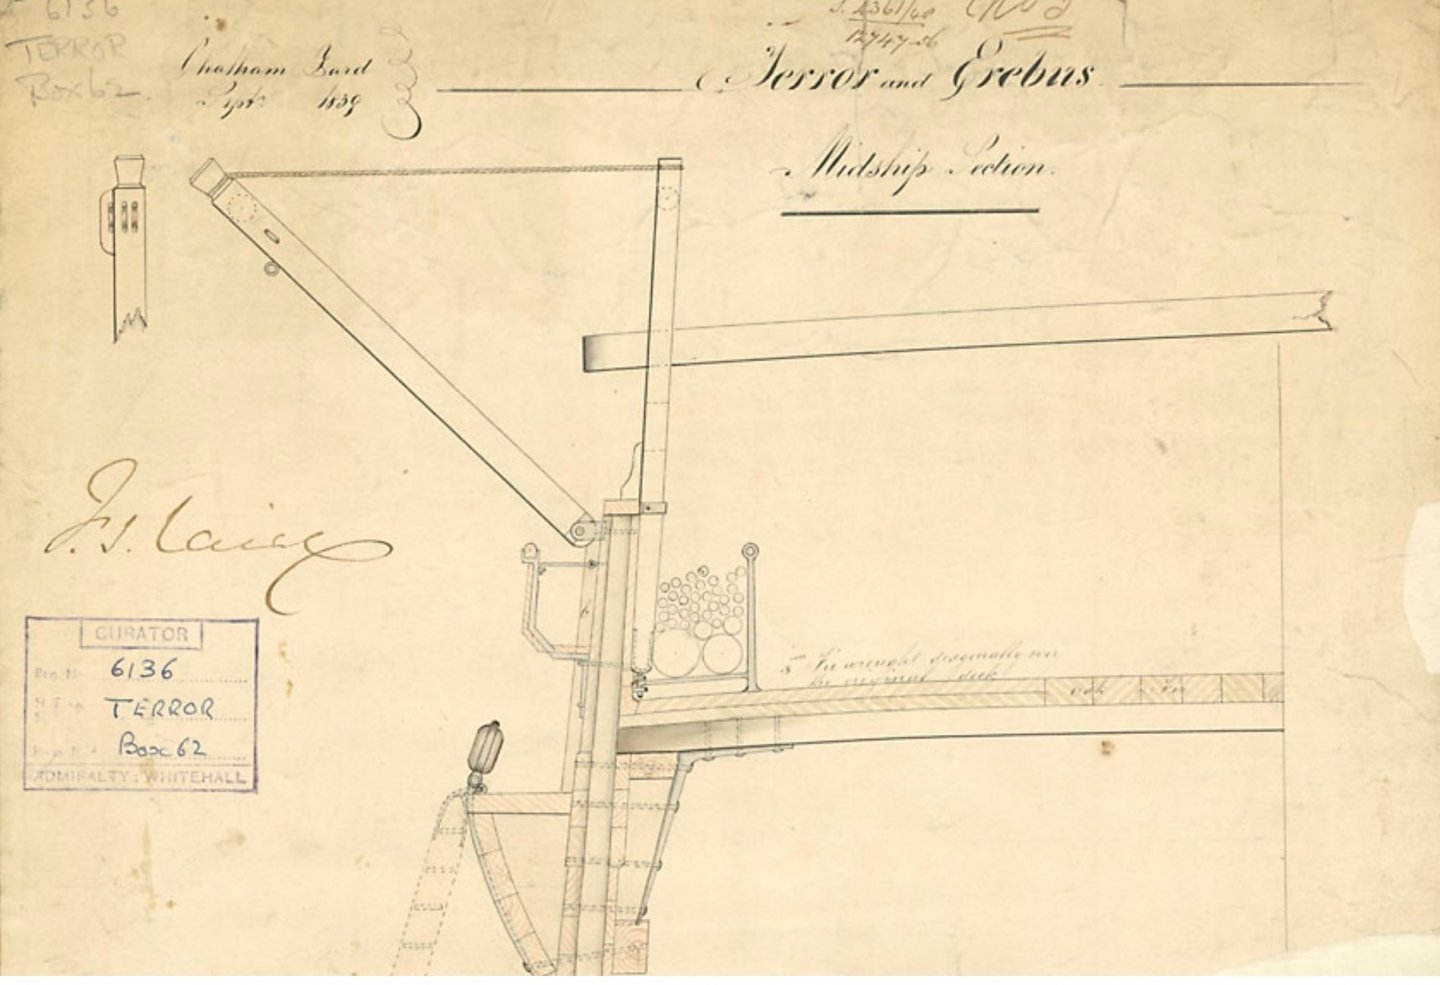
With respect to davits, my print from the Museum of Terror's side profile seems to indicate the midships davits were actually mounted OUTSIDE the bulwark, with the rest being inside. Also, I don't know if you've seen this, also (nicked) from the NMG: (if you look carefully, the deadeyes seem to be attached to iron chainplates, which is why I chose the ones I used on my model). Maybe this picture will give you a clue about the davits, too. Seems also to be some detail of the mysterious "ice plank" on there, although not a satisfying amount of information.
Also there's some weird little stanchion there that is inexplicably attached to the bottom of the davit's vertical part. And I don't know what those circles are, but on plan views of the ship they seem to store barrels in there. I'll be happy to give you whatever details I manage to glean from my print.
-
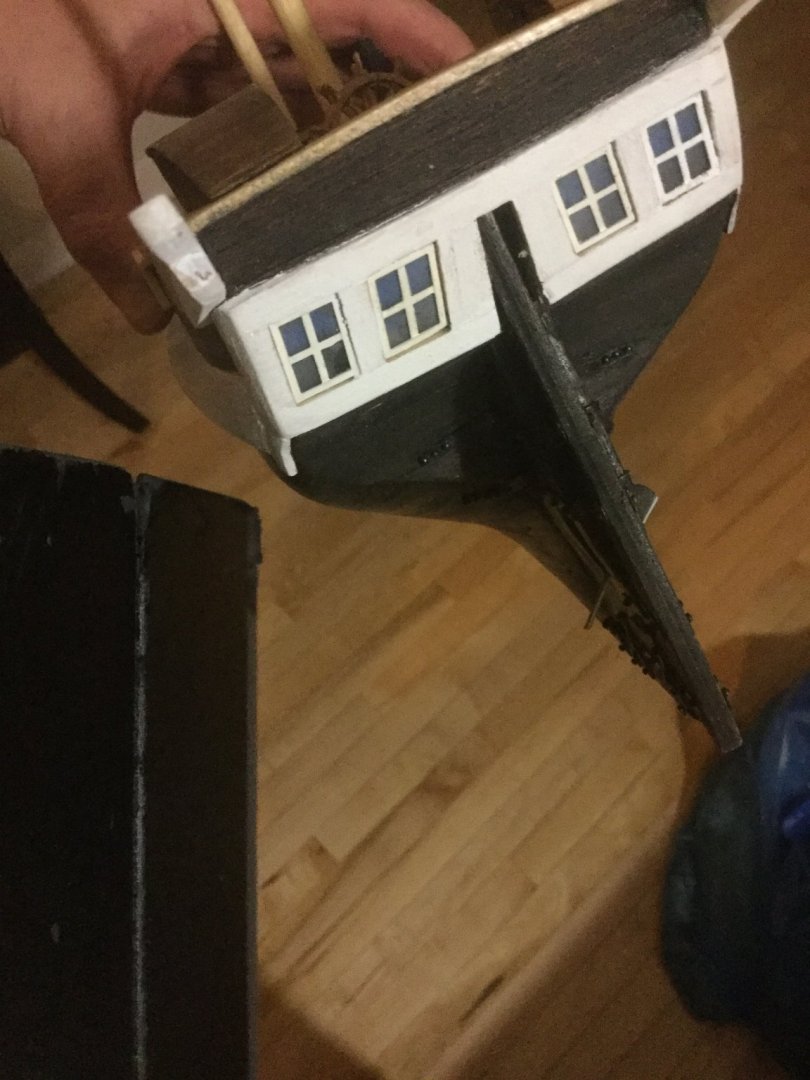
Yes I noticed the difference in the stern too. On the real ship, the whole propeller "trunk" was formed by extending the hull planking past the original stern-post. I would like to have modified my kit to include that detail, but since it's my first model, it seemed like a lot of risky work that I had to balance against the potential of ruining it. I'm more confident now- I wish I could start over in some respects. I also wanted to do more realistic planking, but where it would have been most evident- the "drop" planks in the bow- would be covered in metal armour anyway.
I'm not too worried about the belaying-pins, I think if I do a good job on the rigging it will end up being one of those details that ends up rather buried by everything else around it.
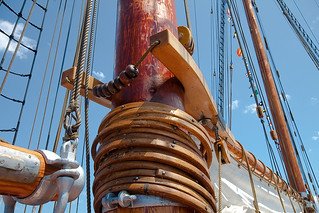
I am planning on metal bands on the mast, I already intercepted that error when I was looking at another build-log here. The builder mentioned that iron bands were the norm after 1820 or so, which if you consider the amount of iron on Terror, it is virtually certain that she was fitted with iron wherever possible, despite her age. I'm thinking of using card for this, the way you have on your yards on Victory.
I am grateful that a kit manufacturer took on one of the Franklin expedition ships, but at this stage I find that the Occre one is basically raw material for a great deal of research and scratch-building when it comes to individual components. There's no doubt that if one built the kit exactly to plans it would be a reasonable model of a bomb-ship in Arctic service, but now that we have the real ship, in excellent condition, sitting in clear, shallow water waiting to be explored, less than 1000 kilometres from my house (!) I feel a compulsion to do the best I can to honour her, as well as being able to look at my model as I follow the researchers vicariously as they explore and photograph her. I hope someday they publish a book or something. I' worried all the dive-footage will be squirrelled away for the boffins and not much will be revealed to us mortals.
I've come to trust Mr. Betts' research completely. There are some things in his reproductions of the draughts that he admits are speculative, which are then revealed to be bang-on when that area of the ship is photographed on the wreck. The little stern lockers, for instance. They are very vaguely described, even in the shipyard drawings, and were moved about a bit when the propeller-well was installed. Yet there is a photograph from the wreck that shows one of them exactly the way Mr. Betts drew them.
-
I'm glad you've made a start on this model; I'm excited to see what you do with her after reading your Victory build log. I was interested to see both models are in the same scale, especially the picture of you holding the model between your knees really shows what small ships the bomb vessels were, and how enormous the line-of-battle ships were. The Terror is about the size of a loaf of bread, while you could almost go for a ride on a pond in your Victory in the same scale.
There is a lot of extra work to do if you wish to make your Terror more historically accurate; she was a highly specialized ship by the end, but all the information you need is online, in Matthew Betts' excellent blog, and the Navy draughts available from NMG.
In my opinion, the features of the OCCRE kit that are most wanting of improvement are the windlass, capstan, and the lack of the little deckhouses astern. The general layout of the deck furniture is accurate enough, with the exception of pin-rails, but the correct location of these is visible in the Navy draughts. I also wish that I had discarded the belaying-pins from the kit and ordered smaller ones, but it's really too late for me to do that now without pulling apart my model. Who knows, maybe I'll be thanking myself when it's time to actually use them with all those little knots and rope-coils.
I have been watching your Victory masting and rigging carefully because I am quickly approaching the point on my model when I will be having to make some decisions about Terror and how she is to be rigged. I believe I'm going to mostly ignore the kit instructions and instead use the book you recommended as well as some common-sense from sailing!
-
Haha happy to be of service, Keith. Victory is a massive job; if I was working on a ship of her magnitude I'd probably drive myself mad. Though I must admit it would be nice to be building a model of a ship one can actually visit! It simultaneously excites and frustrates me that in one of these years soon there will be men prowling the corridors of Terror, but I will not be one of them. Parks Canada hasn't released much of their footage either. Just little snippets.
-
I was admiring the little coconuts you made, and I think as long as you are working on this model again, you should make one little potted breadfruit plant to go in there as well. It would be a cheeky little detail that you could laugh about later.
-
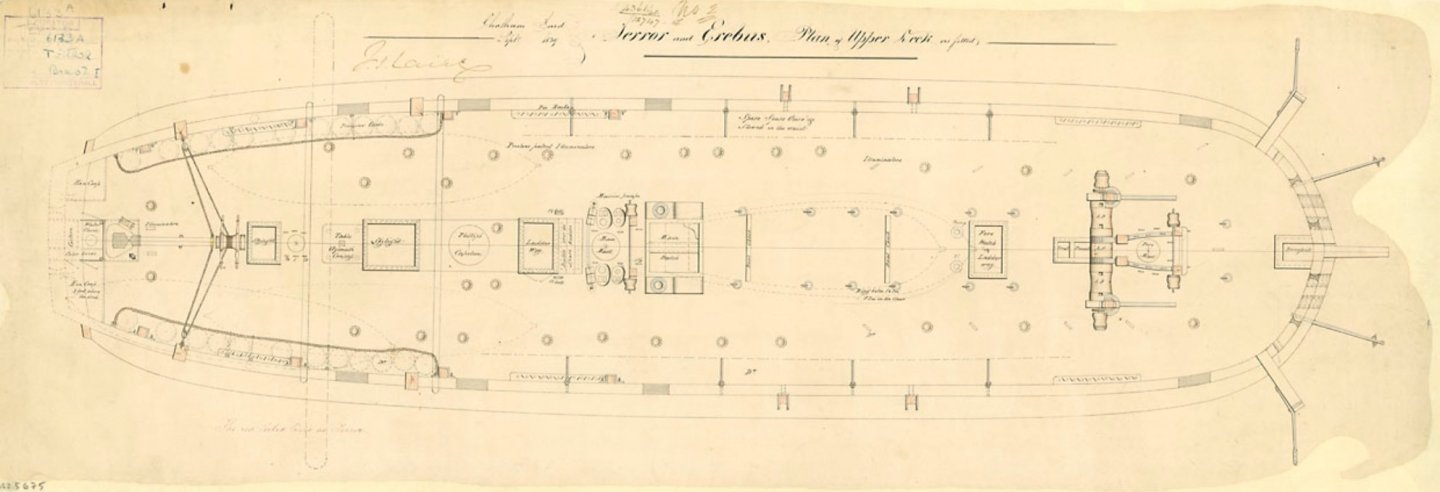
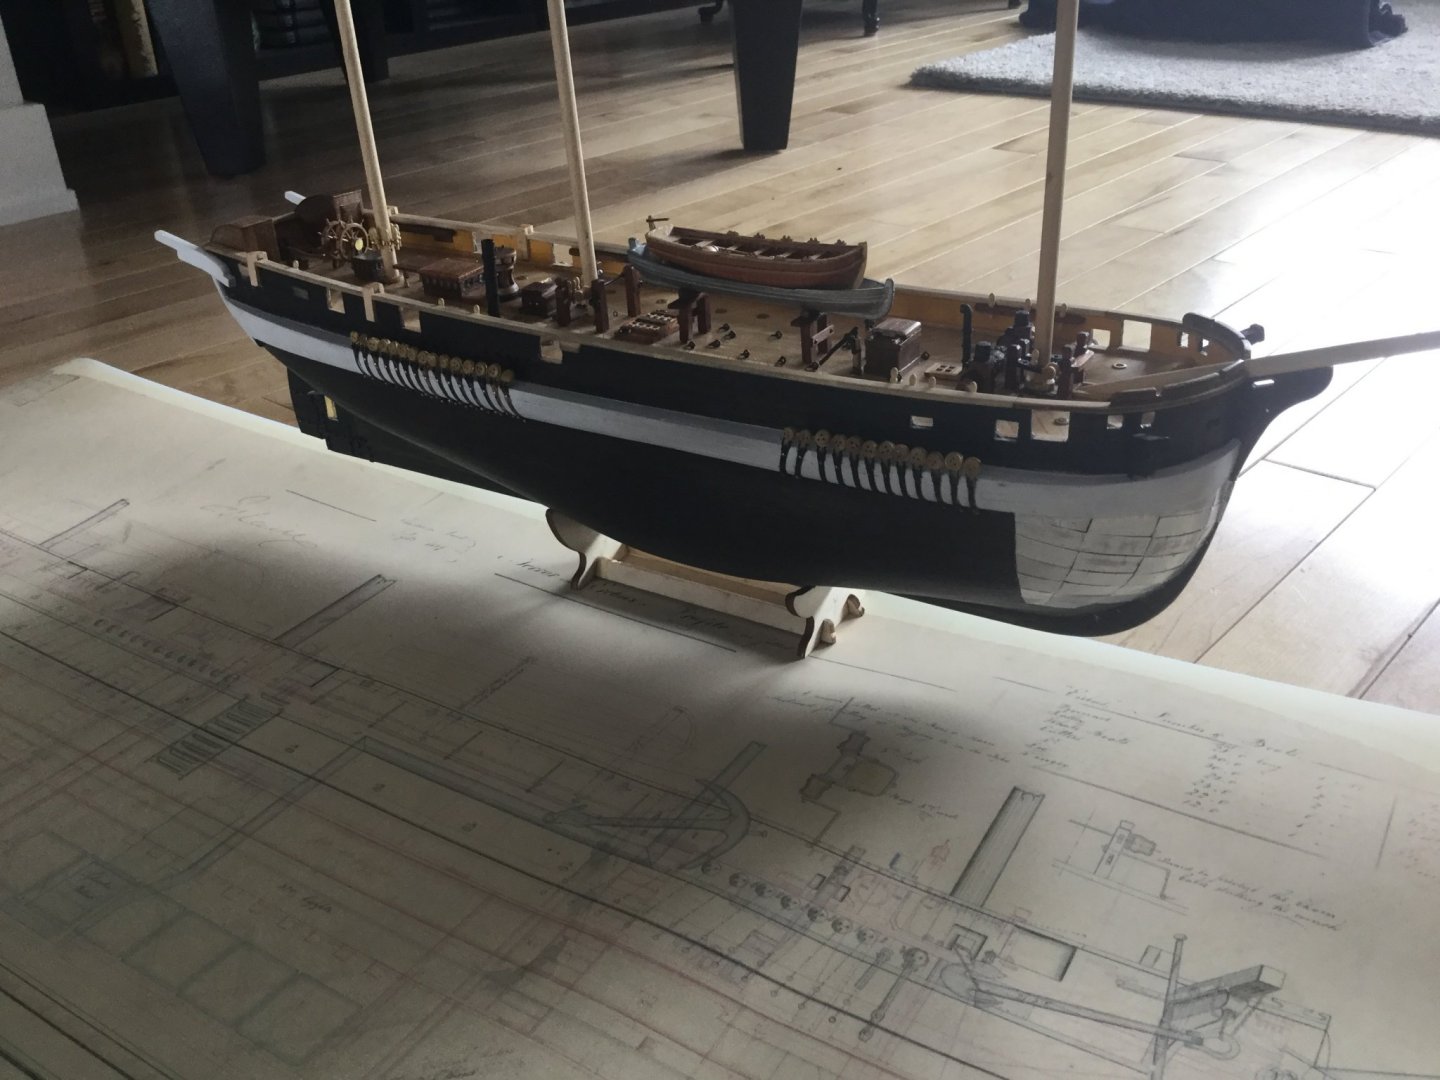
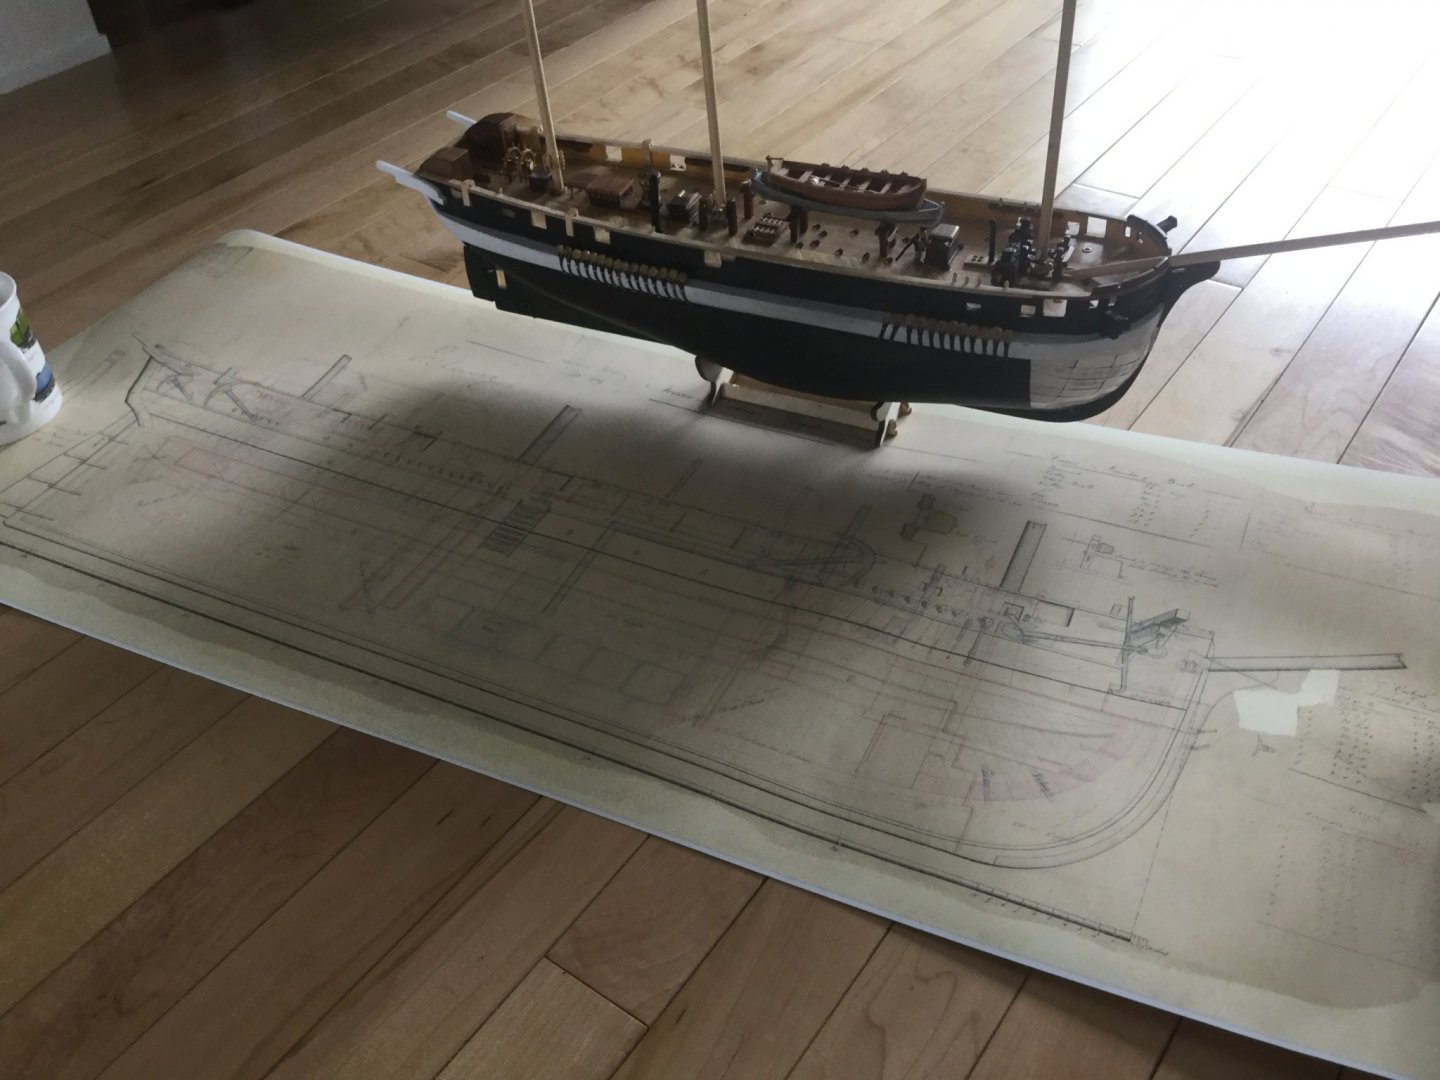
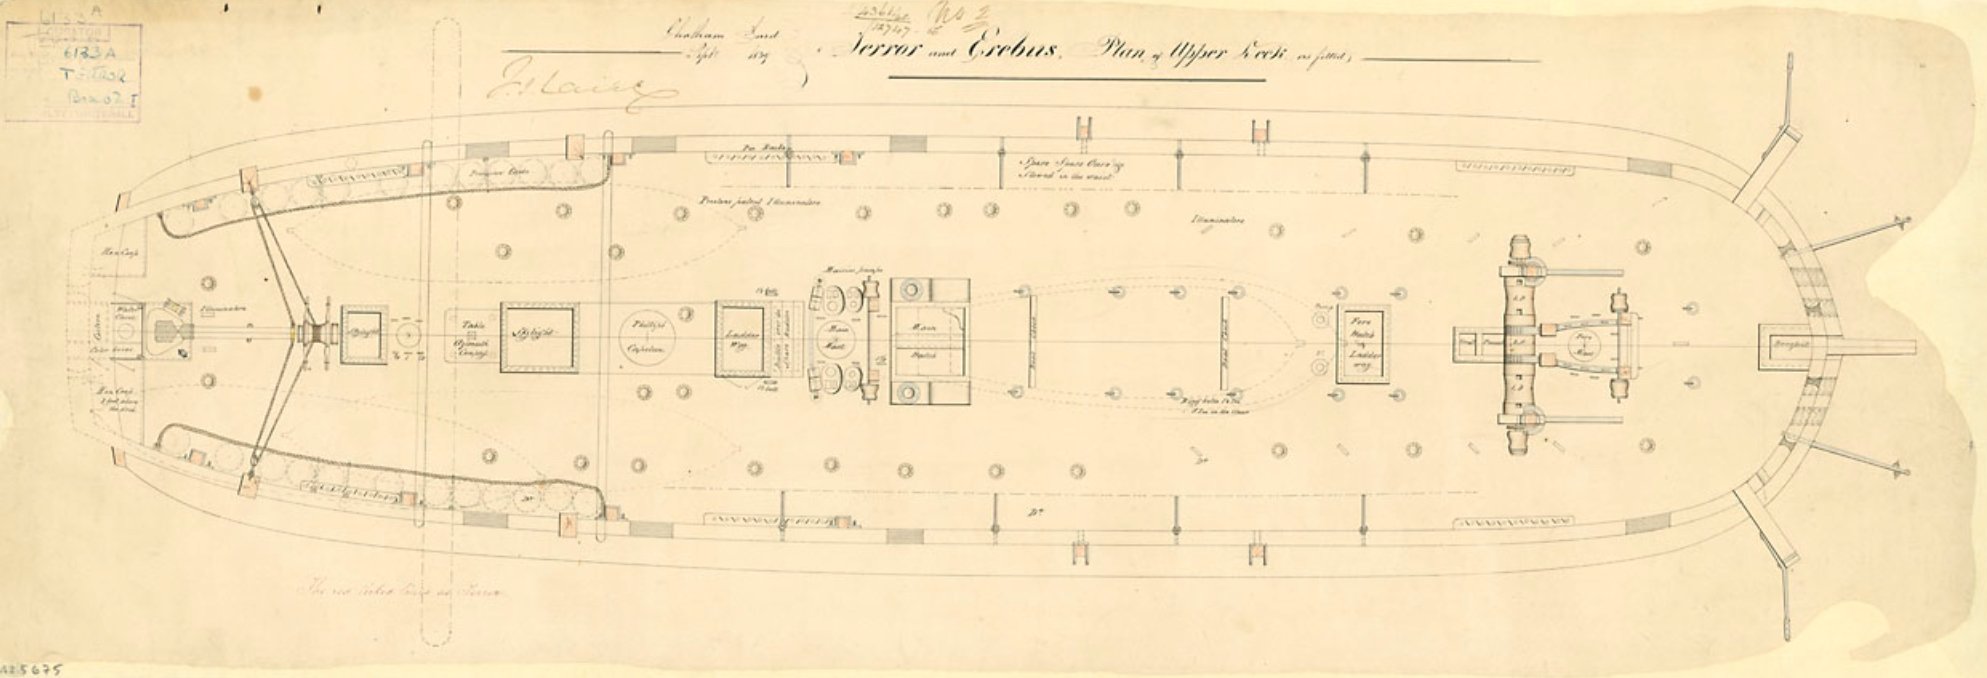
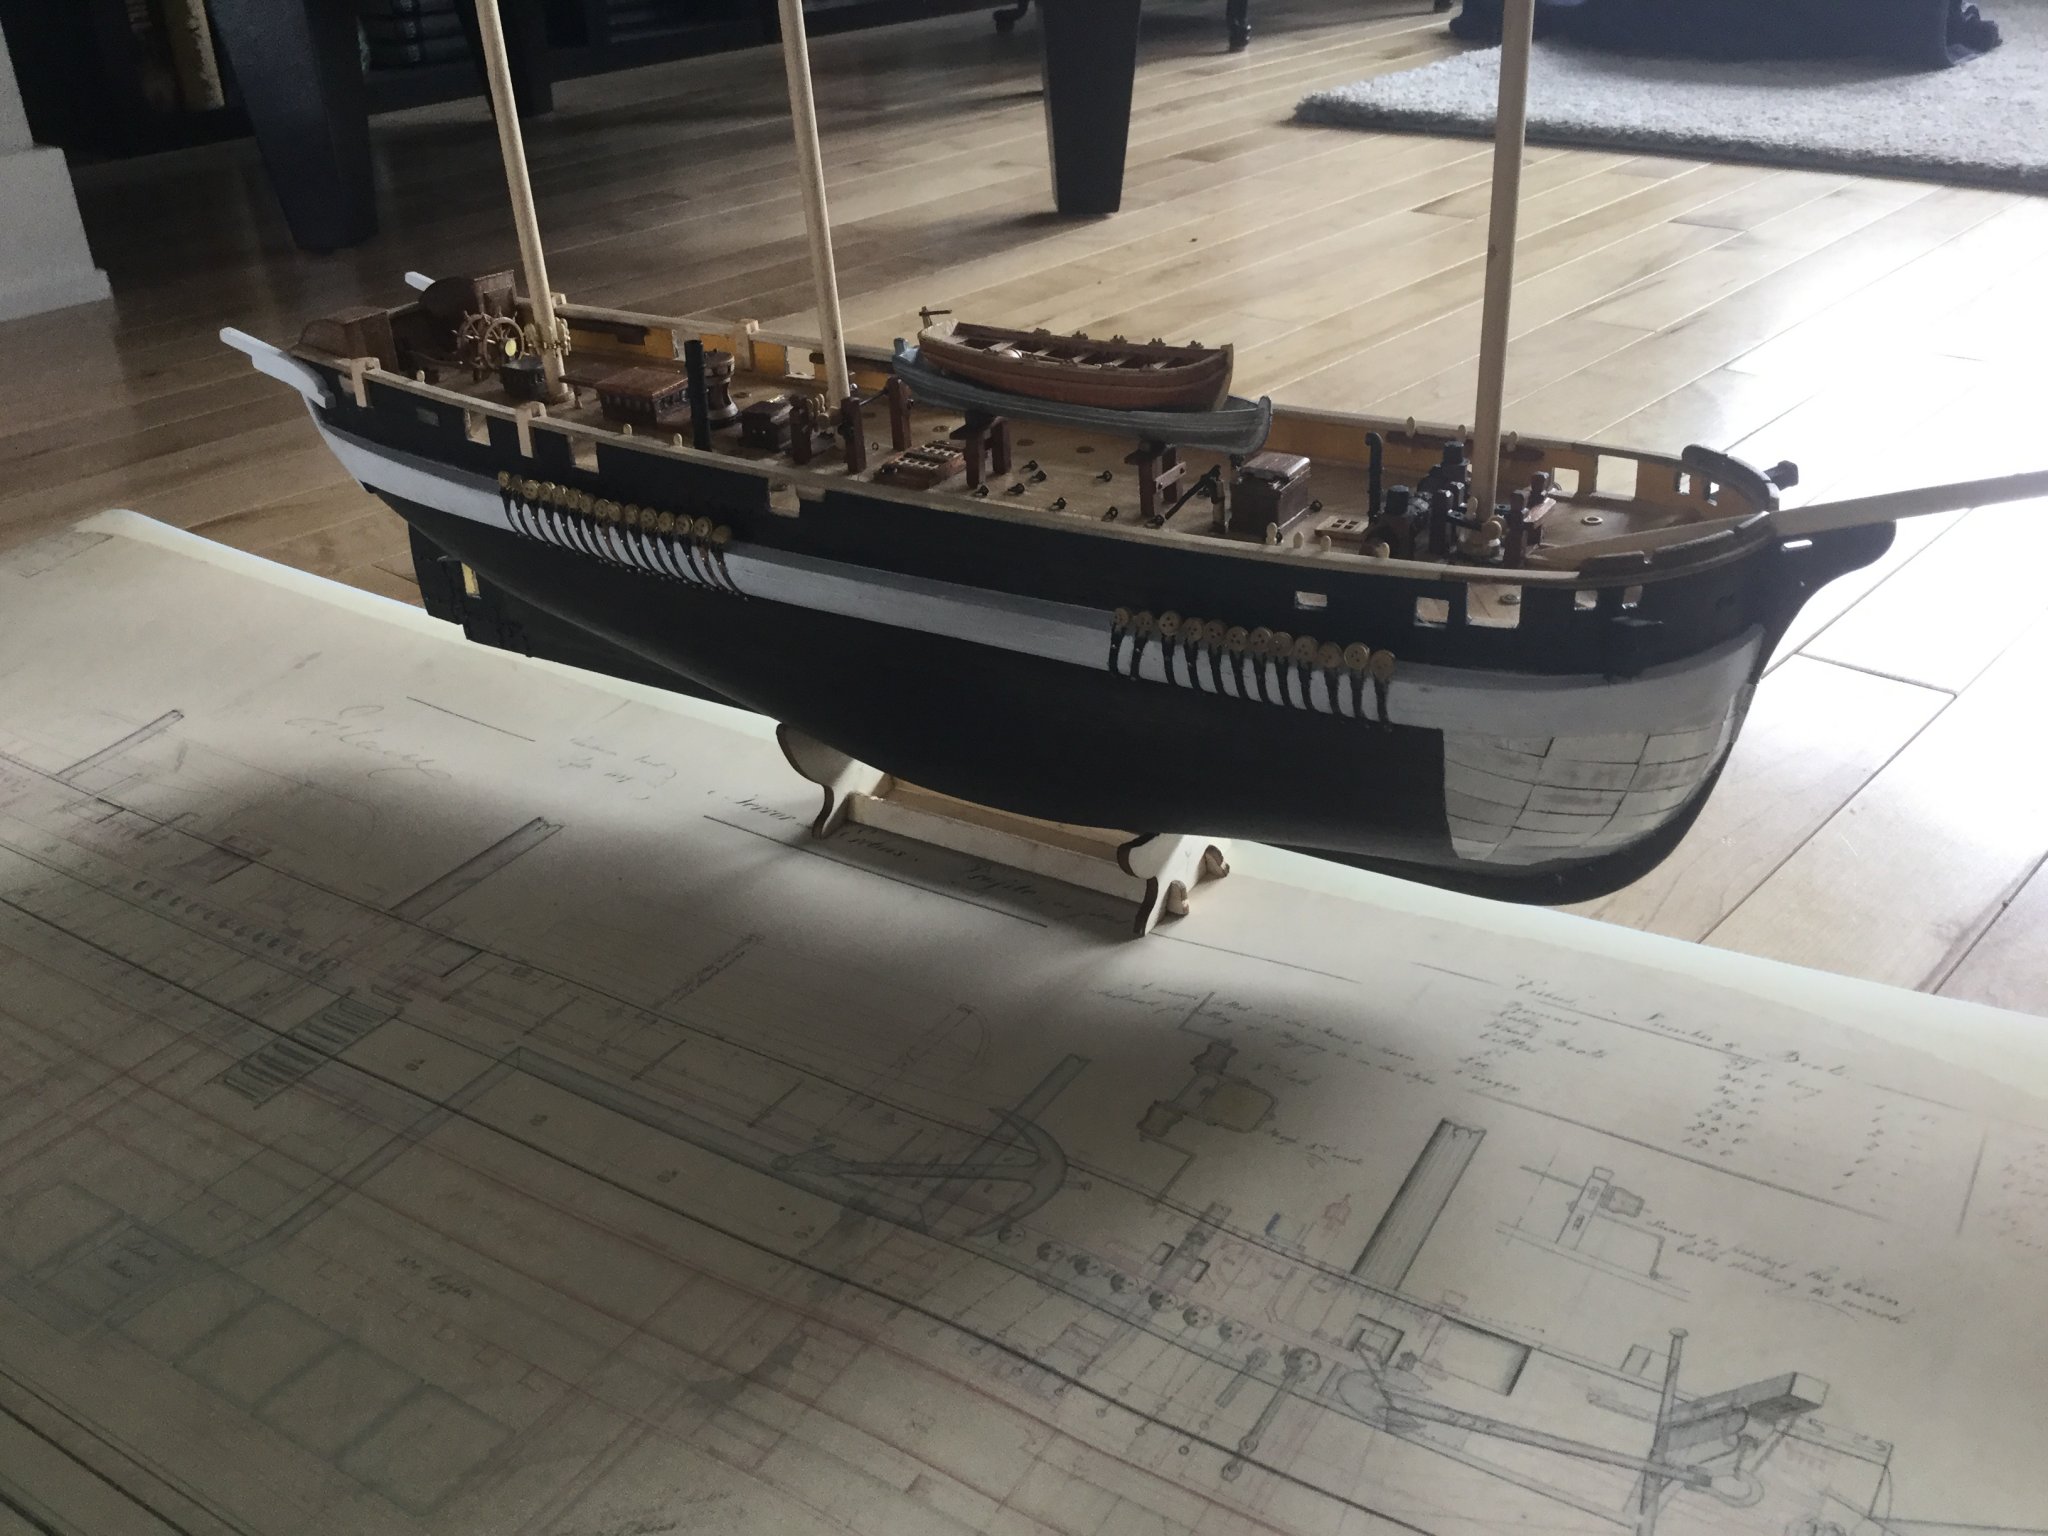
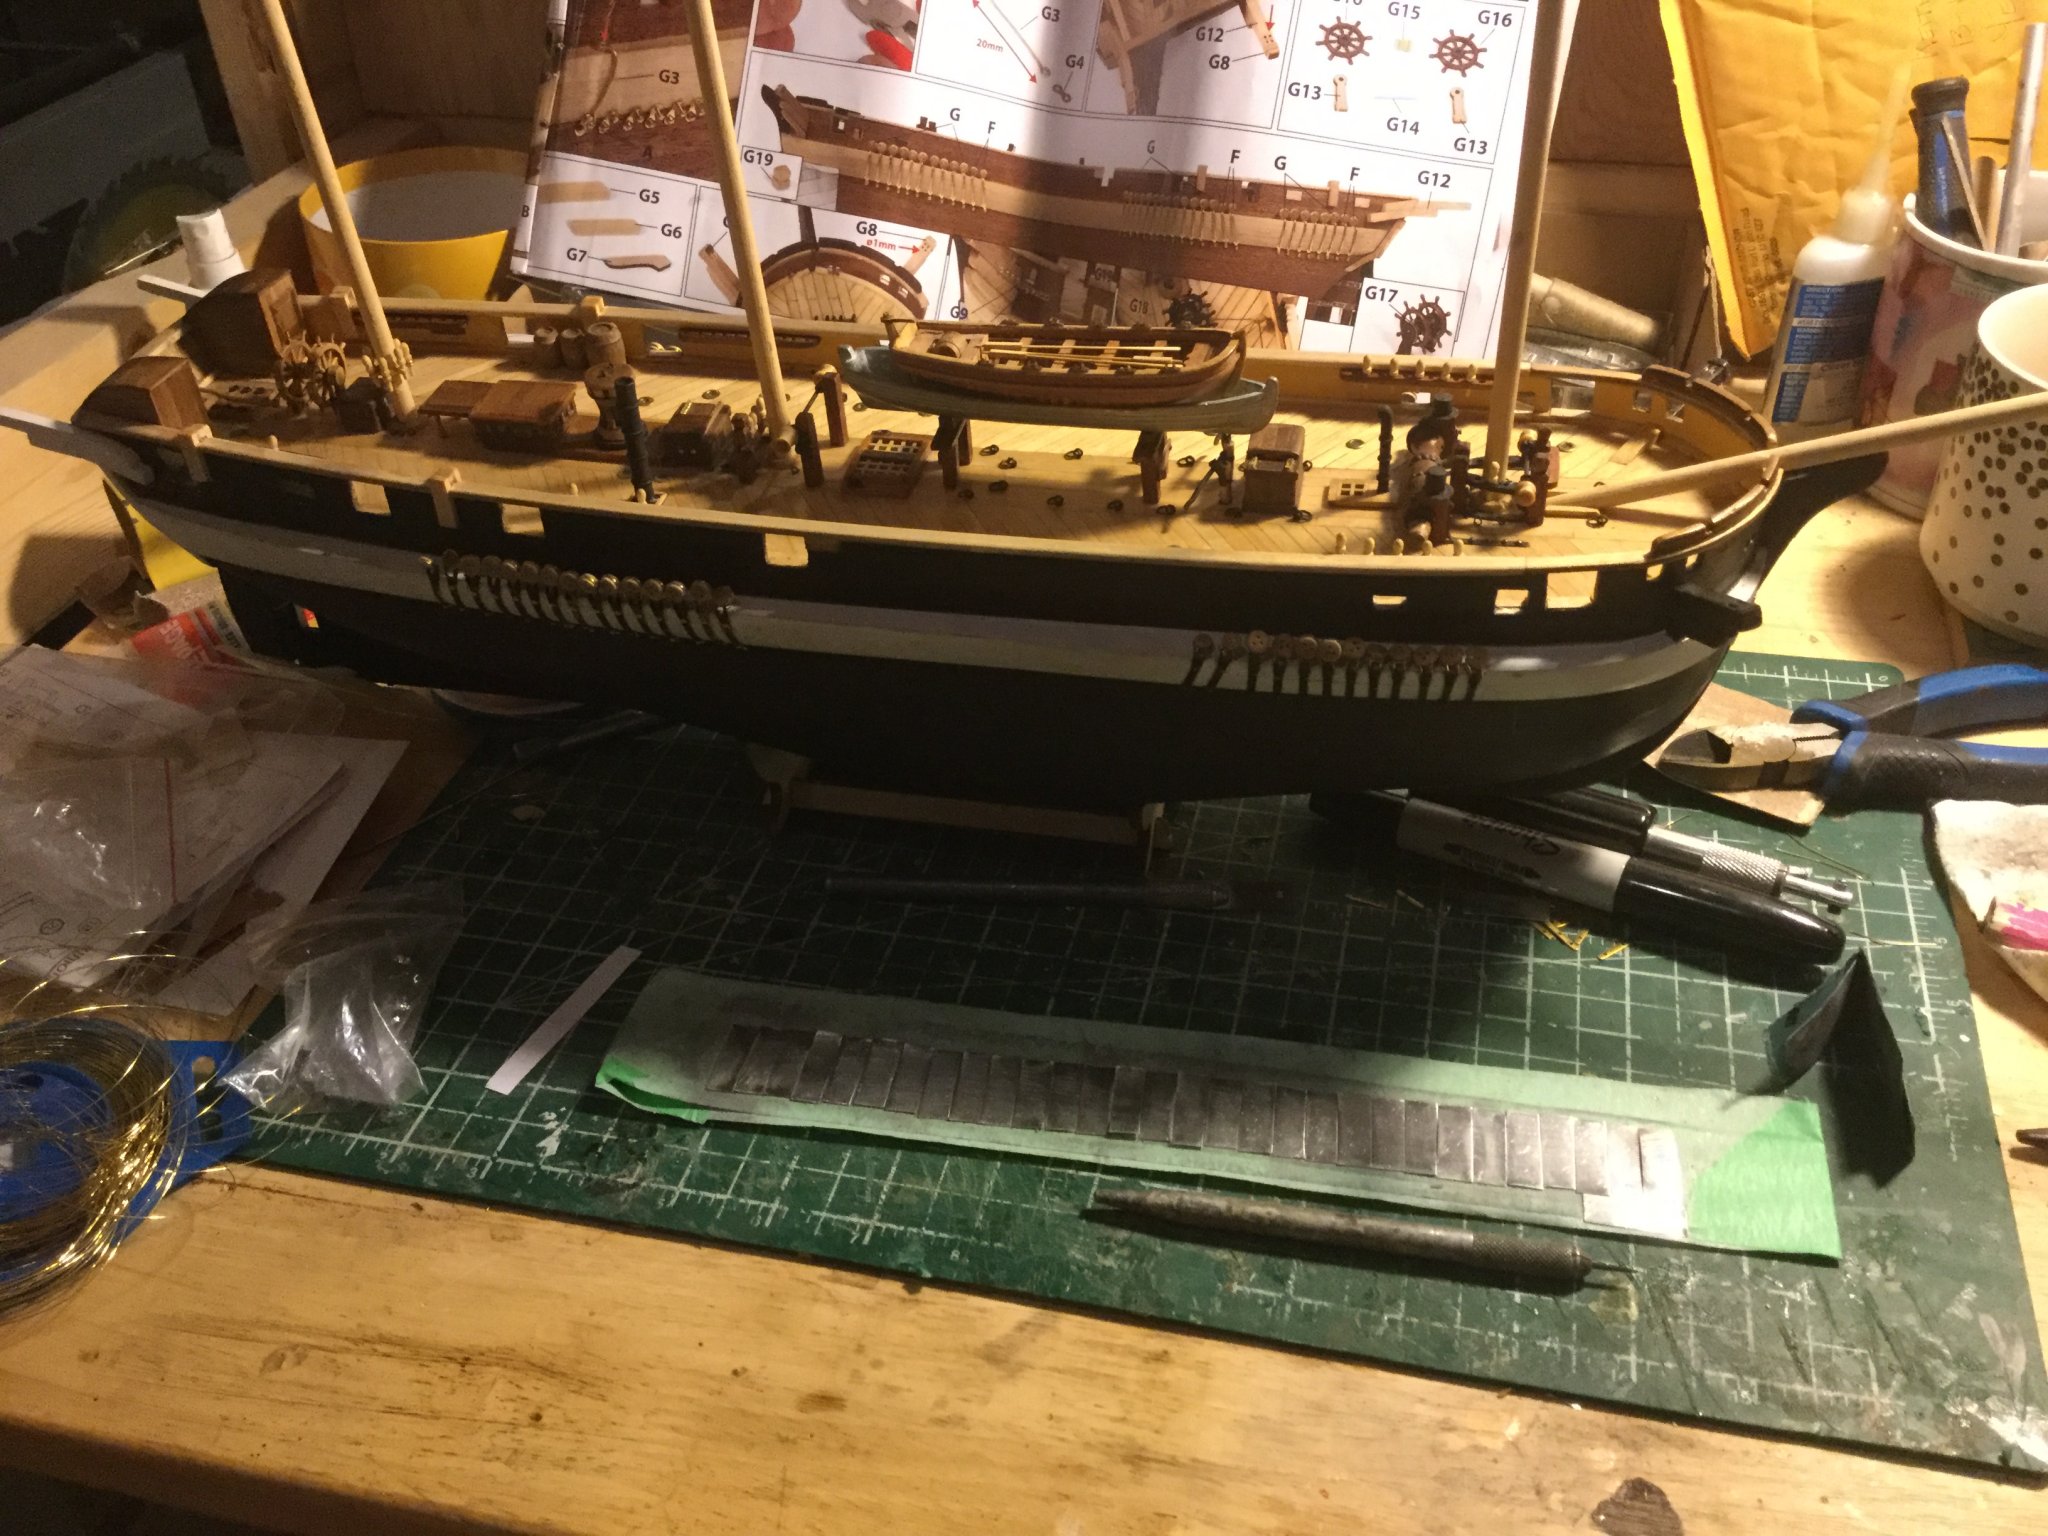
Lockdown excitement! I ordered a copy of this Admiralty draught for the Terror from the Greenwich museum, and they arrived today. What an excellent service from National Museum-Greenwich; it's on lovely card-like paper and the writing is all legible. I'm very excited because this will help me understand what all that stuff on the deck does- I've already learned a few things that will help the model. There's even some rigging information even though the rig isn't depicted, such as a pair of little winches hidden up at the fore- and main-mast heads, and the locations of sheaves in the bulwarks for vangs, &c.
Well, it's the most exciting thing to happen all week. The armour plating on the bow is coming along. I think it will turn out OK but I am not really having fun at it. Almost done the starboard side so of course I'm already starting to worry about making sure the port side is identical, even though I've been making it up as I go along. Will of course be painted when complete.This draught shows her in her engineless, Antarctic configuration, but other than the chimney and propeller-aperture, which I've already built anyway, there is little outward change in her appearance as fitted for the Arctic expedition.
- Keith Black, Jeff-E, GrandpaPhil and 3 others
-
6
-
On 5/5/2020 at 2:53 AM, clearway said:
Hi keith- i have this one in my to do stash and after a quick check to make sure the contents were o.k. before storage came up with the same thoughts regarding accuracy as you- well done on taking her to the next level🧐.
I would leave the ships boat in the natural wood finish and just varnish it- looks toooooo nice to spoil by painting.
Have you read "Erebus" by Michael Palin- jeez them guys had a set!!!!!
also advise James Lees "masting and rigging of english ships of war" when it comes to building the masts and yards.
Keep up the excellent work.
Keith
Yes I have Michael Palin's book. I was amazed to read about the Erebus and Terror's other exploits. It's astonishing the way they threw these tubby little ships around and the sailing exploits they had. I have ordered a copy of the book you recommended. It will comfort me to be able to do research on the way things were done in real life.I tend to get all tied up in knots over historical details.
The bow armour is a thankless task. The kit diagrams and even Occre's videos online do not provide enough information. I've got about a third of it done, but I am not enjoying it!
-
The reason I haven't posted lately is that I've been working on chainplates and the armour plates for the bow of my model. There isn't much to report because both jobs are tedious and repetitive compared to the "fun" parts of crafting details for the deck.

-
On 3/2/2020 at 6:16 AM, Wahka_est said:
Hi so the right location would be the blue line?
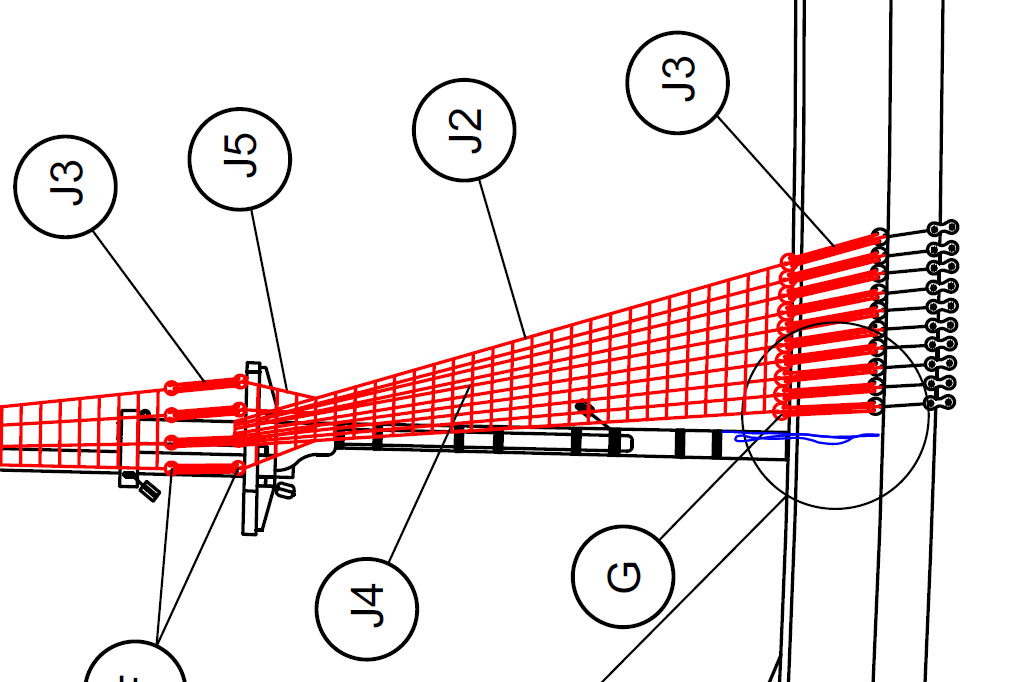
Hi, here is a picture of the Navy draught of the "Terror" showing chain and deadeye locations. I located my chainplates according to this diagram. The deadeyes in the kit are a bit larger than scale, so it was difficult to get them to fit exactly. As a result the rearmost ones on my model are about 5mm further back than scale. I don't feel this is noticeable.
-
I am not certain, but I *THINK* those black beads may be intended to be "parrell beads" on the mizzen yard.
-
Sorry to chime in here as basically a know-nothing about proper planking, but I feel compelled to mention I was doing some research a few months ago on planking and encountered an article which I can't find now. But I recall I was specifically interested in the shape of the garboard plank, and the article I was reading included a few photographs of a real hull under construction. I am not certain, but it may well have been the Endeavour replica. Interestingly, the article showed a picture of the ship's bow as an example of what to avoid, that the garboard strake had not been done optimally and as a result the planks were upswept at the bow to a greater degree than they should, and as a result many more drop strakes were used.
If indeed this was the Endeavour, this may explain why the plans for your model show the strakes meeting the stem at more of a right angle than you see in the replica photographs. Perhaps the replica is actually not entirely accurate.
I hope this isn't heresy. I suppose my point is that you can probably plank your hull however you feel like, because there's a full-sized example of it however it turns out!
-
16 minutes ago, Keith Black said:
That's a quandary to be sure. In some models, because of the lovely wood working techniques involved it would be a bloody shame to paint. Personally I like paint as I think it makes a model look more realistic and paint will hide a multitude of sins which is the case with my build.

This is why I can't make up my mind about it. The little boat is the smallest, most complicated thing I've ever made of wood and I'm astonished it turned out as well as it did. The deckhouses on the stern of the ship are supposed to be white, but after making a pair of white ones my wife and I both agreed they looked wrong in this scale, and they look more realistic in plain wood, even though the colour is NOT realistic.
What I'm seriously considering is painting that strip between the bilge-board and the gunwale and leaving the rest of the hull plain. That way, it will look more realistic AND you'll be able to see the planking.
-
11 minutes ago, Wahka_est said:
Nice progress.
Can you so few close up pictures of deadeyes and chainplates. Im really not happy how mine turned out and i plan to change them.
Hi Wahka, I took a picture and sent you a private message along with a link to the online store where I bought the chainplates.
-
I think commercially available chainplates are an easy way to upgrade this model. Plus, I found it actually less work to use them than it would be to make them the kit way.
I like your rigging so far. It looks like you know what you are doing. I do not know what I am doing, and I fear the rigging.
-
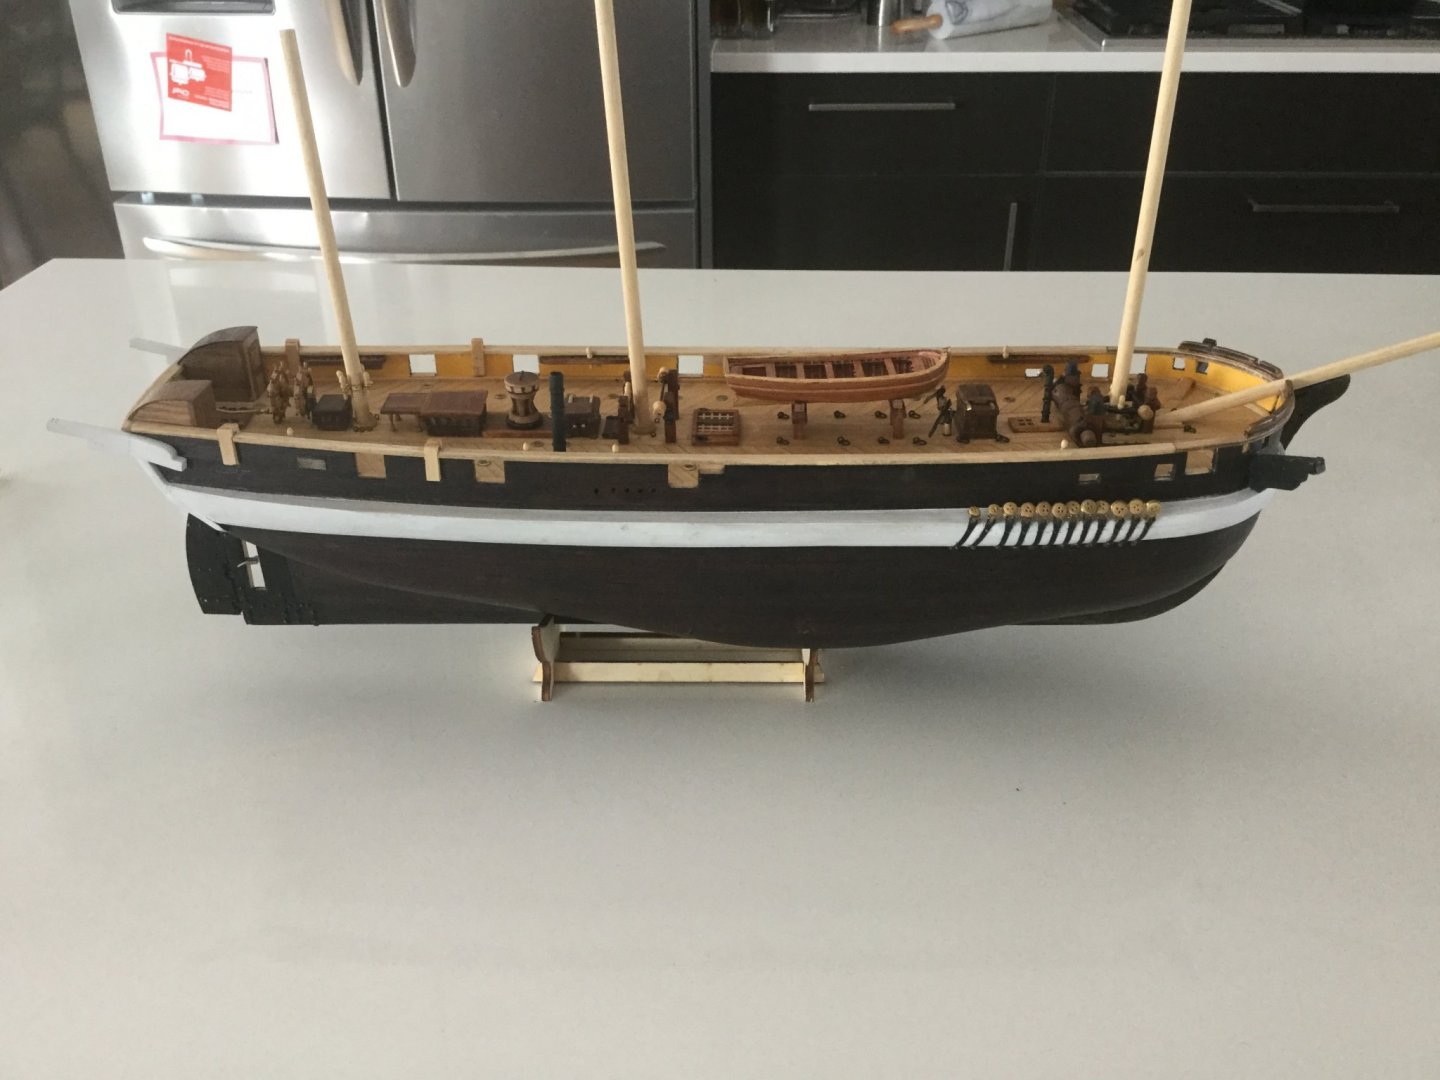
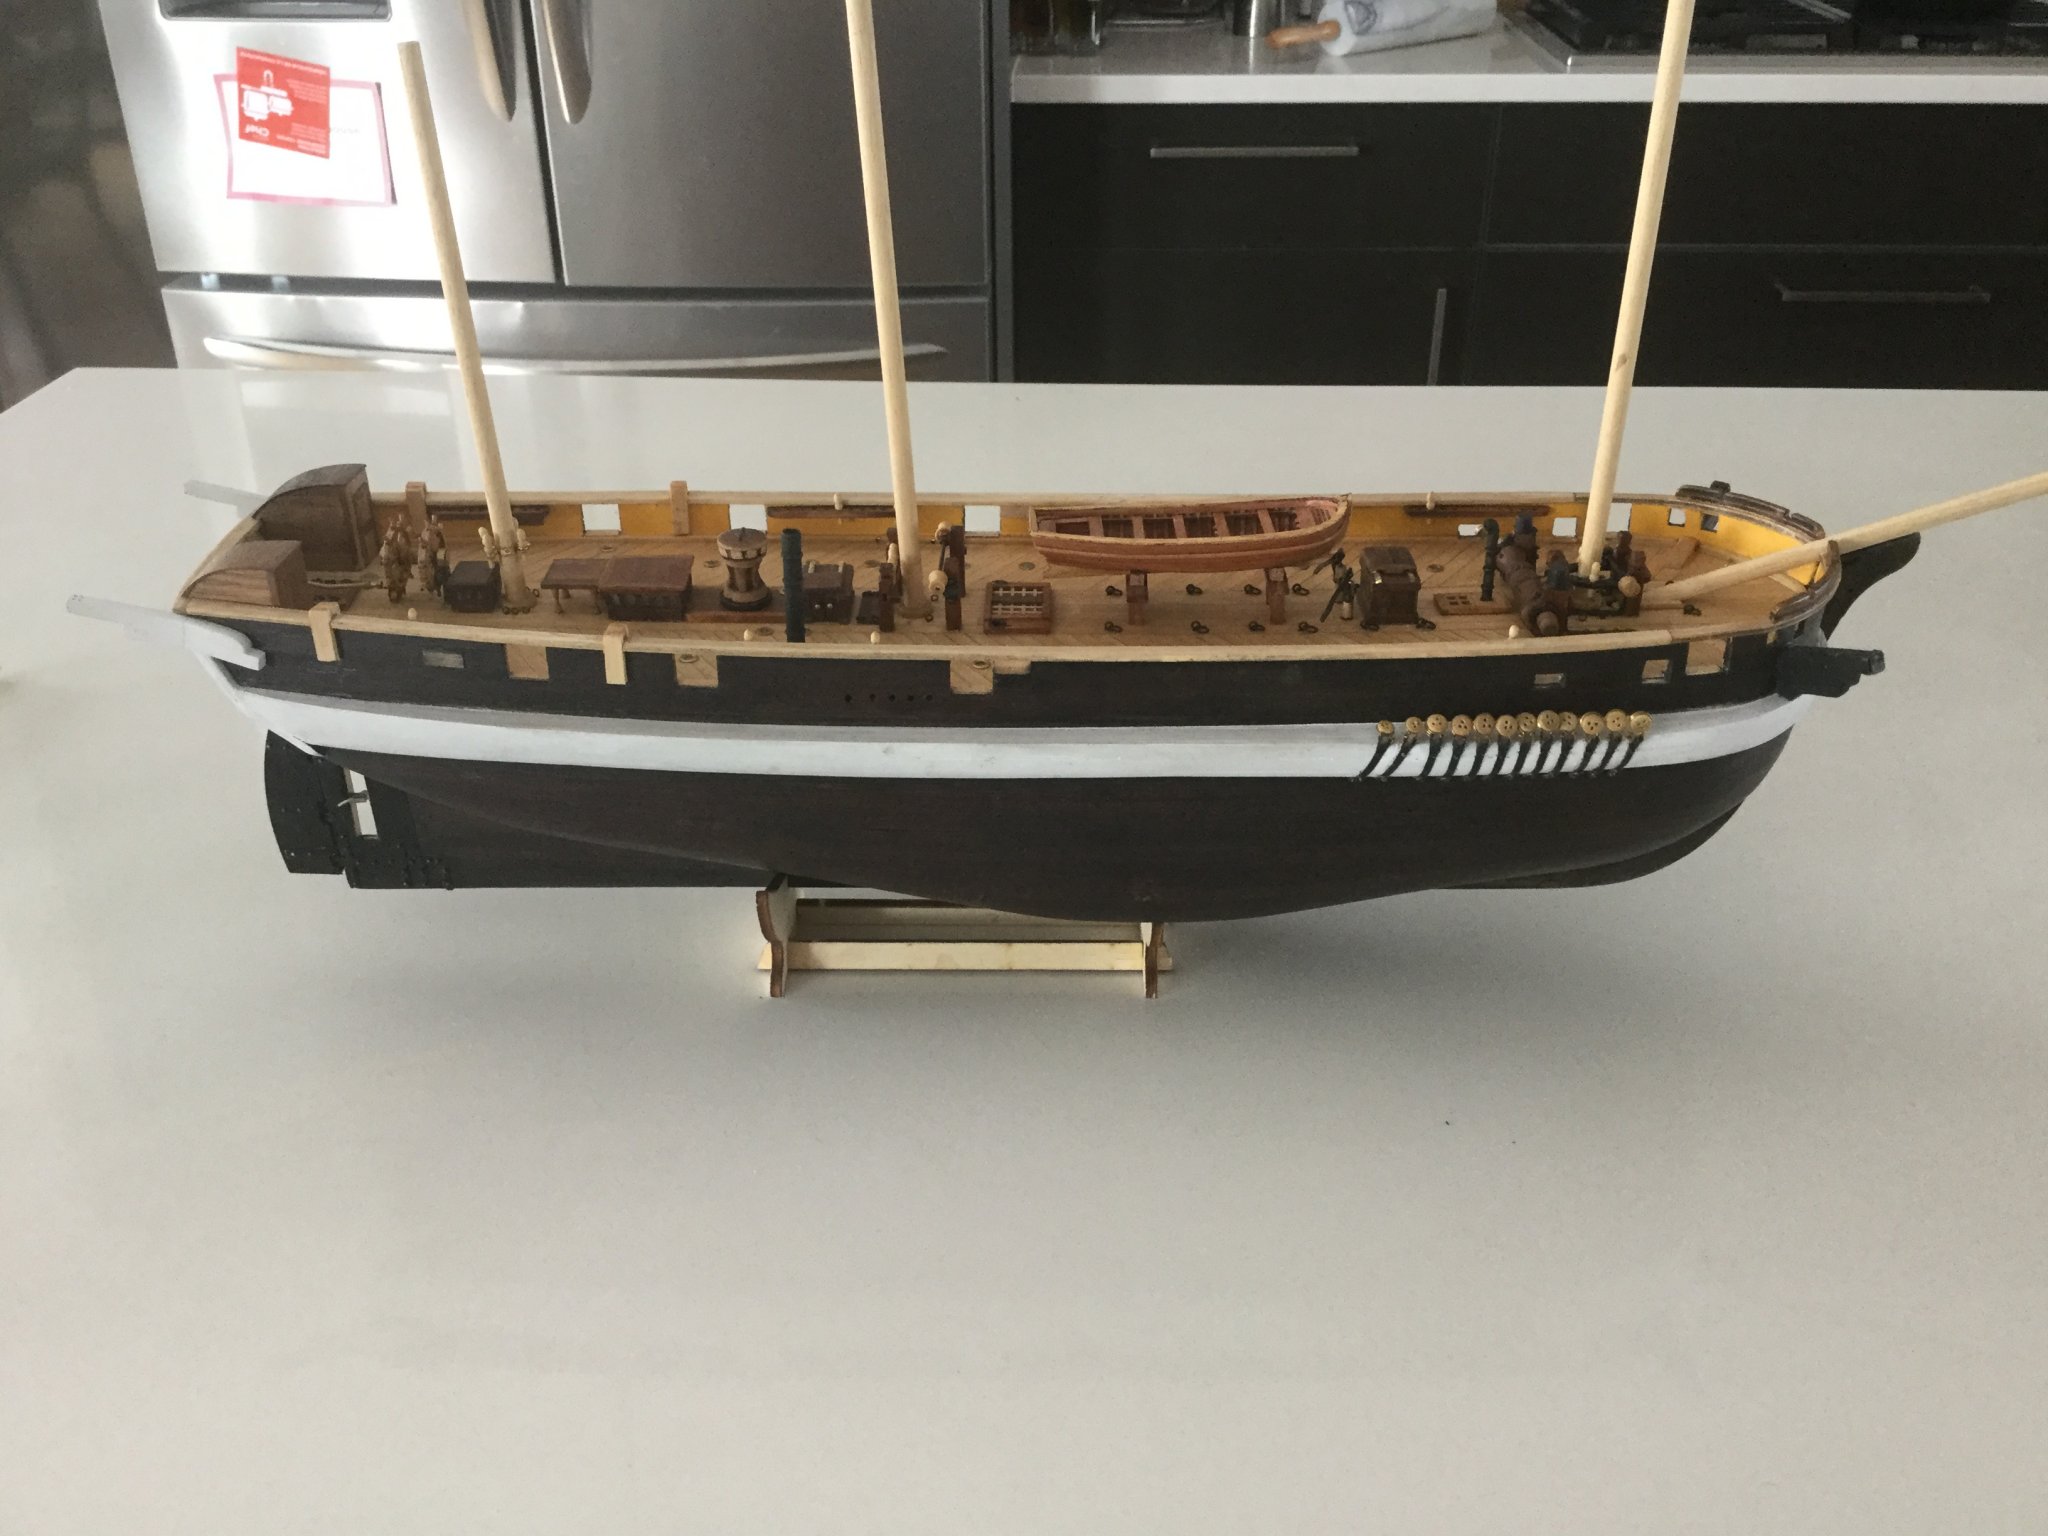
I am pretty pleased with how today's work turned out. I think the boat is going to look good.
Still can't decide whether or not to paint it. Opinions welcome.

- JeffT, Keith Black, NovaStorm and 2 others
-
5
-
Thanks man. I am getting closer to making the bow armour!
-
1) I am also always gluing myself to my model
2) I also do not know what those "support thingies" are supposed to be. They are on the real ship, but I can't work out what they are.
3) The pins are definitely over scale size. I am criticizing myself for not switching to smaller ones. It's too late now.
4) I left mine in the natural wood colour so I have no advice on a quick way to paint them.
For some reason, my kit had very little of the 2mm x 4mm wood that the pin racks are supposed to be made of. Therefore I ordered some 2x4 walnut strips. When they arrived, I was annoyed that they were 2x6 rather than the 2x4 I ordered. But I am pleased now because you're right, the supplied 2x4 stuff is too small.
I am wondering if we were supposed to make the bulwark rail a little more narrow than we did. I notice mine is wider than the plywood curved piece it butts against on the bow. Maybe if the rail was a bit more narrow the 2x4 stock would work better for the pin racks.
-
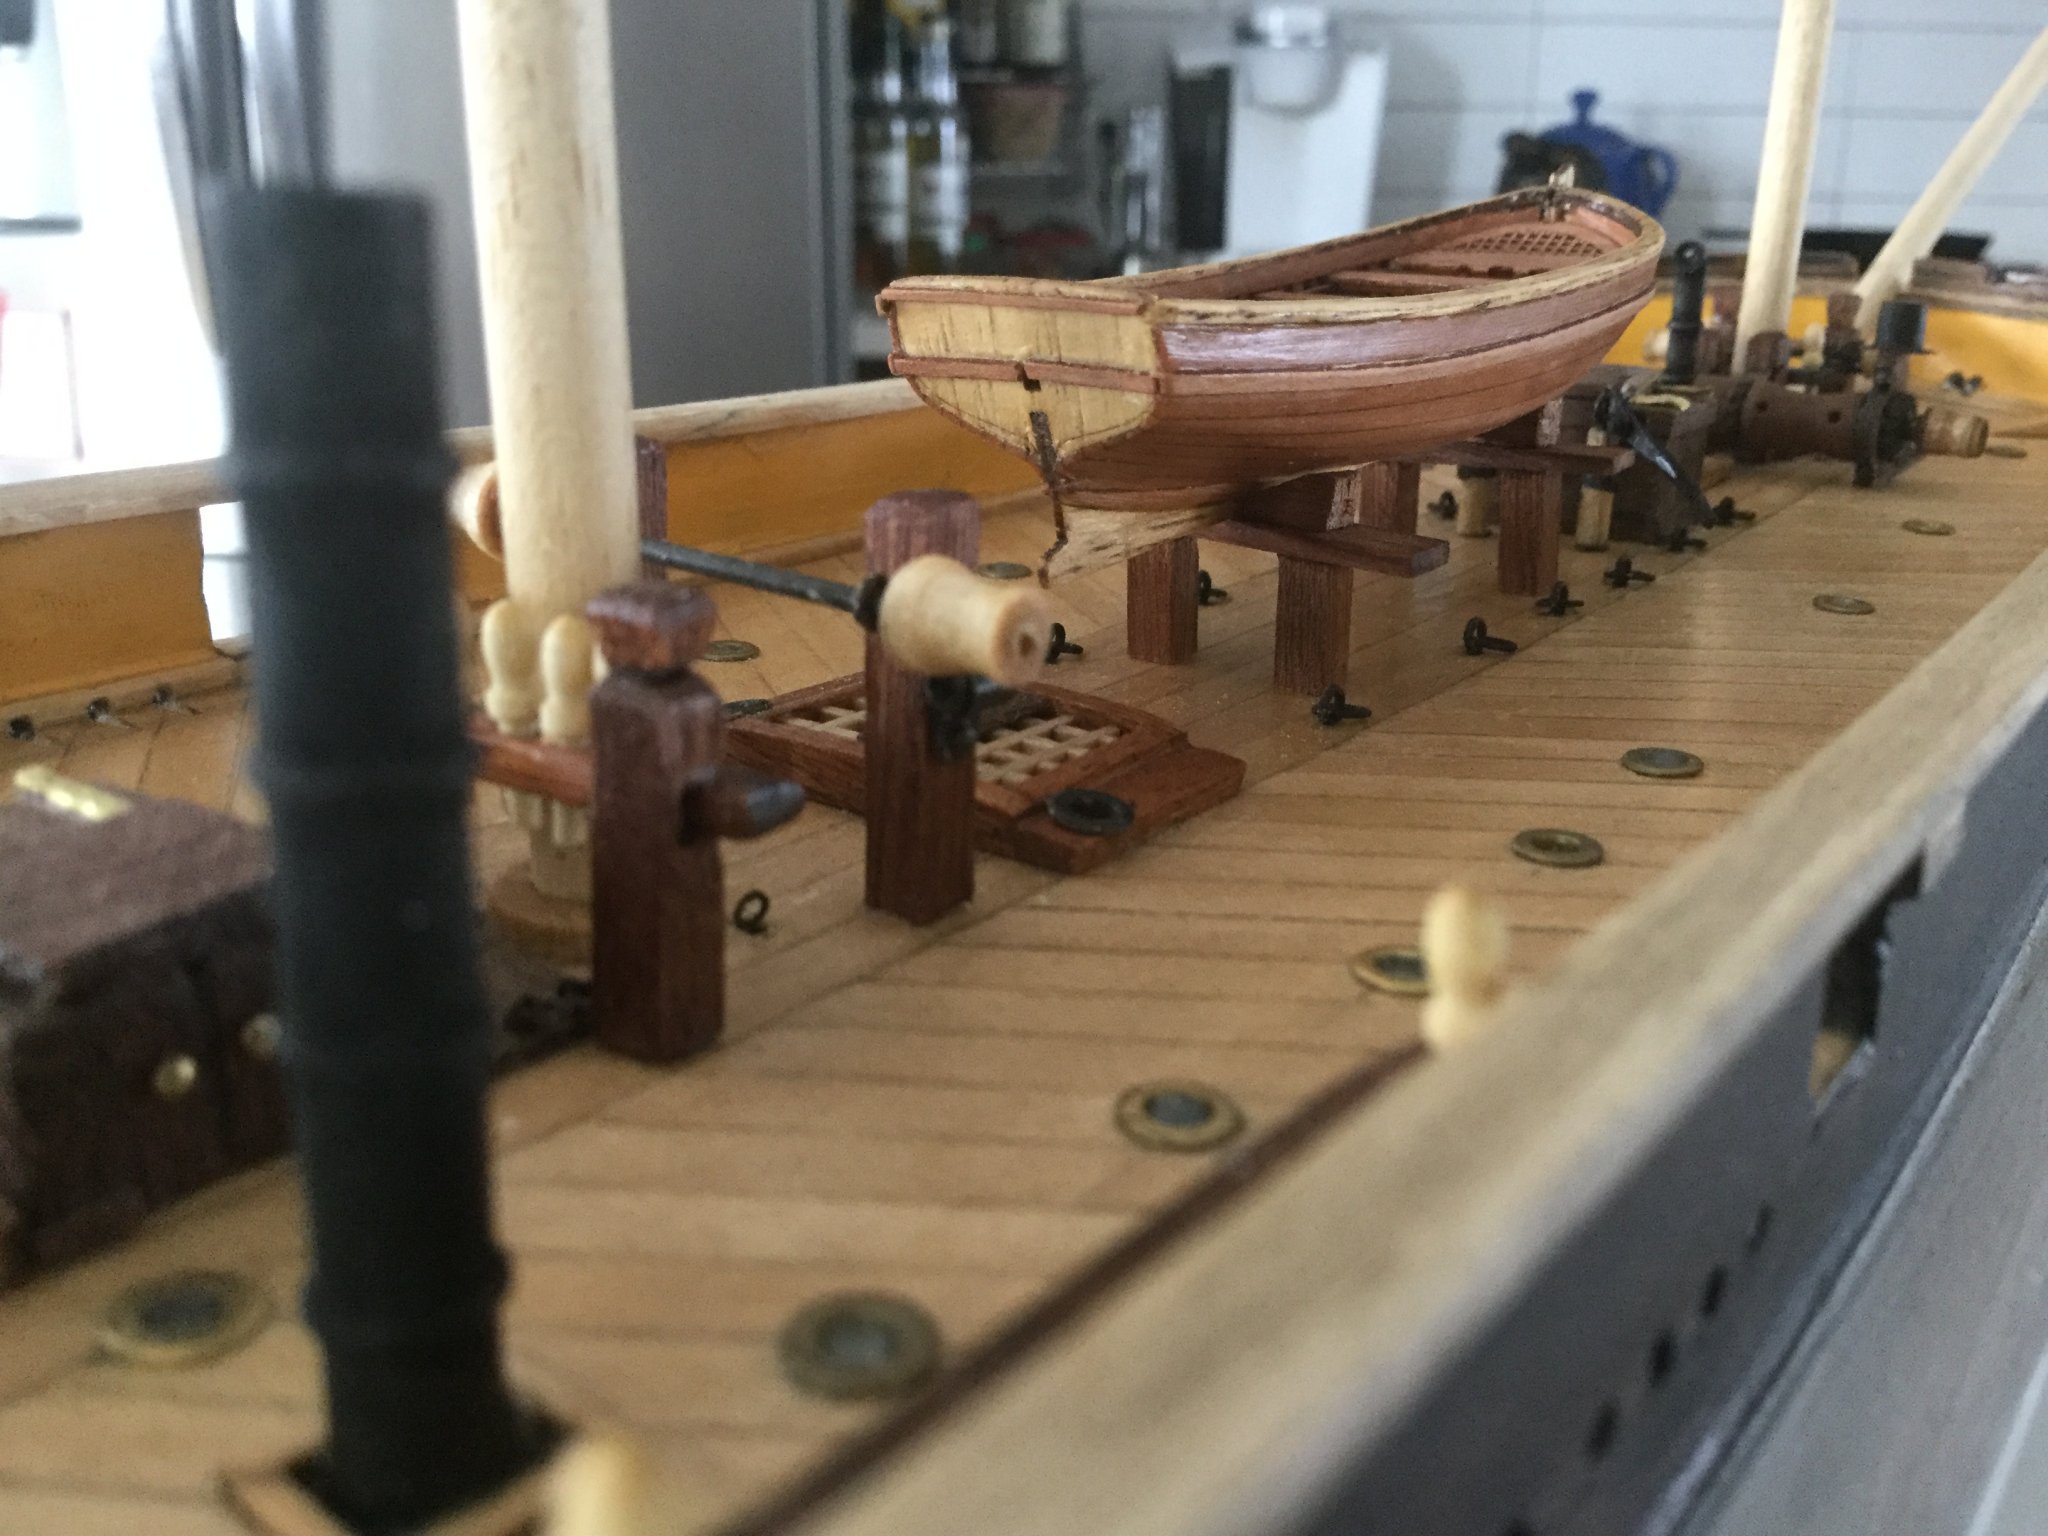
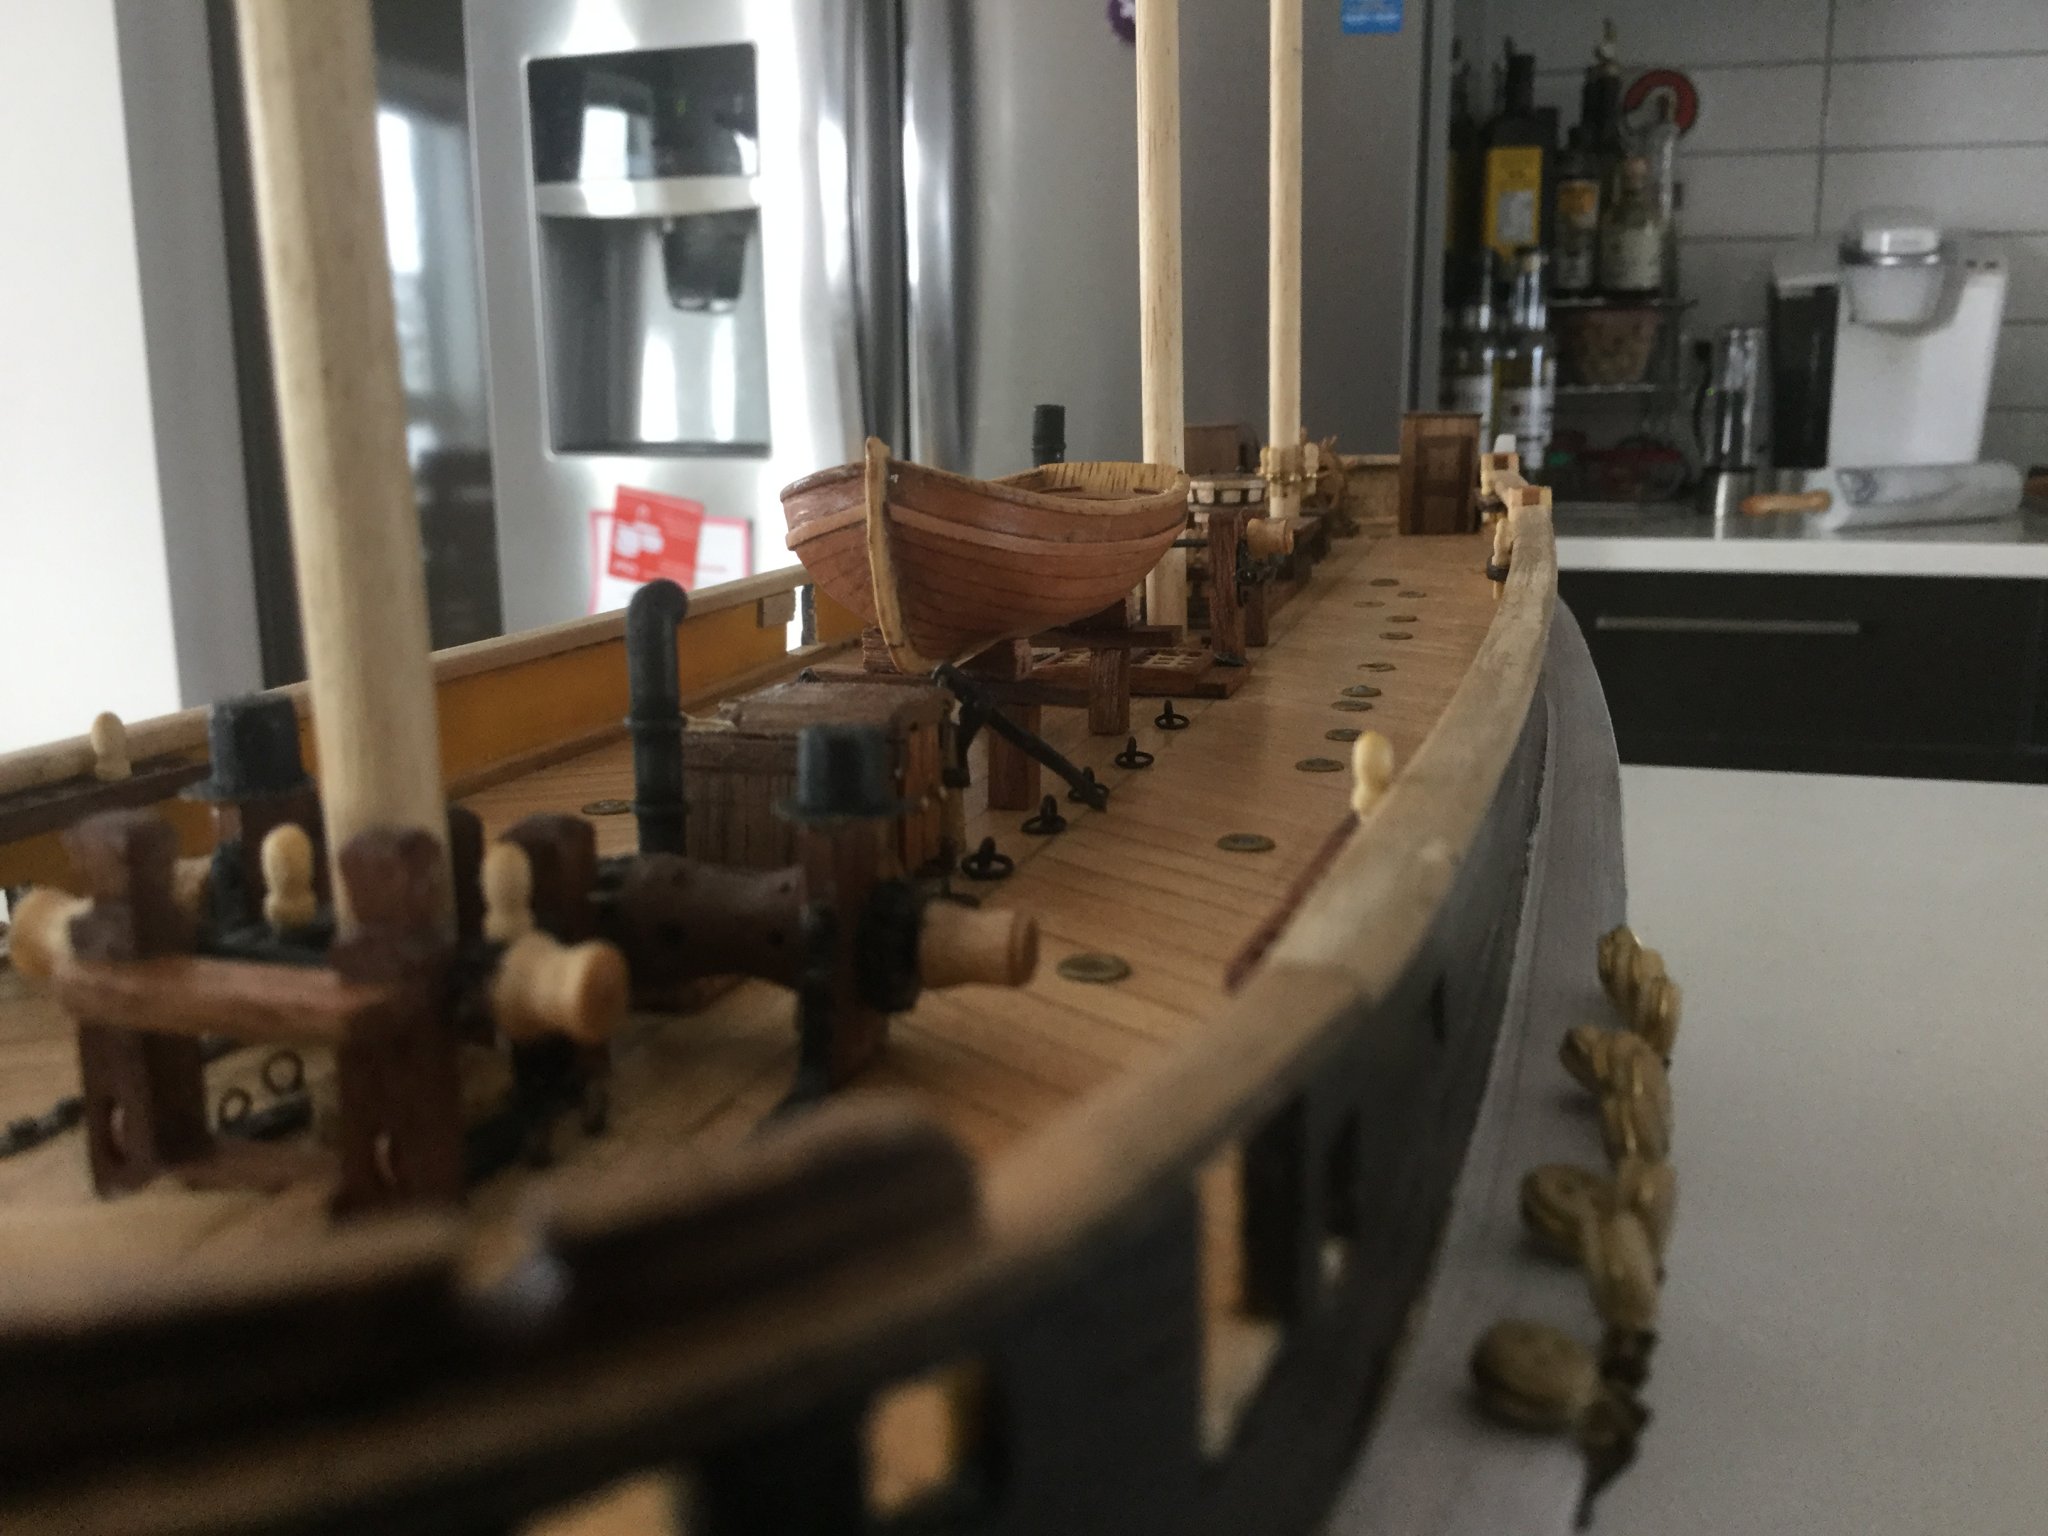
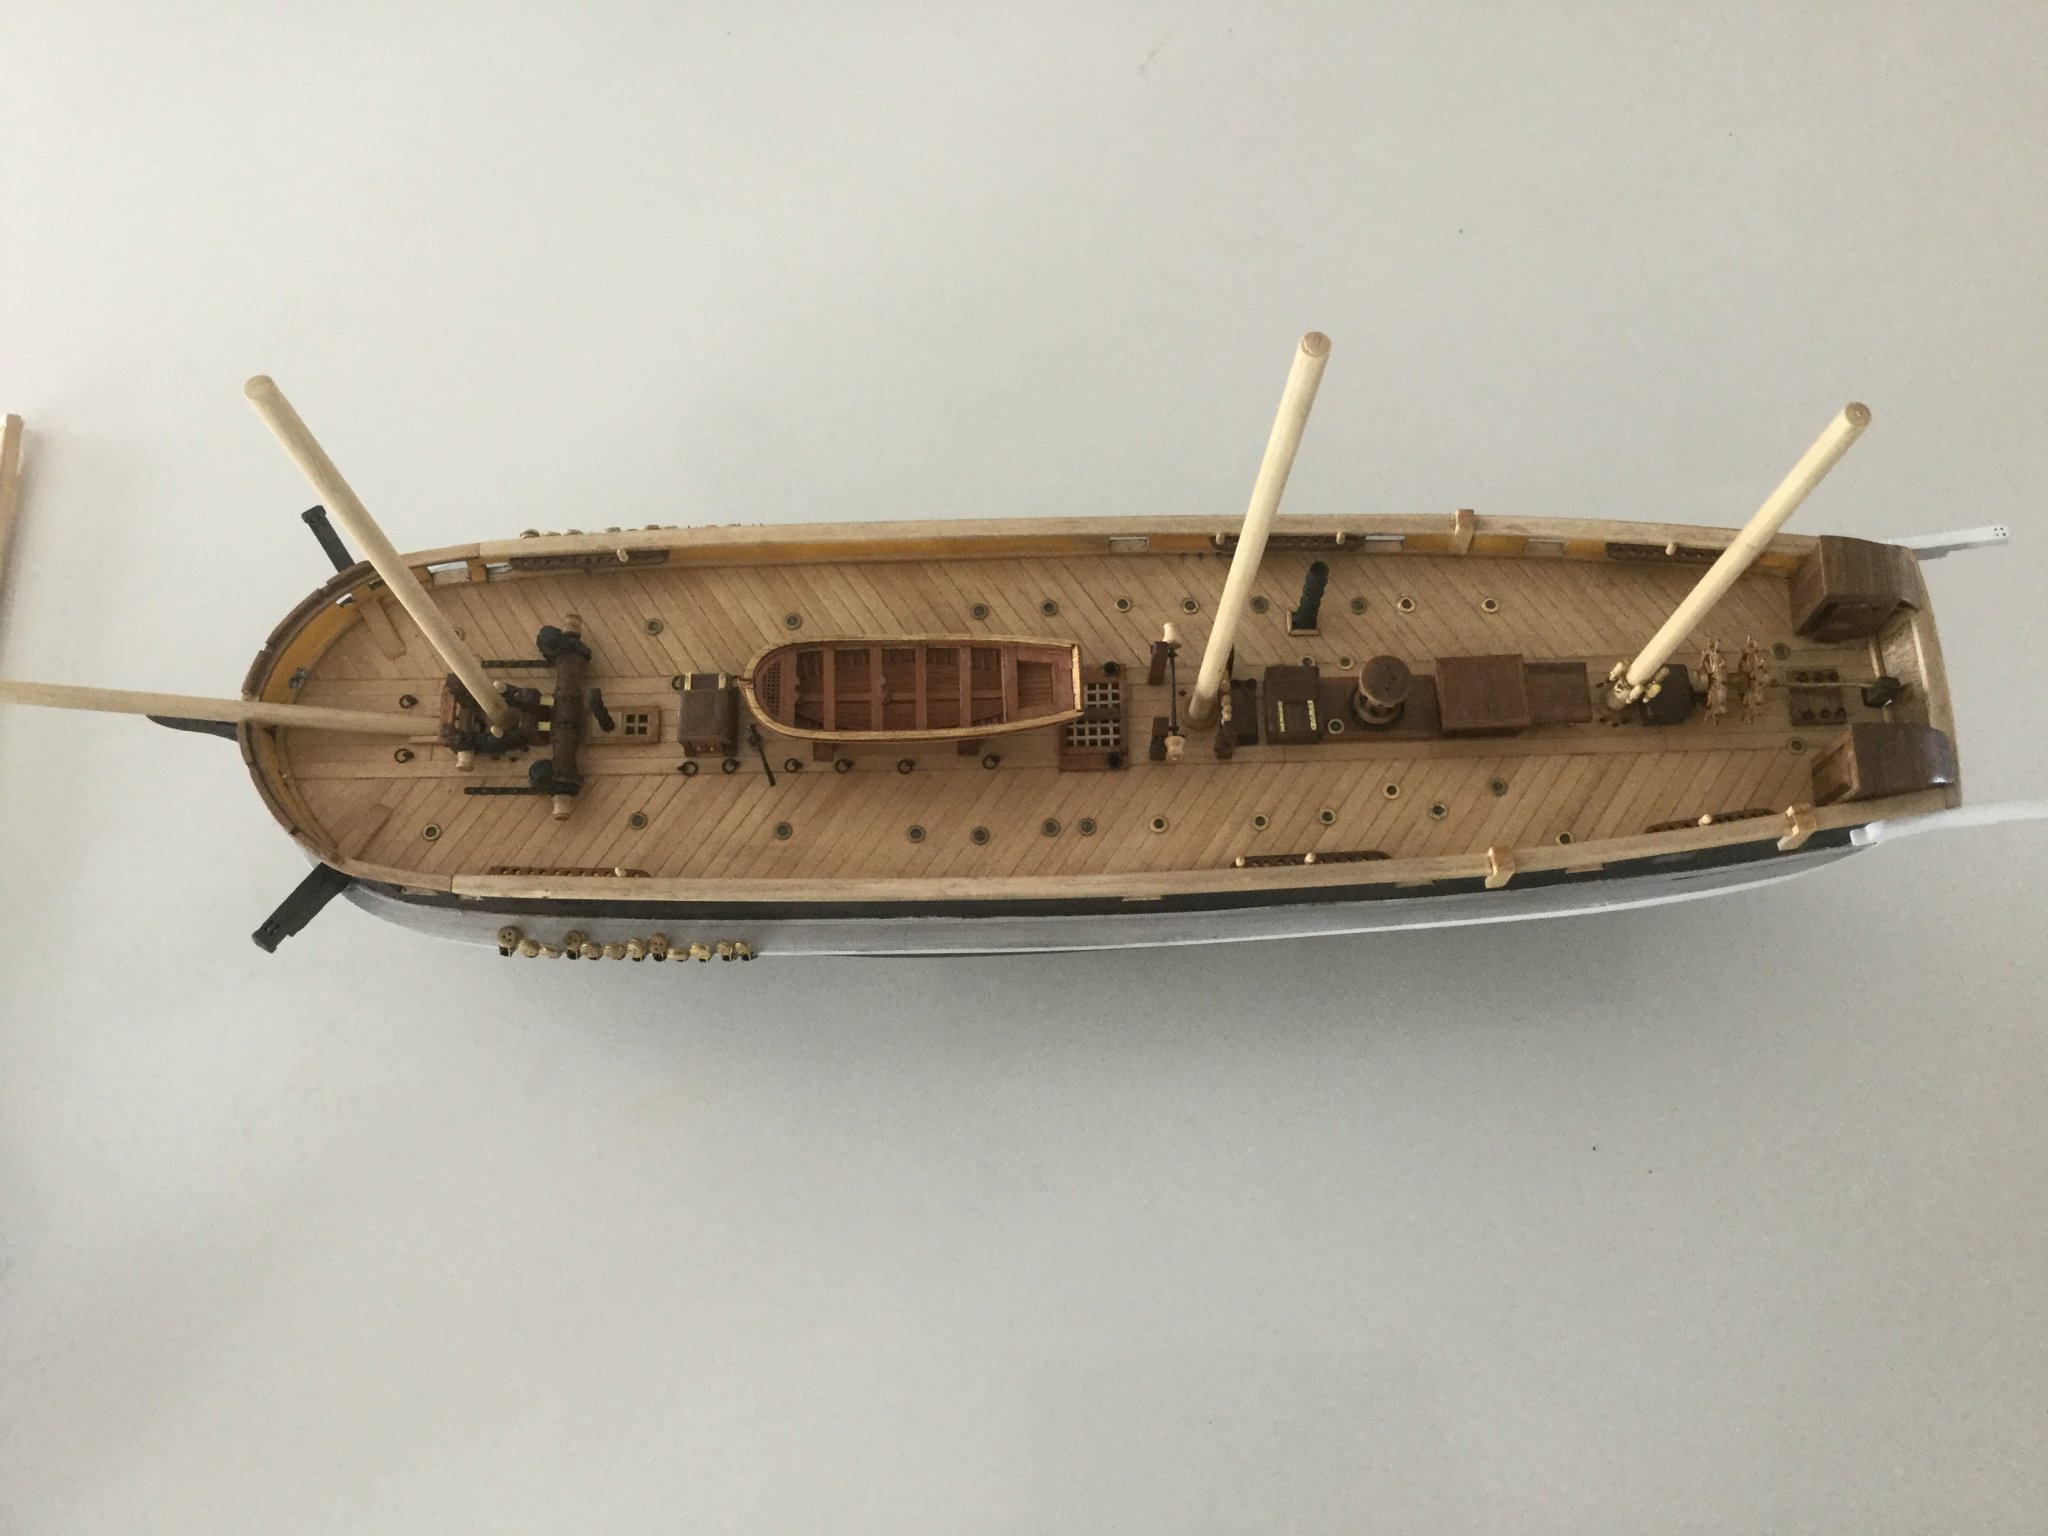
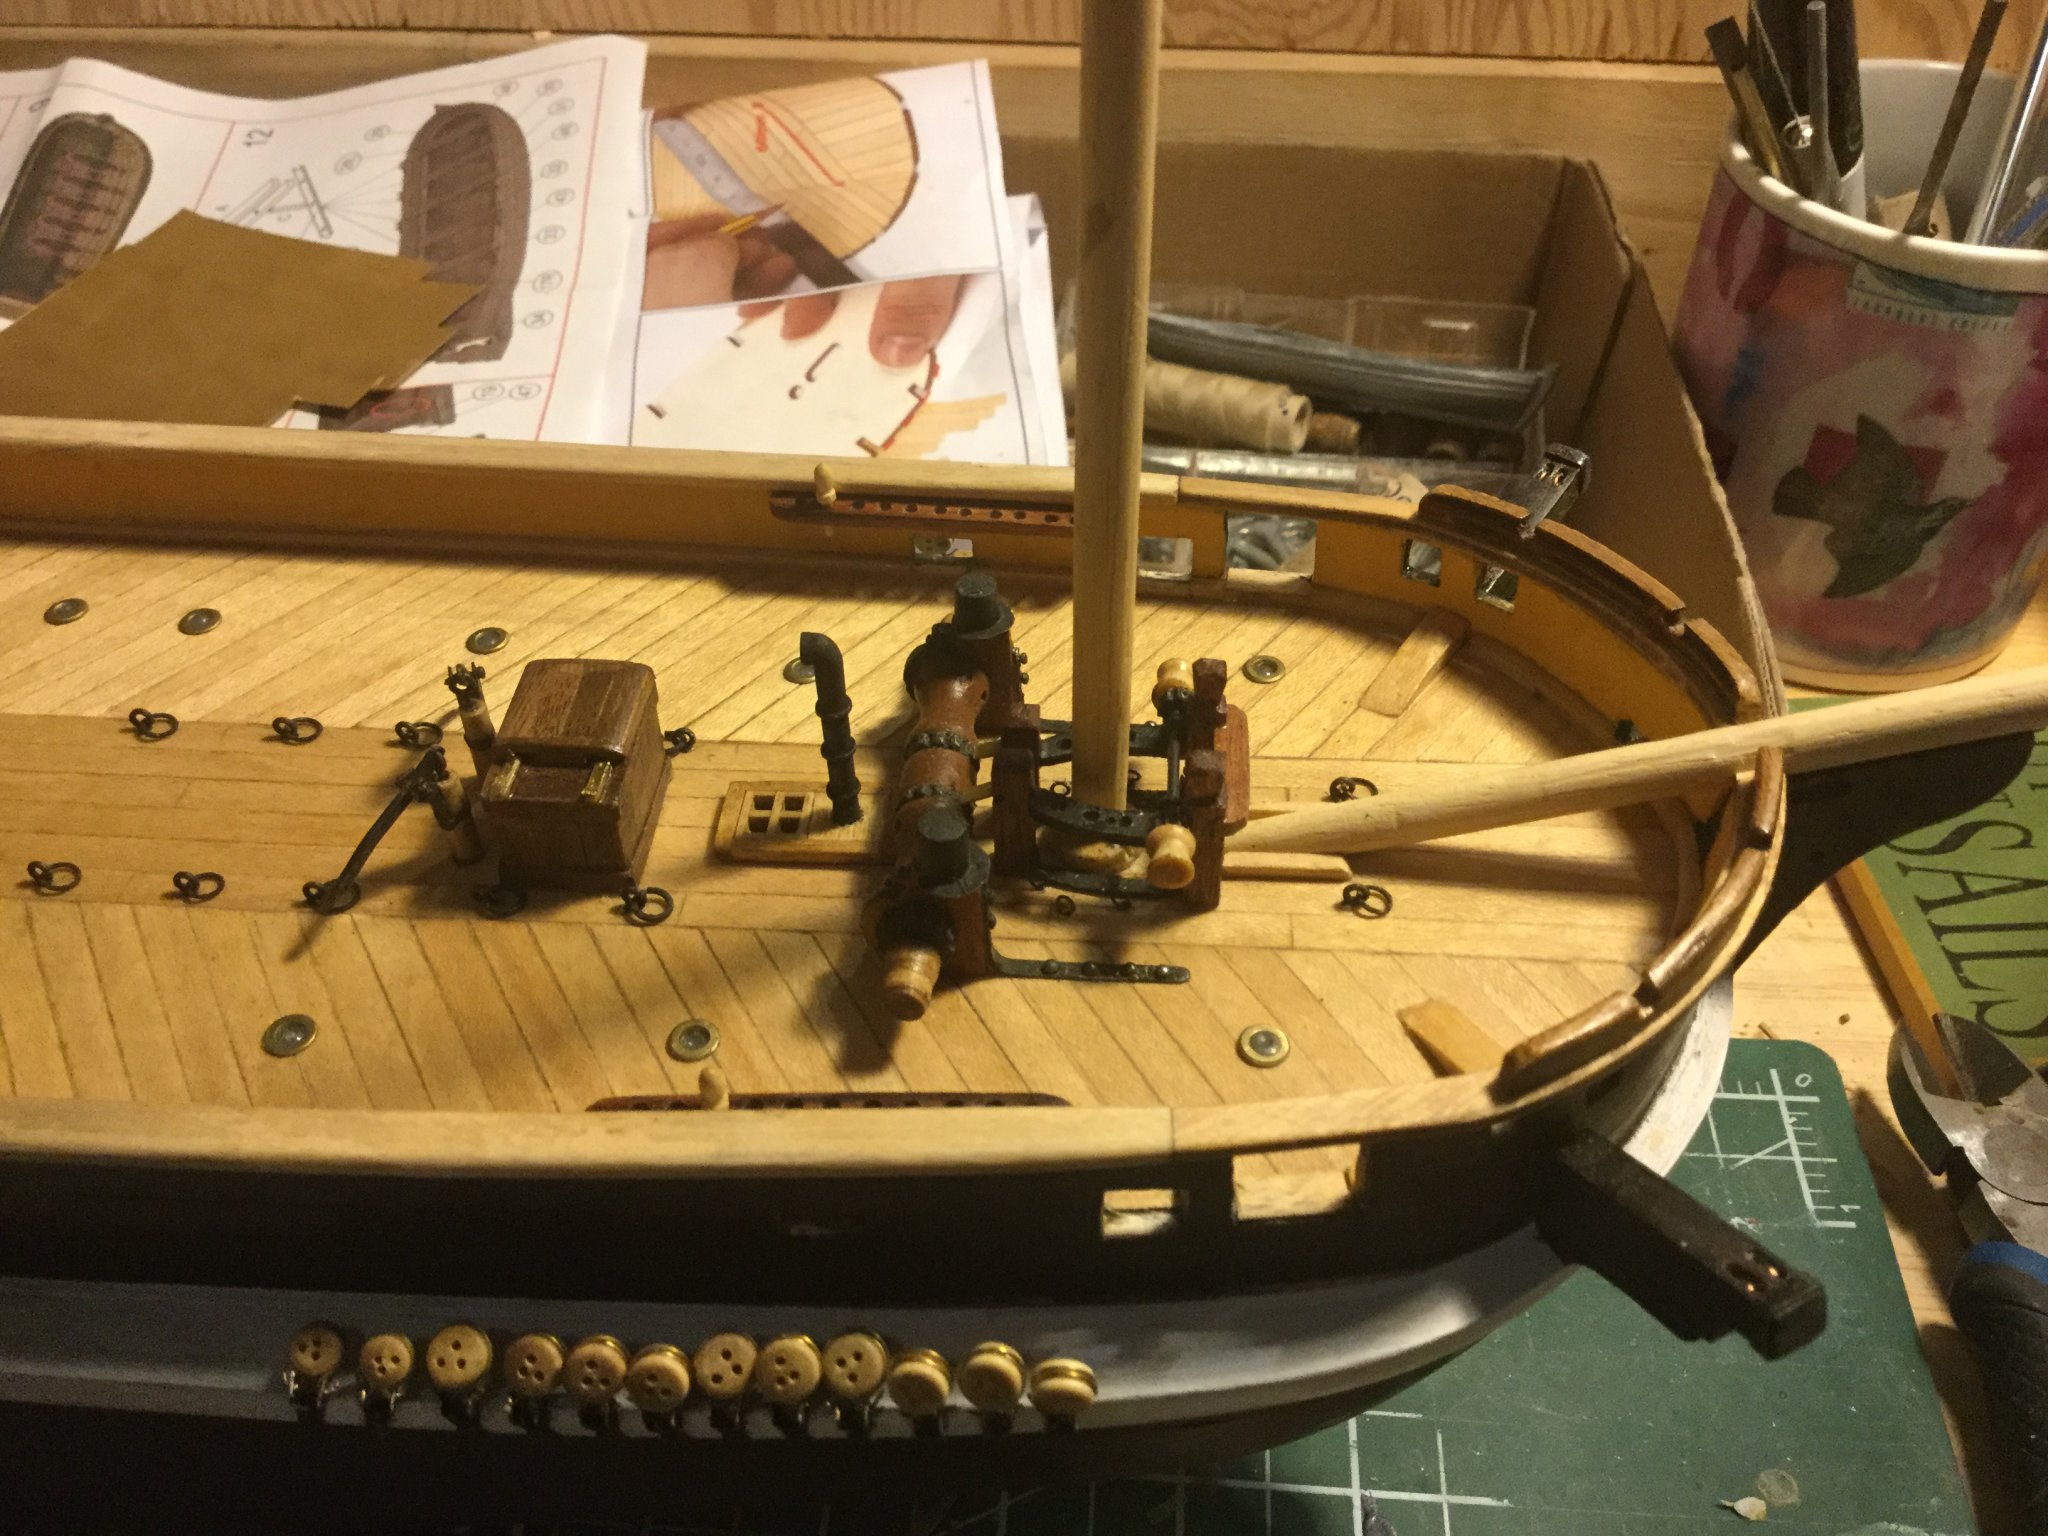
Some more work on the little boat, the ship's foremast/windlass area, and I made a spider-band for the mizzen. The Terror's windlass was reinforced with forged iron knees as well as the pawl bitts and jeer bitts, which were joined to the deck and to each other with a big curved forging. There was also an iron fife-rail between the two, surrounding the mast. I represented the forgings with brass plate, except the fife-rail which is just wood painted black to look like iron. I *think* I've finished with this assembly. For some reason I can't remember now, I elected to use the kit's over-scale belaying pins, so as a result the forward fife-rail and mizzen spider-band are a little hefty compared to how they probably looked on the real ship. Still, I think it looks OK. In the kit, there is a pin-rack at the mizzen, but in wreck photos we can see there is actually a spider-band here. I made this with a band made out of sheet brass wrapped 'round the mast, which was drilled for some brass ring-bolt heads. I enlarged the holes in these so belaying-pins would fit into them.
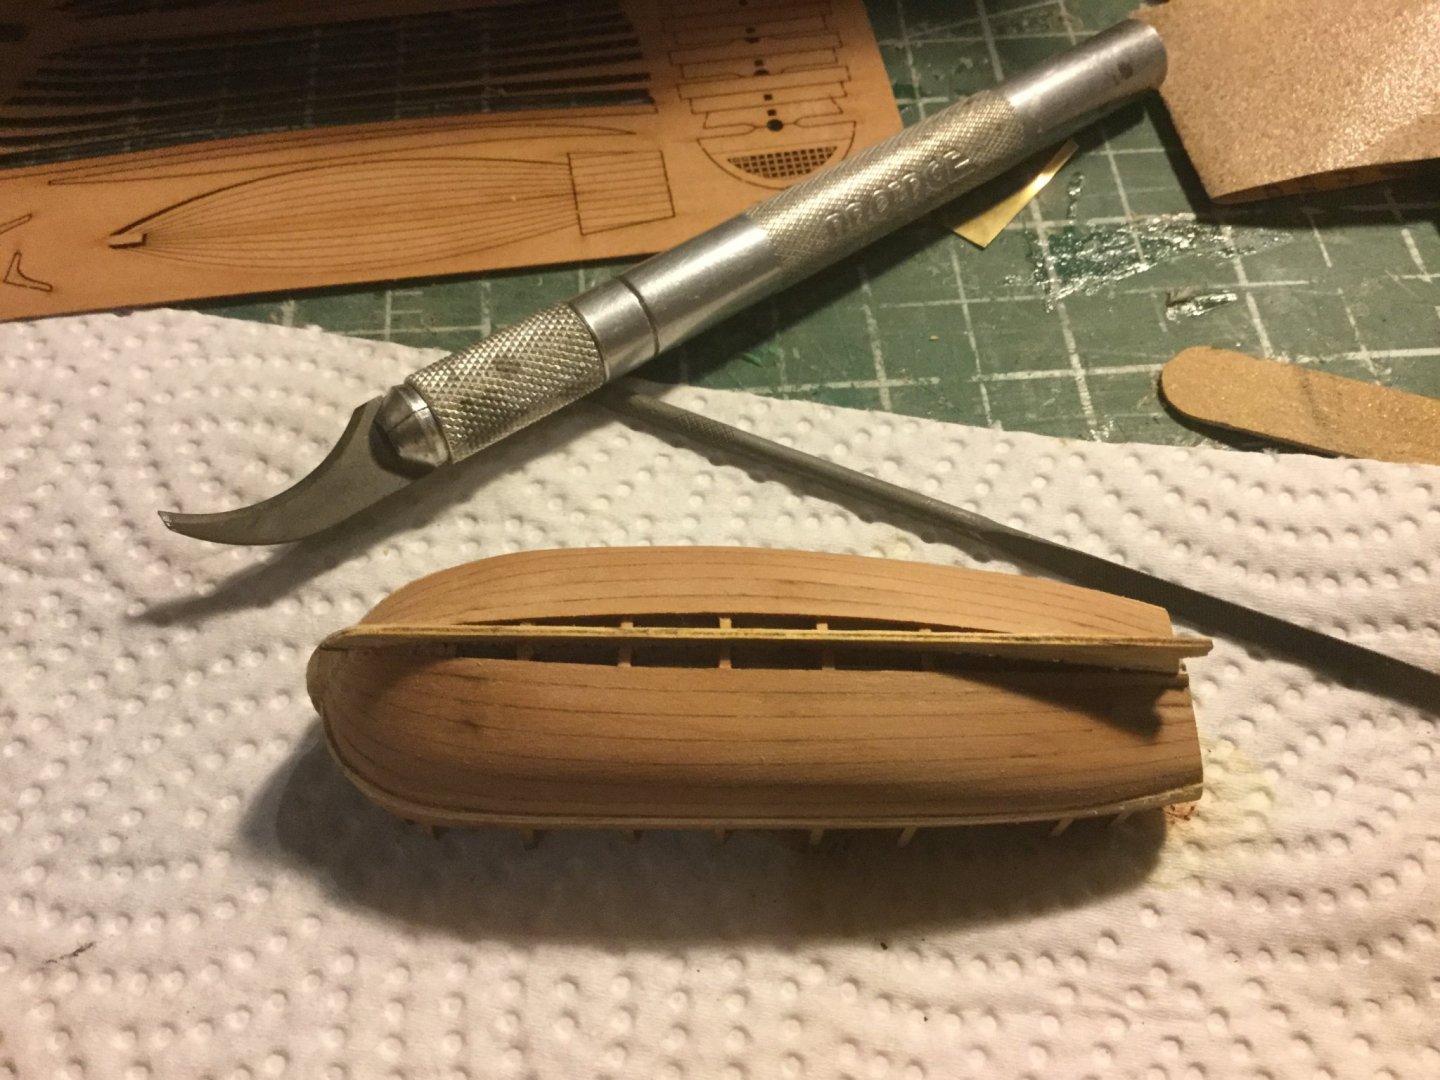
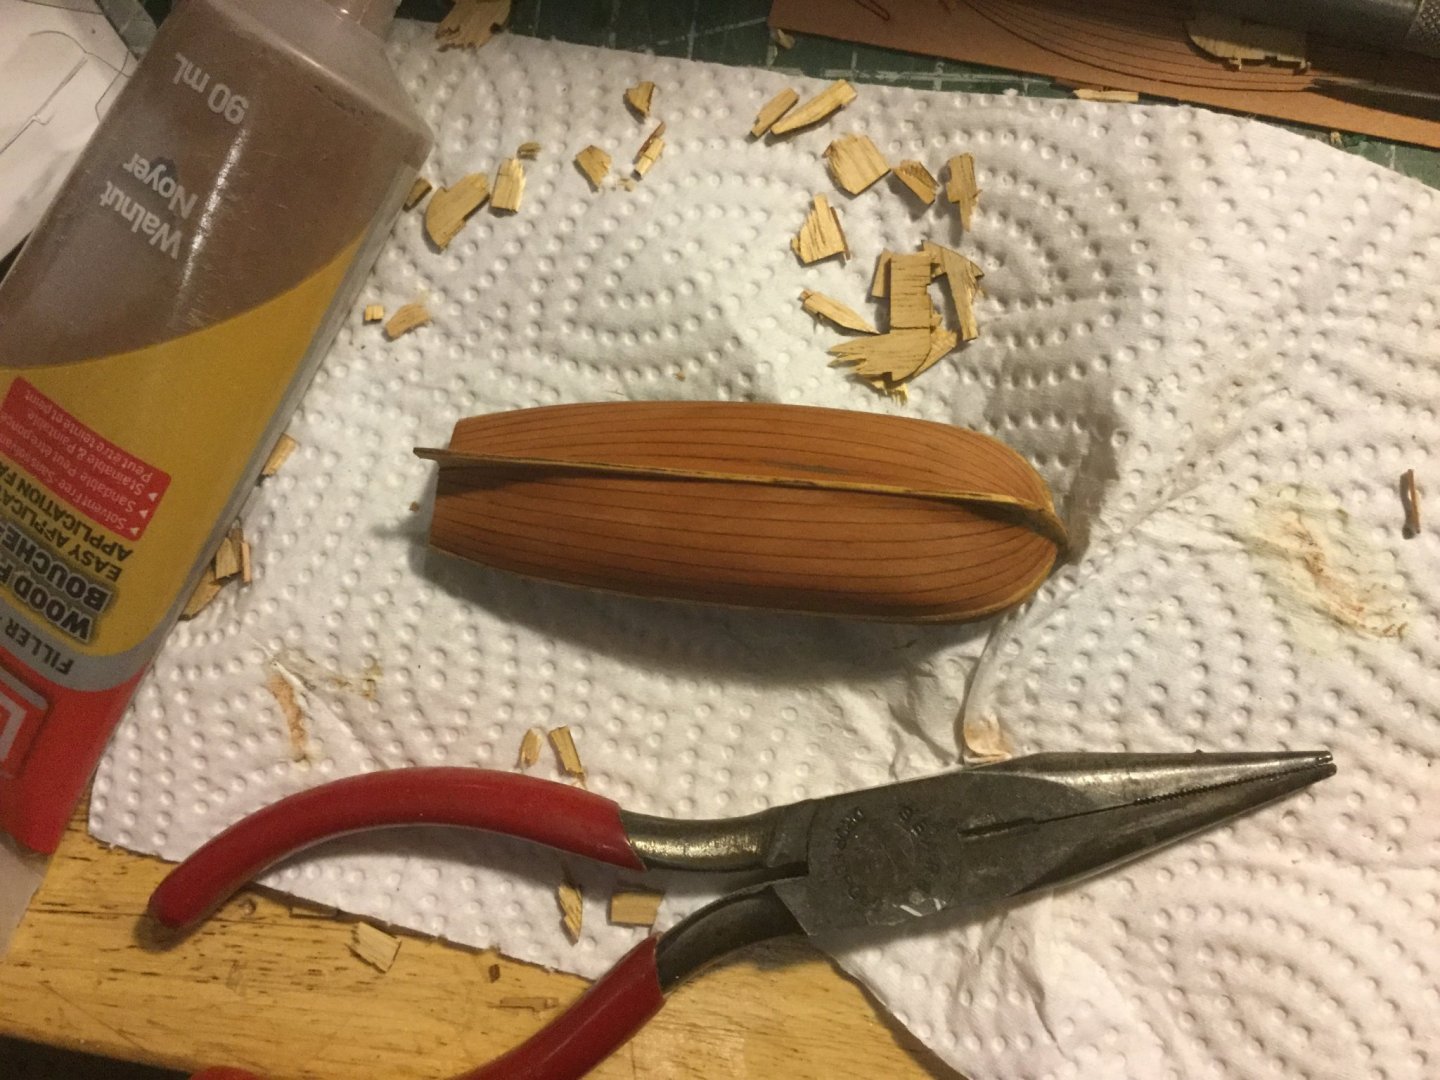
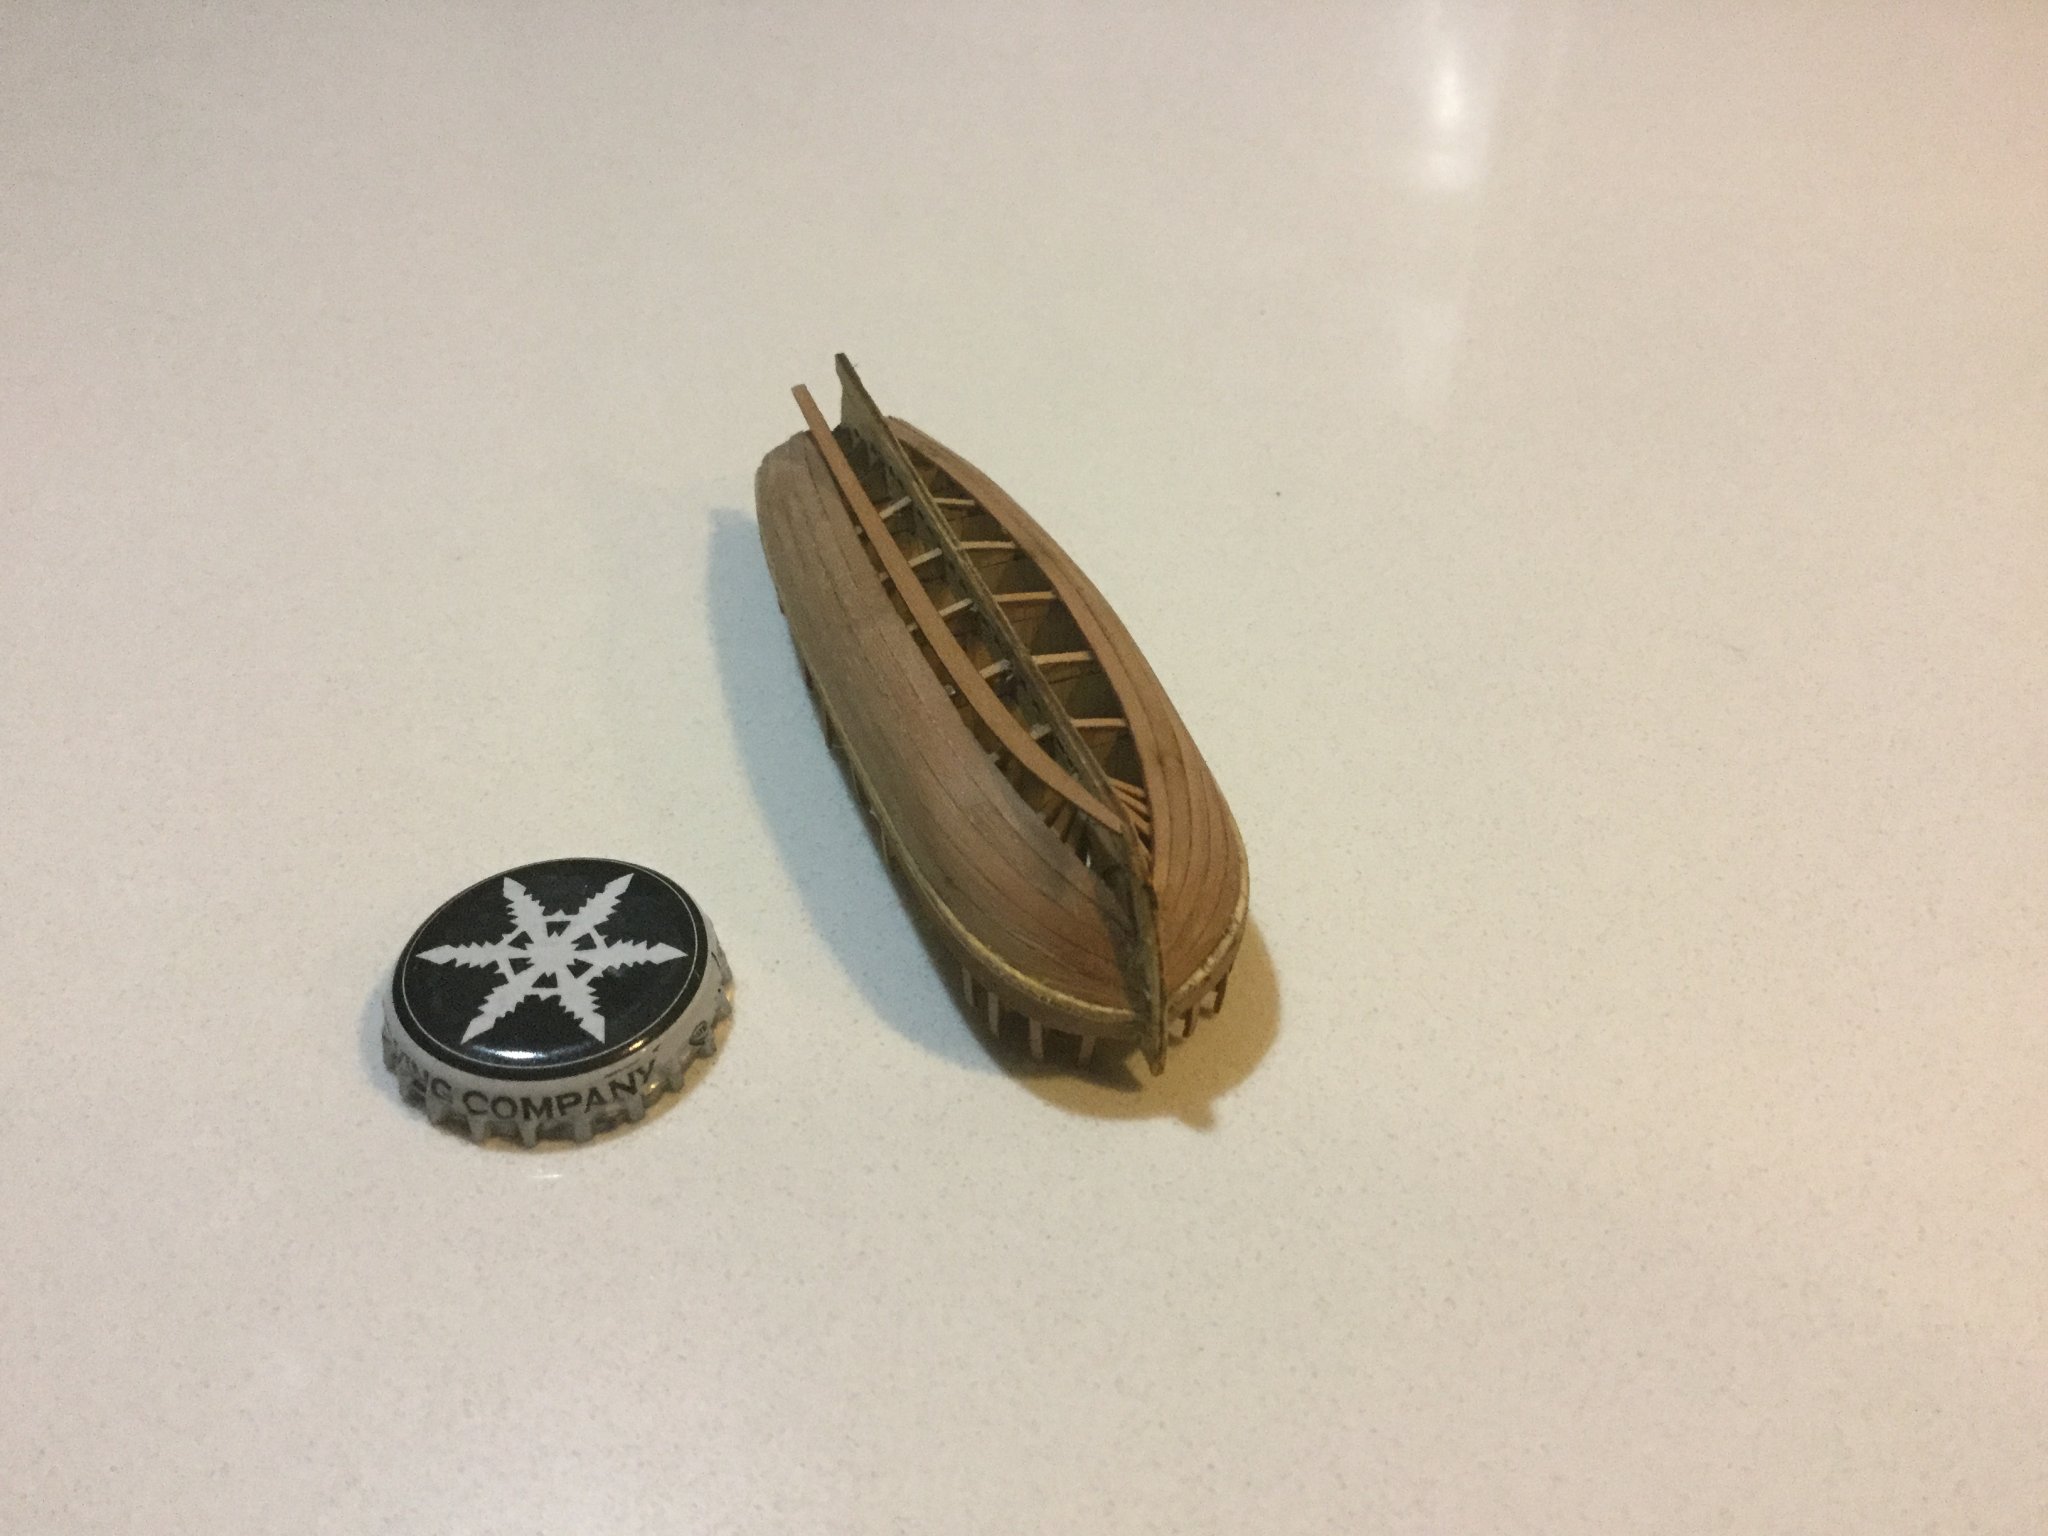
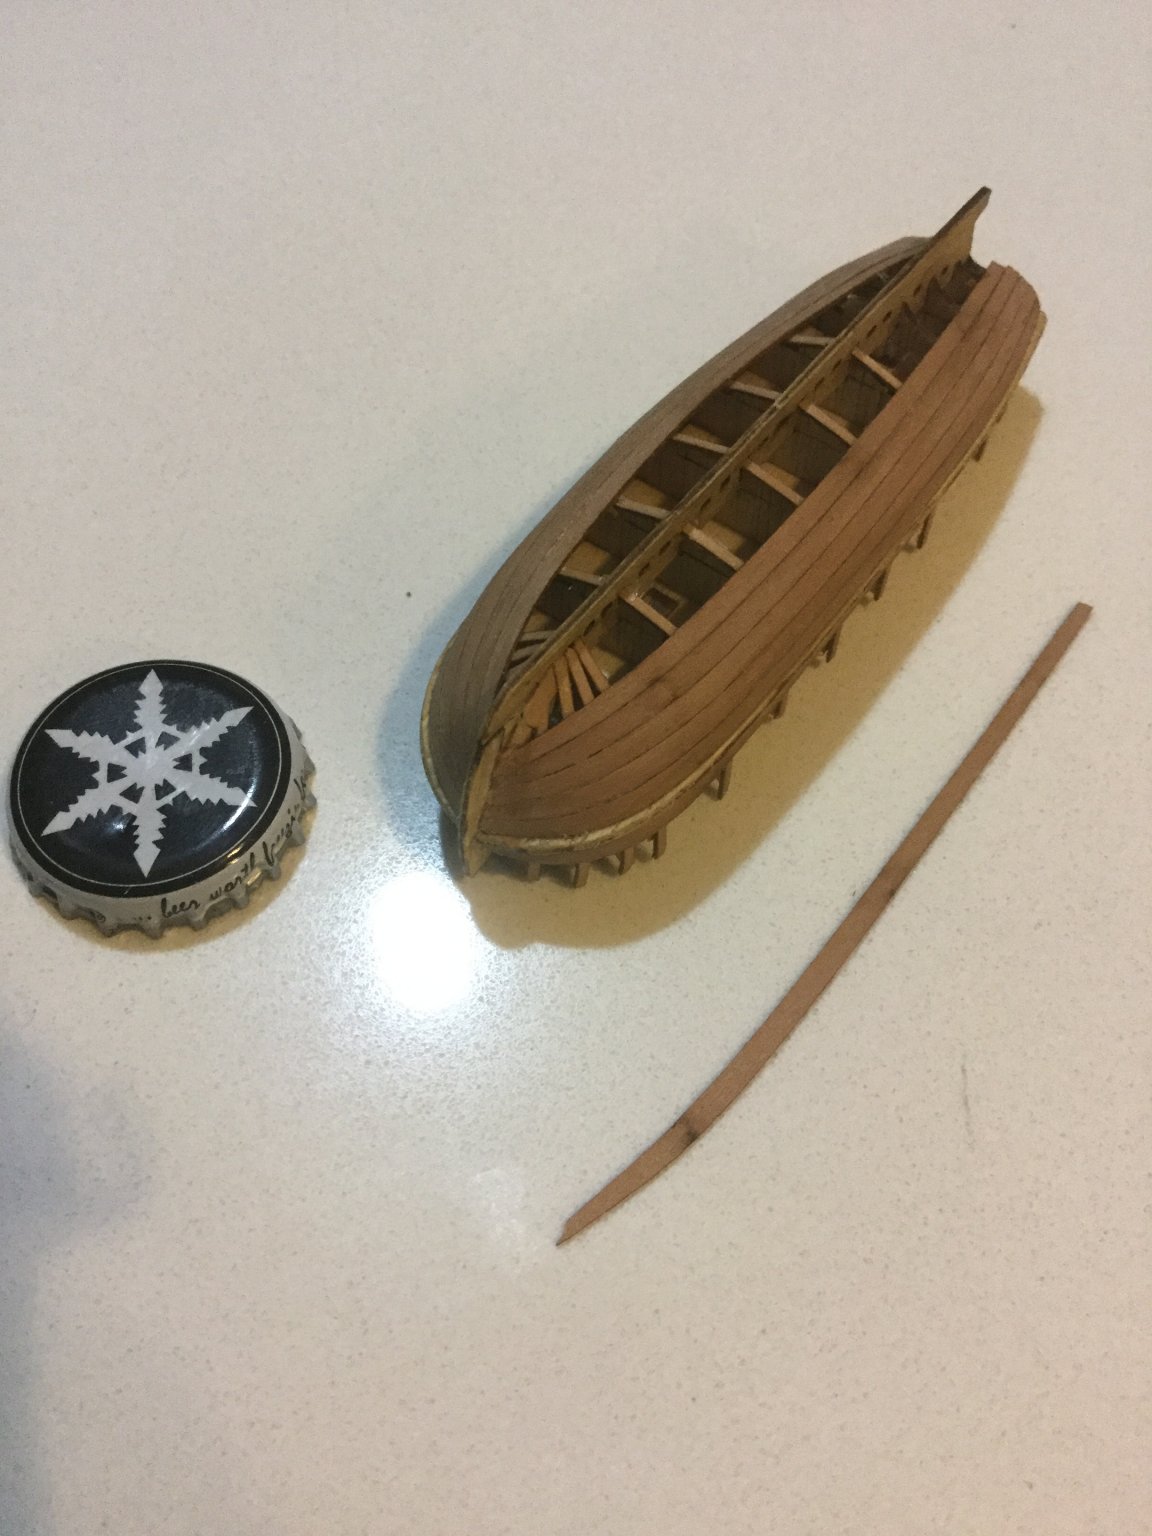
The little boat from Master Korabel is a great little kit. The pre-shaped planks fit perfectly except the garboard strake, which fit after a bit of sanding. The plywood forms popped out reasonably well, with little damage to the boat except some of the webs in the bilge which will be covered by sole-planks anyway. I'm having fun with this little boat. I don't really want to paint it, but I think it will look better white, at least below the waterline. I'll have to research what colour the R.N. painted their boats. There's a painting of the expedition's boats that depict them as being green and black, but other pictures depict at least one being white. If anyone has an opinion on this, let me know!


- Keith Black, ErnieL, ObviousNewbie and 4 others
-
7
-
The OCCRE kit comes with some boats that are cast in white metal, which are meant to be painted and then some wood details added. They actually are pretty nice castings, and I'm sure they would be fine on the model, but recently in another build thread I saw these amazing little boat kits from Master Korabel and simply had to try one.
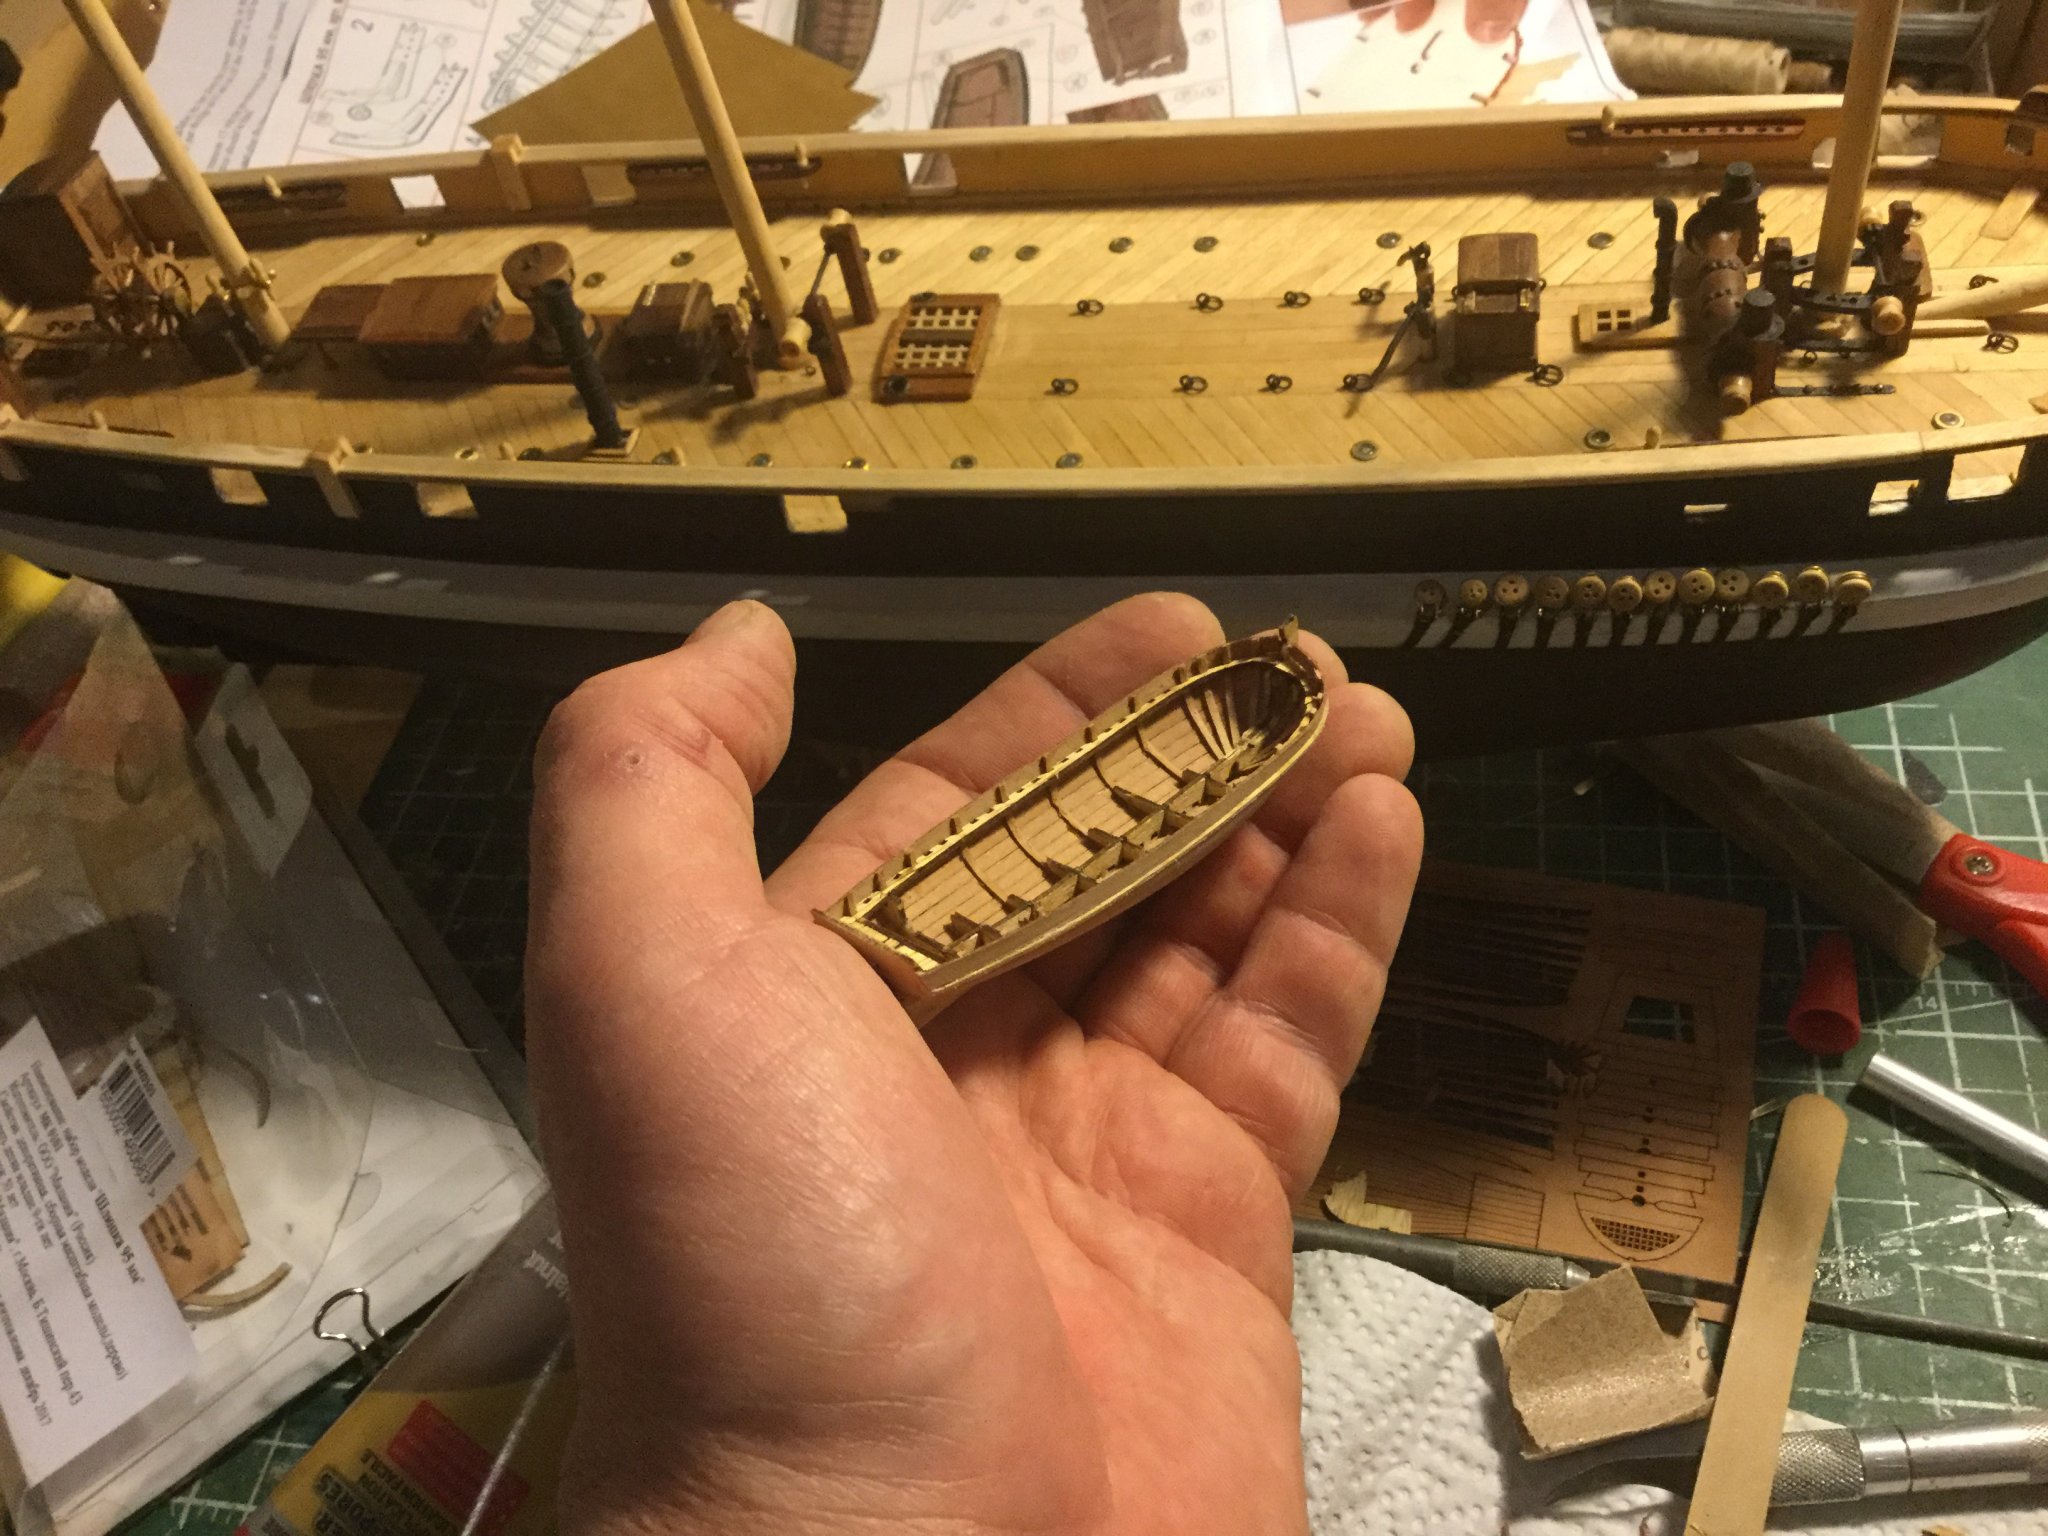
Now I thought the ship's wheel kit from Syren models was the smallest laser-cut thing I've ever seen but this boat takes the cake. It's a full carvel-planked model boat in 1:72 scale. Just like a full-sized boat, the ribs are bent over plywood forms which are then removed after the planking is done. It has all the parts of a real boat!
I recommend one of these kits for anyone who is confused about tapering and "spiling" planks on a model ship. In teeny-tiny size, you can see the complex shape of a garboard strake, and you can see the curves that need to be cut into a properly shaped plank on a ship. In the kit it's all done for you; you just pop the planks out of the fret, soak them a bit and they fit together perfectly. The kit mentions the garboard strake may need a bit of "adjustment" but they give you two pairs of these.
Here's where I am so far with it, with a beer-cap for scale. It's the perfect size for one of Terror's boats, so if I can finish this little kit half-decently, she'll get a place of honour on Terror's deck!


- Keith Black, NovaStorm and GrandpaPhil
-
3
-
I haven't followed a solid-hull build before (I'm new here). This is very interesting. I'm impressed by how smooth and fair your hull looks in that last photo. I think building in 1/96 scale must be very challenging. I'm building one in 1/75 scale and it's hard enough-every little blob of glue or accidental gouge from the hobby-knife looks monstrous. I'll enjoy watching this build. I'm impressed with the deck and inner bulwarks- that's a nice touch on this kit.
-
I'm glad it worked out! I got the idea from a model aeroplane I built once. It was a flying-boat and the fuselage was a molded fibreglass piece. The cockpit windows were just a decal, so I made a frame out of acetate to represent windows, and aluminium tape for a frame. Then I painted the area behind this black. I did not like it so I tried blue paint. The black paint hadn't dried thoroughly and bled through the blue paint. Accidentally I came up with this black/blue idea for painted windows on models!
- Baker and ObviousNewbie
-
2
-
Your plan to use clear plastic is exactly what I did. For colour I used a royal blue, but I blended it with black and painted layers from lighter blue at the top to darker at the bottom. It's very difficult to photograph this, I just discovered. But if you just mix black and blue so it's lighter at the top and darker at the bottom, I find it creates an illusion of depth. The clear plastic "window" is a good idea.
- gieb8688, Baker, GrandpaPhil and 1 other
-
4
-
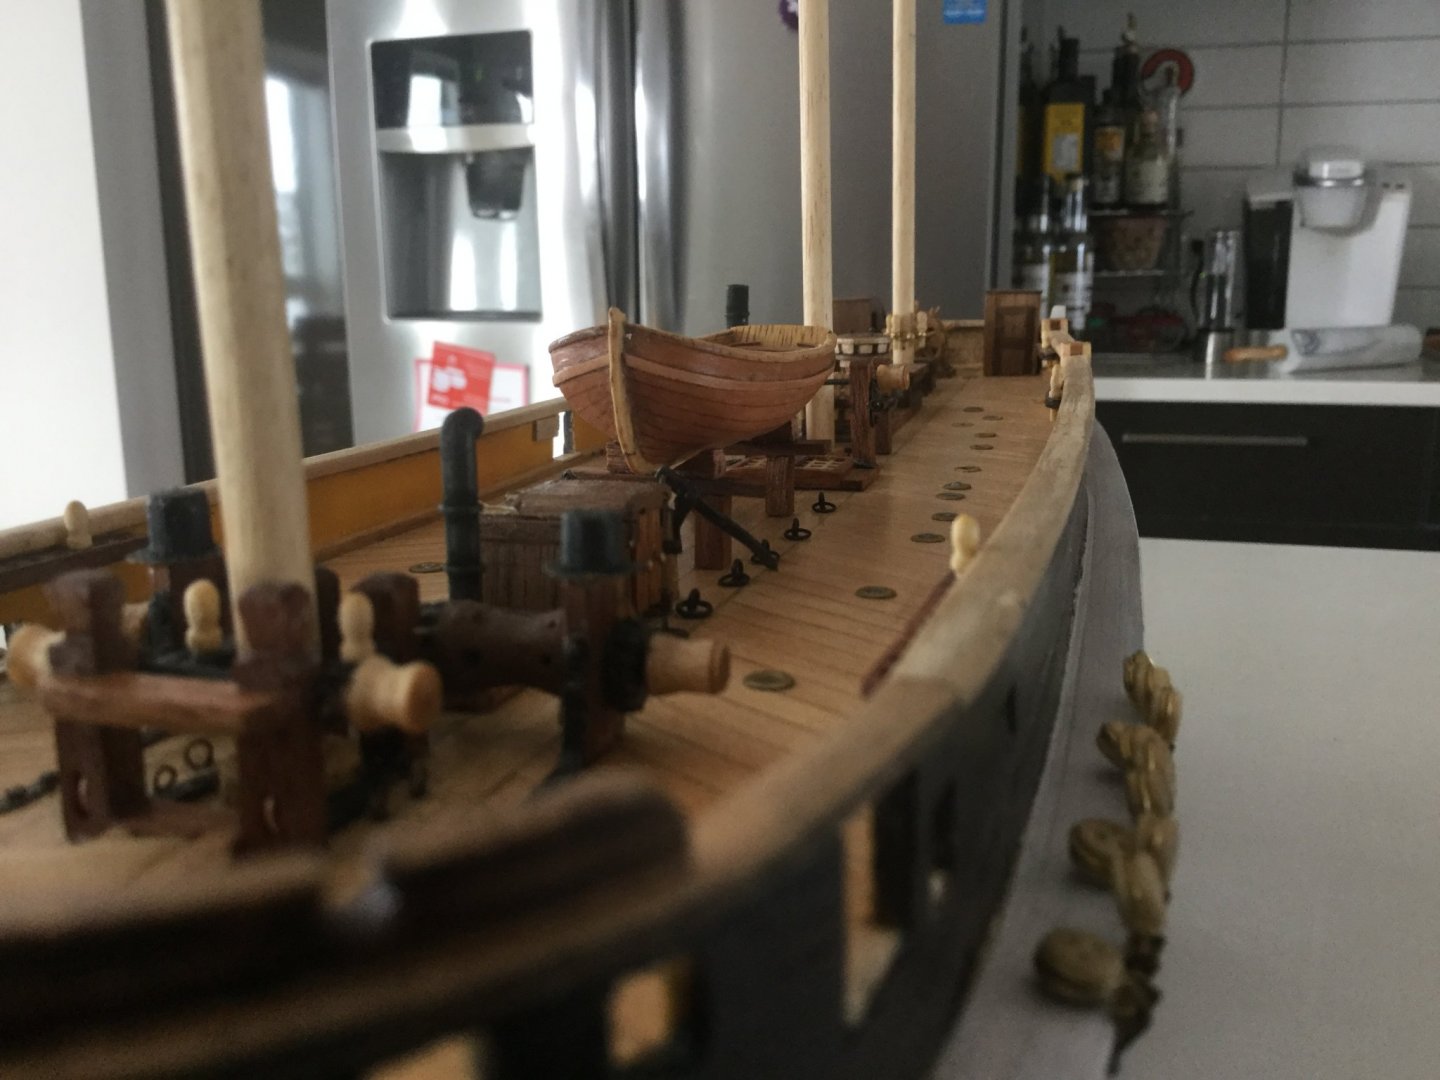
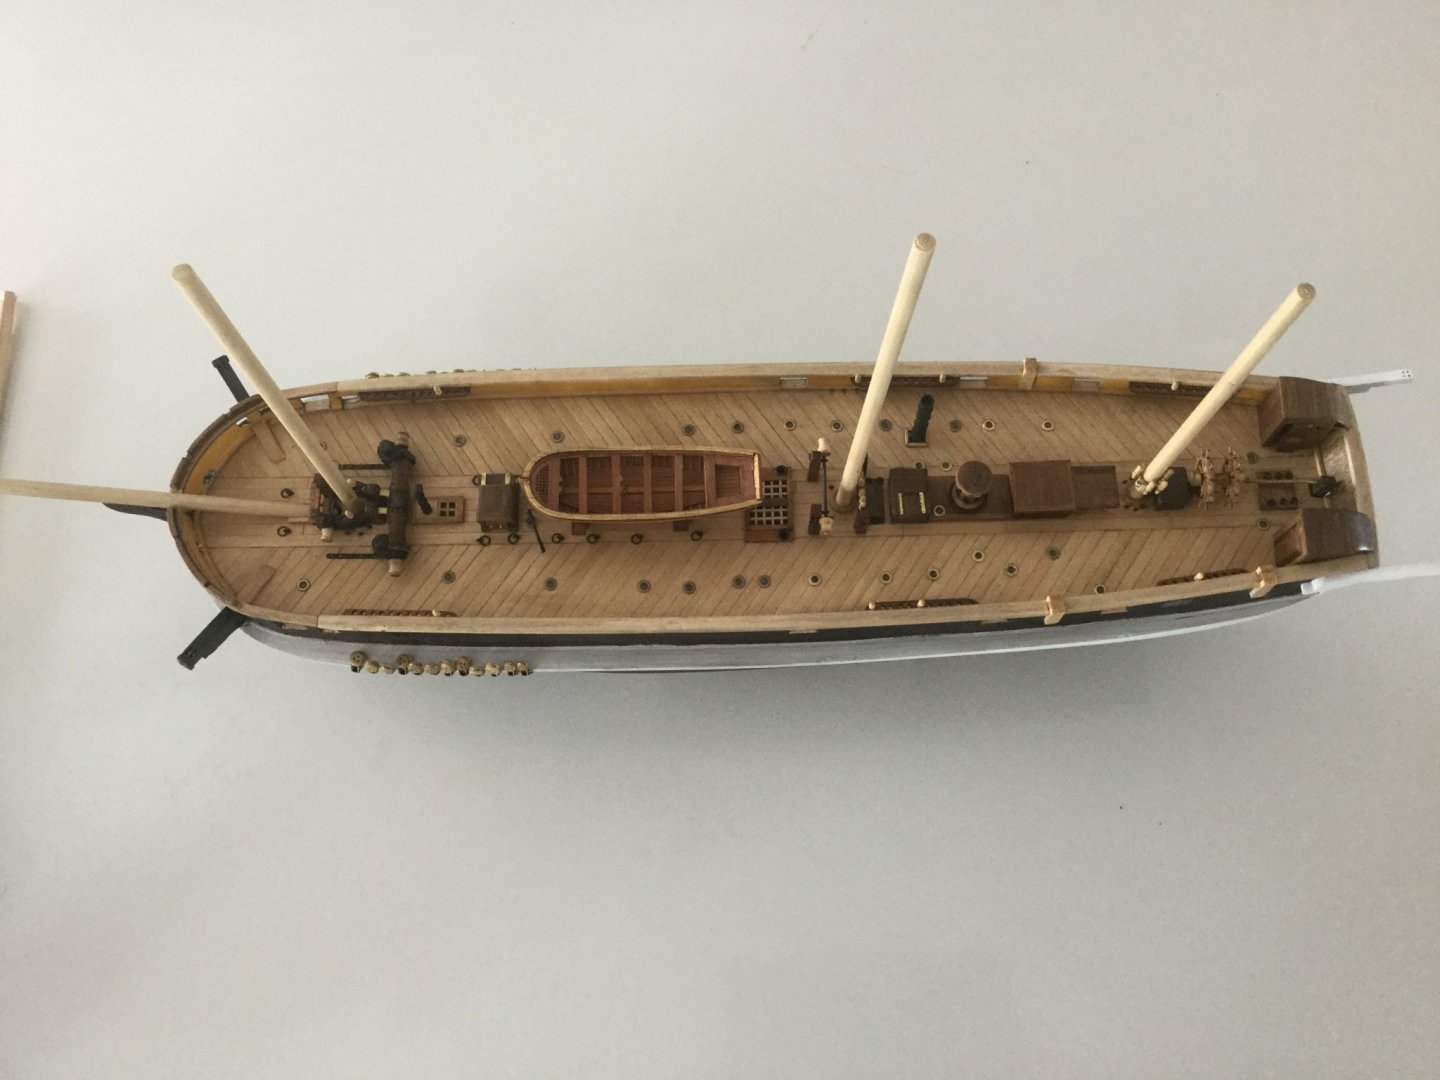
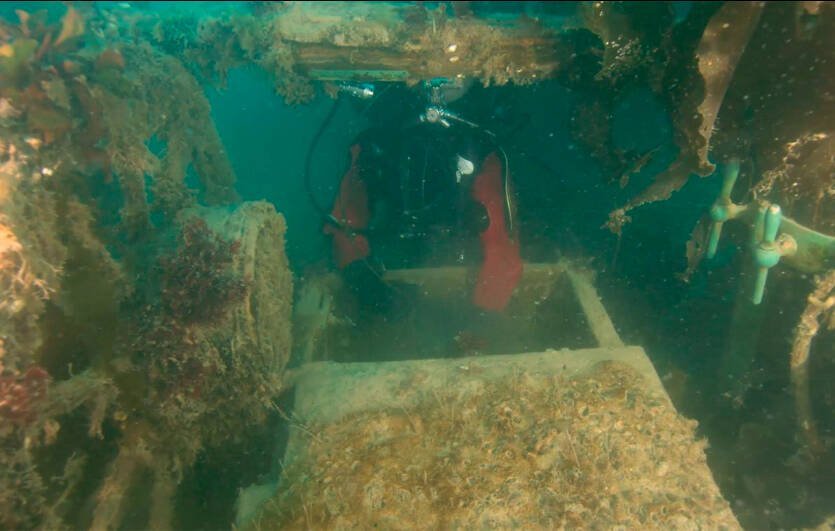
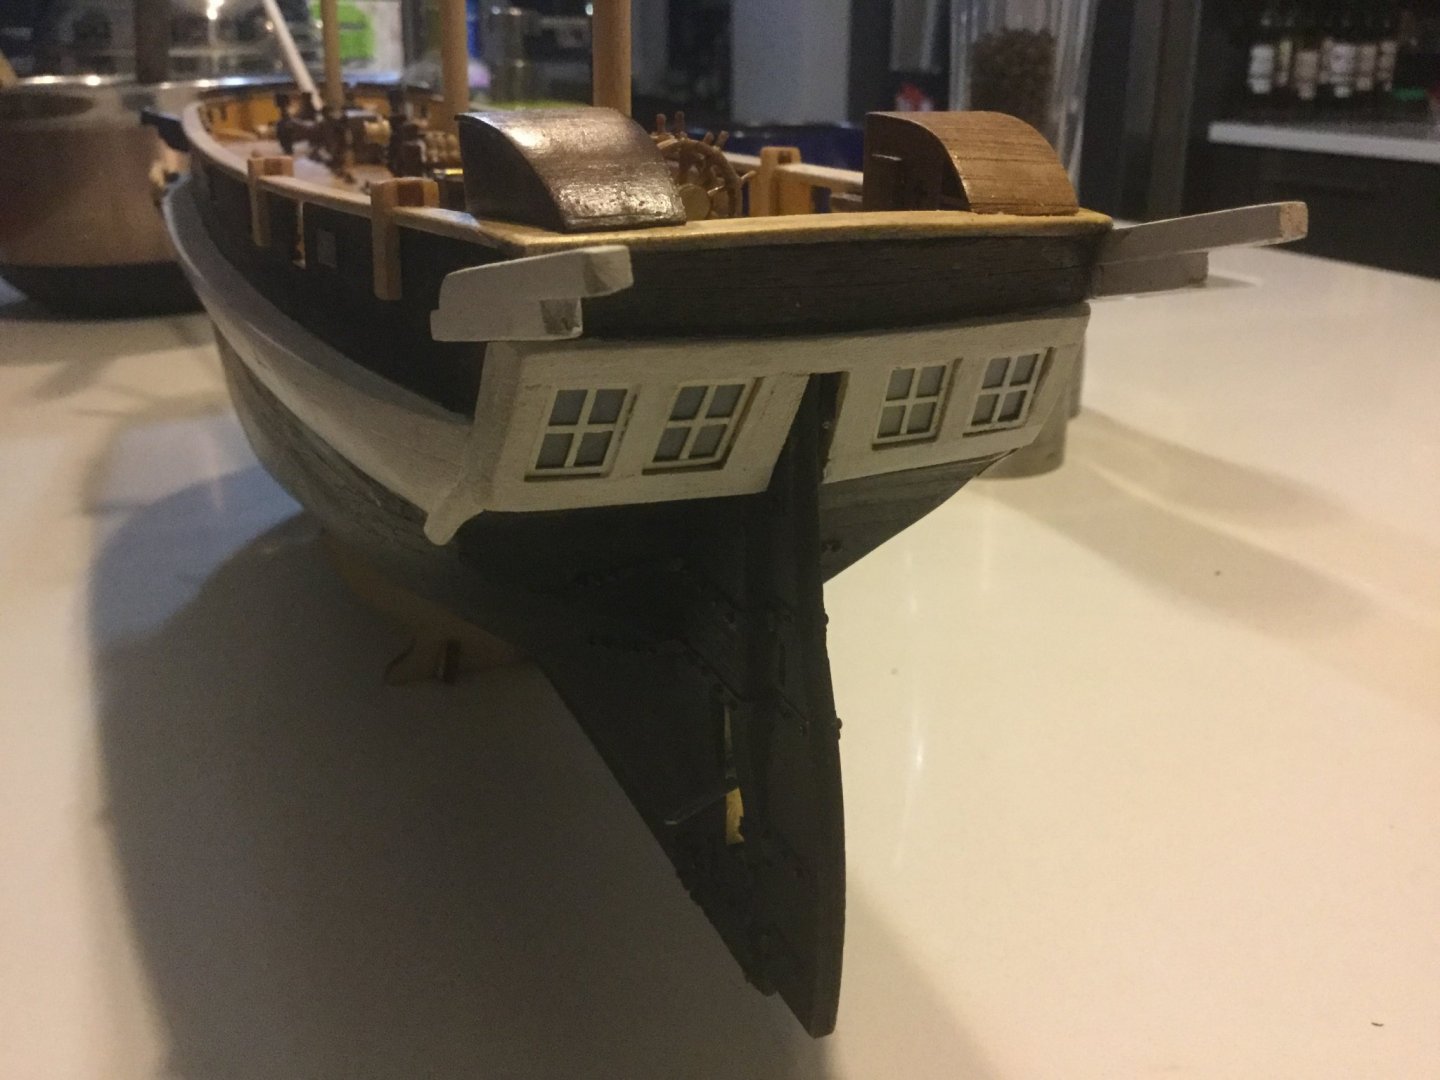
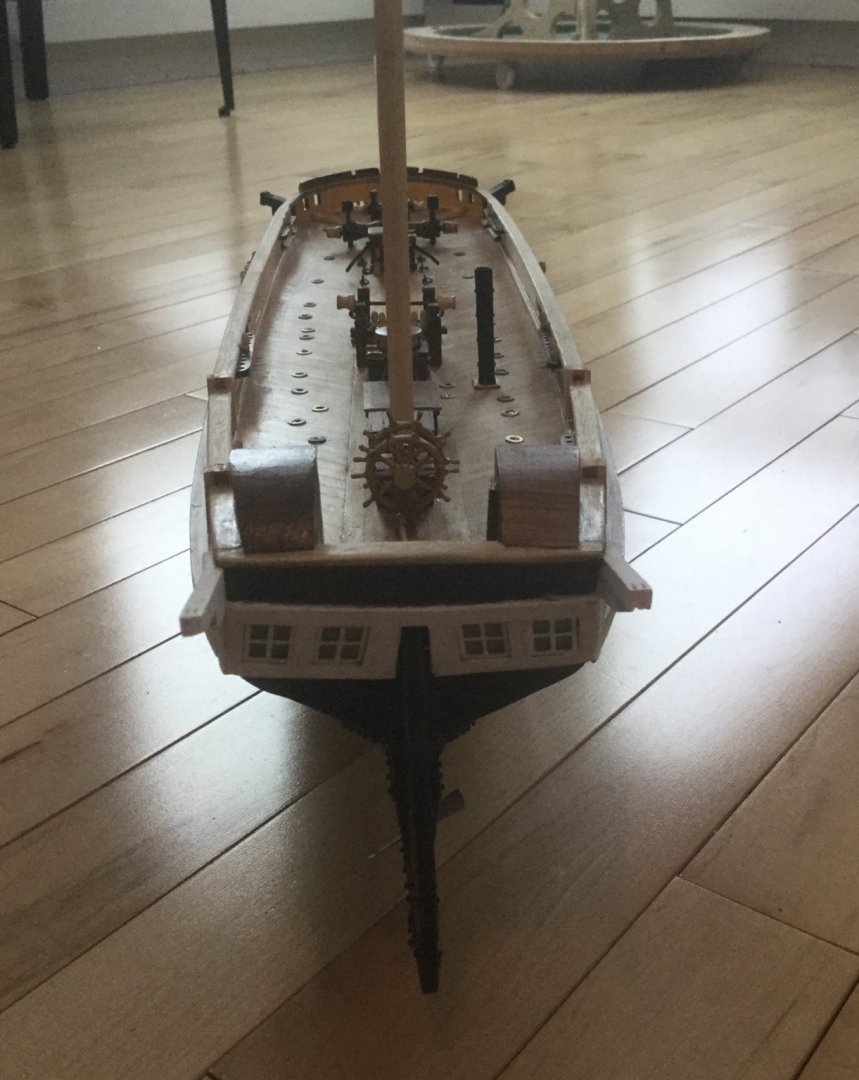
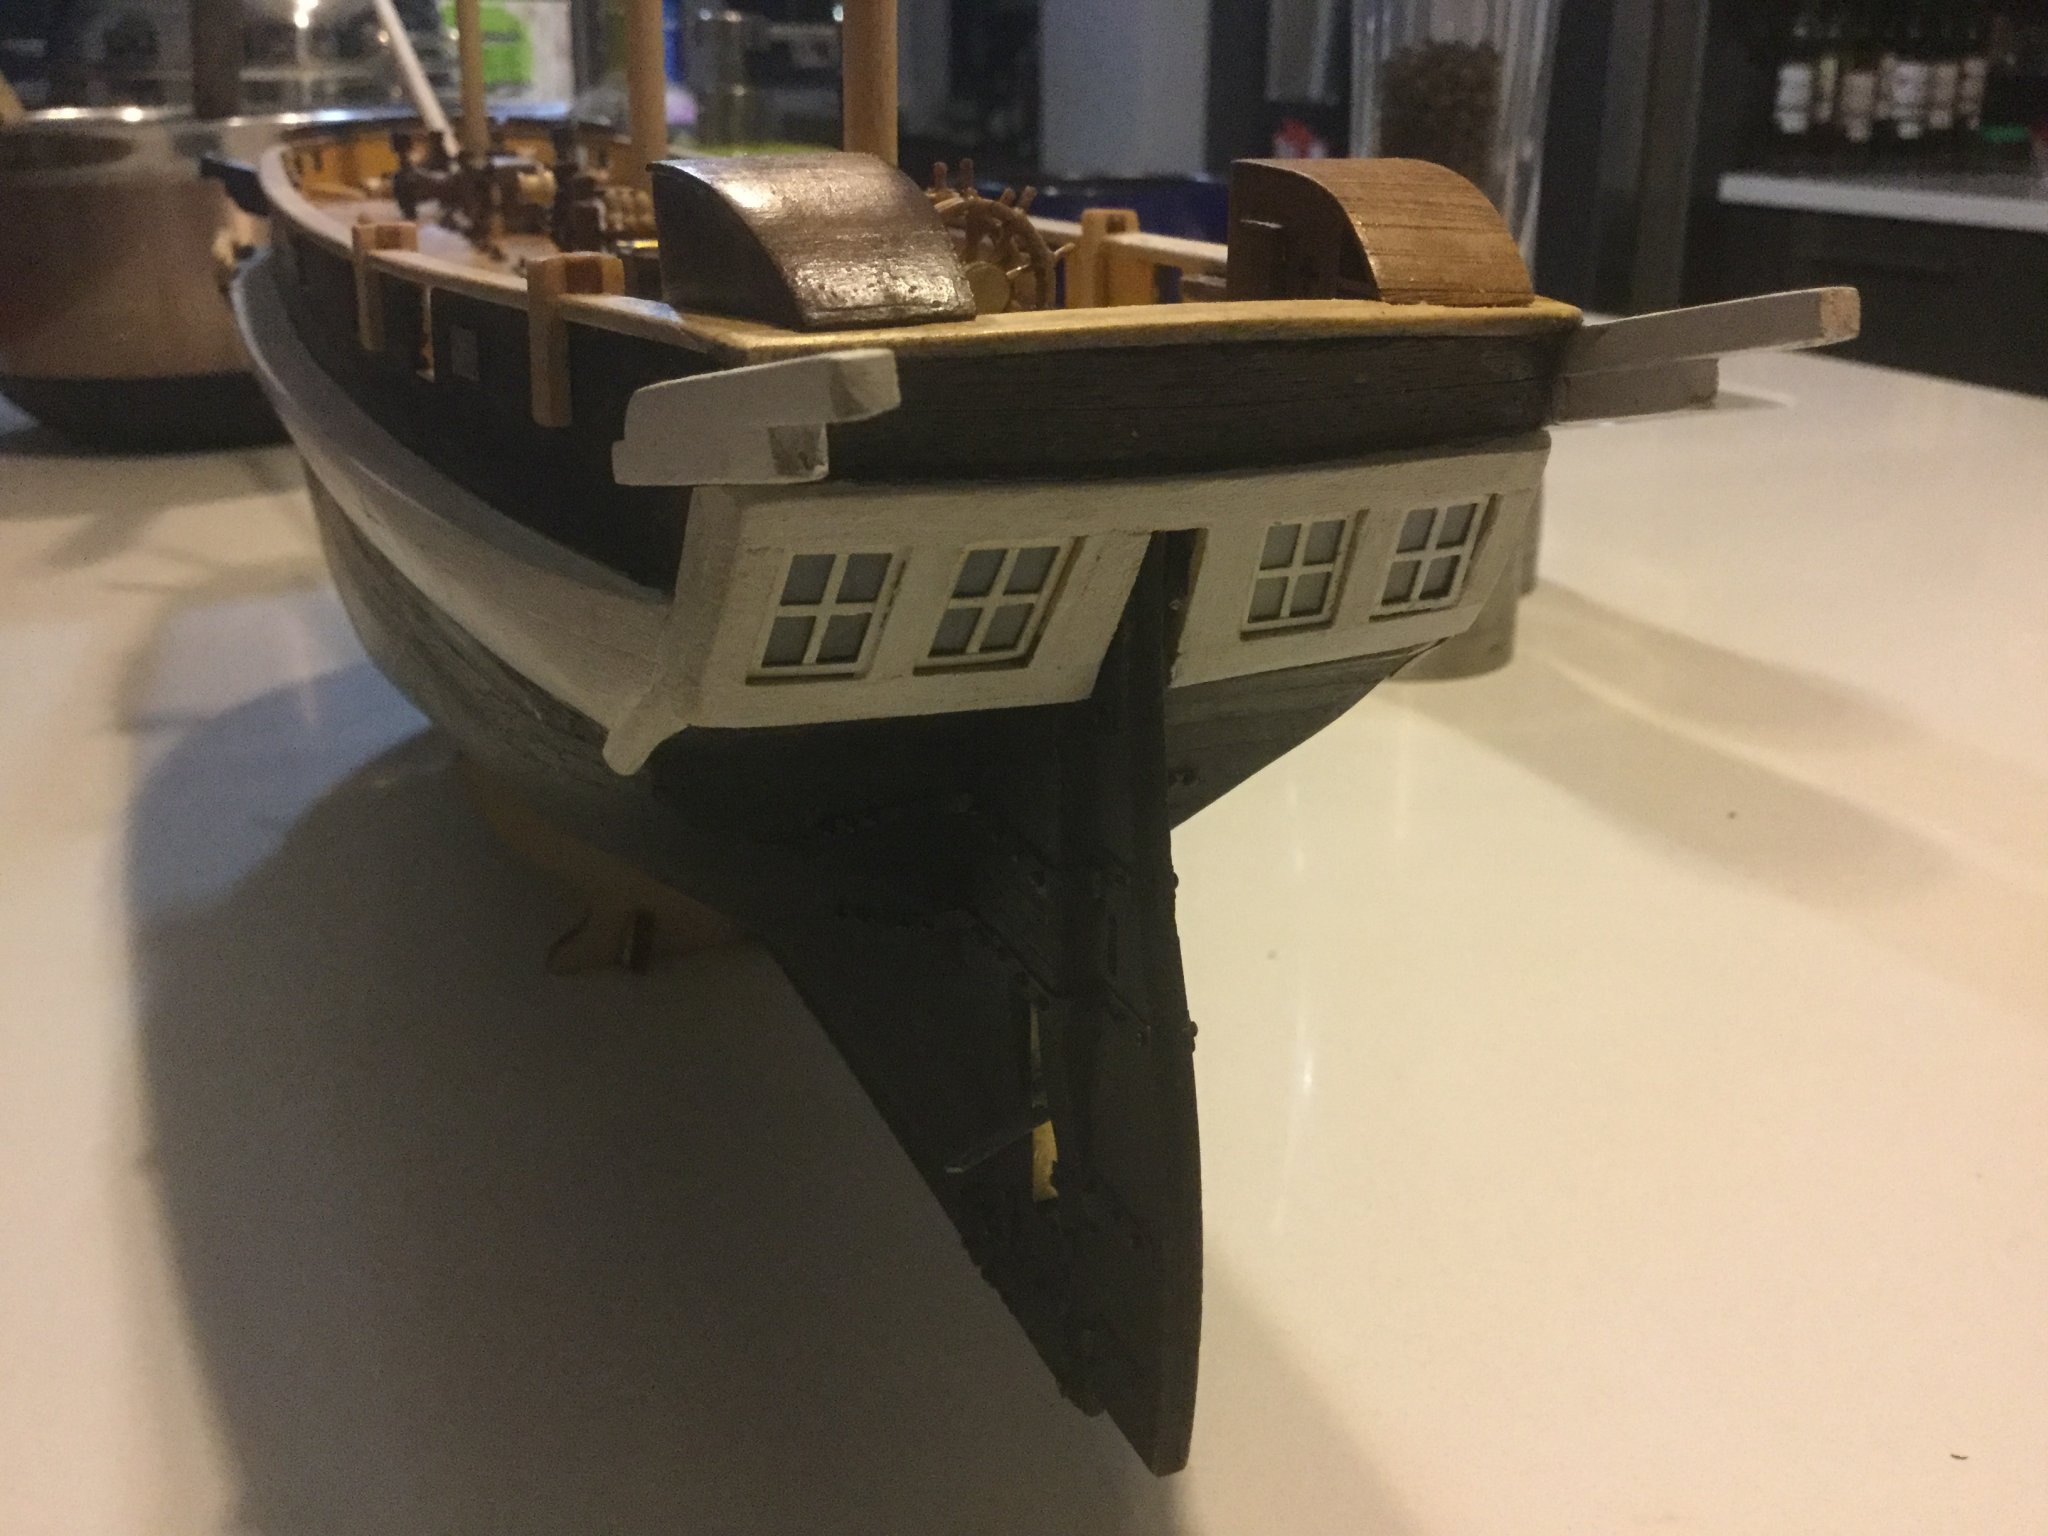
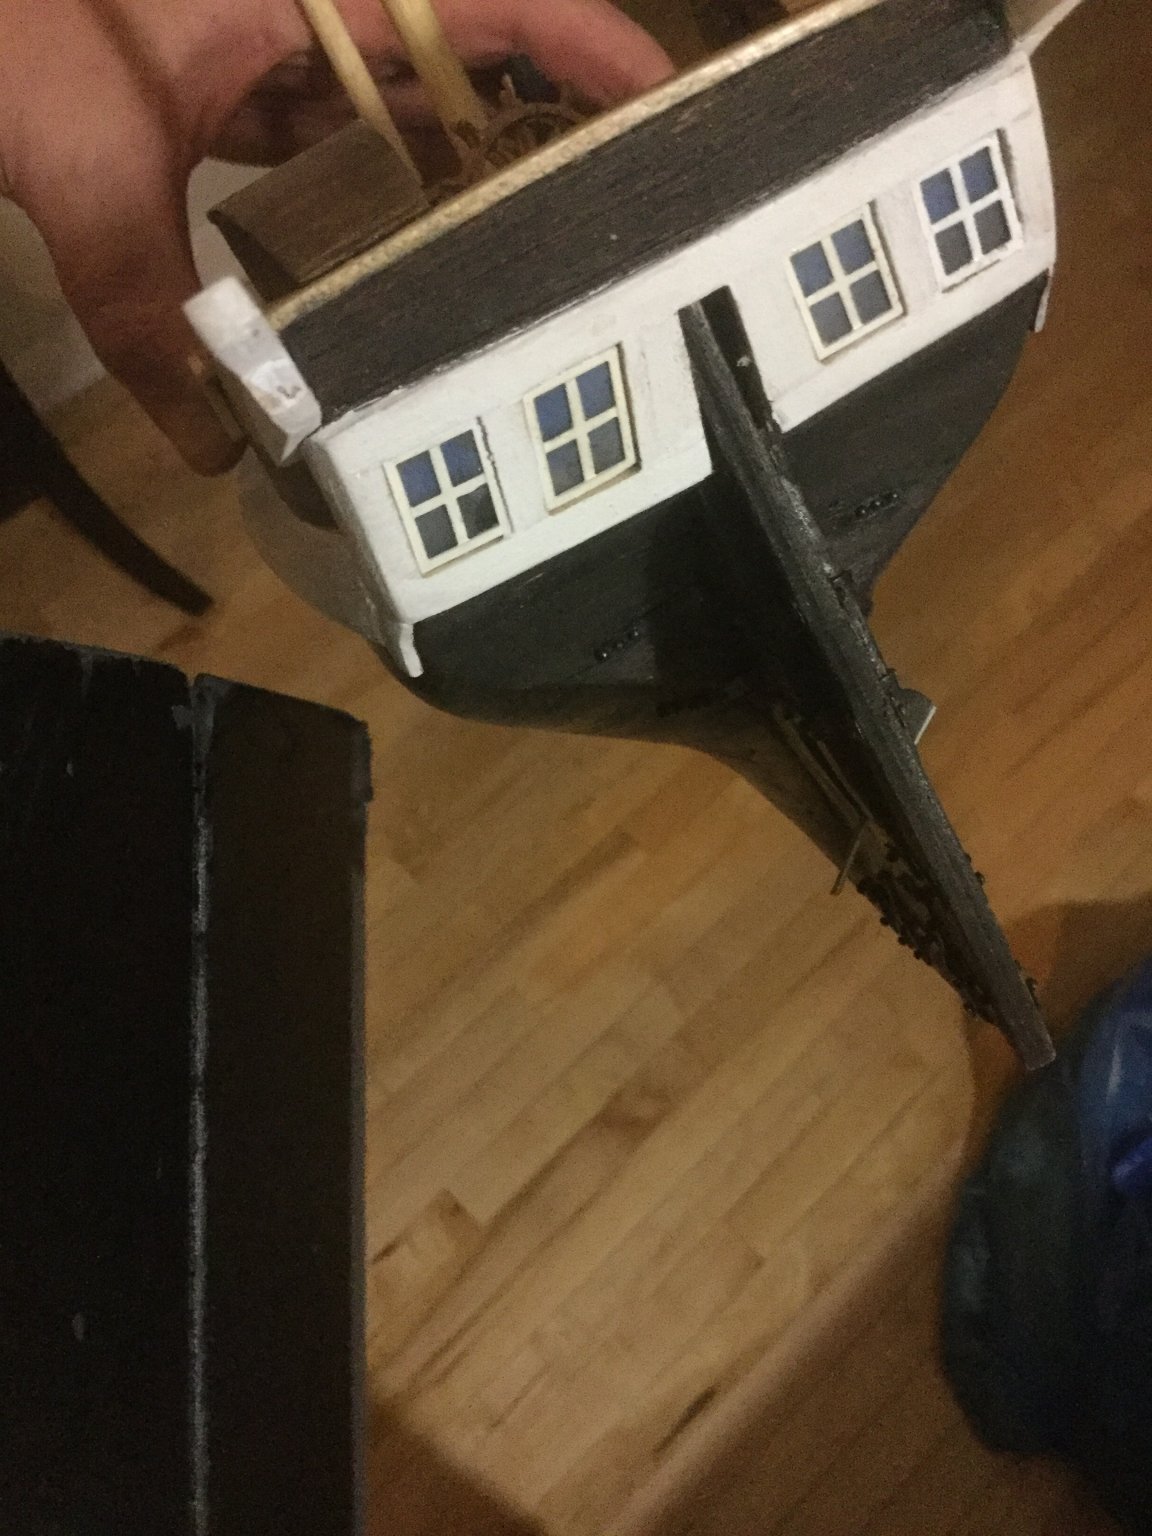
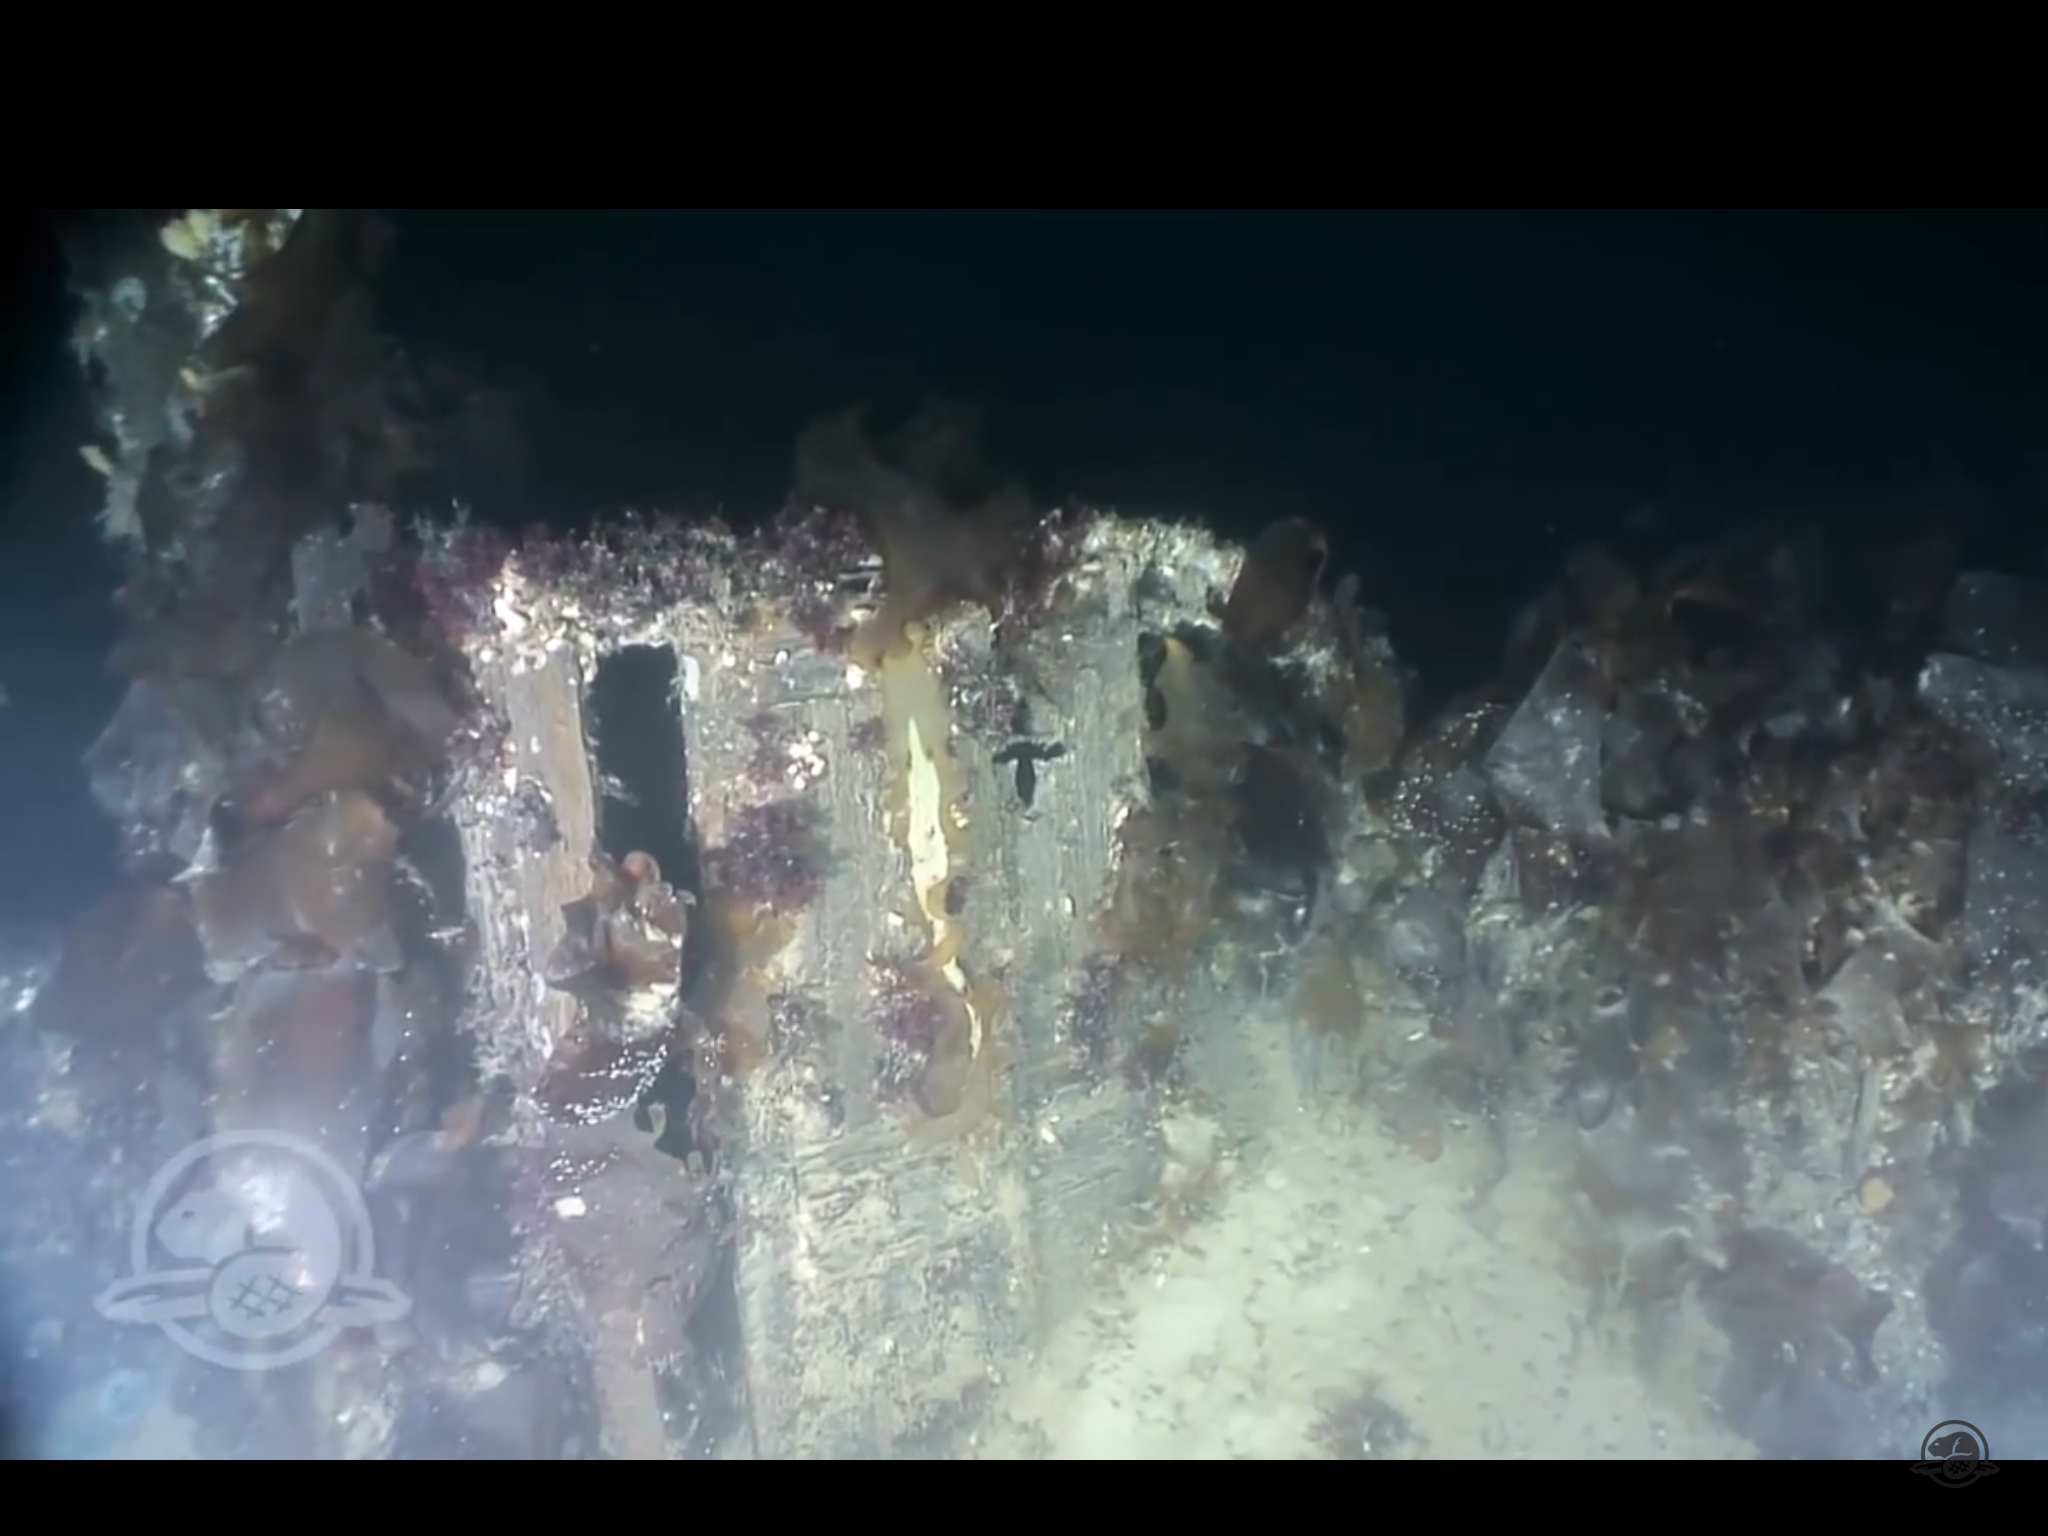
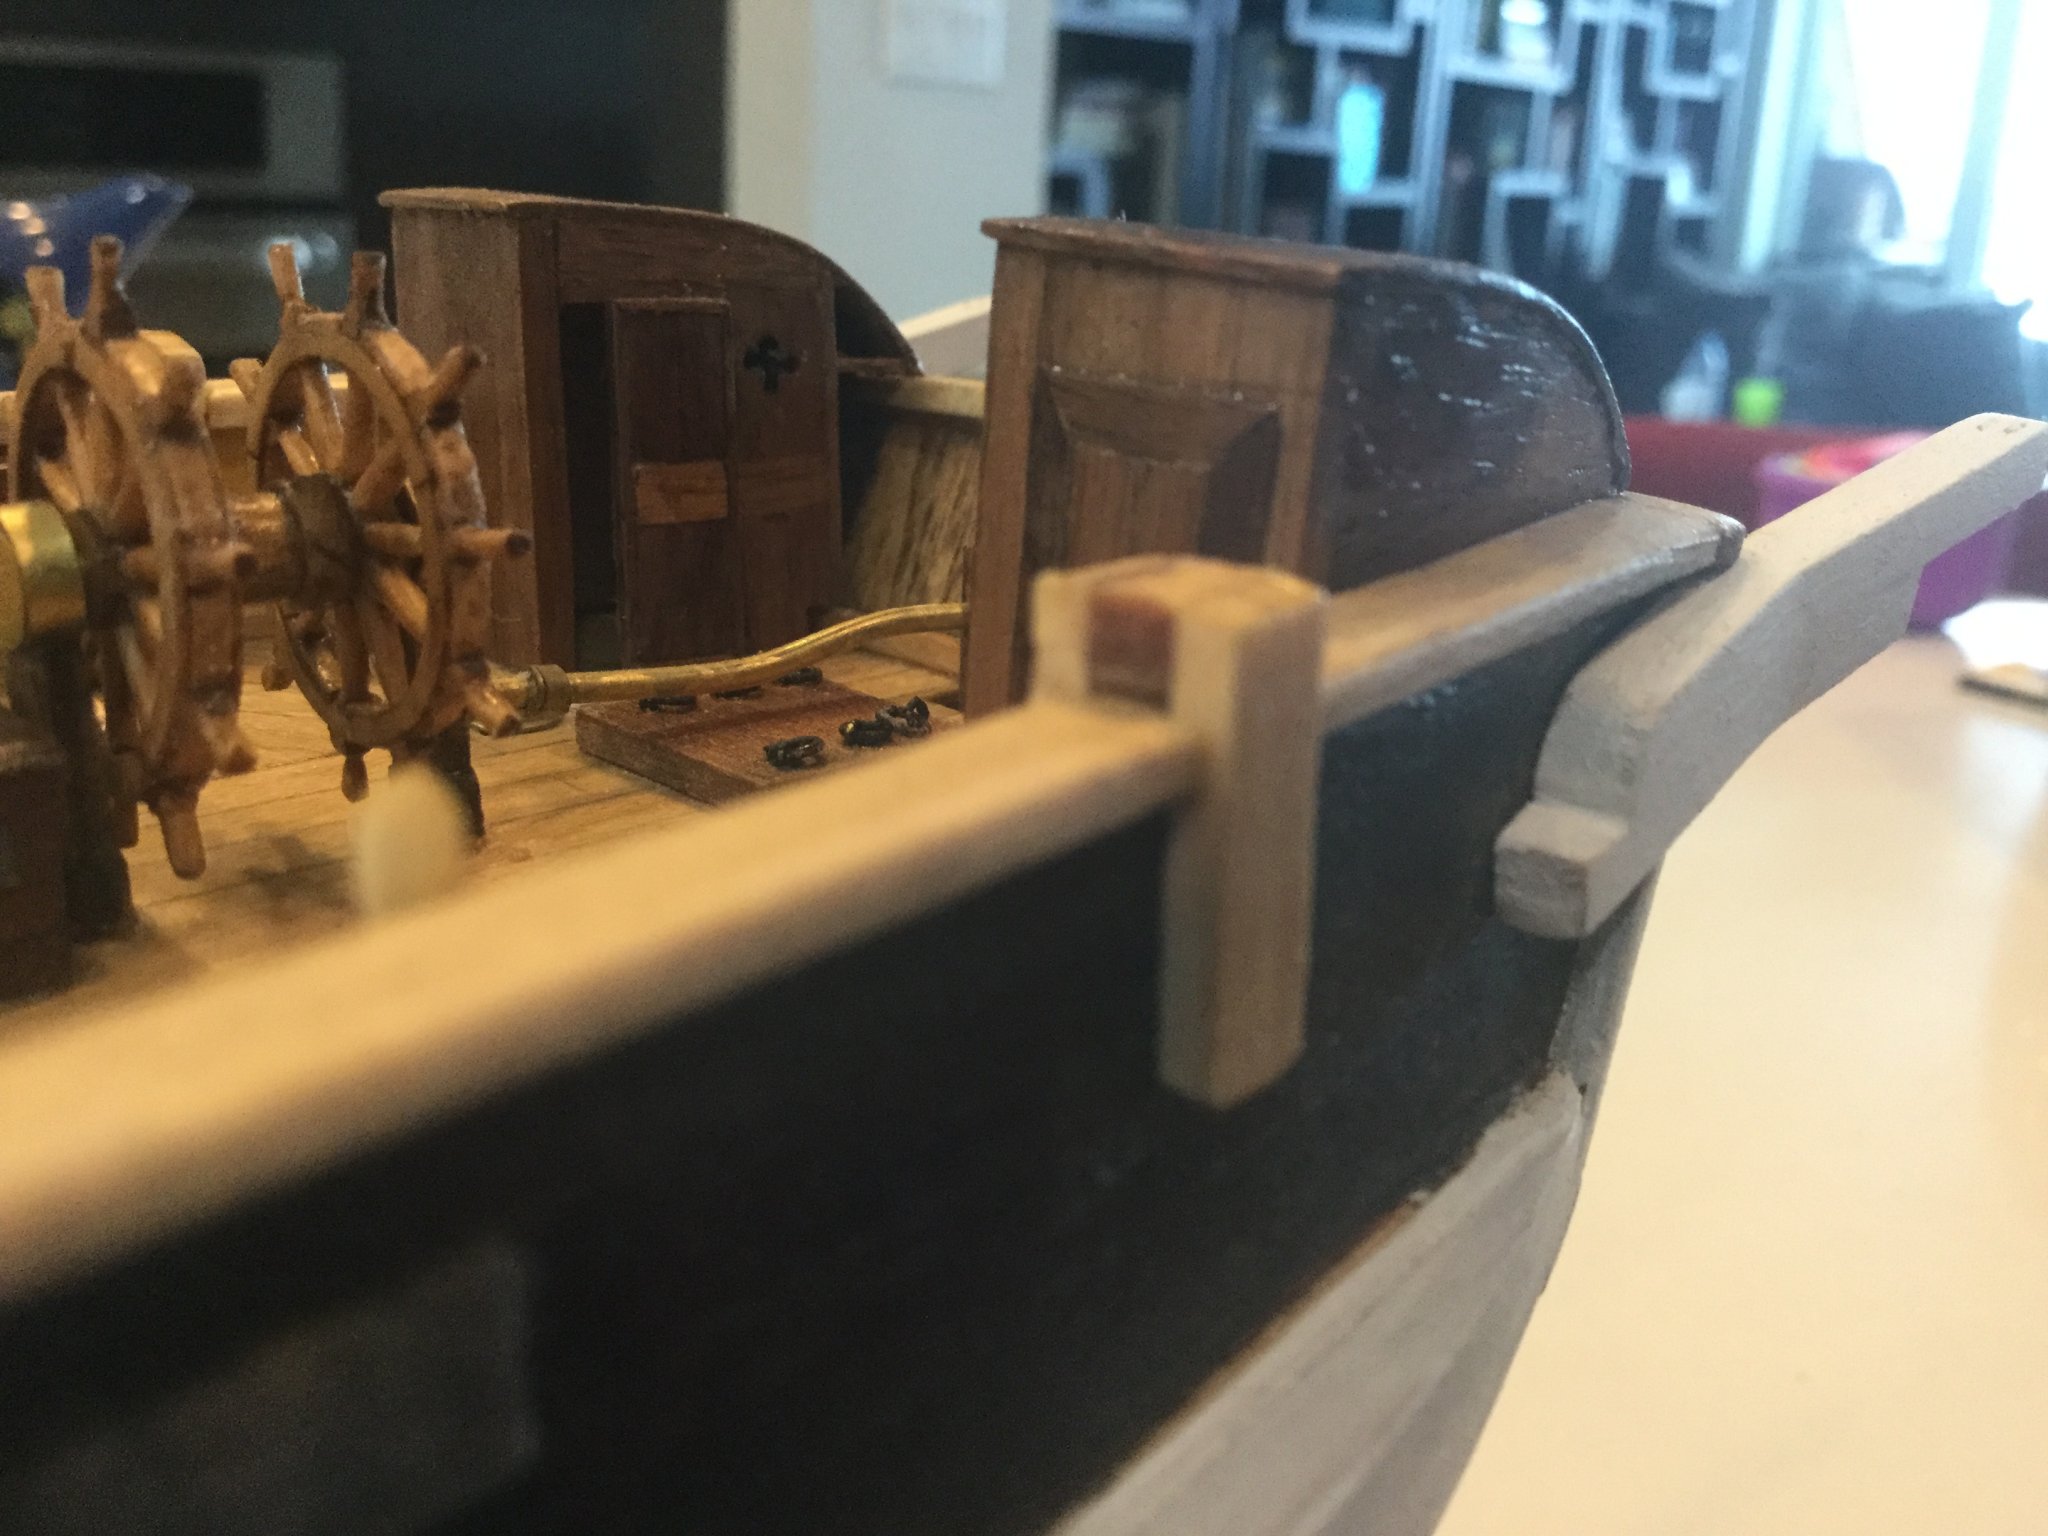
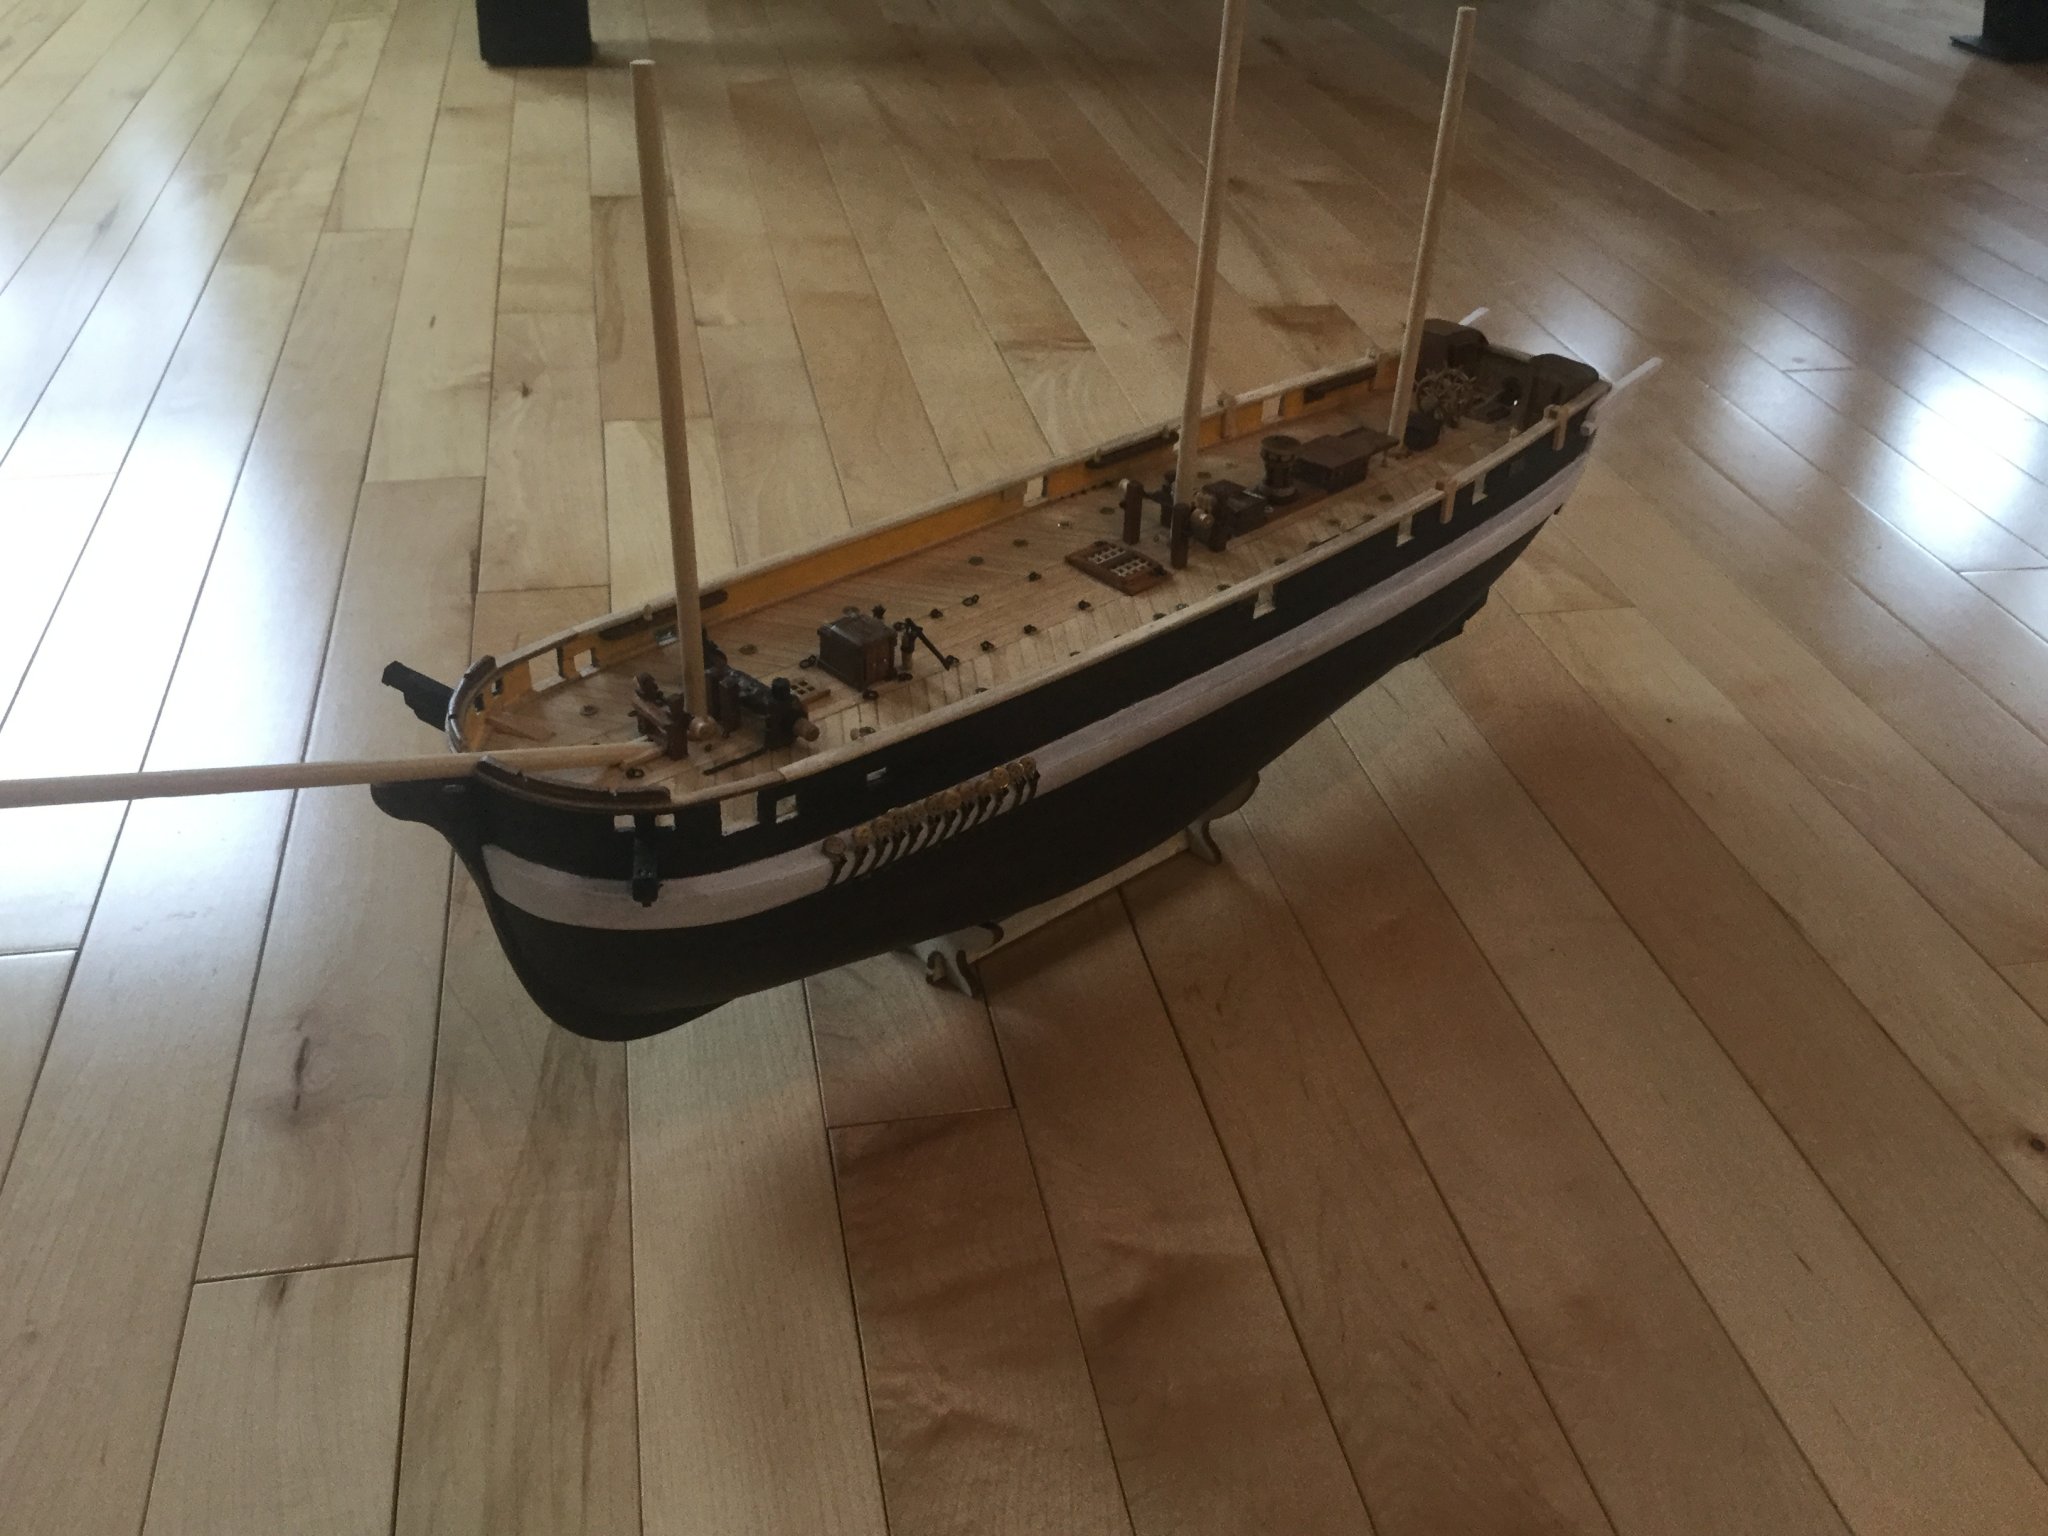
Here is some more progress on the Terror. Plans show a pair of little deckhouses on either side of the rudder-head. It's not clear what was inside these deckhouses or where the doors were on them. Fortunately one of them flashes past the screen on one of Parks Canada's videos of the wreck. In Matthew Betts' blog on the subject of the Terror, he describes his research on the subject and it's his opinion, I think, that the starboard-side one contained a "seat of ease" while the port one was maybe a storage locker. It's all rather hard to tell, but the wreck photograph clearly shows the starboard biffy with a sliding door and little cross-shaped ventilation hole. So, I employed artistic license and made a starboard-side toilet and a port-side storage locker. Initially I painted the first one I made white, as it possibly was on the original ship, but this made it look toy-like and I didn't like the result, so I re-made the deckhouses with the walnut planks varnished. Even though this might actually be LESS realistic, it looks a lot better. I had a hard time making the ventilation hole neatly, but it's so small you need a magnifying glass to see it anyway. Here are some pictures of the model as she stands today, plus the wreck image showing the starboard-side toilet. On the model I left the door partly open because that's how it is now on the wreck.


- Keith Black, JeffT, GrandpaPhil and 3 others
-
6


HMS Terror by clearway - FINISHED - OcCre - 1:75 - upgraded
in - Kit build logs for subjects built from 1801 - 1850
Posted · Edited by Keith S
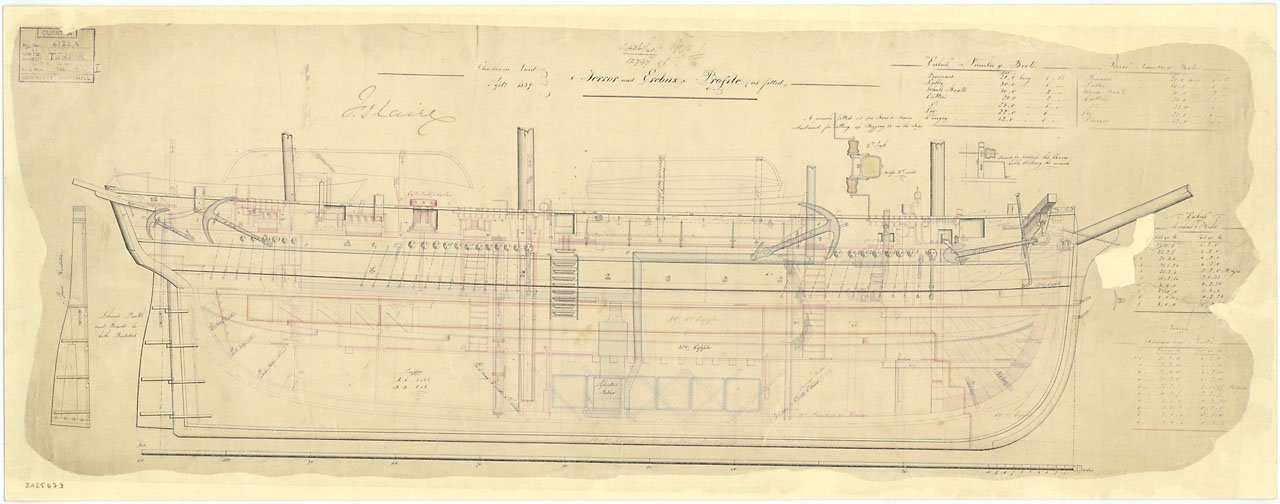
Good question! I assume there would be cranes/davits located everywhere there is boat-storage depicted. On the side-view I purchased from the museum, there are davits in all the locations in the kit: a pair between the mizzen and the stern, another pair between the main and mizzen, and a third pair between the main and foremast. The ones between the main and foremast seem to be mounted outside the bulwarks, and there is a tiny hand-written note there which I will have to use my wife's reading-glasses to read. Let me see if I can make it out. It says: "This upright fitted but (illegible) stored away") the word I can't work out seems to be "un-something". "Unshipped", maybe?
Perhaps these midships ones were meant to be removed when not in use. I can't imagine there's copyright on this ancient material, so I'll take some pictures of it.
You can see some stanchion-looking things depicted in the waist area, not located on the same brackets as the davit uprights the way it would seem from the section-view. There is some mysterious stuff going in in this area (well everywhere, really) I can see where the elmtree pumps are located aft of the companionway, which I've included in my model. The boats do not seem to be stored on an elevated platform, like they are in the kit, (and my model) but seem to be sitting on deck in a big pile. There are ring-bolts depicted at intervals along the bulwarks; and some mysterious structure abeam the main skylight that seems to depict the lateral boat-storage beams being mounted on cheeks attached to the davits. Also there's some more detail of the mysterious bridge-like "ice plank" which is shown on all the draughts, but without much detail. It appears to have permanent small uprights bolted to the outer bulwark with its aft edge attached somehow to the boat-plank. Those square wooden blocks on the bulwarks still don't seem to have an apparent function. Maybe they're swivel-gun mounts, for signal cannon? This is a very mysterious ship with all her modifications and weird specialized equipment. In the bows, you'll see two different locations for the bowsprit. I believe Erebus is the configuration depicted in the draughts, while the location of the bowsprit partners immediately forward of the foremast (which is what the kit depicts) is correct for Terror.
Also there's some chain-plate detail there for you.
EDIT: I should point out that this draught is the ANTARCTIC configuration of the ships. They actually depict the 32-oz copper plating, waterline, and 80-oz copper keel-plates. But we know the copper was removed for the Arctic voyages. Other than that, I think the Arctic modifications were pretty much only the rudder-post and propeller-aperture work..as well as the engine of course.