HOLIDAY DONATION DRIVE - SUPPORT MSW - DO YOUR PART TO KEEP THIS GREAT FORUM GOING! (Only 13 donations so far - C'mon guys!)
×


Bill97
-
Posts
2,704 -
Joined
-
Last visited
Content Type
Profiles
Forums
Gallery
Events
Everything posted by Bill97
-
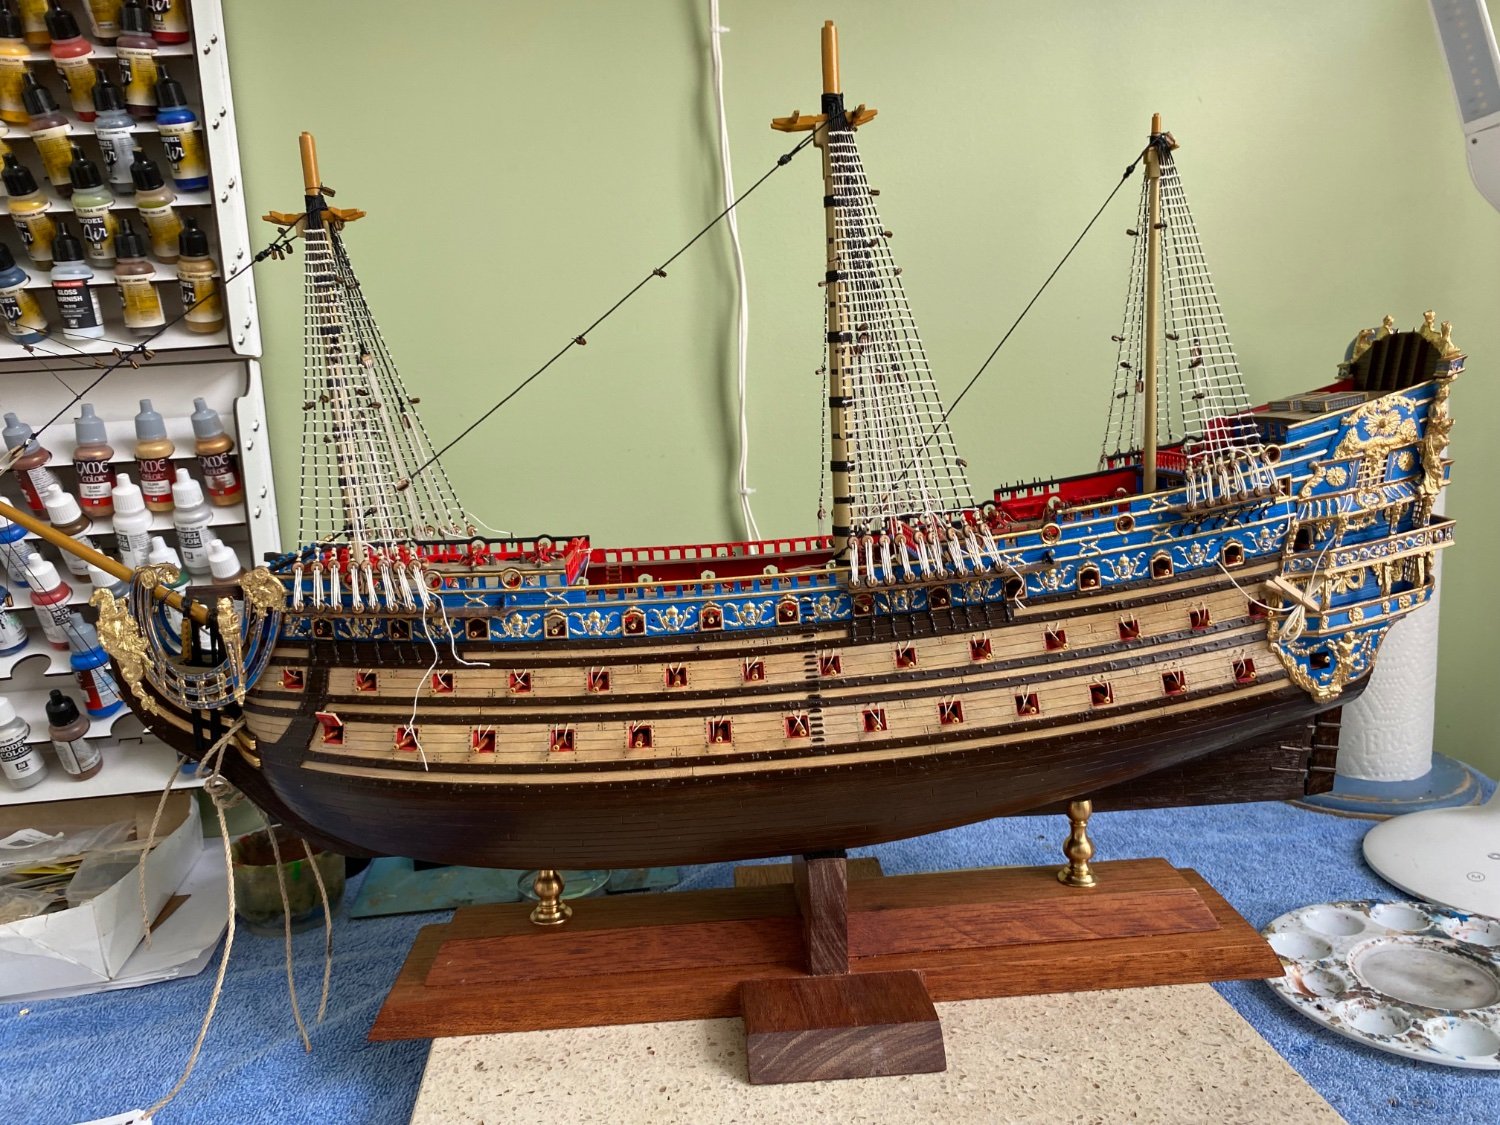
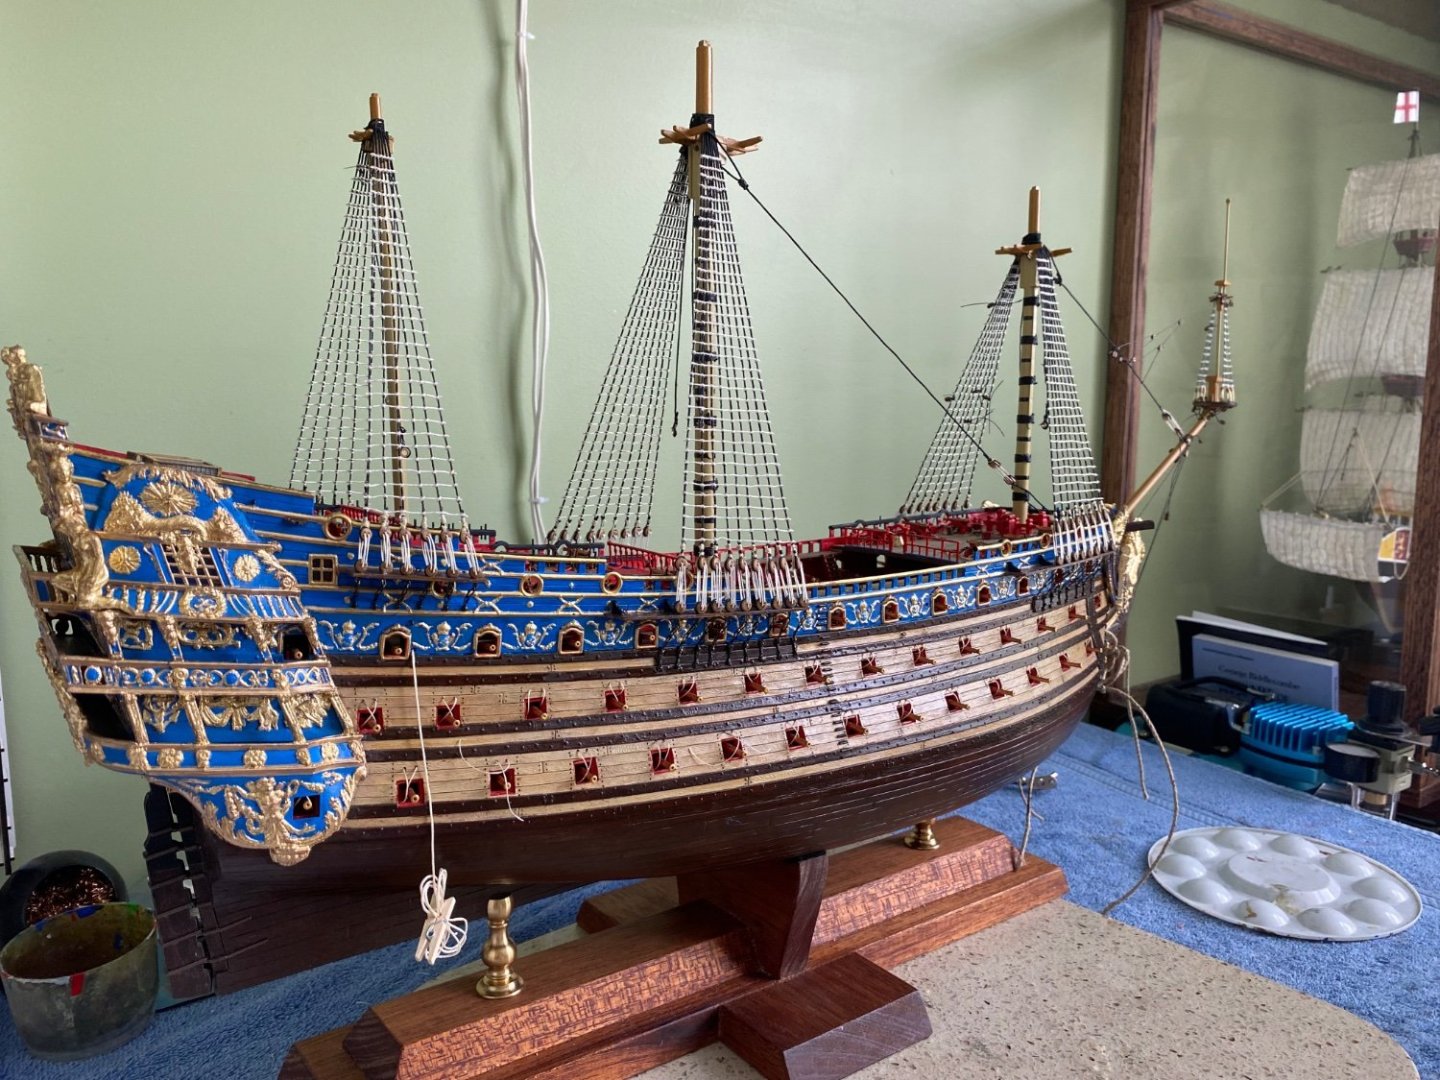
Henry that is exactly everything I did on my HMS Victory.
- 1,508 replies
-
- 1
-

-
- Le Soleil Royal
- Heller
- (and 1 more)
-
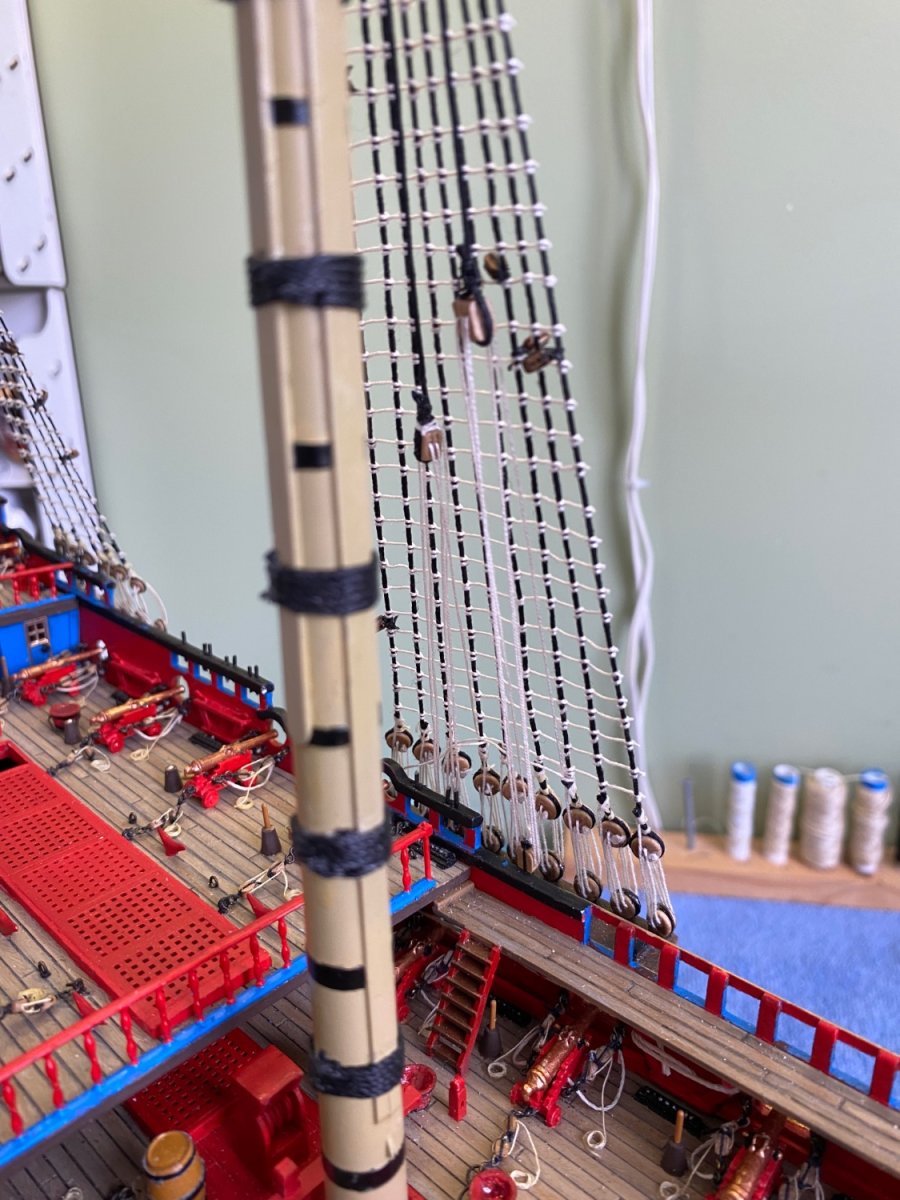
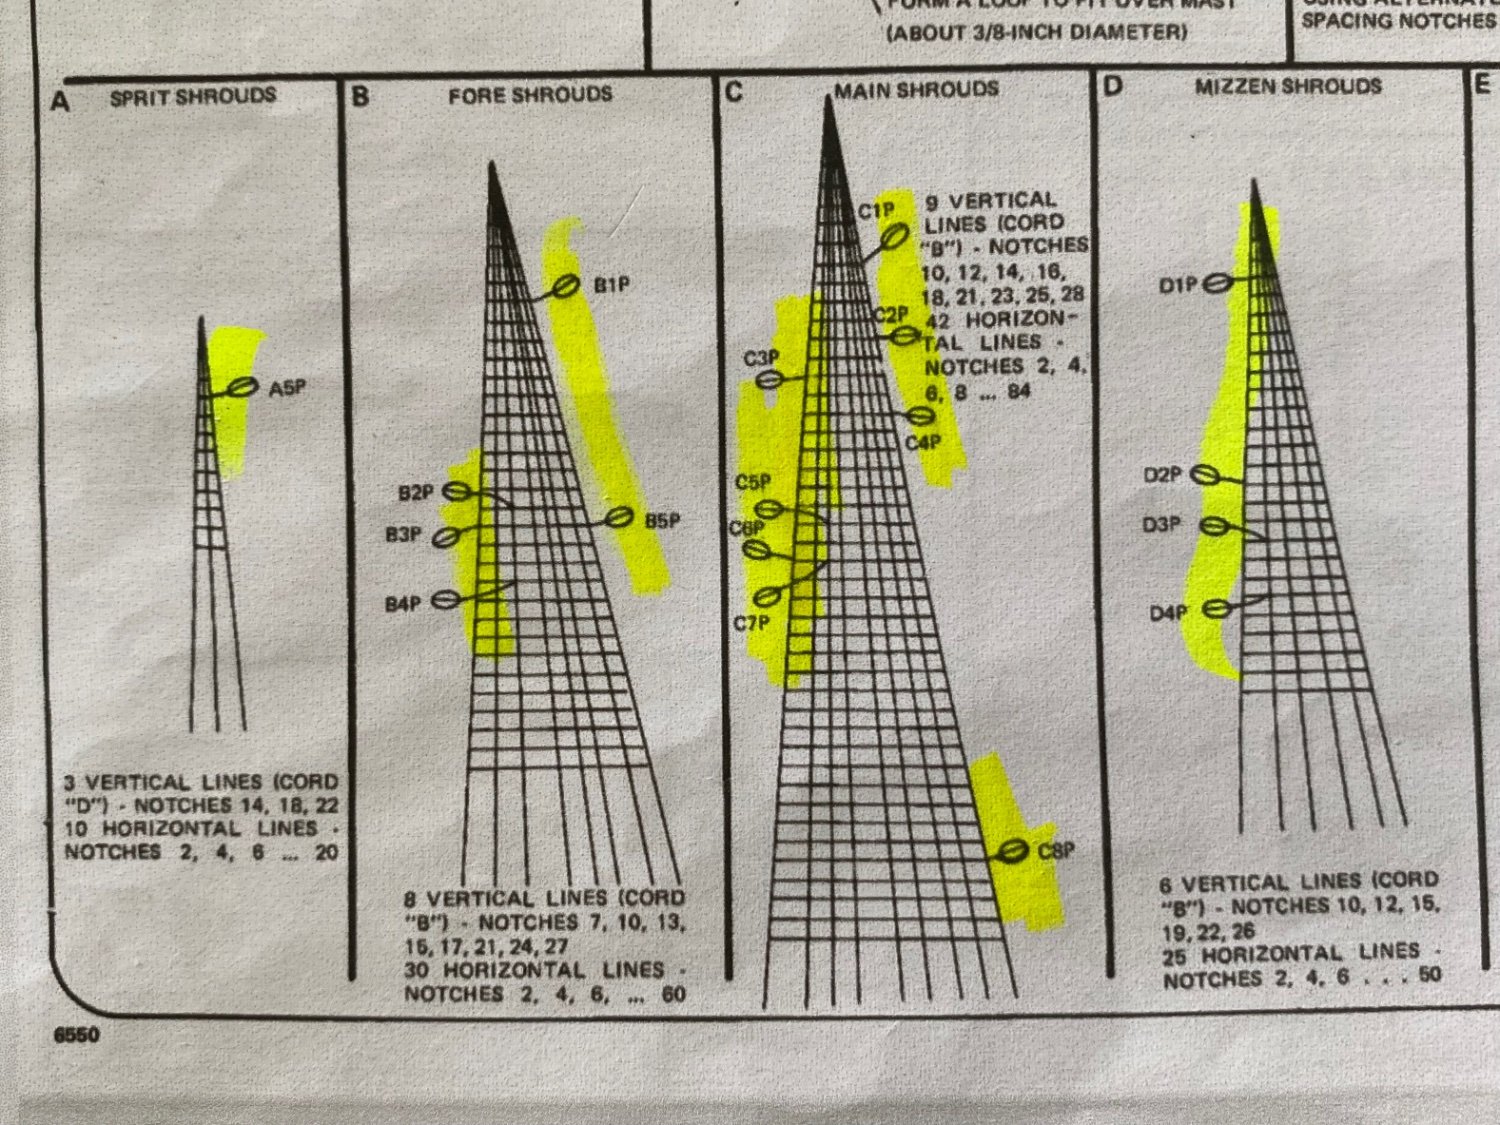
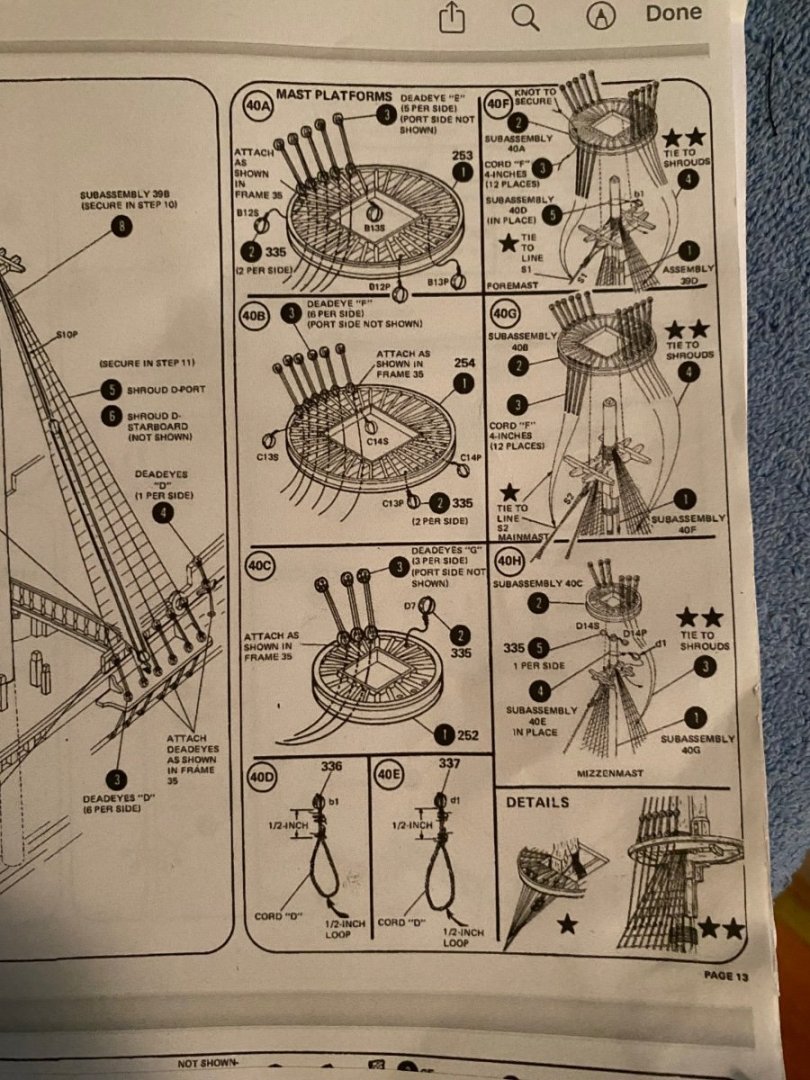
Ok gentlemen a little early Sunday morning discussion. I am reading and comparing my Heller instructions and Anderson’s book on three topics. One is the deadeye/futtock shroud rigging. The Heller instructions describe the process of simply lashing a thread around an appropriate size deadeye, pass the thread through the hole in the top, and then tie the end of the futtock shroud to the lower shrouds. Simple as that. Anderson on page 110 discusses at the end of the 16th century the deadeyes were given a metal “puttock-plate” strop that was passed down through the top. A rope was then hooked or tied to the plate and then tied to the lower shrouds. This was the process for my HMS Victory. Obviously simply tying a thread around the deadeye and passing through the top would be much easier than making metal strops, but may or may not be accurate. Next is the use, or not, of a futtock staff? The Heller instructions do not indicate the need to add one. The French Royal Louis had futtock staffs in 1692, according to Anderson. Last curiosity is the use of catharpins? Again Heller does not address this. Anderson on page 114 has one sentence reference French ships. “In French ships, too, it seems to have been usual to dispense with catharpins up to 1700 at least.” Three curiosity I need to be clear about before moving into this step. Your thoughts?
-
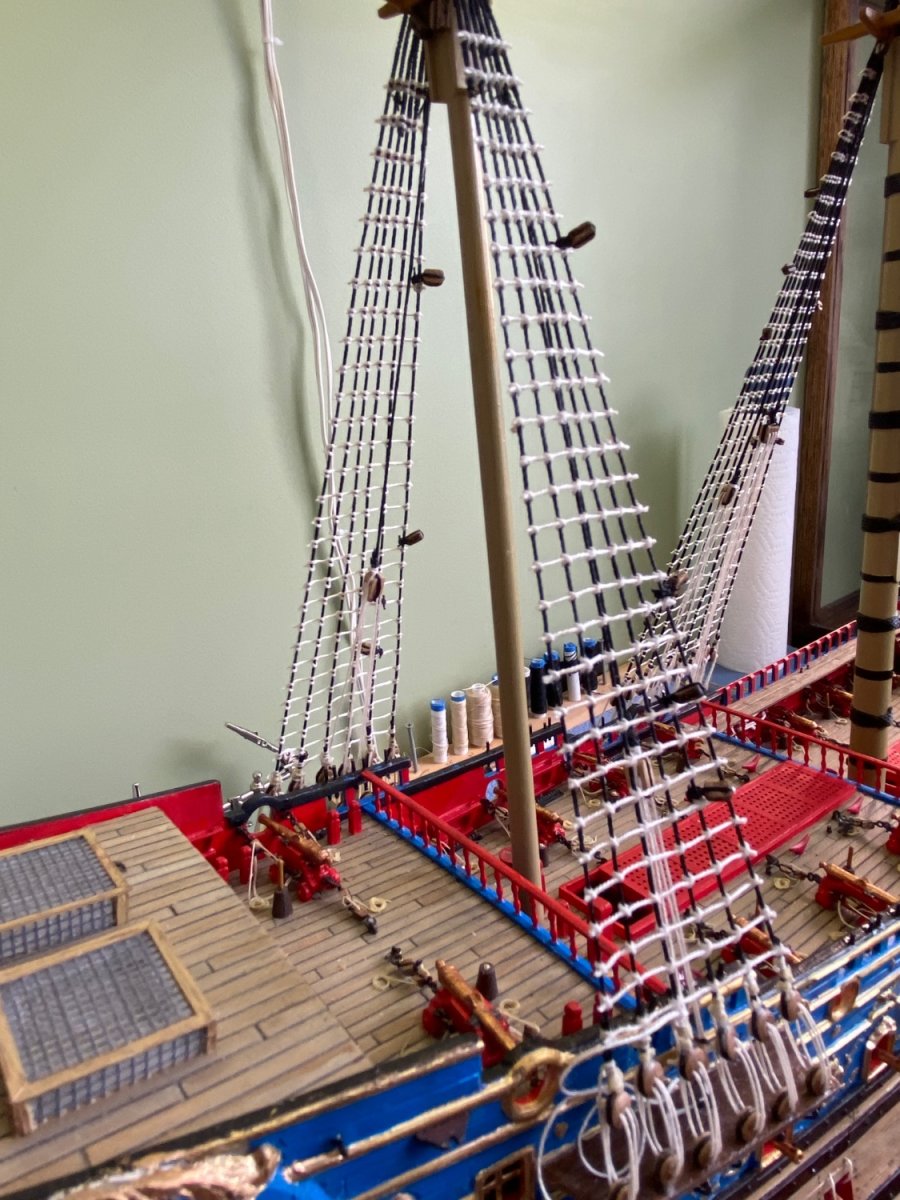
Was looking over my future direction and noticed I had yet to install the mizzenmast stay 😳! Of course had to do that next. As with the fore and main masts I built a stay with a mouse at the top and a block at the bottom. I also made a collar to go around the base of the main mast and added a block to it. Both blocks on the mizzenmast mast stay are double sheave. A lashed them together with a lanyard matching the other two stays.

- 1,508 replies
-
- 3
-
-
- Le Soleil Royal
- Heller
- (and 1 more)
-
Henry your suggestion is right out of the old Heller instructions. It shows moving on next to the tops. The newer addition moves toward the sprityards.
- 1,508 replies
-
- 2
-
-
- Le Soleil Royal
- Heller
- (and 1 more)
-
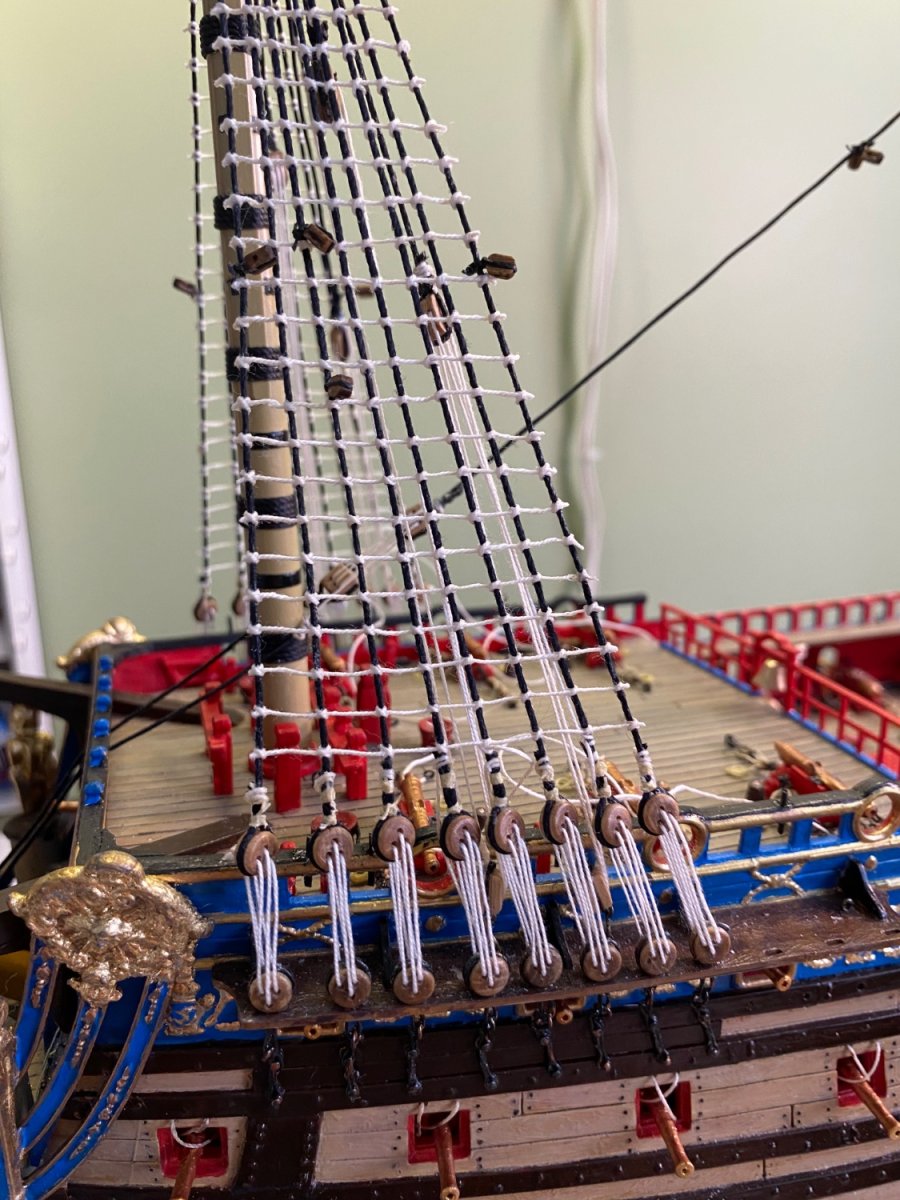
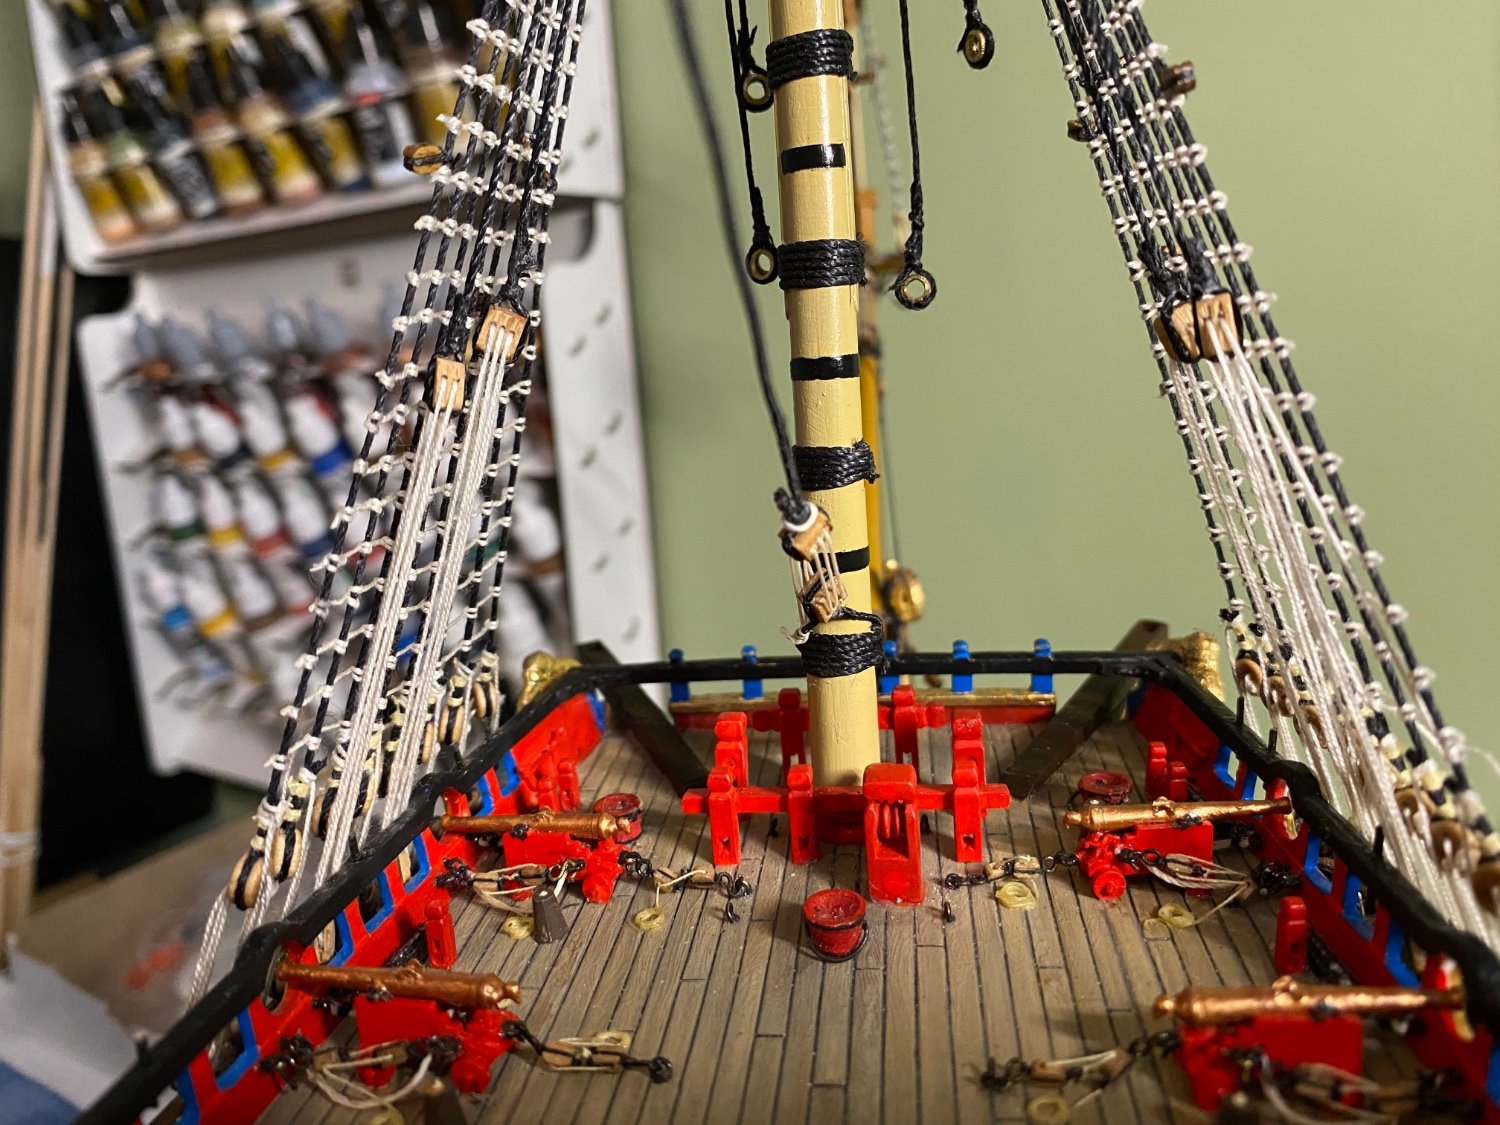
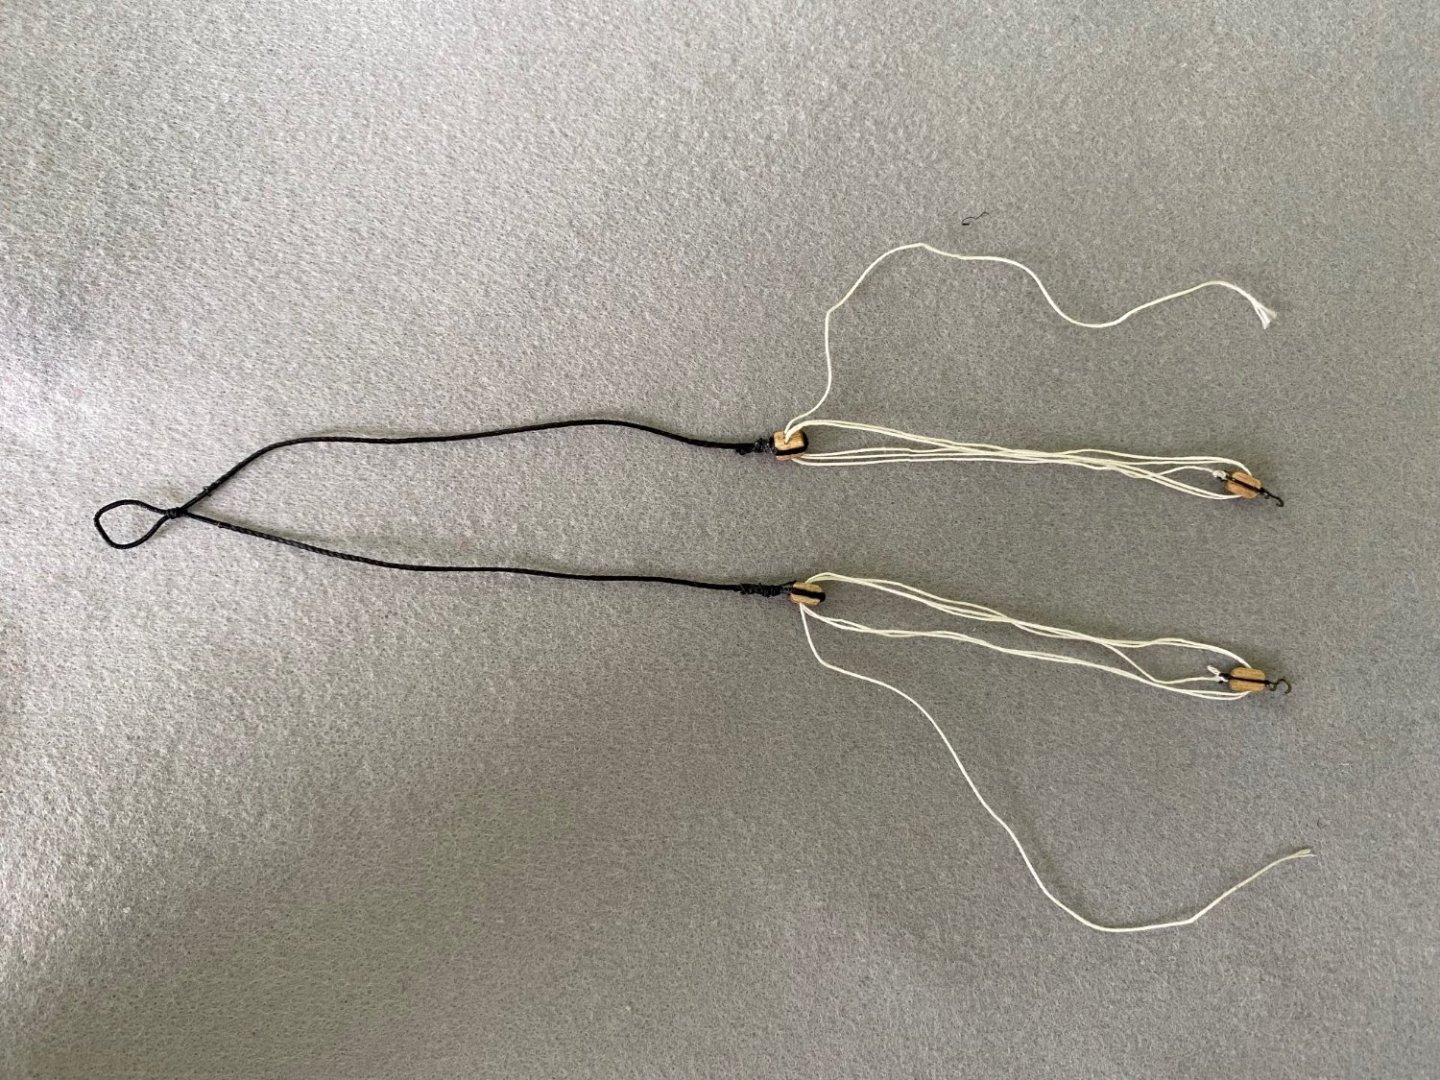
Pendants and tackles fitted for main and mizzenmast. It is tricky to get the threads to run straight between the blocks of the tackle without crossing. I was eventually able to get all 10 tackles straight and acceptable. I now have to decide what to work on next. Instructions show adding and rigging the two yards on the bowsprit. Where would you guys go next?


- 1,508 replies
-
- 1
-
-
- Le Soleil Royal
- Heller
- (and 1 more)
-
Thank you gentlemen. Started switching the mainmast pendants from thimbles to blocks and will rig the tackles today. Then I will need to follow up with the two on the mizzenmast. Will then need to study the instructions to see where I go next.
-
Thanks Michael.
-
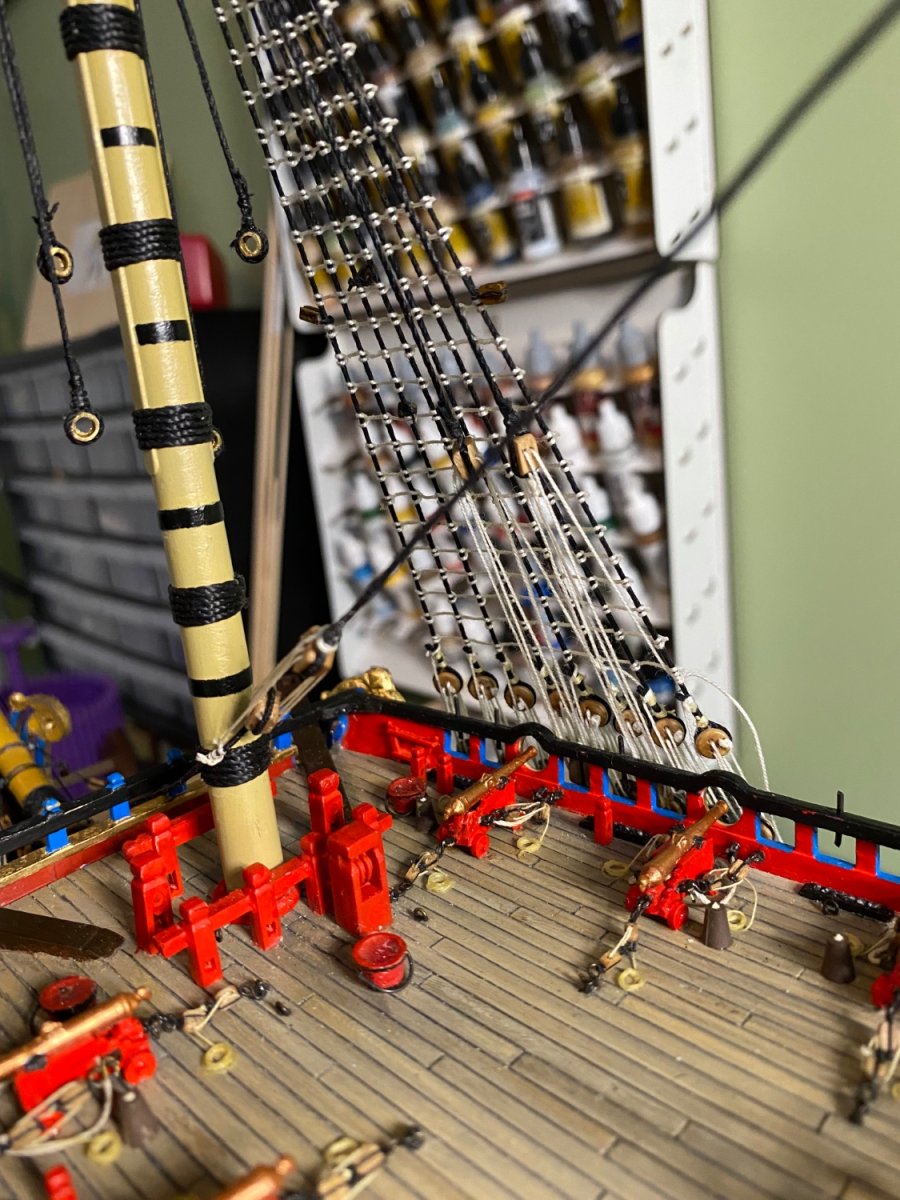
Ok gentlemen correction made to my screw up yesterday. I took the thimbles off and replaced them with the upper blocks of the tackles. Henry I tried your idea of just lashing the blocks to the thimbles but I just could not get a look I was satisfied with. Would the falls which I now have tied at a deadeye have further coiled on the deck for the crew to access? Also need an opinion. I still have the pendants on the main mast with just thimbles. Would have been appropriate for there to be tackles mounted on the foremast and just thimbles on the main? Should I also change them out or display the different functions of the pendants by leaving them with thimbles only?

- 1,508 replies
-
- 4
-
-
- Le Soleil Royal
- Heller
- (and 1 more)
-
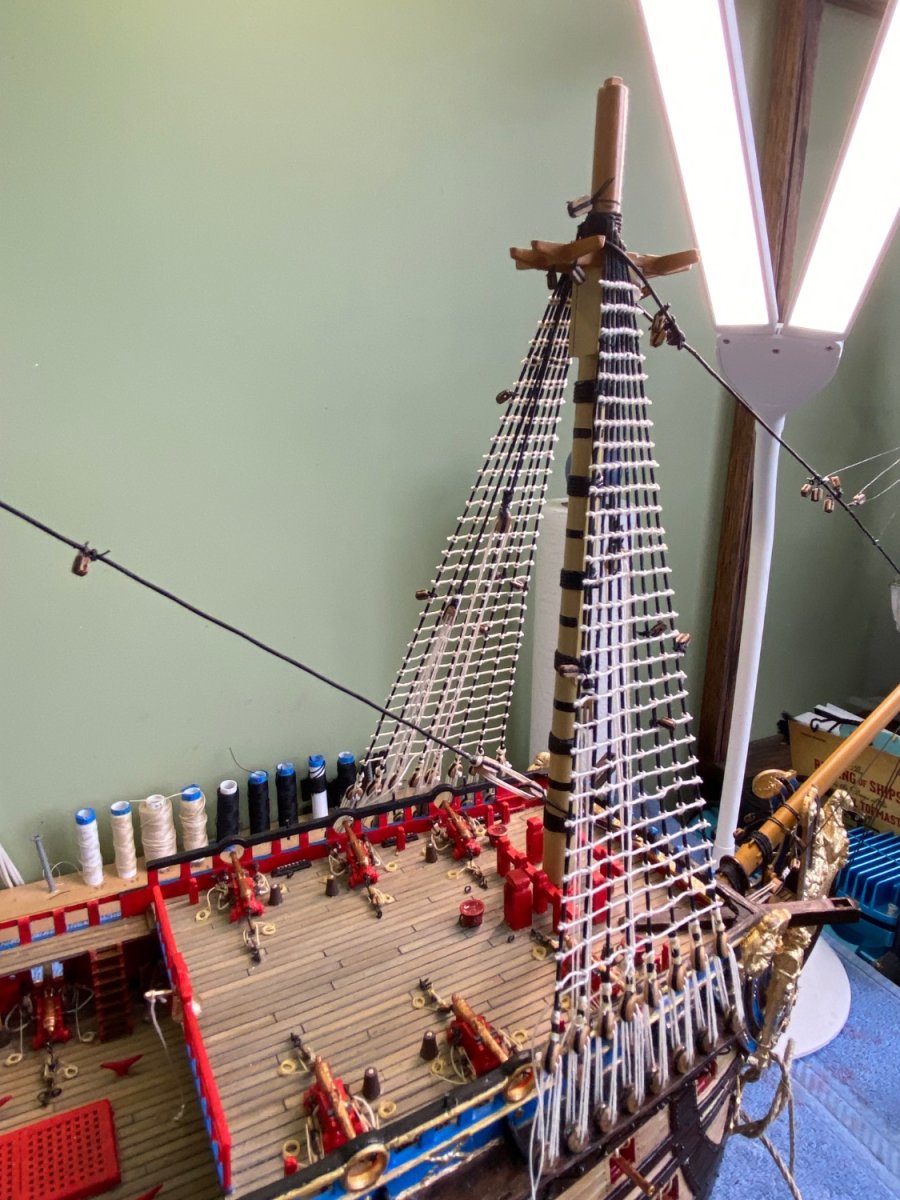
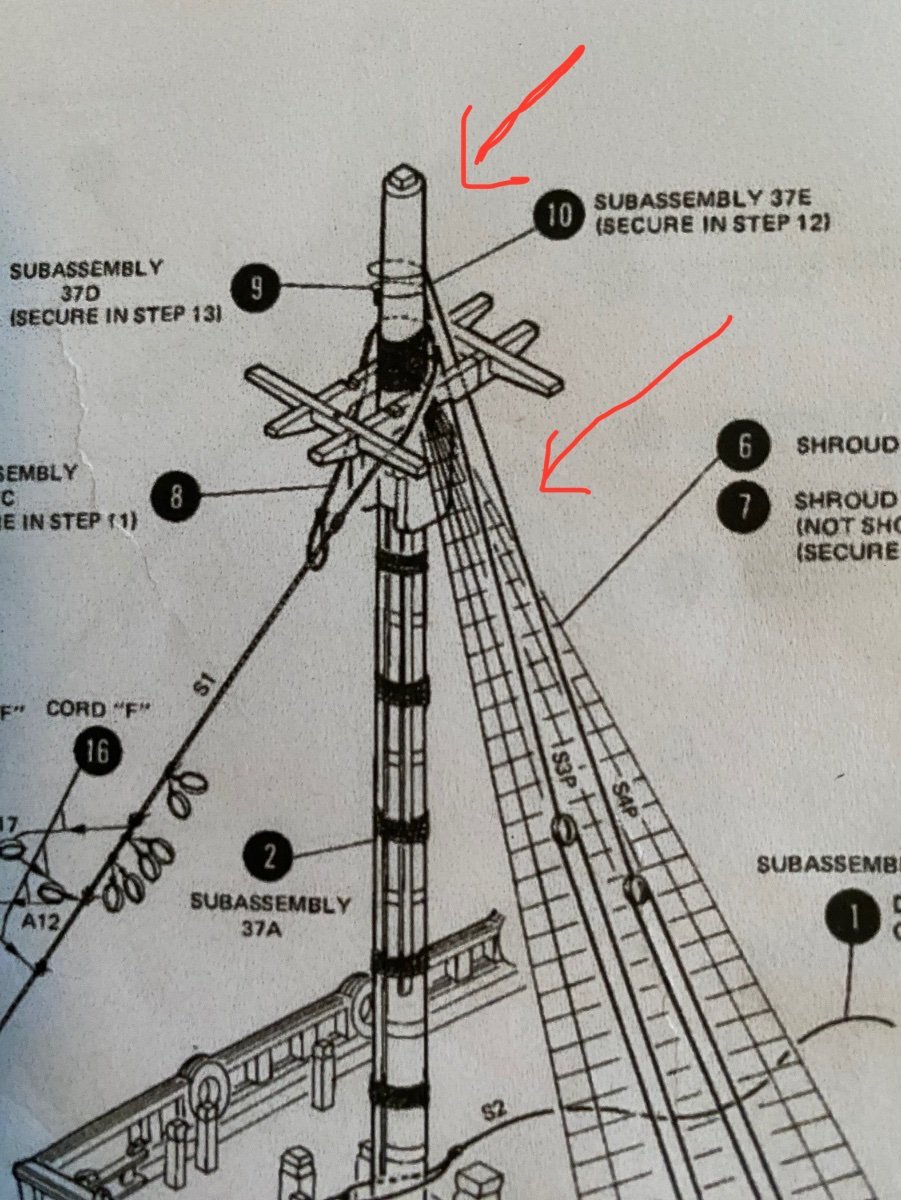
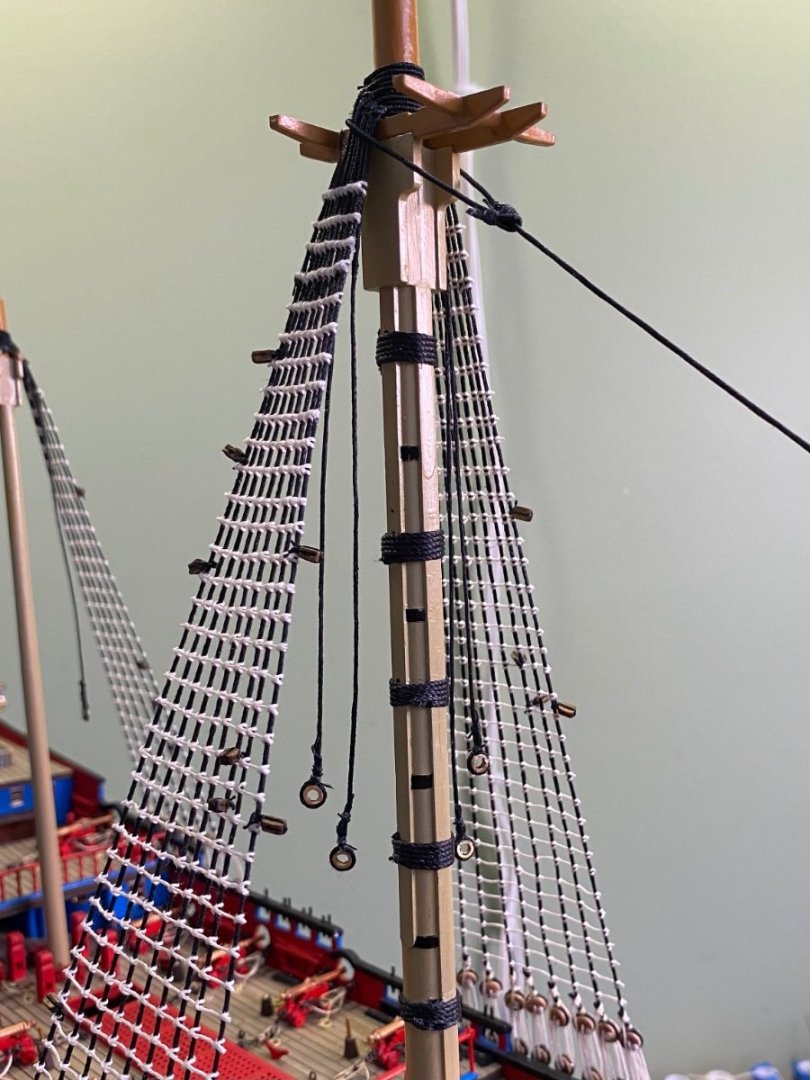
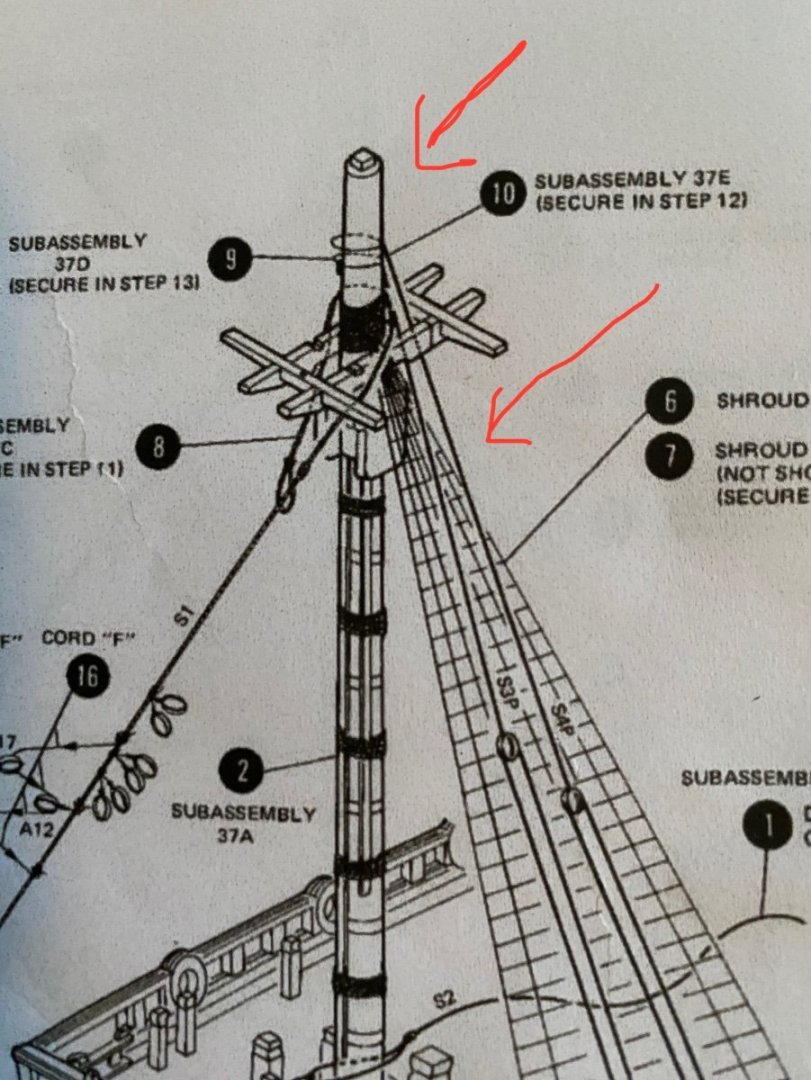
I think this diagram in the older version of the Heller instructions was partially the cause of my screwup yesterday. After our discussion I looked back at this diagram I think as following yesterday. It incorrectly shows the pendants stacked on top the shrouds. Subassembly 37D and 37E are the pendants. Then it further appears to show the pendants coming down through the tree and on the outside of the shrouds. The newer instruction version does redefine those lines more correctly.
-
Well tomorrow is a new day in a he ship yard. Will fix and cleanup all this screw-up! Thanks guys for your guidance. I am truly still learning so much each day, and I honestly appreciate it. This was simply a case of reading to much into the directions. So no pendants on top the shrouds. Now that I reread Anderson’s instructions with my knew knowledge it is clear what he is telling a builder to do.
- 1,508 replies
-
- 1
-
-
- Le Soleil Royal
- Heller
- (and 1 more)
-
So Henry I think we are discussing this at the same time. So would you just remove the new pendants I wrongfully added on top the shrouds today? I could remove them, edge up the shrouds on the mast, and slip these tackles under the shrouds. Not sure which I like the best, the thimbles, or the tackles?
-
Well Michael I think I am trying to do double work 🤔. Reading Anderson’s book page 92 he says the “ first thing to do is to fit the tackle pendants.” I knew them from building my Victory with thimbles. So I made them. Step 1. Then I hung the shrouds. Later in his book, page 102 he says “When the shrouds and stays have been set up it is time to fit the tackles.” The Heller instructions show two tackles and two empty pendants. I think I maybe foolishly viewed that as being a total of 4 tackle pendants per side of the mast. Two with thimbles and two with tackles attached with hooks to the channel. I am guessing that is not the case. Not sure I will remove them or not. I will have to think about what to do at the main mast. Marc and Henry it was a quick fix but now according to Michael I doubled up some work. Oh well no real harm doing extra work.


- 1,508 replies
-
- 3
-
-
- Le Soleil Royal
- Heller
- (and 1 more)
-
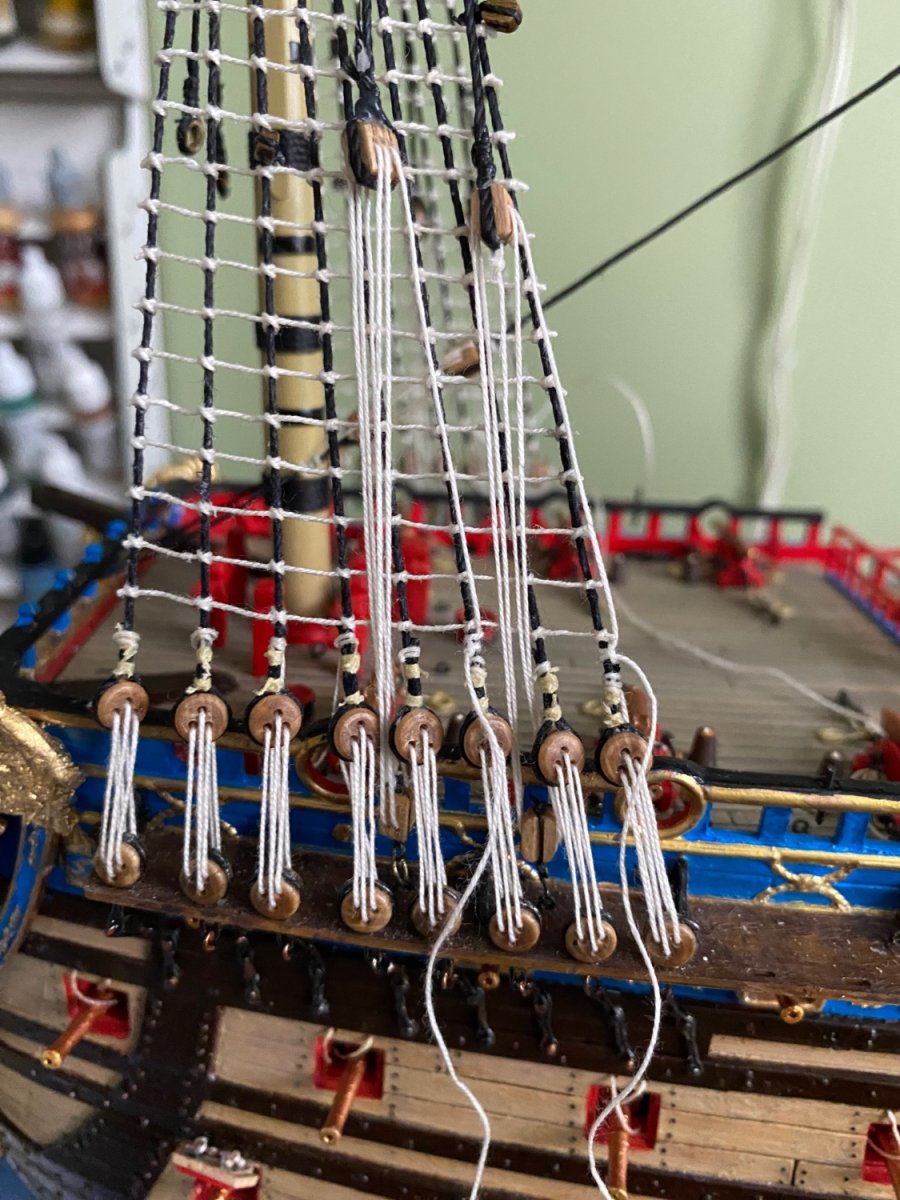
You know guys I wondered that same thing and actually rigged them on the inside of the shrouds first but then after studying the instructions drawings thought maybe they belonged on the outside. I read through the section in Anderson’s book but could not come up with an answer. I was honking of asking you guys but thought you might say “well you dumb **** of course they go on the outside”. This will be an easy fix. Just loosen the rope, slip hook out of eyebolt and move block around the back. Twenty minutes tops. Should have checked in earlier cause now I have to move all four 😊. I attached a photo of one initially on the inside

- 1,508 replies
-
- 2
-

-
-
- Le Soleil Royal
- Heller
- (and 1 more)
-
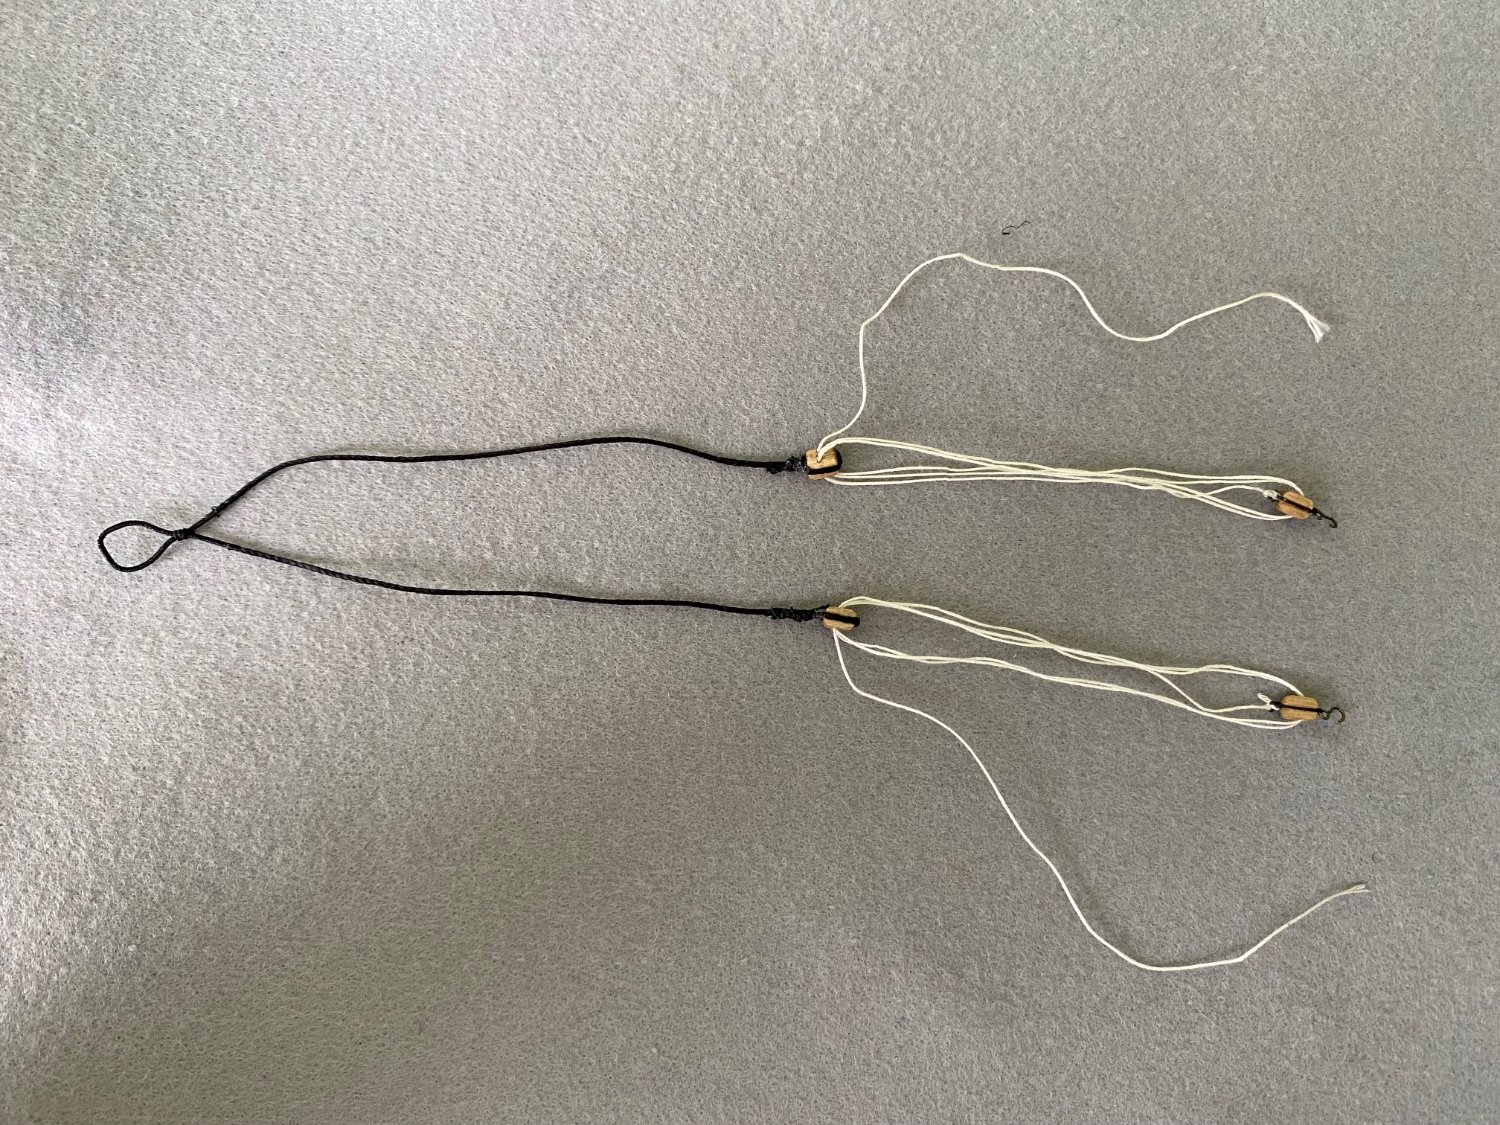
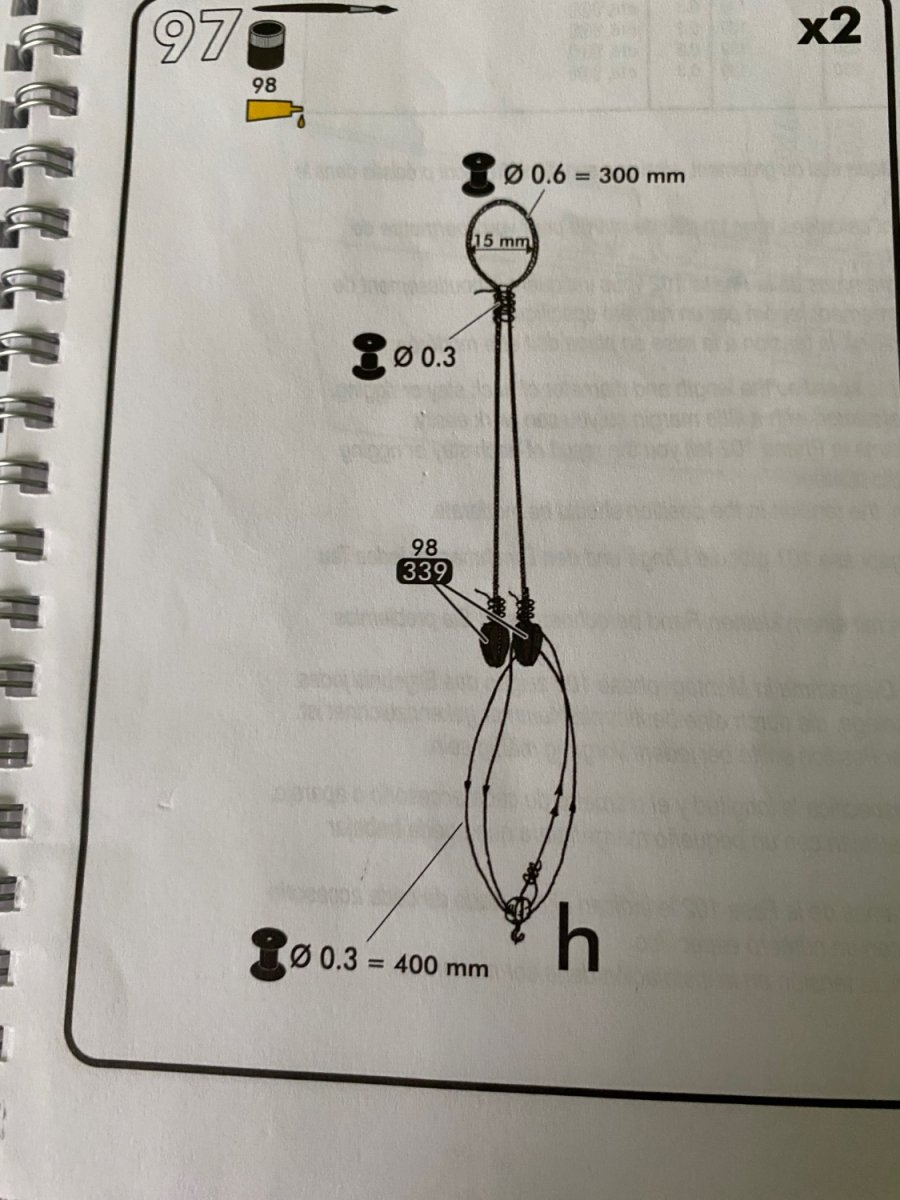
Completed the first burton tackle on the foremast. Used the thread size I used for the shrouds. Served the center section where it wraps around the mast. Used a 3 sheave block for the top of the tackle and a 2 sheave block with a hook for the bottom. Rigged the two blocks with running rigging (tan) thread and tied the fall at the nearest deadeye.
- 1,508 replies
-
- 3
-
-
- Le Soleil Royal
- Heller
- (and 1 more)
-
Thanks Henry. In a zoomed in look at Heller’s diagram it looks as if it is tied off right above the upper block maybe? Is that what you see? Would you do it that way or your suggestion if above the nearest deadeye?
-
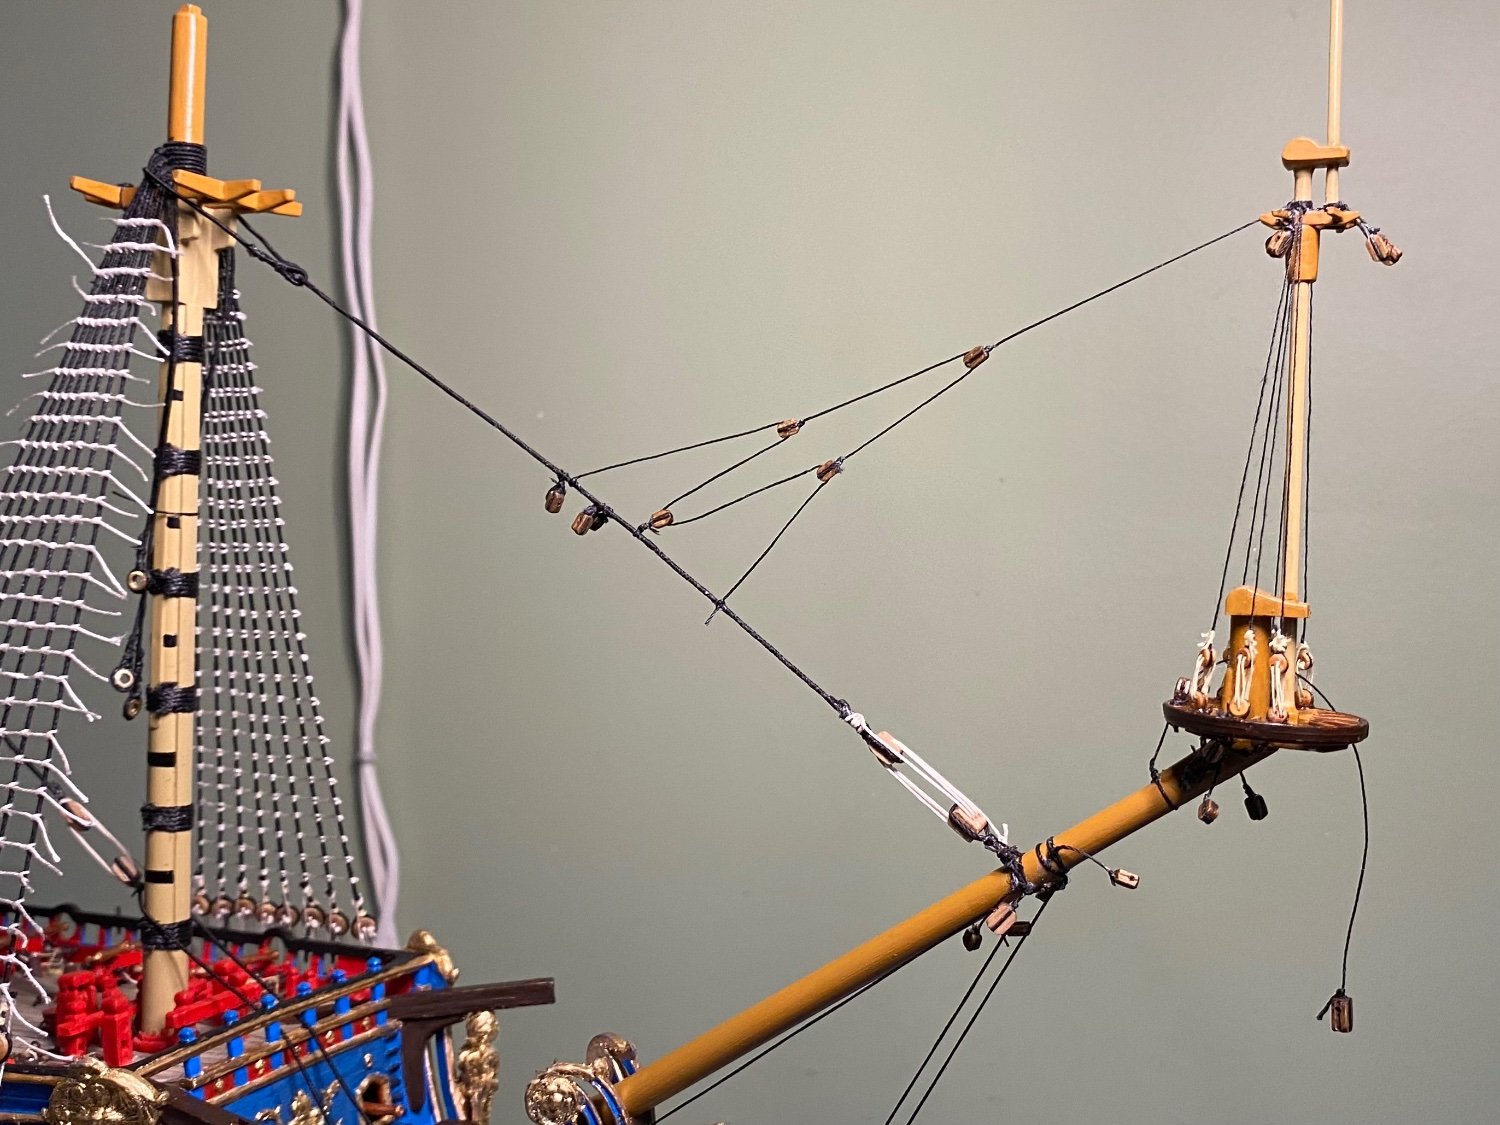
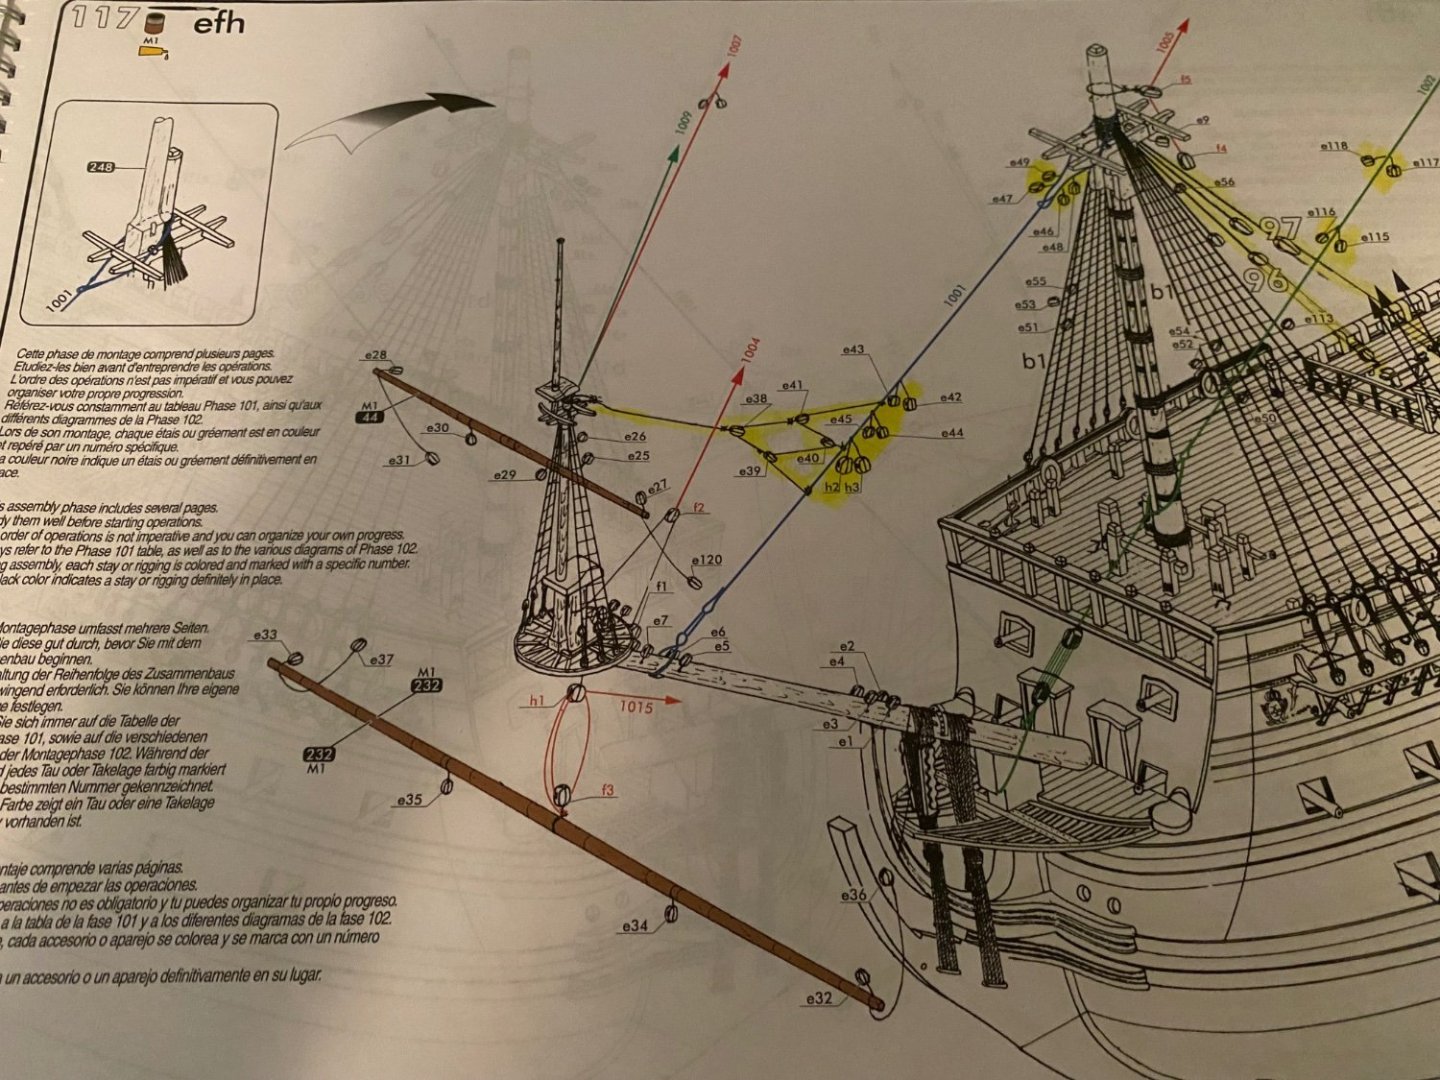
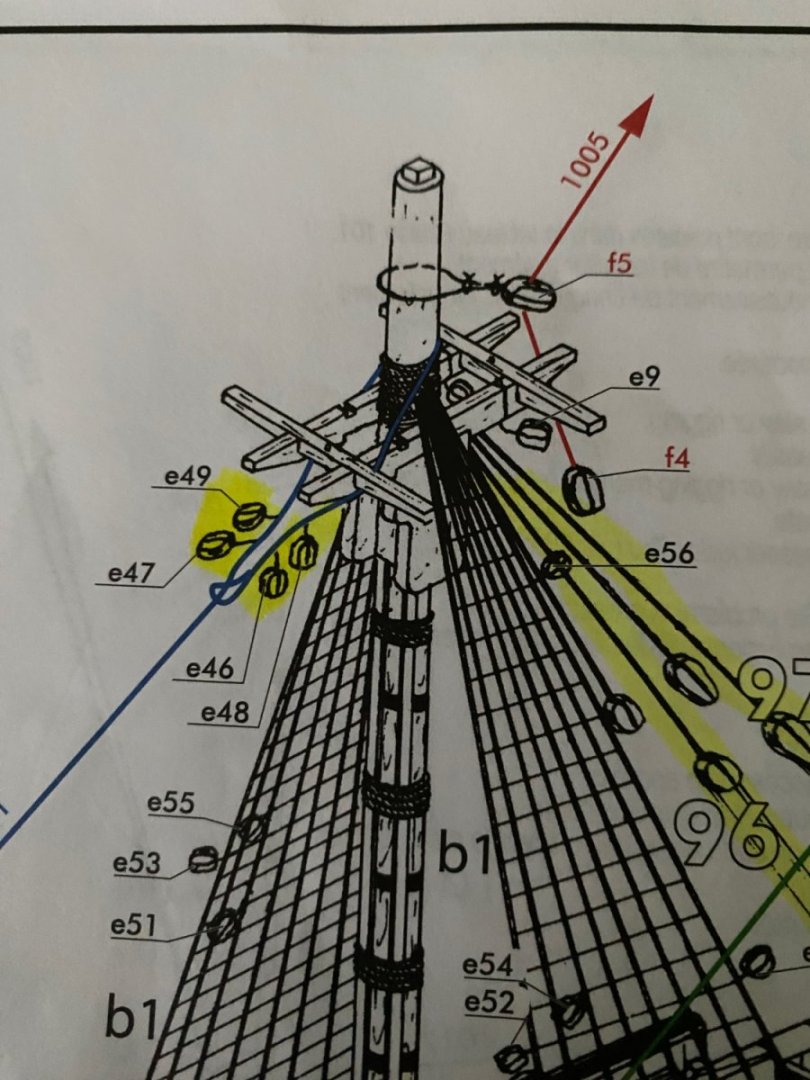
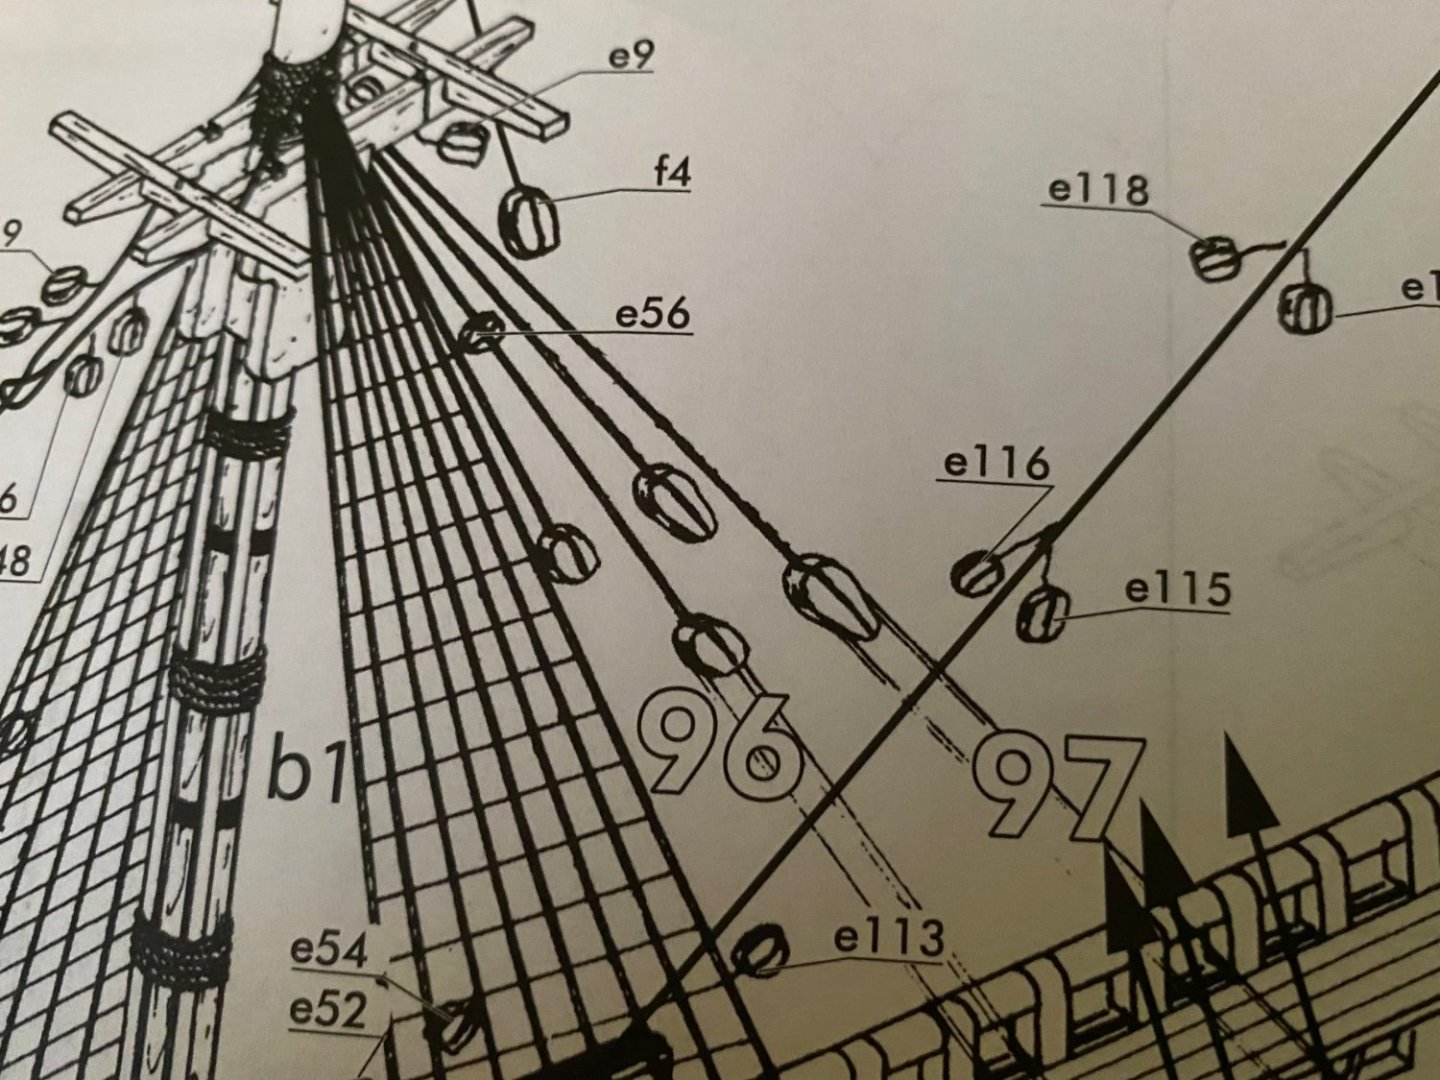
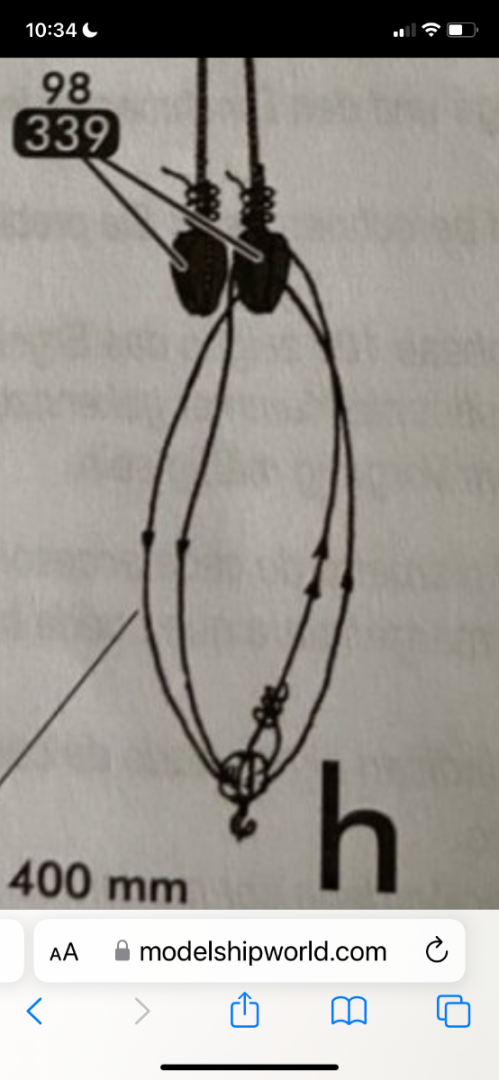
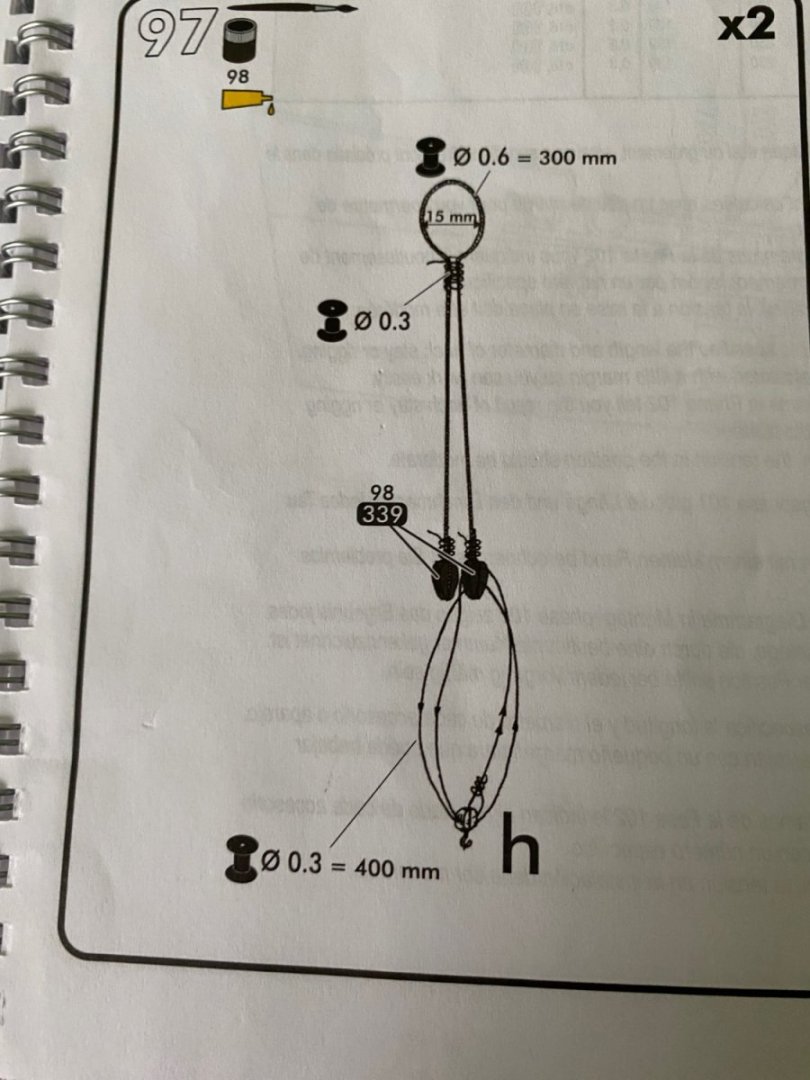
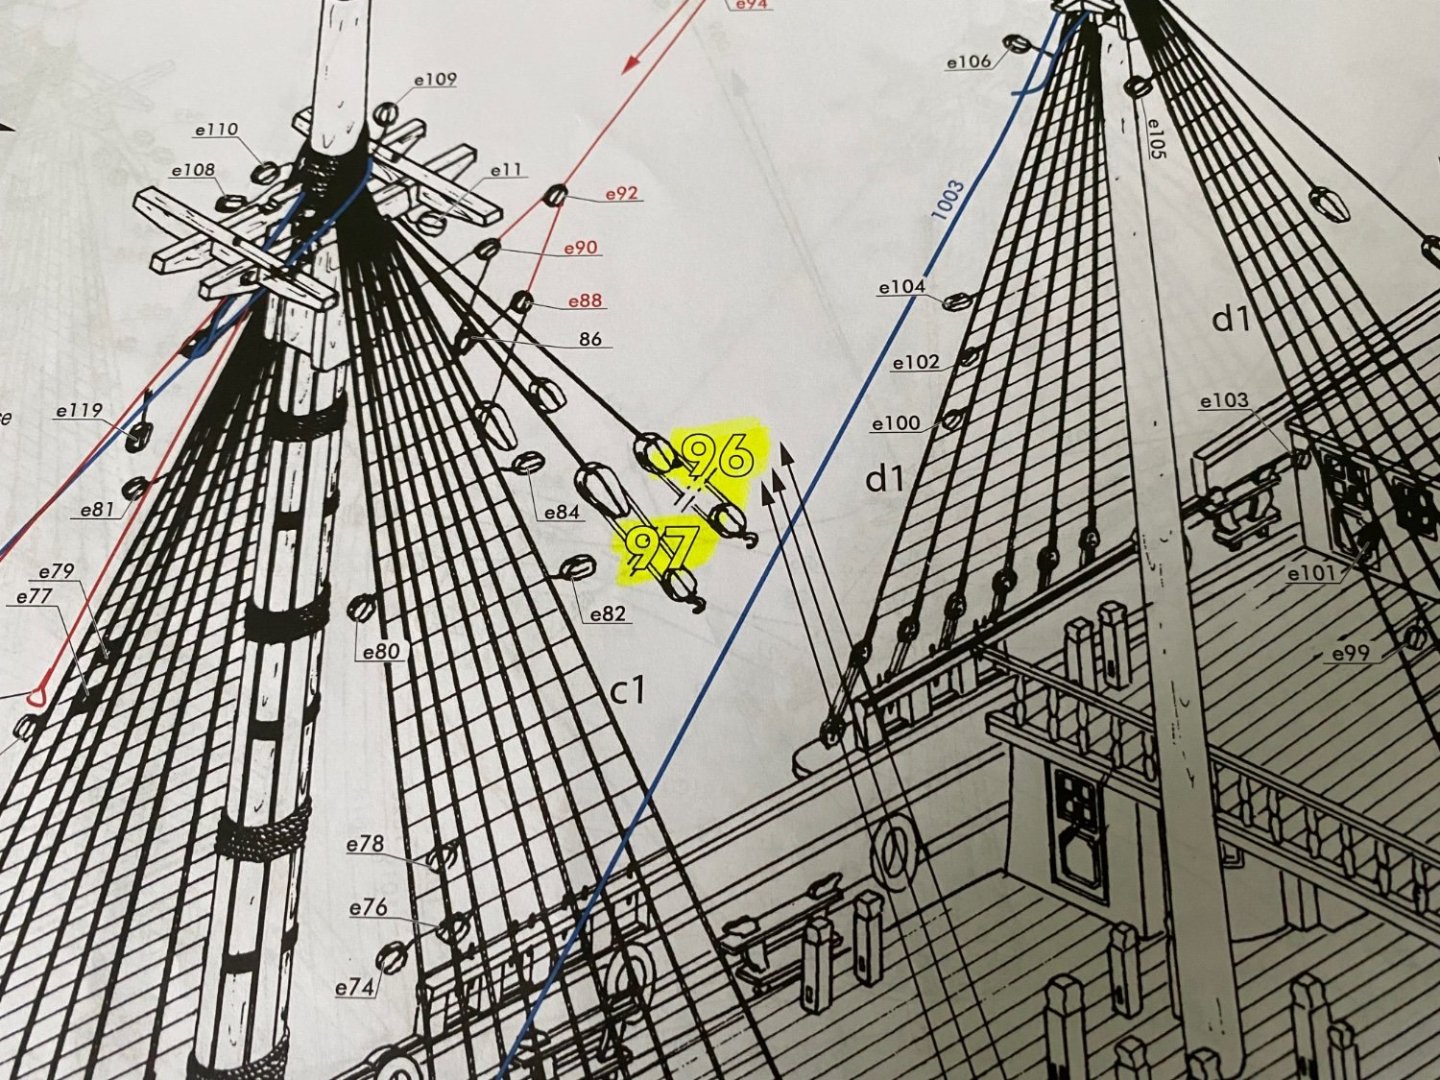
Alright gentlemen I am now moving to the mast pendants. Numbers 96 and 97 for both the fore and mast. I am reading through pages 102-105 in Anderson’s book where he discusses these mast pendants. I can see in the Heller instructions that they are similar to a shroud pair. What I have yet to determine is where the hook on the end of lower block goes. There are a couple eyebolts in the channels behind the shroud deadeyes. Do they hook into them? What do I do with the guys? The photo from the old Heller instructions appears to show the hook placed in a he channel eyebolt.

- 1,508 replies
-
- 1
-
-
- Le Soleil Royal
- Heller
- (and 1 more)
-
Looking great. Making me very anxious to open my kit.
-
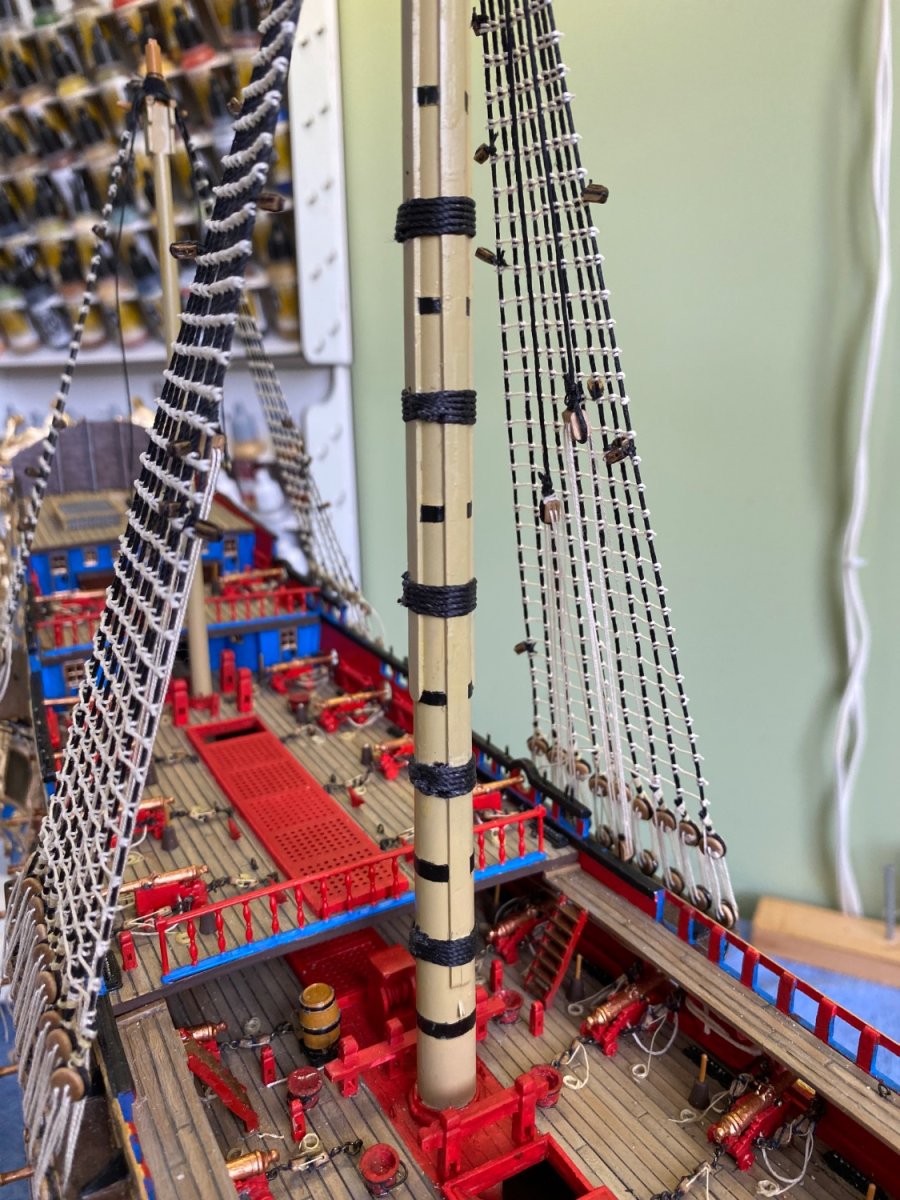
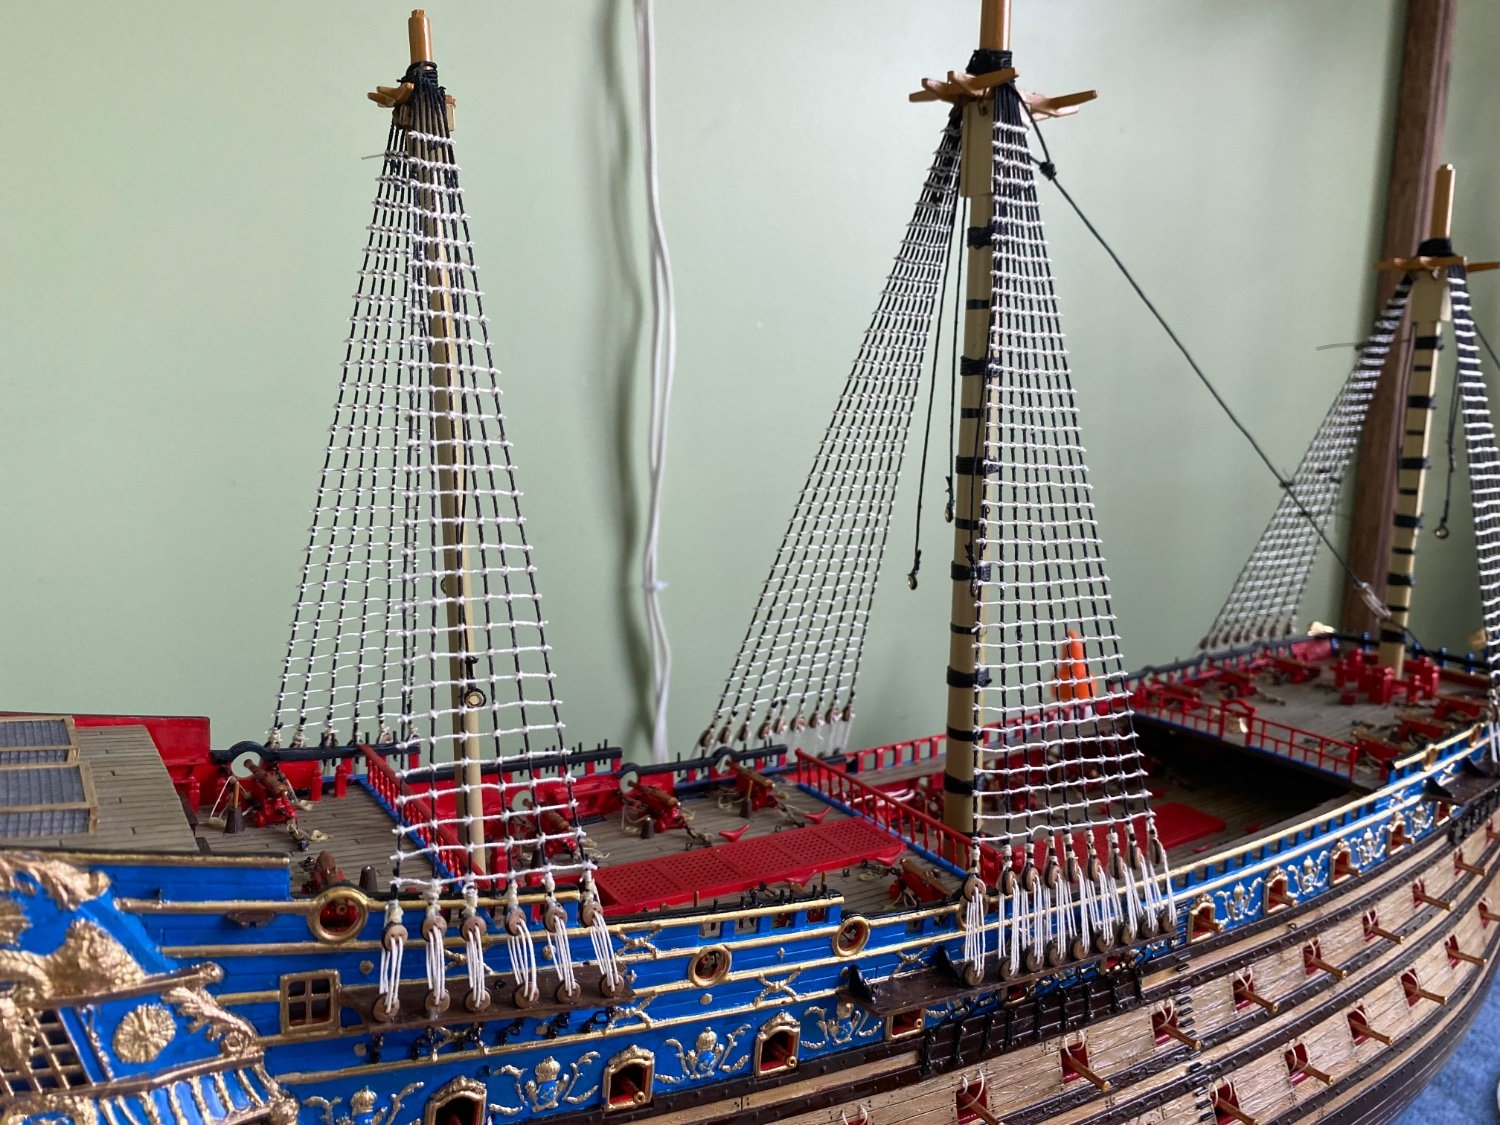
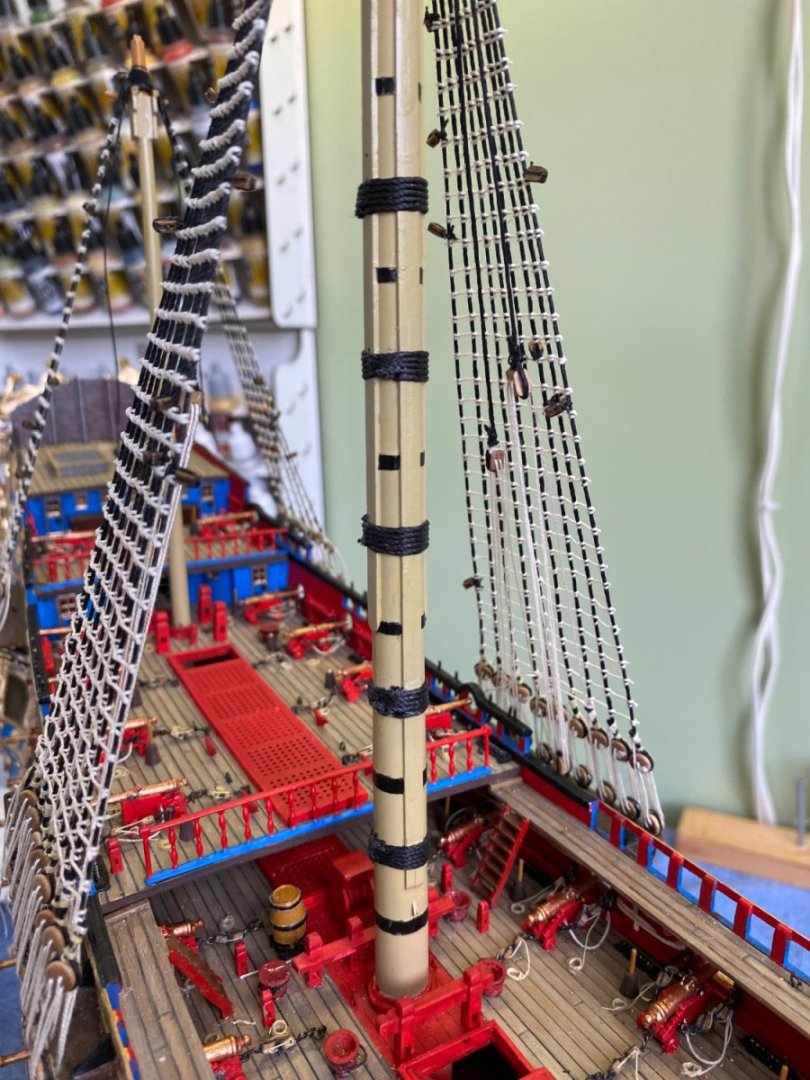
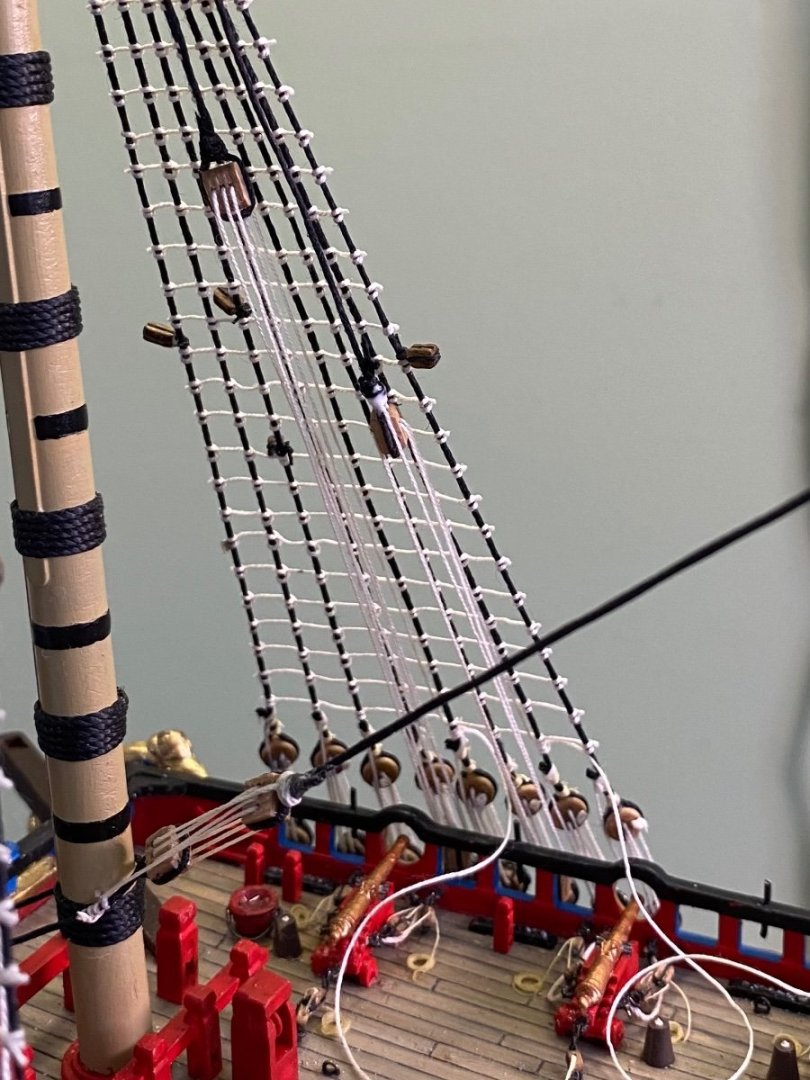
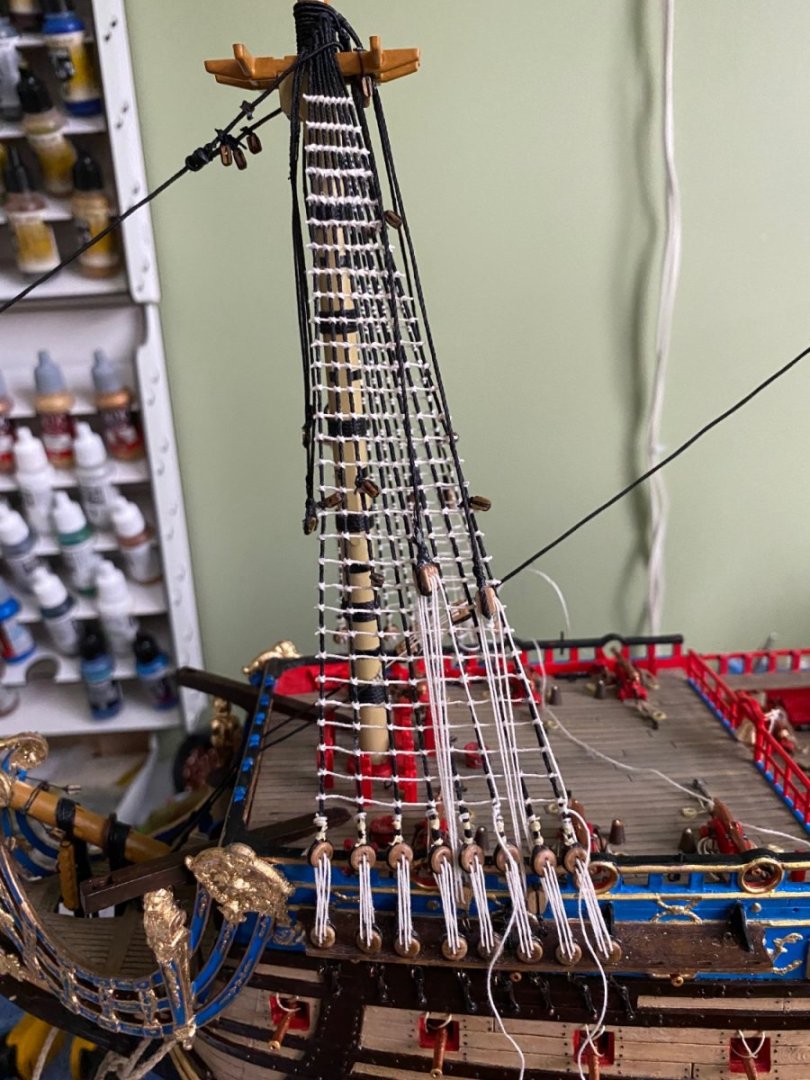
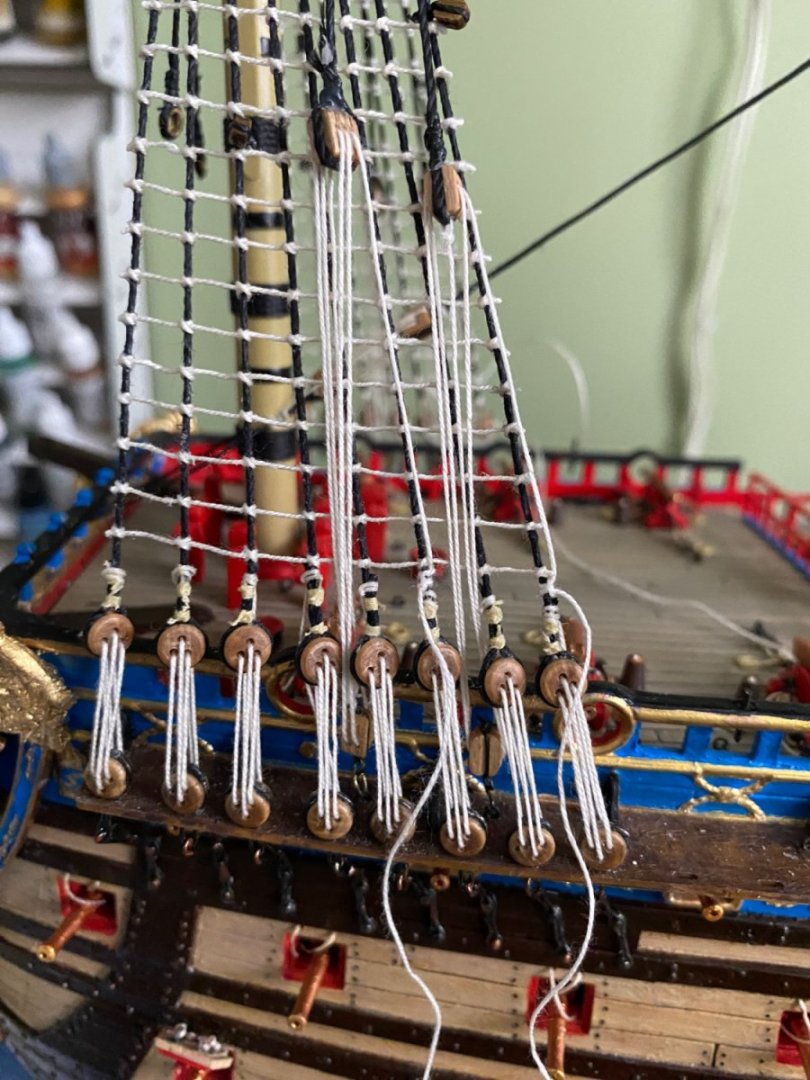
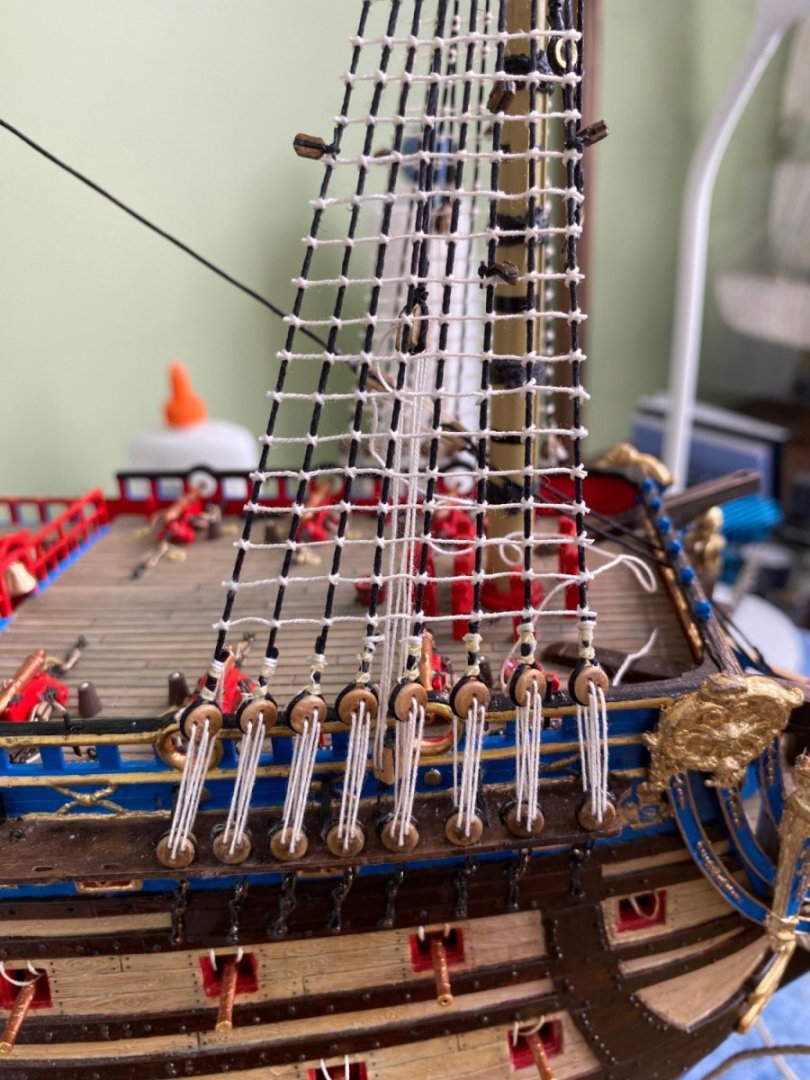
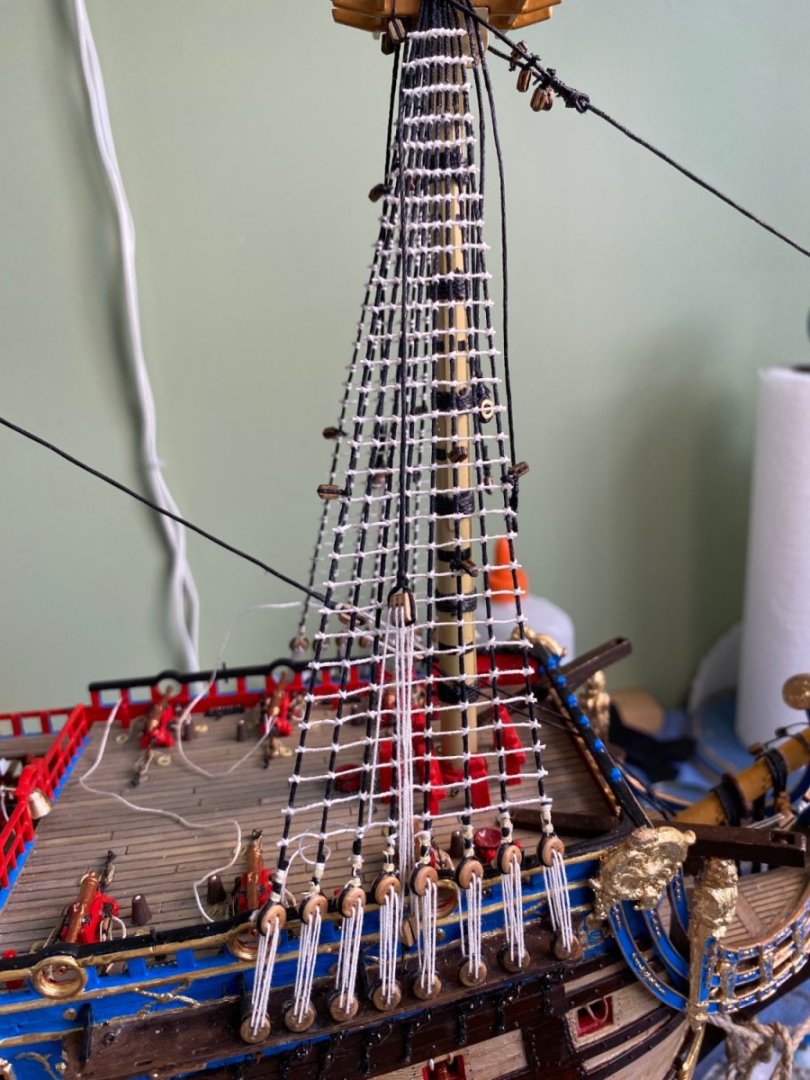
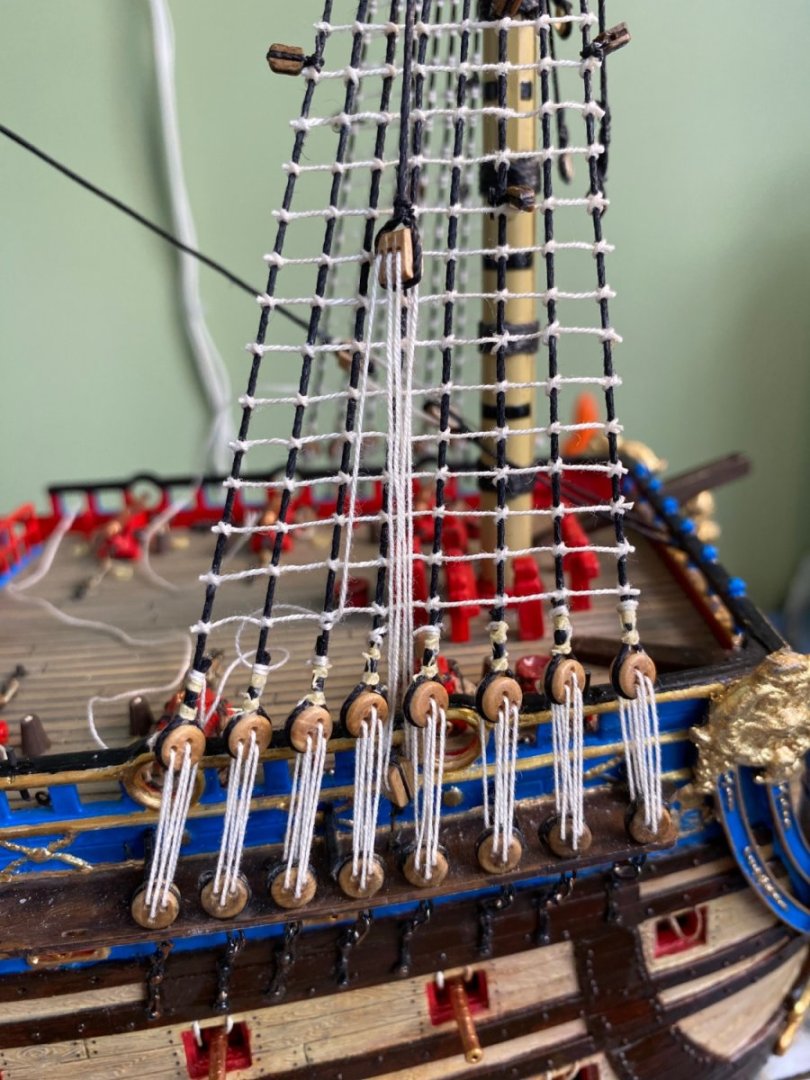
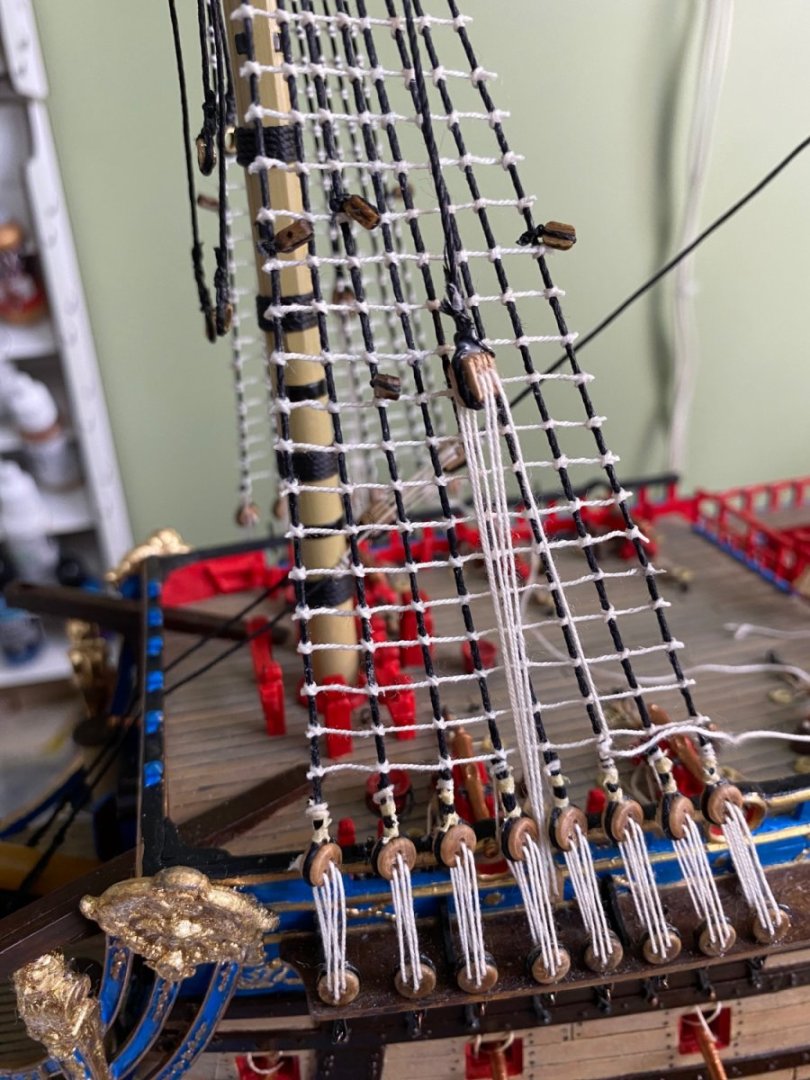
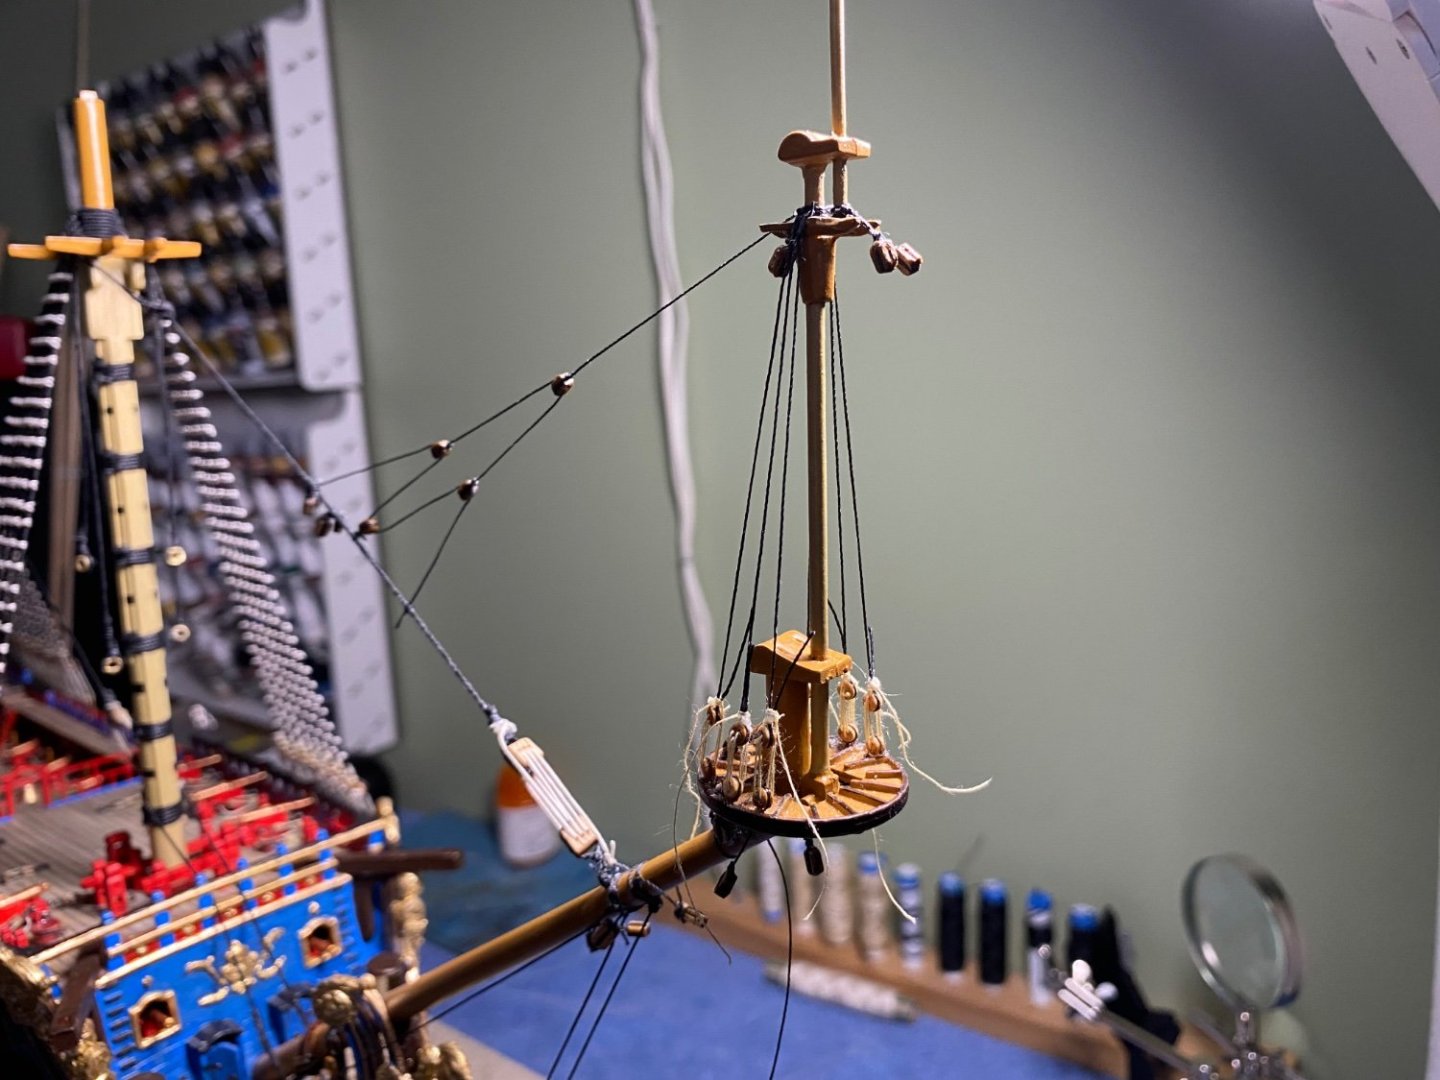
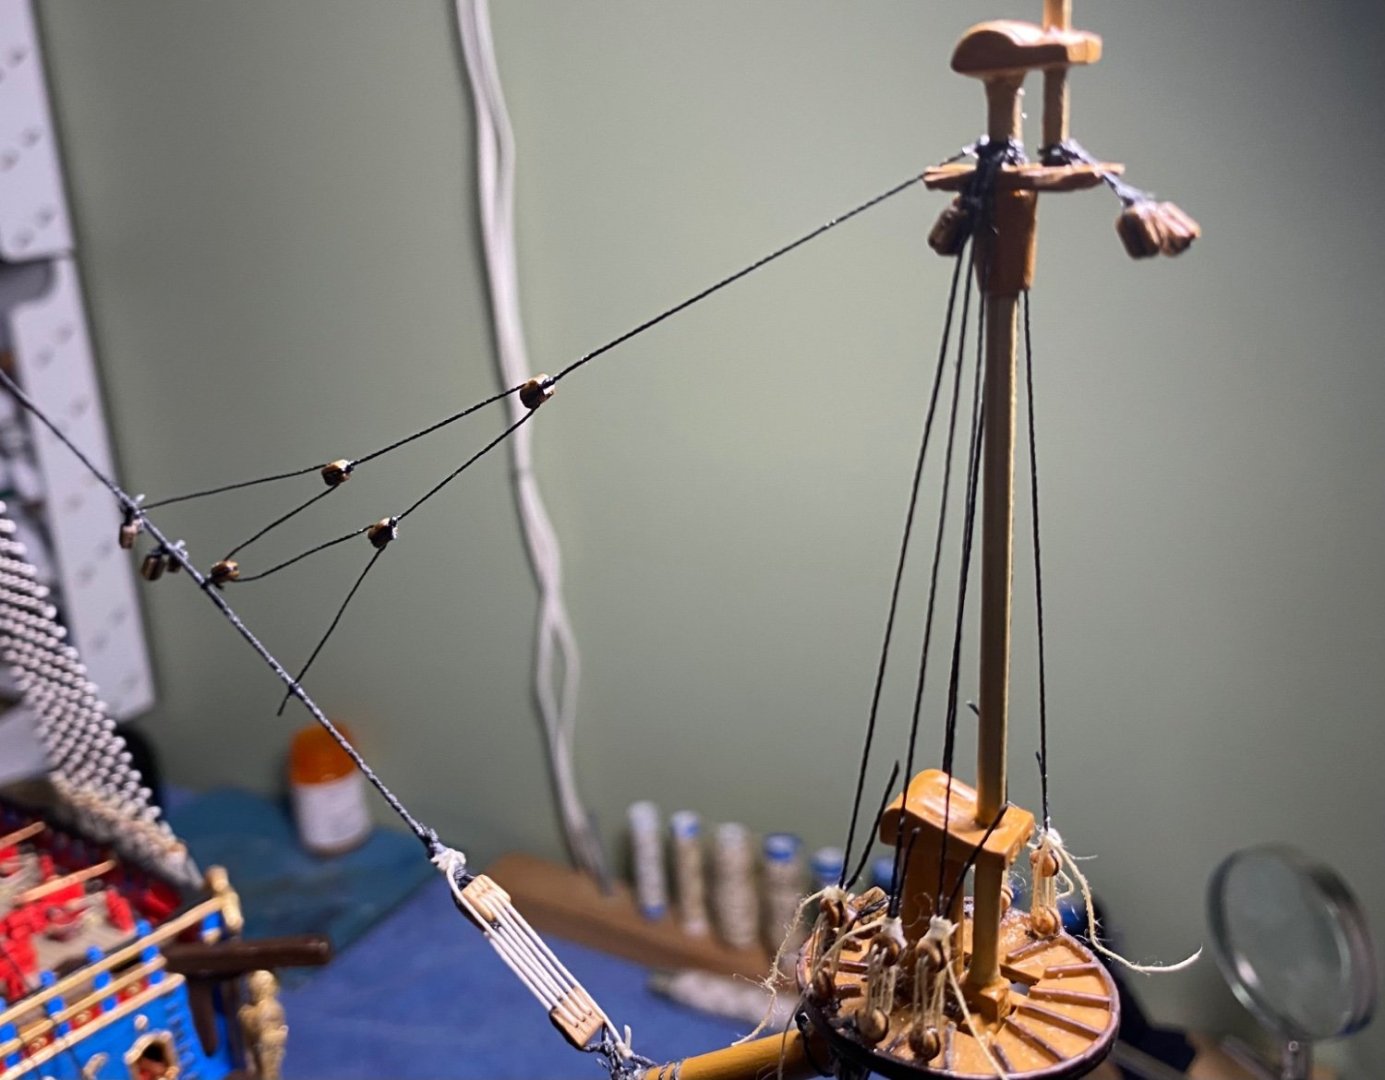
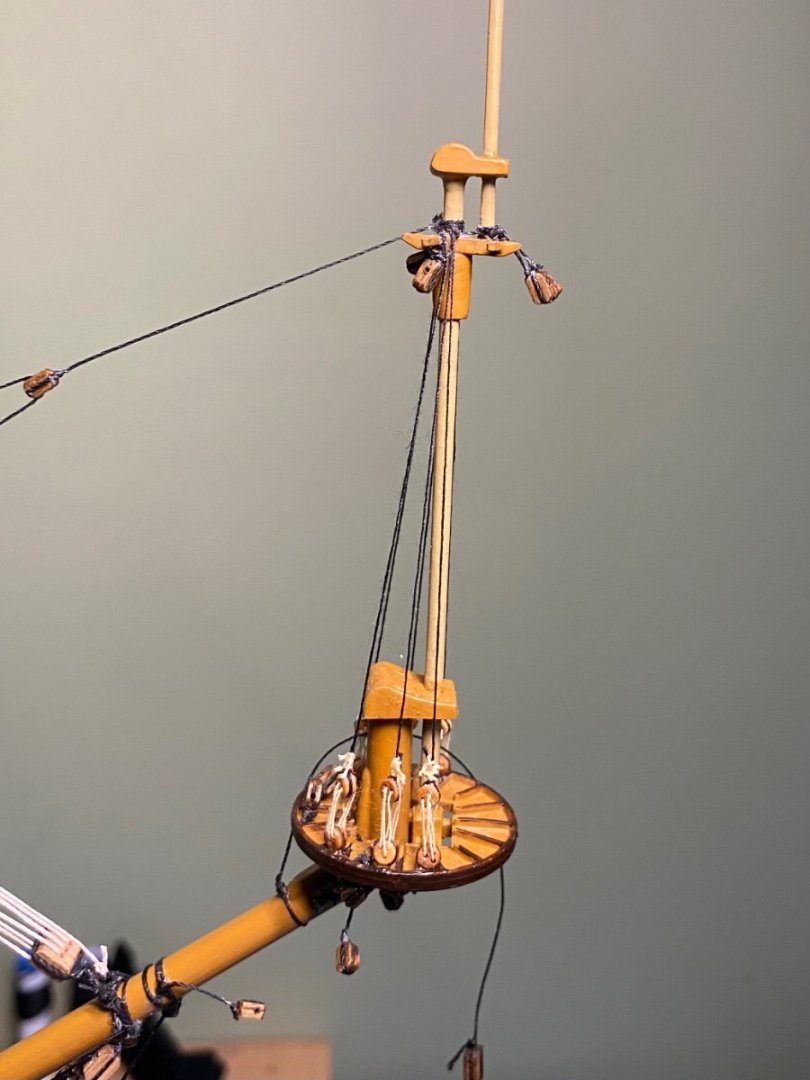
All of the lower ratlines tied to include the spritsail topmast. Now to add all the blocks that are to be tied to the shrouds for future rigging.


- 1,508 replies
-
- 2
-
-
- Le Soleil Royal
- Heller
- (and 1 more)
-
Allan you are questioning the line used for the spritsail topmast stay? Should it be tan running rigging thread or black standing rigging? Excellent question. Since all of the stays throughout the ship rigging are standing rigging, I think, I would lean toward this stay being considered standing as well, therefore black or “tarred” thread. And for a simple reason that is the color thread the instructions say to use. Again though, excellent question. Marc what say you?
- 1,508 replies
-
- 2
-
-
- Le Soleil Royal
- Heller
- (and 1 more)
-
Thanks Henry. That method does work pretty good especially if you add a piece of Evergreen on the inside to increase thickness. The out of box thickness allows very little space to drill into the edge for the wires. In retrospect it may have been possible to sandwich two wires between the halves when I glued them. Not sure. It will be a slow steady process with drilled holes per hatch, but like the ratlines, it will be a labor if love! I like the way the wire allows bending as a hinge would do. Thanks Ferrus. You really need to give ratlines a try on your next build. I got so frustrated with that stay I was so glad to be finished with it. A real balancing act to prevent much bend in the forestay even after adding the bobstay.
- 1,508 replies
-
- 1
-
-
- Le Soleil Royal
- Heller
- (and 1 more)
-
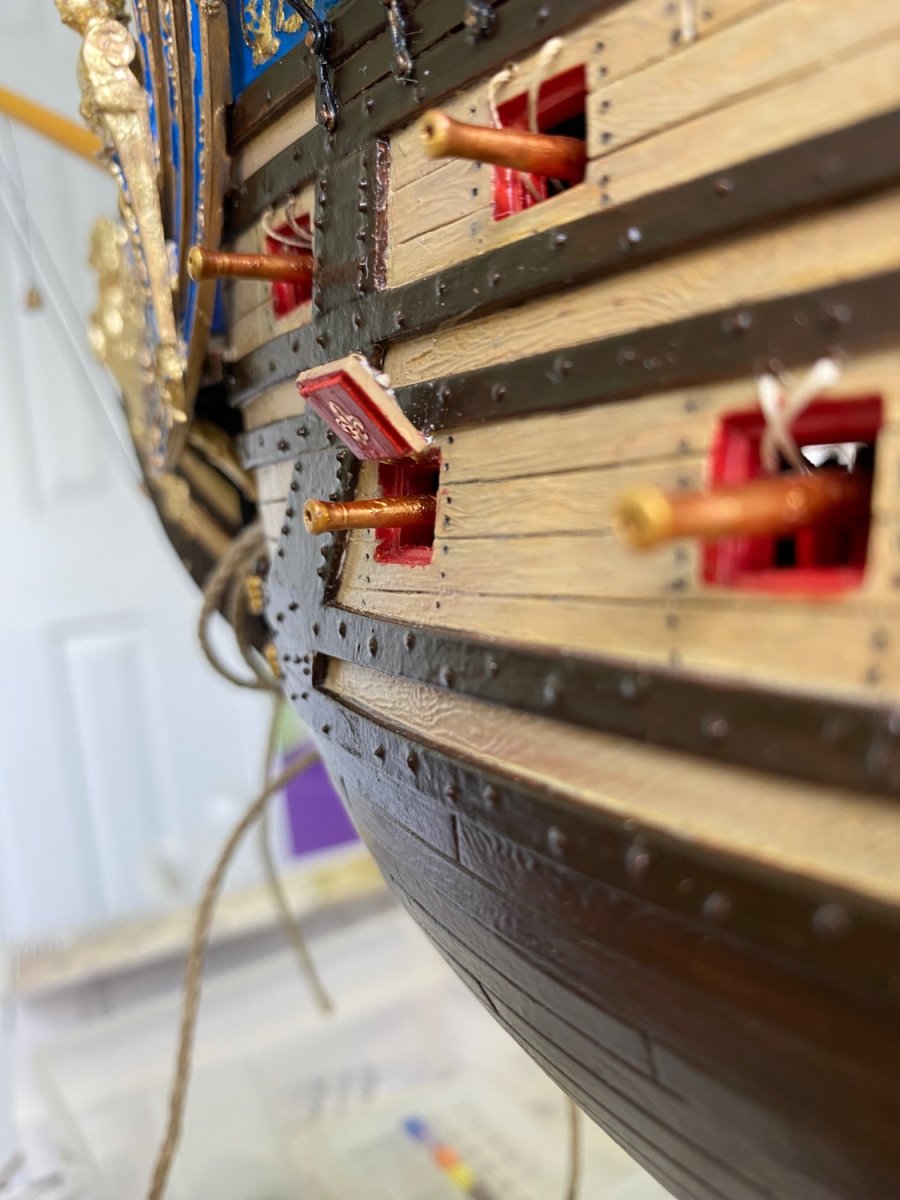
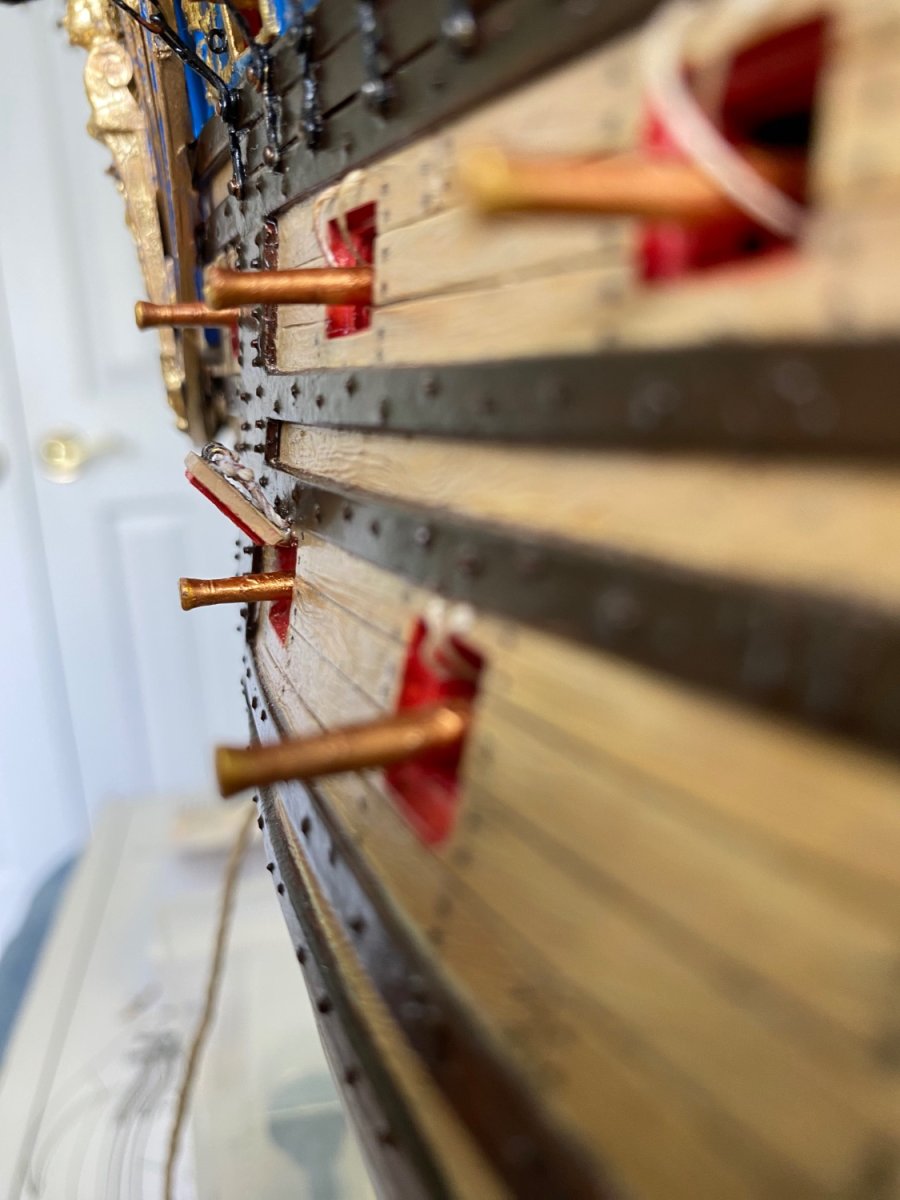
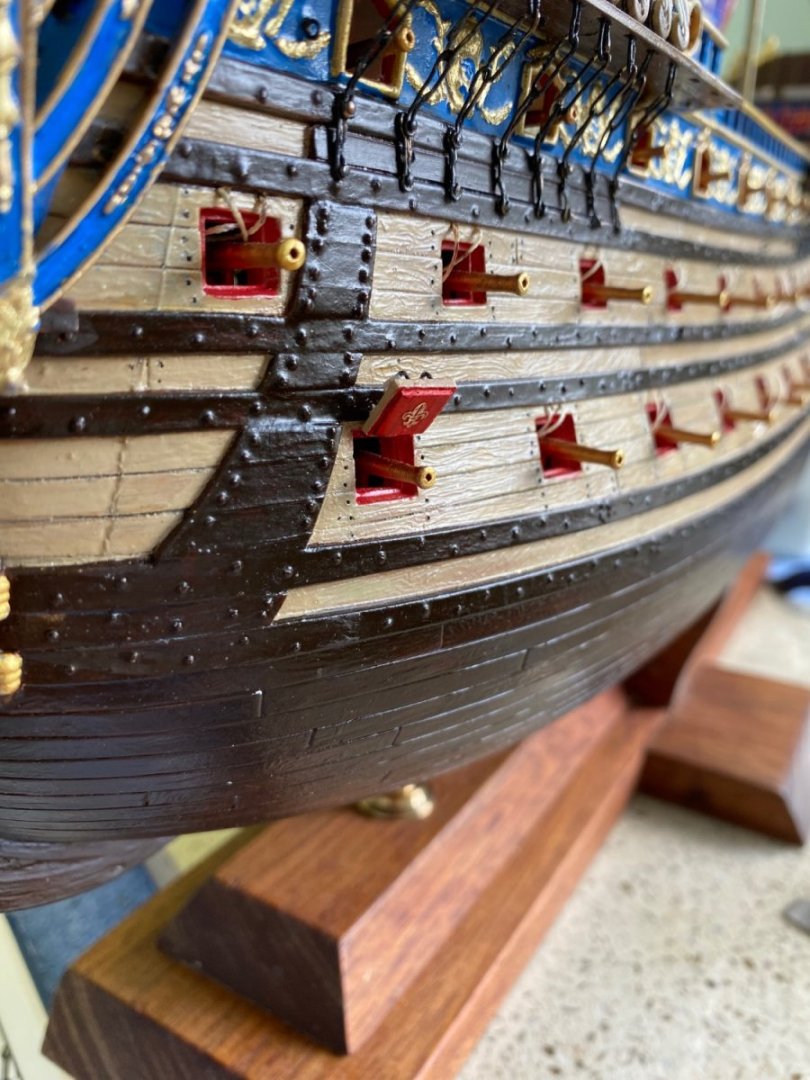
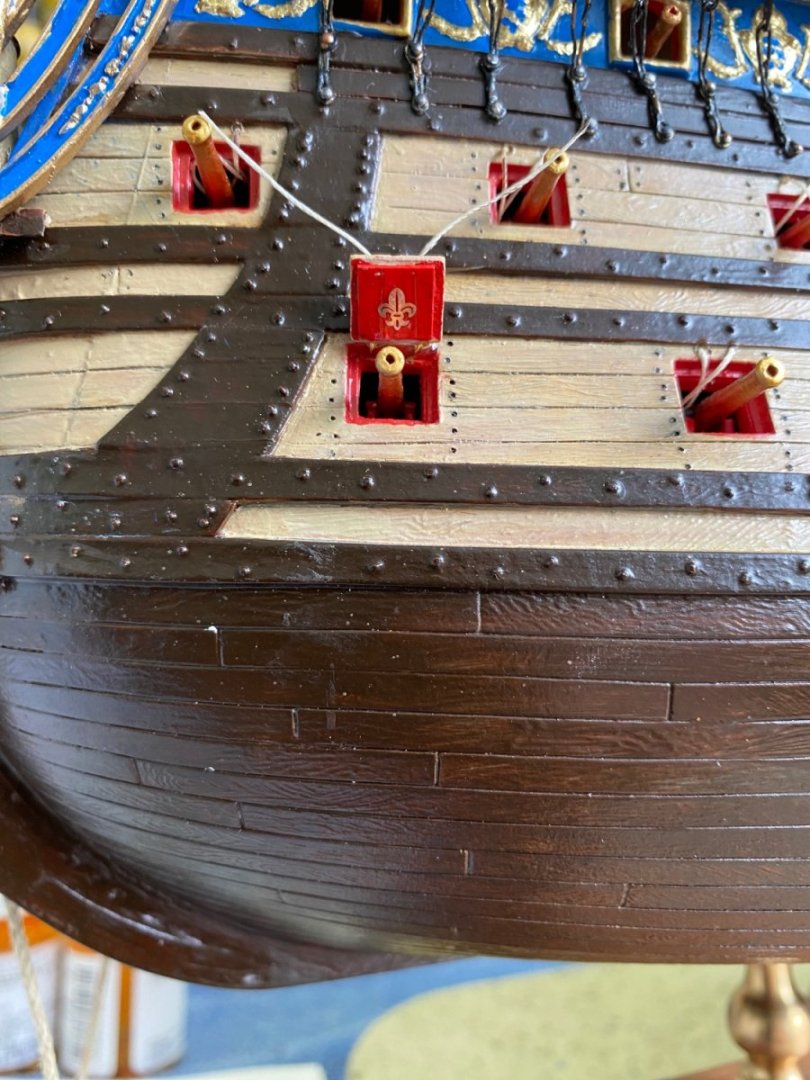
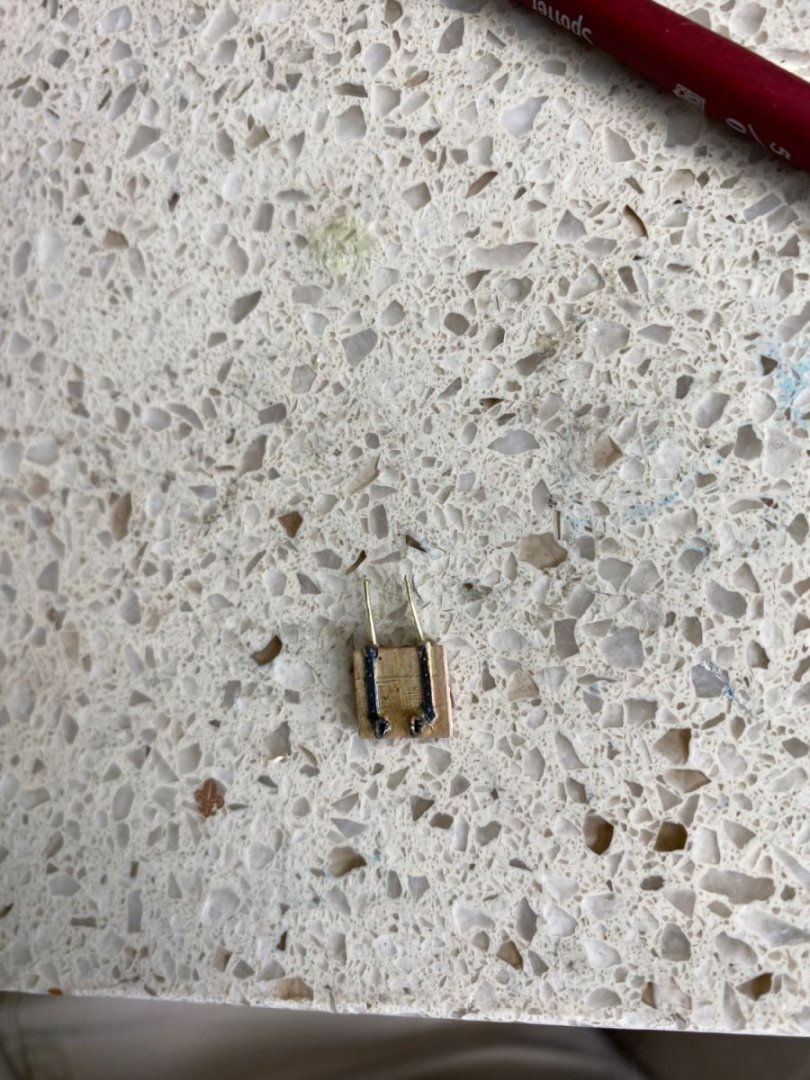
Took a brief break from tying ratlines to tinker with something else. Will get back to the ratlines quickly. For a change of pace I decided to experiment with one of my cannon hatch covers. I previously added additional stock material to the inside to give a thicker profile that matched the hatch. I used Baker’s idea if adding two wires on the top hinge edge and drilled two matching holes in the top inside edge of the hatch. With a touch of CA I was able to insert the wires into the top of the hatch. These wires actually serve as a movable hinge. Before gluing in place I attached to eyebolts to the exterior of the hatch for the ropes. I have the hatch more open than would be the case but I want to show the flur-de-lies appliqué on the hatch cover inside.


- 1,508 replies
-
- 4
-
-
- Le Soleil Royal
- Heller
- (and 1 more)
-
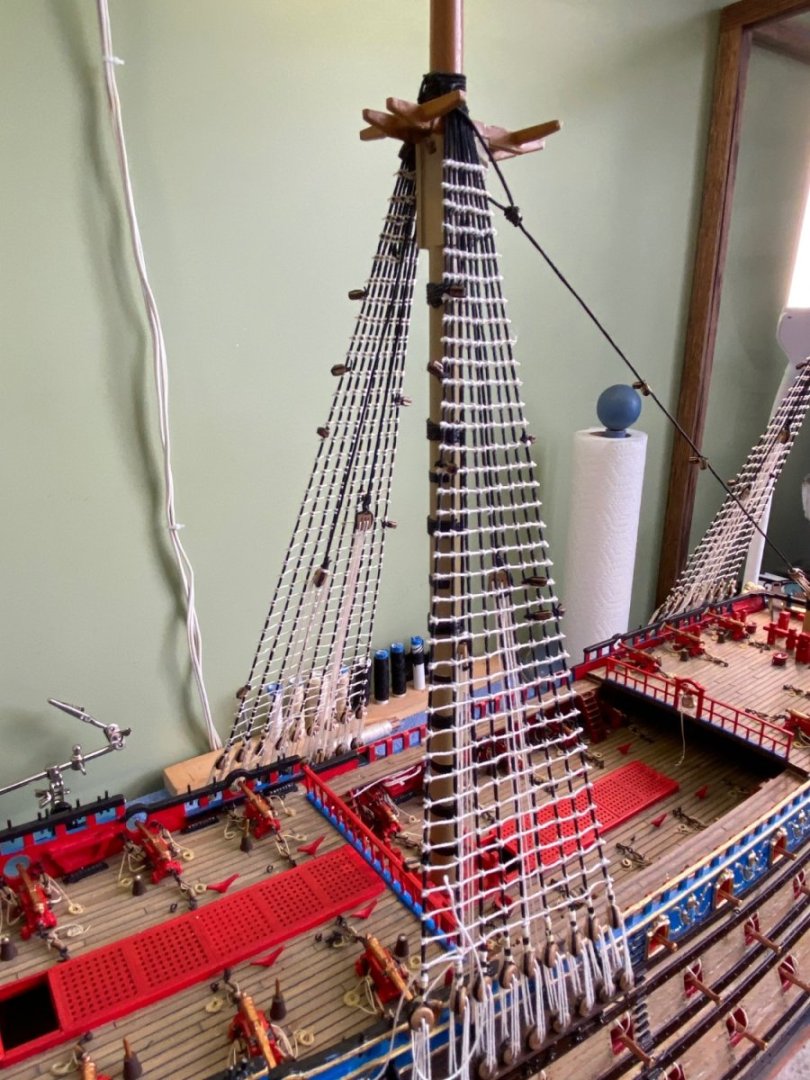
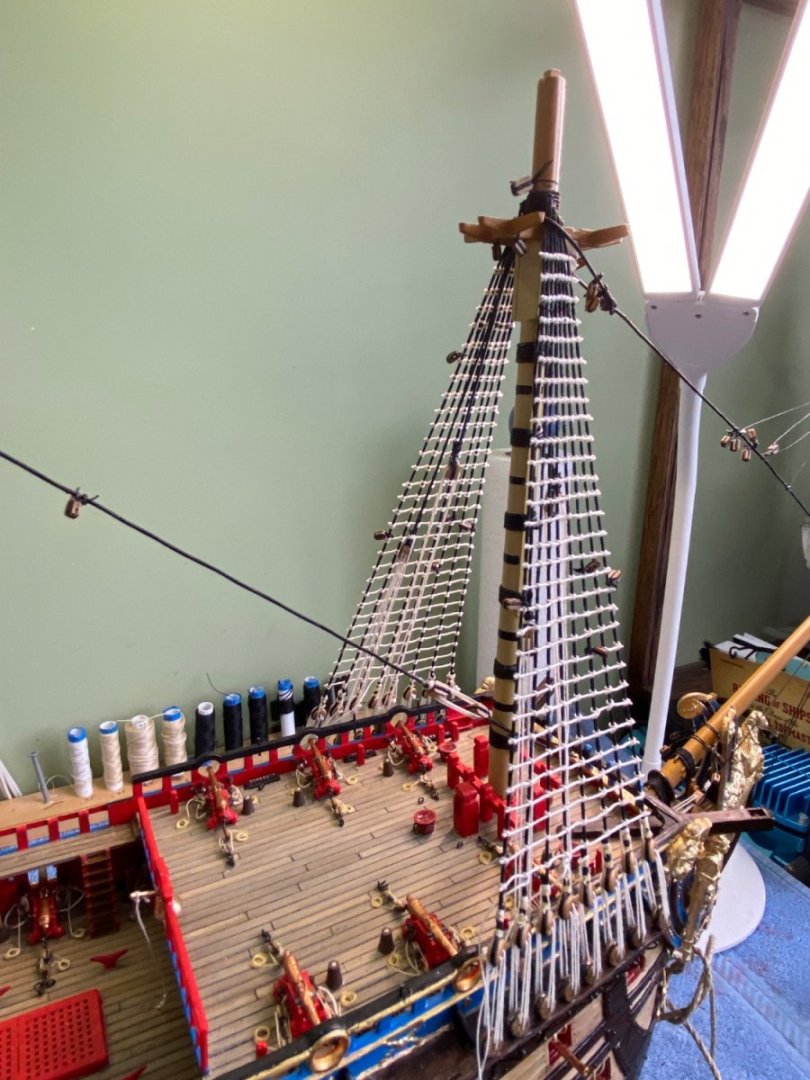
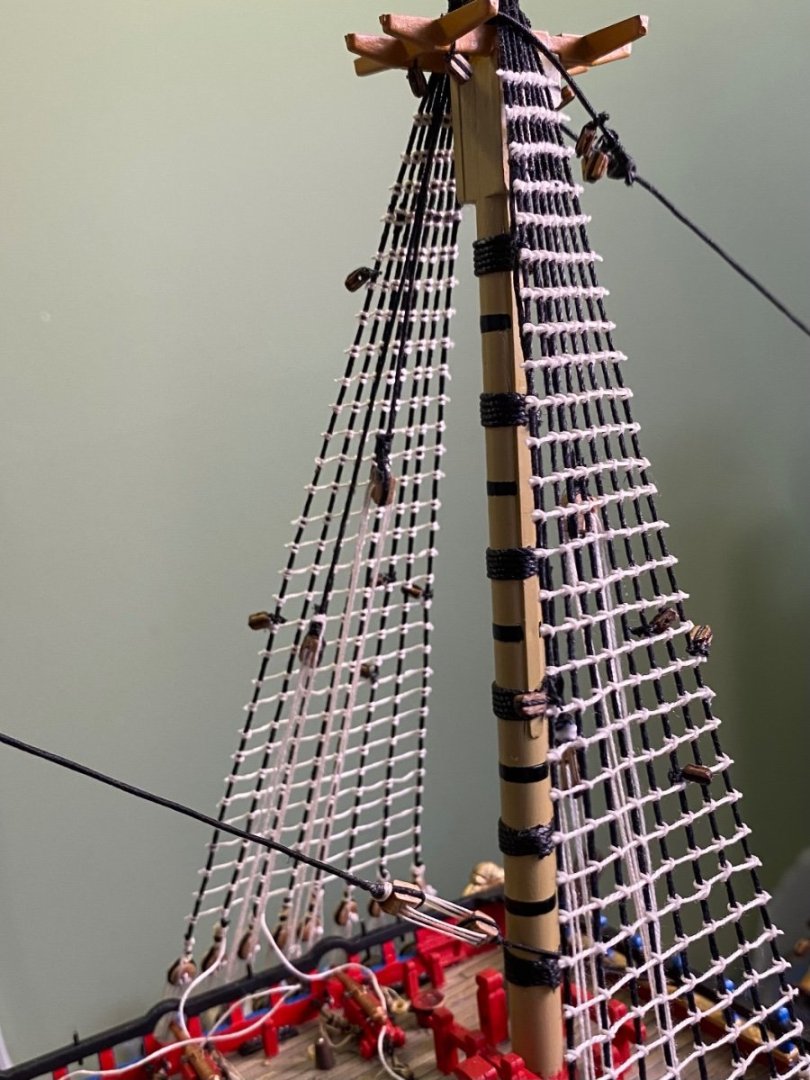
Couple days since an update. Finished the lower shrouds on the foremast. Lower shrouds on the mizzenmast mast up next. Spent a day or so and a fair amount of non-church words 😬 redoing the shrouds on the spritsail topmast. The initial shrouds were of a thread size that I thought appeared too small once I finished. I decided to remove the shrouds and redo them with a larger thread. Working in reverse proved to be a challenge and detrimental to several of the tiny 2.5mm deadeyes. Ultimately I got it accomplished. Now to add the ratlines to these shrouds as well.

- 1,508 replies
-
- 3
-
-
- Le Soleil Royal
- Heller
- (and 1 more)
-
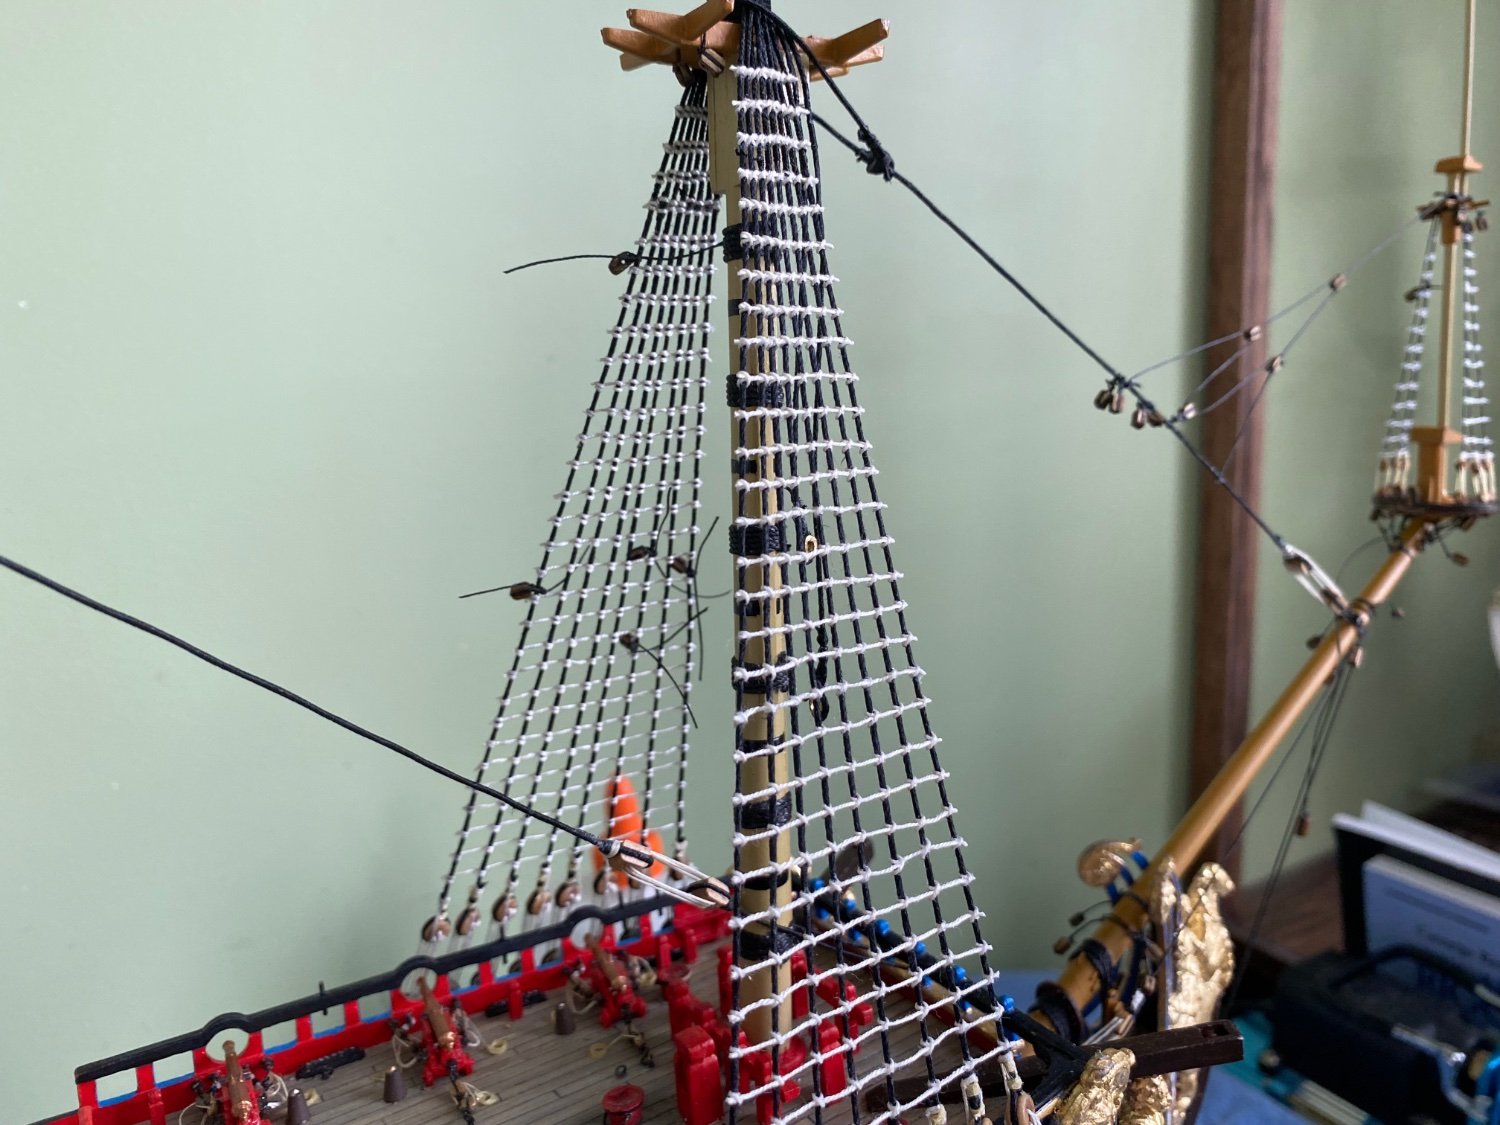
I believe I am going to remake the spritsail topmast shrouds. I am thinking the shrouds are of a to small diameter thread. I used a 2.5mm black thread and as a result they are not very visible. Not sure even when I add the ratlines if they will stand out. I think I will move up to a 3.5mm. This will take some work to undo these smaller shrouds, especially at the deadeyes.

- 1,508 replies
-
- 1
-
-
- Le Soleil Royal
- Heller
- (and 1 more)