


AnobiumPunctatum
-
Posts
1,232 -
Joined
-
Last visited
Reputation Activity
-

 AnobiumPunctatum got a reaction from KARAVOKIRIS in Naval Cutter Alert by AnobiumPuncatum - Scale 1/36 - POF
The first component for the backbone of the Alert is the Fore Deadwood. This was milled from a piece of boxwood.
Even though I am very happy with the finished part, I will use a different technique for the aft deadwood. Before I could hold the finished part in my hands, I had a few failed attempts. With a much more complicated component, this method is unlikely to work satisfactorily.
-
 AnobiumPunctatum got a reaction from oakheart in Naval Cutter Alert by AnobiumPuncatum - Scale 1/36 - POF
Thank you, Chuck and all others for the Likes. I hope that I can finish the aft deadwood this weekend.
-
 AnobiumPunctatum reacted to giampieroricci in HMS PEGASUS by giampieroricci - Scale 1:36 - Swan-Class Sloop from plans by David Antscherl & Greg Herbert
I finished with this little decorations:
-
AnobiumPunctatum reacted to SJSoane in HMS Bellona 1760 by SJSoane - Scale 1:64 - English 74-gun - as designed
Pirate Adam, Dave, Druxey, JD and Amalio, thanks so much for your kind welcoming back comments. This really is a genuine community.
JD, I did work for several months at my computer with it propped up on a stool on my desk. Unfortunately, my shop work surfaces are not moveable, and so I work for a bit, lie down a bit, then work again. More doctor visits coming up, hopefully we can get this finally resolved.
Amalio, I have so far drawn the Bellona for my own modeling purposes, and also because I like to draw. I am not sure they are in a state where I could reliably say they are complete and consistent. I am also not sure what copyright issues would be involved in selling these, since they are derived from prints of the original Admiralty draughts I obtained from the National Maritime Museum many years ago. And I don't want to get into running a business now I am retired. But I do want to share, where appropriate, back to this community that has helped me so much over the years to develop many of the details I have now incorporated.
Here are a few more examples, first, the stern framing I am now working on in the actual model. A note of interest is that I found it necessary to suggest a false floor in the quarter gallery of the upper deck (the lower of the two). If the floor of the gallery were down on top of the lower finishing, it would be a long step down from the door cut in the bulwarks, as measured on the original plans. I imagine it would be a continuation of the upper deck in height and roundup. This is an interesting case of where they needed to resolve the different sheers of the outer bulwarks and the inner decks at this point.
Further below, I am showing some of the hatches and partners on the upper deck I will be building at some time in the future. Interesting construction issues in these!
Best wishes,
Mark
-
AnobiumPunctatum reacted to No Idea in Le Rochefort by No Idea - 1/24th Scale - First POF Build
Thanks Jeremy 🙂
Right I'm back from the hospital and I've been repaired but apparently it's no work for me for a few weeks. So completely ignoring their requests I decided to get on with a bit of ship building to keep me sane 😜
Picking up where I left off my next jobs are to make the ships stove and the small office. Both of these parts require a bit of deck for a base so I did this first. I made these parts of the deck as they should be underneath them rather than just placing a bit of wood for them to stand on. The deck under the stove has a layer of metal on top I guess to keep the heat away from the wood.
The stove starts with a pretty simple wooden box with 4 legs that go through the base.
I then lined 3 of sides with bricks that I bought online at 1/24 scale - I never realised that building ships also involves brick laying! The only tricky part of this job was the small corner 45 degree bricks. To get the 12 that I needed cost me about 40 bricks!
I never really know how much detail people want but next I needed to cut the brass strips for the iron cage that fits inside. These strips were cut from 0.25mm thick brass and are 1.2mm wide. To do this I use double sided tape to hold the brass on a sacrificial piece of wood. It's dead simple but the clean up of the saw takes about 30 minutes as the sawn tape just sticks to everything inside of it.
I wanted the cage to be half decent so I opted to use a plug to try and get a good fit. It's a nice snug fit inside which does not allow for the brass cage.
I then marked out and milled the cage to be made - The inside cuts are 0.5mm deep and the outside cuts are 0.25mm deep. It's not perfect but it's good enough.
Next was to solder the pre-cut brass strips into the plug.
This can then be pushed into place and the brass can be easily folded over the edges of the stove without loosing any of its intended shape.
The result turned out quite nice
Finally the brass was blackened; the bottom bricks installed; the feet cut to a 5 degree angle to suit the deck; lifting eyes made and my favourite - the grill bars were installed. I've not explained how the grill bars were fitted as this caused me some thinking as they are sunk into the bricks - so how do you think this was done??
I'm very pleased with this little stove which I guess took 10 - 12 hours to make as there are many elements to its construction. It's a bit glossy on the inside at the moment but I'll sort that out before it's finally installed. I have 2 more parts to make for it which help firmly fix it to the deck. Other than that I'll make a start on the small office next.
Cheers Mark
-
 AnobiumPunctatum got a reaction from mtaylor in Naval Cutter Alert by AnobiumPuncatum - Scale 1/36 - POF
Thank you, Chuck and all others for the Likes. I hope that I can finish the aft deadwood this weekend.
-
 AnobiumPunctatum got a reaction from druxey in Naval Cutter Alert by AnobiumPuncatum - Scale 1/36 - POF
The first component for the backbone of the Alert is the Fore Deadwood. This was milled from a piece of boxwood.
Even though I am very happy with the finished part, I will use a different technique for the aft deadwood. Before I could hold the finished part in my hands, I had a few failed attempts. With a much more complicated component, this method is unlikely to work satisfactorily.
-
AnobiumPunctatum reacted to hdrinker in Pegasus by hdrinker - 1:48 - POF - Swan practicum
Breastworks, belfry and waist guns completed.
-
-
 AnobiumPunctatum got a reaction from CiscoH in Naval Cutter Alert by AnobiumPuncatum - Scale 1/36 - POF
Thank you, Chuck and all others for the Likes. I hope that I can finish the aft deadwood this weekend.
-
AnobiumPunctatum reacted to Chuck in Naval Cutter Alert by AnobiumPuncatum - Scale 1/36 - POF
An excellent start...I eagerly await your progress updates.
-
 AnobiumPunctatum got a reaction from GrandpaPhil in Naval Cutter Alert by AnobiumPuncatum - Scale 1/36 - POF
The first component for the backbone of the Alert is the Fore Deadwood. This was milled from a piece of boxwood.
Even though I am very happy with the finished part, I will use a different technique for the aft deadwood. Before I could hold the finished part in my hands, I had a few failed attempts. With a much more complicated component, this method is unlikely to work satisfactorily.
-
 AnobiumPunctatum got a reaction from Marcus.K. in Naval Cutter Alert by AnobiumPuncatum - Scale 1/36 - POF
The first component for the backbone of the Alert is the Fore Deadwood. This was milled from a piece of boxwood.
Even though I am very happy with the finished part, I will use a different technique for the aft deadwood. Before I could hold the finished part in my hands, I had a few failed attempts. With a much more complicated component, this method is unlikely to work satisfactorily.
-
AnobiumPunctatum got a reaction from mtaylor in Naval Cutter Alert by AnobiumPuncatum - Scale 1/36 - POF
The first component for the backbone of the Alert is the Fore Deadwood. This was milled from a piece of boxwood.
Even though I am very happy with the finished part, I will use a different technique for the aft deadwood. Before I could hold the finished part in my hands, I had a few failed attempts. With a much more complicated component, this method is unlikely to work satisfactorily.
-
 AnobiumPunctatum got a reaction from mgatrost in Naval Cutter Alert by AnobiumPuncatum - Scale 1/36 - POF
The first component for the backbone of the Alert is the Fore Deadwood. This was milled from a piece of boxwood.
Even though I am very happy with the finished part, I will use a different technique for the aft deadwood. Before I could hold the finished part in my hands, I had a few failed attempts. With a much more complicated component, this method is unlikely to work satisfactorily.
-
 AnobiumPunctatum got a reaction from Ryland Craze in Naval Cutter Alert by AnobiumPuncatum - Scale 1/36 - POF
The first component for the backbone of the Alert is the Fore Deadwood. This was milled from a piece of boxwood.
Even though I am very happy with the finished part, I will use a different technique for the aft deadwood. Before I could hold the finished part in my hands, I had a few failed attempts. With a much more complicated component, this method is unlikely to work satisfactorily.
-
 AnobiumPunctatum got a reaction from JeffT in Naval Cutter Alert by AnobiumPuncatum - Scale 1/36 - POF
The first component for the backbone of the Alert is the Fore Deadwood. This was milled from a piece of boxwood.
Even though I am very happy with the finished part, I will use a different technique for the aft deadwood. Before I could hold the finished part in my hands, I had a few failed attempts. With a much more complicated component, this method is unlikely to work satisfactorily.
-
 AnobiumPunctatum got a reaction from Niklas in Naval Cutter Alert by AnobiumPuncatum - Scale 1/36 - POF
The first component for the backbone of the Alert is the Fore Deadwood. This was milled from a piece of boxwood.
Even though I am very happy with the finished part, I will use a different technique for the aft deadwood. Before I could hold the finished part in my hands, I had a few failed attempts. With a much more complicated component, this method is unlikely to work satisfactorily.
-
AnobiumPunctatum got a reaction from oakheart in Naval Cutter Alert by AnobiumPuncatum - Scale 1/36 - POF
The first component for the backbone of the Alert is the Fore Deadwood. This was milled from a piece of boxwood.
Even though I am very happy with the finished part, I will use a different technique for the aft deadwood. Before I could hold the finished part in my hands, I had a few failed attempts. With a much more complicated component, this method is unlikely to work satisfactorily.
-
 AnobiumPunctatum got a reaction from dvm27 in Naval Cutter Alert by AnobiumPuncatum - Scale 1/36 - POF
The first component for the backbone of the Alert is the Fore Deadwood. This was milled from a piece of boxwood.
Even though I am very happy with the finished part, I will use a different technique for the aft deadwood. Before I could hold the finished part in my hands, I had a few failed attempts. With a much more complicated component, this method is unlikely to work satisfactorily.
-
AnobiumPunctatum reacted to Beckmann in TRE KRONER 1742 by Beckmann - 3"/8' scale - Transom-Model
Hello Everybody,
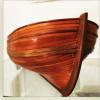
the last weeks I was busy, planking the model. Bending and twisting of planks with dimenson of 2/13 and 2/11 mm was more challenging than I thought ist would be. The curves in the lower areas of the model are very narrow. Here you can see some pictures of the progress.
After this was done, I faired everything.
The colours will be like other contemporary models from the Krigsmuseet in Copenhagen.
Model of CHRSITIAN DEN SIETTE
Model of FYEN
I decided to nail the bright parts of the hull.
After finishing this, I will paint the black areas of the hull an start building the stern and quartergalleries.
I already made the drawings of most of the parts and tested them on the model and prepared the wood to be laser-cut.
It ist all pear-wood I cut in a garden close to the place to our village.
Matthias
-
AnobiumPunctatum reacted to SJSoane in HMS Bellona 1760 by SJSoane - Scale 1:64 - English 74-gun - as designed
HI everyone,
I have not posted in many months, and want to catch up now.
In anticipation of carving the figurehead, I attended the excellent workshop on carving run by David Antscherl and Greg Herbert in Annapolis in early October. Fired up with my newly acquired skills, I flew back home to Montana ready to carve, only to discover that I had pinched the sciatica nerve in my leg on the flight. I was unable to sit at all for several months, taking me entirely out of the workshop. After several months of physical therapy, I am finally able to get into the shop again in small bursts of activity.
During that down time, I put my computer on a stool at my desk so I could work on CAD drawings standing up. I was able to draw many more of the details still to come. I will show some of those in some following posts. Here is a taste:
The unexpected and enforced downtime due to medical issues caused me to realize that I have to get my skates on and work more aggressively towards completion. I may not have the luxury of working for many more years at the same leisurely pace. At the Annapolis workshop, Chuck Passaro discussed with me a number of ideas for tackling the most challenging pieces that were putting me into a tizzy, like the frieze paintings and the fretwork stern decoration, and I am beginning to pursue some of these ideas with him further. Thanks, Chuck, huge help! I am starting with the stern, and here is a sample of what I will discuss in a later posting.
The time off from cutting wood also gave me time to think more carefully about the decorative scheme I will want to follow as I get to this level of detail. I decided at the very beginning that I wanted to show the Bellona as originally designed and built, based on the original Admiralty drawings and on the first Bellona model of 1760 that shows her mainly in frame with little decorative detail other than the taffrail down to the floor of the stern balcony, with no quarter galleries. I did NOT want to portray her as she looked after a major refit 20 years later and shown in the second, fully detailed and colored Bellona model with the coppered bottom. Not only did the latter model show the later structural changes like the changed balcony geometry and the railings along the roundhouse that I do not like, but its overall decorative scheme felt like it was more extravagantly Rococo and showy than the real ship would have looked several decades earlier (like ivory details sprinkled around, and exuberant carvings).
So I have been looking at other models contemporaneous with the first Bellona, like the Princess Royal and the first Victory, both designed by the Bellona's shipwright, Sir Thomas Slade. In some later postings, I will explore this further, as it might be of interest for others who are attempting to reconstruct a decorative scheme from indirect sources.
So anyway, back into the land of the living!
More posts to follow as I am able to put them together.
Best wishes,
Mark
-
AnobiumPunctatum reacted to VTHokiEE in HM Sloop Echo 1781 by VTHokiEE - 1:48 - Cross-Section
I ended up buying the hinge PE set by Mathos Models (I picked up both A and B sets so I can "always be prepared") and I think they worked out well. Unfortunately the bolts became much harder to see after blackening (I assume this is a shadow thing) and I made a CA glue stain (which thankfully is less noticeable no than when I took these pictures). The well and shot locker goes back into storage while I frame out the lower deck.
-
AnobiumPunctatum reacted to Chuck in Sloop Speedwell 1752 by Chuck - Ketch Rigged Sloop - POF - prototype build
Thanks Rusty...
Just a small update...
Now that the aft platforms are completed it made sense to plank the great cabin next. First thing to do was add the laser cut deck clamps. These have notches cut for the qdeck beams. You can see the deck clamp added below. The aft side needs to be beveled to fit flush against the transom. The forward side is left a bit long so you can trim it to fit neatly in place. That forward-most beam notch is a bit longer to give us some wiggle room later for the placement of that beam. In addition before gluing it in...you must shape where the qbadge window is. Sand the shape into the bottom edge of the deck clamp as shown. Because it could be in a slightly different position model-to-model, this detail is not laser cut into the deck clamp.
NOTE the red arrow. The bottom of the notch in the clamp should be even with the top of the window or even slightly higher. But it should not be below the top edge of the windows. If it is, you should make adjustments before gluing it onto the model. In addition, the bottom of these beam notches should NOT be altered. However, when you test fit the beams and find you need to make adjustments, you can absolutely enlarge the notches on the sides and top for a better fit. Just carefully chisel out some of the deck clamp or the planking above it to accommodate your beams.
Next we will plank the inboard side of the great cabin. I am sure most of you could do this without any issues, but to help make it easier, there is a template on the plans. See below.
This should make it easier to cut each strake with the appropriate tapers. There are six strakes. I highly recommend that these planks be cut from a 3/64" sheet as they are somewhat wide at the stern. Plus they are pretty much all drawn out for you. I will also add that you may have to make small adjustments because depending on where you aft platform ended up , you may have a slightly different area of space. Adjust the template accordingly and cut your planks to fit. Again they are 3/64" thick.
Below shows the cabin planked inboard. I carefully cut around that window and did simulate caulking for the plank seams. I just used full length planks rather than show any possible butt joints. They wont be seen anyway. Note the forward edge of the planking runs down the FORWARD edge of the hull frame. Keep the forward esge nice and neat right down the edge of that hull frame.
You might see some laser cut qdeck beams in that picture as well. They are just laying on the lower platform. Although we wont be adding them just yet, it will be to our benefit to have them handy while we do the next steps of fitting out the cabin benches and rudder trunk details. The laser char was removed from the deck beams and they were cut to length. It takes some practice on the first few to get the length correct so they sit nicely in those notches. But dont throw it away if you cut it too short. Just use it for the next shorter beam and work from the forward side aft when doing this.
Test fitting the qdeck beams....none are glued in as I mentioned. Note the extra space on the first beam at the deck clamp notch. This will let us move it around where needed when we start work on the bulkheads there. If any of you are having a problem slipping the beams into those notches, you could easily add another strip of say 1/8 x 1/32 cedar following the bottom of the notches and it would be fine. I did not find the need to do that however. But you might find it easier if there was a second layer that stood proud of the planking a bit to rest your beams on. Builder's choice...
-
AnobiumPunctatum reacted to AON in HMS Bellerophon 1786 by AON – scale 1:64 – 74-gun 3rd Rate Man of War - Arrogant-Class
slow going but I marked all the beams, removed them and am cutting and installing them one at a time to assure all the notches align properly.
slowly getting used to making shallower notches
getting used to it all
by the time I get to the gun deck I'll be... not quite a master at it but much better!