
HOLIDAY DONATION DRIVE - SUPPORT MSW - DO YOUR PART TO KEEP THIS GREAT FORUM GOING! (Only 66 donations so far out of 49,000 members - Can we at least get100? C'mon guys!)
×


DaveBaxt
-
Posts
1,324 -
Joined
-
Last visited
Content Type
Profiles
Forums
Gallery
Events
Everything posted by DaveBaxt
-
Yes I have ordered one thank you. Best regards Dave.
-
I have thought about I f I was to try this again , I thought about drilling a hole on the other face at the apex of the "V" before machining the groove or I could just machine the bottom of the gtoove using a miller but I now get what you mean. Thank you for your input ,it is greatly appreciated. Best regards Dave
-
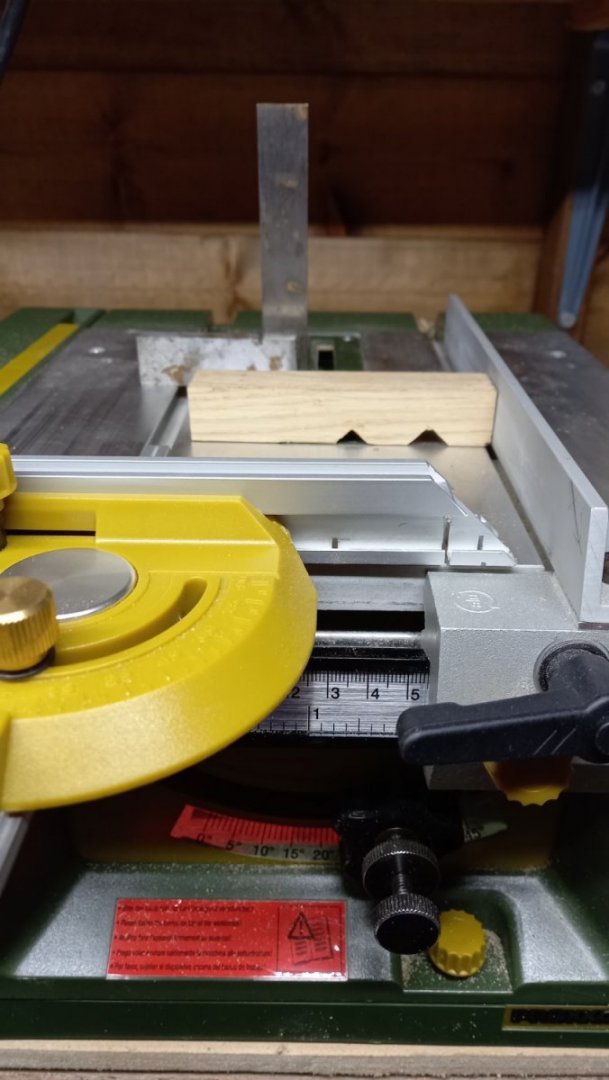
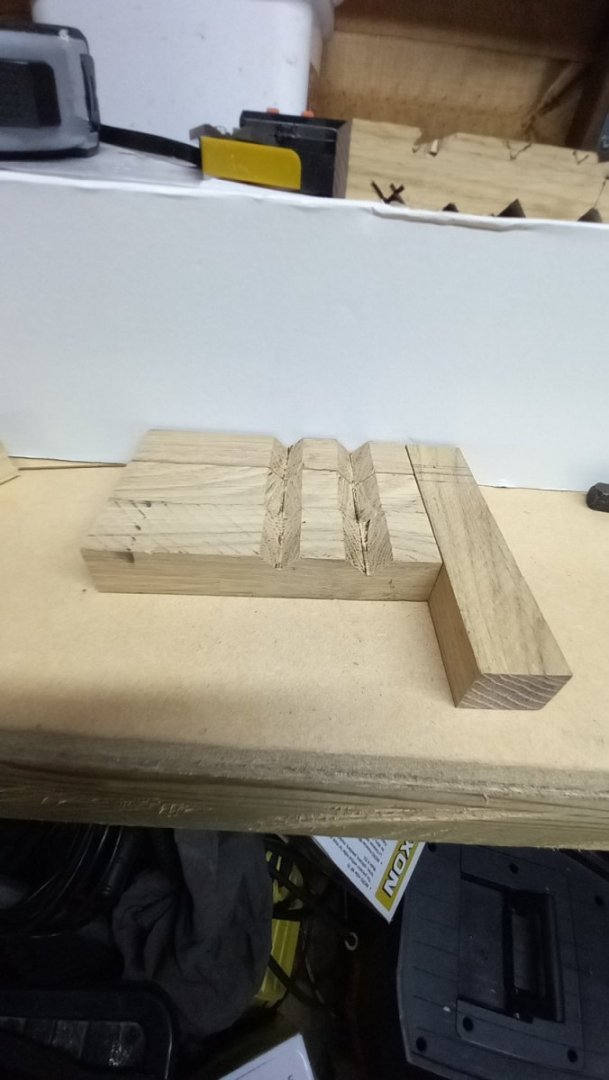
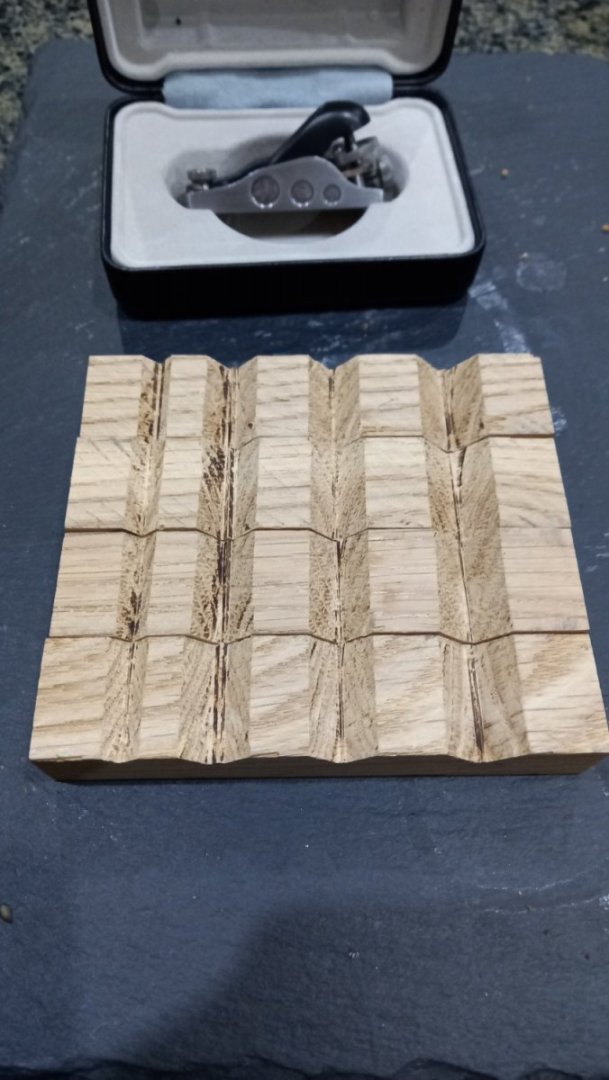
I would just like to thank every one for giving me different ideas on how to make some 90 deg grooves. I have managed to make something using My Proxxon FET table saw which wasn,t straight forward as I thought due to change the angle of the rotary cutter the scale on the front made it useless so I just has to measure using a square and vernier caliper . So not 100% perfect but not too bad but could do with going over some of the grooves with a flat chisel. It is my intention to try the other methods and compare my results. I need to get my hands on a decent chisel set including the one mentioned by druxey . I have also oredered rotary burr tool to see what sort of results I get with that. . Here is a few photos of the work I produced on my FET table saw. They still need a bit of work with chisel and sanding. Best regards Dave I used some old oak strips I was given so not the easiest to cut so not sure if I had the correct cutter for the job .
-
-
Thank you druxey for giving me another way of doing this and can also look into this. Best regards Dave
-
Bruce thanks for the link. If I can't get my hands on a router bit then this is probably something I will go for. However it does not state what the shank diameter is. I will therefore try and ask the supplier and see what he comes up with.Hopefully I will get an answer. If you already have one, perhaps you could let me know the shank size. Best regards Dave
-
Thank you Ondras71 for the video and probably a really good way of cutting a 90 deg groove and will bear that i mind, Best regards Dave
-
Some good ideas there thank you . Unfortunately I do not own a router but have a table saw which the blade can be adjusted to 45 degs so could try that. I to thought about two planks with a 45 deg chamfer but just thought it would be easier if I could get a 90 deg router bit . So hopefully something will turn up
-
Thank you Bruce for the link. I never thought about trying a burr instead of a bit/cutter but I might have to try a burr if I don,t have any joy with the router bits.
-
Hello all. I am looking for a router 90 deg Vee bit to fit my Proxxon milling machine. I have the set of the Proxxon router bits which has a Vee type bit No 29 023 https://www.proxxon.com/en/micromot/tools-router-cutters.php When measuring the angle I have found it to be less than 90 degs . I have searched throughout the internet for several suppliers here in the UK and all of the router bits I have found so far have 6 mm or 1/4" shanks. which is too large for the collets on the Proxxon milling machine, What is needed is a router bit with a 3.2 mm shank.as is the Proxxon bits but non that will give me a 90 deg Vee. I need this router to make a jig for holding square stock for making masts rather than using dowel. Thank you Best regards Dave
-
Should be and something I could practice on as it is relatively cheap. Sorry for another question what are you guys using for a jig for holding the square stock whilst shaping. Thank you again for your prompt reply.
-
Do Any of you use lime for square stock for masts or any other preference for building masts that is readily available in the uk? I now know that boxwood is available in Europe in sheet form but is quite expensive as is the delivery costs.
-
Thanks everyone for what are great replies and for explaining the methods of doing everything by hand . Shipaholic your level of workmanship is truely awe inspiring. Hopefully someday I will also have leaned to achieve such high standards . However after laying out such high costs of purchacing a fair few power tools. I was really hoping that it would be possible to carry out the work using these. However your methods are something I would like to try and will need to source some square stock in a lighter wood as I only have walnut in square stock. I probably need to get a decent small plane as the one I have is just a cheep one. The replies I have received on the thread have really made it worthwhile starting it and something I can save for the future. Once again thank you for giving me a few different ideas. Best regards Dave
-
Thank you for clearing that up for me and what looks like it is faiirly straight forward and therefore a great idea and something I would like to try out at some stage.
-
Mondfeld v Lees Masting and rigging
DaveBaxt replied to DaveBaxt's topic in Masting, rigging and sails
-
Mondfeld v Lees Masting and rigging
DaveBaxt replied to DaveBaxt's topic in Masting, rigging and sails
Thank you once again Allan for your time. I am indeed getting the general idea and I am beginning to understand why people kit bash or even build from scratch and wonder if I would ever have the skill to get to that level. It must take a few years to learn every thing there is to know without considering the level of skill required. The latter being something which I believe I have left too late in life. Best regards Dave -
Thank you Roger for your input it is greatly appreciated, however I do not fully understand your methods. I get the bit about the tapered pieces but unfortunately my saw does not have a miter gauge so its difficult for me to grasp your idea. I don,t suppose you posses such a thing as a photograph or perhaps a link . Please forgive my ignorance and slow uptake and your patience in this is appreciated. Best regards Dave
-
Mondfeld v Lees Masting and rigging
DaveBaxt replied to DaveBaxt's topic in Masting, rigging and sails
Wow Allan if these are Toy models I wonder how difficult the real models are.I think they might be beyond my scope! -
I am now approaching the building of the mast and my questions is in the main regarding the lower mast and how to make these with the help of power tools quite possibly for exampl a Milling machine with a rotating head, together with a wood turning lathe or quite possibly a rotary table saw. When using the afore mentioned tools how are you securing the work piece when machine the flats for the cheeks and hounds. ie how to get the correct taper etc. Machining the square flats at the mast tops etc. Is it easier to start with square or round material when using such power tools . Are there any tips/trick which will help to make realistic masts bearing in mind some masts have sections which have octogons as does yards. Perhaps there are a few modelers who would be kind enough to explain their own process or giving a link to a specific build whereby these procedures are explained or just show some good photos. I appreciate I am asking a lot here but just thought it would be a good idea to have a discussion, all in one place. Best regards Dave
-
Mondfeld v Lees Masting and rigging
DaveBaxt replied to DaveBaxt's topic in Masting, rigging and sails
Sorry to return to this subject but as I now approach the building of the masts I need to get their sizes nailed down. Using the breadth of the model as 145 mm the main lower mast for that period 1758 to 1761 For a 6th rate ship equates to 330.6 mm. Although this is longer than the Caldercraft drawing mast of 293 mm ,they woulld be pretty much the same height above the partners . Using the Main lower mast length as the datum pretty much all the other masts and yards work out ok until I come to the main and fore topgallant yards.According to Caldercraft drawing these are both 150mm each. Now according tp Lees calculations these are calculated as 0.5 of the main topsail yard which is 0.5 x 198.36 = 99.2 mm Quite a bit under. the 150 proposed by Caldercraft , I would have thought. Then we come to the fore topgallant yard , also 0.5 x fore topsail yard which is 0.5 x 178.5 mm which is 89.2. This is smaller but this I beleive to be expected but still too short. The only thing I think I could be going wrong with this is using the comparison of a 6th rate ship. As I understand it the HMB Endeavour is not rated so where do I go from here regards the topgallant yards. Interestingly enough the length of the mizzen mast is much higher than proposed by the Caldercraft drawing and therefore the shrouds will then be clear of the rail. Which was why I raised the initial question. One answer would be if some one was kind enough to work out the sizes for a scale of 1: 64 from the AOTS book just for the main and fore topgallant yards would be fantastic and I would be more than gratefull for their help. For the record I also worked out the sizes from the Monfield book and again the Topgallant yards are pretty much the same as the Lees 6th rate ship.but still a bit on the small size I would have thought and also worked out from the breadth of the ship. I am almost at the point of just using the sizes from the Caldercraft drawings apart from the length of the mizzem mast. as they will all probably look ok and hopefully not top heavy. Thank you for your continued patience. Best regards Dave -
Some fantastic looking deck fittings and hatch covers etc. I hope I can build a Dianna in the future half as good as yours. I do sometimes wonder how accurate the AOTS book is. I am another owner of such a book as I managed to pick this up on the cheap. This is one of the reasons why I am thinking of building the Diana but as I say I do wonder how accurate the position of deck fitting and sizes of various items and wonder where Caldercraft get there information from and wonder what your thoughts are on this. I do hope I am not distracting you too much from your progress. Best regards Dave
-
Some great looking rigging work and I like your mouse on your stays. and well done with your the rest of your build of the Diana. I have been considering building the Diana for a while so its great to see another blog of a excellent build of this ship. I am looking forward to your continued progress. Best regards Dave
-
I see that now and once again thank you for your effort. Best regards Dave
-
Please accept my apologies for asking , it is only because you were discussing ships boats and I was then hoping that it was only a matter of paccking the parts together in bags. I now appreciate that there is more to it than that and it will take you a lot more time. I therefore thank you kindly for your time and effort. Best regards Dave
-
Vane. Thank you for your tips on planking. It is always nice to hear different ideas on how to go about this piece of work. Hope you return to building the Diana in the near future as I look forward to your progress. I am considering building the Diana as I have mmanaged to get my hands on the AOTS book for this ship so it will be interesting to see if there are any differences in the kit. The other reason I wish to build here is I fancy doing one of the big ones but I am still not sure where to put her. You have a huge project on your hands there , so I will wish you good luck and remember to keep us all posted. Best regards Dave


