HOLIDAY DONATION DRIVE - SUPPORT MSW - DO YOUR PART TO KEEP THIS GREAT FORUM GOING! (Only 20 donations so far - C'mon guys!)
×


DaveBaxt
-
Posts
1,324 -
Joined
-
Last visited
Content Type
Profiles
Forums
Gallery
Events
Everything posted by DaveBaxt
-
Great to see another Endeavour on the go and you have made an excellent start and great planking on the Decks,especially with the cauking inbetween the planks. I would be interested to know what you used? I look forward to seeing your progress I f you don,t mind me pulling up a chair.
-
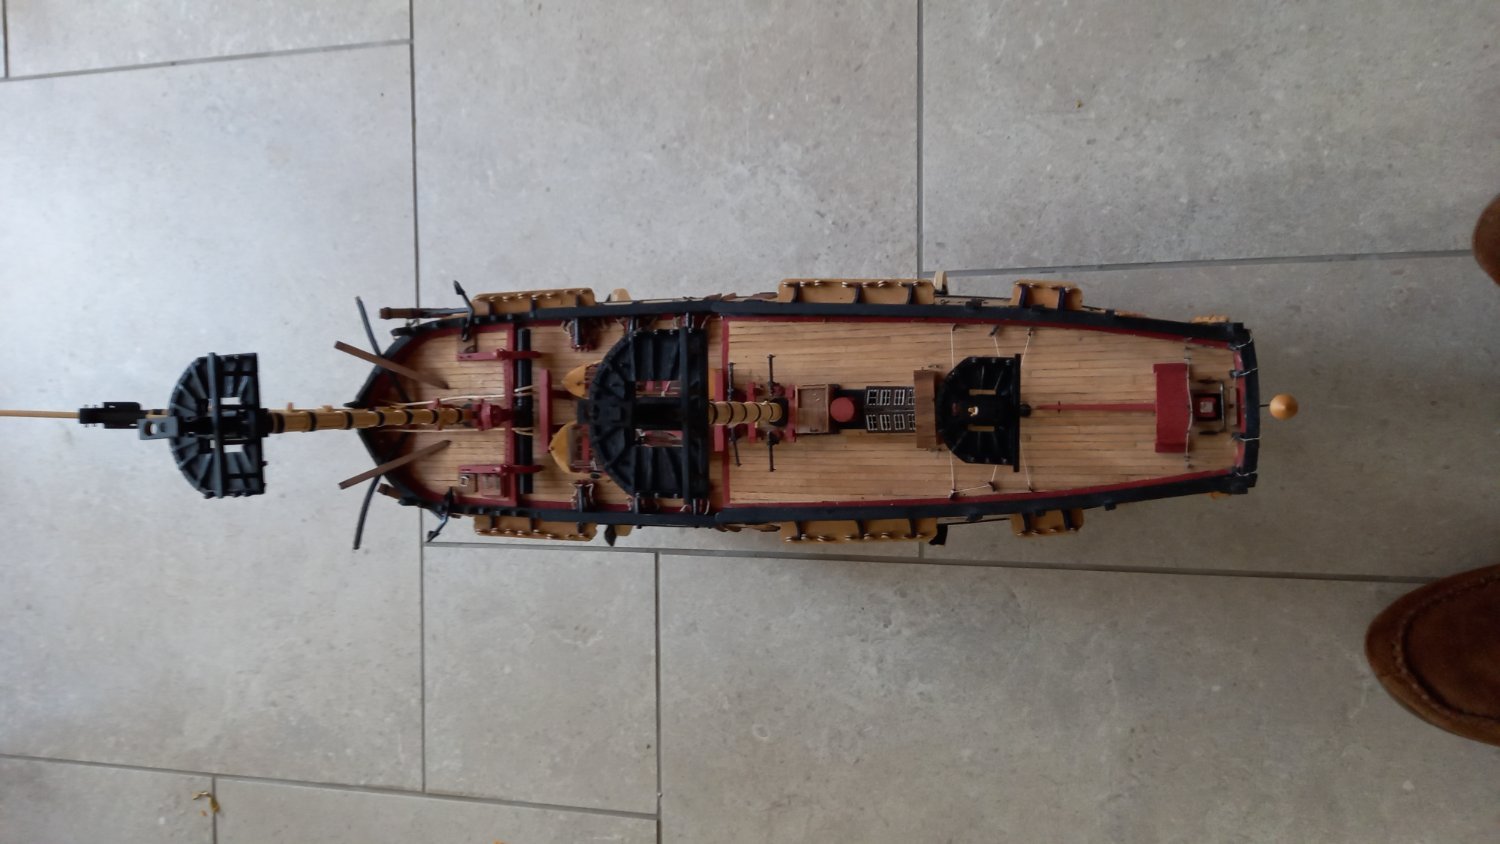
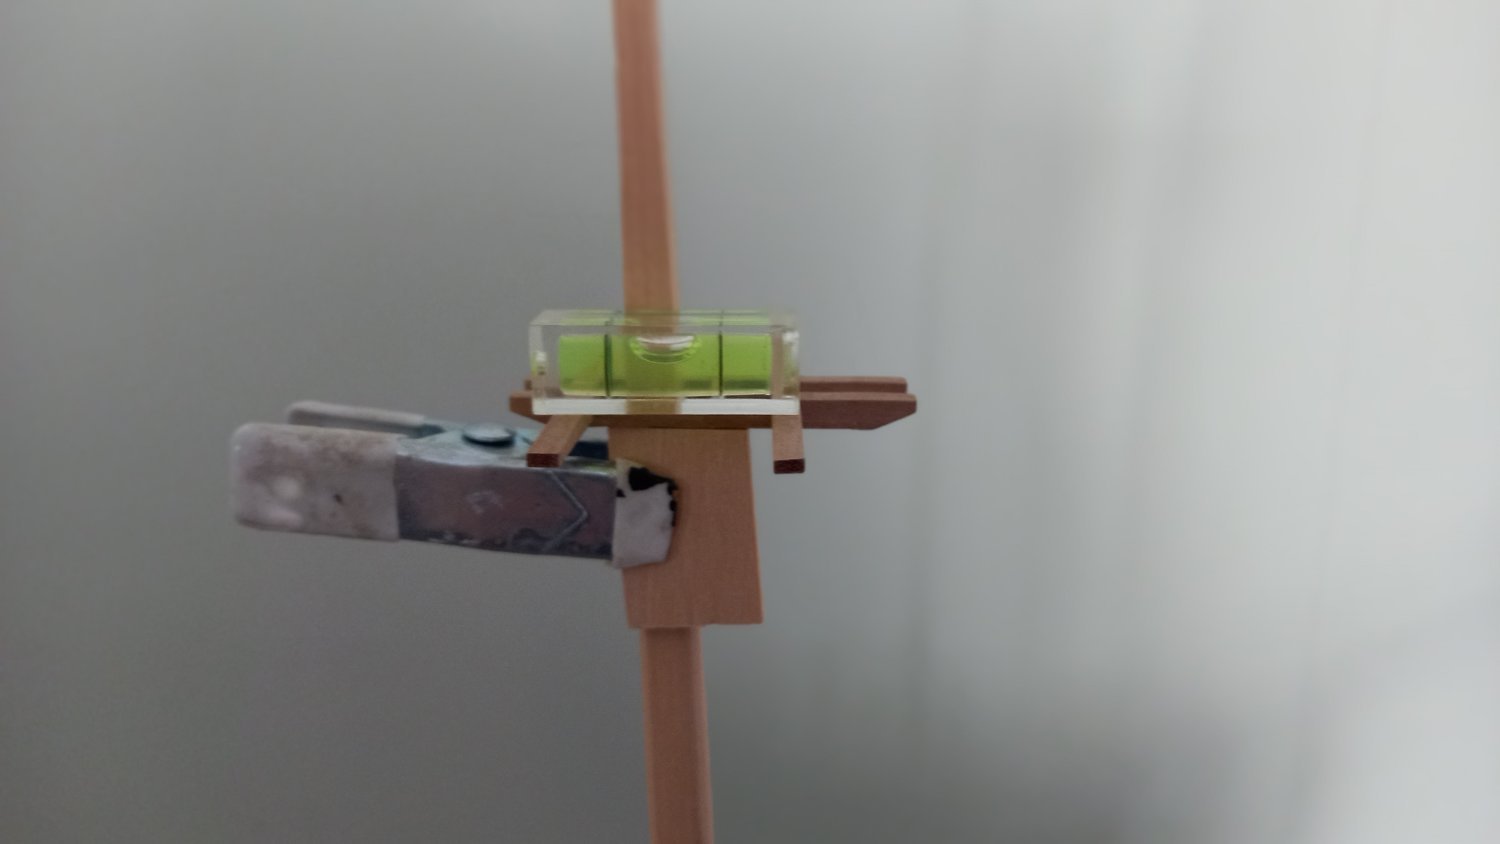
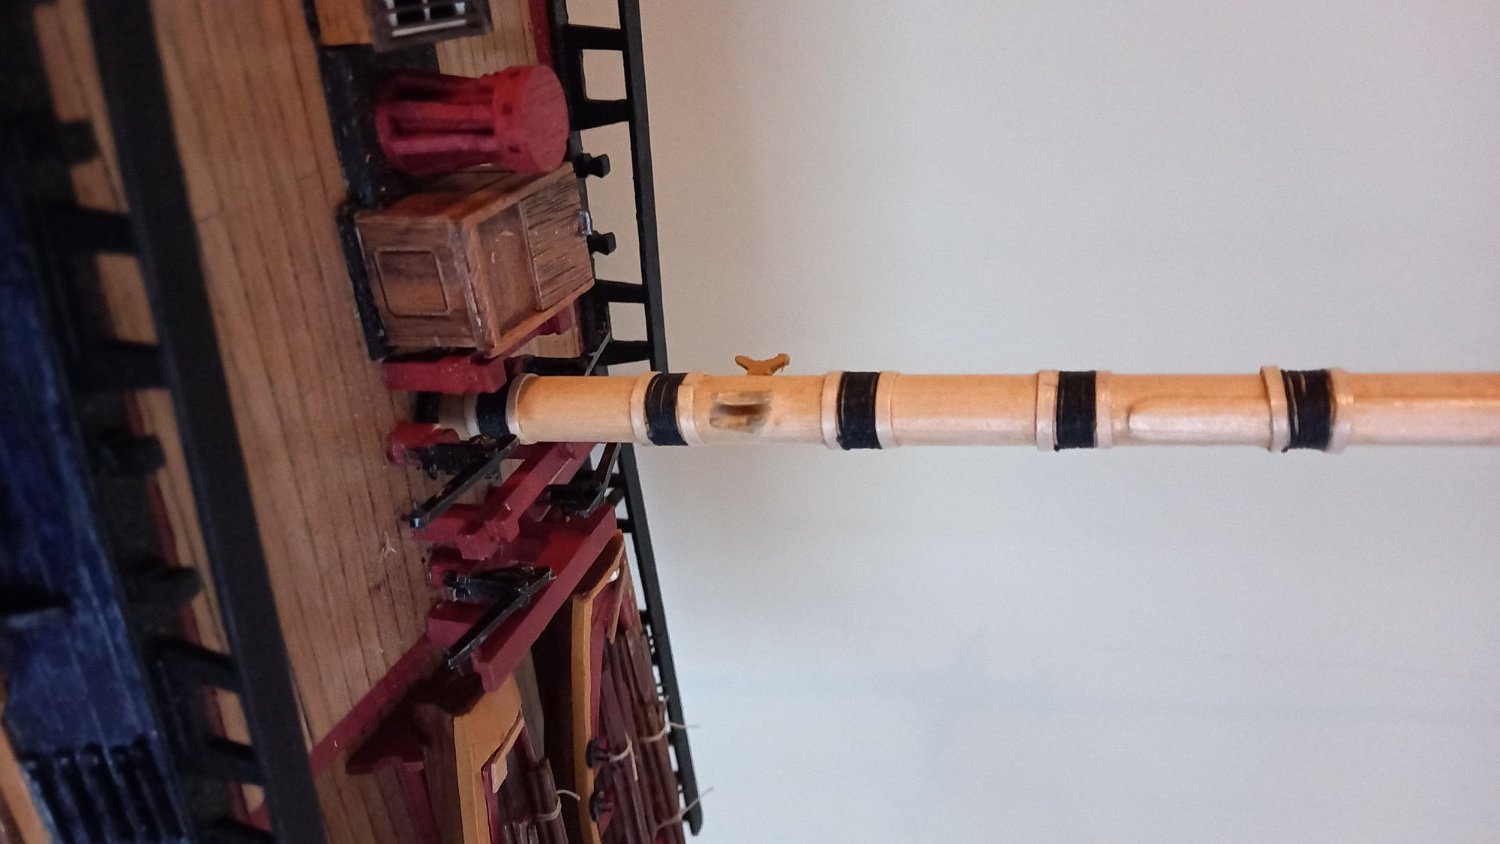
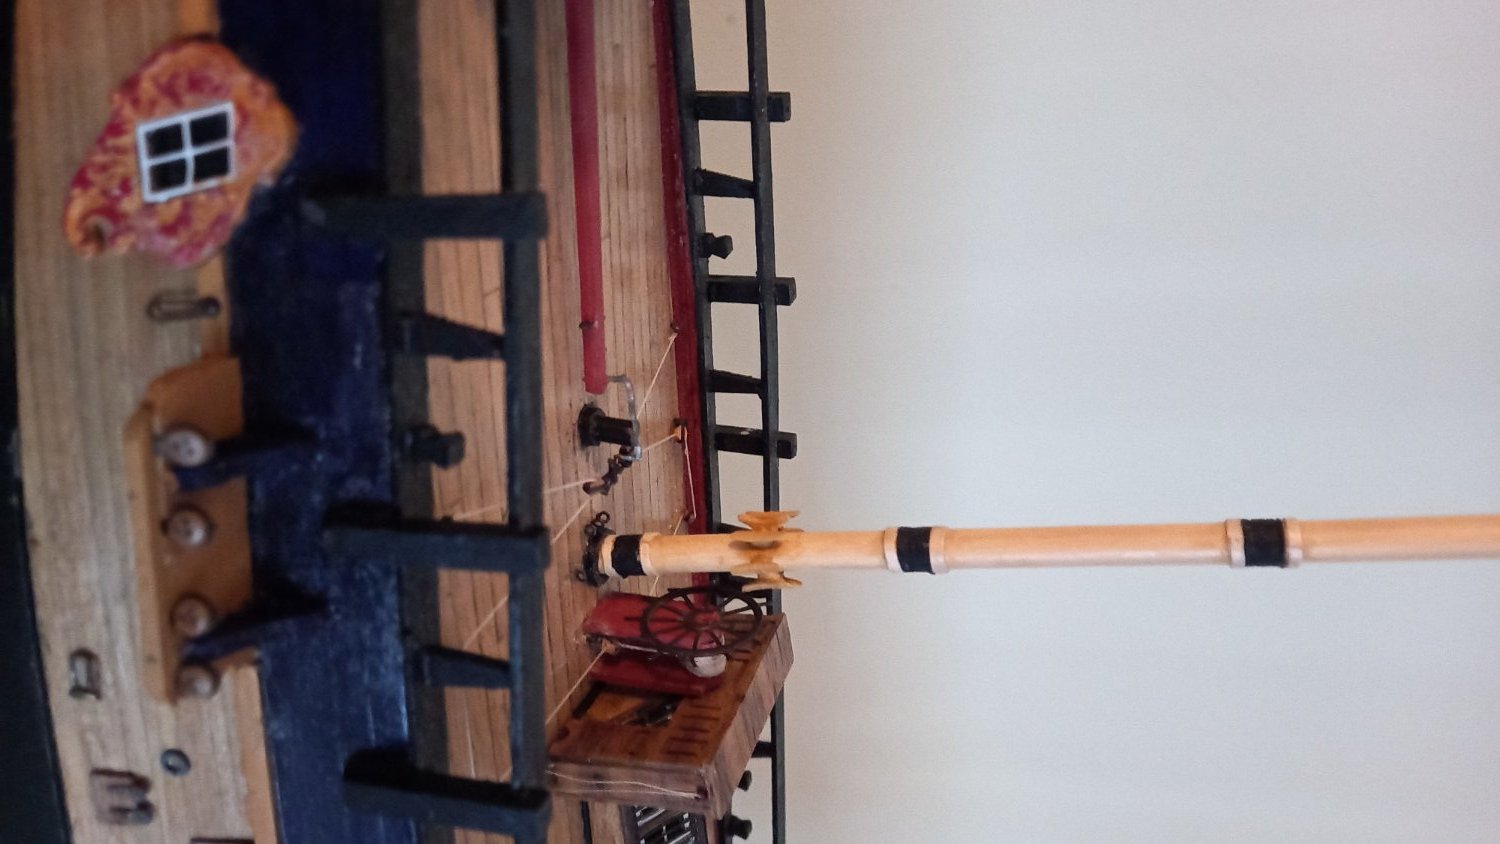
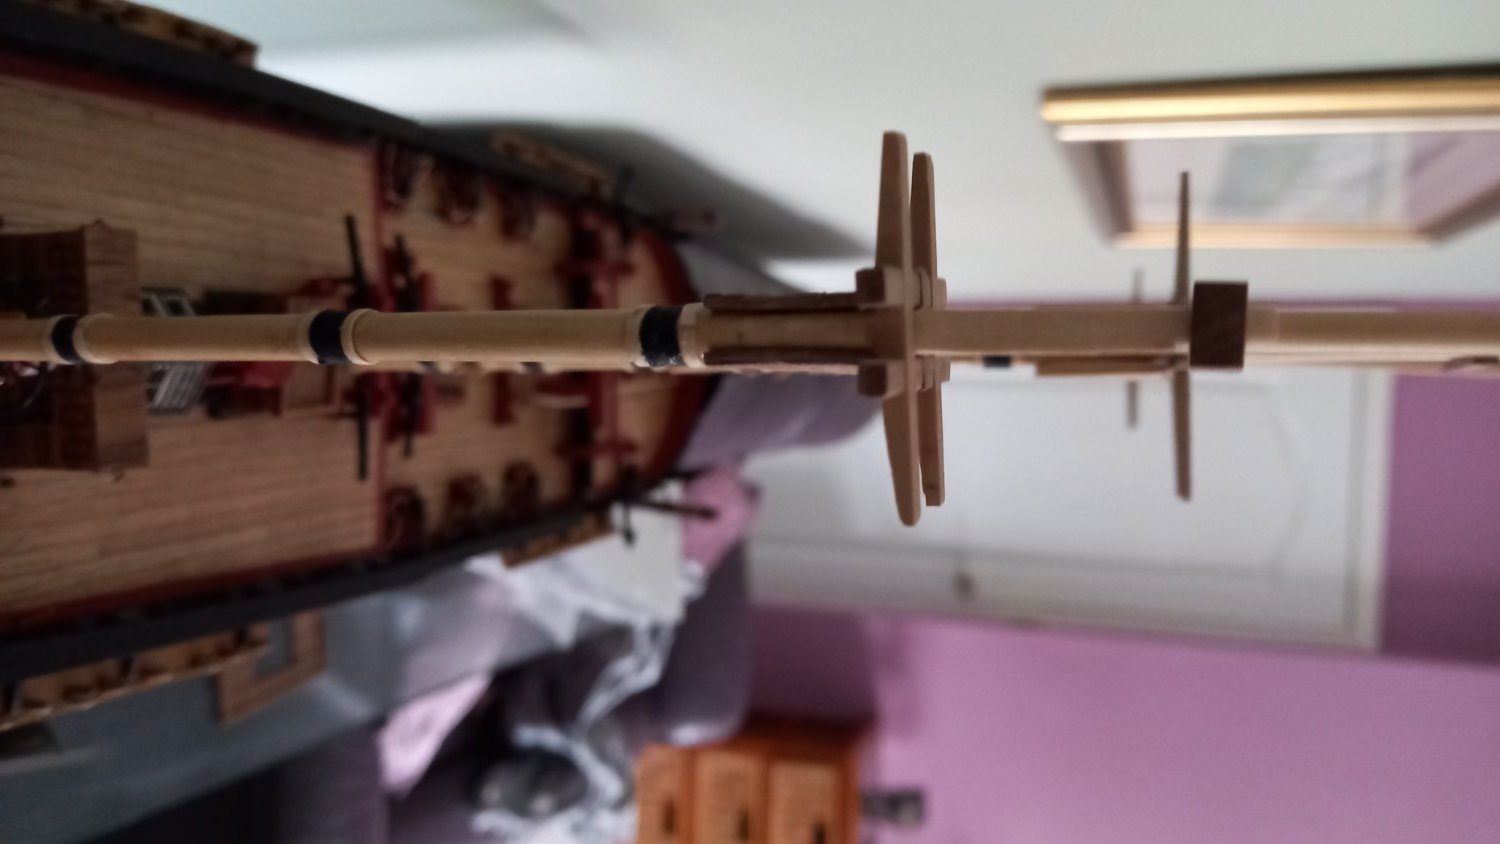
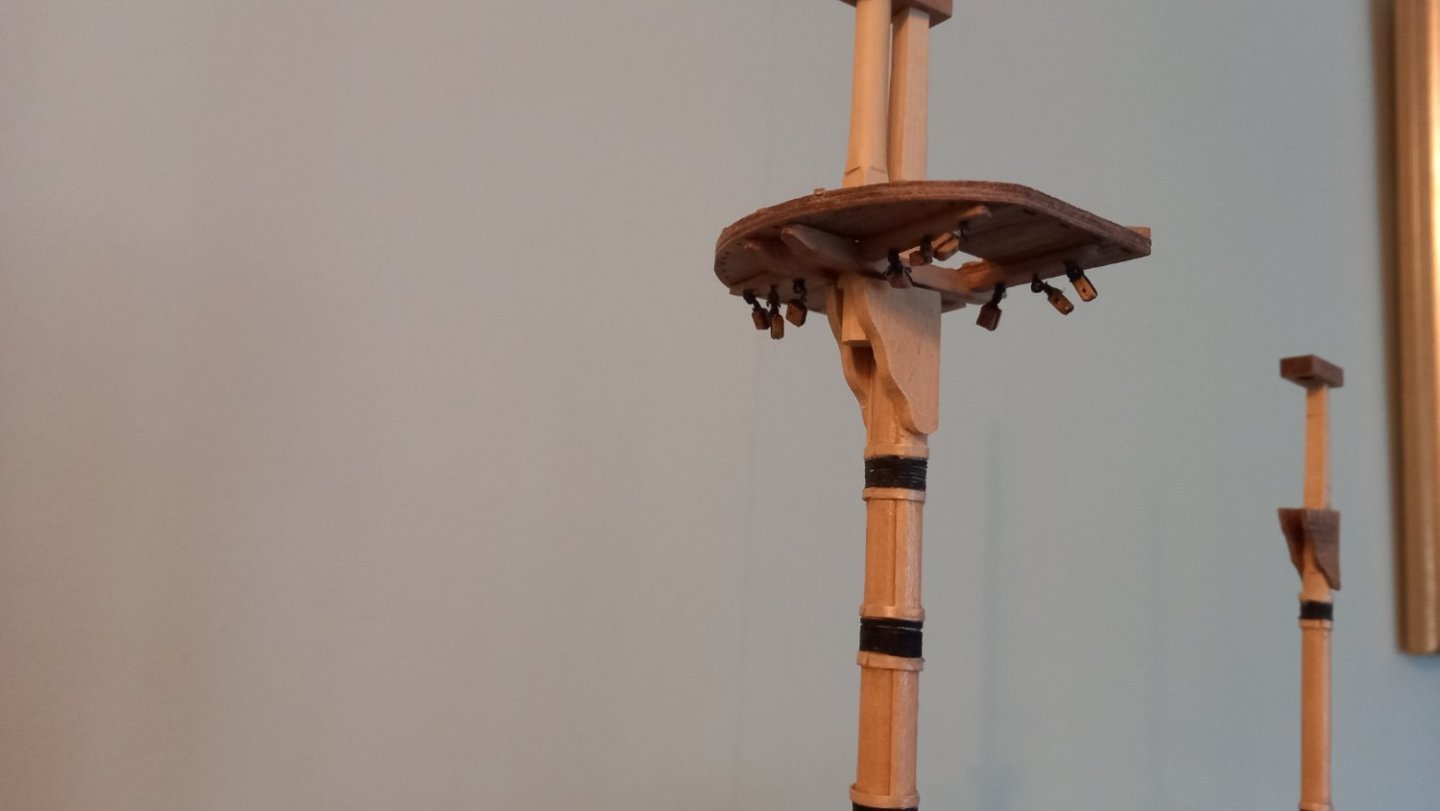
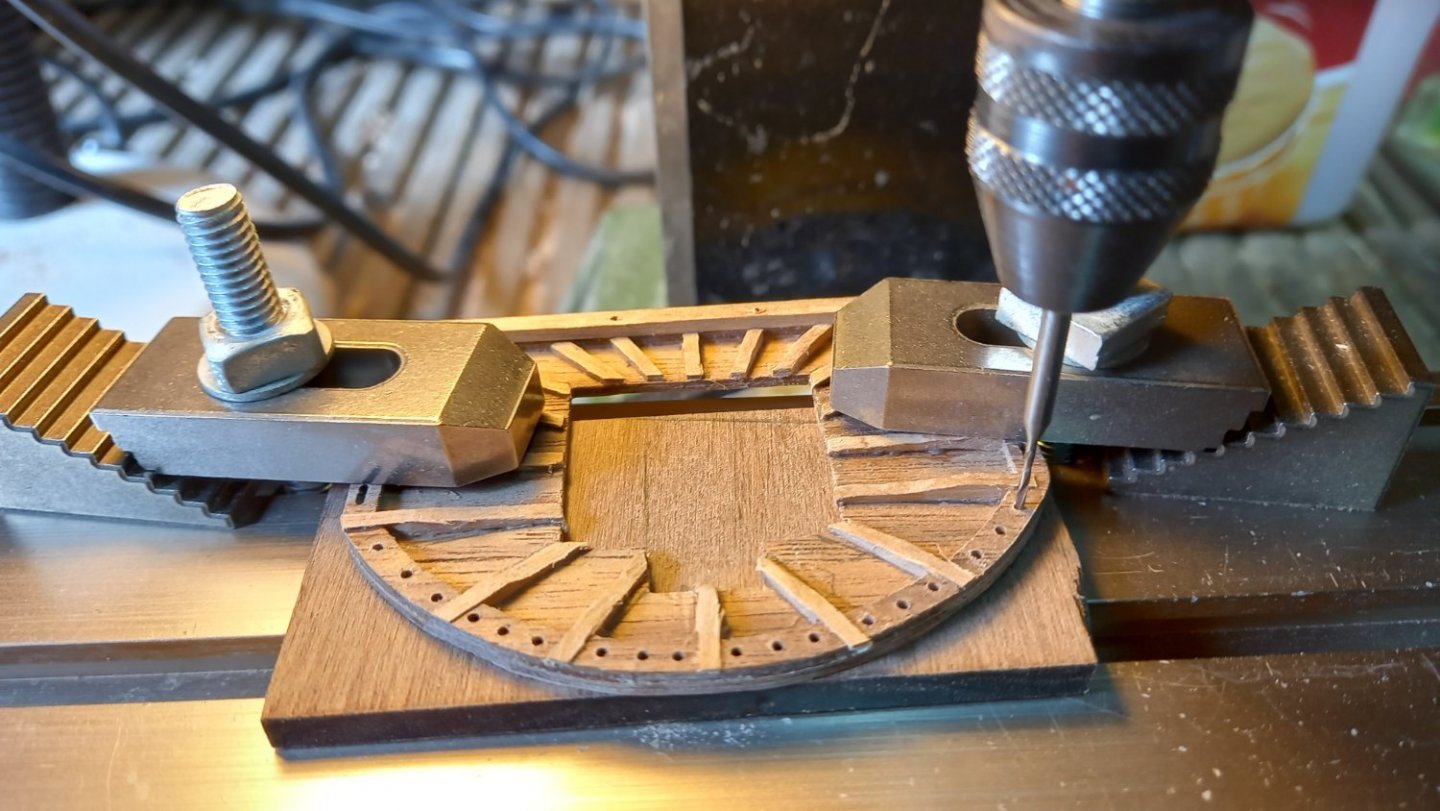
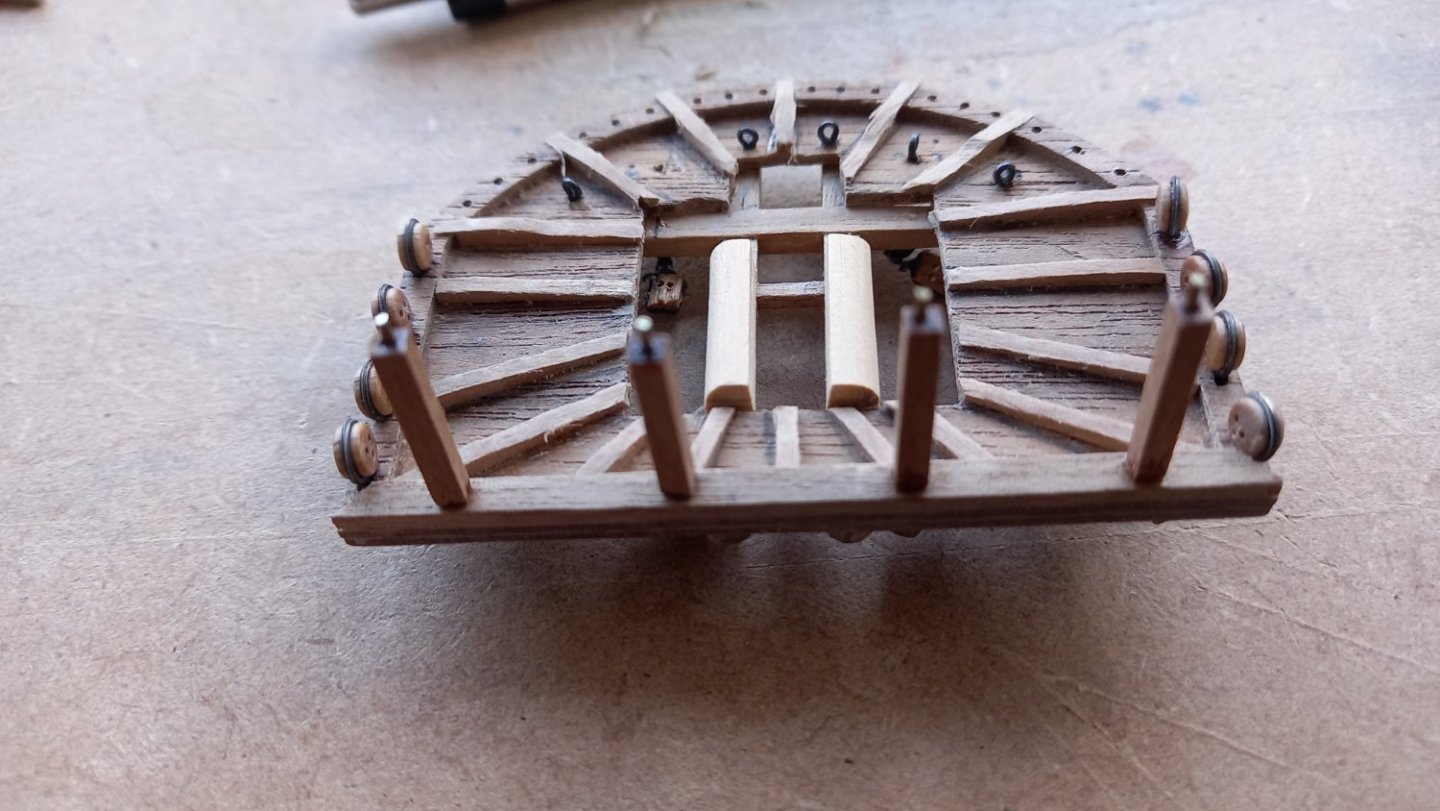
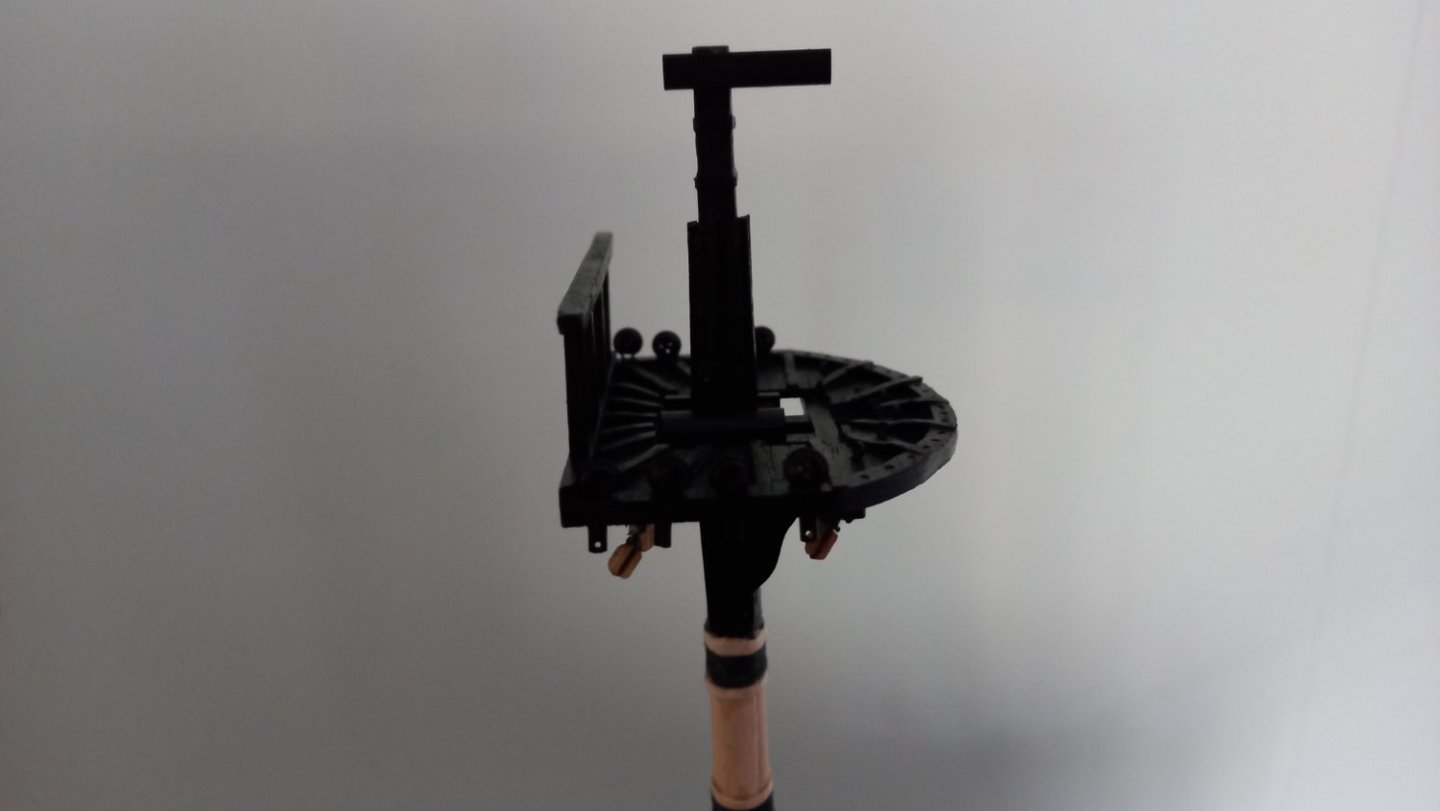
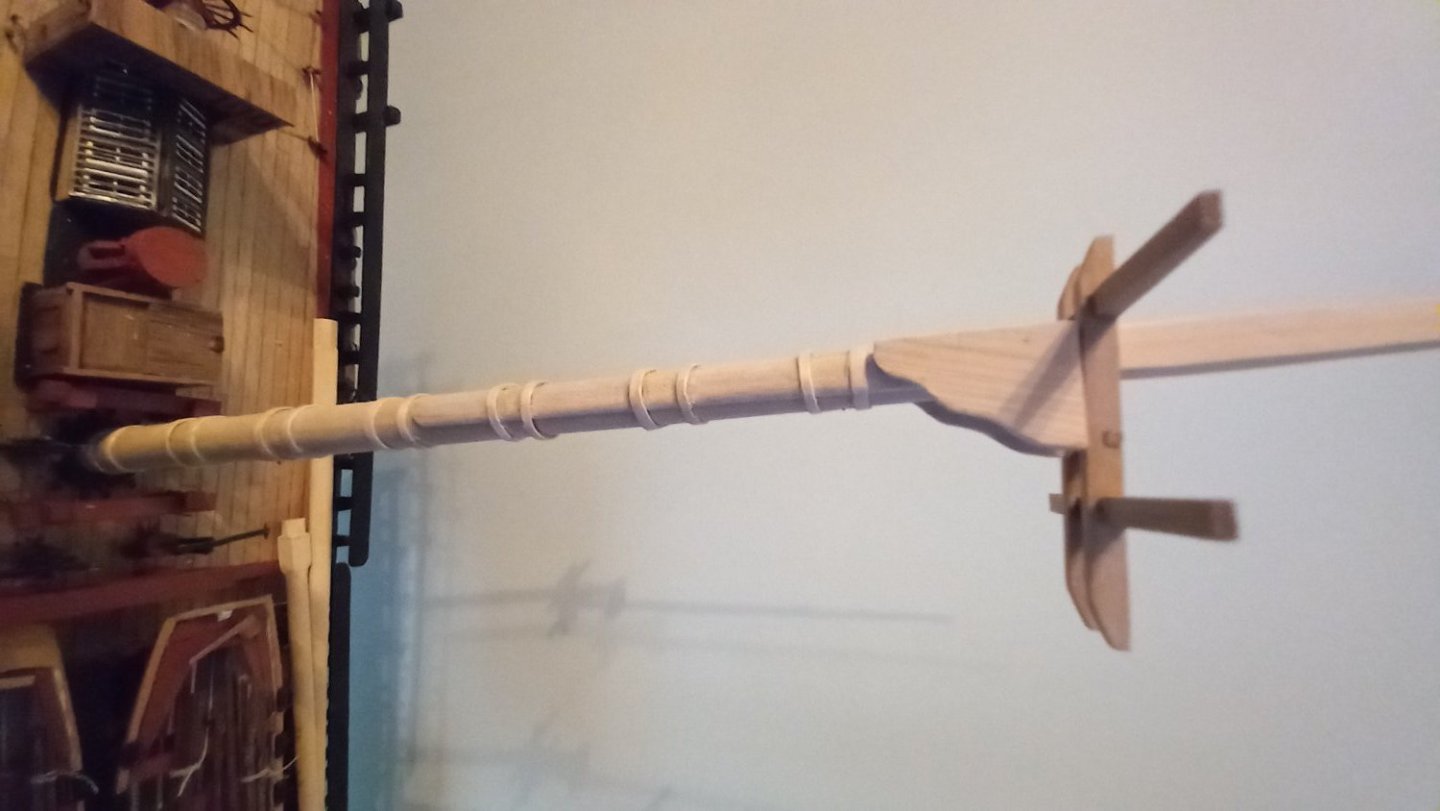
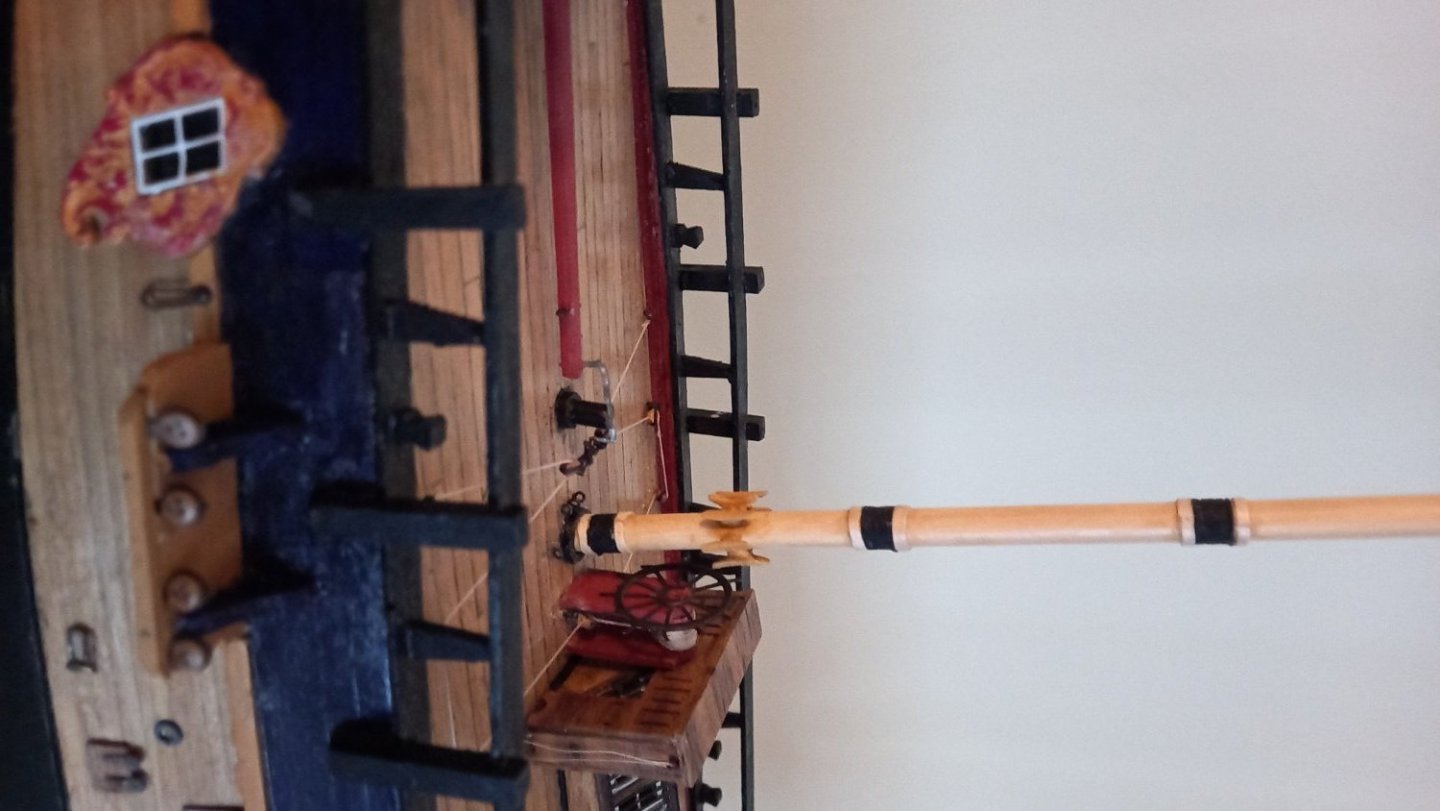
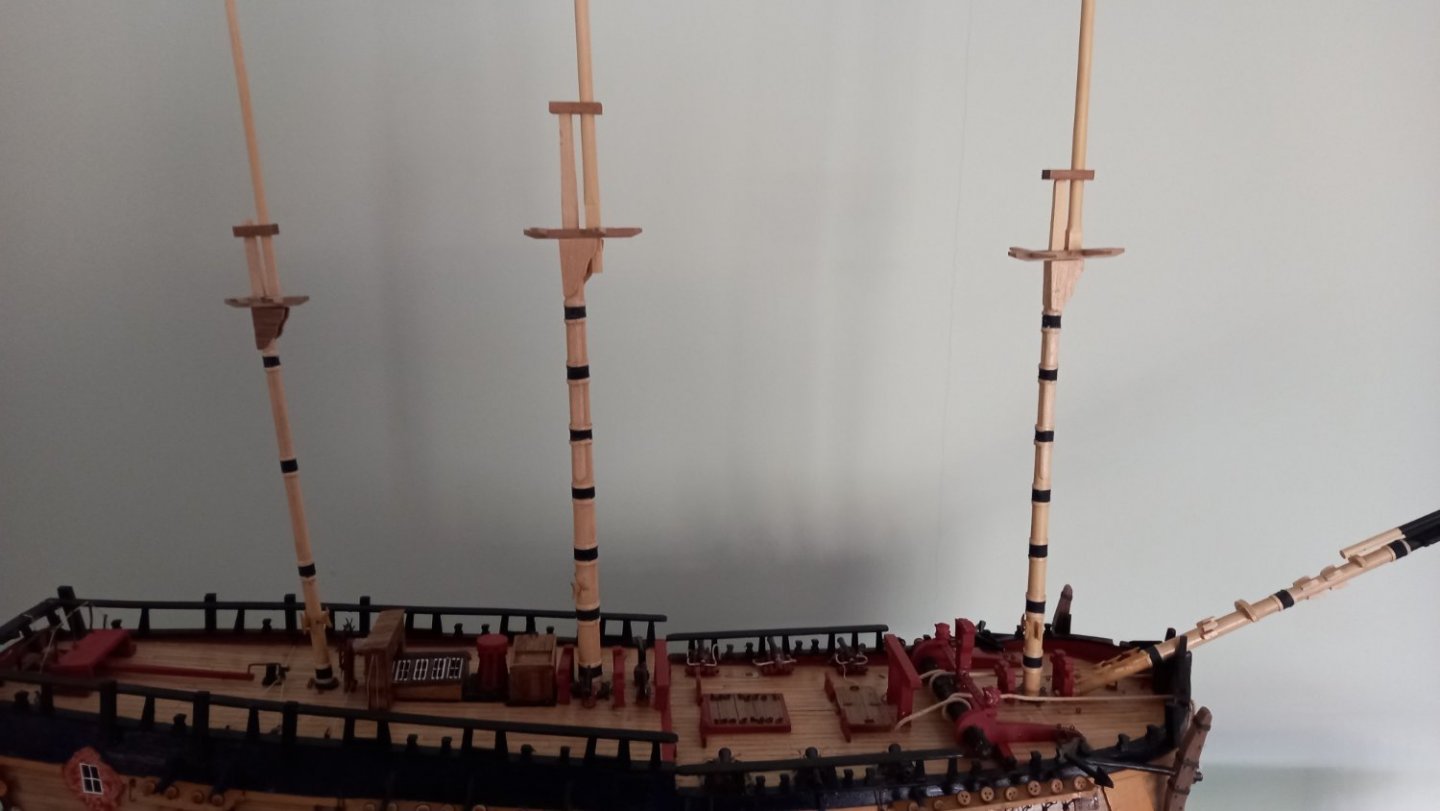
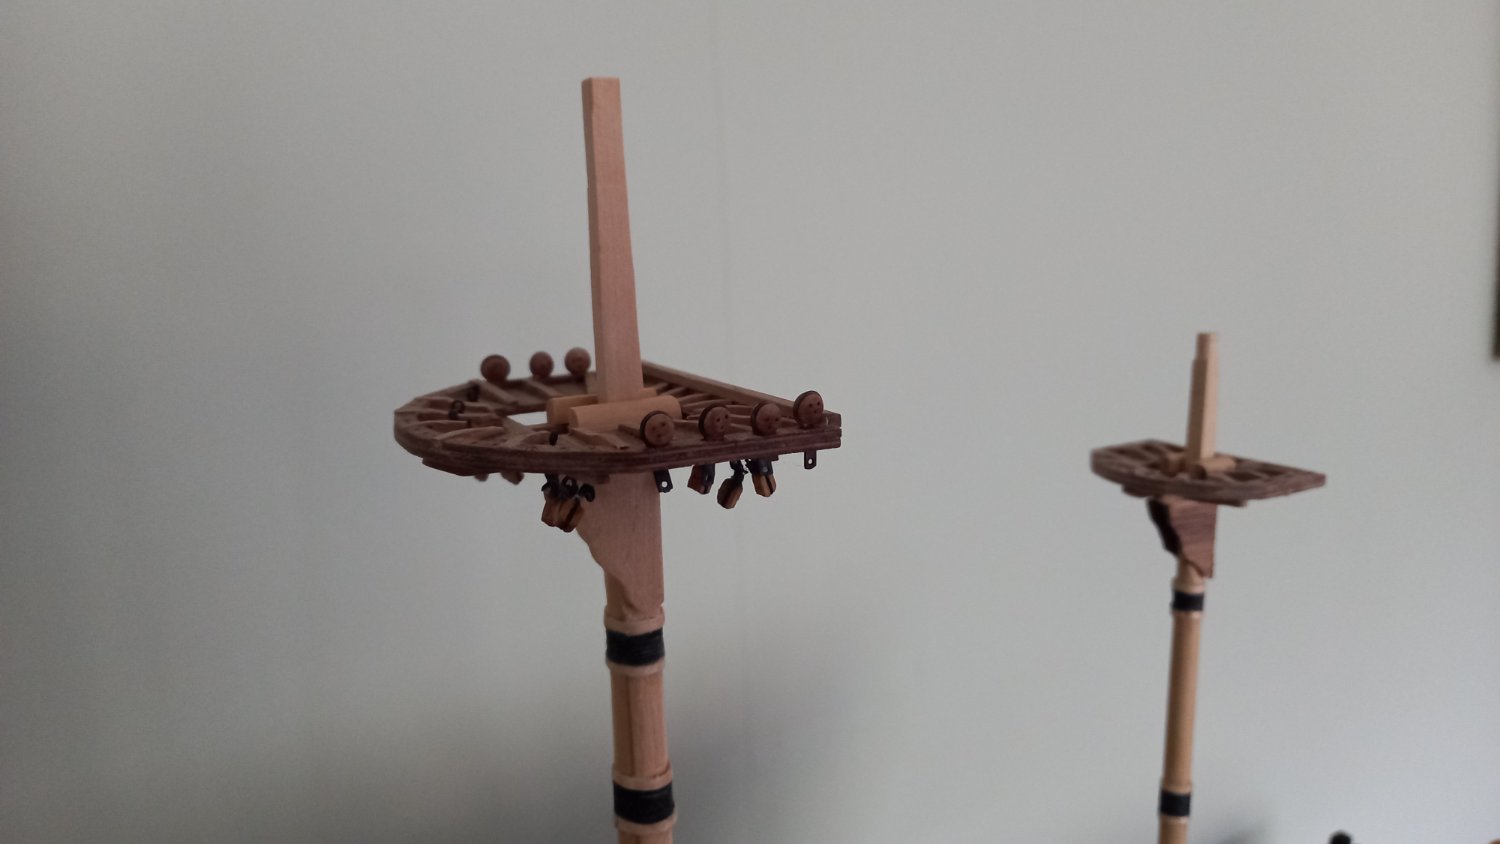
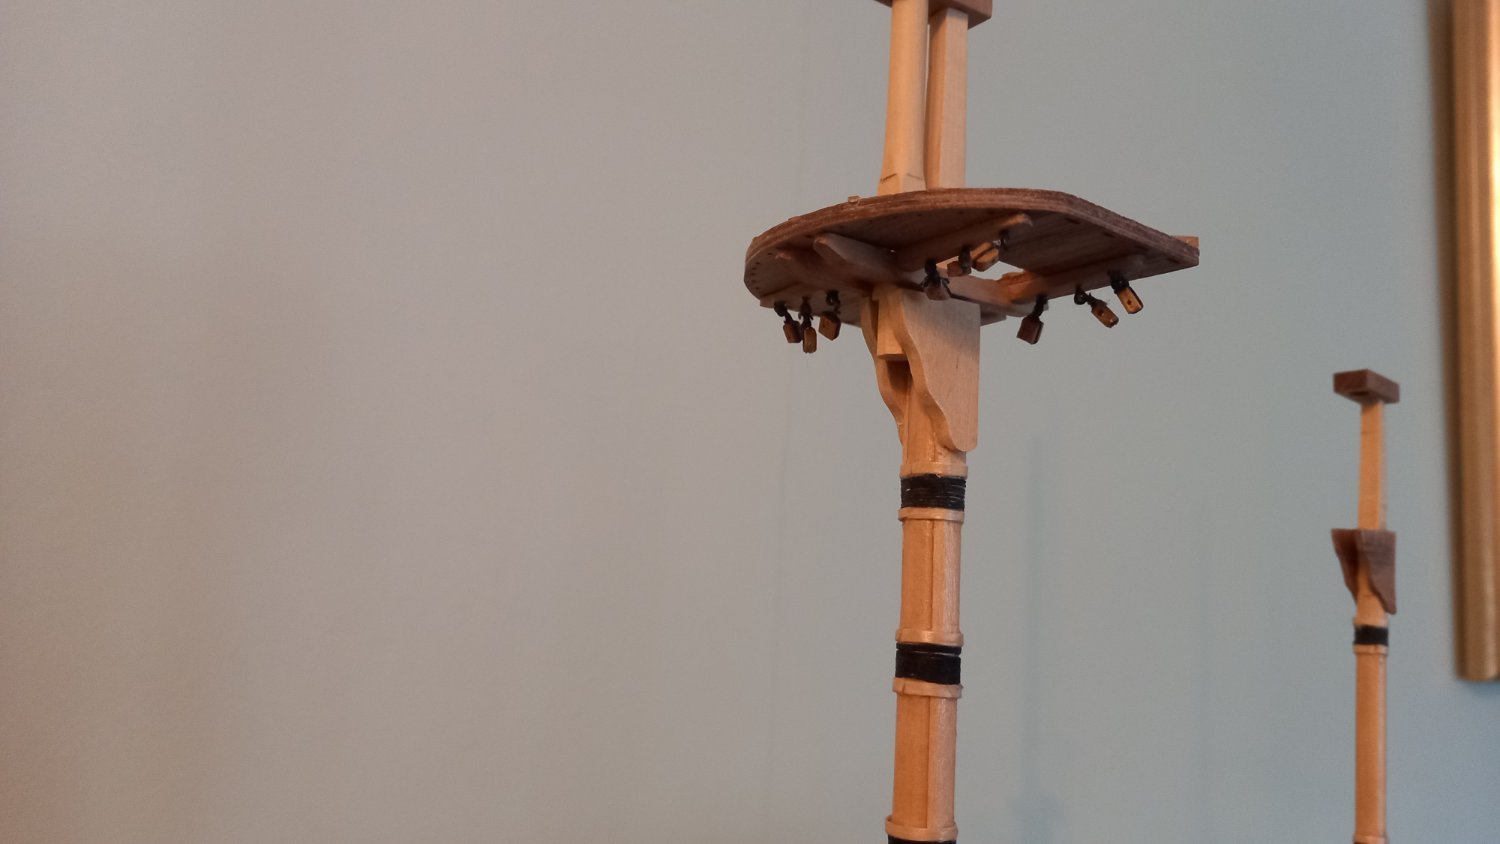
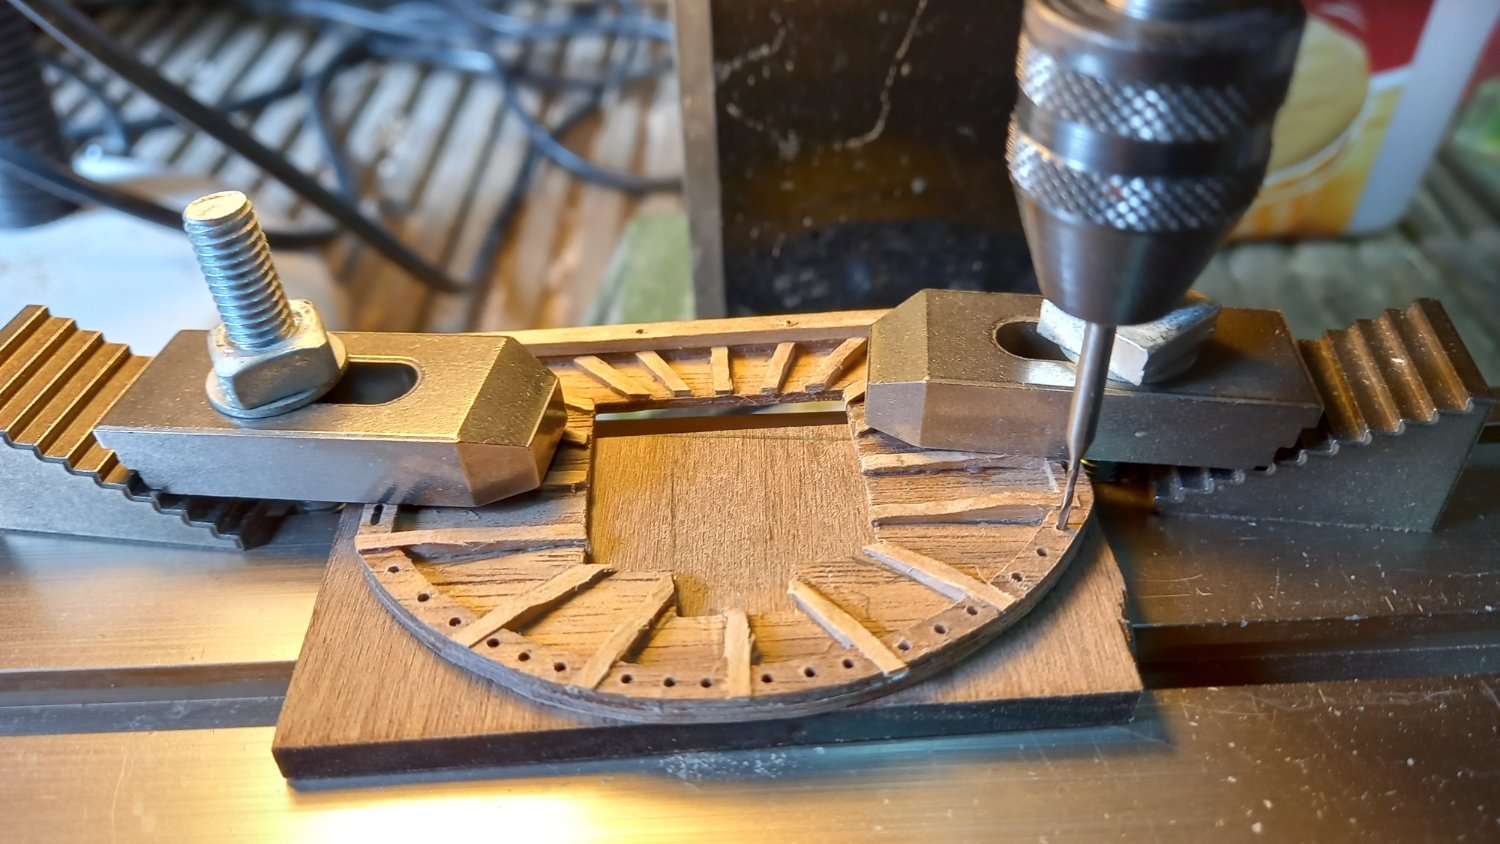
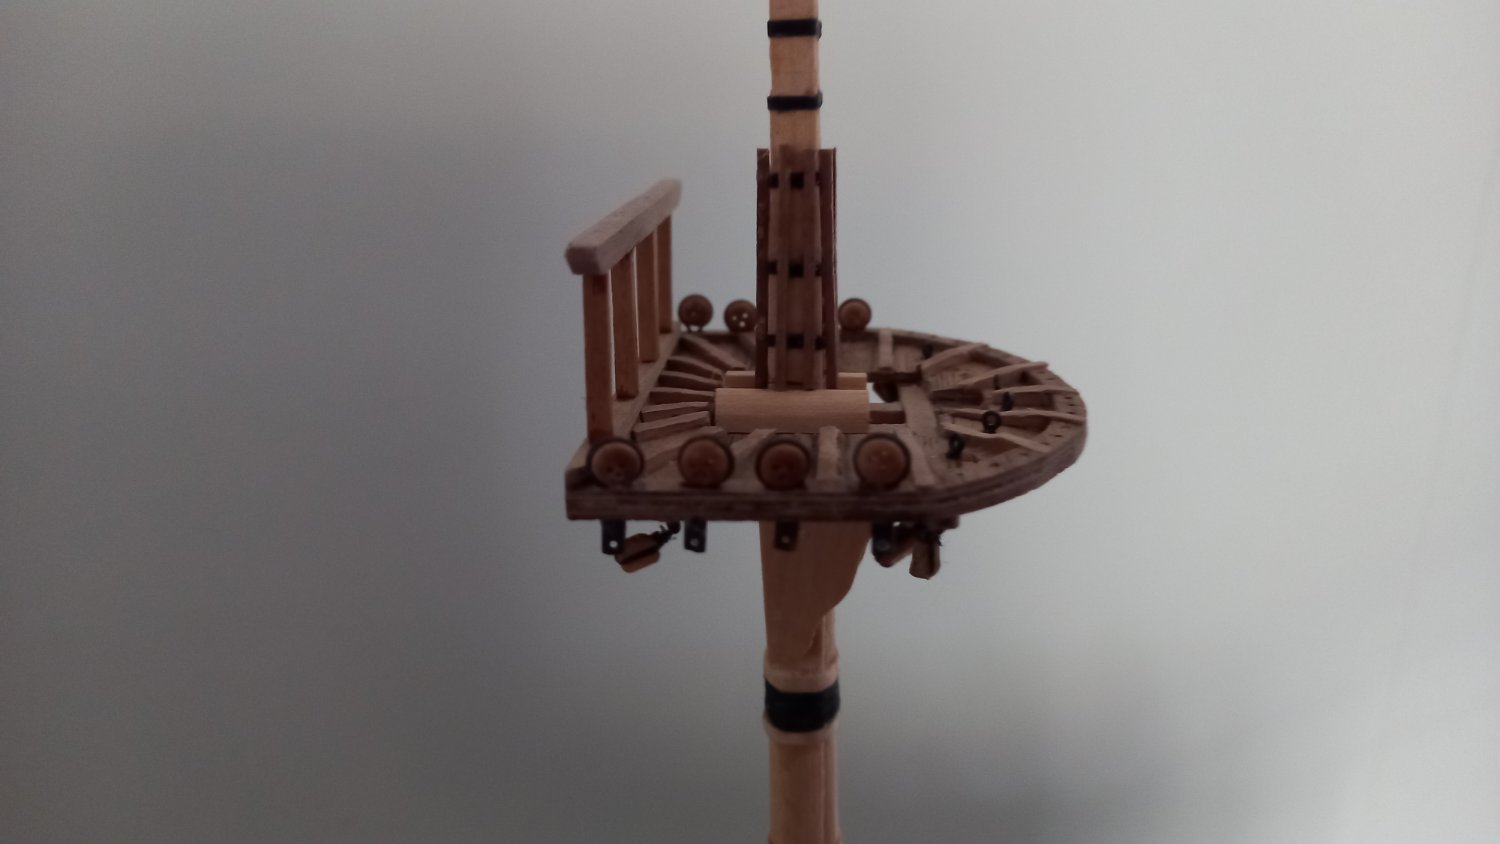
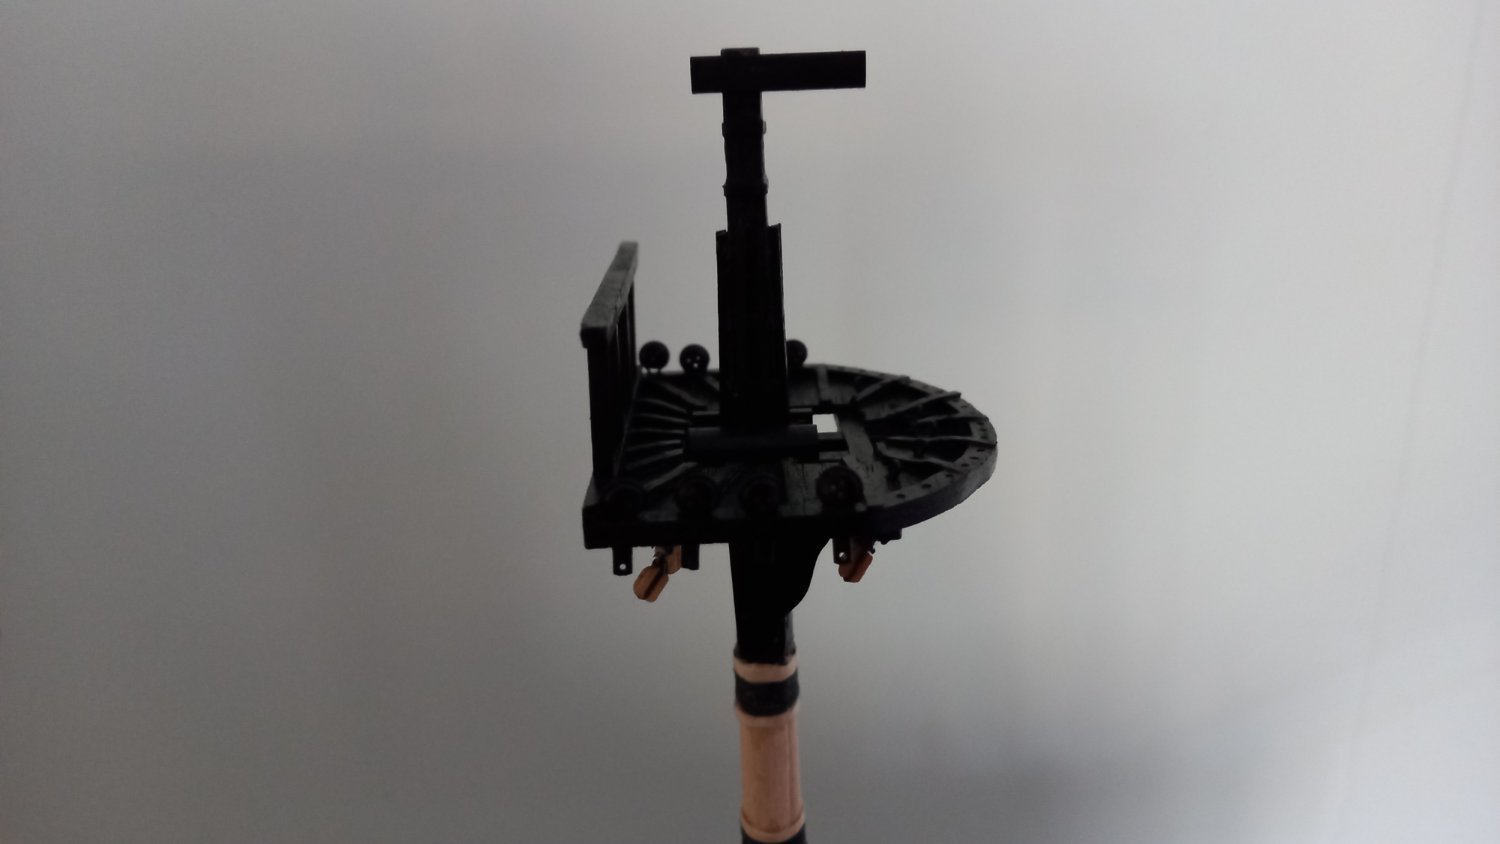
More work completed on the lower mast tops. Although I used some of the parts within the kit I tried to make the tops a bit more realistic and shaped the ribs. I also used the milling machine to get a more accurate holes for the crows feet. All in all I am quite happy with the final result and made sure that the tops were on the same plane as the water line and keel. The stantions for the hand rails are at 90 deg to the tops but this did not look quite right on the mizzen due to being stepped at quite a large angle so rightly or wrongly I set the handrail stantions inline with the mizzen mast. Here is a few photos of the process. I also used the black card supplied with the kit cut into srtips to form the iron hoops on the mast heads and 1mm suare walnut for the battens.Sorry but once this is painted it is difficult to make out in the photos.
.thumb.jpg.a391f31ad58ac69acdd6af5f64307c15.jpg)
.thumb.jpg.d4cf4b803b4eeaf320e6bcfd54871681.jpg)


.thumb.jpg.08aee57256e8fb88e877f99743a8ad0d.jpg)

-
Sorry to hear your visit to the Trincomlee in Hartlepool did not live up to your expectation. I have been there a couple of times of late and has always been an enjoyable experience. Hopefully you do not live too far away and can re visit her when any repair work is finished.. Fortunately for me I only live about 40 miniutes drive to there from where I live so can visit often. I am looking forward to a weeks holiday in Bournmouth in the autum where I plan to visit both the victory and the Mary rose in Prtsmouth. Your Diana is looking excellent so far and you should be more than pleased the way your decking is taking shape. I too will be building the Diana hopefully towards the end of the year and will be taking a closer look at your approach and hopefully mine will turn out half as good as yours.
- 310 replies
-
- 2
-

-
- Diana
- Caldercraft
- (and 1 more)
-
Lighting upgrade to Proxxon band saw
DaveBaxt replied to Kevin Kenny's topic in Modeling tools and Workshop Equipment
Kenny . Great idea and something I need to get sorted with .As Welfalck says you can,t have too much light and LED seems to be the way forward. Thanks for the reminder as its about time a upgraded my bedside lamp. -
If indeed these holes exsisted there would probably have been a means of closing them off in bad weather as would the open. If not they would be burnt out working those bilge pumps. Just a thought but correct me if I am wrong..
-
Thank you once again for your help and quick reply. Andrew It looks like I will have to carry on as I am then. Unfortunately I too have not got a very steady hand and have to mask about everything I possibly can and if not you can usually tell. There are many exsamples of absolutely fantastic painting and just wonder how they manage such great paint jobs. I suppose it just down to very good workmanship so will probably just have to perservere and everything seems to be less is more. .
-
Where ever I can I have always glued before painting but never get that perfect line between two different colours or colour on wood. Its ok when it is possible to use specialist tapes to get lines on large areas. However I find it very difficult to get neat edges when glueing intricate parts. Therefore my question is can you paint the objects first and then glue them onto an area already painted with acrylic and if so will it hold? Is it neccessary to remove an area of paint or leave off part of the paint to get a good wood/metal to wood hold? Than you Dave
-
1:54 HMB Endeavour
DaveBaxt replied to Tony_Brooks's topic in Building, Framing, Planking and plating a ships hull and deck
Seems like an excellent idea to do this.Thanks you -
Terrifc looking Diana and some excelent workmanship. I hope I can acheive something half as good, when I eventually get started. I plan to do another blog so hopefully I will get some help. Just wondering what are your thoughts on Caldercraft in general and would you build another one by them?
-
Great work on the cannon and I like the look of the gun tackle to especially with the improved blocks.I look forward to your progress with interest.Best regards Dave
-
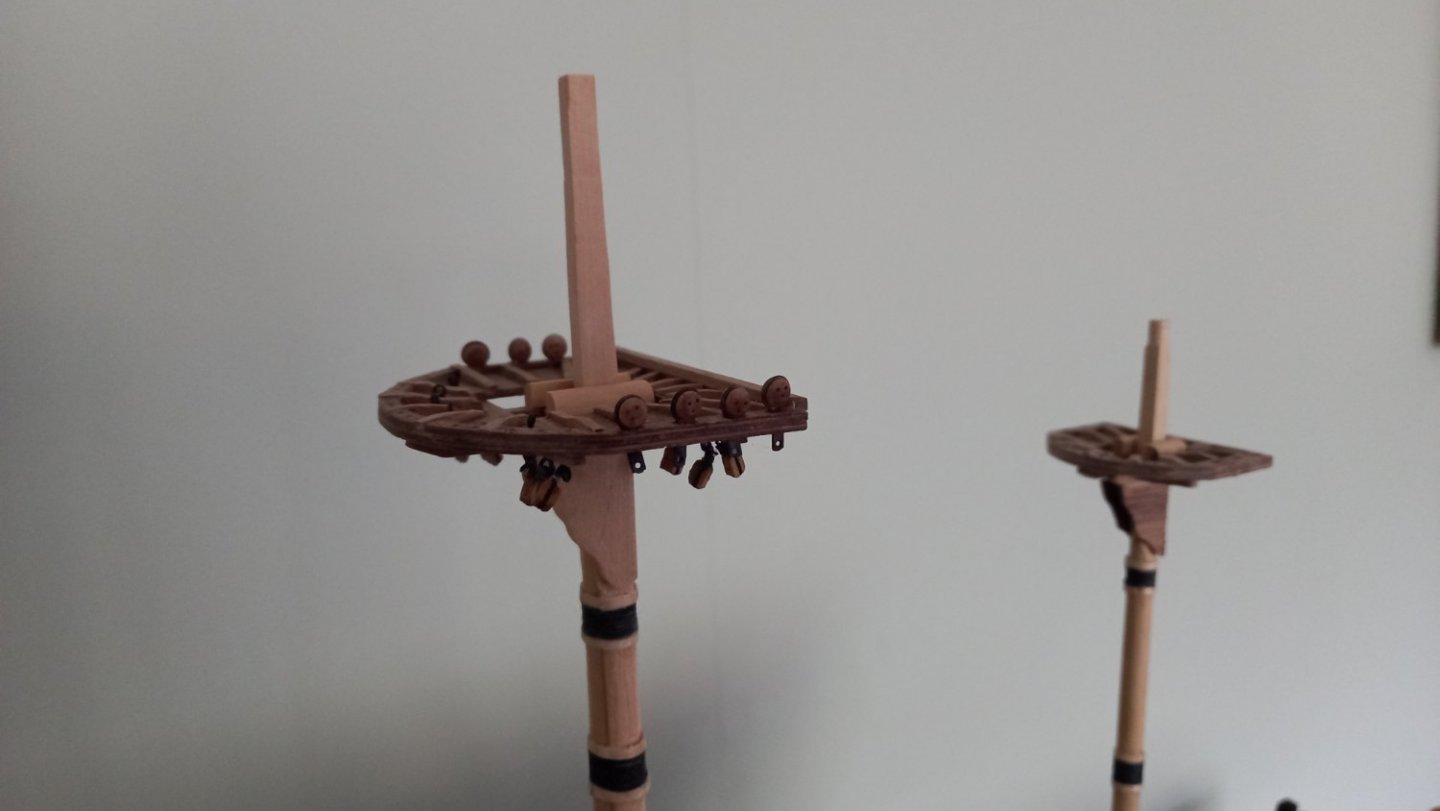
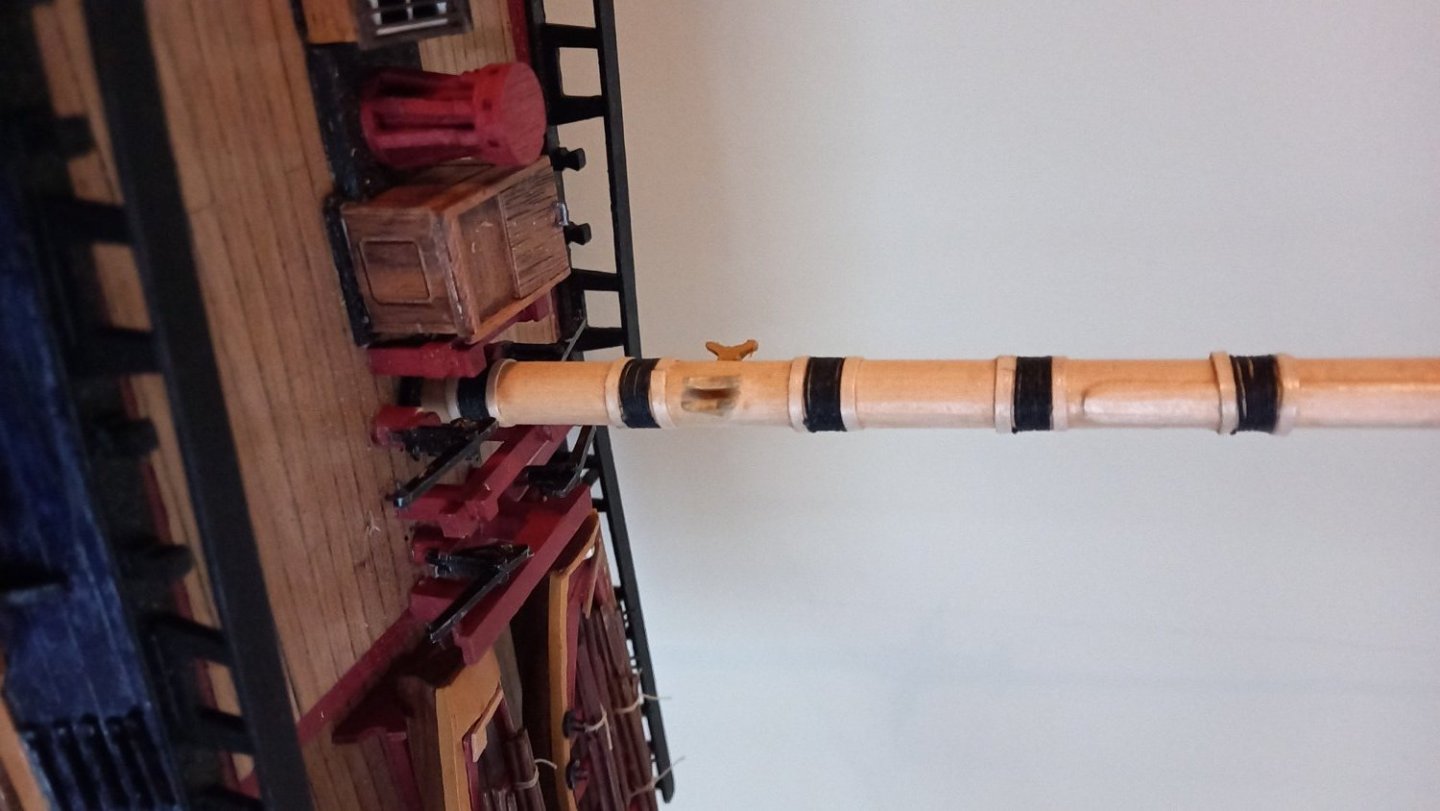
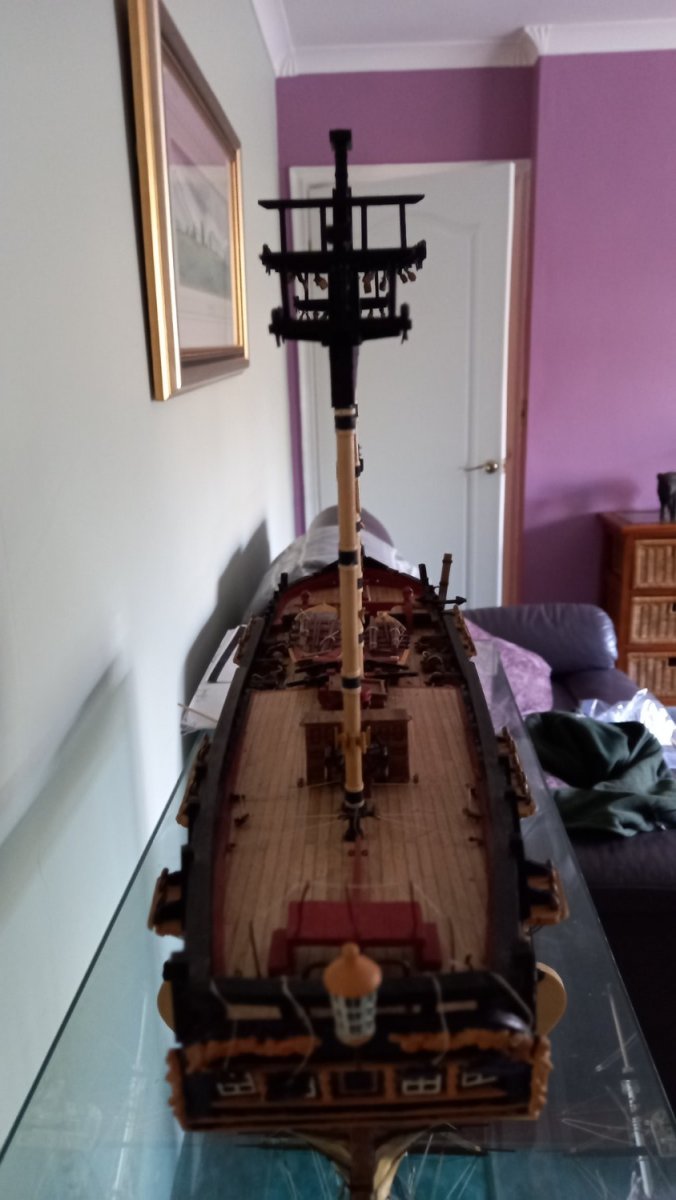
A slow process but more work done on the lower masts including woldings and wooden bands on each side. Accorrding to Lees masting and rigging the mizzen mast also has woldings and two less than the fore mast. Fitted cleats to the mast supplied by kit bit I kind I kind of wished I had fitted wood ones wich may have been stronger as the cast ones supplied by the kit look as if they could easily be knocked off. I was still not happy with the final hieght of the cross/tressle trees so made a final adjustment when fitting the hounds and bibs making sure that each one was inline with the keel when the masts are stepped to fore main and mizzen at 90, 87 and 83 deg respectively and ensuring that both fore and mizzen masts are the correct height in relation to the main mast. There is still more work to do on the mast heads such as iron hoops and wood verical battens to fit., however before that I need to fit a number of blocks on the underside of the cross trees and quite a bit of work to do on the mast tops. I intend to use the ones supplied by the kit which apear to be close to the correct size but are in pretty good shape. There is further work to do on the caps to ensure these are also parallel to the mast tops but will leave this until the tops are in position. when seizing the blocks to the eyelets(on the uderside of the cross trees) I am using watered down PVA glue instead of of CA glue to see what the results are .


-
Nice looking work. Not sure if this is a problem with the Corel kit but is with the Caldercraft Endeavour. Check the size of the channels and that the shrouds clear the bulwarks when checked against the hieght of the mast tops. I ended up making my own channels and all the same width. There is also a problem with the height of the mizzen mast being too short.I am sorry if you have already checked this. Hope this helps Dave
-
Cheers Gregory. For some reason that is about the only thing I find relatively straight forward but I think the Diana could be another learning curve. I have always done the planking the full length of the ship in one length but even though the planks look to be the full length I am not sure if that would be wise to try it. So again something new for me.
-
Always good to try different things.I think that is what this hobby is all about. I have heard that silk span is another material used and I am sure you will have your own thoughts on that and I would be interested if you do have any. Kepp up the good work . Best regards Dave
- 206 replies
-
- 1
-
-
- Vanguard Models
- Brixham trawler
- (and 2 more)
-
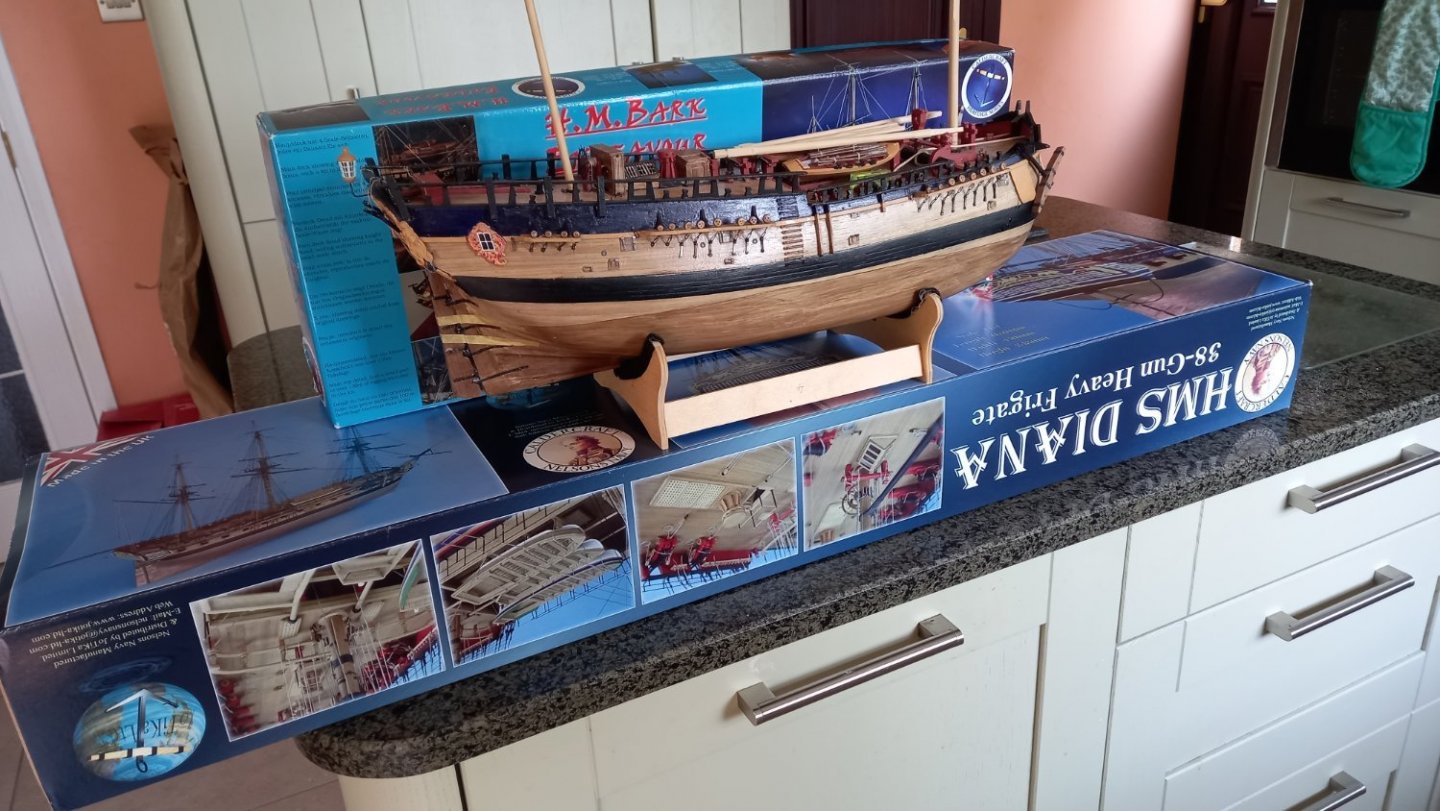
On another tack from the Endeavour I have made a dicision regards my next build,also from Caldercraft. THe HMS Diana and going by the sizes of the box compaired to the Endeavour. What a Beast she is!
-
Welcome to the Endeavour. There are a few build blogs on the go but none better than Steves I think. I look forward to watching your progress Good luck with your build. Dave
-
Some great work there Andrew. You are really doing the build justice. I will have to try a do a model with a set of sails. What is the material you are using ? I do wonder why some kits do not give you the option of buying sails or even give you the plans?
- 206 replies
-
- 1
-

-
- Vanguard Models
- Brixham trawler
- (and 2 more)
-
HMS Diana by Caldercraft Inflation and the price of kits.
DaveBaxt replied to DaveBaxt's topic in Wood ship model kits
Thanks Mark. I still have a very long way to go -
HMS Diana by Caldercraft Inflation and the price of kits.
DaveBaxt replied to DaveBaxt's topic in Wood ship model kits
Well said Mark. I am definately bashing more than I did on my first ship I built as I have learned more about what is accurate or not with the help of friends on this forum together with the many books I have bought. I am also moving further away from the instruction manuals and hopefully one day I will hardly need them at all . My greatest help for me has as been the book by Lees 'The Masting and rigging of English ships of war' and I am trying to follow it word for word. It will be interesting to see what the differences are between this and the AOTS Diana. I wonder if one day I would have the confidence and skill required to build a model ship from scratch. Fingers crossed. -
HMS Diana by Caldercraft Inflation and the price of kits.
DaveBaxt replied to DaveBaxt's topic in Wood ship model kits
Thank you again for your input Craig it is truely appreciated. Yes I have seen a couple of the blogs where modellers have had issues with the plywood stem and I think I will do the same and replace this with boxwood if I can. I have had a number of issues too with my Endeavour ,mainly the warped keel,but was able to overcome this. Also some of the cast fittings such as the rudder hinges are more or less useless but will try the hinges os another manufacturer next time and see how it goes.Hopefully I will get the kit with the better cannon. Regards the instructions. I have found most kit instructions to be pretty vague ( Have not tried Vanguard as yet) but hopefully I will find a good blog to follow and keep me right. Any recomendations would be appriciated here. I have also seen a couple of bloggers who have had issues with the height of the stern and therefore having trouble with the stern counter not fitting properly. Hopefully I will be able to overcome these issues but will just have to hope I get enough help . Thanks again for your input best regards Dave. -
HMS Diana by Caldercraft Inflation and the price of kits.
DaveBaxt replied to DaveBaxt's topic in Wood ship model kits
Great point and I feel I should have done this a long time ago . Cheers. By the way a great online shop. -
HMS Diana by Caldercraft Inflation and the price of kits.
DaveBaxt replied to DaveBaxt's topic in Wood ship model kits
Thank you for your reply Andrew. I have too have been looking at the Snake but also the Vanguard models too. I probably would have gone for the Sphinx but rightly or wrongly have spent a small fortune on some bench power tools such as miller, drill stand, lathe and bench saw I think I am leaning more towards bashing the kit as much as my skill will allow. I also have lots of spare walnut but now starting to use boxwood instead, especially for the masts. I would also like to have a go at the Trincomalee but as you say would need to be build from scratch and do not feel I have the skill level as yet. I am now commited and no going back now. I think this next one could take me a couple of years as each time I build one it takes me twice as long as the previous one but looking forward to another challenge. I have recently booked a trip to Portsmouth for a few days with my wife and hope to spend a day at the Naval dock yard and take in the Victory whilst we are there and hopefully will take in lots of photos . Some of which will help me in some way . Best regards Dave -
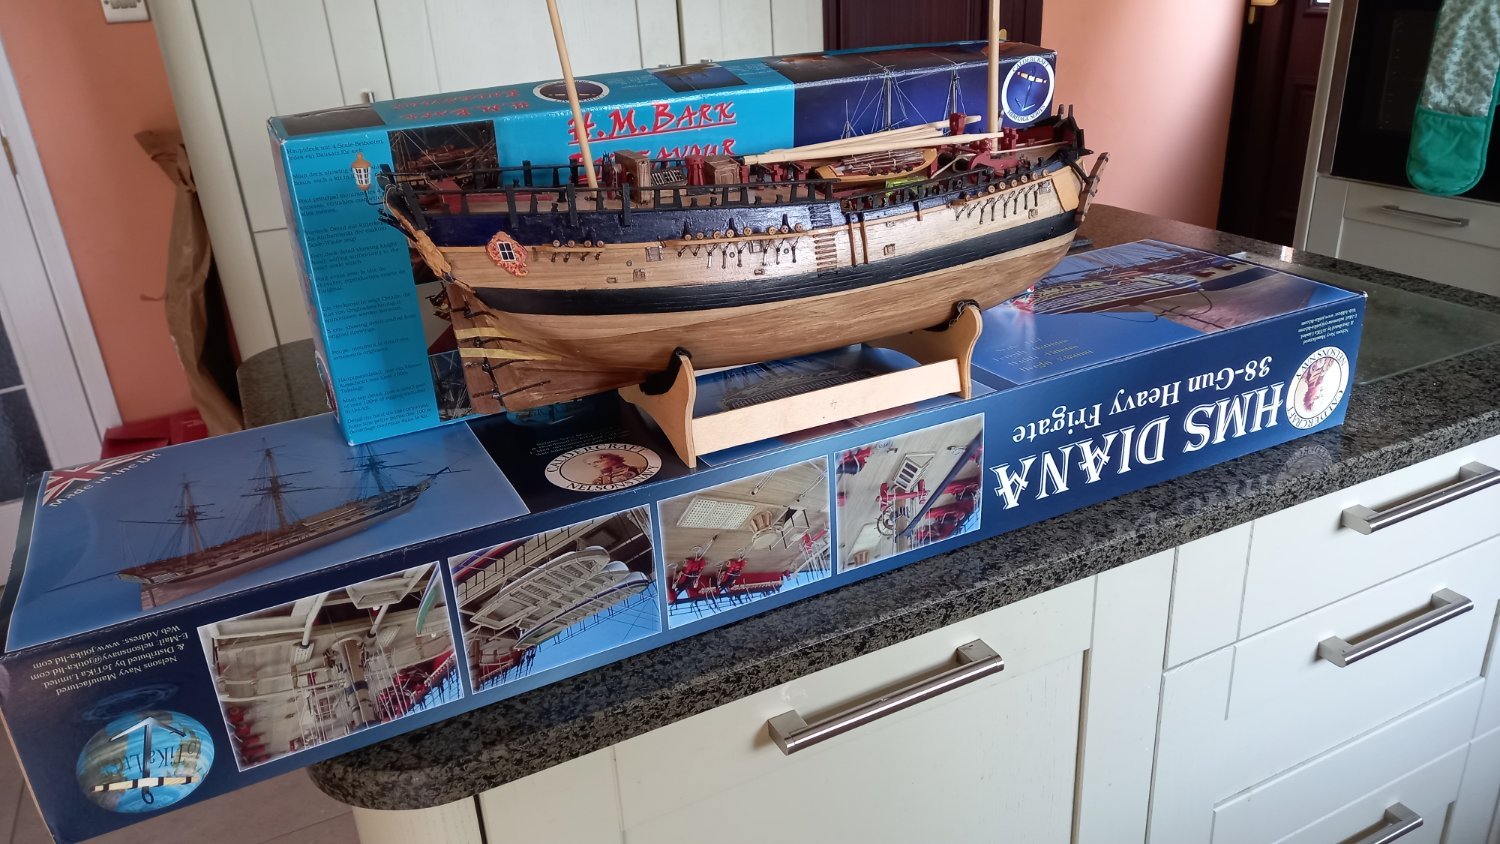
I have had my eye on this one for a good while and have eventually taken the plunge. Altough I am a long way off completing my current build HMS Bark Endeavour when looking at the difference in prices of kits I have noticed that as much 10% can be saved by buying now rather than waiting until the new prices are released here in the uk. So when we are talking about a £600 kit .£ 68 is quite a big saving. I see there are one or two blogs currently on the go which has helped me choose together with owning the AOTS book of the Diana so have plenty of things to help me along which I think I will need with this ship due to the size and new processes I will need to master. I appreciate there are already a few reviews on this ship but wonder if there are any more recent likes/dislikes of the kit in general inluding the condition etc. In time I will contribute to what my initial findings are if anyone is interested. Hope some of you like this post and would like to submit any thoughts then I would be grateful for any input.Best regards Dave
-
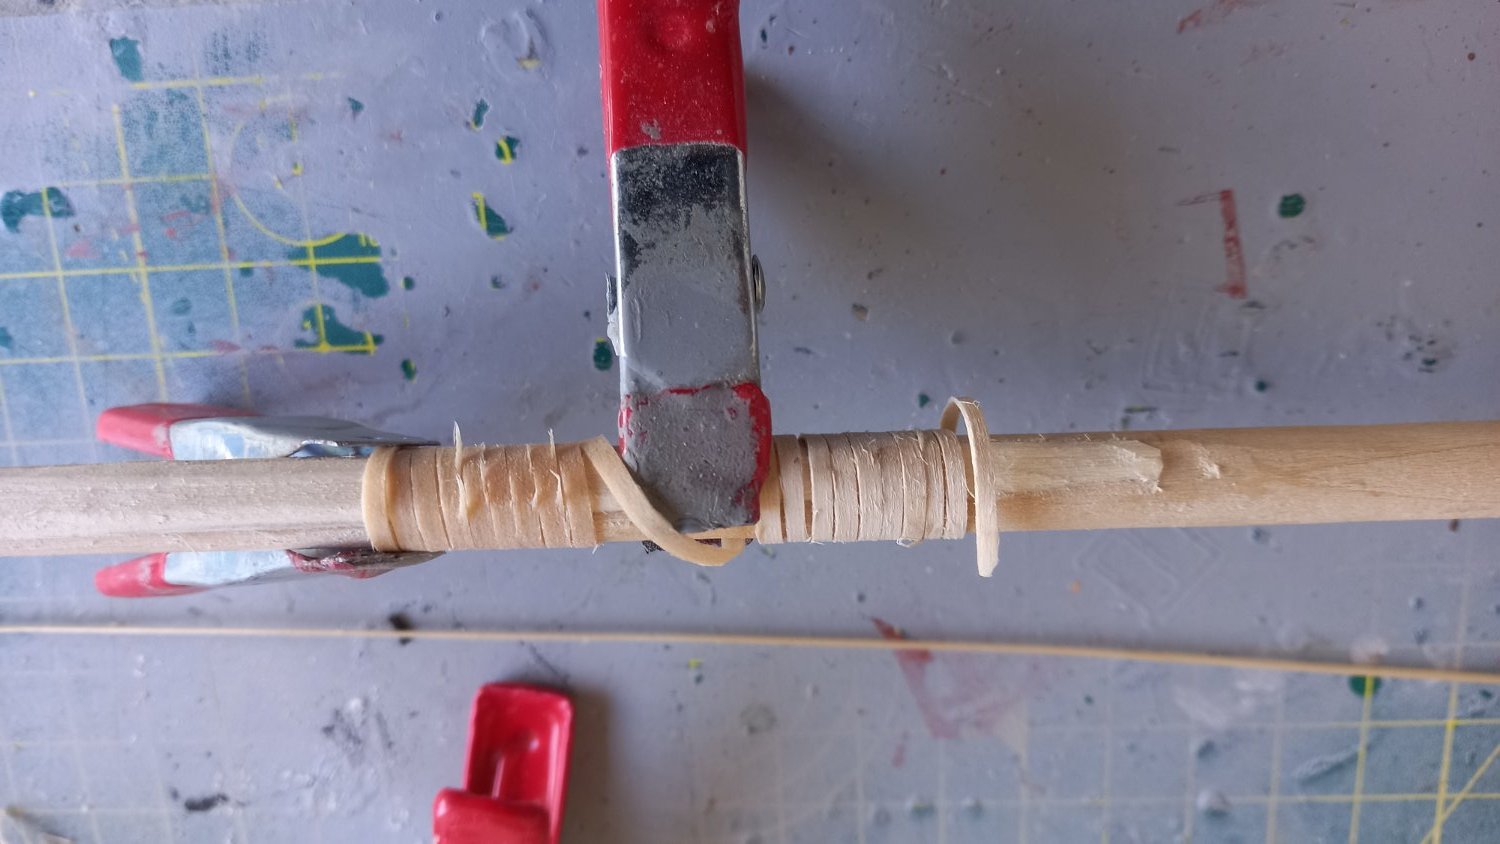
Thank you. I got the idea off Shipaholic, using veneers .( Thanks again Steve if you are watching) I got some samples of different colours and then soaked one of them, a 300mm , 20mm wide length overnight to remove the adesive strip.(unsure if this would do the trick) I then I cut several 2mm wide strips and wrapped them around the mast to form like a spring and then allowed to dry overnight. I then removerd and cut through using vey sharp sissors. I will see if I can hunt out a photo for you .I think I have one somewhere. Here it is some of them came out ok. I have sinse bought a 5 mtr roll . One which I think is the nearest match to boxwood.

.jpg.e57390479b6a42a712794cb8251da5a2.jpg)
.jpg.6a1674a2b9bf6373b07e1ad056a18f4e.jpg)

.jpg.f56e29c58ba4abbf384179884130afa2.jpg)