

GGibson
-
Posts
1,039 -
Joined
-
Last visited
Content Type
Profiles
Forums
Gallery
Events
Everything posted by GGibson
-
 Your Peerless looks great, Eric! I've always found it interesting that, up in Sioux City, IA where I grew up, the Missouri River is truly a recreational river. I learned to ski on the Missouri when I was a teenager! And, in a recent visit to Sioux City this summer, I saw that the river is still very recreational, with boats and jet skis going up and down, and marinas on both the IA and NE sides. However, not sure I have ever seen any boats in the river in Kansas City or even in Omaha. Seeing even a canoe in the water here in Kansas City would be a rare sight! Sounds like an awesome adventure, Eric! 👍
 -
USS Constitution by mtbediz - 1:76
GGibson replied to mtbediz's topic in - Build logs for subjects built 1751 - 1800
Really sharp, Mustafa! I am assuming that, in addition to securing the pins into the bulwarks, you are using some kind of PVA on the bottom of the wheels to secure to the deck? 👍 -
Welcome, Tim! Looking forward to seeing your Mayflower build log! This is a great group and awesome resource with a wealth of knowledge and advice. Enjoy!
-
USS Constitution by mtbediz - 1:76
GGibson replied to mtbediz's topic in - Build logs for subjects built 1751 - 1800
Really awesome, meticulous work, Mustafa! Very impressive! I'm lovin' watching both of your build logs! The Constitution may still be on my "add to the shipyard" wish list, so I am enjoying reading your build logs and learning so much! And as I have said both publicly and to myself countless times as I slowly work on my own Bluenose and see others working ahead of me, it's not a race, but it's all about the journey! 👍🏆 -
Very nice looking, Eric! As I recall, I was able to find the right size parrel beads in either WalMart or Michaels. They come in a small plastic cylinder that (if you do comparable scale ships in the future) will last you forever! <shrug> 🤣👍 Carry on! Almost finished!
- 62 replies
-
- 2
-

-
- Muscongus Bay Lobster Smack
- Model Shipways
- (and 1 more)
-
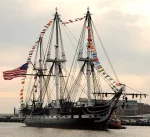
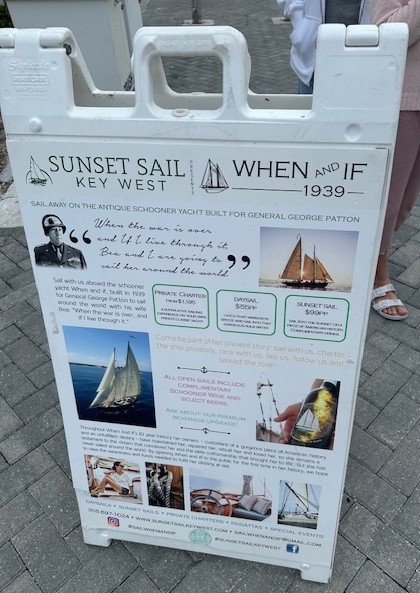
We were just in Key West last week and I noticed a sign for tours on the When and If, which was built in 1939 for General George S. Patton, When and If was commissioned by Patton himself from naval architect John Alden, and built by FF Pendleton in Wiscasset, ME. The boat was out of the marina on a cruise when I saw this sign where it is docked. We will be back down in Key West in May, though, and hopefully it is still there and I will try to take a close look at the ship and take pictures. From their website, it appears the ship is in Key West during the winter and Salem, MA in the summer. We have family down there, so if it's not there in May, there will be another time, I hope! Anyone familiar with this schooner of Patton's? Interesting history. Might be an interesting model.
-
Thanks, James, for this available solution reminder! 👍 Hi Bill - On my Windows 11 Home OS laptop, when I open the Pictures app in preparation to post a picture in MSW, I have simply "spun" the picture 360 degrees and then cropped it to just show what I am featuring (trying to take out background objects, etc.). In times where I have not "spun" the picture in order to set it, the picture has posted sideways, upside down, etc., so it seems like the "spin" option has worked pretty simply and effectively for me. <shrug> 👍
-
Nice work on the standing rigging, Tim! Looks really good. And, good thinking on using the R/C fuel tubing for the clip covers! I bought a bunch of clip covers from Amazon for like $5.00. I'm finding they get a little gunky with glue, etc. after a bit, so I replace them as needed. The tubing idea, though, is great. Keep the extra tubing handy just in case! Your Bluenose is shaping up very well, sir! Carry on!
-
Looks sharp, Jon. A very busy deck! 🏆👍
-
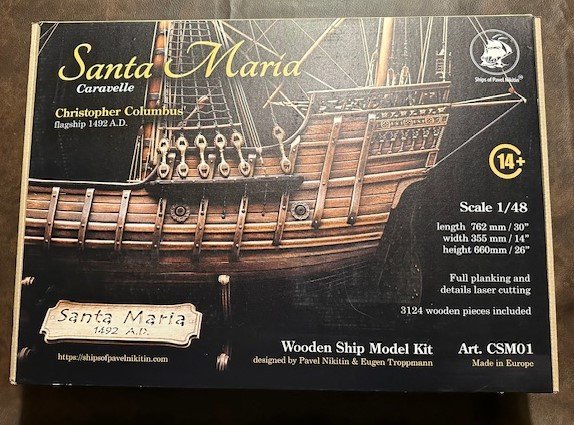
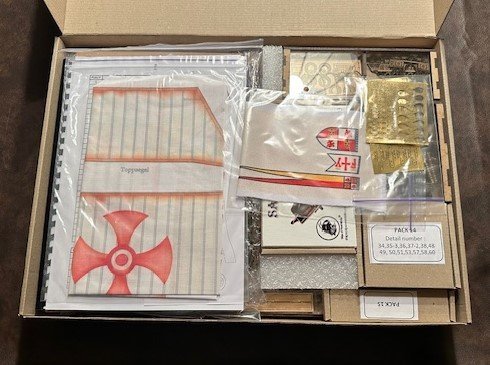
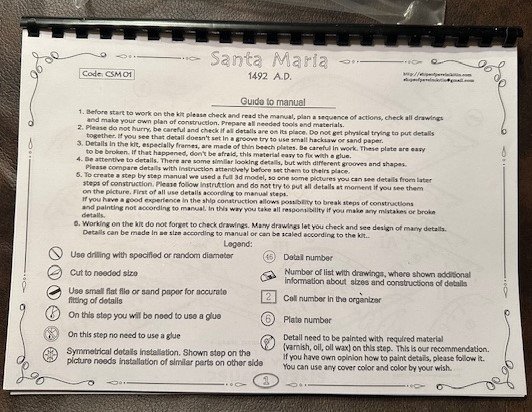
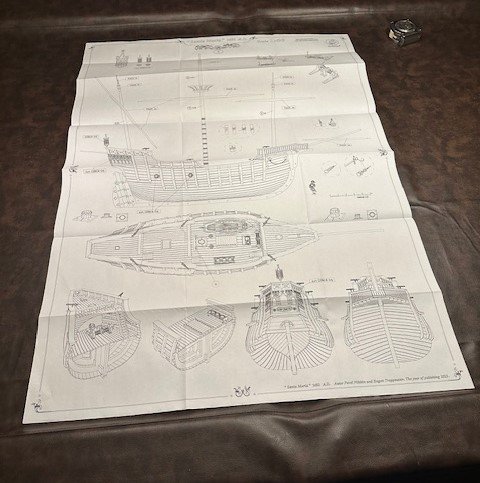
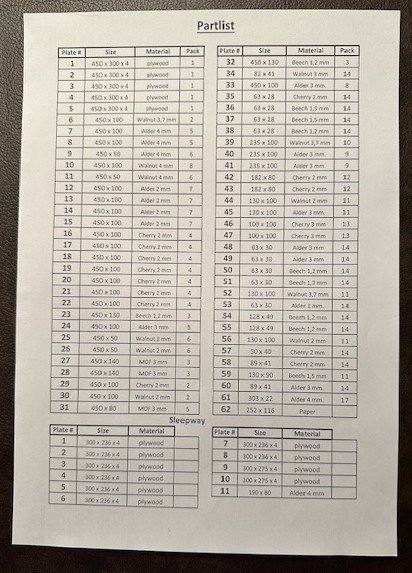
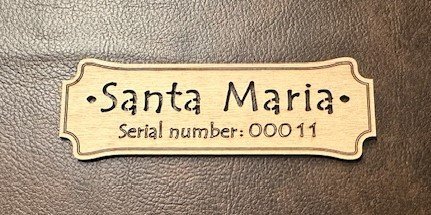
AN ABBREVIATED "UNBOX" INTRO - I was recently internet surfing and looking at Olha Batchvarov's work again (I really enjoy reading her posts and watching her videos, and often pull up her work to get "re-inspired"). In a recent post, she mentioned working with Pavel Nikitin, so I found his website shipsofpavelnikitin.com, and saw the release of his version of the Santa Maria. I then saw that Model Expo was distributing his Santa Maria in the US, and had to add it to my shipyard. I know there is much discussion about the accuracy/authentication of the Santa Maria models and the caravelle vs. nao discussion. As one of those "casual modelers", though, I am happy to work on something as historical as the Santa Maria, and Pavel Nikitin's reputation is exceptional, so I am absolutely pleased. Placed the order and shipping was handled very quickly by Model Expo. Kudos to them! I have promised myself that I would not start the Santa Maria until I finish my Bluenose, but I had to open the box when I got it. Right?!? So, here are a few observations... First thing you notice right away, the box is H-E-A-V-Y!!! Lots of parts! Box Cover Box Contents Upon Opening 92-page Manual (all diagrams, no text) Five (5) - 33"x46" Plan Sheets Parts List (some info on backside, too) Wooden Nameplate - Serial #11 Well, there it is! Putting it up on the shipyard shelf for now. It looks like there are no less than twelve (12) current or finished MSW build logs of the Santa Maria from various kits and in various scales, so there will be no lack of research support from previous builders. I thank you all in advance! And, looking forward to see if anyone else builds this Pavel Nikitin version (other than hopefully @shipphotographer.com Olha Batchvarov, once she completes the handful of ships ahead of this one in her queue). I assume that at least serial numbers 2-10 are out there somewhere! OK, back to my Bluenose so I can get to this build.
- 58 replies
-
- 9
-
-
- Santa Maria
- Ships of Pavel Nikitin
- (and 1 more)
-
Ummm, apparently you were!! 🤣🤣 Nice work on shrouds, John! I am not a knot expert, but is there a discernable difference in strength and appearance between a half hitch and clove hitch? As I recall on my Ballahoo, I used clove hitches on the rat lines, and used clove hitches again when I tied the stirrups to the footropes on the Bluenose bowsprit. At this scale, probably makes little difference. Either method, as you pointed out, is being secured by a touch of CA glue, anyways. Looking great overall, John! Envious of how far you have gotten so well. Carry on, sir! 👍
- 282 replies
-
- 1
-

-
- Bluenose
- Model Shipways
- (and 1 more)
-
Santa Maria 1492 - Ships of Pavel Nikitin - 1:48 - UNBOXING/RAFFLE
GGibson replied to a topic in REVIEWS: Model kits
Will Olha be building this Santa Maria? Love her work!- 3 replies
-
- 2
-
-
- Ships of Pavel Nikitin
- santa maria
- (and 3 more)
-
Nice work, Ed! Great technique! 👍🏆
-
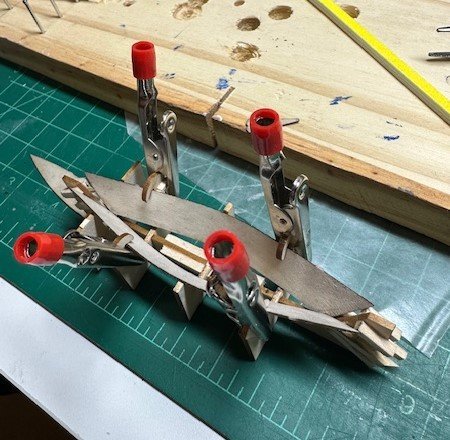
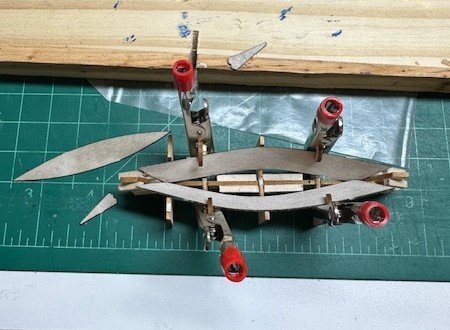
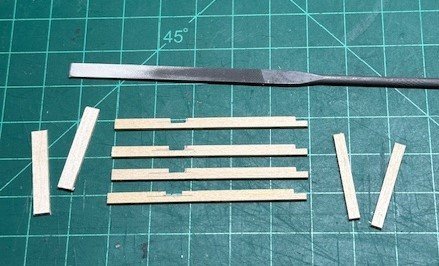
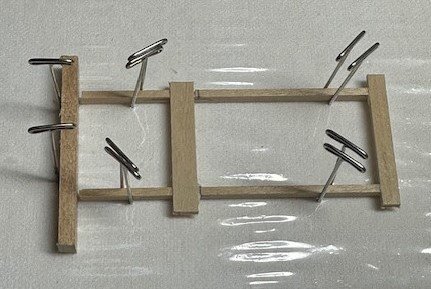
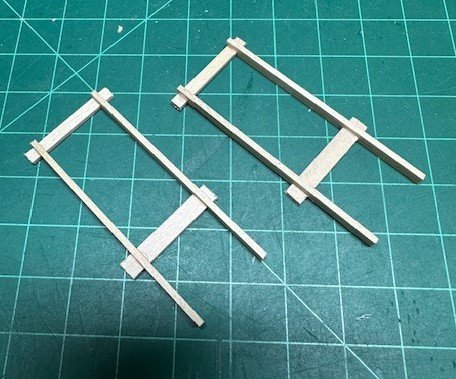
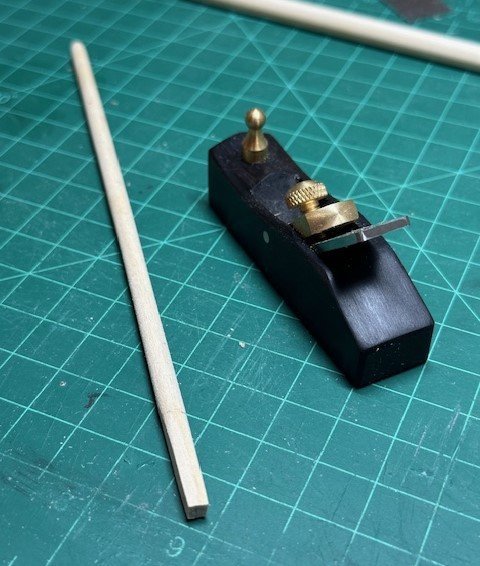
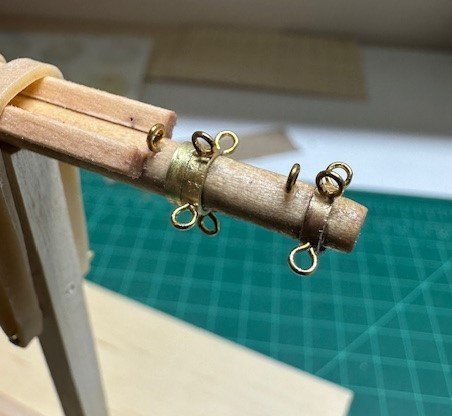
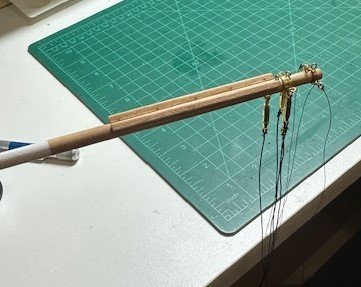
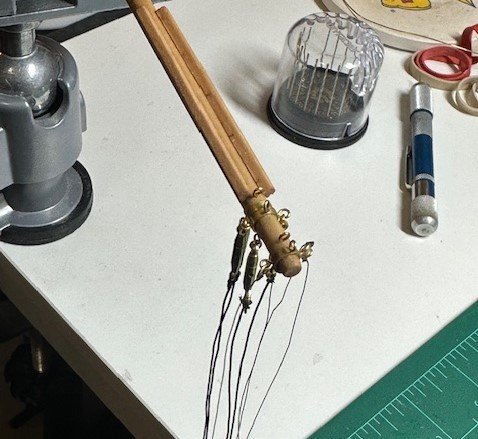
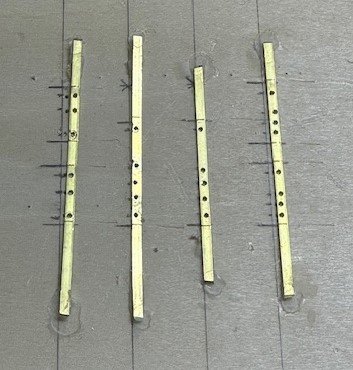
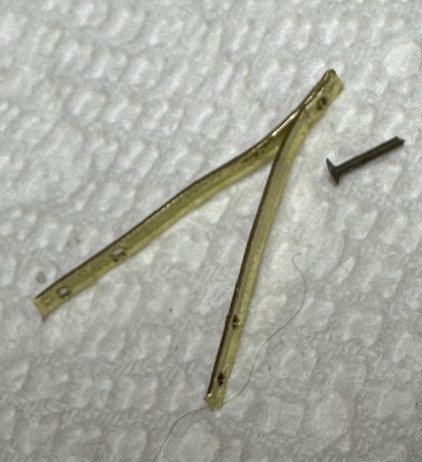
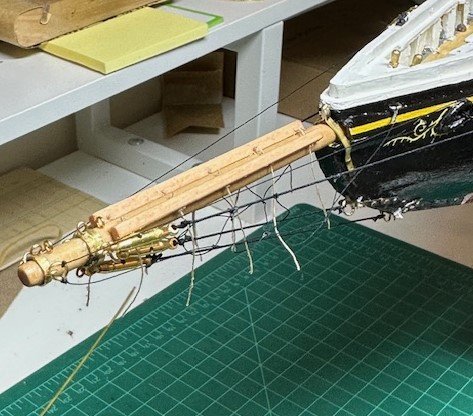
An update on progress... (or lack thereof)... It was a bit frustrating in the shipyard these past few weeks. Besides the fact that I had several travels that interrupted shipyard time (spending some great time over the various holidays with family, though, so it was totally worth it despite the shipyard absence), my time in the shipyard was a struggle completing some things successfully. Guess it is all a part of the build journey and learning along the way. Wanted to start working on the dories and tried to use the supplied pieces in the kit. The dory sides were difficult to shape properly, so built a little jig to hold them after wetting, shaping and drying. That helped some but I still found it incredibly difficult to shape them and build them using the kit-supplied brackets. So, after visiting with another local builder who gave me some alternative options, I decided to shelve the dories project for a little bit. Hopefully, I should be able to finish some dories in the coming weeks, so... perhaps an update on those in my next post. I did, though, work on the dory kids that the boats will sit on while stored on the Bluenose deck. Measured, cut, fitted and glued the small wood strips. Set them aside for now waiting on what I finish with the dories. Time to work on the bowsprit. Shaped it to the measurement needed at certain points on the 1/4" dowel. Started at first using my small handheld planer, then went to various grit sandpaper. Squared off the aft end that fits into the bits and added a small brass rod to fit in the hole I had placed in the samson post. After it was shaped, it was time to add bands... after soldering some type of rings to the bands for the various backropes, footropes, and stays. Uggghhh.... I am still not very good at soldering. Getting better with some practice, but I was not able to duplicate the band rings I have seen on other build logs. So... I settled for using brass hooks placed through holes drilled in the brass strips. I also needed to determine how I was going to simulate the turnbuckles. Without a milling machine (yet), I didn't really know how to duplicate. Got online and found a company that had small model turnbuckles that looked the best (these are 16mm x 2.5mm), and decided to use those. Another "settle for" on this bowsprit. Worked on the gammon iron, the guy plates and the bobstay plates. The Proxxon drill again became useful for that operation. Completed, then, all of the rigging from the bowsprit to the bobstay plates and to the guy plates, and also ran the rope for the backropes and footropes and tying those together at three intervals along the bowsprit. Finally, ran the jibstops through the holes in the bowsprit strips. Not my most exciting work to-date on my Bluenose, but I'll get better. I'll definitely have to, though, as I look ahead to the next huge task, which is the mast work. Lots of detailed soldering work will be needed there, as I have looked at other build logs and the awesome work they have done on the mast caps, spring stay bails, shoulder bands, etc. Taking another quick trip to watch a granddaughter in her "senior day" basketball game, and then the hard shipyard work will start again. Appreciate all the guidance many have provided as I look at other build logs. Thanks!


- 184 replies
-
- 5
-
-
- Bluenose
- Model Shipways
- (and 1 more)
-
USS Constitution by mtbediz - 1:76
GGibson replied to mtbediz's topic in - Build logs for subjects built 1751 - 1800
Ahh, sure, of course! Dowels make sense. Sometimes I forget the scale we are working with when I see certain wood pieces. They look bigger in pictures! <doh> 🤣👍 -
USS Constitution by mtbediz - 1:76
GGibson replied to mtbediz's topic in - Build logs for subjects built 1751 - 1800
Nice work, Mustafa! How did you make the wheels and axles? -
Interesting solution, Geoff! Will be anxious to see the... two dozen results! Good luck! 👍
-
USS Constitution by mtbediz - 1:76
GGibson replied to mtbediz's topic in - Build logs for subjects built 1751 - 1800
Yep, that's the one I have read about most and am seriously looking at getting it. Thanks for sharing what it can do! 👍 -
USS Constitution by mtbediz - 1:76
GGibson replied to mtbediz's topic in - Build logs for subjects built 1751 - 1800
Great work on these cannons, Mustafa! Giving me another justification to add a micro mill to my own shipyard tools! If I ever get to this Constitution build, I may ask you about sharing that jig detail... very nice! What brand of mill machine are you using, Mustafa? -
I am one of those "new builders" that has been interested in adding the Byrnes saw to my list of shipyard tools, and have been waiting, like others, for some information after Jim's passing. A few weeks ago, I decided to simply call Byrnes Model Machines to get an idea of what their plans were. After a few rings, the phone was answered... by Donna herself. (Hope she does not mind me relaying this story.) After some consoling words and discussion of how Jim will be missed, we briefly discussed her plans for the business. It was pretty clear to me that, after some time away to grieve and to do a bit of reorganization, they were looking at having the Byrnes 4" table saw back in production and selling sometime soon after the first of the year. She asked to continue checking the website for when the saw is back on the order page. Therefore, I am optimistic... and I'm first in line for when that happens!
- 56 replies
-
- 11
-
-
USS Constitution by mtbediz - 1:76
GGibson replied to mtbediz's topic in - Build logs for subjects built 1751 - 1800
SWEET!! 👍🏆 -
If I could give one piece of advice, Major, in the position you are now with your build, after I've been working on my own Bluenose bowsprit and rigging, it is to position the bobstay plates at the front of the hull while you are able to do it with the ship upside down. It would have been much easier to place the plates, glue in position, and attach the links at that stage, rather than afterwards, when you can no longer flip the ship with the various deck furnishings in place. Others may disagree and did not have as many issues as I, but my 2 cents of advice at this stage... <shrug> EDIT: And yes, it involves more nails! 😄
-
Hey Major! It all looks great! Nice rudder work, and yes, you will go thru the nails to simulate pins in the rudder and various plates! The deck structure work was, to me, a nice break in between the hull and deck planking work and the upcoming mast and rigging work. Looking really nice, sir!
-
USS Constitution by mtbediz - 1:76
GGibson replied to mtbediz's topic in - Build logs for subjects built 1751 - 1800
Nice montage, Jon! Awesome pictures. 👍