HOLIDAY DONATION DRIVE - SUPPORT MSW - DO YOUR PART TO KEEP THIS GREAT FORUM GOING! (83 donations so far out of 49,000 members - C'mon guys!)
×


FlyingFish
-
Posts
566 -
Joined
-
Last visited
Content Type
Profiles
Forums
Gallery
Events
Everything posted by FlyingFish
-
 No - I have a wheelbarrow.
 -
No illusion - and well spotted! Yes, 6 degrees aft. See post #13 - and I'd welcome any thoughts you may have on its purpose!
- 174 replies
-
- 4
-

-
- Vigilance
- Sailing Trawler
- (and 1 more)
-
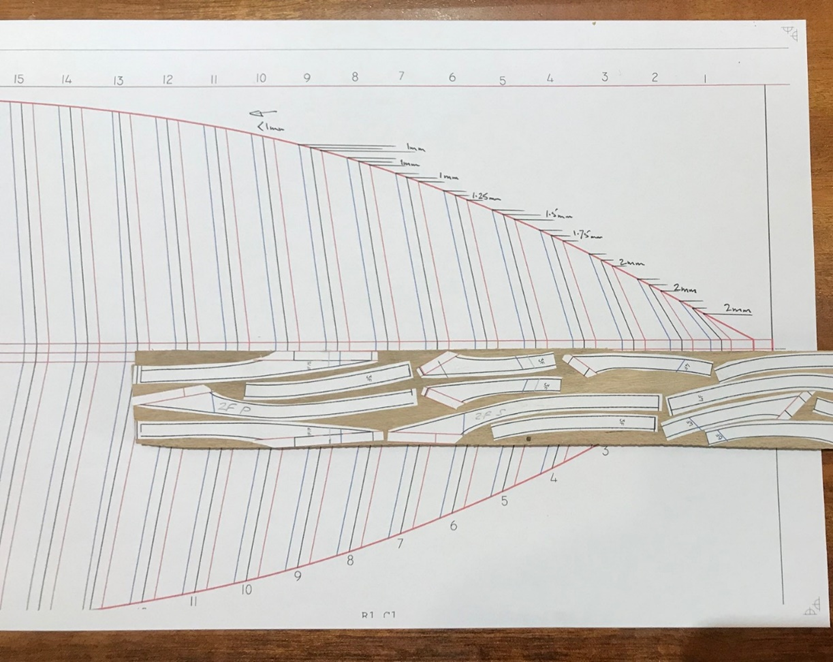
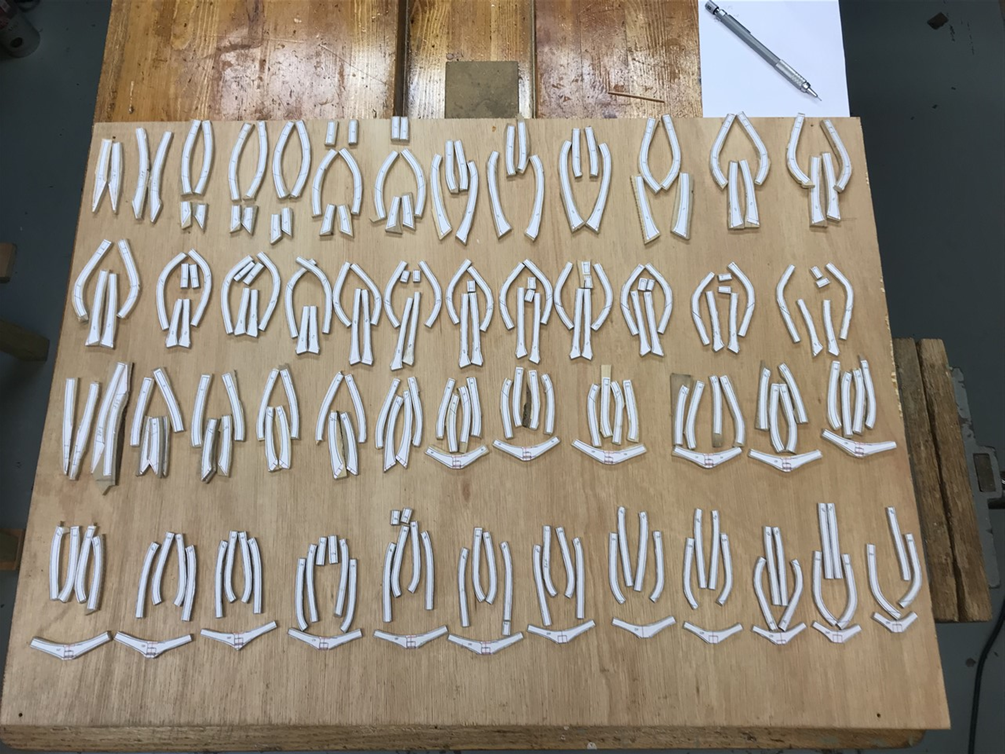
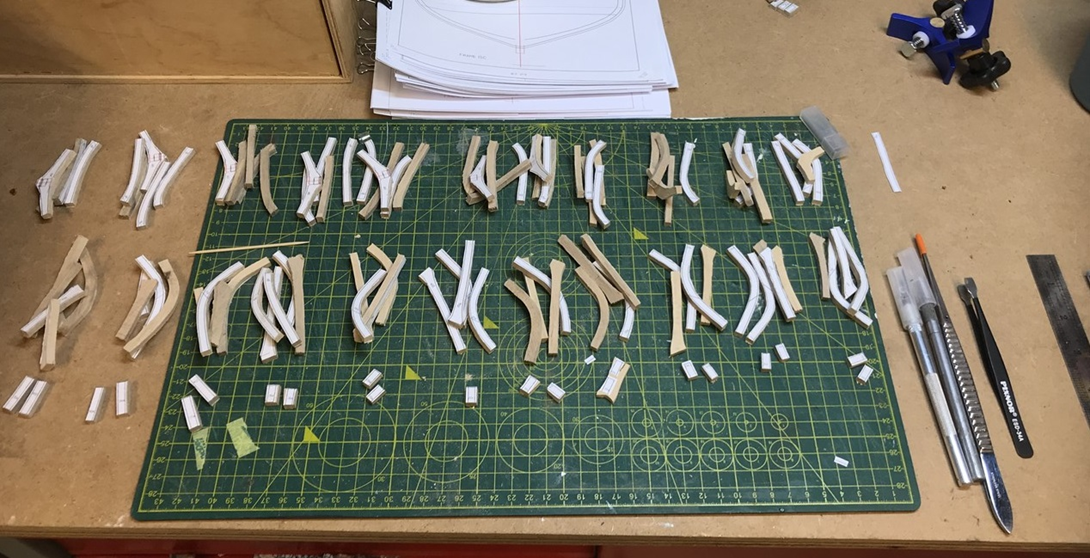
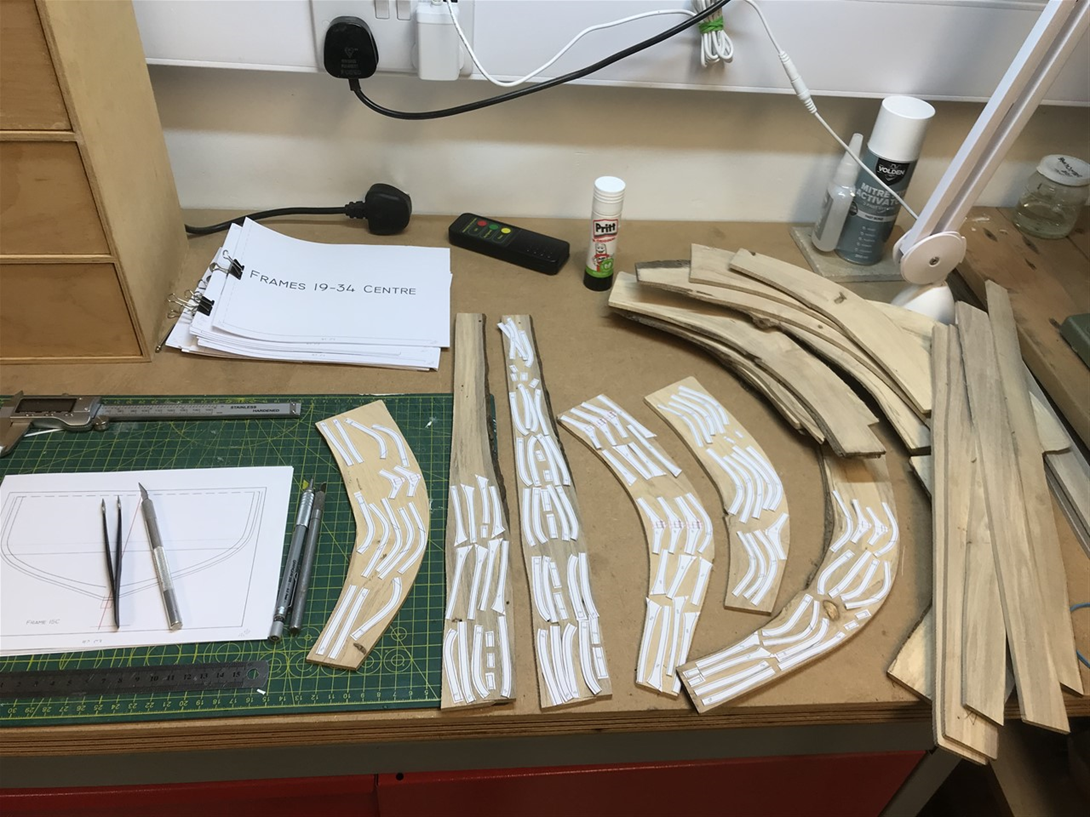
When I said 'it's going alright so far'... I spoke too soon. Well, despite knowing that the foreword frames will need a wider bevel I went ahead a stuck the templates on the wood too close together. A silly mistake, and costly in time. At least I didn’t cut the wood yet. It’s an example of one of those repetitive tasks, cutting out and sticking down multiple templates (whilst listening to a podcast) that allows the mind to slip into neutral. In my case neutral never seems far away… This photo below illustrates the bevel required on the first 4 frame pairs, and that 6° rake makes it even more pronounced of course, as well as adding twist into the frame. So ‘two steps back’ as they say, and this time I printed a framing plan-view to act as a visual check when setting out. Final cut-outs of frame pairs 1-25 in aft and fore versions, waiting assembly. All for now.
- 174 replies
-
- 6
-
-
- Vigilance
- Sailing Trawler
- (and 1 more)
-
Well despte your cold you are making good progress. Working things out without having the right machine tool is very good for the soul. I pity all those people with lathes, mills and suchlike. Must take all the fun out of it.😉
-
Congratulations on the Whiskey plank Hakan - Looks wonderful. You have earned that dram!
-
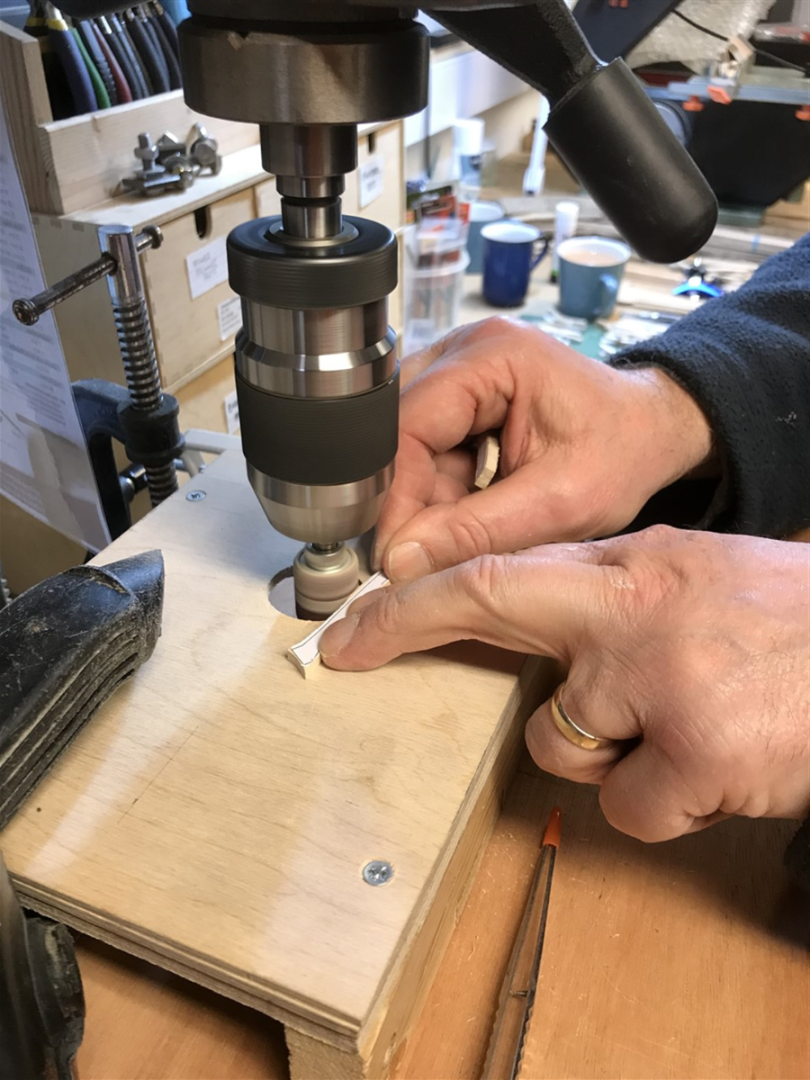
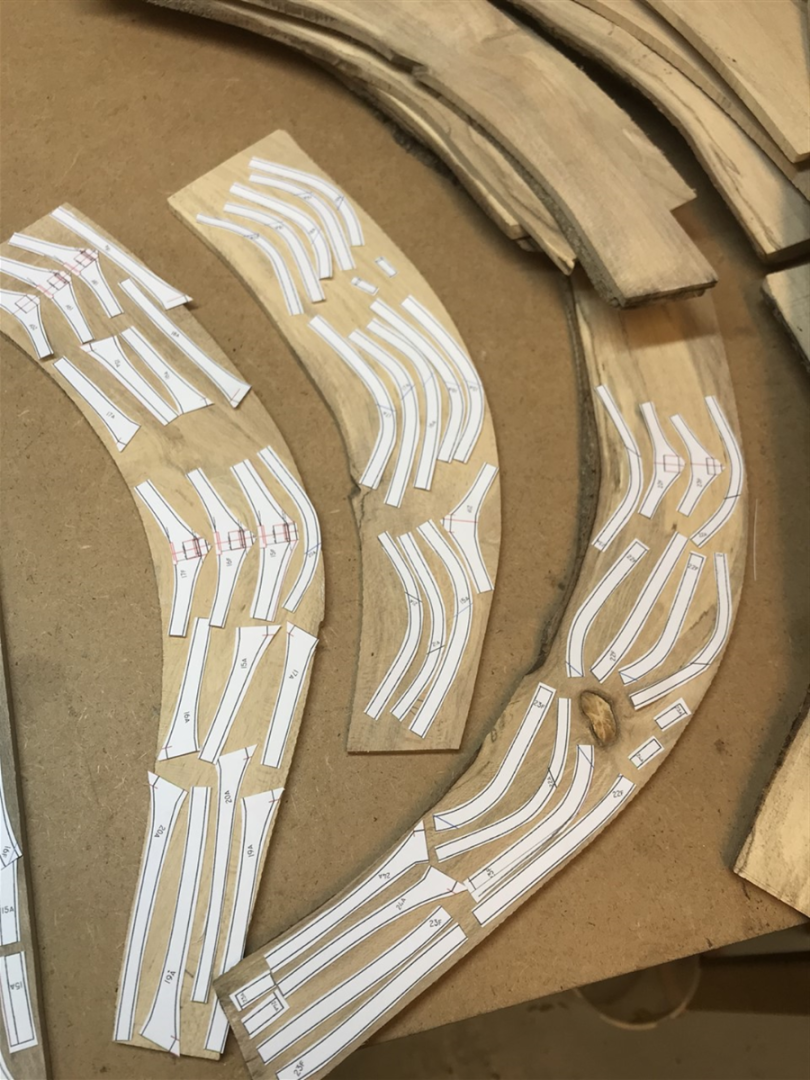
After cutting out on the scroll saw, each futtock is sanded down to within 0.5mm of the line – this should be enough for the bevel. The ends were squared on the disc sander. The tweezers are for retrieving futtocks that go down the pipe into the shop vac and end in the pre-Cambrian layers of dust. Frame pairs 15- 25 ready for assembly. Only another 28 pairs to go. It’s been a productive day. And England won the first test match against India.
- 174 replies
-
- 7
-
-
- Vigilance
- Sailing Trawler
- (and 1 more)
-
Clever idea; like it!
-
Indeed. The Admiral remarked at lunch that I was covered in a fine dust. I find the noise and wearing a mask a bit of a pain, but actually it's going alright so far.
- 174 replies
-
- 4
-
-
- Vigilance
- Sailing Trawler
- (and 1 more)
-
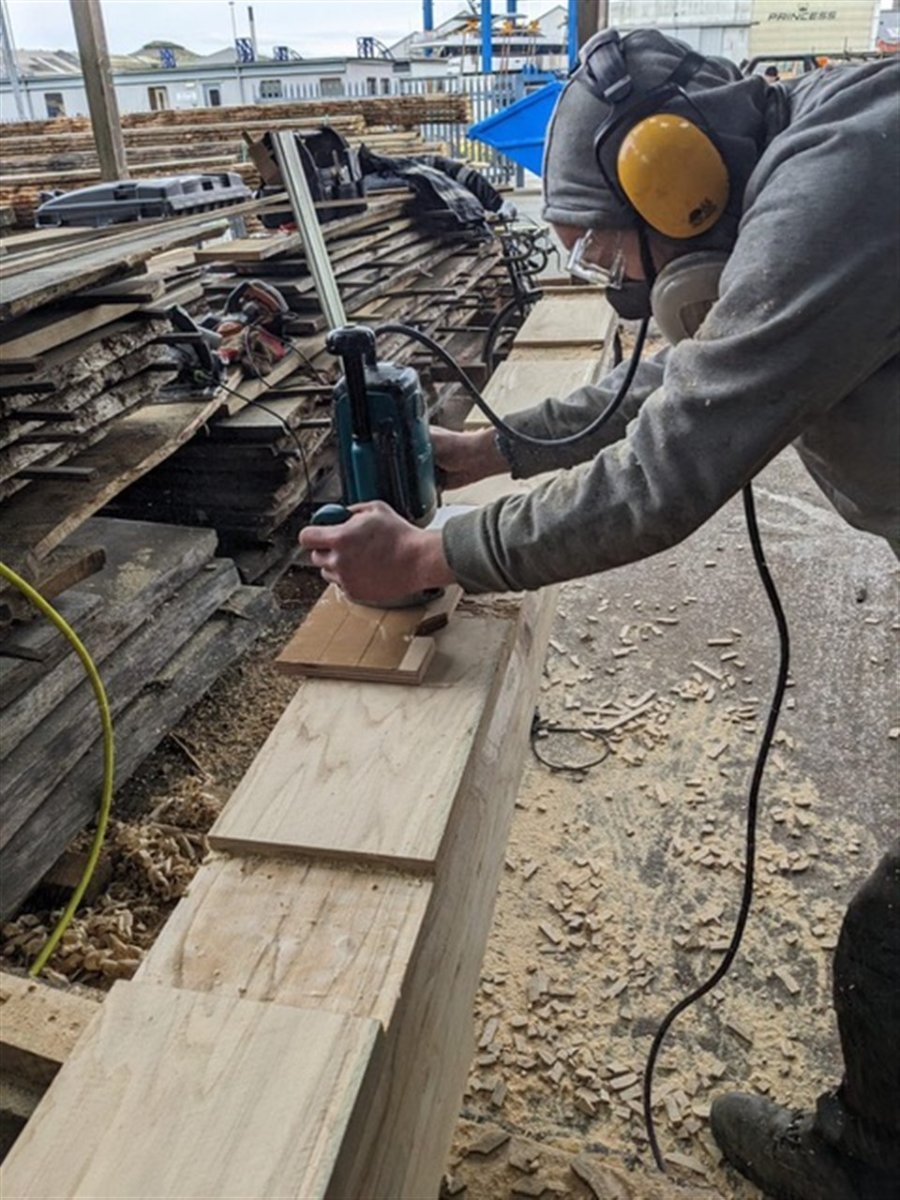
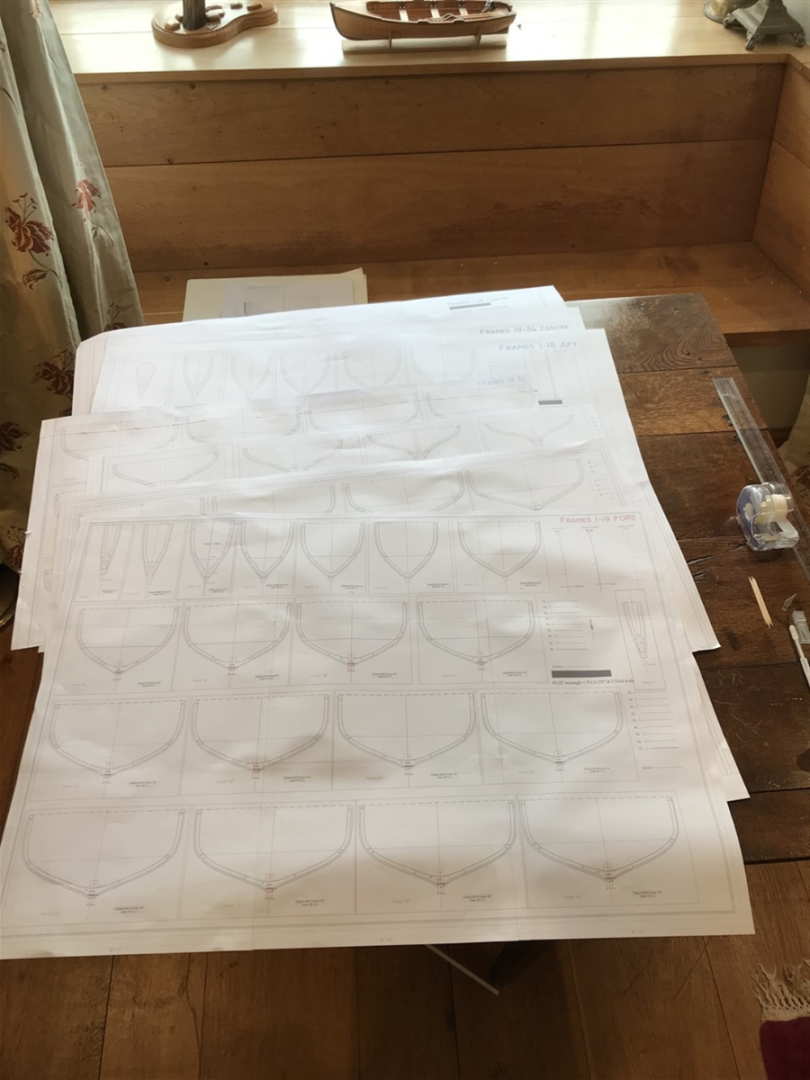
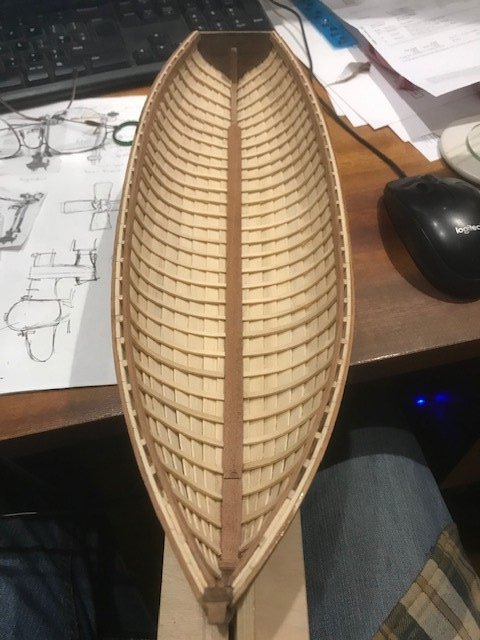
Framing The weather has warmed a little, so on with the work. The frame templates have been drawn and printed. It has taken many days of happy work and sticky fingers. There is a set for aft, centre and fore to enable the double frame to be assembled. I learnt how to set up the CAD to print more efficiently and produced a second set without needing to paste into an A1 sheet. Then the job of cutting these into floors and futtocks to lay out onto the stock timber was straight forward. A corner of the shop has been turned into a frame assembly factory. There are ten frame pairs in this shot: Trying to make the best use of the grain and material: Once happy with the layout, its ‘Pritstick’ time! Next job after this is to stock up on scroll saw blades.
- 174 replies
-
- 11
-

-
-
- Vigilance
- Sailing Trawler
- (and 1 more)
-
I have used this company for wires for fly tying - the coloured copper wires have kept good for years, and they also do tarnish restitant wire, including silver plated, and cotton covered annealed copper which may have a use too. Sizes go down to rediculously small. I'm sure a similar supplier can be found in the US, and elsewhere, but it does show what a variety of materials is available.
-
Looks like you are close to getting the 'whiskey' plank in - or maybe you have some akvavit waiting to celebrate? Looking very good Hakan!
-
Captian Eddy by petehay
FlyingFish replied to petehay's topic in - Build logs for subjects built 1901 - Present Day
Thanks, yes connected together. -
Captian Eddy by petehay
FlyingFish replied to petehay's topic in - Build logs for subjects built 1901 - Present Day
No - it's a flying bridge. Here's an example.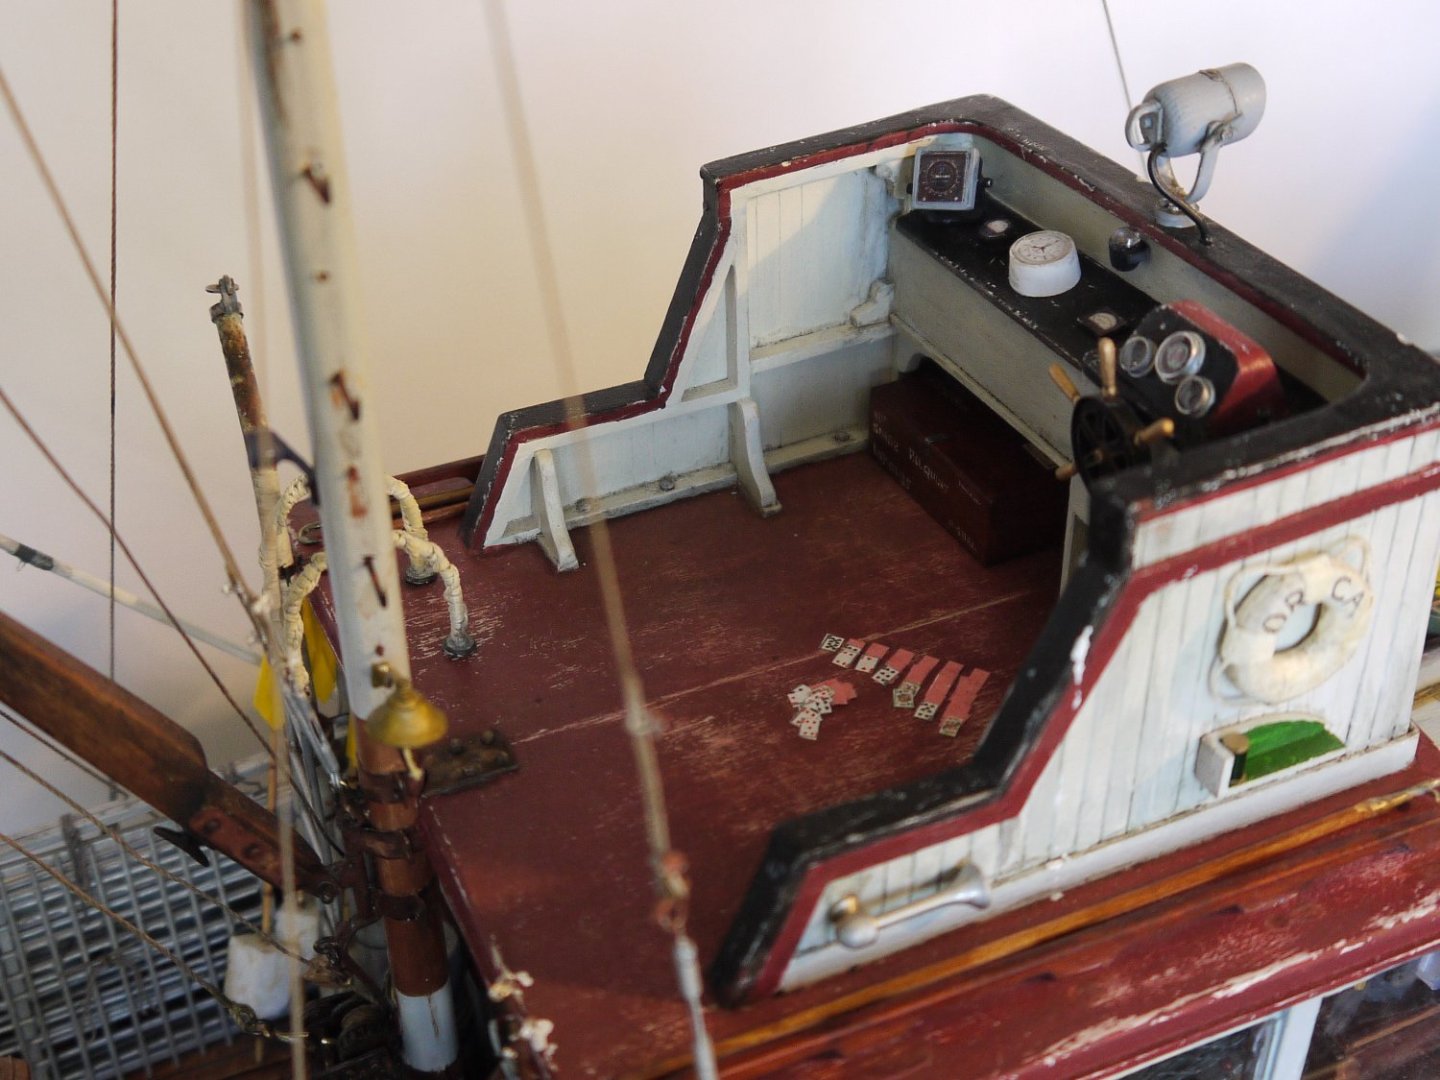
-
At the scale you are working, you could try using a hot soldering iron shaft to bend pre-moistened planking. This is how I did all the bending for the attached hull without too much problem.
-
Congratulations on finishing - it looks very good, and as others have said, it tells a story. I like that. Very good photos too. Not only added to the history of this great movie boat, but made Keith a life long Lana Turner fan!🤣
-
Thanks Gary, yes they certainly do. I visited yesterday to survey the geometry of the counter timbers which they are currently installing. I'll post some pictures of this when I get to it. Meanwhile I am beginning the framing, but limited due to the temperature of the shop which is a bit 'nippy' at the moment.
- 174 replies
-
- 3
-
-
- Vigilance
- Sailing Trawler
- (and 1 more)
-
Thanks Keith and Dave - congrats on the Sharpie build - very clean job!
- 174 replies
-
- 2
-
-
- Vigilance
- Sailing Trawler
- (and 1 more)
-
It looks very nice Hakan! Regards planking, I've not found much in researching Vigilance, which predates your boat but has much the same design. As working boats, cost was important - can't see them cutting an oak plank down without good reason, and the longer the stronger, being single planked. I think they would run 20 - 25 feet if they could, and probably had a pretty loose formula on butt shift. I agree with Eberhard - especially if it coincides with a missing frame. Hope the temperature rises for you soon!
-
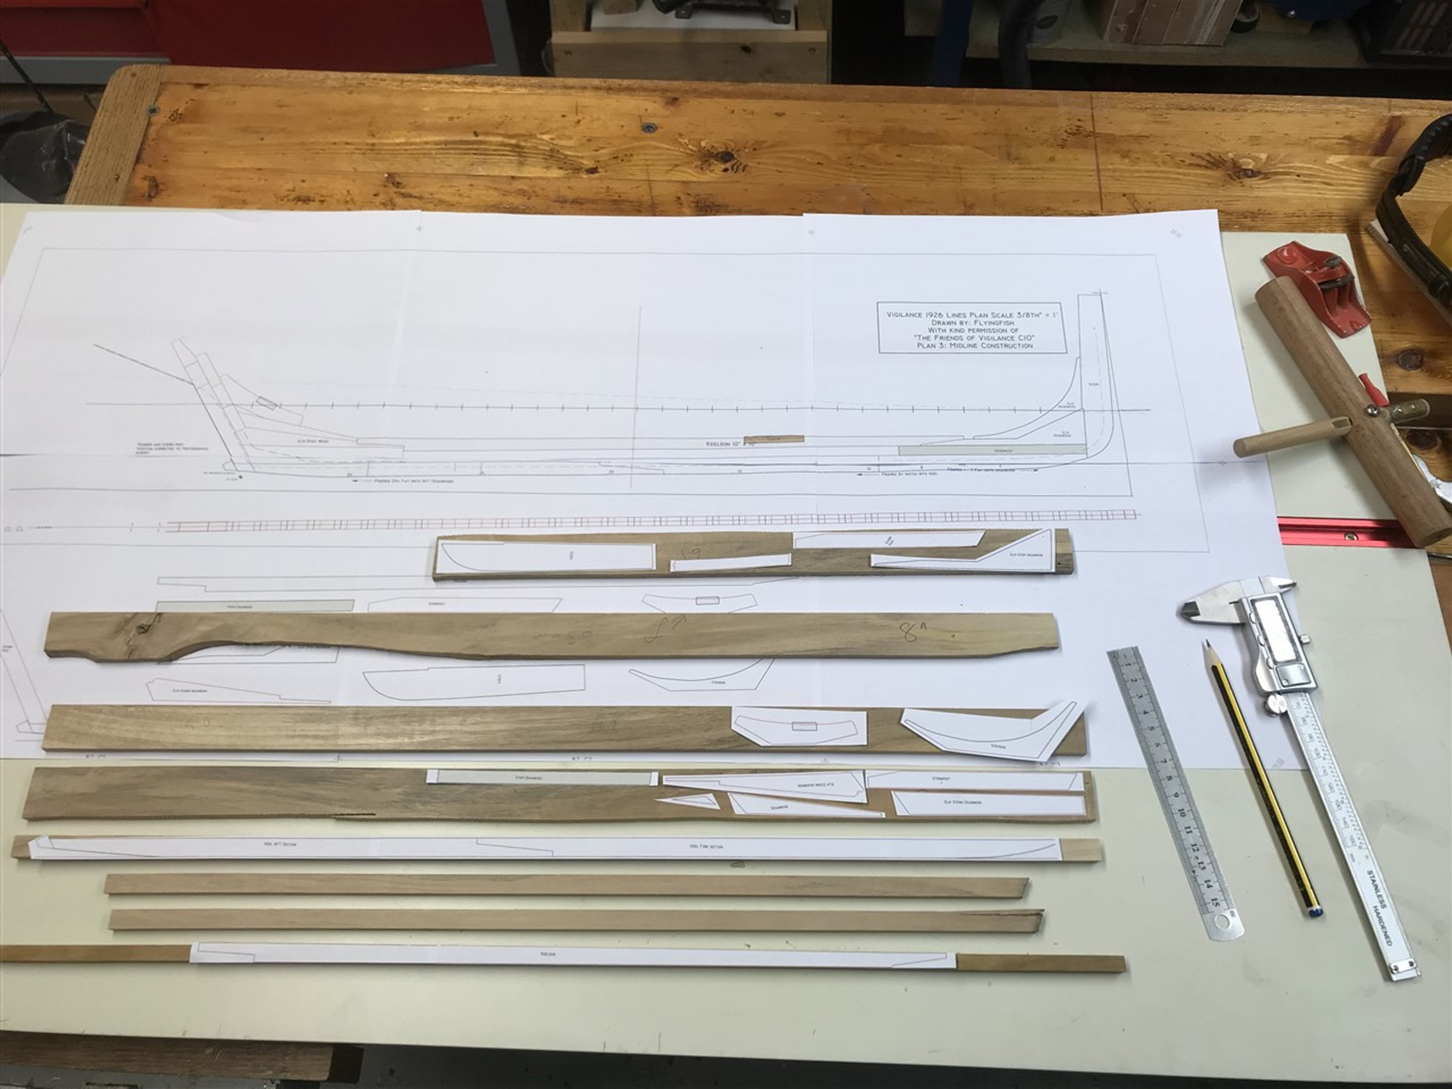
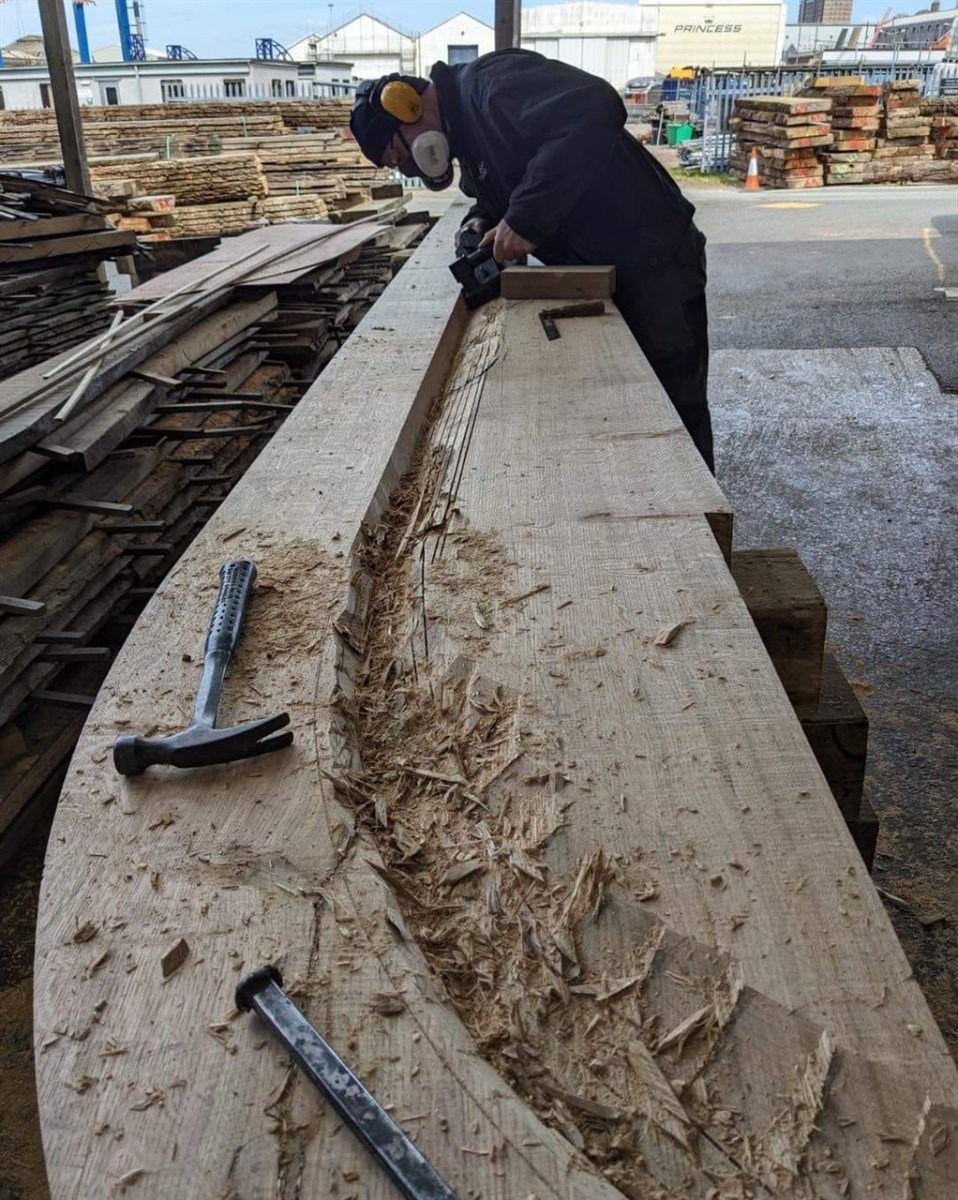
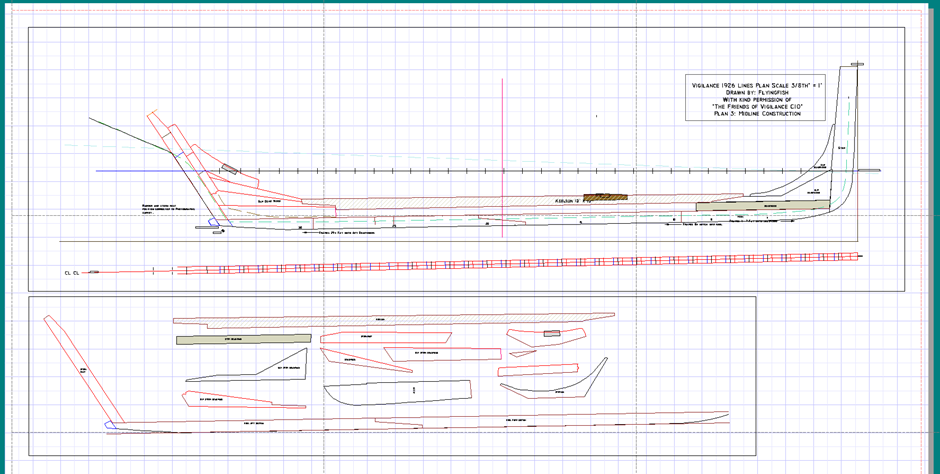
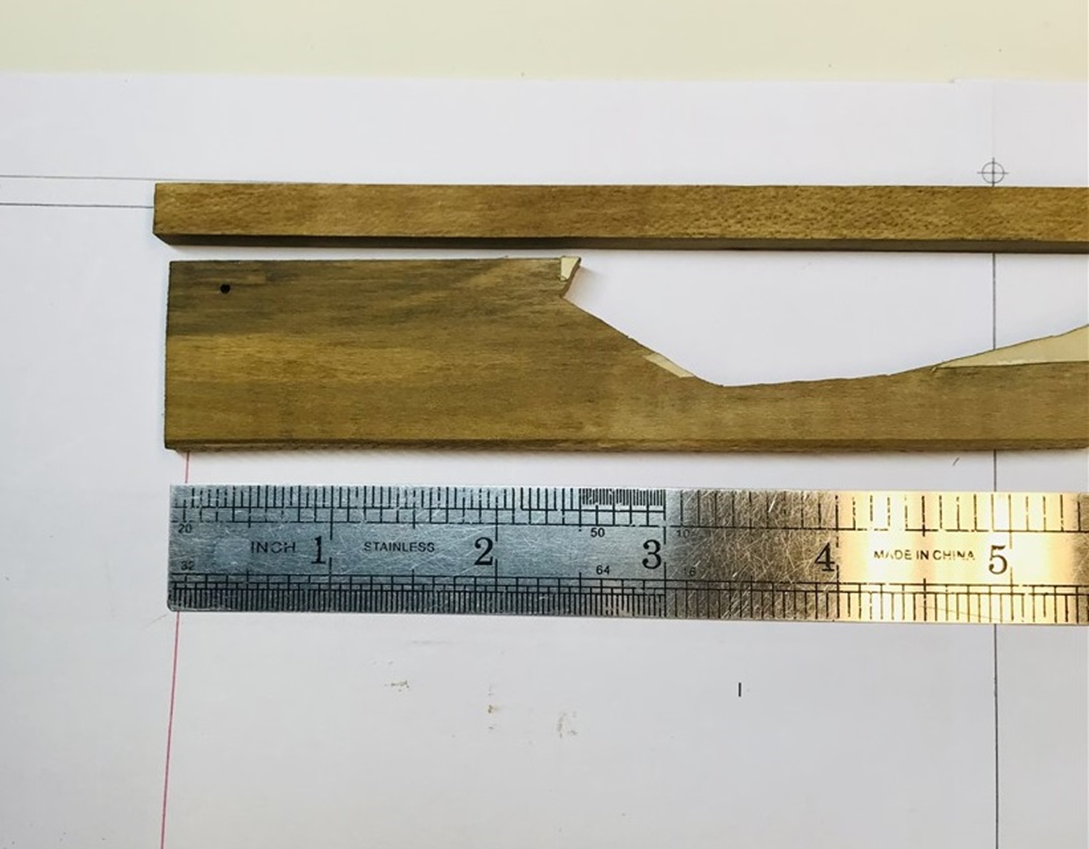
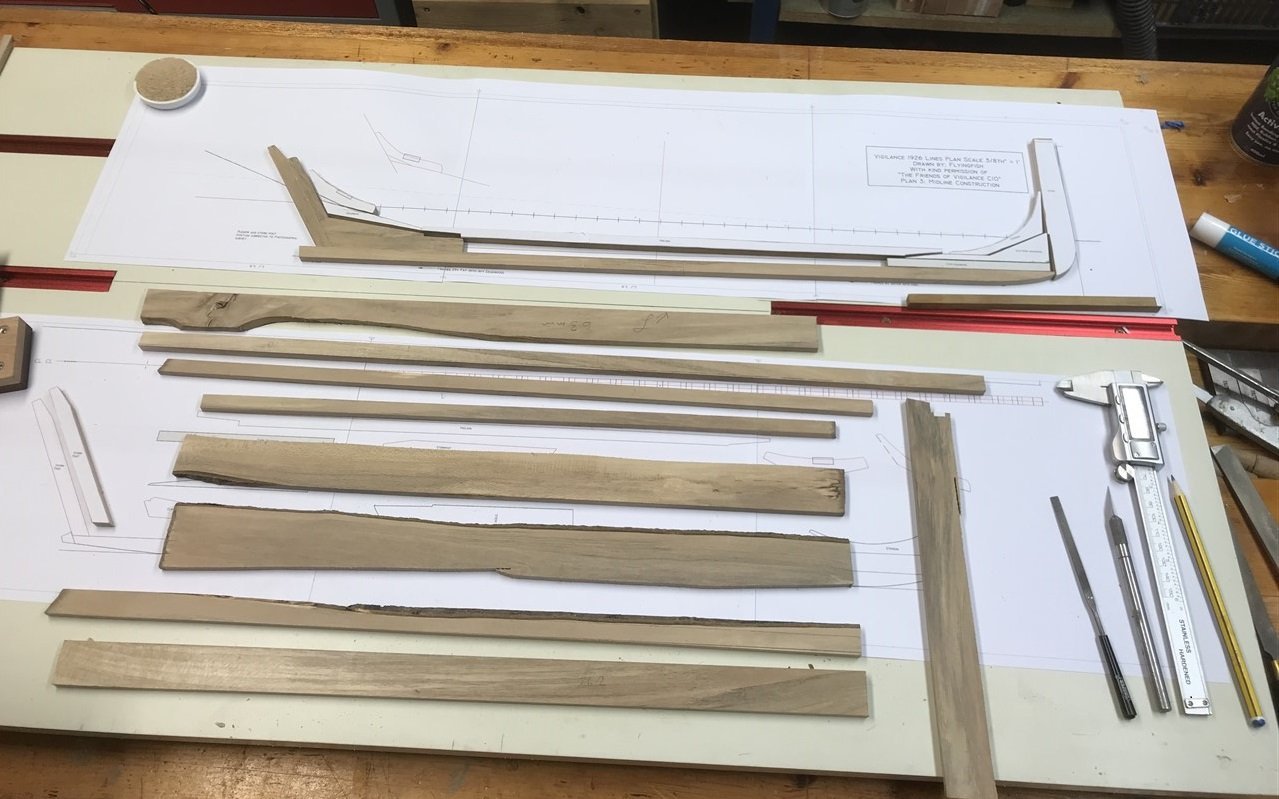
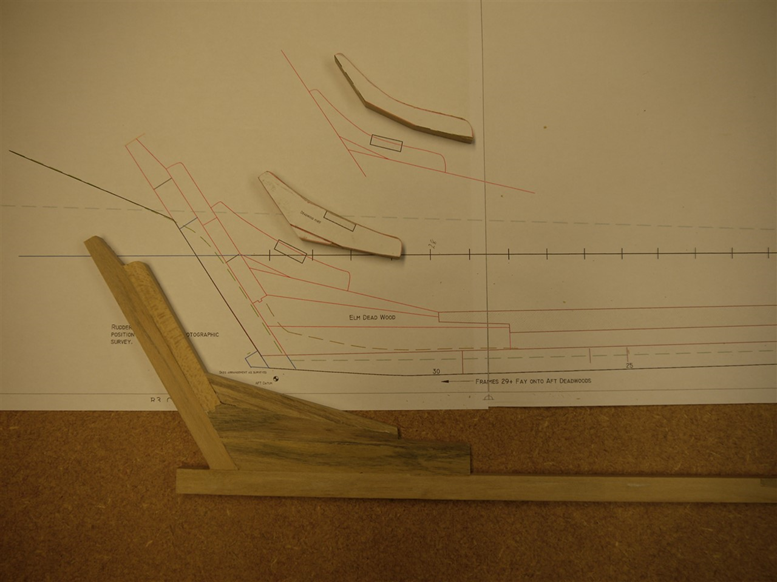
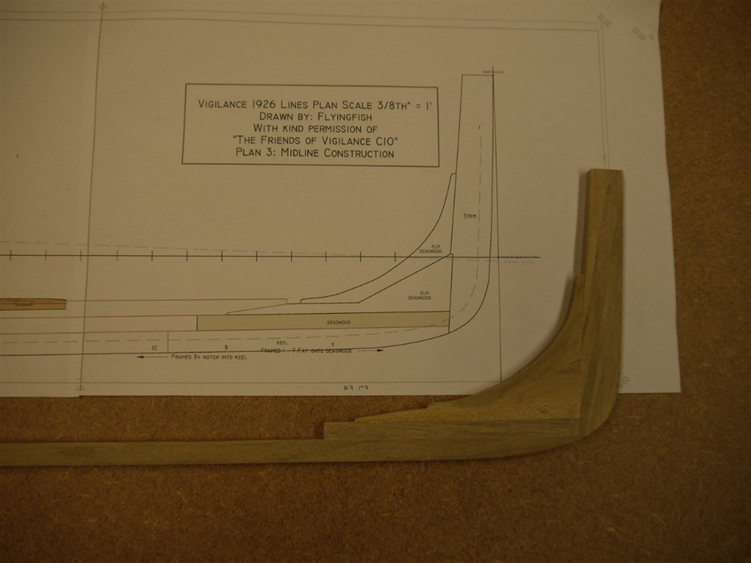
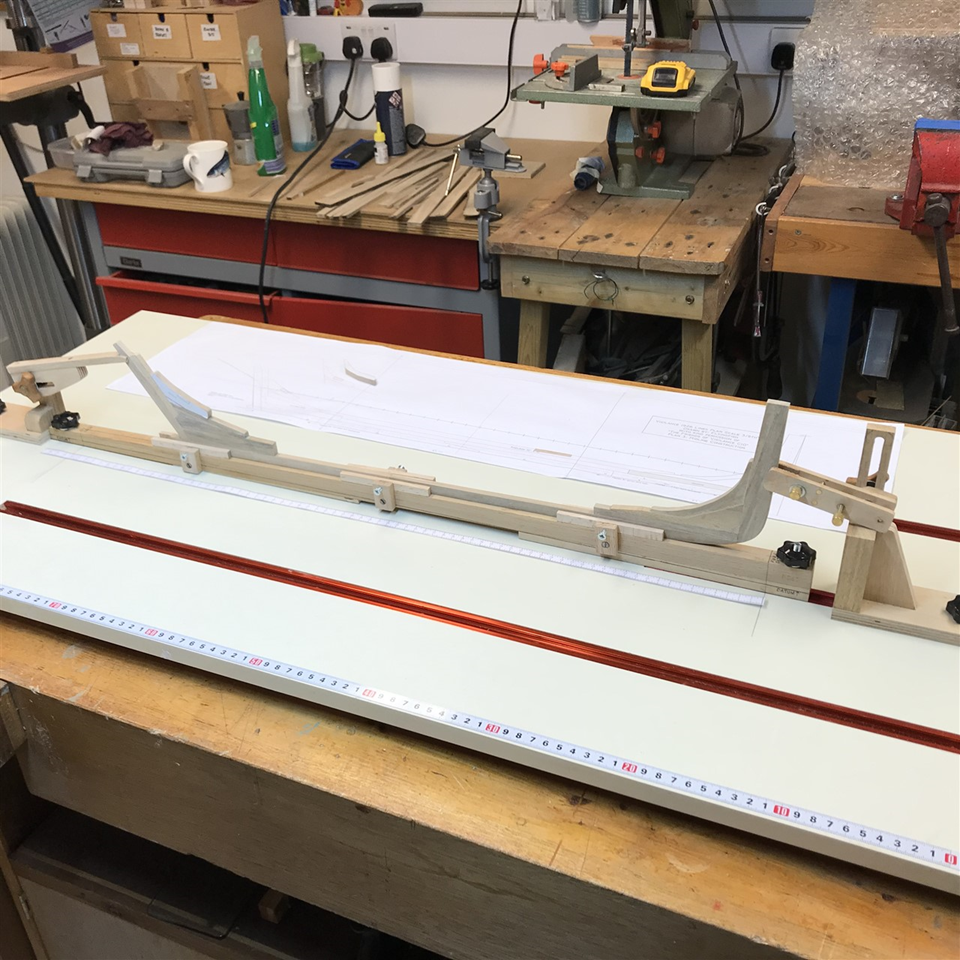
Centreline Layout Finally get to start building. Scantlings 1:1 1:32 Keel (oak) 12.75” by 8” in 2 No. pieces Joined by 4’6” stopped scarf F. Maple 9.7 mm by 6.35 mm Keelson 10” by 10” F Maple 7.9mm by 7.9mm Stem 19” by 8” tapering to 12” by 8” 15.1mm to 9.525mm by 6.35mm Stern post (Oak) 8” sided, 15” moulded at heel, 10” at head Holly 6.4mm sided, 12mm at heel, 8mm at head. Horn Timbers 6” sided by 6”, trapezoid section below to follow planking. 16’ long. Holly 4.7mm sided. Swelling at knuckle and shaped to match planking. 152mm long. Deadwoods (elm) 8” sided. Stemson knee 6” sided. Holly 6.4mm and 4.7mm sided. Parts ‘exploded’ in CAD. Keel, and keelson in maple, and the rest in holly. It doesn’t come out well in a photograph, but this shows how the holly (wider piece) with the grey fungal stain can imitate oak better than the maple, which will take more staining work: The stern deadwoods were original, and I had a rare opportunity to copy them accurately: The knee upon which the mizzen mast-step resides may need a shallower angle, hence the optional piece. Thanks to Ed T for the inspiration to build a proper jig. The stem support jig is an example of over-engineering due to being shop-happy after so many awful wet days here. After some fresh air I made a forked stick for the stern. No excuse to put off framing now!

- 174 replies
-
- 13
-
-
-
- Vigilance
- Sailing Trawler
- (and 1 more)
-
Tremendous work Keith - I agree wholeheartedly with this, although it does look very 'on scale' and I particularly like the lack of 'fuzz' on the ropework - a sign of attention to detail. Really enjoying seeing it come together.
-
Rightly so... its the reason I wipe the wood with thinned shellac sealer before sticking on the paper, and providing the sponge is damp not wet it seems to work. Pesky stuff that Pritt stick glue!
-
Your third image give a real sense of the size of this model - I'm excited! I don't think they are solvent based... I've found a washing-up sponge (scotchbright side) damped with soapy warm water works as well as anything.
-
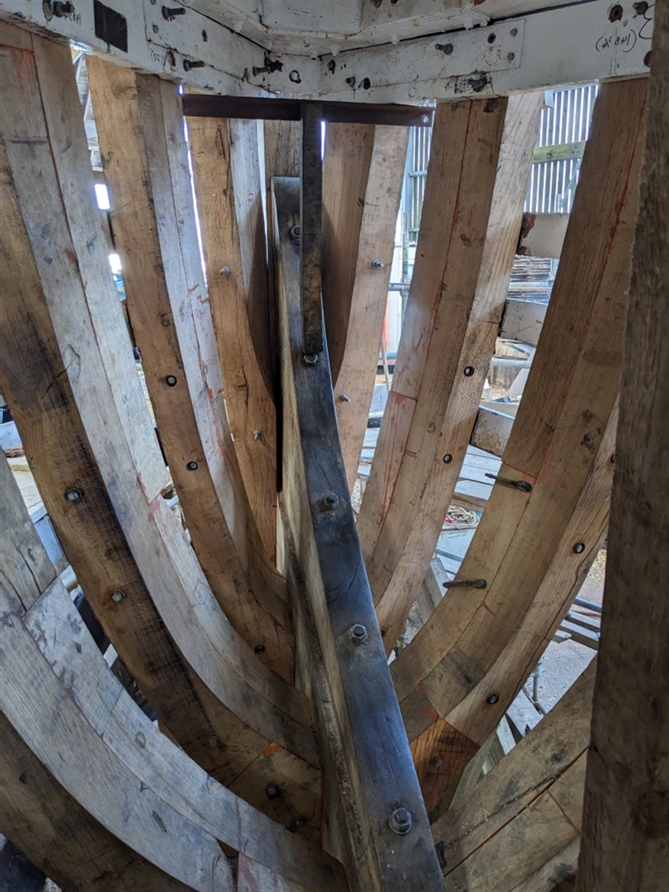
Yes, and the stringers which were only removed after the new keel was fitted. Its a lot of weight to suspend!
- 174 replies
-
- 4
-
-
- Vigilance
- Sailing Trawler
- (and 1 more)
-
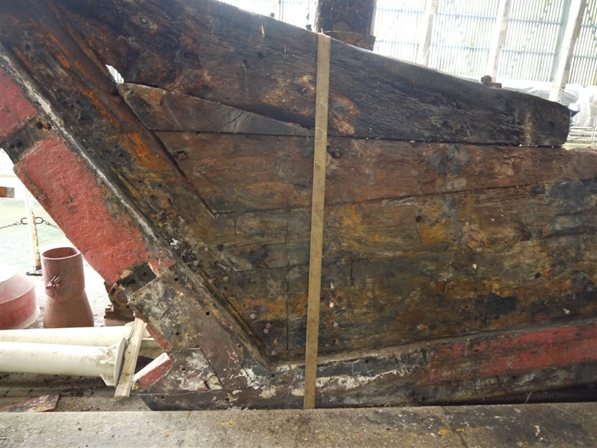
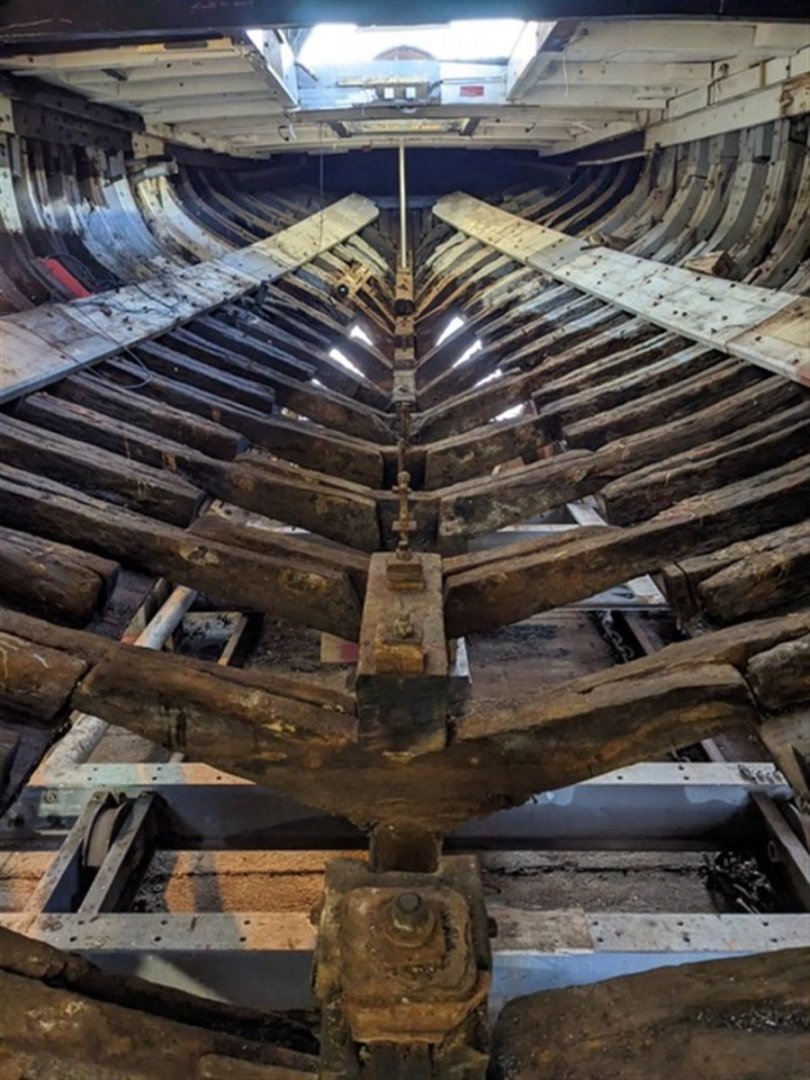
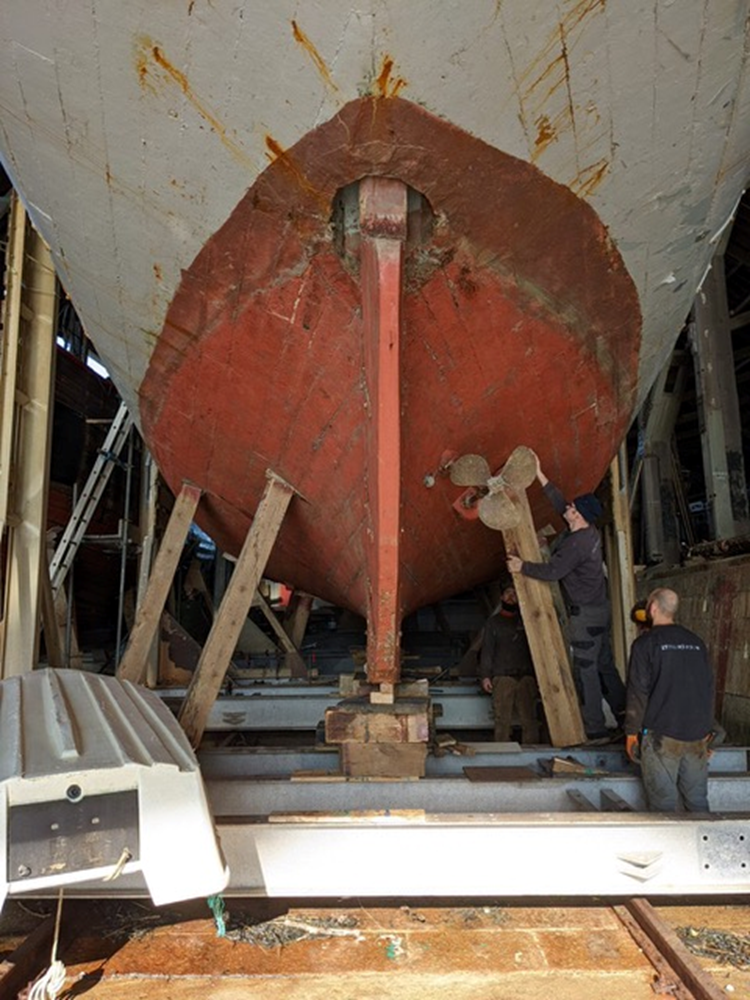
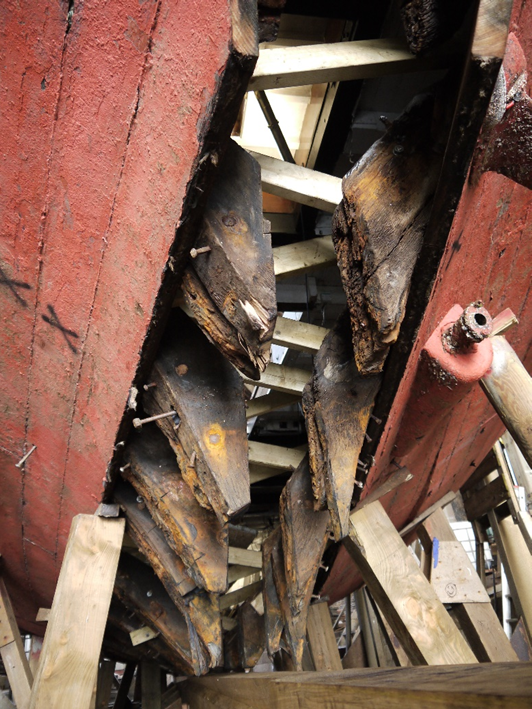
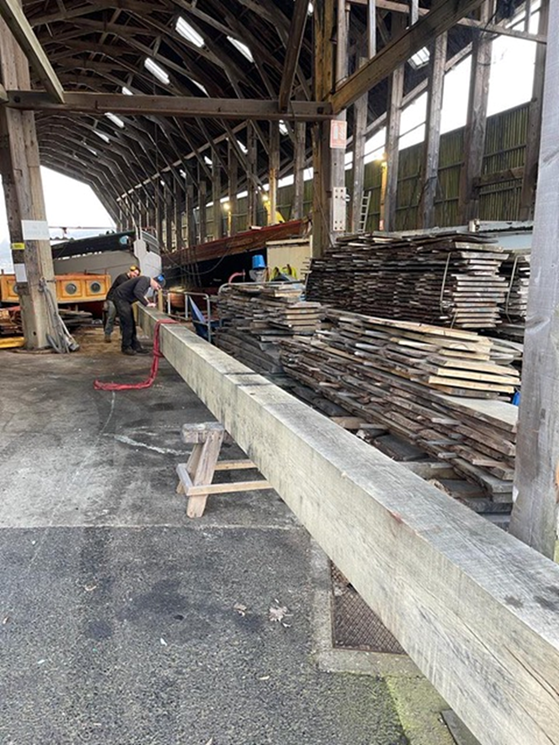
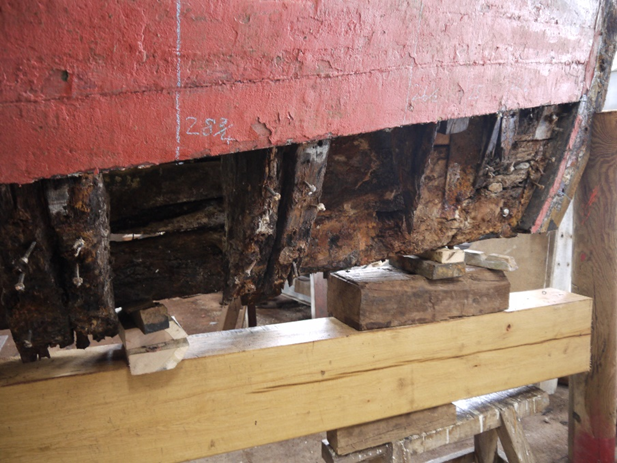
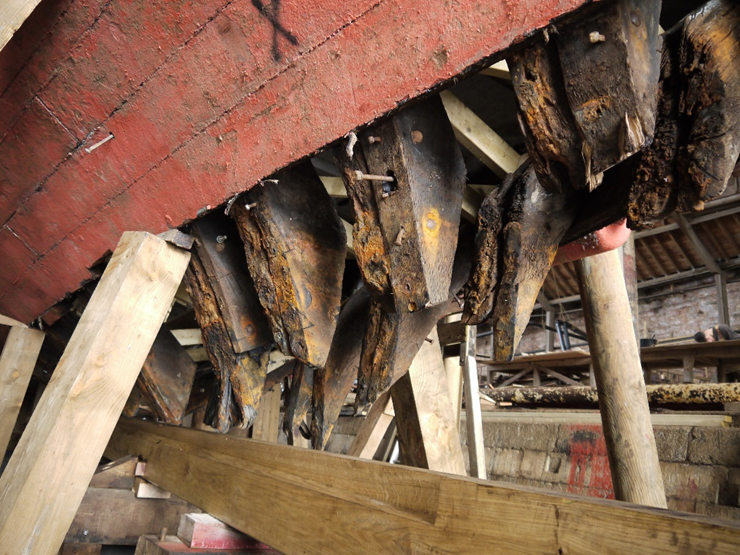
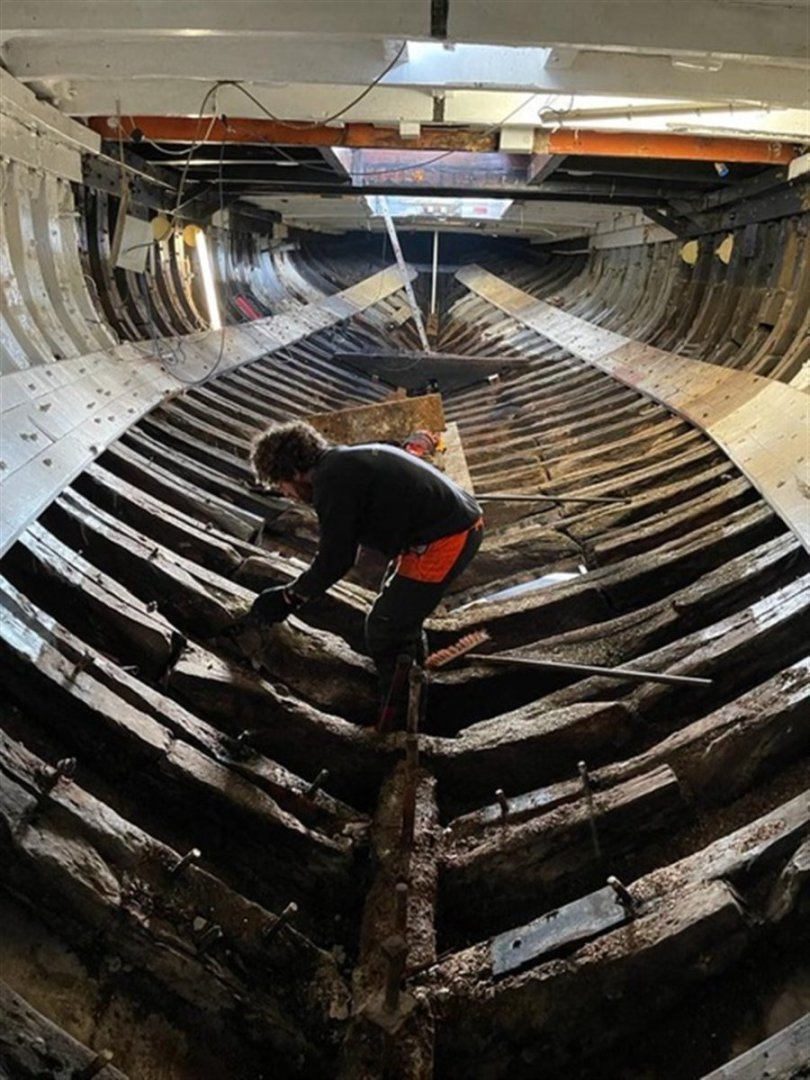
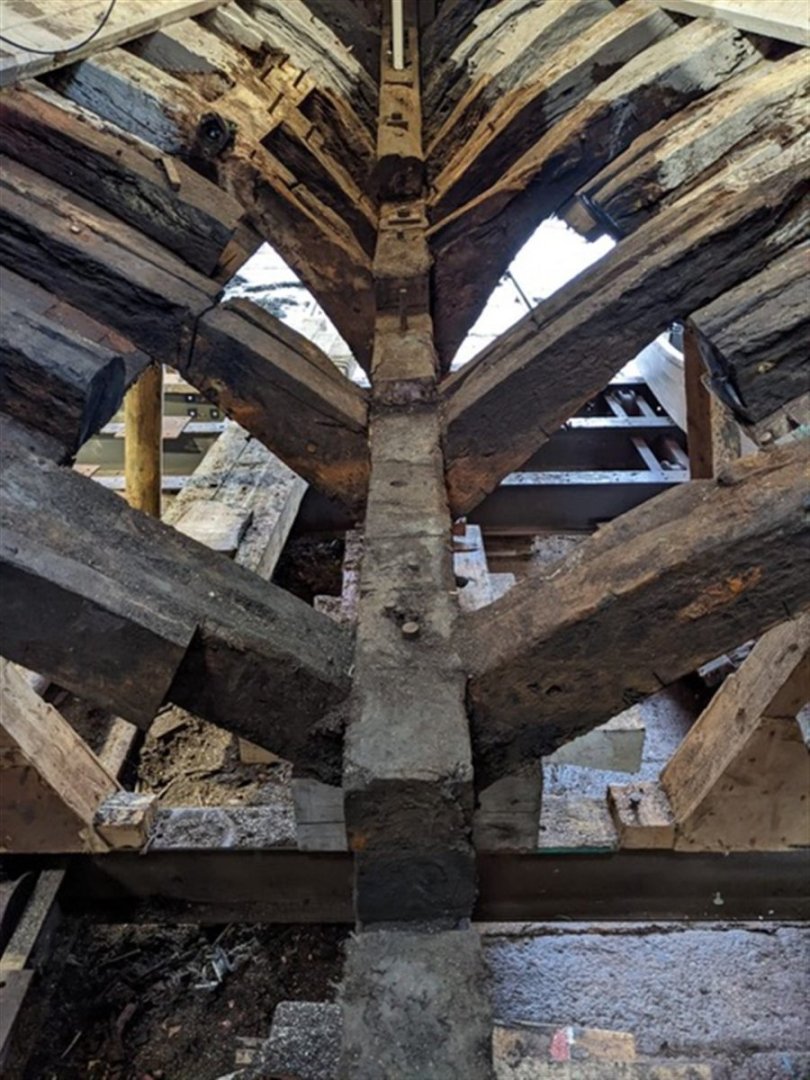
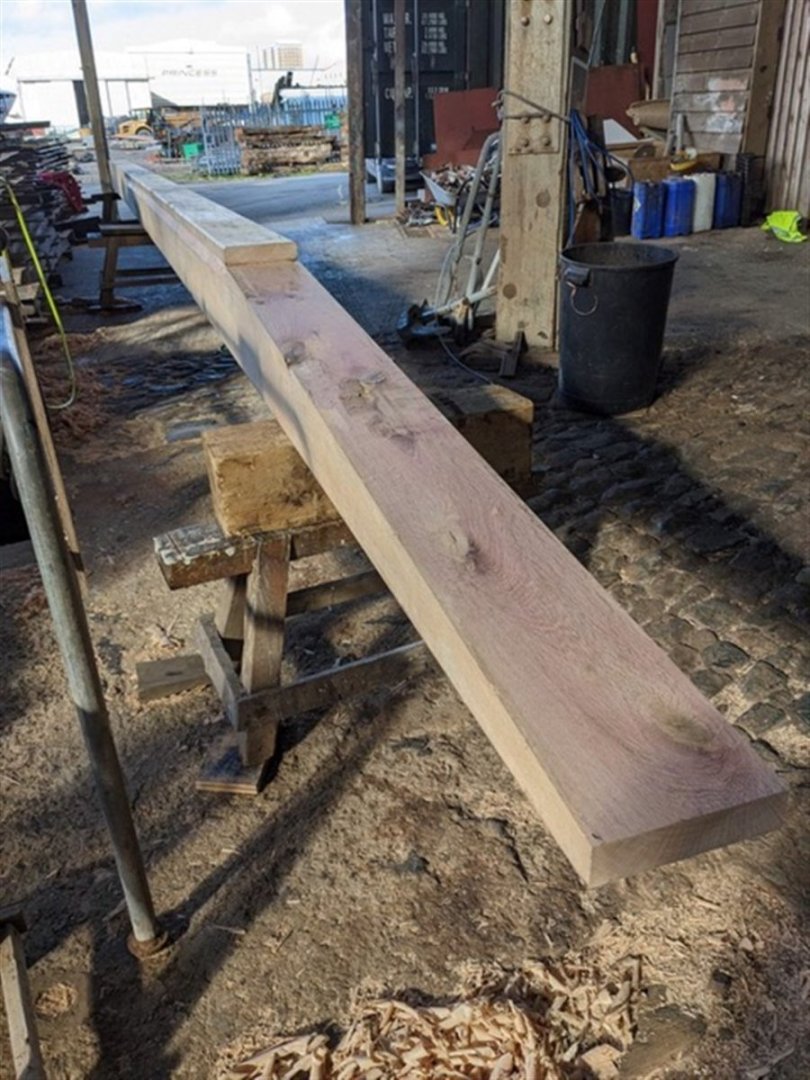
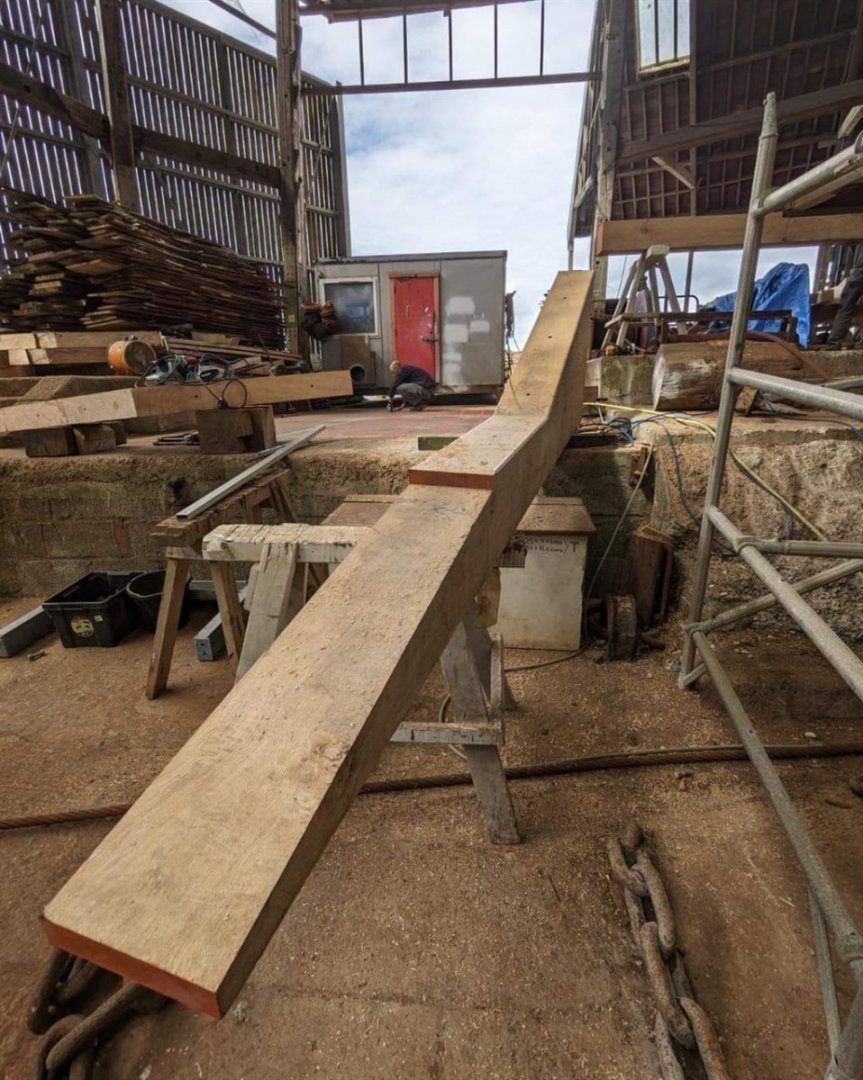
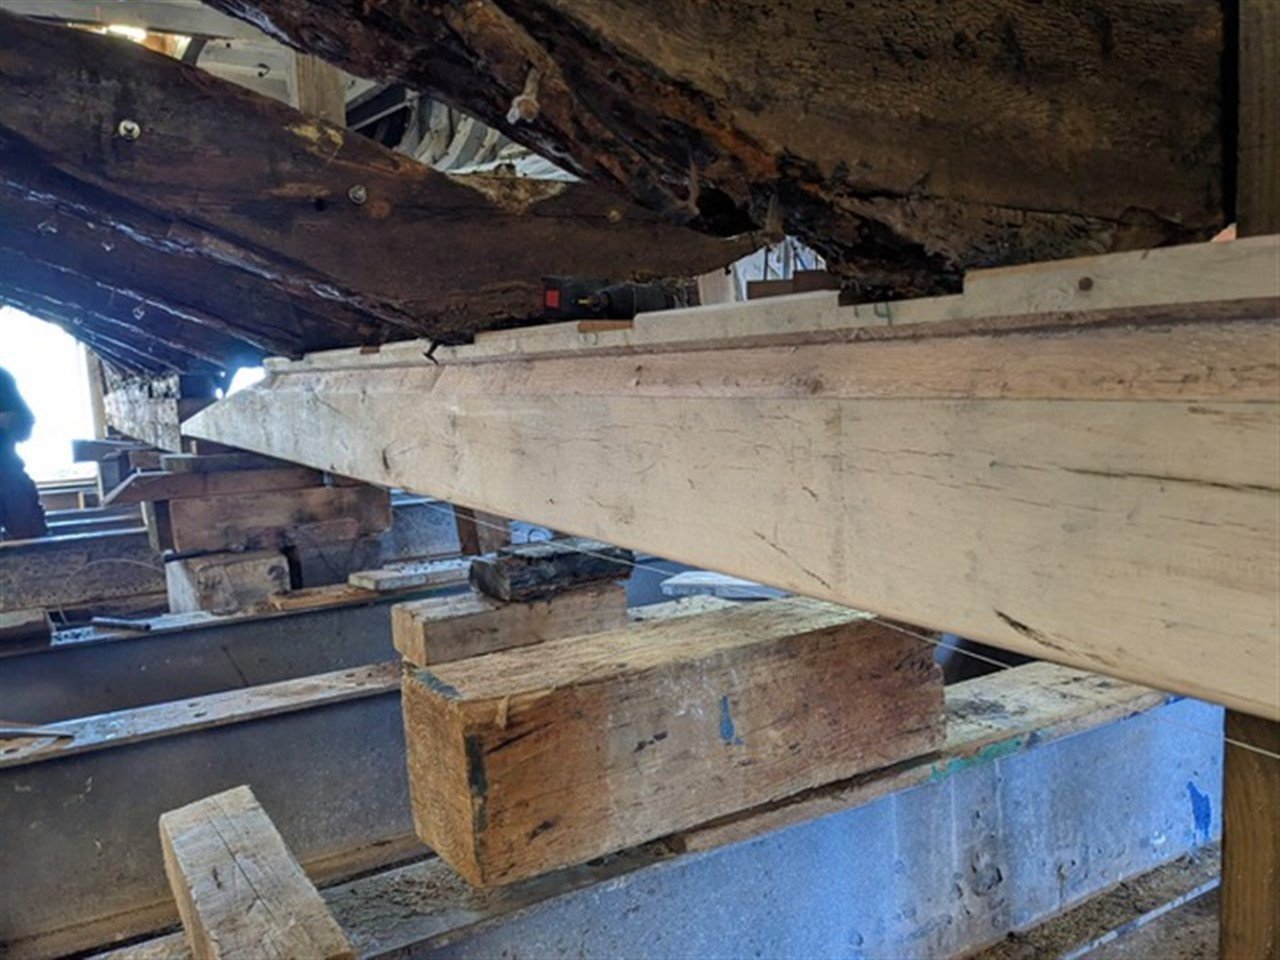
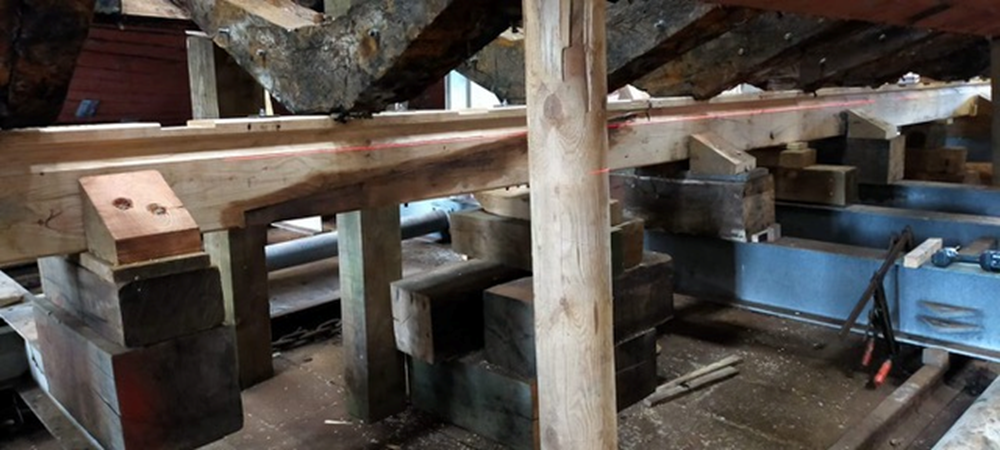
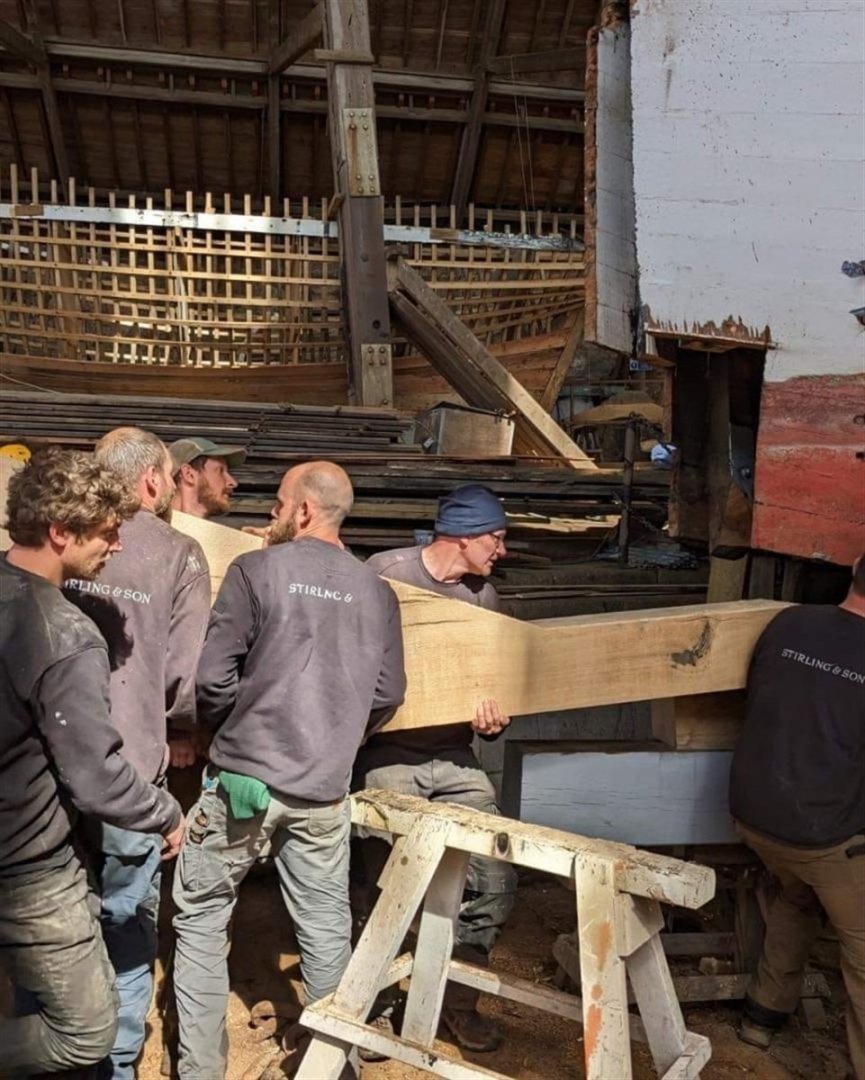
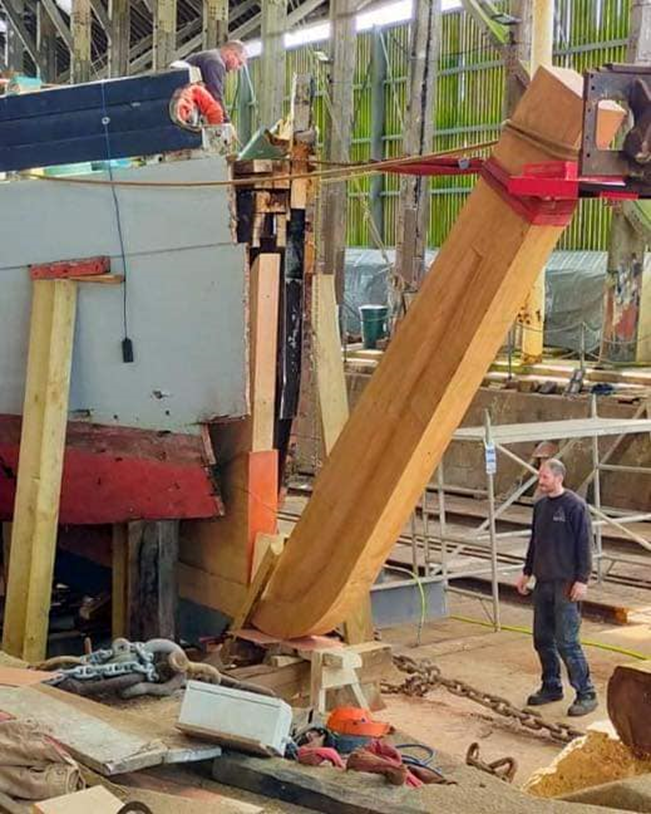
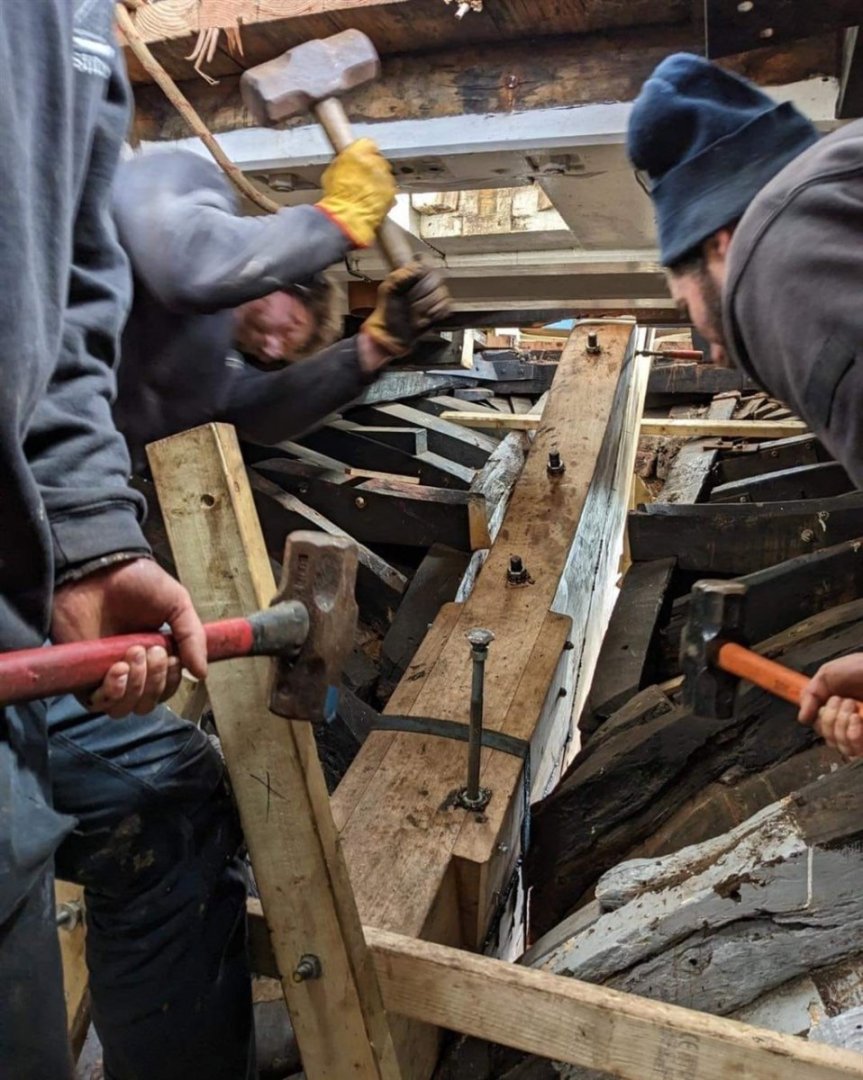
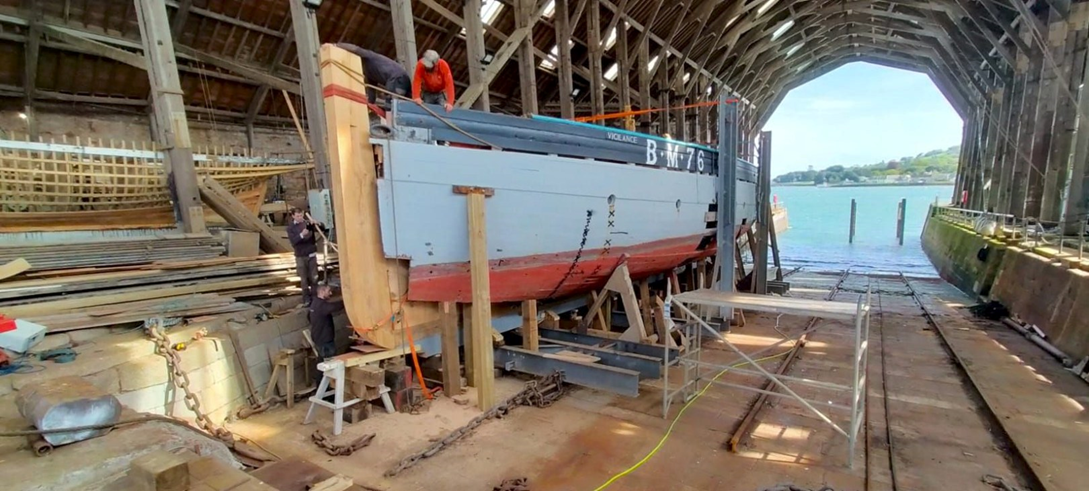
Thanks Keith, Keith and Wefalk, and for the likes. I'll put the lamp base on hold for now, Keith 😅 Centrelineline (dis)Assembly As a break from lofting frames in CAD, there’s no reason to delay laying down the centreline. If, like me, you have ever struggled to assemble a centerline accurately and dead straight, then cast your eyes over this! Stirling’s Yard replaced the centreline of Vigilance as the first step to rebuilding her, whilst keeping the rest of the boat intact. The next few photos (credit to the ‘Friends of Vigilance’ facebook site) are from their pictorial record of works. My efforts to will follow in the next post and should be a great deal easier! Boat propped and held in position – this photo gives an impression of her size. Looking aft; keelson and knees removed; floor bolts being removed. Garboard and next two planks removed. Keel removed in sections, and hull supported on chocks. Stem and deadwoods taken out in one piece. Stern deadwoods removed. New keel prepared ¾” rebates for heel of floors Stopped scarf joint: New half keel slid at the stem: Second keel length slid in from stern. Stem deadwood timbers, with stopped scart to keelson. Cutting the rabbet in the stem. Note step in aft face to help lock into deadwoods. First half of keel in place; note the reduction in keel depth from the original. Scarf at 18th frame. Second section joined; scarf joint complete. Feeding the heavy stem deadwoods into place: Lifting the stem post into position Note reduction in width of the stemson. Stern deadwood knee attachment – mizzen mast step position shown: Stern post in place: Job’s a good ‘un… I am grateful to the 'Friends of Vigilance CIO' for permission to visit the slip, and the kind assistance of Stirlings Yard staff. There are many more pictures of the process on their facebook site here.


- 174 replies
-
- 10
-
-
- Vigilance
- Sailing Trawler
- (and 1 more)