


DocBlake
-
Posts
1,811 -
Joined
-
Last visited
Content Type
Profiles
Forums
Gallery
Events
Posts posted by DocBlake
-
-
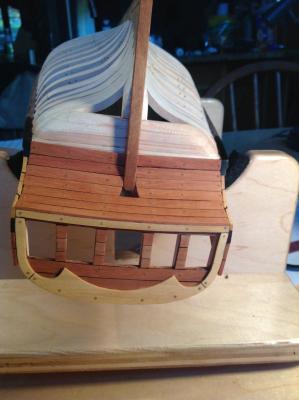
I finished all the treenails in the outer bulwark planking. I also changed the stern. Something didn't look quite right back there, and I realized that the counter planking needed something to divide it from the framing visually. Like the black strake and wales separate the bulwark planking from the framing. So I simply had the black strake and wale "turn the corner" on each side and end at the sternpost. I think it looks better, and it's not without precedent, even though it's not in the plans!

- Ryland Craze, hamilton, Canute and 5 others
-
 8
8
-
Thanks, Jeff. Don't hesitate to ask any questions...I'll help if I can. The practicum is one thing, but building experience is another. This is almost a custom-kit, and a lot of modifications have to be made. I asked Mike Shanks a million questions as I've been building, and this has been a huge help. I've had to make over multiple parts to fit my model, so this is good practice for scratch building. The later kits may not have as many "glitches", though. Don't worry. It will come together!
-
Treenails in the transom and counter.
- jdbradford, GuntherMT, Canute and 4 others
-
7
-
-
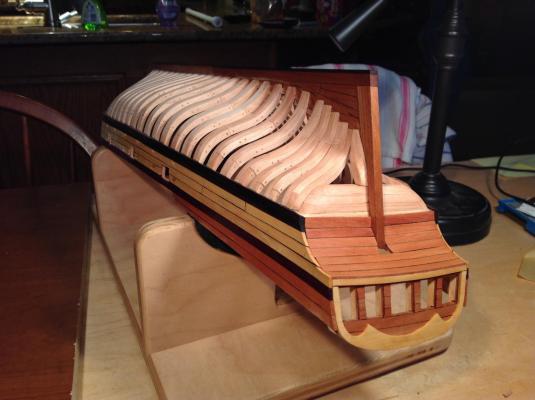
I planked the counter in swiss pear. The wales and planking are all trimmed to finish length. Next I tackle the treenails for the outer planking.
- Cap'n Rat Fink, dgbot, Ryland Craze and 6 others
-
9
-
Busy day, yesterday. I installed the wales below the black strake on both sides. I also glued the transom timbers in place. There are supposed to be two horizontal timbers, and two vertical ones that hug the stern deadwood. There is supposed to be a space between the top transom timber and the wing transom. After some thought I added a third timber where that space would have been. It seemed to make the fairing easier and I think it looks OK. The planking is done on the bulwarks and the transom timbers are faired. Once the counter is planked, I'll trim the bulwark planking, the black strakes and the wales to their finished length. BTW, the transom timbers appear pinkish in color on the photo. That's just the lighting. They are maple, just like all the framing.

- mrshanks, Ryland Craze, Canute and 5 others
-
8
-
Hi Lou! Thanks for looking in.
The alignment of those last frames is a design flaw that was supposed to have been corrected prior to release of the kit. Apparently mine got through without the correction. Obviously, setting the angle of the transom could change things a bit, but the issue here Is the angle that the frames sit and not the transom angle. Had the transom been less wide, a fix may not have been necessary. All in all, it turned out fine. I just need to sand and pare the wood inboard where the fix was made to prepare for the inside planking.
-
Thanks, Brian. Here's a final shot after fixing the port side also. The port side wasn't nearly as bad as the starboard. Next up is finishing the fairing of the transoms and installing the wales. When that's done the framing is complete and I'll begin work on the lower deck.

- Cap'n Rat Fink, hamilton, SkerryAmp and 5 others
-
8
-
-
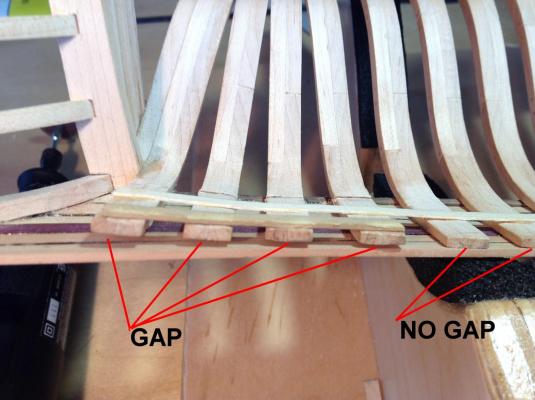
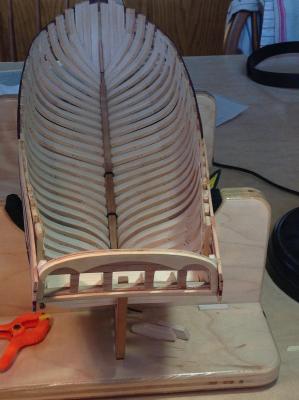
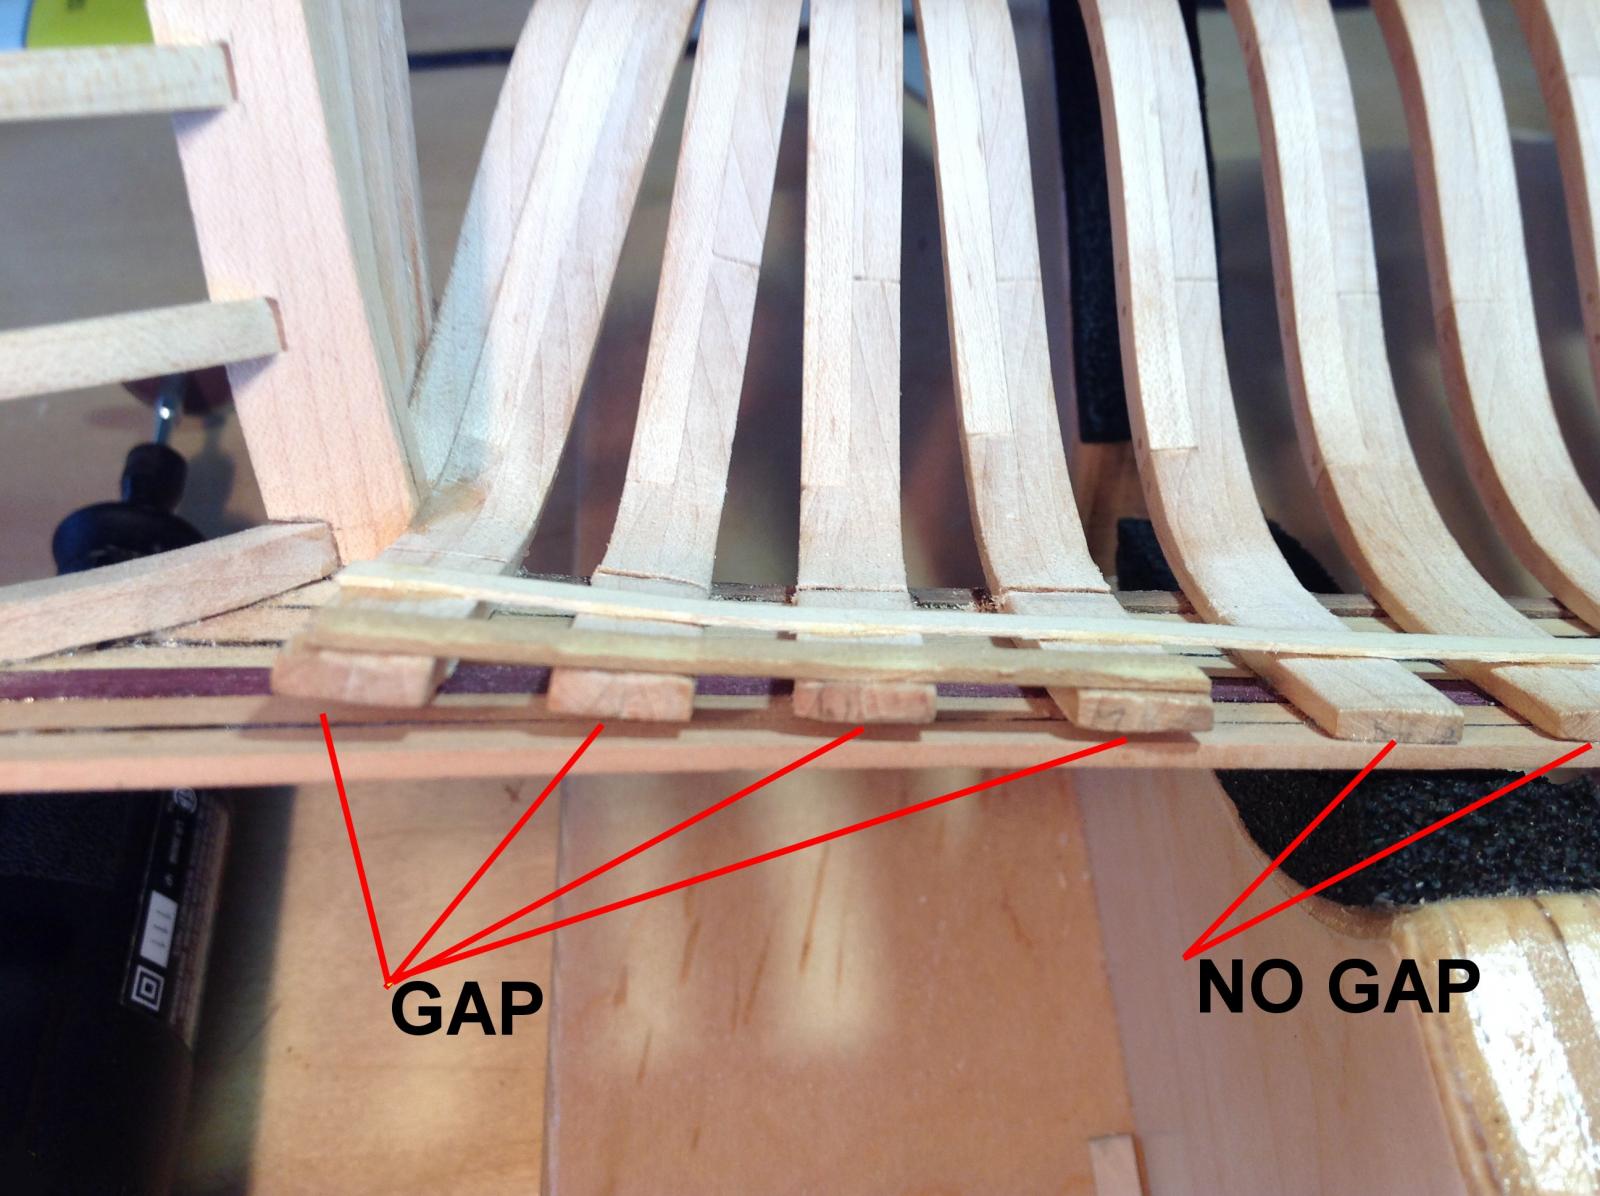
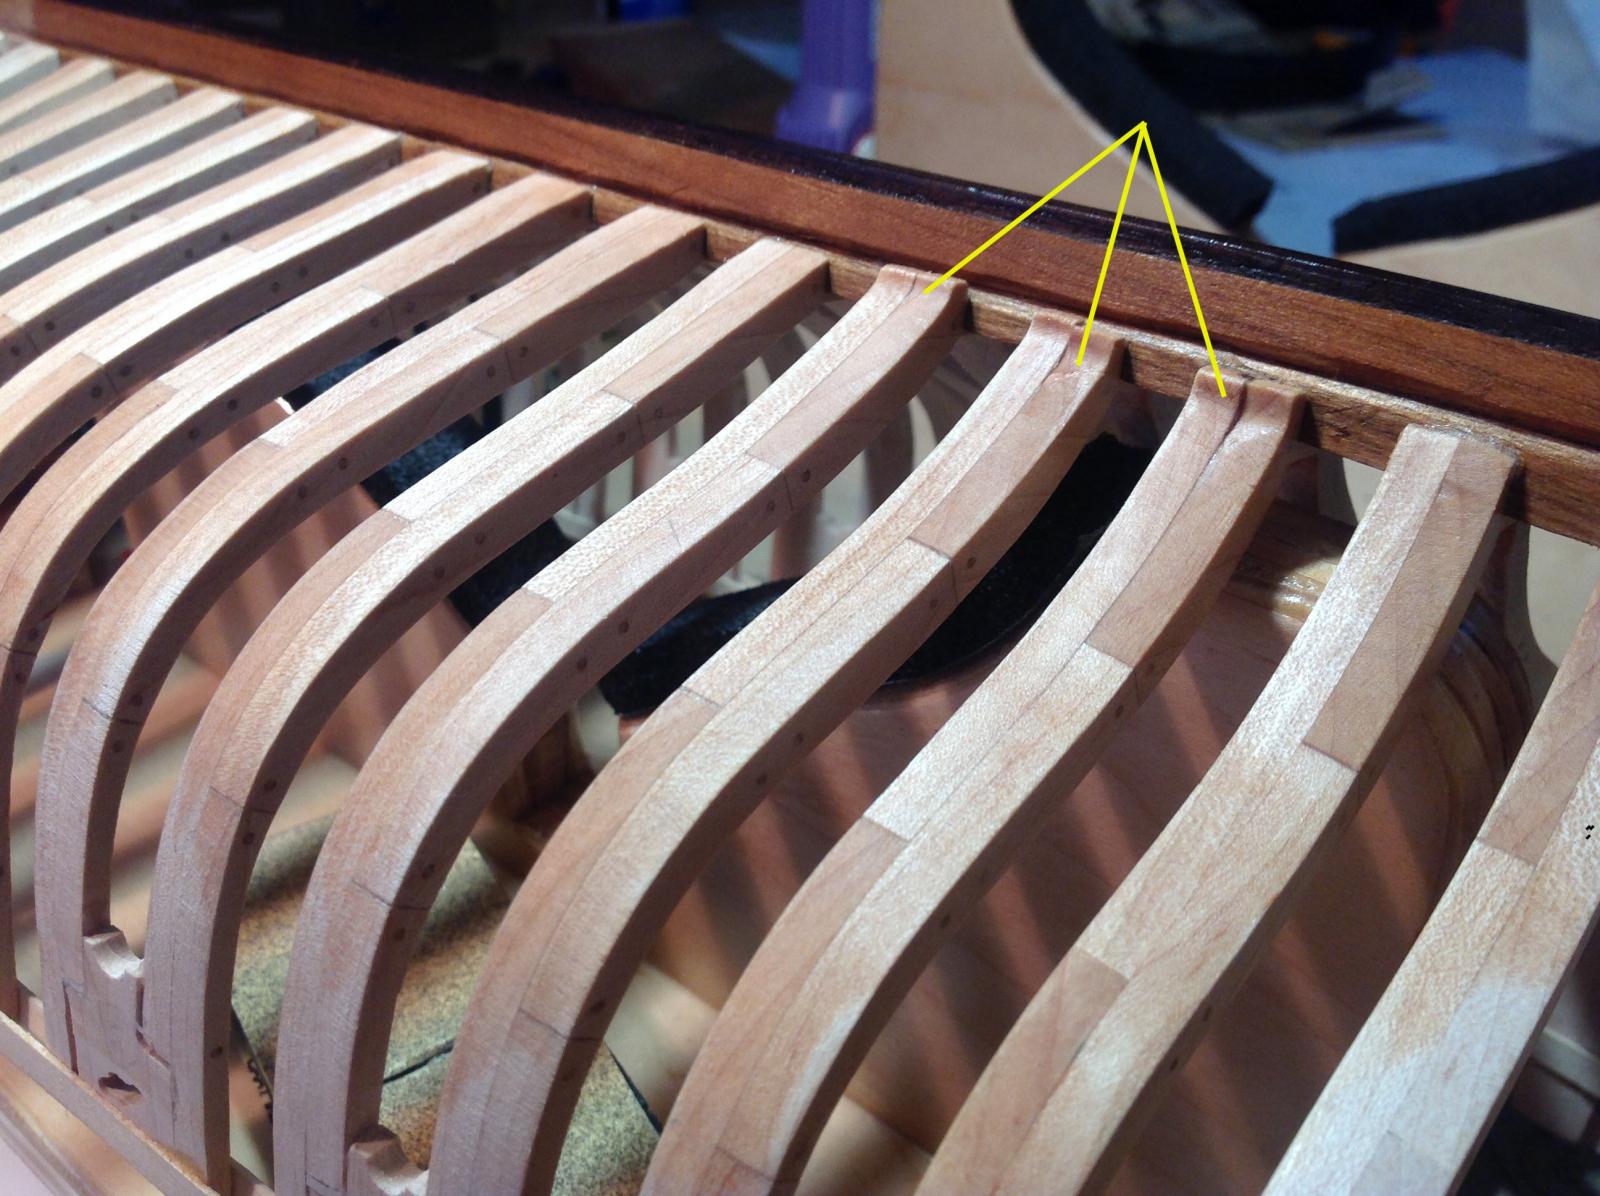
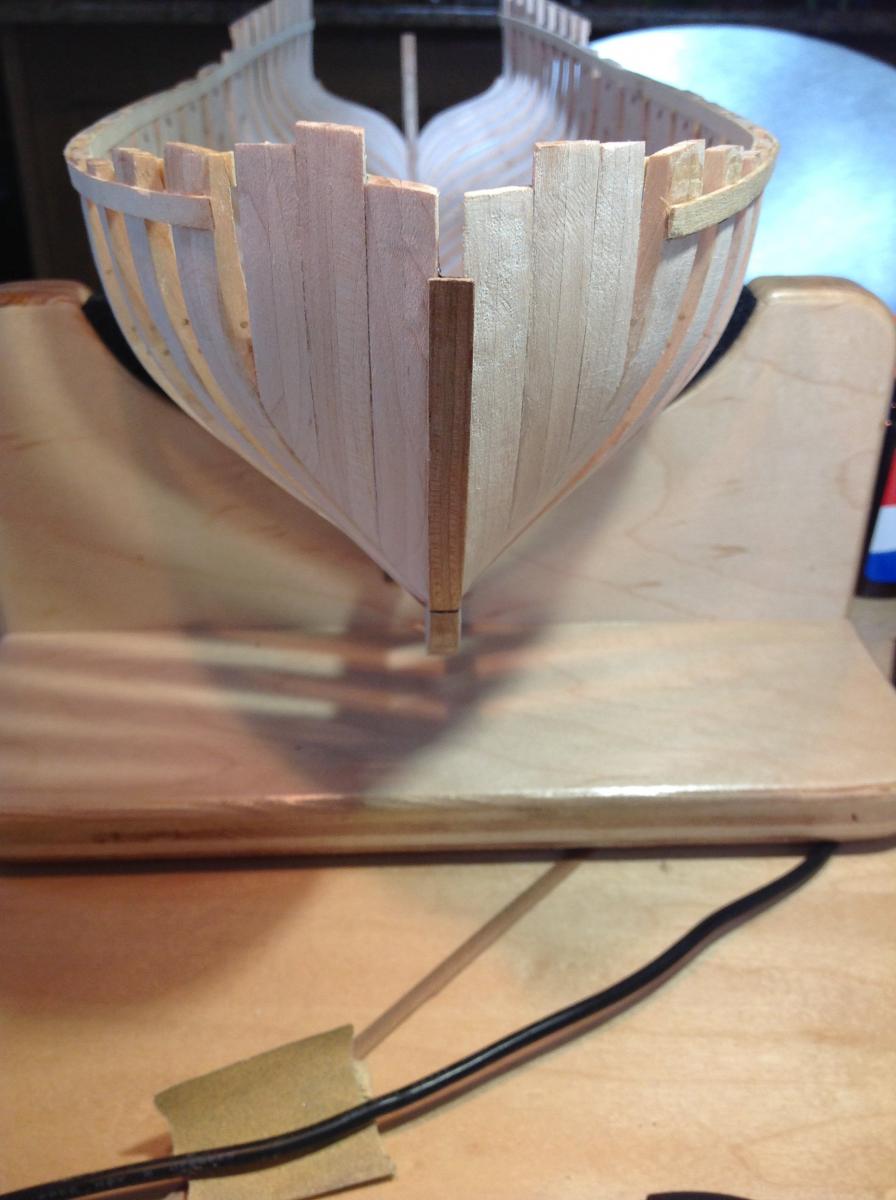
I tackled the transom problem today. Because of problems with the lofting of the after cant frames, the frames did not line up with the transom. The last 4 frames tended to curve inward, like the bow, rather than flow straight to the transom. The only solution was to cut each of the final frames and "bend" then outward to meet the planking which is already in place. The frames were then glued to the planking, and when the glue is completely dry, I'll fair the inside of the hull where the "surgery" took place prior to planking the inner bulwarks. It was REALLY difficult to chuck a cutoff wheel into my Dremel and cut the frames off after all the work that went into building them! Fortunately, I'm planking both sides of the model down to the wales, inboard and outboard, so the "fix" will not show.
The first photo shows the problem, the second shows the cuts and the third shows the frames straightened out and glued to the planking.
Now on to the port side!
- Cap'n Rat Fink, SkerryAmp, mrshanks and 5 others
-
8
-
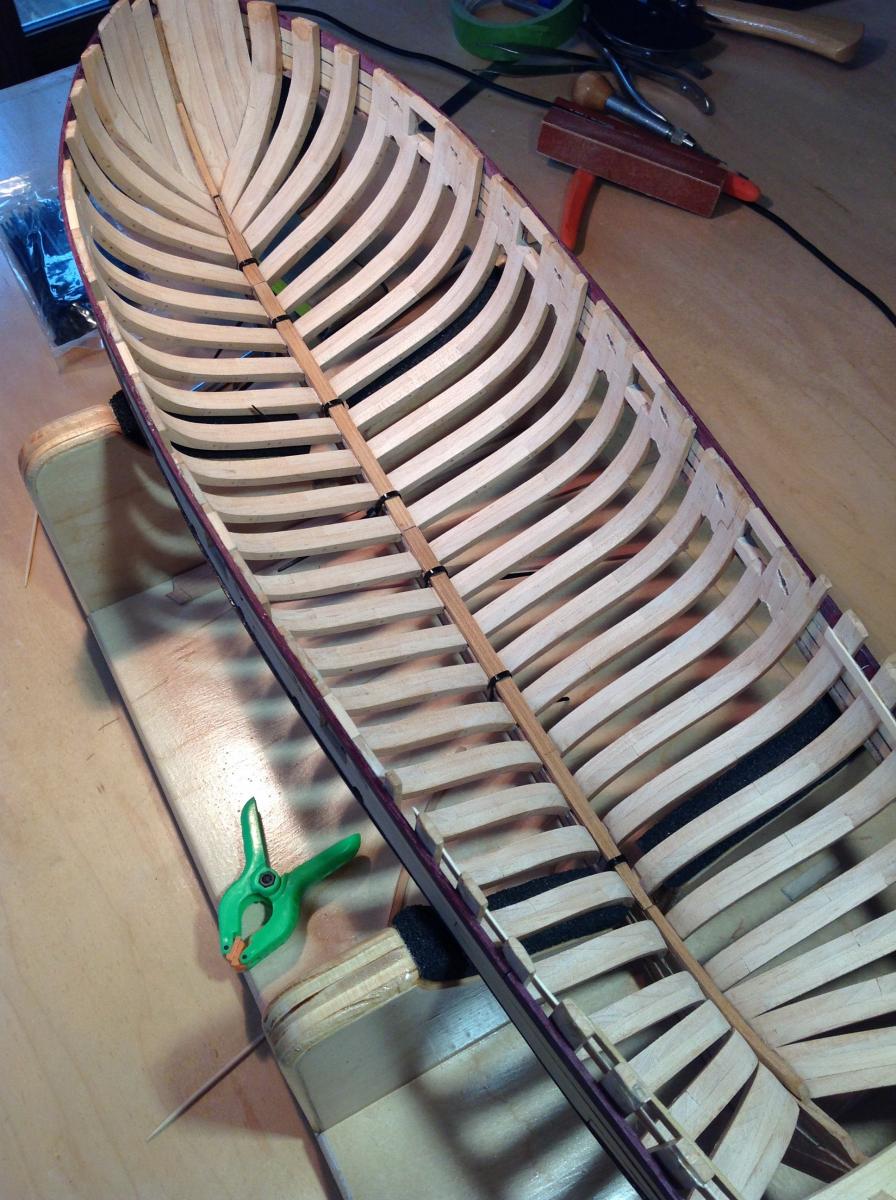
The keelson is glued to the frame floors using Weldbond. The black bands are nylon electrical cable ties acting as clamps to hold the keelson to the assembly while the glue dries.
- Cap'n Rat Fink, mtaylor, Canute and 3 others
-
6
-
Thanks, guys.
Jeff: On the real ship the scuppers have to go through the bulkhead to drain. On a model, you can simulate this by drilling from either side and not all the way through. The MS AVS uses that technique. In this scale, though, through-scuppers are probably necessary
Does anyone know how bulwark planking was treenailed to the hawse timbers? Because of the plank width on this ship,either one or two treenails per frame could be used. Which would look better? I don't want it to be too "busy". Would there have been treenails in each of the three hawse frames?
-
Scuppers and sweep ports cut into the port side. The scuppers are bigger than they should be because when drilling the pilot hole to cut out one of them, the drill came out too high on the plank above the black strake. All the scuppers had to be bigger to compensate. Still, I think it looks OK. It's just one of those things that the builder notices, but no one else usually does on the finished model

-
Thanks for looking in, Hamilton.
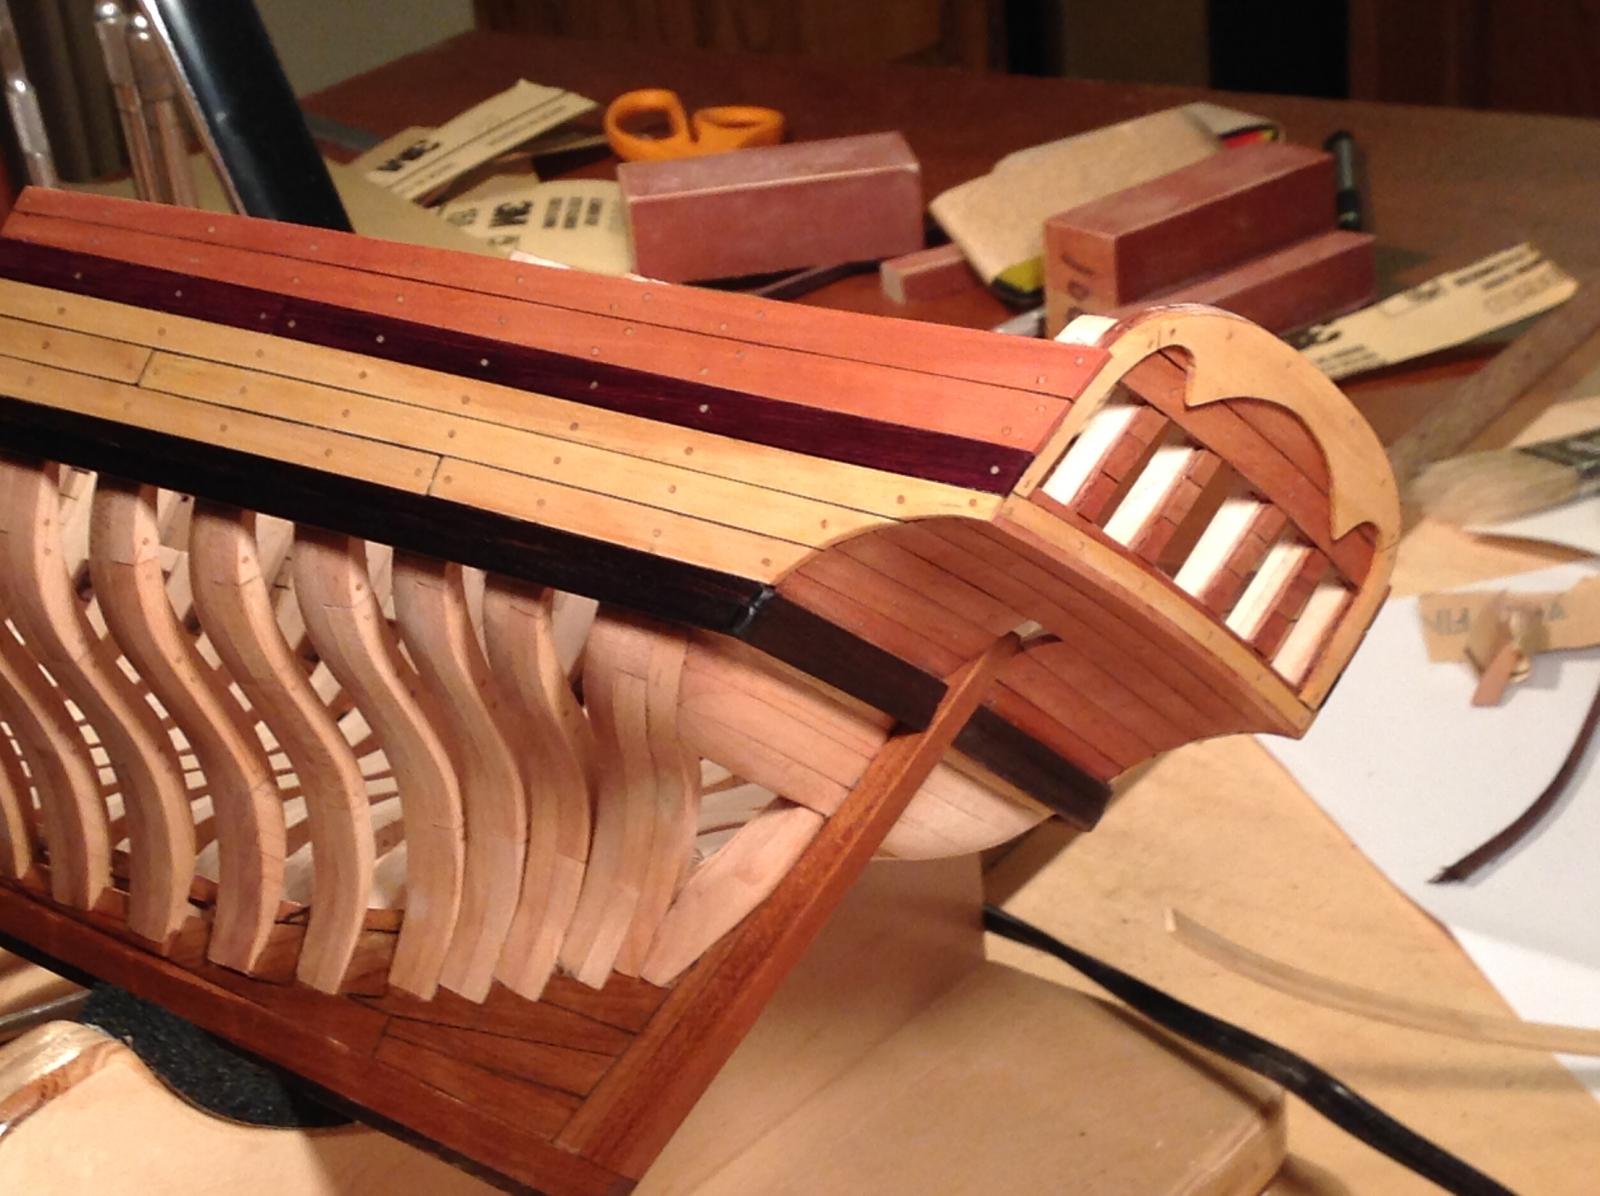
Don: Purpleheart is a very brittle wood and hard to work with. The grain is strong so you have to be very careful cutting with an X-Acto blade. I'm glad I only had 2 strakes to contend with. I did have a lot of practice on my MS AVS because I used bloodwood to plank the inboard bulwarks. Very similar characteristics.
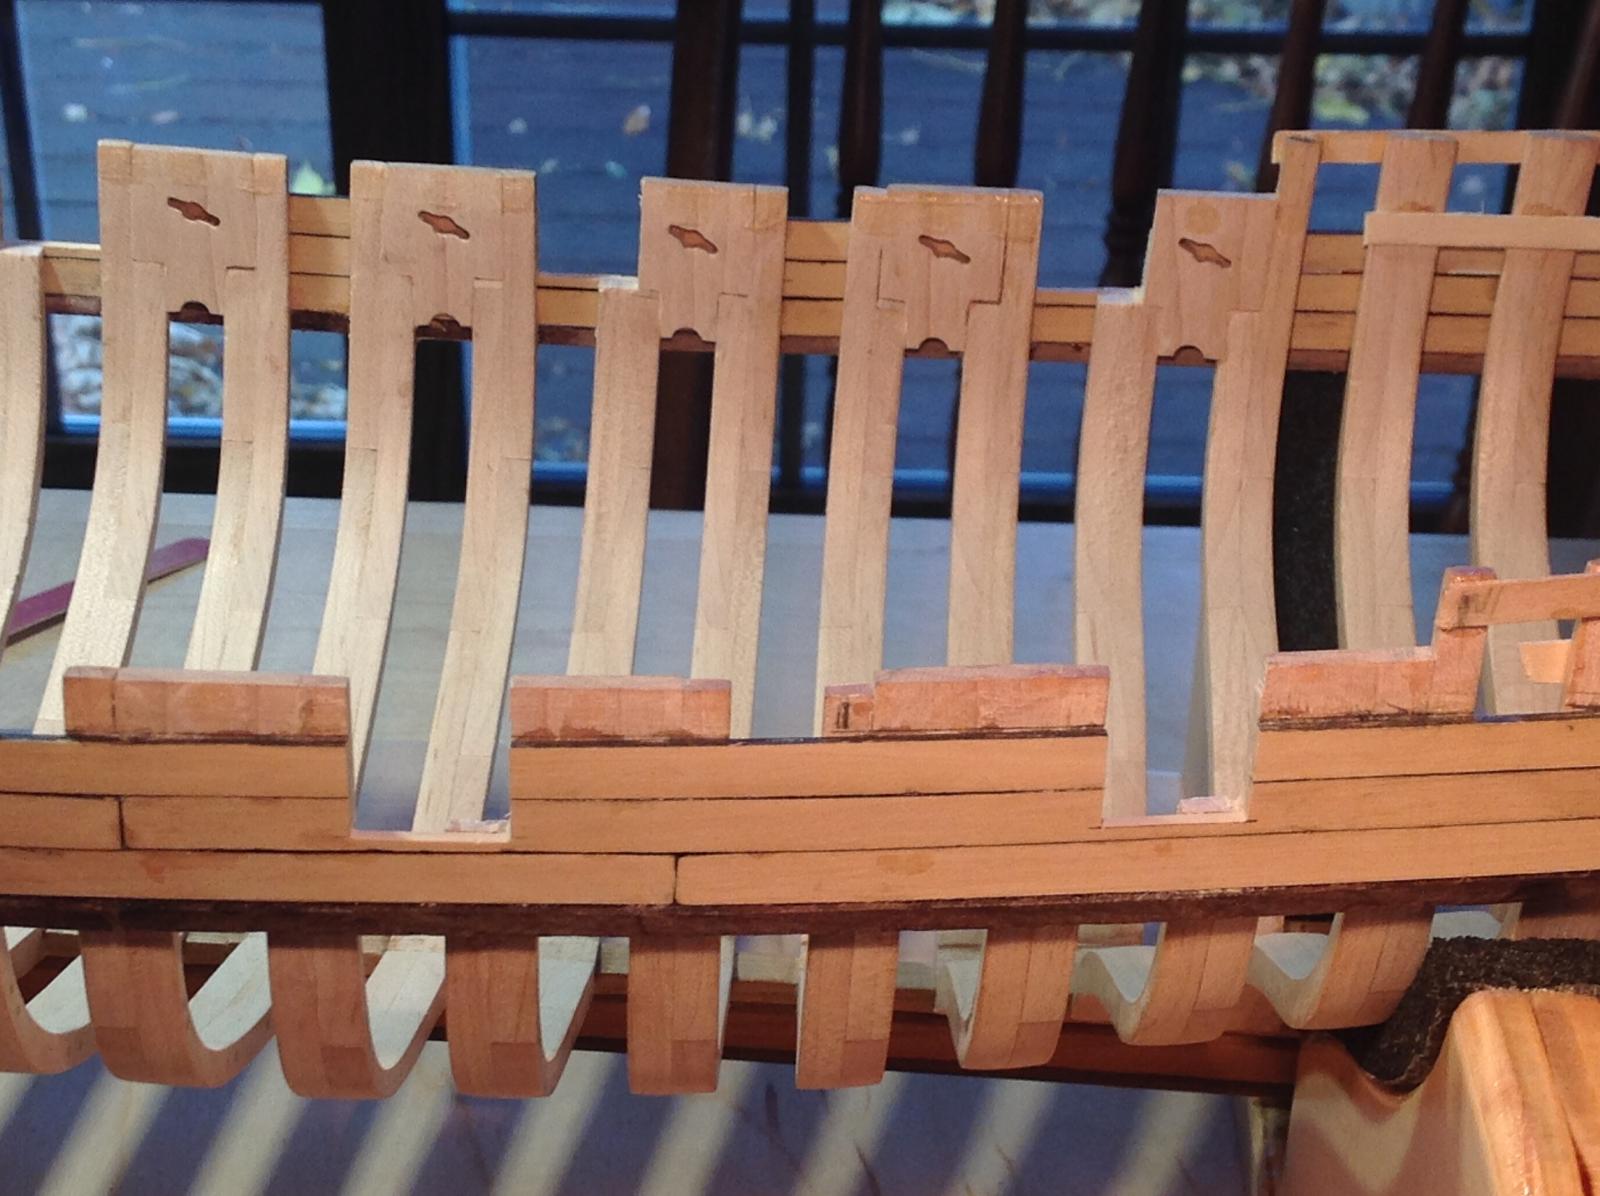
I bent the wood using a steam iron. it worked pretty well, but took awhile. After gluing the strakes in place, I cut the upper edge of the gun ports into the purpleheart. Here's a photo.

- Cap'n Rat Fink, gjdale, jbshan and 6 others
-
9
-
-
-
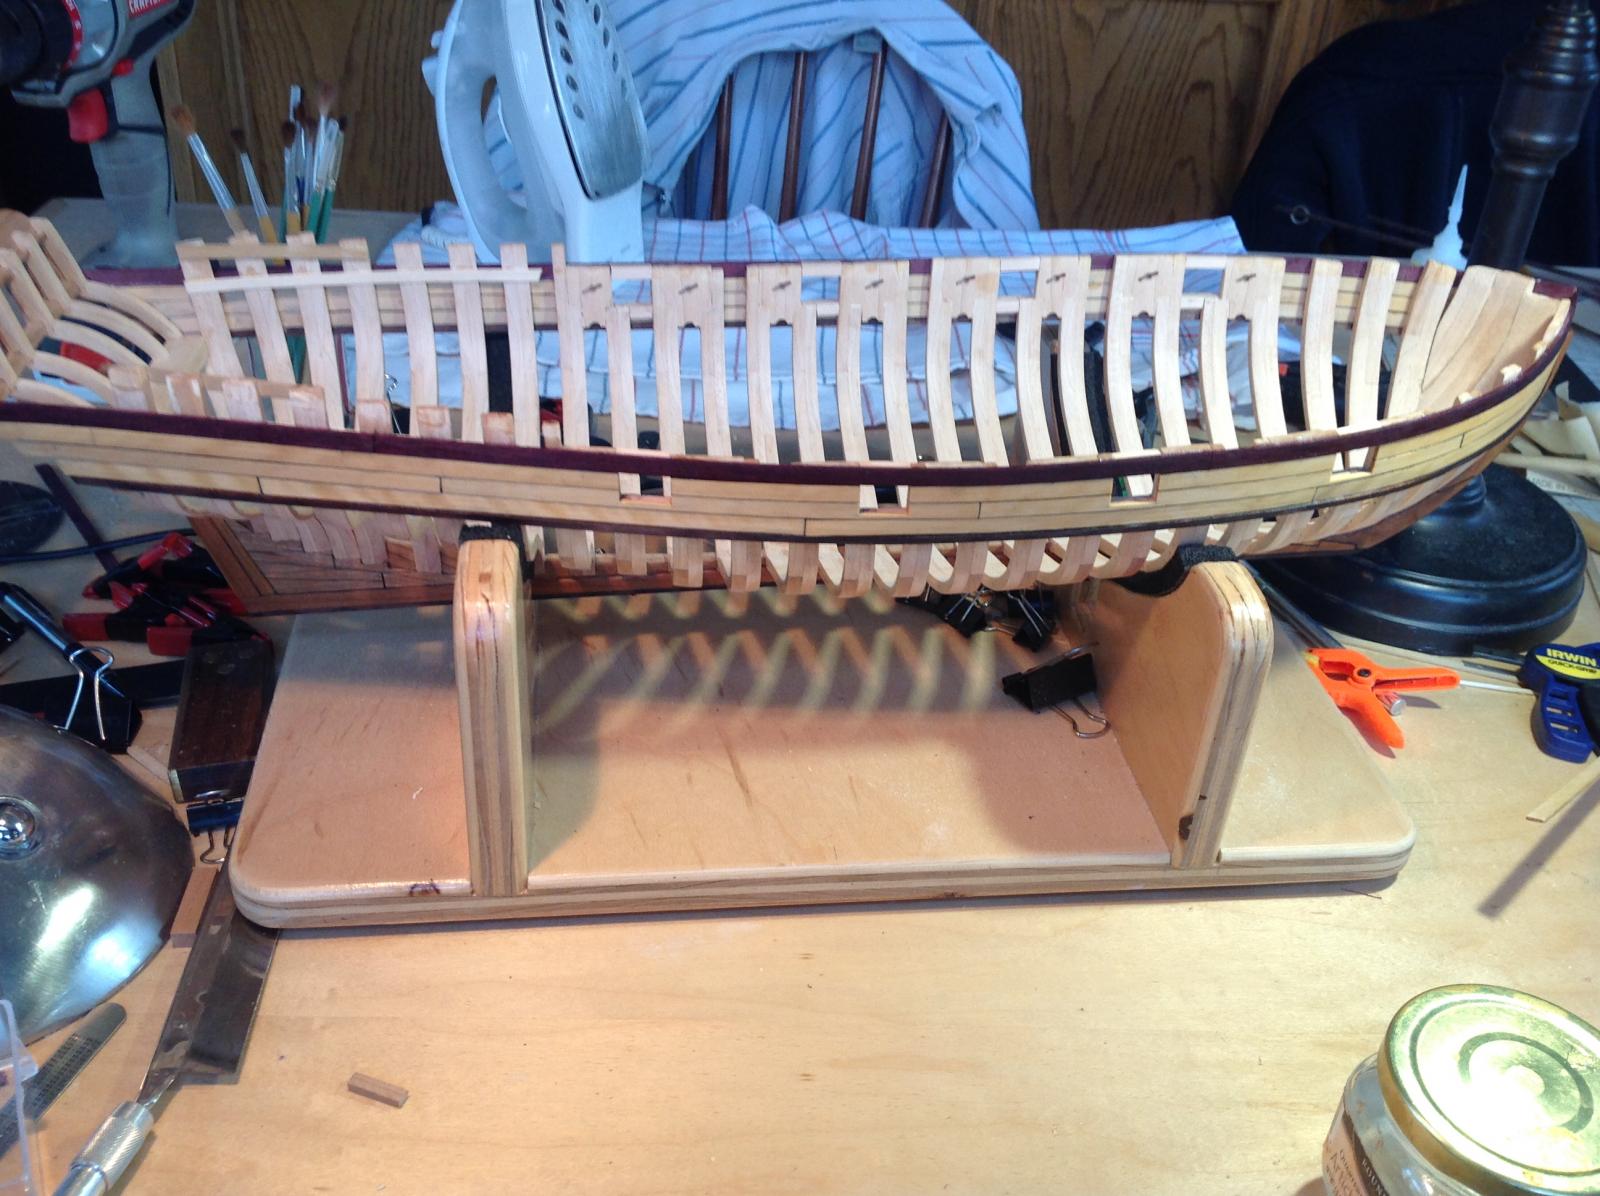
I've added the shear strake and completed framing the gun ports. After the glue is cured I will cut away the shear strake to the top of the port frame to define the upper edge of the gun port. On the old MS model of the Armed Virginia Sloop, many builders painted the shear strake to add a little decoration. I decided to make mine out of purpleheart and not paint it.


- Cap'n Rat Fink, GuntherMT, mtaylor and 8 others
-
11
-
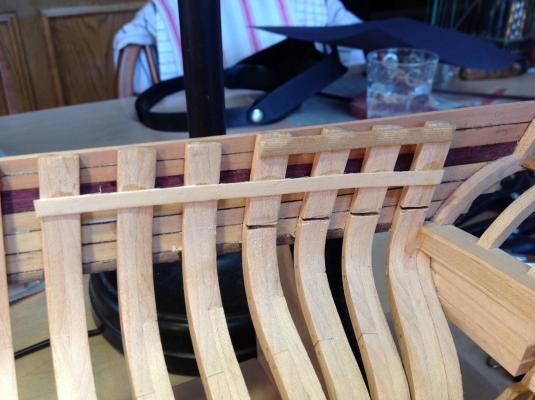
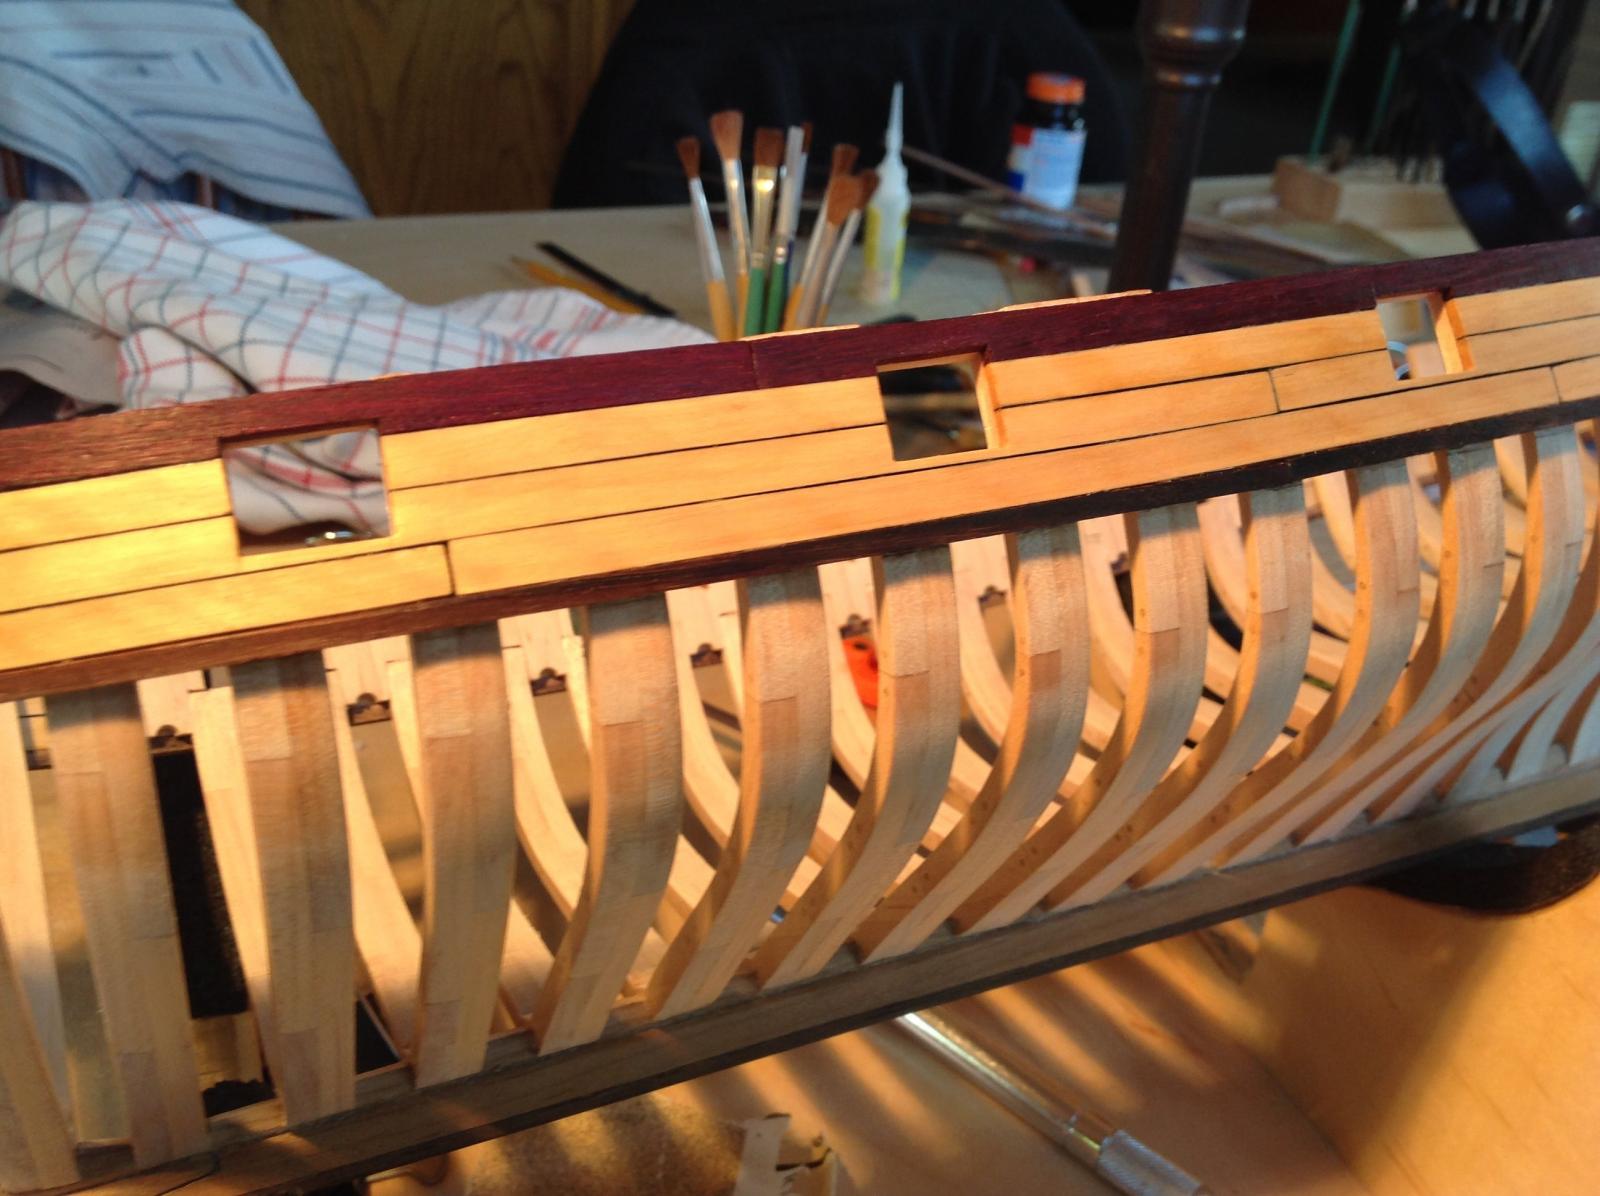
I added the black strake and three boxwood strakes above it. The practicum calls for adding a 4th strake and then framing in the gun ports. The ports are then opened up by drilling holes at the corners, and connecting the holes with an X-Acto knife. The better way is to cut the ports BEFORE adding the 4th strake! I used a razor saw and cut down using the hull frames as a guide. The bottom of the port is formed by using a #10 X-Acto to define the line and then sawing through the half frame that needs to be removed with a #13 blade. A file cleans up the edges. As you can see they are crisp and straight. Once the last strake is added to the top off the port, the top edge is defined again with an X-Acto. Please excuse the planking. It hasn't been sanded so the grit, glue stains and unevenness show up well. It WILL look better when done!

-
-
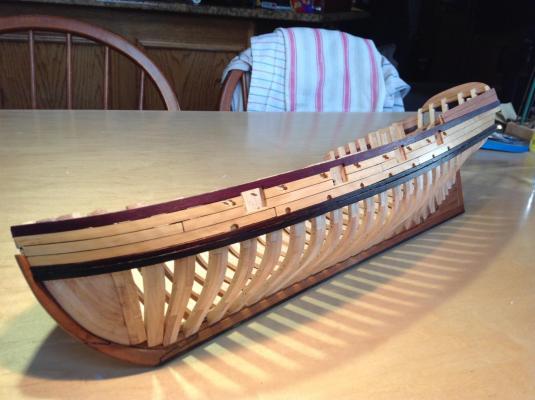
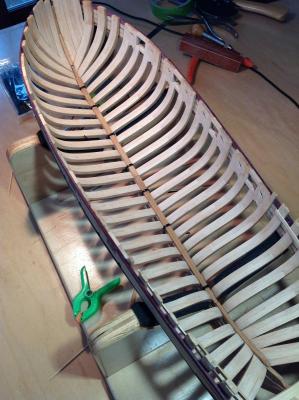
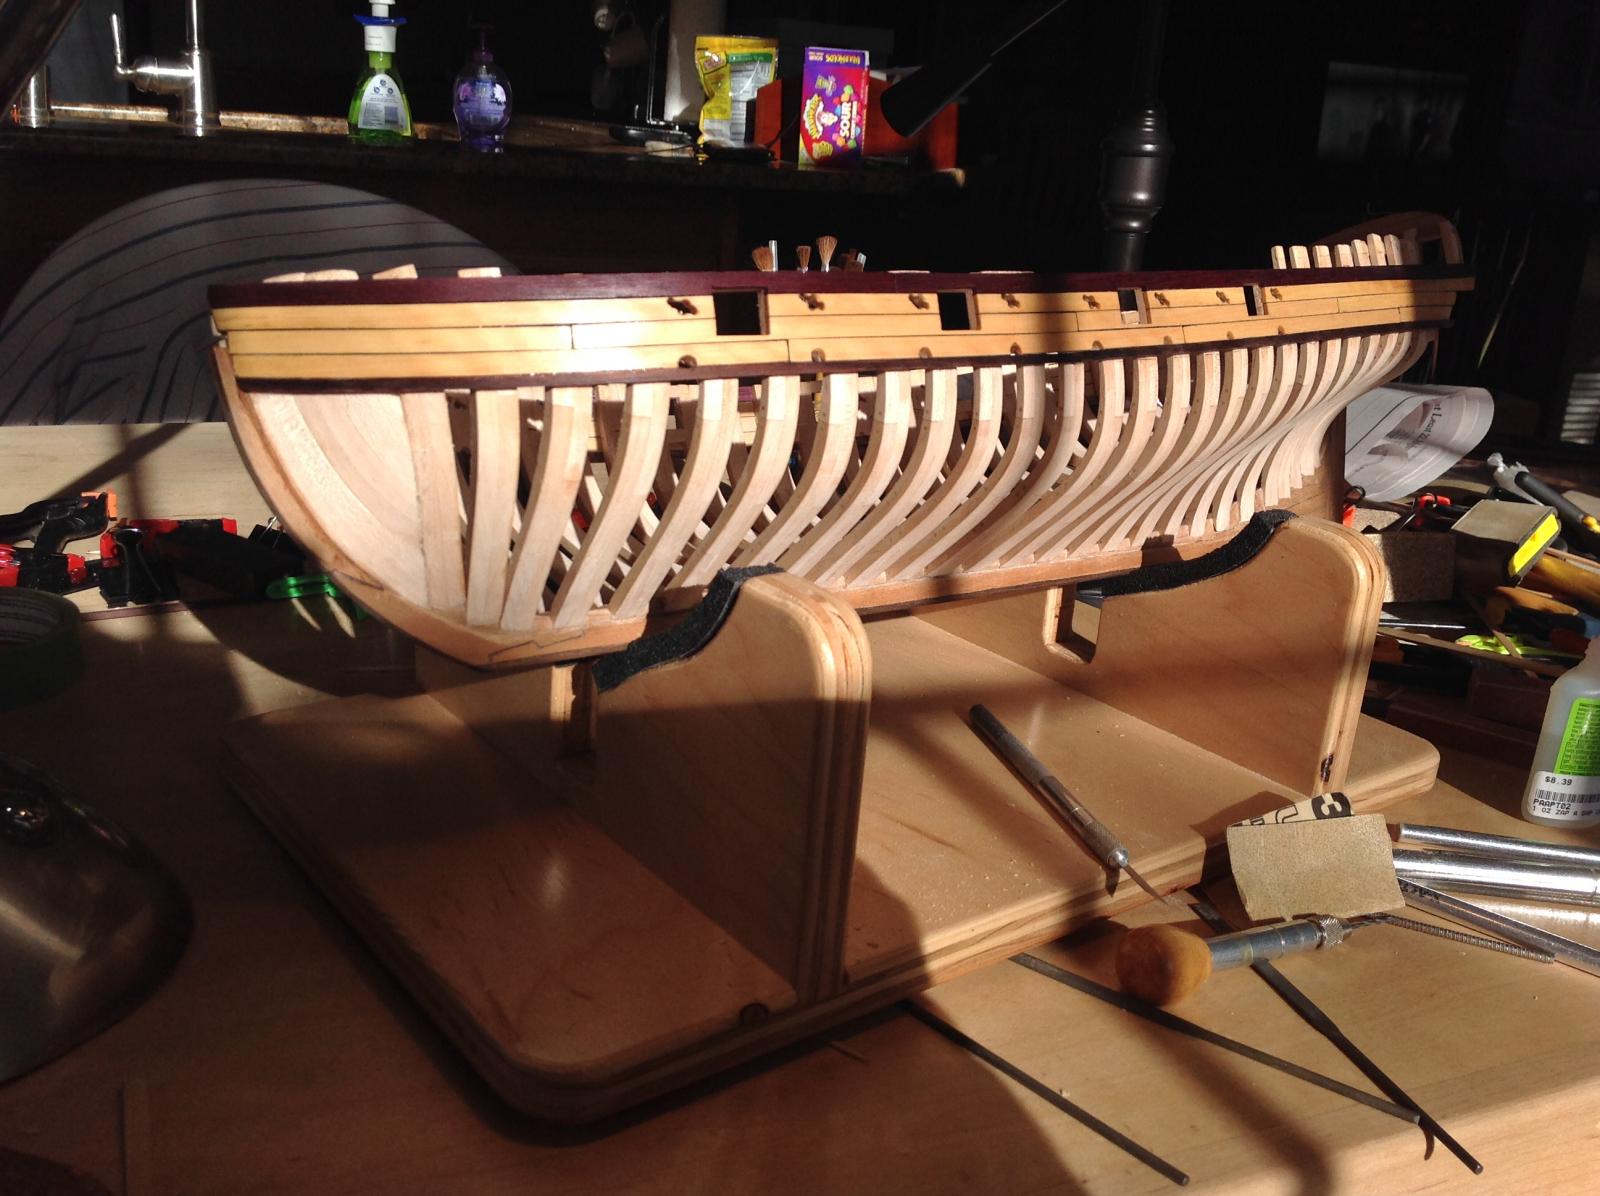
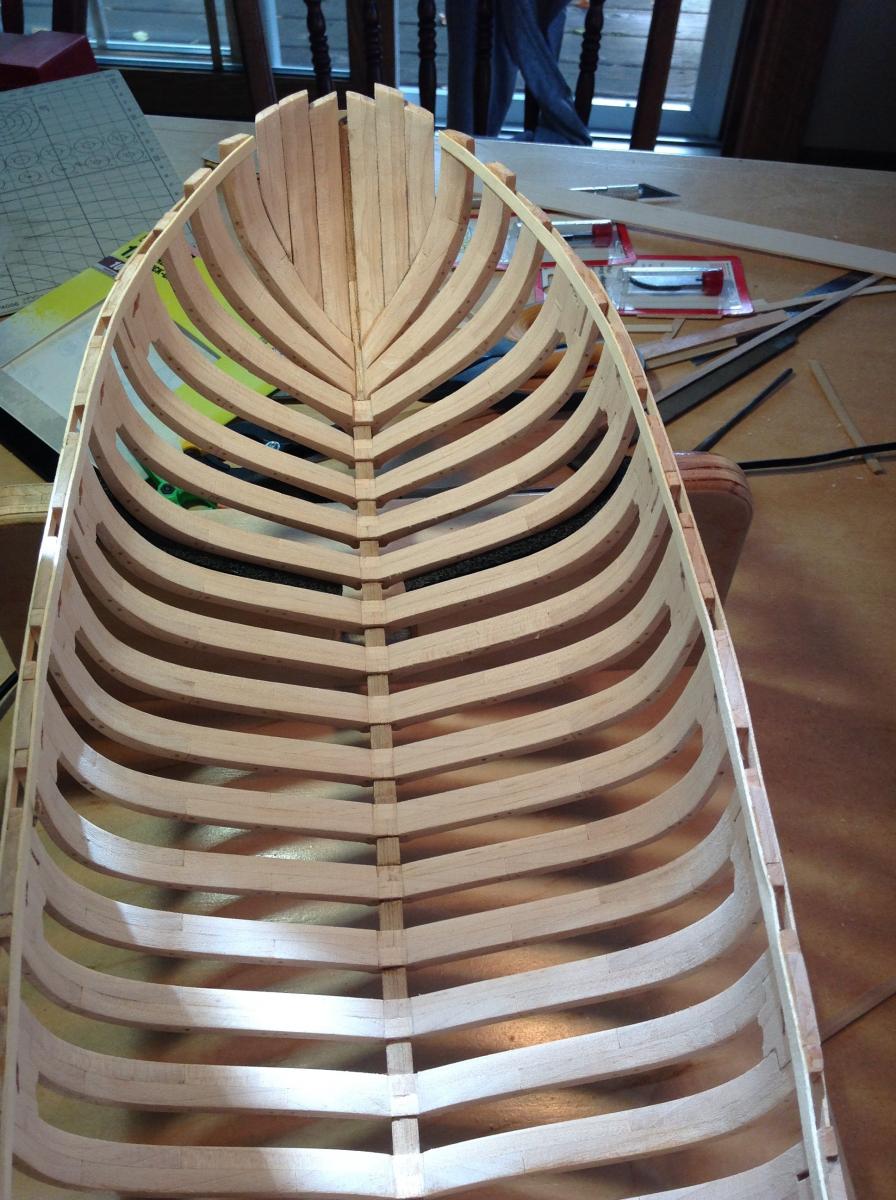
I've been trimming the little tabs that were used to stabilize the frames when they were glued to the rising wood and deadwood. There are three left to do! You can see from the photo how each frame flows smoothly into the rabbet. My next task is the final hull sanding and attaching the counter and transom.

- Cap'n Rat Fink, mtaylor, dgbot and 4 others
-
7
-
I decided to build the stern assembly off the model as Mike S. did. This consists of the transom proper, the wing transom, the counter and transom framing and the transom beams. I built a jig to hold the parts securely while the glue dried. The jig is just scrap plywood joined at a 104 degree angle (14 degrees from the vertical). Fortunately I have a miter saw and it took just a few minutes to build. While the glue was drying, I started removing the tabs from the foot of each frame, so the frame flows smoothly into the rabbet along it's length. The hard maple is hard on blades too!. I'm about half done and I've gone through four X-Acto blades already. Once the tabs are removed and the hull gets it's final fairing, I'll glue the stern assembly in place.

-
Very nice job so far. Your planking and treenails turned out great. You used holly to plank the hull and redheart for the inner bulwarks. What did you use to plank the outer bulwarks, counter and transom? Are you going to use the cast metal stern carvings supplied in the kit, or carve your own?
Dave
-
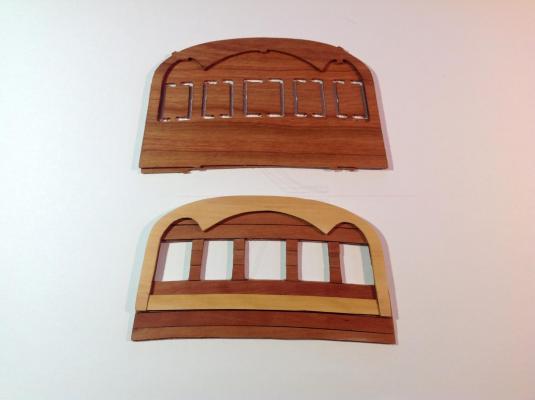
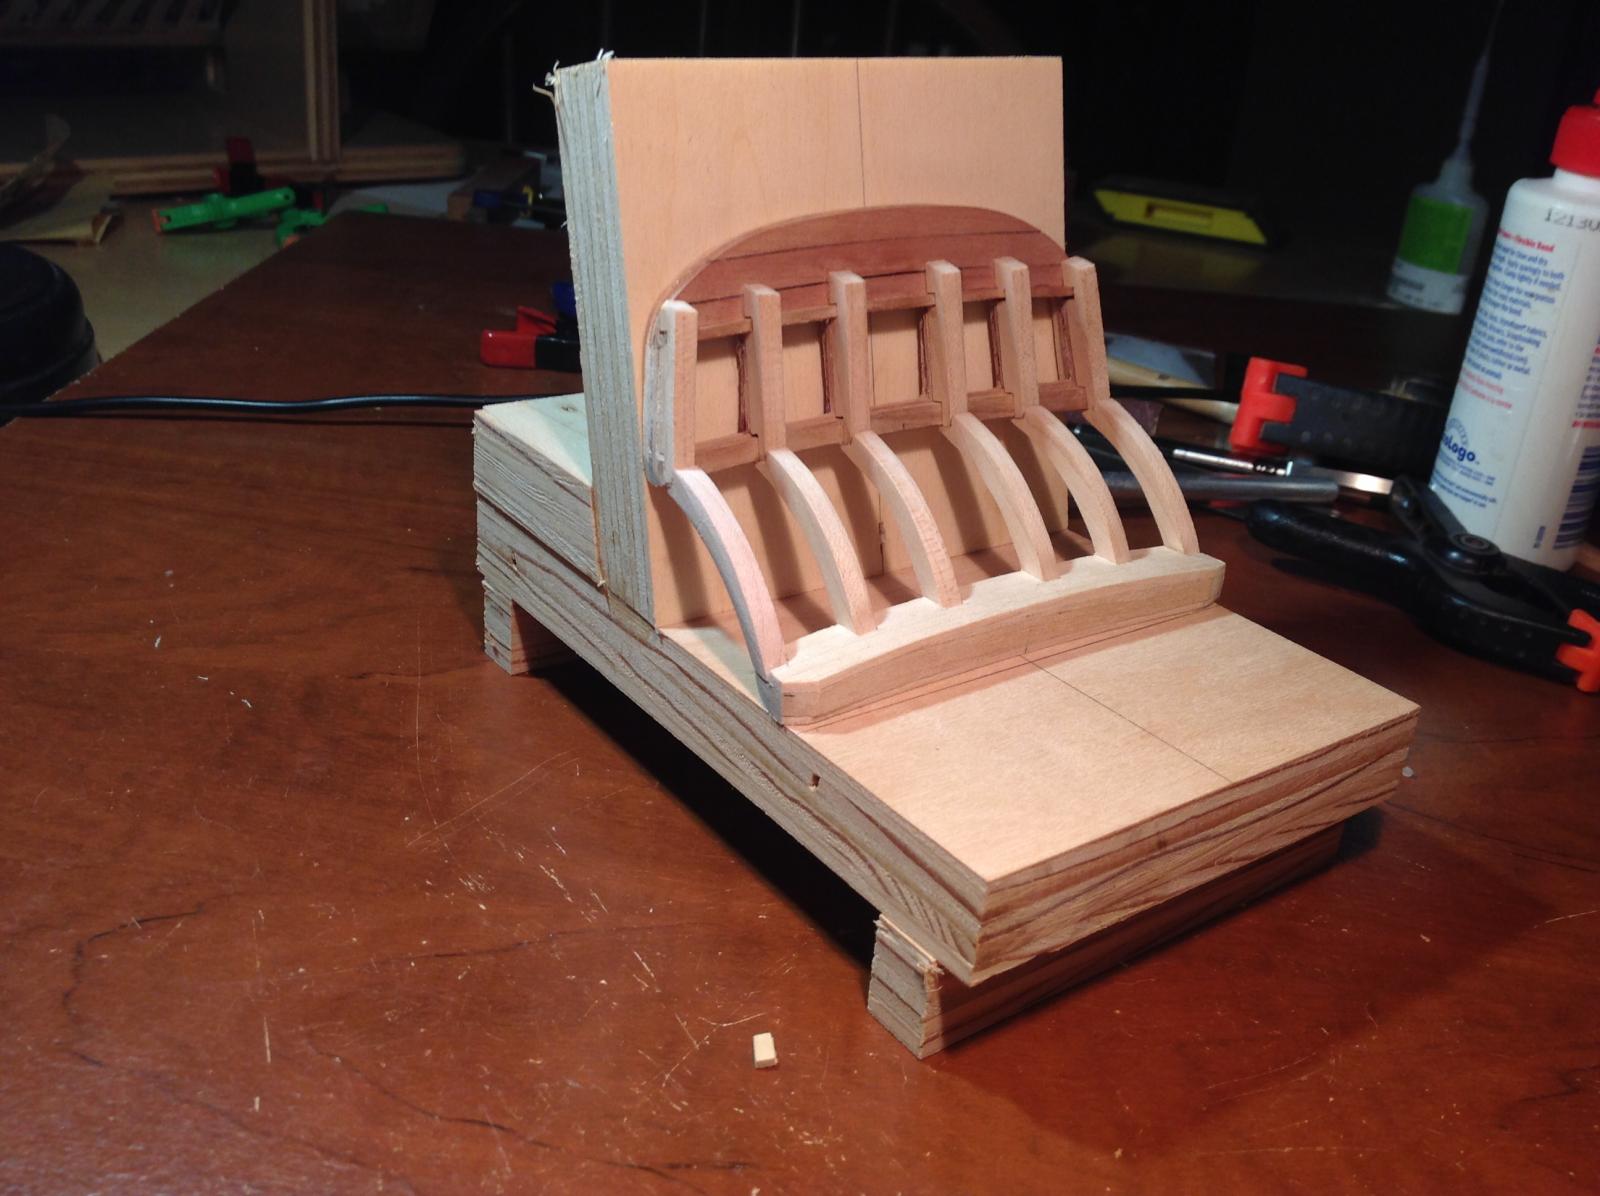
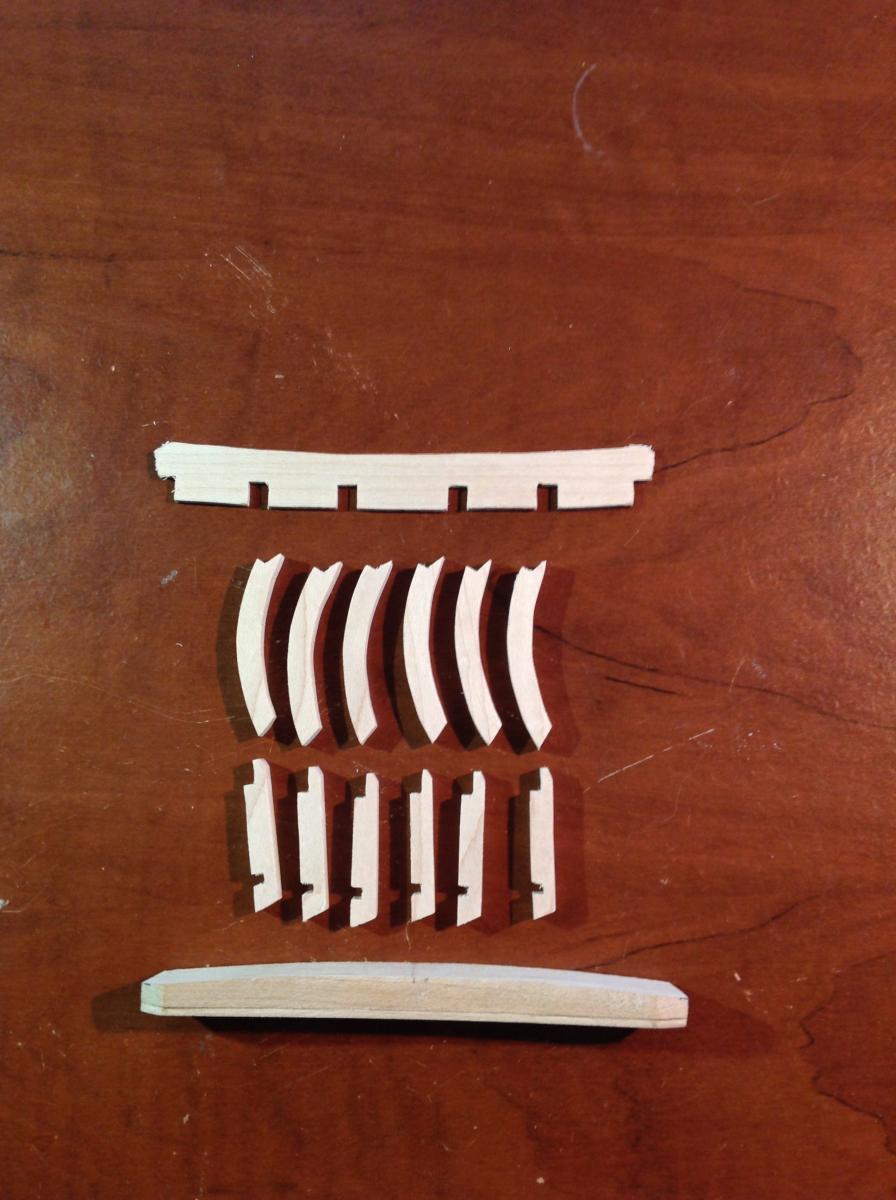
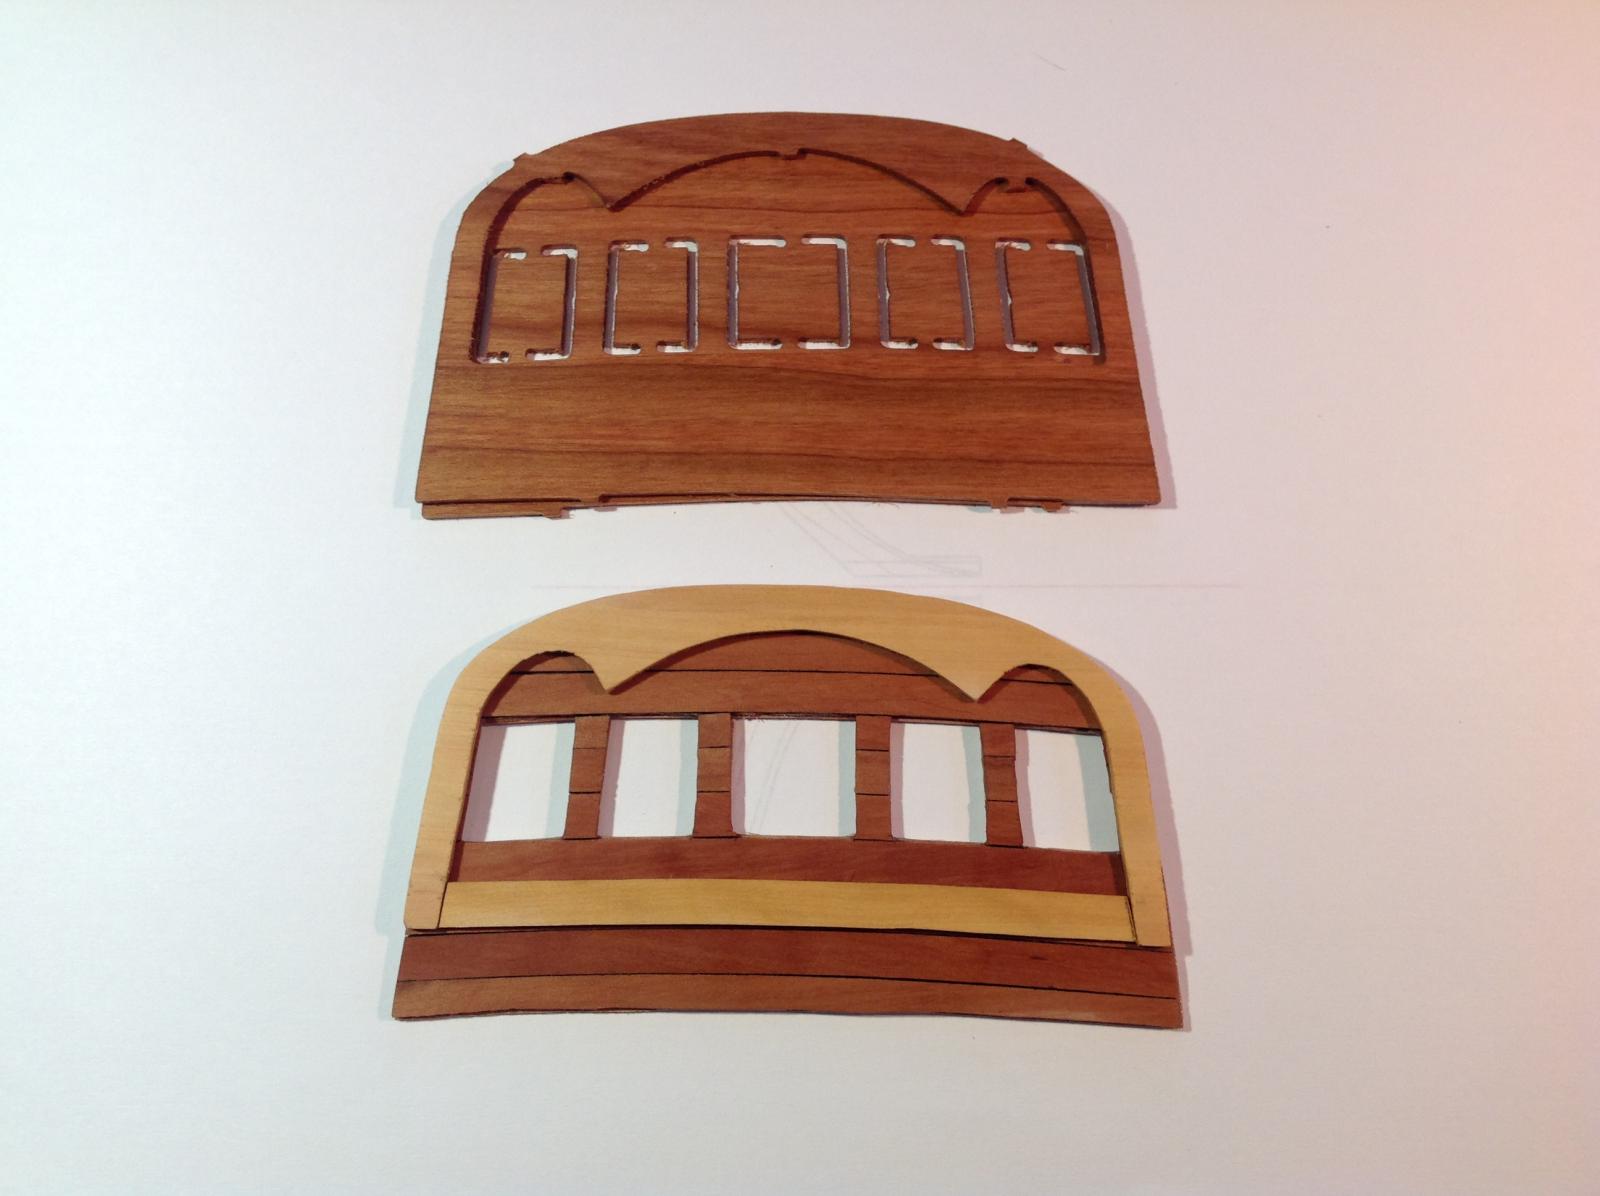
The transom framing and counter framing will be visible through the great cabin roof (poop deck) which will be partially planked. The kit provided the hull planking in hard maple, but counter and transom planking is in cherry. I just finished cutting out the components for this framing, including the wing transom, out of hard maple to match the general framing. To add some contrast, I redid the transom itself. The kit provides two pieces to form the transom. There is the transom proper (TR1) and an "overlay" trim piece (TR2). Both are made of cherry. I took the outline of the transom piece and traced it on some 1/64" plywood and planked both inside and out with swiss pear. I then remade the overlay piece out of boxwood to match the outer bulwark planking. Once the transom is fit in place, the bottom will be trimmed off and the overlay fitted with a plank as shown in the photo. The second transom in the photo is the two kit parts. I like the color contrast between the boxwood and swiss pear.

- jdbradford, GuntherMT, Canute and 3 others
-
6
-
The hawse frames were completed and glued in place. Overall I'm happy with the fit. The first hawse frame is short, but that should be no problem because the kit was design with the hawse timbers and the first two cant frames long, so they can be custom cut for the model. Frame Q is also glued in place. That's where the wing transom sits. Next is fairing the hull.


- GuntherMT, jdbradford, Ryland Craze and 3 others
-
6


Armed Virginia Sloop Patrick Henry by DocBlake - FINISHED - Lauck Street Shipyard - Scale = 1/32 - POF Admiralty Style
in - Kit build logs for subjects built from 1751 - 1800
Posted
Thanks, Brian. The black strake/wale just "ends" on this model, unlike the MS AVS kit which has the wale continue up as the fashion piece and then the taff rail. It needed an upgrade!