


Glen McGuire
-
Posts
1,311 -
Joined
-
Last visited
Content Type
Profiles
Forums
Gallery
Events
Posts posted by Glen McGuire
-
-
After plenty of dry time, the bottle feels securely in place. I think the process above worked well.
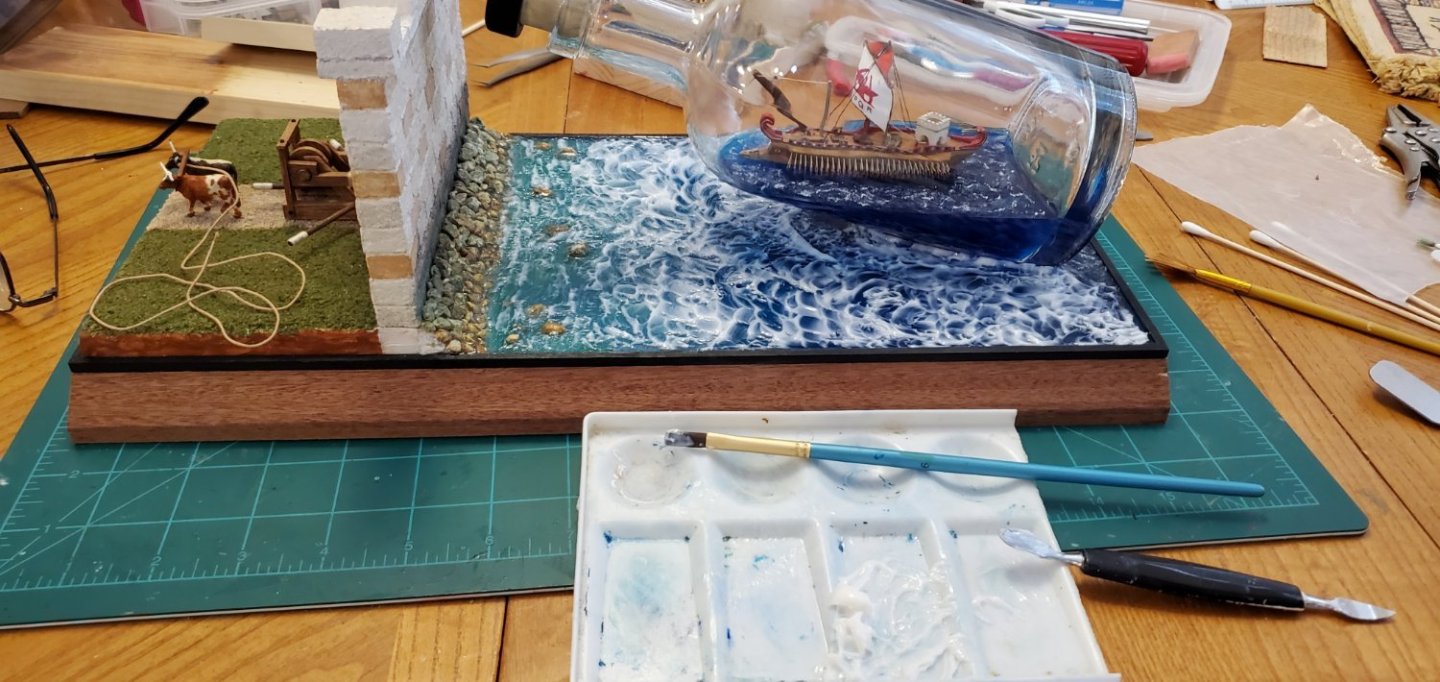
Now it's time to try and bring some life to the water. All the pictures I see of the real Syracuse sea wall show pretty calm waters around the jutting peninsula where the wall stands. That means I don't want to go overboard with wild churning seas like I did for the Kraken. So the first step here is adding a layer of small waves and ripples. For that I use acrylic gel gloss medium. It goes on white, but the pictures below show how it begins to clear as it dries.
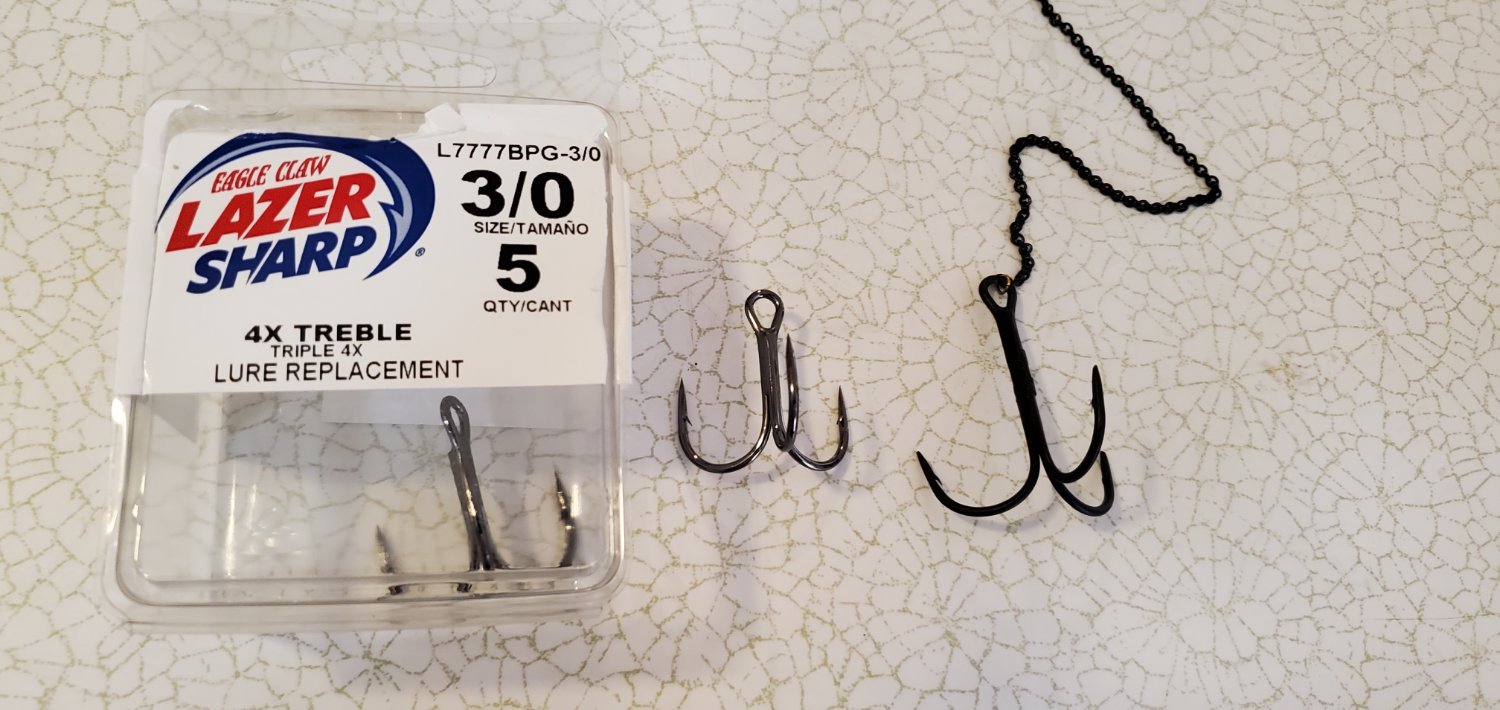
While the gloss gel was drying, I turned my attention to the claw's hook that will grasp the raised tip of the bottle. I wanted something that resembled a grappling hook. I know absolutely nothing about fishing and proudly own the title of the world's worst fisherman, but I figured there had to be some kind of fishing hook that would work. So I visited an unfamiliar aisle in the sporting goods store and found a package of large treble hooks that looked promising.
The first thing I did was file off the sharp tines a bit so I didn't do something stupid with the hook. Next, when I placed the hook against the bottle's opening, it fit nicely underneath, but wasn't tall enough for the tie loop to clear the top edge of the bottle's opening. So I took a couple of the other hooks, cut off pieces of the shank, and solder-spliced them together for a longer shank. It came out ok.

- John Fox III, GrandpaPhil, Thukydides and 7 others
-
 6
6
-
 4
4
-
3 hours ago, Javelin said:
We understand....😂
LOL!!! I knew I wasn't the only one!
On 9/10/2023 at 9:36 PM, BANYAN said:You do realise that you have set a very high bar for yourself now don't you
Bars, bottles, Bundaburg...they all go together, don't they?

-
3 hours ago, Javelin said:
After a lot of hesitation on the real order of installation
Always a challenge with scratch builds, especially on such a unique ship like this one. But you are doing a marvelous job.
- Keith Black, mtaylor and Canute
-
3
-
The shields look great. Nice work, Jason!
-
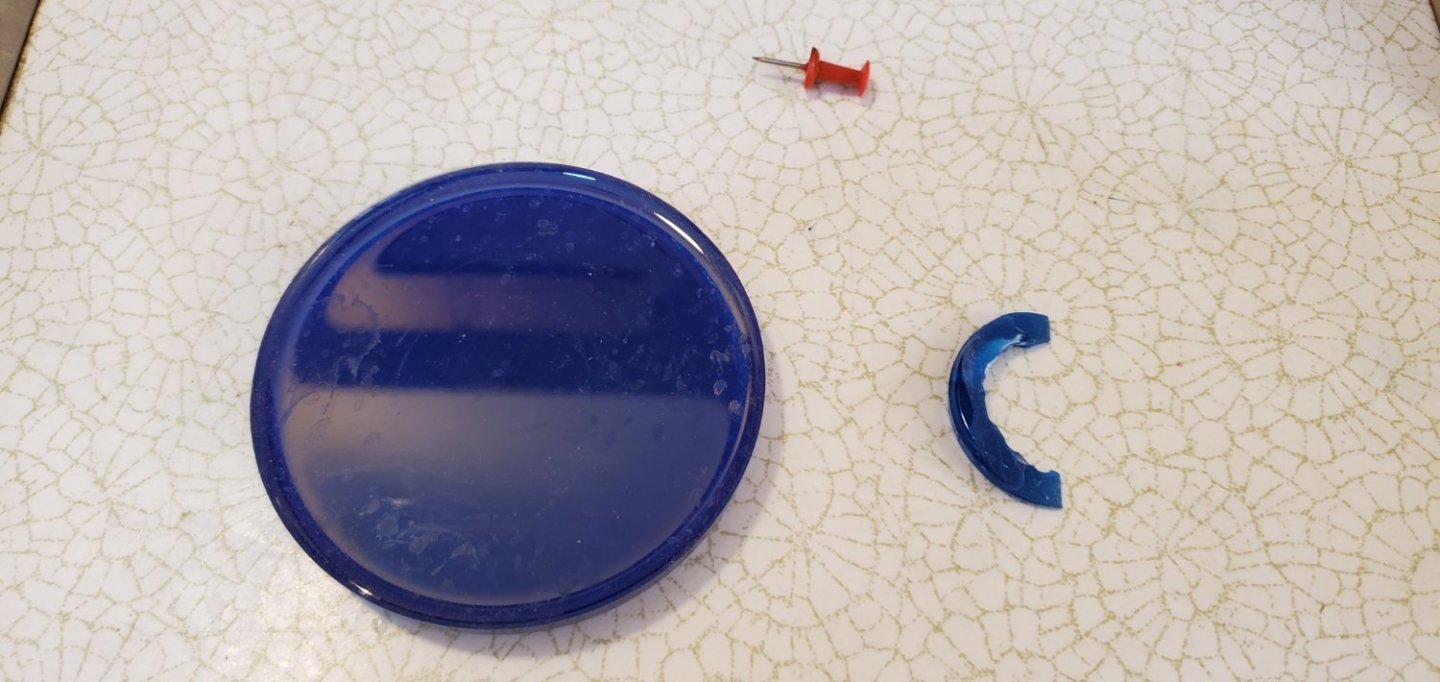
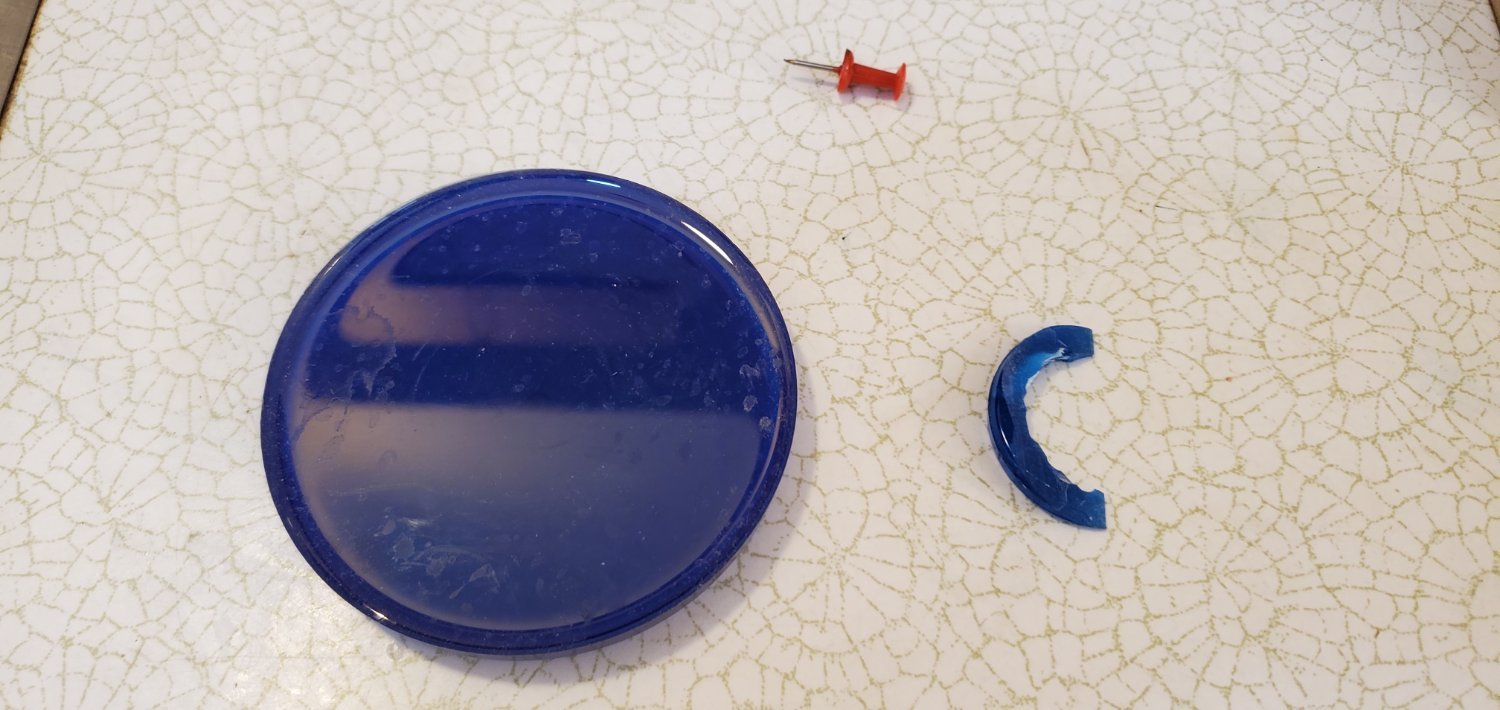
Quick update here and thanks to @Keith Black for his acrylic rod suggestion. Being too impatient to wait for a shipment, I took his idea and came up with something similar using stuff I had on hand. As modelers, we save everything, right? So for a reason I could not explain to anyone outside this forum, I keep the leftover epoxy resin discs that harden in the bottom of whatever cup I'm using to pour from. I've got several of these discs of varying sizes, and they are a nice shade of blue.
Using Keith's idea as inspiration, I took one of the smaller discs, cut in in half, glued the 2 halves together, carved out the middle, then sanded it into a wedge shape that would fit between the rising bottle and my layer of water.

I will surround it with some gel gloss medium to create the look of a small bow wave which will hide it quite nicely I believe.
I'm sure one of you engineers could figure this out with precise calculations, but I think I have the center of gravity now well to the right of the wedge, where it needs to be to keep the bottle secure at that angle. The wedge sits right about the midpoint of the bottle's body. Probably 3/4 of the epoxy inside the bottle is sitting to the right of the wedge. Plus, the bottle itself has a thick base which I think more than offsets the weight of the bottle's neck. If any of y'all think I've got this figured wrong, let me know!
- gjdale, Louie da fly, Knocklouder and 10 others
-
13
-
6 hours ago, Louie da fly said:
I find that isopropyl alcohol is my friend - it enables me to soften the glue of a single joint so I can slide the piece one way or another till it's all exactly right.
Hey Steven, can you explain what you are doing with the alcohol in more detail? Are you applying it to a joint that has already been glued? And what kind of glue does it work on?
-
8 minutes ago, Ian_Grant said:
Glen, I thought the "claw" would be supporting the neck of the bottle anyway?
Hey Ian, that was my original thought when I was first putting this idea together. But I think my claw assembly may be too fragile to support much weight. The claw's base and the cows are just glued to the surface and it would not take much to yank them out. So I decided not put any stress on them.
Also, as you will see when I get the final pieces in place, the hook is not real secure around the end of the bottle either.
- Knocklouder, mtaylor, GrandpaPhil and 3 others
-
6
-
17 hours ago, Knocklouder said:
Would the ship be moving pretty fast , ramming speed?
That's a good question that you and @Louie da fly
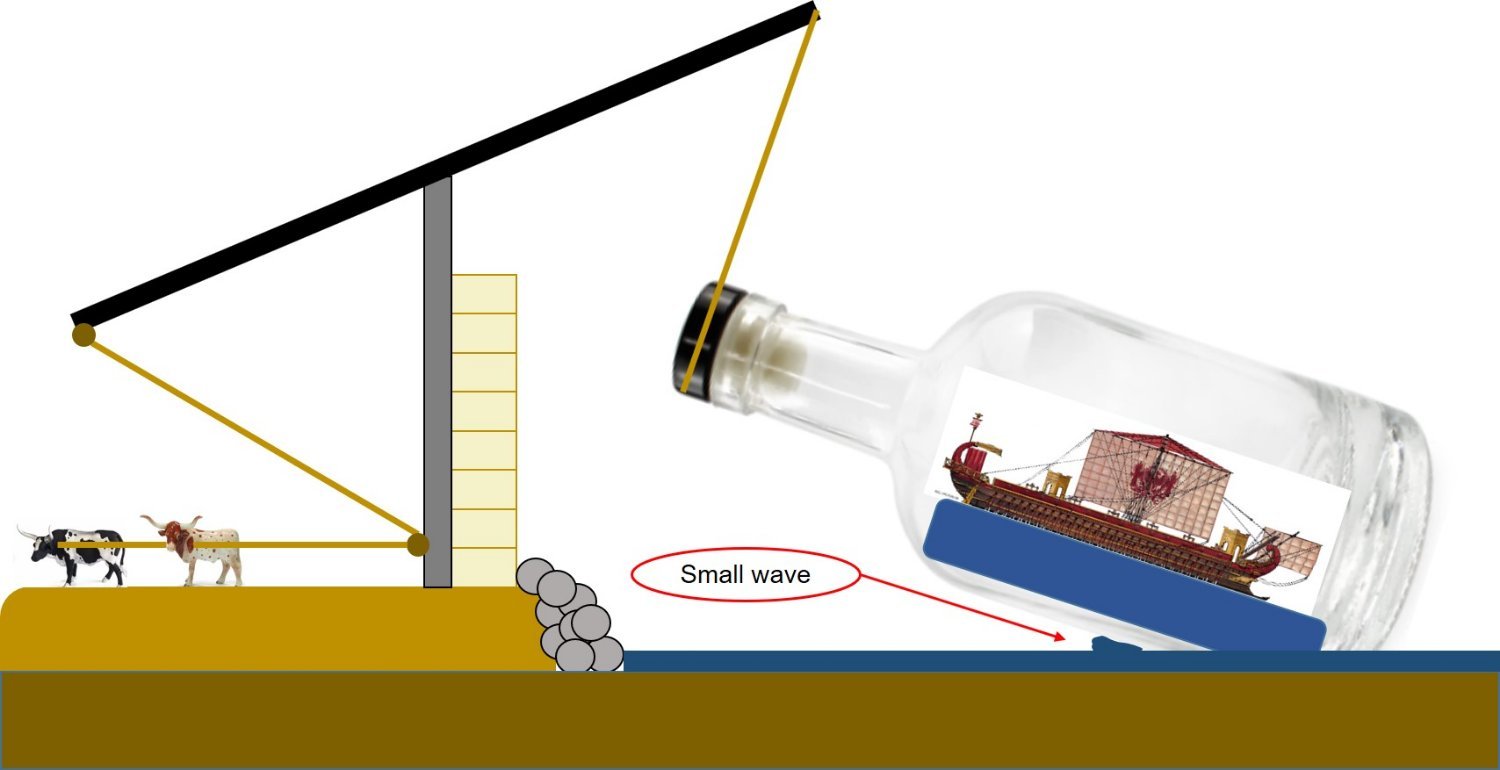
raise. It would likely be at ramming speed as the claw snags the end of the bottle, but the forward momentum would slow as it's pulled out of the water. So maybe I need to extend the arm of the claw further over the bottle and angle the chain and hook towards the wall so it looks like the bottle continued moving forward as it was hooked. Seems like that action would cause a small wave pushing forward. Sort of like in the diagram below. That would probably be enough to support the bottle securely.
 7 hours ago, Louie da fly said:
OTOH, how would a Roman ship attack the walls effectively? It'd surely have to get close enough for the crew to erect scaling ladders
Yes. And that is where my presentation and reality go their separate ways! The quinquereme, which is hiding safely from the claw inside the bottle, has a corvus for that purpose. But I am not equipping the bottle with anything like that.
I suspect a lot of people probably look at my work the same way they look at the giant head in your Byzantine picture and wonder, "What the heck was he thinking?"
6 hours ago, Keith Black said:Glen, a piece of small diameter clear acrylic rod might work?
I love that idea, Keith. I could probably hide that underneath pretty well. Thanks!
- mtaylor, Ian_Grant, GrandpaPhil and 4 others
-
7
-
On 9/5/2023 at 3:22 PM, Javelin said:
Love the way you finished the edges of the base
Thanks, Javelin. For the front edge of the base, I poached some planking strips from my Artesia Latina USS Constellation kit (it's been hiding in my closet for a couple of years now) and used them as veneer. The strips are razor thin but have a really pretty grain. I have not even varnished them yet.
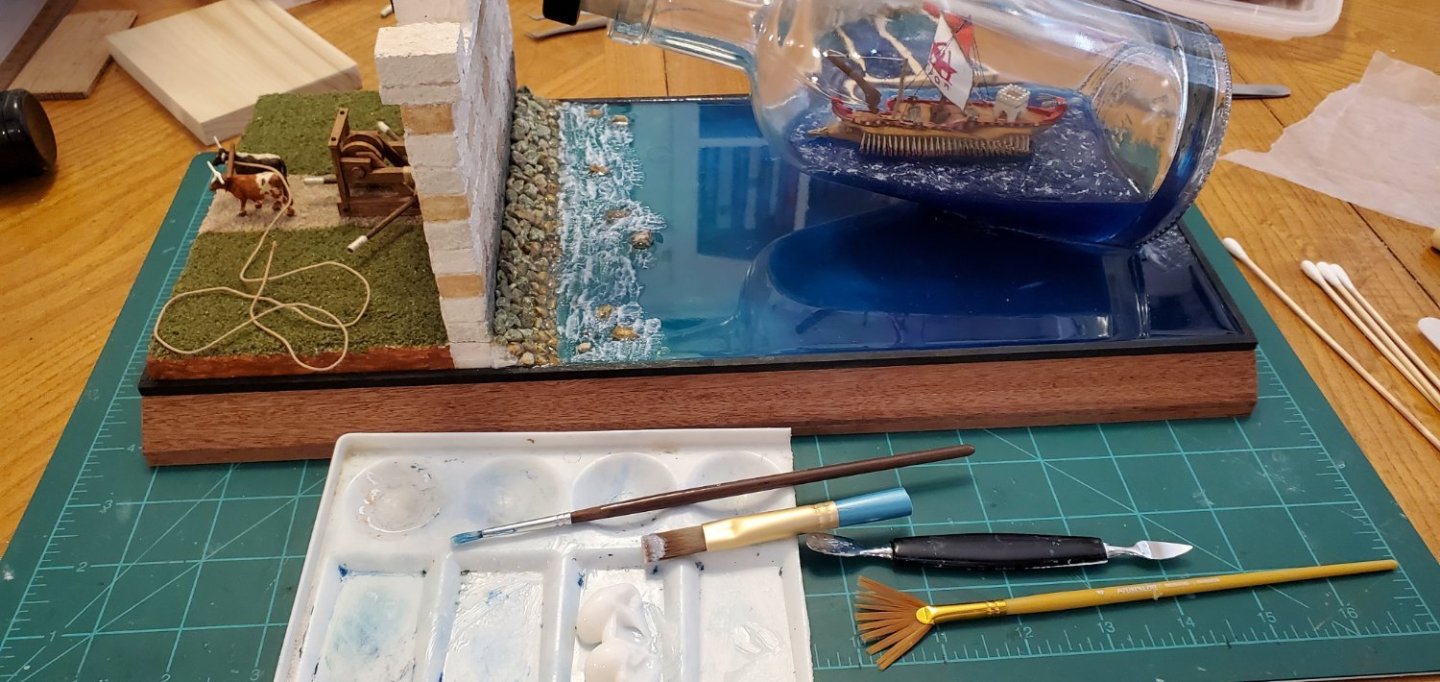
Next steps with the water side of the wall - I tried to take the advice of @Thukydides and @Knocklouder by adding some variation to the water's color shading as well as placing some assorted rocks in the water neat the shoreline. Here's what it looked like after I was done. It looks a little splotchy to me, but in reality, so do the colors in my reference picture. So I think I'm good with it.
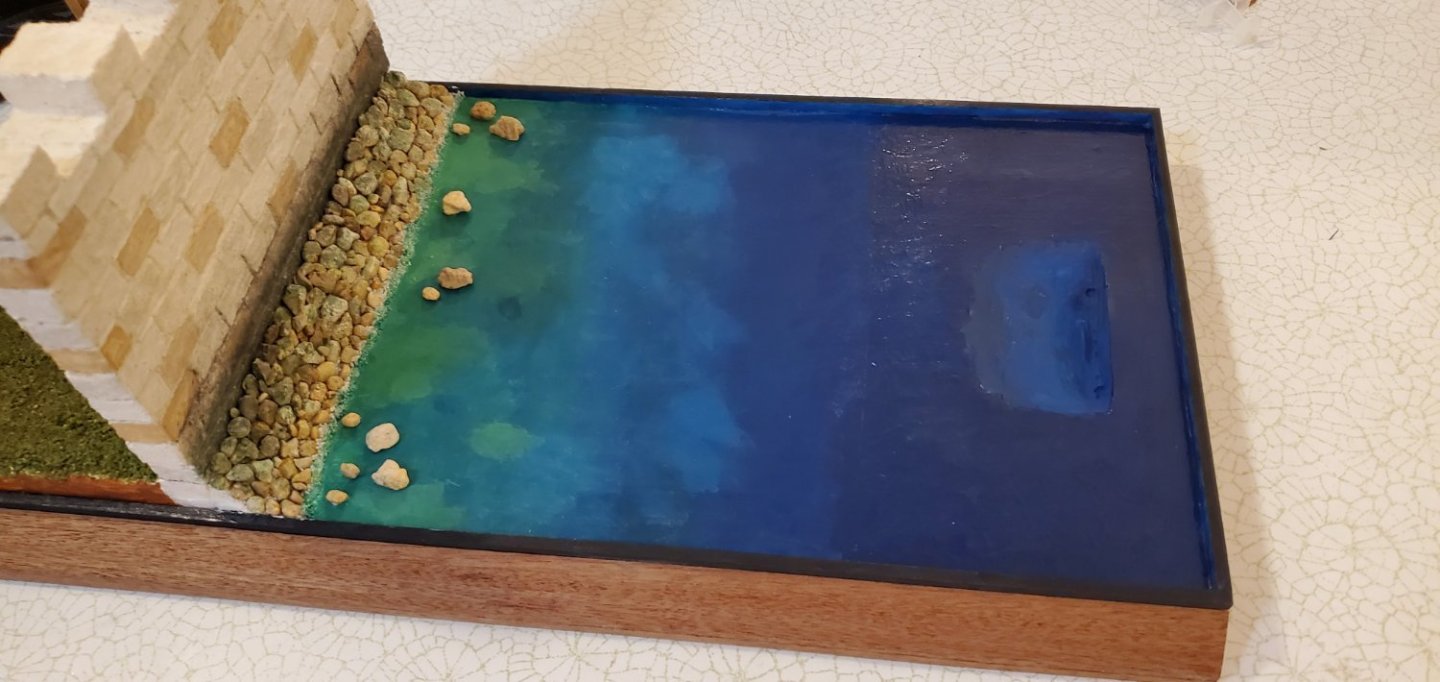
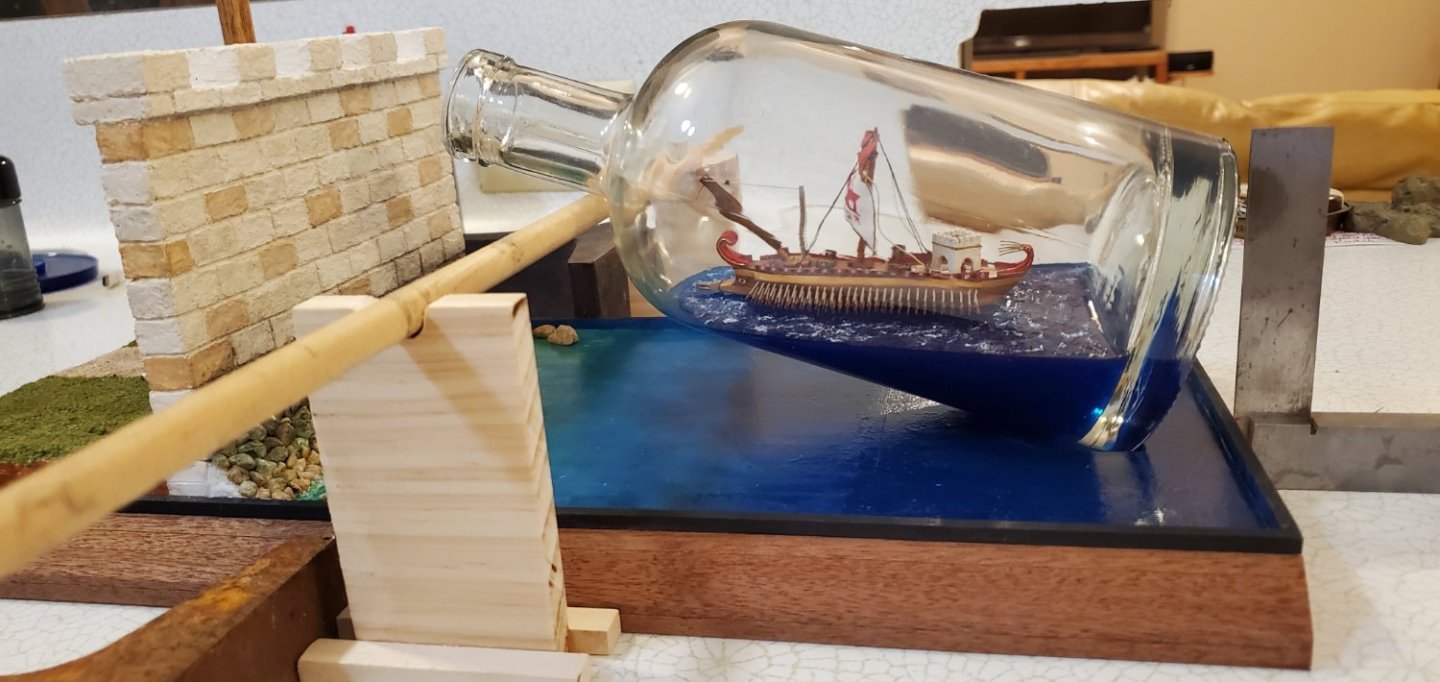
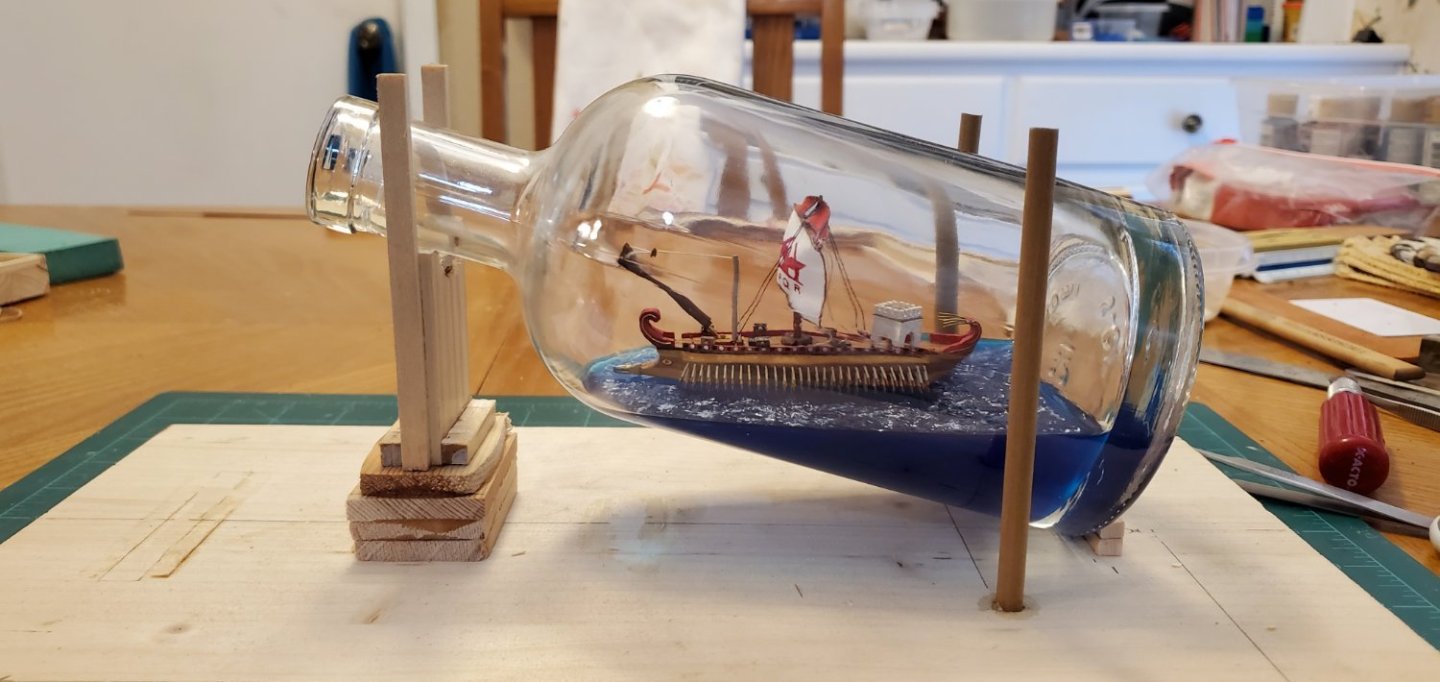
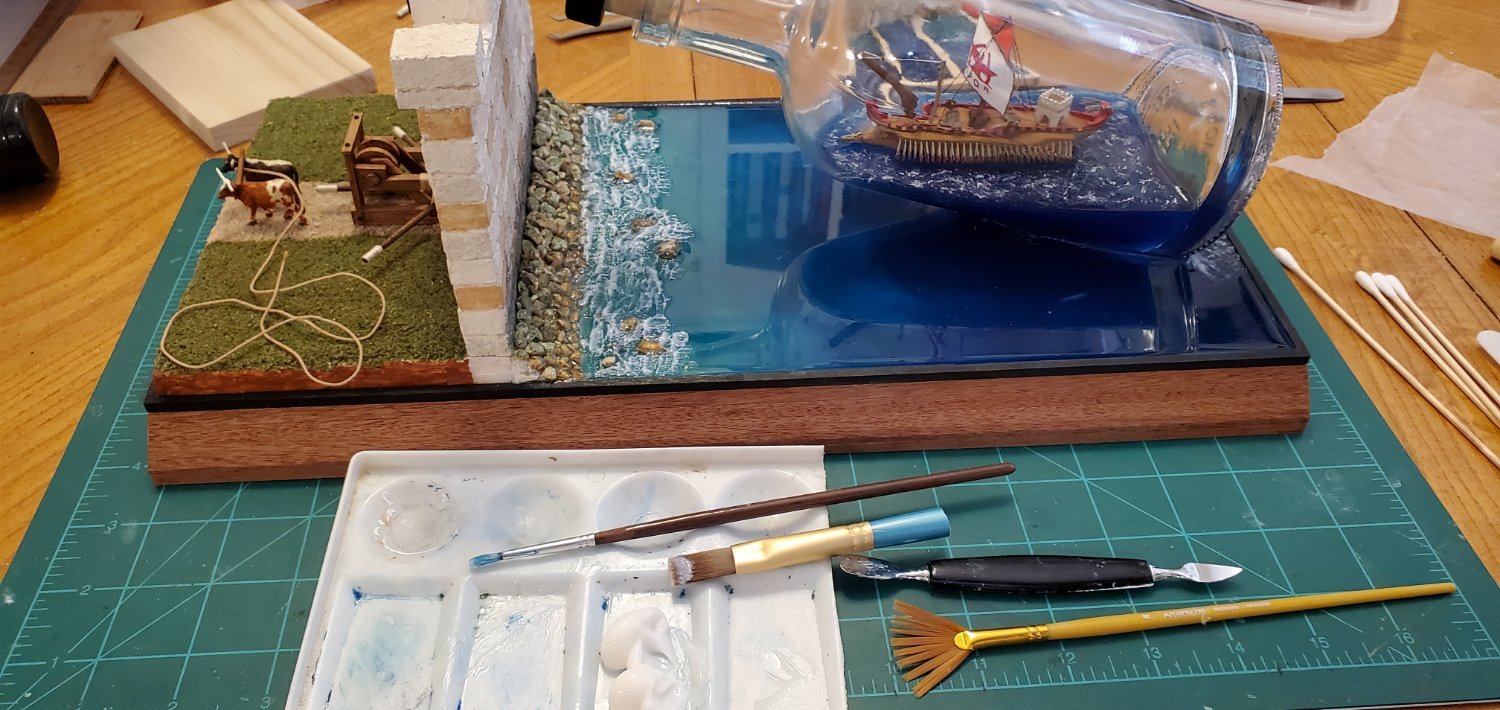
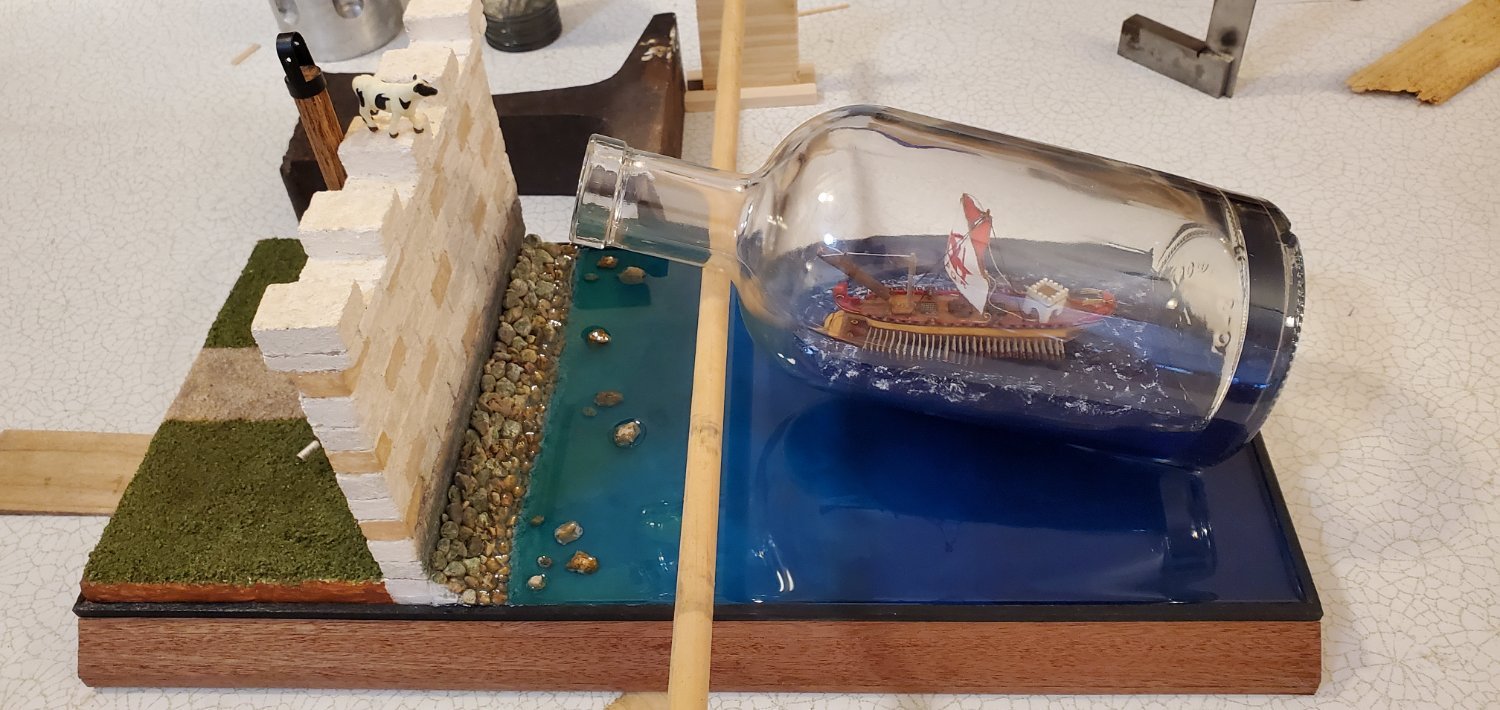
Next step was securing the bottle to the base. I had carved out a cradle on the base's right side that contoured to the end of the bottle. Then it was a matter of making a fixture that would hold the bottle at the proper angle. Once I worked that out, I epoxied the end of the bottle to all points of the cradle where it made contact.
And the last step in this session was pouring the epoxy resin onto the base. I added a single drop of blue dye to my 8 oz mixture of epoxy resin to give it just the slightest blue tint. I wanted the tint, but also transparency where the colors would show thru.

I'm pretty happy with how the epoxy resin turned out. I believe it provides a much more realistic look than just a surface of acrylic paint like I used for the Kraken project because you can see thru it. However, it's not perfectly clear and has a bit of opaqueness, so it seems to blur some of the paint lines and make for smoother color transitions.
Time to let it dry and then add some texture to the water's surface. I'm not sure at this point if the epoxy and epoxy resin are enough to hold the bottle securely at that angle. I'll nervously test that out when the resin dries. I will likely need to build up a small wave underneath the bottle to help with the support, which I would do while I'm adding texture to the water's surface.
-
On 9/4/2023 at 4:18 AM, Louie da fly said:
After the previous posts I can't believe nobody picked up on this and started making puns about yokes, jokes, yolks etc.
Hopefully this project doesn't end up being a big yoke after I get done with the water side of the wall!
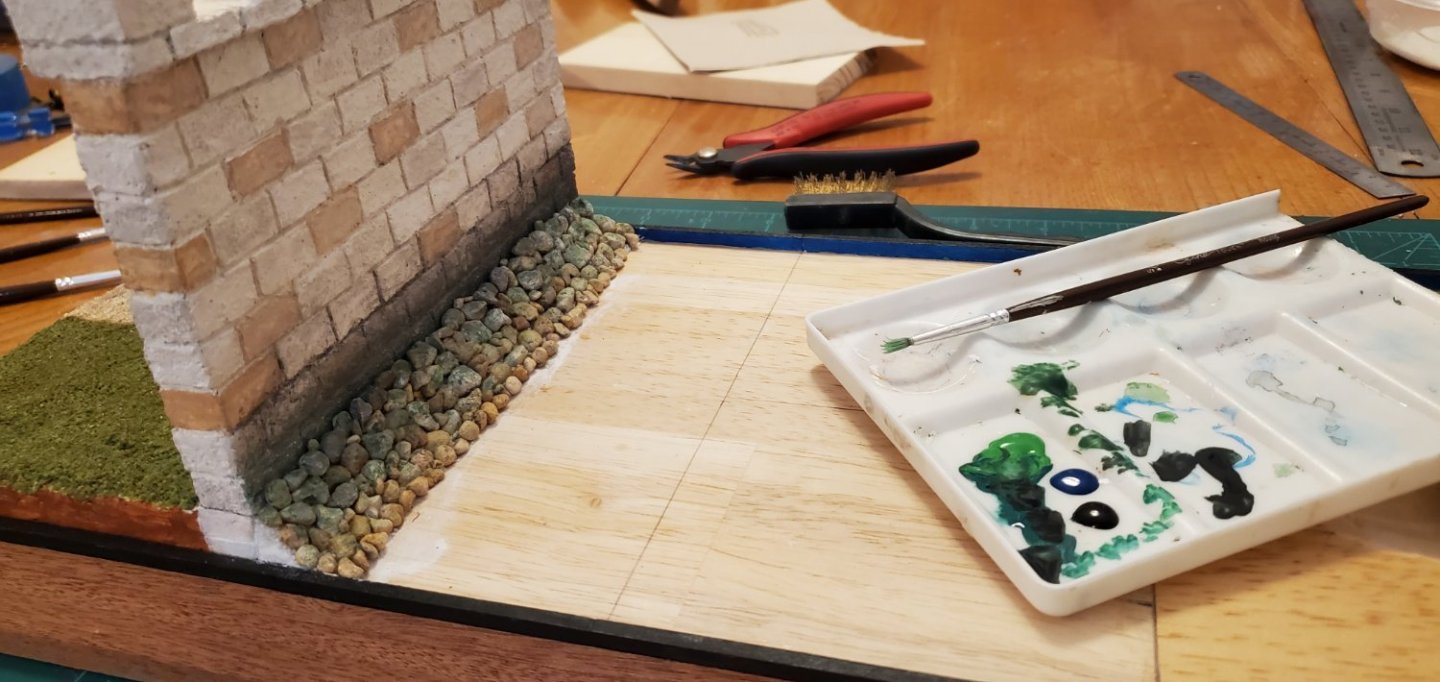
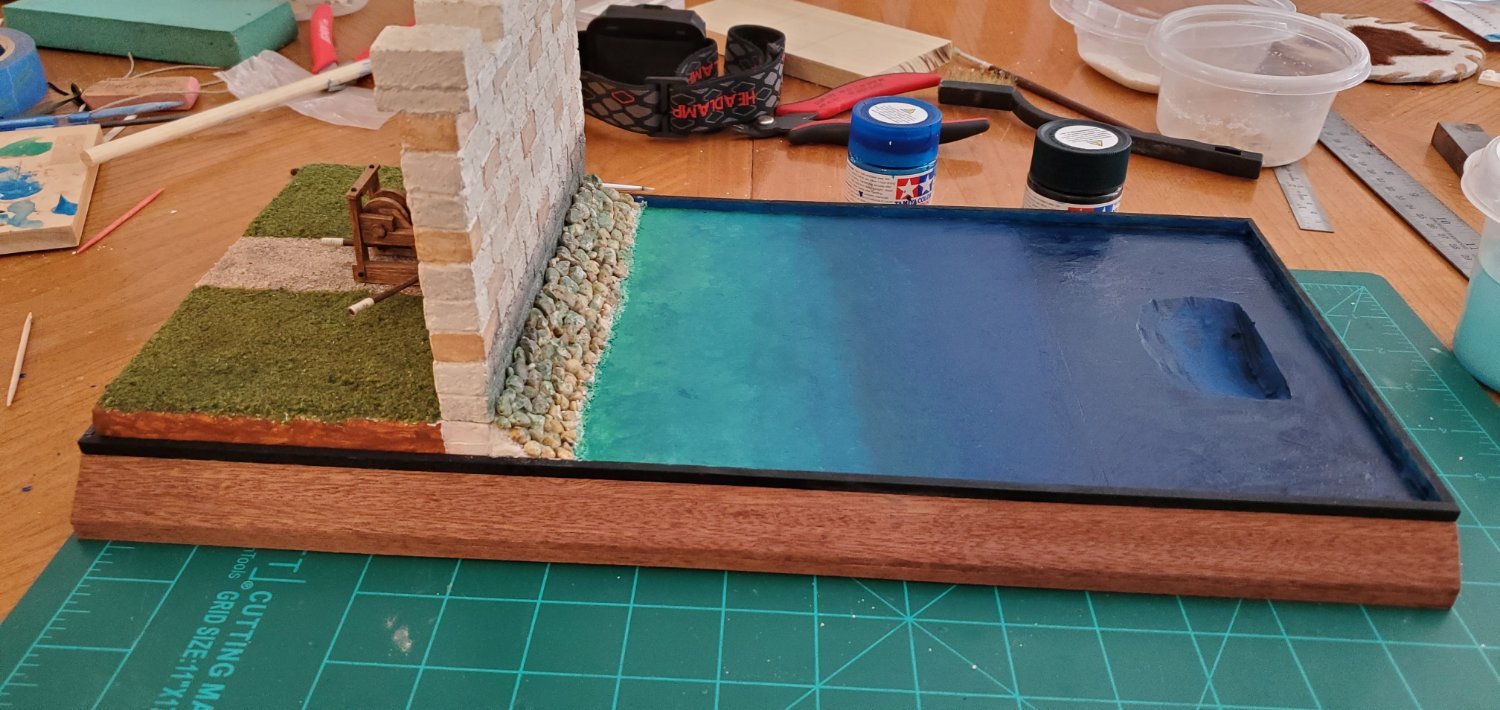
First things first - I took @Thukydides' recommendation and added some greenish scum color to the rocks at the base of the wall. I mixed a "festive green" with a "royal blue" and added just a touch of black for the basic color. Then I diluted it with water as I brushed it on so that some of the rock's natural colors would show thru. I went heavier at the top and thinned it out as I went to the base of the rocks to make a color gradient down to the where the edge of the water will be. My goal was to give the appearance of scum/dried algae on the rocks.
Now for the water. I'm nervously trying something different than my Kraken project where I basically put down crinkled aluminum foil and brushed acrylic paint on top. Now, I'm dealing with shoreline at the base of the wall instead of the open ocean, so I need a color gradient from shallow to deeper water. Plus, I think I have the opportunity to add some transparency and actual depth to the water.
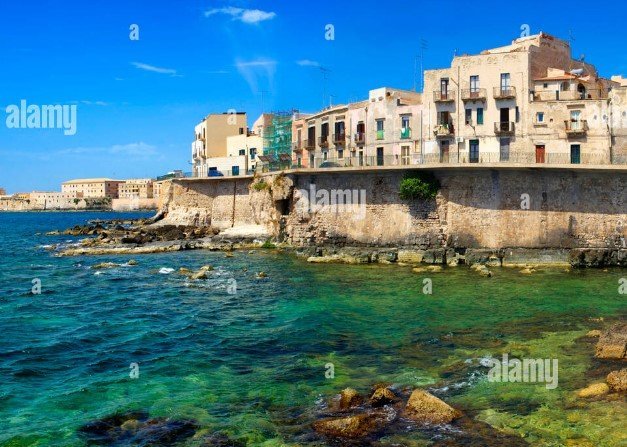
So here's the plan. I'm going to paint the base with the color gradient and then pour clear (or slightly tinted) epoxy resin on top. After the resin dries, I'll add some water texture much like I did with the water inside the bottle. The bad news is that my artistic talent with a paint brush can be generously described as a bit lacking. But we're gonna give it a go anyway. For the transition from shallow to deeper water, I'm aiming for something like the pic below (it's actually the Syracuse seawall as it looks today) with greenish turquoise at the base of the rocks to the darker blue of the deeper water.
So here's my first attempt with the brushes. The colors come from Festive Green, Turquoise, black, Royal Blue, Tamiya Sea Blue, and Tamiya Clear Blue. I'm not sure I'm completely happy with this, so I'm gonna let it dry and maybe try and work a little more color variation into the area on the left, close to the shore.

- JacquesCousteau, Bryan Woods, mtaylor and 8 others
-
4
-
7
-
Nice work on that lifeboat, Bob!
- Keith Black, Knocklouder, mtaylor and 2 others
-
4
-
 1
1
-
4 hours ago, Thukydides said:
It is looking really good. If I may make a small suggestion the rocks probably need some sea scum too. It looks a bit odd them being so clean and the base of the wall so dirty.
The more I look at it the more I agree with you!
-
Just found your build log, Bryan, and went thru the whole thing. Your ship is coming along very nicely.
-
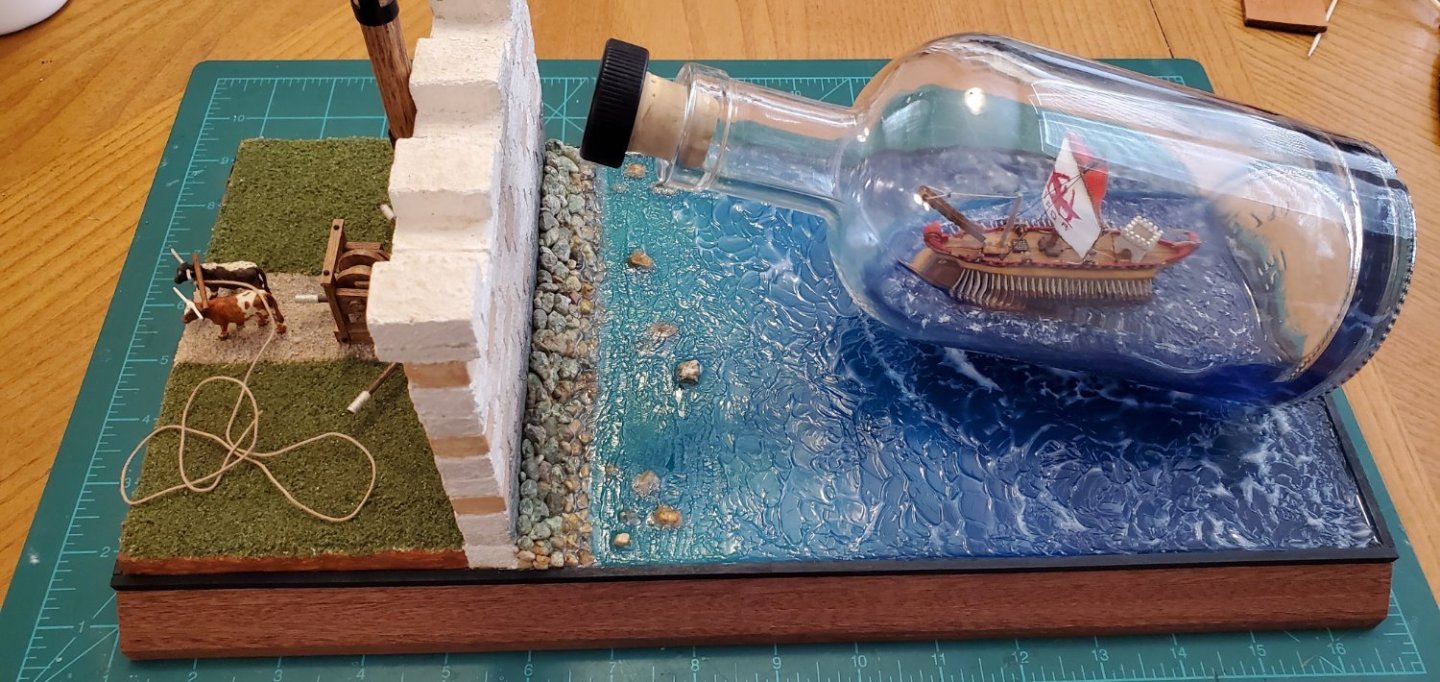
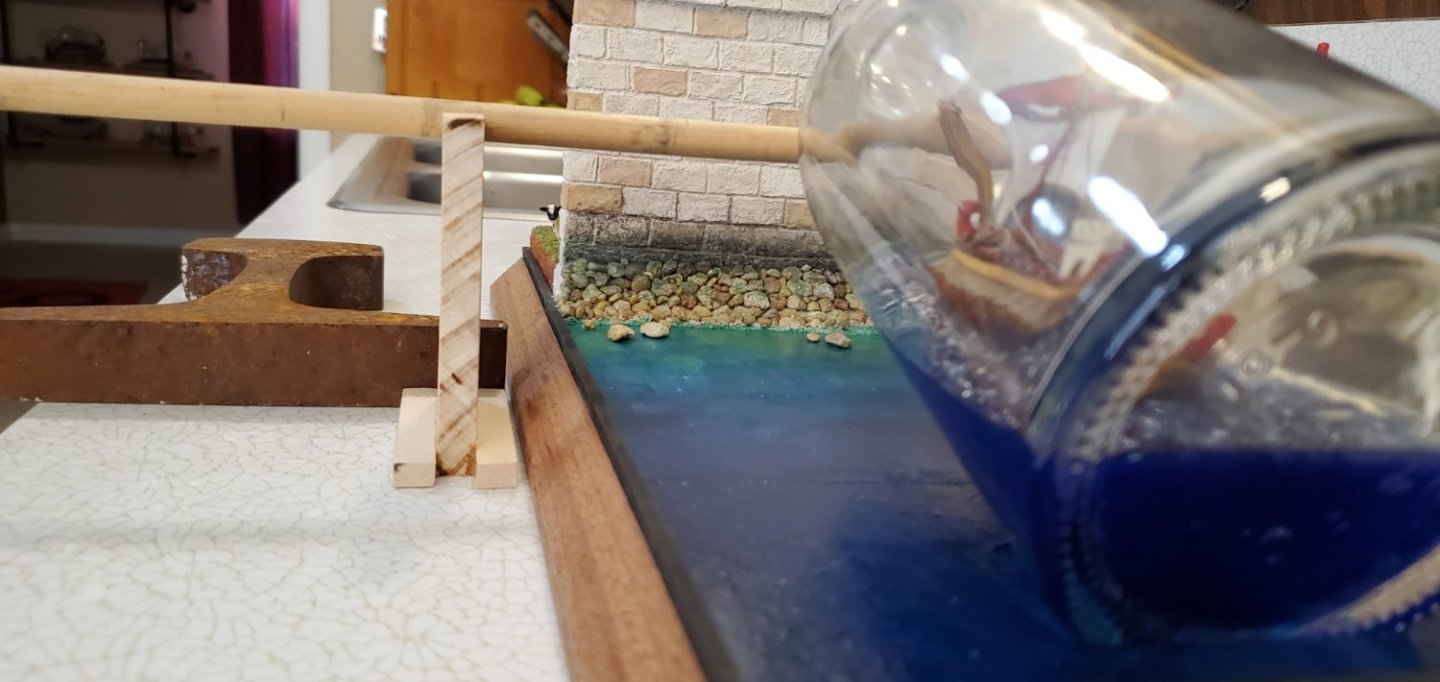
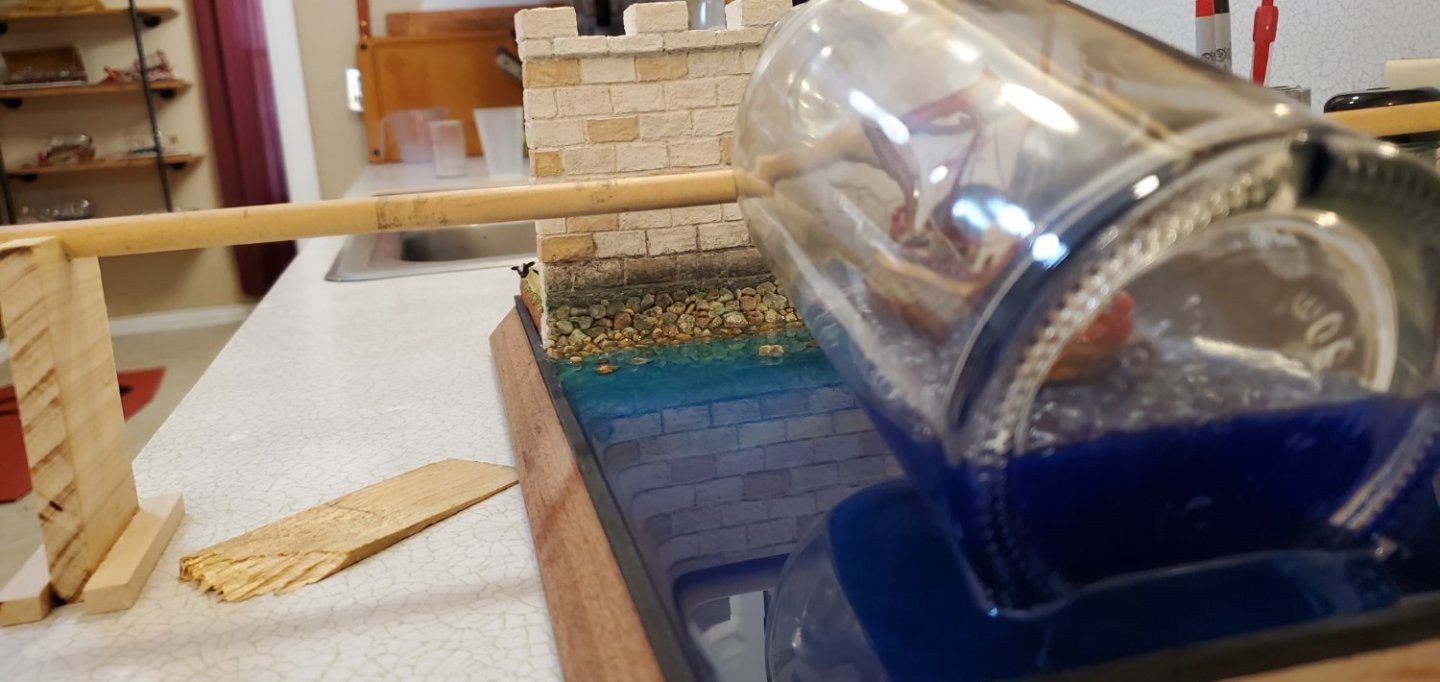
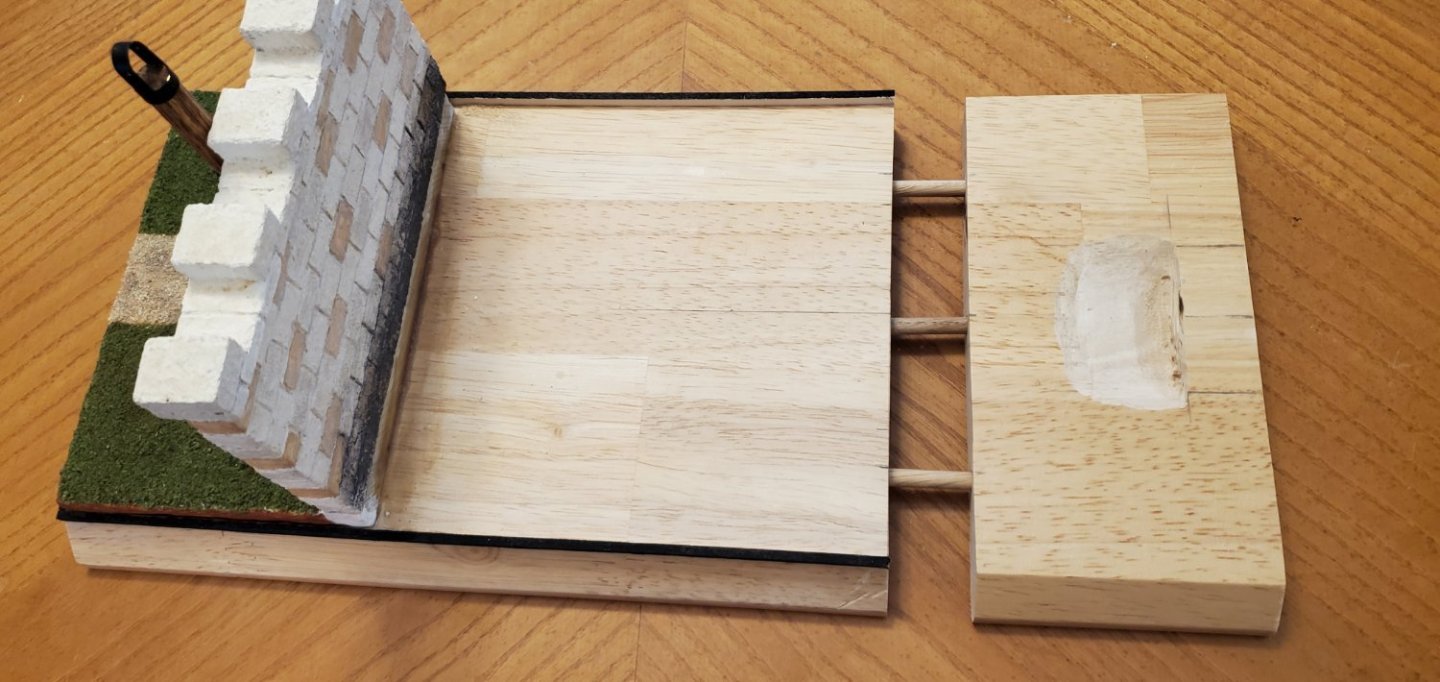
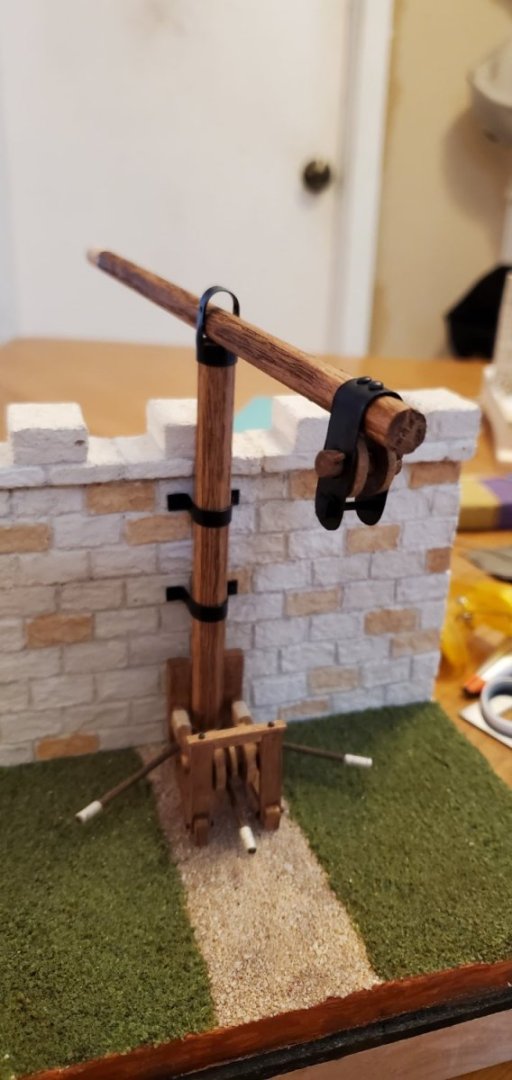
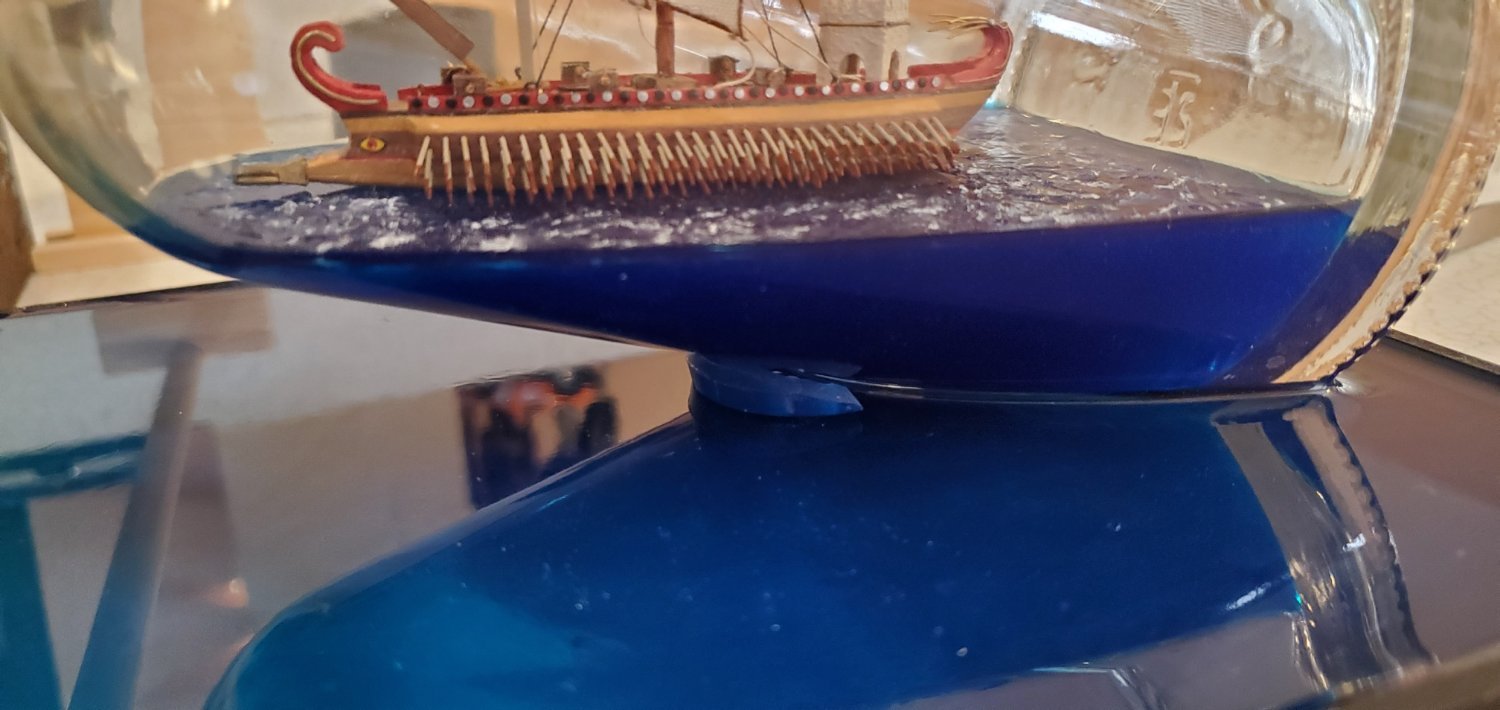
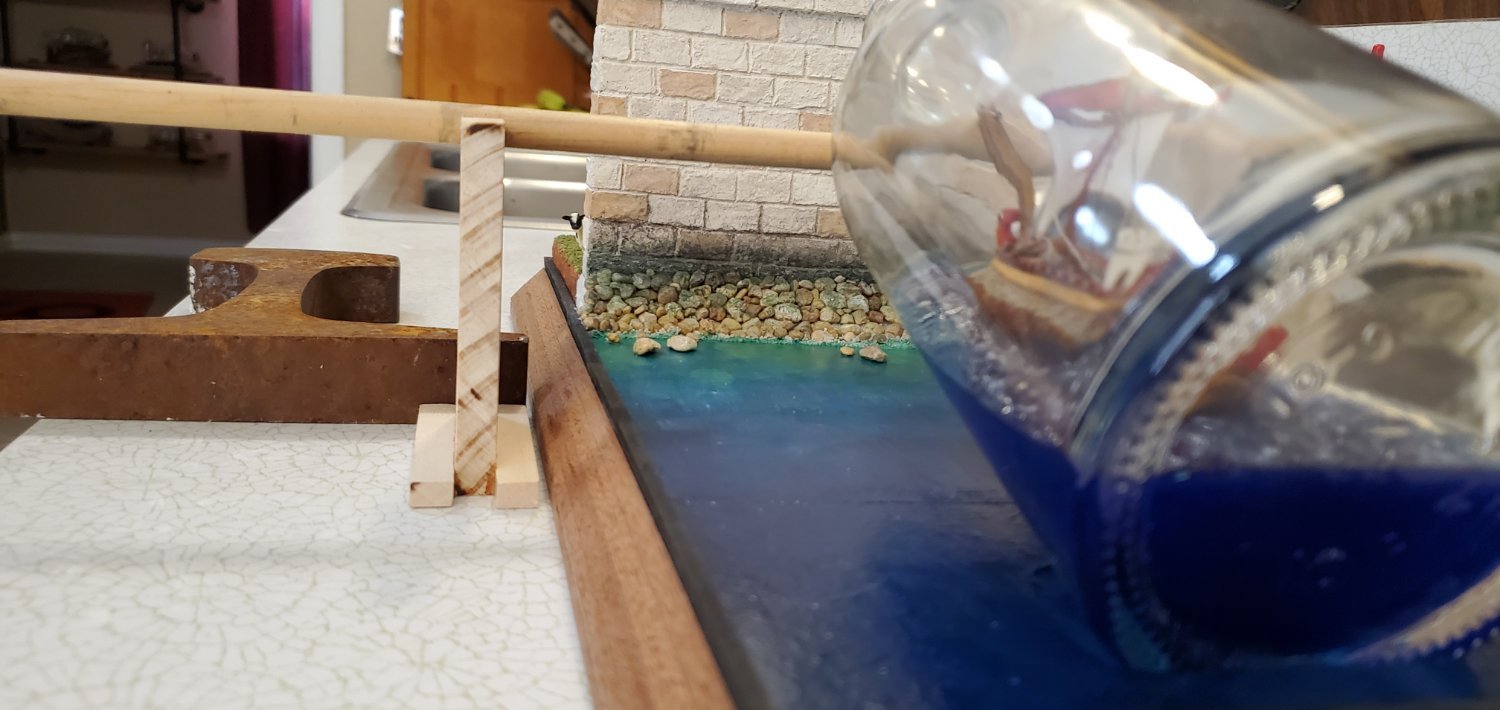
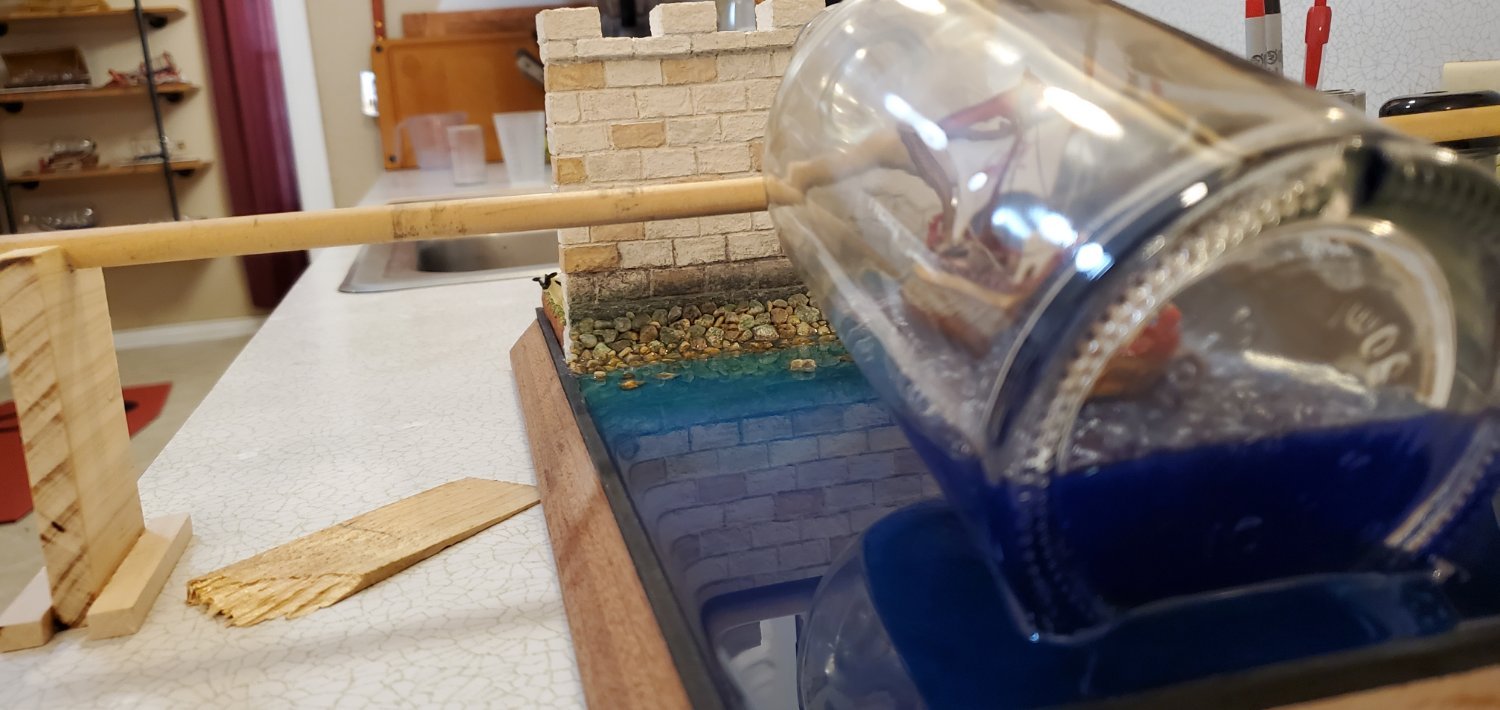
Time to confront one challenge I knew would be waiting for me late in the game - how to secure the bottle to the base at an upward angle when only a small portion of the bottle's rear would actually be in contact with the base. My practice stand below has the bottle at the angle I want and shows how much of the bottle is raised above the base (water) by the claw's hook. However, I don't want to use the claw to actually support the bottle. The bottle weighs too much for my comfort and then there's the lateral stability to worry about.
So my solution is to carve out a small cradle in the base and have the bottle's end epoxied to it. Then create a small wave just to the left of where the bottle extends out of the cradle for additional support. I believe this will work. Because of the bottle's angle, a lot of the weight (helped by the water inside the bottle) is in the rear and will be in the cradle. So my wave should not have to be too high or too far forward to give me comfortable support. That's the theory anyway!
Alas. Ugh. Sigh. After I carved out my cradle in the base and rested the bottle in it for a test, I found I'd made a major blunder. My base was not wide enough. The bottle's opening was almost hitting my seawall. Somehow, (or maybe as usual), I'd measured wrong. The base was about 1 1/2" short. And unfortunately, I'd already glued the wall and land securely to the base. But fortunately, we are talking about wood here, so there's usually a fix. So I decided I'd just extend the base.
I cut off the base at the edge of the cradle I'd carved. The base was made from an old bookshelf I'd repurposed for modeling so I had plenty of extra material to make the extension. I carved a new cradle, cut the extension to the proper size, added some dowels for security, glued it up, and added the border railing.

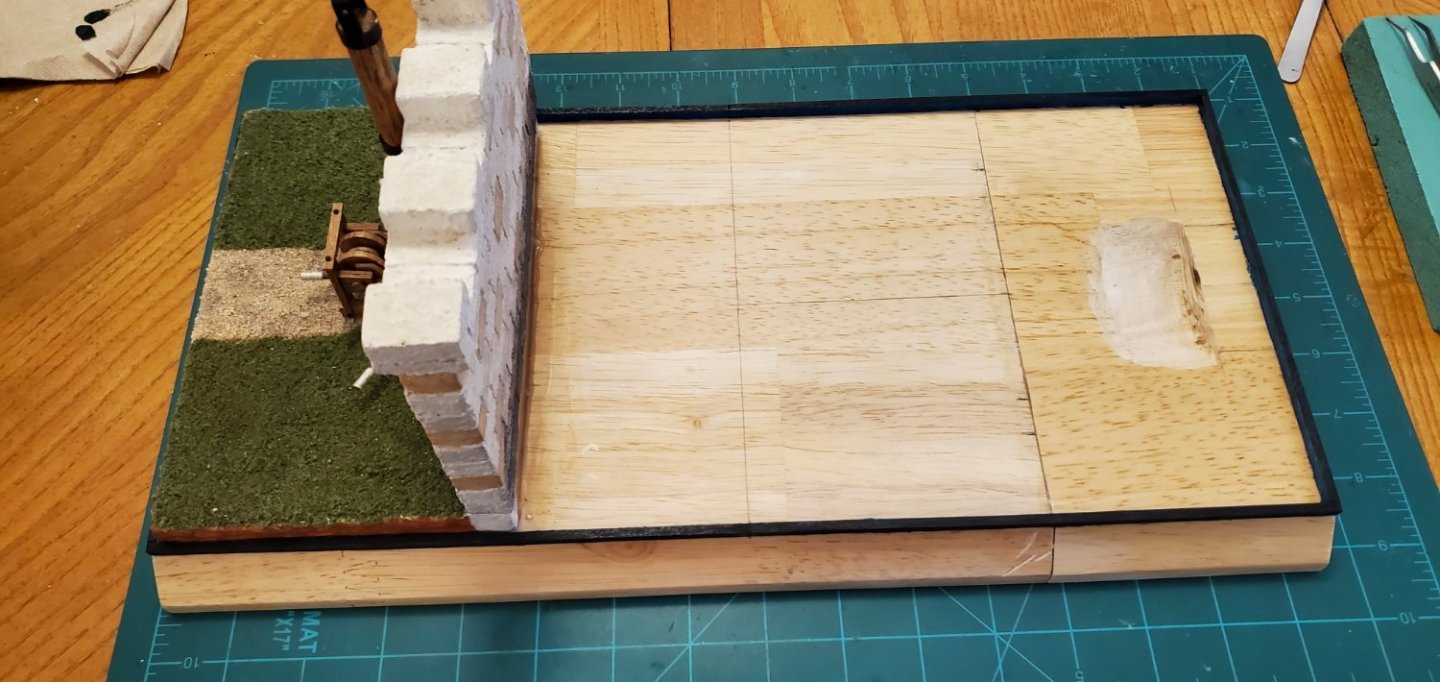
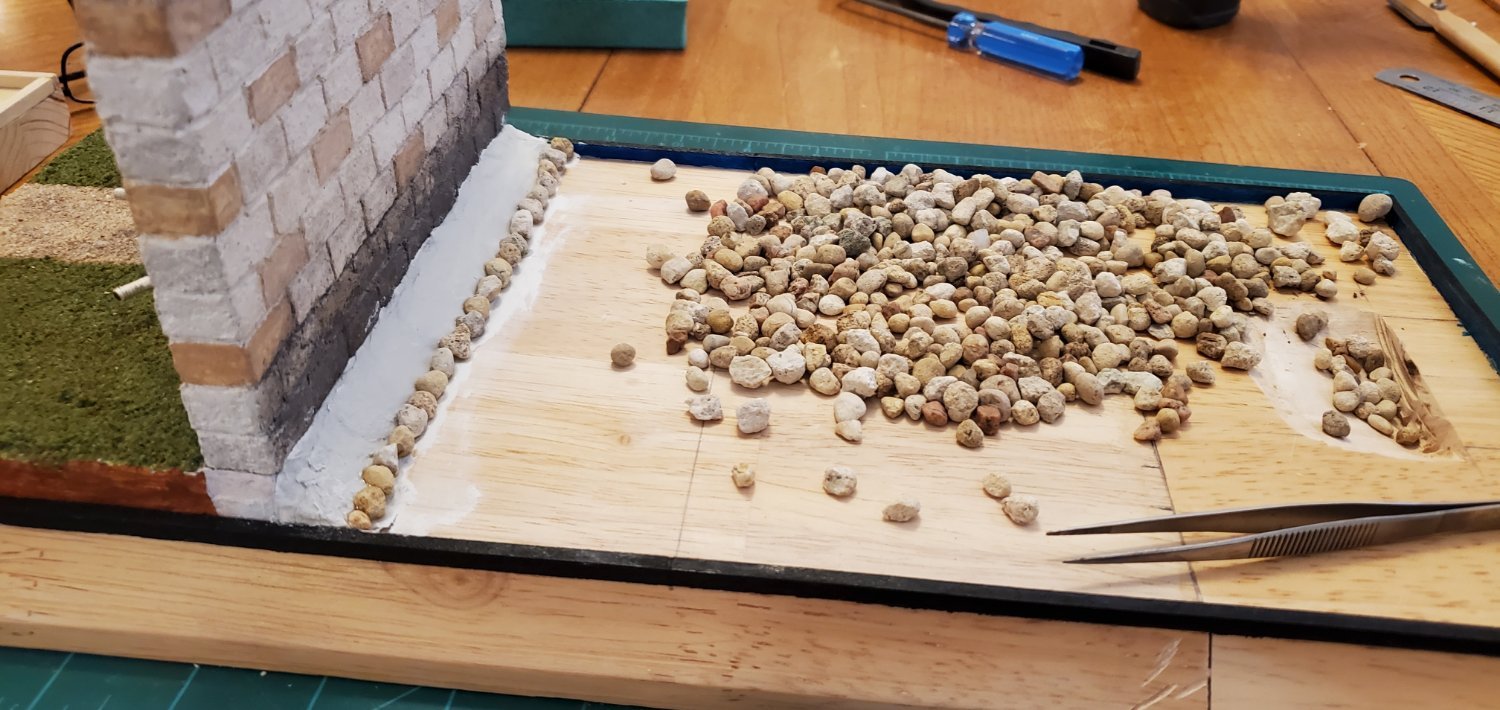
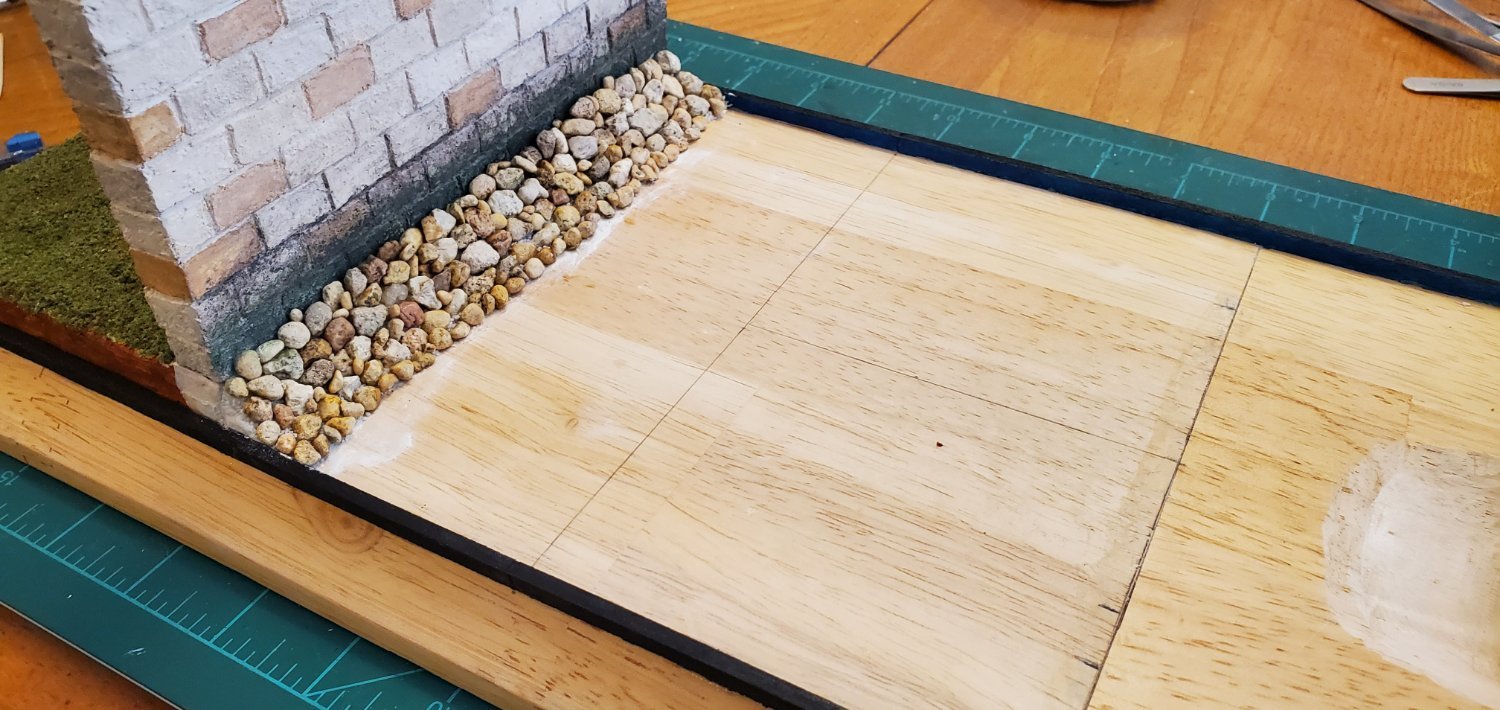
With the self-inflicted detour out of the way, I added the rocks at the base of the seawall. I added a wedge of modeling clay, spread a thin layer of glue, sprinkled some sand on top, then added pea gravel I'd carefully selected from a pathway in my backyard. Putting the rocks in place was kind of like doing a weird puzzle.


As you can see, I also added a layer of sea scum to the base of the wall above the rocks as Pat (aka @BANYAN) suggested in an earlier post. It looks black in the pic above but it reality, it's got a dark greenish tint. I may add a small bit of color to the top layer or 2 of the rocks. But I don't want to go overboard.
-
2 hours ago, Knocklouder said:
the race to the finish, so we can start another lol.
Ain't that the truth! Such an addiction or is it a sickness, take your pick!
- GrandpaPhil, Canute, Knocklouder and 4 others
-
7
-
6 minutes ago, Ferrus Manus said:
Can someone explain to me how a steering oar actually steers a vessel, and how it is operated??
I can't speak to the mosaic ships that Steven is modeling, but when I was doing research for my Oseberg build, I came across this webpage describing the steering oar for Viking ships. Perhaps the concept is the same or similar.
- mtaylor and Ferrus Manus
-
1
-
1
-
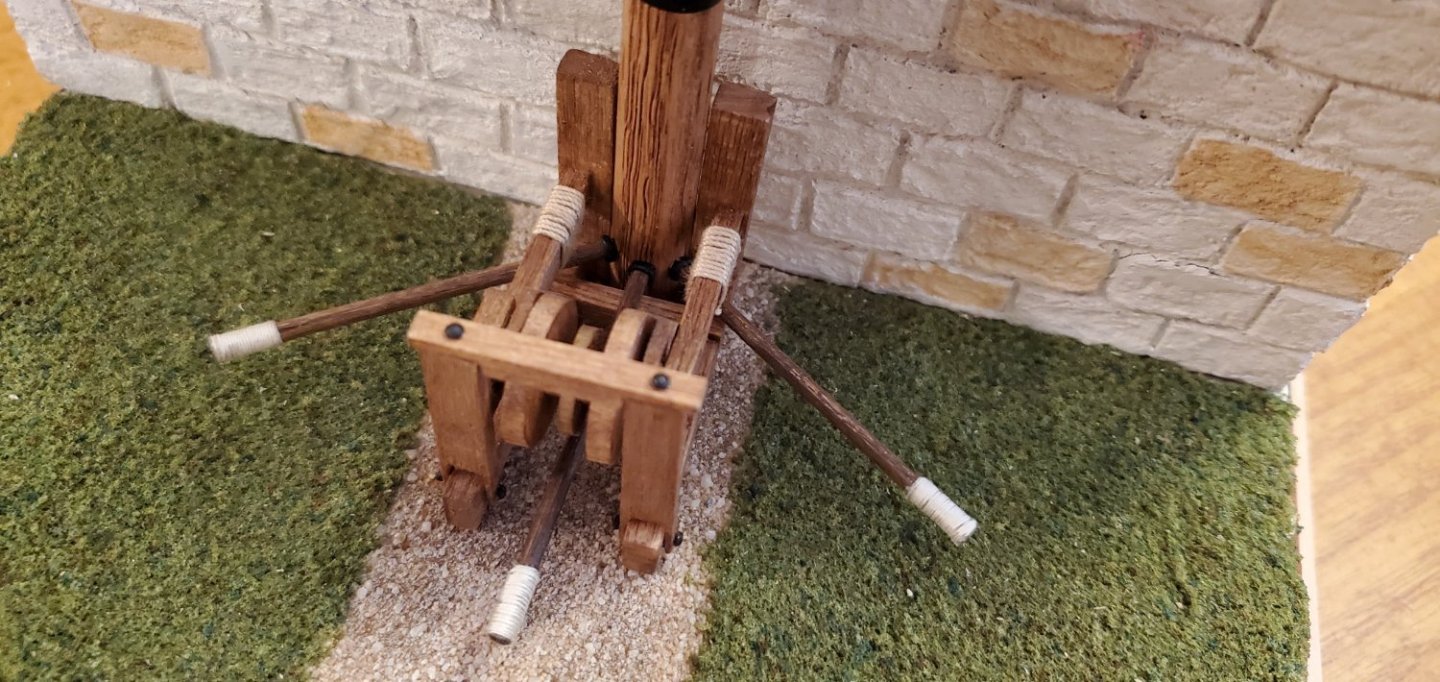
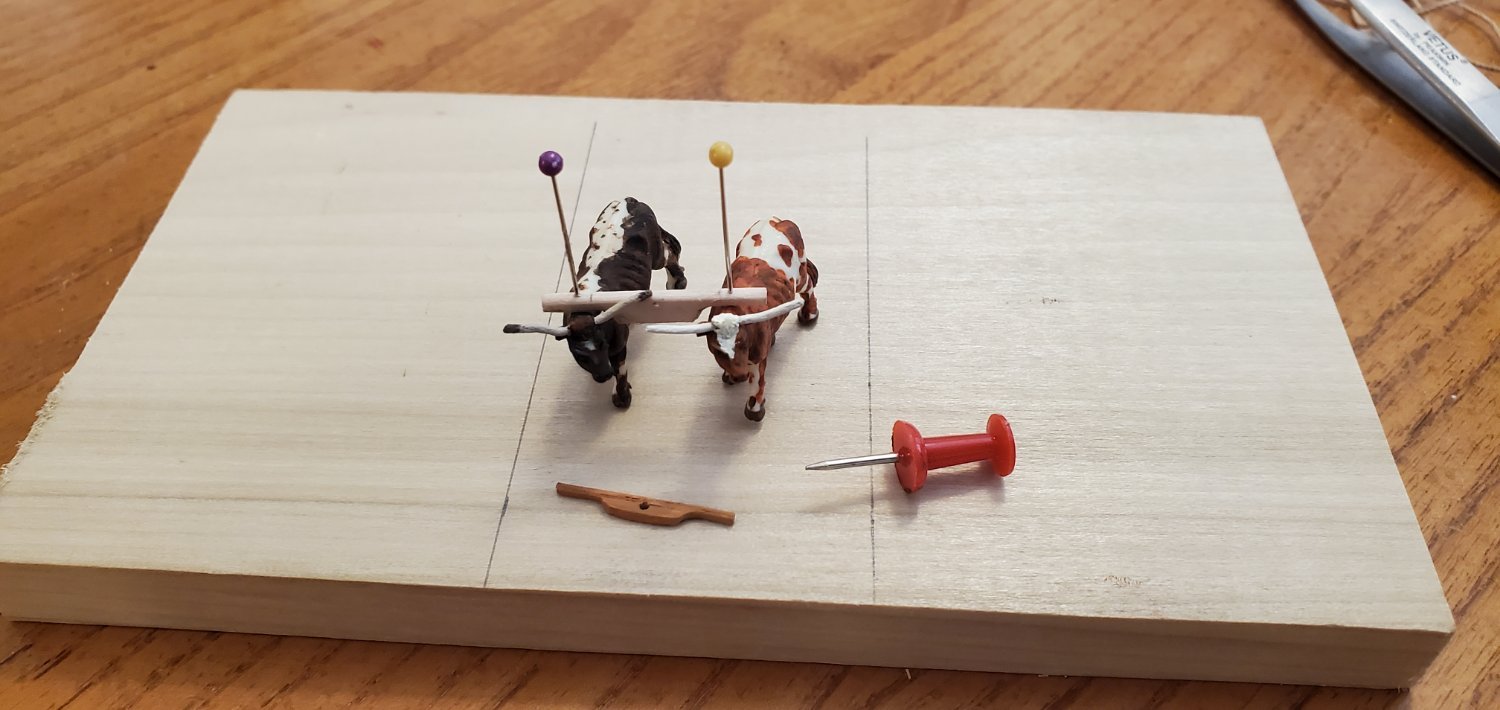
Small update here (ok, all SIB updates are small ones aren't they 🙄). When Ken (a.k.a. @Canute), mentioned oxen in an earlier post, it made me realize that I needed a yoke for my longhorns. I never seem to think of details like that when I come up with a project idea. Then I stumble into them along the way and they add hours and hours to the build.
I ended up making several yokes before I found a size and shape I was happy with. You can see one of my early attempts below that was way too small.


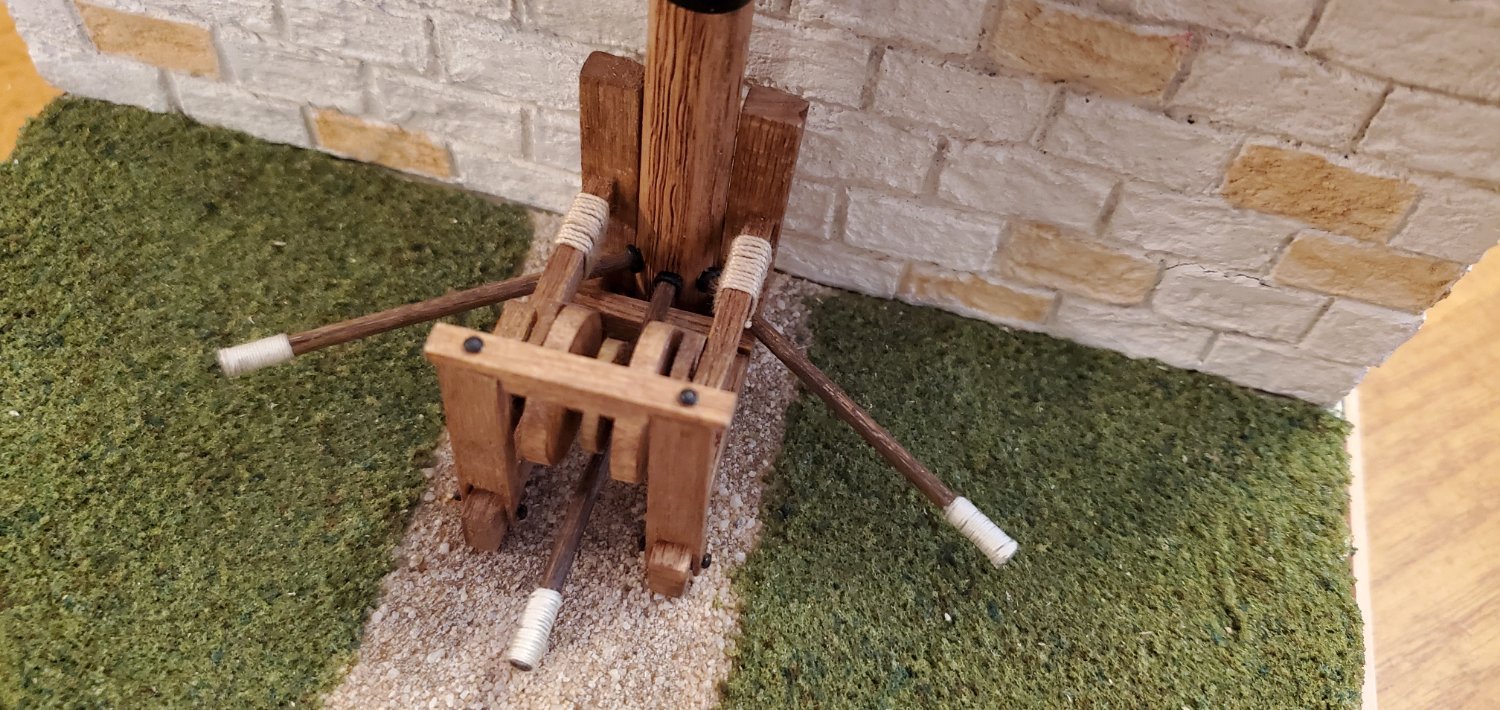
Next, I affixed the claw's base to the main pole and added the swivel rods. Then I made the pulley for the claw's horizontal arm.
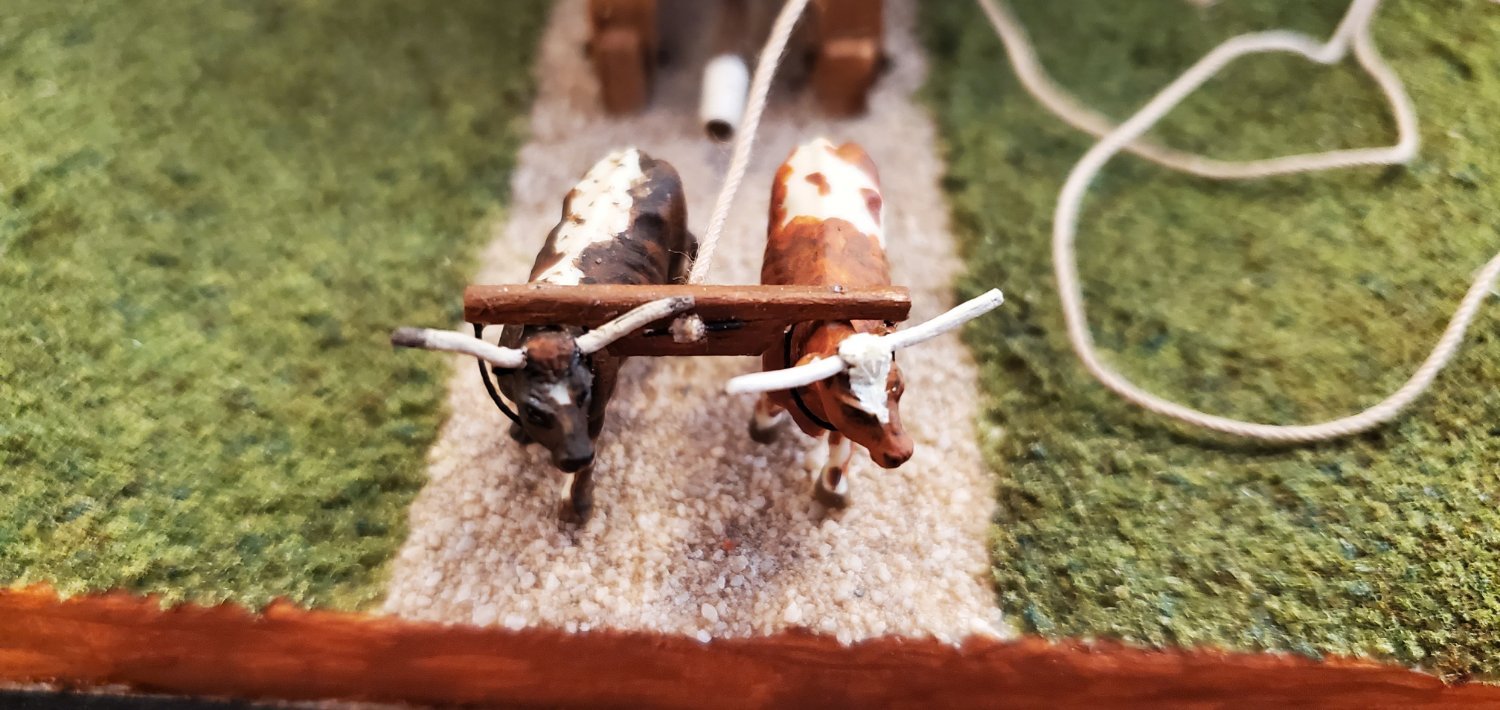
Other than permanently affixing the longhorns and adding their pull rope (which will probably be the very last step of this project), I believe I'm done with the land side of the wall. Now it's time to bring the bottle back into the picture and figure out what I'm going to do with the ocean side.
- Bryan Woods, Canute, Ian_Grant and 4 others
-
7
-
The shipyard can be a very dangerous place, what with falling timbers and other hazards. I hope Marvin is ok. Otherwise, very fine work, Bob!
-
That is absolutely amazing work, Ian! Congrats on a successful test run.
In the first video when you said, "Something's gone wrong" all I could think of was "Houston, we have a problem." But you get her fixed and cruising across the water. Awesome!!
- mtaylor, Ian_Grant and Knocklouder
-
2
-
1
-
8 minutes ago, Canute said:
nice juicy burger. 😁
That's another B word we don't say around my herd, Ken! 🤐
- Keith Black, Canute, mtaylor and 1 other
-
 4
4
-
1 hour ago, Keith Black said:
It's a family show.
I thought we stopped being a family show when @mtaylor made the reference to Monty Python and canoes during my Oseberg build log! 😃
- mtaylor, Keith Black, Knocklouder and 2 others
-
2
-
3
-
-
On 8/25/2023 at 8:59 PM, Louie da fly said:
Depending on how steady your hand is, you could hand-paint it. I used acrylic paint on a piece of (I think) cotton fabric,
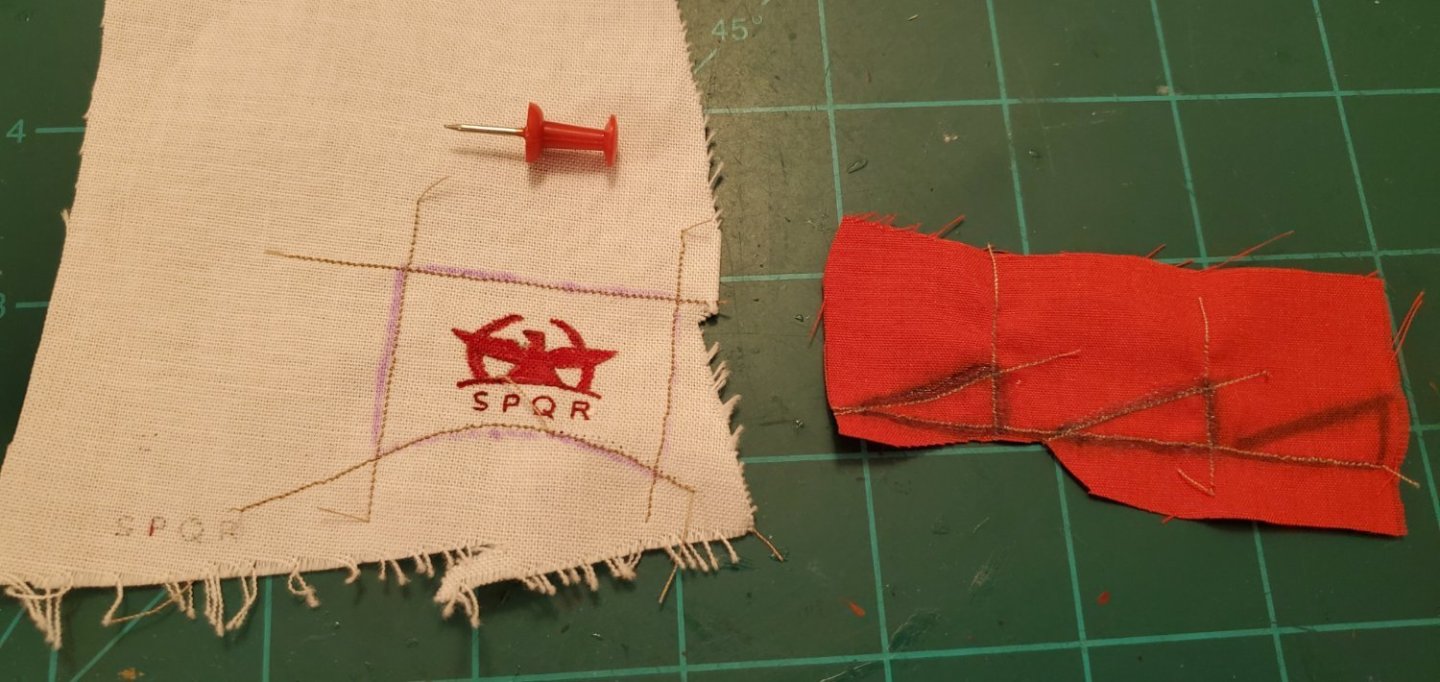
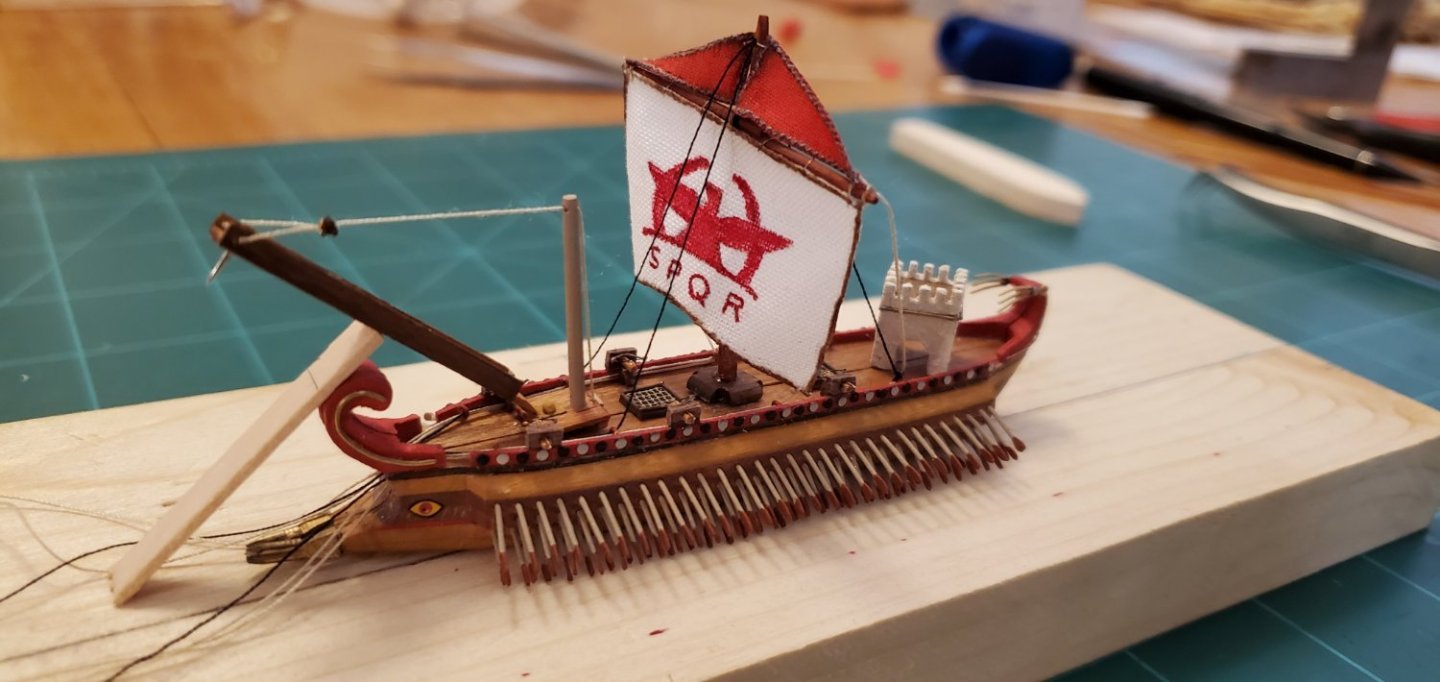
I'm with Steven on this. I am no great artist and would likely find a new hobby before attempting something as intricate as what he did with his incredible restoration project, but I did manage to hand paint a reasonable design with small lettering on my tiny Roman quinquereme sail (muslin fabric).
- thibaultron, mtaylor and Louie da fly
-
3
-
Glad you could make it back, Mr. Pirate!!
- mtaylor and Keith Black
-
2


Roman Quinquereme and Claw by Glen McGuire - FINISHED - 1/500 - BOTTLE
in - Subjects built Up to and including 1500 AD
Posted
A couple of digressions during paint drying sessions...
First, I noticed an interesting characteristic of the epoxy resin I use. It seems to leach upward given the chance. A few hours after pouring the epoxy resin into my base, I noticed that more rocks below the base of the wall looked wet than anticipated. A closer look showed that rocks well above the water line of the epoxy resin were indeed covered in epoxy. And it pooled in the small cavities between the rocks above the water line. In all, the epoxy resin looks to have leached up about 1/8". In this case it's ok and actually adds to the effect of water meeting the rocks. But I'll have to pay attention for future use if I don't want that look.
Second, I was texting pictures of the build progress to a friend of mine. I sent him the 1 below. He asked what the cow was doing on top of the wall. I told him it was stationed up there to watch for incoming Roman ships during construction of the project.
My friend replied, "Oh. So it's a scowt!" 🙄🙄🙄
I told him he'd fit in well with the MSW crowd here.