MORE HANDBOOKS ARE ON THEIR WAY! We will let you know when they get here.
×


Glen McGuire
-
Posts
1,917 -
Joined
-
Last visited
Content Type
Profiles
Forums
Gallery
Events
Everything posted by Glen McGuire
-
 It actually reminded me of a word we have here in Austin - Dragworms. The main street that runs on the west side of the University of Texas campus is affectionately known as "The Drag". It's full of eclectic bars, shops, street vendors, etc. But it also has its share of unsavory characters that are always milling about and everyone calls them Dragworms.
- 70 replies
-
- 3
-

-
- Scheldt River
- Dredger
- (and 2 more)
-
Just found this build log, Phil. I'm on board for what looks like a cool project. Looking good so far!
- 262 replies
-
- 5
-

-
-
- Card
- Pre-Dreadnought
- (and 2 more)
-
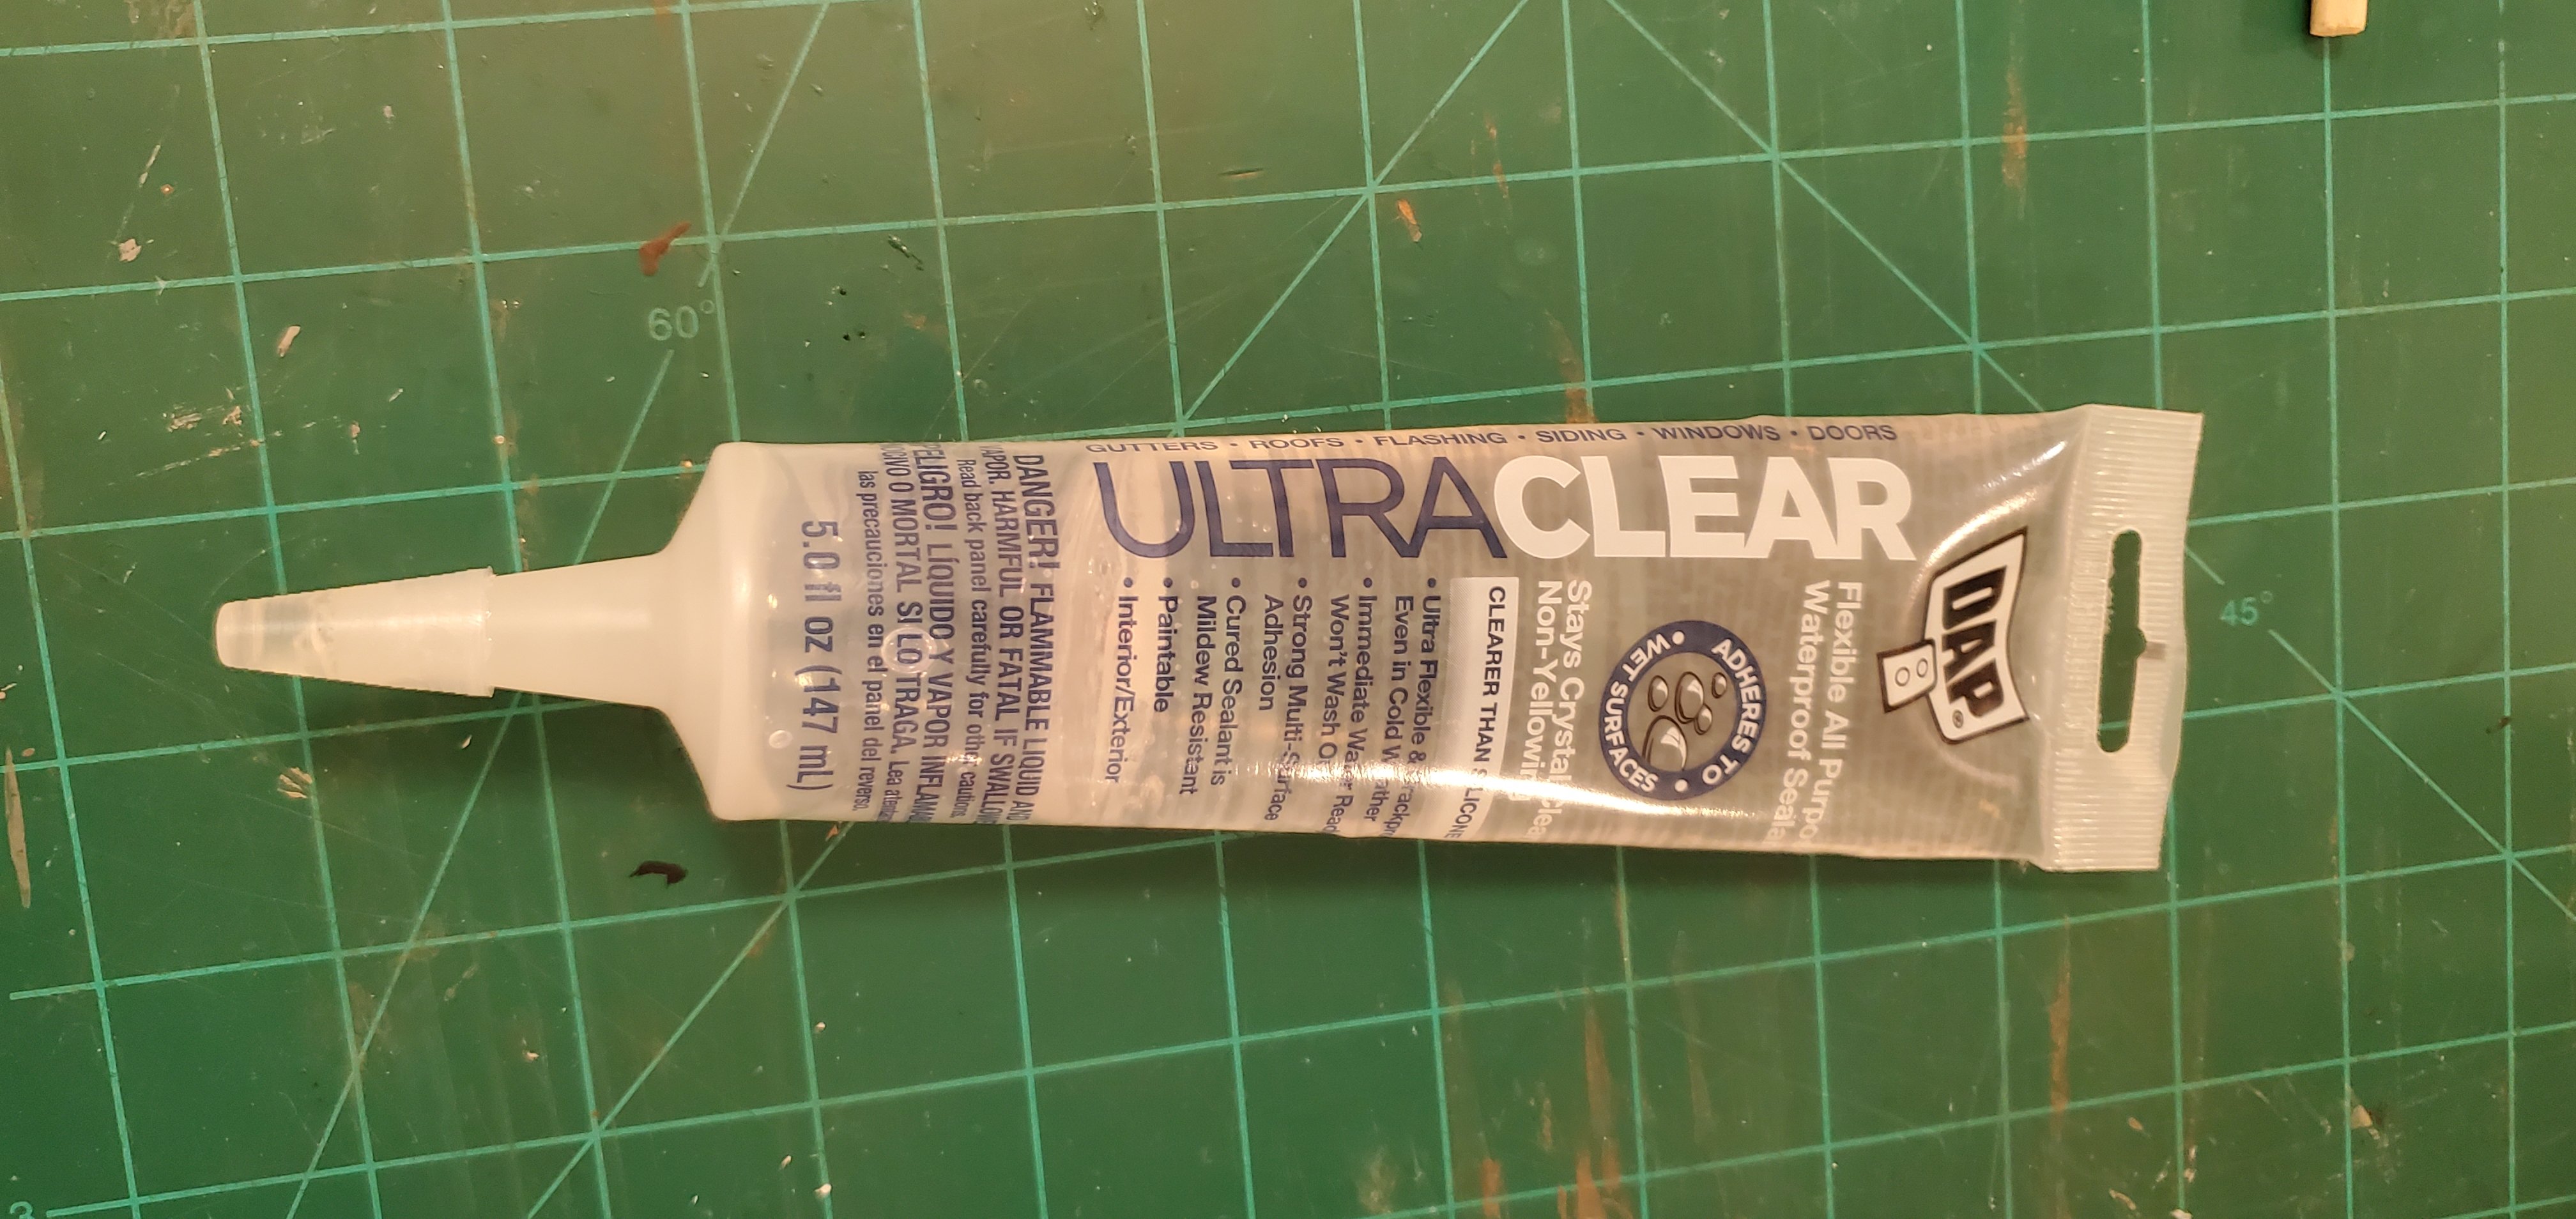
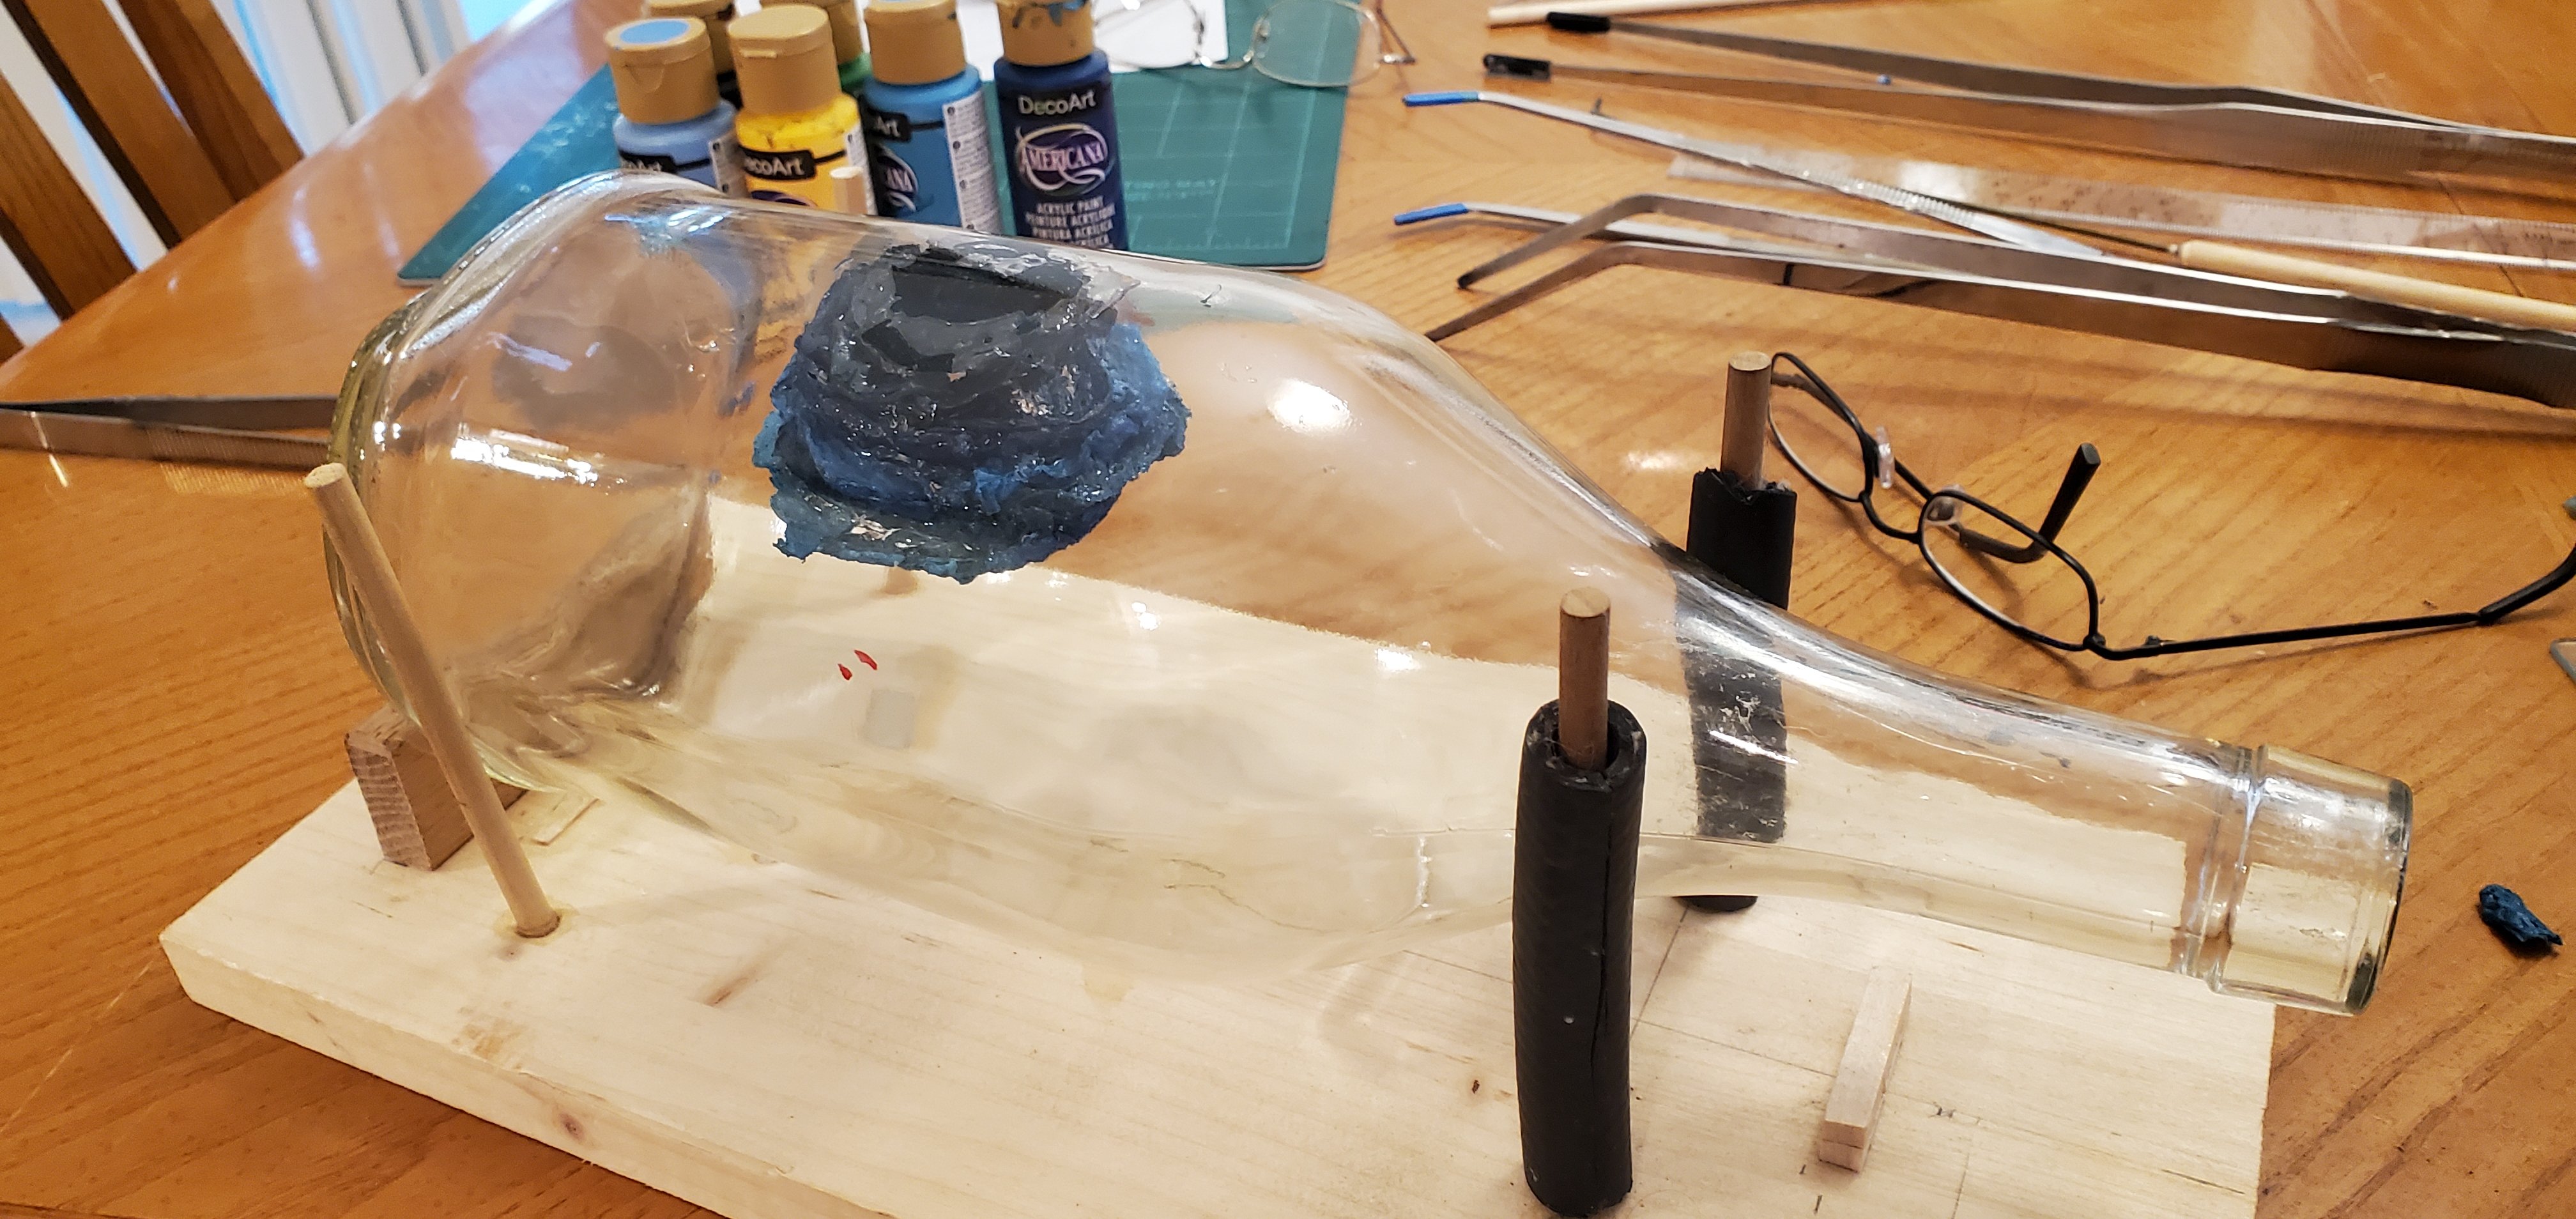
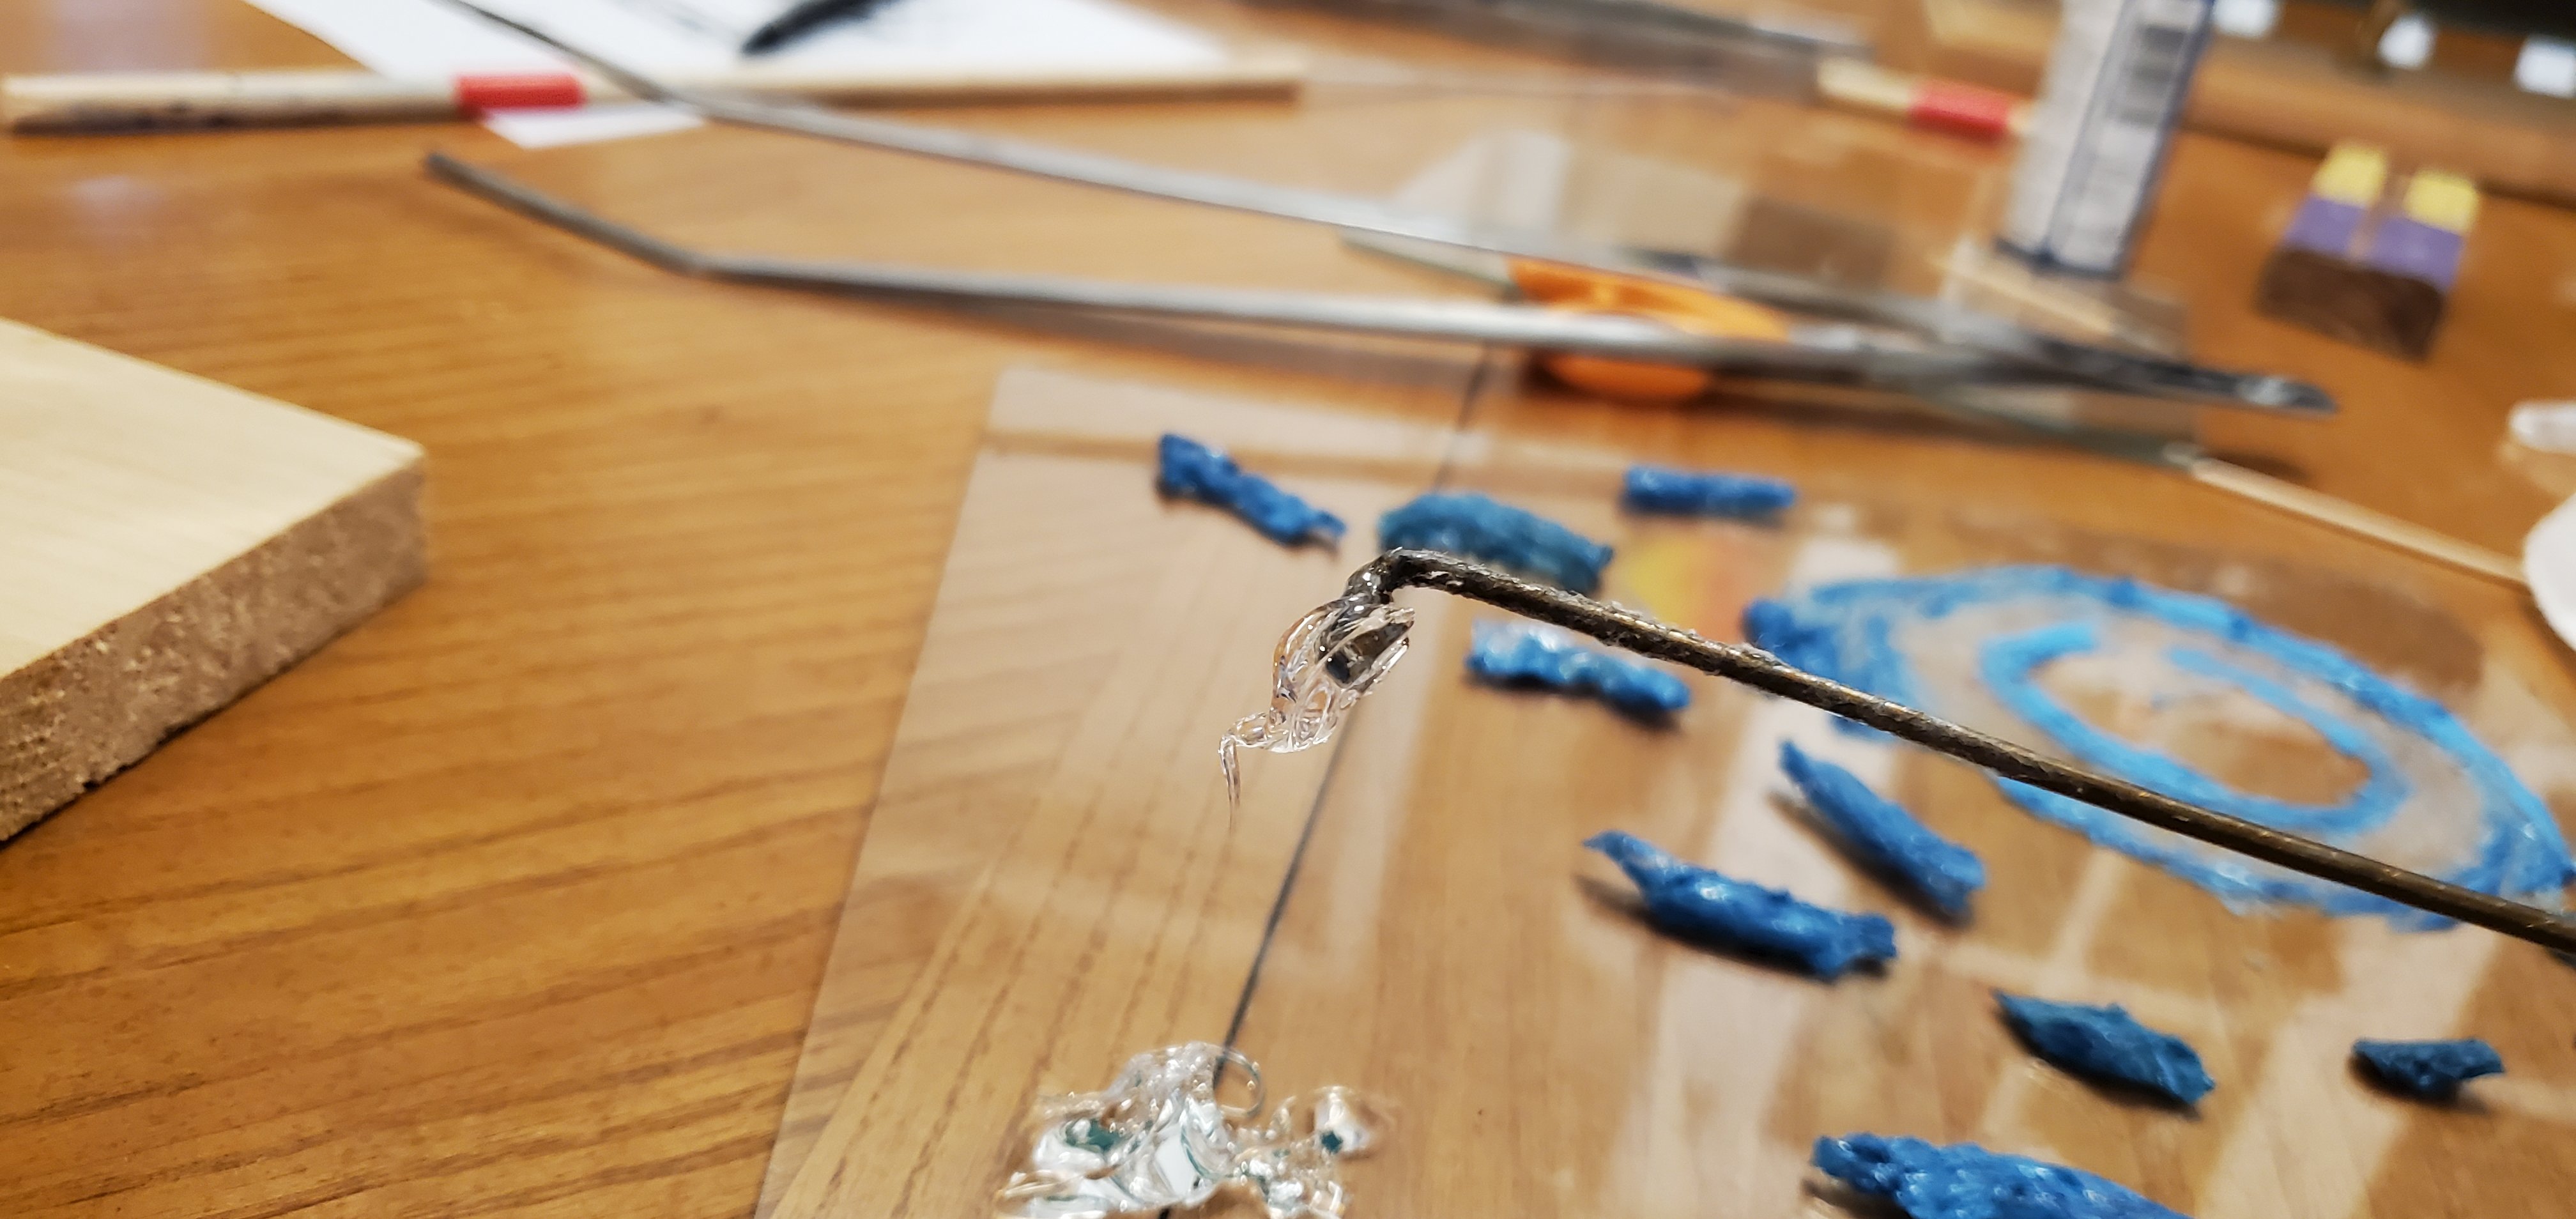
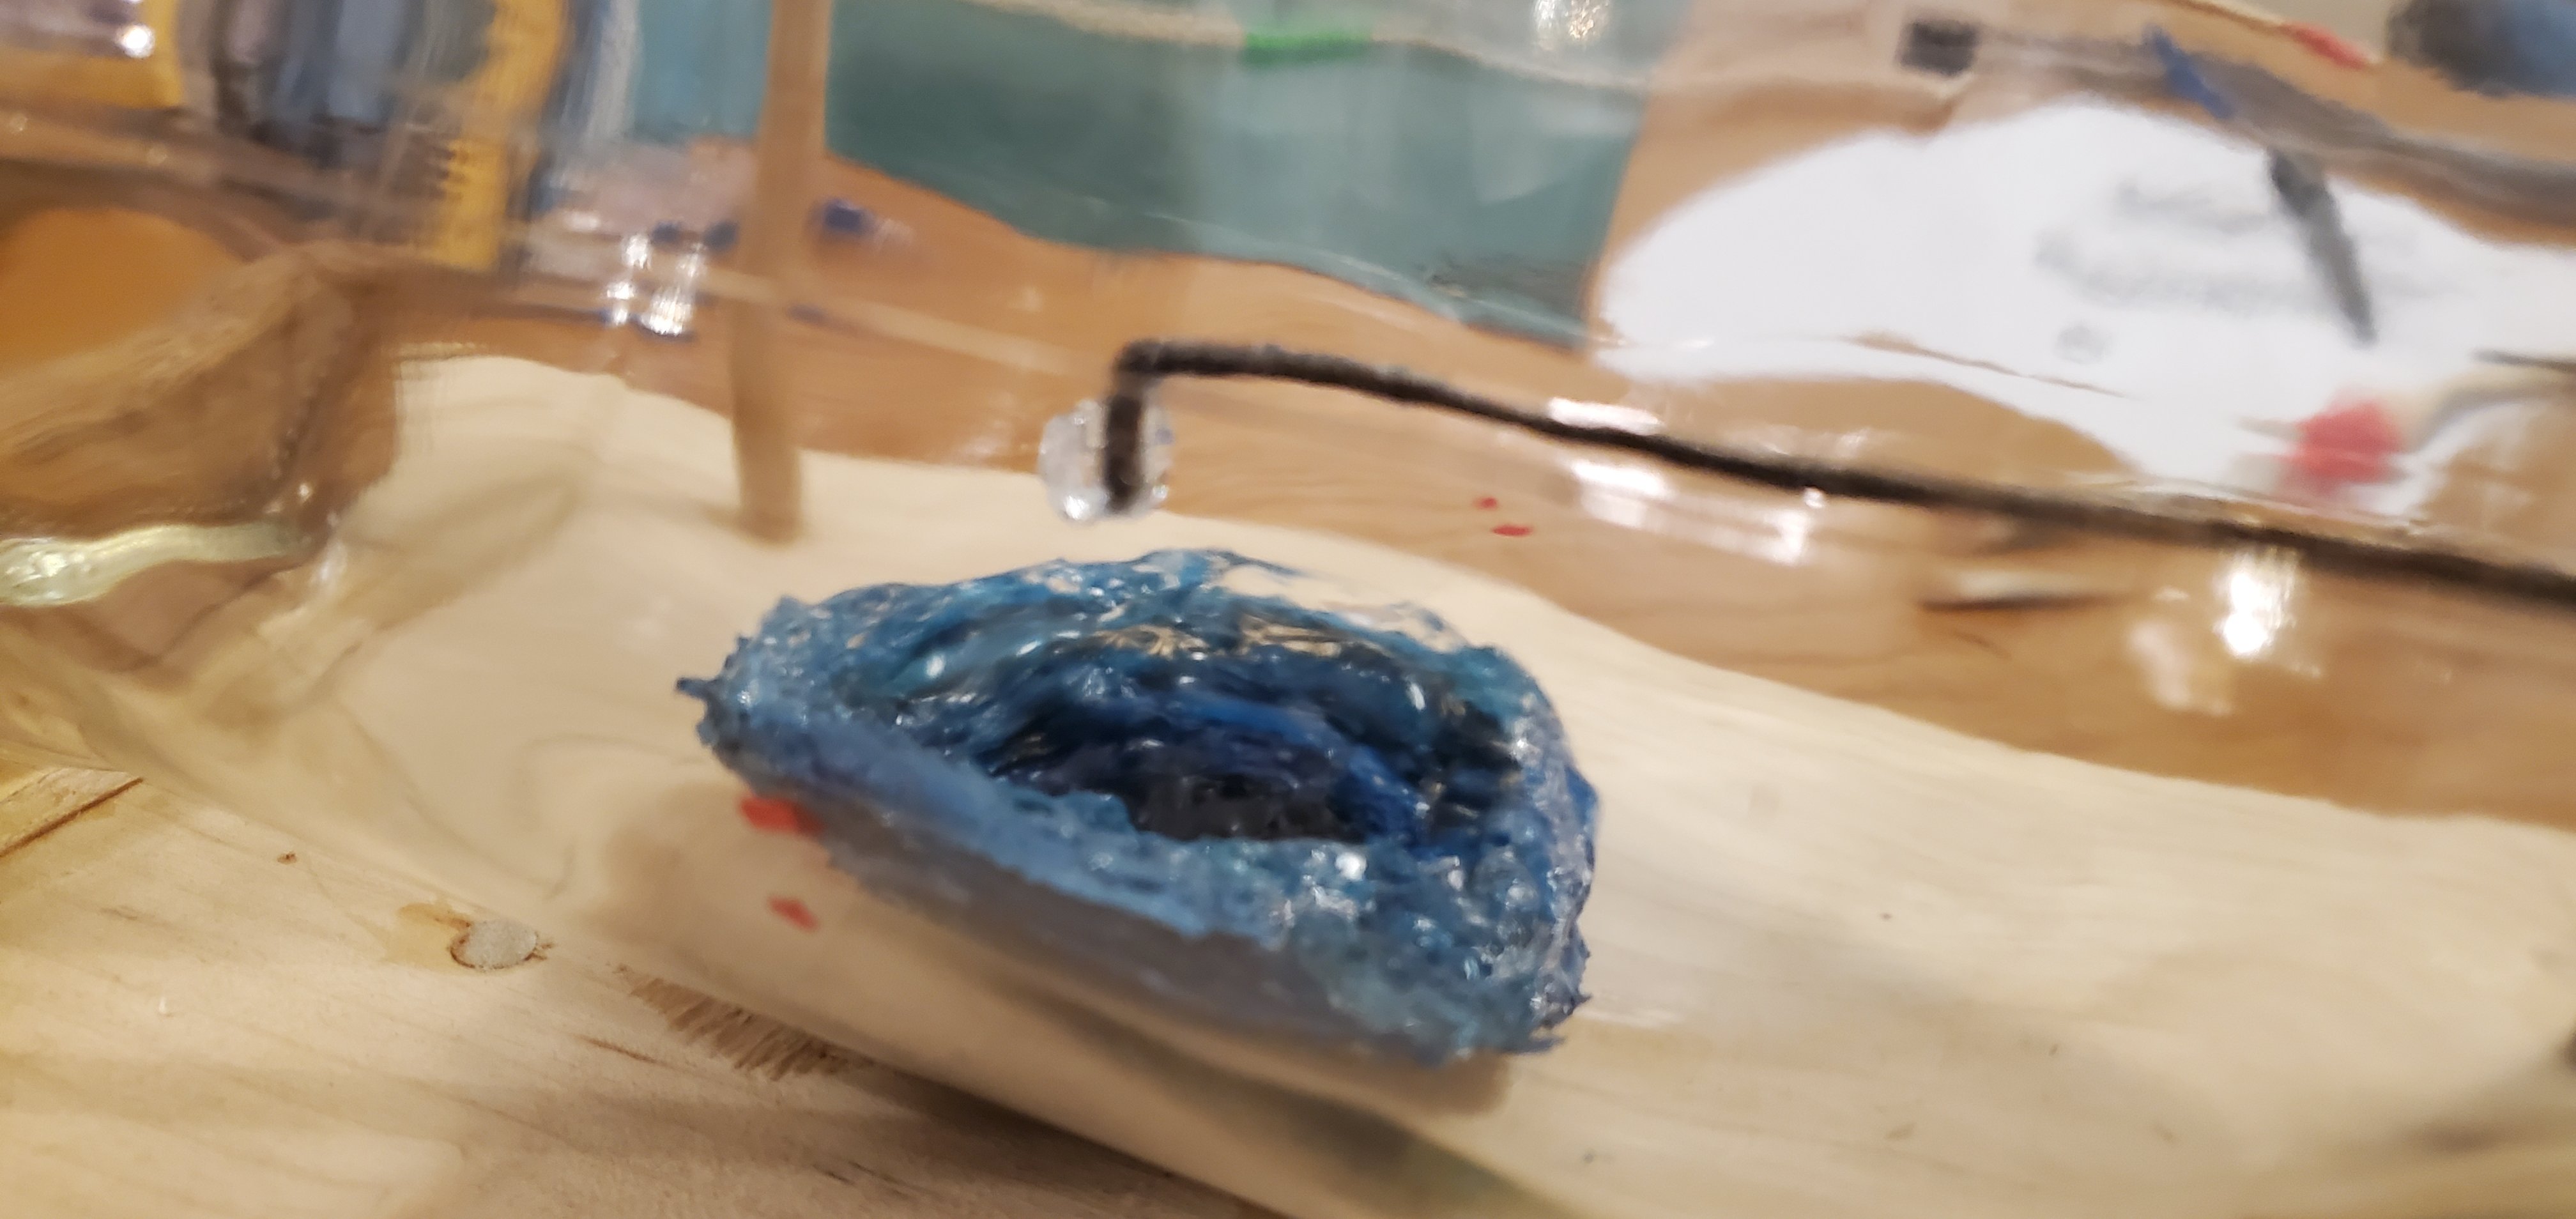
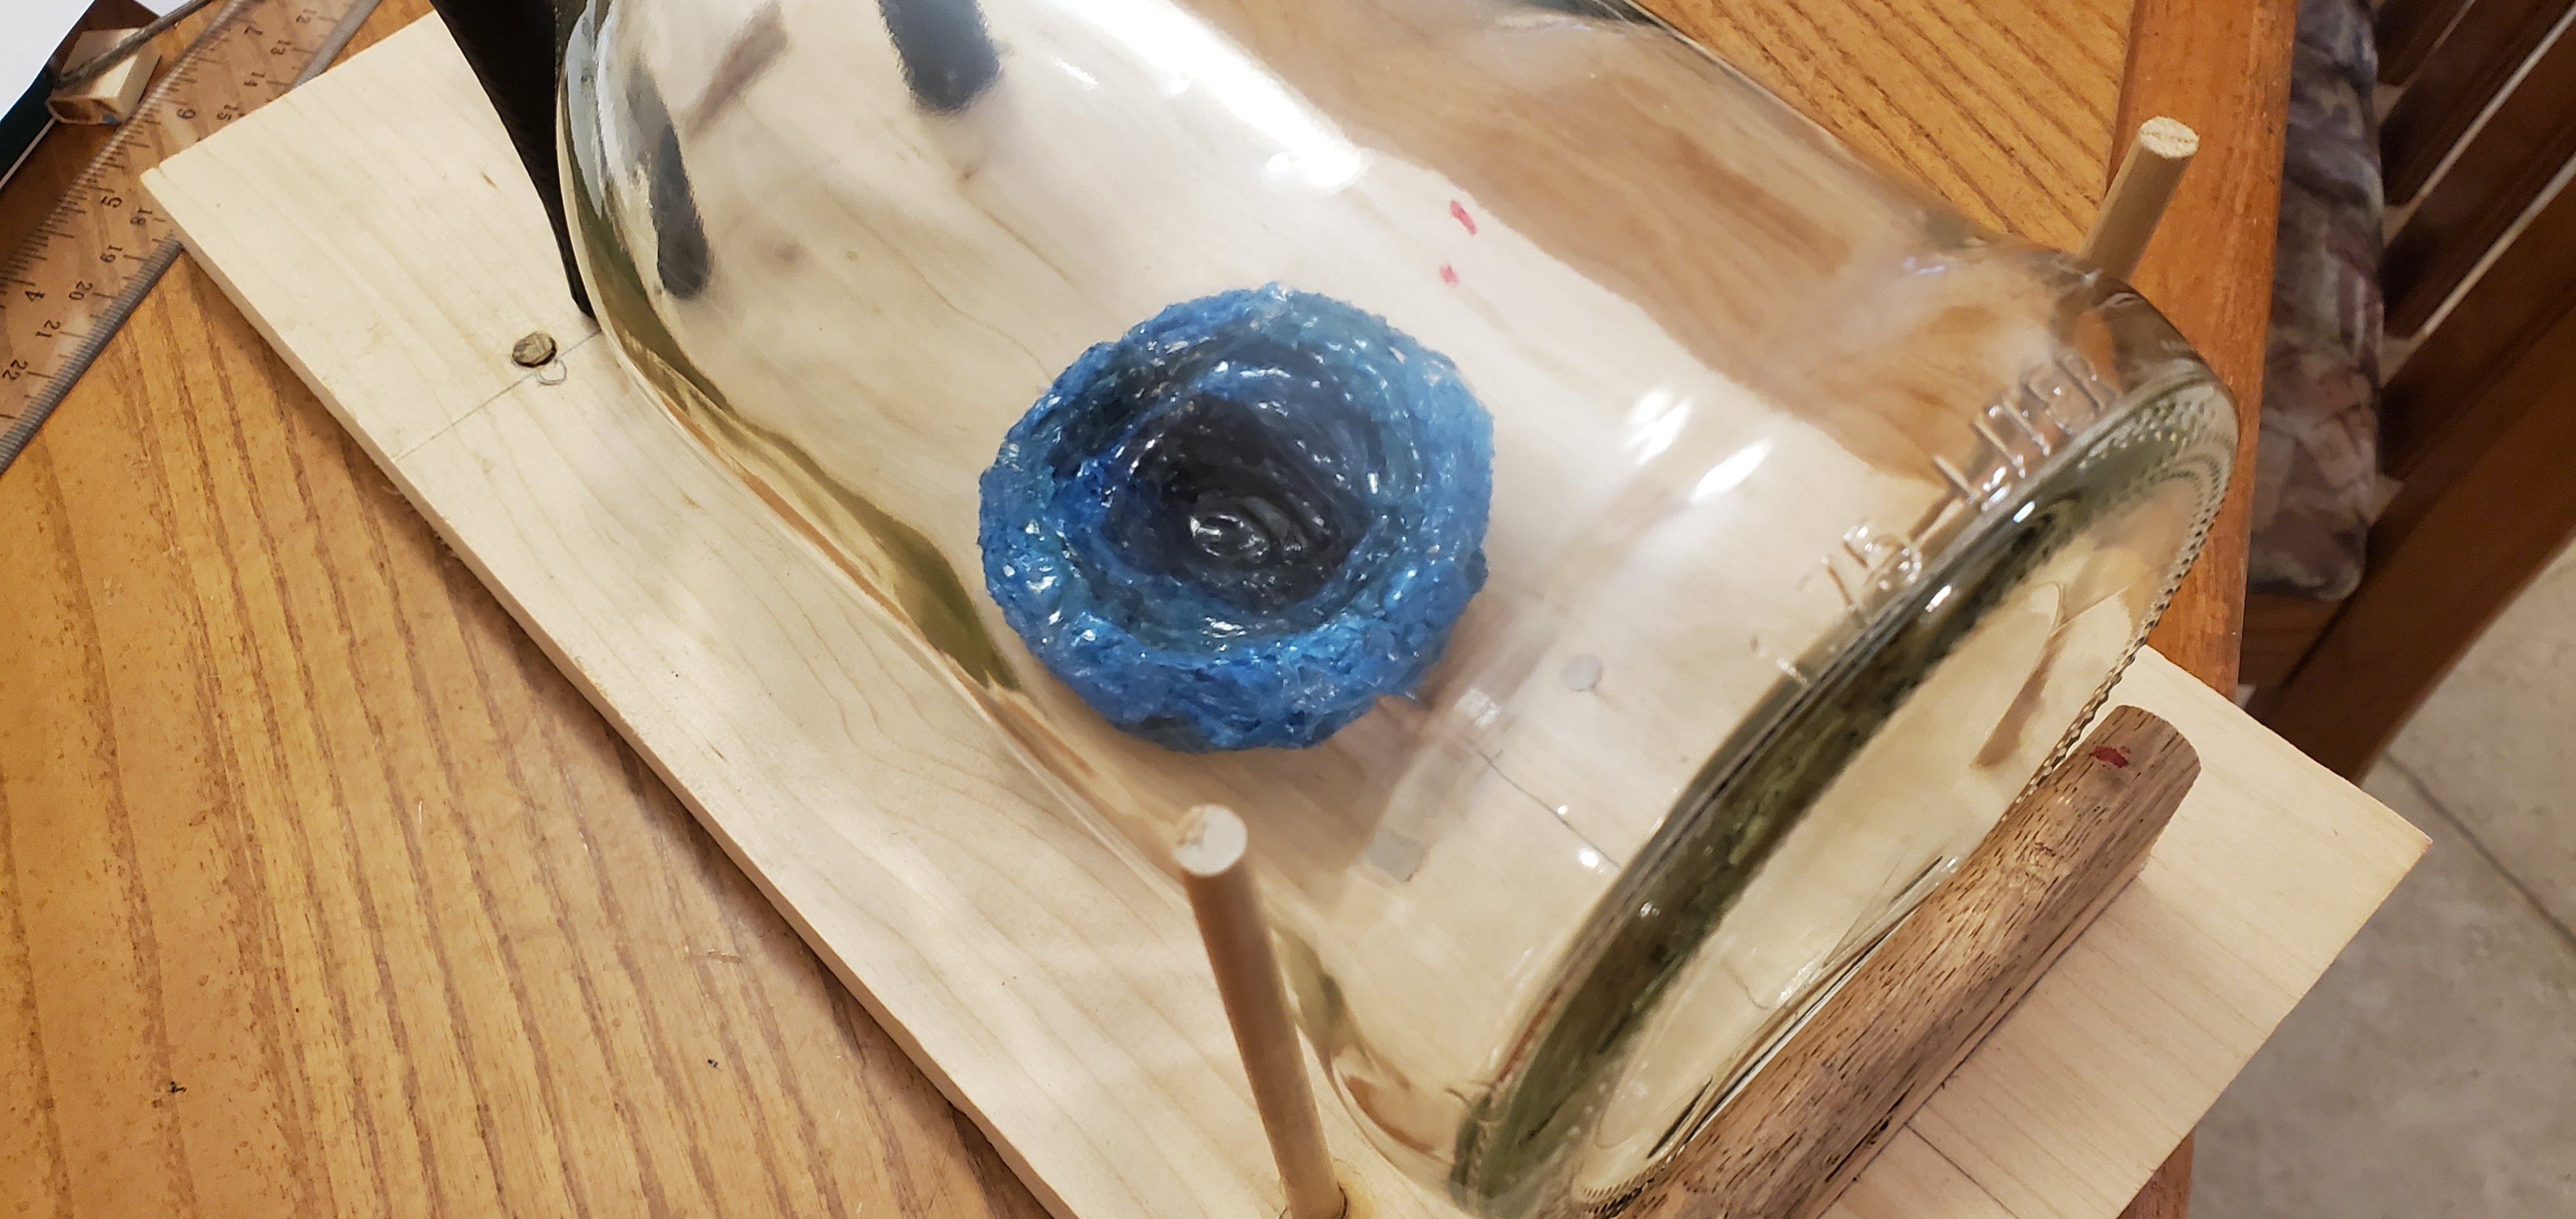
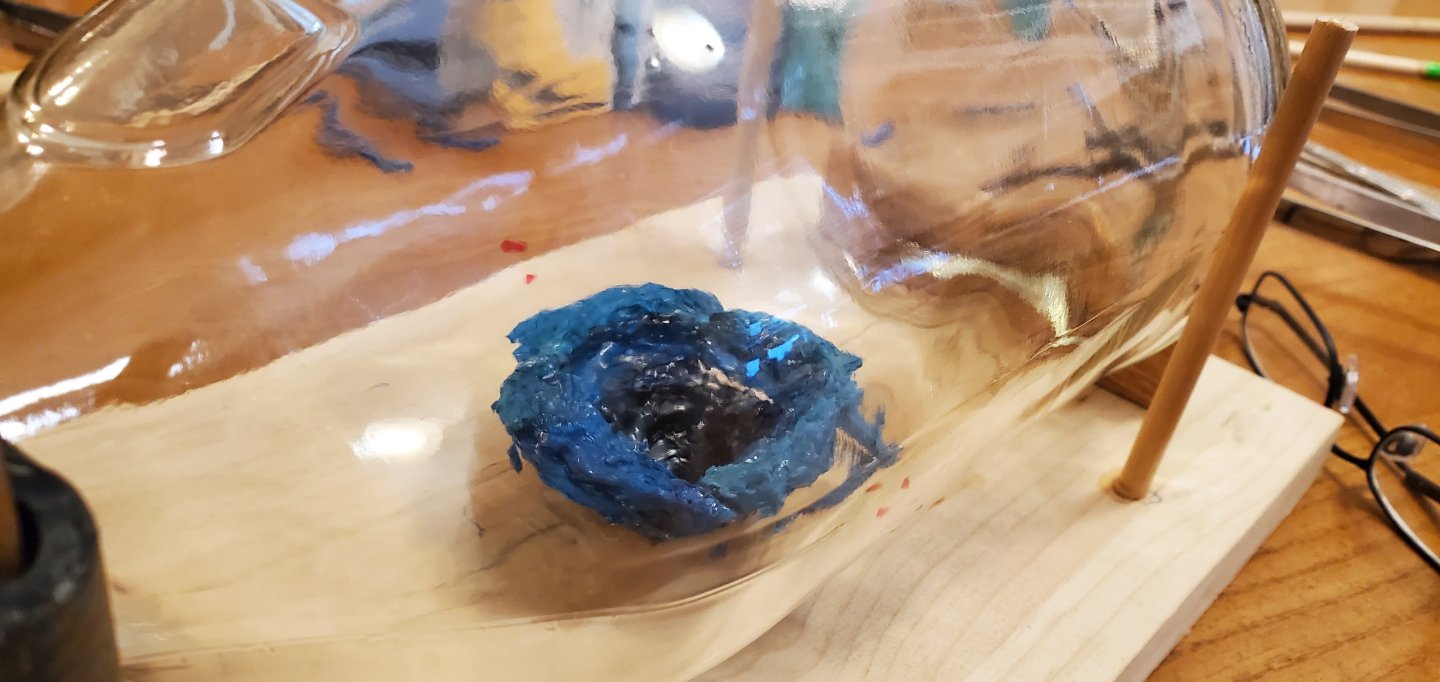
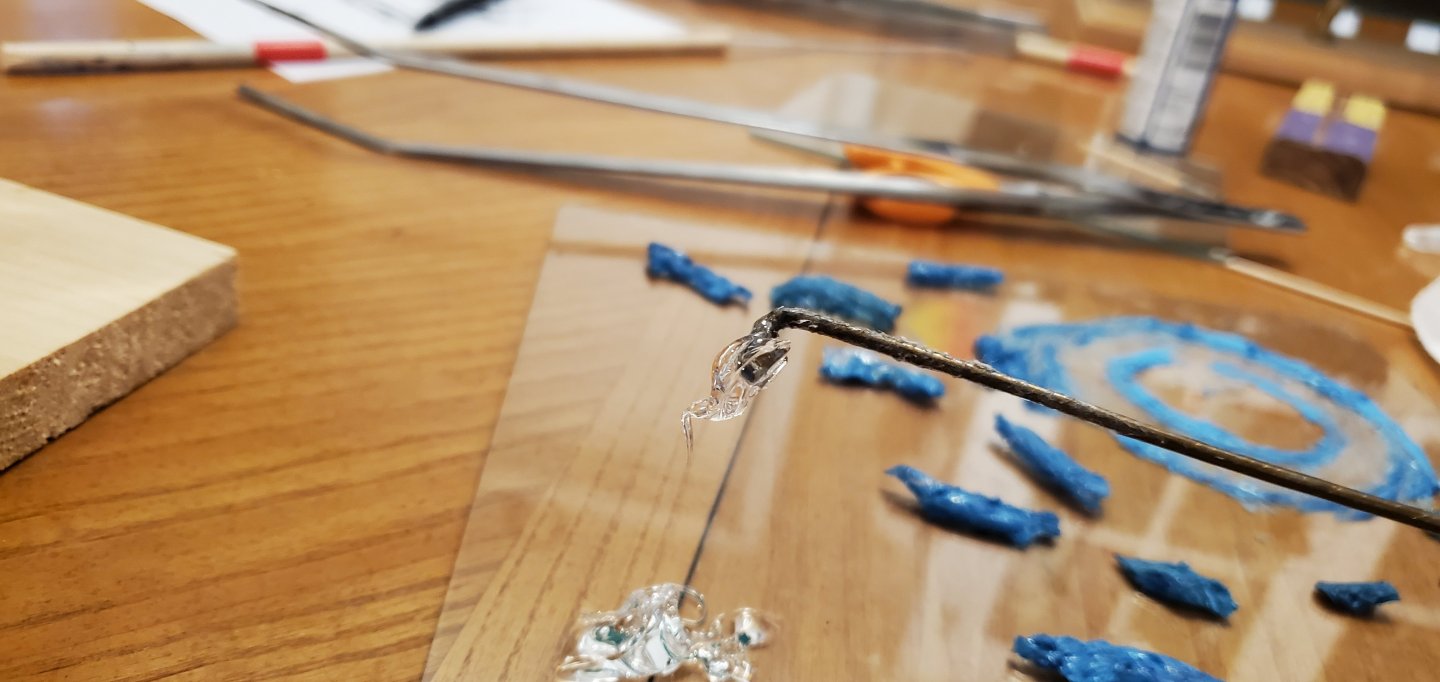
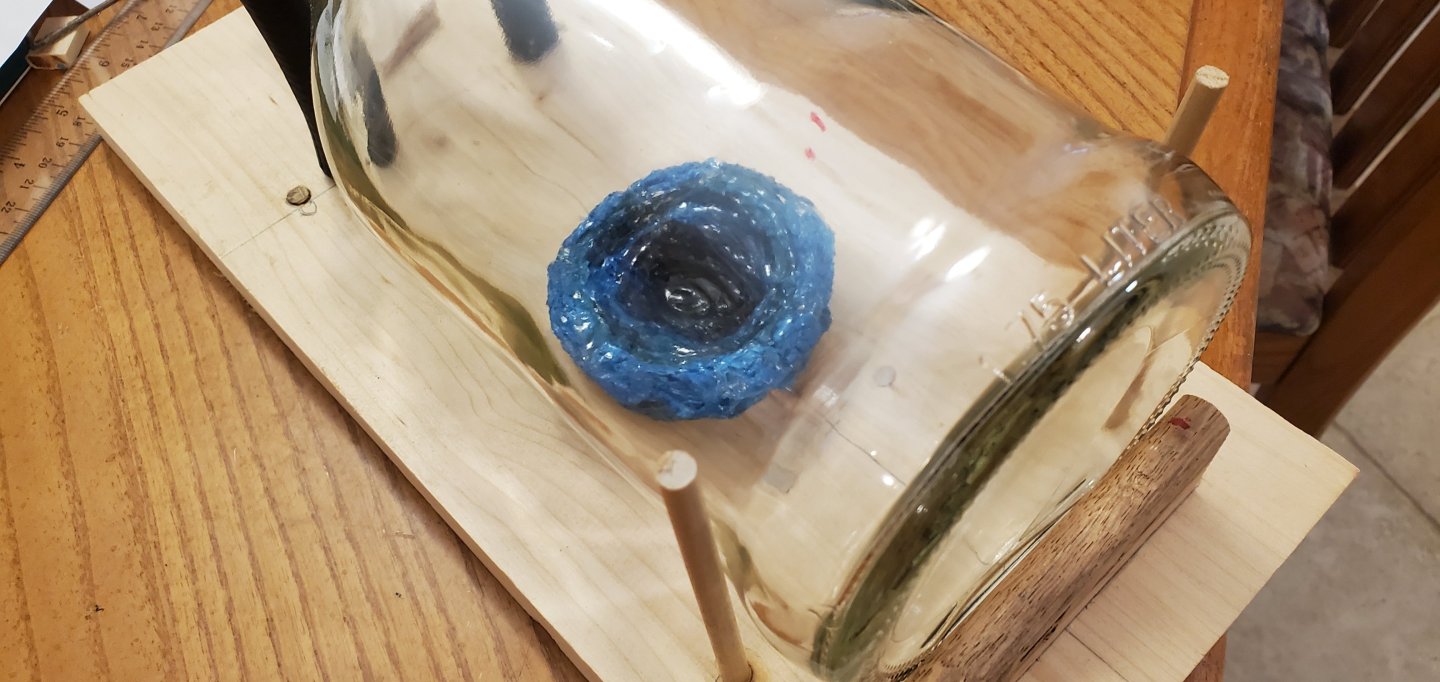
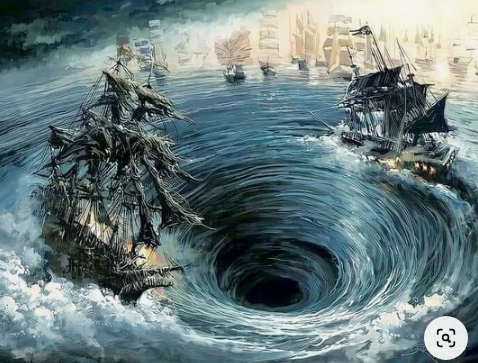
Add a zero to that first number, Tom. Maybe 2 zeroes! I finally quite procrastinating and decided it was time to put up or shut up about the whirlpool. My small test piece looked ok outside the bottle, but you never know what's going to happen when you try replicating something inside. Here's the caulk product of choice for this adventure - DAP UltraClear. It's very sticky but mixes well with acrylic paint and dries glossy clear which makes it very suitable for water effects. Plus, it takes a loooong time to dry so doesn't put me in any kind of time crunch for a change. Here's the process of building the whirlpool inside the bottle: 1. First, I used the caulk to make a small base layer of the whirlpool. It's about the size of a quarter and colored dark, navy blue. I epoxied it to the glass base of the bottle. To give a visual of depth to the whirlpool, the plan was to start dark and move to lighter shades of blue as I got nearer the top surface. 2. Next, I added a layer of the uncolored caulk to the outer edge of the base of the whirlpool. This purpose is to glue each layer of the whirlpool together. I will refer to the uncolored caulk as "glue" going forward to distinguish it from the caulk used to make the whirlpool. 3. I am "gluing" each layer together because there cannot be any gaps between layers of the whirlpool. Otherwise, when I add the epoxy resin ocean water surrounding the whirlpool, it will seep into the whirlpool and be a disaster! 4. Next, I cut the next layer of the whirlpool into small pieces and used very long tweezers to insert them into the bottle. I positioned each piece of the new whirlpool layer on the "glue" on the outer edge of the existing layer to widen the maw of the whirlpool as it is built higher. 4. I did this one layer at a time, allowing the "glue" to dry overnight before adding the next layer of glue and pieces of the next layer of the whirlpool. 5. Rinse and repeat as the whirlpool became taller and wider. Base and first 2 layers below: Layer #3 in place (you can see layer #4 lying in wait on the right side of the pic): Layer #4 in place. Here's where I started running into a problem. The edges of the top layer were now high enough and extending far enough out so that they began to droop as the glue for top layer dried. So I ended up having to turn the bottle upside down every few hours until the glue finally set. Here's where I could have used @Ian_Grant's idea of having some DC gear contraption to spin the bottle for me! Here's how I added the glue (clear caulk) to each layer of the whirlpool inside the bottle: And here is the completed whirlpool with all its layers. I am very happy (maybe more relieved than happy) about how it turned out. For scale, the whirlpool is about 3" across from edge to edge. For comparison, here's the whirlpool shape I was trying to recreate. I did not try to match the blue color in the pic below. I wanted a brighter shade of blue to make more of a contrast with the dark colors of the ships. I will add some thin white streaks to the inside of the whirlpool for highlights to help visualize the rotation. Now, I'm trying to decide if I should do a leak test with water to see if there are any gaps between the layers, or if I should just go for broke and add the epoxy resin ocean water around the whirlpool. As Dirty Harry once said, "Do you feel lucky?"


- 185 replies
-
- 14
-
-

-
- Flying Dutchman
- Black pearl
- (and 2 more)
-
Someone once told me, "It's basically the point of SIB's. If it's not hard or just straightforward, then what's the point?" Oh wait. That was you, Roel! You posted those very inspirational words recently on my Flying Dutchman/Black Pearl log. Even though I have no idea what a draghead is, your sketch looks quite intriguing. I vote for that option.
- 70 replies
-
- 3
-
-
- Scheldt River
- Dredger
- (and 2 more)
-
She's got a nice looking profile, Bryan. Fine work so far!
- 55 replies
-
- 4
-
-
-
- Le Martegaou
- billing boats
- (and 1 more)
-
I hope you tell the First Mate that you've been doing yard work the whole time she was out of town. She will be so impressed!
- 207 replies
-
- 10
-

-
-
- vanguard models
- Duchess of Kingston
- (and 1 more)
-
Simply amazing work.
-
Compared to the piping on your tanker, I figured you could do this one in your sleep! Just kidding, Roel! This one offers a whole different world of challenges, as you have described so well above. Looks to me like you are on a solid track though. Onward thru the fog!
- 70 replies
-
- 6
-
-
-
- Scheldt River
- Dredger
- (and 2 more)
-
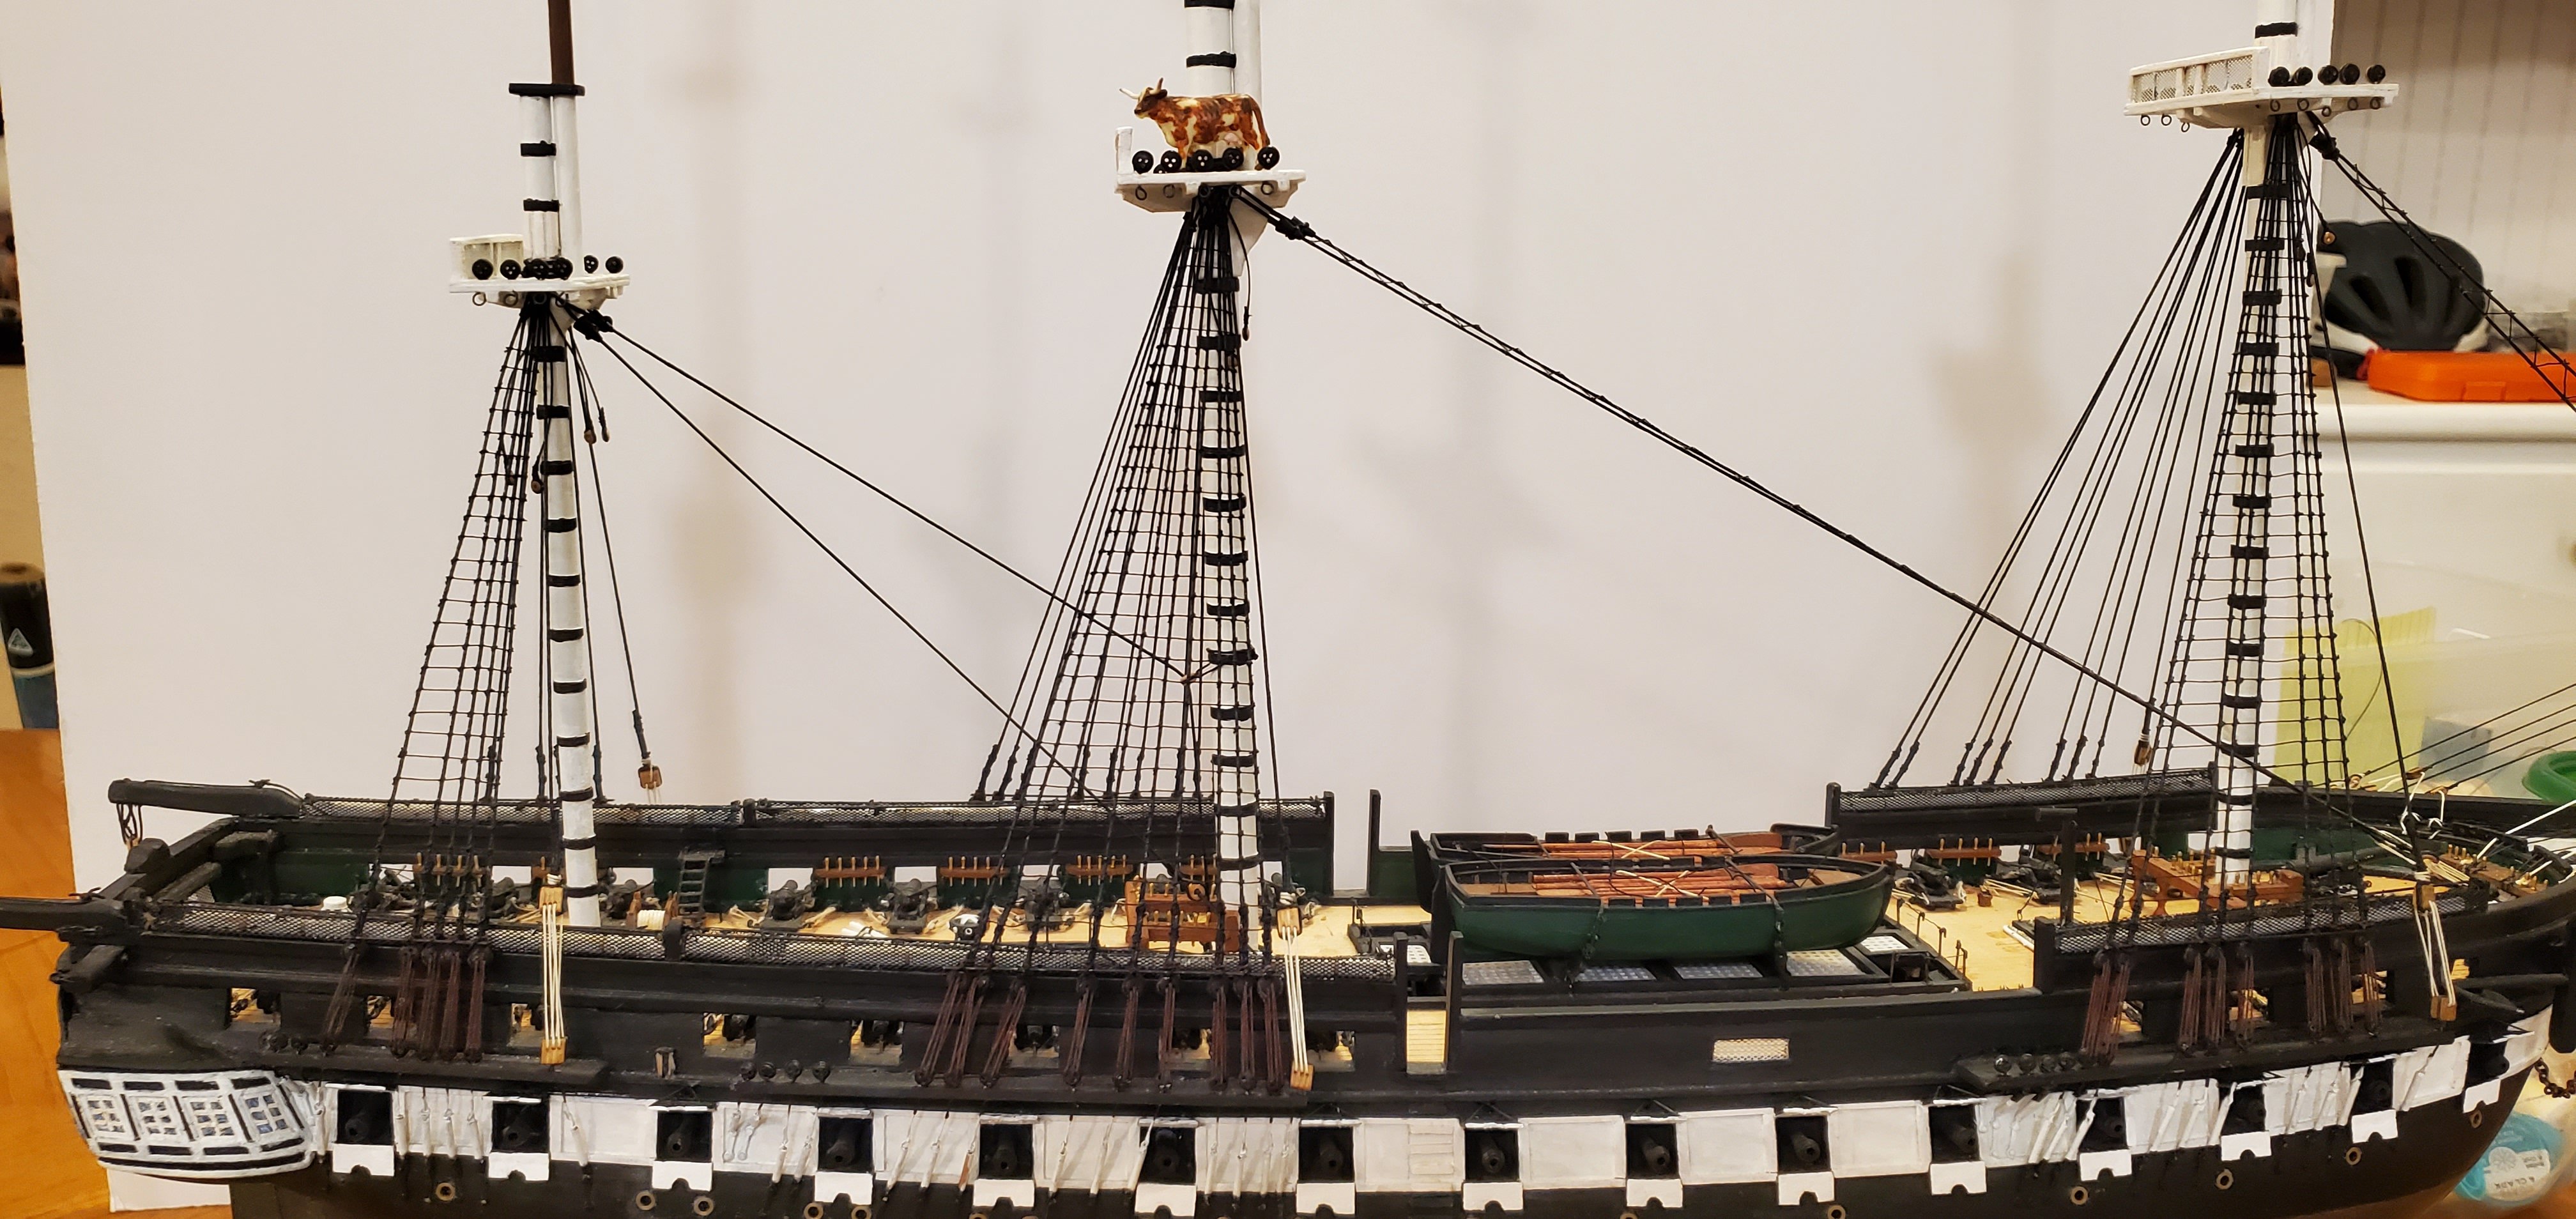
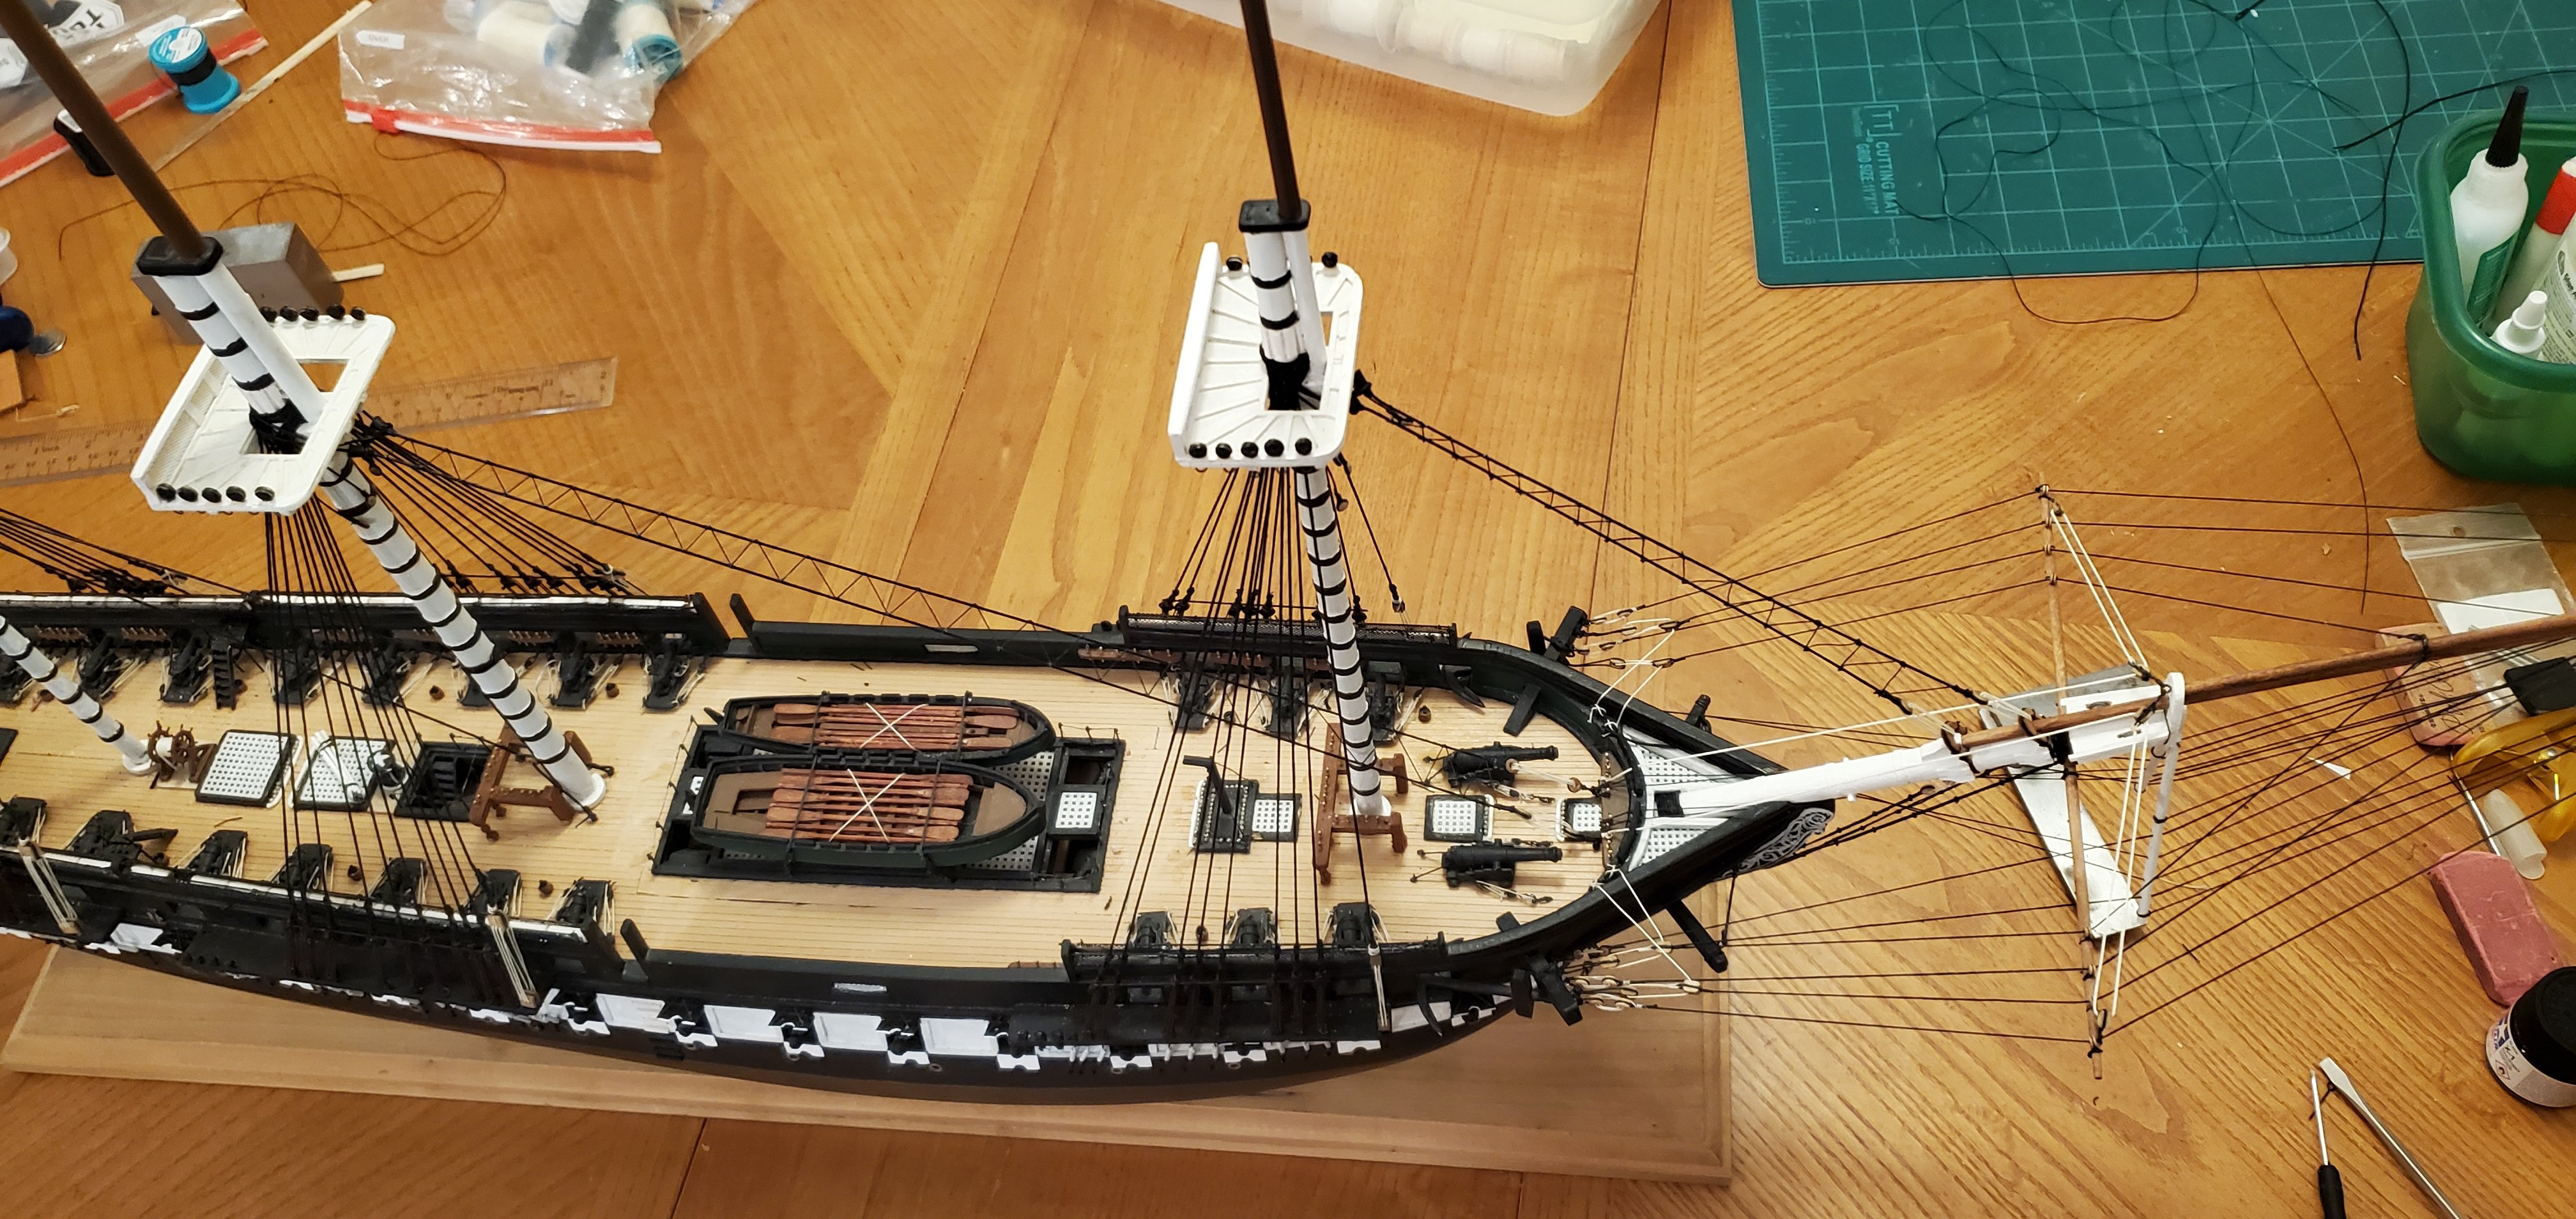
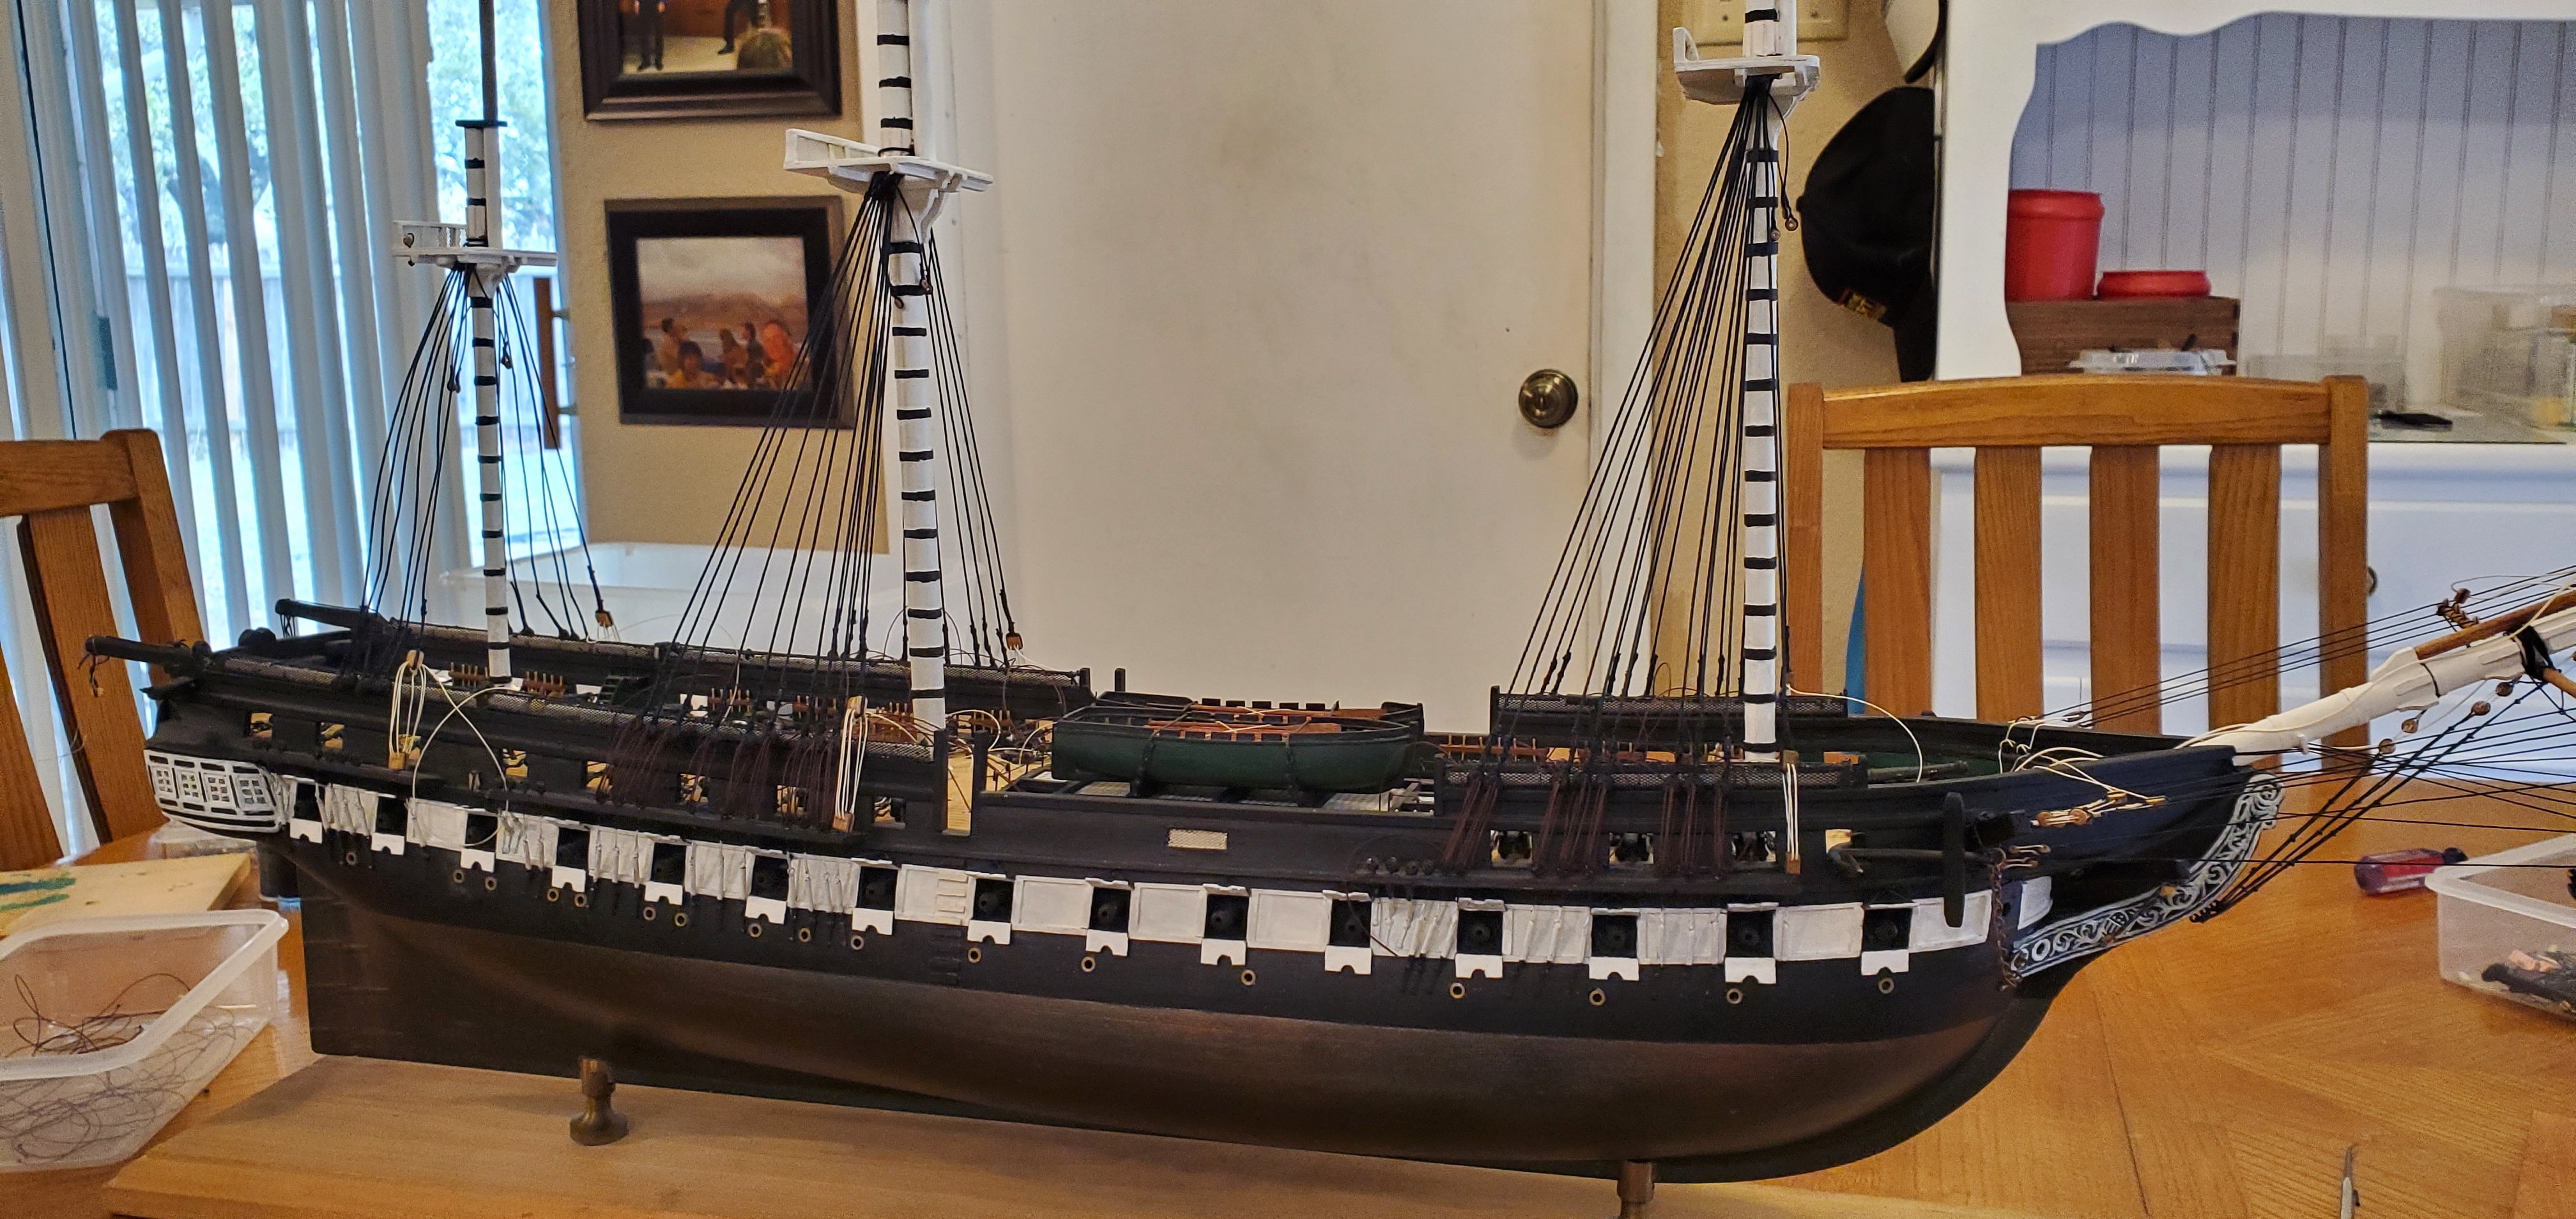
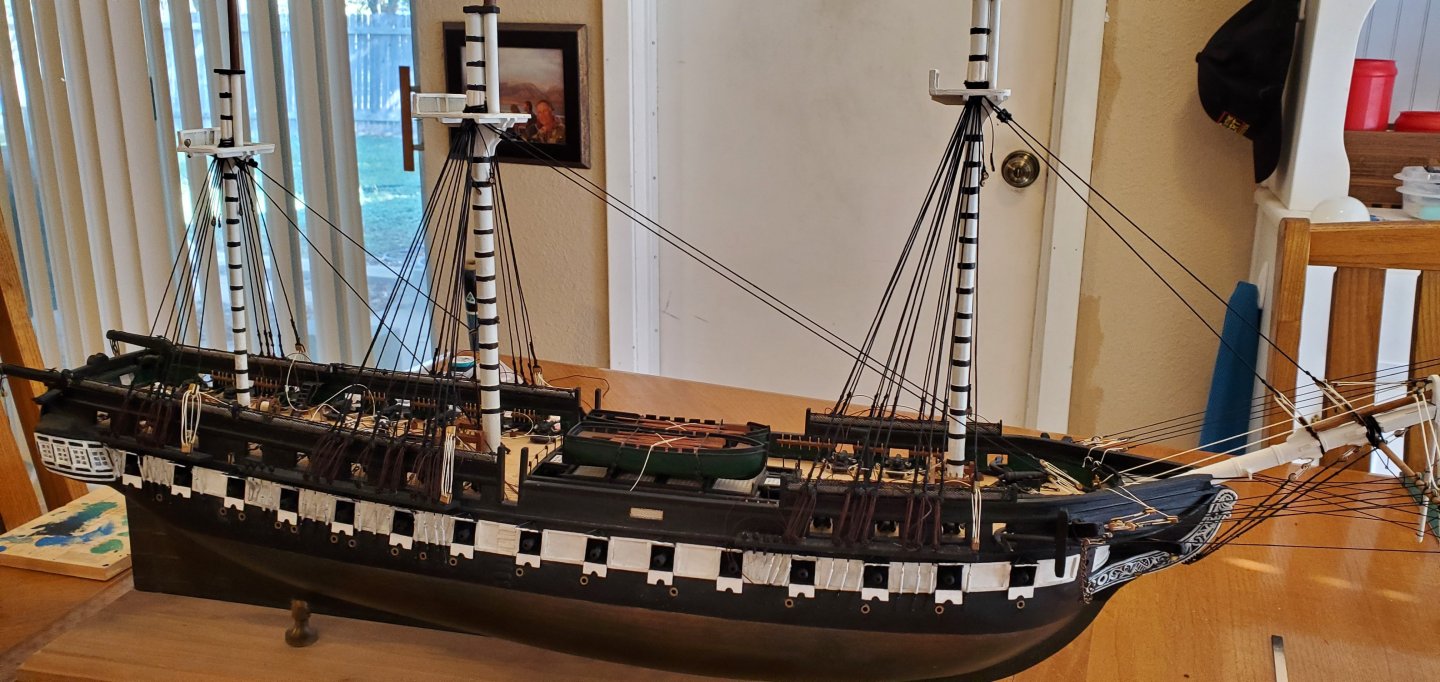
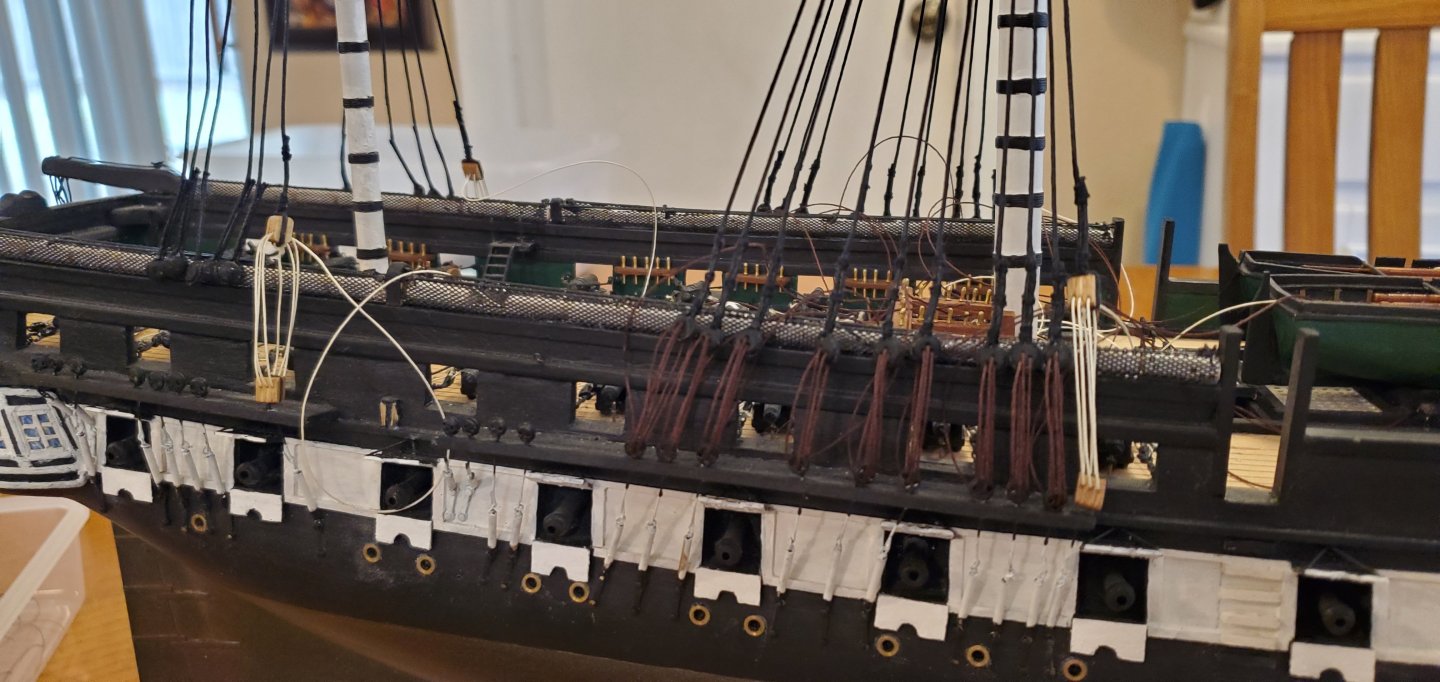
850 knots down and 850 to go, on the lower shrouds anyway! I haven't estimated a number for the uppers yet, but at least it won't be near as many. I kept waiting for Bob to get here and help but I guess PFC Pile would not give him a weekend pass. Mini-Dimples did show up to supervise. Unfortunately, she was not much help. As tedious as those ratlines are, the ship really starts coming to life visually when they are added. For me, they are a defining aspect of the look and feel of the large age of sail ships. My goal when I got back from Hawaii was to get the lower starboard side complete before I head out of town for Thanksgiving. Mission accomplished! After the holiday, I will take a break from the Constitution here and swing back over to the Flying Dutchman/Black Pearl SIB to have a go at making the whirlpool. Yikes!! Speaking of Thanksgiving, one of the things I'm thankful for is all of the incredible people that make up the MSW community. As I've said many times before, y'all make all of my work better and so much more enjoyable. Happy Thanksgiving to everyone!

- 301 replies
-
- 14
-
-
-
- Constitution
- Bluejacket Shipcrafters
- (and 1 more)
-
I think Michigan is somewhere between you and Austin, so you might as well grab @Keith Black on your way and bring him down here to the ratline party.
- 207 replies
-
- 2
-
-
- vanguard models
- Duchess of Kingston
- (and 1 more)
-
More progress the last couple of days. First was adding the mast top deadeyes. Next was snaking the fore stay and main stay. Then I snugged up the lower shroud deadeyes and added sheer poles. I went outside yesterday morning and there was something in the air. Took me a few minutes, but I finally realized it was the smell of ratlines. That dang north wind blew it all the way down from @Knocklouder's workshop in Canada to Austin. I don't see any way out of it, so I started by making some templates. Only 1700 knots. If I can average 30 seconds per knot, that's only about 14 hours of fun and frolic!! Or maybe I should send Bob a plane ticket and have him fly down here and knock 'em out for me!


- 301 replies
-
- 9
-
-
- Constitution
- Bluejacket Shipcrafters
- (and 1 more)
-
Wasn't there a line in an old movie, "I love the smell of ratlines in the morning!"?
- 207 replies
-
- 3
-
-
- vanguard models
- Duchess of Kingston
- (and 1 more)
-
I thought the hull was beautiful before, but the varnish takes it to a whole nother level! Wow! Love the pic of your granddaughter as well!!
-
Very impressive research document, Thukydides!
-
Right back at him! And tell him I hope he's enjoying his long rest, but he needs to get back to work ASAP! That pile of kits in your workshop ain't gonna build themselves! Thanks, Keith. Yes, they were quite happy when I got back and gave them their cow candy!
- 301 replies
-
- 10
-
-
-
- Constitution
- Bluejacket Shipcrafters
- (and 1 more)
-
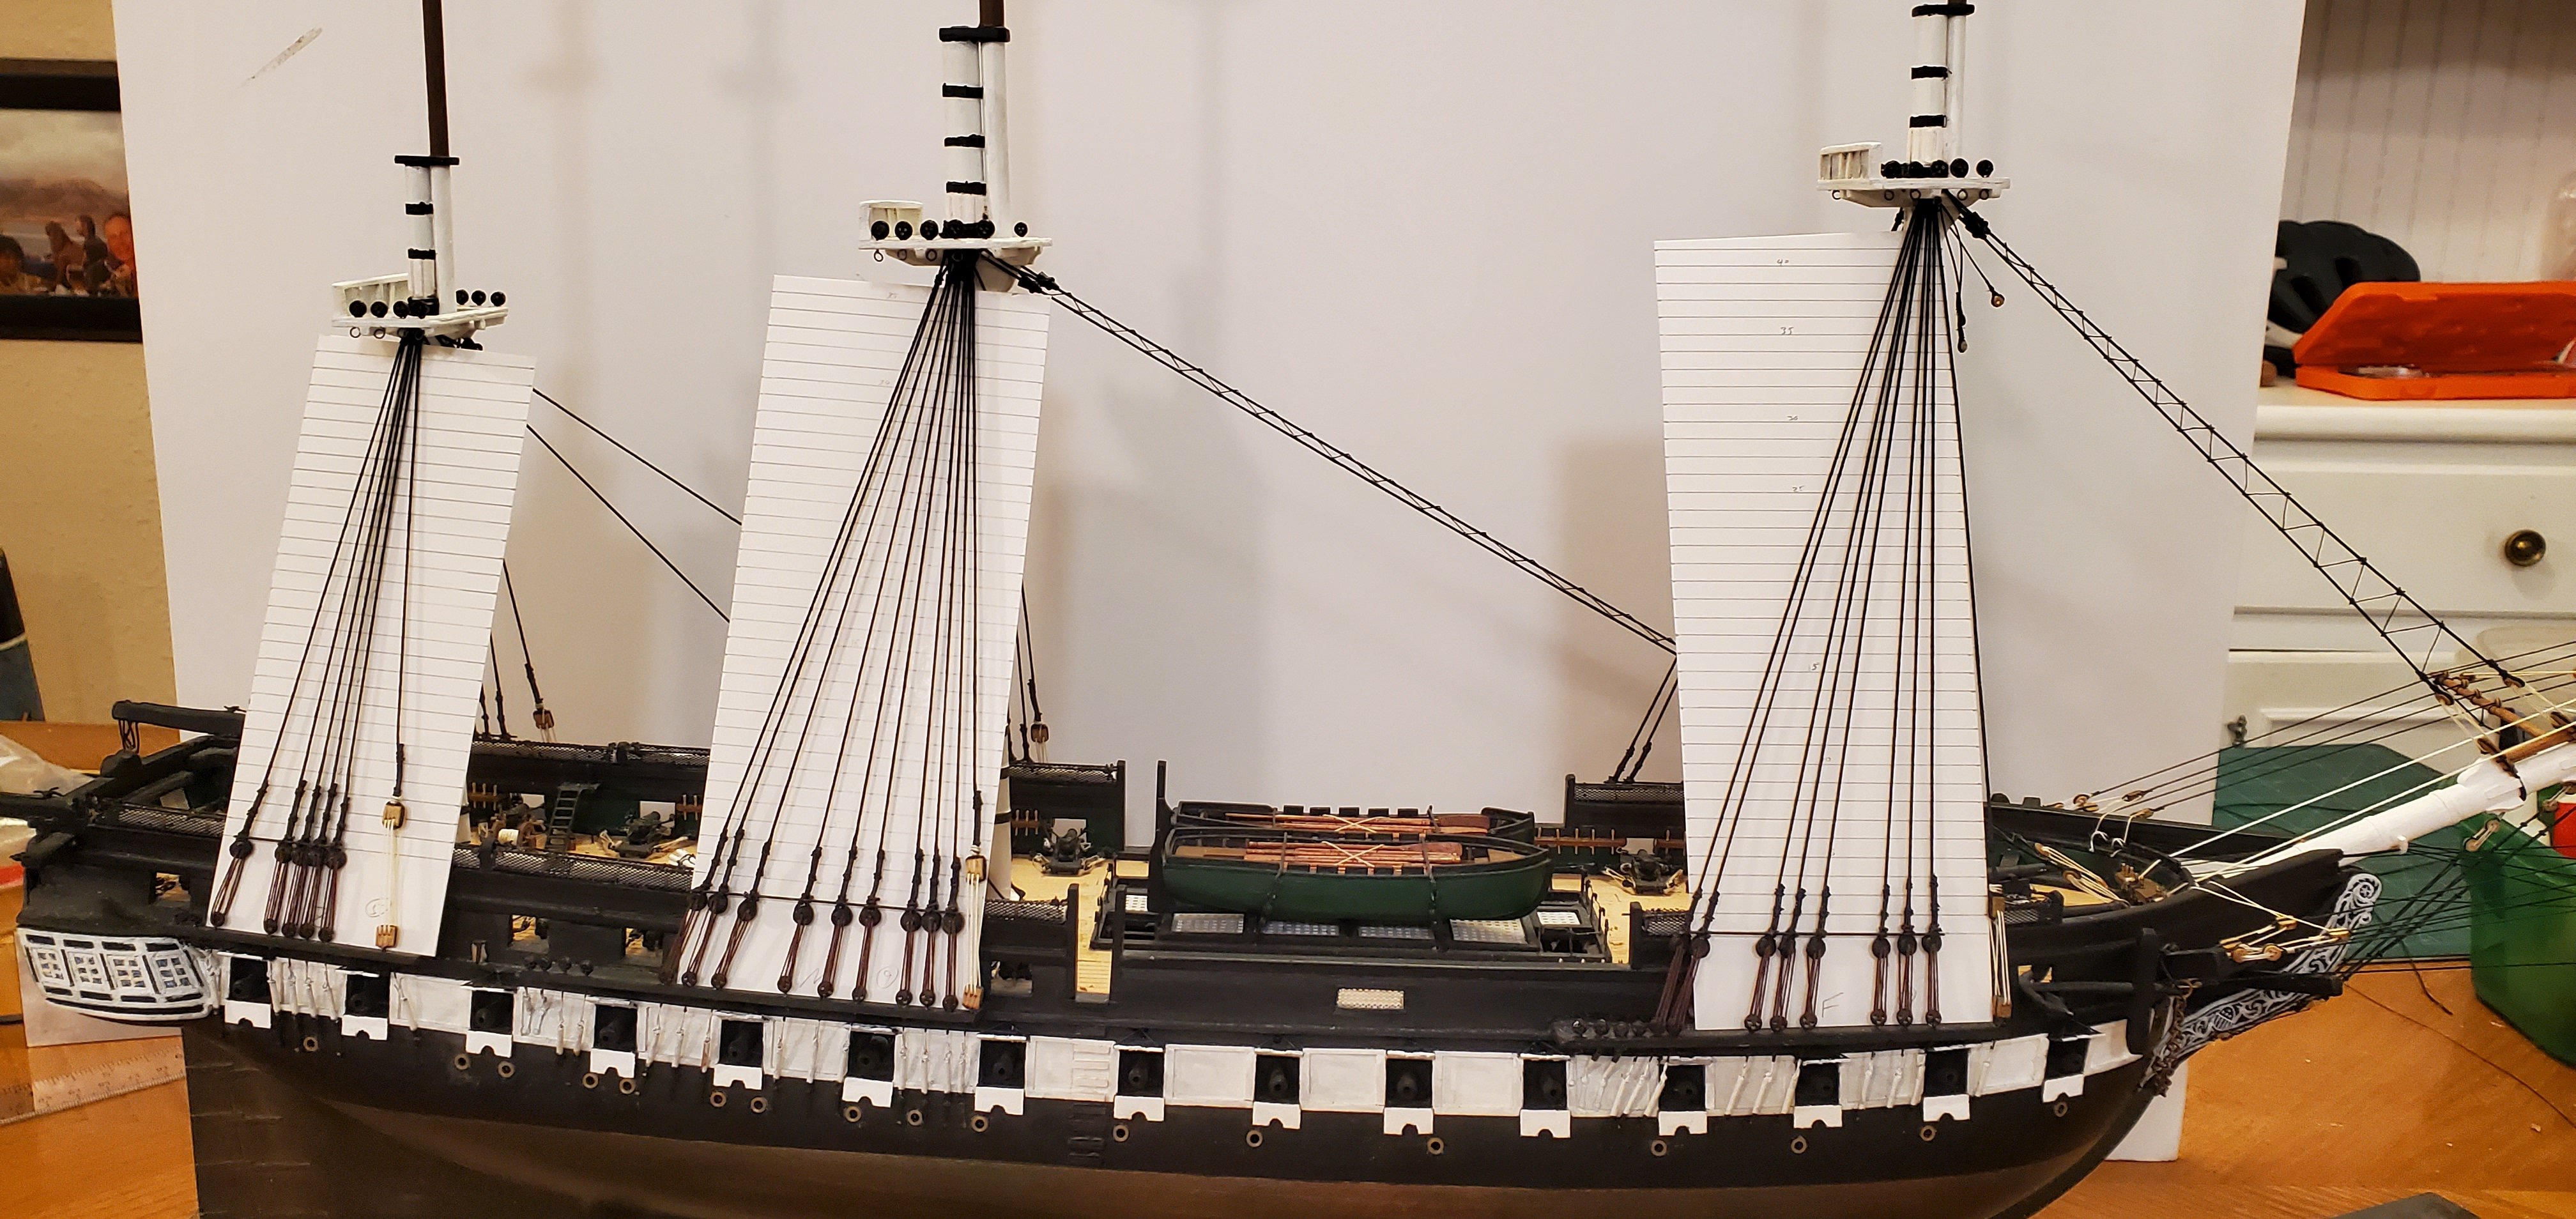
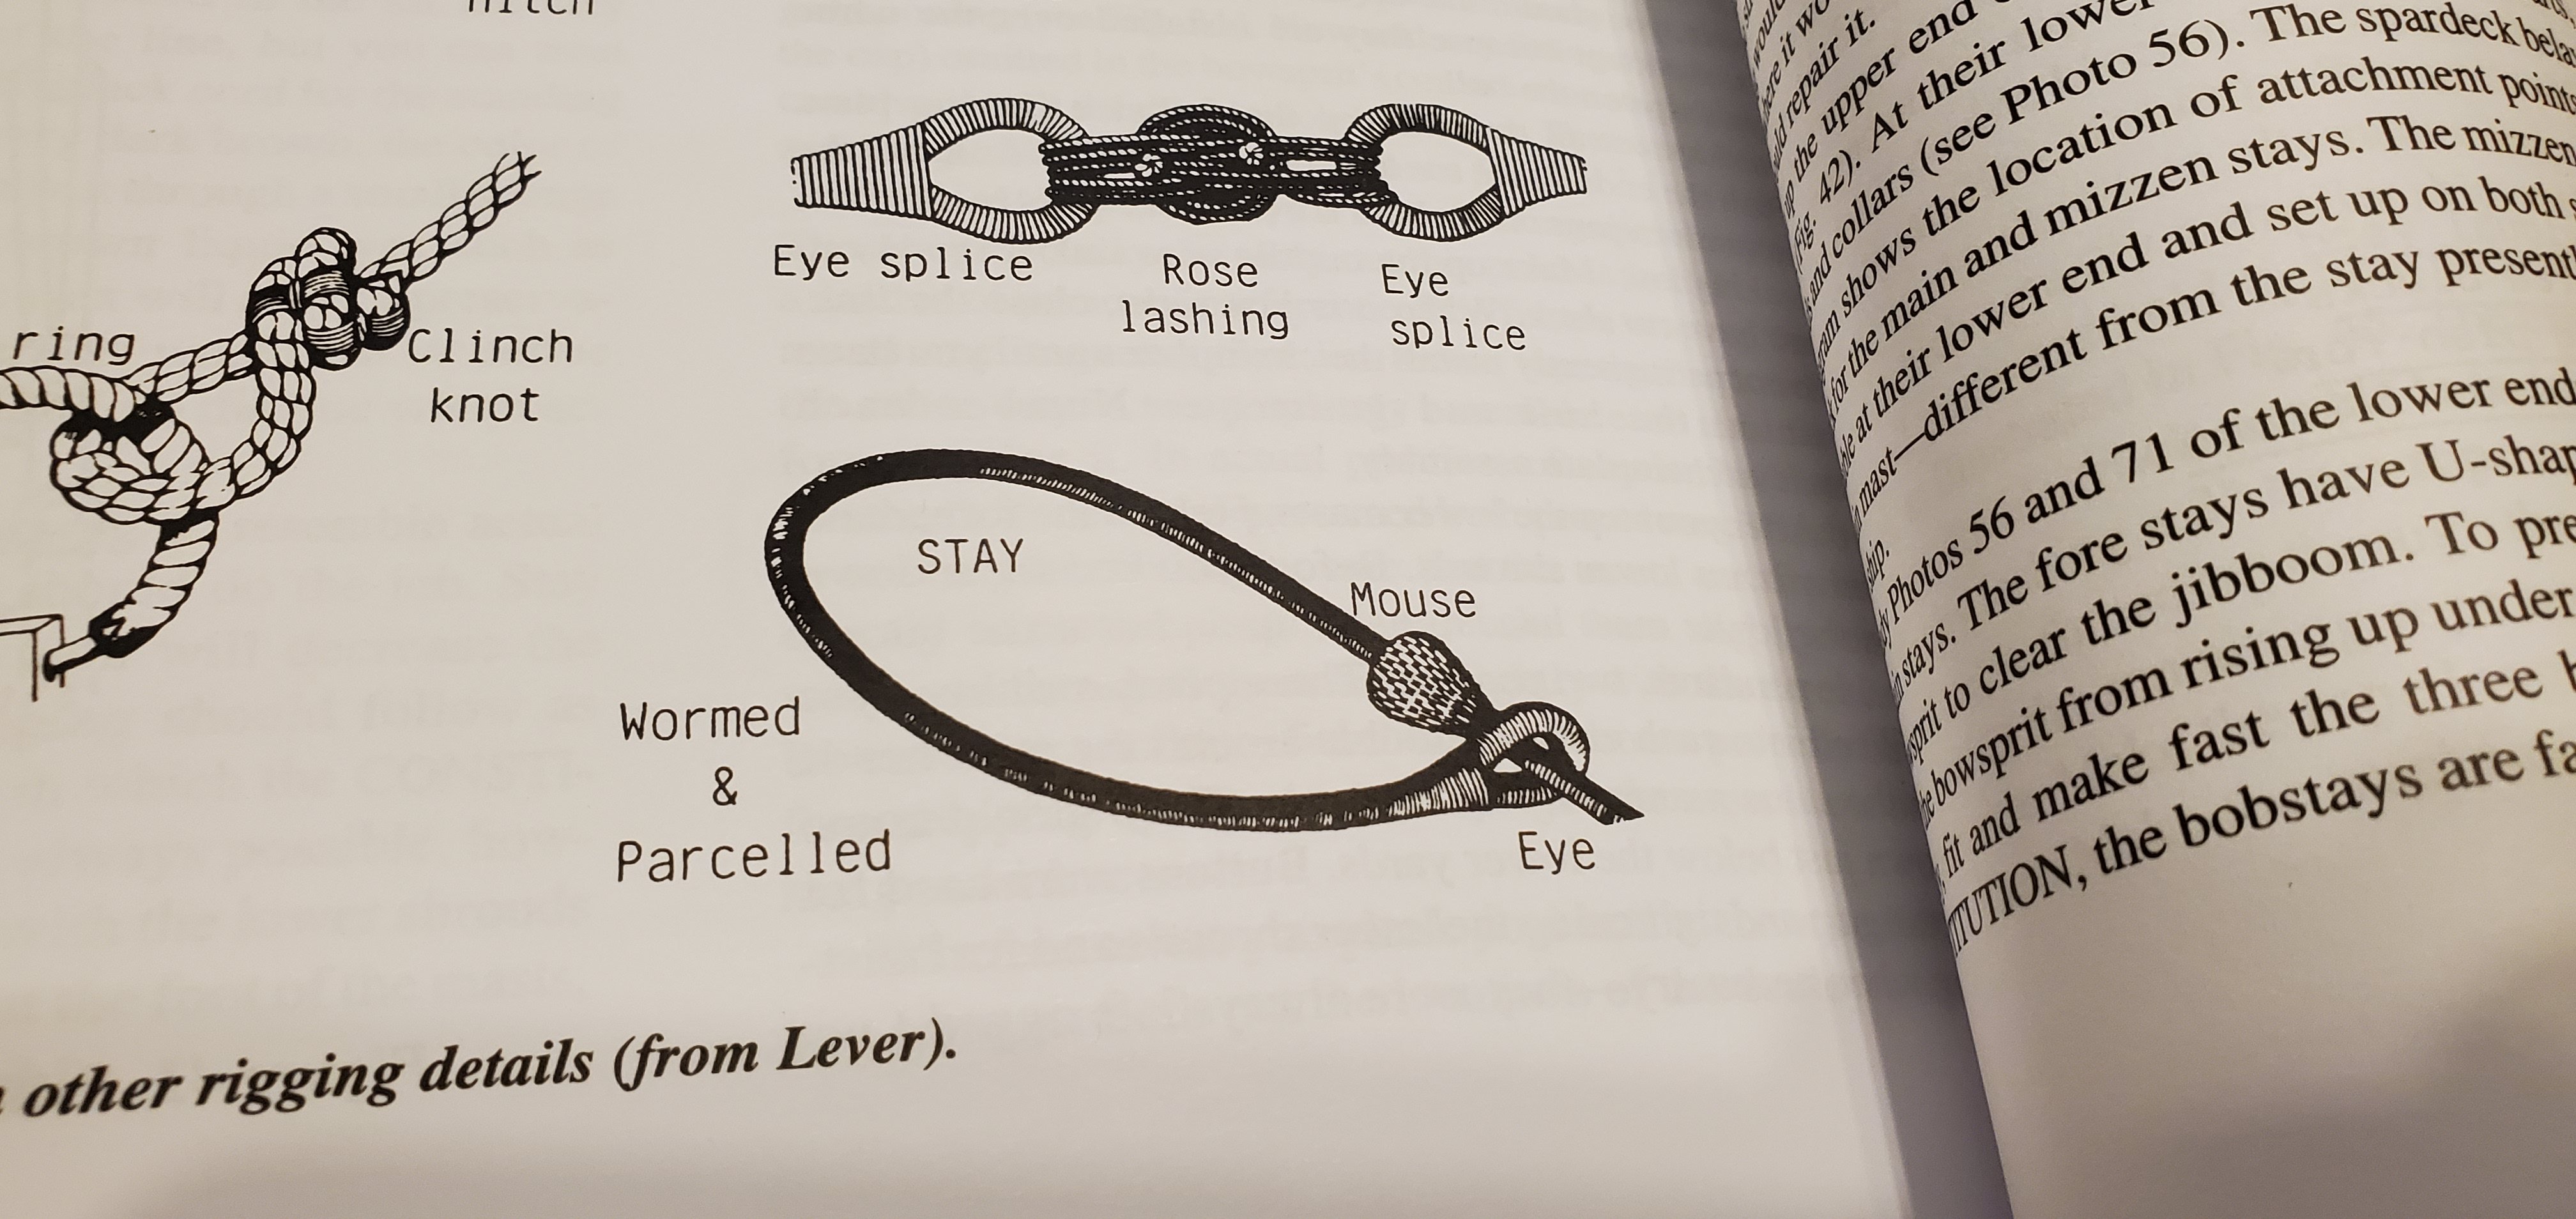
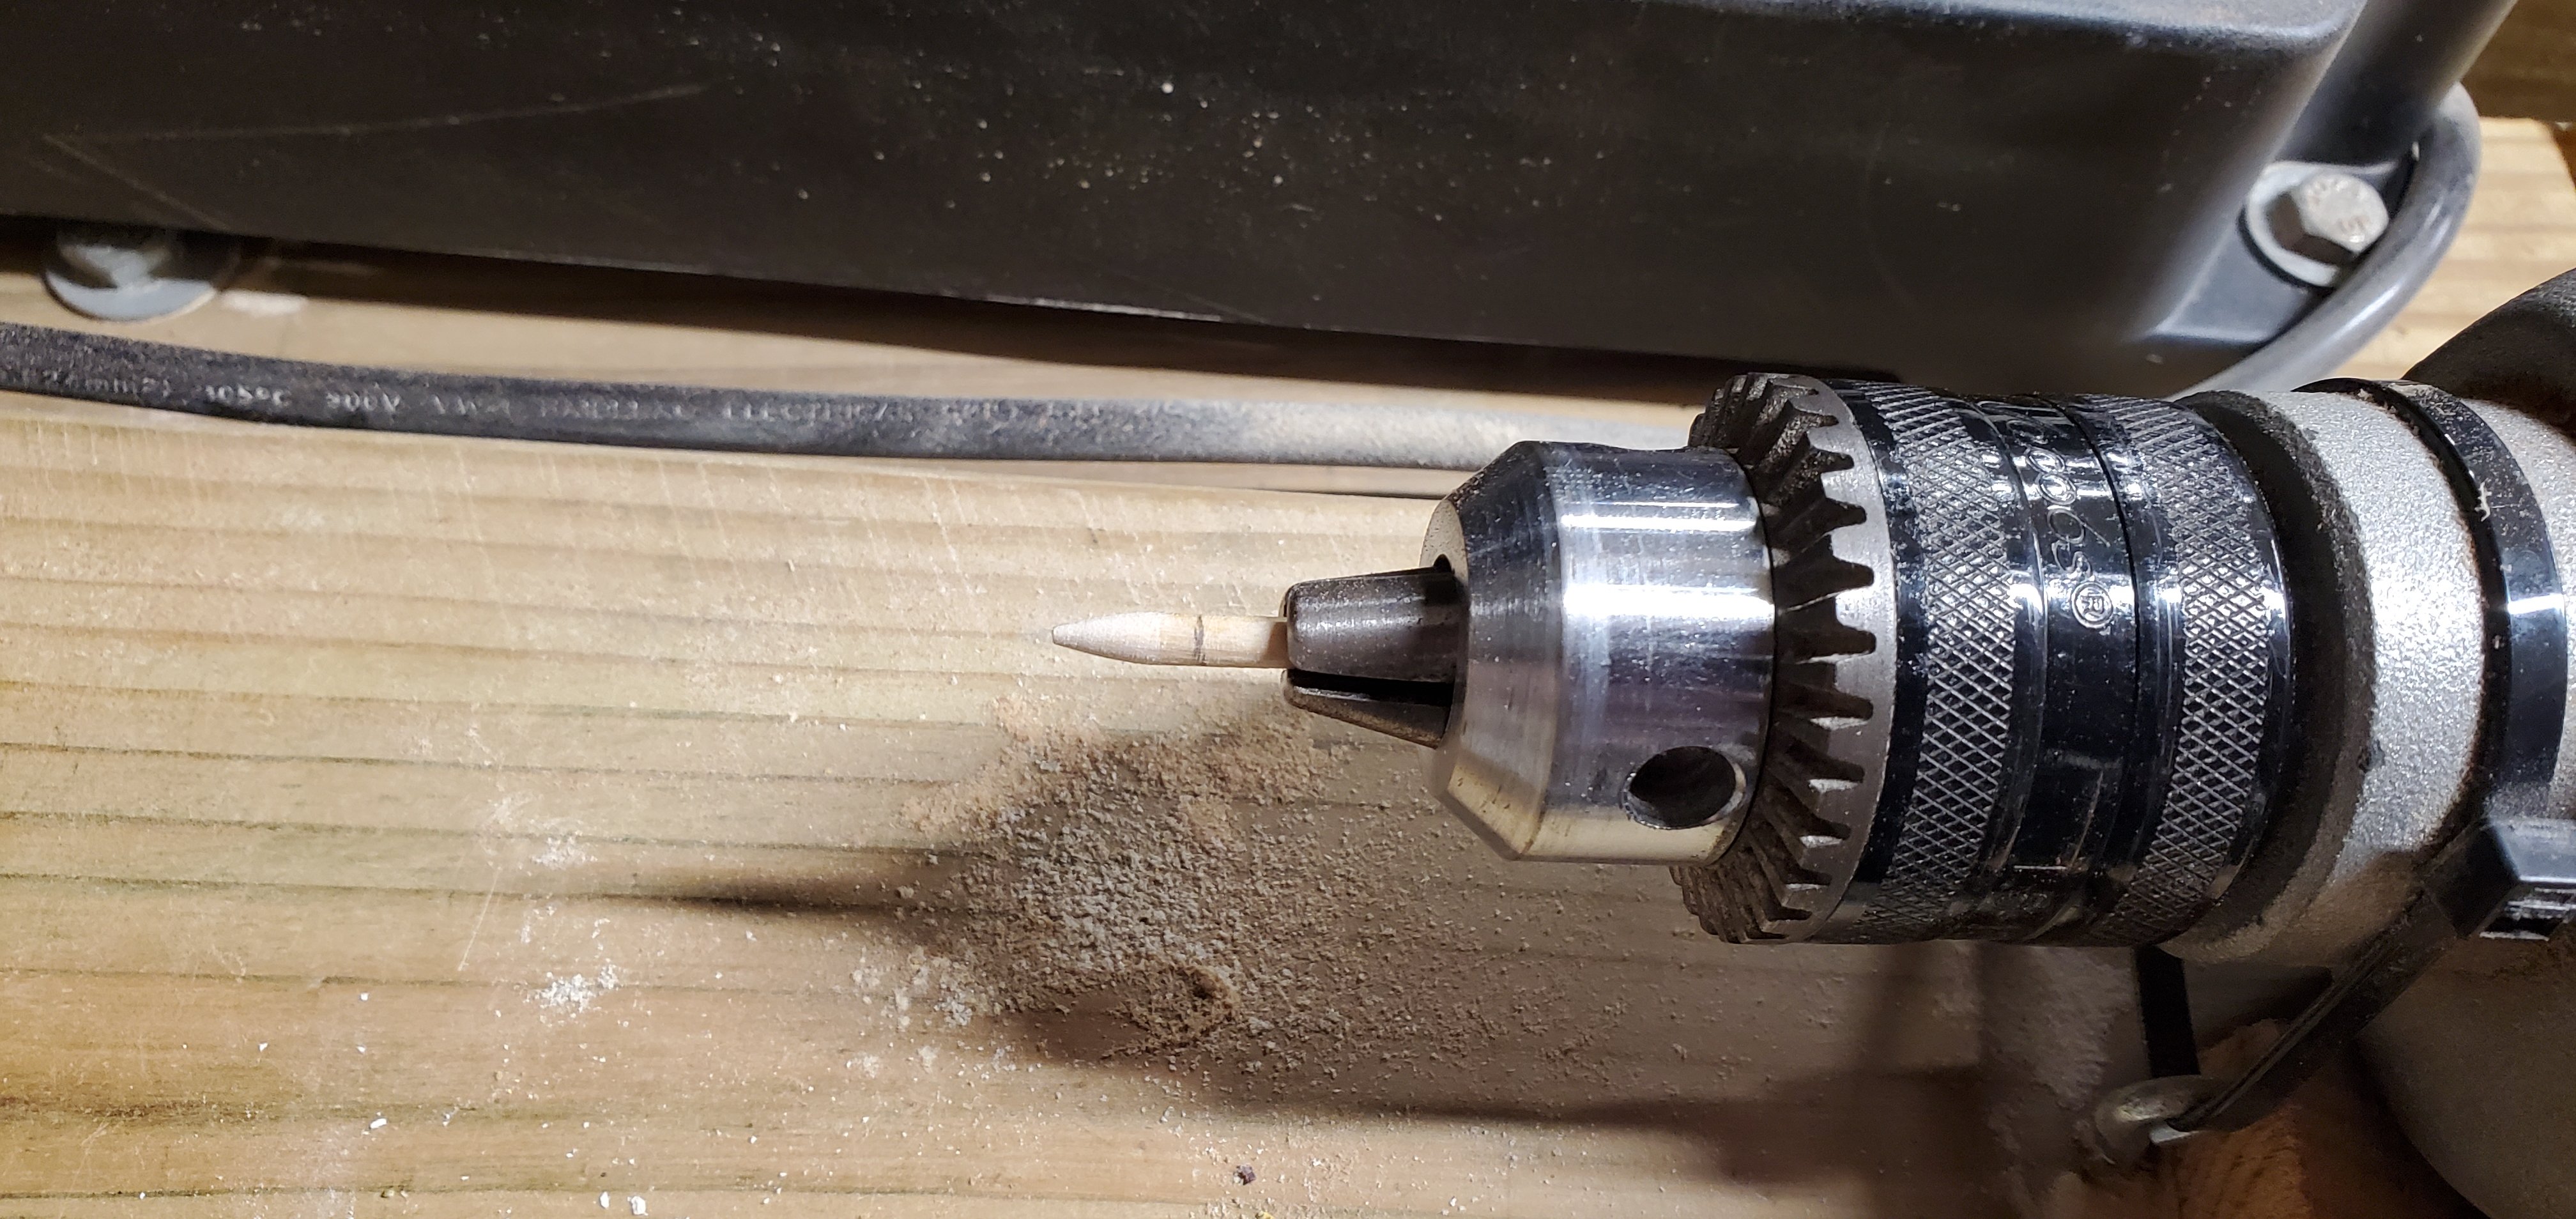
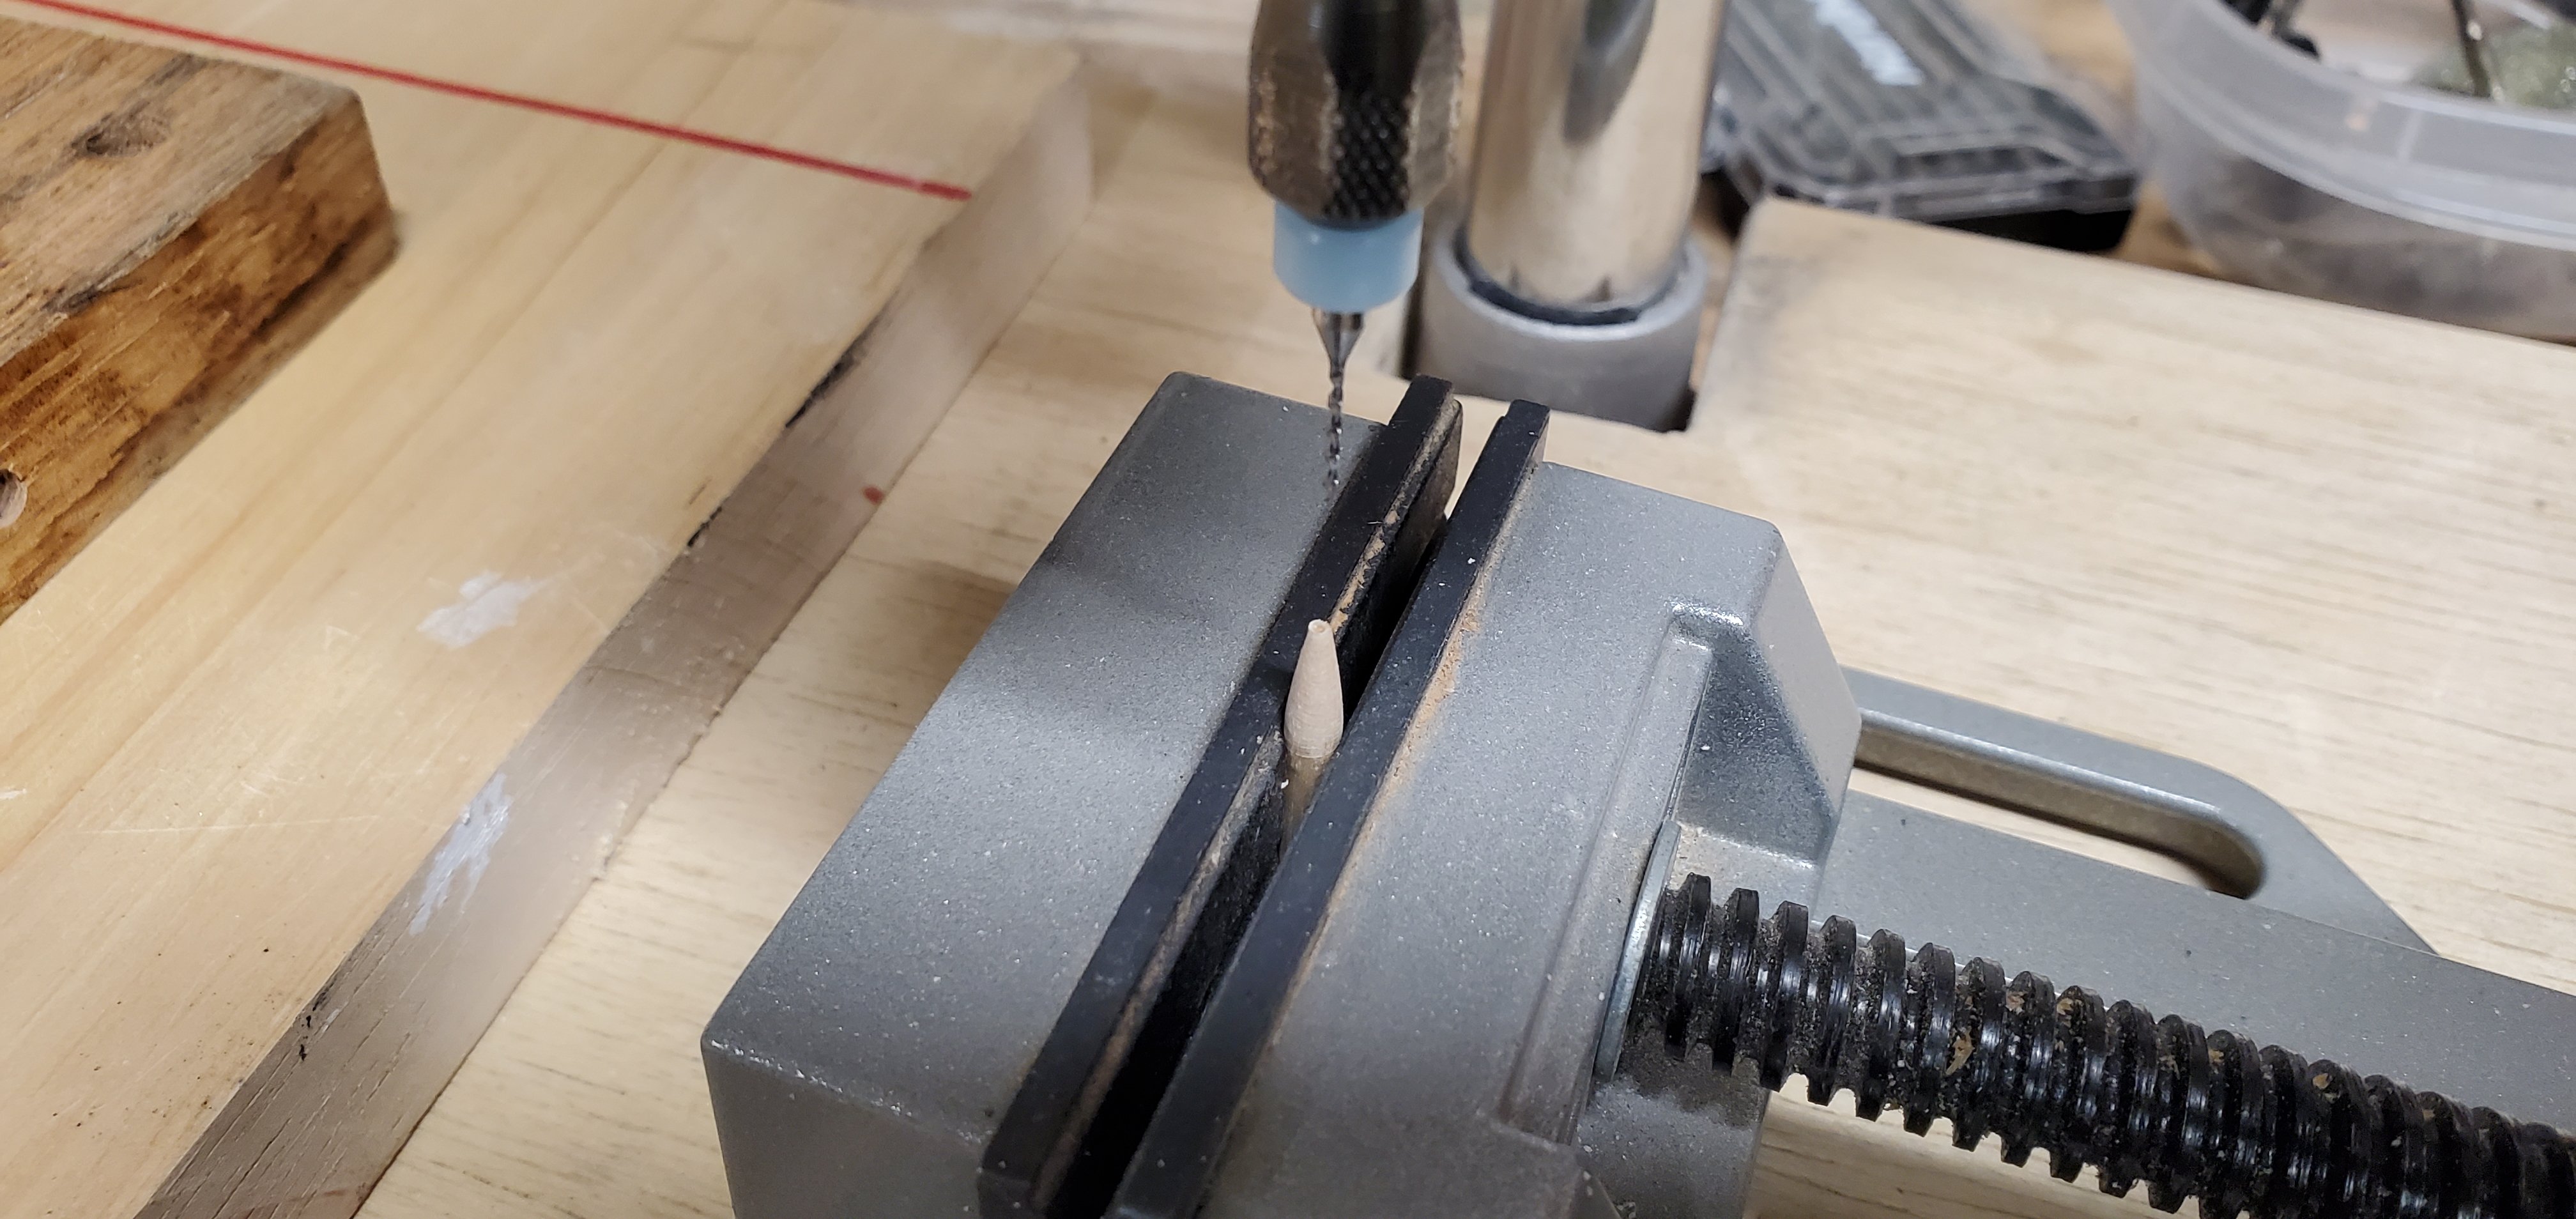
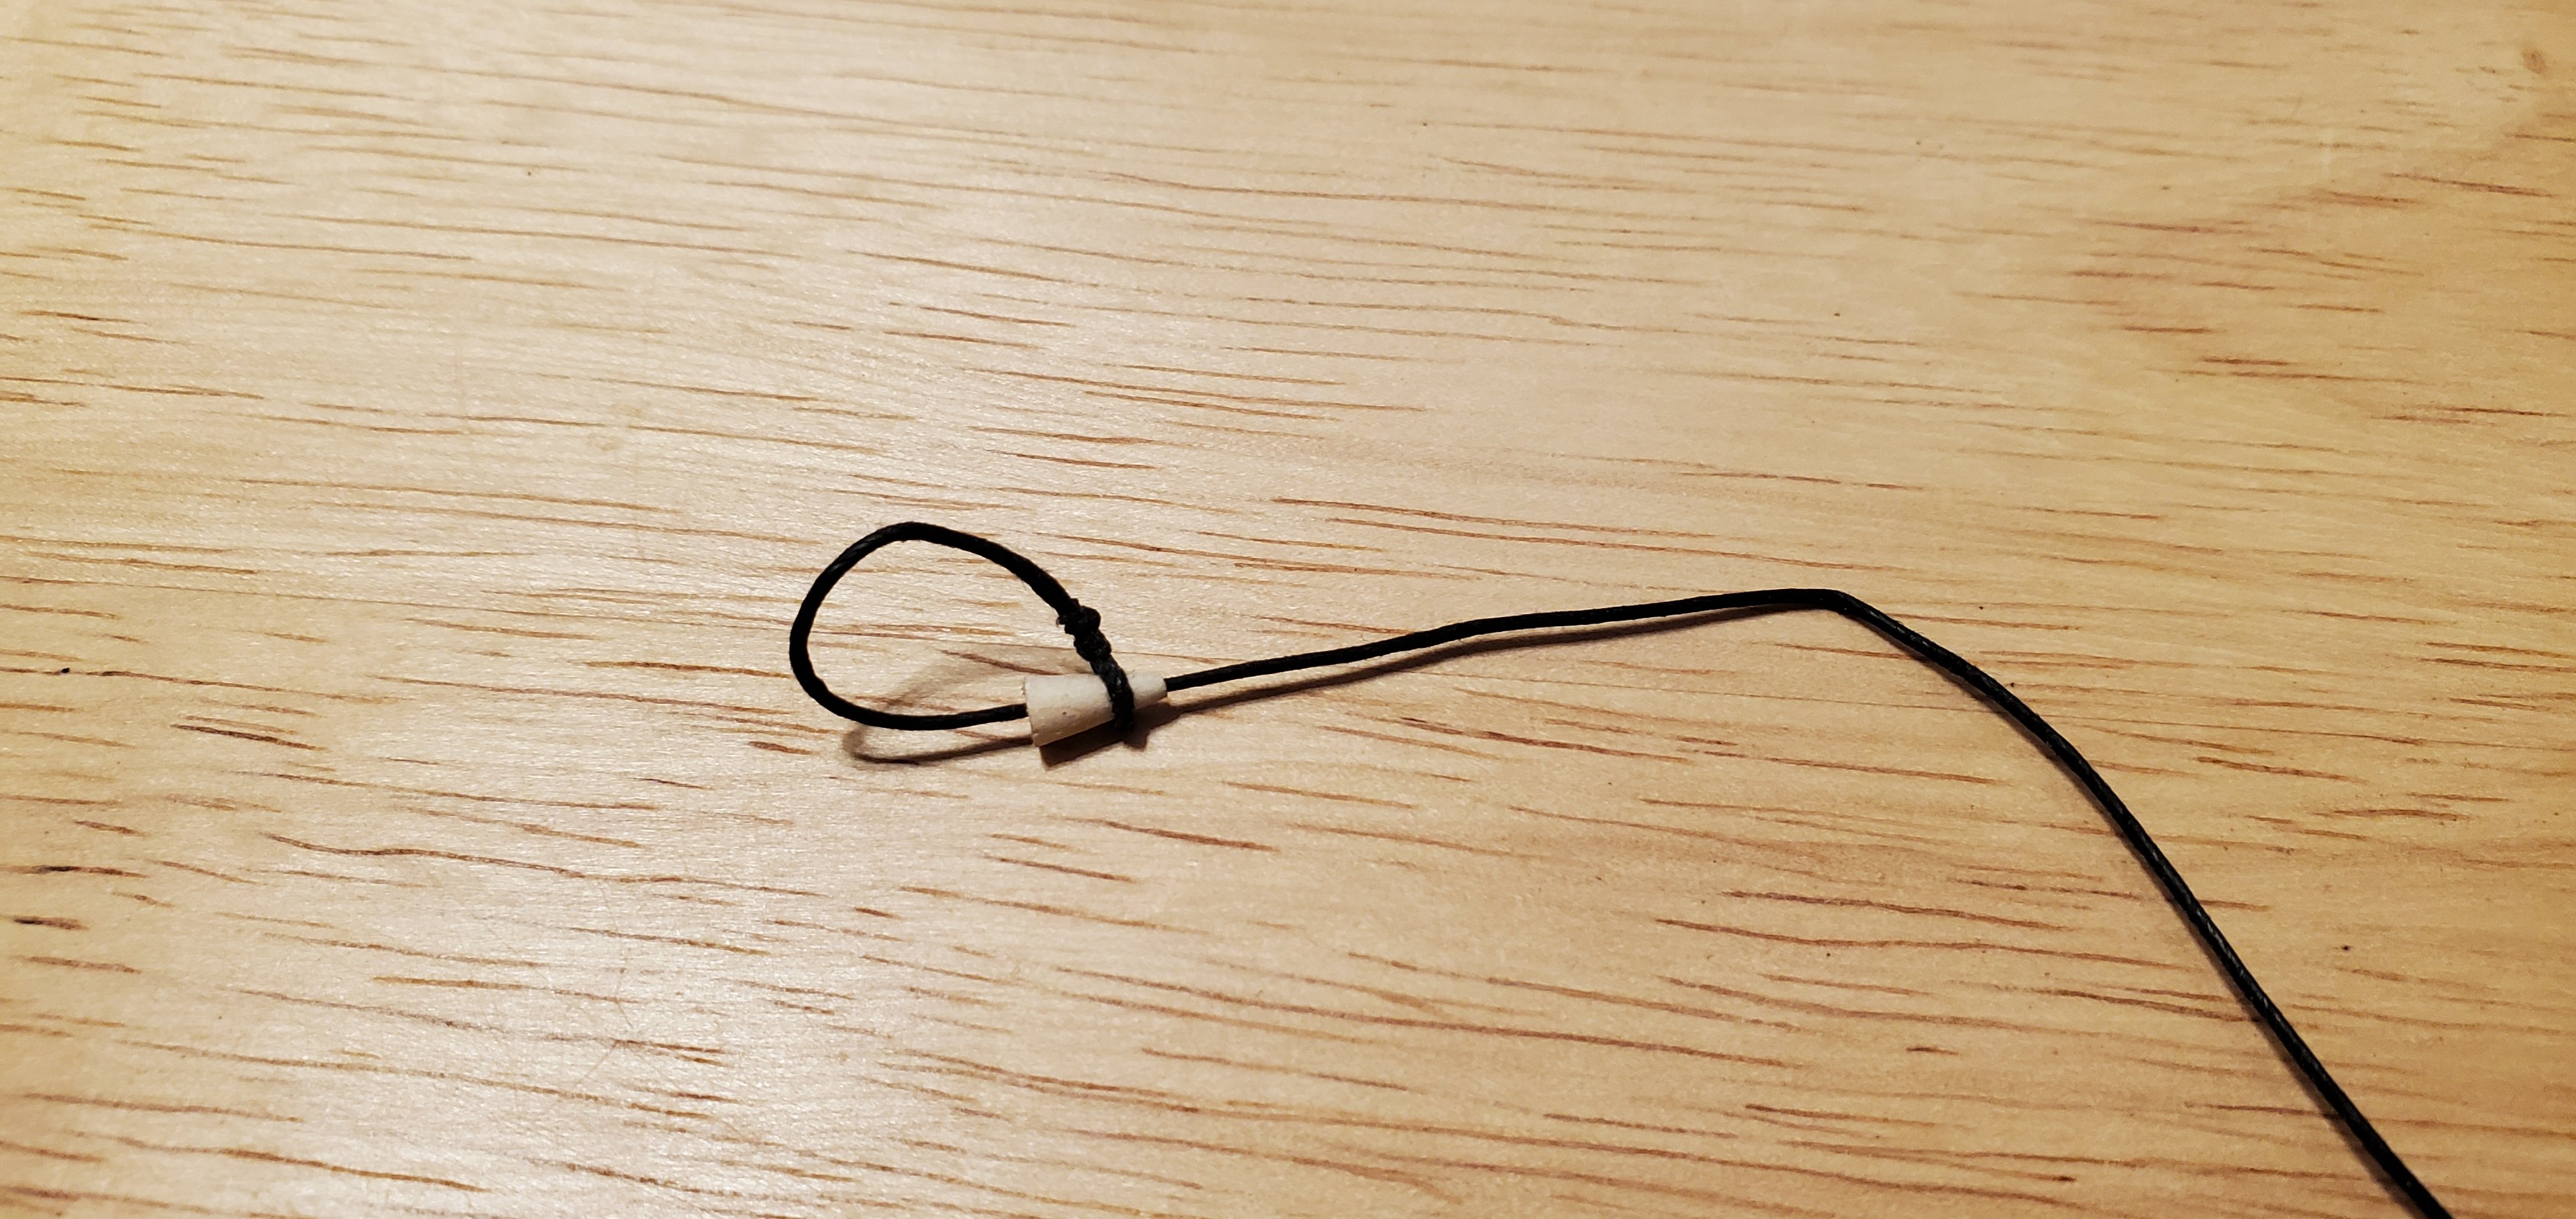
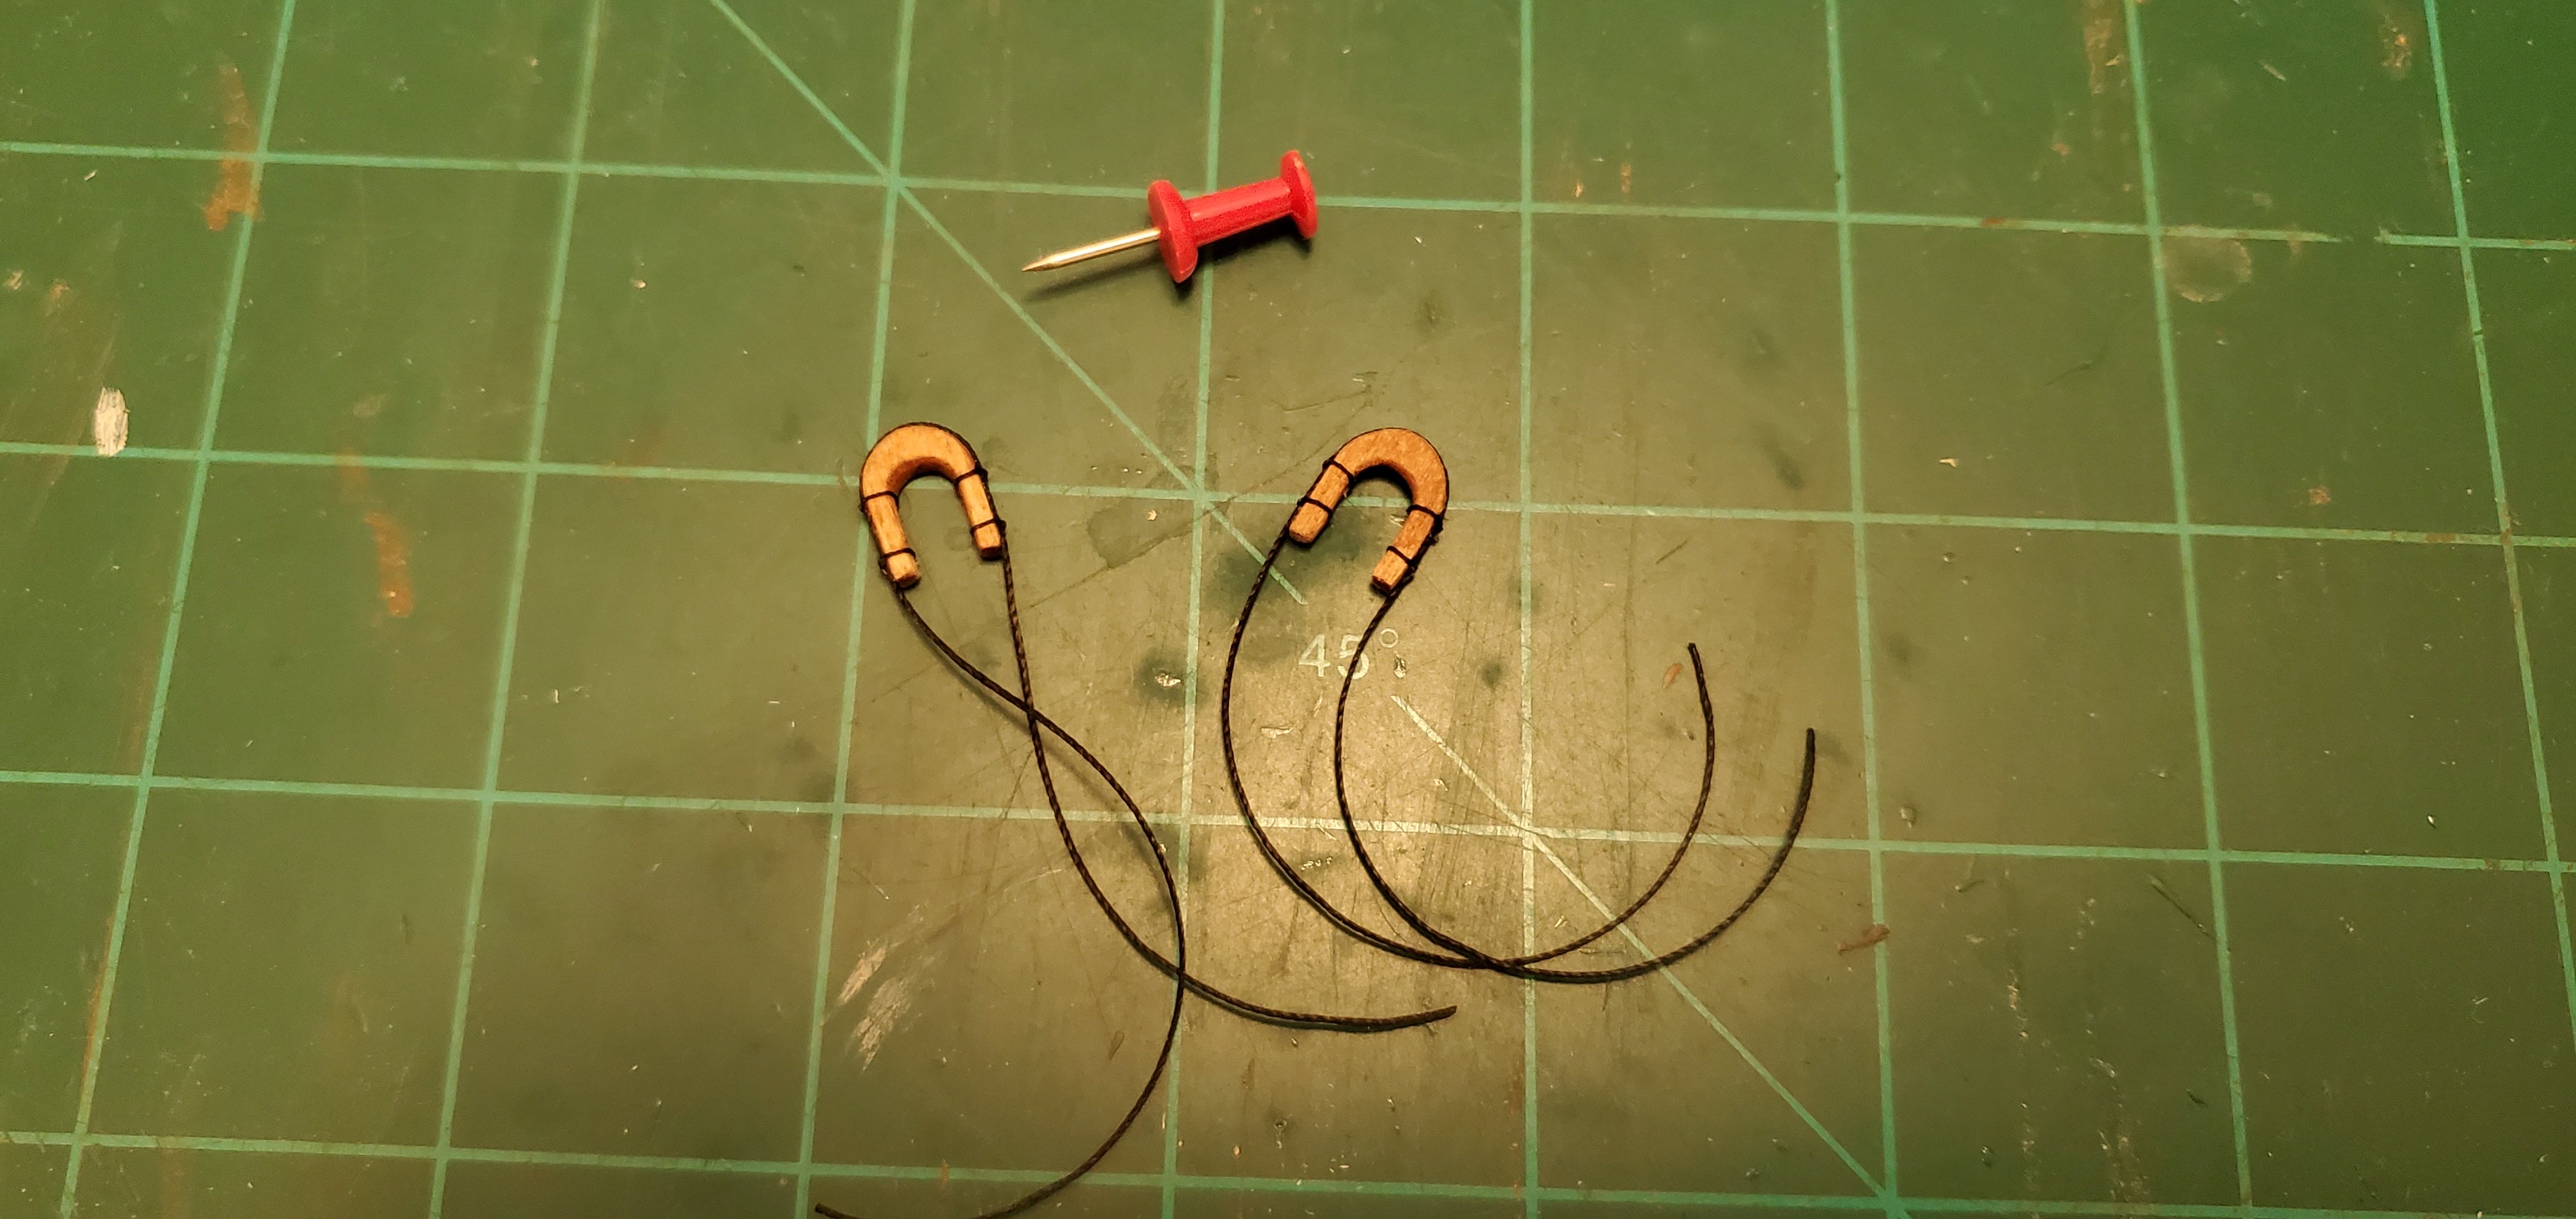
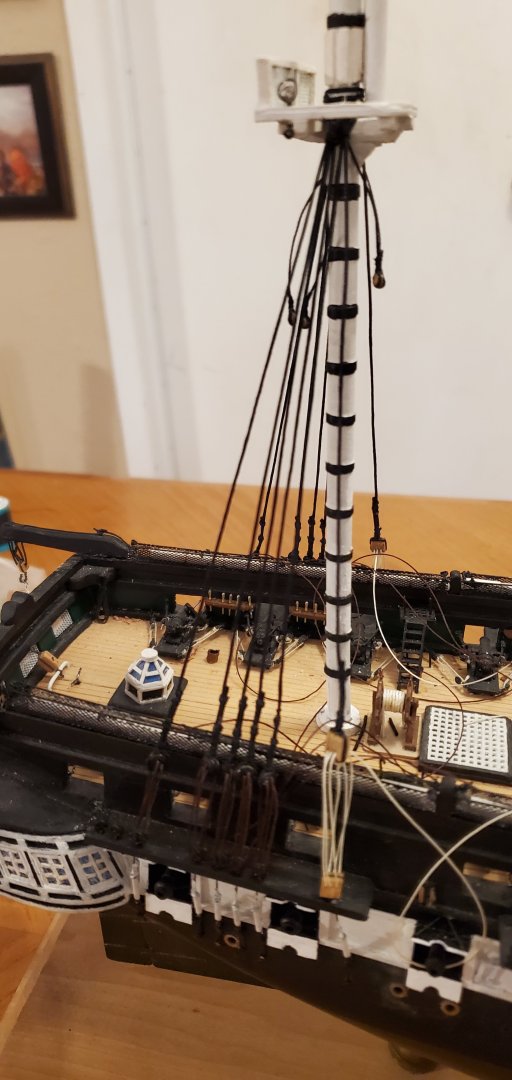
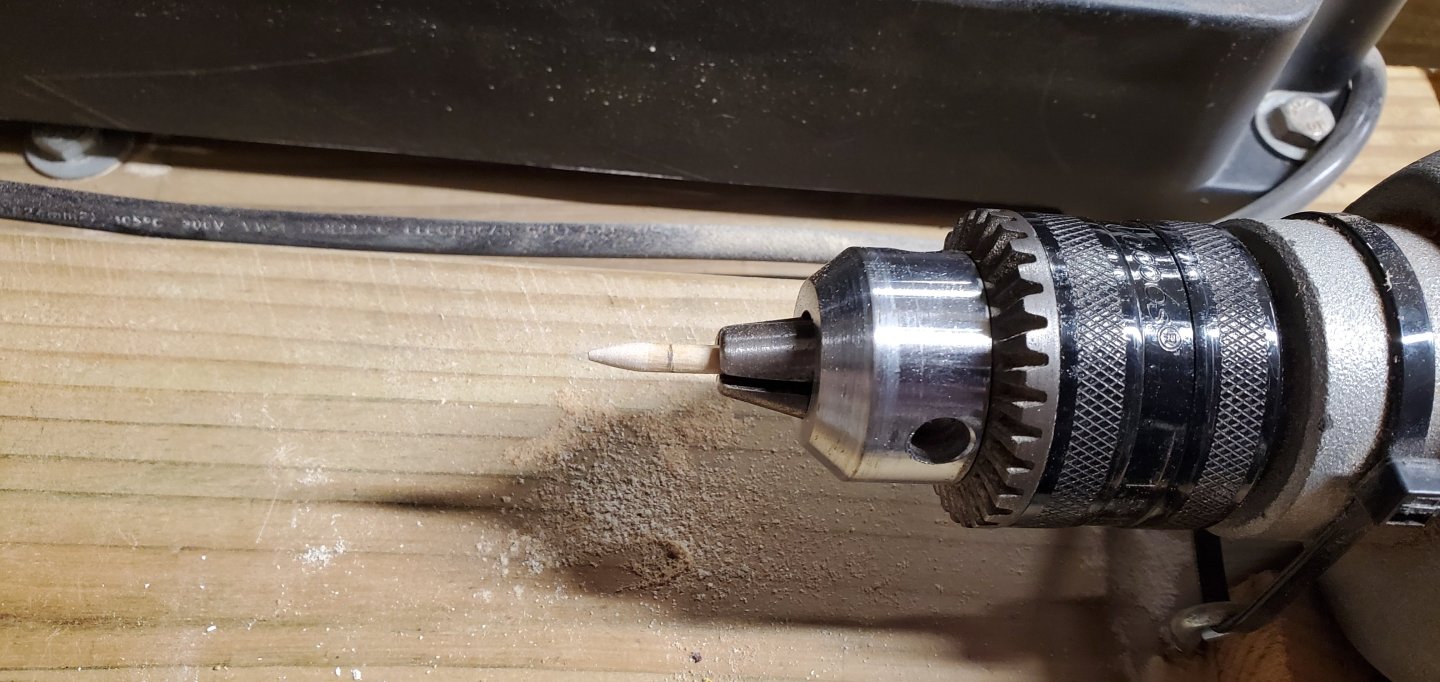
Thanks for the well wishes on the Hawaii trip. We had an amazing time. Beaches, sunsets, mai tais.........ahhhhhh. Time to get back to work. The first thing I did upon return was finish seizing the mizzen shrouds and threading the deadeyes. Still managing to keep the deadeyes aligned fairly well. Next up was the forward stays and preventer stays. These are looped around each mast with an eye and mouse. I made my mice with a 3/16" dowel, sanding to a conical shape and drilling out the center for the stay to pass through. One more thing to make before installing all the stays - the two U-shaped collars that the fore stay and fore preventer stay attach to at the base of the jib boom. I carved these out of 1/8" thick basswood. Here's a good look at the attachment points. The fore stay and fore preventer stay are in the foreground with the U-shaped collars. In the background you can see the main stay and main preventer stay using lanyards anchored at the base of the bow pinrail. And here's a look at the whole thing. That was a lot of work to string only 6 dang lines!!


- 301 replies
-
- 16
-
-
-
- Constitution
- Bluejacket Shipcrafters
- (and 1 more)
-
Glad to see you hitting the bottle again, Roel! This looks like it's going to be a fascinating build and you are off to a nice start. I'm anxious to see the sketch to get a better idea of what the overall project will be. You continue to choose such interesting vessels!
- 70 replies
-
- 5
-
-
- Scheldt River
- Dredger
- (and 2 more)
-
Brilliant work, Gary. She is coming along very nicely!
-
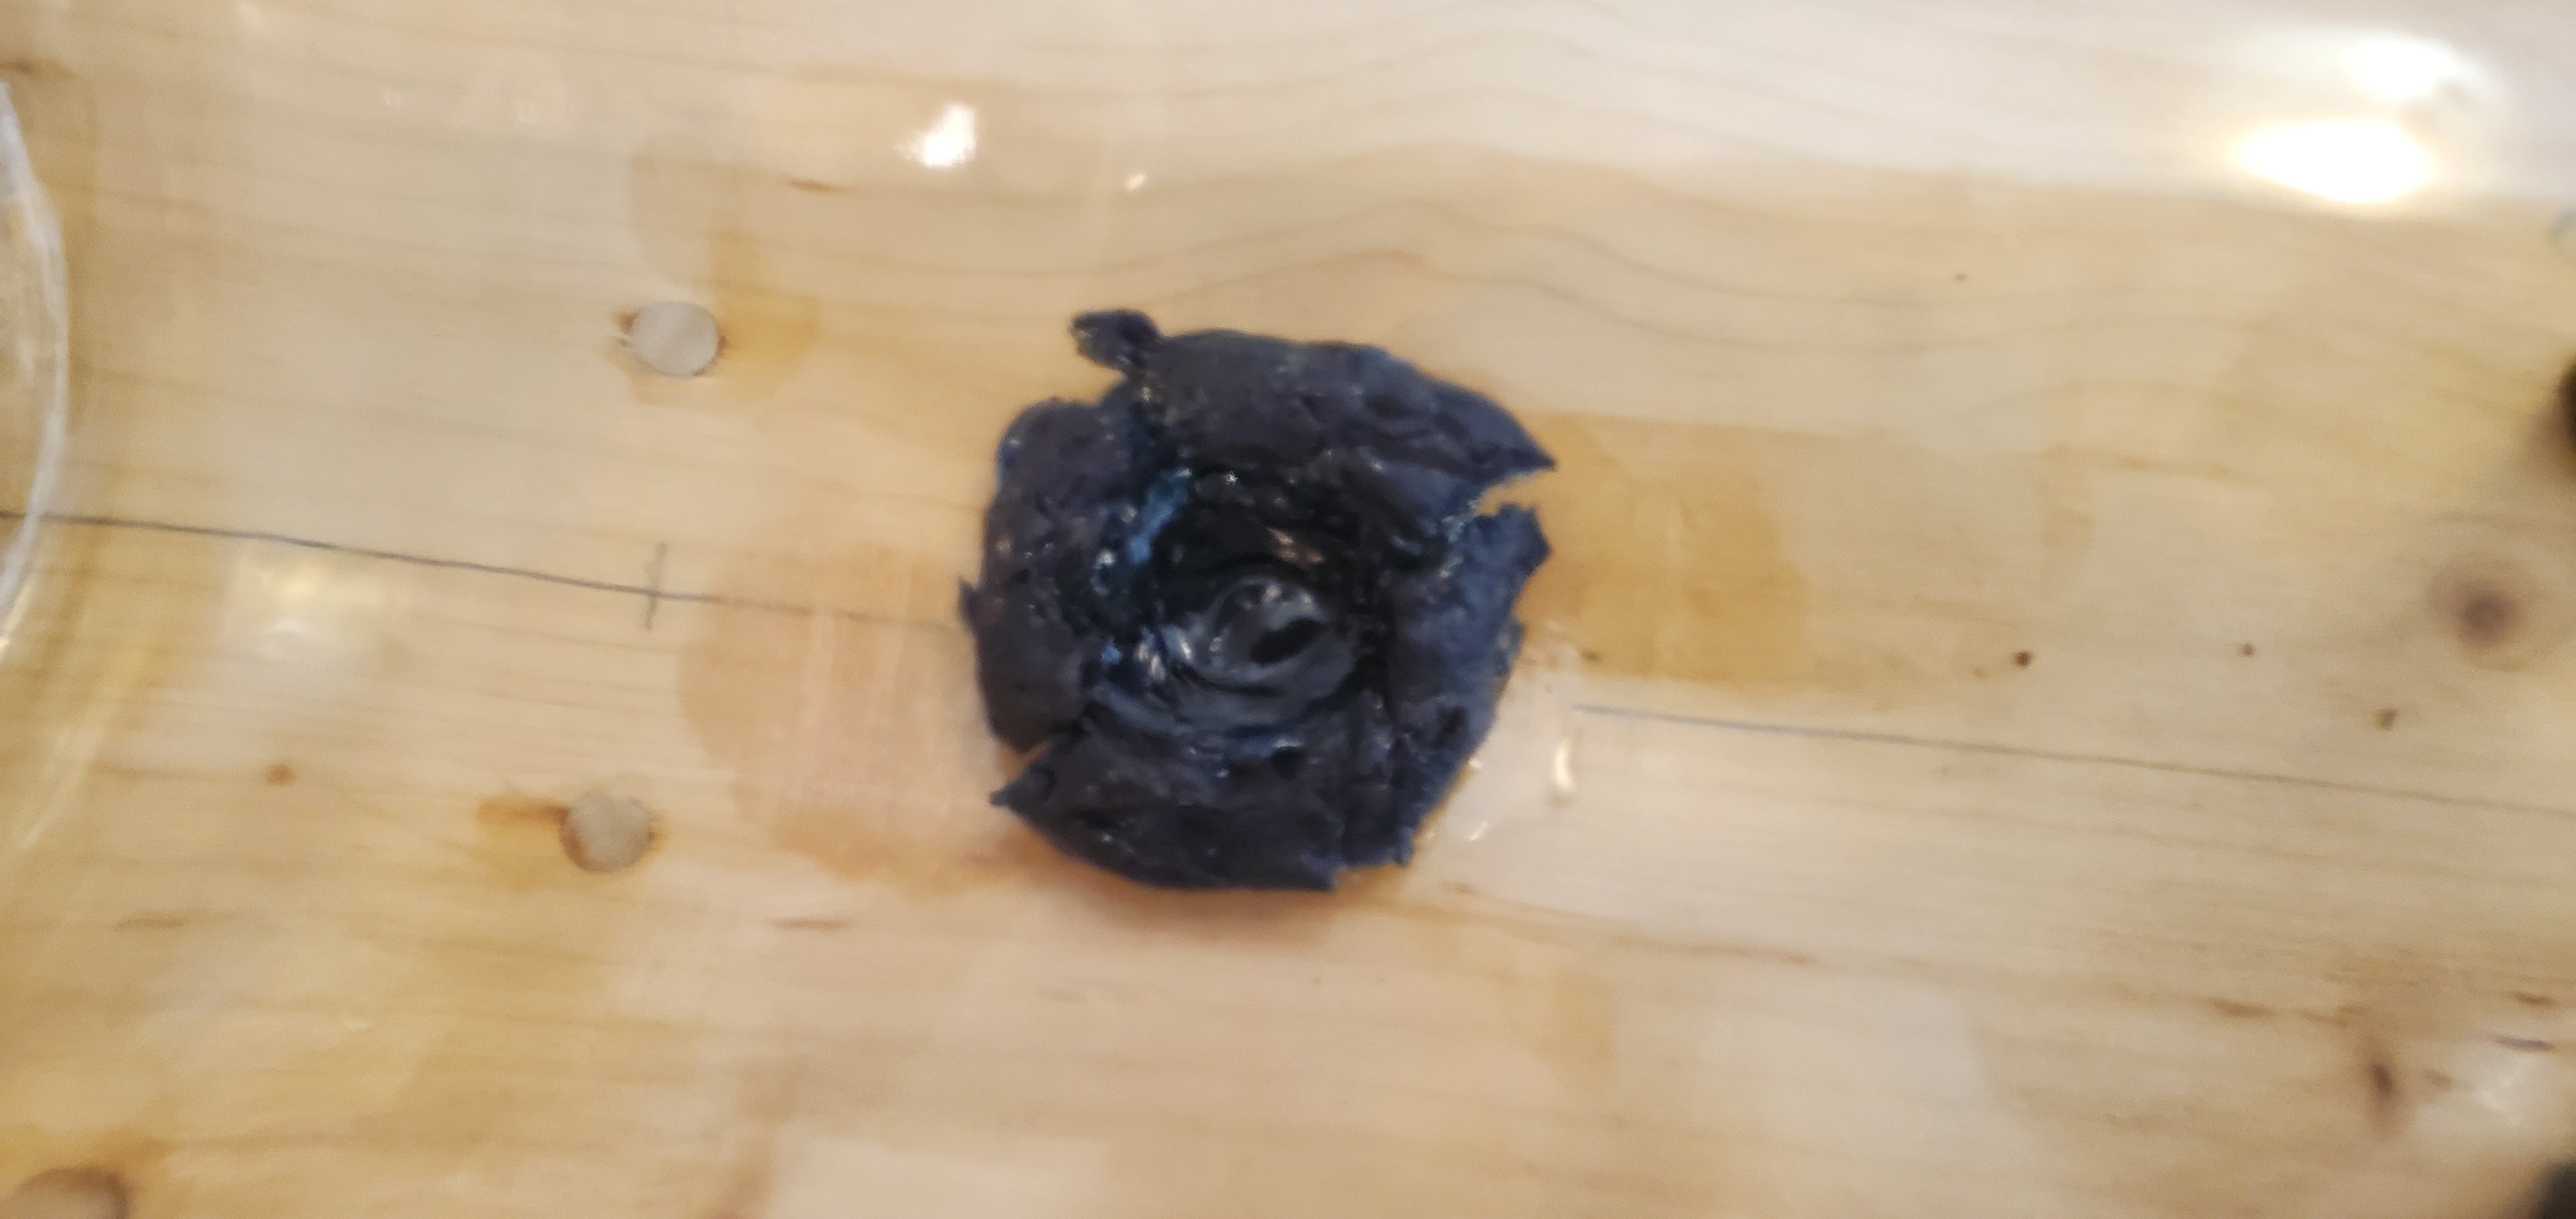
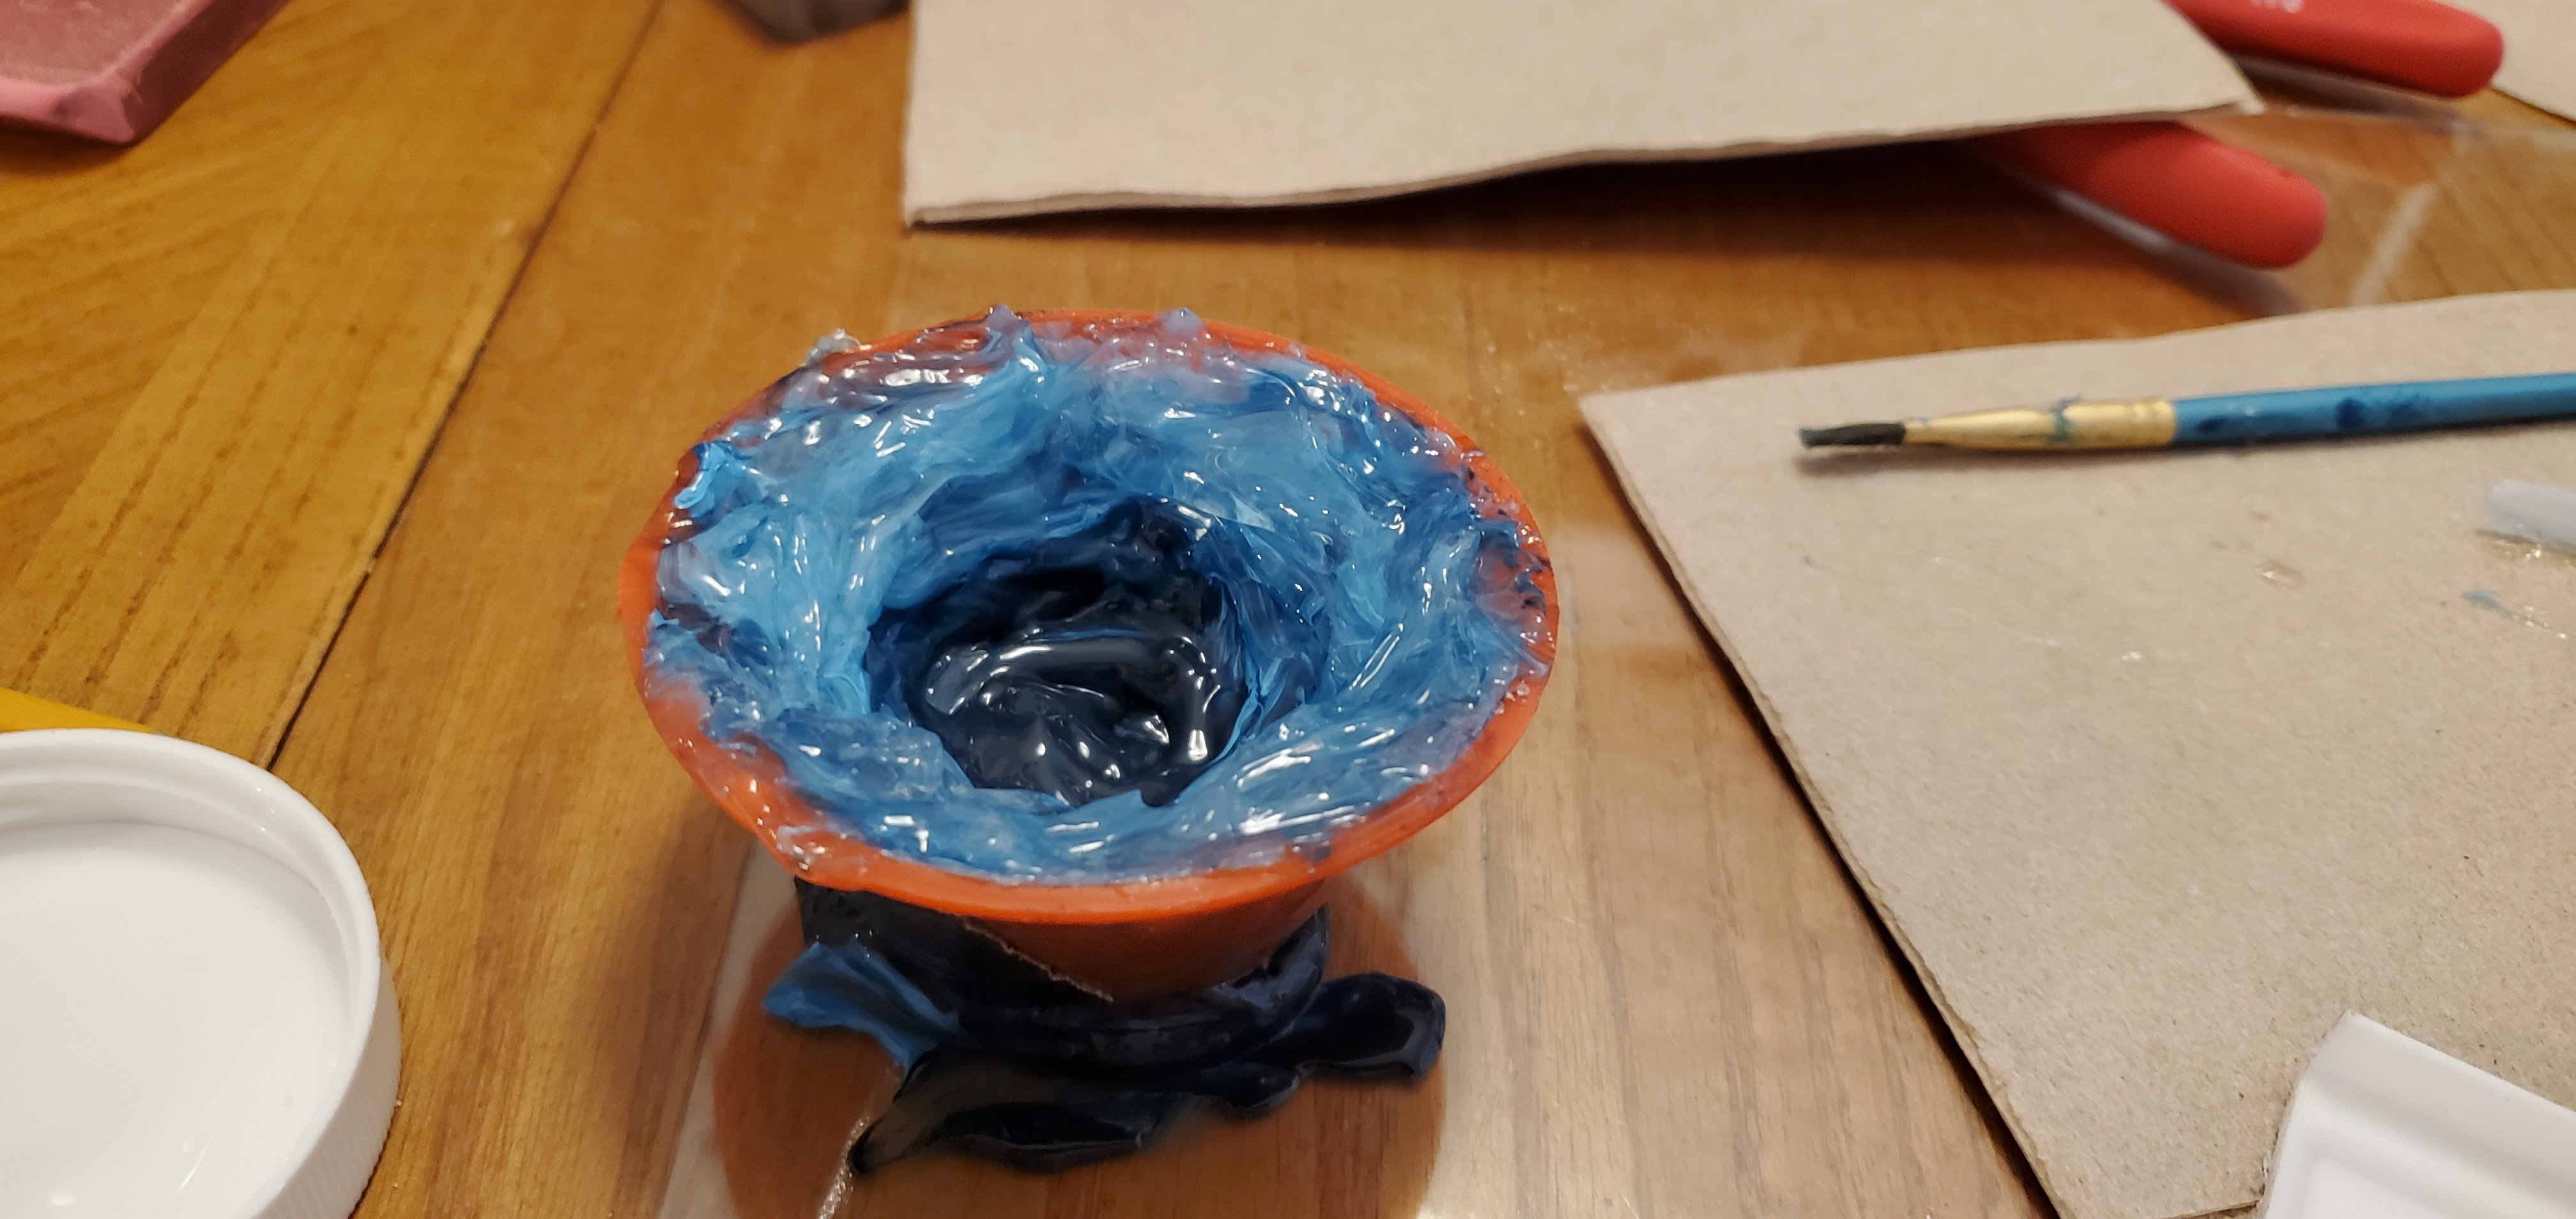
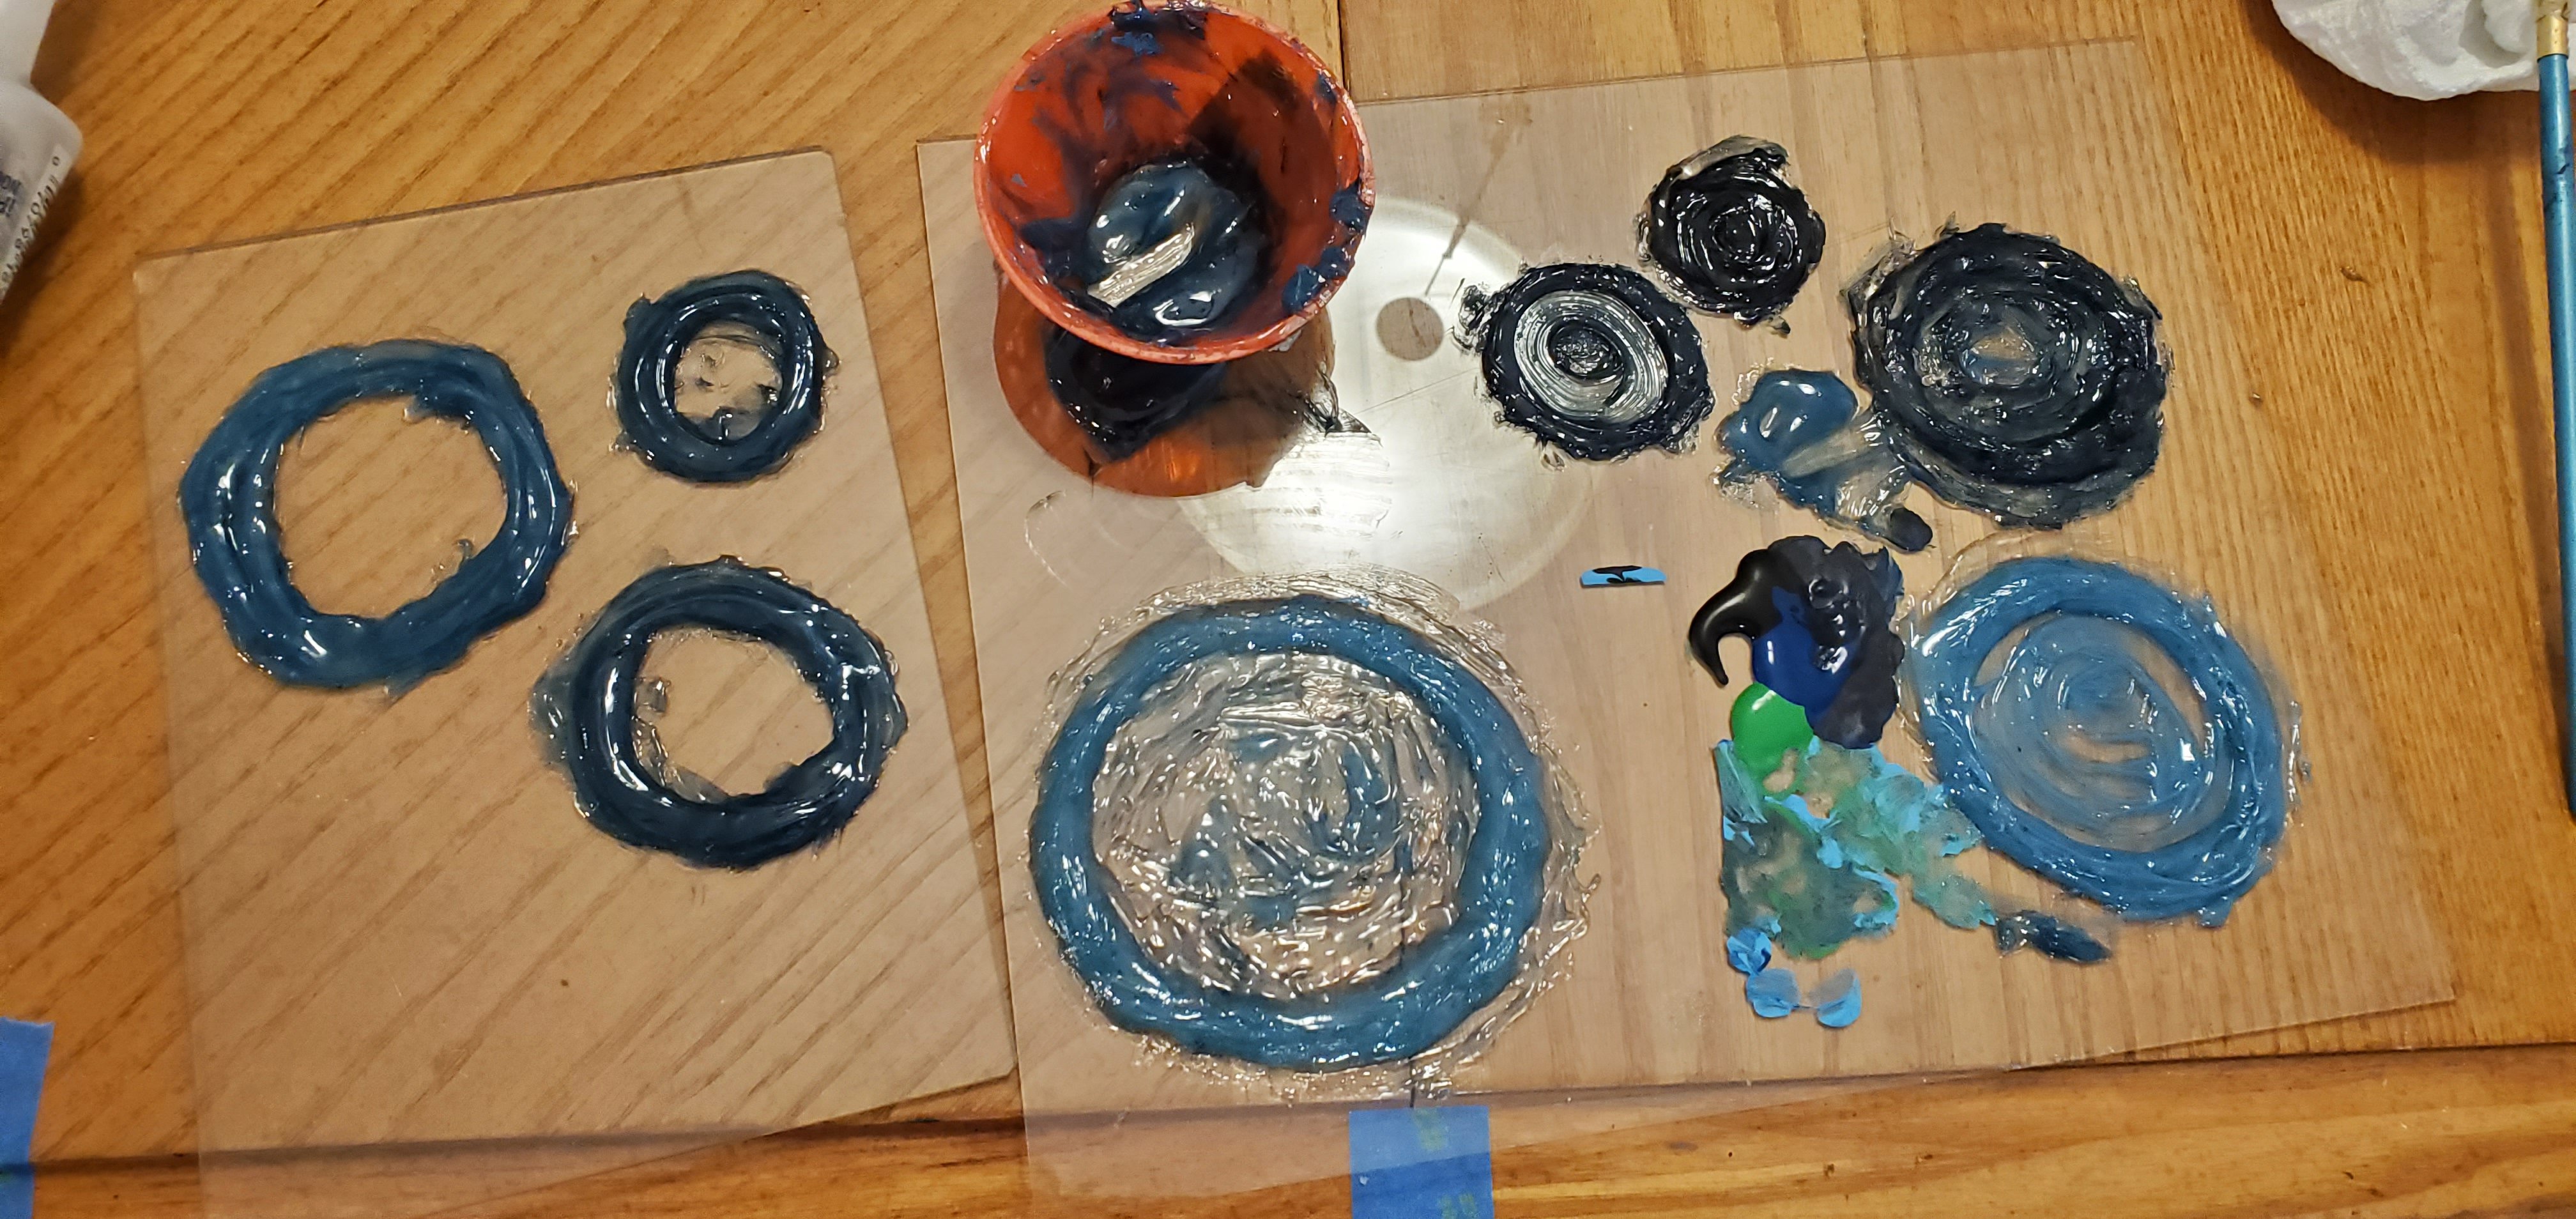
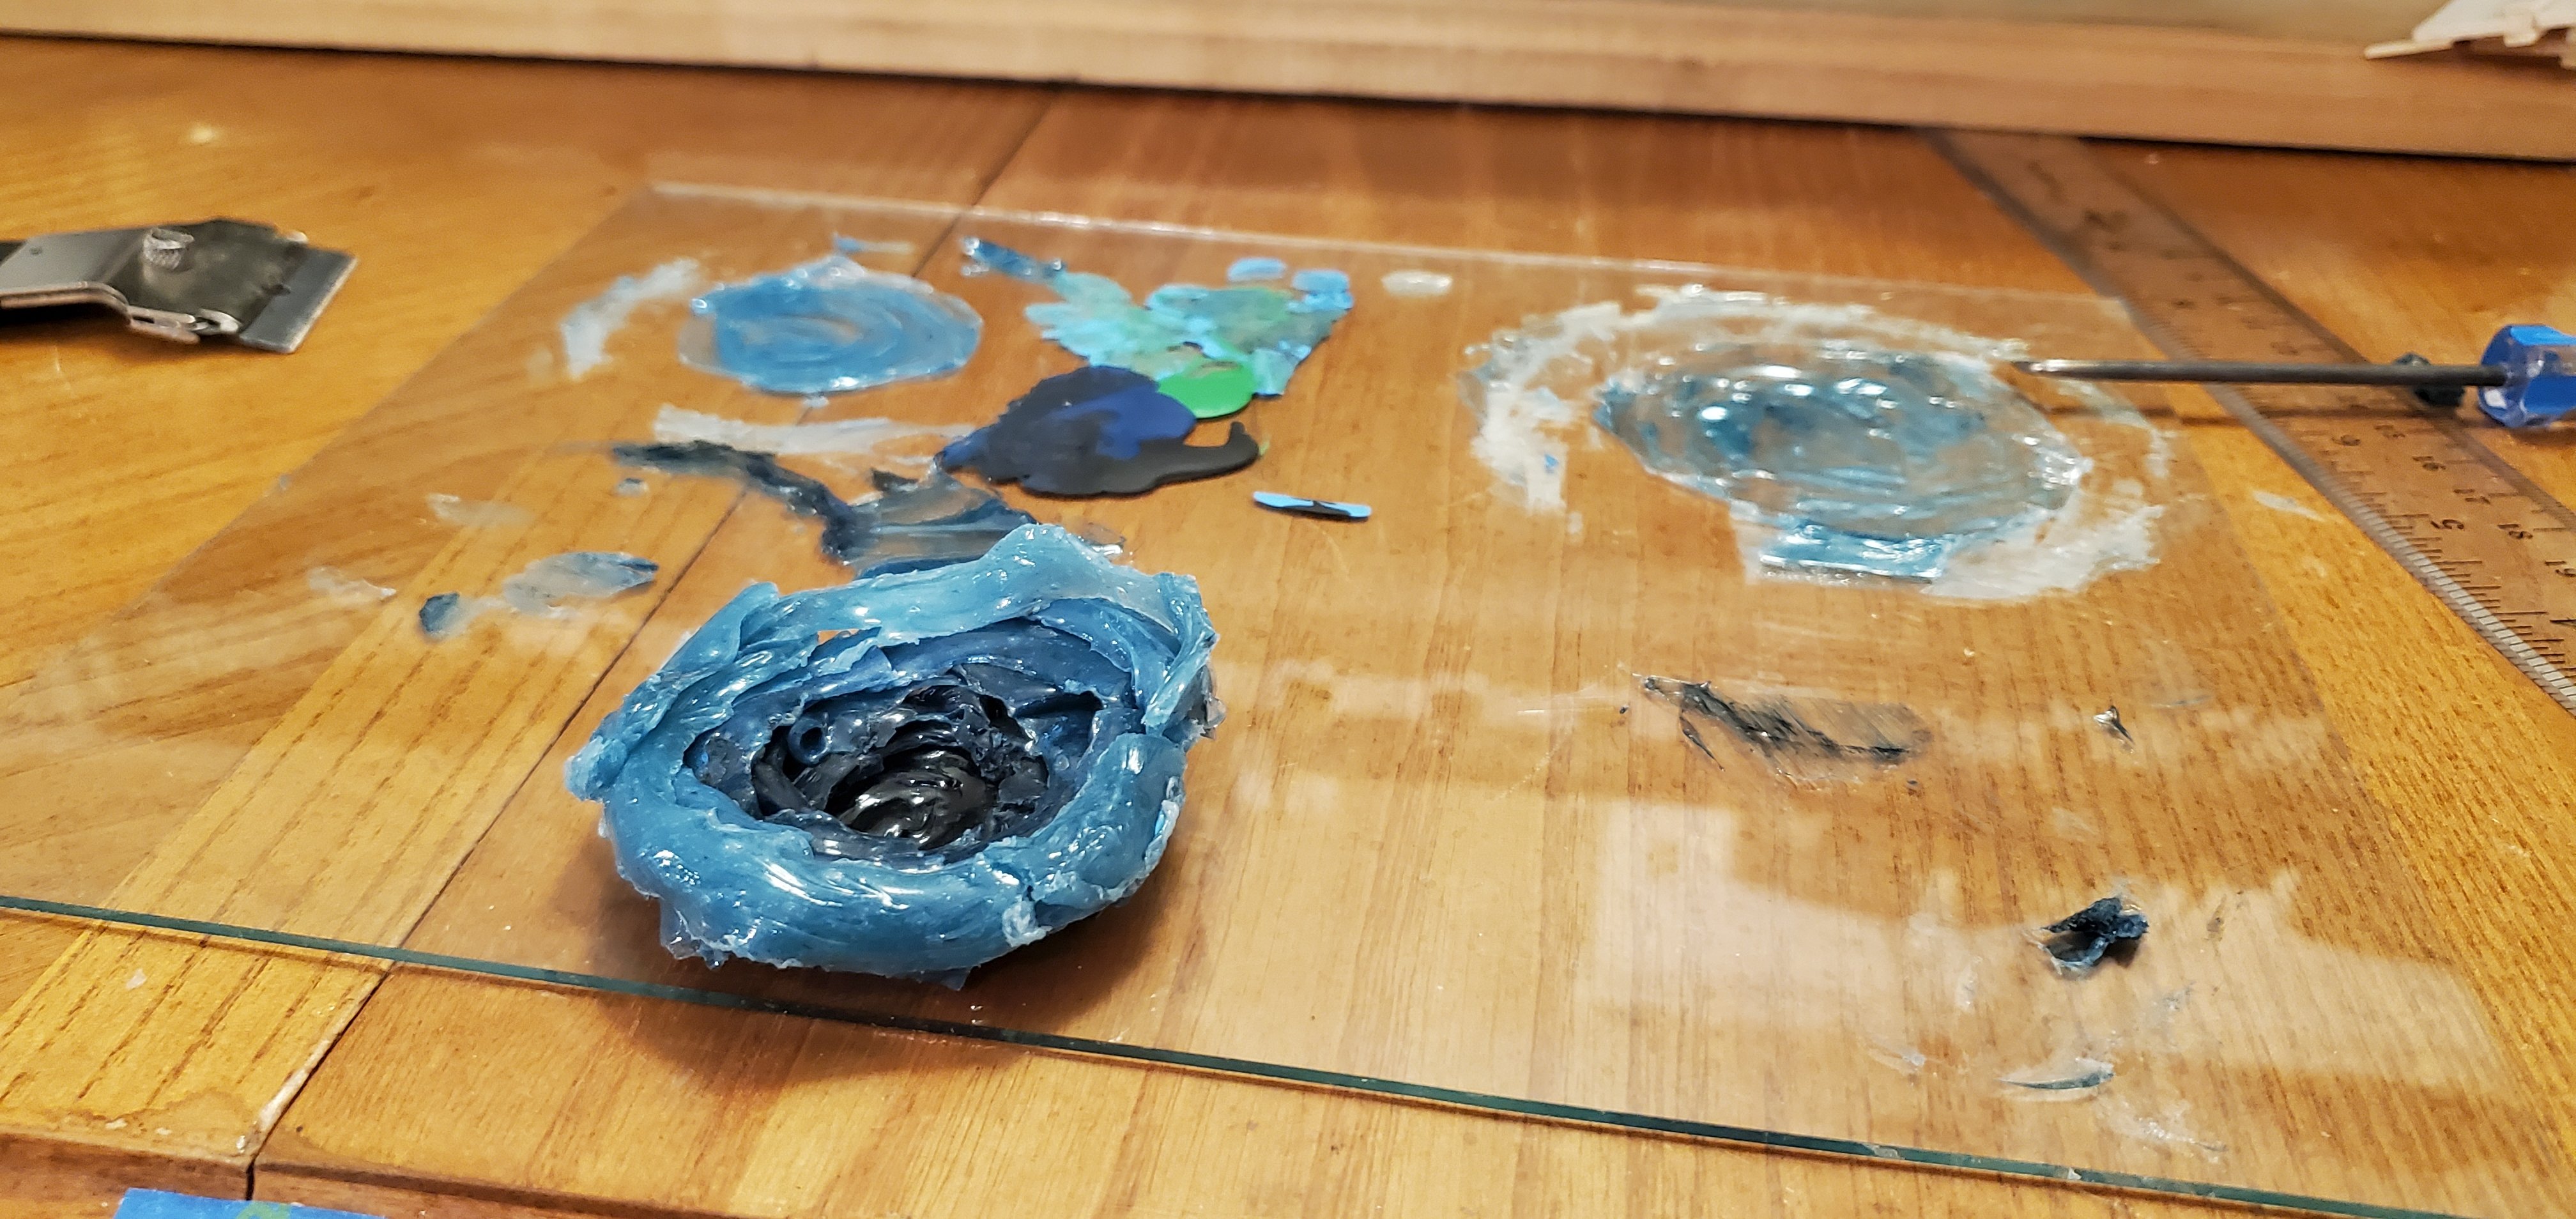
I would be distraught beyond words if I ever found one of those pieces missing! I took a short break from my shift on the Connie to do a little test run on the layered whirlpool idea my artistic friend suggested. My first thought was to build the whirlpool inside a funnel and slice it into layers after it dried. I took some of the DAP UltraClear caulk, did some coloring, and layered it into a funnel that was the appropriate size. I got excited because it looked pretty good at the start as you can see in the pic below. Unfortunately, my excitement faded as gravity overpowered the thickness of the caulk. It eventually ran down the sides of the funnel and ended up as a sticky, blob of goo. The goo was really pretty with its various shades of blue, but a total fail nonetheless. On to Plan B. With the funnel being totally useless, I took the caulk and laid out a bunch of concentric circles with different shades of blue. The color gradient is supposed to enhance the depth as it moves from light on the top to darker and darker as you descend into the whirlpool. After the caulk dried, I scraped it off the glass with a straight razor. Even though it was dry, it was still very sticky, clinging to itself almost like bubble gum. This made it very hard to pull off each circle intact. So much so that I ended up cutting each circle into quarters to get it off cleanly. I think that will actually be beneficial when it's time to do this inside the bottle. The stuff is so sticky that I think I will be able to cut the rings of caulk up into small pieces and add them one at a time inside the bottle. Here's what the test whirlpool looks like after pretty much following that process outside the bottle. For the first time I'm starting to think this whole thing might actually work!


- 185 replies
-
- 18
-
-
- Flying Dutchman
- Black pearl
- (and 2 more)
-
This will be my last post for a couple of weeks as I'm fixing to head out of town for a trip to Hawaii. Slow and steady progress has continued on the lower shroud rigging. I got the lower main mast deadeyes hung and triple-seized, and the lanyards strung. On the mizzen, I got the deadeyes hung but ran out of time before I could seize them and string the lanyards. Although I did get all the swifters in place.

- 301 replies
-
- 13
-
-
- Constitution
- Bluejacket Shipcrafters
- (and 1 more)
-
That catwalk is particularly well done, Roel!
-
Thank you, Bob, Keith, Pat, and Henry. Just to make sure I'm clear on the recommended steps, they are: 1. Snug up all the shrouds equally taut but don't tie them off. 2. When snugging up the shrouds, start with rear-most then forward-most, back to rear, etc finishing in the middle. 3. Also, when snugging up the shrouds, alternate starboard to port for each shroud. 4. Add stays and other rigging. 5. Do final tweak on shrouds for final alignment, then tie each shroud off permanently.
- 301 replies
-
- 7
-
-
- Constitution
- Bluejacket Shipcrafters
- (and 1 more)
-
Hey Jackson! What an interesting thesis you have chosen. I hope you will share it with us after its completion. I got into ship modeling just a few years ago at probably an advance age for a beginner (60). For me, the initial attraction of ship modeling was the challenge of building something that look so complex and intimidating with curving woodwork and an infinite spiderweb of lines running everywhere. I’ve always liked to build things, and a wooden ship model seemed like the ultimate challenge. After buying a kit and completing my first ship, I stumbled upon a ship in a bottle (SIB) kit that looked like another level of challenge. Although I’m not a mechanical engineer like Snug Harbor Johnny above, and many other builders on this site, my dad was a mechanical engineer and I think I’ve got a bit of his ME blood in me. I successfully completed the SIB kit and began doing SIBs from scratch. I really like the engineering aspect of SIBs as you have to devise a mechanical solution for doing what looks impossible - folding masts, twisting yards, scrunching sails, and fitting the assembly through something it looks like it won’t fit through. I also love the fact that there are so many unique ships with incredible stories behind them. From majestic ships that were the centerpiece of some of the most consequential battles in wartime history to ghost ships with an eerie, unexplainable past, there is an endless list of great subjects for us to model and add a small piece to their legacy. On a more personal note, as I started doing these SIBs, something happened and I found it quite interesting. Creating my SIBs brought out an artistic side that I never even knew I had – nor did anyone that’s known me knew I had. The most common reaction from friends and family that see my work is a head scratch and “you did that??” So the word you chose to describe this hobby of ours – enrapturing – is perfect. I am wrapped up in this because I like to build things, it’s incredibly challenging, there are so many fascinating ships with incredible stories, and it brings out things in me I didn’t even realize were there. There’s one other aspect too, and that’s the joy and amazement we get to see in others (particularly children) that look at our work. I cannot think of a more satisfying hobby than ship modeling. Thank you for your interest in our endeavors. Again, I hope you can share your thesis with us after you are done. Best of luck to you!
- 36 replies
-
- 11
-