


DennisL
-
Posts
133 -
Joined
-
Last visited
Content Type
Profiles
Forums
Gallery
Events
Posts posted by DennisL
-
-
I have the Amati kit The Revenge and will probably never build it. I've opened the box to inspect the kit but it is complete. It's a great kit.
I would be willing to offer it to you for "reasonable offer". Shipping might be a lot due to size of box. Let me know if you would be interested as I'm 70 and am interested in selling.
-
I am confused by this thread. A pirated kit is a pirated kit regardless if it's sold direct by the pirating entity or thru another seller is it not??
- hamilton, cotrecerf, Rik Thistle and 1 other
-
 4
4
-
I have 2 Amati models for sale. I've had them in my stash for a while and I realize I will never get a chance to build them. Looking for someone who can appreciate these great kits. The boxes have been opened and checked for completeness by me but are brand new and have never been started.
- Amati Kit #1432 HMS Bounty 1787 in 1:60 Scale
- Amati Kit #1300/08 Revenge 1577 A race Built Galleon in 1:64 scale.
Looking for $225 + freight for the Bounty and $475 + freight for the Revenge. (it's a huge box).
Please let me know if anyone is interested.
-
-
-
Thanks to everyone who responded to my post on the Speedy! Much appreciated.
As to Chuck's question on what I used for the color red, I used some Tamiya acrylics left over from my plastic model days. I mixed a 6:1 ratio of flat red to sky gray. The sky gray toned down the red and made the color more like an earth pigment red.
-
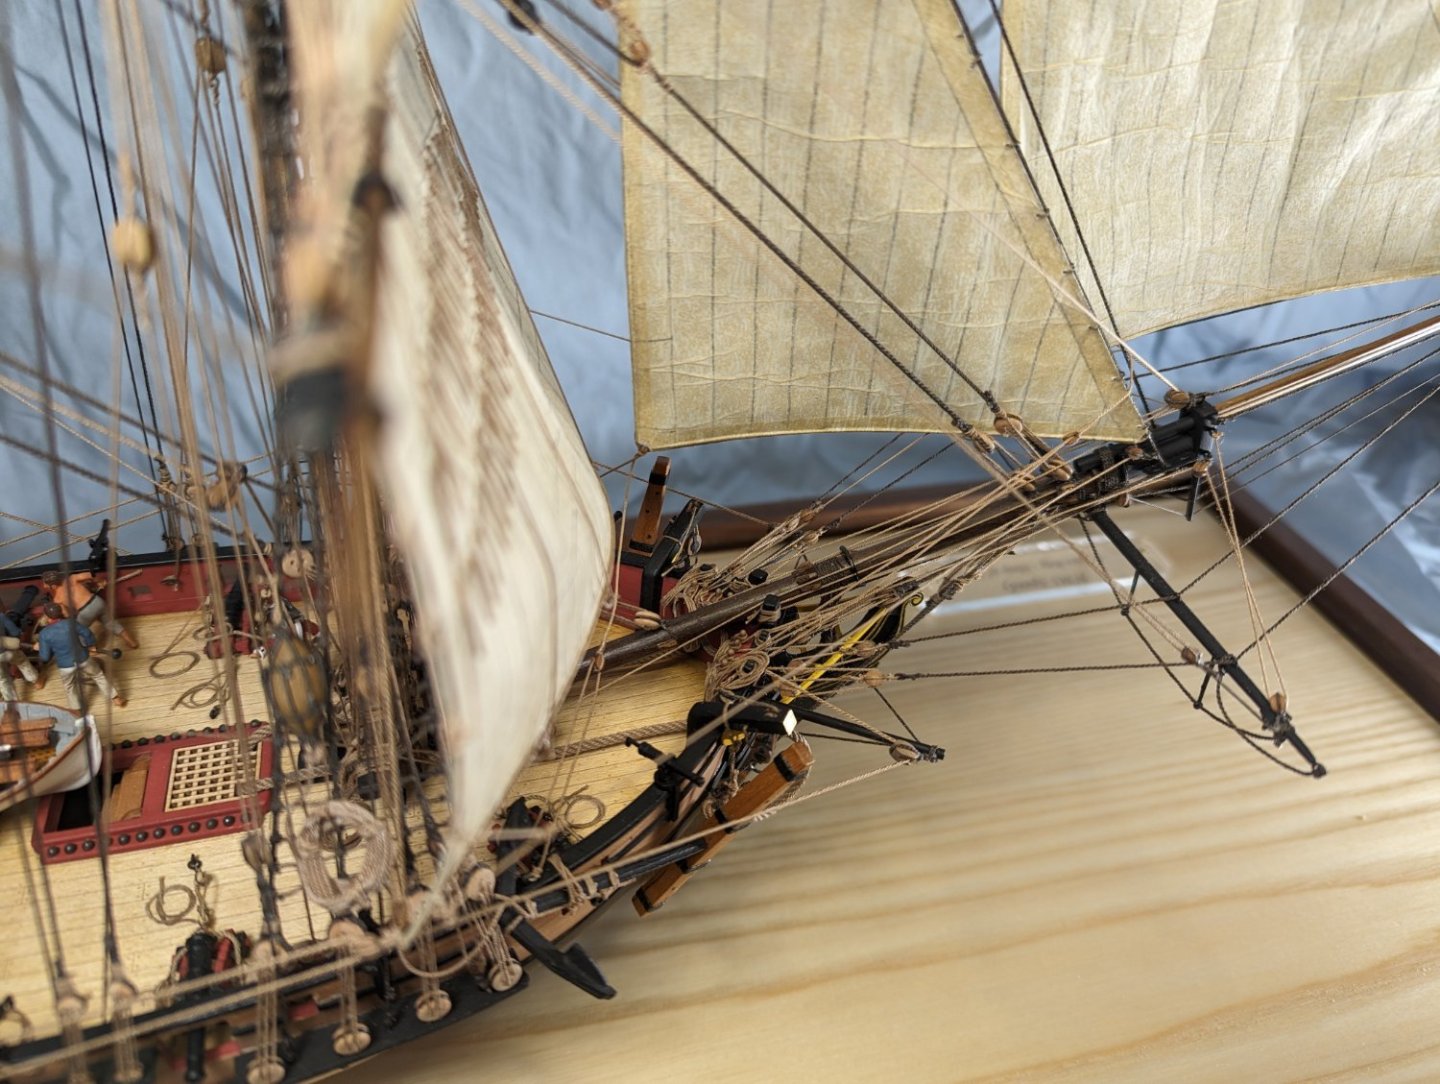
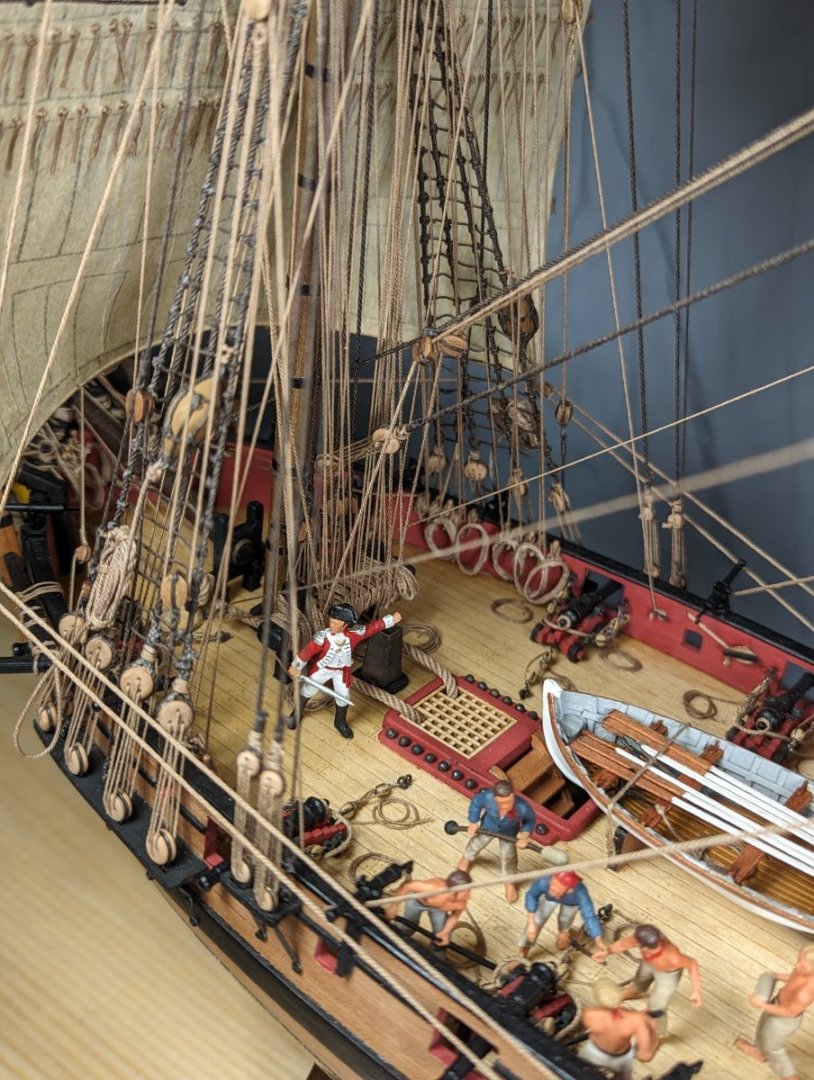
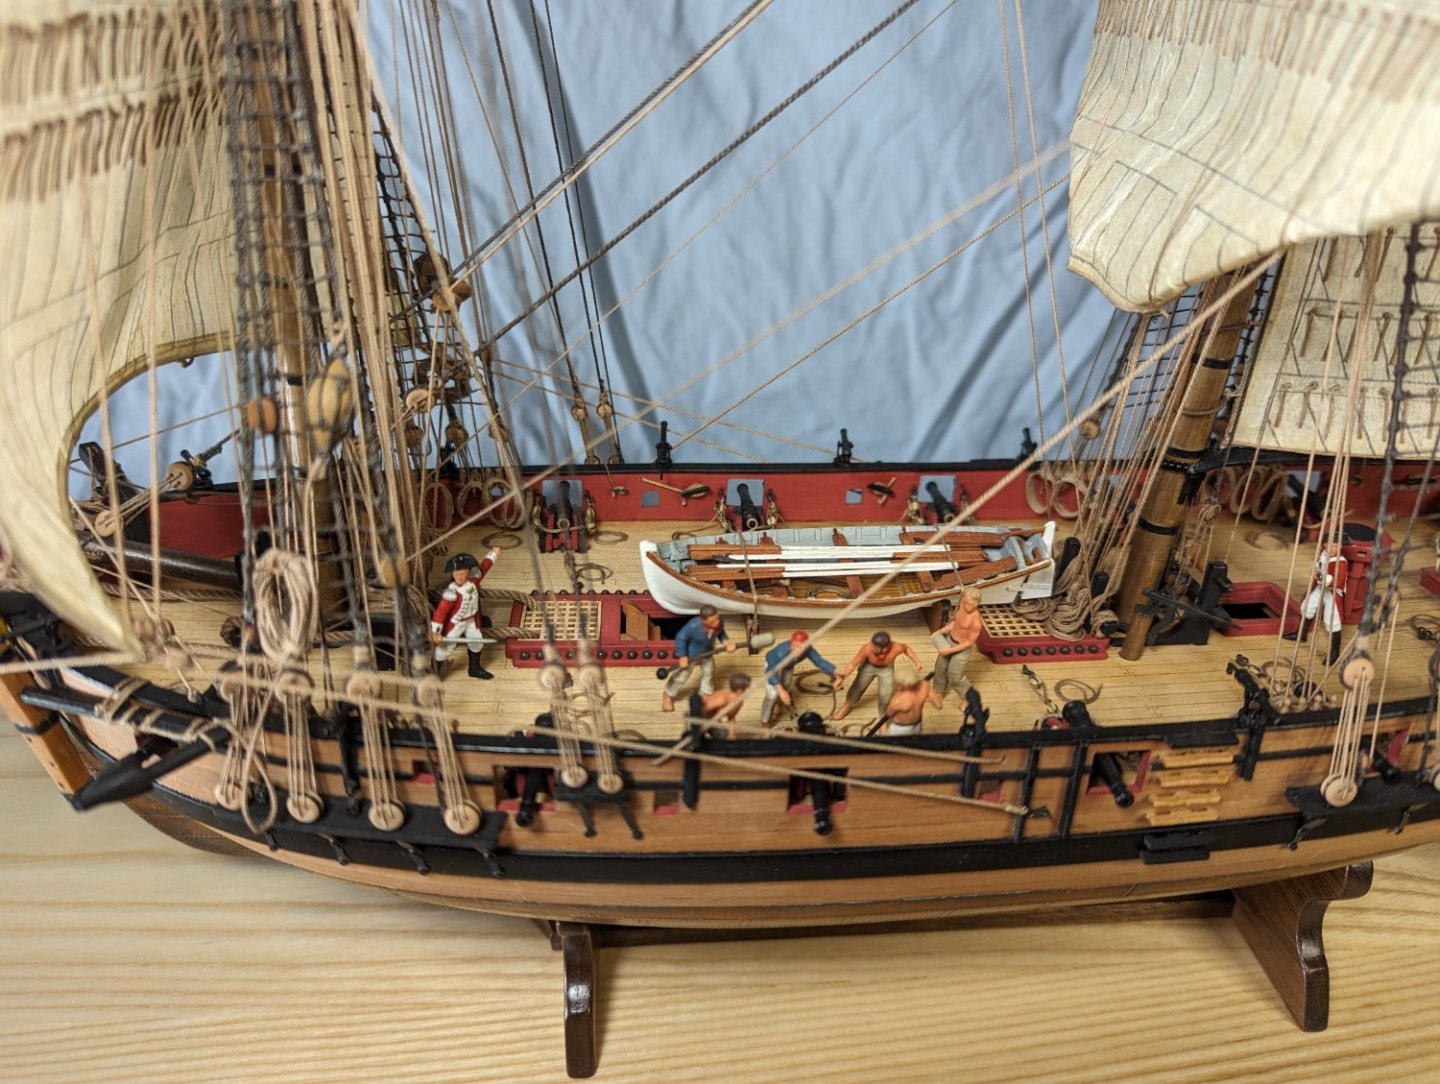
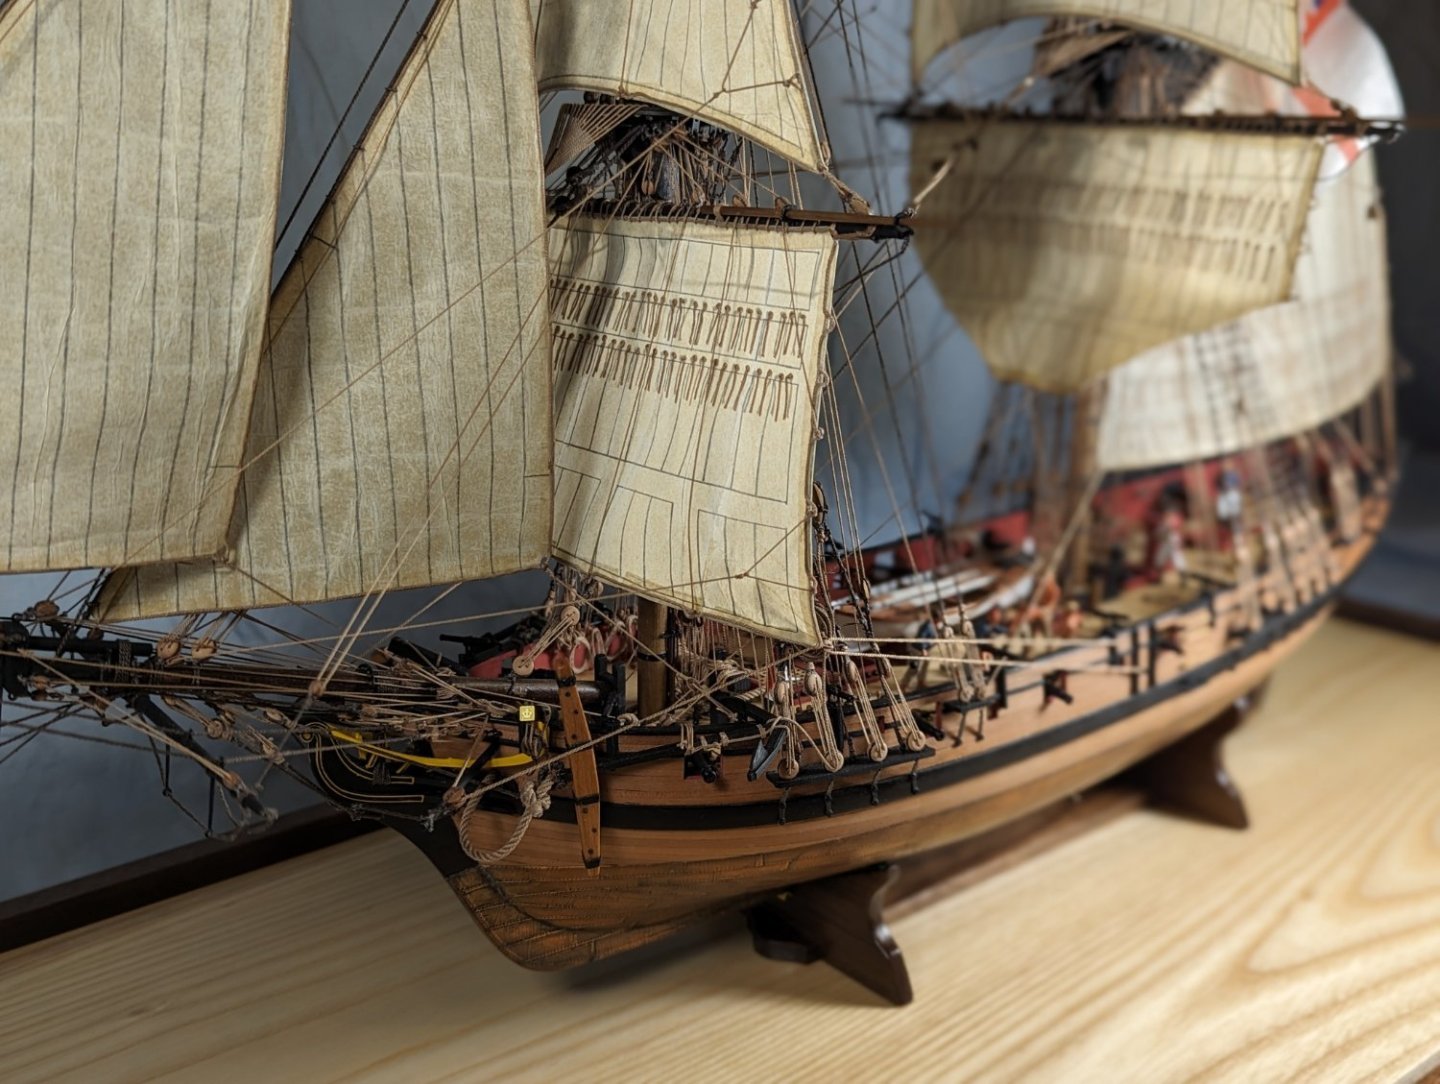
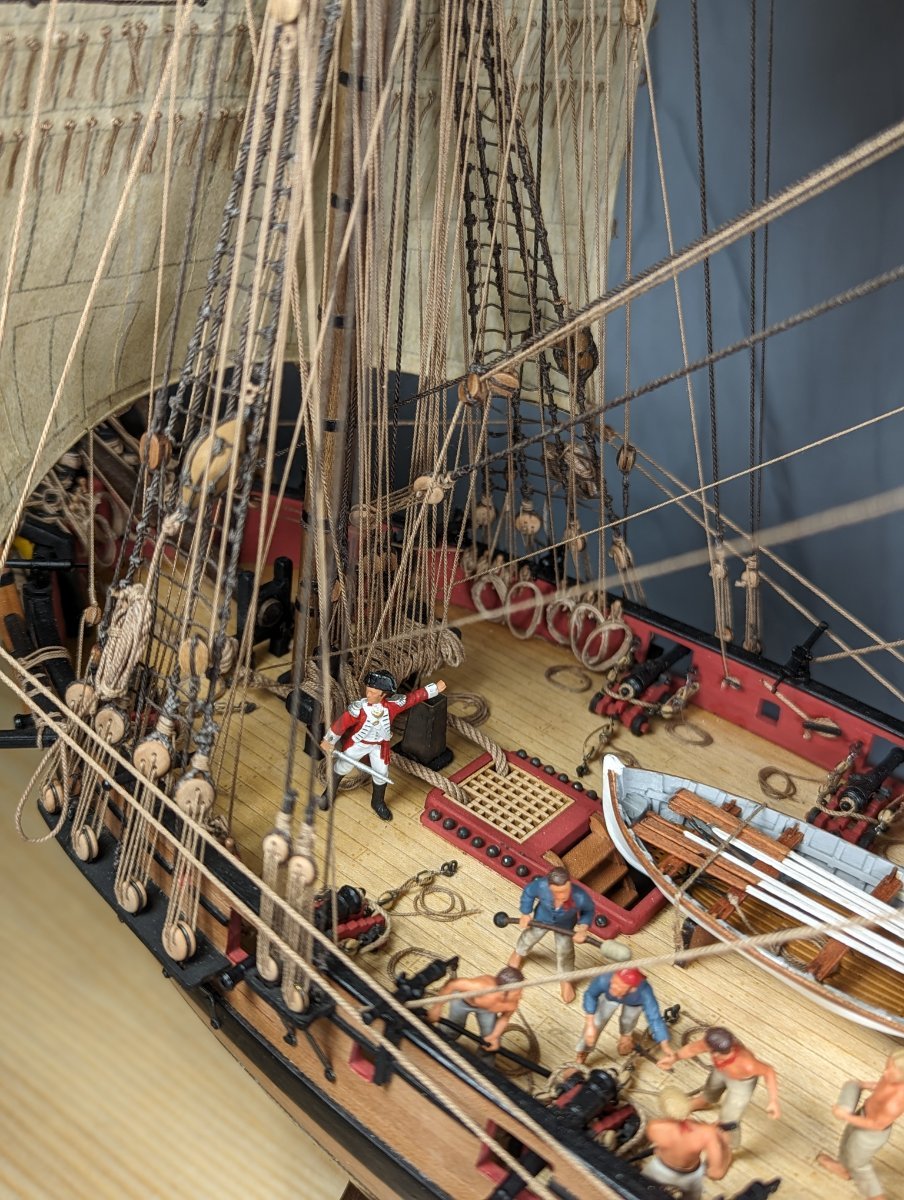
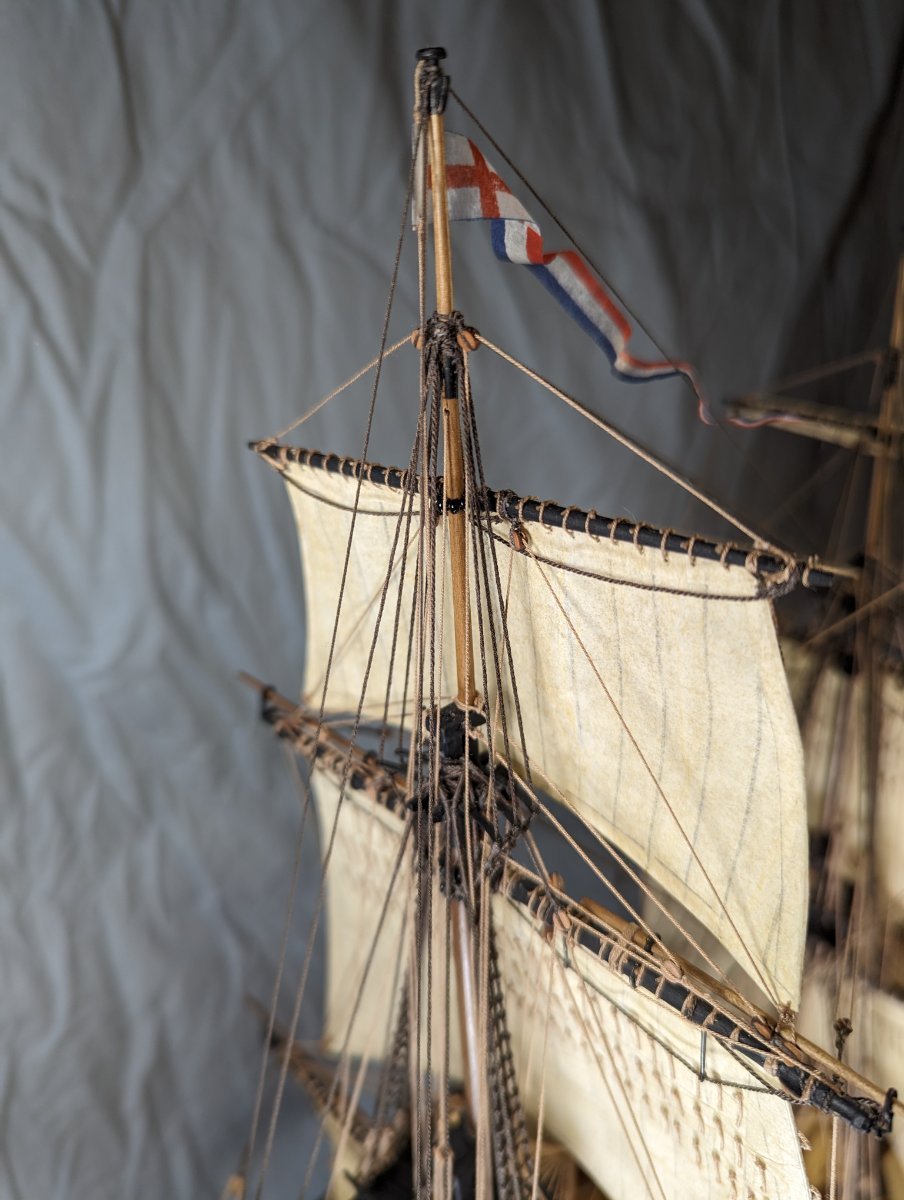
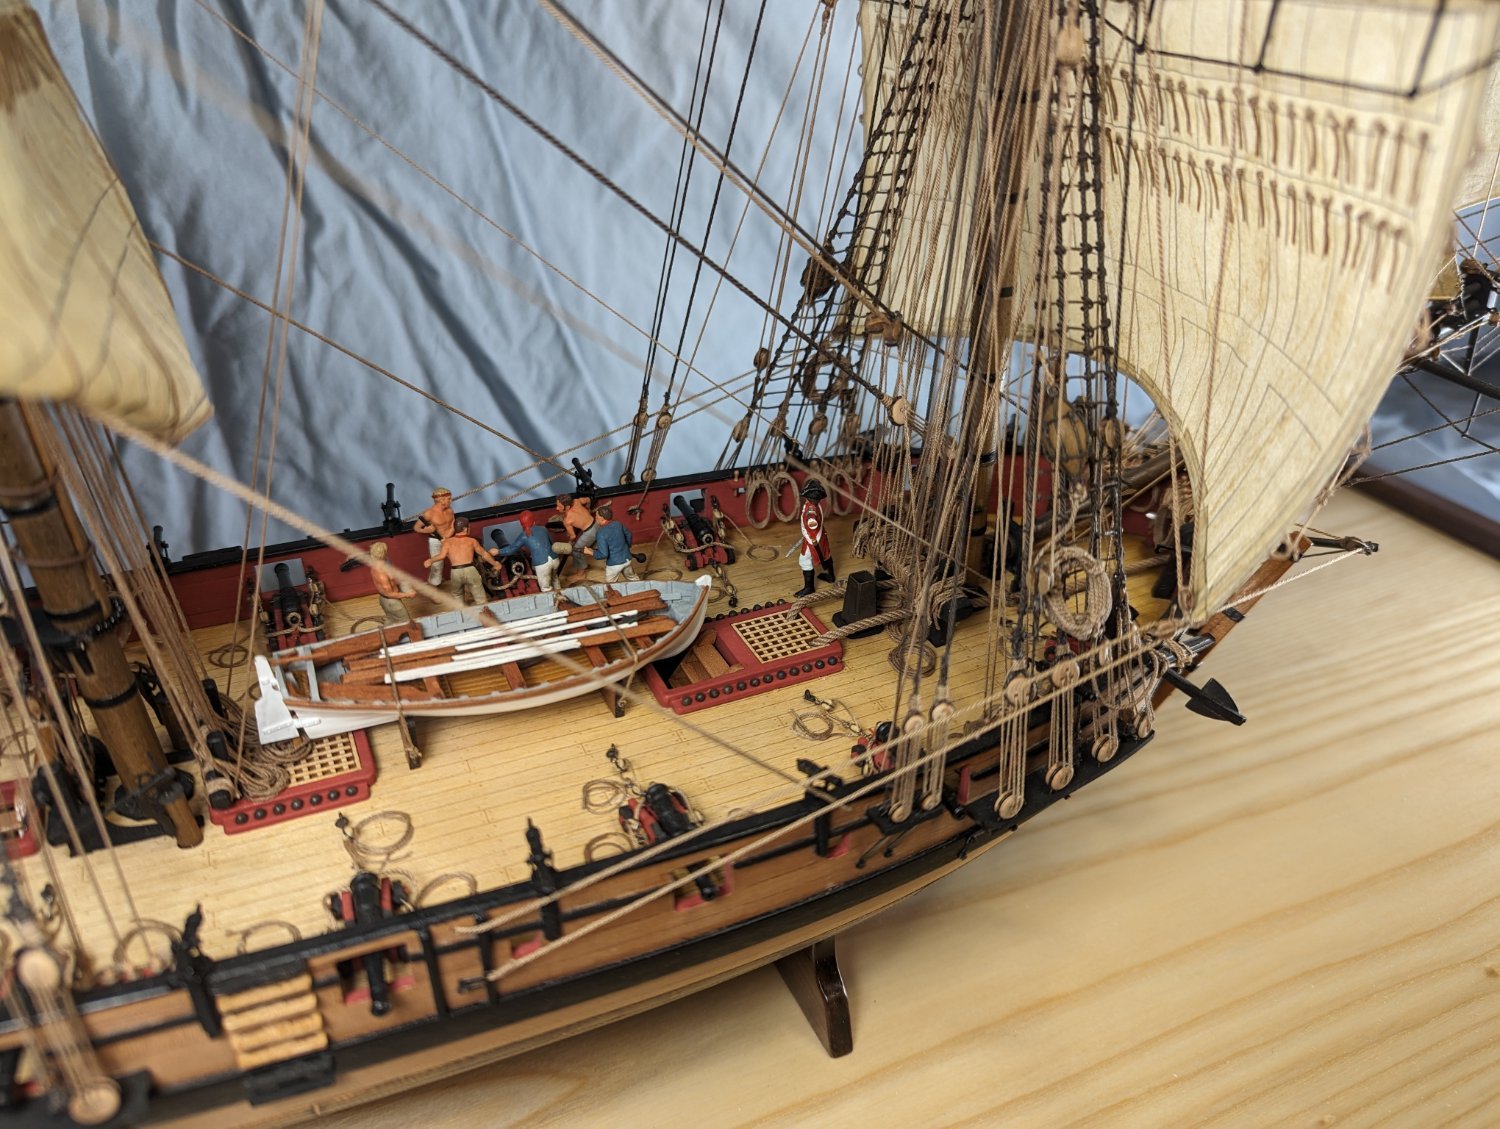
Here is my summary along with pictures of my just completed model of the HM Brig-Sloop by Vanguard Models. The kit itself, both quality of the materials and the accompanying instructions are superb! A number of build logs are have been done on this kit and thanks to them, I had some great hints and tips during the build of this project. Rather than add another build log ( I must admit at 70 years old and not very computer literate, the thought still intimidates me a bit) I've decided to add a few areas in which I diverged from the "out of the box" build. Over-all, the project took me 650 hours to build. Not sure if this about right or if I proceed at a snails pace. I'm somewhat of a minimalist when it comes to tools. An exacto handle with #11 blades, an old 12" Craftsman band saw and some small hands tools is about all I use. For refences I used Steele's Elements of Mastmaking, Sailmaking and Rigging (1794),Darcy Lever The Young Sea Officer's Sheet Anchor (1819), Lees The Masting and Rigging of English Ships of War 1625-1869 (1979) and Ian McLaughlin The Sloop of War 1660-1763 (2014).
With that said, here are some areas in which I diverted from the original kit. I know these comments are very brief, if anyone has any comments/questions please do not hesitate to ask. I am by no means an expert so any comments are greatly appreciated.
Copper Plates: After a brief (but unsuccessful) try at using the kit supplied plates I decided to use 3M black back copper foil Venture Tape #3M1765 - 1/4" width. I had real trouble fitting the kit supplied plates at the bow and stern areas having to cut them to fit the curves. Using the copper tape, I created strips of 4 plates adding the rivet details lightly with a very small pounce wheel. The tape was thin enough to allow to to navigate the curves and the adhesive back was very strong so they stayed put once set in place. I did use the kit supplied plates on the rudder assembly however as I did not have any issues fitting the plates at this location. Once completed, I darkened the plates using Liver of Sulphur extended life gel by EuroTool that I found on EBay. Follow the instructions carefully. Two notes of caution. The stuff darkened the copper very quickly, almost on contact. Have clean water and a soft cloth ready to neutralize and rinse off the solution. Once dry, I buffed out the copper using a soft dry cloth which brought out some highlights in the copper. And secondly, work outside unless you want your house smelling like rotting eggs!
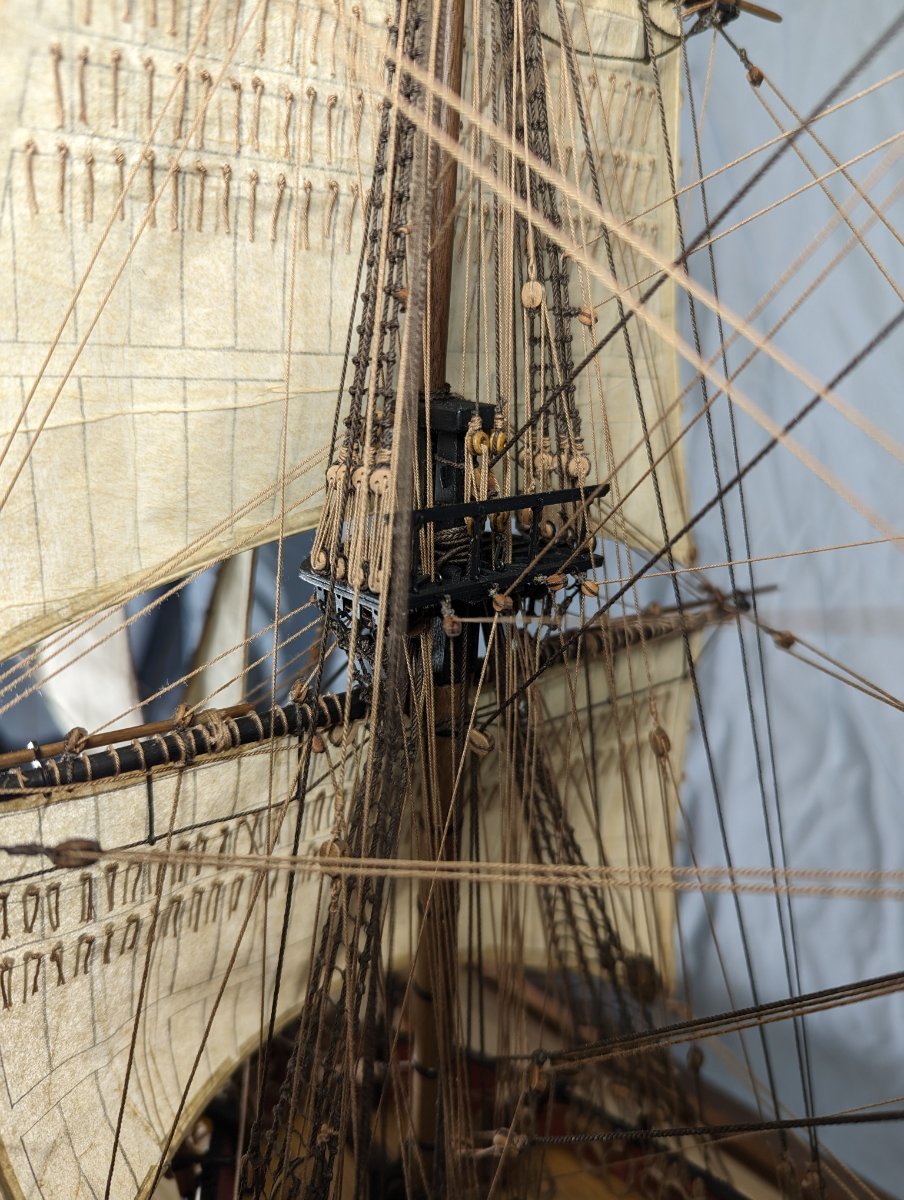
Rigging Line: I decided to try my luck at making my own line using Syren Model's "Rocket" rope walk. After trying to make the line using synthetic thread, I landed on using Gutterman 100% cotton thread Dark Brown #2960 and Taupe #1225 purchased thru WAWAK in NJ. The synthetic thread stretched a bit and I couldn't get the feel for it. When I cut the line, it shriveled up looking like a gypsy moth caterpillar on my work bench. I also wasn't too keen on having to set the synthetic line in the toaster oven. The cotton thread worked better for me and the "frizzies" associated with using cotton thread was minimal. I did not finish the line with beeswax. It left a whitish coat which was especially visible on the darker standing rigging.
Sails: The most difficult aspect of this model was in the making of the sails. Many of the line controlling the sails was not included in the instructions/belaying plans. I referred to the references mentioned above. And yes, I am sure I made a number of mistakes that many more experienced will notice but the important thing is to learned a lot and aim to get better with each model. The sail material is two layers of Silkspan purchased thru Bluejacket. I am not sure what weight it is as they only offer one weight. I added the sail details using a #2 mechanical pencil (sail outline with 3/16" hem, reinforcement points, etc) before laminating the two sheets together. I used a frame and taped the two sheets together prior to laminating. I used a 10 to 1 ratio of water to white Elmer's glue then added some Tamiya "Dessert Tan" to the mix to give the material an antique tan color. The biggest problem I ran into were wrinkles in the fabric. Had to make several sails over and the finished product still has some small wrinkles in them.
The bolt ropes, reef points and cringles were glues on the sails afterwards using matte medium which dried clear.
Flags: I made the flags by first downloading the files from Google. Since I was going for an earlier time period than when Lord Cochran was Master and Commander, I used the white ensign as Speedy worked primarily in anti smuggling operations in the home waters during the first part of her career. Try to find as high a resolution in the files as possible. I then taped a piece of silkspan over a piece of white 8.5 x 11 paper and ran it thru the desktop printer. It might take several tries, but with the silkspan, the ink goes right thru the material and you get a double sided flag. Once cut to size ( I left a tab on the ensign side to fold over to create a reinforcement point when attaching the halyards) I finished the flag off with spray on matte fixative and let dry. While it is drying you can work the flag to give it more of a curl as when flown in a breeze.
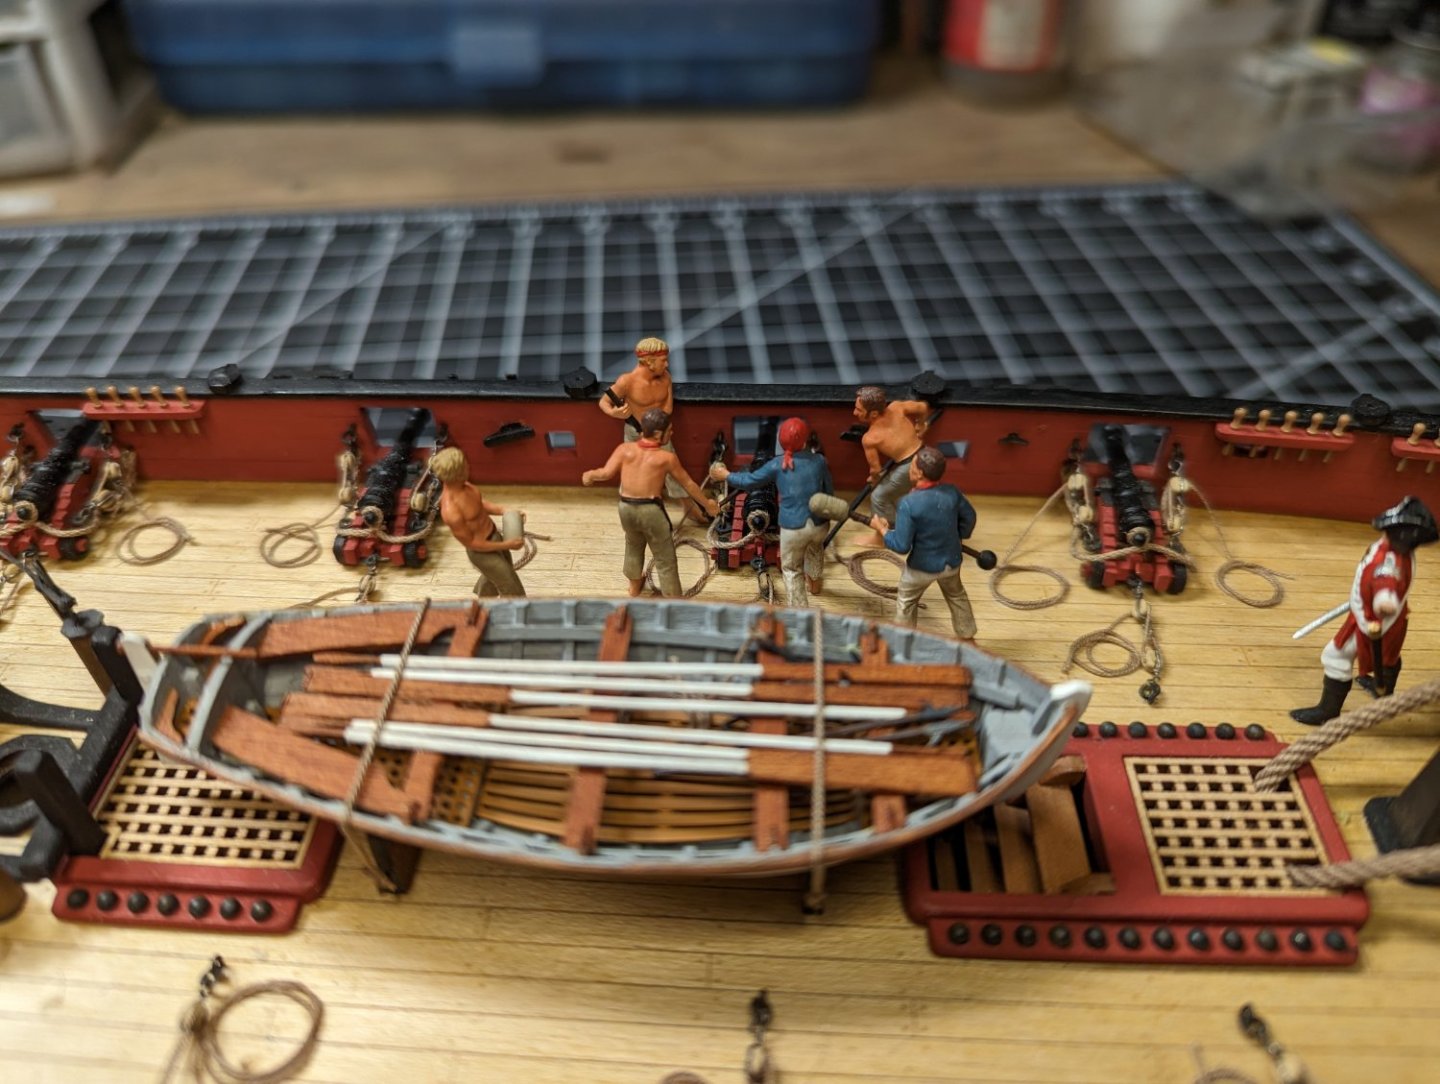
Sailors & Marines: These were purchased thru Vanguard Models and are exceptionally detailed which makes them a bit more easier to paint when you can see the crisp details. I used Tamiya acrylic colors dusted with pastel chalk to bring out some details. The figures were then topcoated in matte clear lacquer.
Display Stand: Rather than use the clear acrylic cradle which comes with the kit, I used the acrylic pieces as templates and fabricated anew cradle in 1/4" solid walnut. I lined the inside face of each cradle with green felt. The base of my display case is white ash with walnut trim. The case itself is fabricated from 1/4" acrylic and siliconed together.
Thanks if you reached this far in the reading. I hope this helps many of the newer members of our hobby. I recommend this kit to anyone as it build into a very beautiful model!


- Paul Le Wol, javajohn, Knocklouder and 14 others
-
4
-
 13
13
-
I bought transfer letters direct from woodland scenic on their website last year. They have a number of different fonts, sizes and colors. Gold, white. Etc. I would try them as they responded in a timely manner.
- thibaultron and mtaylor
-
2
-
Hi
I would recommend the New Bedford Whale boat from Model Shipways. You can usually buy it on sale at Model Expo. The scale is fairly large, the instructions booklet and plans by Erik Ronnberg are excellent and the planks are pre cut and spiled. The model builds over a hardback framework just like you would build a real boat.
The actual boat is on display at the New Bedford Whaling museum here in Massachusetts . In would highly recommend a trip if you are ever in the area.
The three boats mentioned earlier seem like a good start although I have never tried them.
Dennis
-
Having tried many of the current ship model companies out there, I would vote for Chuck's instructions at Syren. I've built both Syren's Medway Longboat and Model Shipways Brig Syren and those instructions are the best I have worked with. The instruction manual that comes with the Model Shipways Nantucket Whaleboat is also top notch. Chuck doesn't only show you where pieces go but the method of getting you there. I would give Chris Watton at Vanguard a close second. His printed instructions and photos are of the highest quality and combined with his pre-engineering of the model itself leads to a very successful project. I've tried Mantua and Corel and find their instructions/details lacking in many aspects. Maybe it's a language thing. I do have a CAF model of Le Coureur that I haven't started yet. But looking at the complexity of the POF model and the paucity of details in the instructions I find that it will be a very difficult build based on the instructions. The instructions almost seem like an afterthought. I did buy the Ancre monograph of Le Coureur and hope this will be a big help.
- thibaultron and mtaylor
-
2
-
Hi Hank
Thanks for the note and for your service.
I would definitely recommend Model Monkey to anyone who asks.
Dennis
- thibaultron, mtaylor and Canute
-
3
-
Beautiful model. The paint job is excellent with just enough weathering to make the plane look real. Nice diorama also!
-
I now make all of the rope I need using the Rocket found on the Syren Models website. It is easy to use and there are several tutorials on YouTube to help. I use 100 per cent cotton thread by Gutterman found on the Wawak website. No frizzies either!
- druxey, mtaylor and Ryland Craze
-
3
-
Hi Everyone,
I just wanted to follow up on my previous question about Model Monkey as a vendor. I ordered 2 sets of 8 carronades to replace the castings for the Brig Syren from Model Shipways.
The carronades arrived in good shape (after only 3 days from order!) and are quite detailed and paint up nicely. Very happy with the order. Thanks again for everyone that responded.
Dennis

- Jonny 007, mtaylor, thibaultron and 7 others
-
10
-
Truly a fantastic production! The German sailors swimming away from the sinking ship was something else. Thank you for sharing.
- Canute, thibaultron and mtaylor
-
3
-
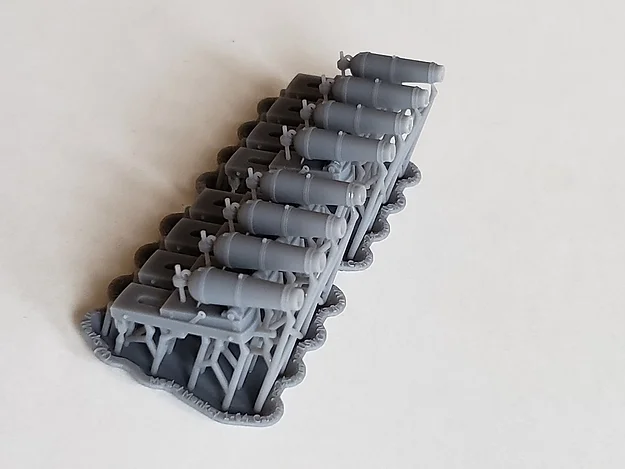
Thank you everyone for your feedback! I agree that 18 barrels for $12 sounds like a real deal. Unfortunately I have no access to 3D software. The Model Monkey sells just the type I need for $26/8 units (see attached photo) + S&H. I would need a total of 16. I am very interested to know per Allen's suggestion if there's anybody out there who would be willing to share 3D drawings - especially for 1/64 naval figures. Chris Watton has introduced some figures on his website and they are very detailed and paint up very well. We've come a long way since the days of cast details in white metal!
- allanyed, thibaultron, Canute and 1 other
-
4
-
Anyone have any experience with an on-line company called Model Monkey? I am looking to upgrade the white metal castings of the carronades and trucks for the 1:64 scale Model Shipways Syren. I would like to go with brass but the cost to upgrade to all brass carronades would be very expensive. Model Monkey has 3D printed ones that look very detailed but I am not sure. Feedback from anyone on this company would be greatly appreciated!
- mtaylor, Canute and thibaultron
-
3
-
-
Thank you everyone who responded to my question about furled sails. Clearly the sails were furled from the front of the sail rather than from behind. It makes sense to me as the sailors standing on the foot ropes would be facing forward and thus be reaching down over the yard. I don't understand why though there are so many pictures of well built models with the sails shown being furled in the opposite direction.
Thank you Thomas for the suggestion of showing the sails in a "brailled up" position and the copy of the Boudriot sketch - it was very helpful. I will be taking your suggestion on this and showing the sails in this position. I have used several layers of silkspan with the details drawn in to create the sails with decent success. I find the material, especially when slightly moistened to be easier to bend into shape on smaller scales. (see photo). By the way I saw your post #80 as referenced and your model looks incredible! Is it scratch built? Congratulations on a beautiful build.
I plan on building the HMS Speedy as originally launched in 1782. I will be including the crows feet on both the Fore & Main Mast so I believe I will be attaching the sails directly to the yards rather than using jackstays which I think would have been used later on than the 1780's. I have included a current picture of where I am at with the Speedy. I used Chris Watton's gun crew and marine figures which are incredibly detailed.
- allanyed, Paul Le Wol, mtaylor and 1 other
-
4
-
I am in the process of building Vanguards model of the HMS Speedy. I would like to add sails to my model and will be using silkspan to make the sails. I would like to show some sails furled while others unfurled. Here's my question. In my research I have seen some models with the sails furled from the afterside of the sails while most pictures of actual vessels show the sails furled up on the forward side of the sails. Darcy Lever's sketches are not really that clear on how it was done. The blocks would have to be mounted on the forward side of the spar to do this yet many diagrams show the blocks mounted on the aft side. Is there a right way to show this? Or did it vary depending on type of ship, period, etc. Thanks for any help in clarifying this.
-
Hi Stevinne,
Hasegawa definitely makes great kits. I am currently building the IJN Akagi in 1/350 scale and have purchased all of the PE add on kits that go along with the kit. It is somewhat of a PE hell once you get into it but the final results are quite stunning. Hasegawa supplies 6 Kates in the original kit along with 3 type 99 dive bombers and 3 Zeros. I added 2 extra plane kits a while back bringing my total of Kates to 18 and 9 zeros for the first strike at Pearl.
Incidentally, if you want an excellent read on the Battle of Midway and the story of Lt. Tomonaga I highly recommend the book "Shattered Sword" by Tully & Parshall. It is written from the Japanese perspective and really gets into the difference in philosophies of the Japanese with respect to both carrier design and plane design and the factors which led to the Japanese defeat at Midway.
Dennis
-
Would anyone happen to have any extra IJN Nakajima Type 97 bombers in their inventory? If so please let me know. I would be happy to purchase them. I need 9 more planes to complete my Akagi for the first wave attack at Pearl Harbor. There were a total of 27 Type 97. I've tried everywhere but apparently the Hasegawa sets are out of production. There's one on ebay from Japan but it's selling for $188!!
Dennis
- mtaylor, Canute and thibaultron
-
3
-
Given the rabid nationalism which existed in Japan at the start of the war it seems crazy that the Japanese would put a western alphabet on their war machines.
- Canute, mtaylor, Keith Black and 1 other
-
4
-
Thanks Bruce for you response!
Makes sense to me but then again I am not Japanese.
Dennis
- mtaylor, Keith Black, thibaultron and 2 others
-
5


Advantage of the Byrnes/Other hobby saws
in Modeling tools and Workshop Equipment
Posted
I agree with Druxey. The only thing I would add is to stay away from the MicroMark/Microlux tilting arbor saw. I wanted to buy the Byrnes saw but couldn't as the web site has been down for a while due to the passing of Jim Byrnes. The Microlux saw is very underpowered and anything greater than 1/4" thickness is a chore to push thru.