


RN77
-
Posts
24 -
Joined
-
Last visited
Content Type
Profiles
Forums
Gallery
Events
Posts posted by RN77
-
-
Good evening Folks
Been a while since my last post as I started again TWICE just wasn't happy with results I was achieving using card and paint.
I have decided to try using styrene sheet.
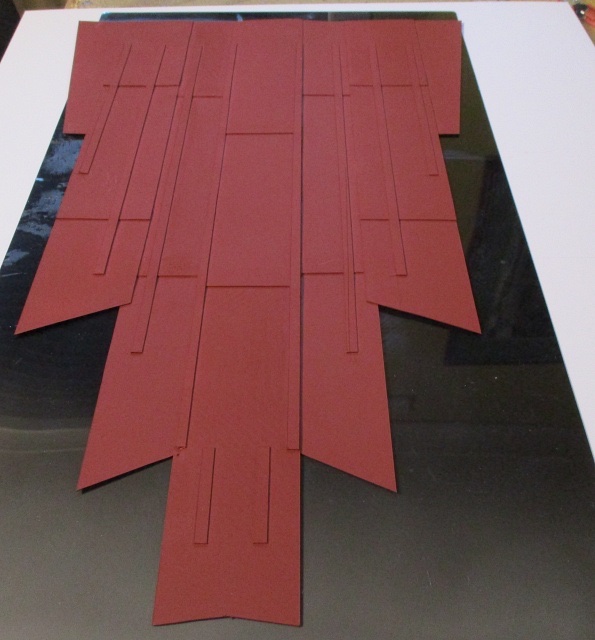
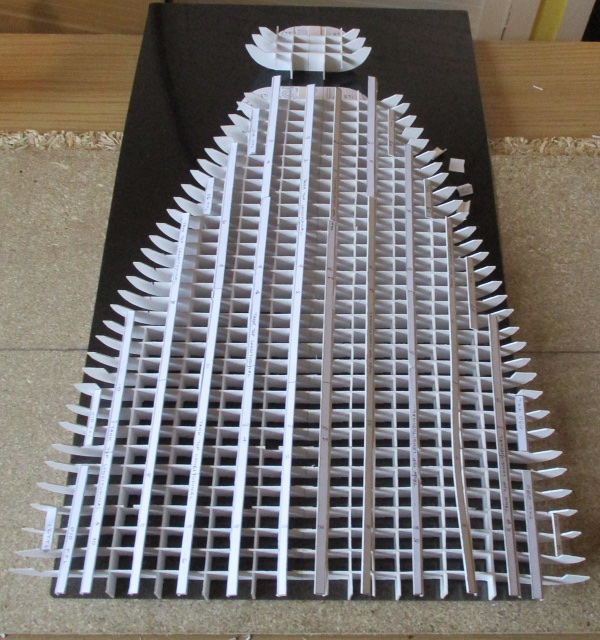
The shell plates were drawn and cut out and the longitudes were glued down using Tamiya extra thin.
I do have bottles of plastic weld but it can burn a hole in this thin and perhaps because it is a cheaper version of styrene than evergreen
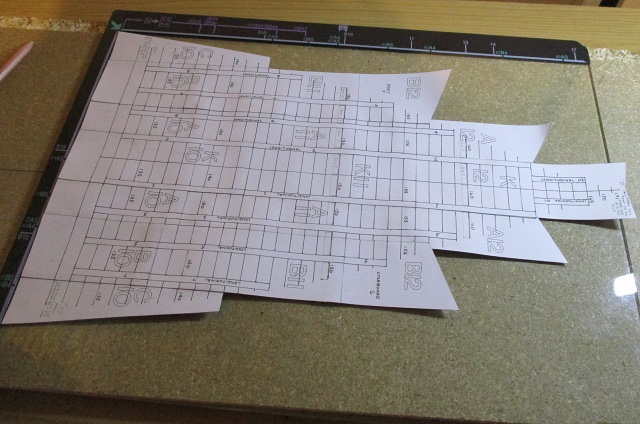
Again I copied the templates and glued them to 0.5mm styrene
Once cut out they were soaked to remove the card but a lot of scraping with my finger nails was required to remove the tacky pva glue.
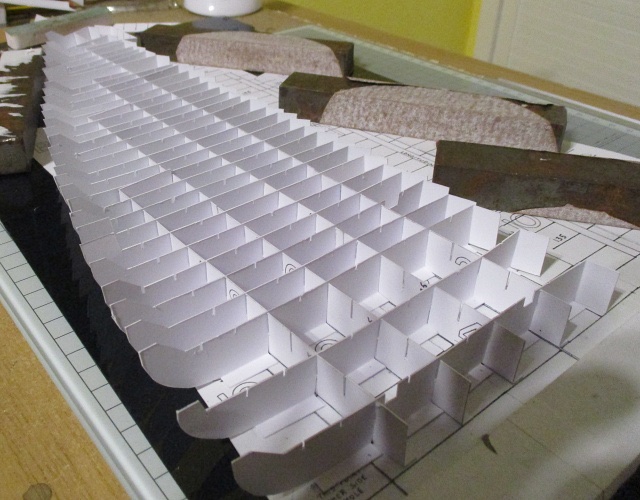
Only done the stb frames so far to see how I get on
I have used a 6mm hole punch for lightening holes and a smaller punch for drainage (mouse holes).Perhaps not the correct size or shape or position but just to represent that it wasn't a complete strip of metal
I have used Halfords red primer from a spray can
Off now to start on the port frames
-
6 hours ago, Kevin said:
that looks fantastic, but that is also a awful amount of work
Hi Kevin
Thanks for taking the time to look and comment
This is all your fault 😝 Came across your build diary and I fancied giving it a go
The amount of monotonous cutting of location marks is broken down by watching commercial tv
Watching commercial tv or even a prerecorded programme instead of fast forwarding the adverts I jump up to the table and cut out a few slots
I an now into the 3rd series of Cracker and the 2nd series of Sharpe 😜
-
Hi Folks
Been humming and hawing whether to continue with the media I am using as I find it a bit fiddly and flexes too much when handling due to my heavy hands and impatience 🤪
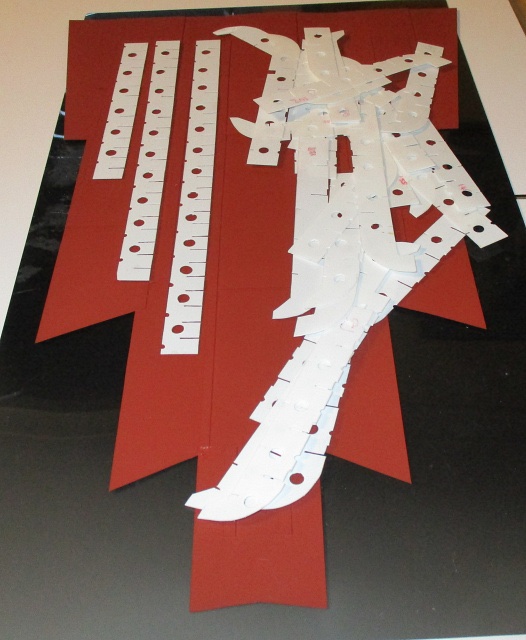
Copied again and glued to card
Quite happy plodding along thinking that as thicker I do not need the folds so i cut them off
After watching a video on the construction off an SD14 i noticed metal bars running the length of the hull plate before anything else
https://www.yfanefa.com/record/24352
I thought that fold on the longitudes was just support for the card
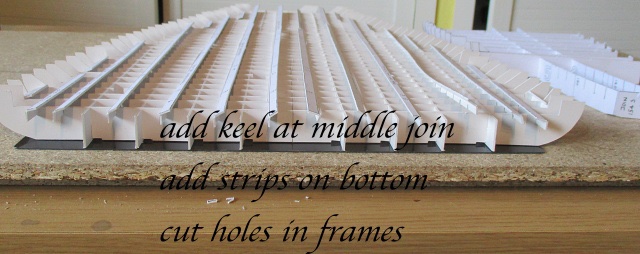
I have cut out the slots on the bottom of the frames and will shove a strip of card there to represent this
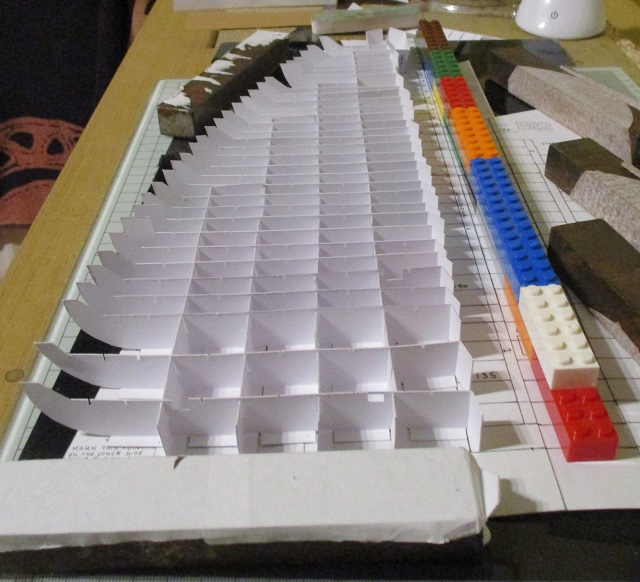
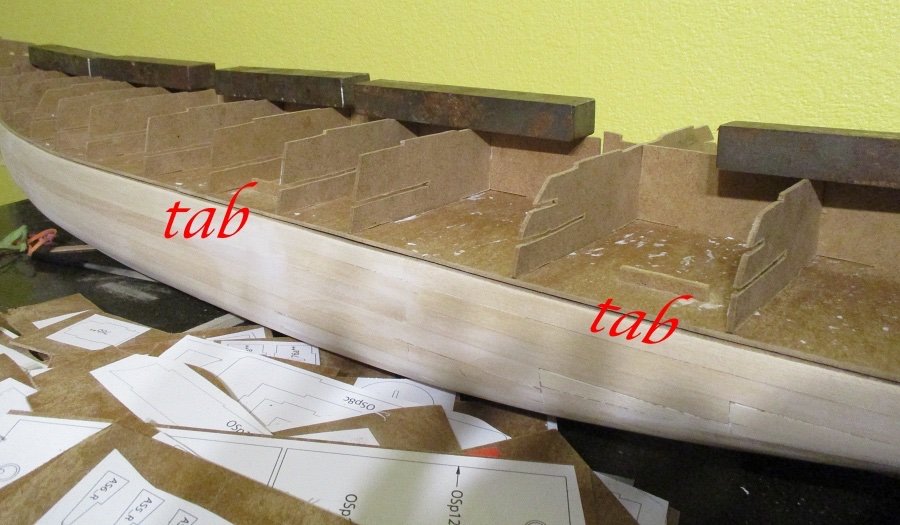
Using the thicker media, the folds will be too wide when joining the port and starboard frames together, so I have joined them together with a tab and I will add a piece of card on the last frame to represent that keel
Shouldn't matter about the rest as will be covered with deck plates
On the model only frames 133 and 134 have marks for cutting out
On the real thing all the frames had cut outs to reduce the weight of the hull (get more /heavier cargo on board??) and for flooding to adjust ballast
Toying whether to cut them all out, only the 2 or none as more than likely won't see this if hull is plated
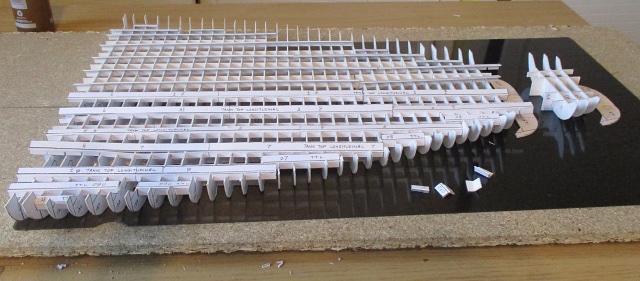
The tank top longitudes --will only glue the verticle parts for spacing between frames, the tops will be replaced with card to reduce the thickness of the card and template
All parts dry fitted only will tidy it up when I start gluing
- yvesvidal, GrandpaPhil, druxey and 2 others
-
 5
5
-
On 11/3/2022 at 12:32 AM, druxey said:
Definitely out of the ordinary!
Thanks for comments and thumbs chaps appreciated
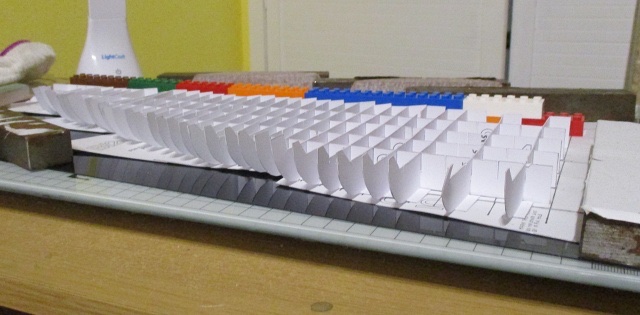
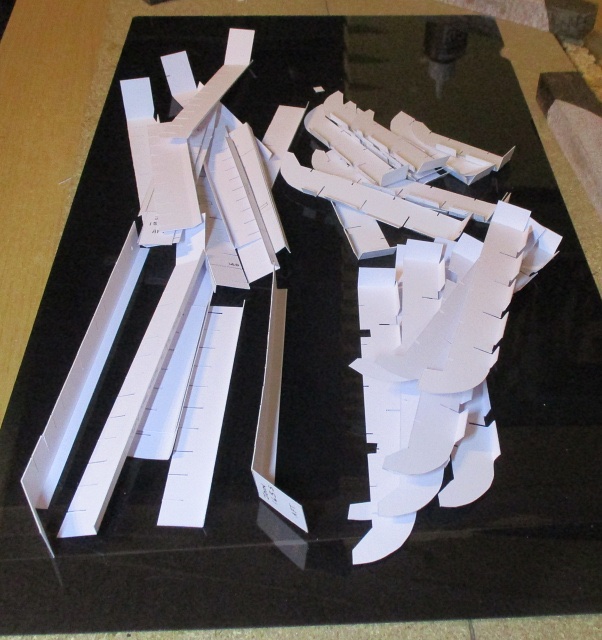
I have redone the shell plates once again but still having a problem getting them to line up perfectly
Decided to carry on and have glued the longitudals in place
Dry fitted the frames on port side....there is a couple missing as I cut thru the fold line 🤪 one of the reasons I am not using the originals😃
Thinking about restarting with a new approach.....I like the skeleton of a ship and as this was built as a training aid being able to see inside then covering the hull would defeat the purpose
This would mean that i can do away with the over lapping hull plates and work on a flat surface. food for thought
Not too happy with my results so far as we all think we could have done that a bit better but the main thing is I am happy plodding along and enjoying it
-
Good Evening Folks
Thought I was being smart using glossy paper but when I tried to remove a spot of glue with a wet finger the gloss rubbed away exposing rough fibres.😄
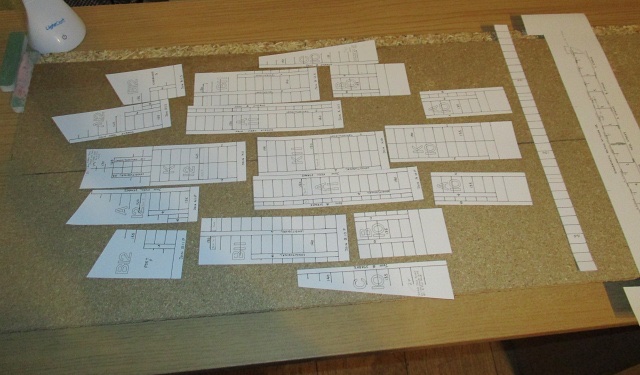
Thought best to change media to ordinary 300gsm paper. Never dawned on me to make copies onto manilla paper like the originals🤪
I have redone the bottom shell plates but may have to try again as a couple of lines are not perfectly straight😝
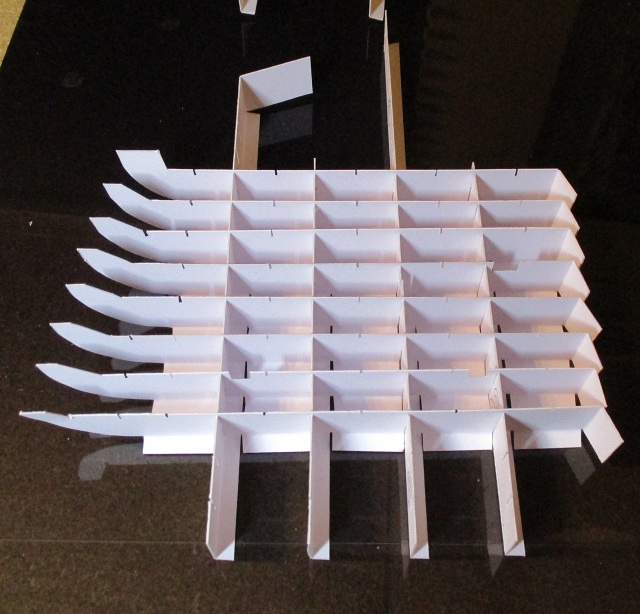
I have cut out the longitudes and most of the port side double bottom frames. These have been dry fitted just to see how they will look and to see if any tweaks are required before gluing
-
Good evening Folks
I think I should have posted this in the kits section
Can the powers that be decide and shift as required..... apologies for any hassle
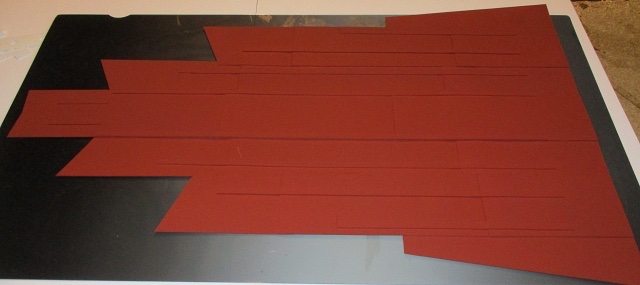
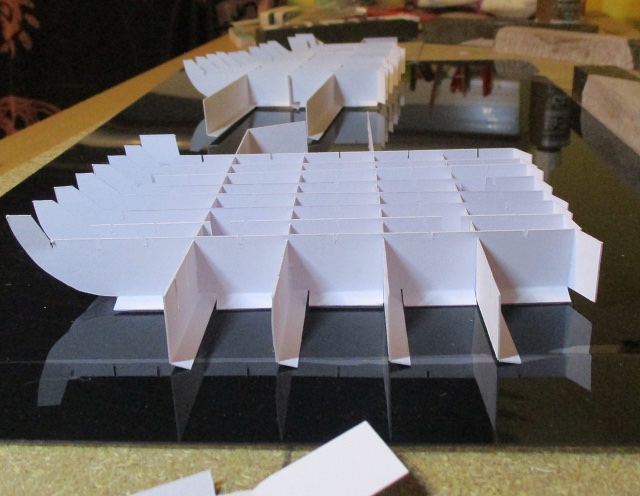
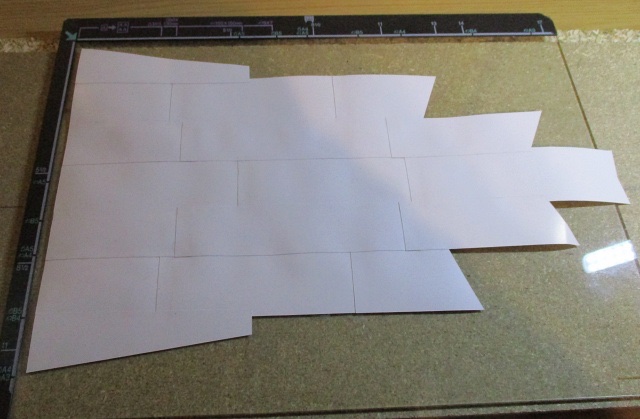
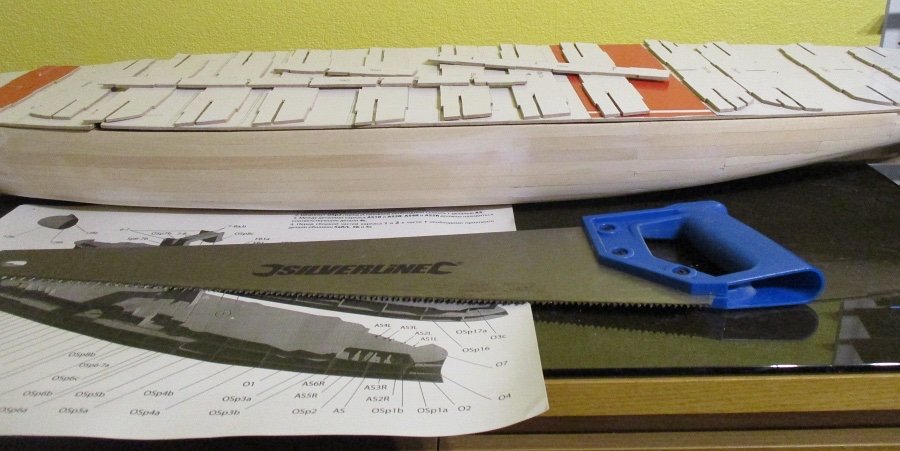
The fwd strakes are glued together
Looks a bit wavy as not lying flat due to the joins over lapping...expect thats so when viewed from the outside there is a bit of hull plating effect
Sitting on a A3 size platen glass from a photocopier to give an idea of the size
I will weight it down overnight till the glue dries
- mtaylor, Canute, Captain Slog and 2 others
-
5
-
Good Evening
After attempting the Borodino and getting a bit fed up trying to get the hull "skin" right I thought I would put it aside for a wee while to take a break from it and return in a few days hopefully remotivated.
Well that was 8 months ago, I still pass by it in my shed but my mind has shifted elsewhere
I came across Kevin's SD14 build log, and as I enjoyed building the "skeleton" of the Borodino, seeing how she came together I thought this would be a good topic I could enjoy and would be interesting enough to look at even if I decide not to plate the hull
I purchased the full kit (a lot of 225gsm manilla A3 sheets) fwd mid and aft sections
First thing to do was to copy them onto glossy double sided 250gsm paper
Thought it would be a good idea as I may get too heavy handed with the scoring and end up cutting the original templates
As the paper is gloss coated I don't think I need to worry about putting wet stuff on to seal the paper for painting
Have made a start with the fwd section plates
- Canute, ccoyle, Captain Slog and 1 other
-
4
-
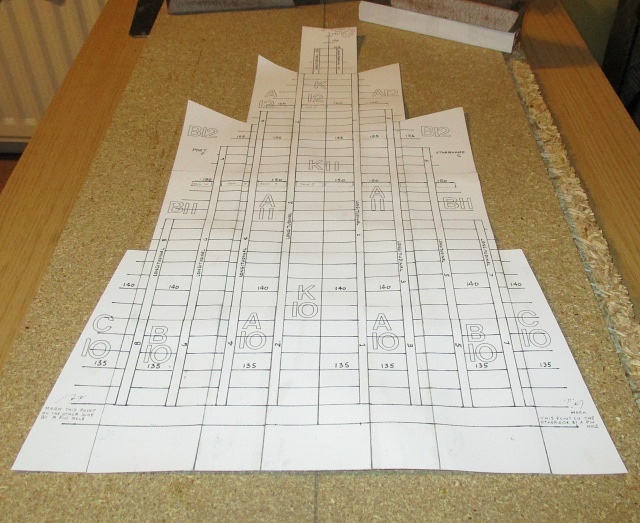
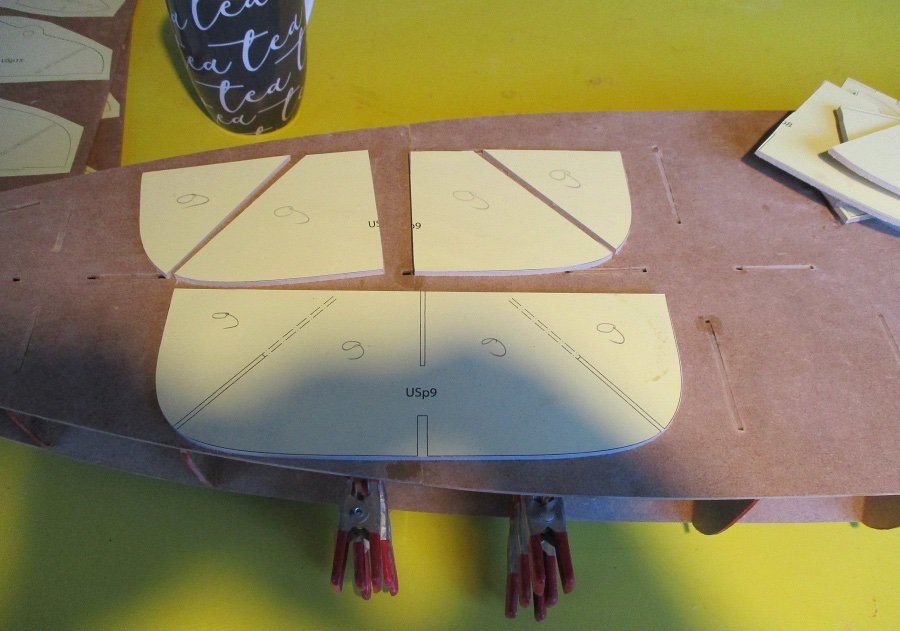
Good Evening Folk
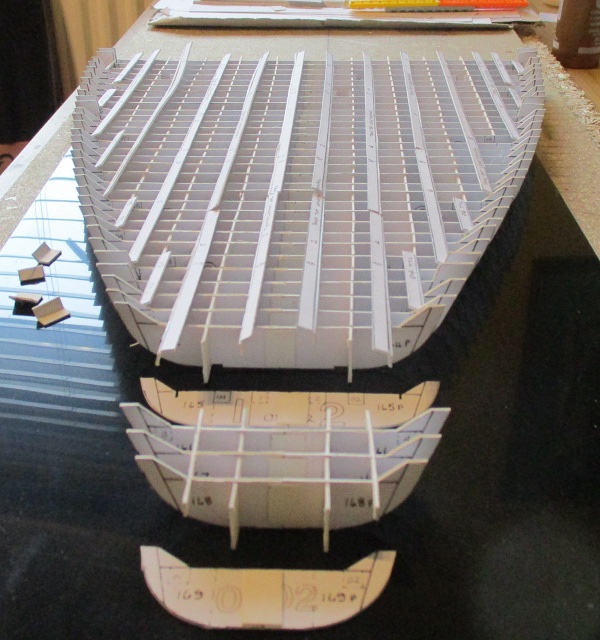
Using Captain Slogs diary for inspiration, I was a bit concerned about lining up the decks one on top of the other as they are not the same width or length, as pointed out by the Captain
There is no instructions for this step
The templates I am using have 10 cutouts on each deck so I am assuming I have to line these up with the use of a tab
Wondering if the Captain could not use this method as he was using the laser cut parts and there was no cutouts on the decks?
Nothing glued as yet on the upper hull, but I have noticed that my port n stbd sides are not quite symmetrical in certain areas
Hopefully I can improve on this once the upper deck is planked...may have to double plank once the lower and upper hull is joined together permanently
Hopefully make some progress over the weekend
- yvesvidal, Canute, Captain Slog and 4 others
-
7
-
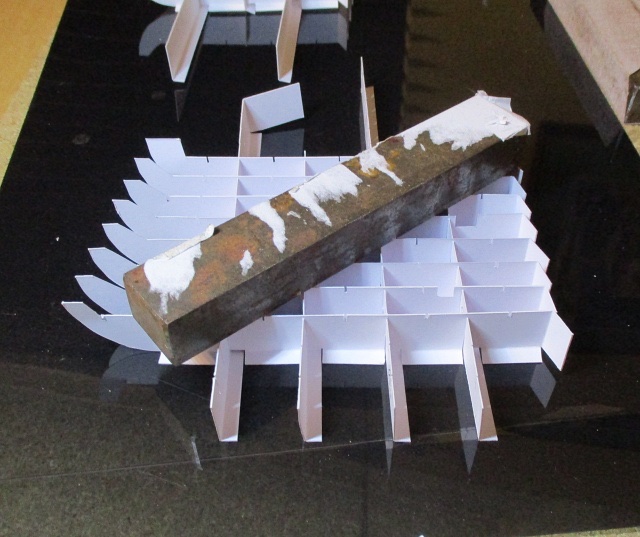
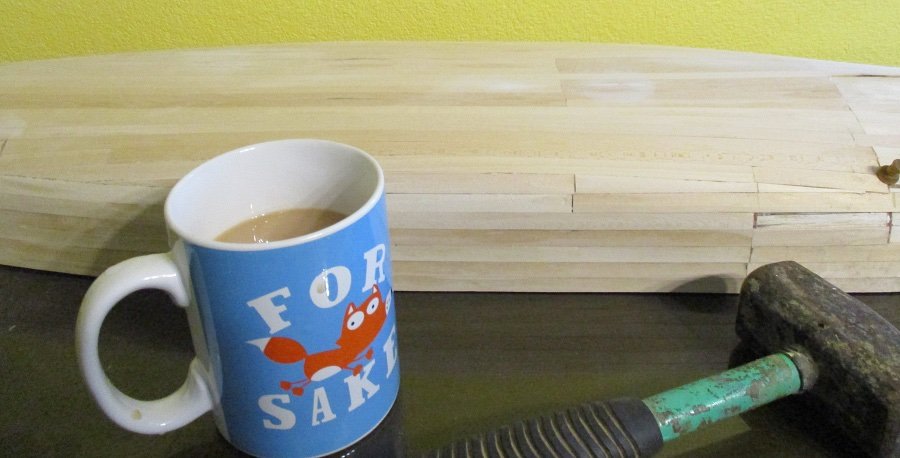
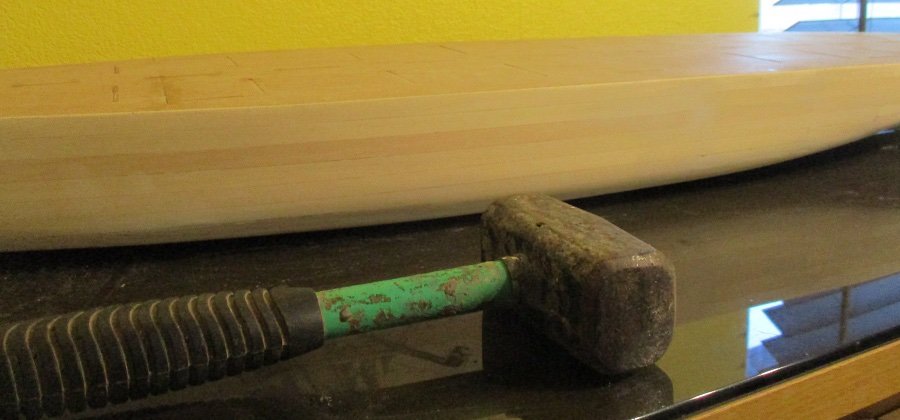
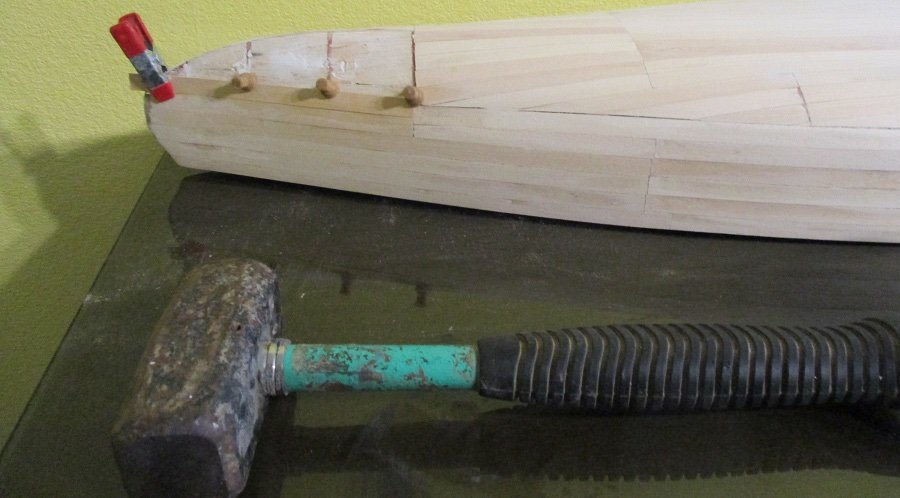
18 hours ago, mtaylor said:
Looks to be going well. BTW, what this that mallet used for? I hope not driving in your planking pins.
Hi Mark thanks for looking
Couldn't find my big hammer which is just as well as I can be a bit heavy handed at times
Taking a break from the lower hull I spent a pleasant afternoon cutting out the frames for the upper hull
- Keith Black, hof00, Captain Slog and 3 others
-
6
-
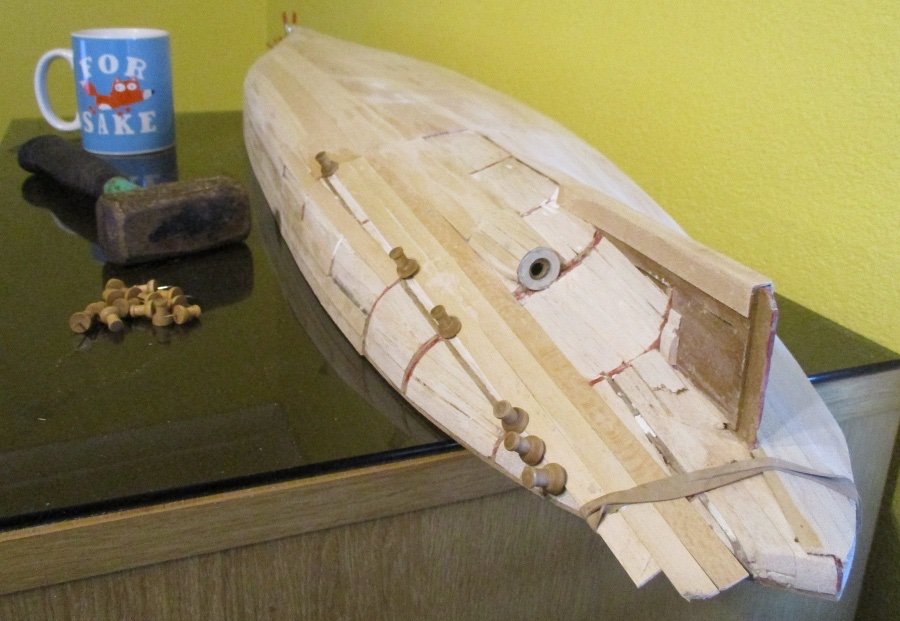
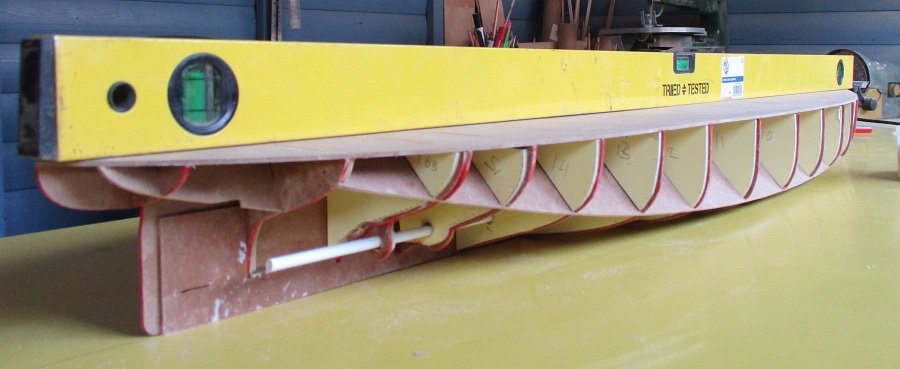
Good Afternoon Folks
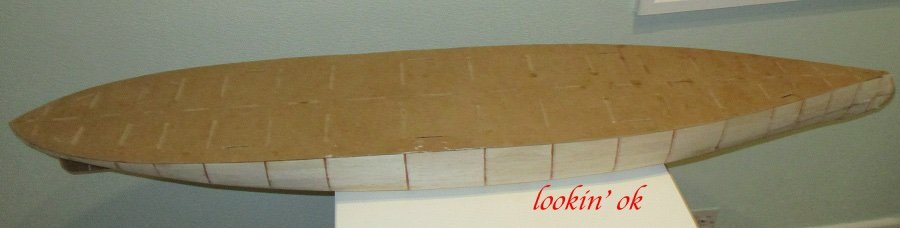
thought I would post my progress after 4 weeks since my last post and still not completed the outer planking but getting there ever so slowly
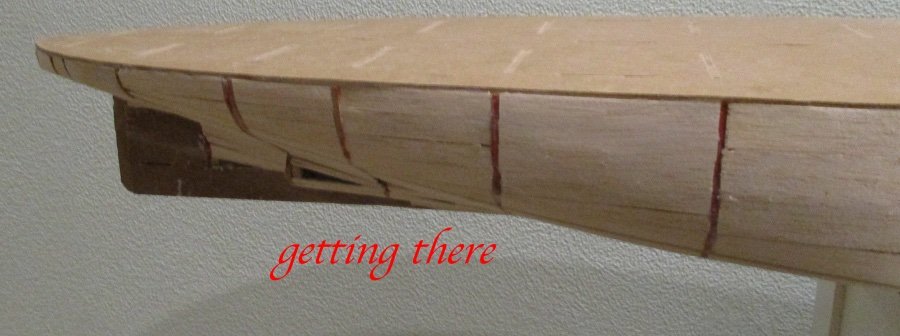
In order to stop me sanding flat spots on the circumference of the prop shaft I added a metal washer.
Stop sanding when you hear that 'horrible screech of sandpaper on metal🤮
The original model templates show no depth of detail for the lower hull but I have come across RGL's model at 1/350 scale with some nice hull plate detail etc
Thinking about having a go at mimicking the detail
Or maybe less is best incase I get carried away
Have sanded some of the hull and I think I can get away with adding more depth to it
Thanks for lookin'
-
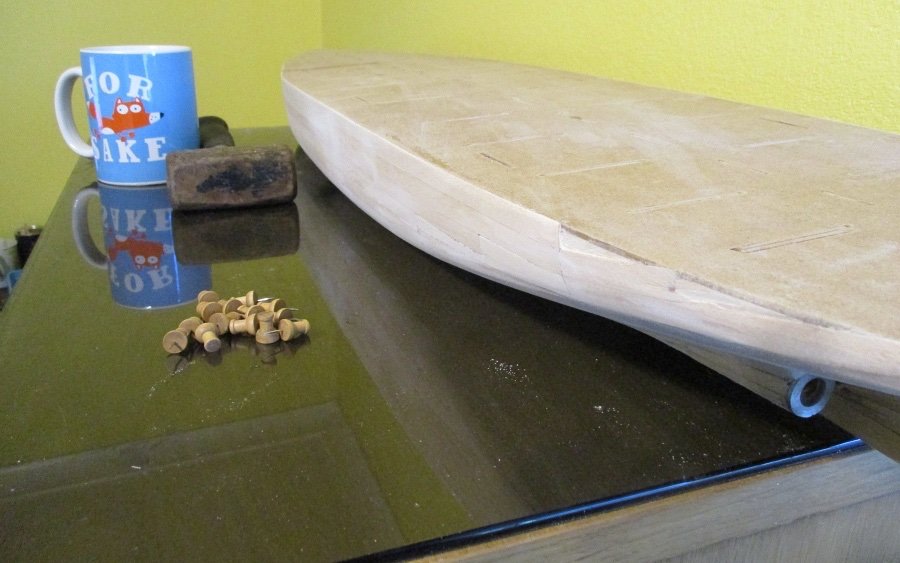
Evening Folks
Thanks for comments and thumbs up
I have been making slow progress with shaping round the prop shaft area ...don't think I will get that finished till sometime next year🙄
Made some thin sanding sticks to make it easier sanding round this area...nearly there
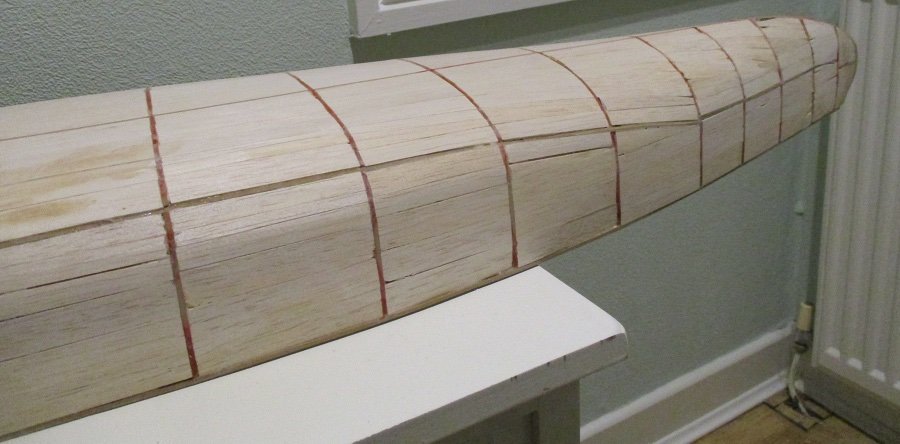
Decided to start planking the outside of hull before I put my fingers thru the thin balsa again😝
I am using 1mm thick strip wood and when this is sanded should not make the hull too "fat"
Definitely feels a lot more sturdy in the areas that have been done
Best wishes for the New Year

- hof00, yvesvidal, GrandpaPhil and 5 others
-
8
-
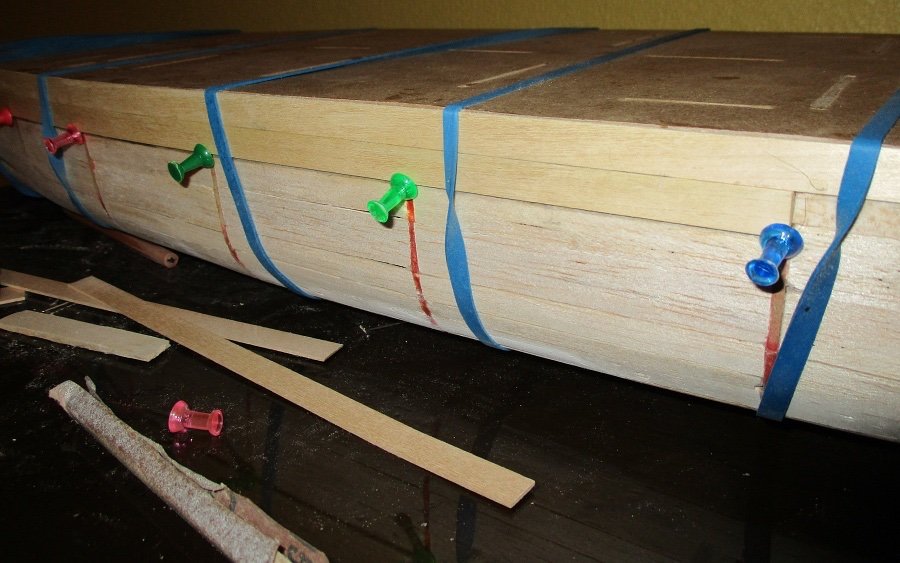
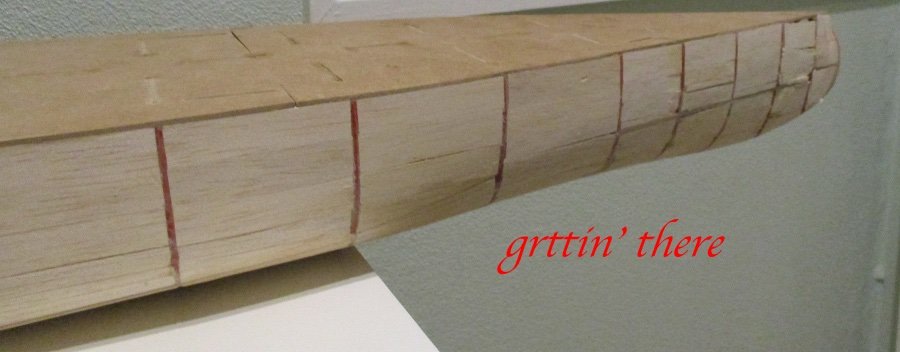
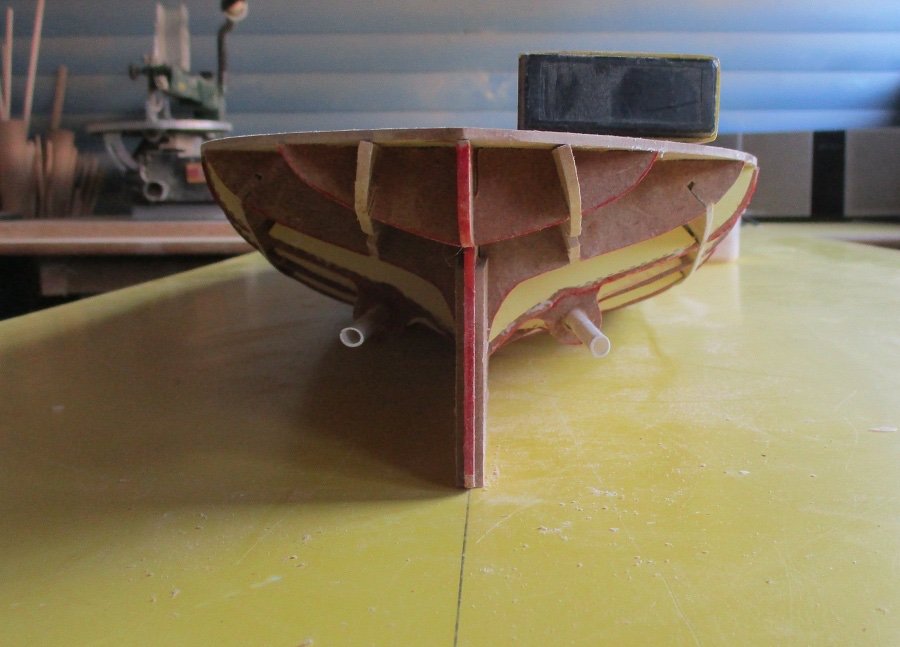
Good Evening Folks
Found this stage to be a bit of a slog (sorry Captain)filling in between the frames.
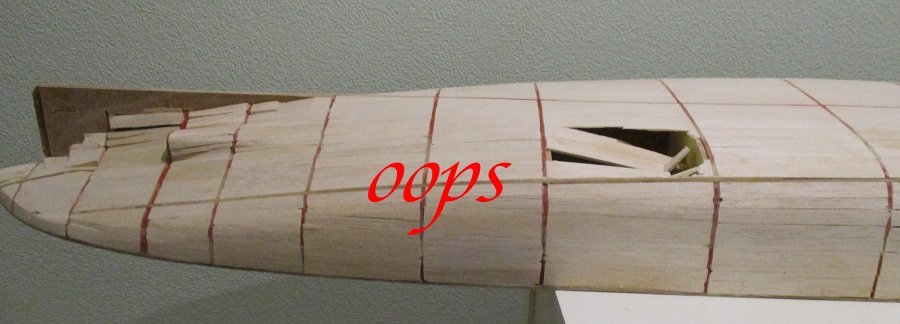
Nearly there but thought I would post my progress so far and had a slight mishap when lifting into position for photo shoot. Nothing that can't be fixed tho 🤔
The planking is very thin after sanding in some areas
I could have avoided this by
1. making the frames smaller and thicker to allow for planking on the outside
2.being more careful in the first place when fitting the edges to each side of the frames to make sure planks would not be too proud of the frames
Thinking about covering the hull in thin paper once planking is complete to offer support to any area that is thinly planked.
Pretty sure I read that idea somewhere
Still have to spend a lot of time slowly going round the aft area by the prop shafts
Thanks for looking' and if I don't speak to you soon have a Merry Xmas and see you's in the New Year


-
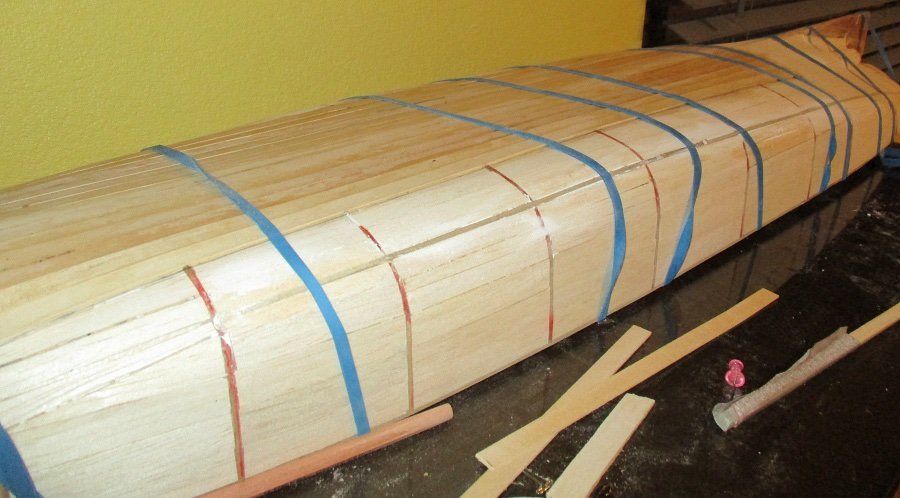
On 11/10/2021 at 3:16 PM, kriszmesz said:
Oh, I've realized just now that this is a new line of reports . I wish you a lot of success especially with skinning the lower hull. This is my most worrysome section.
Mine too
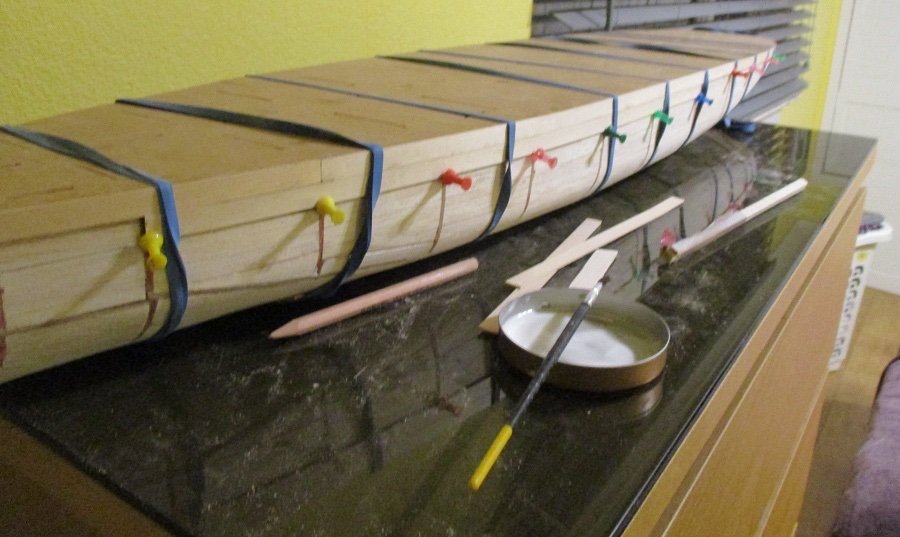
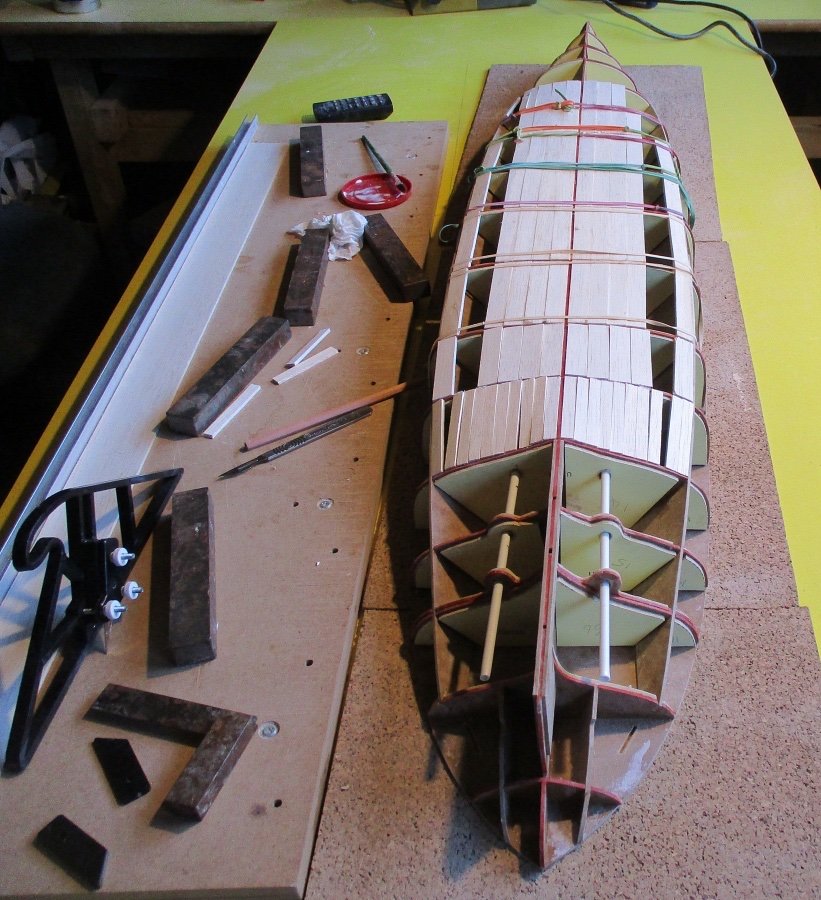
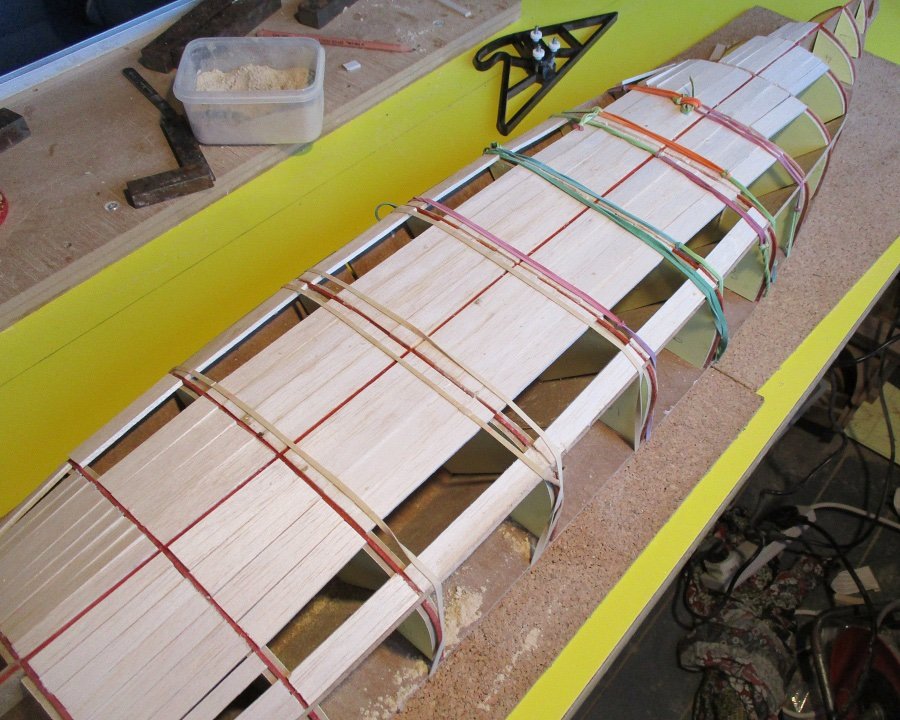
Have made a start with filling in between the frames.
Now beginning to realise that she is pretty big. Who's idea woz this to double the size🙄
This stage will take longer than anticipated.
The planks are glued down only where the elastic bands are
Thanks for lookin'
-
Thanks for your concerns mikegr
Another one of my reasons for scaling up to 1/100 is the wooden decking.
If I lay the deck template flush with the top of the frames rather than sitting on top this should allow me to use 2 mm planks without gaining any height.
I am not too concerned about gaining or losing a mm here or there on the hull as I am doing this for enjoyment to see how I get on—and a learning curve😋plus I won’t tell anyone 😂
Using a thin veneer,if any sanding is required then I think I would lose the caulking effect between the planks and the deck would become one piece.
I can get confused with the debates I have read —some say that at such and such a scale you would not be able to see the separate planks.If that is the case then why can I see rivets etc.
Or in this model the card shows small details on the upper hull but the lower is plain.
Thinking about it too much makes me dizzy.
More than happy just to go along with the designers interpretation perhaps using a bit of modellers license if I get brave enough
- Keith Black, Captain Slog, mtaylor and 2 others
-
5
-
14 hours ago, mikegr said:
nice clean work. Hull looks not easy for a beginner. I suggest you work with balsa than MDF for plating the hull as the latter has some issues with humidity and need some special treatment. Balsa is the no1 alternative for us that our modelling wood market is restricted.
Hi mikegr
Yes I have some sheets of balsa that I am cutting into strips, this should give a smoother hull once sanded
than if I used mdf. (Out to the shed at the weekend to start gluing)
When sanding mdf I think the fibres separate leaving a “fluffy” surface.
As for this particular model being suitable for a beginner, I am building in stages so if I make a pigs ear of it I can try that section again as I have copied the templates.
I most certainly could not build this model out of card using the original parts, as I would only get one shot at getting it right. My lack of skills, patience and heavy handedness would soon see it in the waste paper basket.Thanks for looking
- mtaylor, mikegr, Keith Black and 1 other
-
4
-
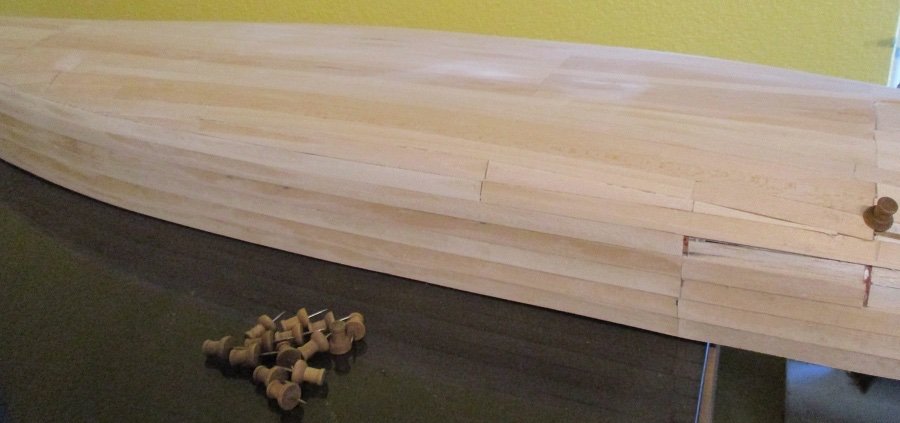
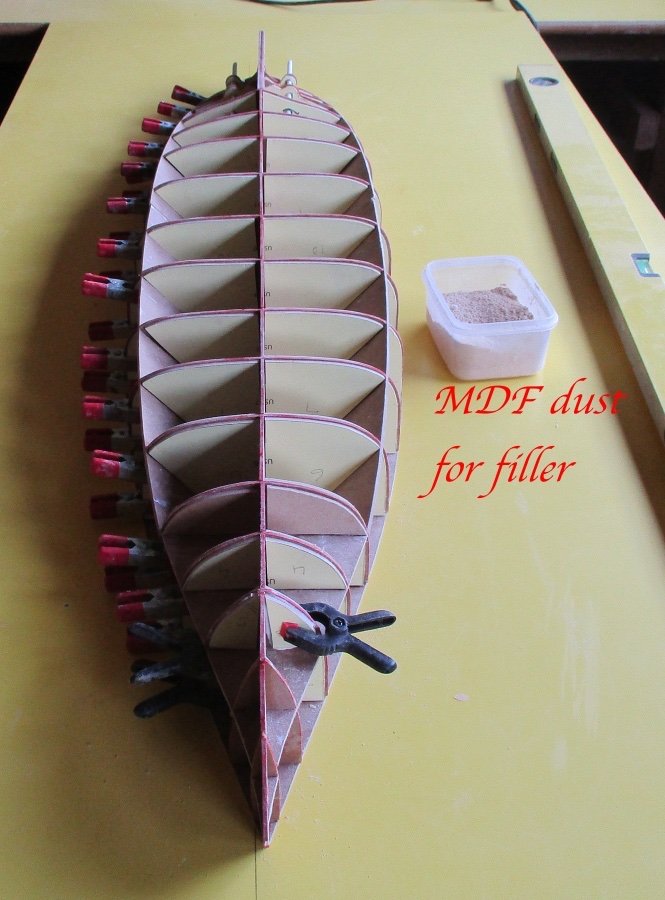
Good Afternoon Folks
As this part of the build can get a bit tedious for me I thought I would spread it throughout the week, doing a wee bit at a time.
This would then give me my Sunday morning time in the shed listening to the radio to start filling in the hull.
Unfortunately the clocks went back an hour last weekend so by the time I get home its dark.
Makes it less appealing for me to head to the shed after tea. Too comfy in the house.🤗
The styrene tube is only there at the moment so I don't clog up the holes with glue.Giving it a wee twist now and again as the glue dries.
Being a Scotsman I didn't want to throw away the sawdust.🤑It can be mixed with glue and used as a filler when required.
The bow and stern sections will be filled in completely with balsa

- CDW, yvesvidal, Keith Black and 9 others
-
12
-
Good Afternoon Folks
Thanks for the "heads up" Captain Slog very much appreciated
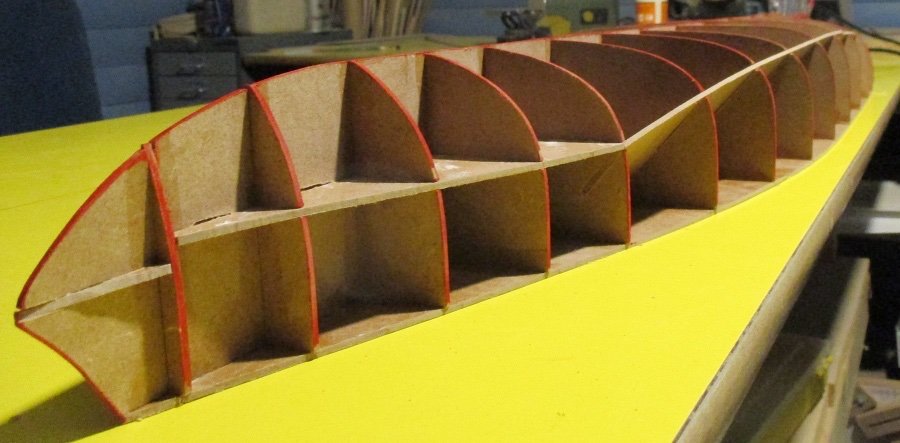
Decided to continue with the lower hull rather than continuing with the upper decks framework
I photocopied the frame templates at 196% and glued them to 3mm mdf
I considered removing the horizontal decks but I must have got glue on them as they would not slip out
Now I have to quarter each reduced frame thats eight pieces per frame. Lucky me🤪
Maybe just as well as the deck helps keep the frames squareish. That should keep me busy for a while
Thanks for lookin'
- hof00, yvesvidal, GrandpaPhil and 4 others
-
7
-
4 hours ago, Captain Slog said:
Coming along nicely. Have you decided how you are going to ‘plate’ it when the frame work is done?
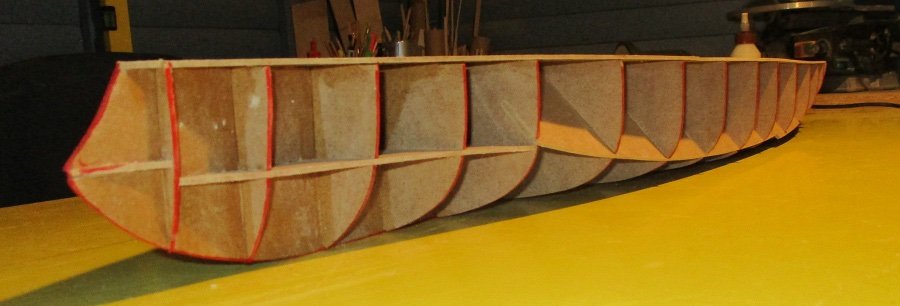
Hi Captain Slog
I will firstly put a reduced frame either side of each frame
This will give me an edge to lay “planks” on proud of the frames using balsa or mdf strips
This will then be sanded down flush with the main frames. Hence the red felt tip…STOP sanding
This should hopefully give me a good surface for using thin planks of wood for “planking” the outer hull as concerned not to make it too thick increasing the size of the hull.
Also was thinking of “plating” as per the card model using the glossy card??
Not sure if that is a good idea but it would have a ready made smooth surface.
Sounds a bit long winded🤒 but it keeps me occupied
- GrandpaPhil, Keith Black, mtaylor and 3 others
-
6
-
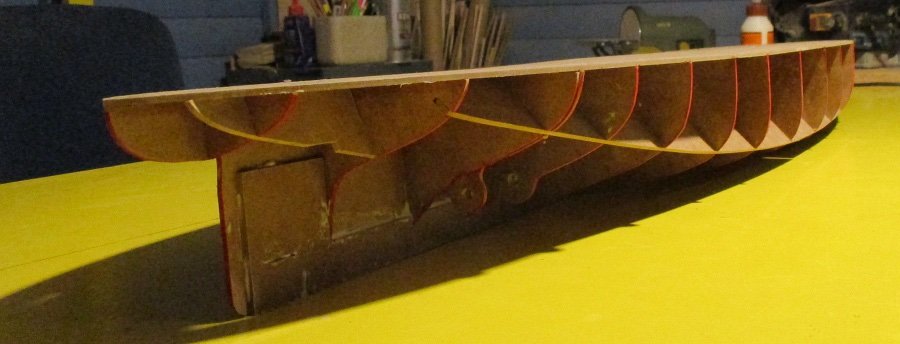
Good Evening Folks
Continuing with the lower hull.....the lighting in my shed does nothing to aide my lack of photographic skills 😜
Progress so far
-
Hi Rvchima
Will be following your build for future reference
Have purchased the kit myself and stowed away for a future project
Missed the Hachete parts work of this when released...think it is more or less the same kit
- Canute, CaptnBirdseye and mtaylor
-
3
-
Good afternoon Folks
Thanks for comments and thumbs up...appreciated
Cut out the slots on the deck ....took longer than I thought using Swan Norton blades, fingers still intact but gained a blister after half an hour
I'm just a wee softy lol
As the templates were glued to the mdf with a carpet spray they peeled away quite easily
I did manage to break the fwd deck where frame 1 goes when trying to cut out the slots in the narrow area but just glued it together again
As that area will get filled not too concerned
The idea of doubling the size of the templates to 1/100 scale was to prevent me from making silly mistakes like that but heyho
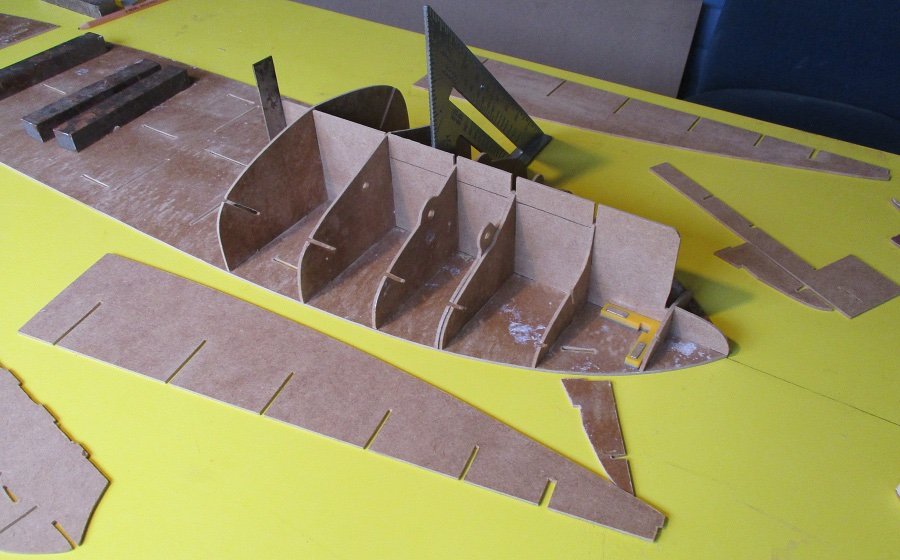
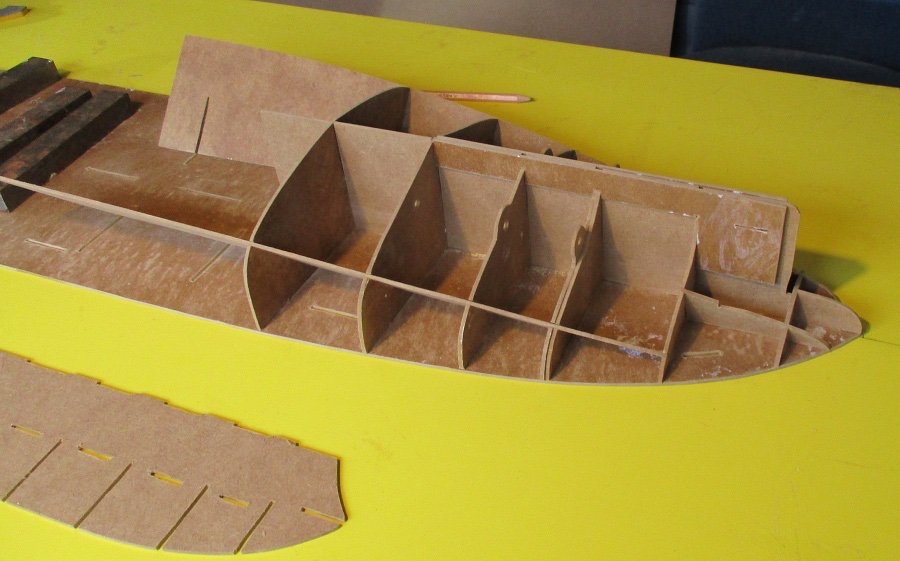
Dry fitting parts to make sure they are not too tight a fit and are going to be square
Thanks for looking
-
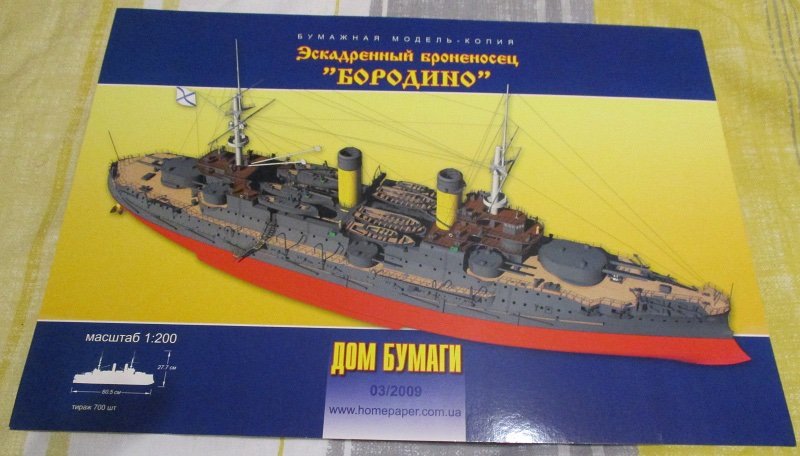
Hi Folks
Thanks for comments
Yes it is the Dom Bumagi version apologies for not being clear
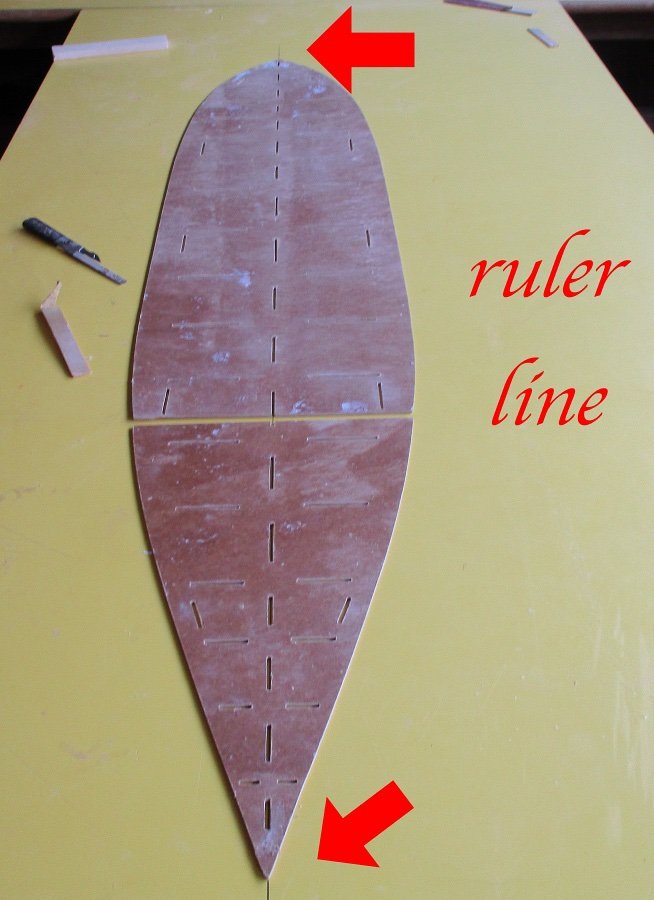
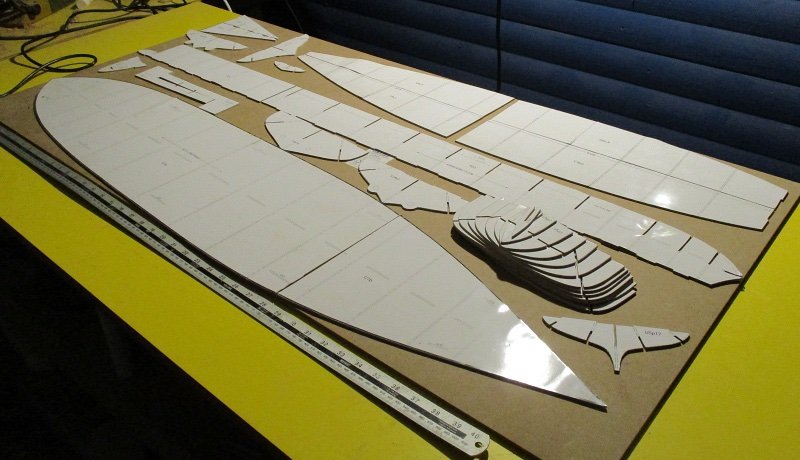
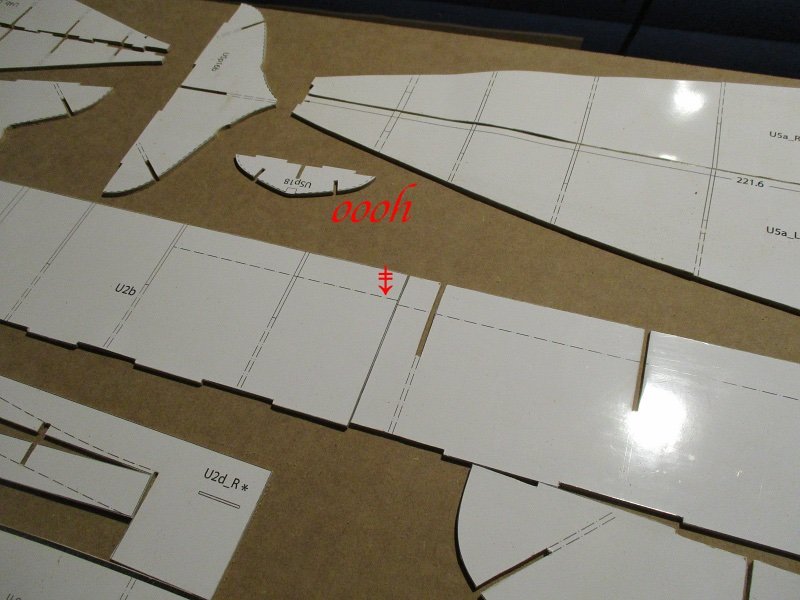
Made a start on cutting out the templates
As you can see in the 3rd photo the line representing where you are meant to cut away the area on the two parts making up the keel does not align
I thought it may have been a hiccup when enlarging on the photocopier and was going to recopy them again tomorrow.
I checked the keel parts on the original template and found that the line did not line up either..so no worries there then lol
Will try uploading pics now
Thanks for popping in
- Keith Black, Canute, Captain Slog and 5 others
-
8
-
Hi Folks
Am new to this forum as I only registered a few months ago and this will be my first post.
I have spent a lot of time drooling over some build diaries and am in awe of the amount of talent and skill on display.
Thinking I may have left it a bit late in life to get into this hobby.
Anyway I have been inspired by the build log of Captain Slogs Borodino.
The way the “skeleton” is assembled keeping everything squarish seems like a good start.
Down side for me is the smaller parts. Seems like you need a lot of patience and good eyesight to achieve the desired effect.
Plus the fact it is made of card keeping the build clean would be challenging for me.
I managed to purchase 1/200 Borodino from the UkraineAs I have access to a photocopier I have magnified the templates by 200% on to glossy card.
The templates for the hull were cut out and glued onto 2mm thick mdf and I am now in the process off cutting them out with a scroll saw and finishing them off with a disc sander.
Will post pics of progress once I work out how to do it
Thanks for looking
- ccoyle, Canute, Old Collingwood and 4 others
-
7


SD 14 by RN77 - Marcle Models - CARD
in - Build logs for subjects built 1901 - Present Day
Posted · Edited by RN77
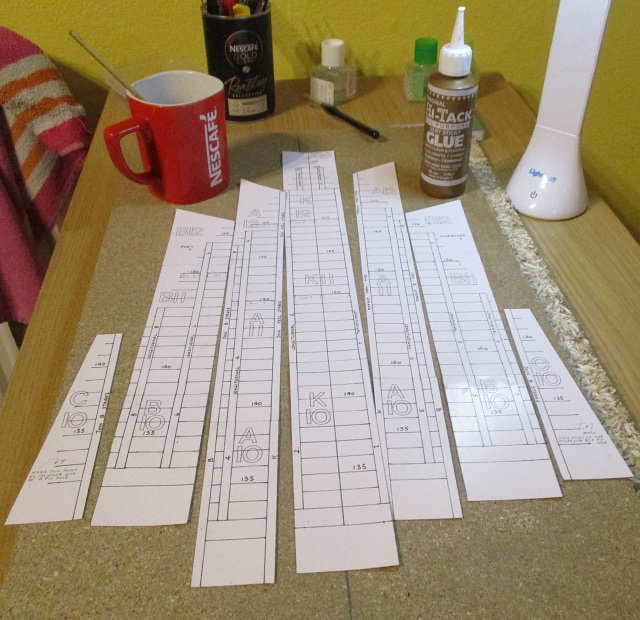
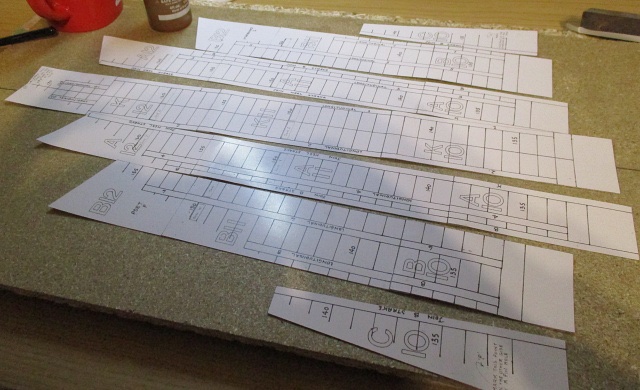
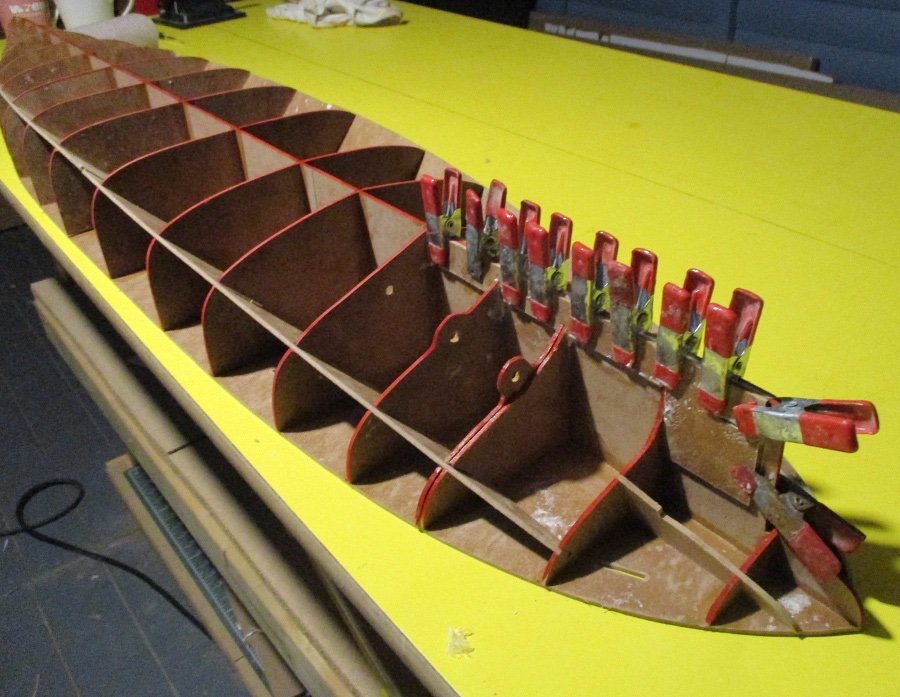
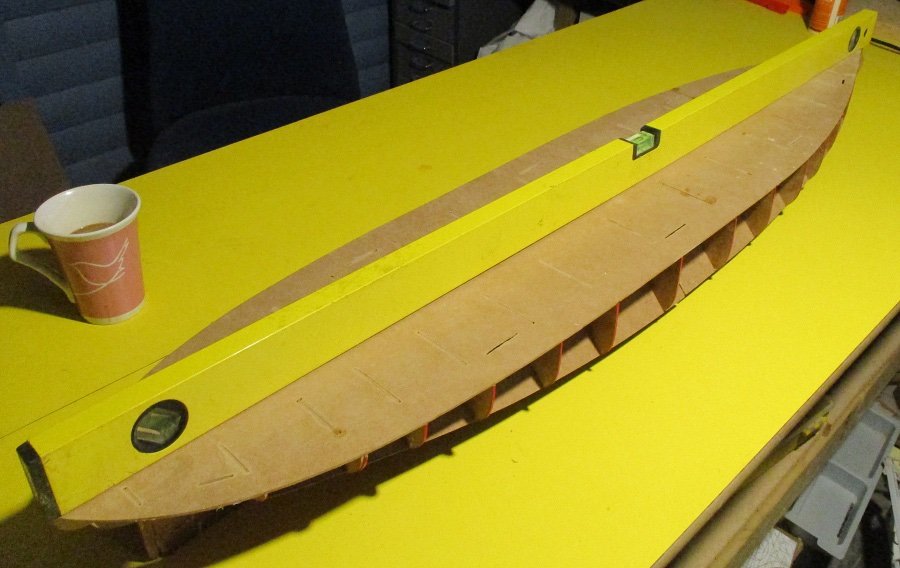
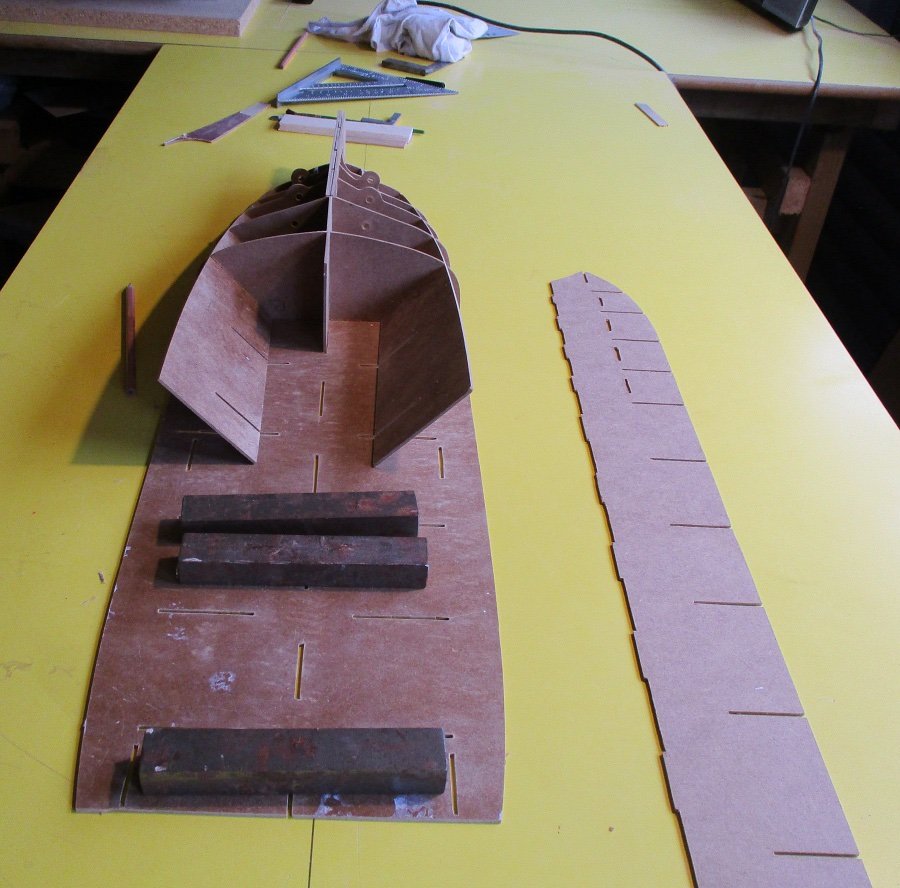
Good Evening Folks
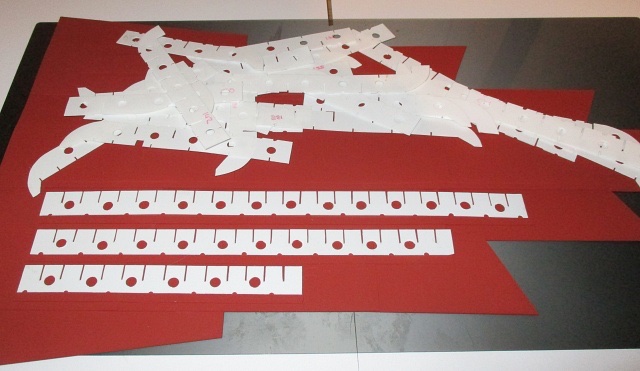
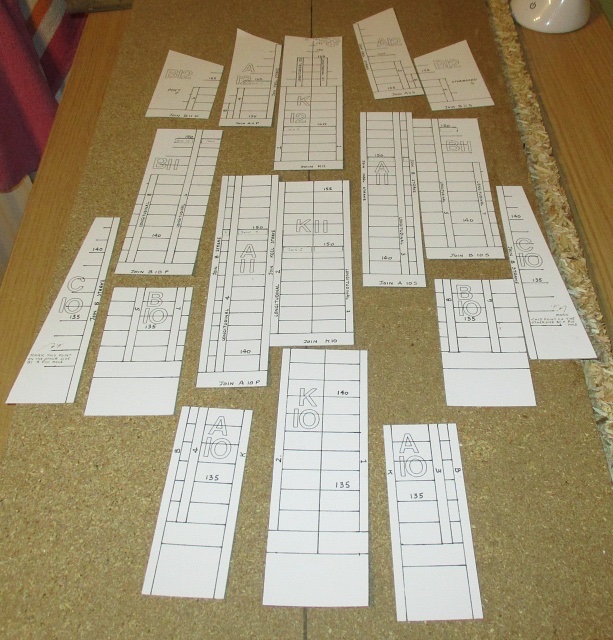
Coming across a diagram I saw that I had my bottom longitudes lying horizontal as per card model instead of verticle
I thought I should correct this while just at the start of the build
The slots on the other longitudes did not line up with each other very well either
I presume this is due to the glue drying out causing the card template to shrink
I clamped all these longitudes together and cut the slots out using one of the templates as a guide on the scroll saw
The middle longitude replaces the fold at the end of the frames for the card model