CaptnBirdseye
-
Posts
155 -
Joined
-
Last visited
Content Type
Profiles
Forums
Gallery
Events
Everything posted by CaptnBirdseye
-
 Thanks Jobbie. I'm going to have a look to see if by notching the front facia the hull planking sits flush below and butts up against it above. That way, the facias will act as a type of 'capping'. Does that make sense? If it doesn't work i now know i can sand flush and no harm done. 👍
 -
Thanks Andrew, Yes i already follow his build but was worried about 'hijacking' his thread. I might just pm him and ask as you suggest 👍
-
Hi David Thanks for the reply. Yes that was my thoughts too, but i didn't want to sand it down, only to find out later it should be like that" The more i think about it, the more i feel it should be 'notched' like the rear facia, to allow the plank to sit under it and give an edging to the bow planking above? Also, after a practice run with the planking, i may need more filler at the stern, under the counter, as the bend is quite severe 😟 Gray
-
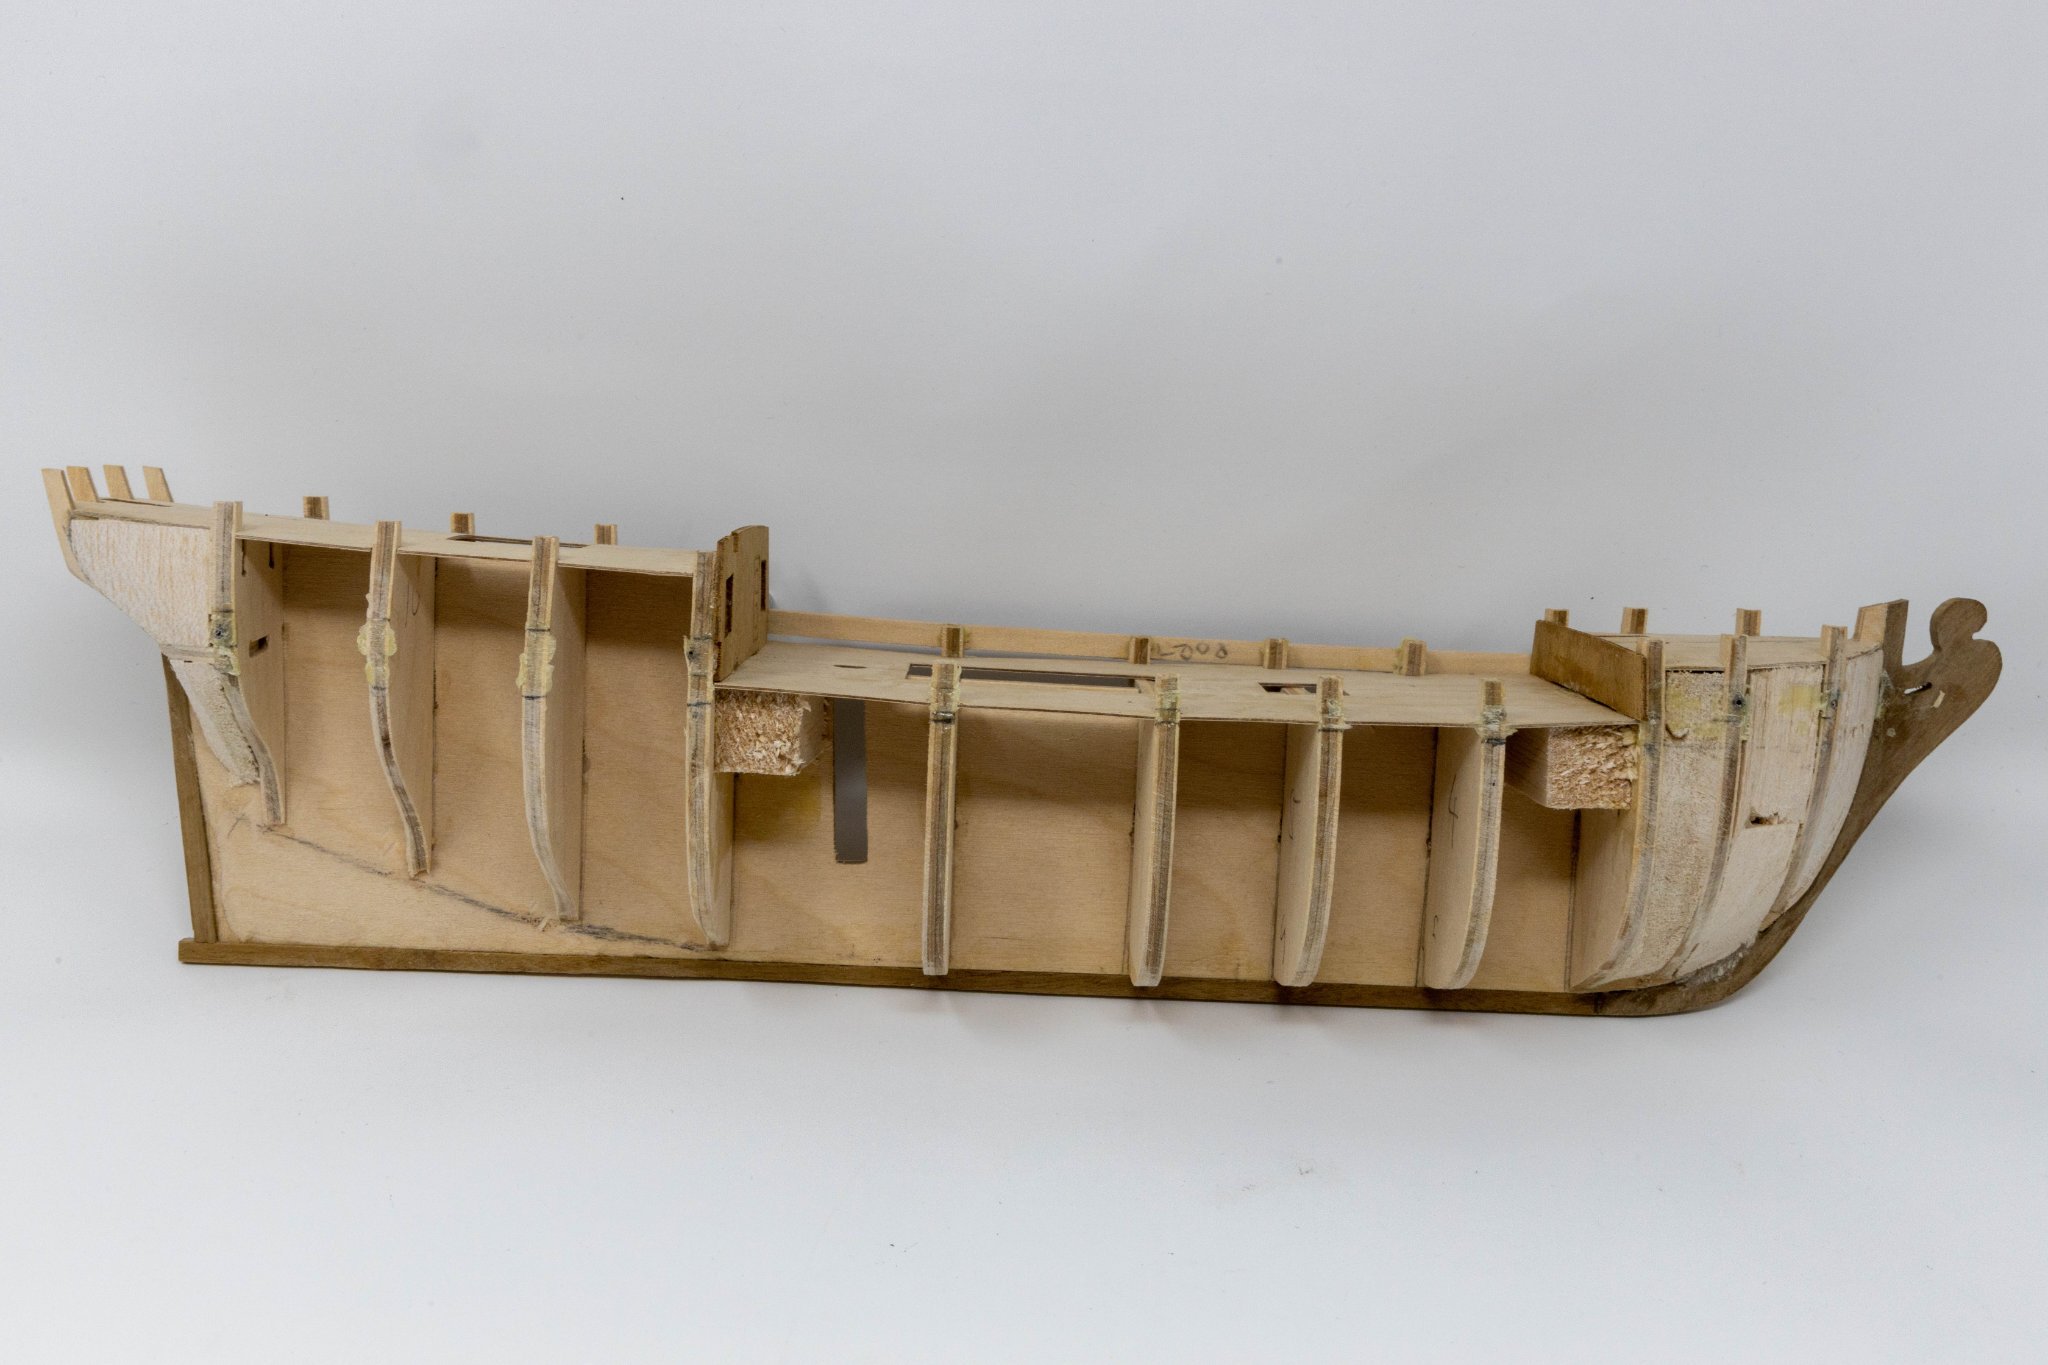
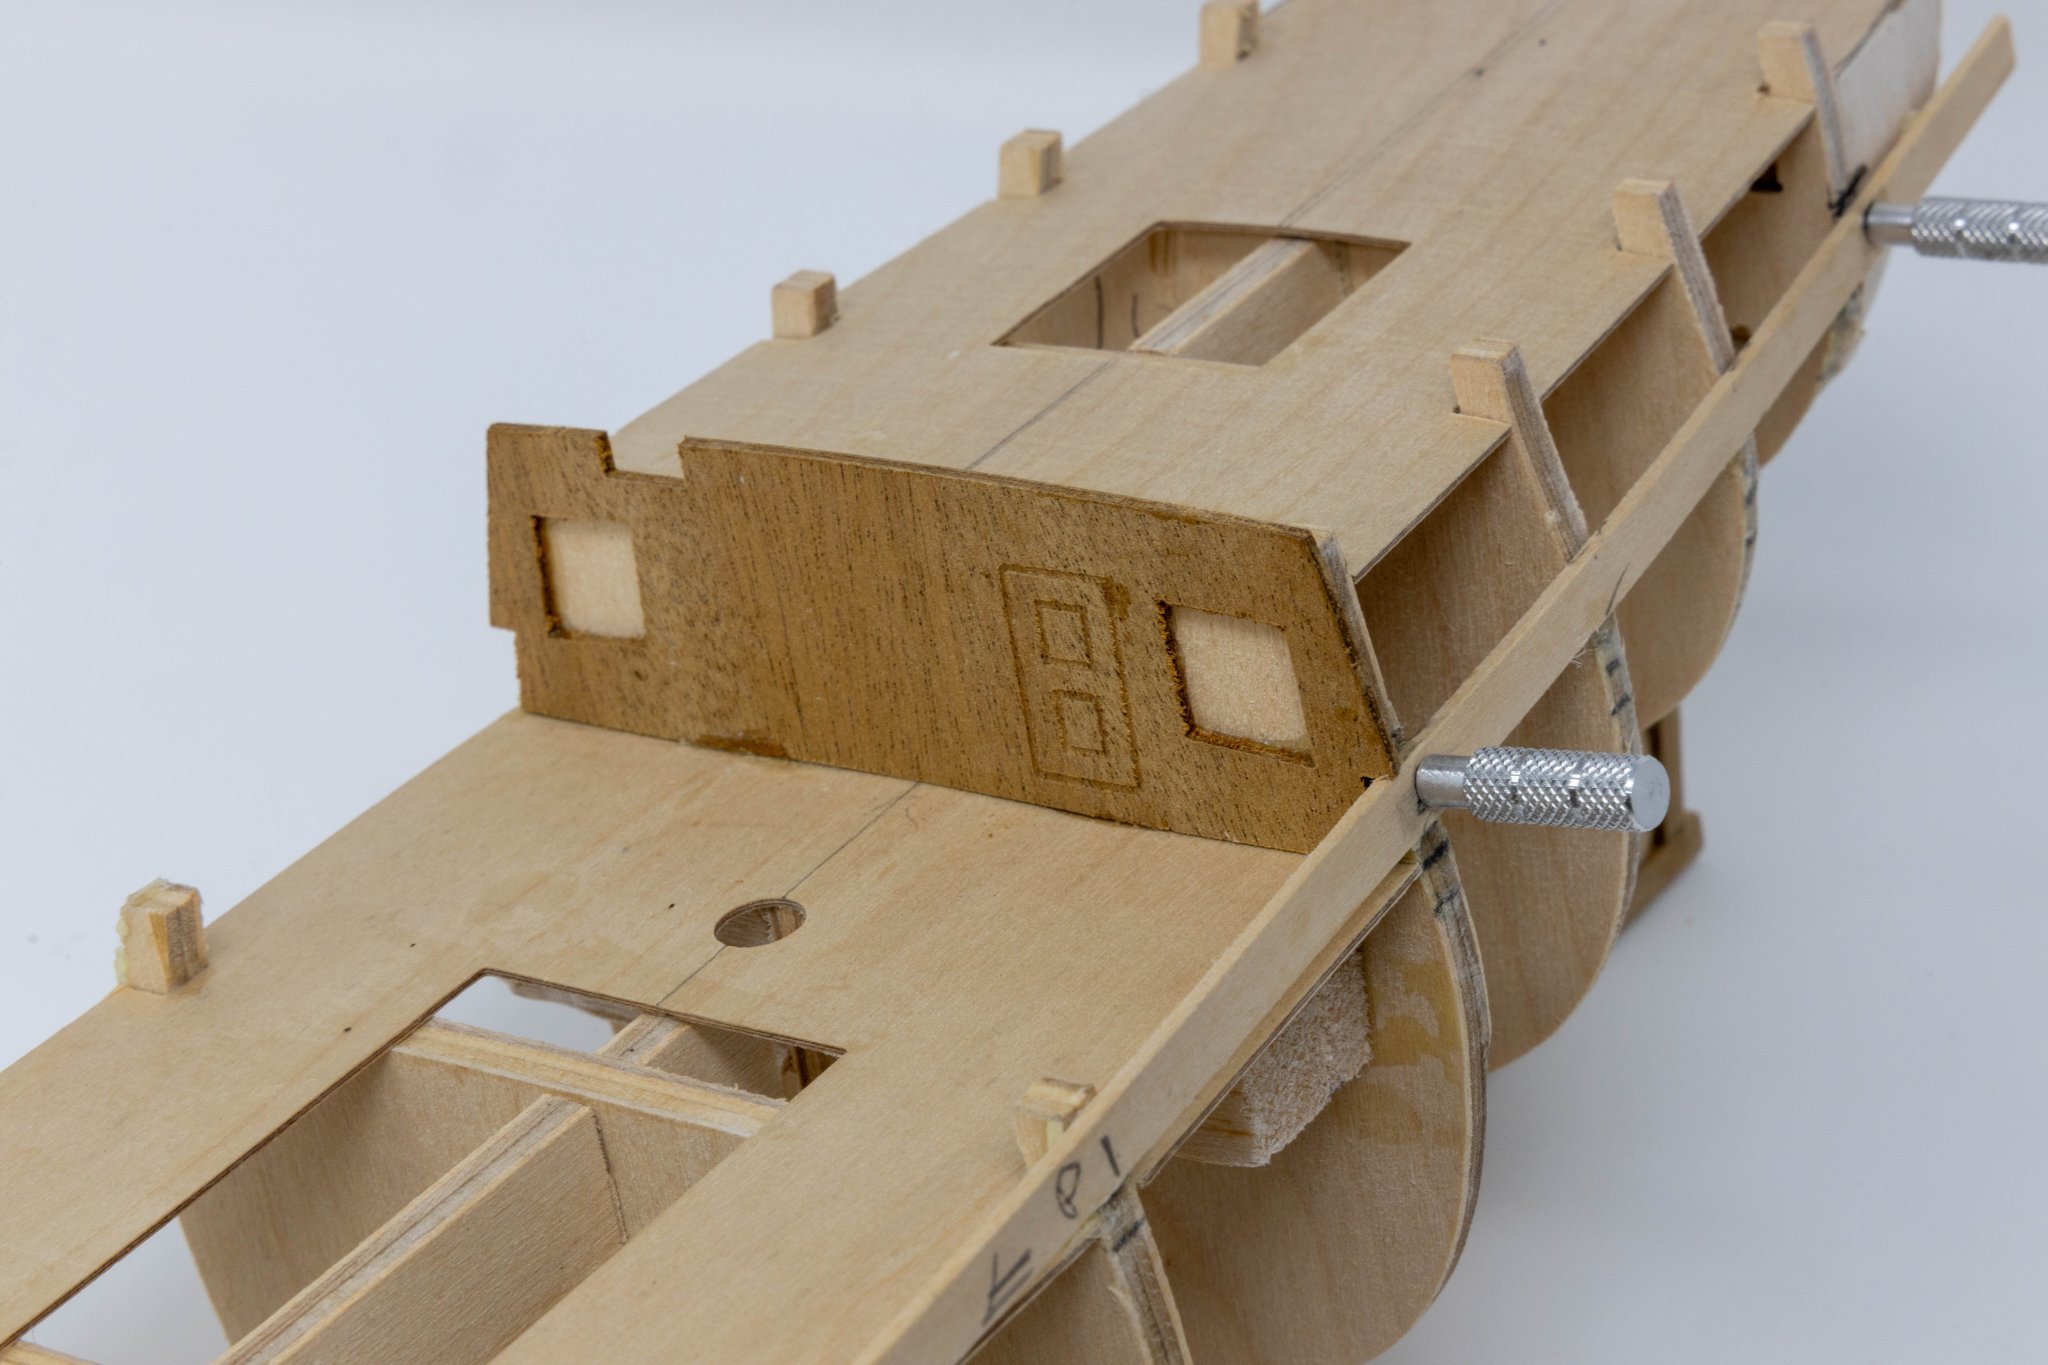
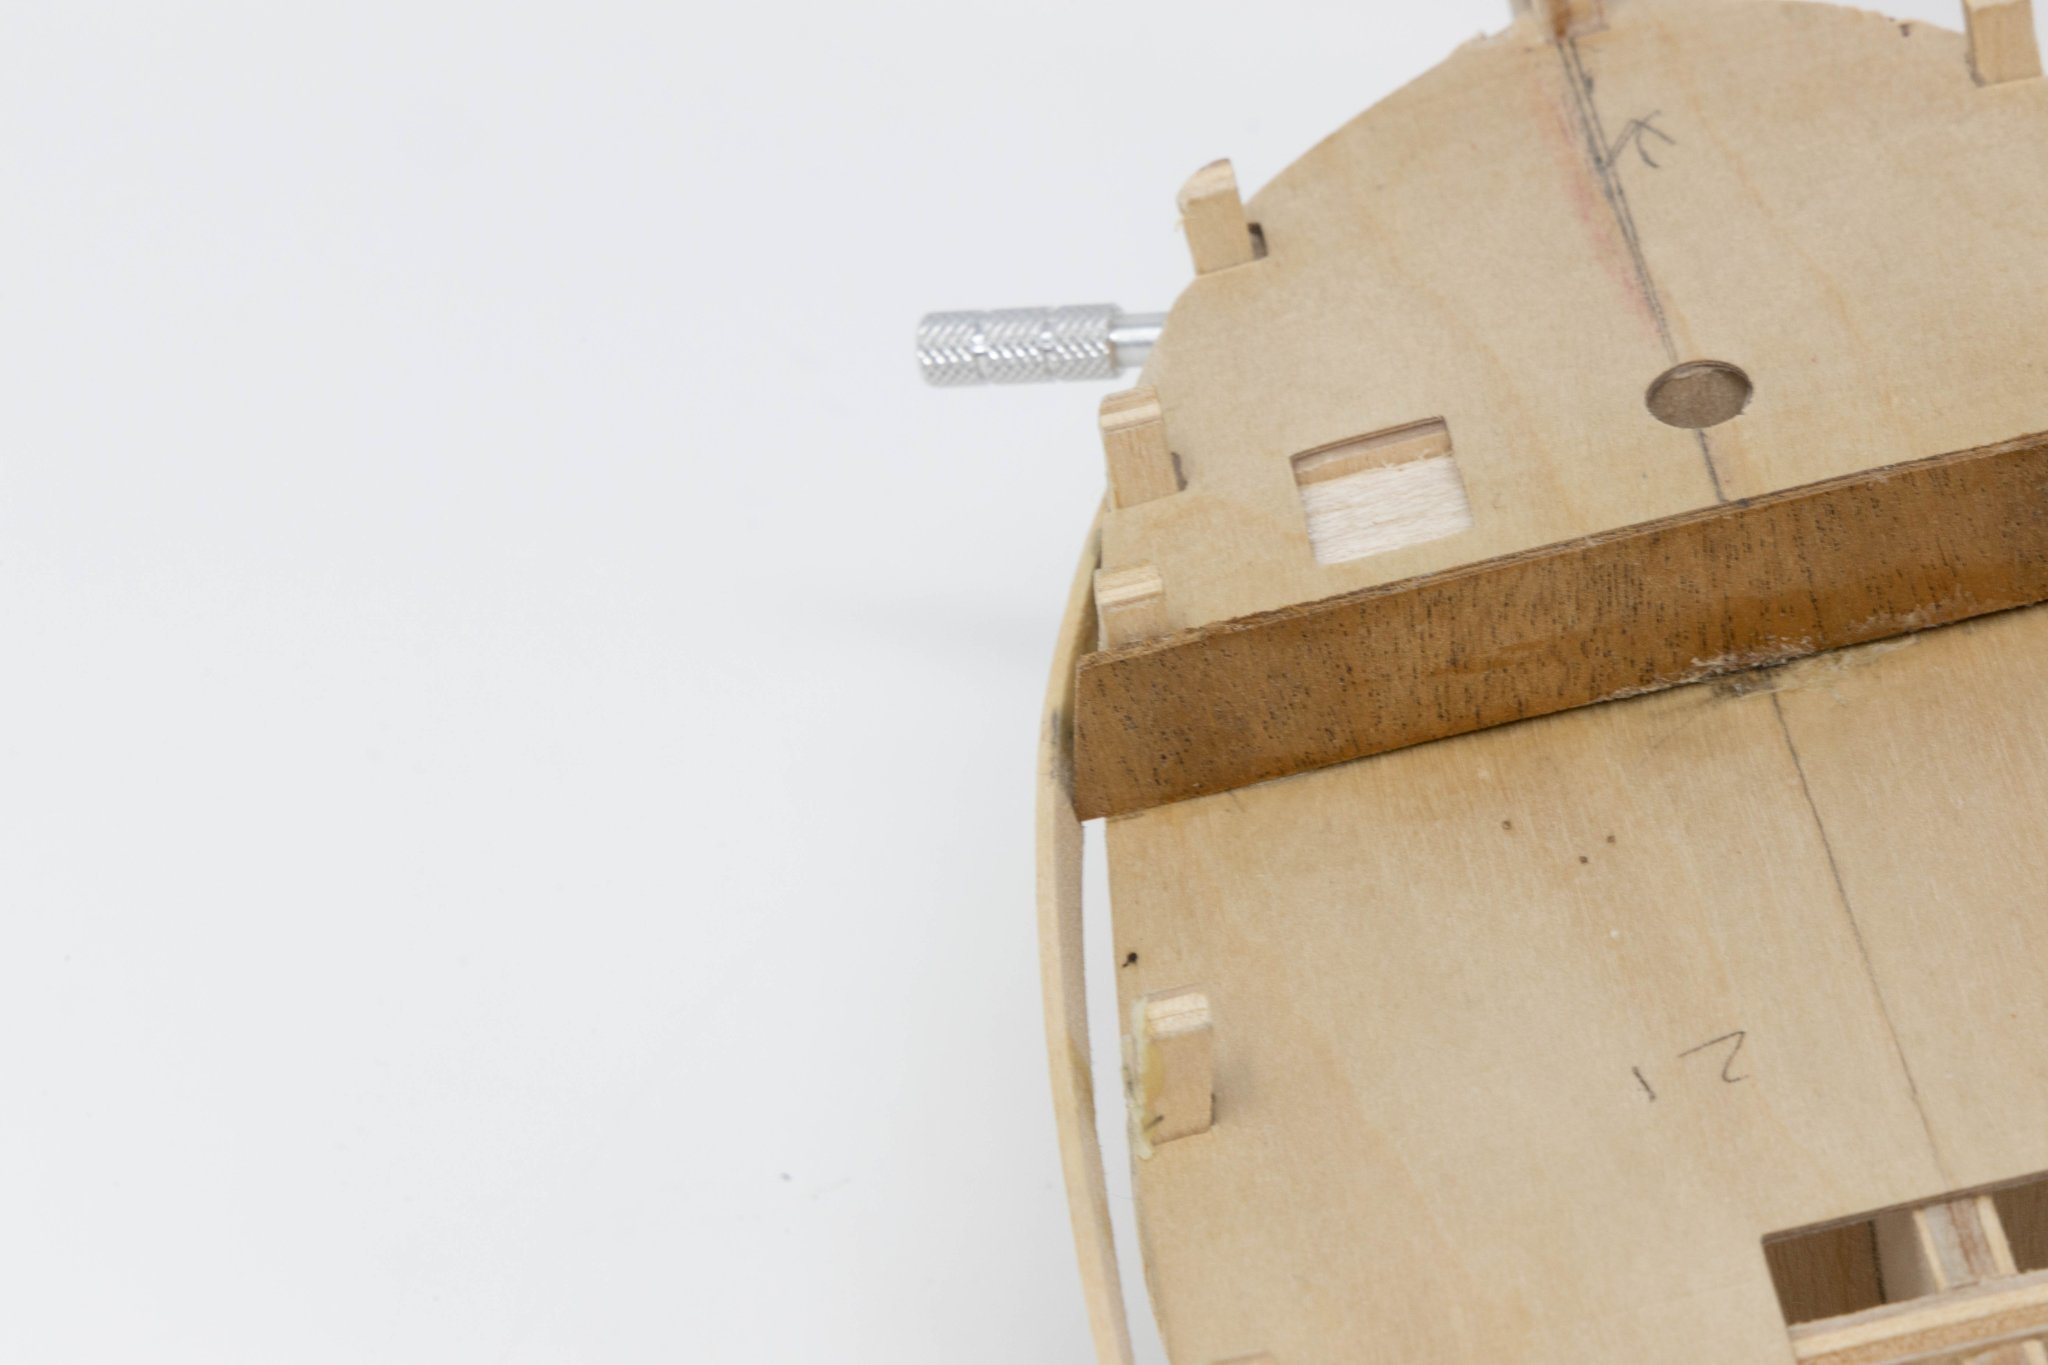
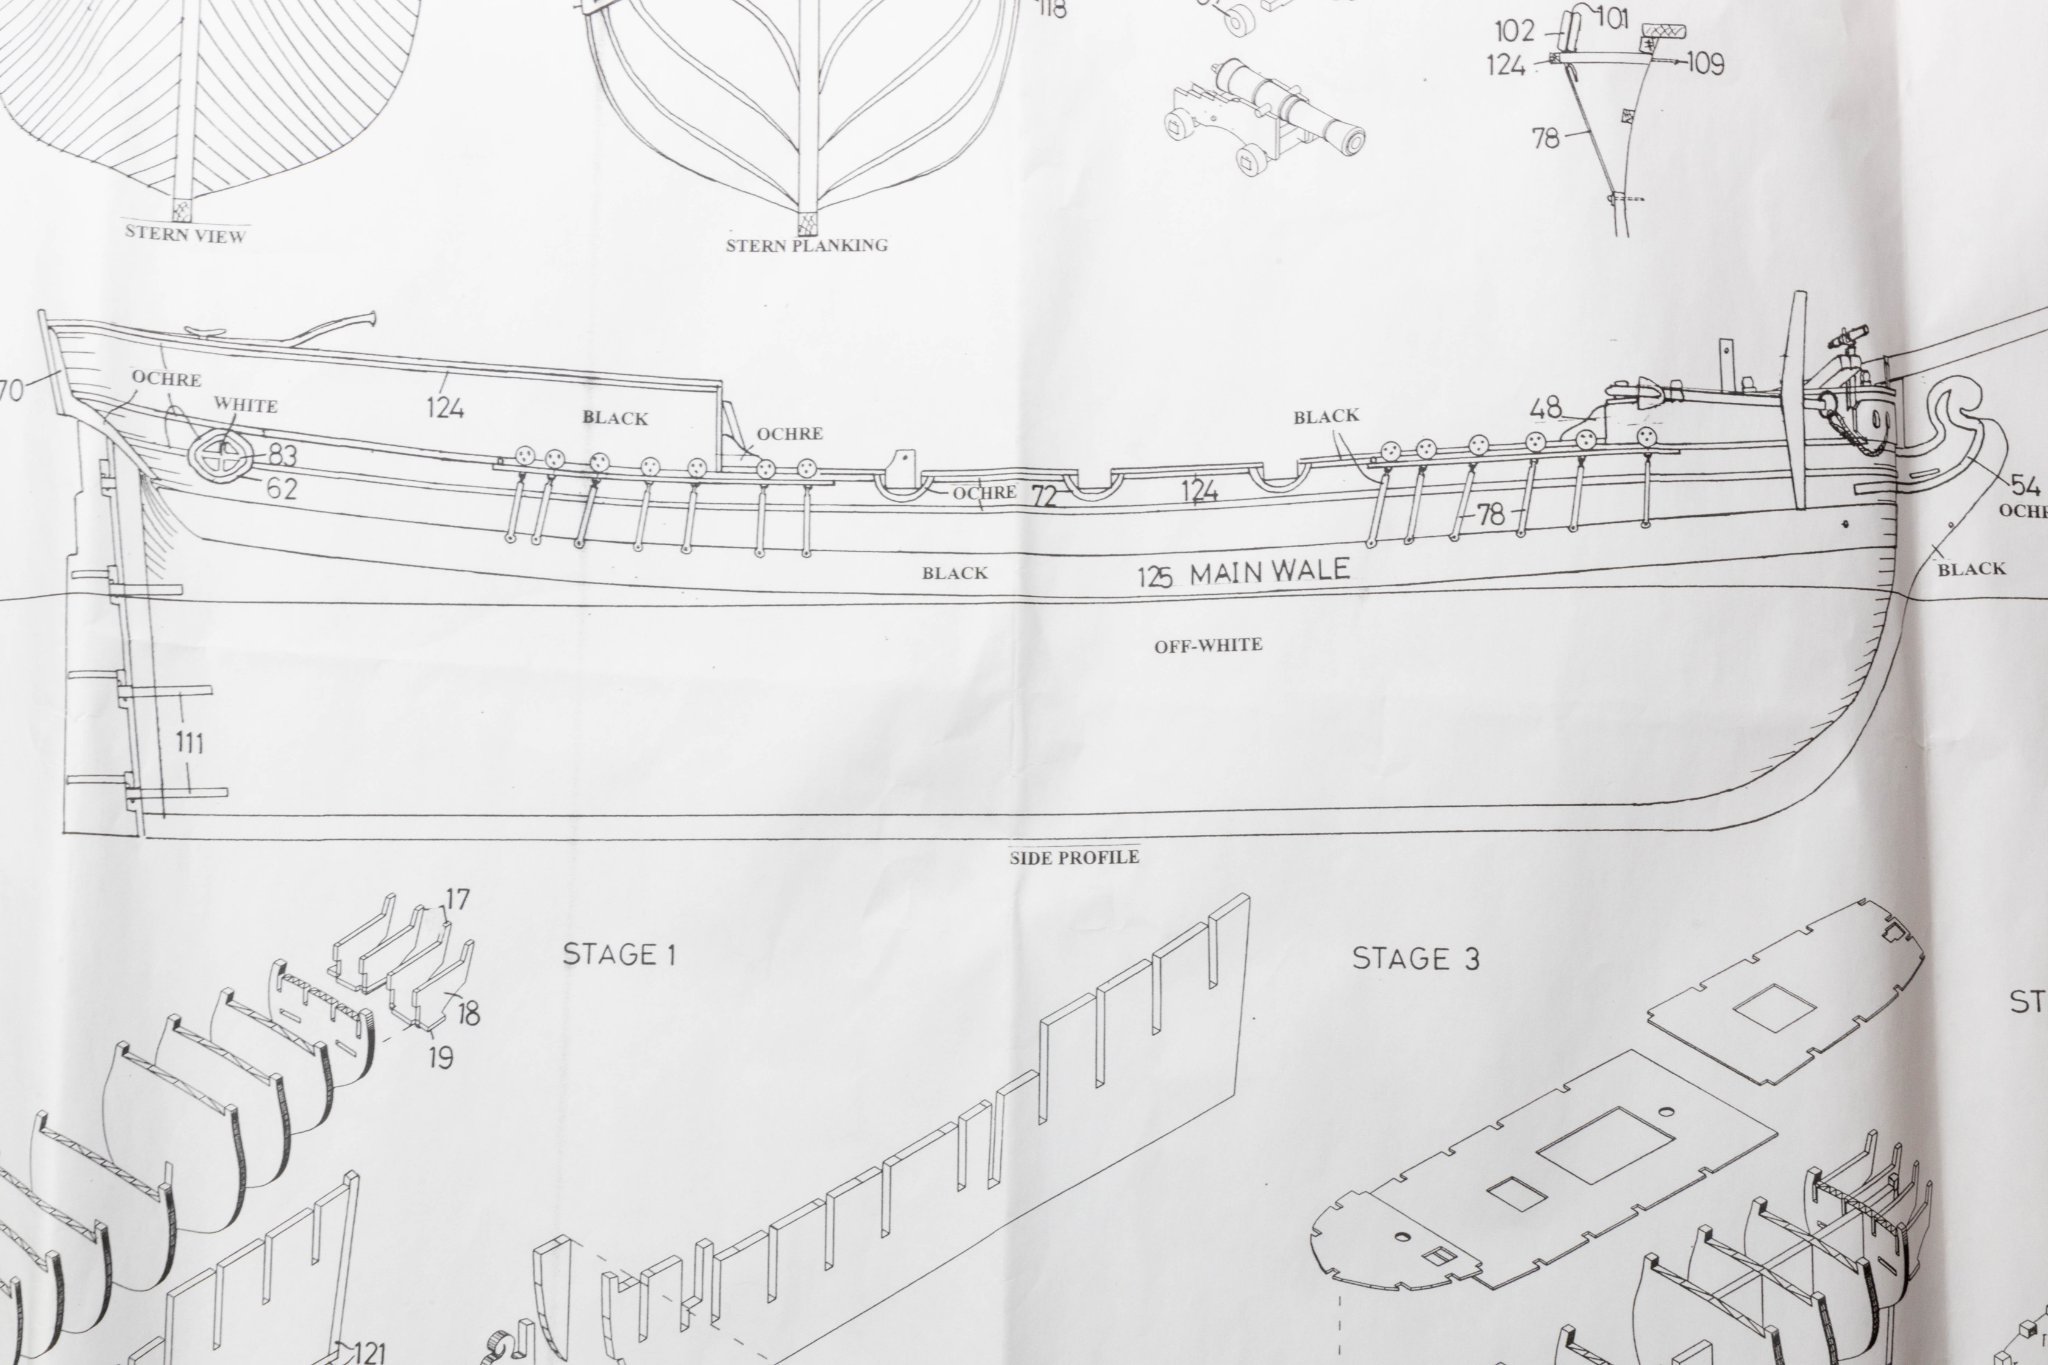
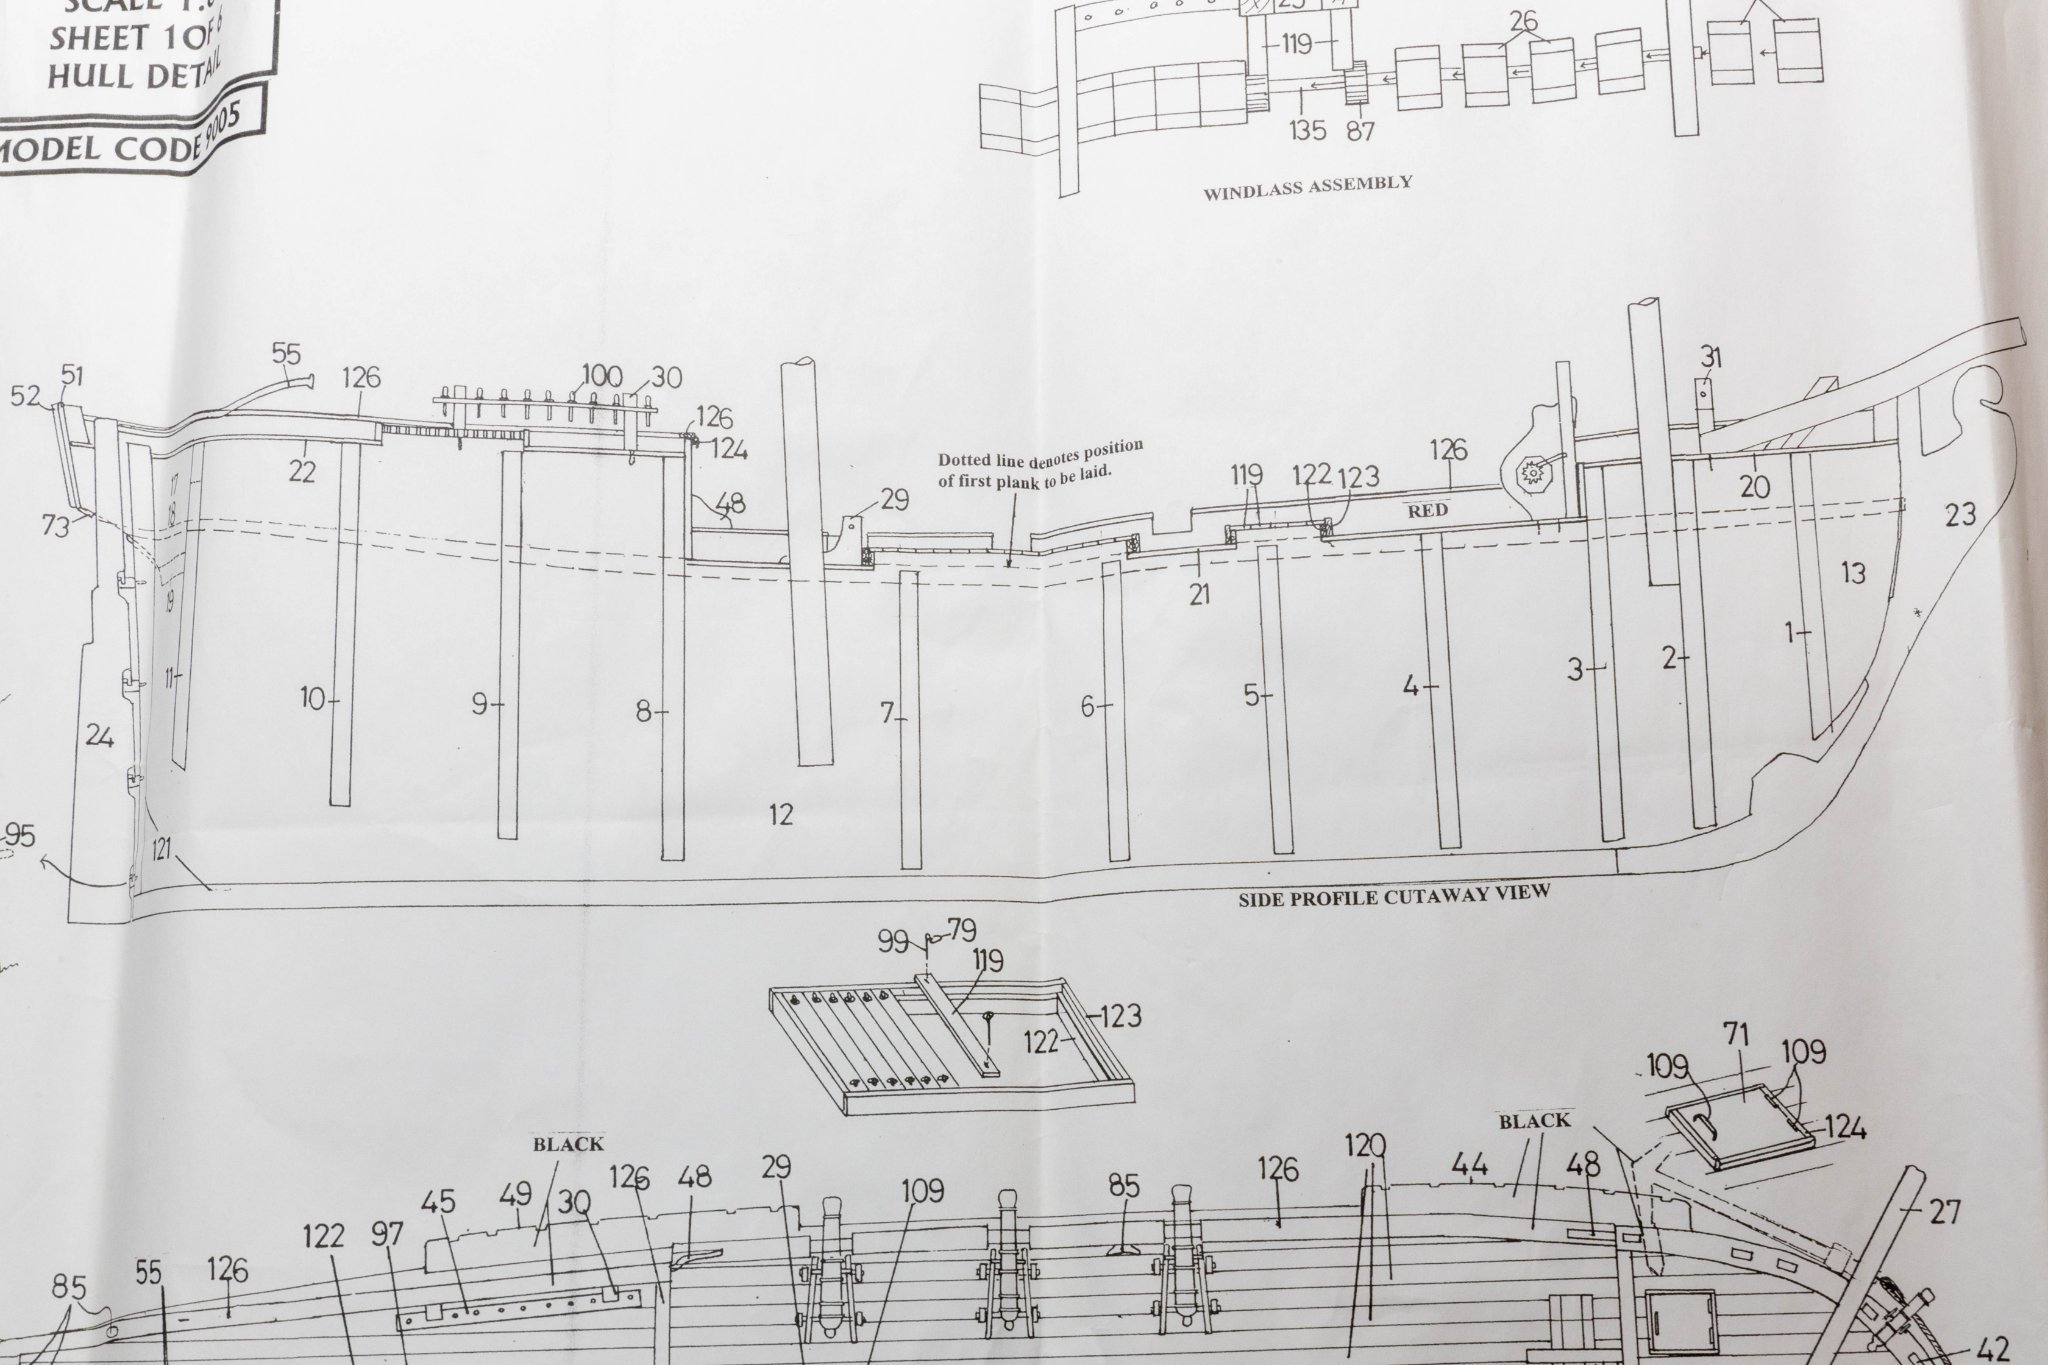
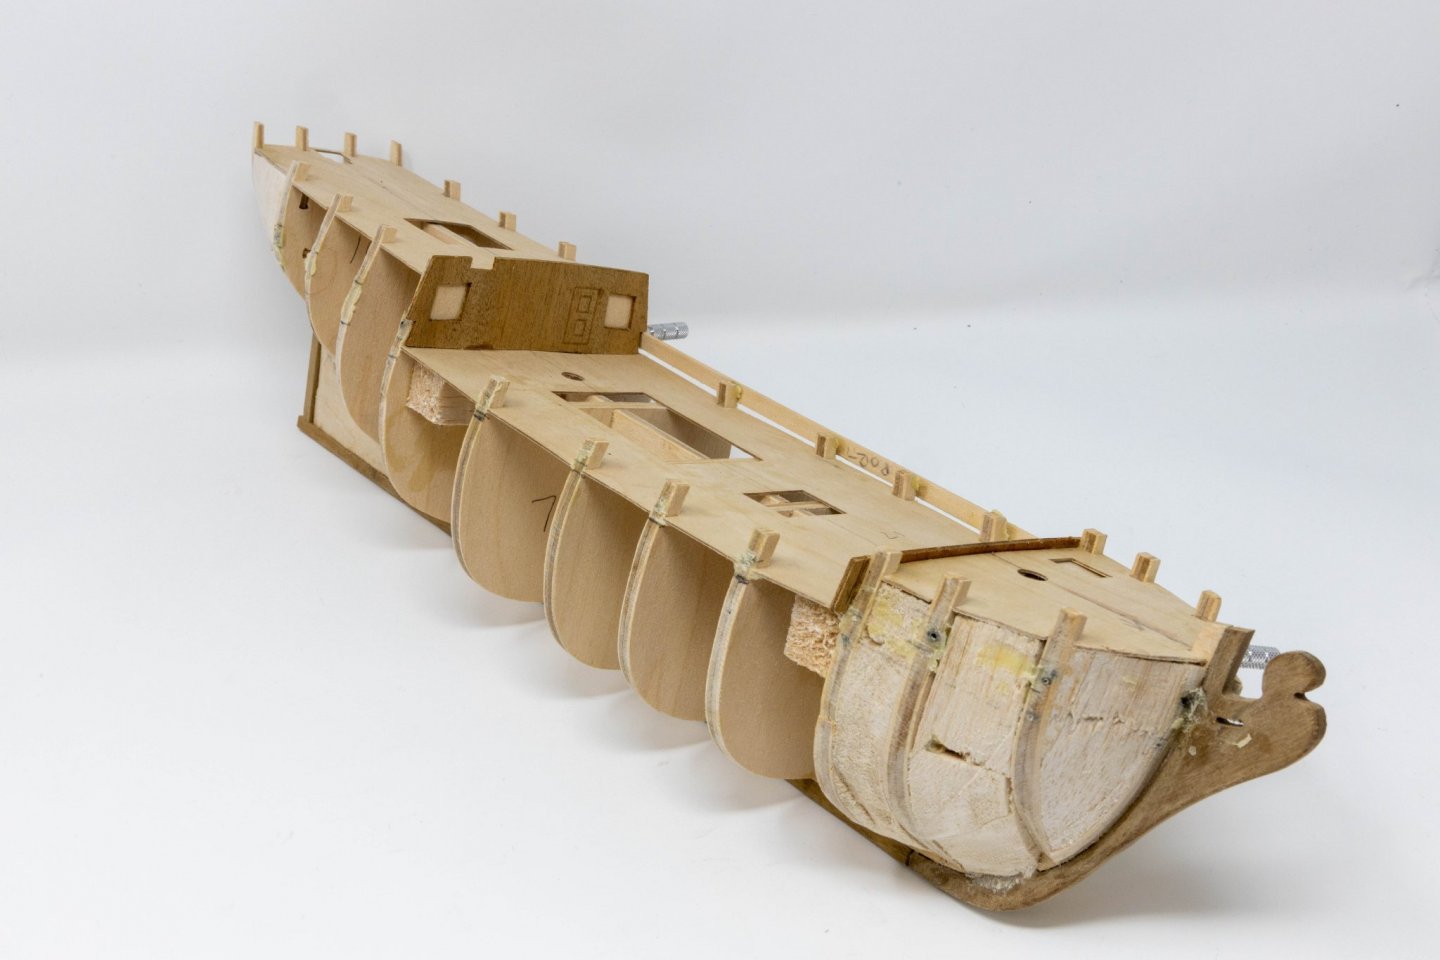
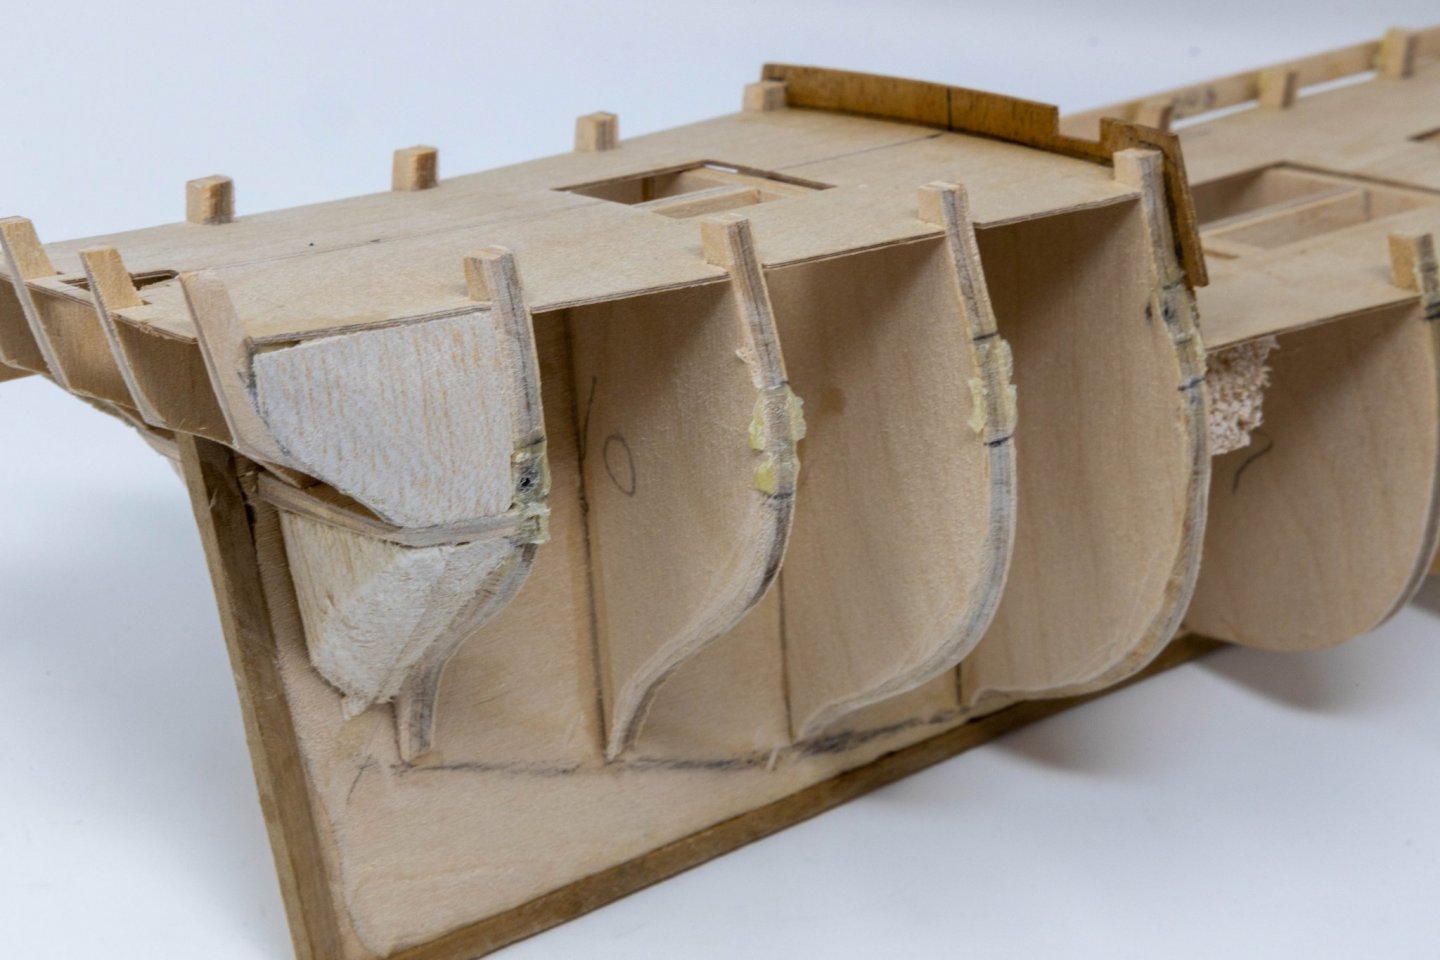
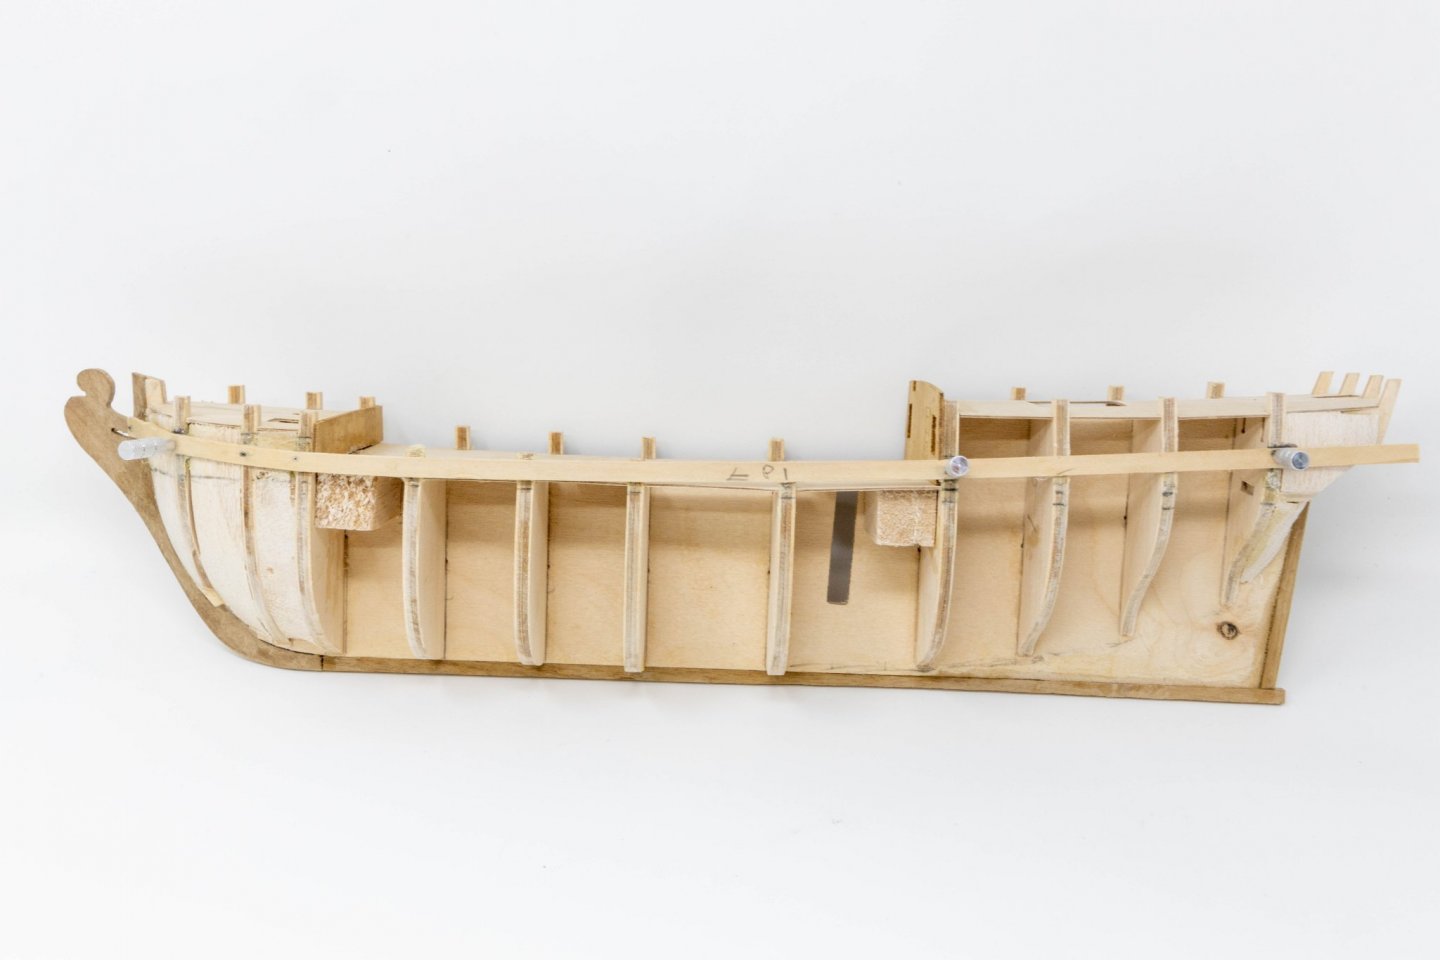
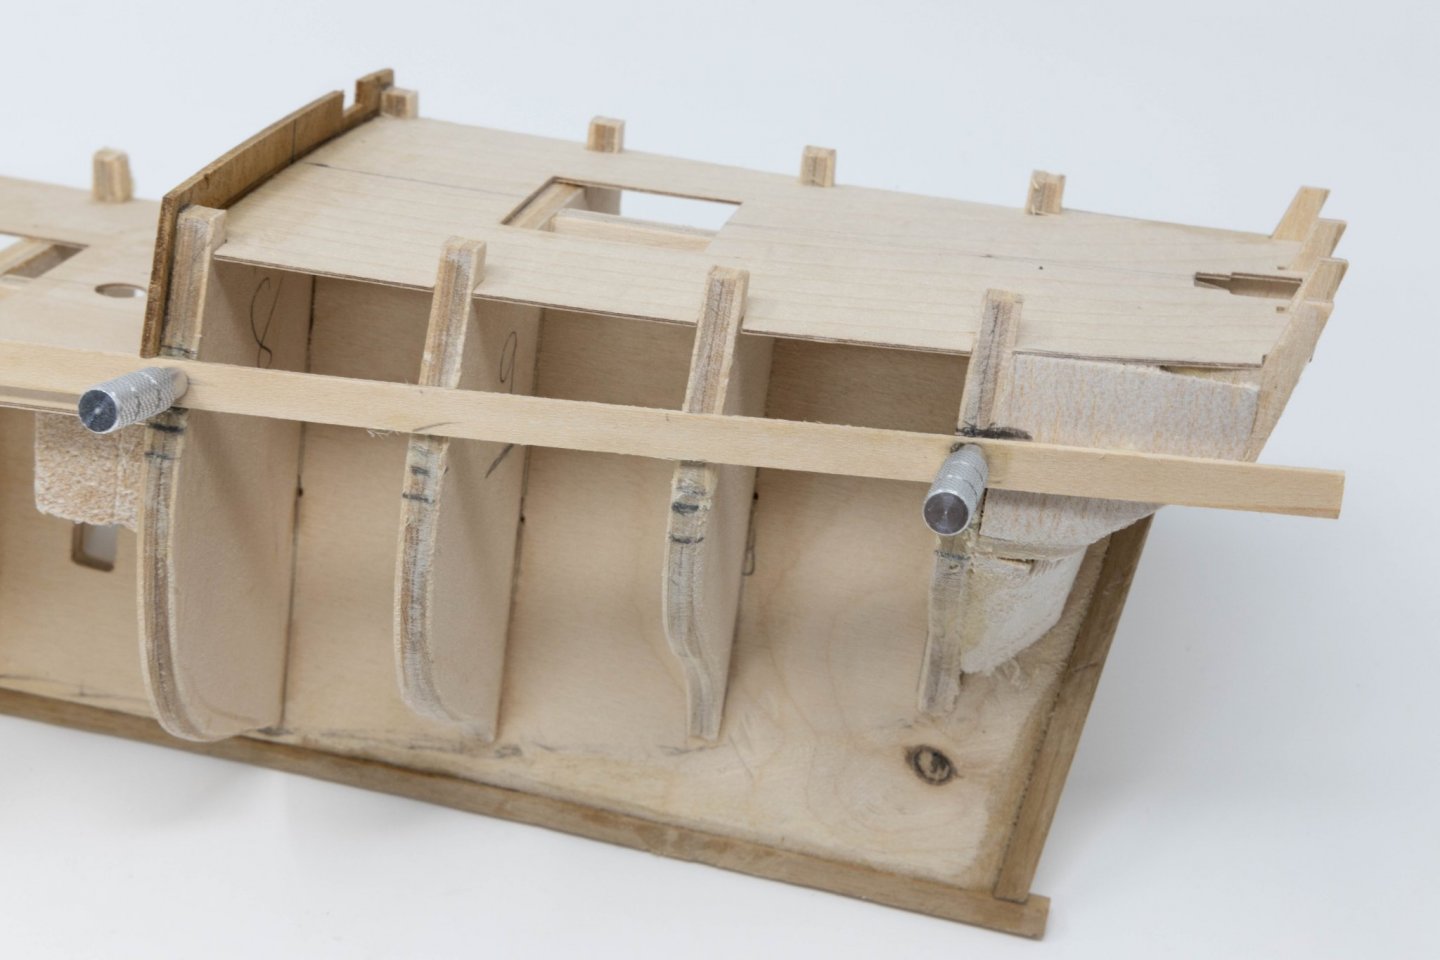
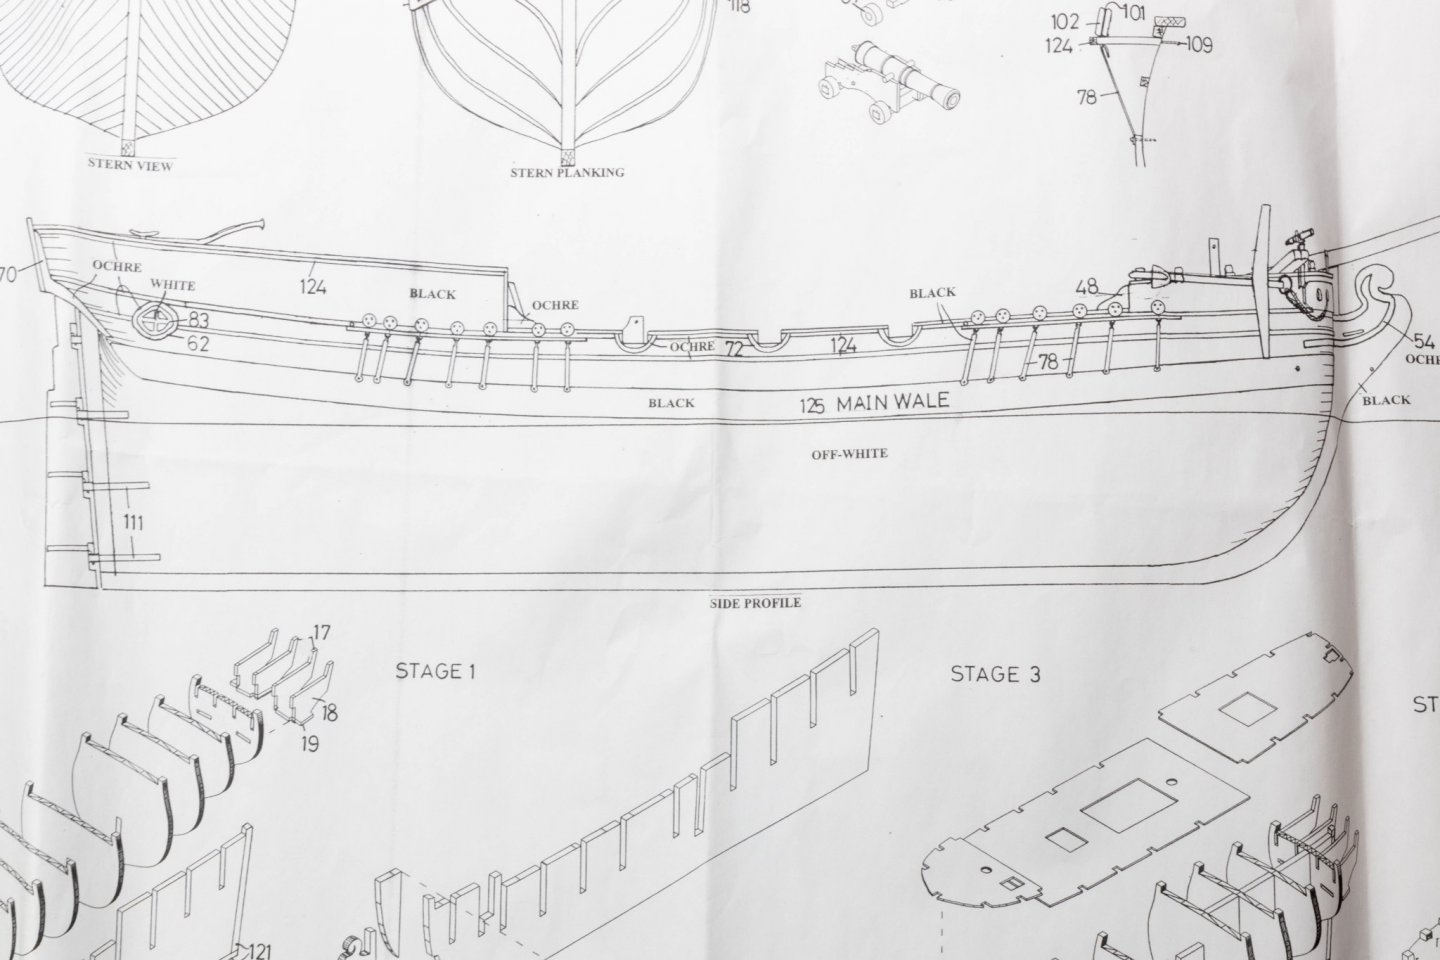
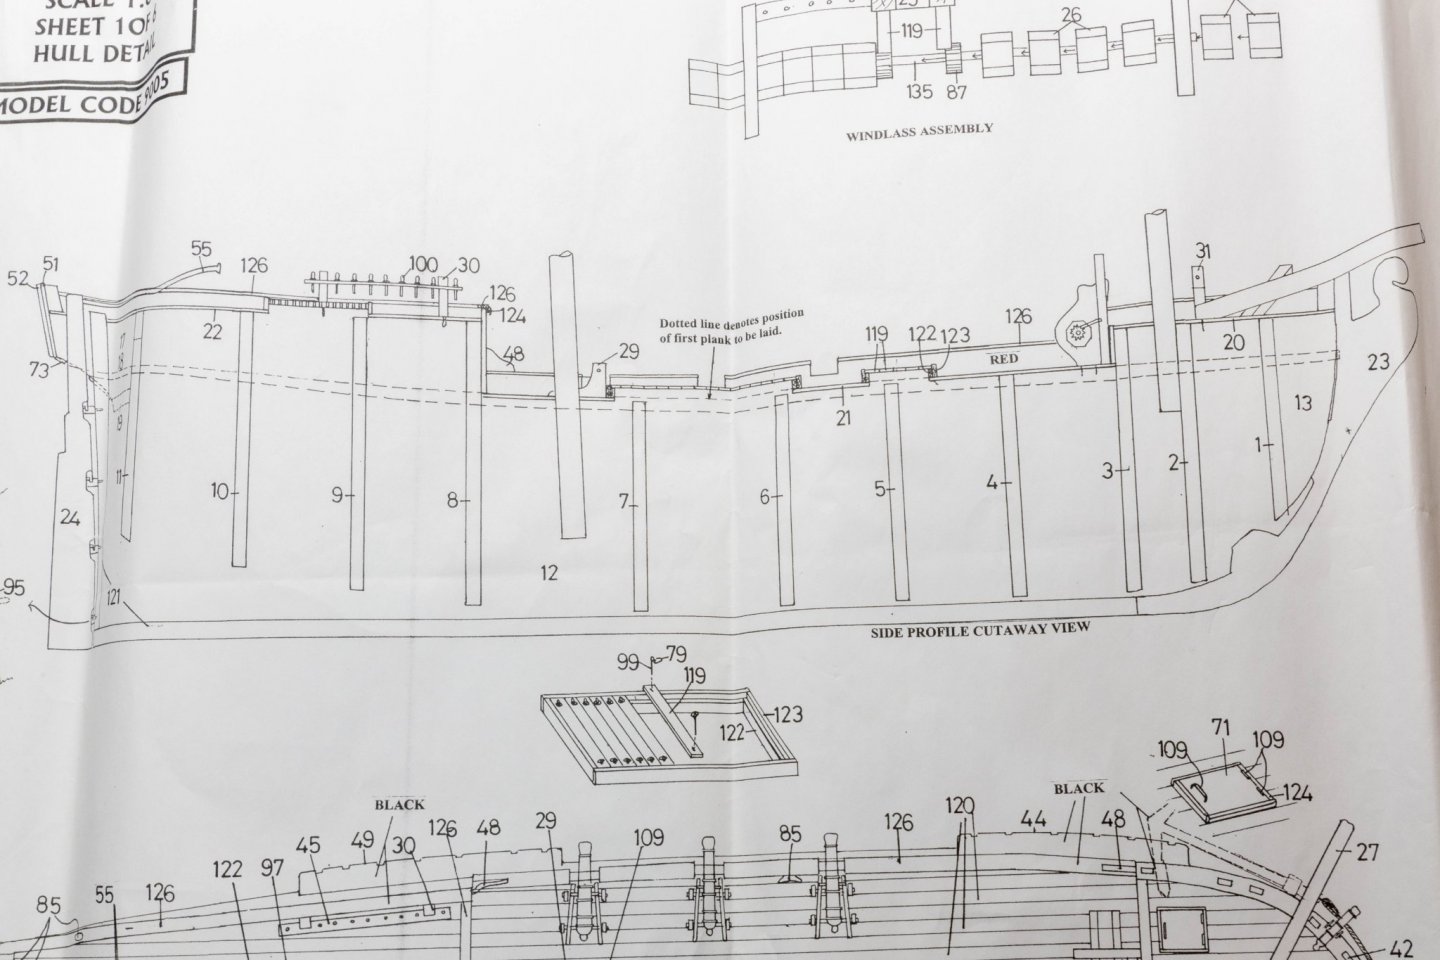
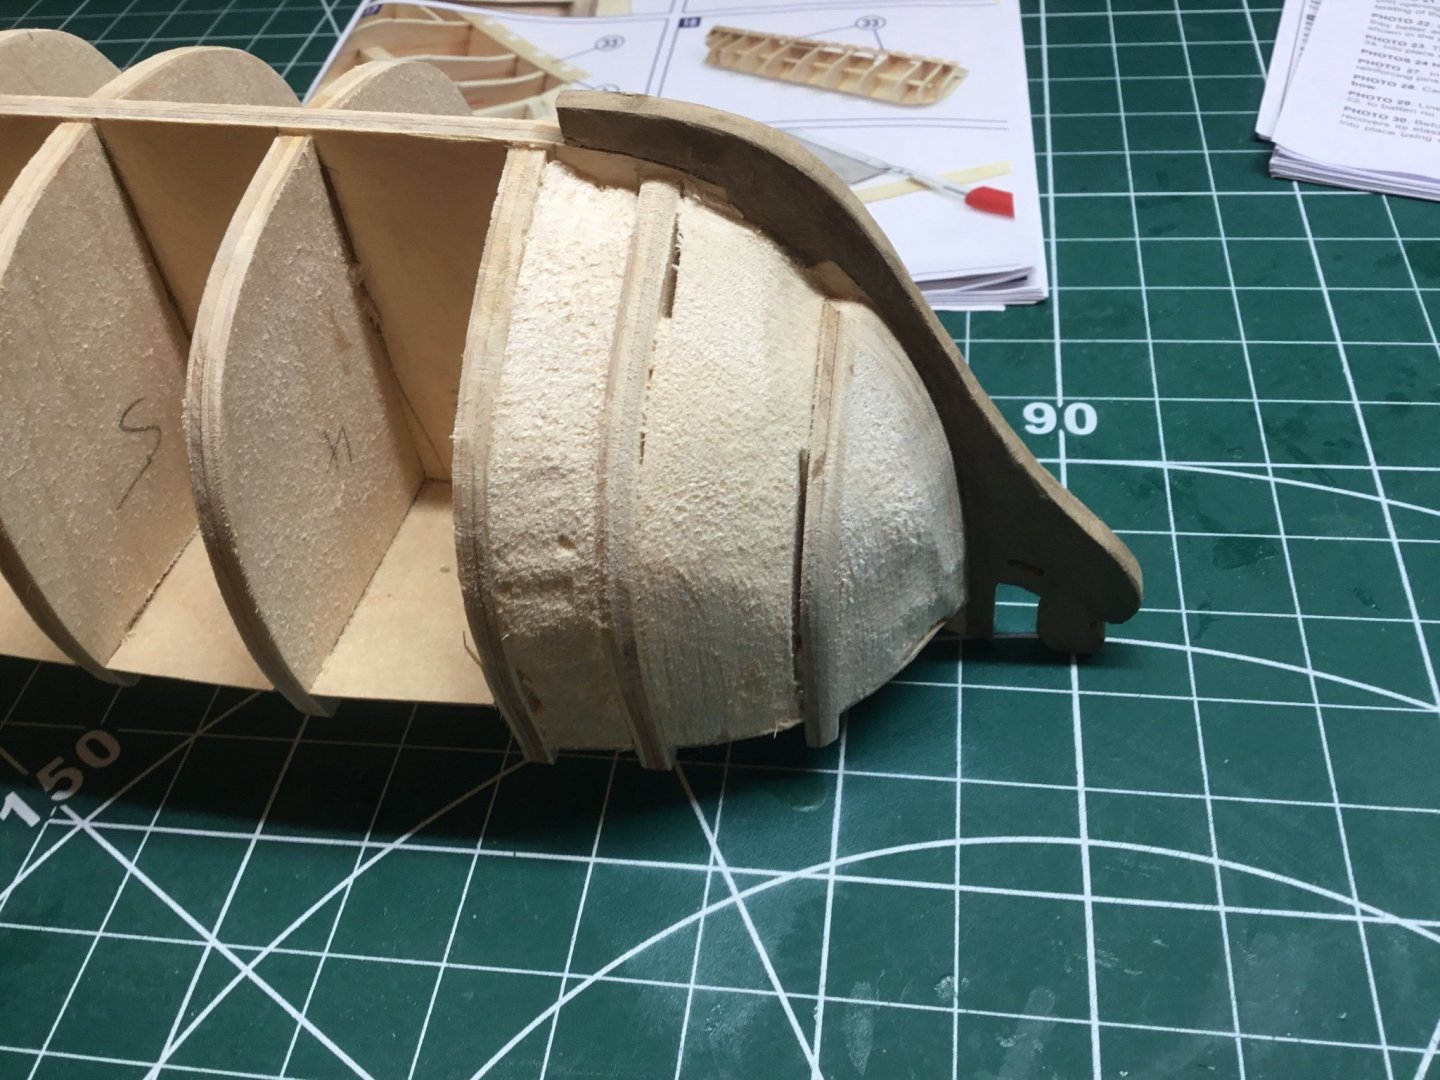
I've been lurking around this superb forum for a while now, and thought it was about time i contributed something back. I bought this kit many, many years ago - well before i even had an inkling of how to build the thing- i just liked the lines of her! So as you can see, i've made some progress, then got stumped, and shelved the whole project for a long while. I thought it was time to bring it out of mothballs, and attempt to finish her. For the most part, i've just been following the build instructions. I deviated a little by adding the balsa fillers at the stem and stern. I've got to the stage where i have faired the hull (as much as is possible with the bow piece, keel and stern piece fitted), and am about to start the first layer of planking. The instructions ( such as they are) tell you to first fit the deck facias. Both of these sit proud of the deck to where the planks would go. That seems ok for the rear one. My first question for those of you who have built this kit is: should the forward facia be sanded flush with the edge of the bulkhead to allow smooth flow of the planking? Beileive it or not, it doesn't even mention it in their instructions. I have measured the distances on the supplied plans for the position of the first run of planking, (last image) and got them just about right i think (unless someone can tell me differently).


-
Personally, i couldn't get on with it as it didn't seem to hold the keel securely. Much preferred the bigger building slip from HZ.
-
I found it didn't cut square after a while too. Nothing wrong with your first planking that i can see 👍
-
Really coming along now Glenn
-
Glenn i think you are too hard on yourself! Most people (myself included) would be so chuffed to have got this far and ended up with a build half as good.
-
Tedd: I've used CMB for years and always find them first class, so glad they are sorting it for you. Rod: That hull looks nice and straight. I screwed mine down to a base board, just in case of warpage (bit overkill i admit- but it worked). Your build is progressing nicely 👍
-
That sounds like a good plan 👍 Best get re-reading all the Flirt build logs 😟
-
Hi Glenn Gerry decided to sell the part-finished project and i was able to grab a myself a bargain! Not sure how to proceed with this as it was his build diary. Also not sure i can keep up his high standards lol So, do i continue the build from here, or start a new diary linked to this one? Any thoughts anyone?
-
Looks good to me 👍
-
Hi Ted coming on strong. By the way, did you know about the video build of this kit? I watched it while attempting to build mine. Comes in ‘issue’ format, so can fast-forward to what you need to see. Might help at times. It’s on the Amati site: https://www.amatimodel.com/en/bismarck-progressive-build-log-1-amati-kit/
-
Great Idea Chris 👍 Mind you, i suppose the grading is subjective. Having been following most (if not all) the Sphinx builds, a lot of people are saying that with a little patience it's buildable by all skill levels. That's a testament to your design skills. Wishing you the best of luck with this new phase. RB
-
Better luck with this one, Glenn. I'm sure you'll be ok now with the lessons you've already learnt on V1. I'll befollowing this one too 👍
- 476 replies
-
- 1
-

-
- sphinx
- vanguard models
- (and 1 more)
-
Yes, the angora one is the metal hulled version. And that's what i personally think spoils it - the overlapping metal plates of the hull. Much prefer the lines of the wooden ones. I actually started to build the metal Hatchette version.
-
Hi HOF Eventually i will. Got too many other builds on the go at the moment tho. Just bought the Half Hull Planking Project as that's an area in need of massive improvement from me 😔 Enjoying following others' builds to steal er i mean borrow their ideas and tips 😀 Following Ted99's new build too
-
Good to se you back on your 'Bizzie'! I'm not sure if it would be classed as 'theraputic' though 😀 I have this kit built up to the 'planking the hull' stage, and like yours it has been in storage for a while. With all this renewed interest in this ship and re-launch from Amati only bodes well for these kits (just rankles that we payed all that when Amati version is less than half the price now). Looking forward to seeing your progress. RB
-
Thanks everyone for your replies. The reason i wanted to remove the stem in the first place is that i think it will just make getting a smoother line for the planking easier, as i won't catch the stem with my sander. Greatly appreciate the input fellas 👍
-
Making great progress, so the time element isn’t important. Great plan, well executed 👍
- 562 replies
-
- 3
-
-
- vanguard models
- alert
- (and 2 more)
-
As you see in the photo attached, if I can remove the stem piece I feel I can get a better run at the hull fairing, ready for planking. Never used isopropanol before. It won’t damage the stem piece will it?
-
Hi Allan Thanks for the reply. Yes will upload a photo as soon as i can. Regarding Glue? God knows! I would assume ordinary aliphatic wood glue, but it was in my early days on wooden ship builds
-
Hi guys I hope you can help me and that i have posted this in the right area? I have a 10 year old (must be easily) Caldercraft Brig Supply that i started ages ago before i really knew what i was doing (not that i do now 😂) . It reamains in the same stae as i left it all those years ago, but would actually like to try to finish it. The problem i got to was where i had built up the false keel amd added the bulkheads, then the instructions said to add the stem. I did this and added some balsa to pad out the bow area to aid fairing. Now i can't easily fair the bow area and bulkheads with these in place. Realistically, i need to remove the stem and balsa. Would using Isoproponol remove the stem and balsa padding to strip it back to where i can continue? Thanks