

Stevinne
-
Posts
333 -
Joined
-
Last visited
Content Type
Profiles
Forums
Gallery
Events
Posts posted by Stevinne
-
-
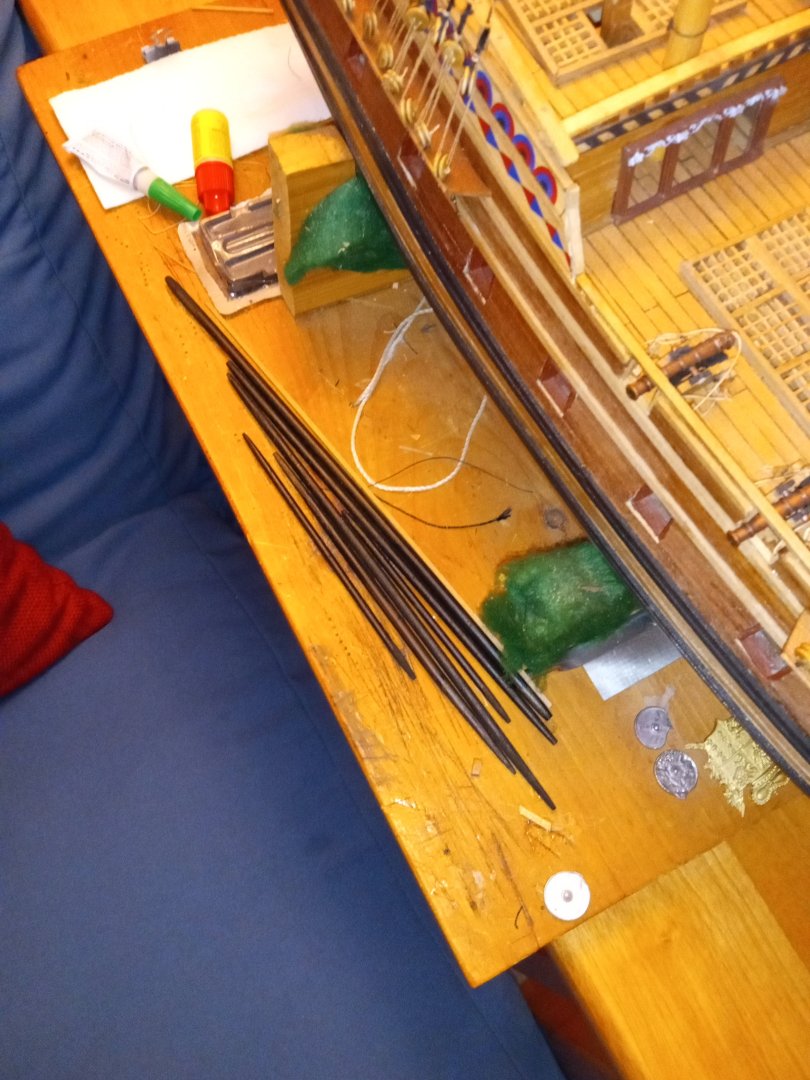
I spent the weekend preparing the catheads. I was unduly pleased with how they came out, until I was rudely reminded of why I dislike this Mamoli kit so much. I started by cutting a 5x7mm strip with the correct angle and length, and then used my miter saw to make some cuts on the face of the wood to create a space for the pulleys. I then used my files to sand the wood away until the pulleys fit. Then I got my Dremel, checked the drill size, and drilled a hole for the axle. Then I hit problems. It turns out the axle is too large for the hole in the brass wheels. I've tried sanding the axle. I've tried reaming out the center hole in the wheels. All the time, all I could think is that this is exactly how Mamoli has approached this kit - things that should be simple are a real pain because the manufacturer seems to have had no real concern about the quality of the product they produced. How difficult is it to ensure the axle is smaller than the hole it is supposed to fit through? I bought my kit before Mamoli had new owners, so I hope things have improved, because all these small headaches make it seem the original manufacturer had no real concern about the product they were putting out. I cannot wait to be done with this build. What should be fun is a real headache.
-
With the weather getting cooler, I'm hoping to finish this project up soon. Working on the crowfoot rigging had intimidated me, but I'm happy with how this turned out. I'm more concerned about the crowsfeet that are attached to the mast stays, since I don't want to distort the stay but I don't want the crowfeet to look saggy or loose. As Baldrick would say, I must devise a cunning plan.

- JacquesCousteau, GrandpaPhil and Baker
-
 3
3
-
As other folks have said, that's no disaster. Your hull is looking good and any issues will be covered by your second layer of planking. Going forward, I'd recommend using tacks with large plastic heads in place of nails for your second build. I used nails on my first build and pulled them all out before laying the second layer of planks. It's much easier with the tacks. Good luck and don't get discouraged. It looks like you are well on your way to a very nice build.
-
On 6/3/2024 at 2:08 PM, Snug Harbor Johnny said:
'Got my box off the shelf (and the main hull parts are elsewhere, as I've reproduced them - with modifications - in 1:88 to match the scale of the cannon), and it's HEAVY ... the weightiest kit I've ever lofted (aprox. 15 pounds complete).
The drawings have the date of January 1st, 1975, ergo I surmise that the release of the kit could well have been later in 1975. There is a lot of 'bang for the buck', and if built 'out of the box' in 1:65 will be quite large and impressive - if not something of an anachronism, since the design of the castles is quite conjectural and they do not conform to either the depiction on the Anthony Roll or the painting Henry VIII commissioned in the 1530s. I'll make mine in 1:88 with a castle profile a lot like Louie da Fly's Henry Grace a Dieu (a log I can recommend reviewing, as it is accomplished in a much smaller scale - and masterfully done at that).
The kit masting seems rather TALL for the hull proportions, and might make a ship built like that 'krank' (tending to heel easily - the 1628 Vasa being a prime example of the effect, to our benefit by raising and restoring the entire original hull). But it is easy just to build the model with slightly less tall masting.
EDIT: Now I recall reading that the Great Harry DID heel too much in brisk winds, and that was why the stern castle was reduced to improve handling. The Mary Rose handled well as built, but the rear castle was raised and extra armaments were added prior to the action that saw her sink in Henry's sight. It is unlikely that a 'lucky shot' from the French did her in - as it would have to be below the waterline, and most likely on the side she settle down on ... the very one we have today, and there are no breaches evident. I rather think that the event was much like the Vasa debacle nearly a century later.
While I believe a bad rebuild contributed to the capsizing, I'm not ready to totally ignore the lucky shot argument. Mary Rose was engaged with the French galleys. The galleys were firing heavy balls at the ship. Much of the ship, including the bow areas on both port and starboard sides are no longer there. Since we can't rule out that she wasn't hit below the waterline by a large ball, and we know that she had a successful career for decades up until her sinking, I think it is reasonable to consider that a French ball caused flooding that helped lead to the ship losing stability and not performing as the command crew expected as they made a turn.
-
-
53 minutes ago, Coyote_6 said:
What a beautiful build! Glad I checked it out. My anchor issues seem a lot like yours - hopefully mine turn out as well as yours did.
Also ironically my next build will likely be Constructo's 1799 Enterprise. Would like to see your Enterprise some time.
Thanks for the kind words. Enterprise was my first build. I enjoyed it a lot and was pretty happy with the way she turned out.

-
1 hour ago, Coyote_6 said:
And it took me a month but coiled the last of my carronade gun tackles today.
On to chase guns and anchors.
Well worth the effort. The ship is looking very good.
- Glen McGuire and Coyote_6
-
1
-
 1
1
-
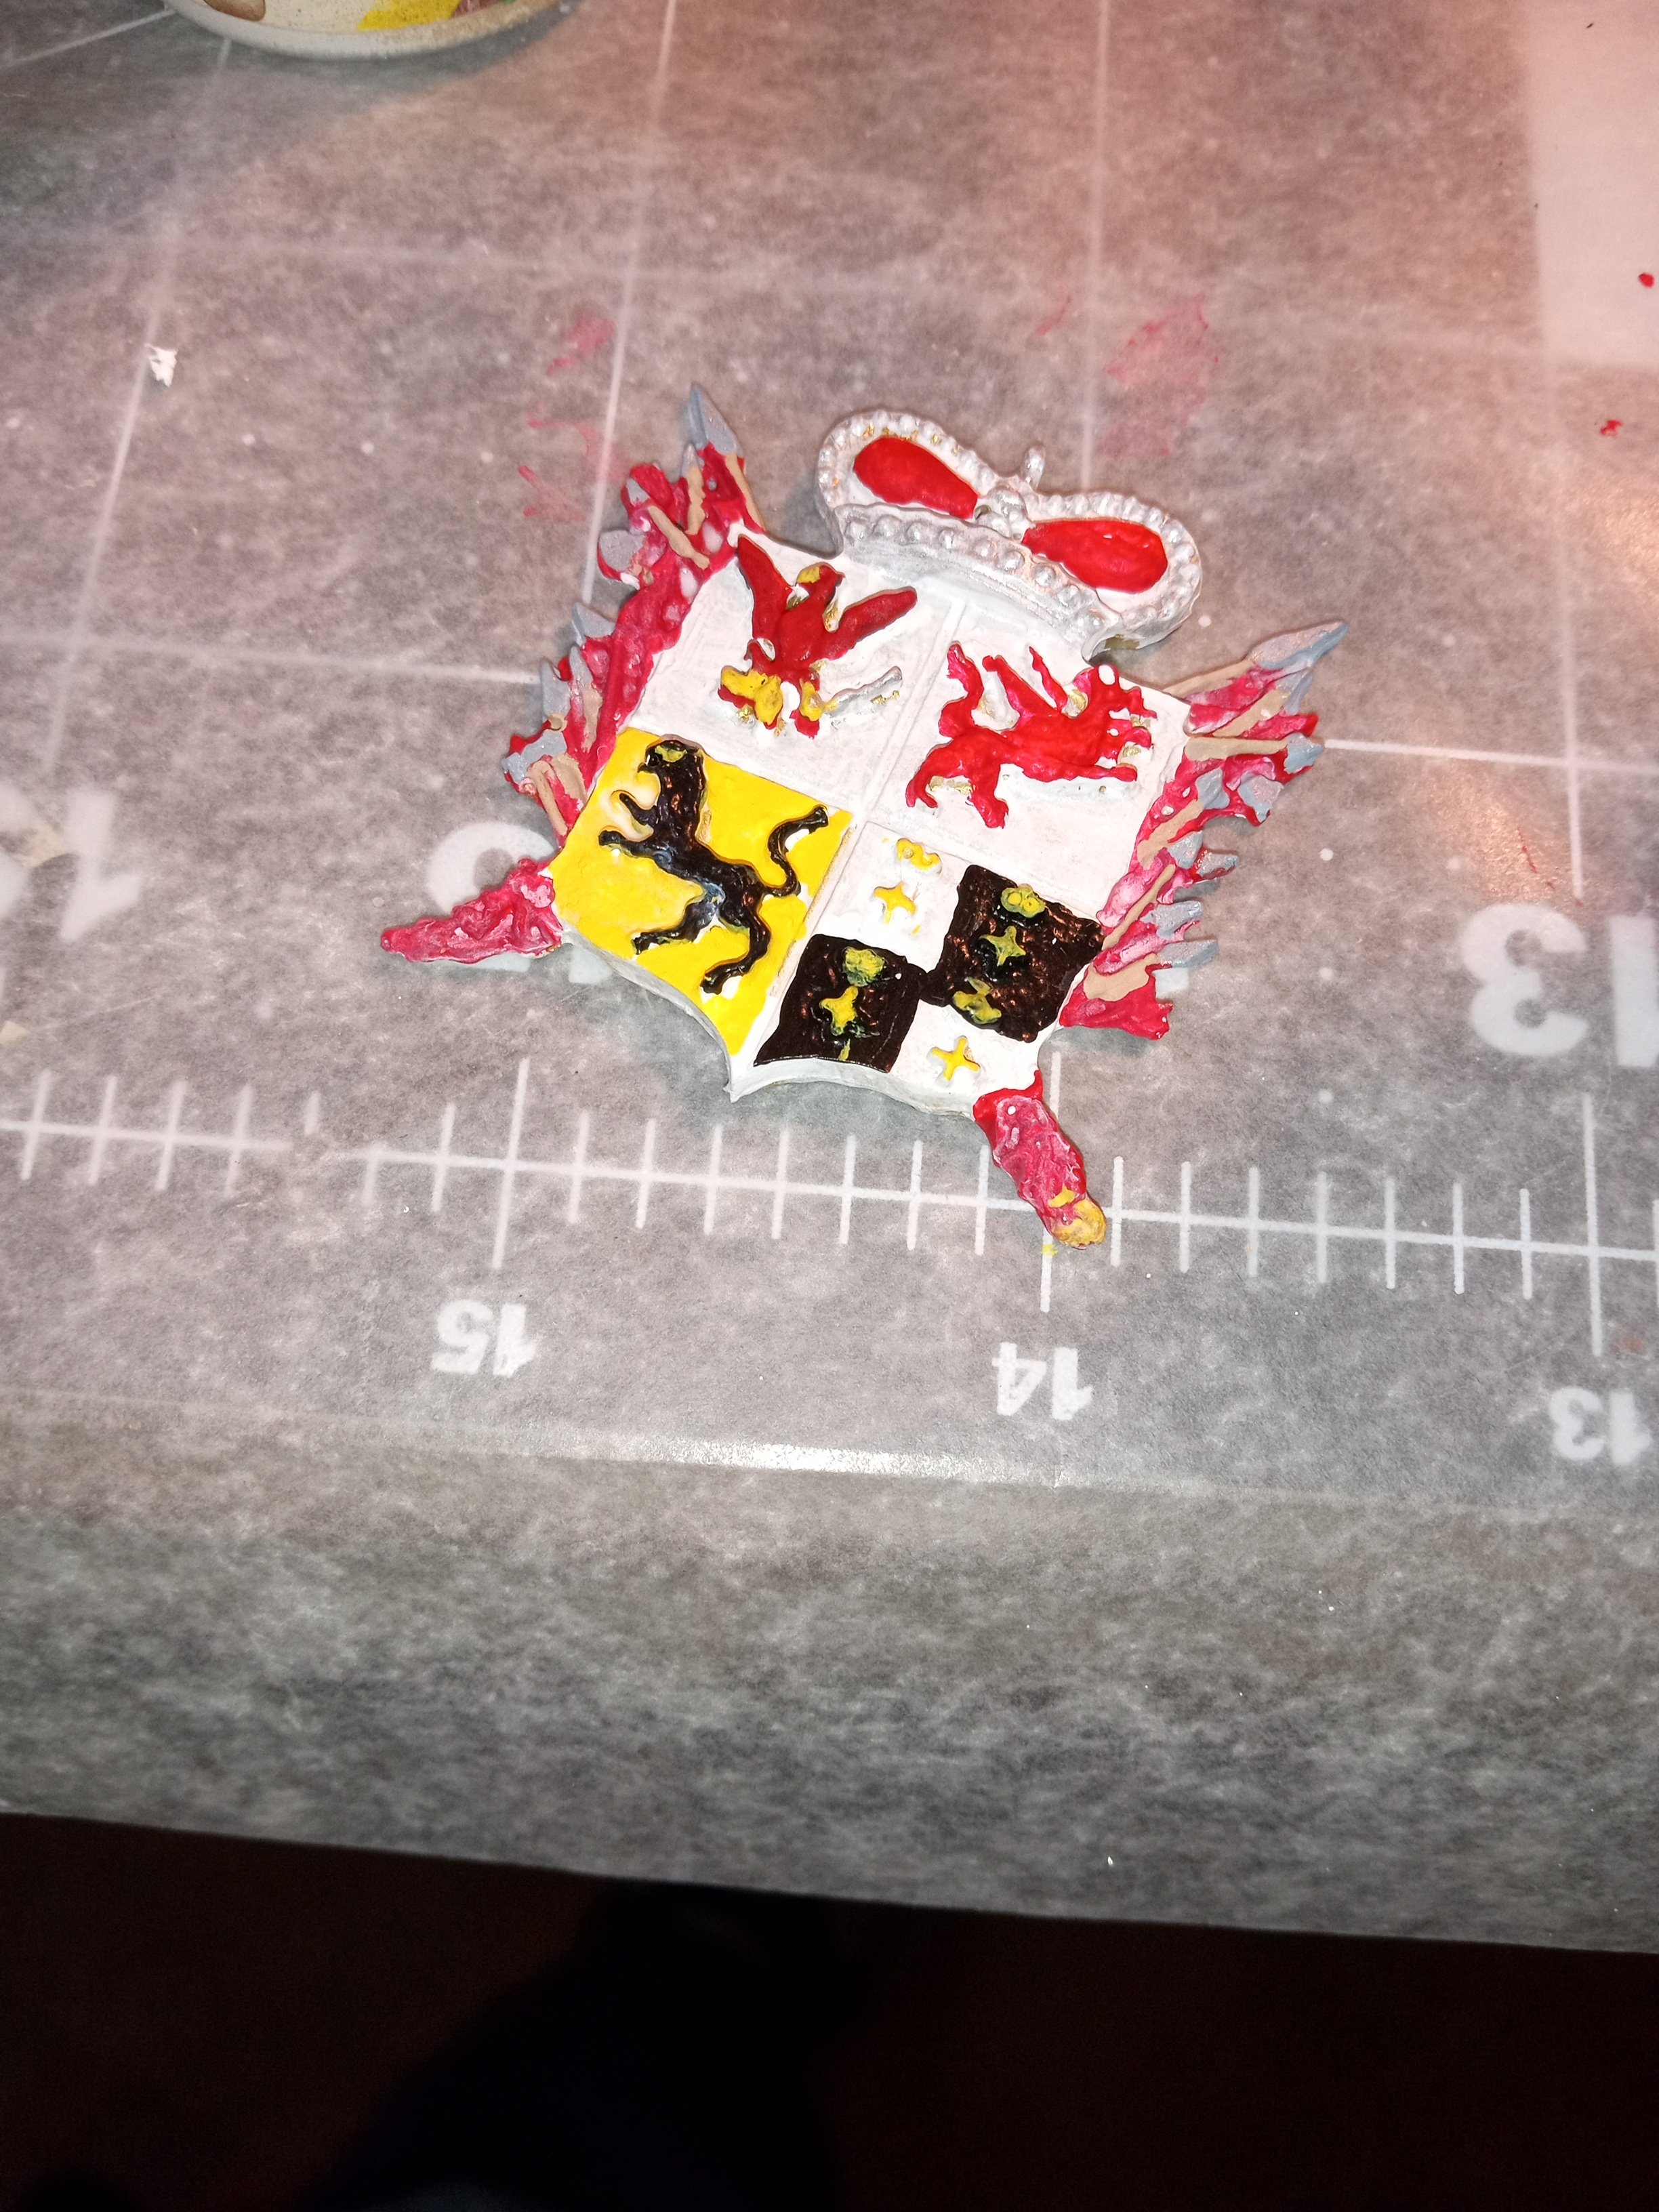
The decorative castings that come with the kit are gilted. I decided to paint the coat of arms that is placed on the stern. I looked around the Internet for pictures of the Elector of Brandenburg's coat of arms and lit on this version. The coat of arms included on the kit box is painted in a slightly different manner, with the upper right quadrant also gold/buff or yellow. I had no idea what color to paint the background that surrounds the shield, so I settled on red, since I figured that goes best with the color scheme used in the other decorations.
The casting was a bit muddy, so it was hard to find all the arrows and what I guess are supposed to be axes, but I did my best.

- JacquesCousteau, Baker and GrandpaPhil
-
3
-
-
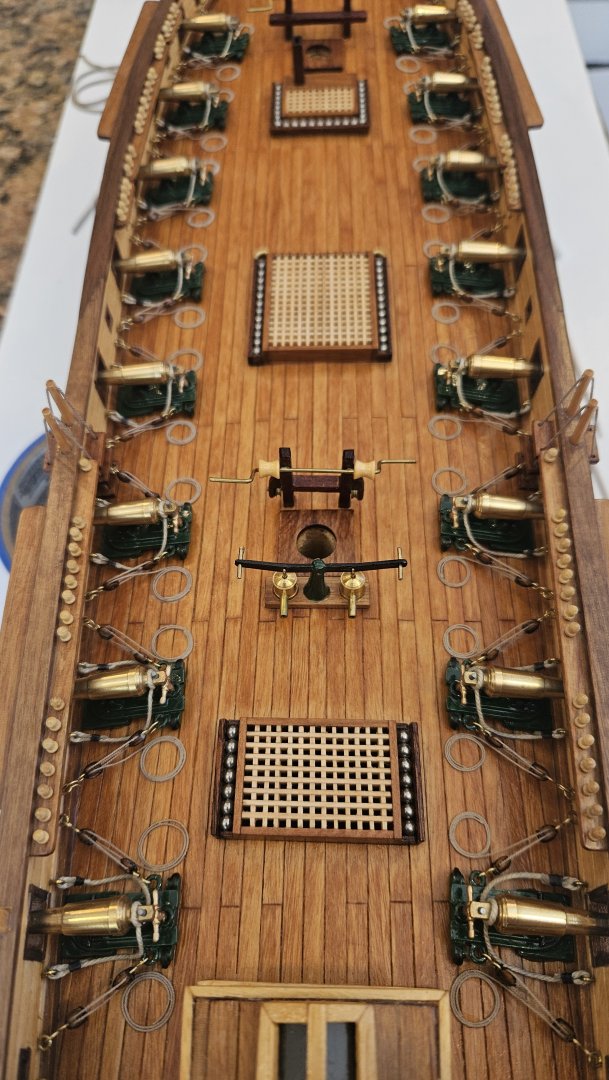
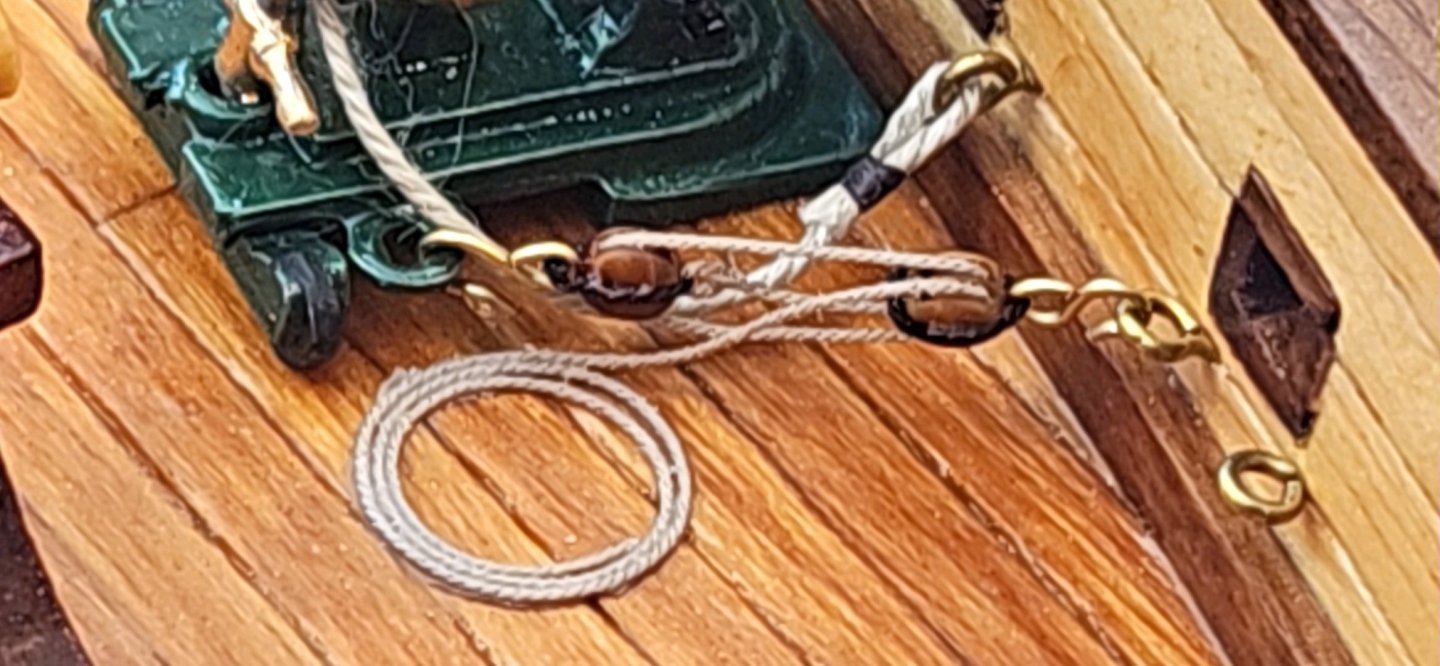
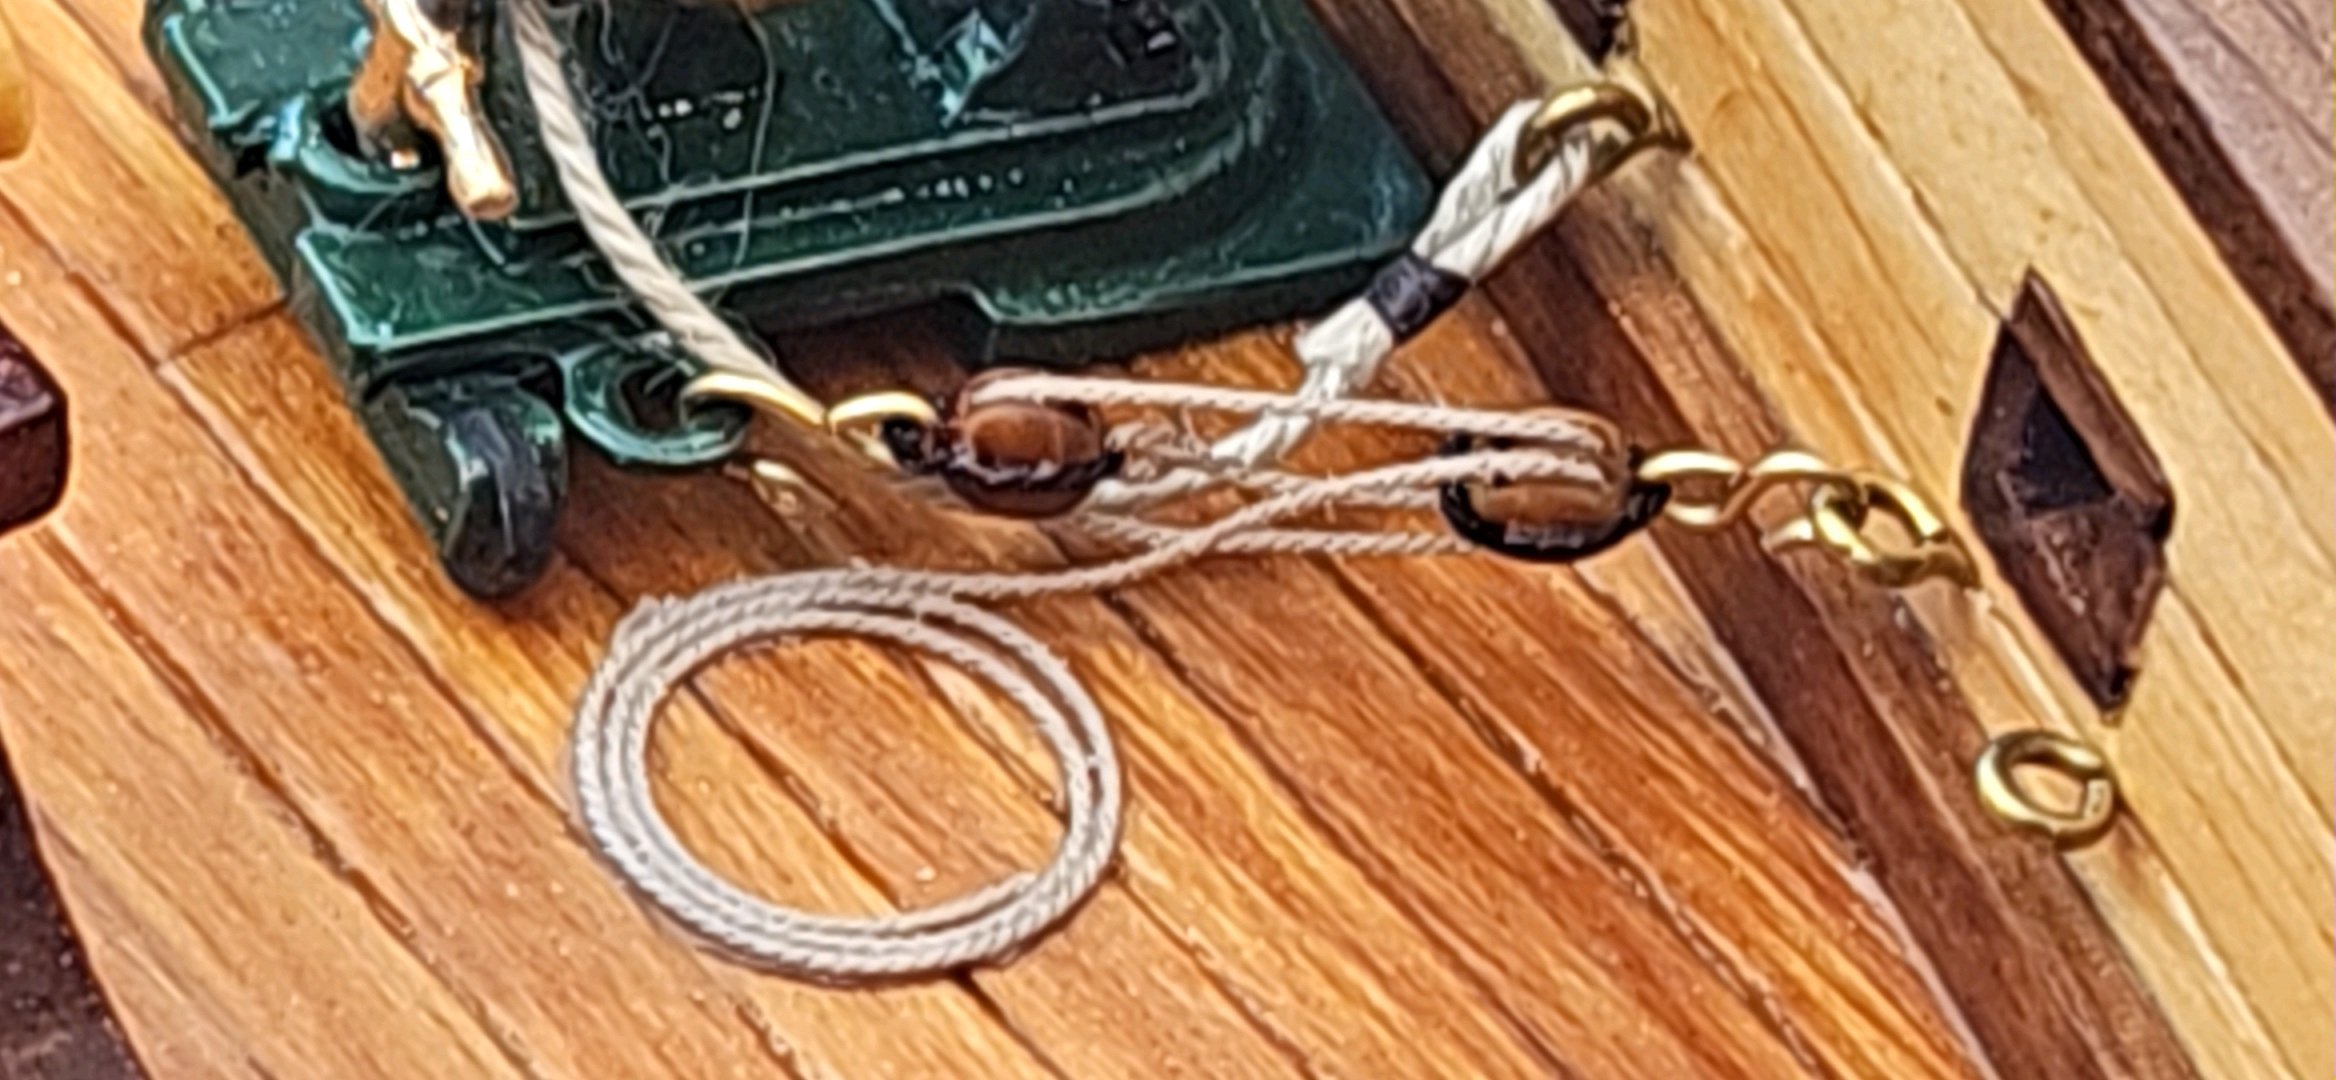
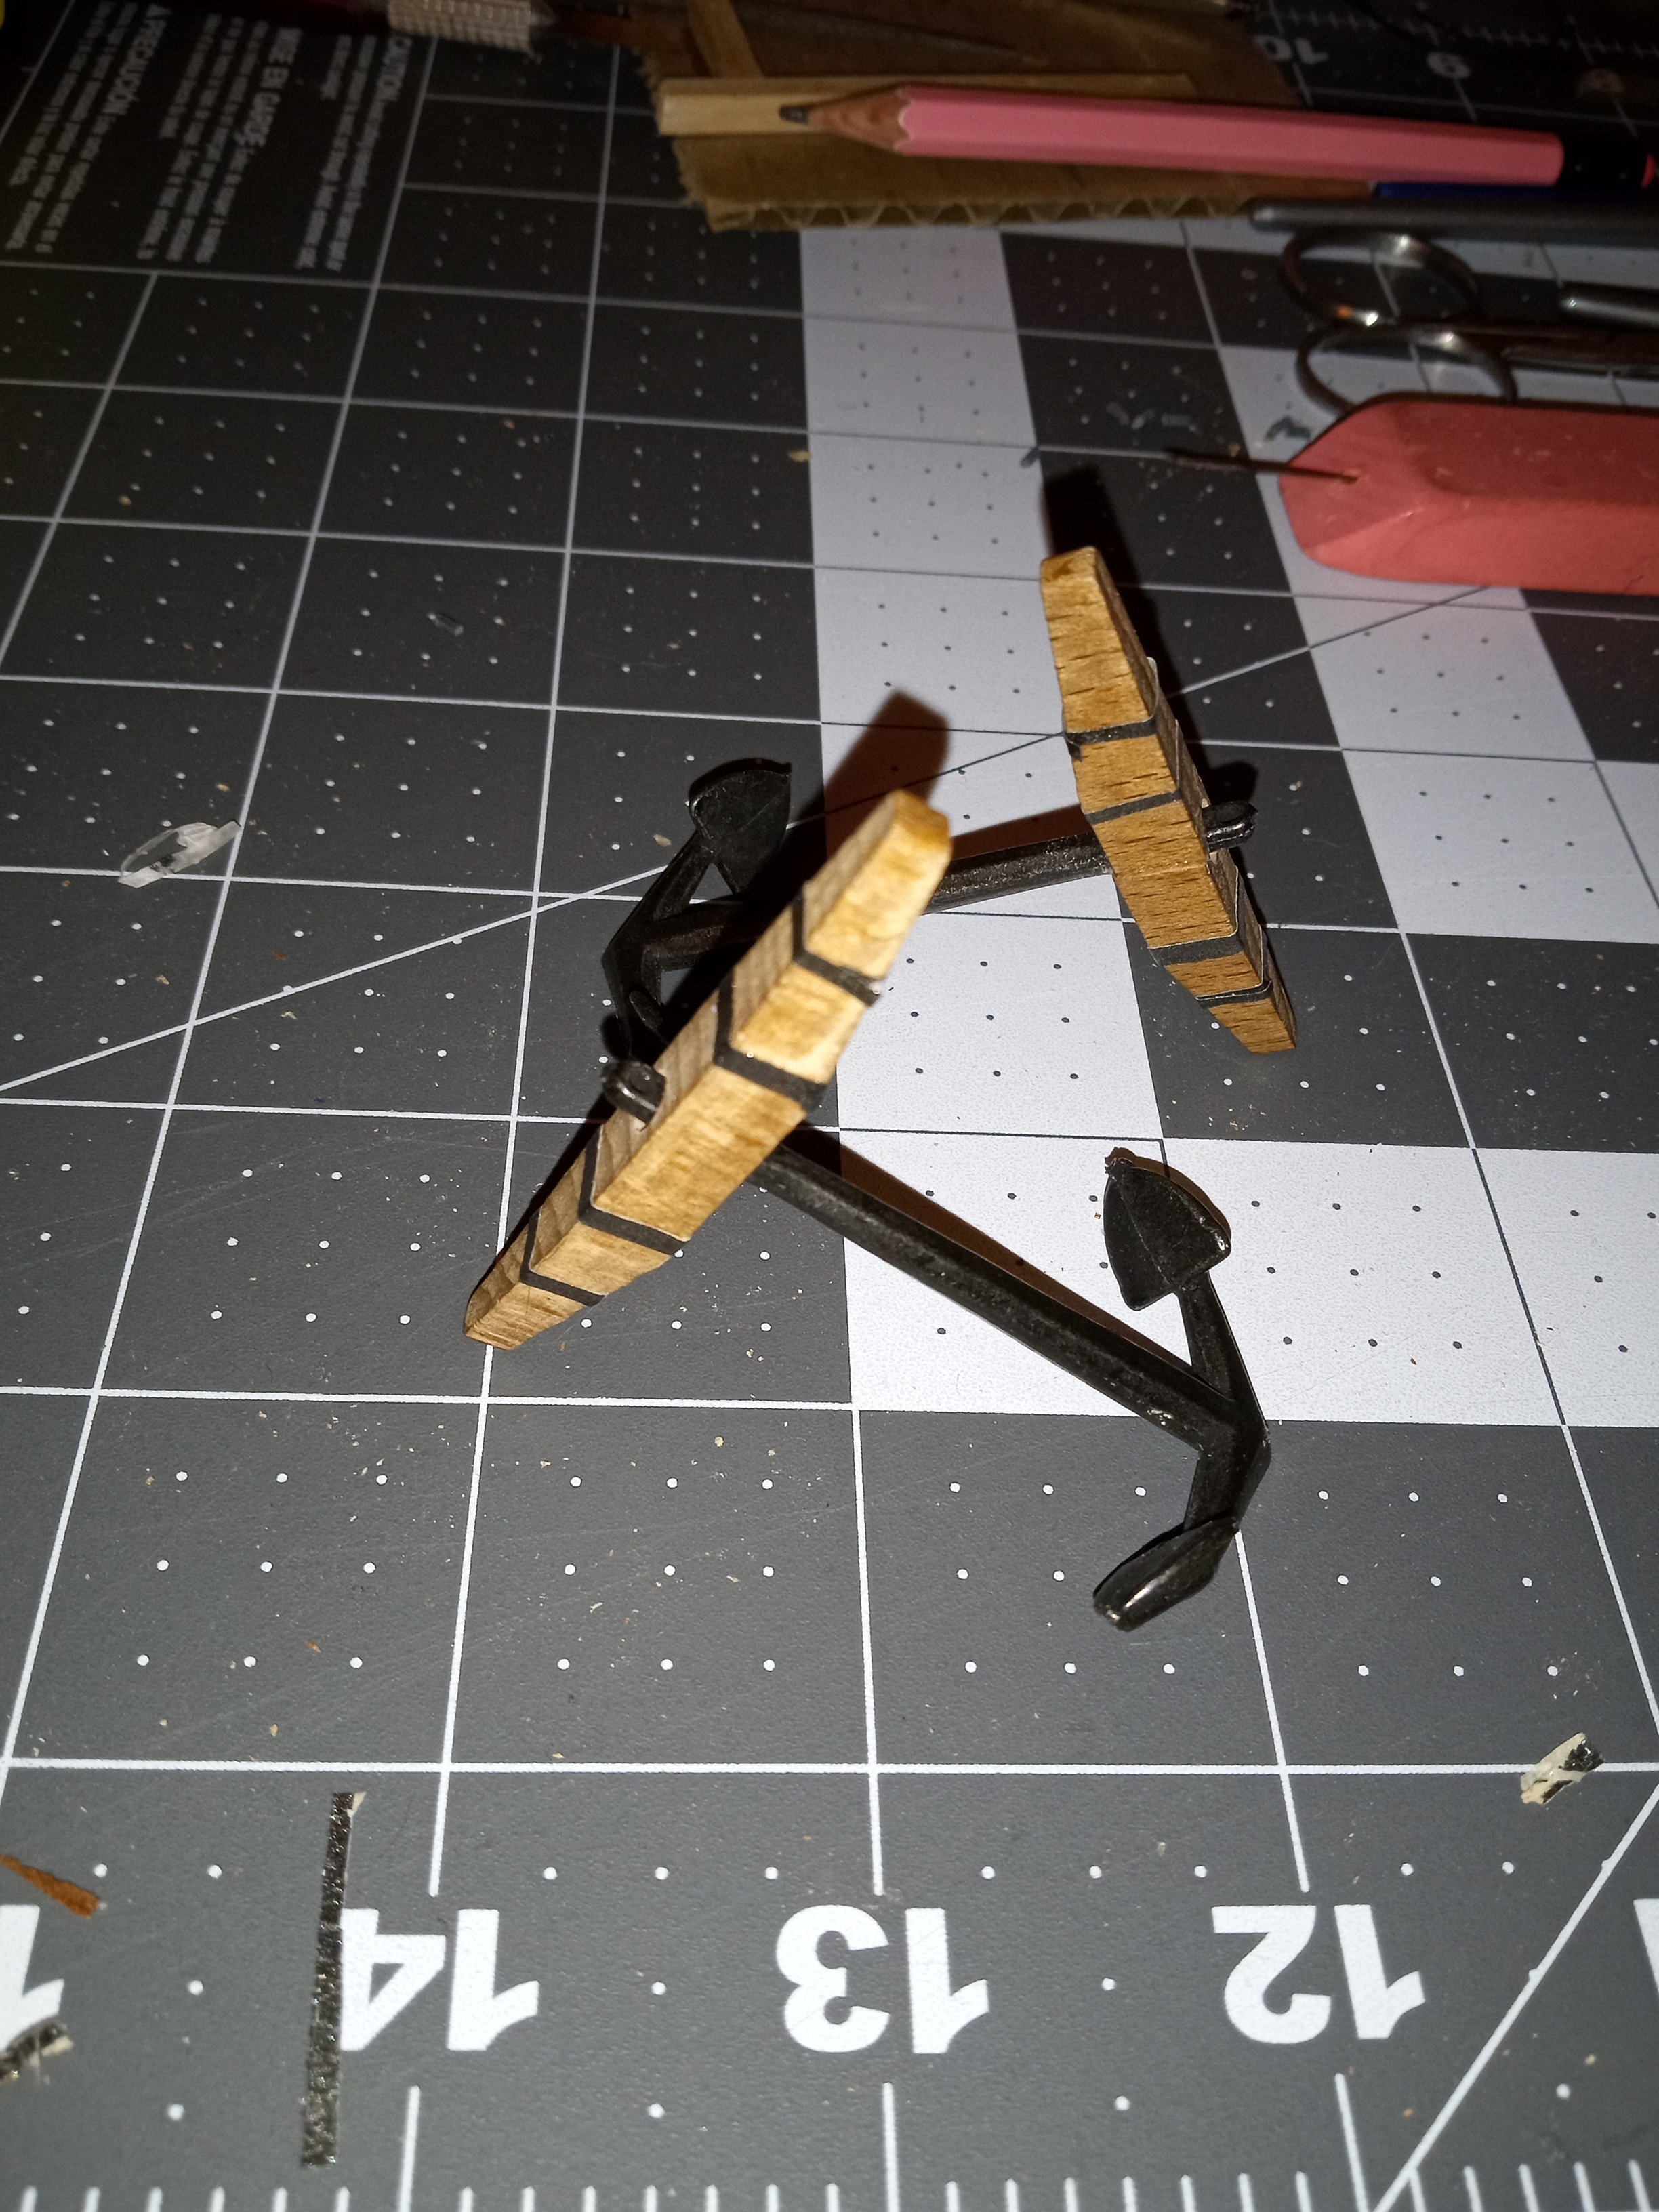
Anchors, with the bands made by painting masking tape with Tamiya gunmetal paint. Neither cross piece fit as originally provided. If you look closely at the cross piece in the rear, you can see the join where the piece broke as I was carefully using my round mini-file to try to enlarge the opening and get it to fit. Again, I was wondering why these things seem designed to frustrate.

-
Over the last couple of days, I have also worked on the gunport lids. They come as a pre-cut piece of ply wood and the instructions call for them to be covered by thin pieces of wood laminate, same as the second course of hull planking.
This kit has been a headache from the start, and the gunports are a good example, as the pre-cut wood are of an odd shape, so none of the 0.5mm planking actually fits. Two pieces are too few and three pieces are too many.
Several of the white-metal hinges also came broken into two pieces, though I was happy to see they included one extra hinge, in case I lost one or couldn't salvage the broken pieces they'd provided.
Overall, though, my impression of the materials has been that they are pretty shoddy.
Everything about this kit seems to be like that, and it is frustrating.
The ship's boat has caused me headaches. It is cast metal with spots to add wooden benches to dress it up. It also it looks like I should add a strake of real wood to finish it off, but each time I try I can't get the wood and metal to line up and adhere properly. Just another headache that makes the kit less fun then it should be. I'm thinking I'll just spend the money and get one of those mini plank-on-frame ship's boat kits from Model Expo to replace it.
I bought this kit from Model Expo shortly before Mamoli went under (though I didn't know what was going on at the time), so I hope that things have gotten better now that Dusek is handling legacy Mamoli kits. The quality of the wood and the overall quality of the kit makes me think (or at least hope) that the soon-to-be-out-of-work Mamoli staff were throwing whatever it is they had on hand into a box before they walked out the door.
- Baker and JacquesCousteau
-
2
-
The last couple of months have been difficult to dedicate to the hobby. With me working from home, Rainy has gotten accustomed to sleeping most of the work day, since I've made it pretty clear I can only play for an hour or so around lunch. But, she is ready to run after 5 p.m. and I feel like she's earned the attention. She is a high-energy dog, so most nights involve tossing toys until at least 9. My wife says I'm nuts, but my last dog - whom I adored - only lived 'til she was 14. Time with them is so short, I think it is important to enjoy it while you can - and I really enjoy having a smart, engaged dog around the house.
It rained like heck today, so I took the time to clean up the stern in anticipation of mounting the Brandenburg coat of arms. Back in December I tapered the yards and stained them black - so we are getting close to completion. With Spring garden planting delayed by the cold weather, I think the next couple of weeks are going to be tough to find the time, but I really want to get this done.

- Baker and JacquesCousteau
-
2
-
-
-
-
Definitely sign up for Model Expo emails - they frequently have sales, so the emails will alert you.
I agree with the recommendation to start with some of the Model Shipways starter kits or something like the Phantom.
I'd also recommend picking up the book "Ship Modeling Simplified" by Frank Mastini, which does a good job of laying out all you need to know for building a first kit.
- Ryland Craze, mtaylor and robert952
-
3
-
East Carolina University is very involved in the survey of the Queen Anne's Revenge site. They would probably be worth looking into.
- mtaylor and Ferrus Manus
-
1
-
1
-
-
-
I've thought about printing the name of ships in white letters on a black background using clear laser-jet decal paper to. Since the printer doesn't print white, that would allow me to place the decal on a brass strip, allowing the letters to be in brass surrounded by a black background. I have not tried it yet.
- thibaultron, SiriusVoyager and mtaylor
-
3
-
On 7/20/2024 at 3:33 PM, Keith Black said:
That's a face full of curiosity right there. Cute little mutt, does she sleep snuggled up?
Yes. She has a small bed and is the first dog we've had that actually enjoys sleeping in a bed. She ties herself in a tight knot and likes having a padded wall she can rest against. Lucky for us, she also seems smart and was able to pick up house training in just a few days.
-
3 hours ago, thibaultron said:
I would guess they were gilded, covered in gold leaf. They would lay some sort of adhesive/varnish on the wood, then place gold leaf sheets on the wet whatever, burnish it down then varnish over it to seal it. So they were not solid gold, but covered in a very thin gold coating.
That's the same technique they used on a lot of the gold materials found in King Tut's tomb. I saw an exhibit of the items many years ago and the coolest part was that once you got up close, you could see the impressions left on the gold leaf by the fingers of the people who applied it. As for the support brackets on the galleon, I'd think that's the manufacturer deciding it would be easier to provide cast pieces instead of carved wood.

-
I haven't had much time to work on the ship for the past couple of weeks. The pressgang brought aboard a new shipmate. She's still a grass-combing lubber who can't hand, reef or steer and requires a lot of attention and our free time, but she's fast as a whip and will surely play havoc with the bread room rats (and the squirrels outside, though she's not really much larger).

- Keith Black and Baker
-
1
-
 1
1
-
Instead of a rabbet, you can bevel the inside of the underside edge of the plank. I have done that in the past and it gave a nice, tight fit. I do the same thing with the front edge of the plank, again so it lays nicely flat against the keel.
Are you starting your planking at the front of the ship, working backward? That allows you to get a good, strong attachment first, and once you achieve that then you can work backward.
My preferred method is to bend the plank to shape as much as possible and then use CA glue on the front of the plank, and the first pair of bulkheads while I paint and the bow filler blocks with wood glue. I attach it, hold it in place until the CA grabs and dries and then apply pins to hold it into place while the wood glue dries up. Once enough time has passed I then move on to attaching the rest of the plank in a similar fashion, doing a couple of bulkheads and allowing for drying time. Once all is dry, I then break out the wood glue again and use the opening in the hull from the missing planks to paint some wood glue on the bulkheads to reinforce the CA. I let that dry.
I use the same technique on subsequent planks, with the only difference being that I paint the top of the plank with wood glue and push it up tight against the upper plank to both ensure a snug fit and allow the glue to solidify the hull.
Frank Mastini's "Ship Modeling Simplified" offers great advice on planking (and just about everything else for someone starting out in the hobby).
- ERS Rich, catopower, Ryland Craze and 1 other
-
4


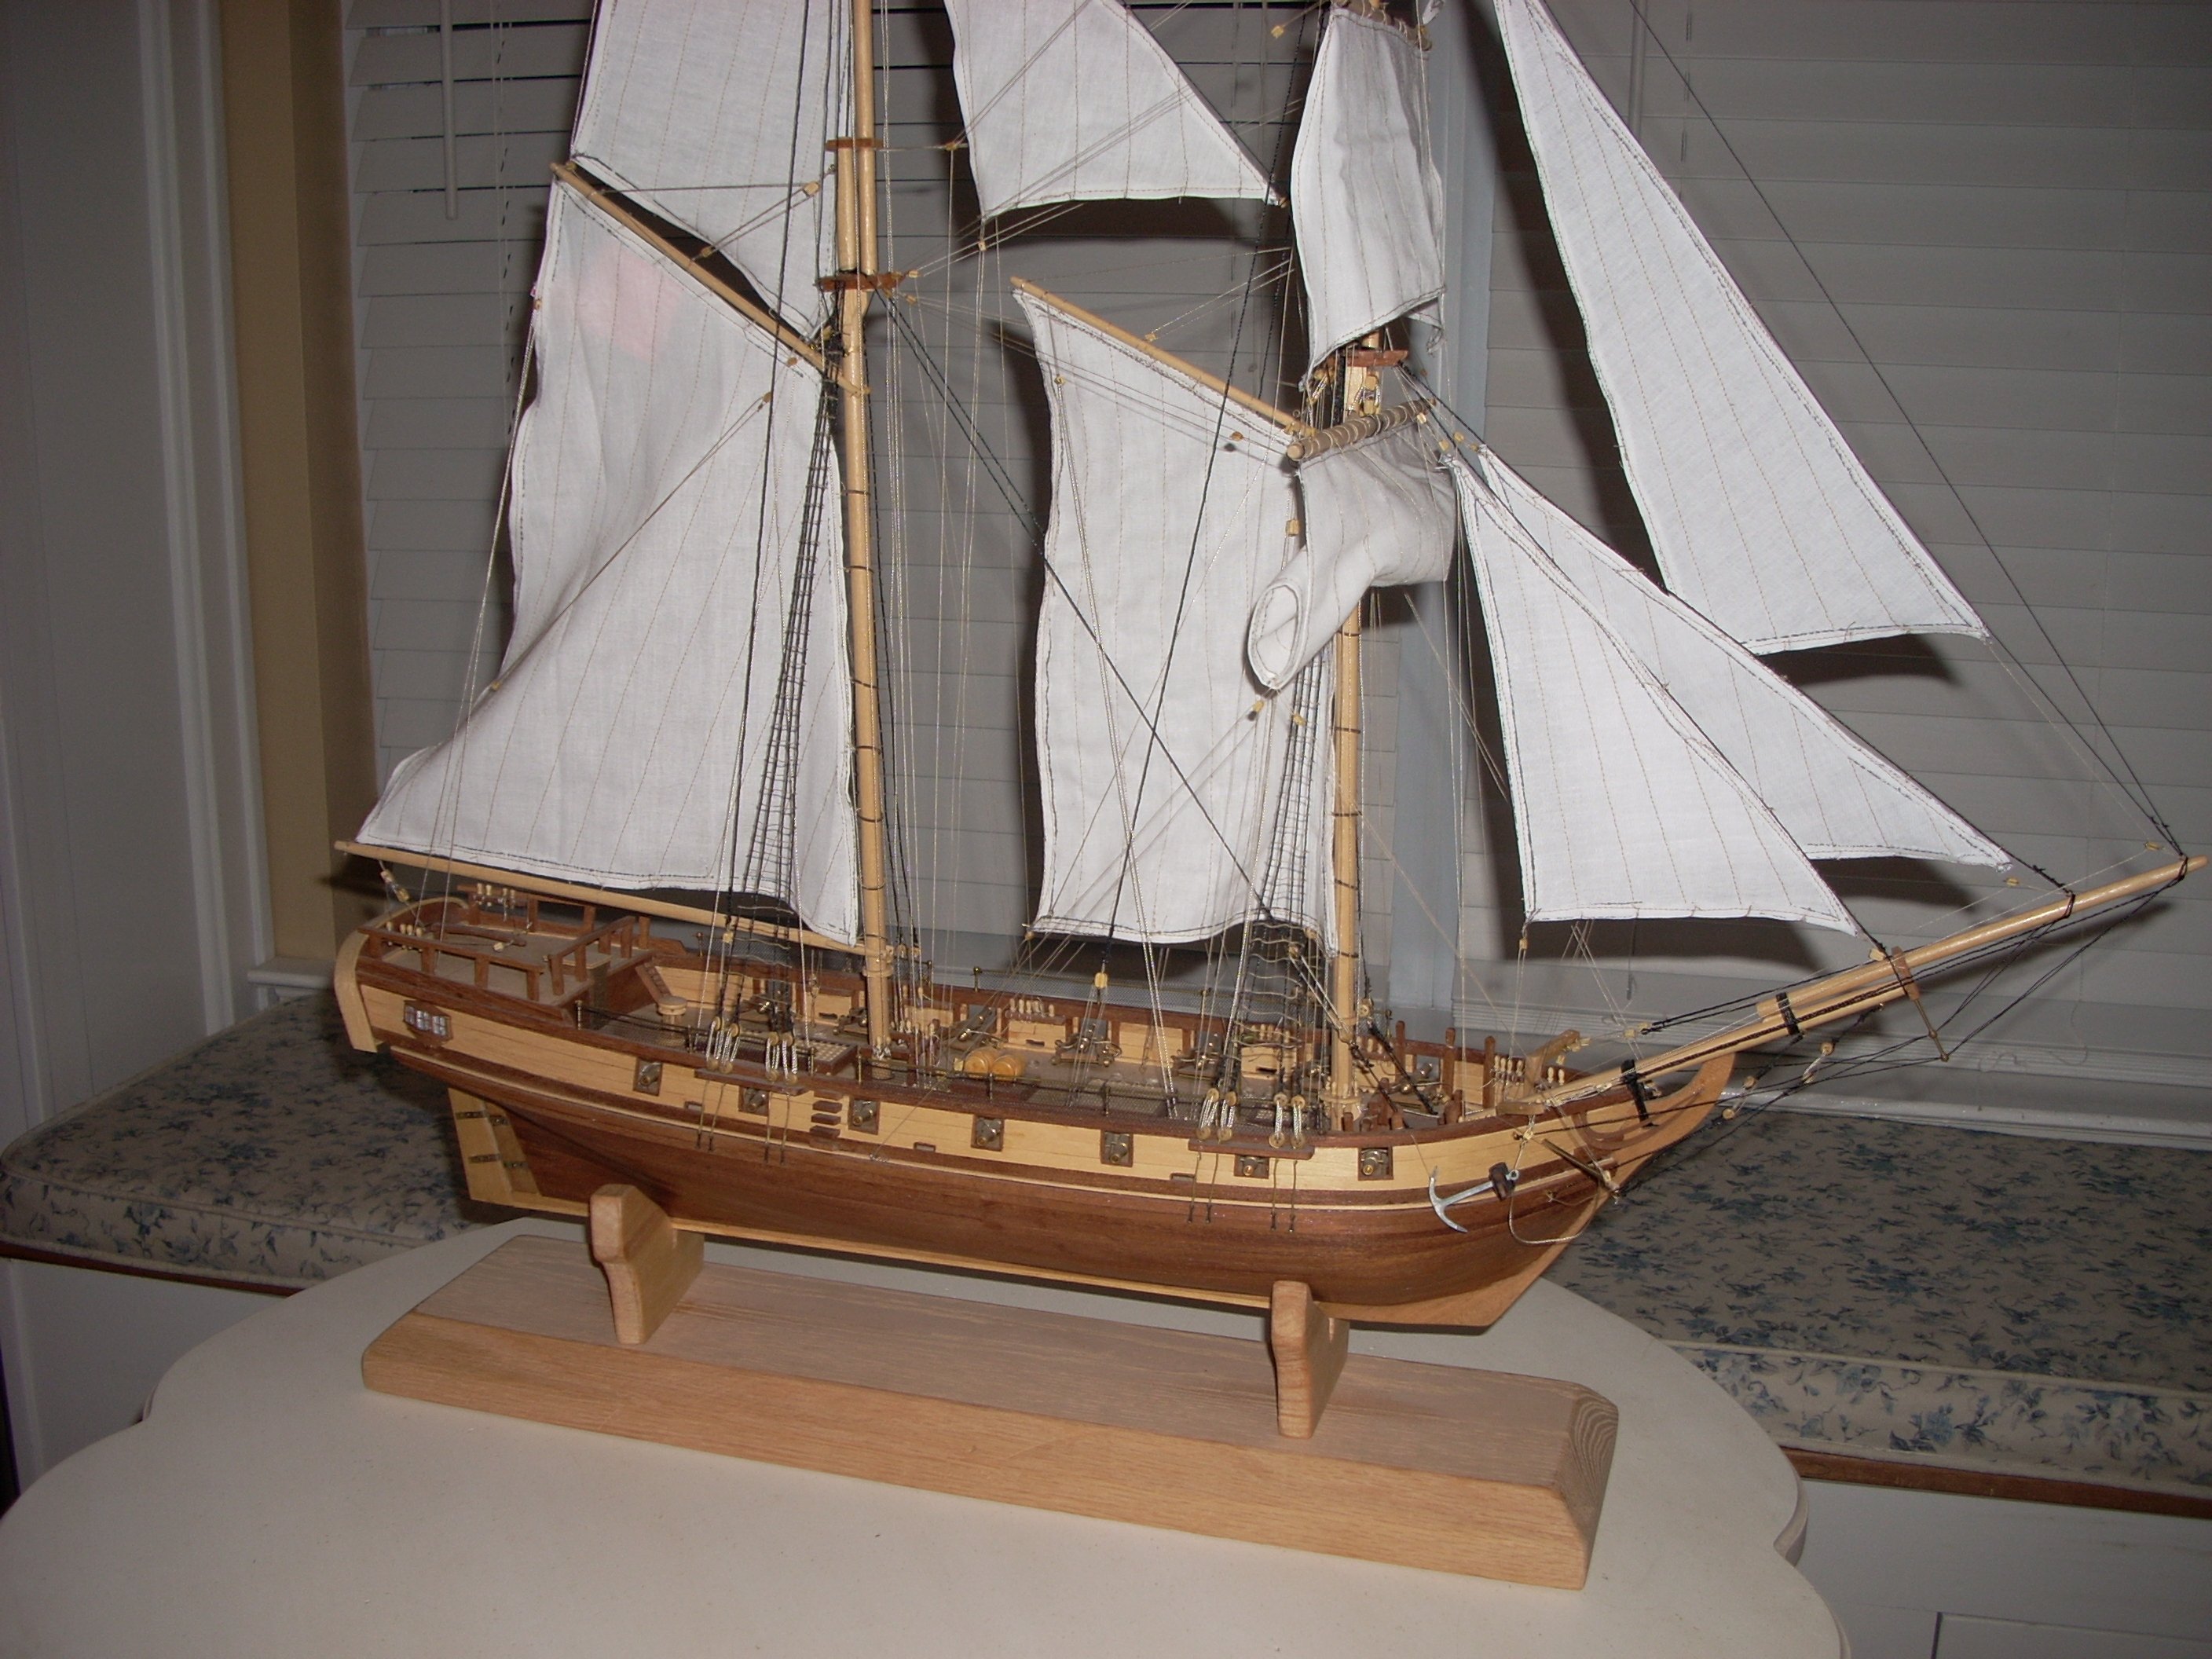


Roter Lowe by Stevinne - Mamoli - 1:55 - Dutch-built Galleon
in - Kit build logs for subjects built from 1501 - 1750
Posted