allanyed
-
Posts
8,149 -
Joined
-
Last visited
Content Type
Profiles
Forums
Gallery
Events
Everything posted by allanyed
-
 Hide glue is the longest proven glue based on models centuries old, but PVA wood glue such as from Elmers or Titebond and others are more forgiving than CA or contact cement and have quite a few years of history. There are hundreds of advocates of all types of glue at MSW, but the majority have had success with PVA over the years based on posts you will find about questions on what glue to use that come up every month. At the least try some test pieces of each that you are interested in using and find what you like best. Allan
 -
Haliburton It may help if you go over planking tutorials as the techniques could apply in this case as well. You can cut to shape from a suitably thick sheet rather than use this straight piece, or soak it for a while in water and set up a jig and bend it and heat it with an iron as Chuck Passaro shows in one of the tutorials. Heat is as important as the wetting process. This method is similar to that advocated by the German model builder Gebhard Kammerlander. Not sure about walnut as many species of walnut are grainy and tend to be brittle thus split more easily than some other species of wood more commonly used for ship models over the centuries. Allan
-
Hi Al Warm welcome to MSW and Happy New Year Allan
-
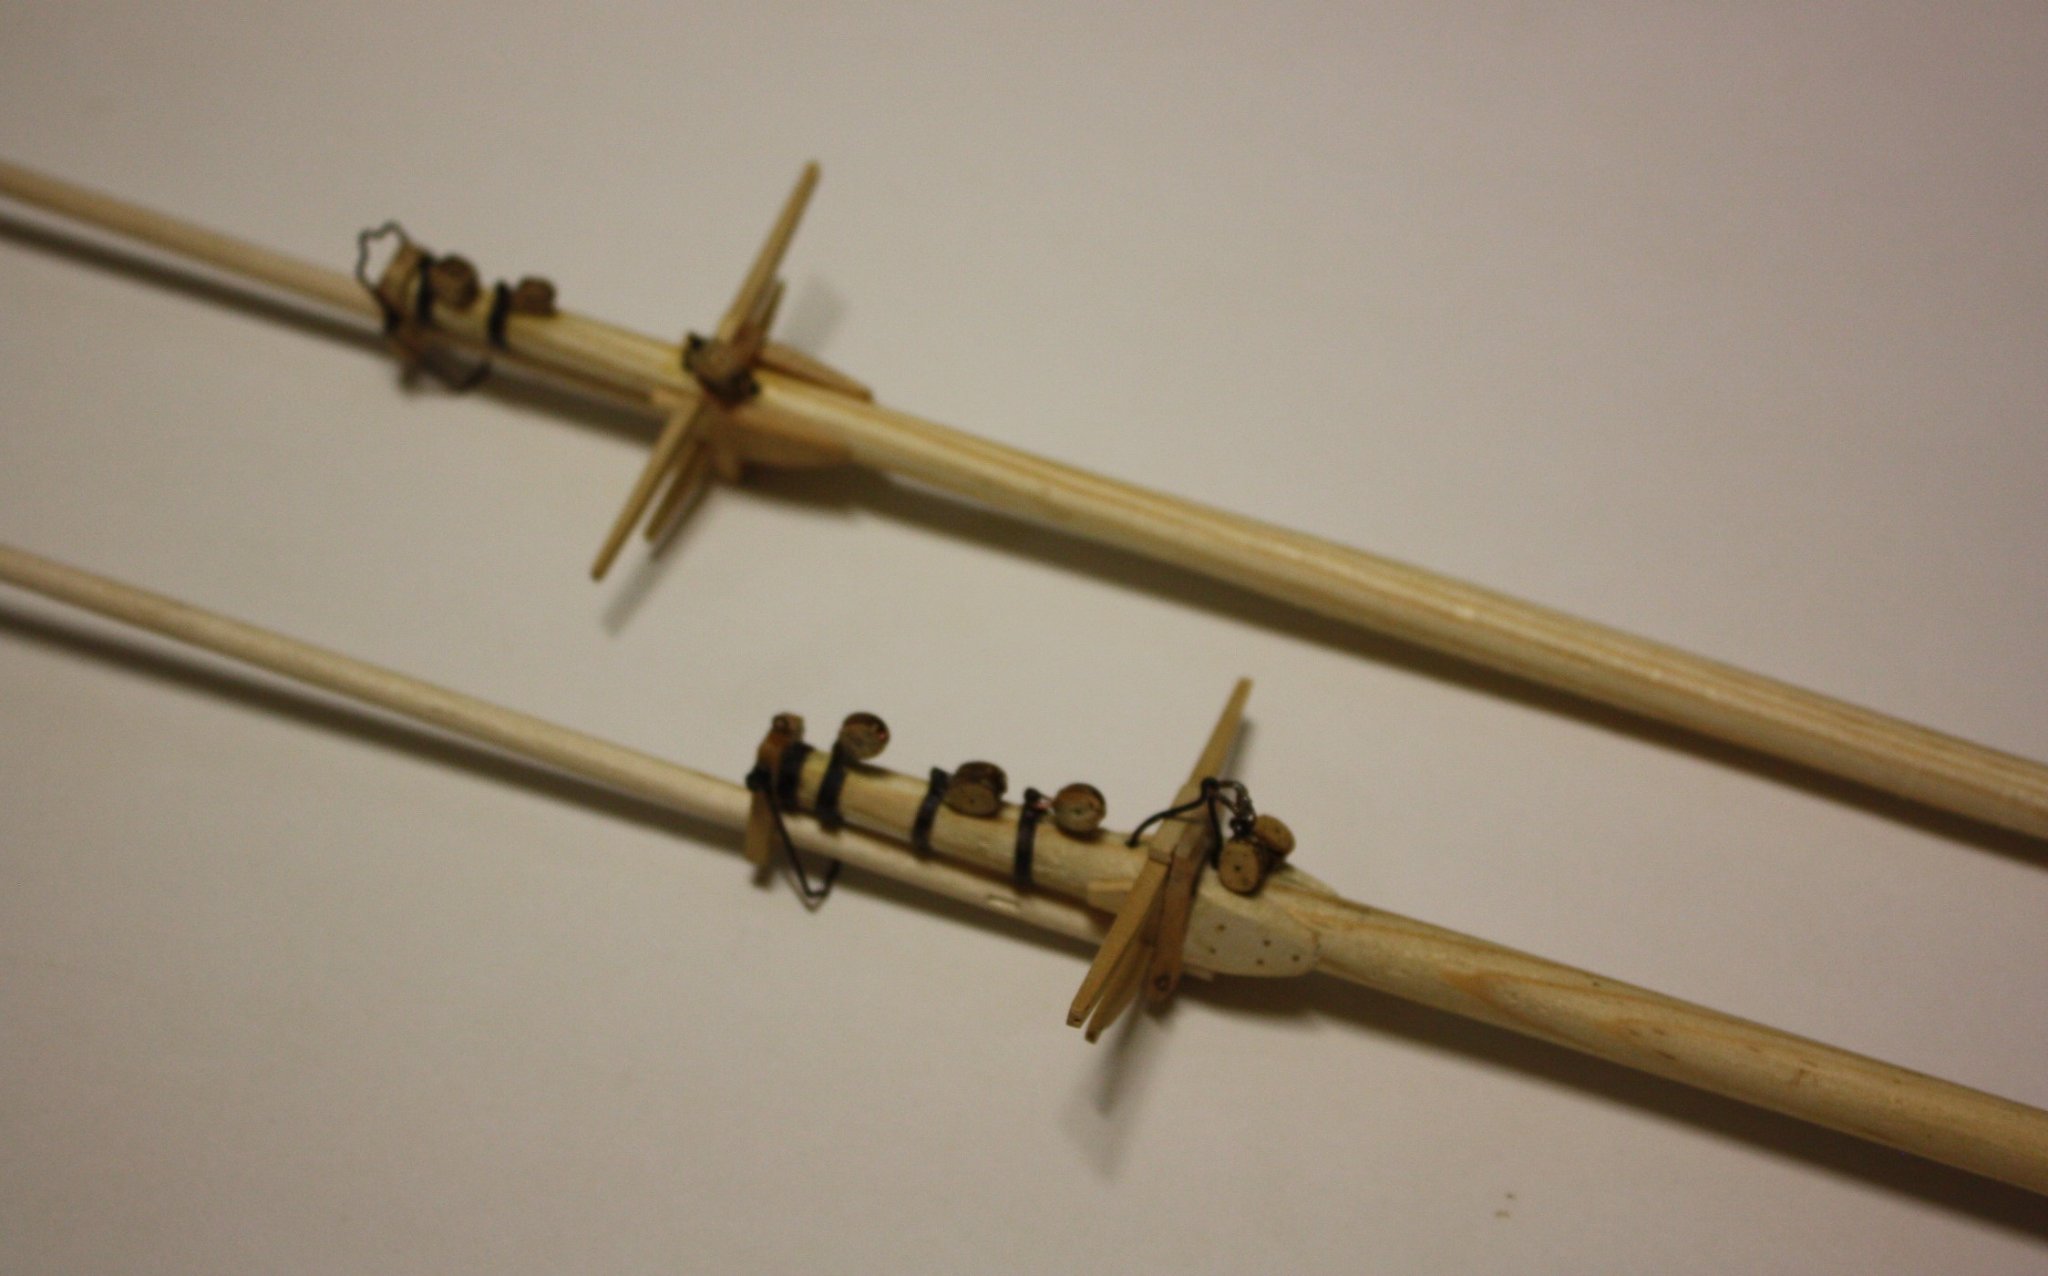
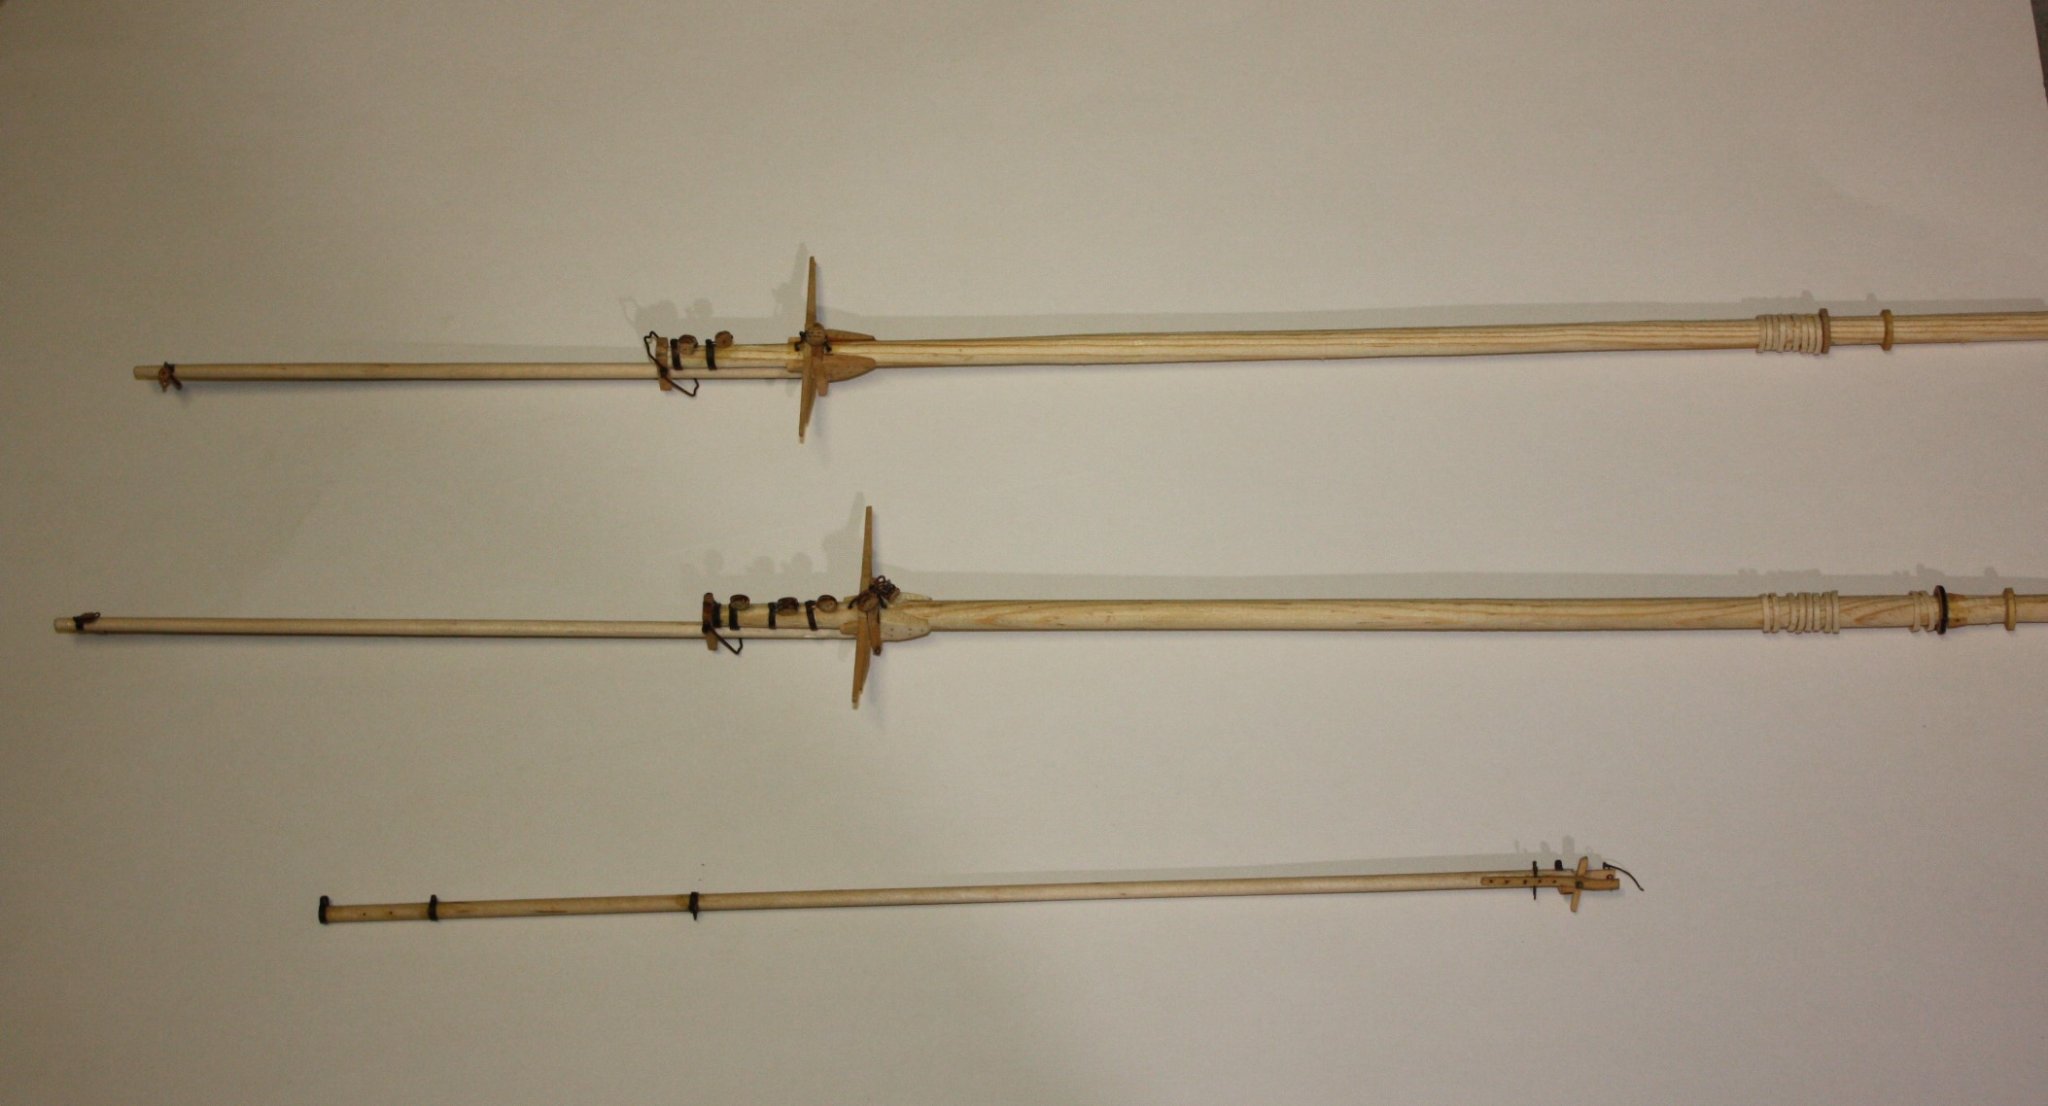
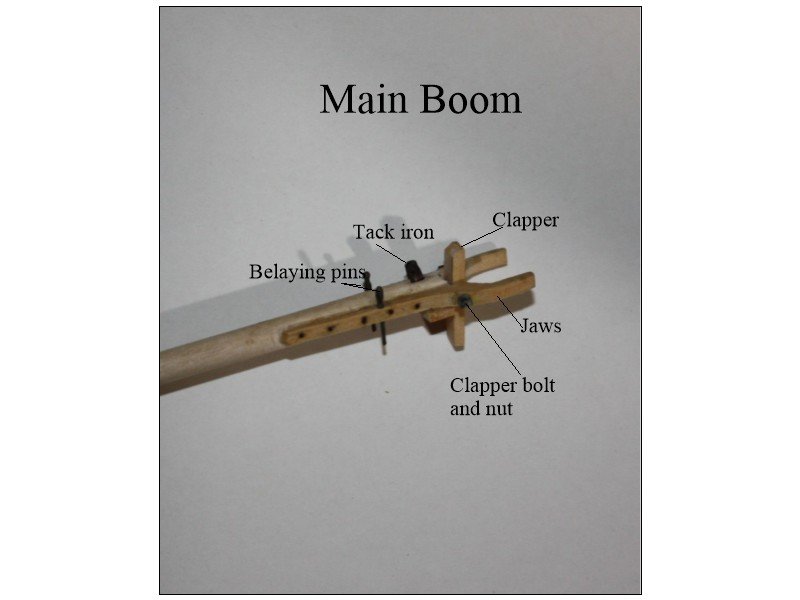
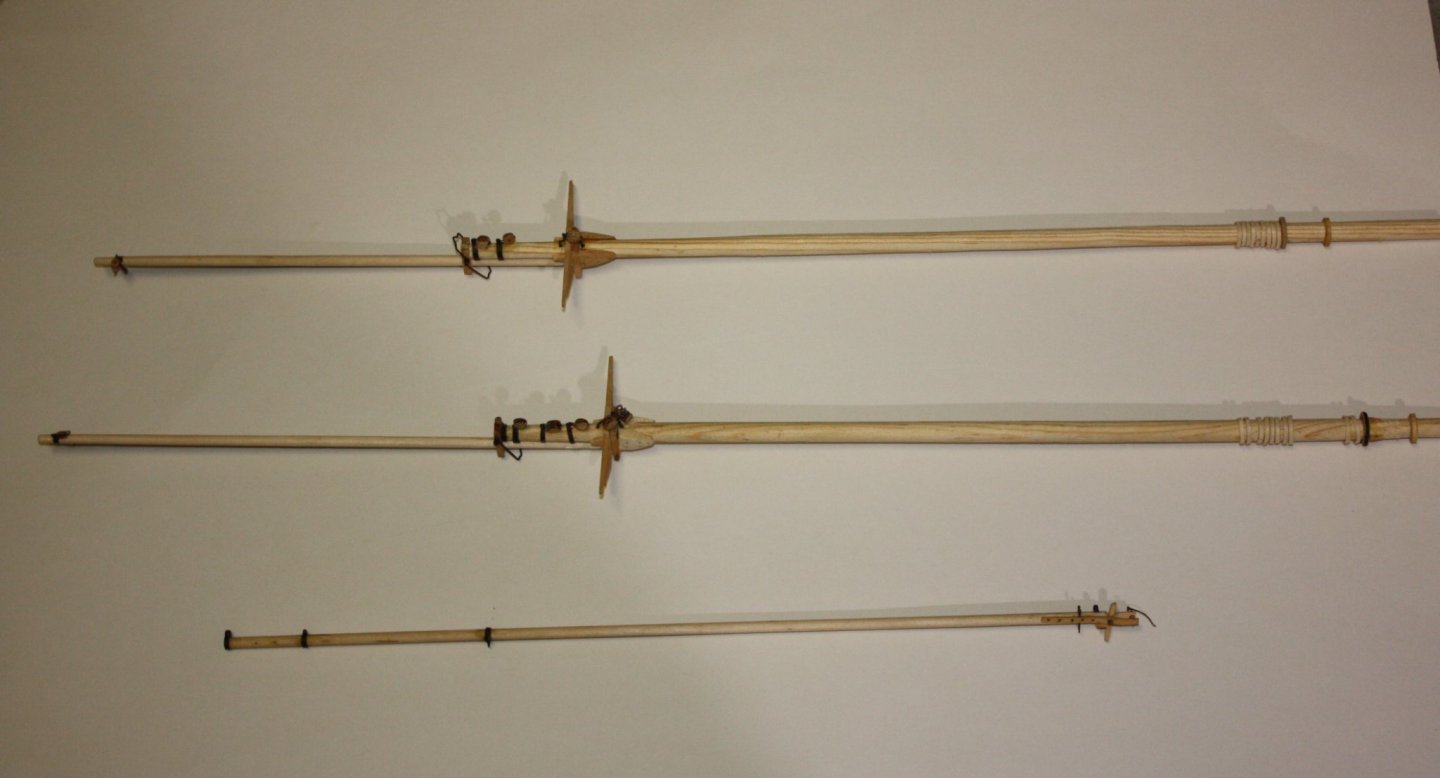
Masts and main boom are nearly complete. For most of the metal work I have been using copper which is so easy to blacken with liver of sulfur, and a few instances where I need something harder I have gone to brass then treat it with Blacken It. For the mast tops, there are a series of blocks, cranes, heart iron on the main crane and bails as well the trestle trees, cheeks, and bolsters. The fore and main mast heads are round as they went from square tops to round about the time Effie was built. The main boom was a fun project. The only thing missing in the photos is the main sheet fairlead which will go on the starboard side and the iron strap that goes from the jaws around the mast. There is a ring at the aft end of the boom for the topping lift eye wye and shackle and there is a clew outhaul band forward of the topping lift band with two topping lift sheaves in between. There is a third ring about 1/3 of the way forward from the aft end with a wye on the under side for the sheet. At the jaw end there are the jaws, clapper, tack iron, tack iron block beneath, bail, and belaying pins. On the main mast, below where the jaws go around the mast is a wooden ring with iron band. Two belaying pins go into the wooden ring, one port, one starboard. The fore end of the iron band has an eye shown very clearly on page 539 of The American Fishing Schooners as well as on the drawings of Efffie from the Library of Congress, but I cannot find any information on the use of this eye. If anyone can share information on this, it would be greatly appreciated. Allan

- 86 replies
-
- 7
-

-
- schooner
- effie m morrisey
- (and 1 more)
-
Hull Planking Question
allanyed replied to tomsimon's topic in Building, Framing, Planking and plating a ships hull and deck
Larry, Yes, I treenail IF I can do it at scale and it is appropriate for the vessel. What ship, scale, year, are you considering? If trennals are appropriate for the vessel and era, it comes down to scale for many, if not most builders. Some ships had bolts, depending on era, nation, etc. in place of or in addition to trennals on some planks. Assume the largest wooden trennals found on the largest ship are 2" diameter for the hull planking. At 1/48, the diameter would be 0.04", quite easy to make with a good quality draw plate and bamboo, boxwood, pear and a few other species. At 1/64 you would still be at about 0.03" diameter and not difficult to make with a good quality drawplate and bamboo. At 1:96, you would be down to 0.02, about the equivalent of a #75 drill diameter. (Species other than bamboo, only based on my own personal experience , have not done very well at the smallest sizes. More waste in material and time than is worth it.) For smaller ships the trennals may be smaller, say 1.5" diameter, depending on the width of the planks themselves. For 1:96 scale I know of no draw plate that goes small enough or wood that would work. The smallest hole on a Byrnes plate is 0.16 so too large. 28 gage wire could be used, but the ends would need to be filed and colored in some manner to replicate wood without staining the planking. Copper wire and liver of sulfate could be used, but it will be black and not replicate wood. It does great to simulate bolts Also care must be taken to remove metal particles that imbed in the wood as these particles will discolor as well as the intended bolt. Going to deck planking, the trennals are smaller in diameter, closer to 1". These can still be shown with some precision at 1:48, but for smaller scales will be very difficult to execute at the proper sizes. Some use pencil point marks but these are not always consistent. Many deck trennals and/or bolts were covered with wooden plugs making them virtually impossible to see at our scales. Alternatively for both hull and deck planking you can drill the proper size hole and fill them in with wood filler or a sawdust/glue mixture, then scrape and sand finish, which often looks very good. There are a number of preferences on how to execute using trennals, so you may want to try a few methods to see what works best for you. If in doubt, it is better to forget about trennals altogether if the alternative is to go over sized. The appearance of over scale trennals is not a good look. Allan -
Paul, As you have a lathe, you might want to consider getting a drawing of the properly sized and shaped barrel and turning your own from brass. These can then be blackened using Blacken It or some other agent. OR, if there are a lot of barrels, make a master and then make a silicone mold and cast the barrels in metal or resin. They will all be the same, (warts and all) From the looks of the drawing you posted, the barrels and carriages don't look right. For example there are too many reinforce rings on the barrel and the trunnions are centered with the bore rather than being lower. For the P of B, should there be cascabel rings as well? Just some thoughts, but there are others here at MSW that no doubt have experience with these vessels that will hopefully give some help. Happy New Year. Allan
-
No matter the model, one of the best pieces of advice given above is study the planking tutorials. There are many ways to incorrectly plank the model, but only a few ways that will yield excellent results. You will see that there is no need for pins or nails at all. At a scale of 1:64, the treenails (best if made of bamboo or some other wood, not metal) would only be about 0.015 to 0.017" diameter thus very difficult to make and to see no matter the material. Looking forward to stopping in on your build log! Allan
-
The quarter bitts on Effie have double cross pieces. which was a first for me. Chapelle notes that these were used on the Philp P. Manta as well as in a few vessels in the late 1890's which fits for Effie. Each cross piece is secured with a single bolt. I made the post to the proper dimensions from the deck level upwards, but made the lower portion smaller. This way I could cut the hole in the deck smaller rather than trying to get a perfect opening to match the post. The larger cross section of the post at deck level then rests on the deck and there is no chance of a gap on any side. Simple but effective. The lower end of the post is cut at an angle to match the curve of the frame on which it rests. Allan
- 86 replies
-
- 6
-
-
- schooner
- effie m morrisey
- (and 1 more)
-
Assuming you are looking for a drawing of a Blomefield pattern 32 pounder, 9' 6" (56cwt) barrel there is a 3"=1' scale drawing on pages 260 and 261 in Volume II of Caruana's books on ordinance. The only obvious differences are you show five reinforce rings, instead of the standard four on a Blomefield 32 pounder, There are also a few other minor differences, but you are pretty close. I would not use McKay as a guide for cannon, but that is only my take. Lavery shows essentially the same drawing of the breech and muzzle. These were taken from contemporary drawings at NMM so I would consider these as more accurate if there are differences with McKay and Hahn. The drawing in the Arming and Fitting by Lavery gives dimensions of all parts. I would love to post a copy but there are copyrights involved. Allan
-
Anthony, there are sources for Castello (not a true boxwood, but fantastic wood for nearly any parts of a POF) Gilmer Woods seems to only have one small piece in stock but Rare Woods USA has Castello box, African boxwood and Pau Marfim which was a go to species in years past. None of them are cheap, but fantastic wood to work with. Pear is closer grained than cherry and will hold up well for framing and planking but it will be red which I like, but not everyone does. For deck planking and ships' boats, and and few other things like mast hoops, I love holly as long as it was harvested and kiln dried properly to keep out the green mold streaks. I have used holly from Gilmer and was quite happy. I assume Rare Woods would be as good. If you are using the book by David Antscherl, I believe he tends to use holly for the white bottom planking below the wales rather than painting. Allan
-
Ratline Making Tools
allanyed replied to acaron41120's topic in Modeling tools and Workshop Equipment
To which tools are you specifically referring? Allan -
You are giving Ed T a run for his money on your build!!! Beautiful work. allan
- 257 replies
-
- 3
-
-
- young america
- Finished
- (and 1 more)
-
Dave, Welcome to MSW! Is this a kit or scratch build? If a kit, was there a rigging drawing in the kit. Maybe ask the folks that sold it to you. Looking at the AL kit on the internet, it appears there are paper drawings included. Allan
- 1 reply
-
- 1
-
-
Eberhard, No worries, this project started years ago then was set aside for other projects. It came back to life just recently as the folks that ordered the Boothbay 65 schooner also wanted Ernestina as they have been rebuilding her in their shipyard the past few years. Very glad you dropped in!!! Happy New year!!! 2021 has got to be better than 2020. Allan
- 86 replies
-
- 2
-
-
- schooner
- effie m morrisey
- (and 1 more)
-
Raisley, You are not being nit picky, you are trying to be accurate, good for you!! The length of a 24 gun carriage for the 1791 pattern was 6 feet 0 inches based on a drawing by Shuttleworth in the R.A. Library. The length of a 32 pounder carriage was 6 feet 8 1/2 inches. See Caruana volume II pages 376 and 378. The 32 pounder drawing is from a contemporary drawing in the British Library. The 24 was 4' 4" wide at the rear truck axles. The 32 was 5' 0" wide at the rear truck axles. The carriages were not the same size for both 24s and 32s based on the research of Caruana. Allan
-
Further to Gary's great information, I would not consider McKay the authority on ordinance. He appears to have used the 20 caliber rule for determining the length of the 32. This was typical in determining the length of the barrel with the exceptions of the 32 pounder and 3 pounder. For the 32, the 20 caliber rule would have the barrel at 10.62 feet as McKay gives which would have been far too heavy (the History of English Sea Ordinance, Caruana, page 220). For English sea ordinance, if there is a bible, I believe it would be the two volumes by Caruana. Allan
-
Raisley It depends on the year. 100 gun ships, including Victory, carried 42 pounders at one time. She had 32 pounders 9 1/2' long available in 1778 and finally brought on board in 1779 to replace 42 pounders (Caruana The History of English Sea Ordinance Vol 11, page 234) 24 pounders only came in three lengths, 10, 9 1/2, and 9 feet. At the time of Trafalgar I believe Victory carried long 24s thus 10 feet long, on the middle deck (Lavery Ships of the Line) and short twelve pounders on the upper gun deck and QD (8 1/2 feet). She had two medium length (between 9 feet and 10 feet) 12 pounders on her forecastle as well as two 68 pounder carronades (Lavery Ships of the Line) Hope this is of some help. Allan
-
Johnny, As mentioned, pick a project or two that you are considering and post these and you will get lots of suggestions based on experience from the members here. Whatever you do, do not think too big for a start. Consider your tool crib as well as what books to buy. We all have budgets within which we have to live, so think about tools that you have and in which you would be willing to invest as well as a budget for materials and books. Allan
-
Where do the horses go? From photos of Ernestina in the Library of Congress there appears to be a horse about 18" forward of the main mast, and smaller horse about 18" forward of the foremast. Chappelle describes three horses, one for the main sheet, one for the foresheet, and one for the jib. I THINK the two in the photo I have are for the jib (forward of the foremast), for the fore sheet, (forward of the main mast) but I have no idea where the main sheet horse would go if there indeed was one. Any clues from more learned schooner modelers would be greatly appreciated. Thanks Allan
- 86 replies
-
- 1
-
-
- schooner
- effie m morrisey
- (and 1 more)
-
I do not like to suggest that anyone spend any amount of money, but if you don't mind you can get the booklet on sail making by David Antscherl available from SeaWatch books for $8. There are also some great videos on the net that show many of the steps as well. No need to go to a store, I bought all the materials required on the net and had it in a couple days. Allan
-
Mark, It is very hard to find cloth sails on a model, especially with sewn hems and seams, that look close to scale unless building at perhaps 1:12 or larger. If you are happy with the look, good for you, but if not, maybe try a different material such as silk span and then you can forget sewing altogether. You can make the sails any color you want, including an old grayish canvas, you can add the reinforcement pieces, proper looking panel seams, they can be furled or not. There have been a number of discussions on sail making recently here at MSW using materials other than cloth. Do a search on silkspan and you will get some thoughts from a number of other members. Great looking sails can make an otherwise OK model look stunning. Poorly made, out of scale sails can make a stunning model look, well, not so nice. Happy New Year!! Allan
-
Recommend ships blogs for Rigging
allanyed replied to DaveBaxt's topic in Masting, rigging and sails
Dave, Yes a big ask, but an interesting idea. Don't know of any blogs, but there are books that show all the details one could ask for on rigging, from rope making to sail making with drawings and photos Drawings are actually sometimes are better in explaining than photos, and both can be found in some books. One example is Lees Masting and Rigging which starts with masts, then yards, then standing rigging, then running rigging with a hundreds of drawings and dozens of photos. It is period specific though, (1625-1860) Chapelle gives a lot of detail on schooners, Anderson on 17th century ships ares two more examples. Antscherl gives a ton of details on rigging and sail making but again is a bit period specific although the techniques can be applied to many ships and other years. If there is a blog out there, this would be interesting to follow. Allan -
Tom, Good kits are not cheap so you may be better off asking here at MSW which kits have the best materials and which are closest to being historically accurate. Some kits offer neither. Start a build log once you begin and you will likely get more and better help from members here than most books which tend to be more appropriate for scratch building and even for kit bashing as mentioned by Roger. You mention you are a newbie, so is this your first wooden ship model? If it is, I would urge you to start with something small and not as complex as most of the 17th century kits available. Also, as a newbie, be sure to read the forum here at MSW on pirated kits before you make your purchase so you do not get stuck with one of these illegal knockoffs. Allan
-
Thanks Keith! I did leave a small section of the hull and deck exposed to show the framing. Hate to have done all the work and then cover it totally never to be seen again. Then again, many here, myself included, have done fully framed models of old warships with all decks, powder rooms, magazines, wells, etc. and they are there only for posterity and self satisfaction. I suppose we are a strange breed at times. Allan
- 86 replies
-
- 1
-
-
- schooner
- effie m morrisey
- (and 1 more)
-
I agree with Wayne, but if you know what model you want to start with, be it scratch or kit, POB or POF, rigged or unrigged, and approximate year of the vessel, that would narrow down the list to something a lot more affordable. Allan